1
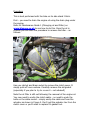
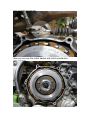
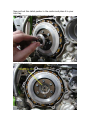
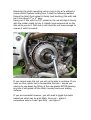
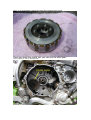
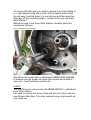
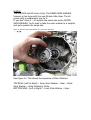
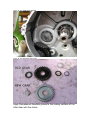
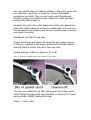
KLX 300 Maintenance Guides from www.klxzone.co.uk
Date: June 2003
Guide 12 : Idler Gear Replacement
Important: Please read carefully
This guide is not intended to replace the User’s Manual – rather it
is a pictorial guide to carrying out maintenance on the KLX300 and
does not necessarily represent the Kawasaki approved methods.
You should therefore realise that you use this guide at your own
risk and neither www.klxzone.co.uk or the author will accept any
responsibility for damage or injury caused as a direct or indirect
result of using this guide.
You use it at your own risk.
There being no Haynes or equivalent manual available for the
KLX300 and the official workshop manual costing around £60 I
thought it may be useful for others to use if they have not carried
out such tasks on their bike before.
This may seem a bit like a “dummys guide” as I have taken
pictures at almost every point. If you find it too tedious then
simply skip past the easy or obvious bits. I wanted to make it as
foolproof as possible and a picture is worth a thousand words.
Tony Saunders
Bike Information:
Kawasaki KLX300R 2002 Model.
Tools Required:
•
•
•
•
•
•
•
•
•
•
•
•
•
7/8” Socket
T-Bar
10mm Socket
8mm Socket
Appropriate Ratchet and bar extensions
Circlip Pliers
Rubber Mallet
Molybdenum Disulfide Grease / Copper Grease
Clutch Removal Tool*
Replacement Clutch Gasket**
Old Watering can or similar receptacle to catch old oil.
Replacement Idler Gear***
An old paint roller tray or similar to keep all the bits in.
*
This is a special tool [Flywheel Holder – 57001-1313]. I
didn’t use one because I haven’t got one.
**
I replaced mine as advised in manual.
Part number : 11060-1325
*** I purchased one from a guy in the USA after the supplier
(Stroker Speed Equipment) stopped operating. The new
company is www.fourstrokeworks.com however the owner is
no longer selling Idler Gears as he claims they do not need
to be changed if the kickstart procedure is properly followed.
I suggest searching on www.ebay.co.uk or www.ebay.com
for a second-hand one. When new they were $88.00 approx
plus postage.
Objective
The Kawasaki KLX 250 and 300 models (upto and including the
2002 models) can suffer from the teeth of the kickstart idler gear
shearing off and causing severe crankcase damage.
Kawasaki UK claim to have had no instances of it happening –
however I personally know several people who have suffered
breakage of the gear.
Until their demise, Stroker Speed Equipment of the USA sold a
specially manufactured gear made from “rockwell” – a softer metal
that would pinch instead of breaking – thus causing less damage
to the engine casing. Stroker no longer exist unfortunately, and
the later 2003 models of the KLX300R “apparently don’t suffer
from the same problem” – that I will leave open for now as it is
maybe too early to say and if Kawasaki claim it isn’t a problem –
why would they have fixed it.
It is interesting to note that the part numbers of the Idler Gear
and some associated bits have changed in the Kawasaki Online
Fiches at www.buykawasaki.com - leading to speculation that the
new one is better and less prone to breakage.
If you have a KLX you may not be able to get a replacement Idler
Gear anymore – but try searching on the KLXZONE forum or EBAY.
If you do get one – here is a guide to help you to fit it.
I recommend doing it at the same time as an oil change as you
will need to drain the engine oil to carry out the work.
Procedure
This is best performed with the bike on its side stand I think.
First – you need to drain the engine oil using the drain plug under
the engine.
Refer to Maintenance Guide 1 (Changing oil and Filter) on
www.klxzone.co.uk to see how to do this. Once the oil is
drained you can start the procedure to remove the Idler – as
follows:
Figure 1: Removing the Six 8mm bolts from the Clutch Housing.
Use you ratchet and 8mm socket to remove the clutch cover. It
simply pulls off once undone. Carefully remove the old gasket
(especially if you plan to try to re-use it – not advised!)
Note the oil filter is still out following the removal of the engine oil.
You now need to unclip the clutch cable – no need to undo the
bolts on the cable mount – simply unclip the cable end from the
actuator as shown in Figure 2. Don’t pull the actuator bar from the
clutch cover or you’ll need to replace it’s gasket too!.
Figure 2: Unclipping the Clutch Cable.
Now you can see the clutch basket and clutch mechanism.
Figure 3: The Clutch.
Now pull out the clutch pusher in the centre and place it in your
bits tray.
Figure 4: Removing the clutch pusher from the centre of the clutch.
Now you should be able to see the Clutch Mounting Nut…
Figure 5: Clutch Mounting Nut
Removing the clutch mounting nut is a pain in the ar*e without a
proper clutch flywheel holding tool. I used the following method.
Ensure the bike’s front wheel is facing (and touching) the wall, and
put it into about 3rd or 4th gear.
Using your T-Bar with the 7/8” socket on the nut and tap it sharply
with the rubber mallet to turn it. Ideally have someone sat on the
bike while you do it. With luck it will crack the nut loose enough to
remove it with the socket.
Figure 6: Undoing the Clutch Mounting Bolt
If you cannot undo this nut you will not be able to continue. If you
have no other option but to re-assemble the bike – ensure you
read on to see about the fitting of the new gasket AFTER cleaning
any bits of old gasket off the clutch housing and cover mating
surfaces.
If you are successful however, you will need to jiggle the clutch
basket out which can be a bit fiddly. Once out – place it
somewhere safe so it can’t get dirty – see figure 7.
Figure 7: The Clutch Basket containing the clutch plate mechanism after removal.
Once you have the clutch out you can see the idler gear.
Figure 8: Now you can see the Idler Gear…
To remove the idler gear you need to remove the circlip holding it
in. I used special circlip pliers which (like all special tools) make
the job easy. Carefully place it in you bits tray and then ease the
idler gear off the mounting spigot – careful not to lose the Outer
Shim Washer!
Behind the gear is the Inner Shim Washer. Carefully place this
somewhere safe too.
Figure 9: Unclipping the Clutch Cable.
The Stroker Kit comes with a replacement INNER SHIM WASHER.
If however you get a gear via some other source and it doesn’t
have one – here’s what you need to do.
KLX250
The KLX250 has an extra circlip (the INNER CIRCLIP) – behind the
Inner Shim Washer.
You need to remove the Inner Circlip and not put it back with the
new Stroker Idler Gear. The other washers can go back exactly as
they came out
KLX300
The KLX300R has NO inner circlip. The INNER SHIM WASHER
however is too large with the new Stroker Idler Gear. The kit
comes with a replacement one for it.
If you don’t have it – it’s exactly the same size as the OUTER
SHIM WASHER. You’ll need to take the outer washer to a supplier
and get a washer the same size.
Figure 10: Note the Outer Shim Washer as I remove the Idler Gear.
See Figure 12. This shows the sequence of Shim Washers.
TOP ROW: (Left to Right) – Inner Shim Washer – Gear – Outer
Shim Washer – Outer Retaining Circlip.
BOTTOM ROW: (Left to Right) – Inner Shim Washer – Gear
Figure 11: The INNER SHIM WASHER
Figure 12: The Old and the New Gears.
Apply Molybdenum Disulfide grease to the mating surfaces of the
Idler Gear with the shims.
Figure 13: The New Stroker Idler Gear in place
Figure 14: The Clutch Basket and Thrust Washer back in position on the spline.
Figures 13 and 14 show the re-install of the new Idler Gear and
the clutch basket. You need to ensure that the new idler gear is
mated correctly with the appropriate shim washers in place.
Ensure the outer circlip is correctly inserted into the groove or it
may damage the engine if it comes off.
I lifted the clutch mechanism out of the clutch basket (taking care
not to lose the thrust washer that sits in between the two. I then
slipped the clutch basket (which has a large gear on the reverse)
onto the driveshaft and then put the thrust washer on as shown in
Figure 14.
You then need to slide the clutch into the basket and ensure it
mates with the splines on the shaft. This is a tedious job that I
eased with a spline driver just to allow me to wiggle and rotate the
shaft so the splines are aligned – see Figure 15
Figure 15: Me wiggling the splines into alignment
It should be down carefully so as to not damage the splines. Don’t
forget that the clutch needs to be aligned with the slots on the
basket too or it will not even start to go in.
You then need to ensure the Clutch hub Nut is fastened back on
and tightened to the appropriate torque. [78 N-m (8.0kg-m or 58
ft-lb)]
You now need to clean the mating surfaces of the clutch cover and
the crankcase – as shown in Figure 16. I used a flat-bladed
screwdriver and cloth. Then you can apply some Molybdenum
Disulfide grease to the clutch pusher (where the clutch actuator
presses) and slide it back in.
Re-attach the clip to the clutch cable and put the new gasket into
place with a little engine oil to ensure it mates well. The cover can
now be pushed into postion (note the two mounting lugs to ensure
you orient it correctly)
The Gasket will ONLY fit one way!
Torque the 6 8mm bolts back into place (the two longer ones go
to the top). I applied a little copper grease to the threads before
inserting them to ensure they don’t lock over time
Torque Settings: 9.8N-m (1.0kg-m or 87 in-lb)
Figure 16: Cleaning the mating surface of the clutch cover and housing.
You may now replace the oil filter and connect the oil filter cover
before filling the engine with approximately 1.4 litres of oil. I used
semi-synthetic 10W40 Putoline this time.
That’s it – job’s a fish!