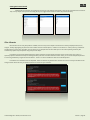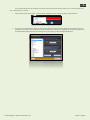
1
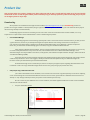
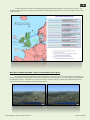
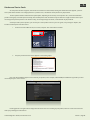
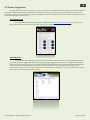
Volume 1 Orbx Logo Contents Introduction Who are Orbx?.................................................................................................................................... page 2 The Orbx Mission................................................................................................................................ page 2 What is FTX?......................................................................................................................................... page 2 Product Support The Guide you are reading now.......................................................................................................... Orbx Support Forum............................................................................................................................ Support Forum Rules & Etiquette....................................................................................................... Requesting Support............................................................................................................................. Extended Orbx Community................................................................................................................. Frequent support requests.................................................................................................................. page 3 page 3 page 4 page 5 page 7 page 8 Flight Simulator Addons Understanding your Simulator............................................................................................................. page 12 The Simulator "Layer Cake".................................................................................................................. page 12 Terrain Mesh.......................................................................................................................................... page 13 Landclass Data....................................................................................................................................... page 14 Textures & Autogen............................................................................................................................... page 15 Vector Data............................................................................................................................................. page 16 Custom Scenery..................................................................................................................................... page 17 Orbx FTX Products FTX Global Products.............................................................................................................................. FTX Global Visual Differences.............................................................................................................. FTX Regional Scenery Packs................................................................................................................. FTX Regional Airports............................................................................................................................ FTX Freeware......................................................................................................................................... page 18 page 20 page 25 page 26 page 26 Product Use Downloading......................................................................................................................................... Installation............................................................................................................................................. FTX Central............................................................................................................................................. Patches & Service Packs....................................................................................................................... FTX Product Configuration................................................................................................................... Orbx Libraries........................................................................................................................................ Simulator Scenery Library Configuration........................................................................................... page 28 page 29 page 31 page 35 page 36 page 37 page 38 In Closing Welcome from the Team...................................................................................................................... page 40 Orbx FTX Beginners' Guides, Introduction to FTX Volume 1, Page 1 Introduction Welcome! Whether you are a new user, a potential customer, or a seasoned FTX veteran, we at Orbx would like to thank you for taking the time to transform your flight simulator world using the Orbx FTX product line. whichever FTX product you choose, once you experience the difference, we are sure you will not want to go back to default. With so many products to choose from however, you may have some questions or just plain curiosity about the products and about the team behind them. These guides are designed to help you get the most out of the Orbx FTX products by explaining how they work, what to expect and how to get help if you need it. These guides should be your first port of call in the event you have a question as they cover all the basics and frequently encountered questions. If you can't find the answer here, then this guide will explain how to request specific help and support via our dedicated forum. Enjoy your new Full Terrain Experience! Who are Orbx? Orbx was founded by CEO John Venema in 2006 and has grown to encompass a worldwide team of over 50 developers and support staff, all dedicated to producing the best flight simulation addons possible. Orbx has released over four hundred and fifty award winning products, both payware and freeware, ranging from small scale airports to entire global upgrades. With continuing impetus and an active research and development drive, Orbx continues to set the standard across multiple simulation platforms by pushing the boundaries of what is possible. The Orbx Mission The Orbx mission is simple. Produce the best flight simulation scenery possible. With the combined talent of the Orbx Developers and Orbx staff, and unique technology such as the various "flow" technologies used in our scenery addons, this is our simple, defined goal. What is FTX? The names "Orbx" and "FTX" are often synonymous and are frequently interchanged. Put simply, Orbx is a company name. The company behind the Full Terrain Experience (FTX) products. Full Terrain Experience is just that. A way to enjoy all that your simulator can be by providing it with data to portray the world as close to reality as is possible. It takes more than just textures, more than just 3D objects and the developers behind the FTX products expertly craft a range of data into products that transform your default simulator platform into a completely new experience. FTX products fall into general categories. FTX Global products (or the "FTX Global Family") are individual products, each upgrading one specific aspect of the simulator across the entire globe. These individual elements will be explained later in this guide. FTX Regional products (often called "full fat regions") provide a complete upgrade for all simulator scenery elements within the area of coverage and are the cream of the FTX range. FTX Airports are also available for both Global and Regional areas and provide high level custom scenery of specific airports and local areas. Orbx FTX Beginners' Guides, Introduction to FTX Volume 1, Page 2 Product Support With so many products to choose from, and an increasingly complex range of choices, you may have questions about the products. You may also have purchased an FTX package and are having issues with installation or configuration. Orbx runs its own support forum where you can find answers to your questions, or get help from a developer. The following information is to help steer you in the right direction if you have such questions or need help. The Guide you are Reading Now... This guide is designed to give you a good overview of both FTX products, and the bigger FTX community as a whole, including how to request help and how to be involved. It is volume 1 of 7 upcoming volumes, each covering specific FTX products. This Volume 1 "The Green Volume" covers the basics of simulator scenery, basic product overviews, and requesting support on the forum. It will also cover the details of product installation, configuration and removal. Future volume releases will follow a color coding system; green (this volume) covers basics and general information, blue covers individual FTX Global products, red covers FTX Regional products. In order to avoid asking repeated questions on the support forum, please use this guide as your first action to see if you can find your solution. There are some very common support requests that can be easily avoided or solved by reading this guide and the subsequent volumes. The Orbx Support Forum The Orbx Support forum is more than just a place to get help. It's a place to feel welcome! The Orbx forums are well known for being friendly and approachable. As a new FTX user, it is highly recommended to register as a member on the forums. To register on the forums, visit www.orbxsystems.com/forums/ , click on the "create account" button at the top right, and enter your details. Orbx FTX Beginners' Guides, Introduction to FTX Volume 1, Page 3 Congratulations. You are now a member of the Orbx FTX Community! From here, we recommend you read the "Orbx Forums Terms of Use" thread in the "General Discussion" forum. This will give you all you need to know about how to use the forums, what to expect from us and what we expect from you in return. Basically, treat each member, including the Orbx team members with respect and patience, just as you would in the real world. The Orbx Support Forum Rules and Etiquette To make sure the forums remain civil, friendly and helpful, please be sure to follow the basic rules listed below. These are summaries of the above Forum thread: Friendly discussions are fine, but please no rudeness, insults or abusive comments. Any such behavior will result in the locking/deletion of the thread and possible member ban from the forums. When creating a thread, especially for support queries, please use a descriptive title including the product and problem. Single word threads, or vague titles often go unchecked as the developers responsible for the support will be looking for specific words to catch their attention (for example, "Need Help" is not a recommended title for a thread. Instead, use "Northern California has no trees" or similar). Please do not create threads with titles, or contents in all Caps. This is considered to be shouting and will be viewed as rude and simply not tolerated. Do not post multiple threads about the same issue, or create duplicate threads to build your thread count. If it appears that a previously posted thread is going unnoticed, please be patient... Our developers are in different time zones and have other real world commitments too. We will get back to you though. No spamming, trolling or advertising is permitted. This includes the use of the private messaging system. Please be patient when considering "bumping" a thread due to lack of response. For general "How do I..." threads, please allow at least 24 hours. For specific product support requests, allow at least 12 hours. Absolutely no sexual, political, racial or religious posts or threads. And violation of this contravenes Orbx Community Standards. No discussions regarding software, music or intellectual copyright theft (Piracy). Period. Only ONE login and account per user is allowed. While comparisons and balanced discussions about competitors products is allowed, product bashing or advertising is prohibited on the Orbx forums. Orbx reserves the right to remove any posts in violation of the Orbx Community Standards without notice. Please do not post "where has my thread gone?". You are free to post in any Non-English language, however if you do so, please also post an English translation. There are also specific foreign language threads for Non-English speakers. Please do not post affiliate or referral links, or posts requesting such. Threads of this nature will be removed. Please do not post links to other vendors websites, competitions, products. This is the Orbx commercial forum and not a platform to promote competitors. Please respect this. Violations of any of the above conditions can result in the immediate (without warning) application of "Limited User" status. Limited users may still request help and support in special forums we have created, visible only to users who are marked as Limited Users. No normal user may post on behalf of a limited user. If a user is suspected of software theft (Piracy), that user will be suspended with no privileges on the forum, including access to Limited User sections. All the above rules are subject to change from time to time. Furthermore, not all situations can be predicted and the above list is not exhaustive, so Orbx staff reserve the right to act appropriately to any event not specified above. Orbx FTX Beginners' Guides, Introduction to FTX Volume 1, Page 4 Requesting Support The scope of Orbx FTX products are huge, and the packages are complex in nature. While every care is taken to simplify the products as much as possible, it is quite possible that you may have questions, or things may not go as planned. Should you run into problems with an Orbx FTX product, or just have questions, please feel free to submit a support request on the forums. Before doing this, there are a few things to know that will help us help you: Add an order number to your Signature Please add your product order number to your forum signature as follows. No order number, no support: 1. Click on your name in the top right of the main forum page, select "My Profile". 2. Click on "Edit My Profile". 3. Click on the "Signature" tab on the left, edit your signature in the bottom box then save. You only need to add ONE order number to your signature... We can view all your valid orders by looking up just one. Your signature now contains an order number, so your order can be verified and any support requests can be initiated by a team member. Orbx FTX Beginners' Guides, Introduction to FTX Volume 1, Page 5 Read your product manual and search the Forums Many support requests are made for the same thing over and over. Quite often, the issue is explained in the product manual. Failing that, it is quite possible that another user has asked for help and received an answer. Please try and find an answer first before submitting a support request... This will cut down on repeated posts and speed up our response times. Create a suitable Support Request Make sure to create you support request in the correct forum. There are multiple threads, each dedicated to a specific product. Please make sure to post in the correct thread, or your request may go unnoticed. Also, give your thread a suitable title that describes the problems you are experiencing. You may go into more detail in the post itself. Finally, a picture says a thousand words, so try to include screenshots in your post. 1. Decide which support thread (listed under the "Orbx Support Forums" block) is most suitable for your request and open it. 2. Click the "Start New Topic" button and create your support request. 3. Add screenshots if you have them by clicking the "picture" icon, then entering the URL of your picture - Your screenshot must be stored on a website and accessed from there... It is not possible to "attach" pictures to posts and upload them to the forum. A screenshot can be created in FSX or P3D by pressing the "V" key. These screenshots are saved as a .BMP file in your Pictures folder (You may need to change them to a .JPG format to reduce the file size). Orbx FTX Beginners' Guides, Introduction to FTX Volume 1, Page 6 4. A recommended website to store your screenshots is the OZx Image Hosting website. It is free and easy to use. Simply navigate to http://fsfiles.org/flightsimshotsv2/ and follow the on screen instructions to obtain your URL link (called "Direct Link" on the image hosting site). 5. Finally, please wait for a response from the development team. This could take up to 2 days, or longer depending on circumstance. Please be patient... A team member will be in touch and reply in due time. You have now submitted your first official support request and soon you will be back up and running! One final word of advice, the support forums are visited by many knowledgeable and talented members. Their advice can be most welcome and the extended Orbx community prides itself on its helpful and friendly nature. Feel free to offer advice and take advice, but the only official solutions to support requests are those provided by Orbx team members (identified by the Orbx Team signature strips). Extended Orbx Community The forums are a one stop shop for advice, support, previews and news regarding the world of Orbx FTX. The forums don't stop there however. The forums are a place where many people come to chat and discuss simulation and flying in general. Many of the Orbx team, and many more of the forum members are pilots in the real world and so aviation in all its forms is the one true theme. We want to encourage that discussion and real sense of being a part of an aviation experience, so the forums have a lot more to offer. Feel free to stop by the "Pilot's Lounge" thread for general aviation related chatter, or the "Tips, Tricks and Techniques" thread for the latest advice and help in getting your simulator running it's best. Finally, be a part of it! If you have a good flight that you want to share, post about it! Leave the flight plan details in the "Flight Plans" thread, or even take some screen shots of your flight and share them with the community. We even run a screenshot competition each month, prizes being Orbx products to expand your FTX world even further. Orbx FTX Beginners' Guides, Introduction to FTX Volume 1, Page 7 Frequent Support Requests With the large variety of computer hardware and software combinations, it's not surprising that a number of support requests present themselves for each product. The good news is that these issues are quickly resolved and you are up and running to enjoy the package you purchased in no time. That being said, there are a good number of support requests that are posted that come up time and time again. More often than not, these are simple fixes. Often, it is caused by not reading the product manual. We recommend that you always read the product manual before submitting a support request, failing this, at least search the forums for an answer. Here are some of our more common requests regarding general FTX products; common product specific requests will be included in the appropriate volume of this guide collection. "I cannot download the software! I keep getting a failed download..." or "My download stops at <X>%... Where can I get the rest?" Orbx FTX packages vary immensely in size but all are large files. Once purchased, you will receive links to download the software to your PC. It may be easy to simply click the link and let your browser handle the download, but this is asking for trouble. Browser based downloaders (Internet Explorer, Chrome, Firefox etc) work great for small files that download in seconds or even a couple of minutes, but the larger the file size (and the longer it takes to download), the more chance you will experience an interruption in your internet service which will cause a failed download. For this reason, Orbx recommends that you use a download manager. Specifically, one that supports interrupt protection and/or resuming. That way, if your download is interrupted for any reason, it will simply start again where it left off. Furthermore, download managers often perform other functions that speed up the download. There are many freeware options out there, such as "Getright", "Down Them All" and "Free Download Manager" so this is not a requirement that will cost you any extra, and it may well save you much time and trouble. If you are experiencing failed downloads, please follow this advice and use a download manager before submitting an unnecessary support request. "When I run the installer, it asks me for Disk 2... I don't have a disk 2..." All Orbx FTX packages come as a single .ZIP file, downloaded from the Flight Sim Store website and saved on your PC. The save location may vary, but it is always saved as a .ZIP file. It is a requirement that this .ZIP file be fully extracted into another folder before running the installer. Do not simply double click the zip file and run the installer. Doing this simply opens a window that lets you see what is inside the .ZIP file... It does not extract the contents. If you run the installer this way, it will not function correctly. It will look for the next volume (disk) when needed, but not find it (It is still inside the .ZIP file, not available to be used). Orbx recommends you use an extraction tool such as WinZip, WinRar or 7Zip to extract the downloaded .ZIP file. The built in Windows extraction tool will work, but can be a little unreliable. (Continued on next page...) Orbx FTX Beginners' Guides, Introduction to FTX Volume 1, Page 8 Please use the following method (or similar) to ensure you are able to run the installer correctly: 1. Find your downloaded .ZIP file: 2. Right Click the file and find your extraction tool options. Click "Extract to xxxxxxxxxxx" option to create a new folder with the same name as the Zip file. 3. Open the newly created folder (NOT the .ZIP file) and run the installer. Follow all on screen instructions. Orbx FTX Beginners' Guides, Introduction to FTX Volume 1, Page 9 "I have a lot of Orbx products and I don't know what order to install them..." The answer to this commonly asked question are covered in more depth later in this guide, on page 29. "I keep getting an 'Unhandled Exception Error' when running FTX Central..." or "I keep getting a 'Radio Button Error' when running FTX Central..." FTX Central performs a lot of roles and is required for the proper function of your Orbx FTX products. It is also required to use the latest version of FTX Central to get all the functionality. FTX Central also requires that your simulator has an appropriate entry in the Windows Registry. This registry file entry is normally created automatically when you install your simulator, However, moving the folders or making other "unusual" changes to your simulator can make this original registry entry invalid and therefore FTX Central will be looking in the wrong place for your simulator. This is the cause of the above errors. To fix this situation, you should do two things: 1. Download and run the "Flight1 Registry Fix" program. This will set your registry entry correctly for your current simulator location. The program can be found at: http://www.flight1software.com/files/FS_Registry_Repair.exe 2. Install the latest version of FTX Central by installing the latest Orbx Libraries, found here: https://www.fullterrain.com/support#. Make sure to download the correct version for your simulator. "Can I install Orbx packages outside of the simulator folders?" All Orbx FTX software is designed to be installed within a specific set of folders, within your simulator's main directory. Some users prefer to have addon scenery outside of that main directory. It is always recommended to leave Orbx packages exactly where they are installed, and for that reason the installers do not provide a choice, installing all software into the default Orbx location. This is to maintain functionality of the core FTX products, including FTX Central. For those who still wish to move the Orbx software to a different location, the only way to do so and still maintain functionality is to create "symbolic links" to the new location, essentially tricking your computer into believing the new location is still the old one. This can be unpredictable and produce undesired results, as such, Orbx will not provide support or instruction for symbolic linking. If you wish to do this, please search the community forums... There is a wealth of knowledge there from members who have done just this, but again, Orbx cannot provide support for issues related to symbolic links. "The FTX support site shows patches available for my product but I just downloaded the full product installer. Do I need the patch?" The full installers (as downloaded from FlightSimStore - FSS) may or may not be the latest versions of the product. This is simply because the updates are often much smaller than the full package and therefore it makes sense to allow users to only download a small update file rather than a full installer. For similar reasons, it makes sense for Orbx to only upload full builds when sufficient changes are made to the package to warrant the increased uploads. If you download the full installer from FSS, it should list in the product description what version the full installer is. Simply download any patches from the FTX support site that are beyond that full build's version. Orbx FTX Beginners' Guides, Introduction to FTX Volume 1, Page 10 "How do I know what version of a product I have installed?" FTX Central has a special function that builds a product version report. You can easily see on this report not only what products are installed, but also what version it currently is. This is another way of determining if you need to download a patch from the FTX support website. Getting the report is simple: 1. Run FTX Central and click "Tools", "Reports", "FTX Products Installed" 2. Read the report to determine your installed versions. "I have a lot of FTX products. Is there an automatic updater or notification for these products?" Not yet, but watch this space! A brand new, fully remodeled FTX Central application is in the works which will combine the benefits of an automatic updater and a fully functional download manager (amongst other improvements). Very soon all your FTX products will be downloaded and kept up to date via the all in one FTX Central. For now, use the above installed product report to see if you need the patches or service packs listed on the FTX support website. Orbx FTX Beginners' Guides, Introduction to FTX Volume 1, Page 11 Flight Simulator Addons Whether you use Microsoft Flight Simulator or Lockheed Martin Prepar3D, there are a whole host of addons available to enhance the world around you and add that extra touch. Orbx prides itself on its FTX range and the ability to transform the world over which you fly into something as close to real life as is possible within the limits of the simulator itself. Seeing is believing, but to get the best out of any package, some basic knowledge goes a long way... Understanding your Simulator For all intent and purpose, your Simulator of choice is nothing more than a basic set of tools, rules and programs that can be used to create a 3D world. The actual simulator program does not contain the data needed to draw the world, it simply interprets data provided to it, then creates and image from that data that is sent to your monitor. Of course both FSX and P3D comes with plenty of data to populate the world around you, but as one might expect, this data has to cover the whole world, and as such is usually of a lower quality. That's where Third Party Developers, like Orbx, come in. Third Party Developers are any of those software developers that produce data for the main Simulator program that either enhances, or replaces the lower quality data supplied with the main Simulator itself. Needless to say, packages provided by Third Party Developers are considerably more complex and higher quality. It is also possible that should two, or more, third party developers produce data for the same area (whether an airport, a city, an airplane or a full geographic region), conflicts may arise between the two sets of data. Luckily, there are tools and techniques that can be used to avoid or fix any potential conflicts, more details of which will follow on page 38. The following pages will hopefully give you a good basic knowledge of the Simulator software and data that is available, and where exactly the Orbx FTX ranges fit within that scheme. If you have any product specific questions or wish to know more details about a specific FTX product, please refer to the appropriate Quick Reference Guide, or the User Manual. The Simulator "Layer Cake" The data that can be provided to the simulator can be split into some very specific categories. Referred to from this point on as "Layers", they are actually different types of data that make up the whole picture. They are not actually layered one on top of the other, but work in concert with each other. However, in order to simplify things, it's easier to think of things as a series of layers. The following gives you descriptions and explanations of each layer. Orbx FTX Beginners' Guides, Introduction to FTX Volume 1, Page 12 Terrain Mesh First up is Terrain Mesh. This is simply a three dimensional grid of points, defining the physical shape of the terrain. Hills, mountains, valleys, ridgelines etc are all produced by a Terrain Mesh. Mesh products can vary in quality and are usually considered to be better quality if the "post spacing" is lower. This "post spacing can be thought of literally... Imagine a vertical post driven into the ground at sea level. These posts are as high as the ground level at that particular point. Obviously, if the posts are closer together (low post spacing), then finer details can be determined and a better representation of the ground shape can be shown. The simulator does not however simply draw straight lines between the posts, it actually produces a smooth ground shape based on the setting you select in your Simulator. So even with a data post spacing of 76m, you can have the simulator create smooth terrain where it calculates the height as much as every 1m. There is no "wireframe" drawn, you cannot physically see what the ground looks like; it is simply a collection of data. The following diagram shows visually the meaning of "post spacing" and how simulator setting affect the terrain grid The following two screen captures, taken at the famous Milford Sound area in New Zealand, shows quite dramatically the differences between the default terrain data provided with the sim, versus a higher quality third party terrain mesh product (in this case, FS Global 2010 - FTX Edition). Note, this is the exact same area taken from the exact same angle. Orbx FTX Beginners' Guides, Introduction to FTX Volume 1, Page 13 Landclass Data Next, we have Landclass Data. This data instructs the simulator to display specific types of terrain in given areas. Examples would be High Density Urban, Arid Scrubland, Pine Forest, Irrigated Crops... The list goes on and one and is designed to encompass a wide variety of land use across the globe. There are actually two types of Landclass data that can be provided. Standard Landclass, or Vector Landclass. For Standard landclass, the entire Simulator world is split into 1km x 1km tiles and each tile is given a terrain type. You can quickly build a large scale picture of the world using this method by assigning the appropriate land use to each tile in the grid. The second method is far more data intensive and time consuming to produce (usually being hand crafted). This is Vector Landclass. This system allows developers to create specifically shaped areas of specific land use. For example, a beach or a complex city outline. Like terrain mesh however, this is just data and is not visible within the sim. Orbx FTX Beginners' Guides, Introduction to FTX Volume 1, Page 14 Textures and Autogen Up next, we have Texture and Autogen. This works hand in hand with Landclass Data and finally adds something visible in the sim world. For every defined land use that can be assigned by the landclass layer, a texture is required. That way, if the landclass says "Deciduous forest", a texture depicting a deciduous forest will be shown in the world. These textures are also 1km x 1km in size, but multiple tiles for each land type is created in such a way as to allow them to be tiled together seamlessly. This way, the texture tiles can be added to the world and produce a wide area of texture, that at first glance does not repeat. It is however not possible to remove all physical repetition within large scale areas of the same land type, simply due to the nature of the system. That said, high quality landclass data does a great deal to improve the situation by varying the textures greatly. A variation of the Texture layer is Photographic Scenery (or PhotoReal). PhotoReal areas are actual photographic textures showing the world exactly as it is in reality. Due to the nature of the sizes of such areas however, PhotoReal scenery takes a lot of drive space and rarely comes with accurate autogen or 3D objects (Orbx FTX scenery packages that include small PhotoReal areas do however contain hand placed 3D objects across the entire PhotReal coverage). Now the ground is painted to look like the real world, it still looks flat, as if a photograph were simply draped over a hill (which is exactly what is happening!). This is where Autogen comes in to flesh out the world. Autogen is basically the collective term for the thousands of small, generic 3D objects placed in the world. Houses, trees, farm buildings, water towers, hedgerows and a multitude of others. As the name implies, these objects are automatically generated by the simulator as you fly. The positions of the autogen objects however are hand crafted. Each 1km x 1km texture tile is "annotated", usually by hand to define the locations, shapes and footprint sizes of trees, buildings and special objects (like tractors or churches etc). These annotations are then called for by the sim at the same time as the texture, so now we see the correct "painted surface" on the ground, populated by appropriate, but automatically generated 3D objects. Orbx FTX Beginners' Guides, Introduction to FTX Volume 1, Page 15 Vector Data Close to the top of the pile, we have Vector Data. Vector data is any item within the simulated world that follows a specific shape, or a line. For example, roads, highways, railways and power lines all follow basic "point to point" lines and are defined simply by geographic coordinates. Other features such as large rivers, parks, golf courses etc that have a complex shape can be created as a vector polygon (a shape with an area) and as seen on page 14, a landclass given to that shape. The simulator takes this data and assigns special objects and textures along the lines or within the polygons, therefore showing a road winding along a valley or a power line climbing a hillside. Orbx FTX Beginners' Guides, Introduction to FTX Volume 1, Page 16 Custom Scenery Finally, on top of all this is Custom Scenery. This type of data is usually the most complex and detailed. Custom scenery covers all the 3D objects you see within the world that are not provided by autogen or Vector data. Things like bridges, docks, airports, cityscapes etc are all custom created and placed appropriately within the simulator. Orbx FTX Beginners' Guides, Introduction to FTX Volume 1, Page 17 ORBX FTX Products Now you understand the basic components that make up the simulated world around you, making sense of the various Orbx ranges available will be easier. There are 2 main "families" of FTX Products... FTX Global Family, and FTX Region Family. The two ranges both fulfill different roles in your simulator, using the standard simulator layer principles. Keep reading to discover those roles and help determine what product best meets your own needs... FTX Global Products FTX Global products are exactly that; Global. Each product provides one scenery layer only, on a global scale. In other words, purchasing an FTX Global product will upgrade that specific simulator scenery layer for the entire globe. The products available cover the four main scenery layers as follows... FTX Global Base Pack This is the starting point for all FTX Global upgrades. This base pack is required for complete functionality of subsequent FTX Global products. The FTX Global Base Pack fully updates all the simulator's default 1km x 1km textures tiles, replacing them with more accurate, photographic textures with a much deeper and more realistic color palette. The textures are created using photographic material, however they are NOT photoreal textures. They do not provide 100% photoreal representations of the world, so are still subject to the same limitations of the default texture tiles. That said, they are obviously a huge improvement over default, in both color, depth and general appearance. FTX Global Base Pack texture tiles also include fully hand crafted autogen placement and a newly developed night lighting system that adds actual 3D lighting to the entire globe. Finally, FTX Global Base Pack also includes some limited adjustments to Standard Landclass for certain parts of the world where the default data is particularly poor. See the FTX Global Guide (when released) for additional information. FTX Global Vector Next, we have FTX Global Vector. Developed in association with Pilot's Software, this package provides a global coverage of new, more accurate Vector data. This package is based upon commercially available data, so while the data provided is a very large improvement over default, like the default data, there will be parts of the world that receive greater improvements than others. FTX Global Vector upgrades any and all vector based scenery, such as roads, railways, coastlines, beaches, power lines, rivers, streams, glaciers and lakes (to mention a few). it also adds features such as the ability to "freeze" lakes into a solid frozen surface during winter months. Lastly, FTX Global Vector also adjusts thousands of airport elevations to their real world elevations, correcting many elevation mistakes and inaccuracies found in default data. See the FTX Global Vector guide (when released) for additional information. Orbx FTX Beginners' Guides, Introduction to FTX Volume 1, Page 18 FTX Global OpenLC Now comes FTX Global OpenLC. As the name suggests, this is the replacement for the Landclass layer. FTX Gloabl OpenLC has evolved vastly since the first early concepts, and become a much more complex product. As such, unlike all the other FTX Global products, FTX Global OpenLC, this product is not a single product for the whole globe, it is split into seven distinct world zones and available as seven seperate products. Open LC includes complete Standard Landclass (1km x 1km tiles) for its entire coverage area, as well as additional localized textures and localized autogen. There are also very limited (provided only where necessary), small photoreal areas. FSGlobal 2010 - FTX Edition Penultimately, the last of the four main layers, Terrain mesh. FSGlobal 2010 is the latest version of Pilot's Software's worldwide terrain mesh coverage. It has been designed specifically in partnership with Orbx as the official Global Terrain Mesh addon to use alongside the FTX Global products. If an FTX Global product is built around any form of terrain, FSGlobal 2010 - FTX Edition is the terrain mesh that is used. As such, for the complete Global solution, Orbx recommends this version. Of course most other terrain meshes will function with the FTX Global product family, but FSGlobal 2010 is the one used by the Orbx developers and testers. FTX Global Custom Scenery And Finally, Custom Scenery for FTX Global. Several packages are in development to add airports, cityscapes and additional local points of interest. For example, available now, for FTX Global is Palm Springs International Airport (KPSP) and Monument Valley. These addons are designed to work with FTX Global Base pack already installed, and as such it is a requirement. Check out the forums for news and previews. Orbx FTX Beginners' Guides, Introduction to FTX Volume 1, Page 19 FTX Global Visual Differences As a final note to the FTX Global Product Family, a picture says a thousand words... So below, you will see just how a raw install of FSX is transformed from its default view of the world, to the final FTX Global vision. Note, that Open LC can only be shown in action on one of these 3 locations due to the fact that only Open LC Europe has so far been released. As a final point, all FTX products are constantly in a state of update. FTX products are not a simple "buy it now and done" item. Orbx strives to constantly add value to products as and when new technology or new data becomes available. Those purchasing any FTX product are investing in a constantly improving product, for which updates and new features are freely provided. Orbx FTX is an investment in your flight simulator of choice. Now enjoy the visual transformation of the world! FSX Default Southampton UK, Queenstown NZ & Redding USA. FSX Default scenery during both daytime and night. Orbx FTX Beginners' Guides, Introduction to FTX Volume 1, Page 20 Adding FTX Global Base Pack Adding FTX Global Base Pack to the simulator. The basic shapes and content of the area remains the same, but richer toned and better looking textures are now displayed, significantly upgrading the overall view of the simulator. Nighttime shows an even greater improvement with the addition of 3D lighting built into the new textures, and additional 3D lighting designed to follow arterial roads. Orbx FTX Beginners' Guides, Introduction to FTX Volume 1, Page 21 Adding FTX Global Vector Now adding FTX Global Vector to the simulator. River shape, roads, railways and other vector based data is much improved over default, even in parts of the world normally served by decent quality default data. This again, significantly upgrades the overall view of the simulator. Orbx FTX Beginners' Guides, Introduction to FTX Volume 1, Page 22 Adding FSGlobal 2010 - FTX Edition Mesh Next, FSGlobal 2010 - FTX Edition. Mountain shape and definition is now greatly improved and "standardized" on a global level. Flatter areas and those already served by good quality default terrain mesh will show less change, but there will be subtle differences (hard to tell from screenshots) that add a truly undulating ground surface as found in the real world, much more realistic than the completely flat representation found in most of the default data. Daytime only... Terrain is usually hard to see at night! Orbx FTX Beginners' Guides, Introduction to FTX Volume 1, Page 23 Adding FTX Global OpenLC Lastly, OpenLC. Probably the most dramatic change of all. Now, areas are localized to look like they do in real life. Not just in overall appearance of buildings, but the shapes and varieties of the landclass areas too. FTX Global Summary So to recap the FTX Global product family, the following points are useful to remember: FTX Global is the blanket name given to an entire Orbx product family. Each FTX Global product upgrades one scenery layer, on a global scale. FTX Global Base Pack is the natural starting point. It is a required package for any subsequent FTX Global products. FTX Global Base Pack upgrades the Texture and Autogen layer. FTX Global Vector upgrades the Vector Layer. FTX Global OpenLC upgrades the Standard Landclass layer. FSGlobal 2010 - FTX Edition upgrades the Terrain Mesh layer. FTX Global Custom Scenery adds realism to FTX Global in the form of airports, cities and landscapes. FTX Global packages ARE NOT a collection of existing FTX Full Regions. FTX Global Base Pack IS NOT required for FTX Full Region packs (which are fully standalone). FTX Global Packages are subject to the same limitations of your flight simulator and cannot fix everything. Hopefully, you now understand FTX Global, it's scope, what it is, what it isn't and see how valuable it is for the simulator. Continue reading for more information regarding the other FTX product range, FTX Full Regions. Orbx FTX Beginners' Guides, Introduction to FTX Volume 1, Page 24 FTX Regional Scenery Packs FTX Global does a great job of fully upgrading the flight simulator world. However, even FTX Global is not the pinnacle of FTX products. FTX Full Region packs are designed to full update ALL flight simulator scenery layers, for a defined geographic region, in one package. No need for FTX Global Base Pack (though it is still recommended), no need for any further software at all. FTX Full regions include highly detailed terrain mesh, hand crafted standard and vector landclass, hand crafted vector features, custom points of interest (such as bridges, dams, local landmarks etc), small areas of photoreal (fully annotated with autogen) where appropriate, AND every single airport within the area of coverage is upgraded to include a more accurate layout, 3D lights and local objects (like 3D grass, static aircraft, people etc). It is fair to say that FTX full regions are the top end of what Orbx offers and completely transform your flight simulator world in one step. Below is a side by side example of the difference between a fully upgraded FTX Global world, and the same area in an FTX Full Region. While the FTX Global rendition of Southampton is very close to reality, here we see the improved features of the FTX Full Region including improved airport layout and boundary, a vector background to the rail yard, more appropriate roof colors better custom landclass and custom scenery in the form of the docks and waterside structures: Orbx FTX Beginners' Guides, Introduction to FTX Volume 1, Page 25 FTX Airports Beyond FTX Full Region Packs, should you wish to have even higher fidelity, you can also purchase FTX Airports. Most FTX Airports are designed to be used specifically inside their corresponding full region (for example, KMRY - Monterey is designed to be installed over FTX Full Region pack Northern California) and will not function correctly if the full region is not installed. Some FTX airports are now being developed specifically for FTX Global. FTX Airports generally include an area of fully annotated PhotoReal scenery for the immediate surroundings, the airport itself fully updated, and many special effects made possible by Orbx Flow Technologies. Flow technologies include such things as PeopleFlow (animated people), CreatureFlow (animated animals and wildlife), NatureFlow (animated grasses, trees and falling leaves), VehicleFlow (animated vehicles such as trucks, trains and hot air balloons), ObjectFlow (seasonal and time based changes to scenery, such as working clocks, hangar doors, pool parties etc). FTX Airports represent the absolute best of all our scenery: Orbx FTX Beginners' Guides, Introduction to FTX Volume 1, Page 26 FTX Freeware FTX products, whether FTX Global or Full Region products, are an investment. Being constantly updated to newer standards and adding value as time goes on. On top of this, the Orbx and the wider FTX community have many talented individuals that freely give of their time and talents to enhance FTX products even further still. One way this is evident is in the ever growing library of FTX Freeware. Currently the number of Freeware Airports produced vs the number of payware is FIVE Freeware to every ONE Payware! FTX Freeware is designed to be used with FTX products and will not function correctly on their own, but if used with FTX products, they provide yet more enhancements and improvements. The Freeware page of the Orbx Website: https://www.fullterrain.com/freeware lists all the current freeware available to our users, ranging from airports, to scenery enhancements to utilities. If you are not yet an Orbx user, you will find free, unlimited use demos of FTX products on this website also... Give them a try and see for yourself what all the fuss is about! Orbx FTX Beginners' Guides, Introduction to FTX Volume 1, Page 27 Product Use Now you know about the products, knowing some basics about FTX and the way it installs will help avoid any of the usual pitfalls encountered. Be sure to read this guide and the product manuals first if you have any questions. If these do not help, feel free to post on the support forum to ask for help. Downloading All FTX products are available from The Flight Sim Store website (http://www.flightsimstore.com) as a download only product. FTX products are no longer available as a boxed product (though a "physical media disk" option can be added to your order which will send a physical disk containing a backup of the download file). Downloading large files can be time consuming and use a lot of data. Some users have limited time and data available, so it is very important that a couple of basic rules be followed when it comes to downloading the products: Use a Download Manager Downloading large files can be frustrating, especially with a slow or inconsistent internet connection. Even if you think you have a good connection, chances are you will experience slight interruptions without even realizing. Should such an interruption to your internet service happen during a download, the file being downloaded will either fail to download, or become corrupted. In either case, you will need to start downloading again from scratch, using more valuable bandwidth and time. Using the built in Windows Internet Explorer, Chrome or Firefox download system included with your browser is a sure fire way to receive a faulty download for this very reason. As such, Orbx recommends the use of a dedicated Download Manager. Such download mangers are freely available on the internet, some payware, some freeware. Examples would be "Getright", "Down Them All" & "Free Download Manager (FDM)". These tools provide a number of benefits including faster downloads (saving time) and most importantly, they provide a feature called "Interrupt Protection". As the name suggests, should your download be interrupted mid way, the download manager will be able to resume your download safely and avoid failed downloads. No download manager can be a 100% safety net, but the vast majority of support requests regarding failed downloads can be traced back to users not using a download manager. Better safe than sorry (and you'll get your product faster too!). Unzip the file using a dedicated archive tool Just as built in downloaders can be unreliable, so too can built in extraction tools. Large files especially can encounter unpacking errors that fall through the cracks with the Windows extraction tool. For this reason, you should use a dedicated extraction tool such as "Winzip" or "7zip". Doing so will help to ensure your product is extracted safely and correctly. Be sure to extract all your downloads. For a correct installation, the installer application MUST be ran from an extracted folder and not from inside the .ZIP file: 1. Find your downloaded .ZIP file: Orbx FTX Beginners' Guides, Introduction to FTX Volume 1, Page 28 2. Right Click the file and find your extraction tool options. Click "Extract to xxxxxxxxxxx" option to create a new folder with the same name as the Zip file. Installing Once your product is safely downloaded and extracted, next you need to install it. To ensure proper installation of all files, make sure to run the installer "as administrator" by right clicking the installer then clicking "run as administrator". If this is your first time installing the product, the installer will ask for your order number, order date and registration key, then continue to the product installation. Should you need to reinstall the product on the same computer, the installer will remember your purchase details. The installers may vary slightly from product to product, but most follow the same format. Once running the installer, simply follow the on screen instructions carefully. Some installers will open FTX Central (the core FTX control panel) automatically and ask you to verify or change a setting before closing it down... Be sure to follow all the simple instructions to the letter. The installer from this point is fully automatic. It will install the product to the correct folders, it will automatically edit required simulator system files, and it will add scenery to your simulator library in the correct location. Just let it run its course. While the installers will automatically place the scenery where it needs to go, and therefore the install order is not important, for tbhose users who wish to follow a "standardized flow", this is a good order to install FTX products: FTX Global Base Pack FTX Global Vector FTX Global OpenLC Terrain Mesh FTX Full Region Packs FTX Custom Scenery (Including Airports) FTX Freeware As a final step, always ensure you install the latest version of the FTX Libraries (available at the bottom of the support page of the FTX website: https://www.fullterrain.com/support). You may install multiple products in succession, but always install the libraries as a final step. this ensure all files are current and up to date. Orbx FTX Beginners' Guides, Introduction to FTX Volume 1, Page 29 1. Right click the installer and run the installer "as administrator": 2. Follow all on screen instructions and allow the installer to complete: 3. Install the latest library files (be sure to install the correct version for your simulator): Orbx FTX Beginners' Guides, Introduction to FTX Volume 1, Page 30 FTX Central Now your FTX product is installed. Due to the complexity the way FTX products are designed to leverage all available simulator resources, FTX products use a central control panel called "FTX Central". FTX Central has some basic functions that are obvious in nature, it also has some functionality that some may not realize. The following information should help you familiarize yourself with the FTX Central application and what it can do. FTX Central Main Page The Main Page of FTX Central contains a FTX Region Selection box, a Menu Bar containing three drop down menus (FTX, Tools and Help), a Status and Options area, a Control Panels button and a PDF Documents button. this guide will now detail each one in turn. Region Selection Box The primary function of FTX Central is to switch out specific files within the simulator that control the way certain features look. By default, the simulator must create a "best global fit" for things such as roof tiles and coloration, the angle at which a sloped terrain displays a rocky texture, etc. This means that the simulator has a limited ability to dedicate specific regional differences. FTX Central Region Switching allows us to use all the simulator's available resources to represent a smaller area, meaning that houses can look truly European, base textures can be representative of the local areas, and tarrain can behave correctly for it's location. The icons within the FTX Central Region Selection Box represent FTX product families. Specifically, if you wish to fly anywhere in the world covered by FTX Global products, select "FTX Global". If you wish to fly within the boundaries of an FTX Full Region Pack, select the appropriate FTX Central Region (Oceania, Europe or North America). Confusion can happen here if unaware; if you wish to fly in North America but OUTISDE of an FTX Full Region coverage (for example, East Coast), you are flying within the confines of the FTX Global family of products, so select FTX Global, not North America. Orbx FTX Beginners' Guides, Introduction to FTX Volume 1, Page 31 Menu Bar The menu bar allows access to the following functions (Specific tools and functions are described later in this guide): FTX Navigation to the FTX website, or Exit the program. Tools Scenery Library Configuration (FTX Scenery Library Insertion points & Validate Scenery.cfg), Reports (FTX Products Installed & Validate Region Files), FTX Aero, FTX Lights Tweaker (Old Style Lights) and Flush Scenery Indexes. Help Navigation to the FTX Support Forums and Information about FTX Central. Status and Options Section The Status and Options section shows which region is currently selected, with what special options. Special options include the use (or not) of Orbx Trees, the addition of 3D lighting to vector roads, and a special "Hybrid" mode, unique to FTX Global that allows you to fly across the borders between FTX full regions and surrounding Global terrain seamlessley, while sacrificing some minor regional specific options. PDF Button As the name suggests, this shows a list of all product manuals for FTX products you have installed. Orbx FTX Beginners' Guides, Introduction to FTX Volume 1, Page 32 Orbx Control Panel Button This button displays a list of all product control panels if your FTX product comes with one. Control panel options are a way to fine tune individual packages for performance or visual presentation. FTX Aero FTX Aero provides a range of options to enhance ground detail within the simulator world. As well as displaying the normal texture tiles, the simulator also overlays this with a semi-transparent fine detail image which creates depth and detail to the close up ground textures. FTX Lights Tweaker FTX Lights Tweaker allows you to fine tune the size and shape of the old style FTX 3D lights. These old style lights are currently in the process of being replaced by the newer, more efficient FTX Global style lighting. Some older products, mainly airports, still use the old style lights and this tool allows you to have control over them. About FTX Global Hybrid Mode Earlier, the option for FTX Global to be ran in Hybrid mode was metioned. This guide will now expand a little on just what Hybrid mode is for. It became apparent early on that users wished to fly into and out of FTX Full Regions, from (or to) FTX Global areas or even from one FTX Full Region to another (for example, London to Seattle would fly out of FTX EU ENG, into FTX NA PNW). Because setting FTX Central to just one regional area (Global, North America, Europe etc) would create issues to any scenery outside that area, a special Hybrid mode was created that allows a seamless "cross border" experience at the expense of some localized features. The offshoot of this is that users, if prepared to accept some small innacuracies, can also enjoy all their FTX full regions and FTX Global as a "set it and forget it" option. Of course, we reccomend the use of the correct FTX Central setting to get the best out of the scenery. Orbx FTX Beginners' Guides, Introduction to FTX Volume 1, Page 33 To further illustrate this concept, the following graphic will visually show what settings to use in FTX Central, and why... Just remember, the general rule of thumb, flying over the border? Use Global Hybrid. Staying inside or outside a full region? Use the correct regional selection: More About FTX Global Hybrid Mode - Why do I need FTX Global if I have regions? As mentioned previously, Hybrid Mode is designed specifically to allow you to "cross the border" between FTX Full Regions, or between FTX Full Regions and FTX Global areas (basically, anywhere outside of a full region). If you are planning to fly exclusively within FTX Full Regions, then yes... FTX Global may not be for you. However, if you plan on flying in a wider space, FTX Global Hybrid mode makes the transition from Full Region to Global practically Seamless: Orbx FTX Beginners' Guides, Introduction to FTX Volume 1, Page 34 Patches and Service Packs As each product evolves and grows, new features and new data are often added, and bug fixes made. When this happens, a patch or service pack will be released. Once enough patches for a product exist, a new build of the full product may be produced. Product updates therefore follow the basic update paths, depending on the maturity of each product. First, comes small individual patches covering only one small aspect. Eventually, these smaller patches and new features may be rolled into a single cumulative service pack containing all the previous patches in one installer. Finally, once enough changes are made, a new full build may be produced. Should you need to patch a product, you can find your current product version in your user guide, or by running the "Reports, FTX Products Installed" option from FTX Central: 1. From the FTX Central Main Screen, click "Tools", "Reports" then "FTX Products Installed. 2. Find your product from the list that appears in the resulting report. Next, visit the FTX Website Support section and find your product (in this example, FTX AU YMEN) and download any patches you need that are beyond your current version: Installing patches is straight forward. Simply follow the same rules as for installing any FTX product; follow on screen instructions and finish up by installing the latest libraries. Orbx FTX Beginners' Guides, Introduction to FTX Volume 1, Page 35 FTX Product Configuration Many FTX products come with control panels, in addition to FTX Central. FTX Global Base Pack has an optional control panel to adjust the 3D lighting, available on the FTX website. FTX Global Vector has the "Vector Configurator" control panel to help customize vector features and adjust airport elevation corrections when needed. Some FTX Full Regions and most FTX Airports come with a control panel to customize the level of detail and features within the areas covered. FTX Global Base Pack The FTX Global Base Pack Lighting Configurator is available from https://www.fullterrain.com/freeware. It is a very intuitive design and operation is simple. For more information, please see the FTX Global Base Pack guide (when released). FTX Global Vector The FTX Global Vector Configurator is installed as part of the FTX Global Vector installation. The main pages within the control panel simply allow you to toggle specific features on or off. The last page, "Airport Elevation Correction", is designed to allow 3rd party airports that come with their own elevation corrections to use that and override the elevation corrections provided by FTX Global Vector. Note, not all the airports within the simulator world have received an elevation correction in FTX Global Vector, so you may not necessarily find an airport in the list. For more information on the FTX Global Vector Configurator and Airport Elevation Correction (AEC), please see the FTX Global Vector guide (when released). Orbx FTX Beginners' Guides, Introduction to FTX Volume 1, Page 36 FTX Regional Control Panels FTX Regional Control Panels are installed as a shortcut on your desktop automatically. They are also accessible from FTX Central. They are very simple control panels that simply allow you to toggle advanced features within the product boundary. Orbx Libraries Because there are so many FTX products available, there are many custom objects created that are used by multiple products (Trees, Hangars, Taxiway edge lighting etc). Because of the number of these common objects, it is better to save these in a "Scenery Library", available for all FTX products to use as they need them. This cuts down on a lot of duplicates and saves disk space. It also means updating the library will automatically update every FTX product using that particular object. FTX Libraries are generally updated with every product released, and also includes the latest version of FTX Central. This is why it is especially important make the final step of installing the Library files after each FTX installation session. Note, you can install multiple FTX products in one sitting, followed by a single install of the libraries... There is no need to install them after each individual product. FTX Libraries are available for FSX and Prepar3D. These are however very different files and will not function correctly if installed into the wrong simulator. Please be sure you download the correct version for your simulator. Orbx FTX Beginners' Guides, Introduction to FTX Volume 1, Page 37 Simulator Scenery Library Configuration FTX Product Installers will automatically add the FTX scenery to your simulator Scenery Library in the correct location. However, as everybody's simulator setup is different, sometimes a heavily populated library can throw off the automatic insertion routine and leave users with scenery looking less than great. This section will show you the order in which the various scenery items should appear in your own scenery library, and will also show you how to use FTX Central to "correct" for a faulty scenery library insertion. First, some basics on the scenery library. Earlier in this guide, the basic scenery layers were discussed. These scenery layers are simply types of data and should not be equated to the layers in the scenery library. The layers within your scenery library are representing installed products, not basic data types. That said, each basic scenery layer type behaves differently within the simulator. Here is a rundown of how. Terrain Mesh Data The Simulator will ALWAYS use the most detailed terrain available to it, no matter where it is placed in your scenery library. If you have a 19m (post spacing) terrain mesh product placed below a 38m terrain mesh product in your scenery library, you will still see the 19m mesh in the simulator. The only time the location of a mesh product matters is if you have 2 or more mesh products of the same post spacing. In this case, the one higher in your scenery library will be displayed. Landclass Data The landclass data that is placed in the higher position within the Scenery Library will be the one displayed by the simulator. It does not matter whether it is standard or vector landclass. Vector Data ALL vector data will be displayed within the simulator. The data that is highest in the scenery library list will be "on top", but all data will be displayed. Of course this could look very messy in the simulator, so most vector based products include a special "exclusion layer" that removes any vector data from the simulator, below itself in the scenery library. Textures & Autogen This type of scenery update (FTX Global Base Pack) does not have an entry in the simulator scenery library. It is simply a straight swap of existing texture tiles. Autogen objects are part of those files. there is however an exception to this... PhotoReal areas will be placed in the simulator scenery library, but will be displayed within the simulator no matter the location. They will suppress any vector data and landclass data they cover. Custom Scenery This works much the same way as Vector data. All custom objects will be shown within the simulator, unless the previous version has been disabled/removed, or an exclusion is placed in the sim to suppress the old data. The objects higher in the simulator scenery library will be the ones "on top" in the simulator. Here is the correct order of a properly configured Simulator Scenery Library, showing the locations of FTX products in relation to each other, other 3rd party software and default items: 3rd Party Scenery (Any scenery you wish to display above Orbx FTX scenery) OZX Scenery (Freeware designed to fit with FTX Regional software) FTX Full Regional Scenery & Airports Tongass Fjords (Fills the gap between Southern Alaska and Pacific Fjords Regions) FTX OpenLC Scenery Named Default Scenery Entries FSGlobal 2010 Entries FTX Global Vector Entries (OBJ, APT, CVX, EXX) Numbered Default Scenery Entries FTX Global Vector Entry (AEC) "Default Scenery" "Default Terrain" Orbx FTX Beginners' Guides, Introduction to FTX Volume 1, Page 38 If your scenery library does not look like this (or similar), in particular your FTX scenery entries, you can use FTX Central to set your "insertion points" as follows: 1. Open FTX Central and click on "Tools", "Scenery Library Configuration" then "FTX Scenery Library Insertion Points". 2. Click on each "Set Insertion Point" button to set the location within the simulator scenery library that you wish to use. In this example, the FTX entries are set to appear just above "Tongass Fjords" scenery. From this point on, any third party addons that are installed will be added to the top of the scenery library (as is proper), and FTX will appear below them. Orbx FTX Beginners' Guides, Introduction to FTX Volume 1, Page 39 In Closing We hope this guide has helped explain what FTX offers, the variety of products available and just how much FTX can change the way you fly. All of us at Orbx are passionate about flight simulation... It's why we do what we do! So all that remain is for us to once again, welcome you to the world of Orbx FTX Again, enjoy your new Full Terrain Experience! Orbx FTX Beginners' Guides, Introduction to FTX Volume 1, Page 40