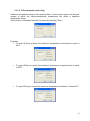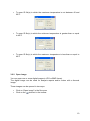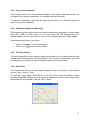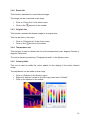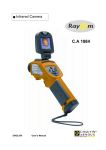
1
Analysis software
ENGLISH
User manual
CONTENTS
1
INSTALLATION ................................................................................................... 3
1.1
1.2
1.3
1.4
2
System requirements ................................................................................... 3
Installing RayCam Preview .......................................................................... 3
Operating on Windows 7 .............................................................................. 6
Uninstalling RayCam Preview ...................................................................... 6
FIRST STEP: PRESENTATION OF THE SOFTWARE ....................................... 7
2.1
2.2
Starting the application ................................................................................. 7
Modes of operation....................................................................................... 7
2.2.1
3
Analysis mode.................................................................................................................... 7
GENERAL FUNCTIONS ..................................................................................... 8
3.1
3.2
Language ..................................................................................................... 8
Management of images and reports ............................................................. 8
3.2.1
Open IR file ........................................................................................................................ 8
3.2.1.1
3.2.1.2
3.2.1.3
3.2.2
3.2.3
3.2.4
3.2.5
3.2.6
3.2.7
3.2.8
3.2.9
3.3
Open image ..................................................................................................................... 10
Copy to the clipboard ....................................................................................................... 11
Snapshot (Analysis mode only) ....................................................................................... 11
IR image switch................................................................................................................ 11
Save IR as ....................................................................................................................... 11
Close the current IR image .............................................................................................. 12
Close all analysis windows .............................................................................................. 12
Exit ................................................................................................................................... 12
Display the images ..................................................................................... 12
3.3.1
3.3.2
3.3.3
3.3.4
3.3.5
3.3.6
4
Thermal image ............................................................................... 8
CCD image .................................................................................... 8
Filter (Analysis mode only) ............................................................. 9
Zoom In ............................................................................................................................ 12
Zoom Out ......................................................................................................................... 13
Original size ..................................................................................................................... 13
Temperature unit ............................................................................................................. 13
Colour palette................................................................................................................... 13
Adjust image .................................................................................................................... 14
ANALYSIS OF THE INFRARED IMAGE .......................................................... 15
4.1
4.2
Parameters of influence ............................................................................. 15
Presentation of the analysis tools ............................................................... 16
4.2.1
The tools .......................................................................................................................... 16
4.2.1.1
4.2.1.2
4.2.1.3
4.2.1.4
4.2.1.5
4.2.1.6
4.2.1.7
4.2.2
4.2.3
4.2.4
4.2.5
Point ............................................................................................. 16
Line .............................................................................................. 16
Vernier ......................................................................................... 16
Circle ............................................................................................ 17
Rectangle ..................................................................................... 17
Polygon ........................................................................................ 17
Polyline ........................................................................................ 18
Max Temperature ............................................................................................................ 18
Min Temperature ............................................................................................................. 18
Cursor .............................................................................................................................. 18
Temperature label ............................................................................................................ 19
1
4.3
4.3.1
4.3.2
4.3.3
4.3.4
4.4
4.5
4.5.1
4.5.2
4.6
4.6.1
4.6.2
4.6.3
Presentation of the analysis functions ........................................................ 19
Isothermal surface ........................................................................................................... 19
Distribution ....................................................................................................................... 21
Histogram ......................................................................................................................... 21
Fusion .............................................................................................................................. 22
Modify analysis tools .................................................................................. 23
Export data ................................................................................................. 24
Thermal image ................................................................................................................. 24
Distribution ....................................................................................................................... 25
Delete/Restore tools ................................................................................... 25
Delete tools ...................................................................................................................... 25
Delete all tools ................................................................................................................. 25
Restore tools (Analysis mode) ......................................................................................... 25
2
1 INSTALLATION
1.1
System requirements
XP:
SP2 or higher
Memory at least 512 MB
700 MHz or higher CPU
NET Framework 2.0 or higher
Resolution of the monitor at least 1024 x 768
Vista:
SP1 or higher
Memory at least 1 Go
1 GHz or higher CPU
NET Framework 2.0 or higher
Resolution of the monitor at least 1024 x 768
1.2
Installing RayCam Preview
(1) Locate the installation program and double-click on the icon of the executable
(.exe);
(2) Click on the “Next” button to continue installation or on the “Cancel” button to
abort;
3
(3) On the licence agreement screen below, click on the “Yes” button to continue
installation or on the “No” button to abort;
(4) Select the installation access path by clicking on the “Browse” button or use the
default path (make sure that the drive selected has enough free space)
Then click on the “Next” button;
(5) Confirm the location of the program directory and click on “Next”;
4
(6) Click on the “Next” button in the “Start Copying Files” dialogue window;
(7) Finally, click on the “Finish” button.
If Microsoft .NET Framework 2.0 (or a more recent version) is not installed on your
computer, a message prompts you to install it. Click on the OK button and follow the
installation instructions.
Remark: if you see the message “Setup cannot continue because this version of the
.Net Framework is incompatible with a previously installed one”, open the
configuration panel, double-click on Addition/Deletion of programs, under XP, or on
Programs and functions, under Vista, to uninstall the previous version of Framework
and uninstall the RayCamReport software. Repeat the steps above to reinstall the
application.
(8) Click on the “Yes” button to reboot the computer when installation is over.
5
1.3
Operating on Windows 7
Please follow the below steps to carry out the compatibility settings to make sure the
software runs properly.
(1) Before first time running the software, Right-click RayCam PRV.exe or
RayCam PRV.exe shortcut and select « property ».
(2) In the compatibility mode, select « Run this program in compatibility mode
for » and then select the « Windows XP (Service Pack 3) » in the drop-down
menu.
(3) In the privilege level, select « Run this program as an administrator »
(4) Finally click ok.
1.4
Uninstalling RayCam Preview
Click on Start in the bottom left corner of the Windows desktop. In All programs >
RayCAmPRV, click on Uninstall RayCAm PRV and follow the instructions to delete
the software.
6
2 FIRST STEP: PRESENTATION OF THE SOFTWARE
2.1
Starting the application
The program can be started in two ways:
•
•
2.2
Click on “Start” in the bottom left corner of the Windows desktop, then “All
programs”, and select RayCamPRV;
Double-click on the RayCamPRV icon on your Windows desktop.
Modes of operation
2.2.1 Analysis mode
When the RayCam PRV application is started, it opens in analysis mode as default.
The screen below is the main interface of the application. The operational functions
can be selected using the menus or the toolbar or by right-clicking on the image itself.
Menus
IR analysis
zone
Toolbar
Information
zone
This mode is used to open one or several images, to add various analysis tools (see
§4), and to obtain all results in condensed form in a table. This mode is useful for a
first-level analysis, when you simply want to form an idea of the temperatures without
saving the analyses.
7
3 GENERAL FUNCTIONS
3.1
Language
This function lets the user select one of the available languages for the interface of
the application.
The language is chosen by selecting “Languages” in the system menu.
3.2
Management of images and reports
3.2.1 Open IR file
3.2.1.1 Thermal image
You can open one or more infrared images in the SAT, JPG, and BMP formats with
thermal data.
These images can be opened in two ways:
•
•
Click on “Open IR file” in the file menu;
shortcut in the toolbar.
Click on the
Remark: In analysis mode, the resolution of the thermal image opened is displayed
in its title bar (320 x 240, for example).
3.2.1.2 CCD image
You can also open the digital image associated with the CCD format to merge it with
the thermal image.
This image can be opened in two ways:
•
•
Click on “Open IR file” in the file menu.
shortcut in the toolbar.
Click on the
8
3.2.1.3 Filter (Analysis mode only)
Defines a temperature range as file opening filter; in other words, opens only thermal
images in which the maximum/minimum temperature lies within a specified
temperature range.
This function is accessed from the File menu by selecting “Filter”
Example:
• To open IR file(s) in which the maximum temperature is less than or equal to
60°C
•
To open IR file(s) in which the maximum temperature is greater than or equal
to 60°C.
•
To open IR file(s) in which the maximum temperature is between 40 and 60°C.
9
•
To open IR file(s) in which the maximum temperature is not between 40 and
60°C.
•
To open IR file(s) in which the minimum temperature is greater than or equal
to 40°C
•
To open IR file(s) in which the maximum temperature is less than or equal to
40°C
3.2.2 Open image
You can open one or more digital images in JPG or BMP format.
The digital image can be used for analysis reports and/or fusion with a thermal
image.
These images can be opened in two ways:
•
•
Click on “Open image” in the file menu
Click on the
shortcut in the toolbar
10
3.2.3 Copy to the clipboard
This function copies the current thermal image to the system clipboard so that you
can paste it into another application, for example a Word document.
To copy the information, click with the right mouse button on a thermal image and
select “Copy to the clipboard”
3.2.4 Snapshot (Analysis mode only)
This function can be used to save the thermal image being analyzed to a new image
file in SAT, BMP, or JPG format. You can then open the JPG snapshot file as a
thermal image from the “Open IR file” menu or as a digital image with “Open image”.
Recording can be done in two ways:
•
•
Click on ”Snapshot” in the Action menu
Click on the
shortcut in the toolbar
3.2.5 IR image switch
You can replace the current thermal image with another one by clicking with the right
mouse button and selecting “IR Image Switch”. This function is useful when you want
to analyze several thermal images using the same set of analysis tools.
3.2.6 Save IR as
This function lets you record the thermal images in one or more files, in the desired
format (*.jpg, *.bmp, or *.sat).
To save an image, select “Save IR as” in the File menu, select the desired output
format and indicate whether or not the scale is displayed (for jpg or bmp image only),
then select the access path. Click on “OK” to finish.
11
3.2.7 Close the current IR image
This function closes the window of the active IR image being analyzed.
The window can be closed in two ways:
•
•
Click on “Close current IR image” in the Action menu
Click on the
button in the top right corner of the window of the IR image
(analysis mode)
Select the image to be deleted, then press “DEL” on your keyboard (report mode)
3.2.8 Close all analysis windows
This function closes all open analysis windows.
The windows can be closed in two ways:
•
•
Click on “Close all analysis windows” in the Action menu
shortcut in the toolbar
Click on the
3.2.9 Exit
To close the application.
The application can be closed in two ways:
•
•
3.3
Click on “Exit” in the file menu
button in the top right corner
Click on the
Display the images
3.3.1 Zoom In
This function enlarges the current thermal image.
The image can be zoomed in two ways:
•
Click on “Zoom In” in the Action menu
•
Click on the
shortcut in the toolbar
12
3.3.2 Zoom Out
This function reduces the current thermal image.
The image can be unzoomed in two ways:
•
Click on “Zoom Out” in the Action menu
•
Click on the
shortcut in the toolbar
3.3.3 Original size
This function restores the thermal image to its original size.
This can be done in two ways:
•
•
Click on “Original size” in the Action menu
shortcut in the toolbar
Click on the
3.3.4 Temperature unit
This function is used to choose the unit of the temperature scale: degrees Celsius or
degrees Fahrenheit.
The unit is chosen by selecting “Temperature scale” in the System menu.
3.3.5 Colour palette
This tool is used to modify the colour palette for the display of the active infrared
image.
The adjustment can be made in three ways:
•
•
•
Click on «Palette» in the System menu
Right-click with the mouse on the IR image, then select “Palette”
Click on the shortcut in the toolbar
13
3.3.6 Adjust image
This function is used to modify the values of the temperature scale. If the temperature
values of the image are not within this range, they are associated with the top or
bottom end of the palette. This adjustment makes it possible to highlight or expand
some parts of the thermal image.
If, for example, >> 19.2°C or << 3°C is displayed on the scale of the palette, it means
that some temperature values in the image are above >> 19.2°C or below << 3°C.
These values will then all be associated with the colours of the top and bottom ends
of the palette, respectively.
The adjustment can be made in three ways:
•
•
Click on “Image Adjustment” in the System menu
Right-click with the mouse on the IR image, then select “Image Adjustment”
•
Click on the
shortcut in the toolbar
In the “Image Adjustment” window, click on the Manual button and move the green or
blue button in the scroll bar to select the temperature range you want.
The blue triangle can be used to shift the whole range left or right.
The blue half-triangles can be used to shift only the high/low value of the scale.
You can also move the Brightness or Contrast buttons to adjust the correspondence
between the temperature values and the image colours.
14
4 ANALYSIS OF THE INFRARED IMAGE
In analysis mode and in report mode, there are many tools you can use to obtain
more information about the whole image or about selected zones.
4.1
Parameters of influence
The “Temperature settings” function is used to adjust the parameters that influence
the measurement, for the temperature calculation of a thermal image or an analysis
tool inserted in the image. These parameters are: the emissivity of the materials, the
ambient temperature, the relative humidity, and the effective distance.
The adjustment can be made in three ways:
•
•
Click on “Temperature settings” in the System menu
Right-click with the mouse on the IR image, then select “Temperature settings”
•
Click on the
shortcut in the toolbar
For the emissivity adjustment, you can enter an emissivity value or click on
to
select a value provided by the system. Each material in the list has an emissivity
range and a default emissivity. When you select a line and click on OK or on Apply,
the default emissivity is used. When you double-click on an emissivity value in a line,
that is the value that is used.
15
4.2
Presentation of the analysis tools
4.2.1 The tools
This menu is used to insert various tools in your thermal image (point, line, vernier,
circle, rectangle, polygon, or polyline) in order to analyze temperature changes in
certain zones of a thermal image.
These tools can be inserted in two ways:
•
•
Click on the desired type of tool in the tools menu
Click on one of the
shortcuts in the toolbar
4.2.1.1 Point
shortcut to place one or more points on a thermal image. Click again
Click on the
on the
shortcut or click with the right mouse button on the thermal image to exit
from the function
4.2.1.2 Line
shortcut to plot one or more lines on a thermal image. To terminate
Click on the
the function, click again on
or click with the right mouse button on the thermal
image.
4.2.1.3 Vernier
Click on
to place a vernier on a selected line in a thermal image. Click again on
or click with the right mouse button on the image to terminate the function. You
can change the location of the vernier by placing your cursor at the desired place on
the line and clicking on it: the vernier then changes position.
16
4.2.1.4 Circle
Click on the
shortcut to plot one or more circles on a thermal image. To
deactivate the function, click again on the
button on the thermal image.
shortcut or click with the right mouse
4.2.1.5 Rectangle
Click on the
shortcut to plot one or more rectangles on a thermal image. Click
again on
or click with the right mouse button on the thermal image to terminate
the function.
4.2.1.6 Polygon
Click on the
shortcut to plot one or more polygons on a thermal image; click once
to mark each angle of the polygon and double-click to finish the last edge and close
the figure. You can click again on
or click with the right mouse button on the
thermal image to terminate the function.
17
4.2.1.7 Polyline
shortcut to plot one or more polylines on a thermal image; click once
Click on the
to finish a segment and double-click to finish the last segment of the polyline. You
can click again on
or click with the right mouse button to terminate the function.
4.2.2 Max Temperature
This tool displays the maximum temperature and the coordinates of the
corresponding point on the active thermal image.
This tool can be inserted in two ways:
•
•
Click on “Max Temperature” in the tools menu
shortcut in the toolbar
Click on the
4.2.3 Min Temperature
This tool displays the minimum temperature and the coordinates of the corresponding
point on the active thermal image.
This tool can be inserted in two ways:
•
•
Click on “Min Temperature” in the tools menu
Click on the
shortcut in the toolbar
4.2.4 Cursor
This tool displays the temperature at and the coordinates of the position of the cursor
on the thermal image.
This tool can be inserted in two ways:
•
•
Click on “Cursor” in the tools menu
Click on the
shortcut in the toolbar
18
4.2.5 Temperature label
This function lets you adjust the display parameters while using the cursor tool, Min
point, and Max point.
Click with the right mouse button on a thermal image, then select “Temperature label”
in the contextual menu.
You can choose to display the coordinates and/or the temperature of the cursor, of
the max point, and of the min point by checking or not checking the appropriate
boxes.
You can also display a remark in this window.
4.3
Presentation of the analysis functions
4.3.1 Isothermal surface
This tool is used to isolate a temperature range chosen by the user by displaying all
points in this range in the same colour.
This tool can be inserted in three ways:
•
•
•
Click on “Isothermal area” in the Writing tools menu
Click on the shortcut in the toolbar
Right-click with the mouse on the IR image, then select “isothermal area”
Two isothermal zones can be assigned per image.
19
The possible parameters of the isotherms are the following.
•
•
•
•
•
•
•
Color – Select a colour for the isothermal zone by double-clicking on the
corresponding box.
Top – Moves isothermal range 1 or 2 up the temperature scale.
Bottom – Moves isothermal range 1 or 2 down the temperature scale.
Semi-Trans – Defines isothermal zone 1 or 2 with a semi-transparent colour.
Ratio – Displays the percentage of the isothermal zone in the image (top left
corner of the thermal image).
Click on the boxes of the isothermal range to change the top and bottom
temperatures.
Move the isothermal range along the temperature scale by holding the left
mouse button down on the zone of the isothermal range.
Resizing – Click and, while keeping the left mouse button pressed on one of the limits
of the isothermal zone, move the cursor up or down to change the limit.
20
4.3.2 Distribution
This tool displays the distribution of the temperatures measured on a line or polyline
inserted in the thermal image.
To create this graph, insert a line/polyline in the infrared image, then click with the
right mouse button and select “Distribution”.
The figure above shows the distribution curves of line L4 with a vernier, of line L3,
and of polyline Cur1. If there is a vernier on a line like L4, you can move it to display
the temperature and coordinates of the point at which it is located. You can also see
the variations of distribution by moving a line or a polyline. The curve is updated
instantaneously.
4.3.3 Histogram
This tool is used to represent in graphic form the percentage of points included in
different temperature intervals.
The histogram tool is effective only from a surface (circle, rectangle, or polygon).
To activate this tool, insert an analysis surface in the IR image, then click with the
right mouse button and select “Histogram”.
You can click with the right mouse button on the histogram window to change the
number of temperature segments (number of intervals).
21
4.3.4 Fusion
The Fusion function is used to merge a digital image (BMP, CCD, or JPG) with an
infrared image.
This can be done only if both a thermal image and a real image have been opened.
The steps in the creation of a merged image are:
(1) Open a thermal image (.sat file) and a digital image (.bmp, .ccd, or .jpg file).
(2) Click on the
shortcut in the toolbar or click on «Fusion» in the Action menu;
(3) In the fusion adjustments window, choose one thermal image and the digital
image;
(4) Click on the OK button;
(5) Adjust the size of the digital image window so that its object matches the object in
the thermal image;
(6) Move the thermal image to superpose its object on the object of the digital image;
(7) Adjust the percentage of fusion by moving the button on the scrollbar;
(8) When the fusion is terminated, you can record the merged image by clicking on
the "Save" button.
22
If you click on Yes, you can save the image in a BMP or JPG file. It then appears in
the analysis or report window. Since the JPG file is recorded with the temperature
data, you can analyze it like a thermal image. If you click on No, the merged image is
displayed in the analysis or report window without being saved.
Click on Cancel to terminate the fusion operation.
4.4
Modify analysis tools
Place the cursor on a drawing (point, line, circle, rectangle, polygon, or polyline) to
resize it or move it when none of the «analysis tool» shortcuts is selected. The
following cursor shapes indicate the operation you can perform on a selected
drawing.
Move a point – press the left mouse button and hold it down to drag the selected
point. Release the button when the point reaches the desired location.
Move a line – press the left mouse button and hold it down to drag the selected
line. Release the button when the line reaches the desired location.
Rotate/Resize a line (operation possible from either end of the line) – press
the left mouse button and hold it down to pivot or resize the selected line. Release
the button when the modification is terminated.
Move a rectangle – press the left mouse button and hold it down to drag the
selected rectangle. Release the button when the rectangle reaches the desired
location.
Resize a rectangle – press the left mouse button and hold it down to
modify the size of the selected rectangle in the direction indicated by the arrow.
Release the button when the operation is terminated.
Move a circle – press the left mouse button and hold it down to drag the selected
circle. Release the button when the circle reaches the desired location.
Resize a circle – press the left mouse button and hold it down to modify the
size of the selected circle in the direction indicated by the arrow. Release the button
when the operation is terminated.
Move a polygon – press the left mouse button and hold it down to drag the
selected polygon. Release the button when the polygon reaches the desired location.
Move a summit of a polygon – press the left mouse button and hold it down to
move the selected summit of the polygon. Release the button when the summit
reaches the desired location.
23
Add summits to a polygon – press the left mouse button and hold it down on the
point where you want to add a summit to the selected side; move the cursor to move
the summit to the desired location. Release the button when the summit is in place.
Move a polyline – press the left mouse button and hold it down to drag the
selected polyline. Release the button when the polyline reaches the desired location.
Move the summits of a polyline – press the left mouse button and hold it down
to move the selected summit of the polyline. Release the button when the summit is
in the desired location.
Add summits to a polyline – press the left mouse button and hold it down on the
point where you want to add a summit to the selected segment; move the cursor to
move the summit to the desired location. Release the button when the summit is in
place.
4.5
Export data
4.5.1 Thermal image
This function exports the temperature values of a selected image in a matrix of rows
and columns in TXT
,CSV, or Mic
range: the export data will be empty if the temperature value is outside the specified
range.
Remark: A file in CSV format can be opened in a text editor or in Microsoft Excel.
Exporting data is much faster in a CSV file that in an Excel file. For this reason,
exporting data in CSV format is recommended.
To export data, select “Data Export” in the Action menu.
24
4.5.2 Distribution
After generating a temperature distribution graph, you can click with the right button
on this graph to export the data in a CSV file.
4.6
Delete/Restore tools
4.6.1 Delete tools
This function deletes a selected analysis tool.
The tool can be deleted in two ways:
•
•
Click on “Delete tool” in the Writing tools menu
shortcut in the toolbar
Click on the
When the cursor takes the shape of a deletion tool ( Point,
Line,
Circle,
Rectangle,
Polygon,
Polyline), click with the left mouse button to suppress the
shortcut to terminate the deletion operation.
shape. Click again on the
4.6.2 Delete all tools
This function deletes all of the analysis tools inserted on the IR image.
This can be done in two ways:
•
•
Click on “Delete all tools” in the Writing tools menu
Right-click with the mouse on the IR image, then select “Delete all tools”
4.6.3 Restore tools (Analysis mode)
You can restore the various tools previously inserted, then deleted, in reverse
chronological order (the last item deleted is the first restored).
Restoration can be performed in two ways:
•
•
Click on “Restore tools” in the Action menu
Click on the
shortcut in the toolbar
25
03 - 2013
Code 693451A02 – Ed. 3
DEUTSCHLAND - Chauvin Arnoux GmbH
Straßburger Str. 34 - 77694 Kehl / Rhein
Tel: (07851) 99 26-0 - Fax: (07851) 99 26-60
SCHWEIZ - Chauvin Arnoux AG
Einsiedlerstraße 535 - 8810 Horgen
Tel: 044 727 75 55 - Fax: 044 727 75 56
ESPAÑA - Chauvin Arnoux Ibérica SA
C/ Roger de Flor N° 293, Planta 1- 08025 Barcelona
Tel: 93 459 08 11 - Fax: 93 459 14 43
UNITED KINGDOM - Chauvin Arnoux Ltd
Unit 1 Nelson Court – Flagship Square-Shaw Cross Business Park
DEWSBURY – West Yorkshire – WF12 7TH
Tel : 011628 788 888 – Fax : 01628 628 099
ITALIA - Amra SpA
Via Sant’Ambrogio, 23/25 - 20050 Bareggia di Macherio (MI)
Tel: 039 245 75 45 - Fax: 039 481 561
MIDDLE EAST - Chauvin Arnoux Middle East
P.O. BOX 60-154 - 1241 2020 JAL EL DIB (Beirut) – LEBANON
Tel: (01) 89 04 25 - Fax: (01) 89 04 24
ÖSTERREICH - Chauvin Arnoux Ges.m.b.H
Slamastrasse 29/2/4 - 1230 Wien
Tel: 01 61 61 961-0 - Fax: 01 61 61 961-61
CHINA - Shanghai Pu-Jiang - Enerdis Instruments Co. Ltd
3 F, 3 rd Building - N° 381 Xiang De Road - 200081 SHANGHAI
Tel: +86 21 65 21 51 96 - Fax: +86 21 65 21 61 07
SCANDINAVIA - CA Mätsystem AB
Box 4501 - SE 18304 TÄBY
Tel: +46 8 50 52 68 00 - Fax: +46 8 50 52 68 10
USA - Chauvin Arnoux Inc - d.b.a AEMC Instruments
200 Foxborough Blvd. - Foxborough - MA 02035
Tel: (508) 698-2115 - Fax: (508) 698-2118
http://www.chauvin-arnoux.com
190, rue Championnet - 75876 PARIS Cedex 18 - FRANCE
Tél. : +33 1 44 85 44 85 - Fax : +33 1 46 27 73 89 - [email protected]
Export : Tél. : +33 1 44 85 44 38 - Fax : +33 1 46 27 95 59 - [email protected]
26