1
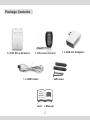
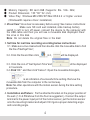
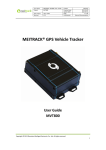
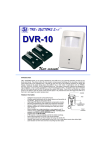
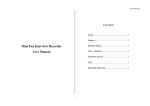
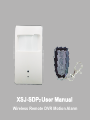
XSJ-SDP2 User Manual Wireless Remote DVR Motion Alarm Brief Introduction: This product is suitable to work with alarm system.It’s a brand new hi-tech product which can automatically take and save audios and videos of the area where alarm events occur.Helpful for evidence obtain.It has a wide application range such as home,office,hotel,marketplace,store, villa, museum and warehouse etc. and any other kind of places which needs special protection. The package mainly contains:1wireless DVR motion alarm,1 SD card (4G),1 USB cable,1 power adaptor and 1 remote. Please read below instructions carefully before using. Function Features: 1.Microcomputer intelligent control,steady performance and reliable quality; 2.Intelligent wide-angle detection, special temperature compensation circuit design,wireless signal transmission. 3.Remote arm and disarm,automatically generates and saves recorded videos.Each video file’s name is the starting time(year,month,date,hour,minute,second)of recording; 4.Remote emergency alarm,automatically generates and saves recorded videos. 5.Default(can be change according to special requirements)recording time for motion detection is 1 minute and max 9 minutes for remote recording; 6.4G default memory capacity and can be extended to 8G,16G,32G, automatic overwrite,data can be saves when power-cut,can connect with computers. 7.AC/DC both available,with rechargeable backup battery,backup battery supports up to 2 hours. 8.Workable at night with light with an extra device added.(Optional,AC power only) 9.Automatic indication of valid recording, easy for checking in time. 10.Can pair maximum 10 wireless sensors/remotes. 1 Package Contents 1 x PIR-SD w/Bracket 1 x Remote Control 1 x USB Cable 1 x USB AC Adapters 2xScrews User’s Manual 2 Product Preview: 1. Specifications: ● Power Input:100~240VAC 50HZ/60HZ ● Backup Battery:3.7V rechargeable Lithium battery ● PIR Detect:Wide-Angle:100° 8 * 8 m ● Static Current:< 60mA Working Current:< 110mA ● Wireless Frequency:433 / 868 MHZ(optional) ● Backup Battery Working Time:≤ 3 Hours ● Camera:1/6.5” OV CMOS Chip, 300,000 pixel ● Video Format:AVI ● Recording Speed:30 fps ● Resolution:640 × 480,Min. illumination: 0.1 lux ● Focal Length:8mm ● Viewing Angle:35°(Vertical) 60°(Horizonal) ● Transmission Mode:USB 2.0(Hs) ● Recording Time: 1 minute (can be customized) 3 ● Memory Capacity:SD card 4GB(Supports:8G、16G、32G) ● Product Dimension:103 * 60 * 32(mm) ● Video Play:Windows ME/ 2000/ XP/ Mac OS 9.2.2 or higher version (Windows98 requires driver installation) 2. Virus Clear: Virus clear is necessary before using!See below instructions: Make sure SD card well installed,slide backup battery switch to left to turn off power,connect the device to the computer with the USB cable and then you will see a moveable disk displayed.Clear the virus in this disk. Note: Do not delete the original files in the disk! 3. Set time for real time recording according below instructions: 3.1. Make sure virus cleared and then double click the moveable disk to find the file of“GetSysTime”; 3.2. Click the file and then click in it, will be displayed. 3.3. Click the icon of “Get System Time”and will be displayed in 3 seconds. 3.4.Click“OK”and then click“Cancel”. Open the moveable disk again, is an indication of successful time setting. Remove the moveable disk from the computer in the normal way. Note: No other operations with the motion sensor during the time setting procedure. 4. Installation and fixture:Fix the attached bracket on the proper position of the wall. (1.8~2.5M above from the floor is suggested.). Connect the output terminal to the power input port of the motion sensor, put the motion sensor onto the mounting bracket and adjust it till it gets a proper detecting angle and recording angle. 4 5. Turns on and Starts:Plug the power adaptor to the outlet after detecting angle and recording angle well adjusted. Slide the backup battery switch to right to turn on the battery, the device will get into standby mode after a red light keep on for 30 seconds and then off. 6. Arm: Press arm key on the remote, the device has one beep and then gets into standby mode after 8 seconds. 7. Disarm: Press disarm key on the remote, the device has two beeps and disarm the device immediately. 8. Automatic recording: It will start a 1 minute on-site audio and video recording upon motion trigger when standby. A red light will keep flashing all the time when recording and will off automatically after finish recording. Files will be saved automatically with a name including the starting time and stopping time of recording. 9. Emergency recording: Press emergency key on the remote, the device will start recording without sound indication. The maximum recording time is 9 minutes. A red light will keep flashing all the time when recording and will off automatically after finish recording. Files will be saved automatically with a name including the starting time and stopping time of recording. 10. Recording Indication: a. A blue light will keep on for around 50 seconds after each recording finished. b. Every time when you disarm the armed device, a solid blue light for around 50 seconds means there are some new recorded file after last arm activity. If pressing arm key, this function will be invalid automatically. 11. Playback the video files: A. Take the SD card out from the device when standby and inset it to the computer, you can click and playback the recorded files in the moveable disk. Then remove the SD card from the computer in normal way and insert it to the motion sensor directly. B.Turn off the backup battery switch of the motion sensor and connect it to the computer with the USB cable, you can click and playback the recorded files in the moveable disk. Note1. No any other operations while reviewing the video files. 5 2. Need to install supported video player , such as Storm Player, Kmplayer,Mplayer. 3. Need to set the time according to the time setting instructions every time before you remove the alarm from the computer. 12. To add wireless accessories: Press study button on the back side of the motion alarm, after hear a beep, trigger the wireless accessories twice consecutively, the motion alarm has 5 beeps means the wireless accessory is successfully paired; 2 beeps means failure. If no study operations within 20 seconds, the motion alarm beeps twice and escape from learning model. 13. To delete wireless accessories: Keep pressing the study button for 5 seconds and release, the motion alarm makes a long beep (around 3 seconds) means successful deleting. All paired wireless accessories will be deleted one time. Cautions 1. Please abide by the applicable laws and regulations. Do not use this unit for other illegal purposes or you should bear all responsibility. 2. Please do not use it at the ambient humidity which human can not fit and do not place it in a humid operating condition, his product is not waterproof. 3. Please do not face the camera to the sun or other strong light to avoid damaging optics parts. 4. Please do not use it under a dusty condition so as to keep its lens and other parts from dust or void video affection. 5. Please clean the lens with lens wiping paper or glass towel periodically. 6. This product is precision electronic product and do not make it subject to any impact or strong shake, do not use in strong magnetic field or electric field. 6