1
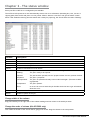
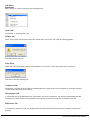
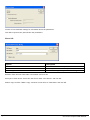
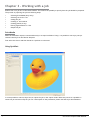
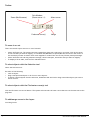
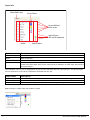
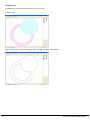
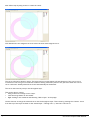
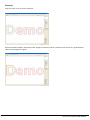
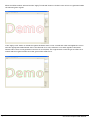
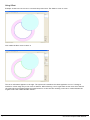
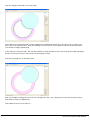
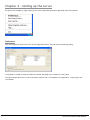
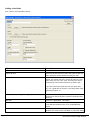
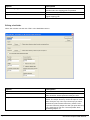
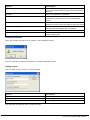
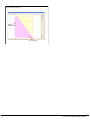
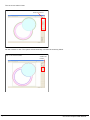
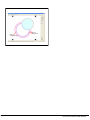
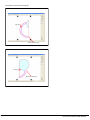
Océ ProCut Prepress
USER MANUAL
Introduction
Introduction to Océ ProCut Prepress workflow software
The Océ ProCut Prepress software described in this manual is a workflow software package used to help prepare
graphics (print files) to be finished with computerized X/Y cutting and milling machines. The software is a true client and server solution compatible with both Windows and Macintosh computers and is engineered to guide users
through a few, but necessary steps of file preparation before processing a given job. Printed files to be trimmed and/
or contour cut needs certain preparation in order to be perfectly finished. The Océ ProCut Prepress software has all
of the necessary tools to assign different tool tasks (routing, creasing, kiss-cutting, through-cutting, etc.) to different
curves in a job, to split jobs into panels, offsetting curves to make sure to cut inside the printed area or to compensate for a router bit, insert registration marks for vision registration and insert barcode(s) for efficient and error free
finishing. Typically, Océ ProCut Prepress can be used to prepare all jobs to be processed with the digital finishing
machine, despite type of RIP and printer – thereby achieve one workflow solution for all the jobs.
About this manual
This manual contains information on how to install and setup Océ ProCut Prepress in a typical production environment as well as detailed description of all of the menu points and functions in the software. In addition, the manual
includes appendixes with job examples and guidance on how to connect to peripheral software such as Onyx and
I-Cut. It is recommended to read through this manual before installing and configuring your system. To get an overview of the manual – use the “bookmarks” section in Adobe Acrobat.
To improve the package, we would very much like to have your input and feedback in regards to the Océ ProCut
Prepress software - new ideas, features, changes, etc are most welcome.
Zünd Skandinavien ApS
Knudsminde 4B
DK - 8300 Odder
Tel.: +45 87 80 22 70
Fax.: +45 87 80 22 71
www.zund.dk
[email protected]
© Copyright 2002 – 2005 by Zünd Skandinavien ApS
All rights reserved. No part of this publication may be reproduced, stored in a retrieval system or transmitted, in any form or by any means
electronic, mechanical, photocopy, recording or otherwise, without the prior written permission of the publisher. The information in this
manual is subject to change without notice and does not represent a commitment on the part of Zünd Skandinavien ApS
In no event will Zünd Skandinavien ApS, be liable for any damages including lost data, lost profits, cost of cover or other special, incidental,
consequential or indirect damages arising from the use of the program however caused and on any theory of liability. This limitation will apply
even if Zünd Skandinavien ApS, or an authorized dealer or distributor has been advised of the possibility of such damage.
Page 2
Océ ProCut Prepress USER MANUAL
Chapter 1 – Entering new jobs into the system
Acceptable file types:
The system is able to accept three types of files.
1) PDF Files (Version 1.3 -> 1.6 without any passwords)
2) EPS Files (All)
3) AI files with “Create PDF compatible file” on (Version 10 -> CS2)
Where to save/copy files:
The files are either saved directly into the hotfolder or copied/moved into the hotfolder. The hotfolder can be found
by opening the servers preference and then open the relevant hotfolder.
The hotfolder can be found under “Import directory”.
All curves will be extracted from the file and the file is removed from the directory when it is imported.
Using spot colours:
If there is curves in the EPS/PDF with spot colour that matches the names of the layers defined in the Océ ProCut
Prepress server, then these curves will be placed automatically in the corresponding layers of job.
It does not matter if it is the stroke or fill that matches the layer names.
When testing the spot colour names all test will be case insensitive and any spaces will be ignored.
As an example where the spot colours in Adobe Illustrator are created as swatches.
Page 3
Océ ProCut Prepress USER MANUAL
Using layers:
When using Illustrator it is possible to define layers with names that matches the layer names in the server preference. All curves in these layers will automatically be copied into the jobs layers with matching names.
Page 4
Océ ProCut Prepress USER MANUAL
Chapter 2 – The status window
Place your EPS or PDF file in a configured input hotfolder.
The Océ ProCut Prepress server will automatically extract the curve information (bounding box, text, line art or
clipping path) from the file and place it in the job list. When it detects a new file it will get the status “Initial”.
When it has finished extracting the information and is ready for preparing, the file will have the status “Waiting”.
Column
Description
File Name
The name of the file entered in the queue
Device
Name of the hotfolder that the file is entered in
File Size
Size of the file in megabytes
Dimensions
Size of the unscaled job
Curves
Number of extracted curves in the file
Status
Initial:
New job found in a hotfolder and curves are being extracted.
Waiting:
The job is ready to be opened.
Opened:
The job has been opened, but the “prepare button” has not yet been clicked.
Prepared:
The job is “prepared”.
Uncompressed:
The job is un-packed and ready to be worked with again. (The same as Waiting/Opened).
Compressed:
The job is packed.
Error:
An error has occurred with this job. Double-check the line to get information
about the error.
Date
Time where the file is entered in the queue
Panels
Number of panels in the job
Change width of the column
Drag the boundary on the right side of the column heading until the column is the width you want.
Change the order of column (Win XP/2000 only)
Click inside the header of the column that is going to be moved. Drag the column to the new position.
Page 5
Océ ProCut Prepress USER MANUAL
Job Menu
Right clicking of a job line will bring the following menu
Open Job
See Chapter 3 – Working with a job
Delete Job
Select one of more jobs and then select the “Delete Job” menu point. For each job a dialog appears
Click OK to delete this file.
View Error
Select the job in error state and then either double click the line or select the menu point “View Error”.
Click OK to close the message box.
Compress Job
Compresses a Job and moves the file to the Backup directory setup in the servers preference. From this directory
the file can be backed up and removed.
Uncompress Job
A compressed job in the Backup directory specified in the servers preference can be uncompressed and thereby
restored to the state before the compression. After the job is restored the job will act like any other job.
ReProcess Job
It is possible to reprocess a job, specifying parameters that override the values from the hotfolder in the server
program.
Page 6
Océ ProCut Prepress USER MANUAL
See the servers hotfolder settings for information about the parameters.
Click OK to reprocess the job with the new parameters.
Move Job
Option
Description
New Name
Name of the renamed or copied file
New Device
Device to put the renamed or copied file under
Make a copy
Click to make a copy else you will be renaming the file
Rename: Enter the new name under “New Name” and click OK.
Move job to other device: Select the new device under “New Device” and click OK.
Make a copy: Click the “Make a copy” and enter a new name in “New Name” and click OK.
Page 7
Océ ProCut Prepress USER MANUAL
Chapter 3 – Working with a job
Double-Click on a job line in the status window. This creates the possibily to specify how the job should be prepared.
The process of preparing the job has following steps:
•
•
•
•
•
•
•
Selecting Print/Media (Onyx only)
Selecting curves for I-Cut
Scaling the job
Creating in- and outlines
Creating panels (if any)
Placing registermarks for I-Cut
Output the job
Print/Media
When the hotfolders output is connected directly to an input hotfolder of Onyx, it is possible to set Onyx print parameters directly from Océ ProCut Prepress.
First select the device and then decide if a quickset is to be used.
Using QuickSet:
It is now possible to instruct Onyx how to output the job on the output media. Below the picture it is possible to
rotate the job and mirror/flip the job. For a description of the parameters please read the Onyx documentation.
Page 8
Océ ProCut Prepress USER MANUAL
Not using QuickSet:
It is now possible to instruct Onyx how to output the job on the output media. Below the picture it is possible to
rotate the job and mirror/flip the job. The Media and Mode can now be set directly from Océ ProCut Prepress. For a
description of the parameters please read the Onyx documentation.
Page 9
Océ ProCut Prepress USER MANUAL
Curves
Click the Curves tab.
Curves Layout
Toolbar
Navigation
Tabs
ToolTip
Visibility
of background
Workarea
LayerInfo
Curve
Information
The layout is split up into following parts.
Navigation Tabs
Toolbar
Visibility of background
Layer Info
Curve information
Workarea
ToolTip
Navigation Tabs
Click on one of the tabs to move to the next process. Normally it is best to move from left to right to get the job
handled correctly
Page 10
Océ ProCut Prepress USER MANUAL
Toolbar
Zoom (like Illustrator)
Fit In Window
(Zoom out to 1:1)
Select curves
Find outer curve(s)
Merge
To zoom in or out
There are several ways to zoom in or out of artwork.
• Select the Zoom tool. The pointer becomes a magnifying glass with a plus sign in its center. Click in the center
of the area that you want to magnify, or hold down Alt (Windows) or Option (Mac OS) and click in the center of
the area that you want to reduce. Each click magnifies or reduces the view to the previous preset percentage.
• Select the Zoom tool and drag a dotted rectangle, called a marquee, around the area you want to magnify.
• To display a file at 100%, click the Fit In Window button.
To select objects with the Selection tool
Select the Selection tool.
Do
•
•
•
either of the following:
Click an object.
Drag a marquee around part or all of one or more objects.
To add or remove objects from the selection, hold down Shift and click or drag around the objects you want to
add or remove.
To select objects with the Find outer curve(s) tool
Click the Find outer curves tool button. The system will now select all outer curves that are not the same size as the
page size.
To add/merge curves to the layers
See Using Curves
Page 11
Océ ProCut Prepress USER MANUAL
Visibility of background
It is possible to adjust intensity of the picture in the background to help selecting curves. By moving the slider to the
left the image will disappear more and more and the opposite when moving to the right.
Description
Slider
Result
Full intensity
Intermediate intensity
No intensity
Page 12
Océ ProCut Prepress USER MANUAL
Layer Info
Show/Hide Layer
Curve Colour
Layers defined
from server
Special layers will not be exported
Name
Select Colour
Column
Description
Show/Hide Layer
Double click to show or hide curves in the layer
Name
Name of the layer
Curve Colour
All curves in this layer will be displayed in this colour. Double click box to change the colour
Select Colour
All selected curves will be displayed in this colour. Double click to change the colour. All selected curves have same select colour. Also used as an indication of which layer the selected
curve(s) belong to.
Layers defined in the server are displayed at the top and the last three layers are special layers. The special layers
are not exported to I-Cut and are information extracted from the job.
Layer name
Description
PageSize
Contains one curve. If the job is an EPS then it has the size of the bounding box.
Curves
All other curves extracted from the job
Image
The background image. Normally only used for turning the image on/off
Right clicking on a layer name will produce a popup
Page 13
Océ ProCut Prepress USER MANUAL
Page 14
Menu point
Description
Hide Curves
Hide all curves in this layer
Delete All Curves
Delete all curves in this layer
Delete Selected Curves
Delete all selected curves in this layer
Select All Curves
Select all curves in this layer
Change Colour
Opens a dialog where a new colour for all curves in this
layer is selected.
Change Select Colour
Opens a dialog where the colour for all selected curves
is choosen. The colour is common to all layers.
Océ ProCut Prepress USER MANUAL
Curve information
Last curve information
Last curves stroke colour
Last curves fill colour
Part
Description
Last curve information
The path is open or closed and how many curve points the path contains.
Last curves stroke colour
Displays the colour of the stroke in the small rectangle and displays the values of the
colour. If the curve is a clippath it is displayed as well.
Last curves fill colour
Displays the colour of the fill in the small rectangle and displays the values of the
colour.
ToolTip
Contains a short help text with a description of the most important possibilities.
Page 15
Océ ProCut Prepress USER MANUAL
Workarea
Here all curves are shown that are extracted from the job as well as a preview of the original job placed in the
background.
Right clicking inside the workarea will produce a popup menu.
Page 16
Menupoint
Description
Undo ...
Undo a function
Redo ...
Redo a function
Delete Selected Curves
All selected curves are deleted. Undo possible. Pressing
“Delete” button does the same function
Select all with same stroke color
Select all curves that has the same stroke color as described in the “Curve Information” part.
Select all with same fill color
Select all curves that has the same fill color as described in the “Curve Information” part.
Find outer curves
Find outer curves of the job that are not the same size
as the page size
Add to layer
See Using curves
Join Curves
The system will try to join as many of the selected open
curves as possible. If start and end points of a curve are
the same the curve will be automatically closed.
Océ ProCut Prepress USER MANUAL
Using Curves
A walkthrough of some of the functions in the Curves tab.
A sample job:
Which should end up with the following result. Through Cut=Red, Kiss Cut=Blue.
Page 17
Océ ProCut Prepress USER MANUAL
Now follows step by step process to create the result.
Click between the two magenta curves to select the outer most magenta curve.
The curve will now be shown in green. The layers and curve information will help detecting if the correct curve
is selected. If the wrong curve is selected continue clicking in different places in the job to see when the correct
curve is selected. Already selected curves will automatically be deselected.
The curve must now be put up in the throughcut layer.
This can be done in 3 ways:
• Using a shortcut to merge it into a layer.
• Click the merge button in the toolbar.
• Right clicking in the workarea and selecting “add to layer” in the popup.
Use the shortcut to merge the selected curve into the throughcut layer. This is done by pressing the 1 button. Count
from the top of the layer list down to the wanted layer. “Through Cut”=1, “Kiss Cut”=2 and so on.
Page 18
Océ ProCut Prepress USER MANUAL
The curve is then added to the Through Cut layer and drawn in the colour specified in the Through Cut layer (Red).
Click inside the cyan curve to select it.
It is now possible to use the 1 button again to get the wanted result, but using the toolbar or popup to add the
curve to a layer will bring additional possibilities. Click the toolbars merge button.
A “Add to layer” dialog will be displayed. Select wanted layer. Select the “Merge” checkbox to merge/combine the
two curves.
Page 19
Océ ProCut Prepress USER MANUAL
The two curves are now combined into one curve in the throughcut layer.
To create a curve that helps cutting out the white area inside the job. The program has a function to create the
wanted curve. It works a little like “Minus Back/Subtract” in pathfinder in Illustrator. It will create a curve out of the
“white” by combining all the curves that create the white area. Ctrl-click inside the white area to create the curve
The created curve is placed in the layer “Curves”. Press the 2 button to move it to Kiss Cut.
All curves are now created to give the wanted result.
Page 20
Océ ProCut Prepress USER MANUAL
The result:
Page 21
Océ ProCut Prepress USER MANUAL
Scale
It is important to scale the job in Océ ProCut Prepress to the final output size and not in the rip. If the job is scaled
afterwards in the rip, registrations marks and tool offsets will no longer be correct size.
Scale Layout
Toolbar
Navigation
Tabs
Visibility
of background
JobSize Info
Workarea
The dialog is build the same way as the Curves tab except the JobSize part.
JobSize Info
The “Width” and the “Height” are the total size of the selected curves from the Curves Tab. The Scale will default
to 1 when the job is first opened.
Page 22
Océ ProCut Prepress USER MANUAL
When a scale 2 is entered the width and height of the curves are automatically calculated.
If a specific size is needed (like width 200 mm) just key the value in and the other two values are calculated automatically. Please observe it is NOT possible to distort the image by having a different scale in width and height.
Page 23
Océ ProCut Prepress USER MANUAL
Offset
In the Offset tab it is possible to compensate for a tool diameter or to cut a little inside of the image to avoid having
“white/unwanted” areas in the final job.
Offset Layout
Toolbar
Navigation
Tabs
Visibility
of background
LayerInfo
Curve
Information
ToolTip
Workarea
Size
Information
Again the layout is the same as in the Curves tab except from the right hand side.
The special parts:
Layer Info
Curve Information
Size Information
Workarea
Layer Info
Click on the layer name to active the layer.
Page 24
Océ ProCut Prepress USER MANUAL
Curve Information
Setting resulting
CurveType
Tolerance when
using Thin
Offset distance
from the
original curve
Apply changes to
the selected curves
in the layer
Apply changes to
the ALL curves
in the layer
Tolerance is used when using Thin Inside/Outside. The resulting thinned curve is created with the specified tolerance
inside or outside the original curve. The thin option is normally only used if the original curve contains a lot of curve
points (reduced cut speed).
Distance is used when offsetting inside or outside. The resulting offset curve is created with the specified distance
to the original curve.
Page 25
Océ ProCut Prepress USER MANUAL
Example:
Only the outer curve of the D is selected
When the Offset Outside is selected and the “Apply To Selected” button is clicked a new red curve is generated outside the selected green original.
Page 26
Océ ProCut Prepress USER MANUAL
When the Offset Inside is selected and the “Apply To Selected” button is clicked a new red curve is generated inside
the selected green original.
If the “Apply to All” button is clicked the system calculates which curves is inside each other and applies the curves
with the appropriate Inside/Outside value. The selected curve is the reference curve with regards to the Inside/
Outside value. There is now generated a new set of curves (Red). The original inside curves has got an offset curve
outside and the original outside curves has got an offset inside curve.
Page 27
Océ ProCut Prepress USER MANUAL
Size Information
Width and height
of the resulting curves
generated from the
selected curves
Width and height of the
resulting curves in the
selected layer
Total width and height of
all the resulting curves in
all layers
Page 28
Océ ProCut Prepress USER MANUAL
Workarea
Curves in other layers are
drawn as dashed black lines
Curves in current selected layer
are shown with the layer colour
from the Curves Tab
It is only possible to select curves in the current layer. After selecting one or more curves it is possible to alter
them. As default none of the curves are offset or thinned.
Page 29
Océ ProCut Prepress USER MANUAL
Using Offset
Example: Create two new curves to cut inside the printed area. The distance is set to 4 mm.
Click inside the blue curve to select it
The curve information appears to the right. The system will remember the values applied to curve if a change is
needed on a later stage. Key in the 4 mm in distance. When selecting a curve type think on this curve alone without
the system knowing anything about the image behind it. In this case the resulting curve has to created outside the
original. Select the “Offset outside” button.
Page 30
Océ ProCut Prepress USER MANUAL
Click the “Apply to selected” to see the result.
The original curve is still selected if further adjustment is needed and a new curve (the blue one) is created. The
blue curve is the resulting curve. Only the resulting curves will be cut. The original curves will not be exported to
I-Cut unless CurveType equals None.
In the sizes the “Selected Layer” has now the resulting curve(s) (the blue curve in this case) as the width and height,
but the “Selected Curve(s)” is still the size of the original curve(s)
Click the “Through Cut” in the Layers part.
Now it is possible to change the curves in the “Through Cut” layer. The resulting curve from the “Kiss Cut” layer is
now shown in black as a dashed line.
Click inside the red curve to select it.
Page 31
Océ ProCut Prepress USER MANUAL
Now the sizes reflect the new layer and the selected curve. This time the resulting curve has to be inside the original curve. Again with the 4 mm distance this gives the following result when “Apply To Selected” is clicked.
The resulting red curve is now generated inside the original curve. The sizes are also now reflecting the change.
The printed size of 200 mm in width that was ordered is now reduced to 192 mm (200 mm - 2 * 4 mm). The 192 is
the final size the job will have after cutting. In other words the 200 mm print width is reduced when cutting to 192
mm cutting width.
Page 32
Océ ProCut Prepress USER MANUAL
Panels
Panels Layout
Navigation
Tabs
Max Panelsize
Oversize
Workarea
Panel
Status
Special sections:
Max Panelsize
Oversize
Panel Status
Workarea
Page 33
Océ ProCut Prepress USER MANUAL
Max Panelsize
Select manuel or automatic panellayout
Size of max panel
Page 34
Column
Description
Manuel PanelLayout
If this is not selected the panels will automatically be adjusted to the specified
values. This will create uniform panels.
Max PanelSize Width
Maximum width a panel is allowed to be
Max PanelSize Height
Maximum height a panel is allowed to be
Océ ProCut Prepress USER MANUAL
Oversize
Oversize type
Distance
Column
Description
Oversize Type
Where the oversize is placed.
Oversize Width
Width of the oversize
Oversize Height
Height of the oversize
There is the following possibilities for placing the oversize:
Oversize types
Page 35
Column
Description
None
The job printed is the same size as the cutting curves.
Inside
Mainly used for rectangle jobs. See Sample 1 and Sample 2
Outside
Used if the cutting curves are created completely in the design programs. Enter the value of the extra space around the job that is needed when printing.
See Sample 4
Océ ProCut Prepress USER MANUAL
Column
Description
Auto
The system automatically calculates the oversize based on the amount the
cutting curves has been offset inside. See Sample 3 . If the curves are without
offset or made outside the values will be zero. Use “Outside” to create additional printed space around the job.
Panel Status
When the cursor is moved inside or on the border between two panels the info below will be updated accordingly.
Overlap/Gap info
Left or top
panel info
Right or bottom
panel info
Page 36
Area
Description
Overlap/Gap
If there is an overlap or gap between the panels this is
the amount.
Left/Top and single panel info
Size of the panel.
Right and bottom panel info
Size of the panel.
Océ ProCut Prepress USER MANUAL
Workarea
Workarea
Oversize bounding box
(Dashed green line)
Cutting curves
Panel size/cutting curves bounding box
(Dashed yellow line)
Right clicking inside workarea
There is two types of popup menus that will be displayed. One when the cursor is inside a panel and the other
where cursor is on a panel border (Cursor changes to two small arrows).
Panel popup
Page 37
Menu point
Description
Edit Panel
See Edit Panel
Split column into two
Split this panel column into two columns where the cursor was when right
clicking. The split is vertical.
Split row into two
Split this panel row into two rows where the cursor was when right clicking.
The split is horizontal.
Océ ProCut Prepress USER MANUAL
Overlap popup
Menu point
Description
Edit Overlap
See Edit Overlap
Join Panels
Two rows/columns of panels are joined together to create one row/column of panels
Dragging panel borders
When the cursor is placed over a panel border the cursor changes shape to two small arrows. It is then possible to
click and drag the border of the panels up/down or left/right.
Edit Panel
Panel Size Layout
Option
Description
Panel Width
Width of all panels in this column.
Panel Height
Height of all panels in this row.
The bottom left corner of the selected panel does not move. The top right corner is adjusted to match the values
entered. The column to the right of the current column is automatically adjusted. The row above the current row is
automatically adjusted.
Page 38
Océ ProCut Prepress USER MANUAL
Edit Overlap
Overlap Layout
Option
Description
Overlap Type
Use Overlap if the final output after cutting need to
have a mounting overlap.
Use Gap if the panels have a metal profile between
them.
Size
Size of Overlap/Gap
Using Panels
See Appendix F - Samples
Page 39
Océ ProCut Prepress USER MANUAL
Register marks
The registration marks are used for the I-Cut camera.
Regmarks Layout
Toolbar
Navigation
Tabs
Visibility
of background
Workarea
ToolTip
Regmark
Information
Size
Information
Again the layout is the same as in the Curves tab except from the right hand side.
Regmark information
Size information
Workarea
Regmark information
Navigate to Next/
Previous Panel
Generates register marks
Distance from curves to
regmarks generated
with “Auto Marks”
Size of all register marks
(the round part of the mark)
Distance between regmarks
generated with “Auto Marks”
Page 40
Océ ProCut Prepress USER MANUAL
If the job has multiple panels it is possible to navigate to between the panels by clicking the Next/Previous Panel
buttons. All panels will by default have registration marks with the size specified in “Register mark diameter” in
each corner. This is what is called “Corner Marks”.
Clicking the “Auto Marks” will create registration marks with the size specified in “Register mark diameter”. All
marks will be generated with a distance of “Distance from curve” from the curves. Specify the distance between the
regmarks in the “Distance between” input field.
By control clicking the buttons the generated marks will be negative.
Size information
Width and height
of the printed panel
Total width and height
of the printed panel
including registration marks
Workarea
Clicking inside the workarea adds an extra register mark in the mouse position. The circle will have the diameter as
specified in “Registermark diameter”. A negative mark will be generated is the Ctrl key is pressed while clicking in
the workarea.
To remove a registermark hold down shift while clicking inside the registration mark.
Page 41
Océ ProCut Prepress USER MANUAL
Using Registermarks
As default the registration marks are placed in the corners
If the “Auto Marks” is clicked a number of registration marks is generated around the job.
Page 42
Océ ProCut Prepress USER MANUAL
Each time the “Auto Marks” is clicked, registration marks will be placed in a different position
Click the “No Marks” remove all registration marks.
Click inside the workarea to manually add a register mark.
Page 43
Océ ProCut Prepress USER MANUAL
Click again to create a second mark
Click again to add a third register mark
Page 44
Océ ProCut Prepress USER MANUAL
Because the third mark increased the “Total” size, remove the mark again by clicking inside it while holding down
the shift key.
Click again in a different position to add the third register mark without changing the total size this time.
Page 45
Océ ProCut Prepress USER MANUAL
Output
Now the job is basically ready to be produced. The tab is displayed in two different ways.
Output Layout (Not Onyx)
Navigation
Tabs
Output
Options
Workarea
Output Layout (Onyx)
Navigation
Tabs
Output
Options
Workarea
Page 46
Océ ProCut Prepress USER MANUAL
It is the “Type” in the Output section and the system configuration that allows the different options.
Output Options (Not Onyx)
Name of the output
and outputtype
Select type of barcode
Clicking the Prepare
produces the outputfile
Select the barcode output. See Appendix D - Barcodes to see the possibilities.
Page 47
Océ ProCut Prepress USER MANUAL
Output Options (Onyx)
The name of the output,
output type and
number of copies
Select position of
barcode(s)
Entered values from
Print/Media tab
Click the Prepare button
to produce outputfile
Specify the number of copies of the panel and select position of barcodes. See Appendix D - Barcodes .
Page 48
Océ ProCut Prepress USER MANUAL
Chapter 4 - Setting up the server
All options are available by right clicking on the server application placed on right hand side of the task bar
Preference
Click the preference menu point in the servers application menu. This will open the following dialog
It is possible to create as many hot folders as needed. Normally one is created for each printer.
The layers should relate one to one to the layers define in the I-Cut template. See Appendix B – Connecting to the
I-Cut-system.
Page 49
Océ ProCut Prepress USER MANUAL
Adding a hotfolder
Click “Add” in the Hotfolders section.
Option
Description
Device Name
Enter the name to identify this hotfolder system
Import Browse
Select/create the directory where new jobs for this hotfolder should be saved/copied/moved by the user
Output Browse
Select/create the directory where output is to be
placed. The output directory can be the input of a hotfolder from your rip. If the rip is from Onyx you select
the directory that contains a directory named “Info”.
If you use to directly output into the rips input directory it is a good idea to click the “use temp folder while
generating output” on.
Page 50
Use temp folder while generating output
When selected the output will be completed at a temporary place and the final file copied to the destination
directory
Barcode
Please see “Appendix D - Barcodes“
Connect tolerance
When the distance between endpoints of an open curve
is less that this tolerance the curve is automatically
closed
Remove extra curves
Remove extra curves that the system does not think is
needed. The value can be overridden in reprocess dialog
Océ ProCut Prepress USER MANUAL
Option
Description
Optimize clipping paths
If “On” and the number of curve points exceeds the
specified value the clipping path is optimized
Optimize when points exceed
Number of curve points
Optimize tolerance
Max distance the optimized curve must differ from the
original clipping path
Editing a hotfolder
Select the relevant row and click “Edit” in the Hotfolders section.
Page 51
Option
Description
Device Name
Enter the name to identify this hotfolder system
Import Browse
Select/create the directory where new jobs for this hotfolder should be saved/copied/moved by the user
Output Browse
Select/create the directory where output is to be
placed. The output directory can be the input of a hotfolder from your rip. If the rip is from Onyx you select
the directory that contains a directory named “Info”.
If you use to directly output into the rips input directory
it is a good idea to click the “use temp folder while
generating output” on.
Océ ProCut Prepress USER MANUAL
Option
Description
Use temp folder while generating output
When selected the output will be completed at a temporary place and the final file copied to the destination
directory
Barcode
Please see “Appendix D - Barcodes“
Connect tolerance
When the distance between endpoints of an open curve
is less that this tolerance the curve is automatically
closed
Remove extra curves
Remove extra curves that the system does not think is
needed. The value can be overridden in reprocess dialog
Optimize clipping paths
If “On” and the number of curve points exceeds the
specified value the clipping path is optimized
Optimize when points exceed
Number of curve points
Optimize tolerance
Max distance the optimized curve must differ from the
original clipping path
Deleting a hotfolder
Select the relevant row and the click “Delete” in the Hotfolders section.
Click the Yes button to delete the hotfolder. To keep the hotfolder click No
Adding a layer
Click the “Add” in Layer section to open this dialog
Option
Description
Enter New LayerName
Enter the layer name that is used in I-Cut
Onyx LayerName
Enter the layer name that is used in Onyx
Wasatch LayerName
Enter the layer name that is used in Wasatch
Click OK when the editing is done to create the layer
Page 52
Océ ProCut Prepress USER MANUAL
Editing a layer
Click “Edit” in the Layer section to open this dialog
Option
Description
Enter New LayerName
Enter the layer name that is used in I-Cut
Onyx LayerName
Enter the layer name that is used in Onyx
Wasatch LayerName
Enter the layer name that is used in Wasatch
Click OK when the editing is done to save the changes to the layer
Deleting a layer
Select the relevant row and the click the Delete in the Layers group.
Click the Yes button to delete the layer. To keep the layer click No
Using Ghostscript®
Please see Appendix E - Using Ghostscript®
Change barcode type
Please see Appendix D - Barcodes
Page 53
Océ ProCut Prepress USER MANUAL
Set Control Word
Key in the control word provided by your software provider and click OK. The system will validate the control word
and report back if the word has been entered correctly.
See Log file
Opens the servers log file in the default “.txt” editor. This log file contains every action the server makes.
About Océ ProCut Prepress server
The servers TCPIP address(es) is displayed in the About dialog.
If the server program detects the dongle the HaspID is displayed as well. If the dongle is not detected the server will
only work in demo mode. In demo mode it is not possible to prepare any jobs.
Help
Open this file.
Page 54
Océ ProCut Prepress USER MANUAL
Appendix A – Installation and configuration of Océ ProCut Prepress
Planning an installation
It is recommended to install the SW programs involved in Océ ProCut Prepress workflow
In following order.
Decide which machines are involved in configuration.
PC workstations, Mac workstations, I-cut PC, and RIP stations
Check, and make list of all IP addresses to use when setting up
Océ ProCut Prepress client/server.
On the RIP station share the hotfolders needed for Océ ProCut Prepress server
If Onyx are used all Quicksets must be generated so correct media/device list is shown in Océ ProCut Prepress
Install Océ ProCut Prepress server and make configuration of all printer devices involved.
Make sure that shared folders are visible on both PC and Mac.
Also make I-cut matching tools names for export to I-cut.
Install Océ ProCut Prepress client on all PC and Mac where client is needed.
Install I-cut and make the necessary steps of setting up I-cut to work with import files from Océ ProCut Prepress.
Page 55
Océ ProCut Prepress USER MANUAL
Page 56
Océ ProCut Prepress USER MANUAL
IP: 192.168.0.12
WIN XP
IP: 192.168.0.13
Mac OSX
IP: 192.168.0.14
MAC OSX Tiger
Map the shared folder //servername/printer-out (this is the prepare-it output
folder
PDF and EPS files with registermarks and barcode for printing)
Special Onyx hotfolder can also be setup via prepare-it server see
manual.
RIP server:
Onyx – Wasatch – Colorburst – HP – Caldera - etc.
Workstation Win2000/XP - Mac OSX/Tiger
DHCP allowed, but must be in same Subnet as prepare-it server
Map the shared folder //servername/printer-in (this is the prepare-it hotfolder where PDF and EPS files are copied to)
Specify in prepare-it client the prepare-it server ip address 192.168.0.10
IP: 192.168.0.11
Win2000
UV Printers:
Zünd – Durst – Nur –
Vutek – Scitek – Inca etc.
Inkjet Printer:
HP – Roland – Mimaki Seiko – Mutoh - etc.
I-cut equiped X-Y finishing
machine
Serial rs232
I-cut computer Win2000/XP
Map shared prepare-it folder //servername/cutfiles
Configure I-cut to import from mapped folder (see manual)
Prepare-it server
Shared hotfolders from prepare-it
and I-cut cutfiles
//servername/printer-in
//servername/printer-out
//servername/cutfiles
Win 2000/XP with Static IP
IP: 192.168.0.10
Sub: 255.255.255.0
Installing the server on Windows XP/2000
Installing the Océ ProCut Prepress Key
Océ ProCut Prepress will not function without hardware key. The key protects Océ ProCut Prepress from being unlawfully copied and must be connected to your Server computer whenever you use Océ ProCut Prepress. You should
always keep the key plugged in your Server. If no key are inserted, Océ ProCut Prepress will run in demo-mode.
To install the Océ ProCut Prepress key
Plug the hardware key into the USB port on the Server.
Installing Océ ProCut Prepress
Insert the Installation CD in your CD-drive. The installation program will automatically start the wizard.
To continue, click Next
Page 57
Océ ProCut Prepress USER MANUAL
Select folder where Setup will install files.
To continue, click next.
Select Client and Server version type to install
Page 58
Océ ProCut Prepress USER MANUAL
Review settings before copying files and click next.
Setup wizard has now successfully finished the installation.
Page 59
Océ ProCut Prepress USER MANUAL
Installing the client on Windows XP/2000
Insert the Installation CD in your CD-drive. The installation program will automatically start the wizard.
To continue, click Next
Select folder where Setup will install files.
To continue, click next. Page 60
Océ ProCut Prepress USER MANUAL
Select Client version type to install
Review settings before copying files and click next.
Page 61
Océ ProCut Prepress USER MANUAL
Setup wizard has now successfully finished the installation.
Page 62
Océ ProCut Prepress USER MANUAL
Installing the client on Mac OS-X
Unpack the “PrepareIt xxx.sit” and copy the “Océ ProCut Prepress” to a convenient place. Double click the “Océ
ProCut Prepress” application.
Select File and Setup.
In the Server “TCPIP-Address” enter the servers tcpip address from About Océ ProCut Prepress server.
Page 63
Océ ProCut Prepress USER MANUAL
Appendix B – Connecting to the I-Cut-system
Start by creating a job through Océ ProCut Prepress with at least one curve in all layers. When the job is finished in
Océ ProCut Prepress a cut file is created.
Creating an I-Cut template for Océ ProCut Prepress
Import the Océ ProCut Prepress cut file In the “CutFiles” path specified in Océ ProCut Prepress server preference.
In this directory is one or more subdirectories. They are all named the same way “yymmdd”. Open the directory for
today and locate the cutfile created by Océ ProCut Prepress.
For each layer select and assign the correct tool. Click the “Save As” button and click the filetype popup and select
“Template Files”. Save the file on the local harddisk.
Step 1:
Setup a
tool for
each layer
Page 64
Select “Template Files”
Océ ProCut Prepress USER MANUAL
Setting up I-Cut to read Océ ProCut Prepress barcodes
Step 2:
Set this popup to
prepare-it
Turn on if Code39 barcodes
Page 65
Set this path to the value under
“Cut Files” in the prepare-it server
preference
Select the “Load Template First”
and browse to the template
just created.
Océ ProCut Prepress USER MANUAL
Appendix C – Connecting to Onyx 6.0
Make Océ ProCut Prepress deliver data directly into Onyx:
Please see the output section of the Editing a hotfolder in the Océ ProCut Prepress servers preference.
Using I-Script with Onyx:
There are two parts involved in setting up Onyx to generate I-Script files for I-Cut.
Start the Onyx ProductionHouse program and do the following.
Part 1 : Setting up the quick sets
Step 1:
Click here to create/edit
the quick sets
Step 2:
Click here to create/edit
the quick set
Page 66
Océ ProCut Prepress USER MANUAL
Step 3:
Click the
Advanced
button
Step 4:
Note/change the prefix entered here to match the PrepareIt
servers OnyxNames.
In this case where the Prefix is called CutContour the registration layer (Regmarks) is called “CutContourMark”.
The other layers are then called “CutContour0”, “CutContour1”, “CutContour2” etc.
Make sure that the OnyxName in the layers section of the Editing a hotfolder in the Océ ProCut Prepress servers
preference is set correctly.
Page 67
Océ ProCut Prepress USER MANUAL
Part 2: Activating the barcodes for the I-Script system
Step 1:
Click here to enable
start enabling the
barcodes
Step 2:
Click here
Page 68
Océ ProCut Prepress USER MANUAL
Step 3:
Select the I-Cut in the popup.
Page 69
Océ ProCut Prepress USER MANUAL
Appendix D - Barcodes
Barcode Types
There are two different types of barcodes.
• I-Cut camera compatible barcode
• Code39 barcode that can be read by handheld barcode readers
The type is set in the servers preference
After a change of barcode type, the client program has to be restarted for the change to take effect.
Barcode Placements
In the client software you can select between the following placements of the barcodes
Page 70
Barcodes in X Direction
Barcodes in Y Direction
Barcode at bottom X-Direction
Barcode at bottom Y-Direction
Océ ProCut Prepress USER MANUAL
Page 71
Barcodes in X Direction
Barcodes in Y Direction
Barcodes at top and bottom X-Direction
Barcodes at top and bottom Y-Direction
Barcodes at left and right X-Direction
Barcodes at left and right Y-Direction
Barcodes on all sides X-Direction
Barcodes on all sides Y-Direction
Océ ProCut Prepress USER MANUAL
Appendix E - Using Ghostscript®
Downloading Ghostscript
You can download the latest version of ghostscript from the internet.
On the bottom of the internet page http://www.zund.dk/default.asp?ID=50 is a link to the latest version tested with
Océ ProCut Prepress.
After downloading the exe file install it on the machine where the Océ ProCut Prepress server is installed. Remember
the path where ghostscript is installed.
Tell Océ ProCut Prepress where ghostscript is located
Select the preference option in the Océ ProCut Prepress server.
Turn “On” the “Enable GhostScript” and click the “Path” button. Browse until the file GsWin32c.exe is found and
click OK. In an English windows with version 8.51 of Ghostscript the file is located in C:\Program Files\gs\gs8.51\bin
All new files and files reprocessed will be using the Ghostscript to create previews
Page 72
Océ ProCut Prepress USER MANUAL
Appendix F - Samples
Sample 1
Synopsis: A rectangle (750x500 mm) needs to be split into two equal sized panels (375x500 mm). There is no bleed
on the job so scaling will be used to make the bleed. The minimum bleed is set to 25 mm on each side (Total of 50
mm).
Step 1 : Original Job
Width 750 mm
Height 500 mm
The scale is now adjusted to include the extra bleed. This is done by adding 50 mm bleed to the original 500 mm
height. The width automatically increased from 750 mm to 825 mm (Total 75 mm).
Step 2 : Adjusting the scale to get
an oversized job
Page 73
Width 825 mm
Height 550 mm
Océ ProCut Prepress USER MANUAL
The bleed now has to be specified so that the result is the same as the original. The width is increased from 750 to
825 (75 mm). Half of this value (37.5 mm) in keyed in the oversize width. This will create 37.5 mm bleed to the
left and the right of the cut. The resulting size after cutting the bleed can all the time be seen in the lower right
corner. The height is adjusted in the same way.
Step 3 : Oversize inside.
Extra Width (825-750) 75 mm
Extra Height (550-500) 50 mm
Cut to this curve
Printed to this curve
Oversize
inside 1/2 the
extra size
Size of cut
Create the two panels. The dashed yellow lines is the cut curves and the green rectangles are the printed size.
Step 4 : Split the job in two equal sized panels
Page 74
Océ ProCut Prepress USER MANUAL
The resulting panels in Océ ProCut Prepress.
Step 5 : Resulting Panel 1
Printed
with oversize
Cut to this line
Step 6 : Resulting Panel 2
Printed
with oversize
Cut to this line
Page 75
Océ ProCut Prepress USER MANUAL
The actual output files:
Panel 1:
Panel 2:
Page 76
Océ ProCut Prepress USER MANUAL
Sample 2
Synopsis: A rectangle (750x500 mm) needs to be split into two equal sized panels (375x500 mm). The job is designed
with an 25 mm bleed on each side (Total of 50 mm). The job designed is then 800x550 mm.
Step 1 : Original Job
Width 800 mm
Height 550 mm
The bleed is entered as oversize and inside.
Step 2 : Oversize inside.
Extra Width (800-750) 50 mm
Extra Height (550-500) 50 mm
Cut to this curve
Page 77
Printed to this curve
Oversize
inside 1/2 the
extra size
Size of cut
Océ ProCut Prepress USER MANUAL
Create the two panels. The dashed yellow lines is the cut curves and the green rectangles are the printed size.
Step 3 : Split the job in two equal sized panels
The resulting panels in Océ ProCut Prepress.
Step 4 : Resulting Panel 1
Printed
with oversize
Cut to this line
Page 78
Océ ProCut Prepress USER MANUAL
Step 5 : Resulting Panel 2
Printed
with oversize
Cut to this line
Page 79
Océ ProCut Prepress USER MANUAL
The actual output files:
Panel 1:
Panel 2
Page 80
Océ ProCut Prepress USER MANUAL
Sample 3
Synopsis: A job needs to be cut inlined 2 mm. The job will be printed with the bleed of 2mm. First part of this
sample will create a one panel job. The second part will create a two panel job.
Step 1 : The original in PrepareIt
Page 81
Océ ProCut Prepress USER MANUAL
The curves are inlined 2 mm.
Step 2 : Inline curves
Curves are inlined
Set the oversize to auto. The system will automatically calculate the necessary bleed.
Step 3 : Set oversize to Auto
Set Oversize
to Auto
Page 82
Océ ProCut Prepress USER MANUAL
Step 4: The result
Print
complete job
Page 83
Cut to
these lines
Océ ProCut Prepress USER MANUAL
The outputfile:
and after cutting:
Page 84
Océ ProCut Prepress USER MANUAL
Step 5 : (Part 2) Creating a two panel job)
Step 5 : Make two panels (with bleed)
Green dashed : print size
Page 85
Automatically
calculated bleed
Yellow dashed : cut lines
Océ ProCut Prepress USER MANUAL
The panels in Océ ProCut Prepress:
Step 6 : Panel 1
Cut lines
Printed with bleed
Step 7 : Panel 2
Cut lines
Printed with bleed
Page 86
Océ ProCut Prepress USER MANUAL
The outputfiles:
Panel 1:
Panel 2:
Page 87
Océ ProCut Prepress USER MANUAL
Sample 4
Synopsis: A job is designed with a bleed of 2 mm. The curves used for cutting is created in the designprogram
Step 1 : The original job
Curves designed
in design program
Page 88
Océ ProCut Prepress USER MANUAL
No curves are offset
Step 2 : No inlines
No inlines
Because the curves are not inlined the system use 0 mm as bleed.
Step 3 : With Autosettings
Printed to cut size
Page 89
With “Auto”
settings
Océ ProCut Prepress USER MANUAL
Add some extra printarea outside the cutting curves
Step 4 : Oversize outside 2 mm
Outside
Print to green dash
Page 90
Océ ProCut Prepress USER MANUAL
The job is now finished. Here the job in Océ ProCut Prepress
Step 5 : The result in PrepareIt
Print
Cut to
these curves
And the outputfile:
Page 91
Océ ProCut Prepress USER MANUAL
Contents
Introduction2
Chapter 1 – Entering new jobs into the system
3
Acceptable file types:
3
Where to save/copy files: 3
Using spot colours: 3
Using layers: 4
Chapter 2 – The status window 5
Change width of the column
5
Change the order of column (Win XP/2000 only)
Job Menu
6
Open Job
6
Delete Job 6
View Error 6
Compress Job6
Uncompress Job
6
ReProcess Job
6
Move Job
7
Chapter 3 – Working with a job 8
Print/Media 8
Curves 10
Navigation Tabs
10
Toolbar11
Visibility of background 12
Layer Info
13
Curve information 15
ToolTip15
Workarea
16
Using Curves 17
Scale 22
Offset 24
Layer Info
24
Curve Information 25
Size Information
28
Workarea
29
Using Offset 30
Panels 33
Max Panelsize34
Oversize
35
Panel Status 36
Workarea
37
Using Panels 39
Register marks
40
Regmark information
40
Size information
41
Workarea
41
Using Registermarks42
Output46
Chapter 4 - Setting up the server
49
Preference 49
Adding a hotfolder 50
Editing a hotfolder 51
Page 92
5
Océ ProCut Prepress USER MANUAL
Deleting a hotfolder 52
Adding a layer 52
Editing a layer
53
Deleting a layer
53
Using Ghostscript® 53
Change barcode type
53
Set Control Word 54
See Log file 54
About Océ ProCut Prepress server
54
Help 54
Appendix A – Installation and configuration of Océ ProCut Prepress
Planning an installation 55
Installing the server on Windows XP/2000
57
Installing the client on Windows XP/2000
60
Installing the client on Mac OS-X 63
Appendix B – Connecting to the I-Cut-system64
Creating an I-Cut template for Océ ProCut Prepress 64
Setting up I-Cut to read Océ ProCut Prepress barcodes
65
Appendix C – Connecting to Onyx 6.0 66
Make Océ ProCut Prepress deliver data directly into Onyx:66
Using I-Script with Onyx: 66
Part 1 : Setting up the quick sets66
Part 2: Activating the barcodes for the I-Script system 68
Appendix D - Barcodes 70
Barcode Types
70
Barcode Placements70
Appendix E - Using Ghostscript®
72
Downloading Ghostscript 72
Tell Océ ProCut Prepress where ghostscript is located
72
Appendix F - Samples
73
Sample 1
73
Sample 2
77
Sample 3
81
Sample 4
88
Page 93
55
Océ ProCut Prepress USER MANUAL