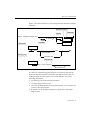
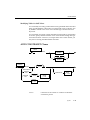
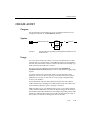
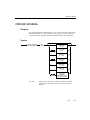
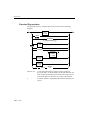
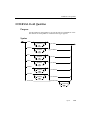
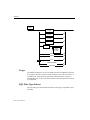
1
Informix Guide to SQL
Syntax
Informix Guide to SQL: Syntax
Version 6.0
March 1994
Part No. 000-7597
THE INFORMIX SOFTWARE AND USER MANUAL ARE PROVIDED ‘‘AS IS’’ WITHOUT WARRANTY
OF ANY KIND, EITHER EXPRESSED OR IMPLIED, INCLUDING, BUT NOT LIMITED TO, THE
IMPLIED WARRANTIES OF MERCHANTABILITY AND FITNESS FOR A PARTICULAR PURPOSE. THE
ENTIRE RISK AS TO THE QUALITY AND PERFORMANCE OF THE INFORMIX SOFTWARE AND
USER MANUAL IS WITH YOU. SHOULD THE INFORMIX SOFTWARE AND USER MANUAL PROVE
DEFECTIVE, YOU (AND NOT INFORMIX OR ANY AUTHORIZED REPRESENTATIVE OF INFORMIX)
ASSUME THE ENTIRE COST OF ALL NECESSARY SERVICING, REPAIR, OR CORRECTION. IN NO
EVENT WILL INFORMIX BE LIABLE TO YOU FOR ANY DAMAGES, INCLUDING ANY LOST
PROFITS, LOST SAVINGS, OR OTHER INCIDENTAL OR CONSEQUENTIAL DAMAGES ARISING
OUT OF THE USE OF OR INABILITY TO USE SUCH INFORMIX SOFTWARE OR USER MANUAL,
EVEN IF INFORMIX OR AN AUTHORIZED REPRESENTATIVE OF INFORMIX HAS BEEN ADVISED
OF THE POSSIBILITY OF SUCH DAMAGES, OR FOR ANY CLAIM BY ANY OTHER PARTY. IN
ADDITION, INFORMIX SHALL NOT BE LIABLE FOR ANY CLAIM ARISING OUT OF THE USE OF OR
INABILITY TO USE SUCH INFORMIX SOFTWARE OR USER MANUAL BASED UPON STRICT
LIABILITY OR INFORMIX’S NEGLIGENCE. SOME STATES DO NOT ALLOW THE EXCLUSION OF
IMPLIED WARRANTIES, SO THE ABOVE EXCLUSION MAY NOT APPLY TO YOU IN WHOLE OR IN
PART. THIS WARRANTY GIVES YOU SPECIFIC LEGAL RIGHTS AND YOU MAY ALSO HAVE OTHER
RIGHTS, WHICH VARY FROM STATE TO STATE.
All rights reserved. No part of this work covered by the copyright hereon may be reproduced or used in
any form or by any means—graphic, electronic, or mechanical, including photocopying, recording, taping,
or information storage and retrieval systems—without permission of the publisher.
Published by INFORMIX® Press
Informix Software, Inc.
4100 Bohannon Drive
Menlo Park, CA 94025
INFORMIX® and C-ISAM® are registered trademarks of Informix Software, Inc.
UNIX® is a registered trademark, licensed exclusively by the X/Open Company Ltd. in the United Kingdom
and other countries.
X/Open® is a registered trademark of X/Open Company Ltd. in the United Kingdom and other countries.
PostScript® is a registered trademark of Adobe Systems Incorporated.
IBM® is a registered trademark and DRDA™ is a trademark of International Business Machines
Corporation.
Some of the products or services mentioned in this document are provided by companies other than
Informix. These products or services are identified by the trademark or servicemark of the appropriate
company. If you have a question about one of those products or services, please call the company in
question directly.
Documentation Team: Bob Berry, Mary Cole, Sally Cox, Signe Haugen, Geeta Karmarkar,
Catherine Lyman, Judith Sherwood, Rob Weinberg, Chris Willis, Eileen Wollam.
RESTRICTED RIGHTS LEGEND
The Informix software and accompanying materials are provided with Restricted Rights. Use, duplication,
or disclosure by the Government is subject to restrictions as set forth in subdivision (c) (1) (ii) of the Rights
in Technical Data and Computer Software Clause at DFARS 252.227-7013 or subparagraphs (c) (1) and (2)
of the Commercial Computer Software-Restricted Rights at 48 CFR 52.227-19, as applicable (and any other
applicable license provisions set forth in the Government contract).
Copyright © 1981-1994 by Informix Software, Inc.
ii
Preface
The Informix Guide to SQL: Syntax is intended to be used as a companion
volume to the Informix Guide to SQL: Tutorial and the Informix Guide to SQL:
Reference. Like the other books in this series, this book is written for people
who already know how to use computers and who rely on them in their daily
work.
Whereas the Informix Guide to SQL: Tutorial explains the philosophy and
concepts behind relational databases and the Informix Guide to SQL: Reference
provides reference information, this volume contains all of the Structured
Query Language (SQL) and Stored Procedure Language (SPL) syntax
diagrams.
You must have the following Informix software:
• An INFORMIX-OnLine Dynamic Server database server or an
INFORMIX-SE database server
The database server either must be installed on your machine or on
another machine to which your machine is connected over a network.
• Either an Informix application development tool, such as INFORMIX-4GL;
or an SQL application programming interface (API), such as
INFORMIX-ESQL/C; or the DB-Access database access utility, which is
shipped as part of your database server.
The application development tool, SQL API, or DB-Access enables you to
compose queries, send them to the database server, and view the results
that the database server returns. You can use DB-Access to try out all the
SQL statements described in this guide.
Preface iii
Summary of Chapters
The Informix Guide to SQL: Syntax includes the following chapters:
• This Preface provides general information about the book and lists
additional reference materials that can help you understand relational
database management.
• The Introduction tells how SQL fits into the Informix family of products
and books, explains how to use this book, introduces the demonstration
database from which the product examples are drawn, and lists the new
features for Version 6.0 of Informix database server products.
• Chapter 1, “SQL Statements,” explains the workings of all the SQL
statements supported by Informix products. Detailed diagrams walk you
through every clause of each SQL statement. Thorough usage instructions, pertinent examples, and references to related material complete the
SQL picture.
• Chapter 2, “SPL Statements,” presents all the detailed syntax diagrams
and explanations for SPL statements.
Informix Welcomes Your Comments
A reader-response card is provided with this manual. Please use this card to
tell us what you like or dislike about this manual. To help us with future versions of the manual, please tell us about any corrections or clarifications that
you would find useful. Return this card to:
Informix Software, Inc.
Technical Publications Department
4100 Bohannon Drive
Menlo Park, CA 94025
If you prefer to share your comments on-line, address your e-mail to:
[email protected]
iv Preface
Related Reading
If you want additional technical information on database management,
consult the following texts by C. J. Date:
• An Introduction to Database Systems, Volume I (Addison-Wesley Publishing,
1990)
• An Introduction to Database Systems, Volume II (Addison-Wesley
Publishing, 1983)
This guide assumes that you are familiar with your computer operating
system. If you have limited UNIX system experience, you might want to look
at your operating system manual or a good introductory text before you read
this manual.
Some suggested texts about UNIX systems follow:
• A Practical Guide to the UNIX System, Second Edition, by M. Sobell
(Benjamin/Cummings Publishing, 1989)
• A Practical Guide to UNIX System V by M. Sobell (Benjamin/Cummings
Publishing, 1985)
• Introducing the UNIX System by H. McGilton and R. Morgan (McGraw-Hill
Book Company, 1983)
•
UNIX for People by P. Birns, P. Brown, and J. Muster (Prentice-Hall, 1985)
If you are interested in learning more about the SQL language, consider the
following text:
• Using SQL by J. Groff and P. Weinberg (Osborne McGraw-Hill, 1990)
Preface v
vi Preface
Table of
Contents
Table of Contents
Introduction
Informix Products That Use SQL Intro-3
Products Included in This Manual Intro-3
Other Useful Documentation Intro-4
How to Use This Manual Intro-5
Typographical Conventions Intro-5
Syntax Conventions Intro-5
Example Code Conventions Intro-10
Useful On-Line Files Intro-11
ASCII and PostScript Error Message Files Intro-11
The Demonstration Database Intro-12
Creating the Demonstration Database Intro-13
New Features in Informix Version 6.0 Products
That Use SQL Intro-14
Chapter 1
Syntax
SQL Statements 1-5
ANSI Compliance and Extensions 1-7
ALLOCATE DESCRIPTOR 1-9
ALTER INDEX 1-12
ALTER TABLE 1-15
BEGIN WORK 1-35
CHECK TABLE 1-37
CLOSE 1-38
CLOSE DATABASE 1-41
COMMIT WORK 1-43
CONNECT 1-44
CREATE AUDIT 1-55
CREATE DATABASE 1-57
CREATE INDEX 1-62
CREATE PROCEDURE 1-68
CREATE PROCEDURE FROM 1-76
CREATE SCHEMA 1-77
CREATE SYNONYM 1-80
CREATE TABLE 1-84
CREATE TRIGGER 1-110
CREATE VIEW 1-136
DATABASE 1-140
DEALLOCATE DESCRIPTOR 1-143
DECLARE 1-145
DELETE 1-159
DESCRIBE 1-162
DISCONNECT 1-167
DROP AUDIT 1-171
DROP DATABASE 1-172
DROP INDEX 1-174
DROP PROCEDURE 1-176
DROP SYNONYM 1-177
DROP TABLE 1-179
DROP TRIGGER 1-181
DROP VIEW 1-183
EXECUTE 1-184
EXECUTE IMMEDIATE 1-190
EXECUTE PROCEDURE 1-192
FETCH 1-194
FLUSH 1-204
FREE 1-207
GET DESCRIPTOR 1-210
GET DIAGNOSTICS 1-217
GRANT 1-231
INFO 1-241
INSERT 1-245
LOAD 1-255
LOCK TABLE 1-260
OPEN 1-263
OUTPUT 1-271
PREPARE 1-273
PUT 1-284
RECOVER TABLE 1-292
RENAME COLUMN 1-294
RENAME TABLE 1-296
REPAIR TABLE 1-299
REVOKE 1-300
ROLLBACK WORK 1-306
viii Table of Contents
ROLLFORWARD DATABASE 1-308
SELECT 1-310
SET CONNECTION 1-346
SET CONSTRAINTS 1-349
SET DEBUG FILE TO 1-351
SET DESCRIPTOR 1-353
SET EXPLAIN 1-360
SET ISOLATION 1-366
SET LOCK MODE 1-370
SET LOG 1-372
SET OPTIMIZATION 1-374
START DATABASE 1-376
UNLOAD 1-378
UNLOCK TABLE 1-381
UPDATE 1-383
UPDATE STATISTICS 1-392
WHENEVER 1-398
Segments 1-403
Condition 1-404
Constraint Name 1-419
Database Name 1-421
Data Type 1-424
DATETIME Field Qualifier 1-428
Expression 1-430
Identifier 1-469
Index Name 1-484
INTERVAL Field Qualifier 1-485
Literal DATETIME 1-487
Literal Interval 1-490
Literal Number 1-493
Procedure Name 1-495
Quoted String 1-497
Relational Operator 1-500
Synonym Name
1-504
Table Name
1-506
View Name 1-510
Chapter 2
SPL Statements
Chapter Overview 2-3
CALL 2-3
CONTINUE 2-6
DEFINE 2-7
EXIT 2-14
Table of Contents ix
FOR 2-16
FOREACH 2-20
IF 2-24
LET 2-28
ON EXCEPTION 2-31
RAISE EXCEPTION 2-36
RETURN 2-38
SYSTEM 2-40
TRACE 2-42
WHILE 2-46
Index
x Table of Contents
Introduction
Introduction
Informix Products That Use SQL 3
Products Included in This Manual 3
Other Useful Documentation 4
How to Use This Manual 5
Typographical Conventions 5
Syntax Conventions 5
Example Code Conventions 10
Useful On-Line Files 11
ASCII and PostScript Error Message Files 11
The Demonstration Database 12
Creating the Demonstration Database
13
Compliance with Industry Standards 14
New Features in Informix Version 6.0 Products
That Use SQL 14
2 Introduction
Structured Query Language (SQL), is an English-like language that you can
use when creating, managing, and using relational databases. The SQL
provided with Informix products is an enhanced version of the industrystandard query language developed by International Business Machines
Corporation (IBM).
Informix Products That Use SQL
Informix produces many application development tools and SQL application
programming interfaces (API). Application development tools currently
available include products like INFORMIX-SQL, INFORMIX-4GL, and the
Interactive Debugger. SQL APIs currently available include
INFORMIX-ESQL/C and INFORMIX-ESQL/COBOL.
Informix products work with a database server, either INFORMIX-OnLine
Dynamic Server or INFORMIX-SE. The DB-Access database access utility is
shipped as a part of each database server.
If you are running client applications developed with Version 4.1 and 5.0
application development tools, you use INFORMIX-NET to connect the client
to the network.
Products Included in This Manual
All of the information presented in this manual is valid for the following
products. Differences in their use of SQL are indicated where appropriate:
•
•
•
•
•
•
INFORMIX-ESQL/C, Version 6.0
INFORMIX-ESQL/COBOL, Version 6.0
INFORMIX-SE, Version 6.0
INFORMIX-OnLine Dynamic Server, Version 6.0
INFORMIX-OnLine/Optical, Version 6.0
INFORMIX-TP/XA, Version 6.0
Introduction 3
Other Useful Documentation
An additional product that uses information from this manual is the
INFORMIX-Gateway with DRDA, Version 6.0.
Other Useful Documentation
You can refer to the following related Informix documents that complement
this manual:
• A companion volume to the Syntax, the Informix Guide to SQL: Tutorial,
provides a tutorial on SQL as it is implemented by Informix products. It
describes the fundamental ideas and terminology that are used when
planning, using, and implementing a relational database.
• An additional companion volume to the Syntax, the Informix Guide to
SQL: Reference, provides reference information on the types of Informix
databases you can create, the data types supported in Informix products,
system catalog tables associated with the database, environment variables, and the SQL utilities. This guide also provides a detailed
description of the stores6 demonstration database and contains a
glossary.
• The SQL Quick Syntax Guide contains syntax diagrams for all statements
and segments described in this manual.
• You, or whoever installs your Informix products, should refer to the
UNIX Products Installation Guide for your particular release to ensure that
your Informix product is properly set up before you begin to work with
it. A matrix depicting possible client/server configurations is included in
the Installation Guide.
• Depending on the database server you are using, you or your system
administrator need either the INFORMIX-SE Administrator’s Guide or the
INFORMIX-OnLine Dynamic Server Administrator’s Guide and
INFORMIX-OnLine Dynamic Server Archive and Backup Guide.
• The DB-Access User Manual describes how to invoke the utility to access,
modify, and retrieve information from Informix database servers.
• When errors occur, you can look them up by number and learn their cause
and solution in the Informix Error Messages manual. If you prefer, you can
look up the error messages in the on-line message file described in the section “ASCII and PostScript Error Message Files” later in this Introduction.
4 Introduction
How to Use This Manual
How to Use This Manual
This manual assumes that you are using INFORMIX-OnLine Dynamic Server
as your database server. Features and behavior specific to INFORMIX-SE are
noted throughout the manual.
The following sections describe the conventions used in this manual for
typographical format, syntax, and example of code.
Typographical Conventions
Informix product manuals use a standard set of conventions to introduce
new terms, illustrate screen displays, describe command syntax, and so forth.
The following typographical conventions are used throughout this manual:
italics
New terms, emphasized words, and variables are printed in
italics.
boldface
Database names, table names, column names, filenames,
utilities, and other similar terms are printed in boldface.
computer
Information that the product displays and information that
you enter are printed in a computer typeface.
KEYWORD
All keywords appear in uppercase letters.
!
This symbol indicates a warning. Warnings provide critical
information that, if ignored, could cause harm to your
database.
Additionally, when you are instructed to “enter” or “execute” text,
immediately press RETURN after the entry. When you are instructed to “type”
the text or “press” a key, no RETURN is required.
Syntax Conventions
Syntax diagrams describe the format of SQL statements or commands,
including alternative forms of a statement, required and optional parts of the
statement, and so forth. Syntax diagrams have their own conventions, which
are defined in detail and illustrated in this section. SQL statements are listed
in their entirety in Chapter 1 of this manual, although some statements may
appear in other manuals.
Introduction 5
How to Use This Manual
Each syntax diagram displays the sequences of required and optional
elements that are valid in a statement or command. Briefly:
• All keywords are shown in uppercase letters for ease of identification,
though you need not enter them that way.
• Words for which you must supply values are in italics.
Each diagram begins at the upper left with a keyword and ends at the upper
right with a vertical line. Between these points, you can trace any path that
does not stop or back up. Each path describes a valid form of the statement.
Except for separators in loops (see page 7), which the path approaches counterclockwise from the right, the path always approaches elements from the
left and continues to the right.
Along a path, you may encounter the following elements:
6 Introduction
KEYWORD
You must spell a word in uppercase letters exactly as shown;
however, you can use either uppercase or lowercase letters
when you enter it.
(.,;+*-/)
Punctuation and mathematical notations are literal symbols
that you must enter exactly as shown.
' '
Single quotes are literal symbols that you must enter as
shown.
variable
A word in italics represents a value that you must supply.
The nature of the value is explained immediately following
the diagram unless the variable appears in a box. In that
case, the page number of the detailed explanation follows
the variable name.
ADD Clause
p. 1-14
A reference in a box represents a subdiagram on the same
page (if no page number is supplied) or on a specified page.
Imagine that the subdiagram is spliced into the main
diagram at this point.
ESQL
A code in an icon is a signal warning you that this path is
valid only for some products or under certain conditions.
The codes indicate the products or conditions that support
the path. The following codes are used:
OL
This path is valid only for INFORMIX-OnLine
Dynamic Server.
SE
OL
This path is valid only for INFORMIX-SE.
How to Use This Manual
DB
E/C
This path is valid only for DB-Access.
ESQL
This path is valid for SQL statements in
INFORMIX-ESQL/C and INFORMIX-ESQL/COBOL.
E/C
E/C
This path is valid only for INFORMIX-ESQL/C.
E/CO
E/C
E/C
This path is valid only for INFORMIX-ESQL/COBOL.
STAR
SPL
This path is valid only if you are using Informix
Stored Procedure Language (SPL).
STAR
NLS
This path is valid only if you have created your database as an NLS database.
STAR
OP
This path is valid only for INFORMIX-OnLine/
Optical.
+
+
This path is an Informix extension to ANSI-standard
SQL. If you initiate Informix extension checking and
include this syntax branch, you receive a warning. If
you have set the DBANSIWARN environment variable at compile time, or have used the -ansi compile
flag, you receive warnings at compile time. If you
have DBANSIWARN set at run time, or if you compiled with the -ansi flag, warning flags are set in the
sqlwarn structure.
A shaded option is the default. Even if you do not explicitly
type the option, it will be in effect unless you choose another
option.
ALL
Syntax enclosed in a pair of arrows indicates that this is a
subdiagram.
The vertical line is a terminator and indicates that the
statement is complete.
IN
A branch below the main line indicates an optional path.
NOT
,
variable
A loop indicates a path that can be repeated. Punctuation
along the top of the loop indicates the separator symbol for
list items.
Introduction 7
How to Use This Manual
1
column
key
A gate ( 1 ) in an option indicates that you can
only use that option once, even if it is within a
larger loop.
In Chapter 1 of this manual, icons that appear in the left margin indicate that
the text inside the gray box is valid only for some products or under certain
conditions. In addition to the icons described in the preceding list, you might
encounter the following icons in the left margin:
8 Introduction
ANSI
E/C
This icon indicates that the functionality described by the
text in the gray box is valid only if your database is ANSIcompliant.
X/O
E/C
This icon indicates that the functionality described by the
text in the gray box conforms to X/Open standards for
dynamic SQL. This functionality is available when you
compile your SQL API with the -xopen flag.
How to Use This Manual
Figure 1 shows the elements of a syntax diagram for the CREATE DATABASE
statement.
Reference Boxes
Terminator
Signals
CREATE DATABASE database name
IN dbspace
OL
Variables
Keywords
OL
OL Log Clause
SE
SE Log Clause
OL Log Clause
WITH
LOG
BUFFERED
Subdiagrams
LOG MODE ANSI
Punctuation
SE Log Clause
WITH LOG IN 'pathname'
MODE ANSI
Figure 1
Elements of a syntax diagram
To construct a statement using this diagram, start at the top left with the
keywords CREATE DATABASE. Then follow the diagram to the right, proceeding through the options that you want. The diagram conveys the
following information:
1. You must type the words CREATE DATABASE.
2. You must supply a database name.
3. You can stop, taking the direct route to the terminator, or you can take one
or more of the optional paths.
4. If desired, you can designate a dbspace by typing the word IN and a
dbspace name.
Introduction 9
How to Use This Manual
5. If desired, you can specify logging. Here, you are constrained by the database server with which you are working.
• If you are using INFORMIX-OnLine Dynamic Server, go to the
subdiagram named OL Log Clause. Follow the subdiagram by typing
the keyword WITH, then choosing and typing either LOG, BUFFERED
LOG, or LOG MODE ANSI. Then, follow the arrow back to the main
diagram.
• If you are using INFORMIX-SE, go to the subdiagram named SE Log
Clause. Follow the subdiagram by typing the keywords WITH LOG IN,
typing a quote, supplying a pathname, and closing the quotes. You
can then choose the MODE ANSI option below the line or continue to
follow the line across.
6. Once you are back at the main diagram, you come to the terminator. Your
CREATE DATABASE statement is complete.
Example Code Conventions
Examples of SQL code occur throughout this manual. Except where noted,
the code is not specific to any single Informix application development tool.
If only SQL statements are listed in the example, they are not delineated by
semicolons. To use this SQL code for a specific product, you must apply the
syntax rules for that product. For example, if you are using the Query-Language option of DB-Access, you must delineate multiple statements with
semicolons. If you are using an SQL API, you must use EXEC SQL and a semicolon (or other appropriate delimiters) at the start and end of each statement,
respectively.
For example, you might see the following example code:
CONNECT TO stores6
.
.
.
DELETE FROM customer
WHERE customer_num = 121
.
.
.
COMMIT WORK
DISCONNECT CURRENT
For detailed directions on using SQL statements for a particular application
development tool or SQL API, see the manual for your product.
10 Introduction
Useful On-Line Files
Also note that dots in the example indicate that more code would be added
in a full application, but it is not necessary to show it to describe the concept
being discussed.
Useful On-Line Files
In addition to the Informix set of manuals, the following on-line files, located
in the $INFORMIXDIR/release directory, may supplement the information in
this manual:
Documentation describe features not covered in the manual or that
Notes
have been modified since publication. The file containing
the Documentation Notes for this product is called
SQLRDOC_6.0.
Release Notes
describe feature differences from earlier versions of Informix
products and how these differences may affect current products. The file containing the Release Notes for Version 6.0 of
Informix database server products is called SERVERS_6.0.
Machine Notes
describe any special actions required to configure and use
Informix products on your machine. Machine notes are
named for the product described, for example, the machine
notes file for INFORMIX-OnLine Dynamic Server is
ONLINE_6.0.
Please examine these files because they contain vital information about
application and performance issues.
A number of Informix products also provide on-line Help files that walk you
through each menu option. To invoke the Help feature, simply press CTRL-W
wherever you are in your Informix product.
ASCII and PostScript Error Message Files
Informix software products provide ASCII files that contain all the Informix
error messages and their corrective actions. To access the error messages in
the ASCII file, Informix provides scripts that let you display error messages
on the screen (finderr) or print formatted error messages (rofferr). See the
Introduction to the Informix Error Messages manual for a detailed description
of these scripts.
The optional Informix Messages and Corrections product provides PostScript files that contain the error messages and their corrective actions. If you
have installed this product, you can print the PostScript files on a PostScript
Introduction 11
The Demonstration Database
printer. The PostScript error messages are distributed in a number of files of
the format errmsg1.ps, errmsg2.ps, and so on. These files are located in the
$INFORMIXDIR/msg directory.
The Demonstration Database
The DB-Access utility, which is provided with your Informix database server
products, includes a demonstration database called stores6 that contains
information about a fictitious wholesale sporting-goods distributor. The sample command files that make up a demonstration application are also
included.
Most of the examples in this manual are based on the stores6 demonstration
database. The stores6 database is described in detail and its contents are
listed in Appendix A of the Informix Guide to SQL: Reference.
The script that you use to install the demonstration database is called
dbaccessdemo6 and is located in the $INFORMIXDIR/bin directory. The database name that you supply is the name given to the demonstration database.
If you do not supply a database name, the name defaults to stores6. Follow
these rules for naming your database:
• Names for databases can be up to 18 characters long for
INFORMIX-OnLine Dynamic Server databases and up to 10 characters
long for INFORMIX-SE databases.
• The first character of a name must be a letter or an underscore (_).
• You can use letters, characters, and underscores (_) for the rest of the
name.
•
DB-Access makes no distinction between uppercase and lowercase
letters.
• The database name should be unique.
When you run dbaccessdemo6, you are, as the creator of the database, the
owner and Database Administrator (DBA) of that database.
If you installed your Informix database server product according to the
installation instructions, the files that make up the demonstration database
are protected so you cannot make any changes to the original database.
You can run the dbaccessdemo6 script again whenever you want to work
with a fresh demonstration database. The script prompts you when the creation of the database is complete, and asks if you would like to copy the
12 Introduction
The Demonstration Database
sample command files to the current directory. Enter “N” if you have made
changes to the sample files and do not want them replaced with the original
versions. Enter “Y” if you want to copy over the sample command files.
Creating the Demonstration Database
Use the following steps to create and populate the demonstration database:
1. Set the INFORMIXDIR environment variable so that it contains the name
of the directory in which your Informix products are installed. Set INFORMIXSERVER to the name of the default database server. The name of the
default database server must exist in the $INFORMIXDIR/etc/sqlhosts
file. (For a full description of environment variables, see Chapter 4 of the
Informix Guide to SQL: Reference.) For information about sqlhosts, see the
INFORMIX-OnLine Dynamic Server Administrator’s Guide or the
INFORMIX-SE Administrator’s Guide.
2. Create a new directory for the SQL command files. Create the directory by
entering
mkdir dirname
3. Make the new directory the current directory by entering
cd dirname
4. Create the demonstration database and copy over the sample command
files by entering the following command:
To create the database without logging enter:
dbaccessdemo6 dbname
To create the demonstration database with logging enter:
dbaccessdemo6 -log dbname
If you are using INFORMIX-OnLine Dynamic Server, by default the data
for the database is put into the root dbspace. If you wish, you can specify
a dbspace for the demonstration database.
To create a demonstration database in a particular dbspace enter:
dbaccessdemo6 dbspacename
If you are using INFORMIX-SE, a subdirectory called dbname.dbs is
created in your current directory and the database files associated with
stores6 are placed there. You will see both data (.dat) and index (.idx) files
Introduction 13
New Features in Informix Version 6.0 Products That Use SQL
in the dbname.dbs directory. (If you specify a dbspace name, it will be
ignored.)
To use the database and the command files that have been copied to your
directory, you must have UNIX read and execute permissions for each
directory in the pathname of the directory from which you ran the
dbaccessdemo6 script.
5. To give someone else the permissions to access the command files in your
directory, use the UNIX chmod command.
6. To give someone else the access to the database that you have created,
grant them the appropriate privileges using the GRANT statement. To
remove privileges, use the REVOKE statement. The GRANT and REVOKE
statements are described in Chapter 1 of this manual..
New Features in Informix Version 6.0 Products
That Use SQL
The Introduction to each Version 6.0 product manual contains a list of new
features for that product. The Introduction to each manual in the Version 6.0
Informix Guide to SQL series contains a list of new SQL features.
A comprehensive listing of all the new features for Version 6.0 Informix
products is found in the Release Notes file called SERVERS_6.0.
This section highlights the major new features implemented in Version 6.0 of
Informix products that use SQL.
• Native Language Support
Native Language Support (NLS) makes Informix Version 6.0 products
adaptable to various European cultural and language environments without requiring changes to the application source code.
When appropriate environment variables are set to activate NLS and
specify a locale, Informix products can properly collate strings that
contain foreign characters, accept money and decimal input, and print
dates and times in the format required by the locale where the software is
run.
14 Introduction
New Features in Informix Version 6.0 Products That Use SQL
The user can
o
Create or access database information in any language available on
the system by changing a few environment variables
o
Name user-defined objects such as databases, tables, columns, views,
cursors, and files using a foreign character set
o
Use the new NCHAR and NVARCHAR data types in place of CHAR and
VARCHAR, respectively, for storing national characters
In addition, by installing one or more language supplements with an
Informix product, the user can view error and warning messages in the
language of the locale.
• Enhanced Database Connections
You can now use three new statements, CONNECT, DISCONNECT, and SET
CONNECTION to provide a connection-oriented association between client
and server processes in a networked or a non-networked environment.
These three statements are compliant with X/Open and ANSI/ISO specifications. Applications with embedded SQL can use these statements for
more uniform and portable syntax when accessing local or remote data.
• Cascading Deletes
Support for cascading deletes is provided in INFORMIX-OnLine
Dynamic Server as an enhancement to referential integrity. Previously,
when you attempted to delete a row from a parent table without deleting
rows from associated child tables first, the delete was disallowed. Now
you can specify the ON DELETE CASCADE option on either the CREATE
TABLE or ALTER TABLE statements or on DB-Access menus to allow
deletes from a parent table to cause deletes on child tables.
• Enhanced CREATE INDEX statement
You can now use the FILLFACTOR option on the CREATE INDEX statement
to create indexes that provide for expansion of the index at a later time or
to create compacted indexes.
• Enhanced Arithmetic Functions
You can now use certain trigonometric and algebraic functions in your
SQL statements. The new functions include ABS, MOD, POW, ROOT, SQRT,
COS, SIN, TAN, ACOS, ASIN, ATAN, ATAN2, EXP, LOGN, and LOG10.
Introduction 15
New Features in Informix Version 6.0 Products That Use SQL
• Enhanced Error Handling
You can now use a new statement to retrieve standard and multiple
diagnostic information about your SQL statements. The GET DIAGNOSTICS statement is compliant with X/Open and ANSI/ISO specifications
and provides a standard method for detecting and handling error messages. The GET DIAGNOSTICS statement is used with a new errorhandling status variable called SQLSTATE.
• New DBINFO Function
The DBINFO function allows you to find the following information:
o
The dbspace name for a given table
o
The last serial value inserted into a table
o
The number of rows processed by SELECT, INSERT, DELETE, UPDATE,
and EXECUTE PROCEDURE statements
• New Environment Variables
The following Informix environment variables and X/Open categories,
described in Chapter 4 of the Informix Guide to SQL: Reference, are new in
Version 6.0:
16 Introduction
o
ARC_DEFAULT
o
ARC_KEYPAD
o
COLLCHAR
o
DBAPICODE
o
DBNLS
o
DBSPACETEMP
o
DBUPSPACE
o
ENVIGNORE
o
INFORMIXC
o
INFORMIXSERVER
o
INFORMIXSHMBASE
o
INFORMIXSTACKSIZE
o
LANG
o
LC_COLLATE
o
LC_CTYPE
o
LC_MONETARY
o
LC_NUMERIC
o
LC_TIME
New Features in Informix Version 6.0 Products That Use SQL
• New Data Distribution Features
You can use the UPDATE STATISTICS statement to create data
distributions for each table. The database server uses these data distributions to improve the choice of execution paths for SELECT statements. The
new data-distribution feature affects application development in the
following three ways:
o
The syntax for the UPDATE STATISTICS statement has been expanded.
o
A new environment variable, DBUPSPACE, sets the upper limit of disk
space that you want to use when columns are sorted.
o
You can use the dbschema utility to print distribution information.
• Introduction of Environment-Configuration Files
The following environment-configuration files can contain default values
of environment variables:
o
$INFORMIXDIR/etc/informix.rc
o
~/.informix
These optional files allow the administrator or the user to set
environment variables in much the same way a .login or .profile file is
used, so that the variables do not need to be set at each session.
Introduction 17
New Features in Informix Version 6.0 Products That Use SQL
18 Introduction
Chapter
1
Syntax
SQL Statements 5
ANSI Compliance and Extensions 7
ALLOCATE DESCRIPTOR 9
ALTER INDEX 12
ALTER TABLE 15
BEGIN WORK 35
CHECK TABLE 37
CLOSE 38
CLOSE DATABASE 41
COMMIT WORK 43
CONNECT 44
CREATE AUDIT 55
CREATE DATABASE 57
CREATE INDEX 62
CREATE PROCEDURE 68
CREATE PROCEDURE FROM 76
CREATE SCHEMA 77
CREATE SYNONYM 80
CREATE TABLE 84
CREATE TRIGGER 110
CREATE VIEW 136
DATABASE 140
DEALLOCATE DESCRIPTOR 143
DECLARE 145
DELETE 159
DESCRIBE 162
DISCONNECT 167
DROP AUDIT 171
DROP DATABASE 172
DROP INDEX 174
DROP PROCEDURE 176
DROP SYNONYM 177
DROP TABLE 179
DROP TRIGGER 181
DROP VIEW 183
EXECUTE 184
EXECUTE IMMEDIATE 190
EXECUTE PROCEDURE 192
FETCH 194
FLUSH 204
FREE 207
GET DESCRIPTOR 210
GET DIAGNOSTICS 217
GRANT 231
INFO 241
INSERT 245
LOAD 255
LOCK TABLE 260
OPEN 263
OUTPUT 271
PREPARE 273
PUT 284
RECOVER TABLE 292
RENAME COLUMN 294
RENAME TABLE 296
REPAIR TABLE 299
REVOKE 300
ROLLBACK WORK 306
ROLLFORWARD DATABASE 308
SELECT 310
SET CONNECTION 346
SET CONSTRAINTS 349
SET DEBUG FILE TO 351
SET DESCRIPTOR 353
SET EXPLAIN 360
SET ISOLATION 366
SET LOCK MODE 370
SET LOG 372
SET OPTIMIZATION 374
START DATABASE 376
UNLOAD 378
UNLOCK TABLE 381
UPDATE 383
UPDATE STATISTICS 392
WHENEVER 398
1-2 Syntax
Segments 403
Condition 404
Constraint Name 419
Database Name 421
Data Type 424
DATETIME Field Qualifier 428
Expression 430
Identifier 469
Index Name 484
INTERVAL Field Qualifier 485
Literal DATETIME 487
Literal Interval 490
Literal Number 493
Procedure Name 495
Quoted String 497
Relational Operator 500
Synonym Name
504
Table Name
506
View Name 510
Syntax
1-3
1-4 Syntax
SQL Statements
SQL statements are divided into the following categories:
•
•
•
•
•
•
•
•
•
•
•
Data definition statements
Data manipulation statements
Cursor manipulation statements
Dynamic management statements
Data access statements
Data integrity statements
Query optimization information statements
Stored procedure statements
Auxiliary statements
Client/Server Connection Statements
Optical Statements
The specific statements contained in each category are found in the following
list:
Data Definition Statements
ALTER INDEX
ALTER TABLE
CLOSE DATABASE
CREATE DATABASE
CREATE INDEX
CREATE PROCEDURE
CREATE PROCEDURE FROM
CREATE SCHEMA
CREATE SYNONYM
CREATE TABLE
CREATE TRIGGER
CREATE VIEW
DATABASE
DROP DATABASE
DROP INDEX
DROP PROCEDURE
DROP SYNONYM
DROP TABLE
DROP TRIGGER
DROP VIEW
RENAME COLUMN
RENAME TABLE
Syntax
1-5
SQL Statements
Data Manipulation Statements
DELETE
INSERT
LOAD
SELECT
UNLOAD
UPDATE
Cursor Manipulation Statements
CLOSE
DECLARE
FETCH
FLUSH
OPEN
PUT
Dynamic Management Statements
ALLOCATE DESCRIPTOR
DEALLOCATE DESCRIPTOR
DESCRIBE
EXECUTE
EXECUTE IMMEDIATE
FREE
GET DESCRIPTOR
PREPARE
SET DESCRIPTOR
Data Access Statements
GRANT
LOCK TABLE
REVOKE
SET ISOLATION
SET LOCK MODE
UNLOCK TABLE
Data Integrity Statements
BEGIN WORK
CHECK TABLE
COMMIT WORK
CREATE AUDIT
DROP AUDIT
RECOVER TABLE
REPAIR TABLE
ROLLBACK WORK
ROLLFORWARD DATABASE
SET CONSTRAINTS
SET LOG
START DATABASE
Query Optimization Information Statements
SET EXPLAIN
SET OPTIMIZATION
UPDATE STATISTICS
Stored Procedure Statements
EXECUTE PROCEDURE
SET DEBUG FILE TO
Auxiliary Statements
INFO
OUTPUT
1-6 Syntax
WHENEVER
GET DIAGNOSTICS
SQL Statements
Client/Server Connection Statements
CONNECT
DISCONNECT
SET CONNECTION
INFORMIX-OnLine/Optical Statements
ALTER OPTICAL CLUSTER
CREATE OPTICAL CLUSTER
DROP OPTICAL CLUSTER
RELEASE
RESERVE
SET MOUNTING TIMING
Note: INFORMIX-OnLine/Optical statements are shown and described in
INFORMIX-OnLine/Optical User Manual.
ANSI Compliance and Extensions
The following lists show ANSI-compliant statements and extensions to the
ANSI standard.
ANSI-Compliant Statements
ALLOCATE DESCRIPTOR
CLOSE
COMMIT WORK
CREATE VIEW
DEALLOCATE DESCRIPTOR
DELETE FROM
EXECUTE IMMEDIATE
GET DESCRIPTOR
GET DIAGNOSTICS
INSERT
OPEN
ROLLBACK WORK
SET DESCRIPTOR
UPDATE
ANSI-Compliant Statements with Informix Extensions
CREATE SCHEMA AUTHORIZATION
CREATE TABLE
DECLARE
Syntax
1-7
SQL Statements
FETCH
SELECT
WHENEVER
Statements That are Extensions to the ANSI Standard
ALTER INDEX
ALTER OPTICAL CLUSTER
ALTER TABLE
BEGIN WORK
CHECK TABLE
CLOSE DATABASE
CONNECT
CREATE AUDIT
CREATE DATABASE
CREATE INDEX
CREATE OPTICAL CLUSTER
CREATE PROCEDURE FROM
CREATE SYNONYM
CREATE TRIGGER
DATABASE
DESCRIBE
DISCONNECT
DROP AUDIT
DROP DATABASE
DROP INDEX
DROP OPTICAL CLUSTER
DROP PROCEDURE
DROP SYNONYM
DROP TABLE
DROP TRIGGER
DROP VIEW
EXECUTE
EXECUTE PROCEDURE
1-8 Syntax
FREE
INFO
LOAD
LOCK TABLE
OUTPUT
PREPARE
PUT
RECOVER TABLE
RELEASE
RENAME COLUMN
RENAME TABLE
RESERVE
REVOKE
ROLLFORWARD DATABASE
SET CONNECTION
SET CONSTRAINTS
SET DEBUG FILE TO
SET EXPLAIN
SET ISOLATION
SET LOCK MODE
SET LOG
SET MOUNTING TIMEOUT
SET OPTIMIZATION
START DATABASE
UNLOAD
UNLOCK TABLE
UPDATE STATISTICS
ALLOCATE DESCRIPTOR
ALLOCATE DESCRIPTOR
Purpose
Use the ALLOCATE DESCRIPTOR statement to allocate memory for a systemdescriptor area that is identified by a descriptor or descriptor variable. Use it to
create a place in memory to hold information obtained by a DESCRIBE
statement or to hold information about the WHERE clause of a statement.
Syntax
ESQL
ALLOCATE
DESCRIPTOR
' descriptor '
descriptor
variable
WITH MAX
occurrences
occurrences
variable
descriptor
is a quoted string that identifies the system-descriptor
area. The descriptor must conform to the same rules as any
identifier, as described in the Identifier segment on
page 1-469.
descriptor variable is an embedded variable name that contains the descriptor
(a quoted string) being allocated. The descriptor variable
must conform to the same rules as any identifier, as
described in the Identifier segment on page 1-469.
occurrences
is the number of items that can be held by the systemdescriptor area. An unsigned INTEGER that specifies a
value greater than 0, default 100.
occurrences variable is a host variable that contains the number of occurrences.
Usage
The ALLOCATE DESCRIPTOR statement creates a system-descriptor area that
is identified by descriptor or descriptor variable.
A system-descriptor area contains one or more item descriptors. Each item
descriptor holds a data value that can be sent to or received from the database
server. The item descriptors also contain information about the database such
as type, length, scale, precision, nullability, and so on.
Syntax
1-9
ALLOCATE DESCRIPTOR
The occurrences or occurrences variable specifies the number of item descriptors
desired in the system descriptor or descriptor variable.
Initially, all fields in the item-descriptor area are undefined. The COUNT is set
to the number of occurrences specified. The TYPE, LENGTH, and other information in the item descriptor are set when a DESCRIBE statement is executed
using the system descriptor. The DESCRIBE statement also allocates memory
for the DATA field in each item descriptor, based on the TYPE and LENGTH
information. The item descriptors can be used with described stored procedures. See Chapter 2, “SPL Statements,” for more information about stored
procedures.
When a descriptor or descriptor variable with the same name is already
allocated, the system returns an error.
The WITH MAX Clause
You can use the optional WITH MAX occurrences clause to indicate the number
of value descriptors you need. This number must be greater than zero. When
the WITH MAX clause is not specified, a default value of 100 is used for
occurrences.
The following examples show the ALLOCATE DESCRIPTOR statement for two
programming languages. All show the WITH MAX occurrences clause.
In each pair, the first example uses an embedded variable name and the
second example uses a quoted string to identify the system-descriptor area
allocated. The WITH MAX occurrences clause alternately uses an embedded
variable name and the unsigned INTEGER 3.
exec sql allocate descriptor :descname with max :occ;
exec sql allocate descriptor 'desc1' with max 3;
INFORMIX-ESQL/C
EXEC SQL ALLOCATE DESCRIPTOR :DESCNAME WITH MAX :OCC END-EXEC
EXEC SQL ALLOCATE DESCRIPTOR 'DESC1' WITH MAX 3 END-EXEC
INFORMIX-ESQL/COBOL
1-10 Syntax
ALLOCATE DESCRIPTOR
References
See the DEALLOCATE DESCRIPTOR, DECLARE, DESCRIBE, EXECUTE, FETCH,
GET DESCRIPTOR, OPEN, PREPARE, PUT, and SET DESCRIPTOR statements in
this manual.
Syntax
1-11
ALTER INDEX
ALTER INDEX
Purpose
Use the ALTER INDEX statement to put the data in a table in the order of an
existing index or to release an index from the clustering attribute.
Syntax
+
ALTER INDEX
Index Name
p. 1-484
TO
CLUSTER
NOT
Usage
The ALTER INDEX statement works only on indexes that are created with the
CREATE INDEX statement; it does not affect constraints created with the
CREATE TABLE statement.
SE
You cannot use a ROLLBACK WORK statement to undo an ALTER INDEX
statement. When you roll back a transaction that contains an ALTER INDEX
statement, the index remains altered; you do not receive an error message.
When you have an audit trail on the table, you cannot use the ALTER INDEX
statement. When you want to change an index on an audited table, you
must first drop the audit on the table, alter the index, and create a new audit
for the table.
You cannot alter the index of a temporary table.
The TO CLUSTER Option
The TO CLUSTER option causes the rows in the physical table to reorder to the
indexed order.
1-12 Syntax
ALTER INDEX
The following example shows how the ALTER INDEX TO CLUSTER statement
is used to physically order the rows in the orders table. The CREATE INDEX
statement creates an index on the customer_num column of the table; then,
the ALTER INDEX statement causes the physical ordering of the rows.
CREATE INDEX ix_cust ON orders (customer_num)
ALTER INDEX ix_cust TO CLUSTER
Reordering causes rewriting the entire file. This process can take a long time,
and it requires sufficient disk space to maintain two copies of the table.
While a table is clustering, the table is locked IN EXCLUSIVE MODE. When
another process is using the table to which index name belongs, the database
server cannot execute the ALTER INDEX statement with the TO CLUSTER
option; it returns an error unless lock mode is set to WAIT. (When lock mode
is set to WAIT, the database server retries the ALTER INDEX statement.)
Over time, if you modify the table, you can expect the benefit of an earlier
cluster to disappear because rows are added in a space-available order, not
sequentially. You can recluster the table to regain performance by issuing
another ALTER INDEX TO CLUSTER statement on the clustered index. You do
not need to drop a clustered index before issuing another ALTER INDEX TO
CLUSTER statement on a currently clustered index.
The TO NOT CLUSTER Option
The NOT option drops the cluster attribute on the index name without
affecting the physical table. Because there can be only one clustered index per
table, you must use the NOT option to release the cluster attribute from one
index before you assign it to another. For example, the following series of
statements illustrates how clustering is removed from one index and the
table is physically reclustered by a second index.
CREATE
ON
CREATE
ON
.
.
.
UNIQUE INDEX ix_ord
orders (order_num)
CLUSTER INDEX ix_cust
orders (customer_num)
ALTER INDEX ix_cust TO NOT CLUSTER
ALTER INDEX ix_ord TO CLUSTER
Syntax
1-13
ALTER INDEX
The first two statements create indexes for the orders table and cluster the
physical table in ascending order on the customer_num column. The last two
statements recluster the physical table in ascending order on the order_num
column.
References
See the CREATE INDEX and CREATE TABLE statements in this chapter.
In the Informix Guide to SQL: Tutorial, see the discussion of clustered indexes
in Chapter 10.
1-14 Syntax
ALTER TABLE
ALTER TABLE
Purpose
Use the ALTER TABLE statement to add a column to or delete a column from
a table, modify the data constraints placed on a column, add a constraint to a
column or a composite list of columns, drop a constraint associated with a
column or a composite list of columns, or change the extent size.
Syntax
,
+
ALTER TABLE
ADD Clause
p. 1-17
Table Name
p. 1-506
DROP Clause
p. 1-26
Synonym
Name
p. 1-504
MODIFY Clause
p. 1-27
ADD CONSTRAINT
Clause p. 1-29
DROP CONSTRAINT
Clause p. 1-32
OL
1
MODIFY NEXT SIZE
Clause p. 1-33
1
LOCK MODE
Clause p. 1-33
Usage
You must own the table name, have the DBA privilege, or be granted the Alter
privilege on the specified table to use the ALTER TABLE statement. You cannot alter a temporary table. To add a referential constraint, you must have the
DBA or References privilege on either the referenced columns or the
referenced table.
To drop a constraint in a database, you must have the DBA privilege or be the
owner of the constraint. If you are the owner of the constraint but not the
owner of the table, you must have Alter privilege on the specified table. You
do not need the References privilege to drop a constraint.
Syntax
1-15
ALTER TABLE
Altering a table on which a view depends may invalidate the view.
You can use one or more of the ADD, DROP, MODIFY, ADD CONSTRAINT, or
DROP CONSTRAINT clauses, and you can place them in any order. You can
use only one MODIFY NEXT SIZE clause or LOCK MODE clause. The actions
are performed in the order specified. When any of the actions fail, the entire
operation is cancelled.
SE
1-16 Syntax
You cannot use a ROLLBACK WORK statement to undo an ALTER TABLE
statement. When you roll back a transaction that contains an ALTER TABLE
statement, the table remains altered; you do not receive an error message.
ALTER TABLE
ADD Clause
ADD Clause
Add Column
Clause
ADD
,
(
)
Add Column
Clause
Add Column
Clause
new
column
name
Data Type
p. 1-424
DEFAULT
Clause
p. 1-18
NOT
NULL
,
New Column
Constraint
Definition
p. 1-20
BEFORE
column name
new column name
column
name
is the name of an existing column before which the new
column is placed.
is the name of the column that you are adding. For
additional information about column naming, see
“Identifier” on page 1-469.
Use the ADD clause to add a column to a table. You cannot add a SERIAL
column to a table if the table has data in it.
Syntax
1-17
ALTER TABLE
DEFAULT Clause
DEFAULT
Clause
DEFAULT
literal
NULL
CURRENT
p. 1-440
DATETIME
Field Qualifier
p. 1-428
USER
p. 1-438
OL
TODAY
p. 1-439
SITENAME
p. 1-438
DBSERVERNAME
p. 1-438
literal
represents a literal default of the appropriate type for the
column.
The default value is inserted into the column when an explicit value is not
specified. When a default is not specified and the column allows nulls, the
default is NULL. When you designate NULL as the default value for a column,
you cannot use the keywords NOT NULL as part of the column definition.
You cannot place a default on SERIAL columns.
When the altered table already has rows in it, the new column contains the
default value for all existing rows.
You can designate literal terms as default values. Use a literal term to define
alpha or numeric constant characters. To use a literal term as a default value,
follow these rules:
1-18 Syntax
ALTER TABLE
Use the Literal
INTEGER
With Columns of Type
INTEGER, SMALLINT, DECIMAL, MONEY,
FLOAT, SMALLFLOAT
DECIMAL
DECIMAL, MONEY, FLOAT, SMALLFLOAT
CHARACTER
CHAR, NCHAR, NVARCHAR, VARCHAR,
DATE
INTERVAL
INTERVAL
DATETIME
DATETIME
• Characters must be enclosed in quotation marks. Date literals must be
formatted in accordance with the DBDATE environment variable. When
DBDATE is not set, the format mm/dd/yyyy is assumed.
• For information on using a literal INTERVAL, see “Literal Interval” on
page 1-490.
• For more information on using a literal DATETIME, see “Literal
DATETIME” on page 1-487.
The following table indicates the data-type requirements for columns that
specify the CURRENT, DBSERVERNAME, SITENAME, TODAY, or USER
functions as the default value:
Function Name
CURRENT
DBSERVERNAME
SITENAME
TODAY
USER
Data-Type Requirements
DATETIME column with matching qualifier
CHAR, NCHAR, VARCHAR, or NVARCHAR column at
least 18 characters long
CHAR, NCHAR, VARCHAR, or NVARCHAR column at
least 18 characters long
DATE column
CHAR column at least 8 characters long
The next example adds a column to the items table. In items, the new column
item_weight has a literal default value.
ALTER TABLE items ADD
item_weight DECIMAL (6, 2) DEFAULT 2.00 BEFORE total_price
In this example, each existing row in the items table has a default value of
2.00 for the item_weight column.
Syntax
1-19
ALTER TABLE
Using NOT NULL with ADD
When you do not indicate a default value for a column, the default is null
unless you include the NOT NULL keywords after the data type of the column.
In this case, if the NOT NULL keywords are used, no default value exists for
the column and the column does not allow nulls. When the table contains
data, however, you cannot use the NOT NULL option when you add a column
(unless both NOT NULL and a default value other than null is specified) nor
can you specify that the new column has a unique or primary-key constraint.
When you want to add a column with a unique constraint, the table can contain a single row of data when you issue the ALTER TABLE statement. When
you want to add a column with a NOT NULL or primary-key constraint, the
table must be empty when you issue the ALTER TABLE statement. The
following statement is valid only if the items table is empty:
ALTER TABLE items
ADD (item_weight DECIMAL(6,2) NOT NULL
BEFORE total_price)
New Column-Constraint Definition
New Column
Constraint
Definition
UNIQUE
DISTINCT
PRIMARY
KEY
+
CONSTRAINT
Constraint
Name
p. 1-419
REFERENCES
Clause
p. 1-21
CHECK
Clause
p. 1-25
You cannot specify a unique or primary-key constraint on a new column if
the table contains data. However, in the case of a unique constraint, the table
can contain a single row of data. When you want to add a column with a
primary-key constraint, the table must be empty when you issue the ALTER
TABLE statement.
1-20 Syntax
ALTER TABLE
The following rules apply when you place unique or primary-key constraints
on existing columns:
• When you place a unique or primary-key constraint on a column or set of
columns, and a unique index already exists on that column or set of columns, the constraint shares the index. However, if the existing index
allows duplicates, the database server returns an error. You must then
drop the existing index before adding the constraint.
• When you place a unique or primary-key constraint on a column or set of
columns, and a referential constraint already exists on that column or set
of columns, the duplicate index is upgraded to unique (if possible) and
the index is shared.
You cannot have a unique constraint on a BYTE or TEXT column, nor can you
place referential or check constraints on these types of columns. You can
place a check constraint on a BYTE or TEXT column. However, you can check
only for IS NULL, IS NOT NULL, or LENGTH.
The REFERENCES Clause
REFERENCES
Clause
REFERENCES
Table
Name
p. 1-506
,
(
column
OL
)
ON DELETE CASCADE
Use the REFERENCES clause to reference a column or set of columns in
another table. When you are using the ADD or MODIFY clause, you can reference a single column. When you are using the ADD CONSTRAINT clause, you
can reference a single column or a set of columns.
The table referenced in the REFERENCES clause must reside in the same
database as the altered table.
A referential constraint establishes the relationship between columns in two
tables or within the same table. The relationship between the columns is commonly called a parent-child relationship, where for every entry in the child
(referencing) columns, there must exist a matching entry in the parent
(referenced) columns.
Syntax
1-21
ALTER TABLE
The referenced column (parent or primary key) must be a column that is a
unique or primary-key constraint. When you specify a column in the
REFERENCES clause that does not meet this criterion, the database server
returns an error.
The referencing column (child or foreign key) that you specify in the Add
Column clause can contain null or duplicate values, but every value (that is,
all foreign-key columns that contain non-null values) in the referencing
columns must match a value in the referenced column.
Relationship Between Referencing and Referenced Columns
A referential constraint has a one-to-one relationship between referencing
and referenced columns. In other words, if the primary key is a set of columns, the foreign key also must be a set of columns that corresponds to the
primary key. The following example creates a new column in the cust_calls
table, ref_order. The ref_order column is a foreign key that references the
order_num column in the orders table.
ALTER TABLE cust_calls ADD
ref_order INTEGER
REFERENCES orders (order_num) BEFORE user_id
When you are referencing a primary key in another table, you do not have to
explicitly state the primary-key columns in that table. Referenced tables that
do not specify the column referenced default to the primary-key column. In
the previous example, because order_num is the primary key in the orders
table, you do not have to reference that column explicitly.
When you place a referential constraint on a column or set of columns and a
duplicate or unique index already exists on that column or set of columns, the
index is shared.
The data types of the referencing and referenced column must be identical,
unless the primary-key column is of type SERIAL. When you are adding a column that references a SERIAL column, the column you are adding must be an
INTEGER column.
Using the ON DELETE CASCADE Option
Cascading deletes allow you to specify whether you want rows deleted in the
child table when rows are deleted in the parent table. Normally, you cannot
delete data in the parent table if child tables are associated with the parent
table. You can decide whether you want the rows in the child table deleted
1-22 Syntax
ALTER TABLE
with the ON DELETE CASCADE rule. The ON DELETE CASCADE rule (or
cascading deletes) means that when you delete a row in the parent table, any
rows associated with that row (foreign keys) in a child table are also deleted.
The principal advantage to the cascading deletes feature is that it allows you
to reduce the quantity of SQL statements you need to use to perform delete
actions.
SE
The ON DELETE CASCADE option is not available in INFORMIX-SE
databases.
For example, the stock table contains the stock_num column as a primary
key. The catalog table refers to the stock_num column as a foreign key. The
following ALTER TABLE statements drop an existing foreign-key constraint
(without cascading delete) and add a new constraint that specifies cascading
deletes.
ALTER TABLE catalog DROP CONSTRAINT aa
ALTER TABLE catalog ADD CONSTRAINT
(FOREIGN KEY (stock_num, manu_code) REFERENCES stock
ON DELETE CASCADE CONSTRAINT ab)
With cascading deletes specified on the child table, in addition to deleting a
stock item from the stock table, the delete cascades to the catalog table associated with the stock_num foreign key. Of course, this works only if the
stock_num that you are deleting has not been ordered; otherwise, the constraint from the items table disallows the cascading delete. For more information, see the following section, “What Happens to Multiple Child Tables.”
You specify cascading deletes with the REFERENCES clause on the ADD
CONSTRAINT clause. You only need the References privilege to indicate cascading deletes. You do not need the Delete privilege to specify cascading
deletes in tables; however, you do need Delete privilege on tables referenced
in the DELETE statement. After you indicate cascading deletes, when you
delete a row from a parent table, INFORMIX-OnLine Dynamic Server deletes
any associated matching rows from the child table.
Use the ADD CONSTRAINT clause to add a REFERENCES clause with the ON
DELETE CASCADE option constraint.
Syntax
1-23
ALTER TABLE
What Happens to Multiple Child Tables
When you have a parent table with two child constraints, one child with
cascading deletes specified and one child without cascading deletes, and you
attempt to delete a row from the parent table that applies to both child tables,
then the delete statement fails and no rows are deleted from either the parent
or child tables.
In the previous example, the stock table is also parent to the items table.
However, you do not need to add the cascading delete clause to the items
table if you are planning to delete items that are not ordered items because
the items table is used only for ordered items.
Locking and Logging
During deletes, the database server places locks on all qualifying rows of the
referenced and referencing tables. You must turn logging on when you perform the deletes. When logging is turned off in a database, even temporarily,
deletes do not cascade. This restriction applies because if logging is turned
off, you have no way to roll back actions. For example, if a parent row is
deleted and the system crashes before the child rows are deleted, the database has dangling child records, which violates referential integrity.
However, when logging is turned back on, subsequent deletes cascade.
Restriction on Cascading Deletes
Cascading deletes can be used for most deletes. The only exception is
correlated subqueries. In correlated subqueries, the subquery (or inner
SELECT) is correlated when the value it produces depends on a value produced by the outer SELECT statement that contains it. When you have implemented cascading deletes, you cannot write deletes that use a child table in
the correlated subquery. You receive an error when you attempt to delete
from a query that contains such a correlated subquery.
Locks Held When You Create a Referential Constraint
When you create a referential constraint, an exclusive lock is placed on the
referenced table. The lock is released after you finish with the ALTER TABLE
statement or at the end of a transaction (if you are altering a table in a
database with transactions and you are using transactions).
1-24 Syntax
ALTER TABLE
CHECK Clause
CHECK
Clause
CHECK
(
Condition
p. 1-404
)
A check constraint designates a condition that must be met before data can be
inserted into a column. If a row evaluates to false for any of the check constraints defined on a table during an insert or update, the database server
returns an error.
Check constraints are defined using search conditions. The search condition
cannot contain subqueries; aggregates; host variables; rowids; the CURRENT,
USER, SITENAME, DBSERVERNAME, or TODAY functions; or stored procedure
calls.
You cannot create check constraints for columns across tables. When you are
using the ADD or MODIFY clause, the check constraint cannot depend upon
values in other columns of the same table. The following example adds a new
column, unit_price, to the items table and includes a check constraint that
ensures that the value entered is greater than 0.
ALTER TABLE items ADD (
unit_price MONEY (6,2) CHECK (unit_price > 0) )
To create a constraint that checks values in more than one column, use the
ADD CONSTRAINT clause. The following example builds a constraint on the
column added in the previous example. However, the check constraint now
spans two columns in the table.
ALTER TABLE items ADD constraint
CHECK (unit_price < total_price)
Syntax
1-25
ALTER TABLE
DROP Clause
DROP
Clause
column name
DROP
,
(
column name
column name
)
is the name of the existing column that you wish to drop.
When you drop a column, all constraints placed on that column are dropped,
as described in the following list:
•
•
•
•
All single-column constraints are dropped.
All referential constraints that reference the column are dropped.
All check constraints that reference the column are dropped.
If the column is part of a multiple-column unique or primary-key
constraint, the constraints placed on the multiple columns are also
dropped. This triggers the dropping of all referential constraints that reference the multiple columns.
Because any constraints associated with a column are dropped when the column is dropped, the structure of other tables may also be altered when you
use this clause. For example, if the dropped column is a unique or primary
key that is referenced in other tables, those referential constraints also are
dropped. This means that the structure of those other tables have also been
altered.
When you drop a column that occurs in the triggering column list of an
UPDATE trigger, the column is dropped from the triggering column list. If the
column is the only member of the triggering column list, the trigger is
dropped from the table. See “CREATE TRIGGER” on page 1-110 for more
information on triggering columns in an UPDATE trigger.
1-26 Syntax
ALTER TABLE
MODIFY Clause
MODIFY
Clause
Modify Column
Clause
MODIFY
,
(
Modify Column
Clause
)
Modify Column
Clause
column
name
Data Type
p. 1-424
DEFAULT
Clause
p. 1-18
column name
NOT
NULL
,
New Column
Constraint
Definition
p. 1-20
is the name of the existing column that you wish to
modify.
Use the MODIFY clause to change the data type of a column and the length of
a character column, to add or change the default value for a column, and to
allow or disallow nulls in a column.
When you modify a column, all attributes previously associated with that
column (that is, default value, single-column check constraint, or referential
constraint) are dropped. When you want certain attributes of the column to
remain, such as a primary key, you must respecify those attributes. For example, if you are changing the data type of an existing column, quantity, to
SMALLINT, and you want to keep the default value (in this case, 1) and nonnull attributes for that column, you can issue the following ALTER TABLE
statement:
ALTER TABLE items
MODIFY (quantity SMALLINT DEFAULT '1' NOT NULL)
Note: Both attributes are specified again in the MODIFY clause.
Syntax
1-27
ALTER TABLE
When you modify a column that has column constraints associated with it,
the following constraints are dropped:
• All single-column constraints are dropped.
• All referential constraints that reference the column are dropped.
• If the modified column is part of a multiple-column unique or primarykey constraint, all referential constraints that reference the multiple
columns also are dropped.
For example, if you modify a column that has a unique constraint, the unique
constraint is dropped. If this column was referenced by columns in other
tables, those referential constraints are also dropped. In addition, if the column is part of a multiple-column unique or primary-key constraint, the
multiple-column constraints are not dropped, but any referential constraints
placed on the column by other tables are dropped. For example, a column is
part of a multiple-column primary-key constraint. This primary key is referenced by foreign keys in two other tables. When this column is modified, the
multiple-column primary-key constraint is not dropped, but the referential
constraints placed on it by the two other tables are dropped.
When you modify a column that appears in the triggering column list of an
UPDATE trigger, the trigger is unchanged.
Altering the Structure of Tables
When you use the MODIFY clause, you can also alter the structure of other
tables. If the modified column is referenced by other tables, those referential
constraints are dropped. You must add those constraints to the referencing
tables again, using the ALTER TABLE statement.
When you change the data type of an existing column, all data is converted
to the new data type, including numbers to characters and characters to numbers (if the characters represent numbers). The following statement changes
the data type of the quantity column:
ALTER TABLE items MODIFY (quantity CHAR(6))
When a unique or primary-key constraint exists, however, conversion takes
place only if it does not violate the constraint. If a data conversion results in
duplicate values (by changing FLOAT to SMALLFLOAT, for example, or by
truncating CHAR values), then the ALTER TABLE statement fails.
1-28 Syntax
ALTER TABLE
Modifying Tables for Null Values
You can modify an existing column that formerly permitted nulls to disallow
nulls, provided that the column does not contain null values. To do this, specify MODIFY with the same column name and data type and the NOT NULL
keywords.
You can modify an existing column that did not permit nulls to permit nulls.
To do this, specify MODIFY with the column name and the existing data type
and omit NOT NULL. However, if a unique index exists on the column, you
may remove it using the DROP INDEX statement.
ADD CONSTRAINT Clause
ADD CONSTRAINT
Clause
Constraint
Definition
ADD CONSTRAINT
,
(
Constraint
Definition
)
,
Constraint
Definition
(
UNIQUE
column
)
DISTINCT
PRIMARY
KEY
FOREIGN
KEY
,
(
column
CONSTRAINT
)
REFERENCES
Clause
p. 1-21
Constraint
Name
p. 1-419
CHECK
Clause
p. 1-25
column
is the name of the column or columns on which the
constraint is placed.
Syntax
1-29
ALTER TABLE
Use the ALTER TABLE statement with the ADD CONSTRAINT keywords to
specify a constraint on a new or existing column or on a set of columns. For
example, to add a unique constraint to the fname and lname columns of the
customer table, use the following example:
ALTER TABLE customer
ADD CONSTRAINT UNIQUE (lname, fname)
To name the constraint, change the preceding example as shown in the following example:
ALTER TABLE customer
ADD CONSTRAINT UNIQUE (lname, fname) CONSTRAINT u_cust
When you do not provide a constraint name, the database server provides
one. You can find the name of the constraint in the sysconstraints system catalog table. See Chapter 2 of the Informix Guide to SQL: Reference for more
information about the sysconstraints system catalog table.
Adding a Unique Constraint
The following rules apply when you add a unique constraint:
• The columns can contain only unique values.
• When you place a unique constraint on a column or set of columns and a
unique index already exists on that column or set of columns, the constraint shares the index. However, if the existing index allows duplicates,
the database server returns an error. You must then drop the existing
index before adding the unique constraint.
• An existing unique constraint cannot have the same name as the
constraint you are adding.
• A composite list can include no more than 16 column names. The total
length of all the columns cannot exceed 255 bytes.
SE
1-30 Syntax
A composite list can include no more than 8 column names and the total
length of all the columns cannot exceed 120 bytes.
ALTER TABLE
Adding a Unique or Primary-Key Constraint
The following rules apply when you add a unique or primary-key constraint:
• When you place a unique or primary-key constraint on a column or set of
columns and a unique index already exists on that column or set of columns, the constraint shares the index. However, if the existing index
allows duplicates, the database server returns an error. You must then
drop the existing index before adding the constraint.
• When you place a unique or primary-key constraint on a column or set of
columns and a referential constraint already exists on that column or set
of columns, the duplicate index is upgraded to unique (if possible) and
the index is shared.
• When you place a referential constraint on a column or set of columns and
a referential constraint already exists on that column or set of columns,
the duplicate index is upgraded to unique (if possible) and the index is
shared.
• An existing unique constraint cannot have the same name as the
constraint you are adding.
• A composite list can include no more than 16 column names. The total
length of all the columns cannot exceed 255 bytes.
When you own the table or have the Alter privilege on the table, you can
create a unique, primary-key, or check constraint on the table and specify
yourself as the owner of the constraint. To add a referential constraint, you
must have References privilege on either the referenced columns or the referenced table. When you have the DBA privilege, you can create constraints for
other users.
Syntax
1-31
ALTER TABLE
DROP CONSTRAINT Clause
DROP CONSTRAINT
Clause
Constraint
Name
p. 1-419
DROP CONSTRAINT
,
(
Constraint
Name
p. 1-419
)
To drop an existing constraint, specify the DROP CONSTRAINT keywords and
the name of the constraint. The following statement is an example of
dropping a constraint:
ALTER TABLE manufact DROP CONSTRAINT con_name
If a constraint name is not specified when the constraint is created, the
database server generates the name. You can query the sysconstraints system
catalog table for the names (including the owner) of constraints. For example,
to find the name of the constraints placed on the items table, you can issue
the following statement:
SELECT constrname FROM sysconstraints
WHERE tabid = (SELECT tabid FROM systables
WHERE tabname = 'items')
When you drop a unique or primary-key constraint that has a corresponding
foreign key, those referential constraints are dropped. For example, if you
drop the primary-key constraint on the order_num column in the orders
table and order_num exists in the items table as a foreign key, that referential
relationship is also dropped.
1-32 Syntax
ALTER TABLE
MODIFY NEXT SIZE Clause
MODIFY NEXT SIZE
Clause
MODIFY NEXT SIZE
kbytes
kbytes
is the size, in kilobytes, that you want to assign for the
next extent for this table.
Use the MODIFY NEXT SIZE clause to change the size of new extents. When
you want to specify an extent size of 32 kilobytes, use a statement such as the
following example:
ALTER TABLE customer MODIFY NEXT SIZE 32
The size of existing extents does not change.
LOCK MODE Clause
LOCK MODE
Clause
LOCK MODE
(
PAGE
)
ROW
Use the LOCK MODE keywords to change the locking mode of a table. The
PAGE keyword is the default lock mode; it is set if the table is created without
using the LOCK MODE clause. The following example sets the lock mode to
row locking:
ALTER TABLE items LOCK MODE (ROW)
Syntax
1-33
ALTER TABLE
References
See the CREATE TABLE, DROP TABLE, and LOCK TABLE statements in this
manual.
In the Informix Guide to SQL: Tutorial, see the discussion of data integrity
constraints in Chapter 4 and the discussion of creating a database and tables
in Chapter 9.
1-34 Syntax
BEGIN WORK
BEGIN WORK
Purpose
Use the BEGIN WORK statement to start a transaction (a sequence of database
operations that are terminated by the COMMIT WORK or ROLLBACK WORK
statement).
Syntax
+
BEGIN WORK
Usage
The following code fragment shows how you might place statements within
a transaction:
BEGIN WORK
LOCK TABLE stock
UPDATE stock SET unit_price = unit_price * 1.10
WHERE manu_code = 'KAR'
DELETE FROM stock WHERE description = 'baseball bat'
INSERT INTO manufact (manu_code, manu_name, lead_time)
VALUES ('LYM', 'LYMAN', 14)
COMMIT WORK
Code fragment showing statements within a transaction
Each row affected by an UPDATE, DELETE, or INSERT statement during a
transaction is locked and remains locked throughout the transaction. A transaction that contains many such statements or that contains statements affecting many rows can exceed the limits placed by your operating system or
INFORMIX-OnLine Dynamic Server configuration on the maximum number
of simultaneous locks. If no other user is accessing the table, you can avoid
locking limits and reduce locking overhead by locking the table with the
LOCK TABLE statement after you begin the transaction. As with all locks, this
table lock is released when the transaction terminates.
You can issue the BEGIN WORK statement only if a transaction is not in
progress. If you issue a BEGIN WORK statement while you are in a
transaction, the database server returns an error.
Syntax
1-35
BEGIN WORK
ESQL
If you use the BEGIN WORK statement within a routine called by a
WHENEVER statement, specify WHENEVER SQLERROR CONTINUE and
WHENEVER SQLWARNING CONTINUE before the ROLLBACK WORK statement. This prevents the program from looping if the ROLLBACK WORK
statement encounters an error or a warning.
With ANSI-Compliant Databases
ANSI
The BEGIN WORK statement is not needed because transactions are implicit.
A warning is generated if you use a BEGIN WORK statement immediately
following one of these statements:
•
•
•
•
•
DATABASE
COMMIT WORK
CREATE DATABASE
ROLLBACK WORK
START DATABASE
An error is generated if you use a BEGIN WORK statement after any other
statement.
References
See the COMMIT WORK and ROLLBACK WORK statements in this manual.
In the Informix Guide to SQL: Tutorial, see the discussion of transactions and
locking, in Chapter 4 and Chapter 7, respectively.
1-36 Syntax
CHECK TABLE
CHECK TABLE
Purpose
Use the CHECK TABLE statement to compare the data in a table with its
indexes to determine whether they match. Use this statement when you think
the data or the indexes might be corrupted because of a power failure,
computer crash, or other abnormal program interruption.
Syntax
SE
DB
+
CHECK TABLE
Table
Name
p. 1-506
Usage
Specify the name of the database table for which you want to check the data
and associated indexes, as shown in the following example:
CHECK TABLE cust_calls
The CHECK TABLE statement calls the secheck utility. See the INFORMIX-SE
Administrator’s Guide for a full description of the secheck utility.
You cannot use the CHECK TABLE statement on a table unless you own it or
have the DBA privilege.
You cannot use the CHECK TABLE statement on the system catalog table
systables, as it is always open. Instead, you can run the secheck utility from
the operating system prompt. You cannot use the CHECK TABLE statement on
other system catalog tables unless you are user informix.
References
See the REPAIR TABLE statement in this chapter.
In the INFORMIX-SE Administrator’s Guide, see the discussion of the secheck
utility in Chapter 7.
Syntax
1-37
CLOSE
CLOSE
Purpose
Use the CLOSE statement when you no longer need to refer to the rows
produced by a select or procedure cursor or when you want to flush and close
an insert cursor.
Syntax
ESQL
cursor name
CLOSE
cursor
name
is the name of a cursor that has been declared with a
DECLARE statement.
Usage
Closing a cursor makes the cursor unusable for any statements except OPEN
or FREE and releases resources that the database server had allocated to the
cursor. A cursor that is associated with an INSERT statement is treated differently by a CLOSE statement than one associated with a SELECT or EXECUTE
PROCEDURE statement.
You can close a cursor that was never opened or that has already been closed.
No action is taken in these cases.
ANSI
An error code is returned if you close a cursor that was not open. No other
action occurs.
Closing a Select or Procedure Cursor
When cursor name is associated with a SELECT or EXECUTE PROCEDURE
statement, closing the cursor terminates the SELECT or EXECUTE PROCEDURE
statement. The database server releases all resources it may have allocated to
the active set of rows, for example, a temporary table that it used to hold an
ordered set. The database server also releases any locks that it may have been
1-38 Syntax
CLOSE
holding on rows selected through the cursor. If the CLOSE statement is
contained in a transaction, the locks are not released by the database server
until you execute COMMIT WORK or ROLLBACK WORK.
After you close a select or procedure cursor, you cannot execute a FETCH
statement that names it until you have reopened the cursor.
Closing an Insert Cursor
When cursor name is associated with an INSERT statement, the CLOSE
statement writes any remaining buffered rows into the database. The number
of rows that were successfully inserted into the database is returned in the
third element of the sqlerrd array in the sqlca structure, the product-specific
name of which is shown in the following chart. (For information on using
SQLERRD to count the total number of rows inserted, see the PUT statement
on page 1-284).
Product
ESQL/C
ESQL/COBOL
Field Name
sqlca.sqlerrd[2]
SQLERRD(3) OF SQLCA
The SQLCODE field of the sqlca structure indicates the result of the CLOSE
statement for an insert cursor. If all buffered rows are successfully inserted,
SQLCODE is set to zero. If an error is encountered, SQLCODE is set to a negative error-message number. See the following chart for the field name for each
product:
Product
ESQL/C
ESQL/COBOL
Field Name
sqlca.sqlcode SQLCODE
SQLCODE OF SQLCA
When SQLCODE is zero, the row buffer space is released and the cursor is
closed; that is, you cannot execute a PUT or FLUSH statement that names the
cursor until you reopen it.
Note: When you encounter an SQLCODE error, there may be a corresponding
SQLSTATE error value. Check the GET DIAGNOSTICS statement for information
about how to get the SQLSTATE value and how to use the GET DIAGNOSTICS
statement to interpret the SQLSTATE value.
If the insert is not successful, the number of successfully inserted rows is
stored in sqlerrd. Any buffered rows following the last successfully inserted
row are discarded. Because, in this case, the CLOSE statement failed, the
Syntax
1-39
CLOSE
cursor is not closed. A second CLOSE statement can be successful because no
buffered rows exist. A subsequent OPEN statement also should be successful
because the OPEN statement performs a successful implicit close. An example
of a situation in which a CLOSE statement fails and produces this setting is if
insufficient disk space is available for some of the rows to be inserted.
Using End of Transaction to Close a Cursor
The COMMIT WORK and ROLLBACK WORK statements close all cursors
except those declared with hold. It is better to close all cursors explicitly, however. For select or procedure cursors, this simply makes the intent of the program clear. It also helps to avoid a logic error if the WITH HOLD clause is later
added to the declaration of a cursor.
For an insert cursor, it is important to use the CLOSE statement explicitly so
you can test the error code. Following the COMMIT WORK statement, SQLCODE reflects the result of the COMMIT statement, not the result of closing
cursors. If you use a COMMIT WORK statement without first using a CLOSE
statement and if an error occurs while the last buffered rows are being written
to the database, the transaction is still committed.
For the use of insert cursors and the WITH HOLD clause, see the DECLARE
statement on page 1-145.
References
See the DECLARE, FETCH, FLUSH, FREE, OPEN, and PUT statements in this
manual.
In the Informix Guide to SQL: Tutorial, see the discussion of cursors in
Chapter 5.
1-40 Syntax
CLOSE DATABASE
CLOSE DATABASE
Purpose
Use the CLOSE DATABASE statement to close the current database.
Syntax
+
CLOSE DATABASE
Usage
Following the CLOSE DATABASE statement, the only legal SQL statements are
CREATE DATABASE, DATABASE, and DROP DATABASE. A CONNECT statement or a DISCONNECT statement can also follow a CLOSE DATABASE statement, but only if an explicit connection existed before you issue the CLOSE
DATABASE statement.
SE
You also can use the START DATABASE and ROLLFORWARD DATABASE
statements after CLOSE DATABASE.
Issue the CLOSE DATABASE statement before you drop the current database.
If your database has transactions, you must issue a COMMIT WORK statement
before you use the CLOSE DATABASE statement, if you have started a
transaction.
The following example shows how to use the CLOSE DATABASE statement to
drop the current database:
DATABASE stores6
.
.
.
CLOSE DATABASE
DROP DATABASE stores6
ESQL
The CLOSE DATABASE statement cannot appear in a multistatement
PREPARE operation.
Syntax
1-41
CLOSE DATABASE
ESQL
If you use the CLOSE DATABASE statement within a routine called by a
WHENEVER statement, specify WHENEVER SQLERROR CONTINUE and
WHENEVER SQLWARNING CONTINUE before the ROLLBACK WORK statement. This prevents the program from looping if the ROLLBACK WORK
statement encounters an error or a warning.
When you issue the CLOSE DATABASE statement, declared cursors are no
longer valid. You must redeclare any cursors that you want to use.
References
See the CONNECT, CREATE DATABASE, DATABASE, DISCONNECT, and DROP
DATABASE statements in this manual.
1-42 Syntax
COMMIT WORK
COMMIT WORK
Purpose
Use the COMMIT WORK statement to commit all modifications made to the
database from the beginning of a transaction.
Syntax
COMMIT WORK
Usage
Use the COMMIT WORK statement when you are sure you want to keep
changes made to the database from the beginning of a transaction. Use the
COMMIT WORK statement only at the end of a multistatement operation.
The COMMIT WORK statement releases all row and table locks.
ESQL
The COMMIT WORK statement closes all open cursors except those declared
with hold.
References
See the BEGIN WORK, ROLLBACK WORK, and DECLARE statements in this
manual.
In the Informix Guide to SQL: Tutorial, see the discussion of transactions in
Chapter 4.
Syntax
1-43
CONNECT
CONNECT
Purpose
Use the CONNECT statement to connect to a database environment.
Syntax
E/C
E/CO
DB
Database
Environment
p. 1-49
CONNECT TO
+
E/C
E/C
E/CO
E/CO
AS
AS
' connection
name '
conn_nm
variable
USER
Clause
p. 1-52
DEFAULT
E/C
E/CO
WITH CONCURRENT TRANSACTION
connection name
conn_nm variable
is a quoted string that identifies the connection. It is casesensitive and must conform to the same rules as any
identifier. See “Identifier” on page 1-469.
is an ESQL/C or ESQL/COBOL character-type host variable
that holds the connection name. The connection name is
not case-sensitive and must conform to the same rules as
any identifier, as described in the Identifier segment. See
“Identifier” on page 1-469.
Usage
The CONNECT statement connects the application to a database environment.
The database environment can be a database, a database server, or a database
and a database server. If the application successfully connects to the specified
database environment, the connection becomes the current connection for the
application. SQL statements fail if no current connection exists between an
1-44 Syntax
CONNECT
application and a database server. If you specify a database name, the
database server opens the database.You cannot use the CONNECT statement
in a PREPARE statement.
An application can connect to several database environments at the same
time, and it can establish multiple connections to the same database environment, provided each connection has a unique connection_name. The only
restriction on this is that an application can establish only one connection to
each local server that uses the shared-memory connection mechanism. To
find out whether a local server uses the shared memory connection mechanism or the local loopback connection mechanism, you should examine the
$INFORMIX/etc/sqlhosts file. (See the INFORMIX-OnLine Dynamic Server
Administrator’s Guide for more information).
Only one connection is current at any time; other connections are dormant.
The application cannot interact with a database through a dormant connection. When an application establishes a new connection, that connection
becomes current, and the previous current transaction becomes dormant.
You can make a dormant connection current with the SET CONNECTION
statement. (See “SET CONNECTION” on page 1-346.)
Connection Identifiers
The optional connection_name is a unique identifier that an application can
use to refer to a connection in subsequent SET CONNECTION and DISCONNECT statements. If the application does not provide a connection_name (or a
conn_nm host variable), it can refer to the connection using the database environment. If the application makes more than one connection to the same
database environment, however, each connection must have a unique
connection_name.
After you associate a connection_name with a connection, you can refer to the
connection using only that connection_name.
Connection Context
Each connection encompasses a set of information that is called the connection
context. The connection context includes the name of the current user and all
the information that the database environment associates with this name.
The connection context is saved when an application becomes dormant, and
it is restored when the application becomes current again.
Syntax
1-45
CONNECT
The DEFAULT Option
If you specify the DEFAULT option, a connection is made to a default
database server. This form of the CONNECT statement does not open a database. The default database server can be either an INFORMIX-OnLine
Dynamic Server or a INFORMIX-SE database server, and it can be either local
or remote. You designate the default database server by setting its name in
the environment variable INFORMIXSERVER.
If you select the DEFAULT option for the CONNECT statement, you must use
the DATABASE statement, the CREATE DATABASE statement, or the START
DATABASE statement to open or create a database in the default database
environment.
The Implicit Connection with DATABASE Statements
If you do not execute a CONNECT statement in your application, the first SQL
statement must be one of the following statements (or a single statement
PREPARE for one of the following statements):
•
•
•
•
DATABASE
CREATE DATABASE
START DATABASE
DROP DATABASE
If one of these database statements is the first SQL statement in an application,
the statement establishes a connection to a server, which is known as an
implicit connection. If the database statement specifies only a database name,
the database server name is obtained from the DBPATH environment
variable. This is described in “Locating the Database” on page 1-50.
An application that makes an implicit connection can establish other
connections explicitly (using the CONNECT statement) but cannot make
another implicit connection. An application can terminate an implicit
connection using the DISCONNECT statement.
After any implicit connection is made, that connection is considered to be the
default connection, regardless of whether the server is the default specified
by the INFORMIXSERVER environment variable. This default is to allow the
application to refer to the implicit connection if additional explicit connections are made, because the implicit connection does not have an identifier.
For example, if you establish an implicit connection followed by an explicit
connection, you can make the implicit connection current by issuing the
statement: SET CONNECTION DEFAULT. This means, however, that once you
1-46 Syntax
CONNECT
establish an implicit connection, you cannot use the CONNECT DEFAULT
command, because the implicit connection is considered to be the default
connection.
An application cannot establish an implicit connection if an explicit
connection is already established or if an implicit connection has been terminated. The database statements can always be used to open a database or
create a new database on the current server.
The WITH CONCURRENT TRANSACTION Option
The WITH CONCURRENT TRANSACTION clause lets you switch to a different
connection while a transaction is active in the current connection. If the current connection was not established using the WITH CONCURRENT TRANSACTION clause, you cannot switch to a different connection if a transaction is
active; the CONNECT or SET CONNECTION statement fails, returning an error,
and the transaction in the current connection continues to be active. In this
case, the application must commit or roll back the active transaction in the
current connection before switching to a different connection.
The WITH CONCURRENT TRANSACTION clause supports the concept of
multiple concurrent transactions, in which each connection can have its own
transaction and the COMMIT WORK and ROLLBACK WORK statements affect
only the current connection.The WITH CONCURRENT TRANSACTION clause
does not support global transactions in which a single transaction spans databases over multiple connections. The COMMIT WORK and ROLLBACK WORK
statements do not act on databases across multiple connections.
Figure 1-1 illustrates how to use the WITH CONCURRRENT TRANSACTION
clause.
main()
{
EXEC SQL CONNECT TO 'a@srv1' AS 'A';
EXEC SQL CONNECT TO 'b@srv2' AS 'B' WITH CONCURRENT TRANSACTION;
EXEC SQL CONNECT TO 'c@srv3' AS 'C' WITH CONCURRENT TRANSACTION;
/*
Execute SQL statements in connection 'C' starting
transaction
*/
EXEC SQL SET CONNECTION 'B'; -- switch to connection 'B'
/*
Execute SQL statements starting a transaction in 'B'.
Now there are two active transactions, one each in 'B'
Syntax
1-47
CONNECT
and 'C'.
*/
EXEC SQL SET CONNECTION 'A';-- switch to connection 'A'
/*
Execute SQL statements starting a transaction in 'A'.
Now there are three active transactions, one each in 'A',
'B' and 'C'.
*/
EXEC SQL SET CONNECTION 'C';-- ERROR, transaction active in 'A'
/*
SET CONNECTION 'C' fails (current connection is still 'A')
The transaction in 'A' must be committed/rolled back since
connection 'A' was started without the
'CONCURRENT TRANSACTION' clause
*/
EXEC SQL COMMIT WORK;-- commit tx in current connection ('A')
/*
Now, there are two active transactions, in 'B' and in 'C',
which must be committed/rolled back separately
*/
EXEC SQL SET CONNECTION 'B';-- switch to connection 'B'
EXEC SQL COMMIT WORK;-- commit tx in current connection ('B')
EXEC SQL SET CONNECTION 'C';-- go back to connection 'C'
EXEC SQL COMMIT WORK;-- commit tx in current connection ('C')
EXEC SQL DISCONNECT ALL;
}
Figure 1-1
!
1-48 Syntax
ESQL/C code showing the WITH CONCURRENT TRANSACTION clause
Warning: When an application uses the WITH CONCURRENT TRANSACTION
clause to establish multiple connections to the same database environment, a deadlock
condition can occur. A deadlock condition occurs when one transaction obtains a lock
on a table and a concurrent transaction tries to obtain a lock on the same table,
resulting in the application waiting for itself to release the lock.
CONNECT
Database Environment
Database
Environment
'dbname'
'@dbservername'
SE
SE
'dbname@dbservername'
'pathname/dbname'
'pathname/dbname@dbservername'
E/C
db_env variable
E/CO
dbname
dbservername
pathname
db_env variable
is the name of the database to open.
is the name of the database server that is home to the
database.The dbservername must match the name of a
database server in the sqlhosts file.
is the path of the database directory to the parent
directory of the .dbs directory, the directory where
INFORMIX-SE database files reside.
is an ESQL/C or ESQL/COBOL character-type host variable
that contains a value representing a database
environment. This database environment can have any of
the formats listed here (that is, dbname, @dbservername,
and so on.)
Using these expressions, you can specify either a server and a database, a
server only, or a database only.
Specifying a Server Only
The “@dbservername” option establishes a connection to the named database
server only; it does not open a database. When you use this option, you must
subsequently use the DATABASE, CREATE DATABASE, or START DATABASE
statement (or a PREPARE statement for one of these statements and an
EXECUTE statement) to open a database.
Syntax
1-49
CONNECT
Specifying a Database Only
The dbname option (and the pathname/dbname option for SE) establishes
connections to the default server or to another database server in the DBPATH
variable. It also locates and opens the named database.This is also true of the
db_env variable option if it specifies only a database name. See “Locating the
Database” on page 1-50 for the order in which an application connects to
different servers to locate a database.
Locating the Database
How a database is located and opened depends on both of the following
factors:
• Whether you specify a database server name in the database environment
expression
• Whether the database server is INFORMIX-OnLine Dynamic Server or
INFORMIX-SE.
Server and Database Specified
If you specify both a database server and a database in the CONNECT
statement, your application connects to the database server, which locates
and opens the database. If the database server is an OnLine database server,
it locates the database using parameters specified in the ONCONFIG
configuration file.
SE
The database server searches the directory that you supply. If you do not
supply a directory path, it searches in the current directory (if the server is
local), the login directory (if the server is remote), or the DBPATH
environment variable.
If the database server you specify is not on-line, an error is returned.
1-50 Syntax
CONNECT
Only Database Specified
If you specify only a database in your CONNECT statement, not a database
server, the application obtains the name of a database server from the
DBPATH environment variable. The database server in the INFORMIXSERVER
environment variable is always added in front of the DBPATH value specified
by the user. Set environment variables as shown in the following example:
setenv INFORMIXSERVER srvA
setenv DBPATH //srvB://srvC
The resulting DBPATH used by your application is shown in the following
example:
//srvA://srvB://srvC
The application first establishes a connection to the database server specified
by INFORMIXSERVER. If the server is INFORMIX-OnLine Dynamic Server, it
locates the database using parameters specified in the configuration file.
SE
If the server is an SE server, it searches the directory that you supply. If you
do not supply a directory path it searches in the current directory (if the
server is local) or the login directory (if the server is remote).
If the database does not reside on the default database server or if the default
database server is not on-line, the application connects to the next database
server in DBPATH. In the previous example, this would be srvB.
SE
If a server in DBPATH is an SE server, it can contain a directory path. For
example the DBPATH might be:
//srvB://srvC/usr/xyz
The server will search for the database in the /usr/xyz directory. If an SE
server in DBPATH does not have any directory path specified, the server
searches in the current directory (if the server is local) or the remote
directory (if the server is remote).
Syntax
1-51
CONNECT
If a directory in DBPATH is an NFS-mounted directory, it is expanded to
contain the hostname of the NFS machine and the complete pathname of the
directory on the NFS host. In this case, the hostname must be listed in your
sqlhosts file as a dbservername, and an sqlexecd daemon must be running on
the NFS host.
USER Clause
USER
Clause
USER
' user identifier '
USING auth variable
user_id
variable
auth variable
user_id variable
user identifier
is an ESQL/C or ESQL/COBOL character-type host variable
that holds the valid password associated with user
identifier. The password must exist in the /etc/passwd file.
If the statement connects to a remote server, the password
must exist in the /etc/passwd file on both the local and
remote servers.
is an ESQL/C or ESQL/COBOL character type host variable
that stores a valid login name. The user id variable must be
listed in the /etc/passwd file. If the statement connects to
a remote server, the user id variable must exist in the
/etc/passwd file on both the local and remote servers. If
the USER clause is omitted in the CONNECT statement, the
current user’s login name will be used.
is a quoted string that is a valid login name. The user
identifier must be listed in the /etc/passwd file. If the
statement connects to a remote server, the user identifier
must exist in the /etc/passwd file on both the local and
remote servers.
The User Clause specifies information that is used to determine whether the
application can access the target computer when the CONNECT statement
connects to the database server on a remote host. Subsequent to the CONNECT statement, all database operations on the remote host use the specified
user name.
1-52 Syntax
CONNECT
The connection is rejected if:
• The specified user lacks the privileges to access the database named in the
database environment.
• The specified user does not have the required permissions to connect to
the remote host.
• You supply a USER clause but do not include the USING auth variable
phrase.
E/C
E/CO
X/O
In compliance with the X/Open specification for the CONNECT statement,
the ESQL/C and ESQL/COBOL preprocessors allow a CONNECT statement
that has a USER clause without the USING auth variable phrase. The connection is rejected at run time by Informix database servers, however, if the auth
variable is not present.
If you do not supply the USER clause, the connection is attempted using the
default INFORMIX user ID. The default INFORMIX user ID is the login name
of the user running the application. In this case, network permissions are
obtained using the standard UNIX authorization procedures (for example,
checking the /etc/hosts.equiv file).
Connecting to pre-Version 6.0 INFORMIX-OnLine
Dynamic Servers
The CONNECT statement syntax described in this chapter is valid for a
Version 6.0 application connecting to pre-Version 6.0 database servers. As
with Version 6.0 database servers, an implicit connection can be made to a
pre-Version 6.0 server, provided that no existing implicit connections exist
and no implicit connections have been previously terminated.
SE
You cannot connect to a pre-Version 6.0 server from aVersion 6.0 application
if the server is an INFORMIX-SE server having nettype seipcpip.
Connections to pre-Version 6.0 OnLine database server differ in the following
respects:
• The CLOSE DATABASE statement causes a connection to a pre-Version 6.0
database server to be dropped. The same statement, applied to a
Syntax
1-53
CONNECT
connection to a Version 6.0 database server, causes the database to close
but the connection remains.
• If an application makes a connection to a pre-Version 6.0 database server
without using the WITH CONCURRENT TRANSACTION clause, you must
close the database (effectively dropping the connection) before switching
to a different connection; otherwise OnLine returns error -1801.
References
See the DISCONNECT, SET CONNECT, DATABASE, START DATABASE, and
CREATE DATABASE statements in this manual.
For information on the contents of the sqlhosts file, refer to the
INFORMIX-OnLine Administrator’s Guide.
1-54 Syntax
CREATE AUDIT
CREATE AUDIT
Purpose
Use the CREATE AUDIT statement to create an audit trail file and to start
writing the audit trail for an INFORMIX-SE database.
Syntax
SE
+
CREATE AUDIT FOR
Table
Name
p. 1-506
IN
' pathname '
Synonym
Name
p. 1-504
pathname
specifies the full operating system pathname and file for the
audit trail file.
Usage
You can create an audit trail to keep a record of all modifications to a table.
An audit trail is a complete history of all additions, deletions, and updates to
the table. The audit trail is used to reconstruct the table from a backup copy
made at the time the audit trail is created.
You only can use the CREATE AUDIT statement with INFORMIX-SE.
INFORMIX-OnLine Dynamic Server provides for full database logging using
log files.
You must own the table or have DBA status to use the CREATE AUDIT
statement. You must set Execute privilege for all directories below root in
pathname for each class of user (owner, owner’s group, and public) that
accesses your database.
If an audit trail file with the same pathname already exists, the CREATE
AUDIT statement does nothing. If an audit trail file for the same table exists
with a different pathname, an error message is returned.
Make a backup copy of your database files as soon as you run the CREATE
AUDIT statement, but before you make any further changes to the database.
(See the RECOVER TABLE statement for an example.) If possible, put the audit
trail file on a different physical device from the one that holds your data, so
that a failure of one does not damage the data on the other.
Syntax
1-55
CREATE AUDIT
Audit trails slow your access to the database very slightly; each alteration of
the database is recorded in the audit trail file, as well as in the database files.
The following example shows how to use the CREATE AUDIT statement in a
UNIX environment:
CREATE AUDIT FOR orders IN '/u/safe/orders.aud'
References
See the DROP AUDIT and RECOVER TABLE statements in this manual.
For more information on audit trails, see the manual for your application
development tool.
1-56 Syntax
CREATE DATABASE
CREATE DATABASE
Purpose
Use the CREATE DATABASE statement to create a new database.
Syntax
+
CREATE
DATABASE
Database
Name
p. 1-421
OL
IN
dbspace
SE
SE Log Clause
OL
OL Log Clause
SE Log Clause
WITH LOG IN ' pathname '
MODE ANSI
OL Log Clause
WITH
LOG
BUFFERED
LOG MODE ANSI
dbspace
is the name of the dbspace in which you want to store the
data for this database. The dbspace must already exist.
pathname
is the full pathname, including the filename, for the log file.
Usage
The database that you create becomes the current database.
The database name you use must be unique within the INFORMIX-OnLine
Dynamic Server environment in which you are working. OnLine creates the
system catalog tables containing the data dictionary that describes the structure of the database in the dbspace. If you do not specify the dbspace, OnLine
creates the system catalog tables in the root dbspace.
Syntax
1-57
CREATE DATABASE
When you create a database, you alone have access to it. The database
remains inaccessible to other users until you, as database administrator
(DBA), grant database privileges. For information on granting database
privileges, see “GRANT” on page 1-231.
The following statement creates the vehicles database in the root dbspace:
CREATE DATABASE vehicles
The following statement creates the stores6 database in the research dbspace:
CREATE DATABASE vehicles IN research
SE
The following example creates the stores6 database in your current
directory:
CREATE DATABASE vehicles
The data for the database is placed in a subdirectory of your current
directory with the name database-name.dbs. The system catalog, tables, data,
and index files are placed in this directory, except for tables that you explicitly instruct be placed elsewhere (see the CREATE TABLE statement on page
1-84). The rules for directory names on your operating system govern the
length of the name that you choose for the database.
ESQL
1-58 Syntax
In SQL APIs, the CREATE DATABASE statement cannot appear in a
multistatement PREPARE operation.
CREATE DATABASE
ANSI-Compliant Databases
ANSI
You have the option of creating an ANSI-compliant database.
ANSI-compliant databases are set apart from non-ANSI databases by the
following features:
• All statements are contained in transactions automatically. All databases
on the INFORMIX-OnLine Dynamic Server use unbuffered logging.
• Owner-naming is enforced. You must use the owner name when
referring to each table, view, synonym, index or constraint, unless you
are the owner.
• For databases on an OnLine database server, the default isolation level
available is repeatable read.
• Default privileges on objects differ from those in databases that are not
ANSI-compliant. Users do not receive PUBLIC privilege to tables and
synonyms by default.
Other slight differences exist between databases that are and are not ANSIcompliant. These differences are noted as appropriate with the related SQL
statement.
Logging on INFORMIX-OnLine Dynamic Server
In the event of a failure, INFORMIX-OnLine Dynamic Server uses the log to
re-create all committed transactions in your database.
If you do not specify the WITH LOG statement, you cannot use transactions
or the statements associated with databases that have logging (BEGIN WORK,
COMMIT WORK, ROLLBACK WORK, SET LOG, and SET ISOLATION).
Designating Buffered Logging
The following example creates a database that uses a buffered log:
CREATE DATABASE vehicles WITH BUFFERED LOG
If you use a buffered log, you marginally enhance the performance of logging
at the risk of not being able to re-create the last few transactions after a failure.
(See the discussion of buffered logging in Chapter 9 of the Informix Guide to
SQL: Tutorial.)
Syntax
1-59
CREATE DATABASE
ANSI
An ANSI-compliant database does not use buffered logging.
Designating an ANSI-Compliant INFORMIX-OnLine Dynamic Server
Database
The following example creates an ANSI-compliant database:
CREATE DATABASE employees WITH LOG MODE ANSI
Creating an ANSI-compliant database does not mean that you get ANSI
warnings when you run the database. You must use the -ansi flag or the
DBANSIWARN environment variable to receive warnings.
For additional information about -ansi and DBANSIWARN, see Chapter 4 in
the Informix Guide to SQL: Tutorial.
Logging on INFORMIX-SE
SE
The following example creates an INFORMIX-SE database named accounts
with a log file. You must use the full pathname to designate the log file.
CREATE DATABASE accounts WITH LOG IN '/acct/f1992/acct_log'
If you specify the WITH LOG IN keywords, you can use transactions and the
statements associated with transactions (BEGIN WORK, COMMIT WORK, and
ROLLBACK WORK). Conversely, if you do not specify the WITH LOG IN
keywords, you cannot use transactions.
You can use the START DATABASE statement to assign a log file to an existing INFORMIX-SE database or to assign a new log file with a different name.
You can determine the location of the log file for the current database by
running the following SELECT statement:
SELECT dirpath FROM informix.systables
WHERE tabtype = 'L'
1-60 Syntax
CREATE DATABASE
Designating an ANSI-Compliant INFORMIX-SE Database
SE
The following example creates an ANSI-compliant database:
CREATE DATABASE employees WITH LOG IN '/u/acctg/lfile'
MODE ANSI
References
See the CLOSE DATABASE, CONNECT TO, DATABASE, DROP DATABASE, and
START DATABASE statements in this manual.
In the Informix Guide to SQL: Tutorial, see the discussion of creating a database
in Chapter 9.
Syntax
1-61
CREATE INDEX
CREATE INDEX
Purpose
Use the CREATE INDEX statement to create an index for one or more columns
in a table and, optionally, to cluster the physical table in the order of the
index. When more than one column is listed, the concatenation of the set of
columns is treated as a single composite column for indexing.
1-62 Syntax
CREATE INDEX
Syntax
+
CREATE
INDEX
UNIQUE
Index
Name
p. 1-484
ON
Clause
OL
CLUSTER
DISTINCT
FILLFACTOR
percent
,
ON
Clause
ON
Table
Name
p. 1-506
Synonym
Name
p. 1-504
(
)
column name
ASC
DESC
temporary table
name
column name
is the name of a column you want to index. To create an index
that applies to several columns, enter a list of column names,
separated by commas. All the columns you specify must
belong to the same table.
percent
indicates the percent to be used for FILLFACTOR. Value
between 1 and 100, inclusive.
temporary table is the name of the temporary table whose columns you want
name
to index. For restrictions on the temporary table name, see the
Identifier segment on page 1-469.
Usage
When you issue the CREATE INDEX statement the table is locked in exclusive
mode. If another process is using the table, the database server cannot
execute the CREATE INDEX statement and returns an error.
Only one index on a particular sequence of columns is allowed with the same
ascending or descending order.
Syntax
1-63
CREATE INDEX
SE
You cannot use a ROLLBACK WORK statement to undo a CREATE INDEX
statement. If you roll back a transaction that contains a CREATE INDEX
statement, the index remains and you do not receive an error message.
UNIQUE Option
The following example creates a unique index:
CREATE UNIQUE INDEX c_num_ix ON customer (customer_num)
This index prevents duplicates in the customer_num column. A column with
a unique index can have, at most, one null value. The DISTINCT keyword is a
synonym for the keyword UNIQUE, so the following statement would
accomplish the same task:
CREATE DISTINCT INDEX c_num_ix ON customer (customer_num)
The index in either example is maintained in ascending order, which is the
default order.
You also can prevent duplicates in a column or set of columns by creating a
unique constraint with the CREATE TABLE or ALTER TABLE statement. See
the CREATE TABLE or ALTER TABLE syntax for more information.
CLUSTER Option
Use the CLUSTER option to reorder the physical table in the order designated
by the index. The CREATE CLUSTER INDEX statement fails if a CLUSTER index
already exists.
CREATE CLUSTER INDEX c_clust_ix ON customer (zipcode)
This statement creates an index on the customer table that orders the table
physically by zip code.
SE
1-64 Syntax
You cannot create a CLUSTER index on a table that has an audit trail.
CREATE INDEX
Composite Indexes
The following example creates a composite index using the stock_num and
manu_code columns of the stock table:
CREATE UNIQUE INDEX st_man_ix ON stock (stock_num, manu_code)
The index prevents any duplicates of a given combination of stock_num and
manu_code. The index is in ascending order by default.
You can include up to 16 columns in a composite index. The total width of all
indexed columns in a single CREATE INDEX statement cannot exceed 255
bytes.
SE
You can use up to 8 columns in a composite index. The total width of all
indexed columns in a single CREATE INDEX statement cannot exceed 120
bytes.
Place columns in the composite index in the order from most frequently used
to least frequently used.
FILLFACTOR Option
Use the FILLFACTOR option to provide for expansion of the index at a later
date or to create compacted indexes. You provide a percent value ranging
from 1 to 100, inclusive. The default percent value is 90.
When the index is created, OnLine initially fills only that percentage of the
nodes specified by the FILLFACTOR value. If you provide a low percentage
value, such as 50, you allow room for growth in your index. The nodes of the
index are initially filled to a certain percentage and contain space for inserts.
The amount of space available depends on the number of keys in each page
as well as the percentage value. For example, with a 50 percent FILLFACTOR
value, the page would be half full and could accommodate doubling in
growth. A low percentage value can result in faster inserts and may be used
for indexes that you expect to grow.
If you provide a high percentage value, such as 99, your indexes will be
compacted and any new index inserts result in splitting nodes. The maximum density is achieved with 100 percent. With a 100 percent FILLFACTOR
value, no room is available for growth; any additions to the index result in
splitting of the nodes. A 99 percent FILLFACTOR value allows room for at
Syntax
1-65
CREATE INDEX
least one insertion per node. A high percentage value can result in faster
selects and may be used for indexes that you do not expect to grow or for
mostly read-only indexes.
This option takes affect only when you build an index on a table which
contains more than 5000 rows and which use more than 100 table pages. The
index will be built with the specified FILLFACTOR if it is rebuilt as a result of
an archive and rollforward of logs. The FILLFACTOR can also be set as a
parameter in the ONCONFIG file. The FILLFACTOR option on the CREATE
INDEX statement overrides the setting in the ONCONFIG file.
For more information about the ONCONFIG file and the parameters you can
use with ONCONFIG, see the INFORMIX-OnLine Dynamic Server Administrator’s Guide.
The ASC and DESC Keywords
Use the ASC option to specify an index that is maintained in ascending order.
The ASC option is the default ordering scheme. Use the DESC option to specify an index that is maintained in descending order. When a column or list of
columns is defined as unique in a CREATE TABLE or ALTER TABLE statement,
the database server implements that UNIQUE CONSTRAINT by creating a
unique ascending index. Thus, you cannot use the CREATE INDEX statement
to add an ascending index to a column or column list already defined as
unique.
You can create a descending index on such columns and you can include such
columns in composite ascending indexes in different combinations. For
example, the following sequence of statements is allowed:
CREATE TABLE customer (
customer_num
SERIAL(101)UNIQUE,
fname
CHAR(15),
lname
CHAR(15),
company
CHAR(20),
address1
CHAR(20),
address2
CHAR(20),
city
CHAR(15),
state
CHAR(2),
zipcode
CHAR(5),
phone
CHAR(18)
)
CREATE INDEX cathtmp ON customer (customer_num DESC)
CREATE INDEX c_temp2 ON customer (customer_num, zipcode)
1-66 Syntax
CREATE INDEX
References
See the ALTER INDEX, DROP INDEX, and CREATE TABLE statements in this
manual.
In the Informix Guide to SQL: Tutorial, see the discussions of indexes in
Chapter 3, Chapter 10, and Chapter 13.
Syntax
1-67
CREATE PROCEDURE
CREATE PROCEDURE
Purpose
Use the CREATE PROCEDURE statement to name and define a stored
procedure.
Syntax
+
CREATE
PROCEDURE
Procedure
Name
p. 1-495
(
)
,
DBA
Parameter
p. 1-69
Statement
Block
p. 1-72
END
PROCEDURE
RETURNING
Clause
p. 1-70
;
,
DOCUMENT
pathname
Quoted String
p. 1-497
WITH
LISTING IN
' pathname '
is the full pathname of the file that is to contain the warnings
of the procedure. The file must be on the host machine of the
database server that serves the database.
Usage
The entire length of a CREATE PROCEDURE statement must be less than 64
kilobytes. This length is the literal length of the CREATE PROCEDURE statement, including blank space and tabs.
ESQL
You can use a CREATE PROCEDURE statement only within a PREPARE
statement. If you want to create a procedure for which the text is known at
compile time, you must use a CREATE PROCEDURE FROM statement.
If the statement block portion of the CREATE PROCEDURE statement is empty,
no operation takes place when you call the procedure. You might use such a
procedure in the development stage when you want to establish the existence
of a procedure but have not yet coded it.
1-68 Syntax
CREATE PROCEDURE
You must have at least the Resource privilege on a database to create a
procedure.
SE
You cannot use a ROLLBACK WORK statement to undo a CREATE
PROCEDURE statement. If you roll back a transaction that contains a
CREATE PROCEDURE statement, the procedure remains and you do not
receive an error message.
DBA Option
If you create a procedure using the DBA option, it is known as a DBAprivileged procedure. If you do not use the DBA option, the procedure is
known as an owner-privileged procedure. The privileges associated with the
execution of a procedure are determined by whether the procedure is created
with the DBA keyword. See Chapter 14 of the Informix Guide to SQL: Tutorial,
for more information.
Parameter Syntax and Use
Parameter
SQL Data Type
(Subset)
p. 1-70
variable
name
LIKE
table
REFERENCES
.
default
value
column
BYTE
TEXT
DEFAULT
NULL
column
is the column name. It is the same data type as the variable.
The column must exist in the database.
default value
is the default value for the parameter.
table
is the name of the table that contains column.
variable name
is the name of a parameter used in the procedure.
If you provide a default value for a parameter, that value is used if the
procedure is called with fewer than the necessary arguments. If you do not
provide a default value for the parameter and the procedure is called with
less than the necessary arguments, the calling application receives an error.
Syntax
1-69
CREATE PROCEDURE
Subset of SQL Data Types Allowed in the Parameter List
The SQL Data Type subset includes all the SQL data types except SERIAL,
TEXT, and BYTE. For the complete syntax of all the SQL data types, see page
1-424.
To use a TEXT or BYTE type, use the REFERENCES keyword, as shown in the
diagram on page 1-69.
Referencing TEXT or BYTE Values
Use the REFERENCES clause to specify that a parameter contains TEXT or
BYTE data. If you use the DEFAULT NULL option in the REFERENCES clause
and you call the procedure without a parameter, a null value is used.
RETURNING Clause
RETURNING
Clause
RETURNING
,
;
SQL Data Type
(Subset)
p. 1-70
REFERENCES
BYTE
TEXT
A procedure can return zero or more values or sets of values. A procedure
that returns more than one set of values (such as multiple rows from a table)
is a cursory procedure. For example, the first RETURNING clause shown in the
following example can return zero or one value if it is not a cursory procedure;
if it is cursory, it returns more than one row from a table and each returned
row contains one value. The second RETURNING clause can return zero or
two values; if it is cursory, it returns more than one row with zero or two
values returned for each row.
RETURNING INT;
RETURNING INT, INT;
The receiving procedure or program must be written appropriately to accept
the information.
1-70 Syntax
CREATE PROCEDURE
Describing the Procedure in the DOCUMENT Clause
The quoted string or strings in the DOCUMENT clause provide a synopsis and
description of the procedure. The DOCUMENT text is intended for the user of
the procedure. Anyone with access to the database can query the sysprocbody system catalog table to obtain a description of one or all of the
procedures stored in the database.
For example, to find the description of the procedure called do_something,
you execute the following query:
SELECT data FROM sysprocbody b, sysprocedures p
WHERE b.procid
= p.procid {join between the two catalogs}
AND
p.procname = 'do_something' {look for procedure do_something}
AND b.datakey = 'D'
{ want user document }
ORDER BY b.seqno;
{
... in order
}
The rows returned are the complete text as supplied in the DOCUMENT
clause of the CREATE PROCEDURE statement.
CREATE PROCEDURE ret_sal (dep_no INT, name CHAR(8) default user)
RETURNING INT;
.
.
.
END PROCEDURE
DOCUMENT
'Usage: salary (dept [required], name [default: your name])',
'returns your (or someone else’s) salary',
'Warning: This procedure sends mail on illegal use'
WITH LISTING IN '/usr/tmp/sal.warnings';
WITH LISTING IN Option
The WITH LISTING IN option specifies a filename where compile time
warnings are sent. After you compile a procedure, this file holds one or more
warning messages.
If you do not use the WITH LISTING IN option, the compiler does not generate
a list of warnings.
Syntax
1-71
CREATE PROCEDURE
The Statement Block
Statement Block
DEFINE
Statement
p. 2-7
CALL
Statement
p. 2-3
ON
EXCEPTION
Statement
p. 2-31
CONTINUE
Statement
p. 2-6
EXECUTE PROCEDURE
Statement
p. 1-192
EXIT
Statement
p. 2-14
FOR
Statement
p. 2-16
FOREACH
Statement
p. 2-20
IF
Statement
p. 2-24
LET
Statement
p. 2-28
RAISE EXCEPTION
Statement
p. 2-36
RETURN
Statement
p. 2-38
SYSTEM
Statement
p. 2-40
TRACE
Statement
p. 2-42
WHILE
Statement
p. 2-46
Subset of SQL
Statement
p.1-73
BEGIN
1-72 Syntax
Statement
Block
END
CREATE PROCEDURE
The statement block can be empty, which results in a procedure that does
nothing.
You cannot close the current database or select a new database within a
procedure.
You cannot drop the current procedure within a procedure. You can,
however, drop another procedure.
Subset of SQL Statements Allowed in the Statement Block
You can use any SQL statement in the Statement Block, except those listed in
Figure 1-2.
CHECK TABLE
CLOSE
CLOSE DATABASE
CONNECT
CREATE DATABASE
CREATE PROCEDURE
CREATE PROCEDURE FROM
DATABASE
DECLARE
DESCRIBE
EXECUTE
EXECUTE IMMEDIATE
FETCH
FLUSH
Figure 1-2
FREE
GET DESCRIPTOR
INFO
LOAD
OPEN
OUTPUT
PREPARE
PUT
REPAIR
ROLLFORWARD DATABASE
SET DESCRIPTOR
START DATABASE
UNLOAD
WHENEVER
SQL statements that cannot be used in a stored procedure
You can use a SELECT statement in only two cases:
• You can use the INTO TEMP clause to put the results of the SELECT
statement into a temporary table.
• You can use the SELECT...INTO form of the SELECT statement to put the
resulting values into procedure variables.
Syntax
1-73
CREATE PROCEDURE
Restrictions on a Procedure Called in a Data Manipulation
Statement
If a stored procedure is called as part of an INSERT, UPDATE, DELETE, or
SELECT statement, the called procedure cannot execute any of the statements
listed in Figure 1-3. This ensures that changes cannot be made that affect the
SQL statement that contains the procedure call.
ALTER INDEX
ALTER OPTICAL
ALTER TABLE
BEGIN WORK
COMMIT WORK
CREATE TABLE
CREATE TRIGGER
DELETE
DROP INDEX
DROP OPTICAL
Figure 1-3
DROP SYNONYM
DROP TABLE
DROP TRIGGER
DROP VIEW
INSERT
RENAME COLUMN
RENAME TABLE
ROLLBACK WORK
SET CONSTRAINT
UPDATE
SQL statements not allowed in a procedure that is called in a data manipulation
statement
For example, if you use the following INSERT statement, the execution of the
called procedure dup_name is restricted:
CREATE PROCEDURE sp_insert
.
.
.
INSERT INTO q_customer
VALUES (SELECT * FROM customer
WHERE dup_name ('lname') = 2)
.
.
.
END PROCEDURE;
In the preceding example, dup_name cannot execute the statements listed in
Figure 1-3. However, if dup_name is called within a statement that is not an
INSERT, UPDATE, SELECT, or DELETE statement (namely EXECUTE
PROCEDURE), dup_name can execute the statements listed in Figure 1-3.
Note that you can use the BEGIN WORK and COMMIT WORK statements in
procedures. You can start a transaction, finish a transaction, or start and finish
a transaction in a procedure. If you start a transaction in a procedure that is
executed remotely, you must finish the transaction before the procedure exits.
1-74 Syntax
CREATE PROCEDURE
References
See the CREATE PROCEDURE FROM, DROP PROCEDURE, GRANT, EXECUTE
PROCEDURE, PREPARE, UPDATE STATISTICS, and REVOKE statements in this
manual.
In the Informix Guide to SQL: Tutorial, see the discussion of creating and using
stored procedures in Chapter 14.
Syntax
1-75
CREATE PROCEDURE FROM
CREATE PROCEDURE FROM
Purpose
Use the CREATE PROCEDURE FROM statement to create a procedure. The
actual text of the procedure resides in a separate file.
Syntax
ESQL
CREATE PROCEDURE FROM
' filename '
+
variable
name
filename
is the name of the file, or the name of the path and file, that
contains the full text of the CREATE PROCEDURE statement.
variable name
is a program variable that holds the name of the file that
contains the full text of the CREATE PROCEDURE statement.
Usage
The filename provided in this statement is relative; if a simple filename is
provided, the database server looks for the file in the current directory.
References
See the CREATE PROCEDURE statement in this manual.
In the Informix Guide to SQL: Tutorial, see the discussion of creating and using
stored procedures in Chapter 11.
1-76 Syntax
CREATE SCHEMA
CREATE SCHEMA
Purpose
The CREATE SCHEMA statement allows you to issue a block of CREATE and
GRANT statements as a unit. It allows you to specify an owner/grantor of
your choice for the subsequent block of CREATE and GRANT statements.
Syntax
DB
CREATE SCHEMA
AUTHORIZATION
CREATE TABLE
Statement
p. 1-84
user
name
+
CREATE INDEX
Statement
p. 1-62
CREATE VIEW
Statement
p. 1-136
+
CREATE SYNONYM
Statement
p. 1-80
GRANT
Statement
p. 1-194
CREATE TRIGGER
Statement
p. 1-110
OP
user name
CREATE OPTICAL
CLUSTER
Statement
INFORMIX-OnLine/
Optical User Manual
is the name of the user to whom the CREATE SCHEMA
statement block, and the objects created by the block,
belongs.
Syntax
1-77
CREATE SCHEMA
Usage
You cannot issue the CREATE SCHEMA statement until you create the affected
database.
Users with Resource privilege can create a schema for themselves. In this
case, user name is the name of the person with the Resource privilege running
the CREATE SCHEMA statement. Anyone with the DBA privilege also can create a schema for someone else. In this case, user name can identify a user other
than the person running the CREATE SCHEMA statement.
You can put CREATE and GRANT statements in any logical order within the
statement, as shown in the following example. Statements are considered
part of the CREATE SCHEMA statement until a semicolon or an end-of-file
symbol is reached.
CREATE SCHEMA AUTHORIZATION sarah
CREATE TABLE mytable (mytime DATE, mytext TEXT)
GRANT SELECT, UPDATE, DELETE ON mytable TO rick
CREATE VIEW myview AS
SELECT * FROM mytable WHERE mytime > '12/31/1992'
CREATE INDEX idxtime ON mytable (mytime);
Creating Objects Within CREATE SCHEMA
All objects created by a CREATE SCHEMA statement are owned by user name,
even if you do not explicitly name each object. If you are the DBA, you can
create objects for another user. If you are not the DBA and you attempt to
create something for an owner other than user name, you receive an error.
Granting Privileges Within CREATE SCHEMA
You can grant privileges only using the CREATE SCHEMA statement; you
cannot revoke or drop privileges.
Creating Objects or Granting Privileges Outside CREATE
SCHEMA
If you create an object or use the GRANT statement outside a CREATE
SCHEMA statement, you receive warnings if you use the -ansi flag or set
DBANSIWARN.
1-78 Syntax
CREATE SCHEMA
References
See the CREATE TABLE, CREATE INDEX, CREATE VIEW, CREATE SYNONYM,
and GRANT statements in this manual.
In the Informix Guide to SQL: Tutorial, see the discussion of creating the
database in Chapter 9.
Syntax
1-79
CREATE SYNONYM
CREATE SYNONYM
Purpose
Use the CREATE SYNONYM statement to provide an alternative name for a
table or view.
Syntax
+
CREATE
SYNONYM
PUBLIC
Synonym
Name
p. 1-504
PRIVATE
FOR
Table Name
p. 1-506
View Name
p. 1-510
Usage
Users have the same privileges for a synonym that were granted to them on
the table to which the synonym applies.
The synonym name must be unique; that is, the synonym name cannot be the
same as another database object, such as a table, view, or temporary table.
Once created, a synonym persists until the owner of the synonym executes
the DROP SYNONYM statement. This property distinguishes a synonym from
an alias that you can use in the FROM clause of a SELECT statement. The alias
persists only for the lifetime of the SELECT statement. If a synonym refers to
a table or view in the same database, the synonym is automatically dropped
if you drop the referenced table or view.
You cannot create a synonym for a synonym in the same database.
ANSI
The name of a synonym is qualified by the owner of the synonym
(owner.synonym). The identifier owner.synonym must be unique among all
the synonyms, tables, temporary tables, and views in the database. You
must specify owner when you refer to a synonym owned by another user.
The following example shows the convention:
CREATE SYNONYM emp FOR accting.employee
1-80 Syntax
CREATE SYNONYM
SE
You cannot use a ROLLBACK WORK statement to undo a CREATE SYNONYM
statement. If you roll back a transaction that contains a CREATE SYNONYM
statement, the synonym remains and you do not receive an error message.
OL
You can create a synonym for any table or view on any database on your
database server. Use the owner. convention if the table is part of an ANSIcompliant database. The following example shows a synonym for a table
outside the current database. It assumes that you are working on the same
database server that contains the payables database.
CREATE SYNONYM mysum FOR payables:jean.summary
OL
You can create a synonym for any table or view that exists on any networked
database server as well as on the database server that contains your current
database. The database server that holds the table must be on-line when you
create the synonym. In a network, INFORMIX-OnLine Dynamic Server
verifies that the object of the synonym exists when you create the synonym.
The following example shows how to create a synonym for an object that is
not in the current database:
CREATE SYNONYM mysum FOR payables@phoenix:jean.summary
The identifier mysum now refers to the table jean.summary, which is in the
payables database on the phoenix database server. Note that if the summary table is dropped from the payables database, the mysum synonym is
left intact. Subsequent attempts to use mysum return a “Table not found”
error.
Syntax
1-81
CREATE SYNONYM
PUBLIC and PRIVATE Synonyms
If you use the PUBLIC keyword (or no keyword at all), your synonym can be
used by anyone who has access to the database. If a synonym is public, a user
does not need to know the name of the owner of the synonym. Any synonym
in a database that is not ANSI-compliant and was created before Version 5.0 of
the database server is a public synonym.
ANSI
Synonyms are always private. If you use the PUBLIC or PRIVATE keywords,
you receive a syntax error.
If you use the PRIVATE keyword, the synonym can be used only by the owner
of the synonym or if the owner’s name is specified explicitly with the synonym. There can be more than one private synonym with the same name in
the same database. However, each synonym with that name must be owned
by a different user.
You only can own one synonym with a given name; you cannot create both
private and public synonyms with the same name. For example, the
following code generates an error.
CREATE SYNONYM our_custs FOR customer;
CREATE PRIVATE SYNONYM our_custs FOR cust_calls;-- ERROR!!!
Synonyms with the Same Name
If you own a private synonym and a public synonym exists with the same
name, and you use a synonym by its unqualified name, the private synonym
is used.
If you use DROP SYNONYM with a synonym, and multiple synonyms exist
with the same name, the private synonym is dropped. If you issue the DROP
SYNONYM statement again, the public synonym is dropped.
Chaining Synonyms with INFORMIX-OnLine Dynamic
Server
If you create a synonym for a table that is not in the current database and the
base table for the synonym is dropped, the synonym stays in place. You can
create a new synonym for the dropped table, with the name of the dropped
table as the synonym name that points to another external or remote table. In
1-82 Syntax
CREATE SYNONYM
this way, you can move a table to a new location and chain synonyms
together so that the original synonyms remain valid. (You can chain as many
as 16 synonyms in this manner.)
The following steps chain two synonyms together for the customer table,
which will ultimately reside on the zoo database server. (Note that the
CREATE TABLE statements are not complete.)
1. In the stores6 database on the database server called training:
CREATE TABLE customer (lname CHAR(15)...)
2. On the database server called accntg:
CREATE SYNONYM cust FOR [email protected]
3. On the database server called zoo:
CREATE TABLE customer (lname CHAR(15)...)
4. On the database server called training:
DROP TABLE customer
CREATE SYNONYM customer FOR [email protected]
The synonym cust on the accntg database server now points to the customer
table on the zoo database server.
The following steps show an example of chaining two synonyms together
and changing the table to which a synonym points:
1. On the database server called training:
CREATE TABLE customer (lname CHAR(15)...)
2. On the database server called accntg:
CREATE SYNONYM cust FOR [email protected]
3. On the database server called training:
DROP TABLE customer
CREATE TABLE customer (lastname CHAR(20)...)
The synonym cust on the accntng database server now points to a new
version of the customer table on the training database server.
References
See the DROP SYNONYM statement in this manual.
In the Informix Guide to SQL: Tutorial, see the discussion of synonyms in
Chapter 5 and Chapter 12.
Syntax
1-83
CREATE TABLE
CREATE TABLE
Purpose
Use the CREATE TABLE statement to create a new table in the current
database, place data integrity constraints on its columns or on a combination
of its columns, designate the size of its initial and subsequent extents, and
specify how it is to be locked.
Syntax
,
CREATE
TABLE
Table
Name
p. 1-506
(
Column
Definition
p. 1-87
,
,
+
TEMP
TABLE
temp
table
name
(
)
,
Column
Definition
p. 1-87
Storage
Option
p. 1-105
Constraint
Definition
p. 1-92
)
,
,
Temp Table
Table-Level
Constraint
p. 1-104
WITH NO LOG
temp table name
is the name that you want to assign to the temporary
table. You cannot use the owner. convention.
Usage
Table names must be unique in the same database. However, although
temporary table names must be different from existing table, view, or synonym names in the current database, they need not be different from other
temporary table names used by other users.
ANSI
1-84 Syntax
In an ANSI-compliant database, the combination owner.tablename must be
unique within the database.
CREATE TABLE
By default, all users who have been granted the Connect privilege to a
database have all access privileges (except Alter, Index, and References) to
the new table. To further restrict access, use the REVOKE statement to take all
access away from public (everyone on the system). Then, use the GRANT
statement to designate the access privileges you want to give to specific users.
ANSI
In an ANSI-compliant database, no default table-level privileges exist. You
must grant these privileges explicitly.
SE
You cannot use a ROLLBACK WORK statement to undo a CREATE TABLE
statement. If you roll back a transaction that contains a CREATE TABLE statement, the table remains and you do not receive an error message.
DB
Using the CREATE TABLE statement outside the CREATE SCHEMA statement
generates warnings if you use the -ansi flag or set DBANSIWARN.
ESQL
Using the CREATE TABLE statement generates warnings if you use the -ansi
flag or set DBANSIWARN.
Defining Constraints
When you create a table, several elements must be defined. For example, the
table and columns within that table must have unique names. Also, every
table column must have at least a data type associated with it. You can also,
optionally, place several constraints on a given column. For example, you can
indicate that the column has a specific default value or that data entered into
the column must be checked to meet a specific data requirement.
Putting a constraint on a column is similar to putting an index on a column
(using the CREATE INDEX statement). However, if you use constraints instead
of indexes, you also can implement data integrity constraints and turn effective checking off and on. For information on data integrity constraints, see
Chapter 3 of the Informix Guide to SQL: Tutorial. For information on effective
checking, see the SET CONSTRAINTS statement on page 1-349.
Note: In a database without logging, the only constraint-checking mode available is
detached. Detached checking means that constraint checking is performed on a rowby-row basis.
Syntax
1-85
CREATE TABLE
You can define constraints at either the column or table level. If you choose to
define constraints at the column level, you cannot have multiple-column constraints. In other words, the constraint created at the column level only can
apply to a single column. If you choose to define constraints at the table level,
you can apply constraints to single or multiple columns. At either level,
single-column constraints are treated the same way.
Whenever you place a data restriction on a column, a constraint is created
automatically. You have the option of specifying a name for the constraint. If
you choose not to specify a name for the constraint, the database server
creates a default constraint name for you automatically.
Limits on Constraint Definitions
You can include up to 16 columns, inclusive, in a list of columns for a unique,
primary key, or referential constraint. The total length of all columns cannot
exceed 255 bytes.
SE
You can use up to 8 columns, inclusive, in an INFORMIX-SE list of columns.
The total length of all columns cannot exceed 120 bytes.
Adding or Dropping Constraints
Once you have used the CREATE TABLE statement to place constraints on a
column or set of columns, you must use the ALTER TABLE statement to add
or drop the constraint from the column or composite column list.
Enforcing Primary Key, Unique, and Referential Constraints
Primary key, unique, and referential constraints are implemented either as an
ascending index that allows only unique entries or an ascending index that
allows duplicates. When one of these constraints is placed on a column, the
database server performs the following functions:
• Creates a unique index for a unique or primary-key constraint
• Creates an index that is not unique for the columns specified in
thereferential constraint
However, if a constraint was already created on the same column or set of
columns, an index is not built. Instead, the index is shared by the constraints.
If the existing index is not unique, it is upgraded if a unique or primary-key
constraint is placed on that column.
1-86 Syntax
CREATE TABLE
Because these constraints are enforced through indexes, you cannot create an
index (using the CREATE INDEX statement) for a column that is of the same
type as the constraint placed on that column. For example, if a unique constraint exists on a column, you can create neither an ascending unique index
for that column nor a duplicate ascending index.
Constraint Names
A row is added to the sysindexes system catalog table for each new primary
key, unique, or referential constraint that does not share an index with an
existing constraint. The index name in the sysindexes system catalog table is
created with the following format:
[space]<tabid>_<constraint id>
In this format,tabid and constraint id are from the systables and
sysconstraints system catalog tables, respectively. For example, the index
name may be something like this: “ 121_13” (quotes used to show the space).
The constraint name must be unique within the database. If you do not specify a constraint name, the database server generates one for the sysconstraints
system catalog table using the following template:
<constraint type><tabid>_<constraint id>
In this template, constraint type is the letter u for unique or primary-key
constraints, r is for referential constraints, or c is for check constraints. For
example, the constraint name for a unique constraint might look like this:
u111_14.If the name conflicts with an existing identifier, the database server
returns an error and you must then supply a constraint name.
Column-Definition Option
Column
Definition
column
Data Type
p. 1-424
DEFAULT
Clause
p. 1-88
column
NOT NULL
Column-Level
Constraint
Definition
p. 1-91
is a valid identifier for columns. The column name must be
unique within a table, but you can use the same names in
different tables in the same database. For additional
Syntax
1-87
CREATE TABLE
information about column naming, see “Identifier” on
page 1-469.
Use the column-definition portion of the CREATE TABLE statement to list the
name, data type, default values, and constraints of a single column as well as
to indicate whether the column does not allow duplicate values.
The DEFAULT Clauses
DEFAULT
Clause
literal
DEFAULT
NULL
+
CURRENT
p. 1-440
DATETIME
Field Qualifier
p. 1-428
+
USER
p. 1-438
TODAY
p. 1-439
OL
+
+
SITENAME
p. 1-438
DBSERVERNAME
p. 1-438
literal
represents a literal default value.
The default value is inserted into the column when an explicit value is not
specified. If a default is not specified and the column allows nulls, the default
is NULL. If you designate NULL as the default value for a column, you cannot
use the keywords NOT NULL as part of the column definition.
You cannot designate default values for serial columns. If the column is of
type TEXT or BYTE, you can designate only nulls as the default value.
1-88 Syntax
CREATE TABLE
Literal Terms as Default Values
You can designate literal terms as default values. A literal term is a string of
character or numeric constant characters that you define. To use a literal term
as a default value, follow these rules:
Use the Literal
INTEGER
With Columns of Type
INTEGER, SMALLINT, DECIMAL, MONEY, FLOAT,
SMALLFLOAT
DECIMAL
DECIMAL, MONEY, FLOAT, SMALLFLOAT
CHARACTER
CHAR, NCHAR, NVARCHAR, VARCHAR, DATE
INTERVAL
INTERVAL
DATETIME
DATETIME
• Characters must be enclosed in quotation marks. Date literals must be of
the format specified by the DBDATE environment variable. If DBDATE is
not set, the format mm/dd/yyyy is assumed.
• For information on using a literal INTERVAL, see “Literal INTERVAL as
an Expression” on page 1-441.
• For more information on using a literal DATETIME, see “Literal
DATETIME as an Expression” on page 1-441.
You cannot designate NULL as a default value for a column that is part of a
primary key.
Data-Type Requirements for Certain Columns
The following table indicates the data type requirements for columns that
specify the CURRENT, USER, TODAY, SITENAME, or DBSERVERNAME
functions as the default value.
Function Name
CURRENT
DBSERVERNAME
SITENAME
TODAY
USER
Data-Type Requirement
DATETIME column with matching qualifier
CHAR, NCHAR, NVARCHAR, or VARCHAR column at
least 18 characters long, inclusive
CHAR, NCHAR, NVARCHAR, or VARCHAR column at
least 18 characters long, inclusive
DATE column
CHAR or VARCHAR column at least 8 characters long
Syntax
1-89
CREATE TABLE
The next example creates a table called accounts. In accounts, the acc_type
and acc_descr columns have literal default values, and acc_id defaults to the
user’s login name.
CREATE TABLE accounts (
acc_num INTEGER DEFAULT 0001,
acc_type CHAR(1) DEFAULT 'A',
acc_descr CHAR(20) DEFAULT 'New Account',
acc_id CHAR(8) DEFAULT USER)
Specifying NOT NULL in a Column Definition
If you do not indicate a default value for a column, the default is null unless
you include the NOT NULL keywords after the data type of the column. In
this case, no default value exists for the column. The following example creates the newitems table. In newitems, the column manucode does not have
a default value nor does it allow nulls.
CREATE TABLE newitems (
newitem_num INTEGER,
manucode CHAR(3) NOT NULL,
promotype INTEGER,
descrip CHAR(20))
If you designate a column as NOT NULL (and no default value is specified),
you must enter a value into this column when you insert a row or update that
column in a row. If you do not enter a value, the database server returns an
error. See “Data Type” on page 1-424 for more information.
1-90 Syntax
CREATE TABLE
Column-Level Constraint-Definition Option
Column-Level
Constraint
Definition
UNIQUE
+
+
DISTINCT
CONSTRAINT
Constraint
Name
p. 1-419
PRIMARY
KEY
REFERENCES
Clause
p. 1-94
CHECK
Clause
p. 1-98
Unlike the table-level constraint-definition option, constraints at the column
level are limited to a single column. In other words, you cannot create check,
unique, primary-, or foreign-key multiple-column constraints. For more
information on the unique, primary-key, and check constraints, see the “The
Constraint-Definition Option” on page 1-92.
The following example creates a simple table with a unique and a primarykey constraint and names the two constraints created:
CREATE TABLE accounts (
acc_num INTEGER PRIMARY KEY CONSTRAINT num,
acc_code INTEGER UNIQUE CONSTRAINT code,
acc_descr CHAR(30))
Using Blob Data Types in Constraints
You cannot place a unique, primary-key, or referential constraint on BYTE or
TEXT columns. However, you can check for null or non-null values by placing
a check constraint on a BYTE or TEXT column.
Syntax
1-91
CREATE TABLE
The Constraint-Definition Option
Constraint
Definition
,
(
UNIQUE
column
)
+
+
DISTINCT
CONSTRAINT
PRIMARY
KEY
,
FOREIGN KEY
(
column
)
Constraint
Name
p. 1-419
REFERENCES
Clause
p. 1-94
CHECK
Clause
p. 1-98
column
is the name of the column.
The constraint-definition option allows you to create constraints for a single
column or a set of columns. You can include up to 16 columns in a list of
columns. The total length of all the columns cannot exceed 255 bytes.
SE
You can use up to eight columns, inclusive, in an INFORMIX-SE list of
columns. The total length of all the columns cannot exceed 120 bytes.
Defining a Column as Unique
You can use the UNIQUE keyword to require that a single column or set of
columns accepts only unique data. You cannot insert duplicate values in a
column that has a unique constraint.
Each column named in a unique constraint must be a column in the table and
cannot appear in the constraint list more than once. The following example
creates a simple table that has a unique constraint on one of its columns:
CREATE TABLE accounts (a_name CHAR(12), a_code SERIAL,
UNIQUE (a_name) CONSTRAINT acc_name)
1-92 Syntax
CREATE TABLE
If you want to define the constraint at the column level instead, you simply
include the keywords UNIQUE and CONSTRAINT in the column definition, as
shown in the following example:
CREATE TABLE accounts
(a_name CHAR(12) UNIQUE CONSTRAINT all_name, a_code SERIAL)
You cannot place a unique constraint on a BYTE or TEXT column.
Defining a Column as a Primary Key
A primary key is a column or set of columns that contains a non-null unique
value for each row in a table. A table can have only one primary key, and a column that is defined as a primary key cannot also be defined as unique. In the
previous two examples, a unique constraint was placed on the column
a_name. The next example creates this column as the primary key for the
accounts table:
CREATE TABLE accounts
(a_name CHAR(12), a_code SERIAL, PRIMARY KEY (a_name))
You cannot place a primary-key constraint on a BYTE or TEXT column.
Defining a Column as a Foreign Key
A foreign key joins and establishes dependencies between tables. A foreign
key references a unique or primary key in a table. For every entry in the foreign-key columns, a matching entry must exist in the unique or primary-key
columns if all foreign-key columns contain non-null values. You cannot make
BYTE or TEXT columns foreign keys.
Syntax
1-93
CREATE TABLE
The REFERENCES Clause
REFERENCES
Clause
REFERENCES
Table
Name
p. 1-506
OL
,
(
column
+
)
ON DELETE CASCADE
You can use the REFERENCES clause to reference a column or set of columns.
If you are defining the REFERENCES clause at the column level, you can
reference only a single column.
The table referenced in the REFERENCES clause must reside in the same
database as the created table.
Referenced and Referencing Column Requirements
In a referential relationship, the referenced column is a column or set of
columns within a table that uniquely identifies each row in the table. In other
words, the referenced column or set of columns must be a unique or primary
key constraint. If the referenced columns do not meet this criteria, the
database server returns an error.
Unlike a referenced column, the referencing column or set of columns can
contain null and duplicate values. However, every non-null value in the referencing columns must match a value in the referenced columns. When a
referencing column meets this criteria, it is called a foreign key.
The relationship between referenced and referencing columns is called a parent-child relationship, where the parent is the referenced column (or primary
key) and the child is the referencing column (or foreign key). This parentchild relationship is established through a referential constraint.
A referential constraint can be established between two tables or within the
same table. For example, you can have an employee table where the emp_no
column uniquely identifies every employee through an employee number.
The mgr_no column in that table contains the employee number of the manager who manages that employee. In this case, mgr_no is the foreign key (or
child) that references emp_no, the primary key (or parent).
A referential constraint must have a one-to-one relationship between
referencing and referenced columns. In other words, if the primary key is a
set of columns, then the foreign key also must be a set a columns that
1-94 Syntax
CREATE TABLE
corresponds to the primary key. The following example creates two tables.
The first table has a multiple-column primary key, and the second table has a
referential constraint that references this key.
CREATE TABLE accounts (
acc_num INTEGER,
acc_type INTEGER,
acc_descr CHAR(20),
PRIMARY KEY (acc_num, acc_type))
CREATE TABLE sub_accounts (
sub_acc INTEGER PRIMARY KEY,
ref_num INTEGER NOT NULL,
ref_type INTEGER NOT NULL,
sub_descr CHAR(20),
FOREIGN KEY (ref_num, ref_type) REFERENCES accounts
(acc_num, acc_type))
In this example, the foreign key of the sub_accounts table, ref_num and
ref_type, references the primary key, acc_num and acc_type, in the accounts
table. If, during an insert, you tried to insert a row into the sub_accounts
table whose value for ref_num and ref_type did not exactly correspond to
the values for acc_num and acc_type in an existing row in the accounts table,
the database server returns an error. Likewise, if you attempt to update
sub_accounts with values for ref_num and ref_type that do not correspond
to an equivalent set of values in acc_num and acc_type (from the accounts
table), the database server returns an error.
If you are referencing a primary key in another table, you do not have to state
the primary-key columns in that table explicitly. Referenced tables that do not
specify the columns to be referenced default to the primary-key columns. The
references section of the previous example can be rewritten as shown in the
following example:
...
FOREIGN KEY (ref_num, ref_type) REFERENCES accounts
...
Because acc_num and acc_type is the primary key of the accounts table and
no other columns are specified, the foreign key, ref_num and ref_type,
references those columns.
Syntax
1-95
CREATE TABLE
Data-Type Restrictions
The data types of the referencing and referenced columns must be identical
unless the column is of type SERIAL. You can specify SERIAL for the primary
key of the parent table and INTEGER for the foreign key. In the previous
example, a one-to-one correspondence exists between the data types of the
primary and foreign keys. If the primary-key column is defined as type
SERIAL, the statement is successfully executed.
You cannot place a referential constraint on a BYTE or TEXT column.
Locking Implications
When you create a referential constraint an exclusive lock is placed on the
referenced table. The lock is released when the CREATE TABLE statement is
done. If you are creating a table in a database with transactions and you are
using transactions, the lock is released at the end of the transaction.
Using REFERENCES in a Column Definition
When you use the REFERENCES option at the column-definition level, you
can reference a single column. The following example shows how to create
two tables, accounts and sub_accounts. A referential constraint is created
between the foreign key, ref_num, in the sub_accounts table and the primary
key, acc_num, in the accounts table.
CREATE TABLE accounts (
acc_num INTEGER PRIMARY KEY,
acc_type INTEGER,
acc_descr CHAR(20))
CREATE TABLE sub_accounts (
sub_acc INTEGER PRIMARY KEY,
ref_num INTEGER REFERENCES accounts (acc_num),
sub_descr CHAR(20))
Note that ref_num is not explicitly called a foreign key in the column
definition syntax. At the column level, the foreign-key designation is applied
automatically.
If you are referencing the primary key in another table, you do not need to
specify the referenced table column. In the preceding example, you simply
can reference the accounts table without specifying a column. Because
acc_num is the primary key of the accounts table, it becomes, by default, the
referenced column.
1-96 Syntax
CREATE TABLE
Using the ON DELETE CASCADE Option
Cascading deletes allow you to specify whether you want rows deleted in the
child table when rows are deleted in the parent table. Unless you specify cascading deletes, the default prevents you from deleting data in the parent table
if child tables are associated with the parent table. With the ON DELETE CASCADE clause, when you delete a row in the parent table, any rows associated
with that row (foreign keys) in a child table are also deleted. The principal
advantage to the cascading-deletes feature is that it allows you to reduce the
quantity of SQL statements you need to perform delete actions.
SE
The ON DELETE CASCADE option is not available in INFORMIX-SE
databases.
For example, the all_candy table contains the candy_num column as a
primary key. The hard_candy table refers to the candy_num column as a foreign key. The CREATE TABLE statement shown in the following example creates the hard_candy table with the cascading delete option on the foreign
key:
CREATE TABLE hard_candy
(candy_num INT,
candy_flavor CHAR(20),
FOREIGN KEY (candy_num) REFERENCES all_candy
ON DELETE CASCADE);
With cascading deletes specified on the child table, in addition to deleting a
candy item from the all_candy table, the delete cascades to the hard_candy
table associated with the candy_num foreign key.
You specify cascading deletes with the REFERENCES clause on a column-level
or table-level constraint. You need only the References privilege to indicate
cascading deletes. You do not need the Delete privilege to perform cascading
deletes; however, you do need the Delete privilege on tables referenced in the
DELETE statement. After you indicate cascading deletes, when you delete a
row from a parent table, INFORMIX-OnLine Dynamic Server deletes any
associated matching rows from the child table.
Syntax
1-97
CREATE TABLE
What Happens to Multiple Child Tables
If you have a parent table with two child constraints, one child with
cascading deletes specified and one child without cascading deletes, and you
attempt to delete a row from the parent table that applies to both child tables,
then the delete statement fails and no rows are deleted from either the parent
or child tables.
Locking and Logging
During deletes, the database server places locks on all qualifying rows of the
referenced and referencing tables. You must turn logging on when you perform the deletes. If logging is turned off in a database, even temporarily,
deletes do not cascade. This restriction applies because if logging is turned
off, you have no way to roll back actions. For example, if a parent row is
deleted and the system crashes before the children rows are deleted, the database has dangling children records, which violates referential integrity.
However, when logging is turned back on, subsequent deletes can cascade.
Restriction on Cascading Deletes
Cascading deletes can be used for most deletes. The only exception is
correlated subqueries. In correlated subqueries, the subquery (or inner
SELECT) is correlated when the value it produces depends on a value produced by the outer SELECT statement that contains it. If you have implemented cascading deletes, you cannot write deletes that use a child table in
the correlated subquery. You receive an error when you attempt to delete
from a query that contains such a correlated subquery.
See Chapter 4 of the Informix Guide to SQL: Tutorial for a detailed discussion
about cascading deletes.
The CHECK Clause
CHECK
Clause
CHECK
(
Condition
p. 1-404
)
Check constraints allow you to designate conditions that must be met before
data can be assigned to a column during an INSERT or UPDATE statement. If
a row evaluates to false for any of the check constraints defined on a table
during an insert or update, the database server returns an error.
1-98 Syntax
CREATE TABLE
Check constraints are defined using search conditions. The search condition
cannot contain subqueries; aggregates; host variables; rowids; the CURRENT,
USER, SITENAME, DBSERVERNAME, or TODAY functions; or stored procedure
calls.
Defining Check Constraints at the Column Level
If you define a check constraint at the column level, the only column that the
check constraint can check against is the column itself. In other words, the
check constraint cannot depend upon values in other columns of the table. As
shown in the following example, the table acct_chk has two columns with
check constraints:
CREATE TABLE acct_chk (
chk_id SERIAL PRIMARY KEY,
debit INTEGER REFERENCES accounts (acc_num),
debit_amt MONEY CHECK (debit_amt BETWEEN 0 AND 99999),
credit INTEGER REFERENCES accounts (acc_num),
credit_amt MONEY CHECK (credit_amt BETWEEN 0 AND 99999))
Both debit_amt and credit_amt are MONEY columns with values that must
be between 0 and 99999. If, however, you wanted to test that both columns
had the same value, you cannot create the check constraint at the column
level. To create a constraint that checks values in more than one column, you
must define the constraint at the table level.
Defining Check Constraints at the Table Level
When a check constraint is defined at the table level, each column in the
search condition must be a column in that table. You cannot create a check
constraint for columns across tables. The next example builds the same table
and columns as the previous example. However, the check constraint now
spans two columns in the table.
CREATE TABLE acct_chk (
chk_id SERIAL PRIMARY KEY,
debit INTEGER REFERENCES accounts (acc_num),
debit_amt MONEY,
credit INTEGER REFERENCES accounts (acc_num),
credit_amt MONEY,
CHECK (debit_amt = credit_amt))
In this example, the debit_amt and credit_amt columns must equal each
other or the insert or update fails.
Syntax
1-99
CREATE TABLE
TEMP TABLE Option
Temporary tables created with the CREATE TEMP TABLE statement are called
explicit temporary tables. Explicit temporary tables can also be created with
the SELECT ... INTO TEMP statement.
When an application creates an explicit temporary table, it exists until one of
the following occurs:
• The application terminates
• The application closes the database in which the table was created. In this
case, the table is dropped only if the database does transaction logging
and the temporary table was not created with the WITH NO LOG option.
• The application closes the database in which the table was created and
opens a database in a different database server (a second OnLine or an SE
database server).
When any of these events occur, the temporary table is deleted.
DB
The INFO statement and the Info Menu Option cannot be used with
temporary tables.
Temporary table names must be different from existing table, view, or
synonym names in the current database, however, they need not be different
from other temporary table names used by other users.
Temporary tables that are created as a part of processing are called implicit
temporary tables. Implicit temporary tables are discussed in the INFORMIXOnLine Dynamic Server Administrator’s Guide.
You can specify where temporary tables are created with the CREATE TEMP
TABLE statement, environment variables and ONCONFIG parameters.
OnLine follows this order when storing temporary tables:
• The IN dbspace clause. You can specify the dbspace where you want the
temporary table stored with the IN dbspace clause of the CREATE TABLE
statement.
• The DBSPACETEMP environment variable. If you do not use the IN dbspace
clause, OnLine checks to see if the DBSPACETEMP environment variable
is set. The DBSPACETEMP environment variable lists dbspaces where temporary tables can be stored. This list can be standard dbspaces, temporary
dbspaces, or both. If the environment variable is set, OnLine stores the
temporary table in one of the dbspaces specified in that list.
1-100 Syntax
CREATE TABLE
• The ONCONFIG parameter DBSPACETEMP. You can specify a location for
temporary tables with the ONCONFIG parameter DBSPACETEMP.
If you do not use the IN dbspace clause, the DBSPACETEMP environment
variable, or the ONCONFIG parameter DBSPACETEMP, by default, temporary
tables are created in the same dbspace as your database server.
You can specify more than one dbspace on the environment variable. For
example, you can specify the following dbspace definitions for the
DBSPACETEMP environment variable:
setenv DBSPACETEMP tempspc1:tempspc2:tempspc3
Each temporary table created round-robins to a dbspace. For example, if you
created three temporary tables, the first one, temp1, would go into the
dbspace called tempspc1, the second one, temp2, would go into tempspc2,
and the third one, temp3, would go into tempspc3.
SE
Temporary tables are created in the directory specified by the DBTEMP environment variable. If the DBTEMP environment variable is not set, temporary
tables are created in the directory of the database (that is, the .dbs directory).
If you have the Connect privilege on a database, you can create temporary
tables. Once a temporary table is created, you can build indexes on the table.
However, you are the only user who can see the temporary table.
Syntax
1-101
CREATE TABLE
Temporary-Table Column Definition
Temporary-Table Column
Definition
column
Data Type
p. 1-424
DEFAULT
Clause
p. 1-88
column
NOT NULL
Temp Table
Column
Constraint
Definition
p.1-103
is a valid identifier for columns. The column name must be
unique within a table, but you can use the same names in
different tables in the same database.
You define columns for temporary tables in the same manner as you define
columns for regular database tables. Note that the only difference is the
option for defining column constraints, which is defined in the following
section.
For more information about defining single columns for temporary tables,
see “Column-Definition Option” on page 1-87.
1-102 Syntax
CREATE TABLE
Temporary-Table Column-Constraint Definition
Temp Table Column
Constraint Definition
UNIQUE
+
DISTINCT
PRIMARY
KEY
CHECK
Clause
p. 1-98
Temporary table column constraints are the same as column constraints for
regular tables except that you cannot place referential constraints on columns
in a temporary table. In other words, temporary columns cannot be referenced or referencing columns. The following constraint-definition keywords
cannot be used when you are creating a temporary table:
•
•
REFERENCES
CONSTRAINT
For more information about column constraints in regular tables, see
“Column-Level Constraint-Definition Option” on page 1-91.
Syntax
1-103
CREATE TABLE
Table-Level Constraint for Temporary Tables
Temp Table Table-Level
Constraint
,
(
UNIQUE
column
)
+
DISTINCT
PRIMARY
KEY
CHECK
Clause
p. 1-98
Table-level constraints are defined for temporary tables in the same manner
as regular database tables. However, you cannot place referential constraints
on columns in a temporary table. In other words, temporary columns cannot
be referenced or referencing columns. The following table constraintdefinition keywords cannot be used when you are creating a temporary table:
•
•
•
FOREIGN KEY
REFERENCES
CONSTRAINT
For more information on table-level constraint-definition options, see “The
Constraint-Definition Option” on page 1-92.
WITH NO LOG Option for Temporary Tables
You must use the WITH NO LOG keywords on temporary tables created in
temporary dbspaces.
Using the WITH NO LOG keywords prevents logging of temporary tables in
databases started with logging.
If you use the WITH NO LOG keywords in a CREATE TABLE statement and the
database does not use logging, the WITH NO LOG option is ignored.
Once you turn off the logging on a temporary table, you cannot turn it back
on; a temporary table is, therefore, always logged or never logged.
1-104 Syntax
CREATE TABLE
The following example shows how to prevent logging of temporary tables in
a database that uses logging:
CREATE TEMP TABLE tab2 (fname CHAR(15), lname CHAR(15))
WITH NO LOG
Storage Option
Storage
Option
OL
IN dbspace
SE
Extent Option
p. 1-107
LOCK MODE
p. 1-108
IN ' pathname '
dbspace
is the name of the dbspace in which the database table is to
be stored.
pathname
specifies the full operating system path and filename in
which you want to store the database table, with no
extension to the filename.
The storage option allows you to specify where the database table is stored
and the locking granularity for the table.
The IN dbspace Clause
The IN dbspace clause allows you to isolate a table. The dbspace that you
specify must already exist. If you do not specify the IN dbspace clause, the
default is the dbspace in which the current database resides.
Syntax
1-105
CREATE TABLE
For example, if the stores6 database is in the stockdata dbspace but you want
the customer data to be in a separate dbspace called custdata, use the
following statements:
CREATE DATABASE stores6 IN stockdata
CREATE TABLE customer
(
customer_num
SERIAL(101),
fname
CHAR(15),
lname
CHAR(15),
company
CHAR(20),
address1
CHAR(20),
address2
CHAR(20),
city
CHAR(15),
state
CHAR(2),
zipcode
CHAR(5),
phone
CHAR(18)
)
IN custdata EXTENT SIZE 16
.
.
.
Isolating a table in a separate dbspace
If your table has one or more blob columns, you can store the blob data with
the table data or in a separate blobspace. See the Data Type segment on
page 1-424 for more information. The following example shows how
blobspaces and dbspaces are specified.
1-106 Syntax
CREATE TABLE
The following statement creates the resume table. The data for the table is
stored in the employ dbspace. The data in the resume column is stored with
the table, but the data associated with the photo column is stored in a
blobspace named photo_space.
CREATE TABLE resume
(
fname
lname
phone
recd_date
contact_date
comments
resume
photo
)
IN employ
CHAR(15),
CHAR(15),
CHAR(18),
DATETIME YEAR TO HOUR,
DATETIME YEAR TO HOUR,
VARCHAR(250, 100),
TEXT IN TABLE,
BYTE IN photo_space
Extent Option
Extent Option
EXTENT SIZE
first
pages
NEXT SIZE
next
pages
first pages
is the length in pages of the first extent for the table. The
default size is eight pages.
next pages
is the length in pages for the subsequent extents. The default
size is eight pages.
See Chapter 10 of the Informix Guide to SQL: Tutorial about calculating extent
sizes.
The minimum size of an extent is four pages. If you specify an extent size (or
next extent size) smaller than the minimum size, the database server returns
an error.
Syntax
1-107
CREATE TABLE
The following example specifies a first extent of 20 pages and allows the rest
of the extents to use the default size:
CREATE TABLE emp_info
(
f_name CHAR(20),
l_name CHAR(20),
position CHAR(20),
start_date DATETIME YEAR TO DAY,
comments VARCHAR(255)
)
EXTENT SIZE 20
Revising Extent Sizes for Unloaded Tables
You can revise the CREATE TABLE statements in generated schema files to
revise the extent and next extent sizes of unloaded tables. See the INFORMIX-OnLine Dynamic Server Administrator’s Guide for information about
revising extent sizes.
LOCK MODE Clause
LOCK MODE Clause
LOCK MODE
PAGE
ROW
The default locking granularity is a page.
Row-level locking provides the highest level of concurrency. However, if you
are using many rows at one time, the lock-management overhead can become
significant. You can also exceed the maximum number of locks available,
depending on the configuration of your INFORMIX-OnLine Dynamic Server
system.
Page locking allows you to obtain and release one lock on a whole page of
rows. Page locking is especially useful when you know that the rows are
grouped into pages in the same order that you are using to process all the
rows. For example, if you are processing the contents of a table in the same
order as its cluster index, page locking is especially appropriate.
You can change the lock mode of an existing table with the ALTER TABLE
statement.
1-108 Syntax
CREATE TABLE
The IN pathname Option
SE
The pathname in an IN clause can specify any valid directory and is not
restricted to the directory that contains the current database. This allows
you to spread your tables over multiple disks.
In UNIX, the pathname cannot be longer than 64 characters and must be
within quotes ('). A pathname must be in the following form:
[/directory-name/...]filename
If the pathname in an IN clause specifies a filename that is different from the
table name, always use the table name (rather than the filename) to refer to the
table in subsequent SQL statements.
The creator of the table must have search permissions on all directories in
the path and write permissions on the directory that is to contain the files.
References
See the ALTER TABLE, CREATE INDEX, CREATE DATABASE, and DROP TABLE
statements in this manual. Also see the Data Type segment on page 1-424.
In the Informix Guide to SQL: Tutorial, see the discussions of data integrity in
Chapter 3, creating a table in Chapter 9, and extent sizing in Chapter 10.
Syntax
1-109
CREATE TRIGGER
CREATE TRIGGER
Purpose
Use the CREATE TRIGGER statement to create a trigger on a table in the
database. A trigger is a database object that automatically sets off a specified
set of SQL statements when a specified event occurs.
Syntax
DB
E/C
CREATE TRIGGER
E/CO
Trigger
Name
p. 1-113
+
INSERT
ON
Table
Name
p. 1-506
Action
Clause
p. 1-116
Insert
REFERENCING
Clause
p. 1-118
DELETE
ON
Table
Name
p. 1-506
Action
Clause
1-116
Delete
REFERENCING
Clause
p. 1-119
UPDATE
Clause
p. 1-114
ON
Table
Name
p. 1-506
Action
Clause
Referencing
p. 1-121
Action
Clause
p. 1-116
Update
REFERENCING
Clause
p. 1-120
1-110 Syntax
Action
Clause
Referencing
p. 1-121
Action
Clause
Referencing
p. 1-121
CREATE TRIGGER
Usage
You must be either the owner of the table or have database administrator
(DBA) status to create a trigger on a table.
You can define a trigger with a stand-alone CREATE TRIGGER statement.
DB
You can define a trigger as part of a schema by placing the CREATE TRIGGER
statement inside a CREATE SCHEMA statement.
You can create a trigger only on a table in the current database. You cannot
create a trigger on a temporary table, a view, or a system catalog table.
You cannot create a trigger inside a stored procedure if the procedure is called
inside a data manipulation statement. For example, you cannot create a trigger inside the stored procedure sp_items in the following INSERT statement:
INSERT INTO items EXECUTE PROCEDURE sp_items
See “Data Manipulation Statements” on page 1-6 for a list of data
manipulation statements.
E/C
E/CO
If you are embedding the CREATE TRIGGER statement in an ESQL/C or
ESQL/COBOL program, you cannot use a host variable in the trigger
specification.
You cannot use a stored procedure variable in a CREATE TRIGGER statement.
SE
You cannot use a ROLLBACK WORK statement to undo a CREATE TRIGGER
statement. If you roll back a transaction that contains a CREATE TRIGGER
statement, the trigger remains and you do not receive an error message.
The Trigger Event
The trigger event specifies the type of statement that activates a trigger. The
trigger event can be an INSERT, DELETE, or UPDATE statement. Each trigger
can have only one trigger event. The occurrence of the trigger event is the
triggering statement.
Syntax
1-111
CREATE TRIGGER
For each table, you can define only one trigger that is activated by an INSERT
statement and only one trigger that is activated by a DELETE statement. For
each table, you can define multiple triggers that are activated by UPDATE
statements. See “UPDATE Clause” on page 1-114 for more information about
multiple triggers on the same table.
You cannot define a DELETE trigger event on a table with a referential
constraint that specifies ON DELETE CASCADE.
It is your responsibility to guarantee that the triggering statement returns the
same result with and without the triggered actions. See “Action Clause” on
page 1-116 and “Triggered Action List” on page 1-121 for more information
on the behavior of triggered actions.
If INFORMIX-OnLine Dynamic Server is the database server, a triggering
statement from an external database server can activate the trigger. As shown
in the following example, an insert trigger on newtab, managed by
dbserver1, is activated by an INSERT statement from dbserver2. The trigger
executes as if the insert originated on dbserver1.
-- Trigger on stores6@dbserver1:newtab
CREATE TRIGGER ins_tr INSERT ON newtab
REFERENCING new AS post_ins
FOR EACH ROW(EXECUTE PROCEDURE nt_pct (post_ins.mc));
-- Triggering statement from dbserver2
INSERT INTO stores6@dbserver1:newtab
SELECT item_num, order_num, quantity, stock_num, manu_code,
total_price FROM items;
Note: An insert trigger is set off by an insert to an external database table.
Trigger Events with Cursors
If the triggering statement uses a cursor, the complete trigger is activated
each time the statement executes. For example, if you declare a cursor for a
triggering INSERT statement, each PUT statement executes the complete trigger. Similarly, if a triggering UPDATE or DELETE statement contains the
clause WHERE CURRENT OF, each update or delete activates the complete
trigger. Note that this behavior is different from what occurs when a triggering statement does not use a cursor and updates multiple rows. In this case,
the set of triggered actions executes only once. See “Action Clause” on
page 1-116 for more information on the execution of triggered actions.
1-112 Syntax
CREATE TRIGGER
Privileges on the Trigger Event
You must have the appropriate Insert, Delete, or Update privilege on the
triggering table to execute the INSERT, DELETE, or UPDATE statement that is
the trigger event. The triggering statement might still fail, however, if you do
not have the privileges necessary to execute one of the SQL statements in the
action clause. When the triggered actions are executed, the database server
checks your privileges for each SQL statement in the trigger definition as if
the statement were being executed independently of the trigger. See “Privileges to Execute Triggered Actions” on page 1-129 for information on the
privileges you need to execute a trigger.
Impact of Triggers
The INSERT, DELETE, and UPDATE statements that initiate triggers might
appear to execute slowly because they activate additional SQL statements,
and the user might not know that other actions are occurring.
The execution time for a triggering data manipulation statement depends on
the complexity of the triggered action and whether it, in turn, initiates other
triggers. Obviously, the elapsed time for the triggering data manipulation
statement increases as the number of cascading triggers increases. See “Cascading Triggers” on page 1-130 for more information on triggers initiating
other triggers.
Trigger Name
Trigger
Name
Identifier
p. 1-469
owner.
owner.
is the user name of the owner of the trigger.
The trigger name follows the same syntax rules as other SQL identifiers. See
“Identifier” on page 1-469.
Syntax
1-113
CREATE TRIGGER
UPDATE Clause
UPDATE
Clause
UPDATE
,
OF
column name
column name
is the name of a column that activates the trigger.
If the trigger event is an UPDATE statement, the trigger executes when any
column in the triggering column list is updated.
If you specify one or more triggering column names, the column names must
belong to the table on which you create the trigger. If you do not specify a list
of triggering columns, the default list consists of all the columns in the table
on which you create the trigger.
If the triggering UPDATE statement updates more than one of the triggering
columns in a trigger, the trigger executes only once.
Defining Multiple Update Triggers
If you define more than one update trigger event on a table, the column lists
of the triggers must be mutually exclusive. For example, of the following triggers on the items table, trig3 is illegal because its column list includes
stock_num, which is a triggering column in trig1.
CREATE TRIGGER trig1 UPDATE OF item_num, stock_num ON items
REFERENCING OLD AS pre NEW AS post
FOR EACH ROW(EXECUTE PROCEDURE proc1());
CREATE TRIGGER trig2 UPDATE OF manu_code ON items
BEFORE(EXECUTE PROCEDURE proc2());
-- Illegal trigger: stock_num occurs in trig1
CREATE TRIGGER trig3 UPDATE OF order_num, stock_num ON items
BEFORE(EXECUTE PROCEDURE proc3());
Multiple update triggers on a table cannot include the same columns
1-114 Syntax
CREATE TRIGGER
When an UPDATE Statement Activates Multiple Triggers
When an UPDATE statement updates multiple columns that have different
triggers, the column numbers of the triggering columns determine the order
of trigger execution. Execution begins with the smallest triggering column
number and proceeds in order to the largest triggering column number. The
following example shows that table taba has four columns (a, b, c, d):
CREATE TABLE taba (a int, b int, c int, d int)
Define trig1 as an update on columns a and c, and define trig2 as an update
on columns b and d, as shown in the following example:
CREATE TRIGGER trig1 UPDATE OF a, c ON taba
AFTER (UPDATE tabb SET y = y + 1);
CREATE TRIGGER trig2 UPDATE OF b, d ON taba
AFTER (UPDATE tabb SET z = z + 1);
The triggering statement is shown in the following example:
UPDATE taba SET (b, c) = (b + 1, c + 1)
Then trig1 for columns a and c executes first, and trig2 for columns b and d
executes next. In this case, the smallest column number in the two triggers is
column 1 (a) and the next is column 2 (b).
Syntax
1-115
CREATE TRIGGER
Action Clause
Action
Clause
BEFORE
Triggered
Action List
p. 1-121
FOR EACH
ROW
FOR EACH
ROW
Triggered
Action List
p. 1-121
Triggered
Action List
p. 1-121
AFTER
AFTER
AFTER
Triggered
Action List
p. 1-121
Triggered
Action List
p. 1-121
Triggered
Action List
p. 1-121
The action clause specifies when the triggered actions occur and defines what
they are. You must define at least one triggered action, using the keywords
BEFORE, FOR EACH ROW, or AFTER to indicate when the action occurs relative to the triggering statement. You can define triggered actions for all three
options on a single trigger, but you must order them in sequence: BEFORE,
FOR EACH ROW, and then AFTER. You cannot follow a FOR EACH ROW triggered action list with a BEFORE triggered action list. If the first triggered
action list is FOR EACH ROW, an AFTER action list is the only option that can
follow it. See “Action Clause Referencing” on page 1-121 for more
information on the action clause when a REFERENCING clause is present.
BEFORE Actions
The BEFORE triggered action or actions execute once before the triggering
statement executes. If the triggering statement does not process any rows, the
BEFORE triggered actions still execute because it is not yet known whether
any row is affected.
FOR EACH ROW Actions
The FOR EACH ROW triggered action or actions execute once for each row
that the triggering statement affects. The triggered SQL statement executes
after the triggering statement processes each row.
If the triggering statement does not insert, delete, or update any rows, the
FOR EACH ROW triggered actions do not execute.
1-116 Syntax
CREATE TRIGGER
AFTER Actions
An AFTER triggered action or actions execute once after the action of the
triggering statement is complete. If the triggering statement does not process
any rows, the AFTER triggered actions still execute.
Actions of Multiple Triggers
When an UPDATE statement activates multiple triggers, the triggered actions
merge. Assume that taba has columns a, b, c, and d as shown in the following
example:
CREATE TABLE taba (a int, b int, c int, d int)
Next, assume that you define trig1 on columns a and c, and trig2 on columns
b and d. If both triggers have triggered actions that are executed BEFORE, FOR
EACH ROW, and AFTER, then the triggered actions are executed in the
following sequence:
1. BEFORE action list for trigger (a, c)
2. BEFORE action list for trigger (b, d)
3. FOR EACH ROW action list for trigger (a, c)
4. FOR EACH ROW action list for trigger (b, d)
5. AFTER action list for trigger (a, c)
6. AFTER action list for trigger (b, d)
The database server treats the triggers as a single trigger, and the triggered
action is the merged-action list. All the rules governing a triggered action
apply to the merged list as one list, and no distinction is made between the
two original triggers.
Guaranteeing Row-Order Independence
In a FOR EACH ROW triggered-action list, the result might depend on the
order of the rows being processed. You can ensure that the result is
independent of row order by following these suggestions:
• Avoid selecting the triggering table in the FOR EACH ROW section. If the
triggering statement affects multiple rows in the triggering table, the
result of the SELECT statement in the FOR EACH ROW section varies as
Syntax
1-117
CREATE TRIGGER
each row is processed. This also applies for any cascading triggers. (See
“Cascading Triggers” on page 1-130.)
• In the FOR EACH ROW section, avoid updating a table with values derived
from the current row of the triggering table. If the triggered actions modify any row in the table more than once, the final result for that row
depends on the order in which rows from the triggering table are
processed.
• Avoid modifying a table in the FOR EACH ROW section that is selected by
another triggered statement in the same FOR EACH ROW section, including any cascading triggered actions. If you modify a table in this section
and later refer to it, the changes to the table might not be complete at the
time you refer to it. Consequently, the result might differ, depending on
the order in which rows are processed.
The database server does not enforce rules to prevent these situations
because doing so would restrict the set of tables from which a triggered
action can select. Furthermore, the result of most triggered actions is independent of row order. Consequently, you are responsible for ensuring that
the results of the triggered actions are independent of row order.
INSERT REFERENCING Clause
INSERT
REFERENCING
Clause
REFERENCING
correlation name
NEW
AS
correlation name
is a name you assign to a new column value so that you
can refer to it within the triggered actions. The new column value is the column value after the triggering statement executes. Once you assign a correlation name, you
can use it only inside the FOR EACH ROW triggered action.
(See “Action Clause Referencing” on page 1-121.) The correlation name follows the same syntax rules as other identifiers. (See “Identifier” on page 1-469.) The correlation
name must be unique within the CREATE TRIGGER
statement.
To use the correlation name, precede the column name with the correlation
name, followed by a period. For example, if the new correlation name is post,
you refer to the new value for the column fname as post.fname.
1-118 Syntax
CREATE TRIGGER
If the trigger event is an INSERT statement, using the old correlation name as
a qualifier causes an error because no value exists before the row is inserted.
See “Using Correlation Names in Triggered Actions” on page 1-124 for the
rules governing the use of correlation names.
You can use the INSERT REFERENCING clause only if you define a FOR EACH
ROW triggered action.
DELETE REFERENCING Clause
DELETE
REFERENCING
Clause
REFERENCING
correlation name
OLD
AS
correlation name
is a name you assign to an old column value so that you
can reference it within the triggered actions. The old column value in the triggering table is its value before the
triggering statement executes. Once you assign a correlation name, you can use it only inside the FOR EACH ROW
triggered action. (See “Action Clause Referencing” on
page 1-121.) The correlation name follows the same syntax rules as other identifiers. (See “Identifier” on
page 1-469.) The correlation name must be unique within
the CREATE TRIGGER statement.
You use the correlation name to refer to an old column value by preceding the
column name with the correlation name and a period (.). For example, if the
old correlation name is pre, you refer to the old value for the column fname
as pre.fname.
If the trigger event is a DELETE statement, use of the new correlation name as
a qualifier causes an error because the column has no value after the row is
deleted. See “Using Correlation Names in Triggered Actions” on page 1-124
for the rules governing the use of correlation names.
You can use the DELETE REFERENCING clause only if you define a FOR EACH
ROW triggered action.
Syntax
1-119
CREATE TRIGGER
UPDATE REFERENCING Clause
UPDATE
REFERENCING
Clause
REFERENCING
1
correlation
name
OLD
AS
1
correlation
name
NEW
AS
correlation name
is a name you assign to an old or new column value so
that you can refer to that value within the triggered
action. The old column value in the triggering table is its
value before the triggering statement made the change; its
new value is its value after the triggering statement executes. Once you assign a correlation name, you can use it
only inside the FOR EACH ROW triggered action. (See
“Action Clause Referencing” on page 1-121.) The correlation name follows the same syntax rules as other identifiers. (See “Identifier” on page 1-469.) The correlation name
must be unique within the CREATE TRIGGER statement.
You use the correlation name to refer to an old or new column value by
preceding the column name with the correlation name and a period (.). For
example, if the new correlation name is post, you refer to the new value for
the column fname as post.fname.
If the trigger event is an UPDATE statement, you can define both old and new
correlation names to refer to column values before and after the triggering
update. See “Using Correlation Names in Triggered Actions” on page 1-124
for the rules governing the use of correlation names.
You can use the UPDATE REFERENCING clause only if you define a FOR EACH
ROW triggered action.
1-120 Syntax
CREATE TRIGGER
Action Clause Referencing
Action
Clause
Referencing
BEFORE
FOR EACH
ROW
Triggered
Action List
p. 1-121
Triggered
Action List
p. 1-121
AFTER
Triggered
Action List
p. 1-121
If the CREATE TRIGGER statement contains an INSERT REFERENCING, a
DELETE REFERENCING, or an UPDATE REFERENCING clause, you must
include a FOR EACH ROW triggered-action list in the action clause. You can
also include BEFORE and AFTER triggered-action lists, but they are optional.
See “Action Clause” on page 1-116 for information on the BEFORE, FOR EACH
ROW, and AFTER triggered-action lists.
Triggered Action List
Triggered
Action List
,
,
(
WHEN
(
Condition
p. 1-404
)
INSERT
Statement
p. 1-245
)
DELETE
Statement
p. 1-159
UPDATE
Statement
p. 1-383
EXECUTE
PROCEDURE
p. 1-192
The triggered action consists of an optional WHEN condition and the action
statements. Objects that are referenced in the triggered action—that is, tables,
columns, and stored procedures—must exist when the CREATE TRIGGER
statement is executed. This applies only to objects that are referenced directly
in the trigger definition.
Syntax
1-121
CREATE TRIGGER
The WHEN Condition
The WHEN condition lets you make the triggered action dependent on the
outcome of a test. When you include a WHEN condition in a triggered action,
if the triggered action evaluates to true, the actions in the triggered action list
execute in the order in which they appear. If the WHEN condition evaluates
to false or unknown, the actions in the triggered action list are not executed. If
the triggered action is in a FOR EACH ROW section, its search condition is
evaluated for each row.
For example, the triggered action in the following trigger executes only if the
condition in the WHEN clause is true:
CREATE TRIGGER up_price
UPDATE OF unit_price ON stock
REFERENCING OLD AS pre NEW AS post
FOR EACH ROW WHEN(post.unit_price > pre.unit_price * 2)
(INSERT INTO warn_tab VALUES(pre.stock_num, pre.order_num,
pre.unit_price, post.unit_price, CURRENT))
Triggered action with optional WHEN condition
A stored procedure that executes inside the WHEN condition carries the same
restrictions as a stored procedure that is called in a data manipulation statement. See “CREATE PROCEDURE” on page 1-68 for more information about
a stored procedure that is called within a data manipulation statement.
The Action Statements
The triggered-action statements can be INSERT, DELETE, UPDATE, or
EXECUTE PROCEDURE statements. If a triggered-action list contains multiple
statements, these statements execute in the order in which they appear in the
list.
SE
1-122 Syntax
In INFORMIX-SE, all objects referenced in the triggered actions must be in
the current database.
CREATE TRIGGER
Achieving a Consistent Result
To guarantee that the triggering statement returns the same result with and
without the triggered actions, make sure that the triggered actions in the
BEFORE and FOR EACH ROW sections do not modify any table referenced in
the following clauses:
•
•
•
•
WHERE clause
SET clause in the UPDATE statement
SELECT clause
EXECUTE PROCEDURE clause in a multiple row INSERT statement
Using Keywords
If you use the keywords INSERT, DELETE, UPDATE, or EXECUTE as an
identifier in any of the following clauses inside a triggered action list, you
must qualify them by the owner name, or the table name, or both:
•
•
•
•
FROM clause of a SELECT statement
INTO clause of the EXECUTE PROCEDURE statement
GROUP BY clause
SET clause of the UPDATE statement
You get a syntax error if these keywords are not qualified when you use these
clauses inside a triggered action.
If you use the keyword as a column name, it must be qualified by the table
name—for example, table.update. If both the table name and the column
name are keywords, they must be qualified by the owner name—for example, owner.insert.update. If the owner name, table name, and column name
are all keywords, the owner name must be in quotes—for example,
'delete'.insert.update. The only exception is when these keywords are the
first table or column name in the list; then you do not have to qualify them.
For example, delete in the following statement does not need to be qualified
because it is the first column listed in the INTO clause:
CREATE TRIGGER t1 UPDATE OF b ON tab1
FOR EACH ROW (EXECUTE PROCEDURE p2()
INTO delete, d)
Syntax
1-123
CREATE TRIGGER
The following examples show instances where you must qualify the column
name or the table name:
CREATE TRIGGER t1 INSERT ON tab1
BEFORE (INSERT INTO tab2 SELECT * FROM tab3,
'owner1'.update)
FROM clause of a SELECT statement
CREATE TRIGGER t3 UPDATE OF b ON tab1
FOR EACH ROW (EXECUTE PROCEDURE p2() INTO
d, tab1.delete)
INTO clause of an EXECUTE PROCEDURE statement
CREATE TRIGGER t4 DELETE ON tab1
BEFORE (INSERT INTO tab3 SELECT deptno, SUM(exp)
FROM budget GROUP BY deptno, budget.update)
GROUP BY clause of a SELECT statement
CREATE TRIGGER t2 UPDATE OF a ON tab1
BEFORE (UPDATE tab2 SET a = 10, tab2.insert = 5)
SET clause of an UPDATE statement
Using Correlation Names in Triggered Actions
The following rules apply when you use correlation names in triggered
actions:
• You can use the correlation names for the old and new column values
only in statements in the FOR EACH ROW triggered-action list. You can
use the old and new correlation names to qualify any column in the triggering table in either the WHEN condition or the triggered SQL
statements.
1-124 Syntax
CREATE TRIGGER
• The old and new correlation names refer to all rows affected by the
triggering statement.
• You cannot use the correlation name to qualify a column name in the
GROUP BY, the SET, or the COUNT DISTINCT clause.
• The scope of the correlation names is the entire trigger definition. This
scope is statically determined, meaning that it is limited to the trigger definition. Thus, it does not encompass cascading triggers or columns that
are qualified by a table name in a stored procedure that is a triggered
action.
When to Use Correlation Names
In an SQL statement in a FOR EACH ROW triggered action, you must qualify
all references to columns in the triggering table with either the old or new correlation name, unless the statement is valid independent of the triggered
action.
In other words, if a column name inside a FOR EACH ROW triggered action
list is not qualified by a correlation name, even if it is qualified by the triggering table name, it is interpreted as if the statement is independent of the
triggered action. No special effort is made to search the definition of the
triggering table for the nonqualified column name.
For example, assume that the following DELETE statement is a triggered
action inside the FOR EACH ROW section of a trigger:
DELETE FROM tab1 WHERE col_c = col_c2
For the statement to be valid, both col_c and col_c2 must be columns from
tab1. If col_c2 is intended to be a correlation reference to a column in the triggering table, it must be qualified by either the old or the new correlation
name. If col_c2 is not a column in tab1 and is not qualified by either the old
or new correlation name, you get an error.
When a column is not qualified by a correlation name, and the statement is
valid independent of the triggered action, the column name refers to the current value in the database. In the triggered action for trigger t1 in the
following example, mgr in the WHERE clause of the correlated subquery is an
Syntax
1-125
CREATE TRIGGER
unqualified column from the triggering table. In this case, mgr refers to the
current column value in empsal because the INSERT statement is valid
independent of the triggered action.
CREATE
CREATE
CREATE
CREATE
DATABASE db1;
TABLE empsal (empno INT, salary INT, mgr INT);
TABLE mgr (eno INT, bonus INT);
TABLE biggap (empno INT, salary INT, mgr INT);
CREATE TRIGGER t1 UPDATE OF salary ON empsal
AFTER (INSERT INTO biggap SELECT * FROM empsal WHERE salary <
(SELECT bonus FROM mgr WHERE eno = mgr));
In a triggered action, an unqualified column name from the triggering table
refers to the current column value, but only when the triggered statement is
valid independent of the triggered action.
Qualified Versus Unqualified Value
The following table summarizes the value retrieved when you use the
column name qualified by the old correlation name and the column name
qualified by the new correlation name.
Trigger Event
old.col
new.col
INSERT
UPDATE
(column updated)
UPDATE
(column not updated)
DELETE
no value (error)
original value
inserted value
current value (N)
original value
current value (U)
original value
no value (error)
Refer to the following key when reading the table:
original
value before the triggering statement
current
value after the triggering statement
N
cannot be changed by triggered action
U
can be updated by triggered statements; value may be
different than original value because of preceding triggered
actions
Outside a FOR EACH ROW triggered-action list, you cannot qualify a column
from the triggering table with either the old correlation name or the new correlation name; thus, it always refers to the current value in the database.
1-126 Syntax
CREATE TRIGGER
Action on the Triggering Table
You cannot reference the triggering table in any triggered SQL statement,
with the following exceptions:
• The trigger event is UPDATE and the triggered SQL statement is also
UPDATE, and the columns in both statements, including any
nontriggering columns in the triggering UPDATE, are mutually exclusive.
For example, if the following UPDATE statement, which updates columns
a and b of tab1, is the triggering statement:
UPDATE tab1 SET (a, b) = (a + 1, b + 1)
The first UPDATE statement in the following example is a valid triggered
action, but the second one is not because it updates column b again:
UPDATE tab1 SET c = c + 1; -- OK
UPDATE tab1 SET b = b + 1;-- ILLEGAL
• The triggered SQL statement is a SELECT statement. The SELECT
statement can be a triggered statement in the following instances:
o
The SELECT statement appears in a subquery in the WHEN clause or a
triggered-action statement.
o
The triggered action is a stored procedure and the SELECT statement
appears inside the stored procedure.
This rule, which states that a triggered SQL statement cannot reference the
triggering table, with the two noted exceptions, applies recursively to all cascading triggers, which are considered part of the initial trigger. This means
that a cascading trigger cannot update any columns in the triggering table
that were updated by the original triggering statement, including any nontriggering columns affected by that statement. For example, assume the
following UPDATE statement is the triggering statement:
UPDATE tab1 SET (a, b) = (a + 1, b + 1)
Syntax
1-127
CREATE TRIGGER
Then in the cascading triggers shown in the following example, trig2 fails at
run time because it references column b, which is updated by the triggering
UPDATE statement. See “Cascading Triggers” on page 1-130 for more
information about cascading triggers.
CREATE TRIGGER trig1 UPDATE OF a ON tab1
AFTER (UPDATE tab2 set e = e + 1);
-- Valid
CREATE TRIGGER trig2 UPDATE of e ON tab2
AFTER (UPDATE tab1 set b = b + 1);
-- Invalid
Rules for Stored Procedures
The following rules apply to a stored procedure that is used as a triggered
action:
• The stored procedure cannot be a cursory procedure (that is, a procedure
that returns more than one row) in a place where only one row is
expected.
• When an EXECUTE PROCEDURE statement is the triggered action, you can
specify the INTO clause only for an UPDATE trigger when the triggered
action occurs in the FOR EACH ROW section. In this case, the INTO clause
can contain only column names from the triggering table. The following
statement illustrates the appropriate use of the INTO clause:
CREATE TRIGGER upd_totpr UPDATE OF quantity ON items
REFERENCING OLD AS pre_upd NEW AS post_upd
FOR EACH ROW(EXECUTE PROCEDURE calc_totpr(pre_upd.quantity,
post_upd.quantity, pre_upd.total_price)
INTO total_price)
When the INTO clause appears in the EXECUTE PROCEDURE statement,
the database server updates the columns named there with the values
returned from the stored procedure. The database server performs the
update immediately upon returning from the stored procedure. See
“EXECUTE PROCEDURE” on page 1-192 for more information about the
statement.
• You cannot use the old or the new correlation name inside the stored
procedure. If you need to use the corresponding values in the procedure,
you must pass them as parameters. The stored procedure should be independent of triggers, and the old or the new correlation name do not have
any meaning outside the trigger.
1-128 Syntax
CREATE TRIGGER
• You cannot use a BEGIN WORK, COMMIT WORK, ROLLBACK WORK, or
SET CONSTRAINTS statement.
When you use a stored procedure as a triggered action, the objects that it
references are not checked until the procedure is executed.
Privileges to Execute Triggered Actions
If you are not the trigger owner but the trigger owner’s privileges include the
WITH GRANT OPTION privilege, you inherit the owner’s privileges as well as
the WITH GRANT OPTION privilege, for each triggered SQL statement. You
have these privileges in addition to your own privileges.
If the triggered action is a stored procedure, you must have the Execute
privilege on the procedure, or the owner of the trigger must have the Execute
privilege and the WITH GRANT OPTION privilege. Inside the stored procedure, you do not carry the privileges of the trigger owner. Instead you have
the following privileges:
1. The triggered action is a DBA-privileged procedure.
When you are granted the Execute privilege on the procedure the server
automatically grants you DBA privileges for the procedure execution.
These DBA privileges are available only to you when you are executing
the procedure.
2. The triggered action is an owner-privileged procedure.
If the procedure owner has the WITH GRANT OPTION right for the necessary privileges on the underlying objects, you inherit these privilege
when you are granted the Execute privilege. In this case, all the nonqualified objects that the procedure references are qualified by the name of the
procedure owner.
If the procedure owner does not have the WITH GRANT OPTION privilege,
you have your original privileges on the underlying objects when the
procedure executes.
For more information on privileges on stored procedures see Chapter 14 in
the Informix Guide to SQL: Tutorial.
Creating a Triggered Action Anyone Can Use
To create a trigger that is executable by anyone who has the privileges to execute the triggering statement, you can ask the DBA to create a DBA-privileged
procedure and grant you the Execute privilege with the WITH GRANT
OPTION privilege. You then use the DBA-privileged procedure as the triggered action. Anyone can execute the triggered action because the
Syntax
1-129
CREATE TRIGGER
DBA-privileged procedure carries the WITH GRANT OPTION privilege. When
you activate the procedure, the database server applies privilege-checking
rules for a DBA. For more information about privileges on stored procedures,
see Chapter 14 of the Informix Guide to SQL: Tutorial.
Cascading Triggers
The database server allows triggers to cascade, meaning that the triggered
actions of a trigger can activate another trigger. The maximum number of
triggers in a cascading sequence is 61, the initial trigger plus a maximum of
60 cascading triggers. When the number of cascading triggers in a series
exceeds the maximum, the database server returns error number -748, as
shown in the following example:
Exceeded limit on maximum number of cascaded triggers.
The following example illustrates a series of cascading triggers that enforce
referential integrity on the manufact, stock, and items tables in the stores6
database. When a manufacturer is deleted from the manufact table, the first
trigger, del_manu, deletes all the manufacturer’s items from the stock table.
Each delete in the stock table activates a second trigger, del_items, that
deletes all the manufacturer’s items from the items table. Finally, each delete
in the items table triggers the stored procedure log_order, which creates a
record of any orders in the orders table that can no longer be filled.
CREATE TRIGGER del_manu
DELETE ON manufact
REFERENCING OLD AS pre_del
FOR EACH ROW(DELETE FROM stock
WHERE manu_code = pre_del.manu_code);
CREATE TRIGGER del_stock
DELETE ON stock
REFERENCING OLD AS pre_del
FOR EACH ROW(DELETE FROM items
WHERE manu_code = pre_del.manu_code);
CREATE TRIGGER del_items
DELETE ON items
REFERENCING OLD AS pre_del
FOR EACH ROW(EXECUTE PROCEDURE log_order(pre_del.order_num));
When you are not using logging or you are using the INFORMIX-SE database
server, with or without logging, referential integrity constraints on both the
manufact and stock tables would prohibit the triggers in this example from
executing. When you use INFORMIX-OnLine Dynamic Server with logging,
1-130 Syntax
CREATE TRIGGER
however, the triggers execute successfully because constraint checking is
deferred until all the triggered actions are complete, including the actions of
cascading triggers. See “Constraint Checking” on page 1-131 for more information about how constraints are handled when triggers execute.
The database server prevents loops of cascading triggers by not allowing you
to modify the triggering table in any cascading triggered action, except an
UPDATE statement, which does not modify any column updated by the
triggering UPDATE statement.
Constraint Checking
When you use logging, INFORMIX-OnLine Dynamic Server defers constraint
checking on the triggering statement until after the statements in the triggered action list execute. OnLine effectively executes a SET CONSTRAINTS
ALL DEFERRED statement before executing the triggering statement. After
the triggered action is completed, it effectively executes a SET CONSTRAINTS
constr_name IMMEDIATE statement to check the constraints that were
deferred. This allows you to write triggers so that the triggered action can
resolve any constraint violations that the triggering statement creates.
Consider the following example, in which the table child has constraint r1,
which references the table parent. You define trigger trig1 and activate it with
an INSERT statement. In the triggered action, trig1 checks to see if parent has
a row with the value of the current cola in child. If not, it inserts it.
CREATE TABLE parent (cola INT PRIMARY KEY);
CREATE TABLE child (cola INT REFERENCES parent CONSTRAINT r1);
CREATE TRIGGER trig1 INSERT ON child
REFERENCING NEW AS new
FOR EACH ROW
WHEN((SELECT COUNT (*) FROM parent
WHERE cola = new.cola) = 0)
-- parent row does not exist
(INSERT INTO parent VALUES (new.cola));
When you insert a row to a table that is the child table in a referential
constraint, the row might not exist in the parent table. The database server
does not immediately return this error on a triggering statement. Instead, it
allows the triggered action to resolve the constraint violation by inserting the
corresponding row into the parent table. As shown in the previous example,
you can check within the triggered action to see whether the parent row
exists and, if so, bypass the insert.
Syntax
1-131
CREATE TRIGGER
OL
For an INFORMIX-OnLine Dynamic Server database without logging,
OnLine does not defer constraint checking on the triggering statement. In
this case, it immediately returns an error if the triggering statement violates
a constraint.
OnLine does not allow the SET CONSTRAINTS statement in a triggered
action. OnLine checks this restriction when you activate a trigger because
the statement could occur inside a stored procedure.
SE
For an INFORMIX-SE database, with or without logging, constraint
checking occurs prior to the triggered action. If a constraint violation results
from the triggering statement, INFORMIX-SE returns an error immediately.
Preventing Triggers from Overriding Each Other
When you activate multiple triggers with an UPDATE statement, it is possible
for a trigger to override the changes made by an earlier trigger. If you do not
want the triggered actions to interact, you can split the UPDATE statement
into multiple UPDATE statements, each of which updates an individual column. As another alternative, you can create a single update trigger for all columns that require a triggered action. Then, inside the triggered action, you
can test for the column being updated and apply the actions in the desired
order. This approach, however, is different than having the database server
apply the actions of individual triggers, and it has the following disadvantages:
• If the trigger has a BEFORE action, it applies to all columns because you
cannot yet detect whether a column has changed.
• If the triggering UPDATE statement sets a column to the current value,
you cannot detect the update and, therefore, the triggered action is
1-132 Syntax
CREATE TRIGGER
skipped. You might want to execute the triggered action even though the
value of the column has not changed.
The Client/Server Environment
In a database under INFORMIX-OnLine Dynamic Server, the statements
inside the triggered action can affect tables in external databases. The following example shows an update trigger on dbserver1, which triggers an update
to items on dbserver2:
CREATE TRIGGER upd_nt UPDATE ON newtab
REFERENCING new AS post
FOR EACH ROW(UPDATE stores6@dbserver2:items
SET quantity = post.qty WHERE stock_num = post.stock
AND manu_code = post.mc)
If a statement from an external database server initiates the trigger, however,
and the triggered action affects tables in an external database, the triggered
actions fail. For example, the following combination of triggered action and
triggering statement results in an error when the triggering statement
executes:
-- Triggered action from dbserver1 to dbserver3:
CREATE TRIGGER upd_nt UPDATE ON newtab
REFERENCING new AS post
FOR EACH ROW(UPDATE stores6@dbserver3:items
SET quantity = post.qty WHERE stock_num = post.stock
AND manu_code = post.mc);
-- Triggering statement from dbserver2:
UPDATE stores6@dbserver1:newtab
SET qty = qty * 2 WHERE s_num = 5
AND mc = 'ANZ';
SE
In a database under INFORMIX-SE, all objects referenced in the triggered
actions must be in the current database.
Syntax
1-133
CREATE TRIGGER
Logging and Recovery
You can create triggers for databases, with and without logging. However,
when the database does not have logging, you cannot rollback when the triggering statement fails. In this case, it is your responsibility to maintain data
integrity in the database.
In INFORMIX-OnLine Dynamic Server, if the trigger fails and the database
has transactions, all triggered actions and the triggering statement are rolled
back because the triggered actions are an extension of the triggering
statement. The rest of the transaction, however, is not rolled back.
SE
In INFORMIX-SE, if you explicitly begin a transaction, you must explicitly
roll back the whole transaction. If the database has no transactions, a possibility exists that data integrity might be violated when the triggered actions
fail.
Even if the database has logging, any data definition statement in the
triggered action cannot be rolled back. Again, it is your responsibility to
maintain data integrity as well as integrity of the database structure.
Note that the row action of the triggering statement occurs before the
triggered actions in the FOR EACH ROW section. If the triggered action fails
for a database without logging, the application must restore the row that was
changed by the triggering statement to its previous value.
When you use a stored procedure as a triggered action, if you terminate the
procedure in an exception-handling section, any actions that modify data
inside that section are rolled back along with the triggering statement. In the
following partial example, when the exception handler traps an error, it
inserts a row into the table logtab:
ON EXCEPTION IN (-201)
INSERT INTO logtab values (errno, errstr);
RAISE EXCEPTION -201
END EXCEPTION
When the RAISE EXCEPTION statement returns the error, however, the
database server rolls back this insert because it is part of the triggered actions.
If the procedure is executed outside a triggered action, the insert is not rolled
back.
1-134 Syntax
CREATE TRIGGER
The stored procedure that implements a triggered action cannot contain any
BEGIN WORK, COMMIT WORK, or ROLLBACK WORK statements. If the database has logging, you must either begin an explicit transaction before the triggering statement or the statement itself must be an implicit transaction. In
any case, another transaction-related statement cannot appear inside the
stored procedure.
You can use triggers to enforce referential actions that the database server
does not currently support. Again, however, for an INFORMIX-SE database or
for an INFORMIX-OnLine Dynamic Server database without logging, you are
responsible for maintaining data integrity when the triggering statement
fails.
References
See the DROP TRIGGER, CREATE PROCEDURE, EXECUTE PROCEDURE statements in this manual.
In the Informix Guide to SQL: Tutorial see Chapter 14.
Syntax
1-135
CREATE VIEW
CREATE VIEW
Purpose
Use the CREATE VIEW statement to create a new view based upon existing
tables and views in the database.
Syntax
CREATE VIEW
View
Name
p. 1-510
,
(
column name
AS
column
name
SELECT
Statement
(Subset)
p. 1-137
)
WITH CHECK
OPTION
is an identifier that names a column of view name. The number of columns that you name must match the number of columns that you select.
Usage
Except for the statements in the following list, you can use a view in any SQL
statement where you can use a table:
ALTER INDEX
ALTER TABLE
CREATE INDEX
CREATE TABLE
CREATE TRIGGER
DROP INDEX
DROP TABLE
DROP TRIGGER
LOCK TABLE
RECOVER TABLE
RENAME TABLE
UNLOCK TABLE
The view behaves like a table with the name view name. It consists of the set
of rows and columns returned by the SELECT statement each time the SELECT
statement is executed by using the view. The view reflects changes to the
underlying tables with one exception. If the view is defined with a SELECT *
clause, it has only the columns in the underlying tables at the time the view
is created. New columns added subsequently to the underlying tables using
the ALTER TABLE statement do not appear in the view.
The view name must be unique; that is, a view name cannot be the same
name as another database object, such as a table, synonym, or temporary
table.
1-136 Syntax
CREATE VIEW
Data types of the columns of the view are inherited from the tables from
which they come. Data types of virtual columns are determined from the
nature of the expression.
You must have the Select privilege on all columns from which the view is
derived to create a view.
The SELECT statement is stored in the sysviews system catalog table. When
you subsequently refer to a view in another statement, the database server
performs the defining SELECT statement while it executes the new statement.
SE
You cannot use a ROLLBACK WORK statement to undo a CREATE VIEW
statement. If you roll back a transaction that contains a CREATE VIEW
statement, the view remains and you do not receive an error message.
DB
If you create a view outside the CREATE SCHEMA statement, you receive
warnings if you use the -ansi flag or set DBANSIWARN.
Subset of a SELECT Allowed in CREATE VIEW
The SELECT statement is a statement of the form described on page 1-310,
except that it cannot have an ORDER BY clause, INTO TEMP clause, or UNION
operator. Do not use display labels in the select list; display labels are
interpreted as column names.
Naming View Columns
If you do not specify a list of columns for view name, the view inherits the
column names of the underlying tables. In the following example, the view
herostock has the same column names as the ones in the SELECT statement:
CREATE VIEW herostock AS
SELECT stock_num, description, unit_price, unit, unit_descr
FROM stock WHERE manu_code = 'HRO'
If the SELECT statement returns an expression, the corresponding column in
the view is called a virtual column. You must provide a name for virtual columns. You must also provide a column name in cases where the selected columns have duplicate column names when the table prefixes are stripped. For
Syntax
1-137
CREATE VIEW
example, when both orders.order_num and items.order_num appear in the
SELECT statement, you must provide two separate column names to label
them in the CREATE VIEW statement, as shown in the following example:
CREATE VIEW someorders (custnum,ocustnum,newprice) AS
SELECT orders.order_num,items.order_num,
items.total_price*1.5
FROM orders, items
WHERE orders.order_num = items.order_num
AND items.total_price > 100.00
If you must provide names for some of the columns in a view, then you must
provide names for all the columns; that is, the column list must contain an
entry for every column appearing in the view.
Using a View in the SELECT Statement
You can define a view in terms of other views, except that you must abide by
the restrictions on queries listed in Chapter 11 of the Informix Guide to SQL:
Tutorial.
WITH CHECK OPTION Keywords
The WITH CHECK OPTION keywords instruct the database server to ensure
that all modifications made through the view to the underlying tables satisfy
the definition of the view.
The following example creates a view named palo_alto that uses all the
information in the customer table for customers in the city of Palo Alto. The
database server checks any modifications made to customer through
palo_alto because the WITH CHECK OPTION is specified.
CREATE VIEW palo_alto AS
SELECT * FROM customer
WHERE city = 'Palo Alto'
WITH CHECK OPTION
1-138 Syntax
CREATE VIEW
Updating through Views
If a view is built on a single table, the view is said to be updatable if the SELECT
statement that defined it did not contain any of the following items:
•
•
•
•
Columns in the select list that are aggregate values
Columns in the select list that use the UNIQUE or DISTINCT keyword
A GROUP BY clause
A derived value for a column, created using an arithmetical expression
That means, in an updatable view, the values in the underlying table can be
updated by inserting values into the view.
Note: You cannot update or insert rows to a remote table through views with check
options.
References
See the CREATE TABLE, DROP VIEW, GRANT, and SELECT statements in this
manual.
In the Informix Guide to SQL: Tutorial, see the discussions of views and
security in Chapter 11.
Syntax
1-139
DATABASE
DATABASE
Purpose
Use the DATABASE statement to select an accessible database as the current
database.
Syntax
+
DATABASE
Database
Name
p. 1-421
EXCLUSIVE
Usage
You can use the DATABASE statement to select any database on your database
server. You can select a database on another OnLine database server by
specifying the name of the database server with the database name.
Issuing a DATABASE statement when a database is already open closes the
current database before opening the new one. Closing the current database
releases any cursor resources held by the database server, which invalidates
any cursors you have declared up to that point.
ESQL
You cannot include the DATABASE statement in a multistatement PREPARE
operation.
You can determine the type of database a user selects by checking the
warning flag after a DATABASE statement in the sqlca structure.
If the database has transactions, the second element of the sqlcawarn
structure contains a W after the DATABASE statement executes. See the
following chart for the name of the variable used for each product.
Product
ESQL/C
ESQL/COBOL
1-140 Syntax
Field Name
sqlca.sqlwarn.sqlwarn1
SQLWARN1 OF SQLWARN OF SQLCA
DATABASE
ESQL
ANSI
If the database is ANSI-compliant, the third element of the sqlcawarn
structure contains a W after the DATABASE statement executes. See the
following chart for the name of the variable that each product uses.
Product
ESQL/C
ESQL/COBOL
ESQL
If the database is an INFORMIX-OnLine Dynamic Server database, the
fourth element of the sqlcawarn structure contains a W after the DATABASE
statement executes. See the following chart for the name of the variable that
each product uses.
Product
ESQL/C
ESQL/COBOL
SE
SE
ESQL
Field Name
sqlca.sqlwarn.sqlwarn2
SQLWARN2 OF SQLWARN OF SQLCA
Field Name
sqlca.sqlwarn.sqlwarn3
SQLWARN3 OF SQLWARN OF SQLCA
Only the databases stored in your current directory, or in a directory
specified in your DBPATH environment variable, are recognized.
If you want to specify a database that does not reside in your current
directory or in a directory specified by the DBPATH environment variable,
you must follow the DATABASE keyword with a program or host variable
that evaluates to the full pathname of the database (excluding the .dbs
extension).
Syntax
1-141
DATABASE
EXCLUSIVE Keyword
The EXCLUSIVE keyword opens the database in exclusive mode and prevents
access by anyone but the current user. To allow others access to the database,
you must execute the CLOSE DATABASE statement and then reopen the
database without the EXCLUSIVE keyword.
The following statement opens the stores6 database on the training database
server in exclusive mode:
DATABASE stores6@training EXCLUSIVE
If another user has already opened the database, exclusive access is denied,
an error is returned, and no database is opened.
References
See the CLOSE DATABASE and CONNECT statements in this manual.
In the Informix Guide to SQL: Tutorial, see the discussions of database design
in Chapter 8 and implementing the data model in Chapter 9.
1-142 Syntax
DEALLOCATE DESCRIPTOR
DEALLOCATE DESCRIPTOR
Purpose
Use the DEALLOCATE DESCRIPTOR statement to free a system descriptor area
that was previously allocated for a specified descriptor or descriptor variable.
Syntax
ESQL
DEALLOCATE DESCRIPTOR
' descriptor '
descriptor
variable
descriptor
is a string that identifies the system descriptor area that is
allocated with the ALLOCATE DESCRIPTOR statement.
descriptor
variable
is an embedded variable name that identifies the system
descriptor area that is allocated with the ALLOCATE
DESCRIPTOR statement.
Usage
The DEALLOCATE DESCRIPTOR statement frees all the memory associated
with the system descriptor area identified by descriptor or descriptor variable.
All the value descriptors (including memory for data value in the value
descriptors) are also freed.
A descriptor or descriptor variable can be reused after it is deallocated.
Deallocation occurs automatically at the end of the program.
Deallocating a nonexistent descriptor or descriptor variable results in an error.
E/C
You cannot use the DEALLOCATE DESCRIPTOR statement to deallocate an
sqlda structure. You can use it only to free the memory allocated for a
system-descriptor area.
Syntax
1-143
DEALLOCATE DESCRIPTOR
The following examples show the DEALLOCATE DESCRIPTOR statement for
INFORMIX-ESQL/C and INFORMIX-ESQL/COBOL, respectively. In each
example, the first line shows an embedded-variable name and the second line
shows a quoted string that identifies the allocated system-descriptor area.
exec sql deallocate descriptor :descname;
exec sql deallocate descriptor 'desc1';
INFORMIX-ESQL/C
EXEC SQL DEALLOCATE DESCRIPTOR :DESCNAME END-EXEC
EXEC SQL DEALLOCATE DESCRIPTOR 'DESC1' END-EXEC
INFORMIX-ESQL/COBOL
References
See the ALLOCATE DESCRIPTOR, DECLARE, DESCRIBE, EXECUTE, FETCH, GET
DESCRIPTOR, OPEN, PREPARE, PUT, and SET DESCRIPTOR statements in this
manual.
In the Informix Guide to SQL: Tutorial, see the discussion of dynamic SQL in
Chapter 5.
1-144 Syntax
DECLARE
DECLARE
Purpose
Use the DECLARE statement to define a cursor that represents the active set
of rows specified by a SELECT, INSERT, or EXECUTE PROCEDURE statement.
Syntax
ESQL
cursor
id
DECLARE
INSERT
Statement
(Subset)
p. 1-157
+
FOR
CURSOR
+
+
cursor
variable
WITH
HOLD
+
+
SCROLL
CURSOR
SELECT
Statement
(Subset)
p. 1-152
FOR
UPDATE
,
FOR
OF
WITH
HOLD
column
SELECT
Statement
p. 1-310
+
statement id
statement id
variable
EXECUTE
PROCEDURE
Statement
p. 1-192
column
is a column that you can update through the cursor.
cursor id
is the identifier of the cursor in other statements. The cursor
id must conform to the same rules as any identifier, as
described in the Identifier segment on page 1-469.
cursor variable
is an embedded variable name that identifies the cursor in
other statements.The cursor variable must conform to the
same rules as any identifier, as described in the Identifier
segment on page 1-469.
Syntax
1-145
DECLARE
statement id
is the identifier for a data structure that represents a
prepared statement (see the PREPARE statement on page
1-273).
statement id
variable
is an embedded-variable name that identifies a data
structure that represents a prepared statement (see the
PREPARE statement on page 1-273).
Usage
The DECLARE statement associates the cursor with a SELECT, INSERT, or
EXECUTE PROCEDURE statement or with the statement identifier (statement id
or id variable) of a prepared statement.
The DECLARE statement assigns an identifier to the cursor, specifies its uses,
and directs the preprocessor to allocate storage to hold the cursor.
The DECLARE statement must precede any other statement that refers to the
cursor during the execution of the program.
Used with a SELECT statement, the cursor is a data structure that represents
a specific location within the active set of rows that the SELECT statement
retrieved. You associate a cursor with an INSERT statement if you want to add
multiple rows to the database in an INSERT operation. When used with an
INSERT statement, the cursor represents the rows that the INSERT statement
is to add to the database. When used with an EXECUTE PROCEDURE statement, the cursor represents the columns or values retrieved by the stored
procedure.
The sum of the number of open cursors and the number of prepared
statements that you can have at one time, in one process, is limited by the
amount of free memory available in the system. Use FREE statement id or FREE
statement id variable to release the resources held by a prepared statement; use
FREE cursor id or FREE cursor variable to release resources held by a cursor.
A program can consist of one or more source-code files. By default, the scope
of a cursor is global to a program. This means that a cursor declared in one
file can be referenced from another file.
In a multiple-file program, if you want to limit the scope of cursors to the files
in which they are declared, you must preprocess all the files with the -local
command line option. See your ESQL product manual for more information,
restrictions, and performance issues when preprocessing with the -local
option.
1-146 Syntax
DECLARE
E/C
A variable used in place of the cursor name or statement identifier must be
of the CHARACTER data type. In C, it must be defined as exec sql char.
E/CO
A variable used in place of the cursor name or statement identifier must be
of the CHARACTER data type. In COBOL, such variables must be declared as
a standard CHARACTER type.
You can declare multiple cursors using a single statement identifier. For
example, the following INFORMIX-ESQL/C example does not return an error:
exec
exec
exec
exec
sql
sql
sql
sql
prepare
declare
declare
declare
pid from
x cursor
y scroll
z cursor
'select * from customer';
for pid;
cursor for pid;
with hold for pid;
If you include the -ansi compilation flag (or DBANSIWARN is set), warnings
are generated for statements that use dynamic cursor names or dynamic
statement id names. Some error checking is done at run time. The typical
checks are found in the following list:
• Illegal use of cursors (that is, normal cursors used as scroll cursors)
• Use of undeclared cursors
• Bad cursor or statement names (empty)
Checks for multiple declarations of a cursor of the same name are performed
at compile time only if the cursor or statement is an identifier. For example,
the first example shows code that follows results in a compile error, whereas
the code in the second example does not:
exec sql declare x cursor for select * from customer;
. . .
exec sql declare x cursor for select * from customer; -- error
Results in error
exec sql declare x cursor for select * from customer;
. . .
strcpy(s, "x");
exec sql declare :s cursor for select * from customer;
Runs successfully
Syntax
1-147
DECLARE
Overview of Cursor Types
Functionally, a cursor can be associated with a SELECT statement (a select
cursor), an EXECUTE PROCEDURE statement (a procedure cursor) that returns
values, or an INSERT statement (an insert cursor). You can use a select cursor
to update or delete rows; then it is called an update cursor.
A cursor can also be associated with a statement identifier, enabling you to
use a cursor with INSERT, SELECT, or EXECUTE PROCEDURE statements that
are prepared dynamically, and to use different statements with the same cursor at different times. In this case, the type of cursor depends on the statement
that is prepared at the time the cursor is opened (see the OPEN statement on
page 1-263).
Note: Cursors for stored procedures behave the same as select cursors, excluding
update cursors.
Select or Procedure Cursor
A select or procedure cursor enables you to scan multiple rows of data,
moving data row by row into a set of receiving variables, as described in the
following steps:
1. Use a DECLARE statement to define a cursor for the SELECT statement.
2. Open the cursor with the OPEN statement. The database server processes
the query to the point of locating or constructing the first row of the active
set.
3. Retrieve successive rows of data with the FETCH statement.
4. Close the cursor with the CLOSE statement when the active set is no
longer needed.
Update Cursor
An update cursor is declared using the FOR UPDATE keywords. Using the
update cursor, you can modify (update or delete) the current row.
ANSI
1-148 Syntax
In an ANSI-compliant database, you can update or delete data using a select
cursor, as long as it follows the restrictions described on page 1-152. You do
not need to use the FOR UPDATE keywords when you declare the cursor.
DECLARE
Insert Cursor
An insert cursor increases processing efficiency (compared to embedding the
INSERT statement directly). The insert cursor allows bulk insert data to be
buffered in memory and written to disk when the buffer is full. This process
reduces communication between program and database server and increases
the speed of the insertions.
Cursor Characteristics
Structurally, you can declare a cursor as a sequential cursor (the default
condition), a scroll cursor (using the SCROLL keyword), or a hold cursor (using
the WITH HOLD keywords). These structural characteristics are explained in
the following sections.
Sequential Cursor
If you use only the CURSOR keyword in a DECLARE statement, you create a
sequential cursor, which can fetch only the next row in sequence from the
active set. The sequential cursor can read only through the active set once
each time it is opened. If you are using a sequential cursor, on each FETCH,
the database server returns the contents of the current row and locates the
next row in the active set.
The following INFORMIX-ESQL/C example creates a sequential cursor:
exec sql declare s_cur cursor for
select fname, lname into :st_fname, :st_lname
from orders where customer_num = 114;
Scroll Cursor
The SCROLL keyword creates a scroll cursor, which you can use to fetch rows
of the active set in any sequence. The database server implements a scroll cursor by creating a temporary table to hold the active set. With the active set
retained as a table, you can fetch the first, last, or any intermediate rows as
well as fetch rows repeatedly without having to close and reopen the cursor.
These abilities are discussed under the FETCH statement (see page 1-194).
The database server retains the active set for a scroll cursor until the cursor is
closed. On a multiuser system, the rows in the tables from which the activeset rows were derived might change after a copy is made in the temporary
table. If you use a scroll cursor within a transaction, you can prevent copied
rows from changing either by setting the isolation level to Repeatable Read
Syntax
1-149
DECLARE
(available only with INFORMIX-OnLine Dynamic Server) or by locking the
entire table in share mode during the transaction. (See the SET ISOLATION
statement on page 1-366 and the LOCK TABLE statement on page 1-260.)
You cannot associate a scroll cursor with an INSERT statement and you cannot
declare a scroll cursor with the FOR UPDATE keywords.
The following example creates a scroll cursor:
DECLARE sc_cur SCROLL CURSOR FOR
SELECT * FROM orders
Hold Cursor
If you use the WITH HOLD keywords, you create a hold cursor. A hold cursor
remains open after a transaction ends. You can declare both sequential and
scroll cursors with the WITH HOLD keywords. The following example creates
a hold cursor:
DECLARE hld_cur CURSOR WITH HOLD FOR
SELECT customer_num, lname, city FROM customer
A hold cursor allows uninterrupted access to a set of rows across multiple
transactions. Ordinarily, all cursors close at the end of a transaction; a hold
cursor does not close. You can use a hold cursor as shown in the following
fragment of ESQL/C code. The code fragment uses a hold cursor as a master
cursor to scan one set of records and a sequential cursor as a detail cursor to
point to records that are located in a different table. The records that are
scanned by the master cursor are the basis for updating the records pointed
to by the detail cursor. In the following example, the COMMIT WORK statement at the end of each iteration of the first WHILE loop leaves the hold cursor
c_master open but closes the sequential cursor c_detail and releases all locks.
1-150 Syntax
DECLARE
This technique minimizes the resources that the database server must devote
to locks and unfinished transactions and it gives other users immediate
access to updated rows.
exec sql begin declare section;
int p_custnum,
int save_status;
long p_orddate;
exec sql end declare section;
exec sql prepare st_1 from
'select order_date
from orders where customer_num = ? for update';
exec sql declare c_detail cursor for st_1;
exec sql declare c_master cursor with hold for
select customer_num
from customer where city = 'Pittsburgh';
exec sql open c_master;
if(SQLCODE==0) /* the open worked */
exec sql fetch c_master into :p_custnum; /* discover first customer */
while(SQLCODE==0) /* while no errors and not end of pittsburgh customers */
{
exec sql begin work; /* start transaction for customer p_custnum */
exec sql open c_detail using :p_custnum;
if(SQLCODE==0) /* detail open succeeded */
exec sql fetch c_detail into :p_orddate; /* get first order */
while(SQLCODE==0) /* while no errors and not end of orders */
{
exec sql update orders set order_date = '08/15/90'
where current of c_detail;
if(status==0) /* update was ok */
exec sql fetch c_detail into :p_orddate; /* next order */
}
if(SQLCODE==SQLNOTFOUND) /* correctly updated all found orders */
exec sql commit work; /* make updates permanent, set status */
else /* some failure in an update */
{
save_status = SQLCODE; /* save error for loop control */
exec sql rollback work;
SQLCODE = save_status; /* force loop to end */
}
if(SQLCODE==0) /* all updates, and the commit, worked ok */
exec sql fetch c_master into :p_custnum; /* next customer? */
}
exec sql close c_master;
To close a hold cursor, use either the CLOSE statement to close the cursor
explicitly or the CLOSE DATABASE or DISCONNECT statements to close it
implicitly. CLOSE DATABASE closes all cursors.
Syntax
1-151
DECLARE
Declaring an Update Cursor
The FOR UPDATE keywords notify the database server that updating is
possible, causing it to use more stringent locking than with a select cursor.
You are not allowed to modify data through a cursor without this clause. You
can specify particular columns that can be updated.
After you create an update cursor, you can update or delete the currently
selected row by using an UPDATE or DELETE statement with the WHERE CURRENT OF clause. The words CURRENT OF refer to the row that was most
recently fetched; they take the place of the usual test expressions in the
WHERE clause.
An update cursor allows you to perform updates that are not possible with
the UPDATE statement, because both the decision to update and the values of
the new data items can be based on the original contents of the row. The
UPDATE statement cannot interrogate the table being updated.
ANSI
All simple select cursors are potentially update cursors even if they are
declared without the FOR UPDATE keywords. (See the restrictions on
SELECT statements in the following section.)
Subset of the SELECT Statement Associated with an Update Cursor
Not all SELECT statements can be associated with an update cursor. The
SELECT statement included in the DECLARE statement (either directly or as a
prepared statement) must conform to the following restrictions:
• You can select data from only one table.
• The statement cannot include any aggregate functions (AVG, COUNT,
MAX, MIN, or SUM).
• The statement cannot include any of the following clauses or keywords:
DISTINCT
GROUP BY
INTO TEMP
ORDER BY
UNION
UNIQUE
For a complete description of SELECT syntax and usage, see the SELECT
statement on page 1-310.
Locking with an Update Cursor
You declare an update cursor to let the database server know that the
program might update (or delete) any row that it fetches as part of the
SELECT statement. The update cursor employs promotable locks for rows that
1-152 Syntax
DECLARE
are fetched. Other programs can read the locked row, but no other program
can place a promotable or write lock. Before the row is modified, the row lock
is promoted to an exclusive lock.
SE
The INFORMIX-SE database server does not use promotable locks. Before
the program modifies a row, the database server obtains an exclusive lock
on the row.
Although it is possible to declare an update cursor WITH HOLD, the only
reason for doing so is to break a long series of updates into smaller transactions. You must fetch and update a particular row in the same transaction.
If an operation involves fetching and updating a very large number of rows,
the lock table maintained by the database server can overflow. The usual way
to prevent this overflow is to lock the entire table being updated. If this is
impossible, an alternative is to update through a hold cursor and to execute
COMMIT WORK at frequent intervals. However, you must plan such an application very carefully because COMMIT WORK releases all locks, even ones
placed through a hold cursor.
Using FOR UPDATE with a List of Columns
When you declare an update cursor, you can limit the update to specific
columns by including the OF keyword and a list of columns. You can modify
only those named columns in subsequent UPDATE statements. The columns
need not be in the select list of the SELECT clause.
This column restriction applies only to UPDATE statements. The OF column
clause has no effect on subsequent DELETE statements that use a WHERE
CURRENT OF clause. (A DELETE statement removes the contents of all
columns.)
The principal advantage to specifying columns is documentation and
preventing programming errors. (The database server refuses to update any
other columns.) An additional advantage is speed, when the SELECT
statement meets two criteria:
• The SELECT statement can be processed using an index.
• The columns listed are not part of the index used to process the SELECT
statement.
If the columns you intend to update are part of the index used to process the
SELECT statement, the database server must keep a list of each row that is
updated to ensure that no row is updated twice. When you use the OF
Syntax
1-153
DECLARE
keyword to specify the columns that can be updated, the database server
determines whether to keep the list of updated rows. If the database server
determines that the list is unnecessary, then eliminating the work of keeping
the list results in a performance benefit. If you do not use the OF keyword, the
database server keeps the list of updated rows even though it might be
unnecessary.
The following example contains INFORMIX-ESQL/C code that uses an update
cursor with a DELETE statement to delete the current row. Whenever the row
is deleted, the cursor remains between rows. After you delete data, you must
use a FETCH statement to advance the cursor to the next row before you can
refer to the cursor in a DELETE or UPDATE statement.
exec sql declare q_curs cursor for
select * from customer where lname matches :last_name
for update;
exec sql open q_curs;
for (;;)
{
exec sql fetch q_curs into :cust_rec;
if (sqlca.sqlcode != 0)
break;
/* Display customer values and prompt for answer */
if (answer[0] == 'y')
exec sql delete from customer where current of q_curs;
if (sqlca.sqlcode != 0)
break;
}
exec sql close q_curs;
Associating a Cursor with a Prepared Statement
The PREPARE statement lets you assemble the text of an SQL statement at run
time and pass the statement text to the database server for execution. If you
anticipate that a dynamically prepared SELECT statement or EXECUTE PROCEDURE statement that returns values could produce more than one row of
data, the prepared statement must be associated with a cursor. (See the PREPARE statement on page 1-273 for more information about preparing SQL
statements.)
1-154 Syntax
DECLARE
The result of a PREPARE statement is a statement identifier (statement id or id
variable), which is a data structure representing the prepared statement text.
You declare a cursor for the statement text by associating a cursor with the
statement id.
You can associate a sequential cursor with any prepared SELECT or EXECUTE
PROCEDURE statement. You cannot associate a scroll cursor with a prepared
INSERT statement or with a SELECT statement that was prepared to include a
FOR UPDATE clause.
After a cursor is opened, used, and closed, a different statement can be
prepared under the same statement id. In this way, it is possible to use a single cursor with different statements at different times. The cursor must be
redeclared before you use it again.
The following example contains INFORMIX-ESQL/C code that prepares a
SELECT statement and declares a cursor for the prepared statement text. The
statement id st_1 is first prepared from a SELECT statement that returns
values; then, the cursor c_detail is declared for st_1.
exec sql prepare st_1 from
'select order_date
from orders where customer_num = ?';
exec sql declare c_detail cursor for st_1;
If you want to modify data using a prepared SELECT statement, add a FOR
UPDATE clause to the statement text you wish to prepare, as shown in the
following INFORMIX-ESQL/C example:
exec sql prepare sel_1 from 'select * from customer for update';
exec sql declare sel_curs cursor for sel_1;
Using Cursors with Transactions
To roll back a modification, you must perform the modification within a
transaction. A transaction begins only when the BEGIN WORK statement is
executed.
ANSI
In ANSI-compliant databases, transactions are always in effect.
Syntax
1-155
DECLARE
The database server enforces the following guidelines for select and update
cursors. These guidelines ensure that modifications can be committed or
rolled back properly:
• Open an insert or update cursor within a transaction.
• Include PUT and FLUSH statements within one transaction.
• Modify data (update, insert, or delete) within one transaction.
The database server permits you to open and close a hold cursor for an
update outside a transaction; however, you should fetch all the rows that pertain to a given modification and then perform the modification all within a
single transaction. You cannot open and close cursors that are not hold or
update cursors outside a transaction.
The following example produces an error when the database server tries to
execute the update line:
exec sql declare q_curs cursor for
select customer_num, fname, lname from customer
where lname matches :last_name
for update;
exec sql open q_curs;
exec sql fetch q_curs into :cust_rec; /* fetch before begin */
exec sql begin work;
exec sql update customer set lname = 'Smith'
where current of q_curs;
/* error here */
exec sql commit work;
Results in error
The following example does not produce an error when the database server
tries to execute the update line:
exec sql declare q_curs cursor for
select customer_num, fname, lname from customer
where lname matches :last_name
for update;
exec sql open q_curs;
exec sql begin work;
exec sql fetch q_curs into :cust_rec; /* fetch after begin */
exec sql update customer set lname = 'Smith'
where current of q_curs;
/* no error */
exec sql commit work;
Runs successfully
1-156 Syntax
DECLARE
When you update a row within a transaction, the row remains locked until
the cursor is closed or the transaction is committed or rolled back. If you
update a row when no transaction is in effect, the row lock is released when
the modified row is written to disk.
If you update or delete a row outside a transaction, you cannot roll back the
operation.
A cursor declared for insert is an insert cursor. In a database that uses
transactions, you cannot open an insert cursor outside a transaction unless it
also was declared with hold.
Subset of INSERT Associated with a Sequential Cursor
You create an insert cursor by associating a sequential cursor with a restricted
form of the INSERT statement. The INSERT statement must include a VALUES
clause; it cannot contain an embedded SELECT statement.
The following example contains INFORMIX-ESQL/C code that declares an
insert cursor:
exec sql declare ins_cur cursor for insert into stock values
(:stock_no,:manu_code,:descr,:u_price,:unit,:u_desc);
The insert cursor simply inserts rows of data; it cannot be used for fetching
data. When an insert cursor is opened, a buffer is created in memory to hold
a block of rows. The buffer receives rows of data as the program executes PUT
statements. The rows are written to disk only when the buffer is full. You can
use the CLOSE, FLUSH, or COMMIT WORK statement to flush the buffer when
it is less than full. This topic is discussed further under the PUT and CLOSE
statements. You must close an insert cursor to insert any buffered rows into
the database before the program ends. You can lose data if you do not close
the cursor properly.
Using an Insert Cursor with Hold
If you associate a hold cursor with an INSERT statement, you can break a long
series of PUT statements into smaller sets of PUT statements by using transactions. Instead of waiting for the PUT statements to fill the buffer and trigger
an automatic write to the database, you can execute a COMMIT WORK statement to flush the row buffer. If you use a hold cursor, the COMMIT WORK
statement commits the inserted rows but leaves the cursor open for further
Syntax
1-157
DECLARE
inserts. This method can be desirable when you are inserting a large number
of rows, because pending uncommitted work consumes database server
resources.
References
See the CLOSE, DELETE, EXECUTE PROCEDURE, FETCH, FREE, INSERT, OPEN,
PREPARE, PUT, SELECT, and UPDATE statements in this manual.
In the Informix Guide to SQL: Tutorial, see the discussions of cursors and data
modification in Chapter 5 and Chapter 6, respectively.
1-158 Syntax
DELETE
DELETE
Purpose
Use the DELETE statement to delete one or more rows from a table.
Syntax
DELETE FROM
Table
Name
p. 1-506
View
Name
p. 1-510
Synonym
Name
p. 1-504
cursor name
WHERE
Condition
p. 1-404
ESQL
CURRENT
OF
cursor
name
is the name of the cursor that you previously declared and
positioned.
Usage
If you use the DELETE statement without a WHERE clause, all the rows in the
table are deleted.
If you use the DELETE statement outside a transaction in a database that uses
transactions, each DELETE statement that you execute is treated as a single
transaction.
Each row affected by a DELETE statement within a transaction is locked for
the duration of the transaction; therefore, a single DELETE statement that
affects a large number of rows locks the rows until the entire operation is
complete. If the number of rows affected is very large, you might exceed the
limits your operating system places on the maximum number of simultaneous locks. If this occurs, you can either reduce the scope of the DELETE
statement or lock the entire table before you execute the statement.
Syntax
1-159
DELETE
If you specify a view name, the view must be updatable. See “Updating
through Views” on page 1-139 for an explanation of an updatable view.
DB
If you omit the WHERE clause while working within the SQL menu,
DB-Access prompts you to verify that you want to delete all rows from a
table. You do not receive a prompt if you run the DELETE statement within
a command file.
ANSI
Statements are always within an implicit transaction in an ANSI-compliant
database; therefore, you cannot have a DELETE statement outside a transaction.
Using Cascading Deletes
Use the ON DELETE CASCADE option of the REFERENCES clause on either the
CREATE TABLE or ALTER TABLE statement to specify that you want deletes to
cascade from one table to another. For example, the stock table contains the
column stock_num as a primary key. The catalog and items tables each contain the column stock_num as foreign keys with the ON DELETE CASCADE
option specified. When a delete is performed from the stock table, rows are
also deleted in the catalog and items tables, which are referred through the
foreign keys.
If a cascading delete is performed without a WHERE clause, all rows in the
parent table (and subsequently, the affected child tables) are deleted.
WHERE Clause
Use the WHERE clause to specify one or more rows that you want to delete.
The WHERE conditions are the same as the conditions in the SELECT statement. For example, the following statement deletes all the rows of the items
table where the order number is less than 1034:
DELETE FROM items
WHERE order_num < 1034
DB
1-160 Syntax
If you include a WHERE clause that selects all rows in the table, DB-Access
gives no prompt and deletes all rows.
DELETE
Deleting and the WHERE Clause
If you delete from a table in an ANSI-compliant database using a WHERE
clause and no rows are found, you can detect this condition using the GET
DIAGNOSTICS statement. The RETURNED_SQLSTATE field of GET DIAGNOSTICS contains the value ‘02000.’ In a database that is not ANSI-compliant, no
error is returned.
If you delete from a table using a WHERE clause in a multistatement prepare
in either ANSI databases and databases that are not ANSI-compliant and no
rows are found, you receive a GET DIAGNOSTICS RETURNED_SQLSTATE field
value of ‘02000.’
For additional information about the SQLSTATE code, see the GET
DIAGNOSTICS statement in this manual.
You can also use SQLCODE of sqlca to determine the same results. See the
Informix Guide to SQL: Tutorial for further information about SQLCODE of
sqlca.
CURRENT OF Clause
ESQL
To use the CURRENT OF clause, you must have previously used the
DECLARE statement with the FOR UPDATE clause to announce the cursor
name.
If you use the CURRENT OF clause, the DELETE statement removes the row
of the active set at the current position of the cursor. After the deletion, no
current row exists; you cannot use the cursor to delete or update a row until
you reposition the cursor with a FETCH statement.
ANSI
ESQL
All select cursors are potentially update cursors in ANSI-compliant
databases. You can use the CURRENT OF clause with any select cursor.
References
See the INSERT, UPDATE, DECLARE, GET DIAGNOSTICS, and FETCH
statements in this manual.
In the Informix Guide to SQL: Tutorial, see the discussions of cursors and data
modification in Chapter 5 and Chapter 6, respectively.
Syntax
1-161
DESCRIBE
DESCRIBE
Purpose
Use the DESCRIBE statement to obtain information about a prepared
statement before you execute it. The DESCRIBE statement returns the prepared statement type and, for a SELECT, EXECUTE PROCEDURE, or INSERT
statement, the number, data types and size of the values, and the name of the
column or expression returned by the query. The information can be stored
in a system descriptor area or, in ESQL/C, in an sqlda structure.
Syntax
ESQL
DESCRIBE
USING
SQL DESCRIPTOR
statement id
+
statement
id variable
E/C
' descriptor '
descriptor
variable
INTO
sqlda pointer
descriptor
is a quoted string that identifies an allocated system
descriptor area.
descriptor
variable
is an embedded variable name that identifies an allocated
system descriptor area.
sqlda pointer
points to an sqlda structure.
statement id
is the identifier for a data structure that represents a
prepared statement. (See the PREPARE statement on page
1-273.)
statement
id variable
is an embedded variable name that identifies a data structure that represents a prepared statement. (See the PREPARE
statement on page 1-273.)
Usage
The DESCRIBE statement allows you to determine, at run time, the type of
statement that has been prepared and the number and types of data that a
prepared query returns when executed. With this information, you can write
code to allocate memory to hold retrieved values and display or process them
after they are fetched.
1-162 Syntax
DESCRIBE
Describing the Statement Type
The DESCRIBE statement takes a statement identifier from a PREPARE
statement as input. When the DESCRIBE statement executes, the database
server sets the value of the SQLCODE field of the sqlca (see the manual for
your embedded-language product) to indicate the statement type; that is, the
keyword with which the statement begins. If the prepared statement text contains more than one SQL statement, the DESCRIBE statement returns the type
of the first statement in the text.
SQLCODE is set to zero to indicate a SELECT statement without an INTO TEMP
clause: This is the most common situation. For any other SQL statement,
SQLCODE is set to a positive integer. Look in the embedded SQL manual for
your embedded product for more information about possible SQLCODE values after a DESCRIBE statement.
You can test the number against the constant names that are defined. In
INFORMIX-ESQL/C, the constant names are defined in the sqlstype.h header
file. A printed list of the possible values and their constant names appears in
the manual for each embedded-language product.
The DESCRIBE statement uses the SQLCODE field differently than any other
statement, possibly returning a nonzero value when it executes successfully.
You can revise standard error checking routines to accommodate this, if
desired.
Checking for Existence of a WHERE Clause
If the DESCRIBE statement detects that a prepared statement contains an
UPDATE or DELETE statement without a WHERE clause, the DESCRIBE
statement sets the following sqlca variable to W.
ESQL/C
sqlca.sqlwarn.sqlwarn4
ESQL/COBOL
SQLWARN4 OF SQLWARN OF SQLCA
Without a WHERE clause, the update or delete action is applied to the entire
table. By checking this variable, you can avoid unintended global changes to
your table.
Describing Values Returned by SELECT or EXECUTE
PROCEDURE or Required for INSERT
If the prepared statement text includes a SELECT statement without an INTO
TEMP clause, an EXECUTE PROCEDURE statement, or an INSERT statement,
the DESCRIBE statement also returns a description of each column or
Syntax
1-163
DESCRIBE
expression included in the SELECT, EXECUTE PROCEDURE, or INSERT list.
These descriptions are stored in a system descriptor area or in a pointer to an
sqlda structure.
The description includes the following information:
• The data type of the column, as defined in the table
• The length of the column, in bytes
• The name of the column or expression
See Chapter 5 of the Informix Guide to SQL: Tutorial for more information on
the sqlda structure and descriptors.
You can modify the system-descriptor-area information and use it in
statements that support a USING SQL DESCRIPTOR clause, such as EXECUTE,
FETCH, OPEN, and PUT. You must modify the system-descriptor area to show
the address in memory that is to receive the described value. You can change
the data type to another, compatible type. This change causes data
conversion to take place when the data is fetched.
In addition to Chapter 5 of the Informix Guide to SQL: Tutorial, see the manual
for your embedded-language product for further information about interpreting and using the data contained in the sqlda data structure and the system-descriptor area.
USING SQL DESCRIPTOR Clause
The USING SQL DESCRIPTOR clause lets you store the description of a SELECT,
INSERT, or EXECUTE PROCEDURE list in a system-descriptor area created by
an ALLOCATE DESCRIPTOR statement. You can obtain information about the
resulting columns of a prepared statement through a system-descriptor area.
Use the USING SQL DESCRIPTOR keywords and a descriptor to point to a
system-descriptor area instead of to an sqlda structure.
The DESCRIBE statement sets the COUNT field in the system-descriptor area
to the number of values in the SELECT, EXECUTE PROCEDURE, or INSERT list.
If COUNT is greater than the number of item descriptors (occurrences) in the
system-descriptor area, the system returns an error. Otherwise, the TYPE,
LENGTH, NAME, SCALE, PRECISION, and NULLABLE information is set and
memory for DATA fields is allocated automatically.
After a DESCRIBE statement is executed, the SCALE and PRECISION fields
contain the scale and precision of the column, respectively. If SCALE and PRECISION are set in the SET DESCRIPTOR statement and TYPE is set to DECIMAL
1-164 Syntax
DESCRIBE
or MONEY, the LENGTH field is modified to adjust for the scale and precision
of the decimal value. If TYPE is not set to DECIMAL or MONEY, the values for
SCALE and PRECISION are not set and LENGTH is unaffected.
INTO sqlda pointer Clause
E/C
The INTO sqlda pointer clause lets you allocate memory for an sqlda structure
and store its address in an sqlda pointer. The DESCRIBE statement fills in the
allocated mrory with descriptive information: it sets the sqlda.sqld variable
to the number of values in the SELECT, INSERT, or EXECUTE PROCEDURE
list. The sqlda structure also contains an array of data descriptors (sqlvar
structures), one for each value in the SELECT, INSERT, or EXECUTE PROCEDURE list. After a DESCRIBE statement is executed, the sqlda.sqlvar
structure has the TYPE, LENGTH, and NAME fields set.
The DESCRIBE statement allocates memory for an sqlda pointer once it is
declared in a program. However, the application program must designate
the storage area of the sqlvar.sqldata fields.
E/CO
This product does not support pointers to an sqlda structure; it returns an
error if you try to execute a DESCRIBE statement that uses one. Only systemdescriptor areas that are allocated with the ALLOCATE DESCRIPTOR statement can be used in a DESCRIBE statement in INFORMIX-ESQL/COBOL. You
can view the contents of the columns by executing a GET DESCRIPTOR statement following a DESCRIBE statement on the specified system descriptor.
The following examples show the use of a system descriptor in a DESCRIBE
statement in INFORMIX-ESQL/C and INFORMIX-ESQL/COBOL. In the first
example in each pair, the descriptor is a quoted string; in the second example
in each pair, it is an embedded variable name:
main()
{
. . .
exec sql allocate descriptor 'desc1' with max 3;
exec sql prepare curs1 FROM 'select * from tab';
exec sql describe curs1 using sql descriptor 'desc1';
}
exec sql describe curs1 using sql descriptor :desc1var;
INFORMIX-ESQL/C
Syntax
1-165
DESCRIBE
EXEC SQL ALLOCATE DESCRIPTOR 'DESC1' WITH MAX 3 END-EXEC.
EXEC SQL PREPARE CURS1 FROM 'SELECT * FROM TAB' END-EXEC.
EXEC SQL DESCRIBE CURS1 USING SQL DESCRIPTOR 'DESC1' END-EXEC.
EXEC SQL DESCRIBE CURS1 USING SQL DESCRIPTOR :DESC1VAR END-EXEC.
INFORMIX-ESQL/COBOL
References
See the ALLOCATE DESCRIPTOR, DEALLOCATE DESCRIPTOR, DECLARE, EXECUTE, FETCH, GET DESCRIPTOR, OPEN, PREPARE, PUT, and SET DESCRIPTOR
statements in this manual for further information about using dynamic
management statements.
In the Informix Guide to SQL: Tutorial, see the discussion of the DESCRIBE
statement in Chapter 5.
For further information about how to use a system-descriptor area or an
sqlda pointer if you intend to use a FETCH...USING DESCRIPTOR or an
INSERT...USING DESCRIPTOR statement, refer to the manual for your SQL API.
1-166 Syntax
DISCONNECT
DISCONNECT
Purpose
The DISCONNECT statement terminates a connection between an application
and a database server.
Syntax
+
DISCONNECT
CURRENT
ESQL
DEFAULT
ALL
' connection name '
conn_nm variable
connection name
is a quoted string that identifies the connection. It is the
connection name assigned by the CONNECT statement
when the initial connection was made.
conn_nm variable
is an ESQL/C or ESQL/COBOL host variable that holds a
character string that identifies the connection. The value of
conn_nm variable is the connection name assigned by the
CONNECT statement when the initial connection was made.
Usage
The DISCONNECT statement lets you terminate a connection to a database
server. If a database is open, it closes before the connection drops.
Syntax
1-167
DISCONNECT
Use the keyword CURRENT to terminate the current connection. For example,
the DISCONNECT statement in the following excerpt drops the current
connection to the database server mydbsrvr:
CONNECT TO 'stores6@mydbsrvr'
.
.
.
DISCONNECT CURRENT
When the DISCONNECT statement drops an implicit connection, as shown in
the following example, that implicit connection cannot be re-established.
DATABASE 'stores6@mydbsrvr'
.
.
.
DISCONNECT CURRENT
DATABASE 'stores6@mydbsrvr'
-- error; no connection
See “The Implicit Connection with DATABASE Statements” on page 1-46 for
more information about an implicit connection.
1-168 Syntax
DISCONNECT
ESQL
Use the keyword DEFAULT to terminate an explicit default connection (a
connection made using the CONNECT TO DEFAULT statement) or an
implicit connection, if one exists.
You establish an implicit connection in your program when you execute
one of the DATABASE statements (DATABASE, START DATABASE, and so
on) prior to issuing a CONNECT statement. If the statement does not specify
a server, as shown in the following example, the connection is made to the
default server:
EXEC SQL DATABASE 'stores6'
.
.
.
DISCONNECT DEFAULT
If the statement specifies a database server, as shown in the following
example, an implicit connection is made to that server:
EXEC SQL DATABASE 'stores6@mydbsrvr'
.
.
.
DISCONNECT DEFAULT
See “The DEFAULT Option” on page 1-46 and “The Implicit Connection
with DATABASE Statements” on page 1-46 for more information about the
default database server and implicit connections.
Use the keyword ALL to terminate all connections established by the application up to that time. For example, the following DISCONNECT statement
disconnects the current connection as well as all dormant connections.
DISCONNECT ALL
If you disconnect a specific connection using connection name or conn_nm
variable, you receive an error if the specified connection is not a current or
dormant connection:
A DISCONNECT statement that does not terminate the current connection
does not change the context of the current environment.
Syntax
1-169
DISCONNECT
If a transaction is active, the DISCONNECT statement returns an error. The
transaction remains active and the application must explicitly commit it or
roll it back. If an application terminates without issuing a DISCONNECT statement because of a system crash or program error, for example—active
transactions are rolled back.
You cannot use the PREPARE statement for the DISCONNECT statement.
References
See the CONNECT, SET CONNECTION, and DATABASE statements in this
manual.
1-170 Syntax
DROP AUDIT
DROP AUDIT
Purpose
Use the DROP AUDIT statement to delete an audit-trail file.
Syntax
SE
+
DROP AUDIT FOR
Table Name
p. 1-506
Synonym
Name
p. 1-504
Usage
When you finish making a backup of your database files, use the DROP
AUDIT statement to remove the old audit trail file. Use the CREATE AUDIT
statement to start a new audit trail for a table.
You must own the table or have the DBA privilege to use the DROP AUDIT
statement.
The following example assumes that you have just backed up the stores6
database. It removes the existing audit trail on the orders table.
DROP AUDIT FOR orders
References
See the CREATE AUDIT and RECOVER TABLE statements in this manual.
In the INFORMIX-SE Administrator’s Guide, see the discussion on audit trails
in Chapter 2.
Syntax
1-171
DROP DATABASE
DROP DATABASE
Purpose
Use the DROP DATABASE statement to delete an entire database, including all
system catalog tables, indexes, and data.
Syntax
+
DROP DATABASE
Database
Name
p. 1-421
Usage
You must have the DBA privilege or be user informix to run the DROP
DATABASE statement successfully. Otherwise, the database server issues an
error message and does not drop the database.
You cannot drop the current database or a database that is being used by
another user. All the database users must first execute the CLOSE DATABASE
statement.
The DROP DATABASE statement cannot appear in a multistatement PREPARE
statement.
The following statement drops the stores6 database:
DROP DATABASE stores6
1-172 Syntax
SE
The user informix must have write permission to the database directory
that is to be dropped.
SE
When you drop a database with transactions, the transaction log file
associated with the database is removed.
DB
Use this statement with caution. DB-Access does not prompt you to verify
that you want to delete the entire database.
DROP DATABASE
ESQL
You can use a simple database name in a program or host variable, or you
can use the full database server and database name. See “Database Name”
on page 1-421 for more information.
SE
The DROP DATABASE statement does not remove the database directory if
it includes any files other than those created for database tables and their
indexes.
You can specify the full pathname of the database in quotes, as shown in the
following example:
DROP DATABASE '/u/training/stores6'
You cannot use a ROLLBACK WORK statement to undo a DROP DATABASE
statement. If you roll back a transaction that contains a DROP DATABASE
statement, the database is not re-created and you do not receive an error
message.
SE
ESQL
You can specify a database that is not in your local directory or DBPATH by
putting the full operating system file in a variable for the database name.
LET db_var = '/u/training/stores6'
DROP DATABASE db_var
References
See the CREATE DATABASE and CLOSE DATABASE statements in this manual.
Syntax
1-173
DROP INDEX
DROP INDEX
Use the DROP INDEX statement to remove an index.
Syntax
+
DROP INDEX
Index
Name
p. 1-484
Usage
You must be the owner of the index or have the DBA privilege to use the DROP
INDEX statement.
The following example drops the index o_num_ix owned by joed. The
stores6 database must be the current database.
DROP INDEX stores6:joed.o_num_ix
You cannot use the DROP INDEX statement on a column or columns to drop
a unique constraint created with a CREATE TABLE statement; you must use
the ALTER TABLE statement to remove indexes created as constraints with a
CREATE TABLE or ALTER TABLE statement.
The index is not actually dropped if it is shared by constraints. Instead, it is
renamed in the sysindexes system catalog table using the following format:
[space]<tabid>_<constraint id>
where tabid and constraint_id are from the systables and sysconstraints
system catalog tables, respectively. The idxname (index name) column in
sysconstraints is then updated to reflect this change. For example, the
renamed index name may be something like this: “ 121_13” (quotes used to
show the spaces).
1-174 Syntax
DROP INDEX
If this index is a unique index with only referential constraints sharing it, the
index is downgraded to a duplicate index after it is renamed.
SE
You cannot use a ROLLBACK WORK statement to undo a DROP INDEX
statement. If you roll back a transaction that contains a DROP INDEX
statement, the index is not re-created and you do not receive an error
message.
References
See the ALTER TABLE, CREATE INDEX, and CREATE TABLE statements in this
manual.
In the Informix Guide to SQL: Tutorial, see the discussion of indexes in
Chapter 10.
Syntax
1-175
DROP PROCEDURE
DROP PROCEDURE
Purpose
Use the DROP PROCEDURE statement to remove a procedure from the
database.
Syntax
+
DROP PROCEDURE
Procedure
Name
p. 1-495
Usage
You must be the owner of the procedure or have the DBA privilege to use the
DROP PROCEDURE statement.
Dropping the procedure removes the text and executable versions of the
procedure.
Note: You cannot drop a procedure from within the same procedure.
SE
You cannot use a ROLLBACK WORK statement to undo a DROP PROCEDURE
statement. If you roll back a transaction that contains a DROP PROCEDURE
statement, the procedure is not re-created and you do not receive an error
message.
References
See the CREATE PROCEDURE statement in this manual.
In the Informix Guide to SQL: Tutorial, see the discussion of using procedures
in Chapter 14.
1-176 Syntax
DROP SYNONYM
DROP SYNONYM
Purpose
Use the DROP SYNONYM statement to remove a previously defined
synonym.
Syntax
+
DROP SYNONYM
Synonym
Name
p. 1-504
Usage
You must be the owner of the synonym or have the DBA privilege to use the
DROP SYNONYM statement.
The following statement drops the synonym nj_cust, owned by cathyg:
DROP SYNONYM cathyg.nj_cust
If a table is dropped, any synonyms in the same database as the table that
refer to the table also are dropped.
If a synonym refers to an external table and the table is dropped, the synonym
remains in place until you explicitly drop it using DROP SYNONYM. You can
create another table or synonym in place of the dropped table, giving the new
object the name of the dropped table. The old synonym then refers to the new
object. See the CREATE SYNONYM statement for a complete discussion of
synonym chaining.
SE
You cannot use a ROLLBACK WORK statement to undo a DROP SYNONYM
statement. If you roll back a transaction that contains a DROP SYNONYM
statement, the synonym is not re-created and you do not receive an error
message.
Syntax
1-177
DROP SYNONYM
Reference
See the CREATE SYNONYM statement in this manual.
In the Informix Guide to SQL: Tutorial, see the discussion of synonyms in
Chapter 12.
1-178 Syntax
DROP TABLE
DROP TABLE
Purpose
Use the DROP TABLE statement to remove a table, along with its associated
indexes and data.
Syntax
+
DROP TABLE
Table
Name
p. 1-506
Synonym
Name
p. 1-504
Usage
You must be the owner of the table or have DBA status to use the DROP TABLE
statement.
Use the DROP TABLE statement with caution. When you remove a table, you
also delete the data stored in it, the indexes or constraints on the columns
(including all the referential constraints placed on its columns), any local
synonyms assigned to it, any triggers created for it, and any authorizations
you have granted on the table. You also drop all views based on the table. You
do not remove any synonyms for the table that have been created in an
external database.
You cannot drop any of the system catalog tables. You cannot drop a table
that is not in the current database.
DB
If you issue a DROP TABLE statement, you are not prompted to verify that
you want to delete an entire table.
SE
You cannot use a ROLLBACK WORK statement to undo a DROP TABLE statement. If you roll back a transaction that contains a DROP TABLE statement,
the table is not re-created and you do not receive an error message.
Syntax
1-179
DROP TABLE
The following example deletes two tables. Both tables are within the current
database and owned by the current user.
DROP TABLE customer
DROP TABLE stores6@accntg:joed.state
Reference
See the CREATE TABLE and DROP DATABASE statements in this manual.
In the Informix Guide to SQL: Tutorial, see the discussions of data integrity and
creating a table in Chapter 4 and Chapter 9, respectively.
1-180 Syntax
DROP TRIGGER
DROP TRIGGER
Purpose
Use the DROP TRIGGER statement to remove a trigger definition from the
database.
Syntax
DB
E/C
E/CO
DROP TRIGGER
+
Trigger
Name
p. 1-113
Usage
You must be the owner of the trigger or have the DBA privilege to drop a
trigger.
Dropping a trigger removes the text of the trigger definition and the
executable trigger from the database.
The following statement drops the items_pct trigger:
DROP TRIGGER items_pct
You cannot drop a trigger inside a stored procedure if the procedure is called
within a data manipulation statement. For example, in the following INSERT
statement, a DROP TRIGGER statement is illegal inside the stored procedure
proc1:
INSERT INTO orders EXECUTE PROCEDURE proc1(vala, valb)
SE
You cannot use a ROLLBACK WORK statement to undo a DROP TRIGGER
statement. If you roll back a transaction that contains a DROP TRIGGER statement, the trigger is not re-created and you do not receive an error message.
Syntax
1-181
DROP TRIGGER
References
See the CREATE PROCEDURE statement in this manual for more information
about a stored procedure that is called within a data manipulation statement.
For more information about triggers, see the CREATE TRIGGER statement in
this manual.
1-182 Syntax
DROP VIEW
DROP VIEW
Purpose
Use the DROP VIEW statement to remove a view from the database.
Syntax
+
DROP VIEW
View
Name
p. 1-510
Synonym
Name
p. 1-504
Usage
You must own the view or have the DBA privilege to use the DROP VIEW
statement.
When you drop view name, you also drop all views that have been defined in
terms of view name. You can determine which, if any, views depend on
another view by querying the sysdepend system catalog table.
The following statement drops the view named cust1:
DROP VIEW cust1
SE
You cannot use a ROLLBACK WORK statement to undo a DROP VIEW statement. If you roll back a transaction that contains a DROP VIEW statement,
the view is not re-created and you do not receive an error message.
References
See the CREATE VIEW and DROP TABLE statements in this manual.
In the Informix Guide to SQL: Tutorial, see the discussion of views in
Chapter 11.
Syntax
1-183
EXECUTE
EXECUTE
Purpose
Use the EXECUTE statement to run a previously prepared statement or set of
statements.
Syntax
ESQL
EXECUTE
statement id
statement
id variable
,
variable
name
USING
: indicator
variable
+
INDICATOR
SQL DESCRIPTOR
E/C
indicator
variable
' descriptor '
descriptor variable
DESCRIPTOR
sqlda pointer
descriptor
is a quoted string that identifies the system-descriptor area
that was previously allocated.
descriptor
variable
is an embedded-variable name that identifies the systemdescriptor area that was previously allocated.
indicator variable is a program variable that receives a return code if null data
is placed in the corresponding data variable.
1-184 Syntax
sqlda pointer
is an INFORMIX-ESQL/C pointer to an sqlda structure that
describes the undefined values in the prepared statement.
statement id
is an SQL statement identifier defined in a previous PREPARE
statement in the same module.
statement
id variable
is an embedded-variable name that identifies the SQL statement defined in a previous PREPARE statement in the same
module.
EXECUTE
variable name
is an INFORMIX-ESQL host variable to be substituted as a
value for a question mark (?) placeholder required by the
prepared statement.
Usage
The EXECUTE statement passes a prepared SQL statement to the database
server for execution. If the statement contained question mark (?)
placeholders, specific values are supplied for them before execution. Once
prepared, an SQL statement can be executed as often as needed.
You can execute any prepared statement except a (prepared) SELECT
statement or (prepared) EXECUTE PROCEDURE statement for procedures that
return rows. A prepared SELECT statement returns rows of data; you may use
the DECLARE, OPEN, and FETCH cursor statements to retrieve the data rows.
(You can, however, use EXECUTE on a prepared SELECT INTO TEMP statement.) If you prepared an EXECUTE PROCEDURE statement and the procedure returns rows, you need to use DECLARE, OPEN, and FETCH as you
would with a SELECT statement.
If you create or drop a trigger after you prepared a triggering INSERT,
DELETE, or UPDATE statement, the prepared statement returns an error when
you execute it.
The following example shows an EXECUTE statement within an
INFORMIX-ESQL/C program:
exec sql prepare del_1 from
'delete from customer
where customer_num = 119';
exec sql execute del_1;
A program can consist of one or more source-code files. By default, the scope
of a statement identifier is global to the program. This means that a statement
identifier created in one file can be referenced from another file.
In a multiple-file program, if you want to limit the scope of a statement
identifier to the file in which it is executed, you may preprocess all the files
with the -local command line option. See your ESQL product manual for
more information, restrictions, and performance issues when preprocessing
with the -local option.
Syntax
1-185
EXECUTE
The sqlca Record and EXECUTE
Following an EXECUTE statement, the sqlca (see your embedded-language
product manual) can reflect two results. The sqlca can reflect an error within
in the EXECUTE statement. For example, sqlca is set for 100 when an UPDATE
. . . WHERE . . . statement within a prepared object processes zero rows. The
sqlca can also reflect the success or failure of the executed statement.
USING Clause
The USING clause specifies values that are to replace question mark (?)
placeholders in the prepared statement. Providing values in the EXECUTE
statement that replace the ? placeholders in the prepared statement is
sometimes called parameterizing the prepared statement.
You can specify any of the following items to replace the question mark (?)
placeholders in a statement before you execute it:
• A host or program variable name (if the number and data type of the
question marks are known at compile time)
• A system descriptor that identifies a system
E/C
• A descriptor that is a pointer to an sqlda structure
Supplying Parameters Through Host or Program Variables
You must supply one variable name for each placeholder. The data type of
each variable must be compatible with the corresponding value required by
the prepared statement.
The variable name can include an indicator variable, provided its use is
appropriate at the corresponding point in the prepared statement.
The following example executes the prepared UPDATE statement in
INFORMIX-ESQL/C:
strcopy (stm1,"update orders set order_date = ? where po_num = ?");
exec sql prepare statement_1 from :stm1;
exec sql execute statement_1 using :order_date:ord_ind, :po_num;
1-186 Syntax
EXECUTE
Supplying Parameters through a System Descriptor
You can create a system-descriptor area that describes the data type and
memory location of one or more values and then specify the descriptor in the
USING SQL DESCRIPTOR clause of the EXECUTE statement.
Each time that the EXECUTE statement is run, the values described by
thesystem-descriptor area are used to replace question mark (?) placeholders
in the PREPARE statement. This method is similar to using the USING keyword with a list of variables, except that your program has full control over
the memory location of the data values.
The COUNT field corresponds to the number of dynamic parameters in the
prepared statement. The value of COUNT must be less than or equal to the
value of the occurrences specified when the system-descriptor area was
allocated with the ALLOCATE DESCRIPTOR statement.
For more information on system descriptors, see your INFORMIX-ESQL
product manual.
The following examples show how to execute prepared statements using
system descriptors in INFORMIX-ESQL/C and INFORMIX-ESQL/COBOL,
respectively:
exec sql execute prep_stmt using sql descriptor 'desc1';
INFORMIX-ESQL/C
EXEC SQL EXECUTE PREP_STMT USING SQL DESCRIPTOR 'DESC1'
END-EXEC.
INFORMIX-ESQL/COBOL
Syntax
1-187
EXECUTE
Supplying Parameters Through an sqlda Structure
E/C
You can specify the sqlda pointer in the USING DESCRIPTOR clause of the
EXECUTE statement. Each time the EXECUTE statement is run, the values
described by the sqlda structure are used to replace question mark (?) placeholders in the PREPARE statement. This method is similar to employing the
USING keyword with a list of variables, except that your program has full
control over the memory location of the data values.
For more information on the sqlda structure, see the manual for the version
of INFORMIX-ESQL/C you are using.
The following example shows how to execute a prepared statement using
an sqlda structure in INFORMIX-ESQL/C:
EXEC SQL EXECUTE prep_stmt USING DESCRIPTOR pointer2;
Error Conditions with EXECUTE
ANSI
In an ANSI-compliant database, if you prepare and execute any of the
following statements and no rows are returned from the statements, the
database server returns SQLNOTFOUND (100).
•
•
•
•
INSERT INTO table-name SELECT . . . WHERE . . .
SELECT INTO TEMP . . . WHERE . . .
DELETE . . . WHERE . . .
UPDATE . . . WHERE . . .
In a database that is not ANSI-compliant, if any statement fails to access any
rows, the database server returns (0).
In a multistatement prepare, if any statements fail to access rows, in either
ANSI databases and databases that are not ANSI-compliant, the database
server returns SQLNOTFOUND (100).
1-188 Syntax
EXECUTE
References
See the ALLOCATE DESCRIPTOR, DEALLOCATE DESCRIPTOR, DECLARE,
EXECUTE IMMEDIATE, GET DESCRIPTOR, PREPARE, PUT, and SET
DESCRIPTOR statements in this manual.
In the Informix Guide to SQL: Tutorial, see the discussion of the EXECUTE
statement in Chapter 5.
Syntax
1-189
EXECUTE IMMEDIATE
EXECUTE IMMEDIATE
Purpose
Use the EXECUTE IMMEDIATE statement to perform the functions of the
following SQL statements in one step: PREPARE, EXECUTE, and FREE.
Syntax
ESQL
EXECUTE IMMEDIATE
Quoted
String
p. 1-497
statement variable name
statement
variable name
is a program or host variable that contains a character string
that consists of one or more SQL statements.
Usage
The quoted string is a character string comprising one or more SQL
statements. The string, or the contents of the statement variable name, is parsed
and executed if correct; then, all data structures and memory resources are
released immediately. In the usual method of dynamic execution, these functions are distributed among the following statements: PREPARE, EXECUTE,
and FREE.
The EXECUTE IMMEDIATE statement makes it easy to dynamically execute a
single simple SQL statement that is constructed during program execution.
For example, you could obtain the name of a database from program input,
construct the DATABASE statement as a program variable, and then use
EXECUTE IMMEDIATE to execute the statement, which opens the database.
1-190 Syntax
EXECUTE IMMEDIATE
Restricted Statement Types
You cannot use the EXECUTE IMMEDIATE statement to execute the following
SQL statements:
CLOSE
GET DESCRIPTOR
CONNECT
OPEN
DECLARE
PREPARE
DISCONNECT
SELECT
EXECUTE
SET CONNECTION
EXECUTE PROCEDURE (if the procedure returns values)
FETCH
SET DESCRIPTOR
GET DIAGNOSTICS
WHENEVER
Use a PREPARE statement to execute a dynamically constructed SELECT
statement.
The following restrictions apply to the statement contained in the quoted
string or in the statement variable name:
• The statement cannot contain a host-language comment.
• Names of host-language variables are not recognized as such in prepared
text. The only identifiers that you can use are names defined in the
database, such as table names and columns.
• The statement cannot reference a host variable list or a descriptor; hence
it must not contain any question mark (?) placeholders, such as those
allowed with a PREPARE statement.
• The text must not include any embedded SQL statement prefix or
terminator, such as the dollar sign or semicolon, or the words EXEC SQL.
The following example shows the EXECUTE IMMEDIATE statement in
INFORMIX-ESQL/C:
sprintf(cdb_text, 'create database %s', usr_db_id);
exec sql execute immediate :cdb_text;
References
See the EXECUTE, FREE, and PREPARE statements in this manual.
In the Informix Guide to SQL: Tutorial, see the discussion of quick execution in
Chapter 5.
Syntax
1-191
EXECUTE PROCEDURE
EXECUTE PROCEDURE
Purpose
Use the EXECUTE PROCEDURE statement to execute a procedure from the
DB-Access interactive editor, an SQL API, or another stored procedure.
Syntax
+
EXECUTE PROCEDURE
Procedure
Name
p. 1-495
(
)
,
Argument
ESQL
,
SPL
INTO
host
variable
Argument
Expression
p. 1-430
parameter name =
SELECT
Statement
(Singleton)
p. 1-310
host variable
parameter name
is a variable defined within the calling program.
is the name of the parameter as defined by its CREATE
PROCEDURE statement.
Usage
The EXECUTE PROCEDURE statement invokes a procedure called Procedure
Name.
If an EXECUTE PROCEDURE statement has more arguments than are expected
by the called procedure, an error is returned.
If an EXECUTE PROCEDURE statement has fewer arguments than are
expected by the called procedure, the arguments are said to be missing. Missing arguments are initialized to their corresponding default values, if default
values were specified. (See the CREATE PROCEDURE statement on page 1-68)
This initialization occurs before the first executable statement in the body of
the procedure.
1-192 Syntax
EXECUTE PROCEDURE
If arguments are missing and do not have default values, they are initialized
to the value of UNDEFINED. An attempt to use any variable that has the value
of UNDEFINED results in an error.
Procedure arguments are bound to procedure parameters by name or
position, but not both. That is, you can use parameter name = syntax for none
or all of the arguments specified in one EXECUTE PROCEDURE statement.
For example, both of the procedure calls are valid for a procedure that expects
three character arguments: t, n, and d, as shown in the following example:
EXECUTE PROCEDURE add_col (t ='customer', d ='integer', n ='newint')
EXECUTE PROCEDURE add_col ('customer','newint','integer')
ESQL
If the EXECUTE PROCEDURE statement returns more than one row, it must
be enclosed within an SPL FOREACH loop or accessed through a cursor.
INTO Clause
ESQL
SPL
The host variable list is a list of the host variables that receive the returned
values from a procedure call. A procedure that returns more than one row
must be enclosed in a cursor. If you execute a procedure from within a
procedure, the list contains procedure variables.
If you prepare the EXECUTE PROCEDURE statement, you must declare
acursor and use the FETCH statement to retrieve any returned values.
References
See the CREATE PROCEDURE, DROP PROCEDURE, GRANT, and CALL
statements in this manual.
In the Informix Guide to SQL: Tutorial, see the discussion of creating and using
stored procedures in Chapter 14.
Syntax
1-193
FETCH
FETCH
Purpose
Use the FETCH statement to move a cursor to a new row in the active set and
to retrieve the row values from memory.
Syntax
,
ESQL
FETCH
INTO
cursor id
+
data
variable
cursor
variable
+
: indicator
variable
indicator
indicator
variable
NEXT
PREVIOUS
+
PRIOR
data structure
FIRST
LAST
CURRENT
SQL
DESCRIPTOR
USING
row
position
RELATIVE
descriptor
variable
E/C
+
ABSOLUTE
cursor id
'descriptor'
DESCRIPTOR
sqlda
pointer
row
position
is the identifier of a cursor that was created in an earlier
DECLARE statement.
1-194 Syntax
cursor variable
is an embedded-variable name that identifies a cursor that
was created in an earlier DECLARE statement.
data structure
is a structure which has been declared as a host variable. The
individual elements of the structure must be matched
appropriately to the type of values being fetched.
data variable
is a program variable or host object that receives one value
from the fetched row.
descriptor
is a string that identifies the system-descriptor area that was
allocated with the ALLOCATE DESCRIPTOR statement.
descriptor
variable
is an embedded-variable name that identifies the systemdescriptor area that was allocated with the ALLOCATE
DESCRIPTOR statement.
FETCH
indicator
variable
is a program variable that receives a return code if null data
is placed in the corresponding data variable.
row position
is an integer or variable that contains an integer value,
giving the position of the desired row in the active set of
rows.
sqlda pointer
is a pointer to an sqlda structure that receives the values
from the fetched row.
Usage
The FETCH statement is one of four statements used for queries that return
more than one row from the database. The four statements, DECLARE, OPEN,
FETCH, and CLOSE, are used in the following sequence:
1. Declare a cursor to control the active set of rows.
2. Open the cursor to begin execution of the query.
3. Fetch from the cursor to retrieve the contents of each row.
4. Close the cursor to break the association between the cursor and the
active set.
A cursor is created as either a sequential cursor or a scroll cursor. The way the
database server creates and stores members of the active set and then fetches
rows from the active set differs, depending on whether the cursor is a sequential cursor or a scroll cursor. (See the DECLARE statement on page 1-145 for
details on the types of cursors.)
X/O
In X/Open mode, if a cursor direction value (such as NEXT or RELATIVE) is
specified, a warning message is issued, indicating that the statement does
not conform to X/Open standards.
FETCH with a Sequential Cursor
A sequential cursor can fetch only the next row in sequence from the active
set. The sole keyword option available to a sequential cursor is the default
value, NEXT. A sequential cursor can read through a table only once each time
it is opened. The following example in INFORMIX-ESQL/C illustrates the use
of a sequential cursor:
exec sql fetch seq_curs into :fname,:lname;
Syntax
1-195
FETCH
When the program opens a sequential cursor, the database server processes
the query to the point of locating or constructing the first row of data. The
goal of the database server is to tie up as few resources as possible.
Because the sequential cursor can retrieve only the next row, it is frequently
possible for the database server to create the active set one row at a time. On
each FETCH operation, the database server returns the contents of the current
row and locates the next row. This one-row-at-a-time strategy is not possible
if the database server must create the entire active set to determine which row
is the first row (as would be the case if the SELECT statement included an
ORDER BY clause).
FETCH with a Scroll Cursor
A scroll cursor can fetch any row in the active set, either by specifying an
absolute row position or a relative offset. You use keywords, found in the
following list, to specify a particular row that you want to retrieve:
1-196 Syntax
NEXT
retrieves the next row in the active set.
PREVIOUS
retrieves the previous row in the active set.
PRIOR
is synonymous with PREVIOUS; retrieves the previous row
in the active set.
FIRST
retrieves the first row in the active set.
LAST
retrieves the last row in the active set.
CURRENT
retrieves the current row in the active set (the same row as
returned by the preceding FETCH statement from the scroll
cursor).
RELATIVE
retrieves the nth row relative to the current cursor position
in the active set, where n is supplied by row position. A negative value indicates the nth row prior to the current cursor
position. If row position is zero, the current row is fetched.
ABSOLUTE
retrieves the nth row in the active set, where n is supplied by
row position. Absolute row positions are numbered from one.
FETCH
The following INFORMIX-ESQL/C examples illustrate the FETCH statement:
exec sql fetch previous q_curs into :orders;
exec sql fetch last q_curs into :orders;
exec sql fetch relative -10 q_curs into :orders;
printf('Which row? ');
scanf('%d',row_num);
exec sql fetch absolute row_num q_curs into :orders;
Row Numbers
The row numbers used with the ABSOLUTE keyword are valid only while the
cursor is open. Do not confuse them with rowid values. A rowid value is
based on the position of a row in its table and remains valid until the table is
rebuilt. A row number for a FETCH statement is based on the position of the
row in the active set of the cursor; the next time the cursor is opened, different
rows may be selected.
How the Database Server Stores Rows
The database server must retain all the rows in the active set for a scroll cursor
until the cursor closes, because it cannot be sure which row the program asks
for next. When a scroll cursor opens, the database server implements the
active set as a temporary table, although it may not fill this table immediately.
The first time a row is fetched, the database server copies it into the
temporary table as well as returning it to the program. When a row is fetched
for the second time, it can be taken from the temporary table. This scheme
uses the fewest resources in case the program abandons the query before it
fetches all the rows. Rows that are never fetched are usually not created or are
saved in a temporary table.
Syntax
1-197
FETCH
Specifying Where Values Go in Memory
Each value from the select list of the query or the output of the executed
procedure must be returned into a memory location. You can specify these
destinations in one of the following ways:
• Using the INTO clause of a SELECT statement
• Using the INTO clause of a EXECUTE PROCEDURE statement
• Using the INTO clause of a FETCH statement
• Using a system descriptor
E/C
• Using an sqlda structure
Using the INTO Clause of SELECT
The SELECT statement that is associated with the cursor can contain an INTO
clause that specifies which program variables are to receive the values. You
can use this method only when the SELECT statement is written as part of the
declaration of the cursor (see the DECLARE statement on page 1-145). In this
case, the FETCH statement cannot contain an INTO clause. The following
example uses the INTO clause of SELECT to specify program variables in
INFORMIX-ESQL/C:
exec sql declare ord_date cursor for
select order_num, order_date, po_num
into :o_num, :o_date, :o_po
exec sql open ord_date
exec sql fetch next ord_date
You should use an indicator variable if the possibility exists that data
returned from the SELECT is null. See your SQL API manual for more
information about indicator variables.
Using the INTO Clause of EXECUTE PROCEDURE
The EXECUTE PROCEDURE statement that is associated with the cursor can
contain an INTO clause that specifies which program variables are to receive
the values. You can use this method only when the EXECUTE PROCEDURE
statement is written as part of the cursor declaration (see the DECLARE
1-198 Syntax
FETCH
statement on page 1-145). In this case, the FETCH statement cannot contain an
INTO clause. The following example uses the INTO clause of EXECUTE
PROCEDURE to specify program variables in INFORMIX-ESQL/C:
exec sql declare ord_date cursor for
execute procedure xx (20)
into :o_num, :o_date, :o_po
exec sql open ord_date
exec sql fetch next ord_date
You should use an indicator variable if the possibility exists that data
returned from the EXECUTE PROCEDURE statement is null. See your SQL API
manual for more information about indicator variables.
Using the INTO Clause of FETCH
When the SELECT statement omits the INTO clause, you must specify
thedestination of the data whenever a row is fetched. The FETCH statement
can include an INTO clause to retrieve data into a set of variables. This
method has the advantage that you can store different rows in different
memory locations.
You cannot use an array of host variables in the INTO clause.
In the following INFORMIX-ESQL/C example, a series of complete rows is
fetched into a program array:
exec sql begin declare section;
char wanted_state[2];
short int row_count = 0;
struct customer_t{
int
c_no;
char
fname[15];
char
lname[15];
} cust_rec[100];
exec sql end declare section;
main()
{
exec sql database 'stores6';
exec sql declare cust cursor for
select * from customer where state = :wanted_state;
printf ('Enter 2-letter state code: ');
Syntax
1-199
FETCH
scanf ('%s', wanted_state);
exec sql open cust;
exec sql fetch cust in :cust_rec;
while (SQLCODE == 0)
{
printf('\n%s %s', cust_rec.fname, cust_rec.lname);
exec sql fetch cust in :cust_rec;
}
printf ('/n');
exec sql close cust;
Fetching a series of rows with ESQL/C
You can fetch into a program-array element only by using an INTO clause in
the FETCH statement. When you are declaring a cursor, do not refer to an
array element within the SQL statement.
Using a System Descriptor
You can use a system-descriptor area as an output variable. The keywords
USING SQL DESCRIPTOR introduce the name of the system-descriptor area
into which you fetch the contents of a row. The values returned by the FETCH
statement can then be transferred from the system-descriptor area into host
variables by using the GET DESCRIPTOR statement.
For more information, see your INFORMIX-ESQL manual. The following
examples show sample FETCH USING SQL DESCRIPTOR statement in
INFORMIX-ESQL/C and INFORMIX-ESQL/COBOL, respectively:
exec sql fetch selcurs using sql descriptor 'desc';
INFORMIX-ESQL/C
EXEC SQL FETCH SEL_CURS USING SQL DESCRIPTOR 'DESC' END-EXEC.
INFORMIX-ESQL/COBOL
1-200 Syntax
FETCH
Using an sqlda Structure
E/C
You can supply destinations using a pointer to an sqlda structure. This
structure contains data descriptors, each one specifying the data type and
memory location for one selected value. For more information, see the
INFORMIX-ESQL/C Programmer’s Manual. The keywords USING
DESCRIPTOR introduce the name of the sqlda pointer structure.
When you create a SELECT statement dynamically, you cannot use an INTO
host-variable clause because you cannot name host variables in a prepared
statement. If you are certain of the number and type of values in the select
list, you can use an INTO host-variable clause in the FETCH statement. However, if the query was generated by user input, you might not be certain of
the number and type of values being selected. In this case, you must use an
sqlda pointer structure as described in the following list:
• Use the DESCRIBE statement to fill in the sqlda.
• Allocate memory to hold the data values.
• Name the sqlda in the FETCH statement.
The following example shows a sample FETCH USING DESCRIPTOR
statement in INFORMIX-ESQL/C:
exec sql fetch selcurs using descriptor pointer2;
Fetching a Row for Update
The FETCH statement does not ordinarily lock a row that is fetched. Thus, the
fetched row can be modified (updated or deleted) by another process immediately after your program receives it. A fetched row is locked in the
following cases:
• When you set the isolation level to Repeatable Read, each row you fetch
is locked with a read lock to keep it from changing until the cursor closes
Syntax
1-201
FETCH
or the current transaction ends. Other programs also can read the locked
rows.
• When you set the isolation level to Cursor Stability, the current row is
locked.
ANSI
• In an ANSI-compliant database, an isolation level of Repeatable Read is
the default; you can set it to something else.
• When you are fetching through an update cursor (one declared FOR
UPDATE), each row you fetch is locked with a promotable lock. Other
programs can read the locked row, but no other program can place a promotable or write lock; therefore, the row is unchanged if another user tries
to modify it using the WHERE CURRENT OF clause of UPDATE or DELETE
statement.
When you modify a row, the lock is upgraded to a write lock and remains
until the cursor is closed or the transaction ends. If you do not modify it,
the lock may or may not be released when you fetch another row, depending on the isolation level you have set. The lock on an unchanged row is
released as soon as another row is fetched, unless you are using Repeatable Read isolation (see the SET ISOLATION statement on page 1-366).
Note: You can hold locks on additional rows even when Repeatable Read isolation
is not in use or is unavailable. Update the row with unchanged data to hold it
locked while your program is reading other rows. You must evaluate the effect of
this technique on performance in the context of your application, and you should
be aware of the increased potential for deadlock.
When you use explicit transactions, be sure that a row is both fetched and
modified within a single transaction; that is, both the FETCH statement and
the subsequent UPDATE or DELETE statement must fall between a BEGIN
WORK statement and the next COMMIT WORK statement.
SE
You cannot set the database isolation level on INFORMIX-SE.
Checking the Result of a FETCH
You can check the result of each FETCH statement using the GET
DIAGNOSTICS statement. You examine the RETURNED_SQLSTATE field of the
GET DIAGNOSTICS statement to check if the field contains the value ‘02000.’
1-202 Syntax
FETCH
If a row is returned successfully, the RETURNED_SQLSTATE field of GET
DIAGNOSTICS contains the value ‘00000,’ representing success. If no row is
found, the preprocessor sets the SQLSTATE code to ‘02000,’ which indicates
no data found, and the current row is unchanged. Five conditions set the
SQLSTATE code to ‘02000,’ indicating no data found, as described in the
following list:
• The active set contains no rows.
• You issue a FETCH NEXT statement when the cursor points to the last row
in the active set or points past it.
• You issue a FETCH PRIOR or FETCH PREVIOUS statement when the cursor
points to the first row in the active set.
• You issue a FETCH RELATIVE n statement when no nth row exists in the
active set.
• You issue a FETCH ABSOLUTE n statement when no nth row exists in the
active set.
See the GET DIAGNOSTICS statement in this manual for more information.
You can also use SQLCODE of sqlca to determine the same results. See the
Informix Guide to SQL: Tutorial for further information about SQLCODE of
sqlca.
References
See the ALLOCATE DESCRIPTOR, CLOSE, DEALLOCATE DESCRIPTOR,
DECLARE, DESCRIBE, GET DESCRIPTOR, OPEN, PREPARE, and SET DESCRIPTOR statements in this manual for further information about using the FETCH
statement with dynamic management statements.
In the Informix Guide to SQL: Tutorial, see the discussion of the FETCH
statement in Chapter 5.
For further information about error checking and the system descriptor area,
see your SQL API manual.
Syntax
1-203
FLUSH
FLUSH
Purpose
Use the FLUSH statement to force rows that were buffered by a PUT statement
to be written to the database.
Syntax
ESQL
+
FLUSH
cursor
id
cursor
variable
cursor id
is the identifier of a cursor that is associated with an INSERT
statement.
cursor variable
is an embedded-variable name that identifies a cursor that is
associated with an INSERT statement.
Usage
The PUT statement adds a row to a buffer, and the buffer is written to the
database when it is full. Use the FLUSH statement to force the insertion when
the buffer is not full.
If the program terminates without closing the cursor, the buffer is left
unflushed. Rows placed into the buffer because the last flush are lost. Do not
expect the end of the program to close the cursor and flush the buffer.
The following example shows a FLUSH statement:
FLUSH icurs
Error Checking FLUSH Statements
The SQLCA contains information on the success of each FLUSH statement and
the number of rows that are inserted successfully. The result of each FLUSH
statement is contained in the fields of the sqlca, as shown in the following
table:
1-204 Syntax
FLUSH
ESQL/C
sqlca.sqlcode SQLCODE
sqlca.sqlerrd[2]
ESQL/COBOL
SQLCODE of SQLCA
SQLERRD[3] OF SQLCA
When using data buffering with an insert cursor, errors are not discovered
until the buffer is flushed. For example, an input value that is incompatible
with the data type of the column for which it is intended is discovered only
when the buffer is flushed. When an error is discovered, rows in the buffer
located after the error are not inserted; they are lost from memory.
The SQLCODE field is set either to an error code or to zero if no error occurs.
The third element of the sqlerrd array is set to the number of rows that are
successfully inserted into the database.
• If a block of rows is successfully inserted into the database, SQLCODE is
set to zero and sqlerrd to the count of rows.
• If an error occurs while the FLUSH statement is inserting a block of rows,
SQLCODE shows which error, and sqlerrd contains the number of rows
that were successfully inserted. (Uninserted rows are discarded from the
buffer.)
Note: When you encounter an SQLCODE error, be aware that there may be a
corresponding SQLSTATE error value. Check the GET DIAGNOSTICS statement for
information about getting the SQLSTATE value and using the GET DIAGNOSTICS
statement to interpret the SQLSTATE value.
Counting Total and Pending Rows
To count the number of rows actually inserted into the database as well as the
number not yet inserted, perform the following steps:
1. Prepare two integer variables, for example, total and pending.
2. When the cursor opens, set both variables to zero.
3. Each time a PUT statement executes, increment both total and pending.
4. Whenever a FLUSH statement executes or the cursor is closed, subtract the
third field of the SQLERRD array from pending.
Syntax
1-205
FLUSH
References
See the CLOSE, DECLARE, OPEN, and PUT statements in this manual.
For information about SQLCA, see your SQL API manual.
In the Informix Guide to SQL: Tutorial, see the discussion of FLUSH in
Chapter 6.
1-206 Syntax
FREE
FREE
Purpose
The FREE statement releases resources that are allocated to a prepared
statement or to a cursor.
Syntax
ESQL
+
FREE
cursor id
cursor
variable
statement
id
statement
id variable
cursor id
is the identifier of a cursor that you declared for a SELECT or
INSERT statement.
cursor variable
is an embedded-variable name that identifies a cursor that
you declared for a SELECT or INSERT statement.
statement id
is the identifier of an SQL statement that you prepared with
the PREPARE statement.
statement
id variable
is an embedded-variable name that identifies an SQL statement that you prepared with the PREPARE statement.
Usage
The FREE statement releases the resources allocated for a prepared statement
or a declared cursor in the application development tool and the database
server. Resources are allocated when you prepare a statement or when you
open a cursor (see the DECLARE and OPEN statements on pages 1-145 and
1-263, respectively.)
The sum of the number of open cursors and the number of prepared
statements that you can have at one time, in one process, is limited by the
amount of free memory available in the system. Use FREE statement id or FREE
statement id variable to release the resources held by a prepared statement; use
FREE cursor id or FREE cursor variable to release resources held by a cursor.
Syntax
1-207
FREE
Freeing a Statement
If you prepared a statement (but did not declare a cursor for it), FREE
statement id (or statement id variable) releases the resources in both the
application development tool and the database server.
If you declared a cursor for a prepared statement, FREE statement id (or
statement id variable) releases only the resources in the application development tool; the cursor can still be used. The resources in the database server
are released only when you free the cursor.
After freeing a statement, you cannot execute it or declare a cursor for it until
you prepare it again.
The following INFORMIX-ESQL/C example shows the sequence of statements
used to free an implicitly prepared statement:
exec sql prepare sel_stmt from 'select * from orders';
.
.
.
exec sql free sel_stmt;
The following INFORMIX-ESQL/C example shows the sequence of statements
used to release the resources of an explicitly prepared statement:
sprintf(demoselect, '%s %s',
'select * from customer ',
'where customer_num between 100 and 200');
exec sql prepare sel_stmt from :demoselect;
exec sql declare sel_curs cursor for sel_stmt;
exec sql open sel_curs;
.
.
.
exec sql close sel_curs;
exec sql free sel_curs;
Freeing a Cursor
If you declared a cursor for a prepared statement, freeing the cursor releases
only the resources in the database server. To release the resources for the
statement in the application development tool, use FREE statement id (or
statement id variable).
1-208 Syntax
FREE
If a cursor is not declared for a prepared statement, freeing the cursor releases
the resources in both the application development tool and the database
server.
After a cursor is freed, it cannot be opened until it is declared again. It is
recommended that the cursor be explicitly closed before it is freed.
References
See the CLOSE, DECLARE, EXECUTE, EXECUTE IMMEDIATE, and PREPARE
statements in this manual.
In the Informix Guide to SQL: Tutorial, see the discussion of the FREE statement
in Chapter 5.
Syntax
1-209
GET DESCRIPTOR
GET DESCRIPTOR
Purpose
Use the GET DESCRIPTOR statement to accomplish the following separate
tasks:
• Determine how many values are described in a system-descriptor area by
retrieving the value in the COUNT field
• Determine the characteristics of each column or expression described in
the system-descriptor area
• Copy a value out of the system-descriptor area and into a host variable
after a FETCH statement
1-210 Syntax
GET DESCRIPTOR
Syntax
ESQL
GET DESCRIPTOR
'descriptor'
host variable = COUNT
,
descriptor
variable
VALUE
item
number
Described
Item Info
item
number
variable
Described
Item Info
field host
variable
=
TYPE
LENGTH
PRECISION
SCALE
NULLABLE
INDICATOR
NAME
DATA
ITYPE
IDATA
ILENGTH
descriptor
descriptor
variable
field host
variable
host variable
item number
item number
variable
is a quoted string that identifies a system-descriptor area
that is already allocated.
is an embedded variable name that identifies a systemdescriptor area that is already allocated.
is the name of a host variable that receives the contents of
the indicated field of the system-descriptor area. The field
host variable must be an appropriate type to receive the
value from the system-descriptor area.
is the name of an integer host variable.
is an unsigned integer that represents one of the values in the
system-descriptor area.
is the name of an integer variable that contains an unsigned
integer that represents one of the values in the systemdescriptor area.
Syntax
1-211
GET DESCRIPTOR
Usage
If an error occurs during the assignment to any of the identified host
variables, the contents of the host variable is undefined.
The role and contents of each of the fields in a system-descriptor area are
described in SQL API manuals.
The GET DESCRIPTOR statement can be used in execute procedure statements
that have been described with the USING SQL DESCRIPTOR parameter.
The host variables used in the GET DESCRIPTOR statement must be declared
in the BEGIN DECLARE SECTION of an ESQL program. See your SQL API
manual for specifics.
Using the COUNT Keyword
Use the COUNT keyword to determine how many values are described into
the system-descriptor area.
The following INFORMIX-ESQL/C example shows how to use a GET
DESCRIPTOR statement with a host variable to determine how many values
are described in the system-descriptor area called desc1:
main()
{
exec sql begin declare section;
int h_type, h_count;
exec sql end declare section;
exec sql allocate descriptor 'desc1' with max occurrences 20;
/* This section of program would prepare a SELECT or INSERT
* statement into the s_id statement id.
*/
exec sql describe s_id using sql descriptor 'desc1';
exec sql get descriptor 'desc1' :h_count = count;
...
}
VALUE Clause
Use the VALUE clause to obtain information about a described column or
expression or to retrieve values returned by the database server.
1-212 Syntax
GET DESCRIPTOR
The item number must be greater than zero and less than the number of
occurrences specified when the system-descriptor area was allocated using
ALLOCATE DESCRIPTOR.
Using the VALUE Clause After a Describe
After you describe a SELECT, EXECUTE PROCEDURE, or INSERT statement,
the characteristics of each column or expression in the select list of the SELECT
statement, the characteristics of the values returned by the EXECUTE PROCEDURE statement, or the characteristics of each column in the INSERT statement are returned in the system-descriptor area. Each value in the systemdescriptor area describes one returned column or expression. Each field and
its possible contents are described in your SQL API manuals.
The following INFORMIX-ESQL/C example shows how a GET DESCRIPTOR
statement can be used to obtain data type information from the demodesc
system descriptor area:
exec sql get descriptor 'demodesc' value :index
:type = TYPE,
:len = LENGTH,
:name = NAME;
printf(' Column %d: type = %d, len = %d, name = %s\n',
index, type, len, name);
The value returned by the database server into the TYPE field is a defined
integer. You can evaluate the type returned by testing for a specific integer
value. The codes for the TYPE field are listed in the embedded language
product manuals.
X/O
In X/Open mode, the X/Open code is returned to the TYPE field. You must
not to mix the two modes because errors can result. For example, if a particular type is not defined under X/Open mode but is defined for Informix
products, the execution of a GET DESCRIPTOR statement can result in an
error.
In X/Open mode, a warning message appears if ILENGTH, IDATA, or ITYPE
is used. It indicates that these types are not standard X/Open fields for a
system-descriptor area.
Syntax
1-213
GET DESCRIPTOR
If the TYPE of a fetched value is DECIMAL or MONEY, the database server
returns the precision and scale information for a column into the PRECISION
and SCALE fields after a DESCRIBE statement is executed. If the TYPE is not
DECIMAL or MONEY, the SCALE and PRECISION fields are undefined.
Using the VALUE Clause After a Fetch
Each time your program fetches a row, it must copy the fetched value into
host variables so that the data can be used. To accomplish this, use a GET
DESCRIPTOR statement after each fetch for each of the values in the select list.
If three values exist in the select list, you need to use three GET DESCRIPTOR
statements after each fetch (assuming you want to read all three values). The
item numbers for each of the three GET DESCRIPTOR statements are 1, 2, and
3.
The following INFORMIX-ESQL/C example shows how you can copy the data
out of the DATA field into a host variable (result) after a fetch. For this
example, it is predetermined that all values returned are the same data type.
exec sql fetch democursor using sql descriptor 'demodesc';
if (sqlca.sqlcode != 0) break;
for (i = 1; i <= desc_count; i++)
{
exec sql get descriptor 'demodesc' value :i :result = DATA;
printf("%s ", result);
}
printf("\n");
}
1-214 Syntax
GET DESCRIPTOR
The following INFORMIX-ESQL/COBOL example shows how you can copy
the data out of the DATA field into host variables after a fetch. The first use of
GET DESCRIPTOR uses a literal item number; the second GET DESCRIPTOR
uses a host variable to hold the item number.
EXEC SQL BEGIN DECLARE SECTION END-EXEC.
01 COUNT
SQLINT.
01 ITEMNO
SQLINT.
01 TYPE
SQLINT.
01 LENGTH
SQLINT.
01 LONGVAL
SQLINT.
01 CHVAL
SQLCHAR(21).
EXEC SQL END DECLARE SECTION END-EXEC.
EXEC SQL GET DESCRIPTOR 'desc1' VALUE 1
:TYPE = TYPE, :LENGTH = LENGTH, :CHVAL = DATA
END-EXEC.
MOVE 2 TO ITEMNO.
EXEC SQL GET DESCRIPTOR 'desc1' VALUE :ITEMNO
:TYPE = TYPE, :LONGVAL = DATA
END-EXEC.
.
.
.
Fetching a Null Value
When you use GET DESCRIPTOR after a fetch and the fetched value is null,
then the INDICATOR field is set to -1 (NULL). The value of DATA is undefined
if INDICATOR indicates a null value. The host variable into which DATA is
copied has an unpredictable value.
Using LENGTH or ILENGTH
If your DATA or IDATA field contains a character string, you must specify a
value for LENGTH. If you specify LENGTH=0, LENGTH is automatically set to
the maximum length of the string. The DATA or IDATA field may contain a
literal character string or a character string derived from a character variable
of type CHAR or VARCHAR. This provides a method to dynamically
determine the length of a string in the DATA or IDATA field.
If a DESCRIBE statement precedes a GET DESCRIPTOR statement, LENGTH is
automatically set to the maximum length of the character field specified in
your table.
This information is identical for ILENGTH.
Syntax
1-215
GET DESCRIPTOR
References
See the ALLOCATE DESCRIPTOR, DEALLOCATE DESCRIPTOR, DECLARE,
DESCRIBE, EXECUTE, FETCH, OPEN, PREPARE, PUT, and SET DESCRIPTOR
statements in this manual for further information about using dynamic SQL
statements.
For further information about the system-descriptor area, see your SQL API
manual.
1-216 Syntax
GET DIAGNOSTICS
GET DIAGNOSTICS
Purpose
Use the GET DIAGNOSTICS statement to return diagnostic information about
the execution of an SQL statement. The GET DIAGNOSTICS statement uses one
of two clauses as described in the following list:
• The Statement clause determines a count and overflow information about
errors and warnings generated by the most recent SQL statement.
• The EXCEPTION clause provides specific information about errors and
warnings generated by the most recent SQL statement.
Syntax
ESQL
GET DIAGNOSTICS
Statement
Clause
p. 1-222
EXCEPTION
Clause
p. 1-223
Usage
The GET DIAGNOSTICS statement retrieves selected status information from
the diagnostics area and retrieves either count and overflow information or
information on a specific exception.
The GET DIAGNOSTICS statement never changes the contents of the
diagnostics area.
Using the SQLSTATE Error Status Code
When an SQL statement executes, an error status code is automatically
generated that represents success, failure, warning, or no data
found. This error status code is stored in a variable called SQLSTATE.
Class and Subclass Codes
The SQLSTATE status code is a a five-character string that can contain only the
following elements:
• Digits
• Capital letters
Syntax
1-217
GET DIAGNOSTICS
The first two characters of the SQLSTATE code indicate a class. The last three
characters of the SQLSTATE code indicate a subclass. Figure 1-6 shows the
structure of the SQLSTATE code:
0
8
CLASS
CODE
Figure 1-6
0
0
1
SUBCLASS
CODE
The structure of the SQLSTATE code using the value 08001, where 08 is the class code
and 001 is the subclass code. The value 08001 represents the error “unable to connect
with database environment.”
The class code of SQLSTATE is unique, but the subclass code is not. The
meaning of the subclass code depends on the accompanying class code. The
initial character of the class code indicates the source of the SQLSTATE value
as described in the following list:
• Class codes that begin with a digit in the range 0-4, or a capital letter in
the range A-H, indicate that the result code is defined by ANSI/ISO. In this
case, the associated subclass codes also begin in the range 0-4 or A-H.
• Class codes that begin with the letters IX indicate error or warning
• conditions used only by Informix. Informix uses codes starting with IX to
support any existing warning or error messages that are not supported by
ANSI/ISO. Other class codes that begin with a digit in the range 5-9, or a
capital letter in the range I-Z (other than IX) indicate conditions that are
currently undefined.
Any Informix error or warning message that is not supported in the ANSI/
ISO reserved range has an IX class code. In addition, the subclass code varies
depending on the error.
1-218 Syntax
GET DIAGNOSTICS
The following table is a quick reference for interpreting class code values:
SQLSTATE class code value
Outcome
00
Success
01
Success with warning
02
No data found
> 02
Error or warning
List of SQLSTATE Codes
The following table describes the class codes, subclass codes, and the
meaning of all valid warning and error codes associated with the SQLSTATE
error status code:
Class
Subclass
Meaning
00
01
01
01
01
01
01
02
07
07
07
07
07
07
07
07
07
08
08
08
08
08
08
08
08
0A
0A
21
21
21
000
000
002
003
004
005
006
000
000
001
002
003
004
005
006
008
009
000
001
002
003
004
006
007
S01
000
001
000
S01
S02
Success
Success with warning
Disconnect error. Transaction rolled back
Null value eliminated in set function
String data, right truncation
Insufficient item descriptor areas
Privilege not revoked
No data found
Dynamic SQL error
Using clause does not match dynamic parameters
Using clause does not match target specifications
Cursor specification cannot be executed
Using clause is required for dynamic parameters
Prepared statement is not a cursor specification
Restricted data type attribute violation
Invalid descriptor count
Invalid descriptor index
Connection exception
Server rejected the connection
Connection name in use
Connection does not exist
Client unable to establish connection
Transaction rolled back
Transaction state unknown
Communication failure
Feature not supported
Multiple server transactions
Cardinality violation
Insert value list does not match column list
Degree of derived table does not match column list
Syntax
1-219
GET DIAGNOSTICS
Class
Subclass
Meaning
22
22
22
22
22
22
22
22
22
23
24
25
2D
26
2E
28
33
34
35
37
000
001
002
003
005
012
019
024
025
000
000
000
000
000
000
000
000
000
000
000
3C
40
40
42
S0
S0
S0
S0
S0
S1
IX
000
000
003
000
000
001
002
011
021
001
000
Data exception
String data, right truncation
Null value, no indicator parameter
Numeric value out of range
Error in assignment
Division by zero
Invalid escape character
Unterminated string
Invalid escape sequence
Integrity constraint violation
Invalid cursor state
Invalid transaction state
Invalid transaction termination
Invalid SQL statement identifier
Invalid connection name
Invalid user-authorization specification
Invalid SQL descriptor name
Invalid cursor name
Invalid exception number
Syntax error or access violation in PREPARE or
EXECUTE IMMEDIATE
Duplicate cursor name
Transaction rollback
Statement completion unknown
Syntax error or access violation
Invalid name
Base table or view table already exists
Base table not found
Index already exists
Column already exists
Memory allocation failure
Informix reserved error or warning message
Using SQLSTATE in Applications
You can use a variable, called SQLSTATE, that you do not have to declare in
your program. SQLSTATE contains the error code, essential for error handling, that is generated every time your program executes an SQL statement.
1-220 Syntax
GET DIAGNOSTICS
SQLSTATE is created automatically, where RETURNED_SQLSTATE contains
the SQLSTATE error status code, as if the following GET DIAGNOSTICS
statement has been executed:
EXEC SQL get diagnostics exception 1 :SQLSTATE =
RETURNED_SQLSTATE;
You can examine the SQLSTATE variable to determine whether an SQL
statement was successful. If the SQLSTATE variable indicates that the statement failed, you can execute a GET DIAGNOSTICS statement to obtain
additional error information.
An alternative to using the SQLSTATE variable that is created for you, is to
declare a host variable within your application to receive the
RETURNED_SQLSTATE value. The value in the RETURNED_SQLSTATE field of
the GET DIAGNOSTICS statement provides the error code that is essential for
error handling. You can assign this host variable any valid name, including
the name SQLSTATE. If you declare a host variable, however, you must explicitly issue the GET DIAGNOSTICS statement after each SQL statement that you
wish to check for exceptions.
To declare an SQLSTATE variable within your application, use the following
syntax:
EXEC SQL BEGIN DECLARE SECTION;
char SQLSTATE[6];
EXEC SQL END DECLARE SECTION;
For an example of how to declare and use an SQLSTATE variable in a program
see “Using GET DIAGNOSTICS for Full Error Checking” on page 1-228.
In Chapter 5 of the Informix Guide to SQL: Tutorial, see the discussion about
error code handling. In addition, refer to the error handling chapter of the
SQL API that you want to use.
Syntax
1-221
GET DIAGNOSTICS
The Statement Clause
,
st_var =
MORE
NUMBER
ROW_COUNT
st_var
is a host variable that receives status information about the
most recent SQL statement. The st_var variable receives
information for the specified status field name. The st_var
variable data type must be the same as that of the requested
field.
When retrieving count and overflow information, GET DIAGNOSTICS can
deposit the values the three statement fields into corresponding host variable. The host variable data type must be the same as that of the requested
field. These three fields are represented by the following keywords:
Field Name
Keyword
Field
Field
Data Type Contents
ESQL/C
ESQL/COBOL
Host Variable Host Variable
Data Type
Data Type
MORE
NUMBER
ROW_COUNT
Character
Integer
Integer
char[2]
int
int
Y or N
1 to 35,000
0 to 999,999,999
PIC X(1)
PIC S9(9)
PIC S9(9)
Using the MORE Keyword
Use the MORE keyword to determine if the most recently executed SQL
statement performed the following actions:
• Stored all the exceptions it detected in the diagnostics area. The GET
DIAGNOSTICS statement returns a value of N.
• Detected more exceptions than it stored in the diagnostics area. The GET
DIAGNOSTICS statement returns a value of Y.
The value of MORE is always N.
1-222 Syntax
GET DIAGNOSTICS
Using the NUMBER Keyword
Use the NUMBER keyword to count the number of exceptions that the most
recently executed SQL statement placed into the diagnostics area. The NUMBER field can hold a value from 1 to 35,000, depending on how many
exceptions are counted.
Using the ROW_COUNT Keyword
Use the ROW_COUNT keyword to count the number of rows the most
recently executed statement processed. ROW_COUNT counts the following
number of rows:
• Inserted into a table
• Updated in a table
• Deleted from a table
The EXCEPTION Clause
,
EXCEPTION
except_num
en_var
ex_var
=
CLASS_ORIGIN
CONNECTION_ALIAS
MESSAGE_LENGTH
MESSAGE_TEXT
RETURNED_SQLSTATE
SERVER_NAME
SUBCLASS_ORIGIN
en_var
is a host variable that specifies an exception number for a
GET DIAGNOSTICS statement.
except_num
is a literal integer value that specifies the exception number
for a GET DIAGNOSTICS statement. The except_num literal
indicates one of the exception values from the number of
exceptions returned by the NUMBER field in the Statement
clause. For example, if the NUMBER field returns the number
5, an except_num value of 1 indicates that only the first value
of 5 values is requested. If multiple errors and warnings are
Syntax
1-223
GET DIAGNOSTICS
detected by the database server, except_num can represent
any entry in the returned values.
ex_var
is a host variable that you declared, which receives
EXCEPTION information about the most recent SQL statement. The ex_var variable receives information for a specified exception field name. The ex_var variable data type
must be the same as that of the requested field.
When retrieving exception information, GET DIAGNOSTICS deposits the
values of any of the seven fields into corresponding host variables. These
fields are located in the diagnostics area and are derived from an exception
raised by the most recent SQL statement.
The host variable data type must be the same as that of the requested field.
The seven exception information fields are represented by the following
keywords:
Field Name
Keyword
Field
Data Type
Field
Contents
RETURNED_SQLSTATE
Character
CLASS_ORIGIN
SUBCLASS_ORIGIN
MESSAGE_TEXT
MESSAGE_LENGTH
Character
Character
Character
Integer
SERVER_NAME
CONNECTION_NAME
Character
Character
SQLSTATE
value
String
String
String
Numeric
value
String
String
ESQL/C
Host
Variable
Data Type
ESQL/
COBOL
Host
Variable
Data Type
char[6]
PIC X(5)
char[254]
char[254]
char[254]
int
PIC X(254)
PIC X(254)
PIC X(254)
PIC 9(4)
COMP-5
PIC X(254)
PIC X(254)
char[254]
char[254]
The application specifies the exception by number, using either an unsigned
integer or an integer host variable (an exact numeric with a scale of 0). An
exception with a value of 1 corresponds to the SQLSTATE value set by the
most recent SQL statement other than GET DIAGNOSTICS. The association
between other exception numbers and other exceptions raised by that SQL
statement is undefined. Thus, no set order exists in which the diagnostic area
can be filled with exception values.
Note: If an error occurs within the GET DIAGNOSTICS statement (that is, if an
7illegal exception number is requested), then the Informix internal SQLCODE and
SQLSTATE variables is set to the value of that exception. In addition, the GET
DIAGNOSTICS fields are undefined.
1-224 Syntax
GET DIAGNOSTICS
Using the RETURNED_SQLSTATE Keyword
Use the RETURNED_SQLSTATE keyword to determine the SQLSTATE value
that describes the exception.
Using the CLASS_ORIGIN Keyword
Use the CLASS_ORIGIN keyword to retrieve the class portion of the
RETURNED_SQLSTATE value. If the ISO international standard defines the
class, the value of CLASS_ORIGIN is equal to ‘ISO 9075’. Otherwise, the value
of CLASS_ORIGIN is defined by Informix and cannot be ‘ISO 9075’.
Using the SUBCLASS_ORIGIN Keyword
Use the SUBCLASS_ORIGIN keyword to define the source of the subclass
portion of the RETURNED_SQLSTATE value. If the ISO international standard
defines the subclass, the value of SUBCLASS_ORIGIN is equal to ‘ISO 9075’.
Using the MESSAGE_TEXT Keyword
Use the MESSAGE_TEXT keyword to determine the message text of the
exception (for example, an error message).
Using the MESSAGE_LENGTH Keyword
Use the MESSAGE_LENGTH keyword to determine the length of the current
MESSAGE_TEXT string.
Using the SERVER_NAME Keyword
Use the SERVER_NAME keyword to determine the name of the server or
servers associated with the actions of a CONNECT or DATABASE statement.
When the SERVER_NAME Field is Updated
The GET DIAGNOSTICS statement updates the SERVER_NAME field when the
following situations occur:
•
•
•
•
A CONNECT statement successfully executes
A SET CONNECTION statement successfully executes
A DISCONNECT statement successfully executes at the current connection
A DISCONNECT ALL statement fails
Syntax
1-225
GET DIAGNOSTICS
When the SERVER_NAME Field is not Updated
The SERVER_NAME field is not updated when:
• A CONNECT statement fails
• A DISCONNECT statement fails
Note: This does not include the DISCONNECT ALL statement.
• A SET CONNECTION statement fails
Note: The SERVER_NAME field retains the value set in the previous SQL
statement. If any of the three preceding conditions occur on the first SQL
statement that executes, the SERVER_NAME field is blank.
The Contents of the SERVER_NAME Field
The SERVER_NAME field contains different information after you execute the
following statements:
1-226 Syntax
CONNECT
the SERVER_NAME field contains the name of
the server to which you connect or fail to connect. The SERVER_NAME field is blank if you
do not have a current connection or if you
make a default connection.
SET CONNECTION
the SERVER_NAME field contains the name of
the server to which you switch or fail to
switch.
DISCONNECT
the SERVER_NAME field contains the name of
the server from which you disconnect or fail to
disconnect. If you disconnect and then you
execute a DISCONNECT statement for a connection that is not current, the SERVER_NAME
field remains unchanged.
DISCONNECT ALL
the SERVER_NAME field is blank if the
statement executes successfully. If the statement does not execute successfully, the SERVER_NAME field contains the names of all the
servers from which you did not disconnect.
However, this does not mean the connection
still exists.
GET DIAGNOSTICS
The DATABASE Statement
When you execute a DATABASE statement, the SERVER_NAME field contains
the name of the server on which the database resides.
Using the CONNECTION_NAME Keyword
Use the CONNECTION_NAME to specify a name for the connection used in
your CONNECT or DATABASE statements.
When the CONNECTION_NAME Keyword is Updated
GET DIAGNOSTICS updates the CONNECTION_NAME field when the
following situations occur:
•
•
•
•
A CONNECT statement successfully executes
A SET CONNECTION statement successfully executes
A DISCONNECT statement successfully executes at the current connection
A DISCONNECT ALL statement fails
When CONNECTION_NAME is not Updated
The CONNECTION_NAME field is not updated when the following situations
occur:
• A CONNECT statement fails
• A DISCONNECT statement fails
Note: This does not include the DISCONNECT ALL statement.
• A SET CONNECTION statement fails
Note: The CONNECTION_NAME field retains the value set in the previous SQL
statement. If any of the preceding conditions occur on the first SQL statement that
executes, the CONNECTION_NAME field is blank.
The Contents of the CONNECTION_NAME Field
The CONNECTION_NAME field contains different information after you
execute the following statements:
CONNECT
the CONNECTION_NAME field contains the
name of the connection, specified in the CONNECT statement, to which you connect or fail
to connect. The CONNECTION_NAME field is
Syntax
1-227
GET DIAGNOSTICS
blank if you do not have a current connection
or if you make a default connection.
SET CONNECTION
the CONNECTION_NAME field contains the
name of the connection, specified in the CONNECT statement, to which you switch or fail to
switch.
DISCONNECT
the CONNECTION_NAME field contains the
name of the connection, specified in the CONNECT statement, from which you disconnect
or fail to disconnect. If you disconnect and
then you execute a DISCONNECT statement for
a connection that is not current, the
CONNECTION_NAME field remains
unchanged.
DISCONNECT ALL
the CONNECTION_NAME field is blank if the
statement executes successfully. If the statement does not execute successfully, the CONNECTION_NAME field contains the names of
all the connections, specified in your CONNECT statement, from which you did not disconnect. However, this does not mean the
connection still exists.
The DATABASE Statement
When you execute a DATABASE statement, the CONNECTION_NAME field is
blank.
Using GET DIAGNOSTICS for Full Error Checking
The following INFORMIX-ESQL/C example shows how to use a GET
DIAGNOSTICS statement to return both statement and exception information.
This program executes several SQL statements. A WHENEVER statement calls
the error-handling function sql_err when an SQLCODE error occurs. Another
WHENEVER statement calls the error handling function sql_err when an SQLWARNING occurs. A switch statement is used within sql_err to determine if
the SQLSTATE variable contains an SQLSTATE error code. If an SQLSTATE
error condition exists, a GET DIAGNOSTICS statement is used to handle the
error. Note that lines 98 through 107 show you how to use the GET
DIAGNOSTICS statement to diagnose both statement and exception
information. In addition, these lines show you how to store the contents of
1-228 Syntax
GET DIAGNOSTICS
GET DIAGNOSTICS fields into host variables. The contents of the host
variables are displayed by printf statements in lines 100, 101, and 108
through 112.
1
2
3
4
5
6
7
8
9
10
11
12
13
14
15
16
17
18
19
20
21
22
23
24
25
26
27
28
29
30
31
32
33
34
35
36
37
38
39
40
41
42
43
44
45
46
47
48
49
50
51
52
53
54
55
56
57
58
#include <stdio.h>
/* Uncomment the following line if the database has
transactions: */
/* EXEC SQL define TRANS; */
EXEC SQL define FNAME_LEN 15;
EXEC SQL define LNAME_LEN 15;
EXEC SQL BEGIN DECLARE SECTION;
char SQLSTATE[6];
EXEC SQL END DECLARE SECTION;
char statement[20];
main()
{
EXEC
char
char
EXEC
SQL BEGIN DECLARE SECTION;
fname[ FNAME_LEN + 1 ];
lname[ LNAME_LEN + 1 ];
SQL END DECLARE SECTION;
printf(“DEMO1 Sample ESQL program running.\n\n”);
EXEC SQL WHENEVER SQLERROR CALL sql_err;
EXEC SQL WHENEVER SQLWARNING CALL sql_err;
strcpy (statement, 'CONNECT stmt');
EXEC SQL connect to 'stores6';
strcpy (statement, 'DECLARE stmt');
EXEC SQL declare democursor cursor for
select fname, lname
into :fname, :lname
from customer
where lname > 'C';
EXEC SQL ifdef TRANS;
strcpy (statement, 'BEGIN WORK stmt');
EXEC SQL begin work;
EXEC SQL endif;
strcpy (statement, 'OPEN stmt');
EXEC SQL open democursor;
strcpy (statement, 'FETCH stmt');
for (;;)
{
EXEC SQL fetch democursor;
if (sql_err() == 2)
break;
printf('%s %s\n',fname, lname);
}
strcpy (statement, 'CLOSE stmt');
EXEC SQL close democursor;
Syntax
1-229
GET DIAGNOSTICS
59
EXEC SQL ifdef TRANS;
60
strcpy (statement, 'COMMIT WORK stmt');
61
EXEC SQL commit work;
62
EXEC SQL endif;
63
64
printf('\nProgram Over.\n');
65
exit(1);
66
}
/*End of main routine */
67
68
sql_err()
69
{
70
EXEC SQL BEGIN DECLARE SECTION;
71
int exception_count, messlen, rowcount, i;
72
char overflow[2];
73
char class[255], subclass[255], message[255];
74
EXEC SQL END DECLARE SECTION;
75
int warning = 0;
75
int warning = 0;
76
77
if(SQLSTATE[0] == ’0’)/* trap '00', '01', '02' */
78
{
79
switch(SQLSTATE[1])
80
{
81
case '0': /* success - return 0 */
82
return(0);
83
case '1': /* warning - return 1 */
84
warning = 1;
85
break;
86
case '2': /* end of data - return 2 */
87
return(2);
88
default:
89
break;
90
}
91
}
92
printf(“----------------------------------------------\n”);
93
if (SQLCODE)
94
printf('SQLCODE: %d\n', SQLCODE);
95
96
printf('%s: SQLSTATE: %s\n',statement, SQLSTATE);
97
98
EXEC SQL get diagnostics :exception_count = NUMBER,
99
:overflow = MORE;
100
printf('NUMBER: %d\n', exception_count);
101
printf('MORE : %s\n', overflow);
102
for (i = 1; i <= exception_count; i++)
103
{
104
EXEC SQL get diagnostics exception :i
105
:SQLSTATE = RETURNED_SQLSTATE,
106
:class = CLASS_ORIGIN, :subclass = SUBCLASS_ORIGIN,
107
:message = MESSAGE_TEXT, :messlen = MESSAGE_LENGTH;
108
printf('SQLSTATE: %s\n',SQLSTATE);
109
printf('CLASS: %s\n',class);
110
printf('SUBCLASS: %s\n',subclass);
111
printf('TEXT: %s\n',message);
112
printf('MESSLEN: %d\n',messlen);
113
}
114
if(warning)
115
return;
116
exit(1);
117 }
118
1-230 Syntax
GRANT
GRANT
Purpose
Use the GRANT statement to specify access privileges for a database or for the
tables and views in a database.
Syntax
DatabaseLevel
Privileges
p. 1-232
+
GRANT
TO
PUBLIC
,
user
TableLevel
Privileges
p. 1-235
ON
Table
Name
p. 1-506
TO
View
Name
p. 1-510
+
,
user
' user '
Synonym
Name
p. 1-504
EXECUTE
ON
Procedure
Name
p. 1-495
+
+
WITH GRANT OPTION
ANSI
PUBLIC
AS grantor
grantor
identifies the user who is granting the privilege to user. As
the current user, you are the default grantor.
user
names the user or users who receive privileges. Granting
privileges to PUBLIC extends a privilege to the class of all
authorized users, both current and future. If you use quotes,
user appears exactly as typed.
In an ANSI-compliant database, if you do not use quotes around user, the
name of the user is stored as uppercase letters.
Syntax
1-231
GRANT
Usage
A GRANT statement can extend user privileges but cannot limit existing
privileges. Later GRANT statements do not affect privileges already granted
to a user. When database-level privileges collide with table-level privileges,
the more restrictive privileges take precedence. You can grant table-level
privileges on a table or on a view.
Privileges granted to users remain in effect until you cancel them with a
REVOKE statement. Only grantors can revoke the privileges that they
previously granted.
SE
You cannot use a ROLLBACK WORK statement to undo a GRANT statement
that successfully executes. If you roll back a transaction that contains a
GRANT statement, the privilege is not revoked and you do not receive an
error message.
Database-Level Privileges
Database-Level
Privileges
CONNECT
RESOURCE
DBA
When you create a database, you alone have access to it. The database
remains inaccessible to other users until you, as DBA, grant database
privileges.
Three levels of database privileges control access. These privilege levels are,
from lowest to highest, Connect, Resource, and DBA. These privileges are
associated with the following keywords:
CONNECT
gives you the ability to query and modify data. You can modify
the database schema if you own the object you wish to modify.
Any user with the Connect privilege can perform the following
functions:
• Execute SELECT, INSERT, UPDATE, and DELETE statements,
provided the user has the necessary table-level privileges
1-232 Syntax
GRANT
• Create views, provided the user has the Select privilege on
the underlying tables
• Create synonyms
• Create temporary tables and create indexes on the
temporary tables
• Alter or drop a table or an index, provided the user owns
the table or index (or has Alter, Index, or References
privileges on the table)
• Grant privileges on a table or view, provided the user owns
the table (or has been given privileges on the table with the
WITH GRANT OPTION keyword)
RESOURCE
gives you the ability to extend the structure of the database. In
addition to the capabilities of the Connect privilege, the holder
of the Resource privilege can perform the following functions:
• Create new tables
• Create new indexes
• Create new procedures
DBA
in addition to the capabilities of the Resource privilege, the
holder of the DBA privilege can perform the following
functions:
• Grant any database-level privilege, including DBA
privilege, to another user
• Use the NEXT SIZE keyword to alter extent sizes in the
system catalog
• Insert, delete, or update rows of any system catalog table
except systables
• Drop any object, regardless of its owner
• Create tables, views, and indexes, and specify another user
as owner of the objects
• Execute the DROP DATABASE statement
• Execute the DROP DISTRIBUTIONS option of the UPDATE
STATISTICS statement
SE
• Execute the START DATABASE and ROLLFORWARD
DATABASE statements
Syntax
1-233
GRANT
User informix has the privilege required to alter tables in the system catalog,
including the systables table.
!
Warning: Although the user informix and DBAs can modify most system catalog
tables (only user informix can modify systables), Informix strongly recommends
that you do not update, delete, or alter any rows in them. Modifying the system
catalog tables can destroy the integrity of the database.
The following example uses the PUBLIC keyword to grant the Connect
privilege on the currently active database to all users:
GRANT CONNECT TO PUBLIC
1-234 Syntax
GRANT
Table-Level Privileges
Table-Level Privileges
ALL
PRIVILEGES
,
INSERT
DELETE
SELECT
,
+
(
UPDATE
,
+
(
)
column
REFERENCES
+
)
column
,
(
column
)
INDEX
ALTER
As the owner of a table, or as DBA, you control access to the table through
seven table-level privileges. Four privileges control access to the table data:
Select, Insert, Delete, and Update. The remaining three privileges are Index,
which controls index creation; Alter, which controls the ability to change the
table definition or alter an index; and References, which controls the ability
to place referential constraints on table columns.
The person who creates a table is its owner and receives all seven table-level
privileges. Table ownership cannot be transferred to another user.
To use the GRANT statement, list the privileges that you are granting to user.
If you are granting all table-level privileges, use the keyword ALL. If you are
granting the Select, Update, or References privilege, you can limit the
privileges by listing the names of specific columns.
Syntax
1-235
GRANT
If you are granting the Index privilege with the intent of allowing user to
make changes to the underlying structure of a table, be aware that user must
also have the Resource privilege for the database to modify the database
structure. The table-level privileges are defined in the following list:
INSERT
provides the ability to insert rows.
DELETE
provides the ability to delete rows.
SELECT
provides the ability to name any column in SELECT
statements. You can restrict the Select privilege to one or
more columns by listing them.
UPDATE
provides the ability to name any column in UPDATE
statements. You can restrict the Update privilege to one or
more columns by listing them.
REFERENCES
provides the ability to reference columns in referential
constraints. You must have the Resource privilege to take
advantage of the References privilege. (However, you can
add a referential constraint during an ALTER TABLE statement. This does not require that you have the Resource privilege on the database.) You can restrict the References
privilege to one or more columns by listing them.
You need only the References privilege to indicate cascading
deletes. You do not need the Delete privilege to place
cascading deletes on a table.
INDEX
provides the ability to create permanent indexes. You must
have Resource privilege to take advantage of the Index privilege. (Any user with the Connect privilege can create an
index on temporary tables.)
ALTER
provides the ability to add or delete columns, modify
column data types, or add or delete constraints.
ALL
provides all privileges. The PRIVILEGES keyword is optional.
The following example grants the Delete and Select privileges on all columns,
and the Update privilege on customer_num, fname, and lname for the customer table, to users mary and john:
GRANT DELETE, SELECT, UPDATE (customer_num, fname, lname)
ON customer TO mary, john
1-236 Syntax
GRANT
To grant these table-level privileges to all authorized users, use the keyword
PUBLIC as shown in the following example:
GRANT DELETE, SELECT, UPDATE (customer_num, fname, lname)
ON customer TO PUBLIC
Restricting Privileges at the Table Level
You must take action to restrict privileges at the table level. The database
server automatically grants to PUBLIC all table-level privileges, except Alter
and References, when you create a table. To limit table access, you must
revoke all privileges and regrant only those you want, as shown in the
following example:
REVOKE ALL ON customer FROM PUBLIC
GRANT ALL ON customer TO john, mary
GRANT SELECT (fname, lname, company, city)
ON customer TO PUBLIC
ANSI
In an ANSI-compliant database, only the table owner receives privileges
when a table is created.
Stored Procedure Privileges
Use the EXECUTE ON option with a procedure name to grant another user the
ability to run a stored procedure that you own.
When you create an owner-privileged stored procedure, the default privilege
is PUBLIC.
SE
If you create a procedure in a database that is ANSI-compliant, no defaultlevel privileges are granted.
WITH GRANT OPTION
Using the WITH GRANT OPTION keyword conveys the specified privilege to
user along with the right to grant those same privileges to other users. You
create a chain of privileges that begins with you and extends to user as well
Syntax
1-237
GRANT
as to whomever user conveys the right to grant privileges. If you use the
WITH GRANT OPTION keyword, you can no longer control the dissemination
of privileges.
If you revoke from user the privilege that you granted using the WITH GRANT
OPTION keyword, you sever the chain of privileges. That is, when you revoke
privileges from user, you revoke automatically the privileges of all users who
received privileges from user or from the chain that user created (unless user,
or the users who received privileges from user, were granted the same set of
privileges by someone else). The following examples illustrate this situation.
You, as the owner of the table items, issue the following statements to grant
access to Mary:
REVOKE ALL ON items FROM PUBLIC
GRANT SELECT, UPDATE ON items TO mary WITH GRANT OPTION
Mary uses her new privilege to grant Cathy and Paul access to the table:
GRANT SELECT, UPDATE ON items TO cathy
GRANT SELECT ON items TO paul
Later you issue the following statement to cancel Mary’s access privileges on
items:
REVOKE SELECT, UPDATE ON items FROM mary
This single statement effectively revokes all privileges on the items table
from Mary, Cathy, and Paul.
If you want to create a chain of privileges with some other user as the source
of the privilege, use the AS grantor clause.
AS grantor
The AS grantor clause lets you establish a chain of privileges with another
user as the source of the privileges. In so doing, you relinquish your ability to
break the chain of privileges. Even a DBA cannot revoke a privilege unless
1-238 Syntax
GRANT
that DBA originally granted the privilege. The following example illustrates
this situation. You are the owner of the items table and you grant all
privileges to Tom, along with the right to grant all privileges:
REVOKE ALL ON items FROM PUBLIC
GRANT ALL ON items TO tom WITH GRANT OPTION
You also grant Select and Update privileges to Jim, but you specify that the
grant is made as Tom. (This means that the records of the database server
shows that Tom is the grantor of the grant in the systabauth system catalog
table, rather than you.)
GRANT SELECT, UPDATE ON items TO jim AS tom
Later, you decide to revoke Tom’s privileges on the items table so you issue
the following statement:
REVOKE ALL ON items FROM tom
When you try to revoke Jim’s privileges with a similar statement, however,
the database server returns an error, as shown in the following example:
REVOKE SELECT, UPDATE ON items FROM jim
580: Cannot revoke permission.
Because the database-server record shows the original grantor as Tom, you
cannot revoke the privilege. ALthough you are the table owner, you cannot
revoke a privilege granted by another user.
Privileges on a View
You must explicitly grant access privileges on the view to users, because no
automatic grant is made to public as is the case with a newly created table.
When creating a view, if you do not own the underlying tables, you must
have at least the Select privilege on the table or columns. As view creator, the
privileges you have on the underlying table apply to the view built on the
table. You do not receive any other privileges or the ability to grant any other
Syntax
1-239
GRANT
privileges because you own the view on the table. If the view meets all the
requirements for updating, any Delete, Insert, or Update privileges you have
on the table also apply to the view.
You can grant (or revoke) privileges on a view only if you are the owner of
the underlying tables or if you received these privileges on the table with the
right to grant them (the WITH GRANT OPTION keyword). You cannot grant
Index, Alter, or References privileges on a view (or the All privilege because
All includes Index, References, and Alter).
For views that reference only tables in the current database, if the owner of a
view loses the Select privilege on any of the tables underlying the view, the
view is dropped.
For detailed information, refer to the CREATE TABLE statement, which also
describes creating views.
References
See the CREATE TABLE and REVOKE statements in this manual.
In the Informix Guide to SQL: Tutorial, see the discussions of database and
table-level privileges in Chapter 4 and privileges and security in Chapter 11.
1-240 Syntax
INFO
INFO
Purpose
Use the INFO statement to display a variety of information about databases
and tables.
Syntax
DB
+
INFO
TABLES
COLUMNS
FOR
Table
Name
p. 1-506
INDEXES
ACCESS
PRIVILEGES
REFERENCES
STATUS
Usage
The following types of information can be displayed by issuing the INFO
statement:
•
•
•
•
•
•
The names of the tables in the current database
Column information for a specified table
Index information for a specified table
Access privileges for a specified table
References privileges for the columns of a specified table
Status information for a specified table
Instead of using the SQL statement INFO, you can use the Info options on the
SQL menu or TABLE menu to display the same and additional information.
Displaying Tables, Columns, and Indexes
You can use keywords in your INFO statement to display a list of tables,
information about the columns of a table, or information about the indexes of
a table.
Syntax
1-241
INFO
Use the TABLES keyword to display a list of the tables in the current database.
The name of a table can appear in one of the following ways:
• If you are the owner of the cust_calls table, it appears as cust_calls.
• If you are not the owner of the cust_calls table, the table name is preceded
by the owner’s name, as in 'june'.cust_calls.
Use the COLUMNS FOR keywords to display the names and data types of the
columns in a specified table and whether null values are allowed. The following examples show an INFO statement and the resulting display of
information about the columns in a table:
INFO COLUMNS FOR cust_calls
Column name
Type
Nulls
customer_num
call_dtime
user_id
call_code
call_descr
res_dtime
res_descr
INTEGER
DATETIME YEAR TO MINUTE
CHAR(18)
CHAR(1)
CHAR(240)
DATETIME YEAR TO MINUTE
CHAR(240)
no
yes
yes
yes
yes
yes
yes
Use the INDEXES FOR keyword to display the name, owner, and type of each
index in a specified table, whether the index is clustered, and the names of the
columns that are indexed. The following examples show an INFO statement
and the resulting display of information about the indexes of a table:
INFO INDEXES FOR cust_calls
Index name
Owner
Type
Cluster
Columns
c_num_dt_ix
velma
unique
No
c_num_cus_ix
velma
dupls
No
customer_num
call_dtime
customer_num
Displaying Privileges, References, and Status
You can use keywords in your INFO statement to display information about
the access privileges (including the References privilege) or status of a table.
1-242 Syntax
INFO
Use the ACCESS FOR or PRIVILEGES FOR keywords to display six of the user
access privileges for a specified table. The following examples show an INFO
statement and the resulting display of user privileges for a table:
INFO PRIVILEGES FOR cust_calls
INFO statement requesting privileges information
User
public
Select
Update
All
All
Insert
Yes
Delete
Yes
Index
Alter
Yes
No
Display of privileges information
Use the REFERENCES FOR keywords to display the References privilege for
users for the columns of a specified table. The following examples show an
INFO statement and the resulting display:
INFO REFERENCES FOR newtable
INFO statement requesting References privilege information
User
Column References
betty
col1
col2
col3
All
None
wilma
public
Display of References privilege information
The output indicates that the user betty can reference columns col1, col2, and
col3 of the specified table, the user wilma can reference all the columns in the
table, and public cannot access any of the columns in the table.
If you want information about database-level privileges, you must use a
SELECT statement to access the sysusers system catalog table.
See the GRANT and REVOKE statements for more information about database
and table-access privileges.
Syntax
1-243
INFO
Use the STATUS FOR keyword to display information about the owner, row
length, number of rows and columns, creation date, and status of audit trails
for a specified table. The following example shows an INFO statement.
Figure 1-10 displays status information for a table on an INFORMIX-SE
database server:
INFO STATUS FOR cust_calls
INFO statement requesting status information
Table Name
Owner
Row Size
Number of Rows
Number of Columns
Date Created
Audit Trail File
Figure 1-10
OL
1-244 Syntax
cust_calls
velma
517
7
7
01/28/1993
Display of status information
The audit trail file line does not appear for tables on the INFORMIX-OnLine
Dynamic Server.
INSERT
INSERT
Purpose
Use the INSERT statement to insert one or more new rows into a table or view.
Syntax
Table
Name
p. 1-506
INSERT INTO
VALUES Clause
p. 1-250
,
View
Name
p. 1-510
(
column
name
Synonym
Name
p. 1-504
)
SELECT
Statement
(Subset)
p. 1-253
+
EXECUTE PROCEDURE
Procedure
Name
p. 1-495
(
)
,
Argument
Argument
Expression
p. 1-430
parameter
name
=
SELECT
Statement
(Singleton)
p. 1-310
column name
is the column that receives the new data.
parameter name
is the name of the parameter as defined by its CREATE
PROCEDURE statement.
Usage
You can use the INSERT statement to create either a single new row of column
values or a group of new rows using data selected from other tables.
Syntax
1-245
INSERT
To insert data into a table, you must either own the table or have the Insert
privilege for the table (see the GRANT statement on page 1-231). To insert data
into a view, you must have the required Insert privilege, and the view must
meet the requirements explained in “Inserting Rows Through a View.”
If you insert data into a table that has data integrity constraints associated
with it, the data inserted must meet the constraint criteria. If it does not, the
database server returns an error.
If you are using effective checking and the checking mode is set to
IMMEDIATE, all specified constraints are checked at the end of each INSERT
statement. If the checking mode is set to DEFERRED, all specified constraints
are not checked until the transaction is committed.
Specifying Columns
If you do not explicitly specify one or more columns, data is inserted into
columns using the column order of the table established when the table was
created or last altered. The column order is listed in the syscolumns system
catalog table.
ESQL
You can use the DESCRIBE statement with an INSERT statement to determine
the column order and the data type of the columns in a table. (For more
information about the DESCRIBE statement, see page 1-162.)
The number of columns specified in the INSERT INTO clause must equal the
number of values supplied in the VALUES clause or by the SELECT statement,
either implicitly or explicitly. If you specify columns, the columns receive
data in the order in which you list them. The first value following the VALUES
keyword is inserted into the first column listed, the second value is inserted
into the second column listed, and so on.
Inserting Rows Through a View
You can insert data through a single-table view if you have the Insert privilege
on the view. To do this, the defining SELECT statement can select from only
one table, and it cannot contain any of the following components:
• DISTINCT keyword
• GROUP BY clause
• Derived value (also referred to as a virtual column)
• Aggregate value
1-246 Syntax
INSERT
Columns in the underlying table that are unspecified in the view receive
either a default value or a null value if no default is specified. If one of these
columns does not specify a default value and a null value is not allowed, the
insert fails.
You can use data integrity constraints to prevent users from inserting values
into the underlying table that do not fit the view-defining SELECT statement.
For further information, refer to the WITH CHECK OPTION discussion under
the CREATE VIEW statement (page 1-138).
If several users are entering sensitive information into a single table, you can
use the USER function to limit the their view to only the specific rows that
each inserted. The following example contains a view and an INSERT
statement that achieve this effect:
CREATE VIEW salary_view AS
SELECT lname, fname, current_salary
FROM salary
WHERE entered_by = USER
INSERT INTO salary
VALUES ('Smith', 'Pat', 75000, USER)
Syntax
1-247
INSERT
Inserting Rows with a Cursor
ESQL
If you associate a cursor with an INSERT statement, you must use the OPEN,
PUT, and CLOSE statements to carry out the INSERT operation. For databases
that have transactions but are not ANSI-compliant, you must issue these
statements within a transaction.
If you are using a cursor associated with an INSERT statement, the rows are
buffered before they are written to the disk. The insert buffer is flushed
under the following conditions:
•
•
•
•
The buffer becomes full
A FLUSH statement executes
A CLOSE statement closes the cursor
In a database that is not ANSI-compliant, an OPEN statement implicitly
closes and then reopens the cursor
• A COMMIT WORK statement ends the transaction
When the insert buffer is flushed, the front-end processor performs
appropriate data conversion before it sends the rows to the database server.
When the database server receives the buffer, it begins to insert the rows one
at a time into the database. If an error is encountered while the database
server inserts the buffered rows into the database, any buffered rows
following the last successfully inserted rows are discarded.
Inserting Rows into a Database Without Transactions
If you are inserting rows into a database without transactions, you must take
explicit action to restore inserted rows after a failure. For example, if the
INSERT statement fails after inserting some rows, the successfully inserted
rows remain in the table. You cannot recover automatically from a failed
insert.
1-248 Syntax
INSERT
Inserting Rows into a Database with Transactions
If you are inserting rows into a database with transactions and you are using
explicit transactions, you can undo the insertion using the ROLLBACK WORK
statement. If you do not execute BEGIN WORK before the insert and the insert
fails, the database server automatically rolls back any database modifications
made since the beginning of the insert.
ANSI
If you are inserting rows into an ANSI-compliant database, transactions are
implicit and all database modifications take place within a transaction. In
this case, if an INSERT statement fails, you can use the ROLLBACK WORK
statement to undo the insertions.
If you are using INFORMIX-OnLine Dynamic Server within an explicit
transaction and the update fails, the database server automatically undoes
the effects of the update.
Rows that you insert within a transaction remain locked until the end of the
transaction. The end of a transaction is either a COMMIT WORK statement,
where all modifications are made to the database, or ROLLBACK WORK statement, where none of the modifications are made to the database. If the number of rows affected by a single INSERT statement is quite large, you can
exceed the maximum number of simultaneous locks permitted. To prevent
this situation, either insert fewer rows per transaction or lock the page or the
entire table before executing the INSERT statement.
SE
To prevent this situation, either insert fewer rows per transaction or lock the
entire table before executing the INSERT statement.
Syntax
1-249
INSERT
VALUES Clause
VALUES Clause
VALUES
,
(
ESQL
variable
name
)
: indicator variable
$ indicator variable
NULL
Literal Number
p. 1-493
Quoted String
p. 1-497
+
USER
p. 1-438
Literal DATETIME
p. 1-487
Literal INTERVAL
p. 1-490
TODAY p. 1-439
CURRENT p. 1-440
OL
SITENAME p. 1-438
DBSERVERNAME
p. 1-438
indicator variable
is a variable associated with a host variable that indicates
when an ESQL statement returns a null value to that host
variable.
variable name
is a program variable or host variable as defined in an SQL
API.
When you use the VALUES clause, you can insert only one row at a time. Each
value that follows the VALUES keyword is assigned to the corresponding column listed in the INSERT INTO clause (or in column order if a list of columns
is not specified).
1-250 Syntax
INSERT
If you are inserting a quoted string into a column, the maximum length of the
string is 256 bytes. If you insert a value greater than 256, the database server
returns an error.
ESQL
If you are using variables, you can insert quoted strings longer than 256
bytes into a table.
Value and Column Type Compatibility
Although the values you insert do not have to be the same data type as the
columns receiving them, the value type and column type must be compatible. You can insert only characters into CHAR columns and only numbers or
characters representing number data into number columns. The following
example inserts values into the columns of the customer table:
INSERT INTO customer
VALUES (0, 'Nadia', 'Broadam', 'Ski & Stuff',
'89 Coniston Road', NULL, 'Short Hills',
'NJ', '07079', '201-457-4100')
The database server makes every effort to perform data conversion. If the
data cannot be converted, the INSERT operation fails. Data conversion also
fails if the target data type cannot hold the value specified. For example, you
cannot insert the integer 123456 into a column defined as a SMALLINT data
type because this data type cannot hold a number that large.
NLS
When NLS is enabled, the following example inserts values containing
foreign characters into NCHAR columns:
INSERT INTO abonnés
VALUES (0, 'Pétain','René','1221 Bd. Hassan II',
'Rabat', 'Maroc');
Inserting Values into SERIAL Columns
If you want to insert consecutive serial values into a SERIAL column in the
table, enter a zero for a SERIAL column in the INSERT statement. When a
SERIAL column is set to zero, the database server assigns the next highest
value. If you want to enter an explicit value into a SERIAL column, specify the
nonzero value after first verifying that the value does not duplicate one
Syntax
1-251
INSERT
already in the table. If the SERIAL column is uniquely indexed or has a unique
constraint and you try to insert a value that duplicates one already in the
table, an error occurs. For more information about the SERIAL data type, see
Chapter 3 of the Informix Guide to SQL: Reference.
Using Functions in the VALUES Clause
You can insert the current date, date and time, login name of the current user,
or database server name of the current INFORMIX-OnLine Dynamic Server
database into a column. The TODAY keyword returns the system date. The
CURRENT keyword returns the system date and time. The USER keyword
returns an eight-character string containing the login account name of the
current user. The SITENAME or DBSERVERNAME keyword returns the database server name on which the current database resides. The following example uses the CURRENT and USER keywords to insert a new row into the
cust_calls table:
INSERT INTO cust_calls (customer_num, call_dtime, user_id,
call_code, call_descr)
VALUES (212, CURRENT, USER, 'L', '2 days')
Inserting Nulls with the VALUES Clause
When you execute an INSERT statement, a null value is inserted into any
column for which you do not provide a value as well as for all columns that
do not have default values associated with them, which not listed explicitly.
You also can use the NULL keyword to indicate that a column should be
assigned a null value. The following example inserts values into three
columns of the orders table:
INSERT INTO orders (orders_num, order_date, customer_num)
VALUES (0, NULL, 123)
In this example, a null value is explicitly entered in the order_date column,
and all other columns of the orders table not explicitly listed in the INSERT
INTO clause are also filled with null values.
1-252 Syntax
INSERT
Subset of SELECT Statement
You can insert the rows of data that result from a SELECT statement into a
table if the insert data is selected from another table or tables. If this statement
has a WHERE clause that does not return rows, sqlca returns SQLNOTFOUND
(100) for ANSI-compliant databases. In databases that are not ANSI-compliant, sqlca returns (0). When you insert as a part of a multistatement prepare
and no rows are inserted, sqlca returns SQLNOTFOUND (100) for both ANSI
and databases that are not ANSI-compliant. The following SELECT clauses are
not supported:
•
•
•
INTO TEMP
ORDER BY
UNION
In addition, the FROM clause of the SELECT statement cannot contain the
same table name as the table into which you are inserting rows, as shown in
the following example:
INSERT INTO newtable
SELECT item_num, order_num, quantity, stock_num,
manu_code, total_price
FROM items
Detailed information on SELECT statement syntax is provided on page 1-310.
Using INSERT as a Dynamic Management Statement
ESQL
You can use the INSERT statement to handle situations where you need to
write code that can insert data whose structure is unknown at the time you
compile. For more information, refer to the dynamic management section of
your SQL API manual.
Syntax
1-253
INSERT
Inserting Data Using a Stored Procedure
You can insert the rows of data that result from a procedure call into a table.
The values returned by the procedure must match those expected by the
column-list in number and data type. The number and data types of the
columns must match those expected by the column list.
References
See the SELECT statement in this manual. Also see the DECLARE, DESCRIBE,
EXECUTE, FLUSH, OPEN, PREPARE, and PUT statements in this manual for
specific information about dynamic management statements.
In the Informix Guide to SQL: Tutorial, see the discussion of inserting data in
Chapter 4 and Chapter 6.
1-254 Syntax
LOAD
LOAD
Purpose
Use the LOAD statement to insert data from an ASCII operating system file
into an existing table, synonym, or view.
Syntax
+
LOAD FROM
' filename '
DELIMITER
INSERT INTO
' delimiter '
Table
Name
p. 1-506
Synonym
Name
p. 1-504
,
)
DB
column
)
View
Name
p. 1-510
column
is a column belonging to Table Name, Synonym Name, or View
Name. You must specify column names if you are not loading
data into all columns in the table, synonym, or view.
delimiter
is a quoted string constant that contains the character to use
as the delimiting character in the load file.
filename
is a quoted string constant or character string that specifies
the file that contains the data to load. It includes the
pathname of an operating system file.
Usage
The LOAD statement appends new rows to the table. It does not overwrite
existing data.
Syntax
1-255
LOAD
You cannot add a row that has the same key as an existing row.
To use the LOAD statement, you must have Insert privileges for the table into
which you want to insert the data. For information on database-level and
table-level privileges, see the GRANT statement on page 1-231.
The LOAD FROM File
The LOAD FROM file is the file that contains the data to add to a table. You can
use the file created by the UNLOAD statement as the LOAD FROM file.
If you do not include a list of columns in the INSERT INTO clause, the fields
in the file must match the columns specified for the table in number, order,
and type.
Each line of the file must have the same number of fields. You must define
field lengths that are less than or equal to the length specified for the corresponding column. Specify only values that can convert to the data type of the
corresponding column. The following table indicates how your Informix
product expects you to represent the data types in the LOAD file:
Type of Data
blank
Input Format
One or more blank characters between delimiters. You can include leading blanks in
fields that do not correspond to character columns.
date
A character string in the following format: month/day/year. You must state the month
as a two-digit number. You can use a two-digit number for the year if the year is in the
20th century. The value must be an actual date; for example, February 30 is illegal. You
can specify a different date format with the DBDATE and LC_TIME environment
variables. See Chapter 4 of the Informix Guide to SQL: Reference for more information
about environment variables.
MONEY
A value that can have leading currency symbols.
NULL
Nothing between the delimiters.
time
A character string in the following format: year-month-day hour:minute:second.fraction
You cannot use type specification or qualifiers for DATETIME or INTERVAL values.
The year must be a four-digit number and the month a two-digit number.
Types of data and their input format for a LOAD statement
If you include any of the following special characters as part of the value of a
field, you must precede the character with a backslash (\):
• Backslash
• Delimiter
1-256 Syntax
LOAD
• New line anywhere in the value of a VARCHAR or NVARCHAR column
• New line at end of a value for a TEXT value
Do not use the backslash character as a field separator. It serves as an escape
character to inform the LOAD statement that the next character is to be
interpreted as part of the data.
The fields corresponding to character columns can contain more characters
than the defined maximum for the field. The extra characters are ignored.
If you are loading files containing VARCHAR or BLOB data types, note the
following information:
• If you give the LOAD statement data in which the character (including
VARCHAR) fields are longer than the column size, the excess characters
are disregarded.
• You cannot have leading and trailing blanks in BYTE fields.
• Use the backslash to escape embedded delimiter and backslash characters
in all character fields, including VARCHAR and TEXT.
• Data being loaded into a BYTE column must be in ASCII-hexadecimal
form. BYTE columns cannot contain preceding blanks.
• Do not use the following characters as delimiting characters in the LOAD
FROM file: 0-9, a-f, A-F, backslash, newline.
For more information about the format of the input file, see the discussion of
the dbload utility in the Informix Guide to SQL: Reference.
The following example shows the contents of a hypothetical input file named
new_custs:
0|Jeffery|Padgett|Wheel Thrills|3450 El Camino|Suite 10|Palo Alto|CA|94306||
0|Linda|Lane|Palo Alto Bicycles|2344 University||Palo Alto|CA|94301|(415)323-6440
This data file conveys the following information:
• Indicates a serial field by specifying a zero (0)
• Uses the vertical bar (|), the default delimiter character
• Assigns null values to the phone field for the first row and the address2
field for the second row. The null values are shown by two delimiter
characters with nothing between them.
Syntax
1-257
LOAD
The following statement loads the values from the new_custs file into the
customer table owned by jason:
LOAD FROM 'new_custs' INSERT INTO jason.customer
DELIMITER Clause
Use the DELIMITER clause to specify the delimiter that separates the data
contained in each column in a row in the input file. If you omit this clause,
your Informix product checks the DBDELIMITER environment variable.
If the DBDELIMITER environment variable has not been set, the default
delimiter is the vertical bar (| = ASCII 124). See Chapter 4 in the Informix
Guide to SQL: Reference for information about how to set the DBDELIMITER
environment variable.
You can specify TAB (CTRL-I) or <blank> ( = ASCII 32) as the delimiter symbol.
You cannot use the following items as the delimiter symbol:
• backslash (\)
• newline (= CTRL-J)
• hex numbers (0-9, a-f, A-F)
The following statement identifies the semicolon (;) as the delimiting
character:
LOAD FROM '/a/data/ord.loadfile' DELIMITER ';'
INSERT INTO orders
INSERT INTO Clause
Use the INSERT INTO clause to specify the table, synonym, or view in which
to load the new data. (See the discussion of Synonym Name, Table Name, and
View Name beginning on page 1-504 for details.)
You must specify the column names only if one of the following conditions is
true:
• You are not loading data into all columns.
• The input file does not match the default order of the columns
(determined when the table was created).
1-258 Syntax
LOAD
The following example identifies the price and discount columns as the only
columns in which to add data:
LOAD FROM '/tmp/prices' DELIMITER ','
INSERT INTO norman.worktab(price,discount)
References
See the UNLOAD and INSERT statements in this manual.
In the Informix Guide to SQL: Reference, see the discussion of the dbload utility
in Chapter 5.
Syntax
1-259
LOCK TABLE
LOCK TABLE
Purpose
Use the LOCK TABLE statement to control access to a table by other processes.
Syntax
+
LOCK TABLE
Table
Name
p. 1-506
Synonym
Name
p. 1-504
IN
SHARE
MODE
EXCLUSIVE
Usage
You can lock a table if you own the table or have the Select privilege on the
table or on a column in the table, either from a direct grant or from a grant to
PUBLIC. The LOCK TABLE statement fails if the table is already locked in
exclusive mode by another process or if an exclusive lock is attempted while
another user has locked the table in share mode.
The SHARE keyword locks a table in shared mode. Shared mode allows other
processes read access to the table but denies write access. Other processes
cannot update or delete data if a table is locked in Shared mode.
The EXCLUSIVE keyword locks a table in Exclusive mode. Exclusive mode
denies other processes both read and write access to the table.
Exclusive-mode locking automatically occurs when you execute the ALTER
INDEX, CREATE INDEX, DROP INDEX, RENAME COLUMN, RENAME TABLE,
and ALTER TABLE statements.
SE
1-260 Syntax
The INFORMIX-SE database server does not permit more than one user to
lock a table in Shared mode.
LOCK TABLE
Databases with Transactions
If your database was created with transactions, the LOCK TABLE statement
succeeds only if it executes within a transaction. You must issue a BEGIN
WORK statement before you can execute a LOCK TABLE statement.
ANSI
Transactions are implicit in an ANSI-compliant database. The LOCK TABLE
statement succeeds whenever the specified table is not already locked by
another process.
The following guidelines apply to the use of the LOCK TABLE statement
within transactions:
• You cannot lock system catalogs.
• You cannot switch between shared and exclusive table locking within a
transaction. For example, once you lock the table in Shared mode, you
cannot upgrade the lock mode to Exclusive.
• If you issue a LOCK TABLE statement before you access a row in the table,
no row locks are set for the table. In this way, you can override row-level
locking and prevent a situation in which you exceed the maximum number of locks defined in the INFORMIX-OnLine Dynamic Server
configuration.
SE
The maximum number of locks allowed by the INFORMIX-SE database
server is a characteristic of the particular operating system on which your
database server is running.
• All row and table locks release automatically after a transaction is
completed. Note that the UNLOCK TABLE statement fails within a
database that uses transactions.
Syntax
1-261
LOCK TABLE
The following example shows how to change the locking mode of a table in
a database that was created with transaction logging:
BEGIN WORK
LOCK TABLE orders IN EXCLUSIVE MODE
...
COMMIT WORK
BEGIN WORK
LOCK TABLE orders IN SHARE MODE
...
COMMIT WORK
Databases Without Transactions
In a database created without transactions, table locks set using the LOCK
TABLE statement are released after any of the following occurrences:
• An UNLOCK TABLE statement executes.
• The user closes the database.
• The user exits the application.
To change the lock mode on a table, release the lock with the UNLOCK TABLE
statement and then issue a new LOCK TABLE statement.
The following example shows how to change the lock mode of a table in a
database that was created without transactions:
LOCK TABLE orders IN EXCLUSIVE MODE
...
UNLOCK TABLE orders
...
LOCK TABLE orders IN SHARE MODE
References
See the BEGIN WORK, SET ISOLATION, SET LOCK MODE, COMMIT WORK,
ROLLBACK WORK, and UNLOCK TABLE statements in this manual.
In the Informix Guide to SQL: Tutorial, see the discussion of locks in Chapter 6.
1-262 Syntax
OPEN
OPEN
Purpose
Use the OPEN statement to activate a cursor associated with a SELECT,
INSERT, or EXECUTE PROCEDURE statement, and thereby begin execution of
the SELECT, INSERT, or EXECUTE PROCEDURE statement.
Syntax
ESQL
OPEN
cursor
id
,
cursor
variable
variable name
USING
SQL DESCRIPTOR
E/C
'
descriptor
'
descriptor
variable
DESCRIPTOR
sqlda
pointer
cursor id
identifies a cursor that was created by an earlier DECLARE
statement.
cursor variable
is an SQL API variable that identifies a cursor that was
created by an earlier DECLARE statement.
descriptor
is a quoted string that identifies the system descriptor area
that was previously allocated.
descriptor
variable
is an SQL API variable name that identifies the
system descriptor area that was previously allocated.
sqlda pointer
points to an sqlda structure that defines the type and
memory location of values that correspond to the question
mark ( ?) placeholder in a prepared statement.
variable name
is a program or host variable whose contents replace a
question mark ( ?) placeholder in a prepared statement.
Syntax
1-263
OPEN
Usage
You create a cursor with a statement using the DECLARE statement (page
1-145). When the program opens the cursor, the associated SELECT, INSERT,
or EXECUTE PROCEDURE statement is passed to the database server, which
begins execution. When the program has retrieved or inserted all the rows it
needs, the cursor should be closed using the CLOSE statement.
The specific actions taken by the database server differ, depending on
whether the cursor is associated with a SELECT statement or an INSERT
statement.
The (SELECT, INSERT, or EXECUTE PROCEDURE) statement associated with a
cursor is prepared implicitly by the OPEN statement. The total number of
epgprepared objects and open cursors allowed in one program at any time is
limited by the available memory. You can use the FREE statement (to free the
cursor) to release the database server resources.
ANSI
You receive an error code if you open a cursor that is already open.
Opening a Select Cursor
When you open either a select cursor or an update cursor, the SELECT
statement is passed to the database server along with any values specified in
the USING clause. (If the statement was previously prepared, the statement
passed to the database server when it was prepared.) The database server
processes the query to the point of locating or constructing the first row of the
active set.
Because this is the first time that the database server sees the query, it is the
time when many errors are detected. The database server does not actually
return the first row of data, but it sets a return code in the SQLCODE field of
the sqlca. The name of the field in each product is indicated in the following
table:
Product
ESQL/C
ESQL/COBOL
Field Name
sqlca.sqlcode SQLCODE
SQLCODE OF SQLCA
The return code value is either negative or zero, as described in the following
list:
negative
1-264 Syntax
An error is detected in the SELECT statement.
OPEN
zero
The SELECT statement is valid.
If the SELECT statement is valid but no rows match its criteria, the first FETCH
statement returns a value of 100 (SQLNOTFOUND), which means no rows
found.
Note: When you encounter an SQLCODE error, be aware that there may be a
corresponding SQLSTATE error value. Check the GET DIAGNOSTICS statement for
information about how to get the SQLSTATE value and how to use the GET
DIAGNOSTICS statement to interpret the SQLSTATE value.
The following example illustrates a simple OPEN statement in
INFORMIX-ESQL/C:
exec sql declare s_curs cursor for
select * from orders;
exec sql open s_curs;
If you are working in a database with explicit transactions, you must open an
update cursor within a transaction. This requirement is waived if you
declared the cursor using the WITH HOLD keyword. (See the DECLARE statement on page 1-145.)
Opening an Procedure Cursor
When you open an procedure cursor, the EXECUTE PROCEDURE statement is
passed to the database server along with any values specified in the USING
clause. The values are passed as arguments to the procedure and the procedure must be declared to accept values. (If the statement was previously prepared, the statement passed to the database server when it was prepared.)
The database server executes the procedure to the point of the first set of
values returned by the procedure.
Because this is the first time that the database server sees the procedure, it is
the time when many errors are detected. The database server does not actually return the first row of data, but it sets a return code in the SQLCODE field
of the sqlca. The name of the field in each product is indicated in the
following table:
Product
ESQL/C
ESQL/COBOL
Field Name
sqlca.sqlcode SQLCODE
SQLCODE OF SQLCA
Syntax
1-265
OPEN
The return-code value is either negative or zero, as described in the following
list:
negative
An error was detected in the EXECUTE PROCEDURE
statement.
zero
The EXECUTE PROCEDURE statement is valid.
If the EXECUTE PROCEDURE statement is valid but no rows are returned, the
first FETCH statement returns a value of 100 (SQLNOTFOUND), which means
no rows found. The procedure must be created to return values, that is, the
procedure must have a RETURNING clause at the beginning of the procedure.
Note: When you encounter an SQLCODE error, be aware that there may be a
corresponding SQLSTATE error value. Check the GET DIAGNOSTICS statement for
information about how to get the SQLSTATE value and how to use the GET
DIAGNOSTICS statement to interpret the SQLSTATE value.
The following example illustrates a simple OPEN statement in
INFORMIX-ESQL/C:
exec sql declare s_curs cursor for
execute procedure new_proc();
exec sql open s_curs;
Opening an Insert Cursor
When you open an insert cursor, the cursor passes the INSERT statement to
the database server, which checks the validity of the keywords and column
names. The database server also allocates memory for an insert buffer to hold
new data. (See the DECLARE statement on page 1-145.)
An OPEN statement for a cursor associated with an INSERT statement cannot
include a USING clause.
The following INFORMIX-ESQL/C example illustrates an OPEN statement
with an insert cursor:
exec sql prepare s1 from
'insert into manufact ', 'values ('npr', 'napier')';
exec sql declare in_curs cursor for s1;
exec sql open in_curs;
exec sql put in_curs;
exec sql close in_curs;
1-266 Syntax
OPEN
Reopening a Select Cursor
The values named in the USING clause are evaluated only when the cursor is
opened. While the cursor is open, subsequent changes to program variables
in the USING clause do not change the active set of selected rows. The active
set remains constant until a subsequent OPEN statement closes the cursor
and reopens it or until the program closes the open cursor, which releases the
active set.
Reopening the cursor creates a new active set based on the current values of
the variables. If the program variables have changed since the previous OPEN
statement, reopening the cursor can generate an entirely different active set.
Even if the values of the variables are unchanged, if data in the table was
modified since the previous OPEN statement, the rows in the active set can be
different.
Reopening an Procedure Cursor
The values named in the USING clause are evaluated only when the cursor is
opened. While the cursor is open, subsequent changes to program variables
in the USING clause do not change the active set of returned rows. The active
set remains constant until a subsequent OPEN statement closes the cursor and
reopens it or until the program closes the open cursor, which releases the
active set.
Reopening the cursor creates a new active set based on the current values of
the variables. If the program variables have changed since the previous OPEN
statement, reopening the cursor can generate an entirely different active set.
Even if the values of the variables are unchanged, if the procedure takes a different execution path from the previous OPEN statement, the rows in the
active set can be different.
Reopening an Insert Cursor
When you reopen an insert cursor that is already open, you effectively flush
the insert buffer; any rows stored in the INSERT buffer are written into the
database table. The database server first closes the cursor, which accounts for
the flush, and then reopens the cursor. See the discussion of the PUT statement on page 1-284 for information about checking errors and counting
inserted rows.
Syntax
1-267
OPEN
USING Clause
The USING clause is required when the cursor is associated with a prepared
SELECT statement that includes ? placeholders. (See the PREPARE statement
on page 1-273.) You can supply values for these parameters in one of two
ways.
Naming Variables in USING
If you know the number of parameters to be supplied at run time and their
data types, you can define the parameters needed by the statement as host
variables in your program. You pass parameters to the database server by
opening the cursor with the USING keyword, followed by the names of the
variables. These variables are matched with the SELECT statement ?
parameters in a one-to-one correspondence, from left to right.
You cannot include indicator variables in the list of variable names. To use an
indicator variable, you must include the SELECT statement as part of the
DECLARE statement.
The following example illustrates the USING clause with the OPEN statement
in an INFORMIX-ESQL/C code fragment:
sprintf (select_1, '%s %s %s %s %s',
'select o.order_num, sum(total price)',
'from orders o, items i',
'where o.order_date > ? and o.customer_num = ?',
'and o.order_num = i.order_num',
'group by o.order_num');
exec sql prepare statement_1 from select_1;
exec sql declare q_curs cursor for statement_1;
exec sql open q_curs using :o_date, :c_num;
USING SQL DESCRIPTOR Clause
You also can associate input values from a system-descriptor area. The
keywords USING SQL DESCRIPTOR indicate the use of a system descriptor.
This allows you to associate input values from a system-descriptor area and
open a cursor.
If a system-descriptor area is used, the count value specifies the number of
input values that are described in occurrences of sqlvar. This number must
correspond to the number of dynamic parameters in the prepared statement.
The value of count must be less than or equal to the value of occurrences
specified when the system-descriptor area was allocated.
1-268 Syntax
OPEN
For further information, refer to the discussion of the system-descriptor area
in your INFORMIX-ESQL product manual. The following examples show the
OPEN USING SQL DESCRIPTOR clause and INFORMIX-ESQL/C and
INFORMIX-ESQL/COBOL, respectively:
exec sql open selcurs using sql descriptor 'desc1';
INFORMIX-ESQL/C
EXEC SQL OPEN SEL_CURS USING SQL DESCRIPTOR 'DESC1' END-EXEC.
INFORMIX-ESQL/COBOL
USING DESCRIPTOR Clause
E/C
You can pass parameters for a prepared statement in the form of an sqlda
pointer structure, which lists the data type and memory location of one or
more values to replace question mark (?) placeholders. For further information, refer to the sqlda discussion in the INFORMIX-ESQL/C Programmer’s
Manual. The following example shows the OPEN USING DESCRIPTOR clause
in INFORMIX-ESQL/C:
struct sqlda *sdp;
...
exec sql open selcurs using descriptor sdp;
The Relationship Between OPEN and FREE
The database server allocates resources to prepared statements and open
cursors. If you release resources with a FREE cursor id or FREE cursor variable
statement, you cannot use the cursor unless you declare the cursor again. If
you execute a FREE statement id or FREE statement id variable statement, you
cannot open the cursor associated with the statement id or statement id variable
unless you prepare the statement id or statement id variable again.
Syntax
1-269
OPEN
References
See the CLOSE, DECLARE, and FREE statements in this manual because they
are cursor-related. See the PUT and FLUSH statments, also in this manual, for
insert cursors.
See the ALLOCATE DESCRIPTOR, DEALLOCATE DESCRIPTOR, DESCRIBE,
EXECUTE, FETCH, GET DESCRIPTOR, PREPARE, PUT, and SET DESCRIPTOR
statements in this manual for further information about dynamic SQL
statements.
In the Informix Guide to SQL: Tutorial, see the discussion of the OPEN
statement in Chapter 5.
Refer also to your SQL API manual for further information about the
system-descriptor area and the sqlda structure.
1-270 Syntax
OUTPUT
OUTPUT
Purpose
Use the OUTPUT statement to send query results directly to an operating
system file or to pipe it to another program.
Syntax
DB
+
OUTPUT TO
SELECT
Statement
p. 1-310
filename
PIPE program
WITHOUT
HEADINGS
filename
is the name of the operating system file in which you want
to store the results of the query.
program
is the name of the program where you want the query results
piped or otherwise sent.
Usage
You can send the results of a query to an operating system file by specifying
the full pathname for the file. If the file already exists, the output overwrites
the current contents, as shown in the following example:
OUTPUT TO /usr/april/query1
SELECT * FROM cust_calls WHERE call_code = 'L'
You can display the results of a query without column headings by using the
WITHOUT HEADINGS keywords, as shown in the following example:
OUTPUT TO /usr/april/query1
WITHOUT HEADINGS
SELECT * FROM cust_calls WHERE call_code = 'L'
Syntax
1-271
OUTPUT
You also can use the keyword PIPE to send the query results to another
program, as shown in the following example:
OUTPUT TO PIPE more
SELECT customer_num, call_dtime, call_code
FROM cust_calls
References
See the SELECT and UNLOAD statements in this manual.
1-272 Syntax
PREPARE
PREPARE
Purpose
Use the PREPARE statement to parse, validate, and generate an execution
plan for SQL statements in INFORMIX-ESQL program at run time.
Syntax
ESQL
PREPARE
+
statement
id
statement
id variable
statement id
statement
id variable
variable name
FROM
Quoted
String
p. 1-497
variable
name
is an SQL statement identifier. The statement id must conform
to the same rules as any identifier, as described in the
Identifier segment on page 1-469.
is the name of an SQL API character variable that contains
the SQL statement identifier. The id variable and the identifier
it contains must conform to the same rules as any identifier,
as described in the Identifier segment on page 1-469.
is an INFORMIX-ESQL host variable that contains the text of
the SQL statement to be prepared.
Usage
The PREPARE statement permits your program to assemble the text of an SQL
statement at run time and make it executable. This dynamic form of SQL is
accomplished in three steps:
1. A PREPARE statement accepts statement text as input, either as a quoted
string or stored within a character variable. Statement text can contain
question mark ( ?) placeholders to represent values that are to be defined
when the statement is executed.
2. An EXECUTE or OPEN statement can supply the required input values
and execute the prepared statement once or many times.
3. Resources allocated to the prepared statement can be released later using
the FREE statement.
Syntax
1-273
PREPARE
The number of prepared objects in a single program is limited by the
available memory. This includes both statement identifiers named in PREPARE statements and cursor declarations that incorporate SELECT, EXECUTE
PROCEDURE, or INSERT statements. To avoid exceeding the limit, use a FREE
statement to release some statements or cursors.
The term “statement identifier” means statement id or statement id variable.
Statement Identifier
A PREPARE statement sends the statement text to the database server where
it is analyzed. If it contains no syntax errors, the text converts to an internal
form. This translated statement is saved for later execution in a data structure
that the PREPARE statement allocates. The structure has the name statement
identifier. Subsequent SQL statements refer to the statement using the
statement identifier.
A subsequent FREE statement releases the resources allocated to the
statement. After you release the database-server resources, you cannot use
the statement identifier with a DECLARE cursor or with the EXECUTE
statement until you prepare the statement again.
A program can consist of one or more source code files. By default, the scope
of a statement identifier is global to the program. This means that a statement
identifier prepared in one file can be referenced from another file.
In a multiple-file program, if you want to limit the scope of a statement identifier to the file in which it is prepared, preprocess all the files with the -local
command line option. See your ESQL product manual for more information,
restrictions, and performance issues when preprocessing with the -local
option.
Releasing a Statement Identifier
A statement identifier can represent only one SQL statement or sequence of
statements at a time. You can execute a new PREPARE statement with an existing statement identifier if you wish to bind a given statement identifier to
different SQL statement text.
1-274 Syntax
PREPARE
The PREPARE statement supports dynamic statement identifier names, which
allow you to prepare a statement identifier as an identifier or as a host character string variable. In the following pairs of examples, the first example
shows a statement identifier prepared as an SQL API variable and the second
shows it as a character string constant:
strcpy (stmtid, 'query2');
exec sql prepare stmtid from
'select * from customer';
exec sql prepare query2 from
'select * from customer';
INFORMIX-ESQL/C
MOVE 'QUERY_2' TO STMTID.
EXEC SQL
PREPARE :STMTID FROM
'SELECT * FROM CUSTOMER'
END-EXEC.
EXEC SQL
PREPARE QUERY_2 FROM
'SELECT * FROM CUSTOMER'
END-EXEC.
INFORMIX-ESQL/COBOL
A statement id variable must be of the CHARACTER data type. In C, it must be
defined as :char. In COBOL, id variables must be declared as a standard
CHARACTER type.
Statement Text
The PREPARE statement can take statement text either as a quoted string or
as text stored in a program variable. The following restrictions apply to the
statement text:
• The text can contain only SQL statements. It cannot contain statements or
comments from the host programming language.
Comments preceded by two hyphens (--), or enclosed in curly braces ({ })
are standard in SQL and are allowed in the statement text. The comment
ends at the end of the line or at the end of the statement.
• The text can contain either a single SQL statement or a sequence of
statements separated by semicolons.
Syntax
1-275
PREPARE
• Names of host-language variables are not recognized as such in prepared
text. The only identifiers that you can use are names defined in the database, such as names of tables and columns. Therefore, you cannot prepare
a SELECT statement that contains an INTO clause because the INTO clause
requires a host-language variable.
Use a question mark (?) as a placeholder to indicate where data is
supplied when the statement executes.
The text cannot include an embedded SQL statement prefix or terminator,
such as a dollar sign or the words EXEC SQL.
The following example shows a PREPARE statement in INFORMIX-ESQL/C:
exec sql prepare new_cust from
'insert into customer(fname,lname)','values(?,?)'
Executing Stored Procedures Within a PREPARE Statement
You can prepare an EXECUTE PROCEDURE statement in conjunction with the
ALLOCATE DESCRIPTOR and GET DESCRIPTOR statements in an ESQL/C program. Parameters to the stored procedure can be passed in the same manner
as SELECT and may be passed at runtime or compile time.
See Chapter 14 of the Informix Guide to SQL: Tutorial for information about
creating and executing stored procedures. See Chapter 10 of the INFORMIXESQL/C Programmer’s Manual for detailed information about dynamically
executing a stored procedure.
Permitted Statements
You can prepare any single SQL statement except the ones in the following
list:
ALLOCATE DESCRIPTOR
CHECK TABLE
CLOSE
CONNECT
DEALLOCATE DESCRIPTOR
DECLARE
DESCRIBE
DISCONNECT
EXECUTE IMMEDIATE
1-276 Syntax
GET DESCRIPTOR
GET DIAGNOSTICS
INFO
LOAD
PUT
OPEN
OUTPUT
PREPARE
REPAIR TABLE
PREPARE
EXECUTE
FETCH
FLUSH
FREE
SET CONNECTION
SET DESCRIPTOR
UNLOAD
WHENEVER
You can prepare a SELECT statement. If the SELECT statement includes the
INTO TEMP clause, you can execute the prepared statement with an EXECUTE
statement. If it does not include the INTO TEMP clause, the statement returns
rows of data. Use DECLARE, OPEN, and FETCH cursor statements to retrieve
the rows.
A prepared SELECT statement can include a FOR UPDATE clause. This clause
normally is used with the DECLARE statement to create an update cursor. The
following example shows a SELECT statement with a FOR UPDATE clause in
INFORMIX-ESQL/C:
sprintf(up_query, '%s %s %s',
'select * from customer ',
'where customer_num between ? and ? ',
'for update');
exec sql prepare up_sel from :up_query;
exec sql declare up_curs cursor for up_sel;
exec sql open up_curs using :low_cust,:high_cust;
Restrictions for Multistatement Prepares
You cannot use the following statements (in addition to the ones listed in
“Permitted Statements” on page 1-276) in a text that contains multiple
statements separated by semicolons:
CLOSE DATABASE
CREATE DATABASE
DATABASE
DROP DATABASE
SELECT
START DATABASE
Thus, a SELECT statement is not allowed in a multistatement prepare; the
statements that could cause the current database to be closed in the middle of
executing the sequence of statements are also not allowed. For general information about multistatement prepares, see “Preparing Sequences of Multiple
SQL Statements” on page 1-281.
Syntax
1-277
PREPARE
Preparing Statements When Parameters Are Known
In some prepared statements, all needed information is known at the time the
statement is prepared. Here is an example in INFORMIX-ESQL/C in which
two statements are prepared from constant data:
sprintf(redo_st, '%s; %s',
'drop table workt1',
'create table workt1 (wtk serial, wtv float)' );
exec sql prepare redotab from redo_st;
Preparing two statements from constant data in INFORMIX-ESQL/C
For further information, consult the manual for your application
development tool.
Preparing Statements That Receive
Parameters At Execution
In some statements, parameters are unknown when the statement is
prepared because a different value can be inserted each time the statement is
executed. In these statements, you can use a question mark (?) placeholder
where a parameter must be supplied when the statement is executed.
The PREPARE statements in the following INFORMIX-ESQL/C examples show
some uses of question mark (?) placeholders:
exec sql prepare s3 from
'select * from customer where state matches ?';
exec sql prepare in1 from
'insert into manufact values (?,?,?)';
sprintf(up_query, '%s %s',
'update customer set zipcode = ?'
'where current of zip_cursor');
exec sql prepare update2 from :up_query;
You can use a placeholder only to supply a value for an expression. You
cannot use a question mark (?) placeholder to represent an identifier such as
a database name, a table name, or a column name.
1-278 Syntax
PREPARE
The following example segment of INFORMIX-ESQL/C code prepares a
statement from a variable named demoquery. The text in the variable
includes one question mark (?) placeholder. The prepared statement is associated with a cursor and, when the cursor is opened, the USING clause of the
OPEN statement supplies a value for the placeholder.
exec sql begin declare section;
char queryvalue [6];
char demoquery [80];
exec sql end declare section;
exec sql database stores6;
sprintf(demoquery, '%s %s',
'select fname, lname from customer',
'where lname > ? ');
exec sql prepare quid from :demoquery;
exec sql declare democursor cursor for quid;
strcpy(queryvalue, 'C');
exec sql open democursor using :queryvalue;
Preparing an INFORMIX-ESQL/C statement that receives values
The USING clause is available in both OPEN (for statements associated with a
cursor) and EXECUTE (all other prepared statements) statements.
Preparing Statements with SQL Identifiers
You cannot use question mark (?) placeholders for SQL identifiers such as a
table name or a column name; you must specify these identifiers in the
statement text when you prepare it.
However, if these identifiers are not available when you write the statement,
you can construct a statement that receives SQL identifiers from user input.
The following INFORMIX-ESQL/C program example prompts the user for the
name of a table and uses that name in a SELECT statement. Because the table
name is unknown until run time, the number and data types of the table columns also are unknown. Therefore, the program cannot allocate host variables to receive data from each row in advance. Instead, this program
fragment describes the statement into an sqlda descriptor and fetches each
row using the descriptor. The fetch puts each row into memory locations
dynamically provided by the program.
Syntax
1-279
PREPARE
If a program retrieves all rows in the active set, the FETCH statement would
be placed in a loop that fetched each row. If the FETCH statement retrieves
more than one data value (column), another loop exists after the FETCH,
which performs some action on each data value.
#include
exec sql
exec sql
exec sql
<stdio.h>
include sqlca;
include sqlda;
include sqltypes;
char *malloc( );
main()
{
struct sqlda *demodesc;
char tablename[19];
int i;
exec sql begin declare section;
char demoselect[200];
exec sql end declare section;
/*
This program selects all the columns of a given tablename.
The tablename is supplied interactively. */
exec sql database stores6;
printf( 'This program does a select * on a table\n' );
printf( 'Enter table name: ' );
scanf( '%s',tablename );
sprintf( demoselect, 'select * from %s', tablename );
exec sql prepare iid from :demoselect;
exec sql describe iid into demodesc;
/* Print what describe returns */
for ( i = 0; i < demodesc->sqld; i++ )
prsqlda (demodesc->sqlvar + i);
/* Assign the data pointers. */
for ( i = 0; i < demodesc->sqld; i++ ) {
switch (demodesc->sqlvar[i].sqltype & sqltype) {
case sqlchar:
demodesc->sqlvar[i].sqltype = cchartype;
demodesc->sqlvar[i].sqllen++;
demodesc->sqlvar[i].sqldata =
malloc( demodesc->sqlvar[i].sqllen );
break;
case sqlsmint:
case sqlint:
case sqlserial:
demodesc->sqlvar[i].sqltype = cinttype;
demodesc->sqlvar[i].sqldata =
malloc( sizeof( int ) );
break;
/*
}
1-280 Syntax
And so on for each type.
*/
PREPARE
}
/* Declare and open cursor for select . */
exec sql prepare d_stmt from :demoselect;
exec sql declare d_curs cursor for d_stmt;
exec sql open d_curs;
/* Fetch selected rows one at a time into demodesc. */
for( ; ; ) {
printf( '\n' );
exec sql fetch d_curs using descriptor demodesc;
if ( sqlca.sqlcode != 0 )
break;
for ( i = 0; i < demodesc->sqld; i++ ) {
switch (demodesc->sqlvar[i].sqltype) {
case cchartype:
printf( '%s: \'%s\'\', demodesc->sqlvar[i].sqlname,
demodesc->sqlvar[i].sqldata );
break;
case cinttype:
printf( '%s: %d\n', demodesc->sqlvar[i].sqlname,
*((int *) demodesc->sqlvar[i].sqldata) );
break;
/* And so forth for each type... */
}
}
}
exec sql close d_curs;
exec sql free d_curs;
/*
Free the data memory.
*/
for ( i = 0; i < demodesc->sqld; i++ )
free( demodesc->sqlvar[i].sqldata );
printf ('Program Over.\n');
}
prsqlda(sp)
struct sqlvar_struct *sp;
{
printf ('type = %d\n', sp->sqltype);
printf ('len = %d\n', sp->sqllen);
printf ('data = %lx\n', sp->sqldata);
printf ('ind=%lx\n', sp->sqlind);
printf ('name=%lx\n', sp->sqlname);
}
Preparing Sequences of Multiple SQL Statements
You can execute several SQL statements as one action if you include them in
the same PREPARE statement. Multistatement text is processed as a unit;
actions are not treated sequentially. Therefore, multistatement text cannot
include statements that depend on action that occurs in a previous statement
Syntax
1-281
PREPARE
in the text. For example, you cannot create a table and insert values into that
table in the same prepared block. Avoid placing BEGIN WORK and COMMIT
WORK statements with other statements in a multistatement prepare.
In most situations, compiled products return error status information on the
first error in the multistatement text. No indication exists of which statement
in the sequence causes an error. You can use sqlca to find the offset of the
following errors:
• In ESQL/C: sqlerrd(4)
• In ESQL/COBOL: SQLERRD(5)
For additional information about sqlca and error-status information, see
your SQL API manual.
In a multistatement prepare, if no rows are returned from a WHERE clause in
the following statements, you get SQLNOTFOUND (100) in both ANSIcompliant databases and databases that are not ANSI-compliant:
•
•
•
•
UPDATE ... WHERE ...
SELECT INTO TEMP ... WHERE ...
INSERT INTO ... WHERE ...
DELETE FROM ...WHERE ...
In the following example, six SQL statements are prepared into a single
INFORMIX-ESQL/C string query. Individual statements are delimited with
semicolons. A single exec sql prepare statement can prepare all six statements for execution and a single exec sql execute statement can execute the
qid string.
exec sql begin work;
sprintf (query, '%s %s %s %s %s %s %s %s %s',
'begin work;',
'update account set balance = balance + ?',
'where acct_number = ?;',
'update teller set balance = balance + ?',
'where teller_number = ?;',
'update branch set balance = balance + ?',
'where branch_number = ?;',
'insert into history values (?, ?);',
exec sql prepare qid from :query;
exec sql execute qid using
:delta, :acct_number, :delta, :teller_number,
:delta, :branch_number, :timestamp, :values;
exec sql commit work;
1-282 Syntax
PREPARE
Using Prepared Statements for Efficiency
To increase performance efficiency, you can use the PREPARE statement and
an EXECUTE statement in a loop to eliminate overhead caused by redundant
parsing and optimizing. For example, an UPDATE statement located within a
WHILE loop is parsed each time the loop runs. If you prepare the UPDATE
statement outside the loop, the statement is parsed only once, eliminating
overhead and speeding statement execution. The following example shows
how to prepare an INFORMIX-ESQL/C statement to improve performance:
exec sql begin declare section;
char disc_up[80];
int cust_num;
exec sql end declare section;
main()
{
sprintf(disc_up, '%s %s',
'update customer ',
'set discount = 0.1 where customer_num = ?');
exec sql prepare up1 from :disc_up;
while (1){
printf('Enter customer number (or 0 to quit):
scanf('%d', cust_num);
if (cust_num == 0)
break;
exec sql execute up1 using :cust_num;
}
');
References
See the DECLARE, DESCRIBE, EXECUTE, FREE, and OPEN statements in this
manual.
In the Informix Guide to SQL: Tutorial, see the discussion of PREPARE
statements and dynamic SQL in Chapter 5.
Syntax
1-283
PUT
PUT
Purpose
Use the PUT statement to store a row in an insert buffer for later insertion into
the database.
Syntax
ESQL
+
PUT
cursor
id
,
cursor
variable
FROM
variable
name
+
INDICATOR
USING
SQL DESCRIPTOR
: indicator
variable
indicator
variable
' descriptor '
descriptor
variable
E/C
DESCRIPTOR
sqlda
pointer
cursor id
is the identifier of a cursor declared for an INSERT statement.
cursor variable
is an embedded-variable name that identifies a cursor
declared for an INSERT statement.
descriptor
is a quoted string that identifies a system-descriptor area
allocated with the ALLOCATE DESCRIPTOR statement.
descriptor
variable
is an embedded variable name that identifies a systemdescriptor area allocated with the ALLOCATE DESCRIPTOR
statement.
indicator variable is a program variable that receives a return code if null data
is placed in the corresponding data variable.
sqlda pointer
1-284 Syntax
points to an sqlda structure representing values that
correspond to the question mark (?) placeholders in a
prepared INSERT statement.
PUT
variable name
is a program variable whose contents are to replace a
question mark (?) placeholder in a prepared INSERT
statement.
Usage
Each PUT statement stores a row in an insert buffer that was created when
cursor name was opened. If the buffer has no room for the new row when the
statement executes, the buffered rows are written to the database in a block
and the buffer is emptied. As a result, some PUT statement executions cause
rows to be written to the database and some do not.
You can use the FLUSH statement to write buffered rows to the database
without adding a new row. The CLOSE statement writes any remaining rows
before it closes an insert cursor.
If the current database uses explicit transactions, you must execute a PUT
statement within a transaction.
The following example uses a PUT statement in INFORMIX-ESQL/C :
exec sql
prepare ins_mcode from 'insert into manufact values(?,?)';
exec sql declare mcode cursor for ins_mcode;
exec sql open mcode;
exec sql put mcode from :the_code, :the_name;
X/O
PUT is not an X/Open SQL statement. Therefore, you get a warning message
if you compile a PUT statement in X/Open mode in an ESQL product. For
details on compiling in X/Open mode, see your product manual.
Supplying Inserted Values
The values that compose the inserted row can come from one of the following
sources:
•
•
•
•
Constant values written into the INSERT statement
Program variables named in the INSERT statement
Program variables named in the FROM clause of the PUT statement
Values that are prepared in memory addressed by an sqlda structure or a
system-descriptor area and then named in the USING clause of the PUT
statement.
Syntax
1-285
PUT
Using Constant Values in INSERT
The VALUES clause of the INSERT statement lists the values of the inserted
columns. One or more of these values might be constants, that is, numbers or
character strings.
When all of the inserted values are constants, the PUT statement has a special
effect. Instead of creating a row and putting it in the buffer, the PUT statement
merely increments a counter. When you use a FLUSH or CLOSE statement to
empty the buffer, one row and a repetition count are sent to the database
server, which inserts that number of rows.
In the following INFORMIX-ESQL/C example, 99 empty customer records are
inserted into the customer table. Because all values are constants, no disk output occurs until the cursor closes. (The constant zero for customer_num
causes generation of a SERIAL value.)
int count;
exec sql declare fill_c cursor for
insert into customer(customer_num) values(0);
exec sql open fill_c;
for (count = 1; count <= 99; ++count)
exec sql put fill_c;
exec sql close fill_c;
Inserting empty customer records into a table in an INFORMIX-ESQL/C program
Naming Program Variables in INSERT
When the INSERT statement is written as part of the cursor declaration (in the
DECLARE statement), you can name program variables in the VALUES clause.
When each PUT statement is executed, the contents of the program variables
at that time are used to compose the row that is inserted into the buffer.
Note: You can name only program variables in the VALUES clause when the INSERT
statement is written as part of the DECLARE statement. Variable names are not recognized in the context of a prepared statement, which is associated with a cursor
through its statement identifier.
The following INFORMIX-ESQL/C example illustrates the use of an insert
cursor. The code includes the following statements:
• The DECLARE statement associates a cursor called ins_curs with an
INSERT statement that inserts data into the customer table. The VALUES
clause names a data structure called cust_rec; the ESQL/C preprocessor
1-286 Syntax
PUT
converts cust_rec to a list of values, one for each component of the
structure.
• The OPEN statement creates a buffer.
• A function not defined in the example obtains customer information from
an interactive user and leaves it in cust_rec.
• The PUT statement composes a row from the current contents of the
cust_rec structure and sends it to the row buffer.
• The CLOSE statement inserts into the customer table any rows that remain
in the row buffer and closes the insert cursor.
int keep_going = 1;
exec sql begin declare section
struct cust_row { /* fields of a row of customer table */ } cust_rec;
exec sql end declare section
exec sql declare ins_curs cursor for
insert into customer values (:cust_rec);
exec sql open ins_curs;
for (; (sqlca.sqlcode == 0) && (keep_going) ;)
{
keep_going = get_user_input(cust_rec); /* ask user for new customer */
if (keep_going)/* user did supply customer info */
{
cust_rec.customer_num = 0;/* request new serial value */
exec sql put ins_curs;
}
if (sqlca.sqlcode == 0)/* no error from PUT */
keep_going = (prompt_for_y_or_n('another new customer') == 'Y')
}
exec sql close ins_curs;
Naming Program Variables in PUT
When the INSERT statement is prepared (see the PREPARE statement on page
1-273), you cannot use program variables in its VALUES clause. However, you
can represent values using a question mark (?) placeholder. You supply the
missing values by listing the names of program variables in the FROM clause
of the PUT statement. The following INFORMIX-ESQL/C example lists host
variables in a PUT statement:
exec
char
char
char
char
exec
sql begin declare section;
ins_comp[80];
sel2 [80];
u_company[20];
answer [1] = ‘y’;
sql end declare section;
main()
{
exec sql database stores6;
exec sql prepare ins_comp from
Syntax
1-287
PUT
'insert into customer (customer_num, company) values (0, ?)';
exec sql declare ins_curs cursor for sel2;
exec sql open ins_curs;
while (1){
printf('\nEnter a customer: ');
gets(u_company);
exec sql put ins_curs from u_company;
printf('Enter another customer (y/n) ? ');
if (answer = getch() != ‘y’)
break;
}
exec sql close ins_curs;
}
Listing host variables in a PUT statement in an INFORMIX-ESQL/C program
Using a System-Descriptor Area
You can create a system-descriptor area that describes the data type and
memory location of one or more values. You can then specify that systemdescriptor area in the USING SQL DESCRIPTOR clause of the PUT statement.
For details on using descriptors, see your SQL API manual. The following
INFORMIX-ESQL/C and INFORMIX-ESQL/COBOL examples show how to
associate values from a system-descriptor area:
exec sql put selcurs using sql descriptor 'desc1';
INFORMIX-ESQL/C
EXEC SQL PUT SEL_CURS USING SQL DESCRIPTOR 'DESC1' END-EXEC.
INFORMIX-ESQL/COBOL
1-288 Syntax
PUT
Using an sqlda Structure
E/C
You can create an sqlda structure that describes the data type and memory
location of one or more values. Then you can specify the sqlda structure in
the USING DESCRIPTOR clause of the PUT statement. Each time the PUT
statement executes, the values described by the sqlda are used to replace
question mark (?) placeholders in the INSERT statement. This process is
similar to using a FROM clause with a list of variables, except that your
program has full control over the memory location of the data values.
For details on the sqlda structure, see the INFORMIX-ESQL/C Programmer’s
Manual.
exec sql put selcurs using descriptor pointer2;
Sample PUT USING DESCRIPTOR statement in ESQL/C
Writing Buffered Rows
When the OPEN statement opens an insert cursor, an insert buffer is created.
The PUT statement puts a row into this insert buffer. The block of buffered
rows is inserted into the database table as a block only when necessary; an
activity called flushing the buffer. The buffer is flushed after any of the
following events occur:
•
•
•
•
The buffer is too full to hold the new row at the start of a PUT statement.
A FLUSH statement executes.
A CLOSE statement closes the cursor.
An OPEN statement executes, naming the cursor.
When applied to an open cursor, the OPEN statement closes the cursor
before reopening it; this implied CLOSE statement flushes the buffer.
• A COMMIT WORK statement executes.
• The buffer contains blob data (flushed after a single PUT).
If the program terminates without closing an insert cursor, the buffer remains
unflushed. Rows inserted into the buffer since the last flush are lost. Do not
rely on the end of the program to close the cursor and flush the buffer.
Syntax
1-289
PUT
Error Checking
The sqlca contains information on the success of each PUT statement as well
as information that lets you count the rows that were inserted. The result of
each PUT statement is contained in the fields of the sqlca, as shown in the
following table:
ESQL/C
sqlca.sqlcode SQLCODE
sqlca.sqlerrd[2]
ESQL/COBOL
SQLCODE OF SQLCA
SQLERRD[3] OF SQLCA
Data buffering with an insert cursor means that errors are not discovered
until the buffer is flushed. For example, an input value that is incompatible
with the data type of the column for which it is intended is discovered only
when the buffer is flushed. When an error is discovered, rows in the buffer
located after the error are not inserted; they are lost from memory.
The SQLCODE field is set to zero if no error occurs; otherwise, it is set to an
error code. The third element of the sqlerrd array is set to the number of rows
that are successfully inserted into the database.
• If a row is put into the insert buffer and buffered rows are not written to
the database, SQLCODE and sqlerrd both are set to zero (SQLCODE
because there was no error and sqlerrd because no rows were inserted).
• If a block of buffered rows is written to the database during the execution
of a PUT statement, SQLCODE is set to zero and sqlerrd is set to the
number of rows successfully inserted into the database.
• If an error occurs while the buffered rows are written to the database,
SQLCODE indicates the error, and sqlerrd contains the number of success-
fully inserted rows. (The uninserted rows are discarded from the buffer.)
Note: When you encounter an SQLCODE error, be aware that there may be a
corresponding SQLSTATE error value. Check the GET DIAGNOSTICS statement for
information about how to get the SQLSTATE value and how to use the GET
DIAGNOSTICS statement to interpret the SQLSTATE value.
Counting Total and Pending Rows
To count the number of rows actually inserted in the database and the
number not yet inserted, perform the following procedure:
• Prepare two integer variables, for example, total and pending.
• When the cursor is opened, set both variables to zero.
1-290 Syntax
PUT
• Each time a PUT statement executes, increment both total and pending.
• Whenever a PUT or FLUSH statement executes, or the cursor closes,
subtract the third field of the SQLERRD array from pending.
At any time, total minus pending is the number of rows actually inserted. If
all commands are successful, pending contains zero after the cursor is closed.
If an error occurs during a PUT, FLUSH, or CLOSE statement, the value
remaining in pending is the number of uninserted (discarded) rows.
References
See the CLOSE, FLUSH, DECLARE, and OPEN statements, which are cursorrelated, in this manual. Also see the ALLOCATE DESCRIPTOR statement.
In the Informix Guide to SQL: Tutorial, see the discussion of the PUT statement
in Chapter 6.
Syntax
1-291
RECOVER TABLE
RECOVER TABLE
Purpose
Use the RECOVER TABLE statement with INFORMIX-SE to restore a database
table in the event of failure.
Syntax
SE
+
RECOVER TABLE
Table
Name
p. 1-506
Usage
The RECOVER TABLE statement applies the table audit trail to an archive
copy of the database. INFORMIX-SE uses audit trails to record operations on
a per-table basis. You can issue a RECOVER TABLE statement if you own the
table or have the DBA privilege on the database.
If a system failure occurs, use an operating system utility to restore each table
file for which you have an audit trail. Issue the RECOVER TABLE statement to
update each newly restored table with the transactions recorded in the audit
trail.
Backup/Restore Procedure
The recommended backup/restore procedure for making archive copies of a
database that includes audit trails is as described in the following list:
• Execute the DROP AUDIT statement for each table that has an audit trail.
The DROP AUDIT statement ends system logging to the audit-trail files.
• Execute the CREATE AUDIT statement for each table, specifying the
pathname of the new audit trail. For maximum protection, specify a location that is not on the same storage device as the database. You can also
select a filename that reflects the table name and the sequence of the file
in the audit trail; for example, audit_cust_001 or audit_cust_002. The
CREATE AUDIT statement registers the new name and location of the
audit-trail file in the systables system catalog table.
• Back up the database files using an operating system utility.
1-292 Syntax
RECOVER TABLE
During execution, the RECOVER TABLE statement checks that the audit trail
and table name have consistent record numbers for rows where changes
occurred. In extremely rare instances, the RECOVER TABLE statement can find
an inconsistency caused by a system crash. In this case only, the RECOVER
TABLE statement stops and you must restore the table manually.
The following list of actions and statements serves as a guide to recover the
customer table. First, restore the customer table from your last archive copy.
Second, run the following statements, which assume that your audit trail
began immediately after you created the archive copy:
RECOVER TABLE customer
DROP AUDIT FOR customer
CREATE AUDIT FOR customer
Third, create a new backup of the recovered table.
The audit-trail file is not in human-readable form. Even so, it is possible for
the DBA to copy the file to a database (.dat) file and manipulate the file. The
modified file can be copied back to the audit trail file, enabling customized
restorations of particular tables. For example, you can modify the audit trail
file to exclude rows entered by a particular user or to undo specific transactions. For specific instructions on modifying audit trail files, refer to the
manual for your application development tool.
References
See the CREATE AUDIT and DROP AUDIT statements in this manual.
Syntax
1-293
RENAME COLUMN
RENAME COLUMN
Purpose
Use the RENAME COLUMN statement to change the name of a column.
Syntax
+
RENAME COLUMN
Table
Name
p. 1-506
.old column
new column
is the new name of the column.
table.old column
is the column you are renaming.
TO
Usage
You can rename a column of a table if any of the following conditions are true:
• You own the table.
• You have the DBA privilege on the database.
• You have the Alter privilege on the table.
When you rename a column, choose a column name that is unique within the
table.
If the column is referenced by a view in the database, the text of the view in
the sysviews system catalog table is updated to reflect the new column name.
If the column is referenced by a check constraint in the database, the text of
the check constraint in the syschecks system catalog table is updated to
reflect the new column name.
If you rename a column that appears within a trigger, it is replaced with the
new name only in the following instances:
• When it appears as part of a correlation name inside the FOR EACH ROW
action clause of a trigger.
• When it appears as part of a correlation name in the INTO clause of an
EXECUTE PROCEDURE statement.
• When it appears as a triggering column in the UPDATE clause.
1-294 Syntax
RENAME COLUMN
When the trigger executes, if the database server encounters a column name
that no longer exists in the table, it returns an error.
The following example assigns the customer_num column in the customer
table the new name of c_num:
RENAME COLUMN customer.customer_num TO c_num
SE
You cannot use a ROLLBACK WORK statement to undo a RENAME COLUMN
statement that successfully executes. If you roll back a transaction that contains a RENAME COLUMN statement, the column retains its new name and
you do not receive an error message.
References
See the ALTER TABLE, CREATE TABLE, and RENAME TABLE statements in this
manual.
Syntax
1-295
RENAME TABLE
RENAME TABLE
Purpose
Use the RENAME TABLE statement to change the name of a table or synonym.
Syntax
+
RENAME TABLE
Table
Name
p. 1-506
TO
Table
Name
p. 1-506
Synonym
Name
p. 1-504
TO
Synonym
Name
p. 1-504
Usage
You can rename a table or synonym if any of the following statements are
true:
• You own the table or synonym.
• You have the DBA privilege on the database.
• You have the Alter privilege on the table or synonym.
You cannot change the table owner by renaming the table or synonym. You
can specify owner as part of old name, but an error occurs during compilation
if you try to specify owner as part of new name.
If a view references this table or synonym, the text of the view in the sysviews
system catalog table is updated to reflect the new table name.
ANSI
In an ANSI-compliant database, you must specify owner if you are referring
to a table or synonym that you do not own.
If you rename a table or synonym that has a trigger, it produces the following
results:
• The database server replaces the name of the table or synonym in the
trigger definition.
• The table or synonym name is not replaced where it appears inside any
triggered actions.
1-296 Syntax
RENAME TABLE
• The database server returns an error if the new table or synonym name is
the same as a correlation name in the REFERENCING clause of the trigger
definition.
When the trigger executes, the database server returns an error if it
encounters a table or synonym name for which no table or synonym exists.
The following example reorganizes the items table. The intent is to move the
quantity column from the fifth position to the third. The example illustrates
four steps:
• Create a new table, new_table, that contains the column quantity in the
third position.
• Fill the table with data from the current items table.
• Drop the old items table.
• Rename new_table with the name items.
The following example reorganizes the items table using the RENAME TABLE
statement:
CREATE TABLE new_table
(
item_num
SMALLINT,
order_num
INTEGER,
quantity
SMALLINT,
stock_num
SMALLINT,
manu_code
CHAR(3),
total_price MONEY(8)
)
INSERT INTO new_table
SELECT item_num, order_num, quantity, stock_num,
manu_code, total_price
FROM items
DROP TABLE items
RENAME TABLE new_table TO items
SE
You cannot use a ROLLBACK WORK statement to undo a RENAME TABLE
statement that successfully executes. If you roll back a transaction that contains a RENAME TABLE statement, the table retains its new name and you
do not receive an error message.
Syntax
1-297
RENAME TABLE
References
See the ALTER TABLE, CREATE TABLE, DROP TABLE, and RENAME COLUMN
statements in this manual.
1-298 Syntax
REPAIR TABLE
REPAIR TABLE
Purpose
Use the REPAIR TABLE statement to remove and rebuild table indexes or data
that may have been damaged or corrupted because of a power failure, computer crash, or other unexpected program stoppage. Only damaged tables
are rebuilt. You can determine whether you need to use the REPAIR TABLE
statement by first issuing the CHECK TABLE statement.
Syntax
SE
DB
REPAIR TABLE
+
Table
Name
p. 1-506
Usage
Specify the name of the table for which you want to restore the integrity of
the index files, as shown in the following example:
REPAIR TABLE cust_calls
You cannot use the REPAIR TABLE statement on a table unless you own it or
have the DBA privilege on the database. You cannot use the REPAIR TABLE
statement on the system catalog table systables unless you have the DBA
privilege on the database.
The REPAIR TABLE statement calls the secheck utility.
References
See the CHECK TABLE statement in this manual.
See the INFORMIX-SE Administrator’s Guide for a full description of secheck.
Syntax
1-299
REVOKE
REVOKE
Purpose
Use the REVOKE statement to remove another user’s privileges for a table,
database, or procedure.
Syntax
+
REVOKE
TableLevel
Privileges
p. 1-301
ON
Table
Name
p. 1-506
View
Name
p. 1-510
FROM
PUBLIC
,
user
'user '
Synonym
Name
p. 1-504
EXECUTE ON
Procedure
Name
p. 1-495
DatabaseLevel
Privileges
p. 1-303
user
ANSI
names the user or users whose privileges are revoked. The
keyword PUBLIC revokes privileges from all users. If you use
quotes, user appears exactly as typed.
In an ANSI-compliant database, if you do not use quotes around user, the
name of the user is stored in uppercase letters.
Usage
You can use the REVOKE statement with the GRANT statement to finely
control the ability of users to modify the database as well as access and
modify data in the tables.
1-300 Syntax
REVOKE
You can revoke all or some of the privileges that you granted to other users.
No one can revoke privileges granted by another user. However, if you
revoke from user the privileges that you granted using the WITH GRANT
OPTION keywords, you sever the chain of privileges granted by that user. In
this case, when you revoke privileges from user, you automatically revoke the
privileges of all users who received privileges from user or from the chain that
user created.
If you revoke the EXECUTE privilege on a stored procedure from a user, that
user can no longer run that procedure using either the EXECUTE PROCEDURE
or CALL statements.
Users cannot revoke privileges from themselves.
SE
You cannot use a ROLLBACK WORK statement to undo a REVOKE statement
that successfully executes. If you roll back a transaction that contains a
REVOKE statement, the privilege is not granted again to the user and you do
not receive an error message.
Table-Level Privileges
Table-Level
Privileges
ALL
PRIVILEGES
,
INSERT
DELETE
SELECT
UPDATE
INDEX
ALTER
REFERENCES
To revoke a table-level privilege from a user, you must revoke all occurrences
of the privilege. For example, if two users grant the same privilege to a user,
then both of them must revoke the privilege. If one grantor revokes the
Syntax
1-301
REVOKE
privilege, the user retains the privilege received from the other grantor. (The
database server keeps a record of each table-level grant in the syscolauth and
systabauth system catalog tables.)
If a table owner grants a privilege to PUBLIC, the owner cannot revoke the
same privilege from any particular user. For example, if the table owner
grants the Select privilege to PUBLIC and then attempts to revoke the Select
privilege from mary, the REVOKE statement generates an error. The Select
privilege was granted to PUBLIC, not to mary, and therefore the privilege cannot be revoked from mary. (ISAM error number 111, No record found,
refers to the lack of a record in either the syscolauth or systabauth system catalog table that would represent the grant that the table owner now wants to
revoke.)
You can revoke table-level privileges individually or in combination. List the
keywords that correspond to the privileges that you are revoking from user.
The keywords are described in the following list. Note that, unlike the
GRANT statement, you cannot qualify the Select, Update, or References privilege with a column name in a REVOKE statement. That is, you cannot revoke
access on specific columns.
1-302 Syntax
INSERT
provides the ability to insert rows.
DELETE
provides the ability to delete rows.
SELECT
provides the ability to display data obtained from a SELECT
statement.
UPDATE
provides the ability to change column values.
INDEX
provides the ability to create permanent indexes. You must
have the Resource privilege to take advantage of the Index
privilege. (Any user with the Connect privilege can create
indexes on temporary tables.)
ALTER
provides the ability to modify column data types or to add
or delete columns.
REFERENCES
provides the ability to reference columns in referential
constraints. You must have the Resource privilege to take
advantage of the References privilege. (However, you can
add a referential constraint during an ALTER TABLE statement. This method does not require that you have the
Resource privilege on the database.) Revoke the References
privilege to disallow cascading deletes.
ALL
provides all the preceding privileges. The PRIVILEGES
keyword is optional.
REVOKE
The following example revokes the Index and Alter privileges from all users
for the customer table; these privileges are then granted specifically to user
mary.
REVOKE INDEX, ALTER ON customer FROM PUBLIC
GRANT INDEX, ALTER ON customer TO mary
Because you cannot revoke access on specific columns, when you revoke the
Select, Update, or References privilege from a user, you revoke the privilege
for all columns in the table. You must use a GRANT statement to specifically
regrant any column-specific privilege that should be available to the user.
REVOKE ALL ON customer FROM PUBLIC
GRANT ALL ON customer TO john, cathy
GRANT SELECT (fname, lname, company, city)
ON customer TO PUBLIC
Database-Level Privileges
Database-Level
Privileges
CONNECT
RESOURCE
DBA
Only a user with the DBA privilege can grant or revoke database-level
privileges.
Three levels of database privileges control access. These privilege levels are,
from lowest to highest, Connect, Resource, and DBA. To revoke a database
privilege, specify one of the keywords CONNECT, RESOURCE, or DBA in the
REVOKE statement.
Because of the hierarchical organization of the privileges (as outlined in the
privilege definitions described later in this section), if you revoke either the
Resource or the Connect privilege from a user with the DBA privilege, the
statement has no effect. If you revoke the DBA privilege from a user with the
DBA privilege, the user retains the Connect privilege on the database. To deny
database access to a user with the DBA or Resource privilege, you must first
revoke the DBA or the Resource privilege and then revoke the Connect
privilege in a separate REVOKE statement.
Syntax
1-303
REVOKE
Similarly, if you revoke the Connect privilege from a user with the Resource
privilege, the statement has no effect. If you revoke the Resource privilege
from a user, the user retains the Connect privilege on the database.
The three database privileges are associated with the following keywords:
CONNECT
gives you the ability to query and modify data. You can
modify the database schema if you own the object you wish
to modify. Any user with the Connect privilege can perform
the following functions:
• Execute SELECT, INSERT, UPDATE, and DELETE
statements, provided the user has the necessary
table-level privileges.
• Create views, provided the user has the Select privilege
on the underlying tables.
• Create synonyms.
• Create temporary tables and create indexes on the
temporary tables.
• Alter or drop a table or an index, provided the user owns
the table or index (or has the Alter, Index, or References
privilege on the table).
• Grant privileges on a table, provided the user owns the
table (or has been given privileges on the table with the
WITH GRANT OPTION keyword).
RESOURCE
gives you the ability to extend the structure of the database.
In addition to the capabilities of the Connect privilege, the
holder of the Resource privilege can perform the following
functions:
• Create new tables
• Create new indexes
• Create new procedures
DBA
allows the holder of DBA privilege to perform the following
functions in addition to the capabilities of the Resource
privilege:
• Grant any privilege, including the DBA privilege, to
another user.
• Use the NEXT SIZE keyword to alter extent sizes in the
system catalog tables.
1-304 Syntax
REVOKE
• Insert, delete, or update rows of any system catalog table
except systables.
• Drop any object, regardless of who owns it.
• Create tables, views, and indexes as well as specify
another user as owner of the objects.
• Execute the DROP DATABASE command.
• Execute the START DATABASE, and ROLLFORWARD
SE
DATABASE commands.
!
Warning: Although the user informix and DBAs can modify most system catalog
tables (only user informix can modify systables), Informix strongly recommends
that you do not update, delete, or alter any rows in them. Modifying the system
catalog tables can destroy the integrity of the database.
References
See the GRANT statement in this manual.
In the Informix Guide to SQL: Tutorial, see the discussion of privileges and
security in Chapter 11.
Syntax
1-305
ROLLBACK WORK
ROLLBACK WORK
Purpose
Use the ROLLBACK WORK statement to cancel a transaction and undo any
changes that occurred since the beginning of the transaction.
Syntax
ROLLBACK
WORK
Usage
The ROLLBACK WORK statement is valid only in databases with transactions.
In a database that is not ANSI-compliant, start a transaction with a BEGIN
WORK statement. You can end a transaction with a COMMIT WORK statement
or cancel the transaction with a ROLLBACK WORK statement. The ROLLBACK
WORK statement restores the database to the state that existed before the
transaction began. Use the ROLLBACK WORK statement only at the end of a
multistatement operation.
The ROLLBACK WORK statement releases all row and table locks held by the
cancelled transaction. If you issue a ROLLBACK WORK statement when no
transaction is pending, an error occurs.
ANSI
1-306 Syntax
In an ANSI-compliant database, transactions are implicit. Transactions start
after each COMMIT WORK or ROLLBACK WORK statement. If you issue a
ROLLBACK WORK statement when no transaction is pending, the statement
is accepted but has no effect.
ROLLBACK WORK
SE
If you are using INFORMIX-SE, a ROLLBACK WORK statement undoes all
database changes except those that result from GRANT or REVOKE statements or from data definition statements. Data definition statements are
treated as single transactions. If they execute successfully, they are committed automatically and cannot be rolled back by the ROLLBACK WORK statement. Data definition statements include statements that modify the
number, names, or indexes of tables and statements that modify the number, names, or data types of columns. For a list of data definition statements,
see “Data Definition Statements” on page 1-5.
If a transaction rolls back, the actions taken to undo the transaction are also
logged to table audit trails, if any exist.
ESQL
The ROLLBACK WORK statement closes all open cursors except those
declared with hold, which remain open despite transaction activity.
ESQL
If you use the ROLLBACK WORK statement within a routine called by a
WHENEVER statement, specify WHENEVER SQLERROR CONTINUE and
WHENEVER SQLWARNING CONTINUE before the ROLLBACK WORK statement. This prevents the program from looping if the ROLLBACK WORK
statement encounters an error or a warning.
References
See the BEGIN WORK and COMMIT WORK statements in this manual.
In the Informix Guide to SQL: Tutorial, see the discussion of ROLLBACK WORK
in Chapter 5.
Syntax
1-307
ROLLFORWARD DATABASE
ROLLFORWARD DATABASE
Purpose
Use the ROLLFORWARD DATABASE statement with the INFORMIX-SE
database server to apply the transaction log file to a restored database.
Syntax
SE
+
ROLLFORWARD DATABASE
Database
Name
p. 1-421
Usage
To restore a database, you need both the archive copy of the database and the
transaction log that began immediately after the archive copy was made.
To execute the ROLLFORWARD DATABASE statement, you need the DBA
privilege. Always precede a ROLLFORWARD DATABASE statement with a
CLOSE DATABASE statement. The ROLLFORWARD DATABASE statement fails
if a database is open.
The ROLLFORWARD DATABASE statement sets an exclusive lock on the
database to prevent access by other processes. If another process is using the
database (even if the database is only being read), the ROLLFORWARD
DATABASE statement fails.
The database remains locked after the ROLLFORWARD DATABASE statement
executes. This allows you to check for errors before you give access to other
users. When you are satisfied that the database is ready for use, release the
exclusive lock by issuing the CLOSE DATABASE statement. You can open the
database with the DATABASE statement.
You must be working on a database server to issue a ROLLFORWARD
DATABASE statement. You cannot execute the statement from a client
machine.
1-308 Syntax
ROLLFORWARD DATABASE
References
See the BEGIN WORK, COMMIT WORK, CLOSE DATABASE, DATABASE, and
ROLLBACK WORK statements in this manual.
In the Informix Guide to SQL: Tutorial, see the discussion of archives and logs
in Chapter 4.
Syntax
1-309
SELECT
SELECT
Purpose
Use the SELECT statement to query a database.
Syntax
UNION
UNION ALL
SELECT
Select
Clause
p. 1-312
FROM
Clause
p. 1-323
ESQL
SPL
INTO
Clause
p. 1-318
WHERE
Clause
p. 1-325
HAVING
Clause
p. 1-336
ORDER BY
Clause
p. 1-337
ESQL
+
GROUP BY
Clause
p. 1-334
+
INTO TEMP
Clause
p. 1-341
FOR UPDATE
Usage
You can query the tables in the current database or in a database that is not
current or a database that is one a different database server than your current
database.
SE
1-310 Syntax
You can query only the current database.
SELECT
The SELECT statement comprises many basic clauses. Each clause is
described in the following list:
ESQL
SELECT clause
names a list of items to be read from the database.
INTO clause
specifies the program variables or host variables
that receive the selected data.
FROM clause
names the tables that contain the selected
columns.
sets conditions on the rows that are chosen.
combines groups of rows into summary results.
sets conditions on the summary results.
orders the selected rows.
creates a temporary table in the current database
and puts the results of the query into the table.
SPL
WHERE clause
GROUP BY clause
HAVING clause
ORDER BY clause
INTO TEMP clause
ESQL
FOR UPDATE clause
designates the values returned by the select as
values that can be updated after a fetch.
Syntax
1-311
SELECT
SELECT Clause
The SELECT clause contains the SELECT keyword and the list of database
objects or expressions to be selected, as shown in the following diagram:
,
Select
List
SELECT
ALL
DISTINCT
+
UNIQUE
Select
List
Expression
p. 1-430
display
label
+
AS
*
display label
Table
Name
p. 1-506
.
View
Name
p. 1-510
.
Synonym
Name
p. 1-504
.
is a temporary name that you assign to the expression.
In the SELECT clause, you specify exactly what data is being selected as well
as whether you want to omit duplicate values.
1-312 Syntax
SELECT
Allowing Duplicates
You can apply the ALL, UNIQUE, or DISTINCT keywords to indicate whether
duplicate values are returned, if any exist. If you do not specify any
keywords, all the rows are returned by default.
ALL
specifies that all selected values are returned, regardless of
whether duplicates exist. ALL is the default state.
DISTINCT
eliminates duplicate rows from the query results.
UNIQUE
eliminates duplicate rows from the query results. UNIQUE is
a synonym for DISTINCT.
For example, the following query lists the stock_num and manu_code of all
items that have been ordered, excluding duplicate items:
SELECT DISTINCT stock_num, manu_code FROM items
You can use the DISTINCT or UNIQUE keywords once in each level of a query
or subquery. For example, the following query uses DISTINCT in both the
query and the subquery:
SELECT DISTINCT stock_num, manu_code FROM items
WHERE order_num = (SELECT DISTINCT order_num FROM orders
WHERE customer_num = 120)
Expressions in the Select List
You can use any of the five basic types of expressions (column, constant,
function, aggregate function, and stored procedure), or combinations thereof,
in the select list. The five expression types are described in detail, beginning
with the section “Expression” on page 1-430.
The following sections present examples of using each type of simple
expression in the select list.
You can combine simple numeric expressions by connecting them with
arithmetic operators for addition, subtraction, multiplication, and division.
However, if you combine a column expression and an aggregate function,
you must include the column expression in the GROUP BY clause.
You cannot use variable names (for example, host variables in an ESQL
application or stored procedure variables in a stored procedure) in the select
list by themselves. You can include a variable name in the select list, however,
if it is connected to a constant by an arithmetic or concatenation operator.
Syntax
1-313
SELECT
Selecting Columns
Column expressions are the most common expressions used in a SELECT
statement. See “Column Expressions” on page 1-433 for a complete
description of the syntax and use of column expressions.
The following examples show column expressions within a select list:
SELECT orders.order_num, items.price FROM orders, items
SELECT customer.customer_num ccnum, company FROM customer
SELECT catalog_num, stock_num, cat_advert [1,15] FROM catalog
SELECT lead_time - 2 UNITS DAY FROM manufact
Selecting Constants
If you include a constant expression in the select list, the same value is
returned for each row returned by the query. See “Constant Expressions” on
page 1-436 for a complete description of the syntax and use of constant
expressions.
The following examples shows constant expressions within a select list:
SELECT 'The first name is', fname FROM customer
SELECT TODAY FROM cust_calls
SELECT SITENAME FROM systables WHERE tabid = 1
SELECT lead_time - 2 UNITS DAY FROM manufact
SELECT customer_num + LENGTH('string') from customer
Selecting Function Expressions
A function expression is an expression that uses a function that is evaluated
for each row in the query. All function expressions require arguments. This
set of expressions contains the time functions and the length function when
they are used with a column name as an argument.
1-314 Syntax
SELECT
The following examples show function expressions within a select list:
SELECT EXTEND(res_dtime, YEAR TO SECOND) FROM cust_calls
SELECT LENGTH(fname) + LENGTH(lname) FROM customer
SELECT HEX(order_num) FROM orders
SELECT MONTH(order_date) FROM orders
Selecting Aggregate Expressions
An aggregate function returns one value for a set of queried rows. The
aggregate functions take on values that depend on the set of rows returned
by the WHERE clause of the SELECT statement. In the absence of a WHERE
clause, the aggregate functions take on values that depend on all the rows
formed by the FROM clause.
The following examples show aggregate functions in a select list:
SELECT SUM(total_price) FROM items WHERE order_num = 1013
SELECT COUNT(*) FROM orders WHERE order_num = 1001
SELECT MAX(LENGTH(fname) + LENGTH(lname)) FROM customer
Selecting Stored Procedure Expressions
Stored procedures extend the range of functions available to you and allow
you to perform a subquery on each row you select.
The following example calls the get_orders procedure for each
customer_num and displays the output of the procedure under the label
n_orders:
SELECT customer_num, lname, get_orders(customer_num) n_orders
FROM customer
Syntax
1-315
SELECT
Selecting Expressions That Use Arithmetic Operators
You can combine numeric expressions with arithmetic operators to make
complex expressions. You cannot combine expressions that contain aggregate functions with column expressions. The following examples show
expressions that use arithmetic operators within a select list:
SELECT stock_num, quantity*total_price FROM customer
SELECT price*2 doubleprice FROM items
SELECT count(*)+2 FROM customer
SELECT count(*)+LENGTH('ab') FROM customer
Using a Display Label
If you are creating a temporary table, you must supply a display label for any
columns that are not simple column expressions. The display label is used as
the name of the column in the temporary table.
DB
A display label appears as the heading for that column in the output of the
SELECT statement.
ESQL
The value of display label is stored in the sqlname field of the sqlda structure.
See your SQL API product manual for more information on the sqlda structure.
If you are using the SELECT statement in creating a view, do not use display
labels. Specify the desired label names in the CREATE VIEW column list
instead.
Using the AS Keyword
If your display label is also a keyword, you can use the AS keyword with the
display label to clarify the use of the word. If you want to use the word
UNITS, YEAR, MONTH, DAY, HOUR, MINUTE, SECOND, or FRACTION as your
1-316 Syntax
SELECT
display label, you must use the AS keyword with the display label. The
following example shows how to use the AS keyword to use minute as a
display label:
SELECT call_dtime AS minute FROM cust_calls
Syntax
1-317
SELECT
INTO Clause
Use the INTO clause within a stored procedure or SQL API to specify the
program variables or host variables to receive the data retrieved by the
SELECT statement. The syntax of the INTO clause is as shown in the following
diagram:
INTO
Clause
,
INTO
data variable
ESQL
+
: indicator variable
INDICATOR indicator variable
data structure
data variable
is a program variable or host object that agrees in type and
order with the corresponding columns or expressions in the
select list.
data structure
is a structure which has been declared as a host variable. The
individual elements of the structure must be matched
appropriately to the type of values being selected.
indicator variable is a program variable that receives a return code if null data
is placed in the corresponding data variable.
If the SELECT statement stands alone (that is, it is not part of a DECLARE
statement and does not use the INTO clause), it must be a singleton SELECT
statement. A singleton SELECT statement returns only one row. The following
example shows a singleton SELECT statement in INFORMIX-ESQL/C:
exec sql select fname, lname, company_name
into :p_fname, :p_lname, :p_coname
where customer_num = 101;
1-318 Syntax
SELECT
INTO Clause with Indicator Variables
ESQL
You should use an indicator variable if the possibility exists that data
returned from the SELECT statement is NULL. See your SQL API product
manual for more information about indicator variables.
INTO Clause with Cursors
ESQL
If the SELECT statement returns more than one row, you must use a cursor
to FETCH the rows individually. You can put the INTO clause in the FETCH
statement rather than in the SELECT statement, but you cannot put it in both.
The following INFORMIX-ESQL/C code examples show using the INTO
clause in the SELECT and the FETCH statement, respectively:
exec sql declare q_curs cursor for
select lname, company
into :p_lname, :p_company
from customer;
exec sql open q_curs;
while (SQLCODE == 0)
exec sql fetch q_curs;
exec sql close q_curs;
INFORMIX-ESQL/C
exec sql declare q_curs cursor for
select lname, company
from customer;
exec sql open q_curs;
while (SQLCODE == 0)
exec sql fetch q_curs into :p_lname, :p_company;
exec sql close q_curs;
INFORMIX-ESQL/C
Syntax
1-319
SELECT
Preparing a SELECT...INTO Query
ESQL
1-320 Syntax
You cannot prepare a query that has an INTO clause. You can prepare the
query without the INTO clause, declare a cursor for the prepared query,
open the cursor, and then fetch the cursor into the program variable using
the FETCH statement with an INTO clause. Alternatively, you can declare a
cursor for the query without first preparing the query and include the INTO
clause in the query when you declare the cursor. Then, open the cursor and
fetch the cursor without using the INTO clause of the FETCH statement.
SELECT
Using Array Variables with the INTO Clause
ESQL
If you use a DECLARE statement with a SELECT statement that contains an
INTO clause and the program variable is an array element, you can identify
individual elements of the array with integer constants or with variables.
The value of the variable used as a subscript is determined when the cursor
is declared, so afterward, the subscript variable acts as a constant.
The following INFORMIX-ESQL/C code example declares a cursor for a
SELECT...INTO statement using the variables i and j as subscripts for the
array a. After you declare the cursor, the INTO clause of the SELECT
statement is equivalent to INTO a[5], a[2].
If the number of variables listed in the INTO clause differs from the number
i =of 5items in the SELECT clause, an error is returned.
j = 2
exec sql declare c cursor for
select order_num, po_num into :a[i], :a[j] from orders
where order_num =1005 and po_num =2865
You can also use program variables in the FETCH statement to specify an
element of a program array in the INTO clause. With the FETCH statement,
the program variables are evaluated at each fetch, rather than when you
declare the cursor.
Error Checking
ESQL
If the number of variables listed in the INTO clause differs from the number
of items in the SELECT clause, a warning is returned in the sqlwarn structure; the specific structure name is shown in the following diagram. The
actual number of variables transferred is the lesser of the two numbers. See
your SQL API product manual for information about the sqlwarn structure.
Product Name
ESQL/C
ESQL/COBOL
ANSI
Variable Name
sqlca.sqlwarn3.sqlwarn3
SQLWARN3 OF SQLWARN OF SQLCA
If the number of variables listed in the INTO clause differs from the number
of items in the SELECT clause, you receive an error.
Syntax
1-321
SELECT
ESQL
SPL
If the data type of the receiving variable does not match that of the selected
item, the data type of the selected item is converted, if possible. If the conversion is impossible, an error occurs and a negative value is returned in the
status variable. In this case, the value in the program variable is unpredictable. The specific name of the status variable for each application
development tool is shown in the following table:
Product Name
ESQL/C
ESQL/COBOL
1-322 Syntax
Variable Name
sqlca.sqlcode SQLCODE
SQLCODE OF SQLCA
SELECT
FROM Clause
The FROM clause lists the table or tables from which you are selecting the
data. The following diagram shows the syntax of the FROM clause:
FROM
Clause
Table
Name
p. 1-506
FROM
View
Name
p. 1-510
+
Additional
Tables
AS
Synonym
Name
p. 1-504
Additional
Tables
,
table
alias
,
Table
Name
p. 1-506
View
Name
p. 1-510
+
table
alias
+
AS
Synonym
Name
p. 1-504
Table
Name
p. 1-506
OUTER
table
alias
View
Name
p. 1-510
AS
Synonym
Name
p. 1-504
OUTER
(
Table
Name
p. 1-506
View
Name
p. 1-510
)
table
alias
,
Additional
Tables
AS
Synonym
Name
p. 1-504
table alias
is a name that you attach to the table within the
scope of the SELECT statement.
Syntax
1-323
SELECT
Use the keyword OUTER to form outer joins. Outer joins preserve rows that
otherwise would be discarded by simple joins. See Chapter 3 of the Informix
Guide to SQL: Tutorial for more information on outer joins.
You can supply an alias for a table name. You can use the alias to refer to the
table in other clauses of the SELECT statement. This is especially useful with
a self-join. (See the WHERE clause on page 1-325 for more information about
self-joins.)
The following example shows typical uses of the FROM clause. The first
query selects all the columns and rows from the customer table. The second
query uses a join between the customer and orders table to select all
customers who have placed orders.
SELECT * FROM customer
SELECT fname, lname, order_num
FROM customer, orders
WHERE customer.customer_num = orders.customer_num
The following example is the same as the second query in the preceding
example, except that it establishes table aliases in the FROM clause and uses
them in the WHERE clause:
SELECT fname, lname, order_num
FROM customer c, orders o
WHERE c.customer_num = o.customer_num
1-324 Syntax
SELECT
The following example uses the OUTER keyword to create an outer join and
produce a list of all customers and their orders, regardless of whether they
have placed orders:
SELECT customer.customer_num, lname, order_num
FROM customer c, OUTER orders o
WHERE c.customer_num = o.customer_num
Creating an outer join
NLS
With NLS enabled, the following example selects data containing foreign
characters from columns in a table named with foreign characters. The collation order of the rows returned depends on environment variable settings.
SELECT numéro, nom, prénom
FROM abonnés
ORDER BY nom;
AS Keyword with Table Aliases
To use potentially ambiguous words as a table alias, you must precede them
with the keyword AS. Use the AS keyword if you want to use the words
ORDER, FOR, GROUP, HAVING, INTO, UNION, WHERE, WITH, CREATE, or
GRANT as a table alias.
WHERE Clause
Use the WHERE clause to specify search criteria and join conditions on the
data that you are selecting.
WHERE
Clause
AND
WHERE
Condition
p. 1-404
Join
p. 1-331
Syntax
1-325
SELECT
Using a Condition in the WHERE Clause
You can use the following kinds of simple conditions or comparisons in the
WHERE clause:
• Relational-operator condition
• BETWEEN
• IN
• IS NULL
• LIKE or MATCHES
You also can use a SELECT statement within the WHERE clause; this is called
a subquery. The following list contains the kinds of subquery WHERE
clauses:
•
•
•
IN
EXISTS
ALL/ANY/SOME
Examples of each type of condition are shown in the following sections. For
more information about each kind of condition, see the Condition segment
on page 1-404.
You cannot use an aggregate function in the WHERE clause unless it is part of
a subquery or if the aggregate is on a correlated column originating from a
parent query and the WHERE clause is within a subquery that is within a
HAVING clause.
Relational-Operator Condition
For a complete description of the relational-operator condition, see page
1-407.
A relational-operator condition is satisfied when the expressions on either
side of the relational operator fulfill the relation set up by the operator. The
following SELECT statements use the greater than (>) and equal (=) relational
operators:
SELECT order_num FROM orders
WHERE order_date > '6/04/93'
SELECT fname, lname, company
FROM customer
WHERE city[1,3] = 'San'
1-326 Syntax
SELECT
BETWEEN Condition
For a complete description of the BETWEEN condition, see page 1-408.
The BETWEEN condition is satisfied when the value to the left of the
BETWEEN keyword lies in the inclusive range of the two values on the right
of the BETWEEN keyword. The first two queries in the following example use
literal values after the BETWEEN keyword. The third query uses the CURRENT function and a literal interval. It looks for dates between the current
day and seven days earlier.
SELECT stock_num, manu_code FROM stock
WHERE unit_price BETWEEN 125.00 AND 200.00
SELECT DISTINCT customer_num, stock_num, manu_code
FROM orders, items
WHERE order_date BETWEEN '6/1/92' AND '9/1/92'
SELECT * FROM cust_calls WHERE call_dtime
BETWEEN (CURRENT - INTERVAL(7) DAY TO DAY) AND CURRENT
IN Condition
For a complete description of the IN condition, see page 1-408.
The IN condition is satisfied when the expression to the left of the IN keyword
is included in the list of values to the right of the keyword. The following
examples show the IN condition:
SELECT lname, fname, company
FROM customer
WHERE state IN ('CA','WA', 'NJ')
SELECT * FROM cust_calls
WHERE user_id NOT IN (USER )
IS NULL Condition
For a complete description of the IS NULL condition, see page 1-409.
Syntax
1-327
SELECT
The IS NULL condition is satisfied if the column contains a null value. If you
use the NOT option, the condition is satisfied when the column contains a
value that is not null. The following example selects the order numbers and
customer numbers for which the order has not been paid:
SELECT order_num, customer_num FROM orders
WHERE paid_date IS NULL
LIKE or MATCHES Condition
For a complete description of the LIKE or MATCHES condition, see page
1-409.
The LIKE or MATCHES condition is satisfied when the column value meets
the criteria specified in the quoted string.
The following SELECT statement returns all the columns in the customer
table from each row in which the lname column begins with the literal string
'Baxter'. Because the string is a literal string, the condition is casesensitive.
SELECT * FROM customer WHERE lname LIKE 'Baxter%'
The following examples use the LIKE condition with a wildcard. The first
SELECT statement finds all stock items that are some kind of ball. The second
SELECT statement finds all company names that contain a percent sign (%).
The backslash is used as the standard escape character for the wildcard percent sign (%). The third SELECT statement uses the ESCAPE option with the
LIKE condition to retrieve rows from the customer table in which the company column includes a percent sign (%). The z is used as an escape character
for the wildcard percent sign (%).
SELECT stock_num, manu_code FROM stock
WHERE description LIKE '%ball'
SELECT * FROM customer
WHERE company LIKE '%\%%'
SELECT * FROM customer
WHERE company LIKE '%z%%' ESCAPE 'z'
1-328 Syntax
SELECT
The following examples use MATCHES with a wildcard in several SELECT
statements. The first SELECT statement finds all stock items that are some
kind of ball. The second SELECT statement finds all company names that contain an asterisk (*). The backslash is used as the standard escape character for
the wildcard asterisk (*). The third statement uses the ESCAPE option with the
MATCHES condition to retrieve rows from the customer table in which the
company column includes an asterisk. The z character is used as an escape
character for the wildcard asterisk (*).
SELECT stock_num, manu_code FROM stock
WHERE description MATCHES '*ball'
SELECT * FROM customer
WHERE company MATCHES '*\**'
SELECT * FROM customer
WHERE company MATCHES '*z**' ESCAPE 'z'
NLS
With NLS enabled, the following example selects data containing foreign
characters from columns in a table named with foreign characters. The values that meet the criteria for the MATCHES condition in the WHERE clause
vary, depending on environment variable settings.
SELECT numéro,nom,prénom
FROM abonnés
WHERE nom MATCHES '[E-P]*'
ORDER BY nom;
IN Subquery
For a complete description of the IN subquery, see page 1-408.
With the IN subquery, more than one row can be returned but only one
column can be returned. The following example shows the use of an IN
subquery in a SELECT statement:
SELECT DISTINCT customer_num FROM orders
WHERE order_num NOT IN
(SELECT order_num FROM items
WHERE stock_num = 1)
Syntax
1-329
SELECT
EXISTS Subquery
For a complete description of the EXISTS subquery, see page 1-414.
With the EXISTS subquery, one or more columns can be returned.
The following example of a SELECT statement with an EXISTS subquery
returns the stock number and manufacturer code for every item that has
never been ordered (and is therefore not listed in the items table). It is appropriate to use an EXISTS subquery in this SELECT statement because you need
the correlated subquery to test both stock_num and manu_code in items.
SELECT stock_num, manu_code FROM stock
WHERE NOT EXISTS
(SELECT stock_num, manu_code FROM items
WHERE stock.stock_num = items.stock_num AND
stock.manu_code = items.manu_code)
The preceding example would work equally well if you use a SELECT * in the
subquery in place of the column names because you are testing for the
existence of a row or rows.
ALL/ANY/SOME Subquery
For a complete description of the ALL/ANY/SOME subquery, see page 1-415.
In the following example, the SELECT statements return the order number of
all orders that contain an item whose total price is greater than the total price
of every item in order number 1023. The first SELECT statement uses the ALL
subquery, and the second SELECT statement produces the same result by
using the MAX aggregate function.
SELECT DISTINCT order_num FROM items
WHERE total_price > ALL (SELECT total_price FROM items
WHERE order_num = 1023)
SELECT DISTINCT order_num FROM items
WHERE total_price > SELECT MAX(total_price) FROM items
WHERE order_num = 1023)
1-330 Syntax
SELECT
The following SELECT statements return the order number of all orders that
contain an item whose total price is greater than the total price of at least one
of the items in order number 1023. The first statement uses the ANY keyword;
the second uses the MIN aggregate function.
SELECT DISTINCT order_num FROM items
WHERE total_price > ANY (SELECT total_price FROM items
WHERE order_num = 1023)
SELECT DISTINCT order_num FROM items
WHERE total_price > (SELECT MIN(total_price) FROM items
WHERE order_num = 1023)
You can omit the keywords ANY, ALL, or SOME in a subquery if you know
that the subquery returns exactly one value. If you omit ANY, ALL, or SOME
and the subquery returns more than one value, you receive an error. The subquery in the following example returns only one row because it uses an
aggregate function:
SELECT order_num FROM items
WHERE stock_num = 9 AND quantity =
(SELECT MAX(quantity) FROM items WHERE stock_num = 9)
Using a Join in the WHERE Clause
You join two tables when you create a relationship in the WHERE clause
between at least one column from one table and at least one column from
another table. The effect of the join is to create a temporary composite table
in which each pair of rows (one from each table) satisfying the join condition
is linked to form a single row. You can create two-table joins, multiple-table
joins, and self-joins.
Syntax
1-331
SELECT
The following diagram shows the syntax for a join:
Join
column
name
Relational
Operator
p. 1-500
column
name
Table
Name
p. 1-506
.
Table
Name
p. 1-506
.
alias
.
alias
.
View
Name
p. 1-510
.
View
Name
p. 1-510
.
Synonym
Name
p. 1-504
.
Synonym
Name
p. 1-504
.
alias
is the alias assigned in the FROM clause.
column name
is the name of a column in one of the tables.
Two-Table Joins
The following example shows a two-table join:
SELECT order_num, lname, fname
FROM customer, orders
WHERE customer.customer_num = orders.customer_num
Note: You do not have to select the column on which the two tables are joined.
Multiple-Table Joins
A multiple-table join is a join of more than two tables. Its structure is similar
to the structure of a two-table join, except that you have a join condition for
more than one pair of tables in the WHERE clause. When columns from different tables have the same name, you must distinguish them by preceding
the name with its associated table or table alias, as in table.column. See “Table
Name” on page 1-506 for the full syntax of a table name.
1-332 Syntax
SELECT
The following multiple-table join yields the company name of the customer
who ordered an item as well as the stock number and manufacturer code of
the item:
SELECT DISTINCT company, stock_num, manu_code
FROM customer c, orders o, items i
WHERE c.customer_num = o.customer_num
AND o.order_num = i.order_num
Self-Joins
You can join a table to itself. To do so, you must list the table name twice in
the FROM clause and assign it two different table aliases. Use the aliases to
refer to each of the “two” tables in the WHERE clause.
The following example is a self-join on the stock table. It finds pairs of stock
items whose unit prices differ by a factor greater than 2.5. The letters x and y
are each aliases for the stock table.
SELECT x.stock_num, x.manu_code, y.stock_num, y.manu_code
FROM stock x, stock y
WHERE x.unit_price > 2.5 * y.unit_price
Outer Joins
The following outer join lists the company name of the customer and all
associated order numbers, if the customer has placed an order. If not, the
company name is still listed and a null value is returned for the order
number.
SELECT company, order_num
FROM customer c, OUTER orders o
WHERE c.customer_num = o.customer_num
See Chapter 3 of the Informix Guide to SQL: Tutorial for more information
about outer joins.
Syntax
1-333
SELECT
GROUP BY Clause
Use the GROUP BY clause to produce a single row of results for each group.
A group is a set of rows that have the same values for each column listed.
GROUP BY
Clause
,
column
name
GROUP BY
Table
Name
p. 1-506
View
Name
p. 1-510
.
Synonym
Name
p. 1-504
.
alias
.
+
select
number
column name
is the name of a column or set of columns joined by a
relational operator that is in the SELECT clause. Do not
include BYTE or TEXT columns.
select number
is an integer that represents the placement of a column or
expression in the SELECT clause.
alias
is a name you attach to a table or view within the scope of
the SELECT statement.
Using a GROUP BY clause restricts what you can enter in the SELECT clause.
If you use a GROUP BY clause, each of the columns that you select must be in
the GROUP BY list. If you use an aggregate function and one or more column
expressions in the select list, you must put all the column names that are not
used as part of an aggregate or time expression in the GROUP BY clause. Do
not put constant expressions or BYTE or TEXT column expressions in the
GROUP BY list. If you are selecting a BYTE or TEXT column, you cannot use
the GROUP BY clause. In addition, you cannot use ROWID in a GROUP BY
clause.
1-334 Syntax
SELECT
The following example names one column that is not in an aggregate
expression. The total_price column should not be in the GROUP BY list
because it appears as the argument of an aggregate function. The COUNT and
SUM keywords are applied to each group, not the whole query set.
SELECT order_num, COUNT(*), SUM(total_price)
FROM items
GROUP BY order_num
If a column stands alone in a column expression in the select list, you must
use it in the GROUP BY clause. If a column is combined with another column
by an arithmetic operator, you can choose to group by the individual
columns or by the combined expression using a specific number.
Using Select Numbers
You can use one or more integers in the GROUP BY clause to stand for column
expressions. In the following example, the first SELECT statement uses select
numbers for order_date and paid_date - order_date in the GROUP BY clause.
Note that you can group only by a combined expression using the selectnumber notation. In the second SELECT statement, you cannot replace the 2
with the expression paid_date - order_date.
SELECT order_date, COUNT(*), paid_date - order_date
FROM orders
GROUP BY 1, 3
SELECT order_date, paid_date - order_date
FROM orders
GROUP BY order_date, 2
Nulls in the GROUP BY Clause
Each row that contains a null value in a column specified by a GROUP BY
clause belongs to a single group (that is, all null values are grouped together).
Syntax
1-335
SELECT
HAVING Clause
Use the HAVING clause to apply one or more qualifying conditions to groups.
HAVING
Clause
HAVING
Condition
p. 1-404
In the following examples, each condition compares one calculated property
of the group with another calculated property of the group or with a constant. The first SELECT statement uses a HAVING clause that compares the
calculated expression COUNT(*) with the constant 2. The query returns the
average total price per item on all orders that have more than two items. The
second SELECT statement lists customers and the call months if they have
made two or more calls in the same month.
SELECT order_num, AVG(total_price) FROM items
GROUP BY order_num
HAVING COUNT(*) > 2
SELECT customer_num, EXTEND (call_dtime, MONTH TO MONTH)
FROM cust_calls
GROUP BY 1, 2
HAVING COUNT(*) > 1
You can use the HAVING clause to place conditions on the GROUP BY column
values as well as on calculated values. The following example returns the
customer_num, call_dtime (in full year-to-fraction format), and cust_code,
and groups them by call_code for all calls that have been received from
customers with customer_num less than 120:
SELECT customer_num, EXTEND (call_dtime), call_code
FROM cust_calls
GROUP BY call_code, 2, 1
HAVING customer_num < 120
1-336 Syntax
SELECT
The HAVING clause generally complements a GROUP BY clause. If you use a
HAVING clause without a GROUP BY clause, the HAVING clause applies to all
rows that satisfy the query. Without a GROUP BY clause, all rows in the table
make up a single group. The following example returns the average price of
all the values in the table, as long as more than ten rows are in the table:
SELECT AVG(total_price) FROM items
HAVING COUNT(*) > 10
ORDER BY Clause
Use the ORDER BY clause to sort query results by the values contained in one
or more columns.
ORDER BY
Clause
,
column
name
ORDER BY
Table
Name
p. 1-506
.
View
Name
p. 1-510
.
Synonym
Name
p. 1-504
.
alias
.
ASC
DESC
select
number
display
label
rowid
column name
is the name of a column from the SELECT clause in which you
want to sort the query results.
display label
is the display label used for a column or expression in the
select list.
select number
is an integer that represents the placement of a column or
expression in the SELECT clause.
Syntax
1-337
SELECT
alias
is a name you attach to a table or view within the scope of
the SELECT statement.
rowid
is a virtual column that you can use on a SELECT statement.
You can do an ORDER BY on a column, or on an aggregate expression when
you use SELECT * or a display label in your SELECT statement.
The following query explicitly selects the order date and shipping date from
the orders table and then rearranges the query by the order date. By default,
the query results are listed in ascending order.
SELECT order_date, ship_date FROM orders
ORDER BY order_date
In the following query, the order_date column is selected implicitly by the
SELECT *, so you can use order_date in the ORDER BY clause:
SELECT * FROM orders
ORDER BY order_date
Ordering by a Derived Column
You can order by a derived column by supplying a display label in the
SELECT clause, as shown in the following example:
SELECT paid_date - ship_date span, customer_num
FROM orders
ORDER BY span
Ascending and Descending Orders
You can use the ASC and DESC keywords to specify ascending (smallest value
first) or descending (largest value first) order. The default order is ascending.
1-338 Syntax
SELECT
For DATE and DATETIME data types, “smallest” means earliest in time and
“largest” means latest in time. For standard character data types, the ASCII
collating sequence is used. See page 1-502 for a listing of the collating
sequence.
NLS
For the NLS data types NCHAR and NVARCHAR, the native collation
sequence is used.
Nulls in the ORDER BY Clause
Null values are ordered as less than values that are not null. Using the ASC
order, the null value comes before the non-null value; using DESC order, the
null value comes last.
Nested Ordering
If you list more than one column in the ORDER BY clause, your query is
ordered by a nested sort. The first level of sort is based on the first column;
the second column determines the second level of sort. The following example selects all the rows in the cust_calls table, and orders them by call_code
and by call_dtime within call_code:
SELECT * FROM cust_calls
ORDER BY call_code, call_dtime
A nested sort
Using Select Numbers
In place of column names, you can enter one or more integers that refer to the
position of items in the SELECT clause. You can use a select number to order
by an expression. For example, the following example orders by the expression paid_date - order_date and customer_num, using select numbers in a
nested sort:
SELECT order_num, customer_num, paid_date - order_date
FROM orders
ORDER BY 3, 2
Select numbers are required in the ORDER BY clause when SELECT statements
are joined by UNION or UNION ALL keywords and compatible columns in the
same position have different names.
Syntax
1-339
SELECT
ORDER BY Clause with DECLARE
ESQL
You cannot use a DECLARE statement with a FOR UPDATE clause to
associate a cursor with a SELECT statement that has an ORDER BY clause.
FOR UPDATE Clause
Use the FOR UPDATE clause when you prepare a SELECT statement, and you
intend to update the values returned by the SELECT statement when the values are fetched. Preparing a SELECT statement that contains a FOR UPDATE
clause is equivalent to preparing the SELECT statement without the FOR
UPDATE clause and then declaring a FOR UPDATE cursor for the prepared
statement.
The FOR UPDATE keyword notifies the database server that updating is
possible, causing it to use more-stringent locking than it would with a select
cursor. You cannot modify data through a cursor without this clause. You can
specify particular columns that can be updated.
After you declare a cursor for a SELECT... FOR UPDATE statement, you can
update or delete the currently selected row using an UPDATE or DELETE
statement with the WHERE CURRENT OF clause. The words CURRENT OF
refer to the row that was most recently fetched; they replace the usual test
expressions in the WHERE clause.
Your program might contain statements such as the sequence of statements
shown in the following example, to update rows with a particular value:
EXEC SQL BEGIN DECLARE SECTION;
char fname[ 16];
char lname[ 16];
EXEC SQL END DECLARE SECTION;
...
EXEC SQL connect to 'stores6';
/* select statement being prepared contains a for update clause */
EXEC SQL prepare x from 'select fname, lname from customer for update;
EXEC SQL declare xc cursor for x; --note no ‘for update’ clause in prepare
for (;;)
1-340 Syntax
SELECT
{
EXEC SQL fetch xc into $fname, $lname;
if (strncmp(SQLSTATE, '00', 2) != 0) break;
printf('%d %s %s\n",cnum, fname, lname );
if (cnum == 999)
--update rows with 999 customer_num
{ EXEC SQL update customer set fname = “rosey” where current of xc;}
}
EXEC SQL close xc;
EXEC SQL disconnect current;
....
A SELECT ... FOR UPDATE, like an update cursor, allows you to perform
updates that are not possible with just the UPDATE statement, because both
the decision to update and the values of the new data items can be based on
the original contents of the row. The UPDATE statement cannot interrogate
the table being updated.
Syntax that is Incompatible with the FOR UPDATE Clause
A SELECT statement that uses a FOR UPDATE clause must conform to the
following restrictions:
• You can select data from only one table.
• The statement cannot include any aggregate functions (AVG, COUNT,
MAX, MIN, or SUM).
• The statement cannot include any of the following clauses or keywords:
DISTINCT
GROUP BY
INTO TEMP
ORDER BY
UNION
UNIQUE
For a description of how to declare a FOR UPDATE cursor for a SELECT
statement that does not include a FOR UPDATE clause, see page 1-152.
INTO TEMP Clause
INTO TEMP
Clause
INTO TEMP
temp table name
WITH NO LOG
temp table name is the simple name of a table. You cannot use any of the
extended syntax described in the Table Name segment on
Syntax
1-341
SELECT
page 1-506. You are limited to the conventions described in
the Identifier segment on page 1-469.
The INTO TEMP clause creates a temporary table that contains the query
results. The initial and next extents for the temp table are always eight pages.
Temporary tables created with the INTO TEMP clause are explicit temporary
tables. Explicit temporary tables can also be created with the CREATE TEMP
TABLE statement.
If the DBSPACETEMP environment variable is set for INFORMIX-OnLine
Dynamic Server, temporary tables created with the INTO TEMP clause are
located in the dbspaces specified in the DBSPACETEMP list. You can also specify dbspace settings with the ONCONFIG parameter DBSPACETEMP. If neither
the environment variable or configuration parameter is set, the default setting is the root dbspace. The settings specified for the DBSPACETEMP environment variable take precedence over the ONCONFIG parameter DBSPACETEMP and the default setting. For more information about creating
temporary tables, see “CREATE TABLE” on page 1-84. For more information
about the DBSPACETEMP environment variable, see Chapter 4 of the Informix
Guide to SQL: Reference. For more information about the ONCONFIG parameter DBSPACETEMP, see the INFORMIX-OnLine Dynamic Server Administrator’s
Guide.
SE
Temporary tables are located in whatever directory is specified in the
DBTEMP environment variable setting or in the directory of the database
(that is, the *.dbs directory).
The temporary table disappears when your program ends or when you issue
a DROP TABLE statement on the temporary table. If your database does not
have logging, or if it has logging and you created the temporary table without
the WITH NO LOG keywords, the temporary table disappears when you close
the current database.
If you use the same query results more than once, a temporary table saves
time. In addition, using an INTO TEMP clause often gives you clearer and
more understandable SELECT statements. However, the data in the temporary table is static; data is not updated as changes are made to the tables used
to build the temporary table.
The column names of the temporary table are those named in the SELECT
clause. You must supply a display label for all expressions other than simple
column expressions. The display label for a column or expression becomes
the column name in the temporary table. If you do not provide a display label
1-342 Syntax
SELECT
for a column expression, the temporary table uses the column name from the
select list. The following example creates the pushdate table with two
columns, customer_num and slowdate:
SELECT customer_num, call_dtime + 5 UNITS DAY slowdate
FROM cust_calls INTO TEMP pushdate
You can put indexes on a temporary table.
INTO TEMP Clause and WHERE Clause
When you use the INTO TEMP clause combined with the WHERE clause and
no rows are returned, the SQLNOTFOUND value is 100 in ANSI-compliant
databases and 0 in databases that are not ANSI-compliant. If the SELECT INTO
TEMP ... WHERE ... is a part of a multistatement prepare and no rows are
returned, the SQLNOTFOUND value is 100 for both ANSI-compliant databases
and databases that are not ANSI-compliant.
INTO TEMP Clause and INTO
ESQL
Do not use the INTO option with the INTO TEMP clause. If you do, no results
are returned to the program variables and the sqlcode variable is set to a
negative value. The name of the sqlcode variable for each product is shown
in the following table:
Product
ESQL/C
ESQL/COBOL
Variable Name
sqlca.sqlcode SQLCODE
SQLCODE OF SQLCA
WITH NO LOG Option
If you use the WITH NO LOG keywords, operations on the temporary table are
not included in the transaction-log operations. You can use this option to
reduce the overhead of transaction logging.
Syntax
1-343
SELECT
UNION Operator
Place the UNION operator between two SELECT statements to combine the
queries into a single query. You can string several SELECT statements together
using the UNION operator. Corresponding items do not need to have the
same name.
Restrictions on a Combined SELECT
Several restrictions apply on the queries that you can connect with a UNION
operator, as described in the following list:
• The number of items in the SELECT clause of each query must be the same,
and the corresponding items in each SELECT clause must have compatible
data types.
• If you use an ORDER BY clause, it must follow the last SELECT clause and
you must refer to the item ordered by integer, not by identifier. Ordering
takes place after the set operation is complete.
• You cannot use a UNION operator inside a subquery or in the definition
of a view.
ESQL
• You cannot use an INTO clause in a query unless you are sure that the
compound query returns exactly one row, and you are not using a cursor. In this case, the INTO clause must be in the first SELECT statement.
You can put the results of a UNION operator into a temporary table by putting
an INTO TEMP clause in the final SELECT statement.
Duplicate Rows in a Combined SELECT
If you use the UNION operator alone, the duplicate rows are removed from
the complete set of rows. That is, if multiple rows contain identical values in
each column, only one row is retained. If you use the UNION ALL operator,
all the selected rows are returned (the duplicates are not removed). The
following example uses the UNION ALL operator to join two SELECT
1-344 Syntax
SELECT
statements without removing duplicates. The query returns a list of all the
calls that were received during the first quarter of 1992 and the first quarter
of 1993.
SELECT customer_num, call_code FROM cust_calls
WHERE call_dtime BETWEEN
DATETIME (1992-1-1) YEAR TO DAY
AND DATETIME (1992-3-31) YEAR TO DAY
UNION ALL
SELECT customer_num, call_code FROM cust_calls
WHERE call_dtime BETWEEN
DATETIME (1993-1-1)YEAR TO DAY
AND DATETIME (1993-3-31) YEAR TO DAY
If you want to remove duplicates, use the UNION operator without the
keyword ALL in the query. In the preceding example, if the combination 101
B were returned in both SELECT statements, a UNION operator would cause
the combination to be listed once. (If you want to remove duplicates within
each SELECT statement, use the DISTINCT keyword in the SELECT clause, as
described on page 1-312.)
Reference
In the Informix Guide to SQL: Tutorial, see the discussion of outer joins in
Chapter 3.
Syntax
1-345
SET CONNECTION
SET CONNECTION
Purpose
The SET CONNECTION statement reestablishes a connection between an
application and a database server and makes the connection current.
Syntax
E/C
E/CO
SET CONNECTION
+
'connection
name'
conn_nm
variable
DEFAULT
connection
name
is a quoted string that identifies the database environment
to which you are reestablishing a connection. It is the
connection name assigned by the CONNECT statement
when the initial connection was made.
conn_nm
variable
is an ESQL/C or ESQL/COBOL character type host variable
that identifies the database environment to which you are
reestablishing a connection. The value of conn_nm variable is
the connection name created by the CONNECT statement
when the initial connection was made.
Usage
The SET CONNECTION statement makes the specified dormant connection
the current one. You can reestablish only a dormant connection. A dormant
connection is a connection that has been established but is not current. If
another connection is current when the statement executes, that connection
becomes dormant.
A dormant connection has a connection context associated with it. The
connection context includes the name of the current user and all the information that the database environment associates with this name. Reestablishing
a connection to a database environment is comparable to establishing the initial connection, except that it typically avoids authenticating the user’s permissions again and it saves the cost of resources associated with the initial
connection (necessary information is available in the associated connection
context).
1-346 Syntax
SET CONNECTION
If the application did not use a connection name in the initial CONNECT
statement, you must use database environment as the connection name. For
example, the following SET CONNECTION statement uses databaseenvironment for the connection name because the CONNECT statement does
not use connection name.
CONNECT TO 'stores6'
.
CONNECT TO 'ashokr'.
.
SET CONNECTION to 'stores6'
If a connection to a database server was assigned a connection name, however,
you must use the connection name to reconnect to the database server. An
error is returned if you use database-environment rather than the connection
name when a connection name exists.
The DEFAULT Option
You can use the DEFAULT option to reestablish a DEFAULT connection. The
DEFAULT connection is one of the following connections:
• An explicit DEFAULT connection (a connection established with the
CONNECT DEFAULT statement)
• An implicit connection (any connection made using the DATABASE,
CREATE DATABASE, or START DATABASE statements)
See “The DEFAULT Option” on page 1-46 and “The Implicit Connection with
DATABASE Statements” on page 1-46 for more information.
When a Transaction is Active
If the current connection has an uncommitted transaction when the SET
CONNECTION statement executes, the following conditions apply:
• If the current connection was established using the WITH CONCURRENT
TRANSACTION clause, the application can switch to a different
connection.
• If the current connection was established without the WITH
CONCURRENT TRANSACTION clause, the application cannot switch to a
different connection; the SET CONNECTION statements returns an error
and the transaction in the current connection continues to be active. The
application must commit or roll back the active transaction before
switching the connection.
Syntax
1-347
SET CONNECTION
Current Connection is to pre-Version 6.0 INFORMIX-OnLine Dynamic Server
If the current connection is to a pre-Version 6.0 OnLine database server, when
the SET CONNECTION statement executes, the following conditions apply:
• If the current connection was established using the WITH CONCURRENT
TRANSACTION clause, the application can switch to a different connec-
tion.
• If the current connection was established without the WITH
CONCURRENT TRANSACTION clause, the application cannot switch to a
different connection; the SET CONNECTION statement returns an error.
The application must use the CLOSE DATABASE statement to close the
database and drop the connection.
References
See the CONNECT, DISCONNECT, and DATABASE statements in this manual.
1-348 Syntax
SET CONSTRAINTS
SET CONSTRAINTS
Purpose
Use the SET CONSTRAINTS statement to check constraints at the transaction
level if deferred or at the end of the statement if immediate.
Syntax
OL
+
SET
CONSTRAINTS
ALL
IMMEDIATE
,
DEFERRED
Constraint Name
p. 1-419
Usage
You can set constraints in a database only with logging. The default
constraint checking mode is IMMEDIATE. When the SET CONSTRAINTS statement is set to IMMEDIATE, effective checking is turned on and all specified
constraints are checked at the end of each INSERT, UPDATE, or DELETE
statement. If a constraint error occurs, the statement is not executed.
When you set the SET CONSTRAINTS statement to DEFERRED, effective
checking is turned off and all specified constraints are not checked until the
transaction is committed. If a constraint error occurs while the transaction is
being committed, the transaction rolls back.
The duration of the SET CONSTRAINTS statement is the transaction in which
it is executed. You cannot execute the SET CONSTRAINTS statement outside a
transaction. Once a COMMIT or ROLLBACK WORK statement is successfully
completed, the constraint mode of all constraints reverts to IMMEDIATE.
To revert from deferred to effective checking, you either can set the SET
CONSTRAINTS to IMMEDIATE or use a COMMIT or ROLLBACK statement in
your transaction.
You cannot explicitly defer the NOT NULL constraint for a column (NOT
NULL constraints are not named) or set of columns. However, if you defer
checking a primary-key constraint, the checking of the NOT NULL constraint
for that column or set of columns is also deferred. To defer the checking of all
NOT NULL constraints, you must defer all constraints.
Syntax
1-349
SET CONSTRAINTS
References
See the CREATE TABLE statement in this manual.
See Chapter 4 of the Informix Guide to SQL: Tutorial for additional information
about constraints.
1-350 Syntax
SET DEBUG FILE TO
SET DEBUG FILE TO
Purpose
Use the SET DEBUG FILE TO statement to name the file that is to hold the
run-time trace output of a stored procedure.
Syntax
+
SET DEBUG FILE TO
'
filename
'
variable name
character
expression
WITH APPEND
character expression
is any expression that evaluates to a usable filename.
filename
is the full path or filename of the file that contains the
trace-statement output.
variable name
is a character variable that contains the full path and
filename of the file that contains the trace-statement
output.
Usage
This statement indicates that the output of the procedure TRACE statement
goes to the file indicated by filename. The WITH APPEND option indicates that
output is added to the file, if it exists. If you do not use the WITH APPEND
keyword, the file is overwritten when you issue another SET DEBUG FILE TO
statement with the same filename.
If you invoke a SET DEBUG FILE TO statement with a simple filename on a
local database, the output file is located in your current directory. If your current database is on a remote database server, the output file is located in your
home directory on the remote database server. If you provide a full pathname
for the debug file, the file is placed in the directory and file specified on the
remote database server. If you do not have write permissions in the directory,
you get an error.
To close the file opened by the SET DEBUG FILE TO statement, issue another
SET DEBUG FILE TO statement with another filename. You can then edit the
contents of the first file.
Syntax
1-351
SET DEBUG FILE TO
You can use the SET DEBUG FILE TO statement outside of a procedure to direct
the trace output of the procedure to a file. You also can use this statement
inside a procedure to redirect its own output.
The following example sends the output of the SET DEBUG FILE TO statement
to a file called debugging.out:
SET DEBUG FILE TO 'debugging' || '.out'
References
See the TRACE statement in this manual.
In the Informix Guide to SQL: Tutorial, see the discussion of stored procedures
in Chapter 14 for a general description of procedures.
1-352 Syntax
SET DESCRIPTOR
SET DESCRIPTOR
Purpose
Use the SET DESCRIPTOR statement to assign values to a system-descriptor
area.
Syntax
ESQL
SET DESCRIPTOR
' descriptor '
value
COUNT =
count
variable
descriptor
variable
VALUE
item
number
,
Item
Descriptor
Information
item
number
variable
Item
Descriptor
Information
TYPE
=
literal integer
integer-host
variable
LENGTH
PRECISION
SCALE
NULLABLE
INDICATOR
ITYPE
ILENGTH
DATA
IDATA
=
Literal Number
p. 1-493
Literal DATETIME
p. 1-487
Literal INTERVAL
p. 1-490
NAME
Quoted String
p. 1-497
data variable
count variable
is a variable that holds a literal integer that specifies how
many items are being described in the system-descriptor
Syntax
1-353
SET DESCRIPTOR
area. The value must be less than or equal to the number of
occurrences in the system-descriptor area, which is set when
the area is allocated.
data variable
is a host variable that contains the information appropriate
for the field being set.
descriptor
is a string that identifies a currently allocated systemdescriptor area.
descriptor
variable
is an embedded-variable name that contains a string that
identifies a currently allocated system descriptor area.
integer host
variable
is the name of a variable that contains an integer value
that is appropriate for the indicated field. For the TYPE
field, the correspondence between the integer codes and
data types is provided in Figure 1-11 on page 1-356.
item number
is an unsigned integer that represents one of the items in the
system-descriptor area.
item number
variable
is the name of an integer host variable that contains an
unsigned integer that represents one of the items in the
system-descriptor area.
literal integer
is a positive, nonzero integer that represents the data type of
the item. The correspondence between the integer codes and
data types is provided in Figure 1-11 on page 1-356.
value
is a literal integer that specifies how many items are being
described in the system-descriptor area. The value must be
less than or equal to the number of occurrences in the system-descriptor area, which is set when the area is allocated.
Usage
Use the SET DESCRIPTOR statement to assign values to a system-descriptor
area in the following instances:
• To set the COUNT field of a system-descriptor area to match the number
of items for which you are providing descriptions in the systemdescriptor area. (Typically the items are in a WHERE clause.)
• To set the item descriptor fields for each value for which you are
providing descriptions in the system descriptor area. (Typically the items
are in a WHERE clause.)
• To modify the contents of an item-descriptor field after you use the
DESCRIBE statement to fill the fields for a SELECT or an INSERT statement.
1-354 Syntax
SET DESCRIPTOR
If an error occurs during the assignment to any of the identified system
descriptor fields, the contents of all identified fields are set to zero or null,
depending on the variable type.
COUNT Option
Use the COUNT option to set the number of items that are to be used in the
system-descriptor area.
If you allocate a system-descriptor area with more items than you are using,
you need to set the COUNT field to the number of items that you actually are
using. The sequence of statements using INFORMIX-ESQL/C, shown in the
following example, can be used in a program:
exec sql begin declare section;
int count, itemno, type, length;
char chval[21];
exec sql end declare section;
exec sql allocate descriptor ‘desc_100’; /*allocates for 100 items*/
count = 2;
exec sql set descriptor ‘desc_100' count = :count;
VALUE Option
Use the VALUE option to assign values from host variables into fields for a
particular item in a system-descriptor area. You can assign values for items
for which you are providing a description (such as parameters in a WHERE
clause), or you can modify values for items that have been described by the
database server during a DESCRIBE statement.
Syntax
1-355
SET DESCRIPTOR
Setting the TYPE Field
Use the set of codes shown in the following table to set the value of TYPE for
each item.
SQL Data Type
CHAR
SMALLINT
INTEGER
FLOAT
SMALLFLOAT
DECIMAL
SERIAL
DATE
MONEY
DATETIME
BYTE
TEXT
VARCHAR
INTERVAL
NCHAR
NVARCHAR
Figure 1-11
Integer Value
0
1
2
3
4
5
6
7
8
10
11
12
13
14
15
16
TYPE codes
The following example shows how you can set the TYPE field in ESQL/C:
main()
{
exec sql begin declare section;
int count, itemno, type, length;
exec sql end declare section;
...
exec sql allocate descriptor 'desc1' with max 5;
...
exec sql set descriptor 'desc1' value 2 type = 5;
type = 2; itemno = 3;
exec sql set descriptor 'desc1' value :itemno type = :type;
}
1-356 Syntax
SET DESCRIPTOR
If you do not compile using the -xopen option, the regular Informix SQL code
is assigned for TYPE. You must be careful not to mix normal and X/Open
modes because errors can result. For example, if a particular type is not
defined under X/Open mode but is defined under normal mode, executing a
SET DESCRIPTOR statement can result in an error.
Setting the TYPE Field in X/Open Programs
X/O
In X/Open mode, you must use the X/Open set of integer codes for the data
type in the TYPE field. The X/Open codes for data types are shown in the
following table.
SQL Data Type
CHAR
SMALLINT
INTEGER
FLOAT
DECIMAL
Integer Value
1
4
5
6
3
If you use the ILENGTH, IDATA, or ITYPE fields in a SET DESCRIPTOR
statement, a warning message appears. The warning indicates that these
fields are not standard X/Open fields for a system-descriptor area.
Setting the DATA Field
When you set the DATA field, you must provide the appropriate type of data
(character string for CHAR or VARCHAR, integer for INTEGER, and so on).
When any value other than DATA is set, the value of DATA is undefined. You
cannot set the DATA field for an item without setting TYPE for that item. If
you set the TYPE field for an item to a character type, you must also set the
LENGTH field. If you do not set the LENGTH field for a character item, you
receive an error.
Using LENGTH or ILENGTH
If your DATA or IDATA field contains a character string, you must specify a
value for LENGTH. If you specify LENGTH=0, LENGTH sets automatically to
the maximum length of the string. The DATA or IDATA field can contain a 368
Syntax
1-357
SET DESCRIPTOR
literal character string or a character string derived from a character variable
of type CHAR or VARCHAR. This provides a method to dynamically determine the length of a string in the DATA or IDATA field.
If a DESCRIBE statement precedes a SET DESCRIPTOR statement, LENGTH
automatically sets to the maximum length of the character field specified in
your table.
This information is identical for ILENGTH.
Using DECIMAL or MONEY Types
If you set the TYPE field for a DECIMAL or MONEY type and you want to use
a scale or precision other than the default values, set the SCALE and
PRECISION fields. You do not need to set the LENGTH field for a DECIMAL or
MONEY item; the LENGTH field is set accordingly from the SCALE and
PRECISION fields.
Using DATETIME or INTERVAL Types
If you set the TYPE field for a DATETIME or INTERVAL value, you can set the
DATA field as a literal DATETIME or INTERVAL or as a character string. If you
use a character string, you must set the LENGTH field to the encoded qualifier
value.
E/C
To determine the encoded qualifiers for a DATETIME or INTERVAL character
string, use the datetime and interval macros in the datetime.h header file.
If you set DATA to a host variable of DATETIME or INTERVAL, you do not
need to set LENGTH explicitly to the encoded qualifier integer.
E/CO
To determine the encoded qualifiers for a DATETIME or INTERVAL character
string, use the ECO-IQU routine.
Setting the INDICATOR Field
If you want to put a null value into the system-descriptor area, set the
INDICATOR field to -1 and do not set the DATA field.
If you set the INDICATOR field to 0, indicating that the data is not null, you
must set the DATA field.
1-358 Syntax
SET DESCRIPTOR
Setting the ITYPE Field
The ITYPE field expects an integer constant that indicates the data type of
your indicator variable. Use the same set of constants as for the TYPE field.
The constants are listed in Figure 1-11.
Modifying Values Set by the DESCRIBE Statement
You can modify the contents of a system-descriptor area after it is set using a
DESCRIBE statement.
E/CO
After you use a DESCRIBE statement on SELECT or an INSERT statement, you
must check to determine whether the TYPE field is set to either 11 or 12,
indicating a TEXT or BYTE data type. If TYPE contains an 11 or a 12, you
must use the SET DESCRIPTOR statement to reset TYPE to 116, which
indicates FILE type.
References
See the ALLOCATE DESCRIPTOR, DEALLOCATE DESCRIPTOR, DECLARE,
DESCRIBE, EXECUTE, FETCH, GET DESCRIPTOR, OPEN, PREPARE, and PUT
statements in this manual for further information about using dynamic SQL
statements.
For further information about the system-descriptor area, see your SQL API
product manual.
Syntax
1-359
SET EXPLAIN
SET EXPLAIN
Purpose
Use the SET EXPLAIN statement to obtain a measure of the work involved in
performing a query.
Syntax
+
SET EXPLAIN
ON
OFF
Usage
The SET EXPLAIN statement executes during the database server
optimization phase, which occurs when you initiate a query. For queries
associated with a cursor, if the query is prepared and does not have host variables, optimization occurs when you prepare it; otherwise, it occurs when
you open the cursor.
When you issue a SET EXPLAIN ON statement, the path chosen by the
optimizer for each subsequent query is written to a file with the name
sqexplain.out. The SET EXPLAIN ON statement remains in effect until you
issue a SET EXPLAIN OFF statement or until the program ends. Table names
in the sqexplain.out file are qualified by the owner name, for example,
owner.customer.
If the file already exists, subsequent output is appended to the file. If the
client application and the database server are on the same machine, the
sqexplain.out file is stored in your current directory.
When the current database is on another machine, the sqexplain.out file is
stored in your home directory on the remote host. If you do not have a home
directory on the remote host, the program stores sqexplain.out in the
directory from which the database server was started.
SE
1-360 Syntax
If you do not have write privileges to a directory, INFORMIX-SE generates
an error.
SET EXPLAIN
SET EXPLAIN Output
The SET EXPLAIN output file contains a copy of the query, a plan of execution
that the database-server optimizer selects, and an estimate of the amount of
work. The optimizer selects a plan to provide the most efficient way to
perform the query, based on such things as the presence and type of indexes
and the number of rows in each table.
The estimated cost is used by the optimizer compares the cost of one path
with another. The estimated cost does not translate directly into time. However, when data distributions are used, it is generally true that a query with
a higher estimate is likely to take longer to run than one with a smaller
estimate.
The estimated cost of the query is included in the SET EXPLAIN output. In the
case of a query and a subquery, two estimated cost figures are returned; the
query figure contains the subquery cost also. The subquery cost is shown
only so that you can see the cost associated with the subquery.
In addition to the estimated cost, the output file also contains the following
information:
• An estimate of the number of rows to be returned
• The order in which tables are accessed during execution
• The table column or columns that serve as a filter, if any, and whether the
filtering is through an index.
• The method (access path) by which the executor reads each table, which
is one of the methods in the following list:
SEQUENTIAL SCAN
reads rows in sequence.
INDEX PATH
scans one or more indexes.
AUTOINDEX PATH
creates a temporary index.
SORT SCAN
sorts the result of the preceding join or table scan.
MERGE JOIN
uses a sort/merge join instead of nested-loop
join.
REMOTE PATH
accesses another distributed database.
The optimizer chooses the best path of execution to produce the fastest
possible table join using a nested-loop join or sort-merge join wherever
appropriate.
The SORT SCAN section indicates that sorting the result of the preceding join
or table scan is to be done in preparation for a sort-merge join. It includes a
list of the columns that form the sort key. The order of the columns is the
Syntax
1-361
SET EXPLAIN
order of the sort. As with indexes, the default order is ascending. Where possible, this ordering is arranged to support any requested ORDER BY or GROUP
BY clause. If the ordering can be generated from a previous sort or an index
lookup, the SORT SCAN section does not appear.
The MERGE JOIN section indicates that a sort-merge join, instead of the
nested-loop join, is to be used on the preceding join/table pair. It includes a
list of the filters that control the sort-merge join and, where applicable, a list
of any other join filters. For example, a join of tables A and B with the filters
A.c1 = B.c1 and A.c2 < B.c2 lists the first join under “Merge Filters”
and the second join under “Other Join Filters.”
SE
When data distributions are not used, the INFORMIX-SE database server
generates fewer query-processing statistics than are available from the
INFORMIX-OnLine Dynamic Server database server. As a result, estimates
for the cost and the number of rows returned may be more precise if you use
INFORMIX-OnLine Dynamic Server than if you use INFORMIX-SE. Estimates returned for queries that include joins tend to be highly inaccurate.
The following output examples represent what you might see when a SET
EXPLAIN ON statement is issued using INFORMIX-OnLine Dynamic Server.
The first two examples contain two entries for a multiple-table query and
show the SORT SCAN and MERGE JOIN lines. Note that in both cases, if SORT
MERGE was not chosen, the second table would have been scanned using an
autoindex path. An autoindex path is an index constructed automatically at
execution time by the engine. It is removed when the query completes.
1-362 Syntax
SET EXPLAIN
QUERY:
----------select i.stock_num from items i, stock s, manufact m
where i.stock_num = s.stock_num
and i.manu_code = s.manu_code
and s.manu_code = m.manu_code
Estimated Cost: 52
Estimated # of Rows Returned: 130
1) rdtest.m: SEQUENTIAL SCAN
SORT SCAN: rdtest.m.manu_code
2) rdtest.s: SEQUENTIAL SCAN
SORT SCAN: rdtest.s.manu_code
MERGE JOIN:
Merge Filters: rdtest.m.manu_code = rdtest.s.manu_code
3) rdtest.i: INDEX PATH
(1) Index Keys: stock_num manu_code
Lower Index Filter: (rdtest.i.stock_num = rdtest.s.stock_num AND
rdtest.i.manu_code = rdtest.s.manu_code)
QUERY:
----------select stock.description from stock, stock2
where stock.description = stock2.description
and stock.unit_price < stock2.unit_price
Estimated Cost: 15
Estimated # of Rows Returned: 370
1) rdtest.stock: SEQUENTIAL SCAN
SORT SCAN: rdtest.stock.description
2) rdtest.stock2: SEQUENTIAL SCAN
SORT SCAN: rdtest.stock2.description
MERGE JOIN
Merge Filters: rdtest.stock2.description = rdtest.stock.description
Other Join Filters: rdtest.stock.unit_price < rdtest.stock2.unit_price
Syntax
1-363
SET EXPLAIN
The following example shows the SET EXPLAIN output for a simple query
and a complex query from the customer table:
QUERY:
----------SELECT fname, lname, company FROM customer
Estimated Cost: 3
Estimated # of Rows Returned: 28
1) joe.customer: SEQUENTIAL SCAN
QUERY:
-----SELECT fname, lname, company FROM customer
WHERE company MATCHES 'Sport*' AND customer_num BETWEEN 110 AND 115
ORDER BY lname;
Estimated Cost: 4
Estimated # of Rows Returned: 1
Temporary Files Required For: Order By
1) joe.customer: INDEX PATH
Filters: joe.customer.company MATCHES 'Sport*'
(1) Index Keys: customer_num
Lower Index Filter: joe.customer.customer_num >= 110
Upper Index Filter: joe.customer.customer_num <= 115
1-364 Syntax
SET EXPLAIN
The following example shows the SET EXPLAIN output for a multiple-table
query:
QUERY:
----------SELECT * FROM customer, orders, items
WHERE customer.customer_num = orders.customer_num
AND orders.order_num = items.order_num
Estimated Cost: 20
Estimated # of Rows Returned: 69
1) joe.orders: SEQUENTIAL SCAN
2) joe.customer: INDEX PATH
(1) Index Keys: customer_num
Lower Index Filter: joe.customer.customer_num = joe.orders.customer_num
3) joe.items: INDEX PATH
(1) Index Keys: order_num
Lower Index Filter: joe.items.order_num
= joe.orders.order_num
Using SET EXPLAIN With SET OPTIMIZATION
If you SET OPTIMIZATION to low, the output of SET EXPLAIN displays the
following uppercase string:
QUERY:{LOW}
If you SET OPTIMIZATION to high, the output of SET EXPLAIN displays the
following uppercase string:
QUERY:
Reference
In the Informix Guide to SQL: Tutorial, see the discussion of SET EXPLAIN and
the optimizer discussion in Chapter 13.
Syntax
1-365
SET ISOLATION
SET ISOLATION
Purpose
Use the SET ISOLATION statement with the INFORMIX-OnLine Dynamic
Server database server to define the degree of concurrency among processes
that attempt to access the same rows simultaneously.
Syntax
OL
+
SET ISOLATION TO
DIRTY READ
COMMITTED READ
CURSOR STABILITY
REPEATABLE READ
Usage
The database isolation level affects read concurrency when rows are retrieved
from the database. INFORMIX-OnLine Dynamic Server uses shared locks to
support four levels of isolation among processes attempting to access data.
The update or delete process always acquires an exclusive lock on the row
being modified. The level of isolation does not interfere with rows that you
are updating or deleting. If another process attempts to update or delete rows
that you are reading with an isolation level of Repeatable Read, that process
will be denied access to those rows.
ESQL
1-366 Syntax
Cursors that are currently open when you execute the SET ISOLATION
statement may or may not use the new isolation level when rows are later
retrieved. The isolation level in effect could be any level that was set from
the time the cursor was opened until the time the application actually
fetches a row. This happens because the database server may have read
rows into internal buffers and internal temporary tables using the isolation
level that was in effect at that time. To ensure consistency and reproduceable results, close open cursors before executing the SET ISOLATION
statement.
SET ISOLATION
Isolation Levels
The following definitions explain the critical characteristics of each isolation
level, from the lowest level of isolation to the highest.
DIRTY READ
Provides zero isolation. Dirty Read is appropriate for
static tables that are used for queries. With a Dirty Read
isolation level, a query may return a phantom row; that
is, an uncommitted row that was inserted or modified
within a transaction that has subsequently rolled back.
No other isolation level allows access to a phantom
row. Dirty Read is the only isolation level available to
databases that do not have transactions.
COMMITTED READ
Guarantees that every row retrieved is committed in
the table at the time that the row is retrieved. Even so,
no locks are acquired. While one process uses a row,
another process can acquire an exclusive lock on the
same row and modify or delete data in the row. Committed Read is the default level of isolation in a
database with logging that is not ANSI-compliant.
CURSOR STABILITY
Acquires a shared lock on the selected row. Another
process also can acquire a shared lock on the same row,
but no process can acquire an exclusive lock to modify
data in the row. When you fetch another row or close
the cursor, INFORMIX-OnLine Dynamic Server
releases the shared lock.
REPEATABLE READ
Acquires a shared lock on every row selected during
the transaction. Another process can also acquire a
shared lock on a selected row, but no other process can
modify any selected row during your transaction. If
you repeat the query during the transaction, you
reread the same information. The shared locks are
released only when the transaction commits or rolls
back. Repeatable Read is the default isolation level in
an ANSI-compliant database.
Syntax
1-367
SET ISOLATION
Default Isolation Levels
The default isolation level for a particular database is established when you
create the database, according to database type. The default isolation level for
each database type is described in the following list:
DIRTY READ
is the default level of isolation in a database
without logging.
COMMITTED READ
is the default level of isolation in a database with
logging that is not ANSI-compliant.
REPEATABLE READ
is the default level of isolation in an ANSIcompliant database.
The default level remains in effect until you issue a SET ISOLATION
statement. After a SET ISOLATION statement executes, the new isolation level
remains in effect until you enter another SET ISOLATION statement or until
the end of the program.
Effects of Isolation Levels
You cannot set the database isolation level in a database that does not have
logging. Every retrieval in such a database occurs as a Dirty Read.
You can issue a SET ISOLATION statement from a client machine only after a
database has been opened.
The data obtained during binary large object (blob) retrieval can vary,
depending on the database isolation level. Under Dirty Read or Committed
Read levels of isolation, a process is permitted to read a blob that is either
deleted (if the delete is not yet committed) or in the process of being deleted.
Under these isolation levels, an application can read a deleted blob when
certain conditions exist.
DB
1-368 Syntax
Using DB-Access, you see more lock conflicts with higher levels of isolation.
For example, if you use cursor stability, you see more lock conflicts than if
you use committed read.
SET ISOLATION
ESQL
If you use a scroll cursor in a transaction, you can force consistency between
your temporary table and the database table either by setting the isolation
level to Repeatable Read or by locking the entire table during the transaction.
If you use a scroll cursor with hold in a transaction, you cannot force
consistency between your temporary table and the database table. A tablelevel lock or locks set by Repeatable Read are released when the transaction
is completed, but the scroll cursor with hold remains open beyond the end
of the transaction. This lets you modify released rows as soon as the transaction ends, creating the possibility that the retrieved data in the temporary
table can be inconsistent with the actual data.
References
See the CREATE DATABASE and SET LOCK MODE statements in this manual.
In the Informix Guide to SQL: Tutorial, see the discussion of isolation levels in
Chapter 7.
Syntax
1-369
SET LOCK MODE
SET LOCK MODE
Purpose
Use the SET LOCK MODE statement to define how the database server handles
a process that tries to access a locked row or table.
Syntax
+
SET LOCK MODE TO
WAIT
OL
seconds
NOT WAIT
seconds
is the maximum number of seconds that a process waits for
a lock to release.
Usage
You can direct the response of the database server in the following ways
when a process tries to access a locked row or table:
SE
NOT WAIT
ends the operation immediately and returns an error code.
This is the default condition.
WAIT
suspends the process until the lock releases.
WAIT seconds
suspends the process until the lock releases or until the end
of a waiting period, specified in seconds. If the lock remains
after waiting, it ends the operation and returns an error code.
INFORMIX-SE does not support the seconds option. If you decide that a
process should wait for a lock to release, you cannot limit the waiting
period.
The SET LOCK MODE option is available on machines that use kernel locking. To determine whether your machine uses kernel locking, inspect the
directory that holds the database files. If the directory contains files with the
extension .lok, your system does not use kernel locking and the SET LOCK
MODE option is unavailable.
1-370 Syntax
SET LOCK MODE
WAIT Keyword
The database server protects against the possibility of a deadlock when you
request the WAIT option. Before suspending a process, the database server
checks whether suspending the process could create a deadlock. If the database server discovers a deadlock could occur, it ends the operation (overruling your instruction to wait) and returns an error code. In the case of either a
suspected or an actual deadlock, the database server returns an error.
Cautiously use the unlimited waiting period created when you specify the
WAIT option without seconds. If you do not specify an upper limit and the
process that placed the lock somehow fails to release it, suspended processes
could wait indefinitely. Because a true deadlock situation does not exist, the
database server does not take corrective action.
In a networked environment, the DBA establishes a default value for seconds
using the onconfig parameter DEADLOCK_TIMEOUT. If you use a SET LOCK
MODE statement to set an upper limit, your value applies only when your
waiting period is shorter than the system default. The number of seconds that
the process waits applies only if you acquire locks within the current server
and a remote server within the same transaction.
References
See the LOCK TABLE, UNLOCK TABLE, and SET ISOLATION MODE in this
manual.
In the Informix Guide to SQL: Tutorial, see the discussion of SET LOCK MODE
in Chapter 7.
Syntax
1-371
SET LOG
SET LOG
Purpose
Use the SET LOG statement to change your INFORMIX-OnLine Dynamic
Server database logging mode from buffered transaction logging to
unbuffered transaction logging or vice versa.
Syntax
OL
+
SET
LOG
BUFFERED
Usage
You activate transaction logging when you create a database or add logging
to an existing database. These transaction logs can be buffered or unbuffered.
The default condition for transaction logs is unbuffered logging. As soon as
a transaction ends, the INFORMIX-OnLine Dynamic Server database server
writes the transaction to the disk. If a system failure occurs when you are
using unbuffered logging, you recover all completed transactions.
You gain a marginal increase in efficiency with buffered logging, but you
incur some risk. In the event of a system failure, the INFORMIX-OnLine
Dynamic Server database server cannot recover the completed transactions
that were buffered in memory.
The SET LOG statement changes the transaction-logging mode to unbuffered
logging; the SET BUFFERED LOG statement changes the mode to buffered
logging.
The SET LOG statement redefines the mode for the current session only. The
default mode, which the INFORMIX-OnLine Dynamic Server administrator
sets using the ON-Monitor, remains unchanged.
The buffering option does not affect retrievals from external tables. For
distributed queries, a database with logging can retrieve only from databases
with logging, but it makes no difference whether the databases use buffered
or unbuffered logging.
ANSI
1-372 Syntax
An ANSI-compliant database cannot use buffered logs.
SET LOG
References
See the CREATE DATABASE and START DATABASE statements in this manual.
Syntax
1-373
SET OPTIMIZATION
SET OPTIMIZATION
Purpose
Use the SET OPTIMIZATION statement to specify a high or low level of
database-server optimization.
Syntax
+
SET OPTIMIZATION
HIGH
LOW
Usage
You can execute a SET OPTIMIZATION statement at any time. The
optimization level carries across databases but applies only within the
current database server.
After a SET OPTIMIZATION statement executes, the new optimization level
remains in effect until you enter another SET OPTIMIZATION statement or
until the program ends.
The default database server optimization level, HIGH, remains in effect until
you issue another SET OPTIMIZATION statement. The LOW option invokes a
less sophisticated, but faster, optimization algorithm.
The algorithm invoked by a SET OPTIMIZATION HIGH statement is a
sophisticated, cost-based strategy that examines all reasonable choices and
selects the best overall alternative. For large joins, this algorithm can incur
more overhead than desired. In extreme cases, you can run out of memory.
The alternative algorithm invoked by a SET OPTIMIZATION LOW statement
eliminates unlikely join strategies during the early stages, which reduces the
amount of time and resources spent during optimization. However, by specifying a low level of optimization, you take the risk that the optimal strategy
is not selected because it was eliminated from consideration during early
stages of the algorithm.
The following example shows optimization across a network. The central
database (on machine 1) is to have LOW optimization; the western database
(on machine 2) is to have HIGH optimization. If the western database were
on the same machine as central, it would have LOW optimization.
1-374 Syntax
SET OPTIMIZATION
CONNECT TO 'central';
SET OPTIMIZATION low;
SELECT catalog.*, description, unit_price, unit,
unit_descr, manu_name, lead_time
FROM catalog, stock, manufact
WHERE catalog.stock_num = stock.stock_num
AND stock.manu_code = manufact.manu_code
AND catalog_num = 10025
CLOSE DATABASE;
CONNECT TO 'western@rockie';
SET OPTIMIZATION low;
SELECT catalog.*, description, unit_price, unit,
unit_descr, manu_name, lead_time
FROM catalog, stock, manufact
WHERE catalog.stock_num = stock.stock_num
AND stock.manu_code = manufact.manu_code
AND catalog_num = 10025
Optimizing Stored Procedures
For stored procedures that remain unchanged or are changed only slightly,
you may want to set the SET OPTIMIZATION statement to HIGH when you
create the procedure. This stores the best query plans for the procedure. Then,
SET OPTIMIZATION to LOW before you execute the procedure. The procedure
then uses the optimal query plans and runs at the more cost-effective rate.
References
In the Informix Guide to SQL: Tutorial, see the discussion of optimizing queries
in Chapter 13.
Syntax
1-375
START DATABASE
START DATABASE
Purpose
Use the START DATABASE statement with an INFORMIX-SE database server
to start recording transactions, to make a database ANSI-compliant, to change
the name of an existing transaction-log file, or to remove logging on a database.
Syntax
SE
+
START DATABASE
Database
Name
p. 1-421
WITH LOG IN
' pathname '
MODE ANSI
WITH NO LOG
pathname
is the pathname of the transaction log file, enclosed in
quotation marks. The directory mentioned in the pathname
must exist.
Usage
To use the START DATABASE statement, all of the following conditions must
be true:
• You have the DBA privilege.
• No current database exists.
• The directories specified in pathname exist.
For maximum protection, specify a location for the transaction log that is not
on the same storage device as the database.
Issue a CLOSE DATABASE statement before you create and start a transaction
log. The START DATABASE statement locks the database exclusively to prevent access by other processes. If another process is using the database (even
if the database is only being read), the START DATABASE statement fails.
The database remains locked after the START DATABASE statement executes.
When you are satisfied that the database is ready to use, remove the exclusive
lock by executing the CLOSE DATABASE statement. Reopen the database with
the DATABASE statement.
1-376 Syntax
START DATABASE
MODE ANSI Keyword
ANSI
Use the MODE ANSI keyword to make a database ANSI-compliant. An ANSIcompliant database conforms to different transaction-processing and
object-naming conventions than does a database that is not ANSI-compliant.
The following example starts an ANSI-compliant database named stores6:
START DATABASE stores6
WITH LOG IN '/u/myname/stores6.log' MODE ANSI
Transaction Log Name Change
You must issue a START DATABASE statement immediately before you
archive the database if you plan to change the name or the location of the
transaction log. Specify the new path to the transaction log in the START
DATABASE statement.
Stopping Logging
If you issue the START DATABASE statement with the WITH NO LOG clause
against a database that has logging, logging is turned off after the statement
is run. If you run the statement against a database that does not have logging,
no error is returned. This statement cannot be run on an ANSI-compliant
database.
References
See the CREATE DATABASE and ROLLFORWARD DATABASE statements in
this manual.
In the Informix Guide to SQL: Tutorial, see the discussion of transaction
processing in Chapter 4 and Chapter 6.
Syntax
1-377
UNLOAD
UNLOAD
Purpose
Use the UNLOAD statement to write the rows retrieved in a SELECT statement
to an ASCII operating system file.
Syntax
DB
+
UNLOAD TO
SELECT
Statement
p. 1-310
' filename '
DELIMITER
' delimiter '
delimiter
is a quoted character that serves as the delimiter between
fields. The default delimiter is the vertical bar (| = ASCII 124)
or the value of the DBDELIMITER environment variable, if
set.
filename
is a quoted string constant that specifies the name of a file.
Rows retrieved in the SELECT statement are written to this
file.
Usage
To use the UNLOAD statement, you must have the Select privilege on all
columns selected in the SELECT statement. For information on database-level
and table-level privileges, see the GRANT statement on page 1-231.
The SELECT statement can consist of a literal SELECT statement or the name
of a character variable that contains a SELECT statement. (See the SELECT
statement on page 1-310.)
UNLOAD TO File
The UNLOAD TO file contains the selected rows retrieved from the table.
1-378 Syntax
UNLOAD
The following table shows types of data and their output format for an
UNLOAD statement in DB-Access:
Data Type
character
Output Format
If a character field contains the delimiter character, Informix products automatically
escape it with a backslash to prevent interpretation as a special character. (If you use
a LOAD statement to insert the rows into a table, backslashes are automatically
stripped.) Trailing blanks are automatically clipped.
date
DATE values are represented as mm/dd/yyyy, where mm is the month (January = 1,
and so on), dd is the day, and yyyy is the year, unless the DBDATE environment
variable has been set and another format is specified. You can specify a different date
format with the DBDATE and LC_TIME environment variables. See Chapter 4 of the
Informix Guide to SQL: Reference for more information about environment variables.
MONEY
MONEY values are unloaded with no leading currency symbol.
NULL
NULL columns are unloaded by placing no characters between the delimiters.
number
Number data types are displayed with no leading blanks.
INTEGER or SMALLINT zero are represented as 0 and FLOAT, SMALLFLOAT,
DECIMAL, or MONEY zero are represented as 0.00. If you are using NLS, you can
specify a different format for MONEY with the LC_MONETARY environment
variable. See Chapter 4 of the Informix Guide to SQL: Reference for more information
about environment variables.
time
DATETIME and INTERVAL values are represented in character form, showing only
their field digits and delimiters. No type specification or qualifiers are included in the
output. The following pattern is used: yyyy-mm-dd hh:mi:ss.fff, omitting fields that are
not part of the data.
Do not use the backslash character as a field separator or UNLOAD delimiter.
It serves as an escape character to inform the UNLOAD command that the
next character is to be interpreted as part of the data.
If you are unloading files containing VARCHAR or BLOB data types, note the
following information:
•
BYTE items are written in hexadecimal dump format with no added
spaces or new lines. Consequently, the logical length of an unloaded file
that contains BYTE items can be very long and very difficult to print or
edit.
• Trailing blanks are retained in VARCHAR fields.
• Do not use the following characters as delimiting characters in the
UNLOAD TO file: 0-9, a-f, A-F, newline, or backslash.
Syntax
1-379
UNLOAD
The following statement unloads rows from the customer table where the
value of customer_num is greater than or equal to 138, and puts them in a file
named cust_file:
UNLOAD TO 'cust_file' DELIMITER '!'
SELECT * FROM customer WHERE customer_num> = 138
The output file, cust_file, appears as shown in the following example:
138!Jeffery!Padgett!Wheel Thrills!3450 El Camino!Suite 10!Palo Alto!CA!94306!!
139!Linda!Lane!Palo Alto Bicycles!2344 University!!Palo Alto!CA!94301!(415)3235400
DELIMITER Clause
Use the DELIMITER clause to identify the delimiter that separates the data
contained in each column in a row in the output file. If you omit this clause,
DB-Access checks the DBDELIMITER environment variable.
If the DBDELIMITER variable has not been set, the default delimiter is the
vertical bar (| = ASCII 124). See Chapter 4 of the Informix Guide to SQL: Reference for information about setting the DBDELIMITER environment variable.
You can specify the TAB (= CTRL-I) or <blank> (= ASCII 32) as the delimiter
symbol. You cannot use the following as the delimiter symbol:
• Backslash (\)
• Newline (= CTRL-J)
• Hex numbers (0-9, a-f, A-F)
The following statement specifies the semicolon (;) as the delimiter character:
UNLOAD TO 'cust.out' DELIMITER ';'
SELECT fname, lname, company, city
FROM customer
References
See the LOAD and SELECT statements in this manual.
1-380 Syntax
UNLOCK TABLE
UNLOCK TABLE
Purpose
Use the UNLOCK TABLE statement in a database without transactions to
unlock a table that you previously locked with the LOCK TABLE statement.
Syntax
+
UNLOCK TABLE
Table
Name
p. 1-506
Synonym
Name
p. 1-504
Usage
You can lock a table if you own the table or if you have the Select privileges
on the table, either from a direct grant or from a grant to public. You can only
unlock a table that you locked. You cannot unlock a table that was locked by
another process. Only one lock can apply to a table at a time.
The table name either is the name of the table you are unlocking or a synonym
for the table. Do not specify a view or a synonym of a view.
To change the lock mode of a table in a database without transactions, you
first unlock the table using the UNLOCK TABLE statement, then issue a new
LOCK TABLE statement.
The UNLOCK TABLE statement fails if it is issued within a transaction. Table
locks set within a transaction are released automatically when the transaction
completes.
ANSI
You should not issue an UNLOCK TABLE statement within an ANSIcompliant database. The UNLOCK TABLE statement fails if it is issued
within a transaction, and a transaction is always in effect in an ANSIcompliant database.
Syntax
1-381
UNLOCK TABLE
References
See the COMMIT WORK, ROLLBACK WORK, and LOCK TABLE statements in
this manual.
1-382 Syntax
UPDATE
UPDATE
Purpose
Use the UPDATE statement to change the values in one or more columns of
one or more rows in a table or view.
Syntax
UPDATE
Table
Name
p. 1-506
View
Name
p. 1-510
SET
SET Clause
p. 1-386
ESQL
SPL
Synonym
Name
p. 1-504
cursor name
Condition
p. 1-404
WHERE
CURRENT OF
cursor
name
is the cursor identifier.
Usage
To update data in a table, you must either own the table or have the Update
privilege for the table (see the GRANT statement on page 1-231). To update
data in a view, you must have the Update privilege, and the view must meet
the requirements explained in “Updating Rows Through a View” on
page 1-384.
If you omit the WHERE clause, all rows of the target table are updated.
If you are using effective checking and the checking mode is set to
IMMEDIATE, all specified constraints are checked at the end of each UPDATE
statement. If the checking mode is set to DEFERRED, all specified constraints
are not checked until the transaction is committed.
DB
If you omit the WHERE clause and are in interactive mode, DB-Access does
not run the UPDATE statement until you confirm that you want to change
all rows. However, if the statement is in a command file and you are
running from the command line, the statement executes immediately.
Syntax
1-383
UPDATE
Updating Rows Through a View
You can update data through a single-table view if you have the Update
privilege on the view (see the GRANT statement on page 1-231). To do this,
the defining SELECT statement can select from only one table, and it cannot
contain any of the following elements:
• DISTINCT keyword
• GROUP BY clause
• Derived value (also called a virtual column)
• Aggregate value
You can use data integrity constraints to prevent users from updating values
into the underlying table that do not fit the view-defining SELECT statement.
For further information, refer to the WITH CHECK OPTION discussion in the
CREATE VIEW statement on page 1-136.
Because duplicate rows can occur in a view even though the underlying table
has unique rows, be careful when you update a table through a view. For
example, if a view is defined on the items table and contains only the
order_num and total_price columns, and if two items from the same order
have the same total price, the view contains duplicate rows. In this case, if
you update one of the two duplicate total price values, you have no way to
know which item price is updated.
Note: You cannot update rows to a remote table through views with check options.
Updating Rows in a Database Without Transactions
If you are updating rows in a database without transactions, you must take
explicit action to restore updated rows. For example, if the UPDATE statement
fails after updating some rows, the successfully updated rows remain in the
table. You cannot automatically recover from a failed update.
1-384 Syntax
UPDATE
Updating Rows in a Database with Transactions
If you are updating rows in a database with transactions and you are using
transactions, you can undo the update using the ROLLBACK WORK statement. If you do not execute a BEGIN WORK statement before the update and
the update fails, the database server automatically rolls back any database
modifications made since the beginning of the update.
ANSI
If you are updating rows in an ANSI-compliant database, transactions are
implicit and all database modifications take place within a transaction. In
this case, if an UPDATE statement fails, you can use the ROLLBACK WORK
statement to undo the update.
If you are using INFORMIX-OnLine Dynamic Server and you are within an
explicit transaction and the update fails, the database server automatically
undoes the effects of the update.
Locking Considerations
If you are using an INFORMIX-OnLine Dynamic Server database server,
when a row is selected with the intent to update, the update process acquires
an update lock. Update locks permit other processes to read, or share, a row
that is about to be updated but do not let those processes update or delete it.
Just before the update occurs, the update process promotes the shared lock to
an exclusive lock. An exclusive lock prevents other processes from reading or
modifying the contents of the row until the lock is released.
INFORMIX-OnLine Dynamic Server allows only one update lock at a time on
a row or a page (the type of lock depends on the lock mode selected in the
CREATE TABLE or ALTER TABLE statements). An update process can acquire
an update lock on a row or a page that has a shared lock from another process, but you cannot promote the update lock from shared to exclusive (and
the update cannot occur) until the other process releases its lock.
If the number of rows affected by a single update is very large, you can
exceed the limits placed on the maximum number of simultaneous locks. If
this occurs, you can reduce the number of transactions per UPDATE statement or lock the page (INFORMIX-OnLine Dynamic Server database servers
only) or the entire table before you execute the statement.
SE
Individual rows of a table are locked automatically when you execute an
UPDATE statement.
Syntax
1-385
UPDATE
SET Clause
SET
Clause
,
column
name
Expression
(Subset)
p. 1-386
=
(
+
SELECT
Statement
(Subset)
p. 1-386
)
NULL
,
(
column
name
,
)
=
(
)
Expression
(Subset)
p. 1-386
*
(
SELECT
Statement
(Subset)
p. 1-386
)
NULL
*
indicates that you want to update all columns in table
name, view name, or synonym name.
column name
names the columns that you want to update. You cannot
update SERIAL data type columns.
The SET clause identifies the columns to be updated and assigns values to
each column. The clause either pairs a single column to a single expression or
lists multiple columns and sets them equal to corresponding expressions.
Subset of Expressions Allowed in the SET Clause
You cannot use an expression made up of aggregate functions in the SET
clause. For a complete description of syntax and usage, see the Expression
segment on page 1-430.
Subset of SELECT Statements Allowed in the SET Clause
A SELECT statement used in a SET clause can return more than one column of
information in a row. However, the SELECT statement cannot return more
than one row of information in a table. For a complete description of syntax
and usage, refer to the SELECT statement on page 1-310.
1-386 Syntax
UPDATE
Single Columns to Single Expressions
You can include any number of single-column to single-expressions in an
UPDATE statement.
The following examples illustrate the single-column to single-expression
form of the SET clause:
UPDATE customer
SET address1 = '1111 Alder Court',
city = 'Palo Alto',
zipcode = '94301'
WHERE customer_num = 103
UPDATE orders
SET ship_charge =
(SELECT SUM(total_price) * .07
FROM items
WHERE orders.order_num = items.order_num)
WHERE orders.order_num = 1001
UPDATE stock
SET unit_price = unit_price * 1.07
Updating a Column to NULL
You can use the NULL keyword to modify a column value when using the
UPDATE statement. For a customer whose previous address required two
address lines, but now requires only one, you would use the following entry:
exec sql update customer
set address1 = '123 New Street',
set address2 = null,
city = 'Palo Alto',
zipcode = '94303'
where customer_num = 134;
Multiple Columns Equal to Multiple Expressions
The SET clause offers the following options for listing a series of columns you
intend to update:
• Explicitly list each column, separating by commas and enclosing all in
parentheses.
• Implicitly list all columns in table name using the asterisk notation (*).
Syntax
1-387
UPDATE
To complete the SET clause, you must list each expression explicitly,
separated by commas and all enclosed in parentheses. An expression list can
include an SQL subquery that returns a single row of multiple values as long
as the number of columns named, explicitly or implicitly, equals the number
of values produced by the expression or expressions that follow the equal
sign.
The following examples illustrate the multiple-column to multipleexpression form of the SET clause:
UPDATE customer
SET (fname, lname) = ('John', 'Doe')
WHERE customer_num = 101
UPDATE manufact
SET * = ('HNT', 'Hunter')
WHERE manu_code = 'ANZ'
UPDATE items
SET (stock_num, manu_code, quantity) =
( (SELECT stock_num, manu_code FROM stock
WHERE description = 'baseball'), 2)
WHERE item_num = 1 AND order_num = 1001
UPDATE table1
SET (col1, col2, col3) =
((SELECT MIN (ship_charge),
MAX (ship_charge) FROM orders),
'07/01/1992')
WHERE col4 = 1001
WHERE Clause
The WHERE clause allows you to limit the rows that you want to update. If
you omit the WHERE clause, every row in the table is updated.
The WHERE clause consists of a standard search condition. (For more
information, see the SELECT statement on page 1-310). The following example illustrates a WHERE condition within an UPDATE statement. In this
1-388 Syntax
UPDATE
example, the statement updates three columns (state, zipcode, and phone) in
each row of the customer table that has a corresponding entry in a table of
new addresses called new_address.
UPDATE customer
SET (state, zipcode, phone) =
(SELECT state, zipcode, phone FROM new_address
WHERE new_address.cust_num =
customer.cust_num)
WHERE customer.cust_num IN
(SELECT cust_num FROM new_address)
When you use the UPDATE statement with the WHERE clause and no rows are
updated, the SQLNOTFOUND value is 100 in ANSI-compliant databases and
0 in databases that are not ANSI-compliant. If the UPDATE ... WHERE ... is a
part of a multistatement prepare and no rows are returned, the SQLNOTFOUND value is 100 for ANSI-compliant databases and databases that are not
ANSI-compliant.
Syntax
1-389
UPDATE
WHERE CURRENT OF Clause
ESQL
You can use the CURRENT OF keyword to update the current row of the
active set of a cursor. However, you cannot update a row with a cursor if
that row includes aggregates. The cursor named in the CURRENT OF clause
can only contain column names. The UPDATE statement does not advance
the cursor to the next row, so the current row position remains unchanged.
You can restrict the effect of the CURRENT OF keyword if you associate the
UPDATE statement with a cursor that was created with the FOR UPDATE
keyword. (See the DECLARE statement on page 1-145.) If the cursor was created without specifying any columns for updating, you can update any column in a subsequent UPDATE...WHERE CURRENT OF statement. However,
if the DECLARE statement that created the cursor specified one or more columns in the FOR UPDATE clause, you are restricted to updating only those
columns in a subsequent UPDATE...WHERE CURRENT OF statement. The
advantage to specifying columns in the FOR UPDATE clause of a DECLARE
statement is speed. INFORMIX-SE and INFORMIX-OnLine Dynamic Server
can usually perform updates more quickly if columns are specified in the
DECLARE statement.
The following INFORMIX-ESQL/C example illustrates the WHERE CURRENT
OF form of the WHERE clause. In this example, updates are performed on a
range of customers who receive 10-percent discounts (assume that a new column, discount, is added to the customer table). The UPDATE statement is prepared outside the WHILE loop to ensure that parsing is done only once. (For
more information, see the PREPARE statement on page 1-273.)
1-390 Syntax
UPDATE
exec sql begin declare section;
char fname[32],lname[32];
int low,high;
float discount;
char answer;
exec sql end declare section;
main()
{
exec sql connect to stores6;
exec sql prepare sel_stmt from
'select * from customer ',
'where cust_num between ? and ? for update');
exec sql declare x cursor for sel_stmt;
printf('\nEnter lower limit customer number: ');
scanf('%d', &low);
printf('\nEnter upper limit customer number: ');
scanf('%d', &high);
exec sql open x using :low, :high;
exec sql prepare u from
'update customer set discount = 0.1 where current of x';
while (1){
exec sql fetch x into :fname, :lname, :discount;
if ( SQLCODE == SQLNOTFOUND)
break;
}
printf('\nUpdate %.10s %.10s (y/n)? ', fname, lname);
if (answer = getch() == ‘y’)
exec sql execute u;
exec sql close x;
}
Note: You can use an update cursor to perform updates that are not possible with
the UPDATE statement. An update cursor is a sequential cursor that is associated
with a SELECT statement that is declared with the FOR UPDATE keyword. For more
information on the update cursor, see page 1-148.
References
See the DECLARE, INSERT, OPEN, and SELECT statements in this manual.
In the Informix Guide to SQL: Tutorial, see the discussion of the UPDATE
statement in Chapter 6.
Syntax
1-391
UPDATE STATISTICS
UPDATE STATISTICS
Purpose
Use the UPDATE STATISTICS statement to update system catalog tables with
information used to determine optimal query plans. In addition, you can use
the UPDATE STATISTICS statement to force stored procedures to be
reoptimized.
1-392 Syntax
UPDATE STATISTICS
Syntax
UPDATE STATISTICS
FOR PROCEDURE
Procedure
Name
p. 1-495
DROP
DISTRIBUTIONS
LOW
FOR TABLE
Table
Name
p. 1-506
,
Synonym
Name
p. 1-504
(
column
)
MEDIUM
RESOLUTION
Table
Name
p. 1-506
FOR
TABLE
Synonym
Name
p. 1-504
percent
conf
,
(
column
)
HIGH
RESOLUTION
Table
Name
p. 1-506
FOR
TABLE
Synonym
Name
p. 1-504
percent
,
(
column
)
column
the name of a column in the specified table. You cannot
create distributions for BYTE or TEXT columns.
conf
the expected fraction of times that sampling should produce
the same results as using HIGH mode. The range of acceptable values for conf is limited to [0.80, 0.99]. The default value
is 0.95.
Syntax
1-393
UPDATE STATISTICS
percent
the desired resolution in units of percent, so that 0.1 means
the data is divided into bins each containing on average
0.1percent of the data. The minimum resolution possible for
a table is 1/nrows, where nrows is the number of rows in the
table. The default value is 2.5 percent for MEDIUM
distributions and 0.5 percent for HIGH distributions.
Usage
When you issue an UPDATE STATISTICS statement, INFORMIX-OnLine
Dynamic Server recalculates the data in the systables, syscolumns, sysindexes, and sysdistrib system catalog tables. The optimizer uses this data to
determine the best execution path for queries. The database server does not
update this statistical data automatically. Statistics are updated only when
you issue an UPDATE STATISTICS statement.
Using the UPDATE STATISTICS statement also updates the optimized
execution plans for procedures in the sysprocplan system catalog table. Each
time a procedure executes, the database server reoptimizes its execution plan
if any of the objects referenced in the procedure have changed.
The UPDATE STATISTICS statement requires a current database. If you omit
the FOR TABLE or FOR PROCEDURE clauses, statistics are updated for every
table and procedure in the current database, including the system tables.
If you use UPDATE STATISTICS ... FOR TABLE without a table name, the
statistics for all tables, including temporary tables, in the current database are
updated. If you use the FOR PROCEDURE keyword without a procedure
name, the statistics for all stored procedures in the current database are
updated.
You cannot update the statistics used by the optimizer for a table or
procedure that is external to the current database.
SE
UPDATE STATISTICS with INFORMIX-SE does not update rows in the
sysindexes table; when you issue an UPDATE STATISTICS statement,
INFORMIX-SE recalculates only the data in the systables and, when
requested, the sysdistrib system catalog tables.
Examining Index Pages
The UPDATE STATISTICS statement reads through index pages in order to
compute statistics for the query optimizer. In addition, the statement also
looks for pages that have the delete flag marked as one. If pages are found
1-394 Syntax
UPDATE STATISTICS
with the delete flag marked as one, the keys so marked are removed from the
btree cleaner list. This is particularly useful if a system crash causes the btree
cleaner list to be lost (because it is in shared memory). By running the
UPDATE STATISTICS statement, you can remove those items.
When to Update Statistics
Update the statistics when you perform extensive modifications to a table or
when changes are made to tables that are used by one or more procedures,
and you do not want the database server to reoptimize the procedure at
execution time.
If your application makes many modifications to the data in a particular
table, update the system catalog table data for that table routinely with the
UPDATE STATISTICS statement to improve the efficiency of queries. “Many”
is relative to the resolution of the distributions. In addition, if the data
changes do not change the distribution of column values, you do not need to
execute UPDATE STATISTICS again.
Specifying the LOW Keyword
If you use the LOW keyword, or if you specify no keyword, the smallest
amount of information is gathered about the column. The data in the
systables, syscolumns, and sysindexes tables is updated. No information is
put into the sysdistrib system catalog table. If data already exists in the
sysdistrib system catalog table when you run an UPDATE STATISTICS (LOW)
statement, the distribution data remains intact unless the DROP DISTRIBUTIONS option is used. If the DROP DISTRIBUTIONS option is specified but no
table name is specified, all the distribution information is removed.
The UPDATE STATISTICS (LOW) statement updates table, row, and page
counts as well as index and column statistics for specified columns. If you
want the UPDATE STATISTICS statement to do minimal work, specify a
column that is not part of an index.
The following example updates statistics on the customer_num column of
the customer table. All distributions associated with the customer table
remain intact, even those that already exist on the customer_num column.
UPDATE STATISTICS LOW FOR TABLE customer (customer_num)
Syntax
1-395
UPDATE STATISTICS
Dropping Data with the DROP DISTRIBUTIONS Clause
If you want to drop distribution data for some or all the columns already
defined in the sysdistrib table, and yet you want to update the statistics with
the LOW option for the rest of the columns in the table, you can use the DROP
DISTRIBUTIONS clause. If you specify the DROP DISTRIBUTIONS keyword, all
distribution information existing for the column specified in the UPDATE
STATISTICS statement drops. If no columns are specified, then all the
distributions for that table are removed.
You must have DBA-privileges or be the owner of the table in order to drop
distributions.
The following example shows how to remove distributions for the
customer_num column in the customer table:
UPDATE STATISTICS LOW
FOR TABLE customer (customer_num) DROP DISTRIBUTIONS
Creating Distributions for Columns
Distributions are a mapping of the data in the column into a carefully chosen
set of the column values. The contents of the column are examined and
divided into bins, which represent a percentage of data. For example, a bin
might hold 2 percent of the data; 50 bins would hold all the data. You can set
the width of the bin with the RESOLUTION percent parameter.
This organization of column values into bins is called the distribution (for
that column). The optimizer examines distributions of columns referenced in
a WHERE clause to estimate the effect of a WHERE clause on the data.
You cannot create distributions for TEXT or BYTE columns. If you include a
TEXT or BYTE column in an UPDATE STATISTICS statement that specifies
MEDIUM or HIGH distributions, no distributions are created for those columns. Distributions are constructed for other columns in the list, and the
statement does not return an error.
You must have the DBA-privilege or be the owner of the table in order to
create HIGH or MEDIUM distributions.
Specifying HIGH Distributions
If you use the HIGH keyword, the constructed distribution is exact, rather
than statistically significant. Because of the time required to gather the information, you should use HIGH distributions for specific tables or even col1-396 Syntax
UPDATE STATISTICS
umns rather than across the database. For very large tables, the database
server may scan the data once for each column. The amount of space designated by the DBUPSPACE environment variable determines the number of
times the table is scanned. For information about DBUPSPACE, see Chapter 4
of the Informix Guide to SQL: Reference.
If you do not specify a RESOLUTION clause, the default percentage is 0.5
percent.
Specifying MEDIUM Distributions
If you use the MEDIUM keyword, the data for the distributions is obtained by
sampling. Because the data obtained by sampling is usually much smaller
than the actual number of rows, the time required to construct MEDIUM distributions is less than that required for HIGH mode. MEDIUM distributions
require at least one scan of the table, so the creation of MEDIUM distributions
executes more slowly than the creation of LOW distributions.
If you do not specify a RESOLUTION clause, the default percentage is 2.5
percent. If you do not specify a value for conf, the default confidence is 0.95.
This can be roughly interpreted as meaning that 95 percent of the time, the
estimate is equivalent to using HIGH distributions.
Update Statistics and Temporary Tables
You can use UPDATE STATISTICS on temporary tables. You can explicitly
update the statistics for a temporary table or build distributions for a temporary table by specifying the name of the table. If you build distributions on all
of the tables in the database by using the FOR TABLE clause without a specific
table name, distributions will also be built on all of the temporary tables in
your session.
References
In the Informix Guide to SQL: Tutorial, see the discussion of UPDATE
STATISTICS in Chapter 13.
Syntax
1-397
WHENEVER
WHENEVER
Purpose
Use the WHENEVER statement to trap errors and warnings that occur during
the execution of other SQL statements.
Syntax
ESQL
WHENEVER
SQLERROR
CONTINUE
GO TO
NOT FOUND
GOTO
+
SQLWARNING
label
: label
STOP
E/CO
CALL
ERROR
+
function
name
E/CO
PERFORM
paragraph
name
function name
is the name of an SQL API function called when the error
or warning condition occurs.
label
is a statement label to which program control transfers
when the error or warning condition occurs.
paragraph name
is the name of a COBOL paragraph.
Usage
Using the WHENEVER statement is equivalent to placing an error-checking
routine after every SQL statement. If you do not use a WHENEVER statement
in your program to look for errors or warnings and an error is encountered,
the program execution stops.
The scope of a WHENEVER statement is from the location of the statement in
the source module until the next WHENEVER statement with the same exception condition (SQLERROR, SQLWARNING, and so on) in the same source
module. If no other WHENEVER statement exists in the source module, the
statement remains in effect until the end of the program or module.
1-398 Syntax
WHENEVER
The following ESQL/C example program has three WHENEVER statements,
two of which are WHENEVER SQLERROR statements. On line 6, the CONTINUE keyword is specified; on line 10, STOP is used with SQLERROR. Any
errors encountered after line 6 and before line 10 are ignored. After line 10,
and for the rest of the program, any SQL errors encountered cause the
program to terminate.
1
2
3
4
5
6
7
8
9
10
11
12
13
14
15
main()
{
long char_num;
exec sql database test;
exec sql whenever sqlerror continue;
printf('\n\nGoing to try first insert\n\n');
exec sql insert into test_color values ('green');
exec sql whenever not found continue;
exec sql whenever sqlerror stop;
printf('\n\nGoing to try second insert\n\n');
exec sql insert into test_color values ('blue');
exec sql close database;
printf('\n\nProgram over\n\n');
}
SQLERROR Keyword
If you use the SQLERROR keyword, any SQL statement that fails is handled as
directed by the WHENEVER statement. An error occurs when the sqlcode
variable is less than zero. The specification for the sqlcode variable for each
product is listed in the following table:
Product Name
ESQL/C
ESQL/COBOL
Variable Name
sqlca.sqlcode SQLCODE
SQLCODE OF SQLCA
The following statement causes SQL errors to be ignored each time they are
encountered:
WHENEVER SQLERROR CONTINUE
If you do not use any WHENEVER SQLERROR statements in a program, the
default for WHENEVER SQLERROR is CONTINUE.
Syntax
1-399
WHENEVER
SQLWARNING Keyword
If you use the SQLWARNING keyword, any SQL statement that generates a
warning causes the action indicated by the WHENEVER SQLWARNING statement to execute. If a warning occurs, the first field of the SQLAWARN record
is set to W.
The following statement causes a program to stop execution if a warning
condition exists:
WHENEVER SQLWARNING STOP
NOT FOUND Keyword
If you use the NOT FOUND keyword, SELECT and FETCH statements are
treated differently from other SQL statements. The NOT FOUND keyword
check for the following cases:
• A FETCH statement that attempts to get a row beyond the first or last row
in the active set
• A SELECT statement that returns no rows
In both of these cases, the sqlcode variable is set to 100. See the figure in
“SQLERROR Keyword” on page 1-399 for the name of the sqlcode variable
in each Informix product.
The following statement calls the no_rows function each time the NOT
FOUND condition exists:
WHENEVER NOT FOUND CALL no_rows
ERROR Keyword
E/CO
ERROR is a synonym for SQLERROR.
GOTO Keyword
Use the GOTO clause to transfer control to the statement identified by the
label. The GO TO keyword is a synonym for GOTO.
1-400 Syntax
WHENEVER
The following example shows that the WHENEVER statement in
INFORMIX-ESQL/C code transfers control to the statement labeled missing:
each time the NOT FOUND condition occurs:
query_data()
...
EXEC SQL WHENEVER NOT FOUND GO TO missing;
...
EXEC SQL FETCH lname INTO :lname;
...
missing:
printf('No Customers Found');
...
If your program contains more than one function, you might need to redefine
the error condition. For example, assume the module contains three functions, and the first function includes a WHENEVER...GOTO statement and a
corresponding labeled statement. When compilation moves from the first
function to the following function, the error condition still refers to the label;
however, the label is no longer defined. If the INFORMIX-ESQL/C compiler
reads an SQL statement and you have not redefined the error condition (for
example, to WHENEVER SQLERROR CONTINUE), an error results from the
compiler.
You can either reset the error condition by issuing another WHENEVER
statement, you can put a labeled statement with the same label-name in each
function, or you can use the CALL clause to call a separate function.
CALL Clause
Use the CALL clause to transfer program control to the named function. Do
not include parentheses after the function name. You cannot pass variables to
the function.
The following statement executes a function called error_recovery if the
program detects an error condition:
WHENEVER SQLERROR CALL error_recovery
You cannot specify the name of a stored procedure with the CALL keyword.
If you want to call a stored procedure, use the CALL clause to execute a
function that contains the EXECUTE PROCEDURE statement.
Syntax
1-401
WHENEVER
CONTINUE Keyword
Use the CONTINUE keyword to instruct the program to take no action. You
can use this keyword to turn off a previously specified option.
STOP Keyword
Use the STOP keyword to exit from the program immediately. The following
statement stops program execution each time the database server issues a
warning:
WHENEVER SQLWARNING STOP
PERFORM Keyword for COBOL
Use the PERFORM keyword to execute a paragraph of COBOL code. The
following example executes the COBOL paragraph ERR-CHK when an error is
encountered:
EXEC SQL WHENEVER ERROR PERFORM ERR-CHK END-EXEC.
References
See the EXECUTE PROCEDURE and FETCH statements in this manual.
See the chapter on error checking in your SQL API product manual.
1-402 Syntax
Segments
Segments
Segments are the elements of syntax that are extracted from the syntax
diagrams and discussed separately for clarification and ease of use.
The following segments, which are common to more than one statement, are
gathered in the following section:
•
•
•
•
•
•
•
•
•
•
•
•
•
•
•
•
•
•
Condition
Constraint Name
Database Name
Data Type
DATETIME Field Qualifier
Expression
Identifier
Index Name
INTERVAL Field Qualifier
Literal DATETIME
Literal INTERVAL
Literal Number
Procedure Name
Quoted String
Relational Operator
Synonym Name
Table Name
View Name
Syntax
1-403
Condition
Condition
Purpose
Use a Condition segment to test data to determine whether it meets certain
qualifications. You can use the Condition segment in the following ways:
•
•
•
•
•
•
In an ALTER TABLE or CREATE TABLE statement as a check constraint
In a DELETE statement within the WHERE clause
In a SELECT statement within the WHERE clause and the HAVING clause
In an UPDATE statement within the WHERE clause
In an IF statement, if you are using SPL
In a WHILE statement, if you are using SPL
Syntax
AND
OR
Comparison
Condition
p. 1-405
NOT
Condition with
Subquery
p. 1-413
Usage
A condition is a collection of one or more search conditions, optionally
connected by the logical operators AND or OR. Search conditions fall into the
following categories:
• Comparison conditions (also called filters or Boolean expressions)
• Conditions with a subquery
1-404 Syntax
Condition
Restrictions on a Condition
A condition can only contain an aggregate function if it is used in the
HAVING clause of a SELECT statement or the HAVING clause of a subquery.
You cannot use an aggregate function in a comparison condition that is part
of a WHERE clause in a DELETE, SELECT, or UPDATE statement unless the
aggregate is on a correlated column originating from a parent query and the
WHERE clause is within a subquery that is within a HAVING clause.
NOT Operator Option
If you preface a condition with the keyword NOT, the test is true only if the
condition that the NOT qualifies is false. If the condition qualified by the NOT
is unknown (uses a null in the determination), the NOT operator has no effect.
The following truth table shows the effect of NOT. The letter T represents a
true condition, F represents a false condition, and ? represents an unknown
condition. Unknown values occur when part of an expression that uses an
arithmetic operator is null.
NOT
T
F
F
T
?
?
Comparison Conditions (Boolean Expressions)
Five kinds of comparison conditions exist: Relational Operator, BETWEEN,
IN, IS NULL, and LIKE and MATCHES. Comparison conditions are often called
Boolean expressions because they evaluate to a simple true or false result.
Their syntax is summarized in the following diagram and explained in detail
after the diagram:
Syntax
1-405
Condition
Comparison
Condition
Expression
p. 1-430
Relational
Operator
p. 1-500
Expression
p. 1-430
Expression
p. 1-430
Expression
p. 1-430
BETWEEN
NOT
Expression
p. 1-430
,
Expression
p. 1-430
+
AND
Literal
Number
p. 1-493
(
IN
NOT
)
Literal
DATETIME
p. 1-487
Literal
INTERVAL
p. 1-490
Quoted
String
p. 1-497
TODAY
Table
Name
p. 1-506
.
View
Name
p. 1-510
.
USER
CURRENT
DATETIME
Field
Qualifier
p. 1-428
OL
Synonym
Name
p. 1-504
.
alias
.
SITENAME
DBSERVERNAME
column
name
IS
NULL
NOT
1-406 Syntax
column
name
Table
Name
p. 1-506
.
View
Name
p. 1-510
.
Synonym
Name
p. 1-504
.
alias
.
LIKE
NOT
+
MATCHES
Quoted
String
p. 1-497
ESCAPE ' char '
Condition
alias
is an alias for the table that contains the column.
char
is a single character enclosed in quotation marks.
column name
is the name of the column.
Refer to the following sections for more information:
• Using relational-operator conditions, refer to “Relational Operator Condition” on page 1-407.
• Using the BETWEEN condition, refer to “BETWEEN Condition” on page
1-408.
• Using the IN condition, refer to “IN Condition” on page 1-408.
• Using the IS NULL condition, refer to the “IS NULL Condition” on page
1-409.
• Using the LIKE and MATCHES condition, refer to the “LIKE and MATCHES
Condition” on page 1-409.
Relational-Operator Condition
Some relational-operator conditions are shown in the following examples:
city[1,3] = 'San'
o.order_date > '6/12/86'
WEEKDAY(paid_date) = WEEKDAY(CURRENT-31 UNITS day)
YEAR(ship_date) < YEAR (TODAY)
quantity <= 3
customer_num <> 105
customer_num != 105
If either expression is null for a row, the condition evaluates to false. For
example, if paid_date has a null value, you cannot use either of the following
statements to retrieve that row:
SELECT customer_num, order_date FROM orders
WHERE paid_date = ''
SELECT customer_num, order_date FROM orders
WHERE NOT PAID !=''
Syntax
1-407
Condition
An IS NULL condition finds a null value, as shown in the following example.
The IS NULL condition is explained fully in “IS NULL Condition” on page
1-409.
SELECT customer_num, order_date FROM orders
WHERE paid_date IS NULL
BETWEEN Condition
For a BETWEEN test to be true, the value of the expression on the left of the
BETWEEN keyword must be in the inclusive range of the values of the two
expressions on the right of the BETWEEN keyword. Null values do not satisfy
the condition. You cannot use NULL for either expression that defines the
range.
Some BETWEEN conditions are shown in the following examples:
order_date BETWEEN '6/1/92' and '9/7/92'
zipcode NOT BETWEEN '94100' and '94199'
EXTEND(call_dtime, DAY TO DAY) BETWEEN
(CURRENT - INTERVAL(7) DAY TO DAY) AND CURRENT
lead_time BETWEEN INTERVAL (1) DAY TO DAY
AND INTERVAL (4) DAY TO DAY
unit_price BETWEEN loprice AND hiprice
IN Condition
The IN condition is satisfied when the expression to the left of the word IN is
included in the list of items. The NOT option produces a search condition that
is satisfied when the expression is not in the list of items. Null values do not
satisfy the condition.
1-408 Syntax
Condition
Some IN conditions are shown in the following examples:
WHERE state IN ('CA', 'WA', 'OR')
WHERE manu_code IN ('HRO', 'HSK')
WHERE user_id NOT IN (USER)
WHERE order_date NOT IN (TODAY)
ESQL
The TODAY function is evaluated at execution time; CURRENT is evaluated
when a cursor opens, or when the query executes, if it is a singleton SELECT.
If you use the USER function, note that it is case-sensitive; it perceives minnie
and Minnie as different values.
IS NULL Condition
The IS NULL condition is satisfied if the column contains a null value. If you
use the IS NOT NULL option, the condition is satisfied when the column contains a value that is not null. The following example shows an IS NULL
condition:
WHERE paid_date IS NULL
LIKE and MATCHES Condition
A LIKE or MATCHES condition tests for matching character strings. The
condition is true, or satisfied, when the value of the column on the left
matches the pattern specified by the quoted string. You can use wildcard
characters in the string. Null values do not satisfy the condition.
You can only use the single quote (') with the quoted string to match a literal
quote; you cannot use the ESCAPE keyword.You can use the quote character
as the ESCAPE character in matching any other pattern if you write it as ''''.
Syntax
1-409
Condition
NOT Option
The NOT option makes the search condition successful when the column on
the left has a value that is not null and does not match the pattern specified
by the quoted string. For example, the following conditions exclude all rows
that begin with the characters Baxter in the lname column:
WHERE lname NOT LIKE 'Baxter%'
WHERE lname NOT MATCHES 'Baxter*'
LIKE Option
If you use the keyword LIKE, you can use the following wildcard characters
in the quoted string:
%
matches zero or more characters.
_
matches any single character.
\
removes the special significance of the next character (used
to match % or _ by writing \% or \_).
Using the backslash as an escape character is an Informix extension to ANSIcompliant SQL.
ANSI
If you use an escape character to escape anything other than % or _, an error
is returned.
The following condition tests for the string “tennis”, alone or in a longer
string, such as “tennis ball” or “table tennis paddle”:
WHERE description LIKE '%tennis%'
The following condition tests for all descriptions that contain an underscore.
The backslash is necessary because the underscore is a wildcard character.
WHERE description LIKE '%\_%'
1-410 Syntax
Condition
MATCHES Option
If you use the keyword MATCHES, you can use the following wildcard
characters in the quoted string:
*
matches zero or more characters.
?
matches any single character.
[...]
match any of the enclosed characters, including character
ranges as in [a-z]. A caret (^) as the first character within the
brackets matches any character that is not listed. Hence
[^abc] matches any character that is not a, b, or c.
\
removes the special significance of the next character (used
to match * or ? by writing \* or \?).
The following condition tests for the string “tennis”, alone or in a longer
string, such as “tennis ball” or “table tennis paddle”:
WHERE description MATCHES '*tennis*'
The following condition is true for the names “Frank” and “frank.”
WHERE fname MATCHES '[Ff]rank'
The following condition is true for any name that begins with either an “F”
or “f.”
WHERE fname MATCHES '[Ff]*'
ESCAPE with LIKE
The ESCAPE clause lets you include an underscore (_) or a percent sign (%) in
the quoted string and avoid having them be interpreted as wildcards. If you
choose to use z as the escape character, the characters z_ in a string stand for
the character _. Similarly, the characters z% represent the percent sign (%).
Syntax
1-411
Condition
Finally, the characters zz in the string stand for the single character z. The
following statement retrieves rows from the customer table in which the
company column includes the underscore character:
SELECT * FROM customer
WHERE company LIKE '%z_%' ESCAPE 'z'
You can also use a single character host variable as an escape character. The
following statement shows the use of a host variable as an escape character:
EXEC
char
char
EXEC
EXEC
SQL BEGIN DECLARE SECTION;
escp='z';
fname[20];
SQL END DECLARE SECTION;
SQL SELECT FNAME FROM customer
WHERE company LIKE '%z_%' ESCAPE :escp;
ESCAPE with MATCHES
The ESCAPE clause lets you include a question mark (?), an asterisk (*), and a
left or right bracket ([]) in the quoted string and avoid having them be interpreted as wildcards. If you choose to use z as the escape character, the characters z? in a string stand for the question mark (?). Similarly, the characters
z* stand for the asterisk (*). Finally, the characters zz in the string stand for
the single character z. The following example retrieves rows from the customer table in which the company column includes the question mark (?):
SELECT * FROM customer
WHERE company LIKE '*z?*' ESCAPE 'z'
1-412 Syntax
Condition
Condition with a Subquery
Condition
with
Subquery
IN
Subquery
p. 1-414
EXISTS
Subquery
p. 1-414
ALL/ANY/SOME
Subquery
p. 1-415
You can use a SELECT statement within a condition; this is called a subquery.
You can use a subquery in a SELECT statement to perform the following
functions:
• Compare an expression to the result of another SELECT statement
• Determine whether an expression is included in the results of another
SELECT statement
• Ask whether any rows are selected by another SELECT statement
The subquery can depend on the current row being evaluated by the outer
SELECT statement; in this case, the subquery is a correlated subquery.
The kinds of subquery conditions are shown in the following example with
their syntax:
A subquery can return a single value, no value, or a set of values depending
on the context in which it is used. If a subquery returns a value, it must select
only a single column. If the subquery simply checks whether a row (or rows)
exists, it can select any number of rows and columns. A subquery cannot contain an ORDER BY clause. The full syntax of the SELECT statement is described
on page 1-310.
Syntax
1-413
Condition
IN Subquery
IN
Subquery
Expression
p. 1-430
IN
(
NOT
Condition
with
Subquery
p. 1-413
)
An IN subquery condition is true if the value of the expression matches one
or more of the values selected by the subquery. The subquery must return
only one column, but it can return more than one row. The keyword IN is
equivalent to the =ANY sequence. The keywords NOT IN are equivalent to the
!=ALL sequence. See the ALL/ANY/SOME section on page 1-415.
The following example of an IN subquery finds the order numbers for orders
that do not include baseball gloves (stock_num = 1):
WHERE order_num NOT IN
(SELECT order_num FROM items WHERE stock_num = 1)
Because the IN subquery tests for the presence of rows, duplicate rows in the
subquery results do not affect the results of the main query. Therefore, putting the UNIQUE or DISTINCT keyword into the subquery has no effect on the
query results, although eliminating testing duplicates can reduce the time
needed for running the query.
EXISTS Subquery
EXISTS
Subquery
EXISTS
NOT
(
Condition
with
Subquery
p. 1-413
)
An EXISTS subquery condition evaluates to true if the subquery returns a row.
With an EXISTS subquery, one or more columns can be returned. The subquery always contains a reference to a column of the table in the main query.
If you use an aggregate function in an EXISTS subquery, at least one row is
always returned.
1-414 Syntax
Condition
The following example of a SELECT statement with an EXISTS subquery
returns the stock number and manufacturer code for every item that has
never been ordered (and is therefore not listed in the items table). It is appropriate to use an EXISTS subquery in this SELECT statement because you use
the subquery to test both stock_num and manu_code in items.
SELECT stock_num, manu_code FROM stock
WHERE NOT EXISTS (SELECT stock_num, manu_code FROM items
WHERE stock.stock_num = items.stock_num AND
stock.manu_code = items.manu_code)
The preceding example works equally well if you use a SELECT * in the
subquery in place of the column names because the existence of the whole
row is tested; specific column values are not tested.
ALL/ANY/SOME Subquery
ANY/ALL/SOME
Subquery
Expression
p. 1-430
Relational
Operator
p. 1-500
(
ALL
Condition
with
Subquery
p. 1-413
)
ANY
SOME
ALL
is a keyword that denotes that the search condition is true if
the comparison is true for every value returned by the subquery. If the subquery returns no value, the condition is true.
ANY
is a keyword that denotes that the search condition is true if
the comparison is true for at least one of the values returned.
If the subquery returns no value, the search condition is
false.
SOME
is an alias for ANY.
Syntax
1-415
Condition
In the following example of the ALL subquery, the first condition tests
whether each total_price is greater than the total price of every item in order
number 1023. The second condition produces the same results using the MAX
aggregate function.
total_price > ALL (SELECT total_price FROM items
WHERE order_num = 1023)
total_price > (SELECT MAX(total_price) FROM items
WHERE order_num = 1023)
The following conditions are true when the total price is greater than the total
price of at least one of the items in order number 1023. The first condition
uses the ANY keyword; the second uses the MIN aggregate function.
total_price > ANY (SELECT total_price FROM items
WHERE order_num = 1023)
total_price > (SELECT MIN(total_price) FROM items
WHERE order_num = 1023)
Using the NOT keyword with an ANY subquery tests whether an expression
is not true for any subquery value. The condition, found in the following
example of the NOT keyword with an ANY subquery, is true when the expression total_price is not greater than any selected value. That is, it is true when
total_price is greater than none of the total prices in order number 1023.
NOT total_price > ANY (SELECT total_price FROM items
WHERE order_num = 1023)
1-416 Syntax
Condition
Omitting ANY, ALL, or SOME Keywords
You can omit the keywords ANY, ALL, or SOME in a subquery if you know
that the subquery will return exactly one value. If you omit the ANY, ALL, or
SOME keywords and the subquery returns more than one value, you receive
an error. The subquery in the following example returns only one row
because it uses an aggregate function:
SELECT order_num FROM items
WHERE stock_num = 9 AND quantity =
(SELECT MAX(quantity) FROM items WHERE stock_num = 9)
Conditions with AND or OR
You can combine simple conditions with the logical operators AND or OR to
form complex conditions. The following SELECT statements contain
examples of complex conditions in their WHERE clauses:
SELECT customer_num, order_date FROM orders
WHERE paid_date > '1/1/92' OR paid_date IS NULL
SELECT order_num, total_price FROM items
WHERE total_price > 200.00 AND manu_code LIKE 'H%'
SELECT lname, customer_num FROM customer
WHERE zipcode BETWEEN '93500' AND '95700'
OR state NOT IN ('CA', 'WA', 'OR')
The following truth tables show the effect of the AND and OR operators.The
letter T represents a true condition, F represents a false condition, and the ?
represents an unknown value. Unknown values occur when part of an
expression that uses a logical operator is null.
?
OR
F
?
F
F
F
?
AND
T
F
T
T
F
F
?
?
T
F
?
T
T
T
T
F
T
F
?
?
T
?
?
If the Boolean expression evaluates to UNKNOWN, the condition is not satisfied.
Syntax
1-417
Condition
Consider the following example within a WHERE clause:
WHERE ship_charge/ship_weight < 5
AND order_num = 1023
The row where order_num = 1023 is the row where ship_weight is null.
Because ship_weight is null, ship_charge/ship_weight is also null; therefore, the truth value of ship_charge/ship_weight < 5 is UNKNOWN. Because
order_num = 1023 is TRUE, the AND table states that the truth value of the
entire condition is UNKNOWN. Consequently, that row is not chosen. If the
condition used an OR in place of the AND, the condition would be true.
1-418 Syntax
Constraint Name
Constraint Name
Purpose
Use the Constraint Name syntax wherever you see a reference to a constraint
name in a syntax diagram. The Constraint Name segment appears in the
following statements:
•
•
•
ALTER TABLE
CREATE TABLE
SET CONSTRAINTS
Syntax
Identifier
p. 1-469
owner.
OL
:
database
'owner'.
@dbservername
database
is the name of the database in which the constraint resides.
owner
is the user name of the owner of the constraint. If you are
using an ANSI-compliant database, you must use the owner.
convention for a constraint that you do not own. If you use
quotes, owner appears exactly as typed.
dbservername
is the name of the INFORMIX-OnLine Dynamic Server that
is home to database. The at sign (@) is a literal character that
you must use to introduce the database server name.
Usage
The actual name of the constraint is an SQL identifier.
If you are creating a table, the .name of the constraint must be unique within
a database.
Syntax
1-419
Constraint Name
ANSI
If you are creating a table, the combination owner.name must be unique
within a database.
The owner.name is case-sensitive. In an ANSI-compliant database, if you do
not use quotes around the owner name, the name of the table owner is
stored as uppercase letters. For more information, see the discussion of case
sensitivity in ANSI-compliant databases on page 1-508.
1-420 Syntax
Database Name
Database Name
Purpose
Use the Database Name syntax wherever you see a reference to a database
name in a syntax diagram. The Database Name segment is used in the
following statements:
•
•
•
•
•
CREATE DATABASE
DATABASE
DROP DATABASE
ROLLFORWARD DATABASE
START DATABASE
Syntax
dbname
OL
OL
@ dbservername
' //dbservername/dbname '
ESQL
variable name
SE
' //dbservername/pathname/dbname '
' /pathname/dbname@dbservername '
dbname
is the name of the database itself. The dbname must conform
to the same rule as any identifier, as described in “Identifier”
on page 1-469.
dbservername
is the name of the database server that is home to the
database. The @ symbol is a literal character that you must
use to introduce the database server name.
pathname
is the path of the database directory up to the parent
directory of the .dbs directory.
variable name
is a program or host variable that contains the name of a
database.
Syntax
1-421
Database Name
Usage
The simple database name is an SQL identifier, as described on page 1-469. If
you are creating a database, the name that you assign to the database can be
18 characters, inclusive. Database names are not case-sensitive.
SE
Database names in INFORMIX-SE databases can be 10 characters, inclusive.
The maximum length of the database name and directory path, including
dbservername, is 128 characters.
The following example shows a database specification:
empinfo@personnel
@dbservername Option
If you use a database-server name, do not put any spaces between the name
and the @. For example, the following statement is valid for the stores6
database on the training database server:
DATABASE stores6@training
Specifying a database server name allows you to choose a database on
another database server as your current database. You can name the current
database server using dbservername, although that is extra information.
//dbservername/dbname Option
If you use the alternative naming method, do not put spaces between the
quotes, slashes, and names, as shown in the following example:
DATABASE '//training/stores6'
As with the @dbservername option, specifying a database server name allows
you to choose a database that is on another database server as your current
database. You can name the local database server by using dbservername along
with the dbname.
1-422 Syntax
Database Name
variable name Option
ESQL
You can use a variable within an SQL API to hold the name of a database.
SE
ESQL
If you want to specify a database that neither resides in your current
directory nor in a directory specified by the DBPATH environment variable,
you must follow the DATABASE keyword with a program variable that
evaluates to the full pathname of the database (excluding the .dbs
extension).
//dbservername/pathname/dbname Option
SE
You can specify a database on a specific database server. Do not put spaces
between the quotes, slashes, and names. The following database name
describes a stores6 database that resides on the business database server:
//business/u/acctng/demo/stores6
Syntax
1-423
Data Type
Data Type
Purpose
Use the Data Type segment whenever you have to specify the data type of a
column or value. The Data Type segment is used in the following statements:
•
•
•
1-424 Syntax
ALTER TABLE
CREATE PROCEDURE
CREATE TABLE
Data Type
Syntax
CHAR
(
CHARACTER
+
NLS
+
DATE
+
DATETIME
NCHAR
)
size
(1)
DATETIME Field Qualifier p. 1-428
DECIMAL
(
DEC
)
precision
NUMERIC
, scale
16
FLOAT
(
float
precision
)
DOUBLE PRECISION
INTEGER
INT
+
INTERVAL
+
MONEY
INTERVAL Field Qualifier p. 1-485
(
16
+
)
precision
,2
, scale
SERIAL
(
+
(1)
start
)
SMALLFLOAT
REAL
SMALLINT
OL
INFORMIX/OnLine Dynamic Server-Specific Data Types p. 1-426
Syntax
1-425
Data Type
INFORMIX/OnLine Dynamic Server-Specific Data Types
INFORMIX/OnLine Dynamic
Server-Specific
Data Types
+
TEXT
+
BYTE
IN
TABLE
blobspace
OP
family name
+
NLS
+
1-426 Syntax
VARCHAR
)
( maximum
NVARCHAR
,reserve
,0
blobspace
is the name of an existing blobspace.
family name
is a quoted string constant that specifies a family name or
variable name in the optical family. Family name or variable
name. For additional information about optical families, see
the INFORMIX-OnLine/Optical User Manual.
float precision
is ignored. Positive integer.
maximum
is the maximum length characters for a VARCHAR, which
ranges from 1 to 255.
precision
is the total number of significant digits in a decimal or
money type. Integer between 1 and 32, inclusive.
reserve
is the amount of space in characters reserved for a VARCHAR
even if the actual data is shorter than reserve. The range is
from 0 to 255 but is less than the maximum size for
VARCHAR.
scale
is the number of digits to the right of the decimal point,
ranging between 1 and precision.
Data Type
size
is the number of characters in the column. For OnLine
databases, the integer is between 1 and 32,767, inclusive. For
SE databases, the integer is between 1 and 32,511.
start
is the starting number for values in a SERIAL column. The
integer is greater than 0 and less than 2,147,483,647.
Usage
For more information, see the discussion of all data types in Chapter 3 of the
Informix Guide to SQL: Reference.
Syntax
1-427
DATETIME Field Qualifier
DATETIME Field Qualifier
Purpose
The DATETIME field qualifier specifies the largest and smallest unit of time in
a DATETIME column or value. Use the DATETIME field qualifier with the
following segments:
• Data type
• Expression (in a constant expression)
Syntax
YEAR
MONTH
TO YEAR
DAY
TO MONTH
HOUR
MINUTE
TO DAY
TO HOUR
SECOND
TO MINUTE
FRACTION
TO SECOND
TO FRACTION
(3)
(digit)
digit
is a single integer between 1 and 5 that indicates how many
digits of precision the fraction is measured.
Usage
Specify the largest unit for the first DATETIME value; after the word TO, specify the smallest unit for the value. The keywords imply that the following
values are used in the DATETIME object:
1-428 Syntax
YEAR
specifies a year numbered from A.D. 1 to 9999.
MONTH
specifies a month, numbered from 1 to 12.
DAY
specifies a day, numbered from 1 to 31, as appropriate to the
month in question.
DATETIME Field Qualifier
HOUR
specifies an hour, numbered from 0 (midnight) to 23.
MINUTE
specifies a minute, numbered from 0 to 59.
SECOND
specifies a second, numbered from 0 to 59.
FRACTION
specifies a fraction of a second, with up to five decimal
places. The default scale is three digits (thousandth of a
second).
The following examples show DATETIME qualifiers:
DAY TO MINUTE
YEAR TO MINUTE
DAY TO FRACTION(4)
MONTH TO MONTH
Syntax
1-429
Expression
Expression
An expression is one or more pieces of data contained in or derived from the
database or database server. The Expression segment is used in the following
statements and segments:
•
•
•
•
1-430 Syntax
SELECT
DELETE within the Condition segment
UPDATE within the Condition segment
EXECUTE PROCEDURE
Expression
Syntax
+
*
/
||
Column
Expressions
p. 1-433
Constant
Expressions
p. 1-436
+
Function
Expressions
p. 1-443
Aggregate
Expressions
p. 1-462
Procedure Call
Expressions
p. 1-468
variable name
SPL
procedure variable name
(
Expression
)
variable name
is the name of a program variable or a host variable that
contains a value.
procedure
variable name
is the name of a valid variable that is defined in the
procedure.
Usage
You can combine expressions by connecting them with arithmetic operators
for addition, subtraction, multiplication, and division.
Syntax
1-431
Expression
You cannot use an aggregate expression in a condition that is part of a WHERE
clause unless the aggregate expression is used within a subquery.
Concatenation Operator
You can use the concatenation operator (||) to concatenate two expressions.
For example, the following are some possible concatenated-expression
combinations. The first example concatenates the zipcode column to the first
three letters of the lname column. The second example concatenates the suffix .dbg to the contents of a host variable called file_variable. The third
example concatenates the value returned by the TODAY function to the string
Date.
lname[1,3] || zipcode
:file_variable || '.dbg'
'Date:' || TODA
ESQL
1-432 Syntax
You cannot use the concatenation operator in an ESQL-only statement. The
ESQL-only statements are found in the following list:
ALLOCATE DESCRIPTOR
FETCH
CLOSE
FLUSH
CONNECT TO
FREE
DEALLOCATE DESCRIPTOR
GET DESCRIPTOR
DECLARE
OPEN
DESCRIBE
PREPARE
DISCONNECT
PUT
EXECUTE
SET CONNECTION
EXECUTE IMMEDIATE
SET DESCRIPTOR
Expression
Column Expressions
The possible syntax for column expressions is as shown in the following
diagram:
column
name
Table
Name
p. 1-506
.
alias
.
+
+
View
Name
p. 1-510
.
Synonym
Name
p. 1-504
.
[first, last]
ROWID
alias
is used in a SELECT statement in any clause but the SELECT
and FROM clauses; it is the alternative name for the table as
established in the FROM clause.
column name
is the name of the column that you are selecting.
first
is the position of the first character of the column (CHAR,
VARCHAR, NCHAR, NVARCHAR, BYTE, or TEXT).
last
is the position of the last character of the portion that you are
selecting.
The following examples show column expressions:
company
items.price
cat_advert [1,15]
Syntax
1-433
Expression
Use a table or alias name whenever it is necessary to distinguish between
columns that have the same name but are in different tables. The SELECT
statements shown in the following example use customer_num from the customer and orders tables, so they precede the column names with the table
names:
SELECT * FROM customer, orders
WHERE customer.customer_num = orders.customer_num
SELECT * FROM customer c, orders o
WHERE c.customer_num = o.customer_num
Using Subscripts on Character Columns
You can use subscripts on CHAR, VARCHAR, NCHAR, NVARCHAR, BYTE, and
TEXT columns. The subscripts indicate the starting and ending character
positions contained in the expression. For example, if a value in the lname
column of the customer table is Greenburg, the following expression
evaluates to burg:
fname[6,9]
1-434 Syntax
Expression
Using Rowids
You can use the rowid associated with each row of the table as a property of
the row. The rowid is essentially a hidden column. It is unique for each row
but it is not necessarily sequential.
SE
The rowid is sequential and starts at 1 for each table.
The following examples show possible uses of the ROWID keyword in a
SELECT statement:
SELECT *, ROWID FROM customer
SELECT fname, ROWID FROM customer
ORDER BY ROWID
SELECT HEX(rowid) FROM customer
WHERE customer_num = 106
In INFORMIX-OnLine Dynamic Server only, the last SELECT statement
example shows how to get the page number (the first six digits after 0x) and
the slot number (the last two digits) of the location of your row.
You cannot use ROWID in the select list of a query that contains an aggregate
function.
Syntax
1-435
Expression
Constant Expressions
The possible syntax for constant expressions is shown in the following
diagram:
Quoted
String
p. 1-497
USER
OL
SITENAME
+
DBSERVERNAME
+
Literal
Number
p. 1-493
TODAY
CURRENT
DATETIME
Field
Qualifier
p. 1-428
Literal
DATETIME
p. 1-487
Literal
INTERVAL
p. 1-490
n
1-436 Syntax
UNITS
datetime
unit
datetime unit
is one of the units that are used to specify an interval
precision; that is, YEAR, MONTH, DAY, HOUR, MINUTE, SECOND, or FRACTION (if the unit is YEAR or the expression is a
year-month interval; otherwise, it is a day-time interval).
n
is a literal number comparable to the datetime unit that you
choose.
Expression
The following examples show constant expressions:
DBSERVERNAME
TODAY
'His first name is'
CURRENT YEAR TO DAY
INTERVAL (4 10:05) DAY TO MINUTE
DATETIME (4 10:05) DAY TO MINUTE
5 UNITS YEAR
The following list provides references for further information:
• Quoted strings as expressions, see “Quoted String as an Expression” on
page 1-438.
• The USER function in an expression, see “USER Function” on page 1-438.
• The SITENAME and DBSERVERNAME functions in an expression, refer to
“SITENAME and DBSERVERNAME Functions” on page 1-438.
• Literal numbers as expressions, see “Literal Number as an Expression” on
page 1-439.
• The TODAY function in an expression, see “TODAY Function” on
page 1-439.
• The CURRENT function in an expression, see “CURRENT Function” on
page 1-440.
• Literal DATETIME as an expression, see “Literal DATETIME as an Expression” on page 1-441.
• Literal INTERVAL as an expression, see “Literal INTERVAL as an Expression” on page 1-441.
• The UNITS keyword in an expression, see “UNITS Keyword” on
page 1-442.
Syntax
1-437
Expression
Quoted String as an Expression
The following examples show quoted strings as expressions:
SELECT 'The first name is ', fname FROM customer
INSERT INTO manufact VALUES ('SPS', 'SuperSport')
UPDATE cust_calls SET res_dtime = '1992-1-1 10:45'
WHERE customer_num = 120 AND call_code = 'B'
USER Function
The USER function returns a string containing the login name of the current
user; that is, the person running the process.
The following statements show how you might use the USER function:
INSERT INTO cust_calls VALUES
(221,CURRENT,USER,'B','Decimal point off', NULL, NULL)
SELECT * FROM cust_calls WHERE user_id = USER
UPDATE cust_calls SET user_id = USER WHERE customer_num = 220
The USER function does not change the case of a user id. If you use USER in
an expression and the present user is Robertm, the USER function returns
Robertm, not robertm. If you specify user as the default value for a column,
the column must be of type CHAR, VARCHAR, NCHAR, or NVARCHAR and it
must be at least eight characters long.
ANSI
In an ANSI-compliant database, if you do not use quotes around the owner
name, the name of the table owner is stored as uppercase letters. If you use
the USER keyword as part of a condition, you must be sure that the way the
user name is stored agrees with the values that are returned by the USER
function, with respect to case.
SITENAME and DBSERVERNAME Functions
The SITENAME and DBSERVERNAME functions return the database server
name, as defined in the ONCONFIG file for the INFORMIX-OnLine Dynamic
Server installation on which the current database resides or as specified in the
INFORMIXSERVER environment variable. The two function names,
1-438 Syntax
Expression
SITENAME and DBSERVERNAME, are synonymous. You can use the
DBSERVERNAME function to determine the location of a table, to put infor-
mation into a table, or to extract information from a table. You can insert
DBSERVERNAME into a simple character field or use it as a default value for
a column. If you specify DBSERVERNAME as a default value for a column, the
column must be of type CHAR, VARCHAR, NCHAR, or NVARCHAR and must
be at least 18 characters long.
In the following example, the first statement returns the name of the database
server on which the customer table resides. Because the query is not
restricted with a WHERE clause, it returns DBSERVERNAME for every row in
the table. If you add the DISTINCT keyword to the SELECT clause, the query
returns DBSERVERNAME once. The second statement adds a row that contains the current site name to a table. The third statement returns all the rows
that have the site name of the current system in site_col. The last statement
changes the company name in the customer table to the current system name.
SELECT DBSERVERNAME FROM customer
INSERT INTO host_tab VALUES ('1', DBSERVERNAME)
SELECT * FROM host_tab WHERE site_col = DBSERVERNAME
UPDATE customer SET company = DBSERVERNAME
WHERE customer_num = 120
Literal Number as an Expression
The following examples show literal numbers as expressions:
INSERT INTO items VALUES (4, 35, 52, 'HRO', 12, 4.00)
INSERT INTO acreage VALUES (4, 5.2e4)
SELECT unit_price + 5 FROM stock
SELECT -1 * balance FROM accounts
TODAY Function
Use the TODAY function to return the system date as a DATE type. If you
specify TODAY as a default value for a column, it must be a DATE column.
Syntax
1-439
Expression
The following examples show how you might use the TODAY function in an
INSERT, UPDATE, or SELECT statement:
UPDATE orders (order_date) SET order_date = TODAY
WHERE order_num = 1005
INSERT INTO orders VALUES
(0, TODAY, 120, NULL, N, '1AUE217', NULL, NULL, NULL, NULL)
SELECT * FROM orders WHERE ship_date = TODAY
CURRENT Function
The CURRENT function returns a DATETIME value with the date and time of
day, showing the current instant.
If you do not specify a datetime qualifier, the default qualifiers are YEAR TO
FRACTION(3). You can use the CURRENT function in any context in which
you can use a literal DATETIME (page 1-487). If you specify CURRENT as the
default value for a column, it must be a DATETIME column and the qualifier
of CURRENT must match the column qualifier. An example of this follows:
CREATE TABLE new_acct (col1 int, col2 DATETIME YEAR TO DAY
DEFAULT CURRENT YEAR TO DAY)
If you use the CURRENT keyword in more than one place in a single
statement, identical values can be returned at each point of the call. You cannot rely on the CURRENT function to provide distinct values each time it
executes.
The returned value comes from the system clock and is fixed when any SQL
statement starts. For example, any calls to CURRENT from an EXECUTE PROCEDURE statement returns the value when the stored procedure starts.
The CURRENT function is always evaluated in the database server where the
current database is located. If the current database is in a remote database
server, the returned value is from the remote host.
The CURRENT function might not execute in the physical order in which it
appears in a statement. You should not use the CURRENT function to mark
the start, end, or a specific point in the execution of a statement.
If your platform does not provide a system call that returns the current time
with subsecond precision, the CURRENT function returns a zero for the FRACTION field.
1-440 Syntax
Expression
In the following example, the first statement uses the CURRENT function in a
WHERE condition. The second statement uses the CURRENT function as the
input for the DAY function. The last query selects rows whose call_dtime
value is within a range from the beginning of 1992 to the current instant.
DELETE FROM cust_calls WHERE
res_dtime < CURRENT YEAR TO MINUTE
SELECT * FROM orders WHERE DAY(ord_date) < DAY(CURRENT)
SELECT * FROM cust_calls WHERE call_dtime
BETWEEN '1992-1-1 00:00:00' AND CURRENT
Literal DATETIME as an Expression
The following examples show literal DATETIME as an expression:
SELECT DATETIME (1993-12-6) YEAR TO DAY FROM customer
UPDATE cust_calls SET res_dtime = DATETIME (1992-07-07 10:40)
YEAR TO MINUTE
WHERE customer_num = 110
AND call_dtime = DATETIME (1992-07-07 10:24) YEAR TO MINUTE
SELECT * FROM cust_calls
WHERE call_dtime
= DATETIME (1995-12-25 00:00:00) YEAR TO SECOND
Literal INTERVAL as an Expression
The following examples show literal INTERVAL as an expression:
INSERT INTO manufact VALUES ('CAT', 'Catwalk Sports',
INTERVAL (16) DAY TO DAY)
SELECT lead_time + INTERVAL (5) DAY TO DAY FROM manufact
The second statement in the preceding example adds five days to each value
of lead_time selected from the manufact table.
Syntax
1-441
Expression
UNITS Keyword
The UNITS keyword enables you to display a simple interval or increase or
decrease a specific interval or datetime value.
If n is not an integer, it is rounded down to the nearest whole number when
it is used.
In the following example, the first SELECT statement uses the UNITS keyword
to select all the manufacturer lead times, increased by five days. The second
SELECT statement finds all the calls that were placed more than 30 days ago.
If the expression in the WHERE clause returns a value greater than 99 (maximum number of days), the query fails. The last statement increases the lead
time for the ANZA manufacturer by two days.
SELECT lead_time + 5 UNITS DAY FROM manufact
SELECT * FROM cust_calls
WHERE (TODAY - call_dtime) > 30 UNITS DAY
UPDATE manufact SET lead_time = 2 UNITS DAY + lead_time
WHERE manu_code = 'ANZ'
1-442 Syntax
Expression
Function Expressions
A function expression takes an argument, as shown in the following diagram:
Algebraic
Functions
p. 1-444
+
DBINFO
Function
p. 1-448
Exponential and
Logarithmic
Functions
p. 1-451
HEX
Function
p. 1-452
LENGTH
Function
p. 1-453
Time
Functions
p. 1-455
Trigonometric
Functions
p. 1-458
The following examples show function expressions:
EXTEND (call_dtime, YEAR TO SECOND)
MDY (12, 7, 1900 + cur_yr)
DATE (365/2)
LENGTH ('abc') + LENGTH (pvar)
HEX (customer_num)
HEX (LENGTH(123))
TAN (radians)
ABS (-32)
EXP (4,3)
MOD (10,3)
Syntax
1-443
Expression
Algebraic Functions
An algebraic function takes one or more argument, as shown in the following
diagram:
Algebraic
Functions
ABS
(
numeric expression
)
MOD
(
dividend, divisor
)
POW
(
base, exponent
)
ROOT
(
radicand
)
, index
,2
ROUND
(
)
Expression
p. 1-430
, rounding factor
,0
SQRT
(
TRUNC
(
integer expression
)
)
Expression
p. 1-430
, truncating factor
,0
1-444 Syntax
base
represents a number raised to a power. It is any numeric
expression that evaluates to a real number.
dividend
represents the value to be divided. It is any real number or
expression.
divisor
represents the value by which the dividend is to be divided.
It can be any real number except zero.
exponent
represents the power to which a value is to be raised. It is
any real number.
Expression
index
represents the type of root you are returning. It is any real
number.
integer
expression
represents an expression that evaluates to an integer. It is any
real number.
numeric
expression
represents an expression that evaluates to a numeric
value. It is any real number.
radicand
represents an expression of which you are determining the
root. It is any real number.
radicand
rounding
factor
indicates the digit to which you want to round the
expression. This digit must be an integer between
+32 and -32, inclusive.
truncating
factor
indicates the position to which you want to truncate the
expression. This digit must be an integer between
+32 and -32, inclusive.
ABS Function
The ABS function gives the absolute value for a given expression. The
function requires a single numeric argument. The value returned is the same
as the argument type. The following example shows all orders of more than
$20 paid in cash (+) or store credit (-). Remember that the stores6 database
does not contain any negative balances; however, you may have negative
balances in your application.
SELECT order_num, customer_num, ship_charge
FROM orders WHERE ABS(ship_charge) > 20
Syntax
1-445
Expression
MOD Function
The MOD function returns the modulus or remainder value for two numeric
expressions. You provide integer expressions for the dividend and divisor.
The divisor cannot be 0. The value returned is INT. The following example
uses a 30-day billing cycle to determine how far into the billing cycle today is:
SELECT MOD(today - MDY(1,1,year(today)),30) FROM orders
POW Function
The POW function raises the base to the exponent. This function requires two
numeric arguments. The return type is FLOAT. The following example
returns all the information for circles whose areas ( π r2) are less than 1,000
square units:
SELECT * FROM circles WHERE (3.1417 * POW(radius,2)) < 1000
ROOT Function
The ROOT function returns the root value of a numeric expression. This
function requires at least one numeric argument but no more than two. If
only one argument is supplied, the value 2 is used as a default value. The
value 0 cannot be used as the base. The value returned is FLOAT. The first
SELECT statement in the following example takes the square root of the
expression; The second SELECT statement takes the cube root of the
expression:
SELECT ROOT(9) FROM angles
-- square root of 9
SELECT ROOT(64,3) FROM angles
-- cube root of 64
Note: The SQRT function uses the form SQRT(x)=ROOT(x) if no index is given.
ROUND Function
The ROUND function returns the rounded value of an expression. The expression must be numeric or must be converted to numeric.
If you omit the digit indication, the value is rounded to zero digits or to the
ones place. The digit limitation of 32 (+ and -) refers to the entire decimal
value.
1-446 Syntax
Expression
Positive-digit values indicate rounding to the right of the decimal point;
negative-digit values indicate rounding to the left of the decimal point, as
shown in Figure 1-17
expression:
24536.8746
ROUND (24,536.8746, -2) = 24,500.00
ROUND (24,536.8746, 0) = 24,537.00
ROUND (24,536.8746, 2) = 24,536.87
Figure 1-17
-2
0
2
ROUND function
SELECT order_num , ROUND(total_price) FROM items
WHERE ROUND(total_price) = 124.00
If you use a MONEY data type as the argument for the ROUND function and
you round to zero places, the value displays with .00. The SELECT statement
in the following example rounds an INTEGER value and a MONEY value. It
displays 125 and a rounded price in the form xxx.00 for each row in items.
SELECT ROUND(125.46), ROUND(total_price) FROM items
SQRT Function
The SQRT function returns the square root of a numeric expression.
The following example returns the square root of 9 for each row of the angles
table:
SELECT SQRT(9) FROM angles
TRUNC Function
The TRUNC function returns the truncated value of a numeric expression.
The expression must be numeric or of a form that can be converted to a
numeric expression. If you omit the digit indication, the value is truncated to
zero digits or to the ones place. The digit limitation of 32 (+ and -) refers to
the entire decimal value.
Syntax
1-447
Expression
Positive digit values indicate truncating to the right of the decimal point;
negative digit values indicate truncating to the left of the decimal point, as
shown in Figure 1-18:
expression:
24536.8746
TRUNC (24536.8746, -2) =24500
TRUNC (24536.8746, 0) = 24536
TRUNC (24536.8746, 2) = 24536.87
Figure 1-18
-2 0
2
TRUNC function
If you use a MONEY data type as the argument for the TRUNC function and
you truncate to zero places, the .00 places are removed. For example, the following SELECT statement truncates a MONEY value and an INTEGER value. It
displays 125 and a truncated price in integer format for each row in items.
SELECT TRUNC(125.46), TRUNC(total_price) FROM items
DBINFO Function
Use the DBINFO function for any of the following purposes:
• To locate the name of a dbspace corresponding to a tblspace number or
expression
• To find out the last serial value inserted in a table
• To find out the number of rows processed by selects, inserts, deletes,
updates, and execute procedure statements
1-448 Syntax
Expression
The DBINFO function can be used anywhere within SQL statements and
within stored procedures.
DBINFO Function
DBINFO
(
OL
'DBSPACE'
,
)
tblspace num
expression
'sqlca.sqlerrd1'
'sqlca.sqlerrd2'
tblspace num
The tblspace (partition) number of a table
expression
An expression that evaluates to tblspace num. The expression
can contain procedure variables, host variables, column
names, or subqueries.
Using the 'DBSPACE' Option
The 'DBSPACE' option returns a character string that contains the name of the
dbspace corresponding to a tblspace number. You must supply an additional
parameter, either tblspace num or an expression that evaluates to tblspace num.
The following example uses the 'DBSPACE' option. First, it queries the systables system catalog table to determine the tblspace num for the table
customer; then, it executes the function to determine the dbspace name.
SELECT tabname, partnum FROM systables;
If the statement returns a partition number of 16777289, you insert that value
into the second argument to find which dbspace contains the customer table.
SELECT DBINFO ('DBSPACE', 16777289) FROM systables;
Using the 'sqlca.sqlerrd1' Option
The 'sqlca.sqlerrd1' option returns a single integer that provides the last serial
value inserted into a table. You can use this DBINFO function to retrieve the
last serial value inserted into a table or to determine the number of rows processed by a query anywhere within SQL statements and within stored
procedures.
Syntax
1-449
Expression
This option applies to all SQL APIs.
To ensure valid results, use this option immediately following an INSERT
statement that inserts a serial value. The following example uses the
'sqlca.sqlerrd1' option:
.
.
EXEC SQL create table fst_tab (ordernum serial, partnum int);
EXEC SQL create table sec_tab (ordernum serial);
EXEC SQL insert into fst_tab values (0,1);
EXEC SQL insert into fst_tab values (0,4);
EXEC SQL insert into fst_tab values (0,6);
EXEC SQL insert into sec_tab select DBINFO('sqlca.sqlerrd1')
from sec_tab where partnum = 6;
.
.
This example inserts a row containing a primary-key serial value into the
fst_tab table, and then inserts the same serial value into the sec_tab table
using the DBINFO() function. The value returned by the DBINFO() function is
the serial value of the last row inserted into fst_tab. Note that the subquery
in the last line contains a WHERE clause so that a single value is returned.
Using the 'sqlca.sqlerrd2' Option
The 'sqlca.sqlerrd2' option returns a single integer that provides the number
of rows processed by SELECT, INSERT, DELETE, UPDATE, and EXECUTE PROCEDURE statements. You can use this option anywhere within SQL
statements and stored procedures. This option also applies to all SQL APIs.
To ensure valid results, use this option after SELECT and EXECUTE
PROCEDURE statements have completed executing. In addition, if you use
this option within cursors, make sure that all rows are fetched before the
cursors are closed to ensure valid results.
1-450 Syntax
Expression
The following example shows a stored procedure that uses the
'sqlca.sqlerrd2' option to determine the number of rows deleted from a table:
CREATE PROCEDURE del_rows (pnumb int)
RETURNING int;
DEFINE nrows int;
DELETE FROM sec_tab WHERE partnum=pnumb;
LET nrows = DBINFO('sqlca.sqlerrd2');
RETURN nrows;
END PROCEDURE
Exponential and Logarithmic Functions
Exponential and logarithmic functions take at least one argument. The return
type is FLOAT. The following example shows exponential and logarithmic
functions:
Exponential and Logarithmic Functions
EXP
LOGN
LOG10
float
expression
(
(
(
float expression
float expression
float expression
)
)
)
is an expression as defined on page 1-430, whose domain
is the set of real numbers and range is the set of positive
real numbers
EXP Function
The EXP function returns the exponential value of two numeric expressions.
You provide a constant and float expression in the form e(n)=en. The following example returns the exponent of 3 for each row of the angles table:
SELECT EXP(3) FROM angles
Syntax
1-451
Expression
LOGN Function
The LOGN function returns the natural log of a numeric expression. The
logarithmic value is the inverse of the exponential value. The following
SELECT statement returns the natural log of population for each row of the
history table:
SELECT LOGN(population) FROM history WHERE country='US'
ORDER BY date
LOG10 Function
The LOG10 function returns the log of a value to the base 10. The following
example returns the log base 10 of distance for each row of the travel table:
SELECT LOG10(distance) + 1 digits FROM travel
HEX Function
HEX Function
HEX
integer
expression
(
integer
expression
)
is an expression, as defined on page 1-430, that can be
converted to an integer.
The HEX function returns the hexadecimal encoding of an integer expression.
The following example displays the data type and column length of the columns of the orders table in hexadecimal format. For MONEY and DECIMAL
columns, you can then determine the precision and scale from the lowest and
next to the lowest bytes. For VARCHAR and NVARCHAR columns, you can
determine the minimum space and maximum space from the lowest and next
to the lowest bytes. (See Chapter 2 of the Informix Guide to SQL: Reference for
more information about encoded information.)
SELECT colname, coltype, HEX(collength)
FROM syscolumns C, systables T
WHERE C.tabid = T.tabid AND T.tabname = 'orders'
1-452 Syntax
Expression
The following example lists the names of all the tables in the current database
and their corresponding tblspace number in hexadecimal format. This example is particularly useful because the two most significant bytes in the hexadecimal number constitute the dbspace number and are used to identify the
table in oncheck output.
SELECT tabname, HEX(partnum) FROM systables
The HEX function can operate on an expression, as shown in the following
example:
SELECT HEX(order_num + 1) FROM orders
LENGTH Function
LENGTH
Function
+
LENGTH
Quoted
String
p. 1-497
(
SPL
ESQL
Table
Name
p. 1-506
)
variable
name
column
name
.
column name
is the name of a column.
variable name
is a program variable or a host variable that contains a
character string.
Syntax
1-453
Expression
The LENGTH function returns the length of a character column, not including
any trailing spaces. With TEXT or BYTE columns, the LENGTH function
returns the full number of bytes in the column. The following example
illustrates the use of the LENGTH function:
SELECT customer_num, LENGTH(fname) + LENGTH(lname),
LENGTH('How many bytes is this?')
FROM customer WHERE LENGTH(company) > 10
ESQL
You can use the LENGTH function to return the length of a character
variable.
Time Functions
Time Functions
+
DATE
DAY
(
non-date
expression
)
(
date/
datetime
expression
)
MONTH
WEEKDAY
YEAR
(
EXTEND
MDY
1-454 Syntax
(
date/
datetime
expression
month
integer
expression
,
)
,
day
integer
expression
first TO last
,
year
integer
expression
)
date/datetime
expression
is an expression, as defined on page 1-430, that evaluates
to a DATE or DATETIME value.
day integer
expression
is an expression, as defined on page 1-430, that evaluates
to an integer between 1 and 28, 29, 30, or 31, as appropriate
for the month.
Expression
first
is a qualifier that specifies the first field in the result. It can be
any DATETIME qualifier, as defined on page 1-428, as long as
first is larger than last.
last
is a qualifier that specifies the last field in the result.
month integer
expression
is an expression, as defined on page 1-430, that evaluates
to an integer between 1 and 12, as appropriate for the
month.
non-date
expression
is an expression, as defined on page 1-430, that evaluates
to a CHARACTER, DATETIME, or INTEGER value that can
be converted to a DATE data type.
year integer
expression
is an expression, as defined on page 1-430, that evaluates
to a four-digit integer.
DATE Function
The DATE function returns a DATE type value that corresponds to the
character expression with which you call it. The argument can be any expression that can be converted to a DATE value, usually a CHAR, DATETIME, or
INTEGER value. The WHERE clauses in the following example achieve the
same end: converting a string to a date.
WHERE order_date < DATE('12/31/92')
WHERE order_date
<
DATE(365)
DAY Function
The DAY function returns an integer that represents the day of the month.
The following example uses the DAY function with the CURRENT function to
compare column values to the current day of the month:
WHERE DAY(order_date) > DAY(CURRENT)
Syntax
1-455
Expression
MONTH Function
The MONTH function returns an integer that corresponds to the month
portion of its type DATE or DATETIME argument. The following example
returns a number (1 through 12) to indicate the month in which the order was
placed:
SELECT order_num, MONTH(order_date) FROM orders
WEEKDAY Function
The WEEKDAY function returns an integer that represents the day of the
week; zero represents Sunday, one represents Monday, and so on. The following lists all the orders that were paid on the same day of the week, which is
the current day:
SELECT * FROM orders
WHERE WEEKDAY(paid_date) = WEEKDAY(CURRENT)
YEAR Function
The YEAR function returns a four-digit integer that represents the year. The
following example lists orders in which the ship_date is earlier than the
beginning of the current year:
SELECT order_num, customer_num FROM orders
WHERE year(ship_date) < YEAR(TODAY)
Similarly, because a DATE value is a simple calendar date, you cannot add or
subtract a DATE value with an INTERVAL value whose last qualifier is smaller
than DAY. In this case, convert the DATE value to a DATETIME value.
EXTEND Function
The EXTEND function adjusts the precision of a DATETIME or DATE value.
The expression cannot be a quoted string representation of a DATE value.
If you do not specify first and last qualifiers, the default qualifiers are YEAR
TO FRACTION(3).
If the expression contains fields that are not specified by the qualifiers, the
unwanted fields are discarded.
1-456 Syntax
Expression
If the first qualifier specifies a larger (that is, more significant) field than what
exists in the expression, the new fields are filled in with values returned by
the CURRENT function. If the last qualifier specifies a smaller field (that is, less
significant) than what exists in the expression, the new fields are filled in with
constant values. A missing MONTH or DAY field is filled in with 1, and the
missing HOUR to FRACTION fields are filled in with 0.
In the following example, the first EXTEND call evaluates to the call_dtime
column value of YEAR TO SECOND. The second statement expands a literal
DATETIME so that an interval can be subtracted from it. You must use the
EXTEND function with a DATETIME value if you want to add it to or subtract
it from an INTERVAL value that does not have all the same qualifiers. The
third example updates only a portion of the datetime value, the hour position. The EXTEND function yields just the hh:mm part of the datetime. Subtracting 11:00 from the hours/minutes of the datetime yields an INTERVAL
value of the difference, plus or minus, and subtracting that from the original
value forces the value to 11:00.
EXTEND (call_dtime, YEAR TO SECOND)
EXTEND (DATETIME (1989-8-1) YEAR TO DAY, YEAR TO MINUTE)
- INTERVAL (720) MINUTE (3) TO MINUTE
UPDATE cust_calls SET call_dtime = call_dtime (EXTEND(call_dtime, HOUR TO MINUTE) - DATETIME (11:00) HOUR
TO MINUTE) WHERE customer_num = 106
Syntax
1-457
Expression
MDY Function
The MDY function returns a type DATE value with three expressions that
evaluate to integers representing the month, day, and year. The first
expression must evaluate to an integer representing the number of the month
(1 to 12).
The second expression must evaluate to an integer representing the number
of the day of the month (1 to 28, 29, 30, or 31, as appropriate for the month.)
The third expression must evaluate to a four-digit integer representing the
year. You cannot use a two-digit abbreviation for the third expression. The
following example sets the paid_date associated with the order number 8052
equal to the first day of the present month.
UPDATE orders SET paid_date = MDY(MONTH(TODAY), 1, YEAR(TODAY))
WHERE po_num = '8052'
Trigonometric Functions
A trigonometric function expression takes an argument, as shown in the
following example:
Trigonometric
Functions
COS
(
radian
expression
)
(
numeric
expression
)
SIN
TAN
ASIN
ACOS
ATAN
ATAN2
1-458 Syntax
(
y, x
)
numeric
expression
is an expression that evaluates to a value between -1 and 1,
inclusive.
radian
expression
is the number of radians.
Expression
If you are using degrees and want to convert degrees to radians, use the
following example:
# degrees * π/180= # radians
If you are using radians and want to convert radians to degrees, use the
following formula:
# radians * 180/π = # degrees
x
is a numeric expression representing the x coordinate of
the rectangular coordinate pair (x, y).
y
is a numeric expression representing the y coordinate of
the rectangular coordinate pair (x, y).
COS Function
The COS function returns the cosine of a radian expression. The following
example returns the cosine of the values of the degrees column in the
anglestbl table. Note that the expression passed to the COS function in this
example converts degrees to radians.
SELECT COS(degrees*180/3.1417) FROM anglestbl
SIN Function
The SIN function returns the sine of a radian expression. The following
example returns the sine of the values in the radians column of the anglestbl
table:
SELECT SIN(radians) FROM anglestbl
Syntax
1-459
Expression
TAN Function
The TAN function returns the tangent of a radian expression. The following
example returns the tangent of the values in the radians column of the
anglestbl table:
SELECT TAN(radians) FROM anglestbl
ACOS Function
The ACOS function returns the arc cosine of a numeric expression. The
following example returns the arc cosine of the value (-0.73) in radians:
SELECT ACOS(-0.73) FROM anglestbl
ASIN Function
The ASIN function returns the arc sine of a numeric expression. The following
example returns the arc sine of the value (-0.73) in radians:
SELECT ASIN(-0.73) FROM anglestbl
ATAN Function
The ATAN function returns the arc tangent of a numeric expression. The
following example returns the arc tangent of the value (-0.73) in radians:
SELECT ATAN(-0.73) FROM anglestbl
1-460 Syntax
Expression
ATAN2 Function
The ATAN2 function computes the angular component of the polar
coordinates (r, θ) associated with (x, y). The following example compares
angles to θ for the rectangular coordinates (4, 5):
WHERE angles > ATAN2(4,5)
--determines θ for (4,5) and
compares to angles
You can determine the length of the radial coordinate r using the expression
shown in the following example:
SQRT(POW(x,2) + POW(y,2))
--determines r for (x,y)
You can determine the length of the radial coordinate r for the rectangular
coordinates (4,5) using the expression shown in the following example:
SQRT(POW(4,2) + POW(5,2))
--determines r for (4,5)
Syntax
1-461
Expression
Aggregate Expressions
An aggregate expression uses an aggregate function to summarize selected
database data.
The following diagram shows aggregate function expressions:
COUNT (*)
(
AVG
MAX
DISTINCT
MIN
.
Synonym
Name
p. 1-504
.
View
Name
p. 1-510
.
)
UNIQUE
SUM
COUNT
Table
Name
p. 1-506
column
name
(
DISTINCT
UNIQUE
AVG
MAX
(
ALL
Expression
(Subset)
p. 1-463
)
MIN
SUM
column name
is the name of the column.
An aggregate function returns one value for a set of queried rows. Some
examples of aggregate functions in SELECT statements follow:
SELECT sum(total_price) FROM items WHERE order_num = 1013
SELECT COUNT(*) FROM orders WHERE order_num = 1001
SELECT MAX(LENGTH(fname) + LENGTH(lname)) FROM customer
If you use an aggregate function and one or more columns in the select list,
you must put all the column names that are not used as part of an aggregate
or time expression in the GROUP BY clause.
1-462 Syntax
Expression
Subset of Expressions Allowed in an Aggregate Expression
The argument of an aggregate function cannot itself contain an aggregate
function. You cannot use the aggregate functions found in the following list:
• MAX(AVG(order_num))
• An aggregate function in a WHERE clause unless it is contained in a
subquery or if the aggregate is on a correlated column originating from a
parent query and the WHERE clause is within a subquery that is within a
HAVING clause
• An aggregate function on a BYTE or TEXT column
For the full syntax of an aggregate expression, see page 1-430.
Including or Excluding Duplicates in the Row Set
The DISTINCT keyword causes the function to be applied to only unique
values from the named column. The UNIQUE keyword is a synonym for the
DISTINCT keyword.
The ALL keyword is the opposite of the DISTINCT keyword. If you specify the
ALL keyword, all the values selected from the named column or expression,
including any duplicate values, are used in the calculation.
COUNT(*) Keyword
The COUNT (*) keyword returns the number of rows that satisfy the WHERE
clause. The following example finds how many Hero products are stocked.
SELECT COUNT(*) FROM stock WHERE manu_code = 'HRO'
If the SELECT statement contains a GROUP BY clause, the COUNT(*) keyword
reflects the number of values in each group. The following example is
grouped by the first name; the rows are selected if the database server finds
more than one occurrence of the same name.
SELECT fname, COUNT(*) FROM customer
GROUP BY fname
HAVING COUNT(*) > 1
If the value of one or more rows is null, the COUNT(*) keyword includes the
null columns in the count unless the WHERE clause explicitly omits them.
Syntax
1-463
Expression
AVG Keyword
The AVG keyword returns the average of all values in the specified column
or expression. You can apply the AVG keyword only to number columns. If
you use the DISTINCT keyword, the average (mean) is greater than only the
distinct values in the specified column or expression. The query in the
following example finds the average price of a helmet:
SELECT AVG(unit_price) FROM stock WHERE stock_num = 110
Nulls are ignored unless every value in the specified column is null. If every
column value is null, the AVG keyword returns a null for that column.
MAX Keyword
The MAX keyword returns the largest value in the specified column or
expression. Using the DISTINCT keyword does not change the results. The
query in the following example finds the most expensive item that is in stock
but has not been ordered:
SELECT MAX(unit_price) FROM stock
WHERE NOT EXISTS (SELECT * FROM items
WHERE stock.stock_num = items.stock_num AND
stock.manu_code = items.manu_code)
Nulls are ignored unless every value in the specified column is null. If every
column value is null, the MAX keyword returns a null for that column.
MIN Keyword
The MIN keyword returns the lowest value in the column or expression.
Using the DISTINCT keyword does not change the results. The following
example finds the least expensive item in the stock table:
SELECT MIN(unit_price) FROM stock
Nulls are ignored unless every value in the specified column is null. If every
column value is null, the MIN keyword returns a null for that column.
1-464 Syntax
Expression
SUM Keyword
The SUM keyword returns the sum of all the values in the specified column
or expression, as shown in the following example. If you use the DISTINCT
keyword, the sum is for only distinct values in the column or expression.
SELECT SUM(total_price) FROM items WHERE order_num = 1013
Nulls are ignored unless every value in the specified column is null. If every
column value is null, the SUM keyword returns a null for that column.
You cannot use the SUM keyword with a character column.
COUNT DISTINCT and UNIQUE Keywords
The COUNT DISTINCT and UNIQUE keywords return the number of unique
values in the column or expression, as shown in the following example. If the
COUNT function encounters nulls, it ignores them.
SELECT COUNT (DISTINCT item_num) FROM items
Nulls are ignored unless every value in the specified column is null. If every
column value is null, the COUNT keyword returns a zero for that column.
Summary of Aggregate Function Behavior
The following example summarizes the action of the aggregate functions:
SELECT a_number FROM testtable WHERE a_number < 10
You get the values shown in the following example from the query shown in
the preceding example:
a_number
2
2
2
3
3
4
(null)
Syntax
1-465
Expression
The values returned from the preceding example are shown in the following
example:
Function
COUNT(*)
AVG
AVG (DISTINCT)
MAX
MAX(DISTINCT)
MIN
MIN(DISTINCT)
SUM
SUM(DISTINCT)
COUNT(DISTINCT)
Results
7
2.67
3
4
4
2
2
16
9
3
The following example show a query that returns the value 3:
SELECT AVG(DISTINCT a_number) FROM testtable WHERE a_number < 10
1-466 Syntax
Expression
Error Checking with Aggregate Functions
ESQL
Aggregate functions always return one row; if no rows are selected, the
function returns a null. You can use the COUNT (*) keyword to determine
whether any rows were selected and you can use an indicator variable to
determine whether any of the selected rows were empty. Fetching a row
with a cursor associated with an aggregate function always returns one row;
hence, 100 for end of data is never returned into the sqlcode variable for a
first fetch attempt.
You can also use the GET DIAGNOSTICS statement for error checking. See the
GET DIAGNOSTICS statement in this manual.
Using Arithmetic Operators with Expressions
You can combine expressions with arithmetic operators to make complex
expressions. You cannot combine expressions that use aggregate functions
with column expressions. The following examples use arithmetic operators:
quantity * total_price
price * 2
COUNT(*) + 2
If any value that participates in an arithmetic expression is null, the value of
the entire expression is null, as shown in the following example:
SELECT order_num, ship_charge/ship_weight FROM orders
WHERE order_num = 1023
If either ship_charge or ship_weight is null, the value returned for the
expression ship_charge/ship_weight is also null. If the expression
ship_charge/ship_weight is used in a condition, its truth value is unknown.
If you combine a DATETIME value with one or more INTERVAL values, all the
fields of the INTERVAL value must be present in the DATETIME value; no
implicit EXTEND function is performed. In addition, you cannot use YEAR to
MONTH intervals with DAY to SECOND intervals.
Syntax
1-467
Expression
Procedure Call Expressions
The following diagram shows procedure call expressions:
,
Procedure
Name
p. 1-495
(
Expression
p. 1-430
called
variable
called variable
)
=
is the name of one of the arguments expected by the called
procedure. Procedure arguments are bound to procedure
parameters by name or position but not both. That is, you
can use the parameter name = syntax for none or all of the
arguments specified in the procedure call expression.
Some typical procedure call expressions are shown in the following example:
read_address('Miller')
read_address(lastname = 'Miller')
1-468 Syntax
Identifier
Identifier
Purpose
Use the Identifier segment in the following segments to specify the name of
a database object:
•
•
•
•
•
•
•
•
•
•
Column Name
Connection Name
Constraint Name
Database Name
Index Name
Procedure Name
Synonym Name
Table Name
Trigger Name
View Name
Syntax
letter
underscore
letter
digit
underscore
digit
is an integer from 0 to 9.
letter
is an uppercase or lowercase character from a to Z.
underscore
is the underscore (_) character.
Syntax
1-469
Identifier
Usage
An identifier can contain up to 18 characters, inclusive.
SE
Database names are limited to 10 characters.
Do not declare any reserved word as an identifier of your application
development tool or SQL API.
NLS
With NLS enabled, you can use foreign characters in names of database
objects such as databases, tables, and views, as shown in the following
example:
CREATE DATABASE marché;
CREATE TABLE équipement
(
code
NCHAR(6),
description
NVARCHAR(128,10),
prix_courant
MONEY(6,2)
);
CREATE VIEW çà_va AS
SELECT numéro,nom FROM abonnés;
Nearly all Informix identifiers work with NLS enabled. The only exception
may be Connection Name, depending upon your system setup.
Note: If you receive an error message that seems unrelated to the statement that
caused the error, you should check to determine whether the statement uses a reserved
word as an identifier.
The following list specifies all the ANSI-reserved words. If you use one of
these words as an identifier, you must perform the following actions:
• Set DBANSIWARN or use the -ansi flag at compile time, you receive
compile-time warnings
• Set DBANSIWARN for runtime, warning flags are set in the SQLAWARN
array of sqlca
1-470 Syntax
Identifier
ADA
all
and
any
as
asc
authorization
avg
begin
between
by
char
character
check
close
cobol
commit
continue
count
create
current
cursor
dec
decimal
declare
delete
desc
distinct
double
end
escape
exec
execute
exists
fetch
float
for
fortran
found
from
go
goto
group
having
in
indicator
insert
int
integer
into
is
language
like
max
min
module
not
null
numeric
of
on
open
option
or
order
pascal
pli
precision
primary
procedure
privileges
public
real
rollback
schema
section
select
set
smallint
some
sql
sqlcode
sqlerror
sum
table
to
union
unique
update
user
values
view
whenever
where
with
work
Potential Ambiguities and Syntax Errors
Although you can use almost any word as an SQL identifier, syntactic
ambiguities can occur. An ambiguous statement might not produce the
desired results. This section outlines some potential pitfalls and
workarounds.
Syntax
1-471
Identifier
Using Functions as Column Names
The following two examples show a workaround for using a function as a
column name in a SELECT statement. This applies to the aggregate functions
(AVG, COUNT, MAX, MIN, SUM) as well as the function expressions (algebraic, exponential and logarithmic, time, hex, length, dbinfo, and
trigonometric functions).
Using avg as a column name causes the following example to fail because the
database server interprets avg as an aggregate function rather than as a
column name:
SELECT avg FROM mytab -- fails
The workaround in following example removes ambiguity by including a
table name with the column name:
SELECT mytab.avg FROM mytab
If you use the keyword TODAY, CURRENT, or USER as a column name,
ambiguity can occur, as shown in the following example:
CREATE TABLE mytab (user char(10),
CURRENT DATETIME HOUR TO SECOND,TODAY DATE)
INSERT INTO mytab VALUES('josh','11:30:30','1/22/89')
SELECT user,current,today FROM mytab
The database server interprets user, current, and today in the SELECT
statement as the SQL functions USER, CURRENT, and TODAY. Thus, instead of
returning josh, 11:30:30,1/22/89, the SELECT statement returns the
current user name, the current time, and the current date.
If you want to select the actual columns of the table, you must write the
SELECT statement in one of the following ways:
SELECT mytab.user, mytab.current, mytab.today FROM mytab;
EXEC SQL SELECT * FROM mytab;
1-472 Syntax
Identifier
Using Keywords as Column Names
Specific workarounds exist for using a keyword as a column name in a
SELECT statement or other SQL statement. In some cases, there might be more
than one suitable workaround.
Using ALL, DISTINCT, or UNIQUE as a Column Name
The first pair of examples shows a workaround for using the ALL, DISTINCT,
or UNIQUE keyword in a SELECT statement.
Using all as a column name causes the following example to fail because the
database server interprets all as a keyword rather than as a column name:
SELECT all FROM mytab -- fails
The workaround in following example uses the keyword ALL with the
column name all:
SELECT ALL all FROM mytab
The rest of the examples in this section show workarounds for using the
keywords UNIQUE or DISTINCT as a column name in a CREATE TABLE
statement.
Using unique as a column name causes the following example to fail because
the database server interprets unique as a keyword rather than as a column
name:
CREATE TABLE mytab (unique INTEGER) -- fails
The workaround shown in the following example uses two SQL statements.
The first statement creates the column mycol; the second renames the column
mycol to unique:
CREATE TABLE mytab (mycol INTEGER)
RENAME COLUMN mytab.mycol TO unique
Syntax
1-473
Identifier
The workaround in the following example also uses two SQL statements. The
first statement creates the column mycol; the second alters the table, adds the
column unique, and drops the column mycol:
CREATE TABLE mytab (mycol INTEGER)
ALTER TABLE mytab
ADD (unique integer)
DROP (mycol)
Using INTERVAL or DATETIME as a Column Name
The examples in this section show workarounds for using the keyword
INTERVAL (or DATETIME) as a column name in a SELECT statement.
Using interval as a column name causes the following example to fail
because the database server interprets interval as a keyword and expects it to
be followed by an INTERVAL qualifier:
SELECT interval FROM mytab -- fails
The workaround in the following example removes ambiguity by specifying
a table name with the column name:
SELECT mytab.interval FROM mytab;
The workaround in the following example includes an owner name with the
table name:
SELECT josh.mytab.interval FROM josh.mytab;
Using rowid as a Column Name
Every table has a virtual column named rowid. To avoid ambiguity, you
cannot use rowid as a column name. Performing the following actions causes
an error:
• Creating a table or view with a column named rowid
• Altering a table by adding a column named rowid
• Renaming a column to rowid
1-474 Syntax
Identifier
The following example uses the term rowid table name:
CREATE TABLE rowid (column INTEGER,
date DATE, char CHAR(20))
Using Keywords as Table Names
The examples in this section show workarounds that involve owner naming
when you use the keyword STATISTICS or OUTER as a table name. This also
applies to the use of STATISTICS or OUTER as a view name or synonym.
Using statistics as a table name causes the following example to fail because
the database server interprets it as part of the UPDATE STATISTICS syntax
rather than as a table name in an UPDATE statement:
UPDATE statistics SET mycol = 10
The workaround in the following example specifies an owner name with the
table name, to avoid ambiguity:
UPDATE josh.statistics SET mycol = 10
Using outer as a table name causes the following example to fail because the
database server interprets outer as a keyword for performing an outer join:
SELECT mycol FROM outer -- fails
The workaround in the following example uses owner naming to avoid
ambiguity:
SELECT mycol FROM josh.outer
Syntax
1-475
Identifier
Workarounds That Use the Keyword AS
In some cases, although a statement is not ambiguous and the syntax is
correct, the database server returns a syntax error. The preceding pages show
existing syntactic workarounds for several situations. You can use the AS
keyword to provide a workaround for the exceptions.
You can use the AS keyword in front of column labels or table aliases. The AS
keyword is an Informix extension to SQL.
The following example uses the AS keyword with a column label:
column-name AS display-label FROM table-name
The following example uses the AS keyword with a table alias:
SELECT select-list FROM table-name AS table-alias
Using AS with Column Labels
The examples in this section show workarounds that use the AS keyword
with a column label. The first two examples show how you can use the keyword UNITS (or YEAR, MONTH, DAY, HOUR, MINUTE, SECOND, or
FRACTION) as a column label.
Using units as a column label causes the following example to fail because
the database server interprets it as a DATETIME qualifier for the column
named mycol:
SELECT mycol units FROM mytab
The workaround in the following example includes the AS keyword:
$SELECT mycol AS units FROM mytab;
The following examples show how the AS or FROM keyword can be used as
a column label.
1-476 Syntax
Identifier
Using as as a column label causes the following example to fail because the
database server interprets as as identifying from as a column label and thus
finds no required FROM clause:
SELECT mycol as from mytab -- fails
The following example repeats the AS keyword:
SELECT mycol AS as from mytab
Using from as a column label causes the following example to fail because the
database server expects a table name to follow the first from:
SELECT mycol from FROM mytab -- fails
The following example uses the AS keyword to identify the first from as a
column label:
SELECT mycol AS from FROM mytab
Using AS with Table Aliases
The examples in this section show workarounds use the AS keyword with a
table alias. The first pair shows how to use the ORDER, FOR, GROUP, HAVING,
INTO, UNION, WITH, CREATE, GRANT, or WHERE keyword as a table alias.
Using order as a table alias causes the following example to fail because the
database server interprets order as part of an ORDER BY clause:
SELECT * FROM mytab order -- fails
The workaround in the following example uses the keyword AS to identify
order as a table alias:
SELECT * FROM mytab AS order;
The following two examples show how to use the keyword WITH as a table
alias.
Syntax
1-477
Identifier
Using with as a table alias causes the following example to fail because the
database server interprets the keyword as part of the WITH CHECK OPTION
syntax:
select * from mytab with -- fails
The workaround in the following example uses the keyword AS to identify
with as a table alias:
exec sql select * from mytab as with;
The following two examples show how to use the keyword CREATE (or
GRANT) as a table alias.
Using create as a table alias causes the following example to fail because the
database server interprets the keyword as part of the syntax to create an
entity such as a table, synonym, or view:
exec sql select * from mytab create -- fails
The workaround in the following example uses the keyword AS to identify
create as a table alias:
exec sql select * from mytab as create;
1-478 Syntax
Identifier
Fetching Keywords as Cursor Names
In a few situations, no workaround exists for the syntactic ambiguity that
occurs when a keyword is used as an identifier in an SQL program.
In the following example, the FETCH statement generates a syntax error
because the preprocessor interprets the syntax as pertaining to a scroll cursor
and expects a cursor name to follow next. This occurs whenever the keyword
NEXT, PREVIOUS, PRIOR, FIRST, LAST, CURRENT, RELATIVE, or ABSOLUTE is
used as a cursor name.
exec sql declare next cursor for
select customer_num, lname from customer;
exec sql open next;
exec sql fetch next into :cnum, :lname;
Using Keywords as Procedure Variable Names
If you use any of the following keywords as identifiers for variables in a
procedure, you can create ambiguous syntax:
CURRENT
OFF
DATETIME
ON
GLOBAL
PROCEDURE
INTERVAL
SELECT
NULL
Syntax
1-479
Identifier
Using CURRENT, DATETIME, INTERVAL, and NULL in INSERT
You cannot use the CURRENT, DATETIME, INTERVAL, or NULL keyword as
the name of a procedure with the INSERT statement.
For example, if you define a variable called null, when you try to insert the
value null into a column, you receive a syntax error. This is shown in the
following example:
CREATE PROCEDURE problem()
.
.
.
DEFINE null INT;
LET null = 3;
INSERT INTO tab VALUES (null); -- error, inserts NULL, not 3
Using NULL and SELECT in a Condition
If you define a variable with the name null or select, using it in a condition that
uses the IN keyword is ambiguous. The following example shows three conditions that cause problems: in an IF statement, in a WHERE clause of a
SELECT statement, and in a WHILE condition:
CREATE PROCEDURE problem()
.
.
.
DEFINE x,y,select, null, INT;
DEFINE pfname CHAR[15];
LET x = 3; LET select = 300;
LET null = 1;
IF x IN (select, 10, 12) THEN LET y = 1; -- problem if
IF x IN (1, 2, 4) THEN
SELECT customer_num, fname INTO y, pfname FROM customer
WHERE customer IN (select , 301 , 302, 303); -- problem in
WHILE x IN (null, 2) -- problem while
.
.
.
END WHILE;
1-480 Syntax
Identifier
You can use the variable select in an IN list if you ensure it is not the first
element in the list. The workaround in the following example corrects the IF
statement shown in the preceding example:
IF x IN (10, select, 12) THEN LET y = 1; -- problem if
No workaround exists to using null as a variable name and attempting to use
it in an IN condition.
Using ON, OFF, or PROCEDURE with TRACE
If you define a procedure variable called on, off, or procedure and you attempt
to use it in a TRACE statement, the value of the variable does not trace.
Instead, the TRACE ON, TRACE OFF, or TRACE PROCEDURE statements
execute. You can trace the value of the variable by making the variable into a
more complex expression. The following example shows the ambiguous
syntax and the workaround.
DEFINE on, off, procedure INT;
TRACE
TRACE
TRACE
TRACE
on;
0+ on;
off;
''||off;
--ambiguous
--ok
--ambiguous
--ok
TRACE procedure;--ambiguous
TRACE 0+procedure;--ok
Using GLOBAL as a Variable Name
If you attempt to define a variable with the name global, the define operation
fails. The syntax shown in the following example conflicts with the syntax for
defining global variables, and no workaround exists:
DEFINE global INT; -- fails;
Syntax
1-481
Identifier
Using EXECUTE, SELECT, or WITH as Cursor Names
Do not use an EXECUTE, SELECT, or WITH keyword as the name of a cursor.
If you try to use one of these keywords as the name of a cursor in a FOREACH
statement, the cursor name is interpreted as a keyword in the FOREACH
statement. No workaround exists.
The following example does not work:
DEFINE execute INT;
FOREACH execute FOR SELECT col1 -- error, looks like
-- FOREACH EXECUTE PROCEDURE
INTO var1 FROM tab1; --
SELECT Statements in WHILE and FOR Statements
If you use a SELECT statement in a WHILE or FOR loop and if you need to
enclose it in parentheses, enclose the entire SELECT statement in a
BEGIN...END block. The SELECT statement in the first WHILE statement in the
following example is interpreted as a call to the procedure var1; the second
WHILE statement is interpreted correctly:
DEFINE var1, var2 INT;
WHILE var2 = var1
SELECT col1 INTO var3 FROM TAB -- error, seen as call var1()
UNION
SELECT co2 FROM tab2;
END WHILE
WHILE var2 = var1
BEGIN
SELECT col1 INTO var3 FROM TAB -- ok syntax
UNION
SELECT co2 FROM tab2;
END
END WHILE
1-482 Syntax
Identifier
The SET Keyword in the ON EXCEPTION Statement
If you use a statement that begins with the keyword SET inside the statement
ON EXCEPTION, you must enclose it in a BEGIN...END block. This includes the
following statements:
SET CONSTRAINTS
SET LOCK MODE
SET DEBUG FILE
SET LOG
SET EXPLAIN
SET OPTIMIZATION
SET ISOLATION
The following example shows the ON EXCEPTION statement, which returns
an error and a correct ON EXCEPTION statement that uses the BEGIN ... END
block:
ON EXCEPTION IN (-107)
SET LOCK MODE TO WAIT; -- error, value expected, not 'lock'
END EXCEPTION
ON EXCEPTION IN (-107)
BEGIN
SET LOCK MODE TO WAIT; -- ok
END
END EXCEPTION
References
In the Informix Guide to SQL: Tutorial, see the owner-naming discussion in
Chapter 13.
Syntax
1-483
Index Name
Index Name
Purpose
Use the Index Name segment wherever you see a reference to an index name
in a syntax drawing. It appears in the following statements:
•
•
•
ALTER INDEX
CREATE INDEX
DROP INDEX
Syntax
Identifier
p. 1-469
OL
owner.
:
database
'owner'.
@ dbservername
database
is the name of the database in which the index resides.
dbservername
is the name of the INFORMIX-OnLine Dynamic Server
database server that is home to database. The @ sign is a literal
character that you must use to introduce the database server
name.
owner
is the user name of the owner of the index. If you are using
an ANSI-compliant database, you must use the owner. convention for indexes that you do not own. If you use quotes,
owner. appears exactly as typed.
Usage
The actual name of the index is an SQL identifier.
If you are creating an index, the name must be unique within a database.
ANSI
1-484 Syntax
The owner.name is case-sensitive. In an ANSI-compliant database, if you do
not use quotes around the owner name, the name of the table owner is
stored as uppercase letters. For more information, see the discussion of
case-sensitivity in ANSI-compliant databases on page 1-508.
INTERVAL Field Qualifier
INTERVAL Field Qualifier
Purpose
Use the INTERVAL field qualifier to specify the units for an INTERVAL value.
The INTERVAL field qualifier is used in the Data Type segment.
Syntax
YEAR
(y-precision)
TO YEAR
(4)
MONTH
(precision)
TO MONTH
(2)
DAY
(precision)
TO DAY
(2)
HOUR
(precision)
TO HOUR
(2)
MINUTE
(precision)
TO MINUTE
(2)
SECOND
(precision)
TO SECOND
(2)
FRACTION
TO FRACTION
(f-precision)
(3)
Syntax
1-485
INTERVAL Field Qualifier
f-precision
is the maximum number of digits used in the fraction field.
The default is three; the maximum is five.
precision
is the number of digits in the largest number of months,
days, hours, or minutes that the interval can hold. The
default is two; the maximum is nine.
y- precision
is the number of digits in the largest number of years that the
interval can hold. The default is four; the maximum is nine.
Usage
The examples in this section show INTERVAL data types that are of the type
YEAR TO MONTH types. The first example can hold an interval of up to 999
years and 11 months, because it gives 3 as the precision of the year field. The
second example uses the default precision on the year field, so it can hold an
interval of up to 9,999 years and 11 months.
YEAR (3) TO MONTH
YEAR TO MONTH
When you want a value to contain only one field, the first and last qualifiers
are the same. For example, an interval of whole years is qualified as YEAR TO
YEAR or YEAR (5) TO YEAR, for an interval of up to 99,999 years.
The following examples show several forms of INTERVAL qualifiers:
YEAR(5) TO MONTH
DAY (5) TO FRACTION(2)
DAY TO DAY
FRACTION TO FRACTION (4)
References
In the Informix Guide to SQL: Reference, for information about using INTERVAL
data in arithmetic and relational operations, see Chapter 3.
1-486 Syntax
Literal DATETIME
Literal DATETIME
Purpose
Use a literal DATETIME segment as a DATETIME value. The literal DATETIME
segment is used in the following statements and segments:
• INSERT statement
• SELECT statement
• UPDATE statement
• Condition segment
• Expression segment
Syntax
1-487
Literal DATETIME
Syntax
Numeric
Date
(
DATETIME
DATETIME
Field Qualifier
p. 1-428
)
Numeric Date
yyyy
mo
dd
space
hh
:
mi
:
ss
.
f
1-488 Syntax
yyyy
is the year in up to four digits. If you use two digits, 19 is
assumed as the first part of the year, as in 1993.
mo
is the month in two digits.
dd
is the day in up to two digits.
space
is, literally, a space made by pressing the spacebar.
hh
is the hour in up to two digits.
mi
is the minute in up to two digits.
ss
is the second in up to two digits.
f
is the fraction of a second in up to five digits, depending on
the precision given to the fractional portion in the INTERVAL
qualifier.
Literal DATETIME
Usage
The following examples show literal DATETIME values:
DATETIME (92-3-6) YEAR TO DAY
DATETIME (09:55:30.825) HOUR TO FRACTION
DATETIME (92-5) YEAR TO MONTH
The following example shows a literal DATETIME value used with the
EXTEND function:
EXTEND (DATETIME (1992-8-1) YEAR TO DAY, YEAR TO MINUTE)
- INTERVAL (720) MINUTE (3) TO MINUTE
Syntax
1-489
Literal Interval
Literal Interval
Purpose
The literal INTERVAL segment is used in the following statements and
segments:
• INSERT statement
• UPDATE statement
• Condition segment
• Expression segment
1-490 Syntax
Literal Interval
Syntax
(
INTERVAL
INTERVAL
Field Qualifier
p. 1-485
)
Numeric Date
Numeric Date
yyyy
mo
dd
space
hh
:
mi
:
ss
.
f
yyyy
is the number of years. The maximum number of digits
allowed is four, unless this is the first field and the precision
is specified differently by the INTERVAL field qualifier.
mo
is the number of months. The maximum number of digits
allowed is two, unless this is the first field and the precision
is specified differently by the INTERVAL field qualifier.
dd
is the number of days. The maximum number of digits
allowed is two, unless this is the first field and the precision
is specified differently by the INTERVAL field qualifier.
space
is, literally, a space made by pressing the SPACEBAR.
hh
is the number of hours. The maximum number of digits
allowed is two, unless this is the first field and the precision
is specified differently by the INTERVAL field qualifier.
Syntax
1-491
Literal Interval
mi
is the number of minutes. The maximum number of digits
allowed is two, unless this is the first field and the precision
is specified differently by the INTERVAL field qualifier.
ss
is the number of seconds. The maximum number of digits
allowed is two, unless this is the first field and the precision
is specified differently by the INTERVAL field qualifier.
f
is the fraction of a second in up to five digits, depending on
the precision given to the fractional portion in the INTERVAL
field qualifier.
Usage
The following examples show literal INTERVAL values:
INTERVAL (3-6) YEAR TO MONTH
INTERVAL (09:55:30.825) HOUR TO FRACTION
INTERVAL (40 5) DAY TO HOUR
1-492 Syntax
Literal Number
Literal Number
Purpose
A literal number is an integer or noninteger (floating) constant. The Literal
Number segment is used in the following statements and segments:
• GRANT statement
• INSERT statement
• UPDATE statement
• UPDATE STATISTICS statement
• Condition segment
• Expression segment
Syntax
digit
.
+
-
digit
.
digit
E
digit
-
digit
is an integer from 0 to 9.
Usage
Literal numbers do not contain embedded commas; you cannot use a comma
to indicate a decimal point. You can precede literal numbers with a plus or a
minus sign. Integers do not contain decimal points. The following examples
shows some integers:
10
-27
25567
Syntax
1-493
Literal Number
Floating and decimal numbers contain a decimal point and/or exponential
notation. The following examples show floating and decimal numbers:
123.456
1.23456e2
123456.0e-3
When you use a literal number as a MONEY value, do not precede it with a
money symbol or include commas.
1-494 Syntax
Procedure Name
Procedure Name
Purpose
Use the Procedure Name segment wherever you see a reference to a
procedure name in a syntax drawing. It appears in the following statements:
•
•
•
•
•
CREATE PROCEDURE
DROP PROCEDURE
EXECUTE PROCEDURE
GRANT
UPDATE
Syntax
Identifier
p. 1-469
OL
owner.
:
database
'owner'.
@ dbservername
database
is the name of the database in which the procedure resides.
dbservername
is the name of the INFORMIX-OnLine Dynamic Server
database server that is home to database. The @ sign is a literal
character that you must use to introduce the database server
name.
owner
is the user name of the owner of the procedure. If you are
using an ANSI-compliant database, you must use the owner.
convention for a procedure that you do not own. If you use
quotes, owner. appears exactly as typed.
Usage
The actual name of the procedure is an SQL identifier.
Syntax
1-495
Procedure Name
If you are creating the procedure, the name of the procedure must be unique
within a database.
ANSI
If you are creating the procedure, the combination owner.name must be
unique within a database.
The owner.name is case sensitive. In an ANSI-compliant database, if you do
not use quotes around the owner name, the name of the table owner is
stored as uppercase letters. For more information, see the discussion of case
sensitivity in ANSI-compliant databases on page 1-508.
Procedures and SQL Functions with the Same Names
If you create a procedure with the same name as an SQL function and then
explicitly define that name as a procedure, any calls by that name are to the
procedure instead of the SQL function. That is, you cannot use the system
function within the statement block in which the procedure is defined.
The following example uses two length functions. The first time the
procedure calls the length function, it is the SQL function named LENGTH.
The second time the procedure calls the length function is within a
BEGIN...END block in which length has been defined as a procedure. The
second call to length actually uses the user-created procedure called length.
CREATE PROCEDURE test_len()
RETURNING INT, INT;
DEFINE c INT;
DEFINE d INT;
LET c = (SELECT length(fname) FROM customer
WHERE customer_num = 101);
BEGIN
DEFINE length PROCEDURE;
LET d = length(5);
END
RETURN c, d;
END PROCEDURE;
1-496 Syntax
Quoted String
Quoted String
Purpose
The Quoted String segment is used in the following statements and
segments:
• INSERT statement
• SELECT statement
• Condition segment
• Expression segment (in constant expressions)
Syntax
'
'
character
+
"
''
"
character
""
character
is an ASCII character.
Usage
The string constant must be written on a single line; that is, you cannot use
embedded new lines.
Using Quotes in Strings
The single quote has no special significance in string constants delimited by
double quotes. Likewise, the double quote has no special significance in
strings delimited by single quotes. For example, the following strings are
valid:
'Nancy's puppy jumped the fence'
'Billy told his kitten, "no!"'
Syntax
1-497
Quoted String
If your string is delimited by double quotes, you can include a double quote
in the string by preceding the double quote with another double quote, as
shown in the following string:
"Enter ""y"" to select this row"
DATETIME and INTERVAL Values as Strings
You can enter DATETIME and INTERVAL data in the literal forms described in
the “Literal DATETIME” and “Literal Interval” segments beginning on pages
1-487 and 1-490, respectively, or you can enter them as quoted strings. Valid
literals that are entered as character strings are converted automatically into
DATETIME or INTERVAL values. The following INSERT statements use
quoted strings to enter INTERVAL and DATETIME data:
INSERT INTO cust_calls(call_dtime) VALUES ('1992-5-4 10:12:11')
INSERT INTO manufact(lead_time) VALUES ('14')
The format of the value in the quoted string must exactly match the format
specified by the qualifiers of the column. For the first case in the preceding
example, call_dtime must be defined with the qualifiers YEAR TO MINUTE
for the INSERT statement to be valid.
LIKE and MATCHES in a Condition
Quoted strings with the LIKE or MATCHES keyword in a condition can
include wildcard characters. See the “Condition” segment beginning on page
1-404 for a complete description of how to use wildcard characters.
Inserting Values as Quoted Strings
If you are inserting a value that is a quoted string, you must adhere to the
following conventions:
• Enclose CHAR, VARCHAR, NCHAR, NVARCHAR, DATE, DATETIME, and
INTERVAL values in quotation marks.
• Set DATE values in the mm/dd/yyy format or in the format specified by
DBSET, if set.
• You cannot insert strings longer than 256 bytes.
1-498 Syntax
Quoted String
• Numbers with decimal values must contain a decimal point. You cannot
use a comma as a decimal indicator.
• You cannot precede MONEY data with a dollar sign or include commas.
• You can include NULL as a placeholder only if the column accepts null
values.
Syntax
1-499
Relational Operator
Relational Operator
Purpose
Use a relational operator to compare two expressions quantitatively. The
Relational Operator segment is used in the Condition segment.
Syntax
A relational operator takes the following form:
<
<=
>
=
>=
<>
+
!=
1-500 Syntax
<
means less than.
<=
means less than or equal to.
>
means greater than.
=
means equal to.
>=
means greater than or equal to.
<>
means not equal to.
!=
means not equal to.
Relational Operator
Usage
For DATE and DATETIME expressions, greater than means later in time.
For INTERVAL expressions, greater than means a longer span of time.
For CHAR and VARCHAR expressions, greater than means after in ASCII collating order, where lowercase letters follow uppercase letters, and both follow
numerals. The following chart contains the seven-bit ASCII collating order.
NLS
Native-language collating sequence is used for NCHAR and NVARCHAR
expressions.
Syntax
1-501
Relational Operator
1-502 Syntax
Num
Char
Num
Char
Num
Char
0
1
2
3
4
5
6
7
8
9
10
11
12
13
14
15
16
17
18
19
20
21
22
23
24
25
26
27
28
29
30
31
32
33
34
35
^@
^A
^B
^C
^D
^E
^F
^G
^H
^I
^J
^K
^L
^M
^N
^O
^P
^Q
^R
^S
^T
^U
^V
^W
^X
^Y
^Z
esc
^\
^]
^^
^_
43
44
45
46
47
48
49
50
51
52
53
54
55
56
57
58
59
60
61
62
63
64
65
66
67
68
69
70
71
72
73
74
75
76
77
78
+
,
.
/
0
1
2
3
4
5
6
7
8
9
:
;
<
=
>
?
@
A
B
C
D
E
F
G
H
I
J
K
L
M
N
86
87
88
89
90
91
92
93
94
95
96
97
98
99
100
101
102
103
104
105
106
107
108
109
110
111
112
113
114
115
116
117
118
119
120
121
V
W
X
Y
Z
[
\
]
^
_
`
a
b
c
d
e
f
g
h
i
j
k
l
m
n
o
p
q
r
s
t
u
v
w
x
y
!
"
#
Relational Operator
Num
Char
Num
Char
Num
Char
36
37
38
39
40
41
42
$
%
&
'
(
)
*
79
80
81
82
83
84
85
O
P
Q
R
S
T
U
122
123
124
125
126
127
z
{
|
}
~
del
^X = CTRL-X
Syntax
1-503
Synonym Name
Synonym Name
Purpose
Use the Synonym Name segment wherever you see a reference to a synonym
name in a syntax drawing. It appears in the following statements:
•
•
•
•
•
•
•
•
•
•
•
•
•
•
•
•
•
•
•
•
•
1-504 Syntax
ALTER TABLE
CREATE AUDIT
CREATE INDEX
CREATE SYNONYM
CREATE VIEW
DELETE
DROP AUDIT
DROP SYNONYM
DROP TABLE
DROP VIEW
GRANT
INSERT
LOCK TABLE
RECOVER TABLE
RENAME COLUMN
RENAME TABLE
REVOKE
SELECT
UNLOCK TABLE
UPDATE
UPDATE STATISTICS
Synonym Name
Syntax
Identifier
p. 1-469
OL
owner.
+
:
database
'owner'.
@ dbservername
database
is the name of the database in which the synonym resides.
dbservername
is the name of the INFORMIX-OnLine Dynamic Server
database server that is home to database. The @ sign is a literal
character that you must use to introduce the database server
name.
owner
is the user name of the owner of the synonym. If you are
using an ANSI-compliant database, you must use the owner.
convention for a synonym that you do not own. If you use
quotes, owner. appears exactly as typed.
Usage
The actual name of the synonym is an SQL identifier.
If you are creating the synonym, the name of the synonym must be unique
within a database The name cannot be the same as table names, temporary
table names, or view names. It is possible to have a public and private
synonym with the same name.
ANSI
If you are creating the synonym, the combination owner.name must be
unique within a database.
The owner.name is case-sensitive. In an ANSI-compliant database, if you do
not use quotes around the owner name, the name of the table owner is
stored in uppercase letters. For more information, see the discussion of
case-sensitivity in ANSI-compliant databases on page 1-508.
Syntax
1-505
Table Name
Table Name
Purpose
Use the Table Name segment in the following statements to specify the name
of a table:
•
•
•
•
•
•
•
•
•
•
•
•
•
•
•
•
•
•
•
1-506 Syntax
ALTER TABLE
CREATE AUDIT
CREATE INDEX
CREATE SYNONYM
CREATE TABLE
DELETE
DROP AUDIT
DROP TABLE
GRANT
INSERT
LOCK TABLE
RECOVER TABLE
RENAME COLUMN
RENAME TABLE
REVOKE
SELECT
UNLOCK TABLE
UPDATE
UPDATE STATISTICS
Table Name
Syntax
Identifier
p. 1-469
OL
owner.
+
'owner'.
:
database
@ dbservername
database
is the name of the database in which the table resides.
dbservername
is the name of the INFORMIX-OnLine Dynamic Server
database server that is home to database. The @ sign is a literal
character that you must use to introduce the database server
name.
owner
is the user name of the owner of the table. If you are using an
ANSI-compliant database, you must use the owner.
convention for tables that you do not own. If you use quotes,
owner. appears exactly as typed.
Usage
The following example shows a table specification:
empinfo@personnel:emp_names
If you are creating or renaming a table, the name of the table must be unique
among all the tables, synonyms, temporary tables, and views that already
exist in the database.
ANSI
If you are creating or renaming a table, you must make sure that the
combination of owner and name is unique within a database.
In an ANSI-compliant database, the table name must include owner. unless
you are the owner. For system catalog tables, the owner is informix.
Syntax
1-507
Table Name
Case-Sensitivity in ANSI-Compliant Databases
ANSI
The database server shifts the owner name to uppercase letters before the
statement executes, unless the owner name is enclosed in quotes. Put quotes
around the owner portion of a name if you want the owner to be read
exactly as written. In the following example, the name cathl in the first statement is upshifted to CATHL before it is used; the name nancy in the second
statement is not upshifted:
SELECT * FROM cathl.customer
SELECT * FROM 'nancy'.customer
No problem exists if you create a table with an implicit owner in uppercase
letters and the owner’s real login name is also in uppercase letters. For
example, suppose that you are the user BROWN and you create a view with
the following statement:
CREATE VIEW newcust AS
SELECT fname, lname FROM customer WHERE state = 'NJ'
You, BROWN, can run the following SELECT statements on the view:
SELECT * FROM brown.newcust
SELECT * FROM newcust
SELECT * FROM systables WHERE tabname = newcust
AND owner = USER
In the first query in the preceding example, the database server automatically upshifts brown before the SELECT statement executes. In the second
query, the database server returns the owner name BROWN already
upshifted. In the third query, USER returns the login name as it is stored—
in this case, in uppercase letters.
1-508 Syntax
Table Name
If you are the user nancy and you use the following statement, the resulting
view has the name NANCY.njcust:
CREATE VIEW nancy.njcust AS
SELECT fname, lname FROM customer WHERE state = 'NJ'
If you are nancy and you use the following statement, the resulting view has
the name nancy.njcust:
CREATE VIEW 'nancy'.njcust AS
SELECT fname, lname FROM customer WHERE state = 'NJ'
The following SELECT statement fails because it tries to match the name
NANCY.njcust to the actual owner and table name of nancy.njcust:
SELECT * FROM nancy.njcust
References
In the Informix Guide to SQL: Tutorial, see the discussion of owner naming in
Chapter 13.
Syntax
1-509
View Name
View Name
Purpose
Use the View Name segment in the following statements to specify the name
of a view:
•
•
•
•
•
•
•
•
•
CREATE SYNONYM
CREATE VIEW
DELETE
DROP VIEW
GRANT
INSERT
REVOKE
SELECT
UPDATE
Syntax
Identifier
p. 1-469
OL
owner.
+
:
database
'owner'.
@ dbservername
1-510 Syntax
database
is the name of the database in which the view resides.
dbservername
is the name of the INFORMIX-OnLine Dynamic Server
database server that is home to database. The @ sign is a literal
character that you must use to introduce the database server
name.
owner
is the user name of the owner of the view. If you are using an
ANSI-compliant database, you must use the owner. convention for views that you do not own. If you use quotes, owner.
appears exactly as typed.
View Name
Usage
The use of the prefix owner. is optional; however, if you use it, the database
server does check owner for accuracy. If you are creating a view, the name of
the view must be unique among all the tables, synonyms, temporary tables,
and views that already exist in the database.
ANSI
If you are creating a view, the owner.view-name must be unique among all the
tables, synonyms, and views that already exist in the database.
The owner.name is case-sensitive. In an ANSI-compliant database, if you do
not use quotes around the owner name, the name of the table owner is
stored as uppercase letters. For more information, see the discussion of casesensitivity in ANSI-compliant databases on page 1-508.
References
In the Informix Guide to SQL: Tutorial, see the discussions of views and
security in Chapter 11.
Syntax
1-511
View Name
1-512 Syntax
Chapter
SPL Statements
Chapter Overview 3
CALL 3
CONTINUE 6
DEFINE 7
EXIT 14
FOR 16
FOREACH 20
IF 24
LET 28
ON EXCEPTION 31
RAISE EXCEPTION 36
RETURN 38
SYSTEM 40
TRACE 42
WHILE 46
2
2-2 SPL Statements
Chapter Overview
This chapter contains the Stored Procedure Language (SPL) statements. For
additional information about using stored procedures, see Chapter 14 of the
Informix Guide to SQL: Tutorial.
CALL
Purpose
Use the CALL statement to execute a procedure from within a stored
procedure.
Syntax
CALL
Procedure
Name
p. 1-495
(
)
;
,
,
Argument
RETURNING
procedure
variable
Argument
Expression
p. 1-430
parameter
name
=
SELECT
Statement
(Subset)
p. 2-4
parameter name
is the name of the parameter as defined by its CREATE
PROCEDURE statement. Procedure arguments are
bound to procedure parameters by name or position,
but not both. That is, you can use the parameter name =
SPL Statements 2-3
CALL
syntax for none or all the arguments specified in one
CALL statement.
procedure variable
is the name of a variable as defined by its CREATE
PROCEDURE statement.
Usage
The CALL statement invokes a procedure called procedure name. The CALL
statement is identical in behavior to the EXECUTE PROCEDURE statement,
except it can be used only from within a stored procedure.
Specifying Arguments
If more arguments are in a CALL statement than are expected by the called
procedure, you receive an error.
If fewer arguments are specified by a CALL statement than are expected by
the called procedure, the arguments are said to be missing. Missing arguments are initialized to their corresponding default values, if default values
were specified. (See CREATE PROCEDURE on page 1-68.) This initialization
occurs before the first executable statement in the body of the procedure.
If arguments are missing and do not have default values, they are initialized
to the value of UNDEFINED. An attempt to use any variable that has the value
of UNDEFINED results in an error.
Procedure arguments are bound to procedure parameters by name or
position, but not both. That is, you can use the parameter name = syntax for
none or all of the arguments specified in one CALL statement.
Each procedure call in the following example is valid for a procedure that
expects character arguments t, n, and d, in that order:
CALL add_col (t='customer', d ='integer', n = 'newint');
CALL add_col('customer','newint','integer');
Subset of SELECT Allowed in a Procedure Argument
You can use any SELECT statement as the argument for a procedure, as long
as it returns exactly one value of the proper type and length. (See the discussion of SELECT statements that begins on page 1-310 for more information.)
2-4 SPL Statements
CALL
Receiving Input from the Called Procedure
The RETURNING clause specifies the procedure variables that receive the
returned values from a procedure call. If the RETURNING clause is omitted,
the called procedure must not return any values.
The following example shows two procedure calls, one that expects no values
to be returned (no_args) and one that expects three values to be returned
(yes_args). Three integer variables have been defined to receive the returned
values from yes_args.
CREATE PROCEDURE not_much()
DEFINE i, j, k INT;
CALL no_args (10,20);
CALL yes_args (5) RETURNING i, j, k;
END PROCEDURE
SPL Statements 2-5
CONTINUE
CONTINUE
Purpose
Use the CONTINUE statement to start the next iteration of the innermost FOR,
WHILE, or FOREACH loop.
Syntax
CONTINUE
FOR
;
WHILE
FOREACH
Usage
When you encounter a CONTINUE statement, the rest of the statements in the
innermost loop of the indicated type are skipped. Execution continues at the
top of the loop with the next iteration. In the following example, the values 3
through 15 are inserted into the table testtable. The values 3 through 9 and 13
through 15 are also returned in the process. The value 11 is not returned
because the CONTINUE FOR statement is reached and causes the RETURN i
WITH RESUME statement to be skipped.
CREATE PROCEDURE loop_skip()
RETURNING INT;
DEFINE i INT;
.
.
.
FOR i IN (3 TO 15 STEP 2)
INSERT INTO testtable values(i, null, null);
IF i = 11
CONTINUE FOR;
END IF;
RETURN i WITH RESUME;
END FOR;
END PROCEDURE;
The CONTINUE statement generates errors if it cannot find the identified
loop.
2-6 SPL Statements
DEFINE
DEFINE
Purpose
Use the DEFINE statement to declare variables that are used in the procedure
and assign them data types.
Syntax
,
DEFINE
SQL Data Type
(Subset)
p. 2-8
variable
name
GLOBAL
OL
REFERENCES
Default
Value
DEFAULT
BYTE
;
DEFAULT
NULL
TEXT
,
SQL Data Type
(Subset)
p. 2-8
variable
name
OL
BYTE
REFERENCES
TEXT
LIKE
Table Name
p. 1-506
.
column
Synonym
Name
p. 1-504
View Name
p. 1-510
PROCEDURE
column
is the name of a column in the table.
variable name
is the name of the procedure variable being defined.
SPL Statements 2-7
DEFINE
Default
Value
Literal Number
p. 1-493
Quoted String
p. 1-497
Literal Interval
p. 1-490
Literal Datetime
p. 1-487
CURRENT
p. 1-440
DATETIME
Field
Qualifier
p. 1-428
USER
TODAY
NULL
OL
DBSERVERNAME
SITENAME
Usage
The DEFINE statement is not an executable statement. The DEFINE statement
must appear after the procedure header and before any other statements. A
variable can be used anywhere within the statement block in which it is
defined; that is, the scope of a defined variable is the statement block in which
it was defined.
SQL Data Type Subset
The SQL data type subset includes all the SQL data types except SERIAL, TEXT,
and BYTE.
2-8 SPL Statements
DEFINE
Defining TEXT and BYTE Variables
You can use TEXT and BYTE variables by using the REFERENCES keyword.
TEXT and BYTE variables do not contain the actual data but are simply pointers to the data. The REFERENCES keyword is a reminder that the procedure
variable is just a pointer. You use the procedure variables for TEXT and BYTE
data types exactly as you would any other variable.
Redeclaration or Redefinition
If you define the same variable twice within the same statement block, you
receive an error. A variable can be redefined within a nested block, in which
case it temporarily hides the outer declaration. The following example
produces an error:
CREATE PROCEDURE example1()
DEFINE n INT; DEFINE j INT;
DEFINE n CHAR (1); -- redefinition produces an error
.
.
.
The redeclaration in the following example is allowed. Within the nested
statement block, n is a character variable. Outside the block, n is an integer
variable.
CREATE PROCEDURE example2()
DEFINE n INT; DEFINE j INT;
.
.
.
BEGIN
DEFINE n CHAR (1); -- character n masks integer variable
locally
.
.
.
END
SPL Statements 2-9
DEFINE
Declaring GLOBAL Variables
The GLOBAL modifier indicates that the list of variables that follows the
keyword GLOBAL are available to other procedures. The types of these variables must match the types of variables in the global environment. The global
environment is the memory used by all the procedures run within a given
session (a DB-Access session or an SQL API session). The values of global
variables are stored in memory.
Global variables are shared between procedures running in the current
session. Because global variables are not saved in the database, they are lost
when the current session closes.
Global variables are not shared across databases. Global procedure variables
are not shared between the database server and any application development
tools.
The first declaration of a global variable establishes the variable in the global
environment; subsequent global declarations simply bind the variable to the
global environment, establishing the value of the variable at that point. The
following example shows two procedures, proc1 and proc2, which have both
defined the global variable gl_out:
CREATE PROCEDURE proc1()
.
.
.
DEFINE GLOBAL gl_out INT DEFAULT 13;
.
.
.
LET gl_out = gl_out + 1;
END PROCEDURE;
CREATE PROCEDURE proc2()
.
.
2-10 SPL Statements
DEFINE
.
DEFINE GLOBAL gl_out INT DEFAULT 23;
DEFINE tmp INT;
.
.
.
LET tmp = gl_out
.
.
.
END PROCEDURE;
If proc1 is called first, gl_out is set to 13 and then incremented to 14. If proc2
is then called, it sees that the value of gl_out is already defined, so the default
value of 23 is not applied. Then, proc2 assigns the existing value of 14 to tmp.
If proc2 had been called first, gl_out would have been set to 23, and 23 would
have been assigned to tmp. Later calls to proc1 would not apply the default
of 13.
Providing Default Values
You can provide a literal value or a null value as the default for a global
variable. You also can use a call to an SQL function to provide the default
value. The following example uses the SITENAME function to provide a
default value. It also defines a global BYTE variable.
CREATE PROCEDURE gl_def()
DEFINE GLOBAL gl_site CHAR(18) DEFAULT SITENAME;
DEFINE GLOBAL gl_byte REFERENCES BYTE DEFAULT NULL;
.
.
.
END PROCEDURE
SITENAME or DBSERVERNAME
If you use the value returned by SITENAME or DBSERVERNAME as the
default, the variable must be a CHAR, VARCHAR, NCHAR, or NVARCHAR
value of at least 18 characters.
USER
If you use USER as the default, the variable must be a CHAR, VARCHAR,
NCHAR, or NVARCHAR value of at least eight characters.
SPL Statements 2-11
DEFINE
CURRENT
If you use CURRENT as the default, the variable must be a DATETIME value.
If your variable has been qualified with the YEAR TO FRACTION keyword,
you can use CURRENT without qualifiers. If your variable uses another set of
qualifiers, you must provide the same qualifiers when you use CURRENT as
the default value. The following example defines a DATETIME variable with
qualifiers and uses CURRENT with matching qualifiers:
DEFINE GLOBAL d_var DATETIME YEAR TO MONTH
DEFAULT CURRENT YEAR TO MONTH;
TODAY
If you use TODAY as the default, the variable must be a DATE value.
TEXT and BYTE
The only default value possible for a TEXT or BYTE variable is null. The
following example defines a global variable call l_blob of type TEXT:
CREATE PROCEDURE use_text()
DEFINE i INT;
DEFINE GLOBAL l_blob REFERENCES TEXT DEFAULT NULL;
END PROCEDURE
Declaring Local Variables
Nonglobal (local) variables do not allow defaults. The following example
shows typical definitions of local variables:
CREATE PROCEDURE def_ex()
DEFINE i INT;
DEFINE word CHAR(15);
DEFINE b_day DATE;
DEFINE c_name LIKE customer.fname;
DEFINE b_text REFERENCES TEXT ;
END PROCEDURE
2-12 SPL Statements
DEFINE
Declaring Variables LIKE Columns
If you use the LIKE clause, variable name is defined as the same type as the type
of the column in table. The types of variables defined as database columns are
resolved at run time; therefore, column and table do not exist at compile time.
Declaring Variables as the PROCEDURE Type
The PROCEDURE type indicates that in the current scope, variable name is a
user-defined procedure call and not an SQL function or a system function call.
For example, the following statement defines length as a procedure not the
SQL LENGTH function. This disables the SQL LENGTH function within the
scope of the statement block. You would use such a definition if you had created a procedure with the name length prior to defining and using it in
another procedure, as shown in the following example:
DEFINE length PROCEDURE;
.
.
.
LET x = length (a,b,c)
If you create a procedure named the same as an aggregate function (SUM,
MAX, MIN, AVG, COUNT) or one named extend, you must qualify the procedure name with the owner name.
Declaring Variables for BYTE and TEXT Data
The keyword REFERENCES indicates that variable name is not a BYTE or TEXT
value, but rather, a pointer to the BYTE or TEXT value. You use the variable as
though it holds the data.
The following example defines a local BYTE variable:
CREATE PROCEDURE use_blob()
DEFINE i INT;
DEFINE l_blob REFERENCES BYTE;
END PROCEDURE --use_blob
If you pass a variable of type TEXT or BYTE to a procedure, the data is passed
to the database server and stored in the root dbspace or DBSPACETEMP, if set.
You do not need to know the location or name of the file that holds the data;
only the name of the BYTE or TEXT variable as it is defined in the procedure is
needed for BYTE or TEXT manipulation.
SPL Statements 2-13
EXIT
EXIT
Purpose
Use the EXIT statement to stop the execution of a FOR, FOREACH, or WHILE
loop.
Syntax
EXIT
FOR
;
WHILE
FOREACH
Usage
The EXIT statement causes the innermost loop of the indicated type (WHILE,
FOR, or FOREACH) to terminate. Execution resumes at the first statement
outside the loop.
If the EXIT statement cannot find the identified loop, it fails.
Used outside all loops, the EXIT statement generates errors.
2-14 SPL Statements
EXIT
In the following example, an EXIT FOR statement is used. In the FOR loop,
when j becomes 6, the IF condition i = 5 in the WHILE loop is true. The FOR
loop stops executing, and it continues at the next statement outside the FOR
loop (in this case, the END PROCEDURE statement). In the following example,
the procedure finishes when j equals 6.
CREATE PROCEDURE ex_cont_ex()
DEFINE i,s,j, INT;
FOR j = 1 TO 20
IF j > 10 THEN
CONTINUE FOR;
END IF
LET i,s = j,0;
WHILE i > 0
LET i = i -1;
IF i = 5 THEN
EXIT FOR;
END IF
END WHILE
END FOR
END PROCEDURE
SPL Statements 2-15
FOR
FOR
Purpose
Use the FOR statement to initiate a controlled (definite) loop in cases where
you want to guarantee termination of the loop. The FOR statement uses
expressions or range operators to establish a finite number of iterations for a
loop.
Syntax
,
FOR
variable
name
IN
(
left
expression
right
expression
TO
)
Statement
Block
p. 1-72
END
FOR
;
increment
expression
STEP
,
expression
=
left
expression
TO
right
expression
STEP
2-16 SPL Statements
increment
expression
expression
is a numeric or character value. The data type of expression
must match the data type of the variable name. You can use
the output of a SELECT statement as an expression.
increment
expression
is a positive or negative value by which variable name
is to be incremented. The increment expression cannot
evaluate to zero.
left expression
is the starting expression of a range. The left expression
must match the data type of the variable name.
right expression
is the ending expression in the range.
variable name
is a variable that is already defined and valid within this
statement block.
FOR
Usage
All expressions are computed before the FOR statement executes. If one or
more of the expressions are variables and their values are changed during the
loop, the change has no effect on the iterations of the loop.
The FOR loop terminates when variable name takes on the values of each
element in the expression list or range in succession or when it encounters an
EXIT FOR statement.
An error is generated if an assignment within the body of the FOR statement
attempts to modify the value of variable name.
Using the TO Keyword to Define a Range
The TO keyword implies a range operator; the range is defined by left
expression and right expression, and the number of increments is set implicitly
with the STEP increment expression option. If you use the TO keyword, the variable name must be an INT or SMALLINT data type. The following example
shows two equivalent FOR statements. Each uses the TO keyword to define a
range. The first statement uses the IN keyword, and the second statement
uses an equal sign (=). Each statements causes the loop to execute five times.
FOR index_var IN (12 TO 21 STEP 2)
-- statement block
END FOR
FOR index_var = 12 TO 21 STEP 2
-- statement block
END FOR
If you omit the STEP option, increment expression is given the value of -1 if right
expression is less than left expression, or +1 if right expression is more than left
expression. If the increment expression is specified, it must be negative if right
expression is less than left expression, or positive if right expression is more than
SPL Statements 2-17
FOR
left expression. The two statements in the following example are equivalent. In
the first statement, the STEP increment is explicit. In the second statement, the
STEP increment is implicitly 1.
FOR index IN (12 TO 21 STEP 1)
-- statement block
END FOR
FOR index = 12 TO 21
-- statement block
END FOR
The value of variable name is initialized to the value of left expression. In
subsequent iterations, increment expression is added to the value of variable
name and checked to determine whether the value of variable name is still
between left expression and right expression. If so, then the next iteration occurs;
otherwise, the loop is exited or, if another range is specified, the variable
takes on the value of the first element in the next range.
Specifying Two or More Ranges in a Single FOR Statement
The following example shows a statement that traverses a loop forward and
backward using different increment values for each direction:
FOR index_var IN (15 to 21 STEP 2, 21 to 15 STEP -3)
-- statement body
END FOR
Using an Expression List as the Range
The value of variable name is initialized to the value of the first expression
specified. In subsequent iterations, variable name takes on the value of the next
expression. When the last expression in the list is used, the loop stops.
The expressions in the IN list are not limited to numeric values, as long as no
range operators are used in the IN list. The following example uses a
character expression list:
FOR c IN ('hello', (SELECT name FROM t), 'world', v1, v2)
INSERT INTO t VALUES (c);
END FOR
2-18 SPL Statements
FOR
The following FOR statement shows the use of a numeric expression list:
FOR index IN (15,16,17,18,19,20,21)
-- statement block
END FOR
Mixing Range and Expression Lists in the Same FOR Statement
If variable name is an INT or SMALLINT value, you can mix ranges and
expression lists in the same FOR statement. The following example shows a
mixture using an integer variable. Values in the expression list include the
value returned from a SELECT statement, a sum of an integer variable and a
constant, the values returned from a procedure named p_get_int, and integer
constants.
CREATE PROCEDURE for_ex ()
DEFINE i, j INT;
LET j = 10;
FOR i IN (1 TO 20, (SELECT c1 FROM tab WHERE id = 1),
j+20 to j-20, p_get_int(99),98,90 to 80 step -2)
INSERT INTO tab VALUES (i);
END FOR
END PROCEDURE
SPL Statements 2-19
FOREACH
FOREACH
Purpose
Use a FOREACH loop to select and manipulate more than one row.
Syntax
SELECT...INTO
Statement
p. 2-22
FOREACH
cursor
name
Statement
Block
p. 1-72
END
FOREACH
;
WITH HOLD
FOR
WITH HOLD
EXECUTE
PROCEDURE
Procedure
Name
p. 1-495
(
)
,
INTO
variable
name
,
variable
name
2-20 SPL Statements
=
Expression
(Subset)
p. 2-23
cursor name
is an identifier that you supply as a name for the
SELECT... INTO statement.
variable name
is the name of a procedure variable. Procedure arguments
are bound to procedure parameters by name or position, but
not both. That is, you can use variable name = syntax for none
or all the arguments specified in one FOREACH EXECUTE
PROCEDURE statement.
FOREACH
Usage
A FOREACH loop is the procedural equivalent of using a cursor. When a
FOREACH statement executes, the database server takes the following
actions:
1. A cursor is declared and opened implicitly.
2. The first row is obtained from the query contained within the FOREACH
loop, or the first set of values is obtained from the called procedure.
3. Each variable in the variable list is assigned the value of the
corresponding value from the active set created by the SELECT statement
or the called procedure.
4. The statement block is executed.
5. The next row is fetched from the SELECT statement or called procedure on
each iteration; step 3 is repeated.
6. The loop terminates when no more rows are found that satisfy the SELECT
statement or called procedure. The implicit cursor is closed when the loop
terminates.
Because the statement block can contain additional FOREACH statements,
cursors can be nested. No limit exists to the number of cursors that can be
nested.
A procedure that returns more than one row or set of values is called a cursory
procedure.
SPL Statements 2-21
FOREACH
The following procedure illustrates the three types of FOREACH statements:
with a SELECT...INTO clause, with an explicitly named cursor, and with a
procedure call:
CREATE PROCEDURE foreach_ex()
DEFINE i, j INT;
FOREACH SELECT c1 INTO i FROM tab order by 1
INSERT INTO tab2 VALUES (i);
END FOREACH
FOREACH cur1 FOR SELECT c2, c3 INTO i, j FROM tab
IF j > 100 THEN
DELETE FROM tab WHERE CURRENT OF cur1;
CONTINUE FOREACH;
END IF
UPDATE tab SET c2 = c2 + 10 WHERE CURRENT OF cur1;
END FOREACH
FOREACH EXECUTE PROCEDURE bar(10,20) INTO i
INSERT INTO tab2 VALUES (i);
END FOREACH
END PROCEDURE -- foreach_ex
A select cursor is closed when any of the following situations occur:
• No further rows are returned by the cursor.
• The cursor is a select cursor without a HOLD specification and a
transaction completes using COMMIT or ROLLBACK statements.
• An EXIT statement executes, which transfers control out of the FOREACH
statement.
• An exception occurs that is not trapped inside the body of the FOREACH
statement. (See the ON EXCEPTION statement on page 2-31.)
• A cursor in the calling procedure that is executing this cursory procedure
(within a FOREACH loop) closes for any reason.
Using a SELECT...INTO Statement
The SELECT statement in the FOREACH statement must include the INTO
clause. It can also include UNION and ORDER BY clauses. It cannot use the
INTO TEMP clause. The syntax of a SELECT statement is shown on page 1-310.
The type and count of each variable in the variable list must match each value
returned by the SELECT...INTO statement.
2-22 SPL Statements
FOREACH
Hold Cursors
Using the WITH HOLD keyword specifies that the cursor should remain open
when a transaction closes (committed or rolled back).
Updating or Deleting Rows Identified by Cursor Name
To update or delete the current row of cursor name, use the WHERE CURRENT
OF cursor name clause.
Calling a Procedure in the FOREACH Loop
The called procedure can return zero or more rows.
The type and count of each variable in the variable list must match each value
returned by the called procedure.
Subset of Expressions Allowed in the Procedure Parameters
You can use any expression as a procedure parameter except an aggregate
expression. If you use a subquery or procedure call, the subquery or
procedure must return a single value of the appropriate type and size. For the
full syntax of an expression, see page 1-430.
SPL Statements 2-23
IF
IF
Purpose
Use an IF statement to create a branch within a procedure.
Syntax
IF
Condition
p. 1-404
THEN
END IF
;
IF Statement
List
p. 2-26
ELIF
Condition
p. 1-404
THEN
IF Statement
List
p. 2-26
ELSE
IF Statement
List
p. 2-26
Usage
The condition stated in the IF clause is evaluated. If the result is true, then the
statements following the THEN keyword executes. If the result is false and an
ELIF clause exists, the statements following the ELIF clause execute. If no ELIF
clause exists, or if the condition in the ELIF clause is not true, the statements
following the ELIF keyword execute.
In the following example, the procedure uses an IF statement with both an
ELIF clause and an ELSE clause. The IF statement compares two strings and
displays a 1 to indicate that the first string comes before the second string
alphabetically, or a -1 if the first string comes after the second string
alphabetically. If the strings are the same, a 0 is returned.
2-24 SPL Statements
IF
CREATE PROCEDURE str_compare (str1 CHAR(20), str2 CHAR(20))
RETURNING INT;
DEFINE result INT;
IF str1 > str2 then
result =1;
ELIF str2 > str1 THEN
result = -1;
ELSE
result = 0;
END IF
RETURN result;
END PROCEDURE -- str_compare
The ELIF Clause
Use the ELIF clause to specify one or more additional conditions to evaluate.
If you specify an ELIF clause and the IF condition is false, the ELIF condition
is evaluated. If the ELIF condition is true, the statements following the ELIF
clause execute.
The ELSE Clause
The ELSE clause executes if no true previous condition is in the IF clause or
any of the ELIF clauses.
Conditions in an IF Statement
Conditions in an IF statement are evaluated in the same way as conditions in
a WHILE statement.
If any expression contained within the condition evaluates to null, then the
condition automatically becomes not true. Consider the following points:
1. Let the expression x evaluate to null. Then x is not true by definition.
Furthermore, not (x) is also not true.
2. The sole operator that can yield true for x is the IS NULL operator. That
is, x IS NULL is true and x IS NOT NULL is not true.
If an expression within the condition has an UNKNOWN value (due to the use
of an uninitialized variable), it is an immediate error. The statement
terminates and an exception is raised.
SPL Statements 2-25
IF
IF Statement List
BEGIN
Statement
Block
p. 1-72
END
CALL
Statement
p. 2-3
CONTINUE
Statement
p. 2-6
EXIT
Statement
p. 2-14
FOR
Statement
p. 2-16
FOREACH
Statement
p. 2-20
IF
Statement
p. 2-24
LET
Statement
p. 2-28
RAISE EXCEPTION
Statement
p. 2-36
RETURN
Statement
p. 2-38
SYSTEM
Statement
p. 2-40
TRACE
Statement
p. 2-42
WHILE
Statement
p. 2-46
SQL Statement
2-26 SPL Statements
IF
Subset of SQL Statements Allowed in an IF Statement
You can use any SQL statement in the statement block except for the ones in
the following list:
ALLOCATE DESCRIPTOR
CHECK TABLE
CLOSE DATABASE
CONNECT
CREATE DATABASE
CREATE PROCEDURE
DATABASE
DEALLOCATE DESCRIPTOR
DECLARE
DESCRIBE
DISCONNECT
EXECUTE
EXECUTE IMMEDIATE
FETCH
FLUSH
FREE
GET DESCRIPTOR
GET DIAGNOSTICS
INFO
LOAD
OPEN
OUTPUT
PREPARE
PUT
REPAIR TABLE
ROLLFORWARD DATABASE
SET CONNECTION
SET DESCRIPTOR
START DATABASE
UNLOAD
WHENEVER
You can use a SELECT statement only if you use the INTO TEMP clause to put
the results of the SELECT statement into a temporary table.
SPL Statements 2-27
LET
LET
Purpose
Use the LET statement to assign values to variables. You also can use the LET
statement to call a procedure within a procedure and assign the returned
values to variables.
Syntax
,
,
LET
variable
name
,
=
Procedure
Name
p. 1-495
Expression
p. 1-430
(
called
variable
)
;
=
,
Expression
p. 1-430
called variable
is a procedure variable of the called procedure. Procedure
arguments are bound to procedure parameters by name or
position but not both. That is, you can use called
variable=syntax for none or all the arguments specified in one
LET statement.
variable name
is a procedure variable.
Usage
If you assign a value to a single variable, it is called a simple assignment; if you
assign values to two or more variables, it is called a compound assignment.
At run time, the value of the SPL expression is computed first. The resulting
value is converted to variable name type, if possible, and the assignment takes
place. If conversion is not possible, an error occurs and the value of variable
name is undefined.
A compound assignment assigns multiple expressions to multiple variables.
The count and type of expressions in the expression list must match the count
and type of the corresponding variables in the variable list.
2-28 SPL Statements
LET
The following example shows several LET statements that assign values to
procedure variables:
LET
LET
LET
LET
LET
LET
a
= c + d ;
a,b = c,d ;
expire_dt = end_dt + 7 UNITS DAY;
name = 'Brunhilda';
sname = DBSERVERNAME;
this_day = TODAY;
You cannot use multiple values to operate on other values. For example, the
following statement is illegal:
LET a,b = (c,d) + (10,15); -- ILLEGAL EXPRESSION
Using a SELECT Statement in a LET Statement
Using a SELECT statement in a LET statement is equivalent to using a
SELECT...INTO procedure-variable statement in a procedure. The examples in
this section use a SELECT statement in a LET statement. You can use a SELECT
statement to assign values to one or more variables on the left-hand side of
the = operator, as shown in the following example:
LET a,b = (SELECT c1,c2 FROM t WHERE id = 1);
LET a,b,c = (SELECT c1,c2 FROM t WHERE id = 1), 15;
You cannot use a SELECT statement to make multiple values operate on other
values. The code in the following example is illegal:
LET a,b = (SELECT c1,c2 FROM t) + (10,15); -- ILLEGAL CODE
Because a LET statement is equivalent to a SELECT...INTO statement, the two
statements in the following example have the same results: a=c and b=d:
CREATE PROCEDURE proof()
DEFINE a, b, c, d INT;
LET a,b = (SELECT c1,c2 FROM t WHERE id = 1);
SELECT c1, c2 INTO c, d FROM t WHERE id = 1
END PROCEDURE
SPL Statements 2-29
LET
If the SELECT statement returns more than one row, the SELECT statement
must be enclosed in a FOREACH loop.
Calling a Procedure in a LET Statement
You can call a procedure in a LET statement and assign the returned values to
variables. If the LET statement includes a procedure call, it invokes the named
procedure. You must specify all the necessary arguments to the procedure in
the LET statement, unless the procedure has default values for its arguments.
If you use the called variable = syntax for one of the parameters in the called
procedure, you must use it for all the parameters.
The variable name receives the returned value from a procedure call. A
procedure can return more than one value into a list of variable names. A
procedure that returns more than one row must be enclosed in a FOREACH
loop.
The following example shows two valid LET statements that contain
procedure calls. The third LET statement is not legal, because it tries to have
the output of two procedures added and then assigned to two variables, a
and b. This LET statement can be split easily into two legal LET statements.
LET a, b, c = proc1(name = 'grok', age = 17);
LET a, b, c = 7, proc ('orange', 'green');
LET a, b = proc1() + proc2(); -- ILLEGAL CODE
2-30 SPL Statements
ON EXCEPTION
ON EXCEPTION
Purpose
Use the ON EXCEPTION statement to specify the actions that are taken for a
particular error or a set of errors.
Syntax
Statement
Block
p. 1-72
ON EXCEPTION
,
(
IN
SET
SQL
error
variable
END EXCEPTION
;
error
number
)
WITH RESUME
,
ISAM
error
variable
,
error
data
variable
error data
variable
is a literal string or a variable that contains a string
returned by an SQL error.
error number
is an SQL error number, or an error number created by a
RAISE EXCEPTION statement, that is to be trapped.
ISAM error
is an integer variable that receives the ISAM error number of
the exception raised.
variable
SQL error
variable
is an integer variable that receives the SQL error number of
the exception raised.
Usage
The ON EXCEPTION statement, together with the RAISE EXCEPTION
statement, provides an error-trapping and -recovery mechanism for SPL. The
ON EXCEPTION statement defines a list of errors that are to be trapped as the
procedure executes and specifies the action (within the statement block) to
take when the trap is triggered. If the IN clause is omitted, all errors are
trapped.
You can use more than one ON EXCEPTION statement within a given
statement block.
SPL Statements 2-31
ON EXCEPTION
The scope of an ON EXCEPTION statement is the statement block that follows
the ON EXCEPTION statement, all the statement blocks nested within that following statement block, and all the statement blocks that follow the ON
EXCEPTION statement.
The exceptions trapped can be either system- or user-defined.
When an exception is trapped, the error status is cleared.
If you specify a variable to receive an ISAM error and no accompanying ISAM
error exists, a zero returns to the variable. If you specify a variable to receive
the returned error text and none exists, an empty string goes into the variable.
Placement of the ON EXCEPTION Statement
The ON EXCEPTION statement is a declarative statement, not an executable
statement. For this reason, you must use the ON EXCEPTION statement before
any executable statement and after any DEFINE statement in a procedure.
The following example shows the correct placement of an ON EXCEPTION
statement. You use ON EXCEPTION statement after the DEFINE statement and
before the body of the procedure. The following procedure inserts a set of values into a table. If the table does not exist, it is created and the values are
inserted. The procedure also returns the total number of rows in the table
after the insert occurs.
CREATE PROCEDURE add_salesperson(last CHAR(15),
first CHAR(15))
RETURNING INT;
DEFINE x INT;
ON EXCEPTION IN (-206) -- If no table was found, create one
CREATE TABLE emp_list
(lname CHAR(15),fname CHAR(15), tele CHAR(12));
INSERT INTO emp_list VALUES -- and insert values
(last, first, '800-555-1234');
END EXCEPTION WITH RESUME
INSERT INTO emp_list VALUES (last, first, '800-555-1234')
LET x = SELECT count(*) FROM emp_list;
RETURN x;
END PROCEDURE
When an error occurs, the database server searches for the last declaration of
the ON EXCEPTION statement that traps the particular error code. This can be
an ON EXCEPTION statement that has the error number in the IN clause or an
ON EXCEPTION statement without an IN clause. If no pertinent ON EXCEPTION statement is found, the error code passes back to the caller (procedure,
application, or interactive user), and execution aborts.
2-32 SPL Statements
ON EXCEPTION
The following example uses two ON EXCEPTION statements with the same
error number so that error number 691 can be trapped in two levels of
nesting:
CREATE PROCEDURE delete_cust (cnum INT)
ON EXCEPTION IN (-691)
-- children exist
BEGIN -- Begin-end is necessary so that other DELETEs
-- don't get caught in here.
ON EXCEPTION IN (-691)
DELETE FROM another_child WHERE num = cnum;
DELETE FROM orders WHERE customer_num = cnum;
END EXCEPTION -- for 691
DELETE FROM orders WHERE customer_num = cnum;
END
DELETE FROM cust_calls WHERE customer_num = cnum;
DELETE FROM customer WHERE customer_num = cnum;
END EXCEPTION
DELETE FROM customer WHERE customer_num = cnum;
END PROCEDURE
Using the IN Clause to Trap Specific Exceptions
A trap is triggered if either the SQL error code or the ISAM error code matches
an exception code in the list of error numbers. The search through the list
begins from the left and stops with the first match.
You can use a combination of an ON EXCEPTION statement without an IN
clause and one or more ON EXCEPTION statements with an IN clause to set
up a default trapping situation. For example, the sequence of statements in
the following example has a net effect of saying, “Test for an error. If it is error
-210, -211, or -212, take action A. If it is error -300, take action B. If it is any
other error, take action C.” Remember that when an error occurs, the database
server searches for the last declaration of the ON EXCEPTION statement that
traps the particular error code.
SPL Statements 2-33
ON EXCEPTION
CREATE PROCEDURE ex_test ()
.
.
.
ON EXCEPTION
SET error_num
-- action C
END EXCEPTION
ON EXCEPTION IN (-300)
-- action B
END EXCEPTION
ON EXCEPTION IN (-210, -211, -212)
SET error_num
-- action A
END EXCEPTION
.
.
.
Receiving Error Information in the SET Clause
If you use the SET clause, when an exception occurs, the SQL error number
and (optionally) the ISAM code are inserted into the variables specified in the
SET clause. If you provided an error data variable, any error text returned by
the database server is put into the error data variable. Error text includes such
information as the offending table or column name.
Forcing Continuation of the Procedure with the WITH
RESUME Keyword
The example on page 2-32 uses the WITH RESUME keyword to indicate that
after the statement block in the ON EXCEPTION statement executes, execution
is to continue at the LET x = SELECT COUNT(*) FROM emp_list statement, which is the line following the line that raised the error. For this procedure, this means that the count of salespeople names occurs even if the error
occurred.
2-34 SPL Statements
ON EXCEPTION
Continuation of Procedure Execution After an Exception Occurs
If you do not include the WITH RESUME keyword in your ON EXCEPTION
statement, after an exception is raised, the next statement that executes
depends on the placement of the ON EXCEPTION statement, as described in
the following scenarios:
• If the ON EXCEPTION statement is inside a statement block with a BEGIN
and an END keyword, the execution resumes with the first statement (if
any) after that BEGIN...END block. That is, it resumes after the scope of the
ON EXCEPTION statement.
• If the ON EXCEPTION statement is inside a loop (FOR, WHILE, FOREACH),
the rest of the loop is skipped and execution resumes with the next iteration of the loop.
• If the ON EXCEPTION statement is not contained within any statement or
block but only in the procedure, the procedure terminates by executing a
RETURN statement with no arguments. That is, the procedure returns a
successful status and no values.
Errors Within the ON EXCEPTION Statement Block
To prevent an infinite loop, if an error occurs during execution of the
statement block of an error trap, the search for another trap does not include
the current trap.
SPL Statements 2-35
RAISE EXCEPTION
RAISE EXCEPTION
Purpose
Use the RAISE EXCEPTION statement to simulate the generation of an error.
Syntax
RAISE EXCEPTION
SQL
error
;
,
ISAM
error
,
error
text
error text
is a quoted string or variable that contains a string to be
returned by the SQL error.
ISAM error
is an SPL expression that evaluates to an integer value that is
a valid ISAM error number.
SQL error
is an SPL expression that evaluates to an integer value that is
a valid SQL error number.
Usage
The RAISE EXCEPTION statement is used to simulate an error. The generated
error can be trapped by an ON EXCEPTION statement.
If the ISAM error expression is omitted, the ISAM error code is set to zero when
the exception is raised. (If you want to use the error text field but not specify
the ISAM error number portion, you can specify the ISAM error to be zero.) For
example, the following statement raises the error number 99999 and returns
the stated text:
RAISE EXCEPTION -99999, 0, 'You broke the rules';
The exceptions raised can be either system- or user-generated.
In the following example, if the value of a is negative, exception 99999 is
raised. An ON EXCEPTION statement that traps for an exception of 99999
should be in the code.
2-36 SPL Statements
RAISE EXCEPTION
FOREACH SELECT c1 INTO a FROM t
IF a < 0 THEN
RAISE EXCEPTION 99999-- emergency exit
END IF
END FOREACH
See the ON EXCEPTION statement for more information about scope and
compatibility of exceptions.
SPL Statements 2-37
RETURN
RETURN
Purpose
Use the RETURN statement to designate the values that are returned by the
procedure to the calling module.
Syntax
;
RETURN
,
Expression
p. 1-430
WITH RESUME
Usage
The RETURN statement returns zero or more values to the calling process.
All the RETURN statements in the procedure must be consistent with the
RETURNING clause of the CREATE PROCEDURE statement that defined the
procedure. The number and type of values in the RETURN statement, if any,
must match in number and type the types listed in the RETURNING clause of
the CREATE PROCEDURE statement. You can choose to return no values even
if you specify one or more values in the RETURNING clause. If you use a
RETURN statement without any expressions but the calling procedure or program expects one or more return values, it is equivalent to returning the
expected number of null values to the calling program.
In the following example, the procedure includes two acceptable RETURN
statements. A program that calls this procedure should check if no values are
returned and act accordingly.
CREATE PROCEDURE two_returns (stockno INT)
RETURNING CHAR (15);
DEFINE des CHAR(15);
ON EXCEPTION (-272) -- if user doesn’t have select privs...
RETURN;
-- return no values.
END EXCEPTION;
SELECT DISTINCT descript INTO des FROM stock
WHERE stocknum = stockno;
ßRETURN des;
END PROCEDURE
2-38 SPL Statements
RETURN
A RETURN statement without any expressions exits only if the procedure is
declared not to return values; otherwise it returns nulls.
The WITH RESUME Keyword
If you use the WITH RESUME keyword after the RETURN statement executes,
the next invocation of this procedure (upon the next FETCH or FOREACH
statement) starts from the statement following the RETURN statement. If a
procedure executes a RETURN WITH RESUME statement, it must be called
from a FOREACH loop in the calling procedure or program.
ESQL
If a procedure executes a RETURN WITH RESUME statement, it can be called
with a FETCH statement in an application written in an SQL API.
The following example shows a cursory procedure that can be called by
another procedure. After the RETURN i WITH RESUME statement returns
each value to the calling procedure, the next time sequence is called, the next
line of sequence is executed. If backwards equals 0, no value is returned to
the calling procedure and execution of sequence stops.
CREATE PROCEDURE sequence (limit INT, backwards INT)
RETURNING INT;
DEFINE i INT;
FOR i IN (1 TO limit)
RETURN i WITH RESUME;
END FOR
IF backwards = 0 THEN
RETURN;
END IF
FOR i IN (limit TO 1)
RETURN i WITH RESUME;
END IF
END PROCEDURE -- sequence
SPL Statements 2-39
SYSTEM
SYSTEM
Purpose
Use the SYSTEM statement to make an operating system command run from
within a procedure.
Syntax
SYSTEM
character expression
;
character variable
character expression
is any expression that is a user-executable operating
system command.
character variable
is a variable that contains a valid operating system
command.
Usage
If the supplied expression is not a character expression, expression is converted
to a character expression before the operating system command is made. The
complete character expression passes to the operating system and executes as
an operating system command.
The operating system command specified by the SYSTEM statement cannot
run in the background. The database server waits for the operating system to
complete execution of the command before continuing to the next procedure
statement.
Your procedure cannot use a value or values returned by the command.
If the operating system command fails, that is, if the operating system returns
a nonzero status for the command, an exception is raised containing the
returned operating system status as the ISAM error code and an appropriate
SQL error code.
In both DBA-privileged and owner-privileged procedures that contain
SYSTEM statements, the operating system command runs with the
permissions of the user executing the procedure.
2-40 SPL Statements
SYSTEM
The following example shows the use of a SYSTEM statement:
CREATE PROCEDURE sensitive_update()
.
.
.
LET mailcall = 'mail headhoncho < alert'
-- code that evaluates if operator tries to execute a
-- certain command, then send email to system administrator
SYSTEM mailcall
.
.
.
END PROCEDURE -- sensitive_update
You can use a double pipe symbol (||) to concatenate expressions with a SYSTEM statement, as shown in the following example:
CREATE PROCEDURE sensitive_update2()
.
.
.
-- code that evaluates if operator tries to execute a
-- certain command, then send email to system administrator
SYSTEM 'mail -s violation' ||user1 || ' ' || user2
|| ' < violation_file'
.
.
.
END PROCEDURE
SPL Statements 2-41
TRACE
TRACE
Purpose
Use the TRACE statement to control the generation of debugging output.
Syntax
TRACE
ON
;
OFF
PROCEDURE
Expression
p. 1-430
Usage
Using the TRACE statement generates output that is sent to the file specified
by the SET DEBUG FILE TO statement.
Tracing prints out the current values of all the following items:
• Variables
• Procedure arguments
• Return values
• SQL error codes
• ISAM error codes
The output of each executed TRACE statement is on a separate line.
If you use the TRACE statement without first specifying a DEBUG file to
contain the output, an error is generated.
The trace state is inherited by called procedures. That is, a called procedure
assumes the same trace state (ON, OFF, or PROCEDURE) as the calling procedure. The called procedure can set its own trace state, but that state is not
passed back to the calling procedure.
The trace state is not inherited by a procedure that is executed on a remote
database server.
2-42 SPL Statements
TRACE
TRACE ON
If you specify the keyword ON, all statements are traced. The values of
variables (in expressions or otherwise) are printed before they are used. Turning tracing ON implies tracing both procedure calls and statements in the
body of the procedure.
TRACE OFF
If you specify the keyword OFF, all tracing is turned off.
TRACE PROCEDURE
If you specify the keyword PROCEDURE, only the procedure calls and return
values are traced not the body of the procedure.
Printing Expressions
You can use the TRACE statement with a quoted string or an expression to
display values or comments in the output file. If the expression is not a literal
expression, the expression is evaluated before being written to the output file.
You can use the TRACE statement with an expression even if you used a
TRACE OFF statement earlier in a procedure. However, you must have
established a trace-output file using the SET DEBUG statement.
SPL Statements 2-43
TRACE
The following example uses a TRACE statement with an expression after
previously using a TRACE OFF statement:
CREATE PROCEDURE tracing ()
DEFINE i INT;
BEGIN
ON EXCEPTION IN (1)
END EXCEPTION; -- do nothing
TRACE OFF;
SET DEBUG FILE TO '/tmp/foo.trace';
TRACE 'Forloop starts';
FOR i IN (1 TO 1000)
BEGIN
TRACE 'FOREACH starts';
FOREACH SELECT...INTO a FROM t
IF <some condition> THEN
RAISE EXCEPTION 1
-- emergency exit
END IF
END FOREACH
-- return some value
END
END FOR
-- do something
END;
END PROCEDURE
2-44 SPL Statements
TRACE
The following example shows additional TRACE statements:
CREATE PROCEDURE testproc()
DEFINE i INT;
TRACE OFF;
SET DEBUG FILE TO '/tmp/test.trace';
TRACE 'Entering foo';
TRACE PROCEDURE;
LET i = testtoo();
TRACE ON;
LET i = i + 1;
TRACE OFF;
TRACE 'i+1 = ' || i+1;
TRACE 'Exiting testproc';
SET DEBUG FILE TO '/tmp/test2.trace';
END PROCEDURE;
Looking at the Traced Output
To see the traced output, use an editor or utility to display or read the
contents of the file.
SPL Statements 2-45
WHILE
WHILE
Purpose
Use the WHILE statement to establish an indefinite loop within a procedure.
Syntax
WHILE
Condition
p. 1-404
Statement
Block
p. 1-72
END WHILE
;
Usage
The condition is evaluated once at the beginning of the loop. Subsequently,
the condition is evaluated at the beginning of each iteration. The statement
block is executed as long as the condition remains true. The loop terminates
when the condition evaluates to not true.
If any expression contained within the condition evaluates to NULL, the
condition automatically becomes not true unless you are explicitly testing for
the IS NULL condition.
If an expression within the condition has an UNKNOWN value because it
references uninitialized procedure variables, it is an immediate error. In this
case, the loop terminates and an exception is raised.
CREATE PROCEDURE simp_while()
DEFINE i INT;
DEFINE pf_name CHAR(15);
WHILE EXISTS (SELECT fname INTO pf_name FROM customer
WHERE customer_num > 400)
DELETE FROM customer WHERE id_2 = 2;
END WHILE
LET i = 1;
WHILE i < 10
INSERT INTO tab_2 VALUES (i);
LET i = i +1;
END WHILE;
END PROCEDURE;
2-46 SPL Statements
Index
Index
This index covers the Tutorial, Reference, and Syntax manuals.
Page numbers that end in T can be found in the Tutorial, those that
end in R can be found in the Reference Manual, and those that end
in S can be found in the Syntax manual. Special symbols are listed
in ASCII order at the end of the index.
A
ABS function
syntax in expression 1-444S
use in expression 1-445S
ABSOLUTE keyword
syntax in FETCH 1-194S
use in FETCH 1-196S
Access control. See Privilege.
ACCESS FOR keywords, in INFO statement 1-243S
Accessing tables 12-16T
ACOS function
syntax in expression 1-458S
use in expression 1-460S
Action clause
AFTER 1-117S
definition of 1-116S
FOR EACH ROW 1-116S
subset, syntax 1-121S
syntax 1-116S
Action statements
in triggered action clause 1-122S
list of 1-122S
order of execution 1-122S
Active set
constructing with OPEN 1-264S, 1-265S
definition of 2-29T
of a cursor 5-24T
retrieving data with FETCH 1-194S
ADD CONSTRAINT keywords, syntax
in ALTER TABLE 1-15S
AFTER
action 1-117S
keyword 1-117S
Aggregate function
ALL keyword, syntax 1-462S
and GROUP BY clause 3-5T
AVG function, syntax 1-462S
description of 2-53T
DISTINCT keyword, syntax 1-462S
in ESQL 1-467S, 5-14T
in EXISTS subquery 1-414S
in expressions 1-314S
in SELECT 1-315S
in SPL expressions 14-21T
in subquery 3-36T
MAX function, syntax 1-462S
MIN function, syntax 1-462S
null value signalled 5-12T
restrictions in modifiable view 11-24T
restrictions with GROUP BY 1-334S
SUM function, syntax 1-462S
summary 1-465S
Algebraic functions
ABS function 1-445S
MOD function 1-446S
POW function 1-446S
ROOT function 1-446S
ROUND function 1-446S
SQRT function 1-447S
syntax 1-444S
TRUNC function 1-447S
Alias
for a table in SELECT 1-323S
for table name 2-79T
to assign column names in temporary
table 3-12T
use in ORDER BY clause 1-338S
use with GROUP BY clause 1-334S
with self-join 3-11T
See also Synonym.
ALL keyword
beginning a subquery 1-330S, 3-33T
DISCONNECT statement 1-169S
syntax
in expression 1-462S
in GRANT 1-235S
in REVOKE 1-301S
in SELECT 1-312S
with UNION operator 1-310S
2 Index
use
in Condition subquery 1-415S
in expression 1-463S
in GRANT 1-236S
in SELECT 1-313S
with UNION operator 1-344S
ALLOCATE DESCRIPTOR statement
syntax 1-9S
with concatenation operator 1-432S
Allocating memory with the ALLOCATE
DESCRIPTOR statement 1-9S
ALTER INDEX statement
creating clustered index 1-12S, 10-25T
dropping clustered index 1-13S
locks table 7-7T
syntax 1-12S
See also Index Name segment.
ALTER keyword
syntax
in GRANT 1-231S
in REVOKE 1-301S
use
in GRANT 1-236S
in REVOKE 1-302S
Alter privilege 1-236S, 11-8T
ALTER TABLE statement
ADD clause 1-17S
ADD CONSTRAINT clause 1-30S
adding a column 1-17S
adding a column constraint 1-29S
and NCHAR column 1-19R
and NVARCHAR column 1-19R
cascading deletes 1-22S
changing column data type 1-27S,
9-19T
changing table lock mode 1-33S
CHECK clause 1-25S
DEFAULT clause 1-18S
DROP clause 1-26S
DROP CONSTRAINT clause 1-32S
dropping a column 1-26S
dropping a column constraint 1-32S
LOCK MODE clause 1-33S
MODIFY NEXT SIZE clause 2-9R,
1-33S
NEXT SIZE clause 10-8T
ON DELETE CASCADE keyword
1-21S
PAGE keyword 1-33S
privilege for 1-231S, 11-10T
reclustering a table 1-13S
REFERENCES clause 1-21S
ROW keyword 1-33S
rules for primary key constraints
1-31S
rules for unique constraints 1-31S
American National Standards Institute.
See ANSI.
AND keyword
syntax in Condition segment 1-404S
use
in Condition segment 1-417S
with BETWEEN keyword 1-327S
AND logical operator 1-417S, 2-36T
ANSI 1-15T
ANSI compliance
determining 1-10R
table naming 1-296S
ANSI-compliance
-ansi flag 4-15R, Intro-7S, 1-78S, 1-85S,
1-137S
described 1-9R
list of SQL statements 1-7S
reserved words 1-470S
updating rows 1-385S
ANSI-compliant database
buffered logging restricted in 9-23T
create with START DATABASE
1-376S
description of 1-59S, 1-15T
designating 1-10R
effect on
cursor behavior 1-13R
decimal data type 1-13R
default isolation level 1-13R
escape characters 1-13R
object privileges 1-12R
owner-naming 1-12R
SQLCODE 1-14R
transaction logging 1-12R
transactions 1-11R
FOR UPDATE not required in 1-148S,
6-16T
index naming 1-419S, 1-484S, 1-505S
owner-naming 1-12R
privileges 1-12R
procedure naming 1-495S
reason for creating 1-9R
Repeatable Read isolation standard in
7-13T
signalled in SQLAWARN 5-12T
SQL statements allowed 1-14R
table privileges 1-85S, 11-7T
using with INFORMIX-SE 1-61S
with BEGIN WORK 1-36S
ANY keyword
beginning a subquery 1-330S, 3-34T
in WHENEVER 1-398S
use in Condition subquery 1-415S
Application
common features 1-18T
description of 1-16T
design of order-entry 4-23T
handling errors 5-16T
performance analysis of 13-5T
report generator 1-17T
screen forms 1-17T
Archives
with INFORMIX-SE 12-19T
Archiving
description of 1-10T, 4-25T
INFORMIX-OnLine Dynamic Server
methods 4-26T
transaction log 4-26T
ARC_DEFAULT environment variable
4-14R
ARC_KEYPAD environment variable
4-14R
Arithmetic functions. See Algebraic
functions.
Arithmetic operator, in expression
1-431S, 2-46T
Array, moving rows into with FETCH
1-199S
AS keyword
in SELECT 1-312S
syntax
in CREATE VIEW 1-136S
in GRANT 1-231S
use
in CREATE VIEW 1-137S
in GRANT 1-239S
with display labels 1-316S
with table aliases 1-325S
ASC keyword
syntax
in CREATE INDEX 1-63S
in SELECT 1-337S
use
in CREATE INDEX 1-66S
in SELECT 1-338S
Index 3
Ascending order in SELECT 2-14T
ASCII collating order 1-15R, 1-501S
ASIN function
syntax in expression 1-458S
use in expression 1-460S
Asterisk
wild card character in SELECT 2-12T
Asterisk (*)
arithmetic operator 1-431S
use in SELECT 1-312S
At (@) sign, in database name 1-421S
ATAN function
syntax in expression 1-458S
use in expression 1-460S
ATAN2 function
syntax in expression 1-458S
use in expression 1-461S
Attribute
identifying 8-14T
important qualities of 8-15T
nondecomposable 8-15T
Audit trail
applying with RECOVER TABLE
1-292S
dropping with DROP AUDIT 1-171S
manipulating audit trail file 1-293S
no clustered index 1-64S
starting with CREATE AUDIT 1-55S
Automatic type conversion. See Data
type conversion.
AVG function
as aggregate function 2-53T
syntax in expression 1-462S
use in expression 1-464S
B
Bachman, C.R. 8-17T
Backslash (\)
as escape character with LIKE 1-410S
as escape character with MATCHES
1-411S
Backup. See Archive.
BEFORE keyword 1-116S
BEGIN WORK statement
locking in a transaction 1-35S
specifies start of a transaction 4-24T
syntax 1-35S
BETWEEN keyword
4 Index
syntax in Condition segment 1-405S
use
in Condition segment 1-408S
in SELECT 1-327S
BETWEEN keyword, used to test for
equality in WHERE clause 2-29T
BETWEEN operator 2-32T
Binary Large Object (BLOB)
choosing location for 10-18T
disk storage for 10-4T, 10-6T
effect of isolation on retrieval 1-368S
estimating disk space for 10-17T
in a LOAD statement 1-257S
in an UNLOAD statement 1-379S
See also BYTE data type.
See also TEXT data type.
blobspace 10-4T, 10-18T
BLOB. See Binary Large Object.
Boolean expression
and logical operator 2-36T
in Condition segment 1-404S
Bourne shell
how to set environment variables
4-5R
.profile file 4-4R
BUFFERED keyword, syntax in SET LOG
1-372S
BUFFERED LOG keywords
syntax in CREATE DATABASE 1-57S
use in CREATE DATABASE 1-59S
Buffered logging 1-57S, 9-22T
Building your data model 8-3T to 8-33T
BYTE data type
choosing location for 10-18T
considerations for UNLOAD
statement 1-379S
description of 3-5R, 9-19T
disk storage for 10-4T
estimating disk space for 10-17T
inserting data 3-5R
requirements for LOAD statement
1-257S
restrictions
in Boolean expression 3-5R
with GROUP BY 3-5R
with LIKE or MATCHES 3-5R
with ORDER BY 3-5R
restrictions with GROUP BY 3-7T
restrictions with LIKE or MATCHES
2-37T
restrictions with relational expression
2-29T
selecting a BYTE column 3-5R
syntax 1-425S
with stored procedures 2-9S, 2-13S
BYTE value, displaying 2-11T
C
C shell
how to set environment variables
4-5R
.cshrc file 4-4R
.login file 4-4R
Calculated expression
restrictions with GROUP BY 1-334S
See also Expression segment.
CALL keyword, in the WHENEVER
statement 1-398S, 1-401S
CALL statement
assigning values with 14-21T
executing a procedure 14-9T
syntax 2-3S
call_type table in stores6 database,
columns in A-5R
Candidate key
defined 8-23T
Cardinality 8-9T
Cardinality in relationship 8-13T
Caret (^) wildcard in Condition segment
1-411S
Cartesian product
basis of any join 2-71T
description of 2-69T
Cascading deletes
defined 1-22S, 1-97S, 4-21T
locking associated with 1-24S, 1-98S,
4-21T
logging 1-24S, 1-98S, 4-21T
restriction 1-24S, 1-98S, 4-22T
syntax 1-21S, 1-94S
Cascading triggers
and triggering table 1-127S, 1-131S
description of 1-130S
maximum number of 1-130S
scope of correlation names 1-125S
triggered actions 1-118S
Catalog. See System catalog.
Chaining synonyms 12-18T
CHAR data type 9-15T
changing data types 3-23R
description of 3-6R
in INSERT 1-498S
in relational expressions 2-29T
replacing with TEXT 10-27T
replacing with VARCHAR 10-26T
subscripting 2-44T
substrings of 2-27T
syntax 1-425S
truncation signalled 5-12T
using as default value 1-19S, 1-89S
versus NCHAR data type 1-19R
CHARACTER data type. See CHAR data
type.
Character mapping files 5-5R
Character string
as DATE values 3-29R
as DATETIME values 3-10R, 3-29R
as INTERVAL values 3-15R
processing with NLS 1-15R
See also Quoted String segment.
Character-position form of FILE and
INSERT statements 5-28R
Check constraint
adding with ALTER TABLE 1-25S
definition of 1-98S, 4-19T
specifying at column level 1-98S
specifying at table level 1-98S
CHECK keyword
use in ALTER TABLE 1-25S
use in CREATE TABLE 1-98S
CHECK TABLE statement, syntax and
use 1-37S
Checking contents of environment
configuration file 5-4R
Checking for corrupted tables 1-37S
chkenv utility
description of 5-4R
error message for 5-4R
Chunk
description of 10-4T
mirrored 10-5T
Client/server environment 1-133S
CLOSE DATABASE statement
effect on database locks 7-7T
prerequisites to close 1-41S
syntax 1-41S
CLOSE statement
Index 5
closing
a select cursor 1-38S
closing an insert cursor 1-39S
cursors affected by transaction end
1-40S
syntax 1-38S
with concatenation operator 1-432S
CLUSTER keyword
syntax
in ALTER INDEX 1-12S
in CREATE INDEX 1-63S
use
in ALTER INDEX 1-12S
in CREATE INDEX 1-64S
Clustered index
creating with CREATE INDEX 1-64S
description of 10-25T
with ALTER INDEX 1-12S
with audit trails 1-64S
COBOL 5-6T
Codd, E. F. 1-11T, 8-4T, 8-32T
Code set
for crtcmap text file 5-6R
mapping non-standard to standard
5-5R
mapping with crtcmap utility 5-5R
Collation
COLLCHAR environment variable
4-45R
LC_COLLATE environment variable
4-50R
simultaneous, and performance 1-20R
with NLS activated 1-15R
Collation order and NLS 2-25T
COLLCHAR environment variable
1-16R, 4-45R
Colon (:)
as delimiter in DATETIME 3-9R
as delimiter in INTERVAL 3-15R
Color, setting INFORMIXTERM for
4-38R
Column
changing data type 3-23R
creating with NLS 1-19R
defined 2-5T
defining 8-20T
defining as foreign key 1-93S
defining as primary key 1-93S
description of 1-12T
displaying information for 1-242S
6 Index
in relational model 1-12T, 8-20T
in stores6 database A-2R to A-6R
inserting into 1-246S
label on 3-48T
modifying with ALTER TABLE 1-27S
naming conventions 1-87S, 1-102S,
1-294S
naming, allowable characters 1-469S
naming, in ALTER TABLE 1-17S
naming, in CREATE TABLE 1-87S
number allowed when defining
constraint 1-86S
putting a constraint on 1-86S
referenced and referencing 1-22S,
1-94S
renaming 1-294S
specifying check constraint for 1-98S
specifying with CREATE TABLE
1-87S
virtual 1-137S
See also Constraint.
See also Data Type segment.
Column expression
in SELECT 1-314S
syntax 1-433S
See also Expression segment.
Column filter. See Filter expression.
Column name
allowable characters 1-469S
in UPDATE clause 1-114S
naming in ALTER TABLE 1-17S
using functions as names 1-472S
using keywords as names 1-473S
when qualified 1-124S
Column number 2-24T
effect on triggers 1-115S
Column value
in triggered action 1-125S
qualified vs. unqualified 1-126S
when unqualified 1-125S
Column-level privilege 1-236S, 11-10T
COLUMNS FOR keywords, in INFO
statement 1-242S
Command file, dbload 5-23R
Command script, creating database
9-26T
Commit, two-phase 12-20T
COMMIT WORK statement
closes cursors 7-18T
releases locks 7-8T, 7-18T
sets SQLCODE 6-5T
syntax 1-43S
Committed Read isolation level 1-367S,
7-10T
COMMITTED READ keywords, syntax
in SET ISOLATION 1-366S
Comparison condition
description of 2-29T
syntax and use 1-405S
See also Boolean expression.
Compiler
setting environment variable for C
4-31R
setting environment variable for
COBOL 4-32R, 4-33R
specifying storage mode for COBOL
4-33R
Complex
relationship 8-28T
Complex condition. See Condition
segment.
Complex query
example of 1-364S
Composite column list, multiple-column
restrictions 1-30S, 1-31S
Composite index
column limit 1-65S
creating with CREATE INDEX 1-63S
definition of 1-65S
order of columns 13-31T
use 13-31T
Composite key 8-23T
Compound assignment 2-28S
Compound query 3-43T
Computer network 12-4T
Concatenation operator (||) 1-432S
Concurrency
Committed Read isolation 1-367S,
7-10T
Cursor Stability isolation 1-367S,
7-11T
database lock 7-6T
deadlock 7-14T
defining with SET ISOLATION
1-366S
description of 4-27T, 7-3T
Dirty Read isolation 1-367S, 7-10T
effect on performance 7-3T
isolation level 7-9T
kinds of locks 7-6T
lock duration 7-8T
lock scope 7-6T
maximizing 10-32T, 10-35T
Repeatable Read isolation 1-367S,
7-12T
SERIAL values 9-7T
table lock 7-7T
Condition segment
ALL, ANY, SOME subquery 1-415S
boolean expressions 1-405S
comparison condition 1-405S
description of 1-404S
join conditions 1-331S
null values 1-405S
relational operators in 1-407S
subquery in SELECT 1-413S
syntax 1-404S
use of functions in 1-405S
wildcards in searches 1-410S
with BETWEEN keyword 1-408S
with ESCAPE keyword 1-411S
with EXISTS keyword 1-414S
with IN keyword 1-408S
with IS keyword 1-409S
with MATCHES keyword 1-409S
with NOT keyword 1-410S
Configuring a database server 12-15T
CONNECT keyword
in GRANT 1-232S
in REVOKE 1-303S
Connect privilege 1-232S, 1-303S, 11-6T
CONNECT statement
and INFORMIXSERVER
environment variable 4-37R,
1-46S
connection context 1-45S
connection identifiers 1-45S
database environment 1-49S
DEFAULT option 1-46S
implicit connections 1-46S
opening a database 12-16T
syntax 1-44S
use 1-44S
USER clause 1-52S
WITH CONCURRENT
TRANSACTION option 1-47S
CONNECT TO statement
with concatenation operator 1-432S
Connecting to data 12-12T
Index 7
Connection
context 1-45S
dormant 1-169S
identifiers 1-45S
setting the INFORMIXCONRETRY
environment variable 4-34R
setting the INFORMIXCONTIME
environment variable 4-35R
Connectivity in relationship 8-8T, 8-11T,
8-17T
Constant expression
in SELECT 1-314S
inserting with PUT 1-286S
restrictions with GROUP BY 1-334S
syntax 1-436S
See also Expression segment.
See also Literal Number.
Constraint
adding with ALTER TABLE 1-29S,
1-86S
cardinality 8-9T
checking 1-131S
defining domains 9-3T
definition of 1-85S
dropping with ALTER TABLE 1-32S,
1-86S
enforcing 1-86S
modifying a column that has
constraints 1-27S
number of columns allowed 1-86S,
1-92S
optimizer uses 13-9T
privileges needed to create 1-31S
rules for unique constraints 1-30S
setting checking mode 1-349S
specifying at table level 1-92S
with DROP INDEX 1-174S
See also Primary key constraint.
See also Referential constraint.
See also Unique constraint.
CONSTRAINT keyword
in ALTER TABLE 1-29S
in CREATE TABLE 1-91S
Contention
for bottleneck tables 10-35T
for disk access arms 10-7T
reducing 10-32T, 10-35T
CONTINUE keyword, in the
WHENEVER statement 1-398S,
1-402S
CONTINUE statement
8 Index
exiting a loop 14-23T
syntax 2-6S
Conventions
example code Intro-8R, Intro-10S, 5T
for naming tables 1-84S
syntax Intro-5S
typographical Intro-5R, Intro-5S, 5T
Converting data types 3-23R
Coordinated deletes 6-6T
Correlated subquery
definition of 1-413S, 3-32T
restriction with cascading deletes
4-22T
Correlation name
and stored procedures 1-125S
in COUNT DISTINCT clause 1-125S
in DELETE REFERENCING clause
1-119S
in GROUP BY clause 1-125S
in INSERT REFERENCING clause
1-118S
in SET clause 1-125S
in stored procedure 1-128S
in UPDATE REFERENCING clause
1-120S
new 1-120S
old 1-120S
rules for 1-124S
scope of 1-125S
table of values 1-126S
using 1-124S
when to use 1-125S
COS function
syntax in expression 1-458S
use in expression 1-459S
COUNT DISTINCT clause 1-125S
COUNT field
getting contents with GET
DESCRIPTOR 1-210S
setting value for WHERE clause
1-354S
use in GET DESCRIPTOR 1-212S
COUNT function
and GROUP BY 3-6T
as aggregate function 2-53T
count rows to delete 4-5T
use in a subquery 4-6T
use in expression 1-463S, 1-465S
with DISTINCT 2-54T
COUNT keyword, use in SET
DESCRIPTOR 1-355S
CREATE AUDIT statement
need for archive 1-55S
starts audit trail 1-55S
syntax 1-55S
CREATE DATABASE statement
and dbspace 10-5T
ANSI compliance 1-59S
in command script 9-26T
logging with OnLine 1-59S
sets shared lock 7-6T
SQLAWARN after 5-12T
syntax 1-57S
using with
CREATE SCHEMA 1-77S
INFORMIX-SE 1-60S, 9-23T
OnLine 9-21T
PREPARE 1-58S
CREATE INDEX statement
composite indexes 1-65S
implicit table locks 1-63S
locks table 7-7T
syntax 1-62S
using
with CREATE SCHEMA 1-77S
using with
ASC keyword 1-66S
CLUSTER keyword 1-64S
DESC keyword 1-66S
UNIQUE keyword 1-64S
See also Index Name segment.
CREATE PROCEDURE FROM
statement
in embedded languages 14-5T
syntax and use 1-76S
CREATE PROCEDURE statement
inside a CREATE PROCEDURE
FROM 14-5T
syntax 1-68S
use of dbschema 5-34R
using 14-5T
CREATE SCHEMA statement
defining a trigger 1-111S
syntax 1-77S
with CREATE sequences 1-78S
with GRANT 1-78S
CREATE SYNONYM statement
ANSI-compliant naming 1-80S
chaining synonyms 1-83S
synonym for a table 1-80S
synonym for a view 1-80S
syntax 1-80S
use of dbschema 5-34R
with CREATE SCHEMA 1-77S
CREATE TABLE
use of dbschema 5-34R
CREATE TABLE statement
and COLLCHAR environment
variable 4-46R
and NCHAR column 1-19R
and NVARCHAR column 1-19R
cascading deletes 1-97S
CHECK clause 1-98S
creating temporary table 1-100S
DEFAULT clause 1-88S
defining constraints
at column level 1-91S
at table level 1-92S
description of 9-24T
EXTENT SIZE clause 10-8T
in command script 9-26T
IN dbspace clause 1-105S
locating BLOB column 10-18T
LOCK MODE clause 1-108S
naming conventions 1-84S
NEXT SIZE clause 10-8T
ON DELETE CASCADE keyword
1-94S
REFERENCES clause 1-94S
rules for primary keys 1-94S
rules for referential constraints 1-94S
rules for unique constraints 1-94S
sets initial SERIAL value 9-8T
setting columns NOT NULL 1-20S,
1-90S
specifying extent size 1-107S
specifying table columns 1-87S
storing database tables 1-105S
syntax 1-84S
with BLOB data types 1-91S
with CREATE SCHEMA 1-77S
CREATE TRIGGER statement
in ESQL/C 1-111S
in ESQL/COBOL 1-111S
privilege to use 1-111S
purpose 1-110S
syntax 1-110S
triggered action clause 1-121S
use 1-111S
CREATE VIEW statement
Index 9
column data types 1-137S
privileges 1-137S
restrictions on 11-22T
syntax 1-136S
use of dbschema 5-34R
using 11-20T
virtual column 1-137S
WITH CHECK OPTION 1-138S
with CREATE SCHEMA 1-77S
with SELECT * notation 1-136S
Creating
a database from ASCII files 5-14R
a dbload command file 5-23R
crtcmap utility
creating mapping files 5-5R
description of 5-5R
error messages for 5-7R
formats for mapping files 5-6R
Currency, representing with NLS 1-15R
Current database
specifying with DATABASE 1-140S
CURRENT function
4GL example 13-6T
comparing column values 2-56T
syntax
in Condition segment 1-405S
in expression 1-436S
in INSERT 1-250S
use
in ALTER TABLE 1-18S
in CREATE TABLE 1-88S
in expression 1-440S
in INSERT 1-252S
in WHERE condition 1-441S
input for DAY function 1-441S
CURRENT keyword
DISCONNECT statement 1-168S
syntax in FETCH 1-194S
use in FETCH 1-196S
CURRENT OF keywords
syntax
in DELETE 1-159S
in UPDATE 1-383S
use
in DELETE 1-161S
in UPDATE 1-390S
Cursor
activating with OPEN 1-263S
active set of 5-24T
affected by transaction end 1-40S
10 Index
associating with prepared statements
1-154S
characteristics 1-149S
closing 1-38S, 7-18T
closing with ROLLBACK WORK
1-307S
declaring 1-145S, 5-20T
definition of types 1-148S
for insert 6-8T
for update 6-15T, 7-9T
hold 7-18T
manipulation statements 1-6S
opening 1-264S, 1-265S, 5-20T, 5-24T
retrieving values with FETCH 1-194S,
5-21T
scroll 1-149S, 5-23T
sequential 1-149S, 5-23T, 5-25T
statement, as trigger event 1-112S
using with transactions 1-155S
with
DELETE 1-159S
INTO keyword in SELECT 1-319S
prepared statements 1-148S, 5-32T
WITH HOLD 7-18T, 10-34T
See also CLOSE statement.
See also Hold cursor.
See also Insert cursor.
See also OPEN statement.
See also Scroll cursor.
See also Select cursor.
See also Sequential cursor.
See also Update cursor.
Cursor Stability isolation level 1-367S,
7-11T
CURSOR STABILITY keywords, syntax
in SET ISOLATION 1-366S
Cursory procedure 2-21S
customer table in stores6 database,
columns in A-2R
cust_calls table in stores6 database,
columns in A-5R
Cyclic query 4-22T
D
Daemon 12-14T
Data
connecting to 12-12T
containing foreign characters 1-19R
inserting with the LOAD statement
1-255S
integrity 12-20T
Data access statements 1-6S
Data definition statements 1-5S, 5-34T
Data distributions
confidence 1-397S
creating on filtered columns 13-9T,
13-29T
on temporary tables 1-397S
RESOLUTION 1-396S, 1-397S
use with optimizer 13-9T
DATA field
setting with SET DESCRIPTOR 1-357S
Data integrity 4-22T to 4-25T, 12-20T
statements 1-6S
Data manipulation statements 1-6S
Data model
attribute 8-14T
building 8-3T to 8-33T
defining relationships 8-8T
denormalizing 10-26T to 10-32T
description of 1-3T, 8-3T
entity-relationship 8-4T
many-to-many relationship 8-11T
one-to-many relationship 8-11T
one-to-one relationship 8-11T
See also Relational model.
telephone-directory example 8-6T
Data protection
with OnLine 12-19T
Data replication 12-19T
Data type
automatic conversions 5-15T
BYTE 3-5R, 9-19T
changing with ALTER TABLE 1-28S
CHAR 3-6R, 9-15T
CHARACTER 3-7R
character data 9-15T
CHAR, mapping to NCHAR 4-46R
choosing 9-19T
chronological 9-12T
considerations for INSERT 1-251S,
1-498S
conversion 3-23R, 4-8T
DATE 3-7R, 9-12T
DATETIME 3-7R, 9-12T
DEC 3-10R
DECIMAL 3-10R, 9-10T
DOUBLE PRECISION 3-12R
fixed-point 9-10T
FLOAT 3-12R
floating-point 3-12R, 9-9T
in SPL variables 14-17T
INT 3-13R
INTEGER 3-13R, 9-7T
INTERVAL 3-13R, 9-14T
MONEY 3-16R, 9-10T
NCHAR 3-17R
NCHAR, mapping to CHAR 4-46R
NUMERIC 3-18R
numeric 9-7T
NVARCHAR 3-18R
REAL 3-19R, 9-9T
requirements for referential
constraints 1-22S, 1-96S
segment 1-424S
SERIAL 3-19R, 9-7T
SMALLFLOAT 3-20R, 9-9T
SMALLINT 3-20R
specifying with CREATE VIEW
1-137S
summary table 3-4R
syntax 1-425S
TEXT 3-21R, 9-17T
VARCHAR 3-22R, 9-15T
See also Data Type segment.
Data types
creating NCHAR columns 1-19R
creating NVARCHAR columns 1-19R
OnLine specific 1-4R
Database
ANSI-compliant 1-15T
application 1-16T
archiving 1-10T
closing with CLOSE DATABASE
1-41S
concurrent use 1-8T
creating ANSI-compliant 1-376S
creating in NLS mode 1-20R
creating with CREATE DATABASE
1-57S
data types 3-4R
default isolation levels 1-368S
defined 1-3T, 1-11T
dropping 1-172S
implicit connection 1-168S
lock 1-142S
management of 1-9T
map of
stores6 A-6R
system catalog tables 2-33R
mission-critical 1-10T
naming conventions 1-422S
Index 11
naming unique to engine 9-21T
naming with variable 1-423S
NLS 1-16T
NLS versus non-NLS 1-20R
NLS, accessing 1-20R
opening in exclusive mode 1-142S
optimizing queries 1-394S
populating new tables 9-27T
relation to dbspace 10-5T
relational, defined 1-11T
remote 1-422S
restoring 1-308S
server 1-8T, 1-16T
server, definition of 1-16T
stopping logging on 1-376S
stores6 Intro-9R, Intro-12S, 7T
stores6 description of A-1R
table names 12-16T
See also Database Name segment.
Database Administrator (DBA) 1-233S,
11-7T
Database application. See Application.
Database lock 7-6T
Database management system 12-4T
Database Name segment
database outside DBPATH 1-423S
for remote database 1-422S
naming conventions 1-421S
naming with variable 1-423S
syntax 1-421S
using quotes, slashes 1-423S
Database server
choosing OnLine or SE 1-3R
configuration 12-15T
definition of 1-16T
effect of server type on
available data types 1-4R
isolation level 1-6R
locking 1-5R
rolling back transactions 1-4R
SQL statements supported 1-7R
system catalog tables 1-7R
transaction logging 1-5R
local 12-5T
NLS versus non-NLS 1-20R
remote 12-8T
specifying default for connection
4-36R
DATABASE statement
determining database type 1-140S
exclusive mode 1-142S, 7-6T
12 Index
for database outside DBPATH 1-141S
locking 7-6T
specifying current database 1-140S
SQLAWARN after 1-141S, 5-12T
syntax 1-140S
using with program variables 1-141S
See also Database Name segment.
Database-level privilege
description of 1-232S, 4-15T
granting 1-232S
passing grant ability 1-237S
revoking 1-303S
See also Privilege.
DATE data type
converting to DATETIME 3-25R
description of 3-7R, 9-12T
functions in 1-454S, 2-56T
in ORDER BY sequence 2-14T
range of operations 3-25R
representing DATE values 3-29R
syntax 1-425S
using with DATETIME and
INTERVAL values 3-28R
DATE function
as time function 2-56T
syntax in expression 1-454S
use in expression 1-455S, 2-61T
DATE value
setting DBDATE environment
variable 4-16R
specifying European format with
DBDATE 4-17R
DATETIME data type
4GL example 13-6T
adding or subtracting INTERVAL
values 3-27R
as quoted string 1-498S
character string values 3-10R
converting to DATE 3-25R
description of 9-12T
displaying format 2-61T, 9-16T
field qualifiers 3-8R, 1-428S
functions on 2-56T
in
expression 1-441S
INSERT 1-498S
ORDER BY sequence 2-14T
relational expressions 2-29T
multiplying values 3-26R
precision and size 3-8R, 9-13T
range of expressions 3-26R
range of operations with DATE and
INTERVAL 3-25R
representing DATETIME values
3-29R
syntax 1-425S, 1-488S
using the DBTIME environment
variable 4-27R
with EXTEND function 3-26R, 3-28R
See also Literal DATETIME.
DATETIME Field Qualifier segment
1-428S
DATETIME formats, using the DBTIME
environment variable 4-27R
Date, representing with NLS 1-15R
DAY function
as time function 2-57T
syntax in expression 1-454S
use
as time function 2-56T
in expression 1-455S
DAY keyword
syntax
in DATETIME data type 1-428S
in INTERVAL data type 1-485S
use
as DATETIME field qualifier 3-8R,
1-488S
as INTERVAL field qualifier 3-14R,
1-491S
DBA keyword
in GRANT 1-233S
in REVOKE 1-303S
DB-Access
creating database with 5-34T, 9-26T
UNLOAD statement 9-28T
DBANSIWARN environment variable
4-15R, 1-78S, 1-85S, 1-137S, 5-10T
DBAPICODE environment variable
1-16R, 4-47R
relation to crtcmap utility 5-5R
DBA-privileged procedure 14-13T
DBA. See Database Administrator.
DBDATE environment variable 4-16R,
4-8T, 9-13T
DBDELIMITER environment variable
4-18R, 1-258S
DBEDIT environment variable 4-18R
dbexport utility
description of 5-8R
destination options 5-10R
Interrupt key 5-9R
specifying field delimiter with
DBDELIMITER 4-18R
unloading a database 5-8R
using with NLS 5-12R
dbimport utility
create options 5-16R
creating a database 5-14R
description of 5-13R
input file location options 5-15R
Interrupt key 5-14R
using with NLS 5-13R, 5-18R
DBINFO function
syntax in expression 1-448S
use in expression 1-448S
DBLANG environment variable 4-19R
dbload utility
creating a command file 5-23R
description of 5-19R
INSERT statement, compared to SQL
INSERT statement 5-30R
Interrupt key 5-21R
loading data from a command file
5-20R
loading data into a table 9-28T, 10-12T
options
bad-row limits 5-23R
batch size 5-22R
command-file syntax check 5-21R
load start point 5-22R
specifying field delimiter with
DBDELIMITER 4-18R
writing a command file in
character-position form 5-31R
writing a command file in delimiter
form 5-26R
DBMONEY environment variable 4-20R,
9-12T
DBMS. See Database management system.
DBNLS environment variable 1-16R,
4-48R
DBPATH environment variable 4-21R,
1-141S, 1-423S, 12-14T
DBPRINT environment variable 4-24R
DBREMOTECMD environment variable
4-25R
Directory, extension,.dbs extension
1-101S
.dbs extension Intro-11R, 1-58S, 1-141S
Index 13
dbschema utility
create schema for a database 5-34R
description of 5-33R
options
obtaining privilege schema 5-36R
obtaining synonym schema 5-35R
specifying a table, view, or
procedure 5-37R
owner conventions 5-35R
use of 9-26T
DBSERVERNAME function
returning servername 1-438S
use
in ALTER TABLE 1-18S
in CREATE TABLE 1-88S
in expression 1-438S
in SELECT 2-63T, 2-65T, 3-20T
dbspace
definition of 10-4T
division into extents 10-8T
for temporary tables 10-6T
mirrored 10-5T
multiple access arms in 10-7T
on dedicated device 10-6T
relation to tblspace 10-7T
root 10-5T
selecting with CREATE DATABASE
1-57S, 9-22T
DBSPACETEMP environment variable
4-26R, 1-100S
DBTEMP environment variable 4-27R
DBTIME environment variable 4-27R
DBUPSPACE environment variable
4-30R
DDL statements, summary 1-5S
Deadlock detection 1-371S, 7-14T
DEALLOCATE DESCRIPTOR statement
syntax 1-143S
with concatenation operator 1-432S
DEC data type. See DECIMAL data type.
DECIMAL data type
changing data types 3-23R
description of 3-11R
fixed-point 9-10T
floating-point 3-11R, 9-10T
signalled in SQLAWARN 5-12T
syntax 1-425S
using as default value 1-19S, 1-89S
Decimal point (.)
as delimiter in DATETIME 3-9R
14 Index
as delimiter in INTERVAL 3-15R
DECLARE statement
cursor characteristics 1-149S
cursor types 1-148S
cursors with prepared statements
1-154S
cursors with transactions 1-155S
definition and use
hold cursor 1-150S
insert cursor 1-149S, 1-157S
procedure cursor 1-148S
scroll cursor 1-149S
select cursor 1-148S
sequential cursor 1-149S
update cursor 1-148S, 1-152S
description of 5-20T
FOR INSERT clause 6-8T
FOR UPDATE 6-15T
insert cursor 1-148S
insert cursor with hold 1-157S
procedure cursor 1-148S
restrictions with SELECT with
ORDER BY 1-340S
SCROLL keyword 5-23T
syntax 1-145S
update cursor 1-148S
updating specified columns 1-153S
use
with concatenation operator
1-432S
with FOR UPDATE keywords
1-148S
WITH HOLD clause 7-19T
with SELECT 1-321S
Default assumptions for your
environment 4-6R
DEFAULT keyword 1-169S
in the CONNECT statement 1-46S
Default value
description of 4-19T
specifying
with ALTER TABLE 1-19S
with CREATE TABLE 1-88S
Deferred checking 1-349S
DEFERRED keyword, in the SET
CONSTRAINTS statement 1-349S
DEFINE statement
in stored procedures 14-17T
placement of 2-8S
syntax 2-7S
DELETE keyword
syntax
in GRANT 1-235S
in REVOKE 1-301S
use
in GRANT 1-236S
in REVOKE 1-302S
Delete privilege 1-235S, 11-8T, 11-28T
DELETE REFERENCING clause
and FOR EACH ROW section 1-121S
correlation name 1-119S
syntax 1-119S
DELETE statement
all rows of table 4-4T
and end of data 6-14T
applied to view 11-24T
as triggering statement 1-112S
cascading 1-160S
coordinated deletes 6-6T
count of rows 6-4T
CURRENT OF clause 1-161S
description of 4-4T
embedded 5-6T, 6-3T to 6-8T
in trigger event 1-111S
in triggered action 1-122S
number of rows 5-12T
preparing 5-30T
privilege for 1-235S, 11-6T, 11-8T
syntax 1-159S
time to update indexes 10-20T
transactions with 6-5T
using subquery 4-6T
WHERE clause restricted 4-6T
with Condition segment 1-404S
with cursor 1-152S, 6-7T
with select..for update 1-340S
within a transaction 1-159S
Delete, cascading
See Cascading deletes
Delimiter
for DATETIME values 3-9R
for INTERVAL values 3-15R
for LOAD input file 1-258S
specifying with UNLOAD 1-380S
Delimiter form of FILE and INSERT
statements 5-24R
DELIMITER keyword
in LOAD 1-258S
in UNLOAD 1-380S
Demonstration database
copying Intro-10R, Intro-13S, 8T
installation script Intro-9R, Intro-12S,
7T
map of A-6R
overview Intro-9R, Intro-12S, 7T
structure of tables A-2R
tables in A-2R to A-6R
See also stores6 database.
Denormalizing 10-26T
Derived data
introduced for performance 10-30T
produced by view 11-20T
DESC keyword 1-338S
syntax
in CREATE INDEX 1-63S
in SELECT 1-337S
use
in CREATE INDEX 1-66S
in SELECT 1-338S
Descending order in SELECT 2-14T
DESCRIBE statement
and COLLCHAR environment
variable 4-46R
and the USING SQL DESCRIPTOR
clause 1-164S
describing statement type 1-163S,
5-33T
INTO sqlda pointer clause 1-165S
relation to GET DESCRIPTOR 1-213S
syntax 1-162S
using with concatenation operator
1-432S
values returned by SELECT 1-163S
Descriptor 1-164S
Determining ANSI-compliance 1-10R
Device
optical 12-6T
storage 12-6T
Directory, extension, .dbs 1-58S, 1-141S
Dirty Read isolation level 1-367S, 7-10T
DIRTY READ keywords, syntax in SET
ISOLATION 1-366S
DISCONNECT statement 1-169S
ALL keyword 1-169S
CURRENT keyword 1-168S
with
concatenation operator 1-432S
Disk access
chunk 10-4T
Index 15
cost to read a row 13-16T
dbspace 10-4T
latency of 13-17T
nonsequential 13-18T
nonsequential avoided by sorting
13-37T
performance 13-17T to 13-19T, 13-34T
reducing contention 10-7T
seek time 13-17T
sequential 13-17T, 13-34T
sequential forced by query 13-32T,
13-33T, 13-35T
using rowid 13-18T
Disk buffer. See Page buffer.
Disk contention
effect of 13-17T
multiple arms to reduce 10-7T
Disk extent 10-8T
Disk mirroring 10-5T
Disk page
buffer for 13-16T, 13-18T
size of 10-4T, 13-14T
Display label
in ORDER BY clause 2-52T
syntax in SELECT 1-312S
with SELECT 2-49T
Display schema for a database 5-34R
DISTINCT keyword
relation to GROUP BY 3-5T
restrictions in modifiable view 11-24T
syntax
in CREATE INDEX 1-63S
in expression 1-462S
in SELECT 1-312S
use
in CREATE INDEX 1-64S
in SELECT 1-313S, 2-19T
no effect in subquery 1-414S
with COUNT function 2-54T
Distributed deadlock 7-15T
Distributed processing 12-8T
Distributions
dropping with DROP
DISTRIBUTIONS clause 1-396S
privileges required to create 1-396S
using the HIGH keyword 1-396S
using the MEDIUM keyword 1-397S
Division (/) symbol, arithmetic operator
1-431S
16 Index
DML statements, summary 1-6S
DOCUMENT keyword, use in stored
procedures 14-6T
Documentation notes Intro-8R,
Intro-11S, 6T
Dominant table 3-21T
Dormant connection 1-169S
DOS operating system 12-4T
DOUBLE PRECISION data type. See
FLOAT data type.
DROP AUDIT statement 1-171S
DROP CONSTRAINT keywords
syntax in ALTER TABLE 1-15S
use in ALTER TABLE 1-32S
DROP DATABASE statement 1-172S
DROP INDEX statement
locks table 7-7T
releasing an index 13-34T
syntax 1-174S
DROP keyword
syntax in ALTER TABLE 1-15S
use in ALTER TABLE 1-26S
DROP SYNONYM statement 1-177S
DROP TABLE statement 1-179S
DROP TRIGGER statement
syntax 1-181S
use of 1-181S
DROP VIEW statement 1-183S
Duplicate index keys 10-22T
Duplicate values
finding 3-16T
in a query 1-313S
Dynamic management statements 1-6S
Dynamic SQL
cursor use with 5-32T
description of 5-5T, 5-28T
freeing prepared statements 5-33T
E
Editor, specifying with DBEDIT 4-18R
Effective checking 1-349S
Ellipses (...), wildcard in Condition
segment 1-411S
Embedded SQL
defined 5-3T
languages available 5-4T
See also ESQL.
End of data
signal in SQLCODE 5-11T, 5-17T
signal only for SELECT 6-14T
when opening cursor 5-20T
Entity
attributes associated with 8-15T
business rules 8-5T
criteria for choosing 8-7T
defined 8-4T
important qualities of 8-5T
in telephone-directory example 8-7T
integrity 4-18T
naming 8-4T
represented by a table 8-22T
Entity occurrence, defined 8-16T
Entity-relationship diagram
connectivity 8-17T
discussed 8-17T
meaning of symbols 8-17T
reading 8-18T
ENVIGNORE environment variable
4-30R
relation to chkenv utility 5-4R
Environment configuration file
debugging with chkenv 5-4R
example 4-4R
where stored 4-5R
Environment variable
and case sensitivity 4-6R
ARC_DEFAULT 4-14R
ARC_KEYPAD 4-14R
COLLCHAR 4-45R
DBANSIWARN 4-15R
DBAPICODE 4-47R
DBAPICODE, and crtcmap utility
5-5R
DBDATE 4-16R
DBDELIMITER 4-18R
DBEDIT 4-18R
DBLANG 4-19R
DBLANG, and crtcmap utility 5-5R
DBMONEY 4-20R
DBNLS 4-48R
DBPATH 4-21R, 12-14T
DBPRINT 4-24R
DBREMOTECMD 4-25R
DBSPACETEMP 4-26R
DBTEMP 4-27R
DBTIME 4-27R
DBUPSPACE 4-30R
default assumptions 4-6R
defining in environment
configuration file 4-4R
definition of 4-3R
ENVIGNORE 4-30R
ENVIGNORE, and chkenv utility
5-4R
how to set in Bourne shell 4-5R
how to set in C shell 4-5R
how to set in Korn shell 4-5R
INFORMIX environment variables,
listing 4-8R
INFORMIXC 4-31R
INFORMIXCOB 4-32R
INFORMIXCOBDIR 4-32R
INFORMIXCOBSTORE 4-33R
INFORMIXCONRETRY 4-34R
INFORMIXCONTIME 4-34R
INFORMIXDIR 4-36R, 12-14T
INFORMIXSERVER 4-36R, 12-14T
INFORMIXSHMBASE 4-37R
INFORMIXSTACKSIZE 4-38R
INFORMIXTERM 4-38R
LANG 4-49R
LANG, and crtcmap utility 5-5R
LC_COLLATE 4-50R
LC_CTYPE 4-51R
LC_MONETARY 4-52R
LC_NUMERIC 4-53R
LC_TIME 4-53R
listed 4-8R
listed, by topic 4-9R
listed, for NLS 4-9R
listed, for UNIX 4-9R
NLS environment variables, listing
4-9R
ONCONFIG 4-39R
overriding a setting 4-4R, 4-30R
PATH 4-54R, 12-14T
PSORT_DBTEMP 4-40R
PSORT_NPROCS 4-41R
rules of precedence 4-7R
setting at the command line 4-4R
setting in a shell file 4-4R
SQLEXEC 4-41R
SQLRM 4-41R, 4-42R
SQLRMDIR 4-43R
TERM 4-55R
TERMCAP 4-56R, 12-14T
TERMINFO 4-56R
UNIX environment variables, listing
4-9R
where to set 4-4R
Index 17
Equals (=) relational operator 2-30T,
2-71T
Equi-join 2-71T
ERROR 1-400S
Error checking
continuing after error in stored
procedure 2-34S
error status with ON EXCEPTION
2-32S
exception handling 14-27T
in stored procedures 14-27T
simulating errors 14-31T
with SYSTEM 2-40S
ERROR keyword, in the WHENEVER
statement 1-398S
Error messages
for NLS 1-21R
for trigger failure 15-14T
generating in a trigger 15-14T
retrieving trigger text in a program
15-16T, 15-17T
Errors
after DELETE 6-4T
at compile time 14-6T
codes for 5-11T
dealing with 5-16T
detected on opening cursor 5-20T
during updates 4-22T
in stored procedure syntax 14-7T
inserting with a cursor 6-11T
ISAM error code 5-12T
using to identify NLS database server
1-19R
ESCAPE keyword
syntax in Condition segment 1-405S
use
in Condition segment 1-409S
with LIKE keyword 1-328S, 1-411S
with MATCHES keyword 1-329S,
1-412S
with WHERE keyword 1-328S,
2-43T
ESQL
cursor use 5-19T to 5-28T
DELETE statement in 6-3T
delimiting host variables 5-6T
dynamic embedding 5-5T, 5-28T
error handling 5-16T
fetching rows from cursor 5-21T
host variable 5-6T, 5-8T
18 Index
indicator variable 5-15T
INSERT in 6-8T
NLS errors in SQLERRM field 1-19R
overview 5-3T to 5-37T, 6-3T to 6-17T
preprocessor 5-4T
scroll cursor 5-23T
selecting single rows 5-13T
SQL Communications Area 5-8T
SQLCODE 5-11T
SQLERRD fields 5-12T
static embedding 5-5T
UPDATE in 6-14T
Estimating
blobpages 10-17T
maximum number of extents 10-10T
size of index 10-16T
table size with fixed-length rows
10-13T
table size with variable-length rows
10-14T
Example database. See Demonstration
database.
EXCLUSIVE keyword
syntax
in DATABASE 1-140S
in LOCK TABLE 1-260S
use
in DATABASE 1-142S
in LOCK TABLE 1-262S
Exclusive lock 7-6T
EXECUTE IMMEDIATE statement
description of 5-34T
restricted statement types 1-191S
syntax and usage 1-190S
using with concatenation operator
1-432S
EXECUTE ON keywords
syntax
in GRANT 1-231S
in REVOKE 1-300S
use
in GRANT 1-237S
in REVOKE 1-300S
EXECUTE PROCEDURE statement
1-192S
assigning values with 14-21T
associating cursor with DECLARE
1-148S
in FOREACH 2-20S
in triggered action 1-122S
using 14-9T
with
INTO keyword 1-198S
EXECUTE statement
and sqlca record 1-186S
description of 5-31T
parameterizing a statement 1-186S
syntax 1-184S
USING DESCRIPTOR clause 1-188S
with concatenation operator 1-432S
with USING keyword 1-186S
Existence dependency 8-9T
EXISTS keyword
beginning a subquery 1-330S
in a WHERE clause 3-33T
use in condition subquery 1-414S,
11-27T
EXIT statement
exiting a loop 14-23T
syntax 2-14S
EXP function
syntax in expression 1-451S
use in expression 1-451S
Explicit temporary table 1-100S
Exponential function
EXP function 1-451S
Exponential function. See EXP function.
Expression
date-oriented 2-56T
description of 2-46T
display label for 2-49T
in UPDATE 1-387S
ordering by 1-339S
Expression segment
aggregate expressions 1-462S
column expressions 1-433S
combined expressions 1-467S
constant expressions 1-436S
expression types 1-431S
function expressions 1-443S
in SPL expressions 1-468S
syntax 1-431S
EXTEND function
syntax in expression 1-454S
use in expression 1-456S
with DATE, DATETIME and
INTERVAL 3-26R, 3-28R, 2-56T,
2-61T
extension
.dat Intro-11R
.dbs Intro-11R
.idx Intro-11R
.lok 1-370S
Extension checking, specifying with
DBANSIWARN 4-15R
Extension, to SQL
symbol for Intro-7S
with ANSI-compliant database 1-14R
Extent
changing size of for system table 2-9R
description of 10-8T
next extent doubles 10-10T
sizes of 10-8T
upper limit on 10-10T
EXTENT SIZE keywords 1-107S, 10-8T
F
FETCH statement
ABSOLUTE keyword 5-23T
as affected by CLOSE 1-39S
checking results with SQLCA 1-202S
description of 5-21T
fetching a row for update 1-201S
locking for update 1-201S
relation to GET DESCRIPTOR 1-210S
sequential 5-23T
specifying a value’s memory location
1-198S
syntax 1-194S
with
concatenation operator 1-432S
INTO keyword 1-319S
program arrays 1-199S
scroll cursor 1-196S
sequential cursor 1-195S, 5-25T
X/Open mode 1-195S
Field qualifier
for DATETIME 3-8R, 1-428S
for INTERVAL 3-13R, 1-485S, 1-491S
File
compared to database 1-3T
environment configuration 4-4R
environment configuration, checking
with chkenv 5-4R
extension
.lok 1-370S
mapping, and COLLCHAR 4-45R
mapping, and crtcmap utility 5-5R
mapping, and DBAPICODE 4-47R
mapping, format for 5-6R
Index 19
permissions in UNIX 11-4T
sending output with the OUTPUT
statement 1-271S
shell 4-4R
temporary for OnLine 4-26R
temporary for SE 4-27R
FILE statement
character-position form 5-28R
delimiter form 5-24R
syntax for character-position form
5-29R
syntax for delimiter form 5-25R
with dbload 5-23R
Filter expression
effect on performance 13-23T, 13-32T,
13-33T
evaluated from index 13-10T, 13-31T
optimizer uses 13-10T, 13-23T
selectivity estimates 13-30T
finding location of row 1-435S
FIRST keyword
syntax in FETCH 1-194S
use in FETCH 1-196S
First normal form 8-29T
Fixed point 9-10T
FLOAT data type
changing data types 3-23R
description of 3-12R, 9-9T
syntax 1-425S
using as default value 1-19S, 1-89S
Floating point 9-9T
FLUSH statement
count of rows inserted 6-11T
syntax 1-204S
with concatenation operator 1-432S
writing rows to buffer 6-10T
FOR EACH ROW action
SELECT statement in 1-117S
triggered action list 1-116S
FOR EACH ROW action.See also
FOREACH keyword.
FOR keyword
in CONTINUE 2-6S
in CREATE AUDIT 1-55S
in CREATE SYNONYM 1-80S
in EXIT 2-14S
for locating temporary tables 1-100S
FOR statement
looping in a stored procedure 14-23T
20 Index
specifying multiple ranges 2-18S
syntax 2-16S
using expression lists 2-18S
using increments 2-17S
FOR TABLE keywords, in UPDATE
STATISTICS 1-393S
FOR UPDATE keywords
conflicts with ORDER BY 6-8T
not needed in ANSI-compliant
database 6-16T
relation to UPDATE 1-390S
specific columns 6-16T
syntax in DECLARE 1-145S
use
in DECLARE 1-148S, 1-152S,
1-155S
in SELECT 1-340S
with column list 1-153S
FOREACH keyword
in CONTINUE statement 2-6S
in EXIT 2-14S
FOREACH keyword. See also FOR EACH
ROW action.
FOREACH statement
looping in a stored procedure 14-23T
syntax 2-20S
Foreign characters, using NLS 1-14R
Foreign key 1-22S, 1-93S, 1-94S, 4-19T
See also Referential constraint.
FOREIGN KEY keywords
in ALTER TABLE 1-29S
in CREATE TABLE 1-92S
Format
for crtcmap mapping file 5-6R
specifying for DATE value with
DBDATE 4-16R
specifying for DATETIME value with
DBTIME 4-27R
specifying for MONEY value with
DBMONEY 4-20R
FRACTION keyword
syntax
in DATETIME data type 1-428S
in INTERVAL data type 1-485S
use
as DATETIME field qualifier 3-8R,
1-488S
as INTERVAL field qualifier 3-14R,
1-491S
FREE statement
effect on cursors 1-269S
freeing prepared statements 5-33T
syntax 1-207S
with concatenation operator 1-432S
FROM keyword
alias names 2-79T
syntax
in PUT 1-284S
in REVOKE 1-300S
in SELECT 1-310S
use
in PUT 1-287S
in SELECT 1-323S
Function
aggregate 2-53T
algebraic 1-444S
date-oriented 2-56T
in SELECT statements 2-53T
within a stored procedure 14-24T
Function expression
DBINFO function 1-448S
description of 1-443S
in SELECT 1-314S
Functional dependency 8-31T
G
GET DESCRIPTOR statement
syntax 1-210S
the COUNT keyword 1-212S
use with FETCH statement 1-200S
with concatenation operator 1-432S
X/Open mode 1-213S
GET DIAGNOSTICS statement
CLASS_ORIGIN keyword 1-225S
CONNECTION_NAME keyword
1-227S
exception clause 1-223S
MESSAGE_LENGTH keyword
1-225S
MESSAGE_TEXT keyword 1-225S
MORE keyword 1-222S
NUMBER keyword 1-223S
purpose 1-217S
RETURNED_SQLSTATE keyword
1-225S
ROW_COUNT keyword 1-223S
SERVER_NAME keyword 1-225S
statement clause 1-222S
keywords 1-222S
SUBCLASS_ORIGIN keyword 1-225S
syntax 1-217S
Global transaction 12-21T
GOTO keyword, in the WHENEVER
statement 1-398S
GRANT statement
automated 11-13T
changing grantor 1-238S
creating a privilege chain 1-238S
database-level privileges 1-232S,
11-5T
default table privileges 1-237S
in 4GL 11-13T
in embedded SQL 5-34T to 5-37T
passing grant ability 1-237S
privileges on a view 1-239S
syntax 1-231S
table-level privileges 1-235S, 11-7T
use of dbschema 5-34R
with CREATE SCHEMA 1-77S
GROUP BY clause 1-125S
GROUP BY keywords
column number with 3-7T
composite index used for 13-31T
description of 3-4T
indexes for 13-10T, 13-34T
restrictions in modifiable view 11-24T
sorting rows 13-12T
syntax in SELECT 1-310S
use in SELECT 1-334S
H
HAVING keyword
description of 3-9T
syntax in SELECT 1-310S
use in SELECT 1-336S
Header, of a procedure 14-25T
HEX function 1-435S
syntax in expression 1-452S
use in expression 1-452S
HIGH keyword 1-374S
Hold cursor
definition of 1-149S, 7-18T
insert cursor with hold 1-157S
use of 1-150S
Host machine 12-8T
Host variable
delimiter for 5-6T
description of 5-6T
dynamic allocation of 5-33T
Index 21
fetching data into 5-21T
in DELETE statement 6-4T
in INSERT 6-8T
in UPDATE 6-14T
in WHERE clause 5-14T
INTO keyword sets 5-13T
null indicator 5-15T
restrictions in prepared statement
5-29T
truncation signalled 5-12T
using non-English characters in 1-22R
with EXECUTE 5-31T
HOUR keyword
syntax
in DATETIME data type 1-428S
in INTERVAL data type 1-485S
use
as DATETIME field qualifier 3-8R,
1-488S
as INTERVAL field qualifier 3-14R,
1-491S
Hyphen (-)
as delimiter in DATETIME 3-9R
as delimiter in INTERVAL 3-15R
I
Icon, explanation of Intro-6S
IDATA field
SET DESCRIPTOR statement 1-357S
with X/Open programs 1-213S
Identifier segment
column names 1-476S
column naming, allowable characters
1-469S
cursor name 1-482S
cursor names 1-479S
database objects that use 1-469S
stored procedures 1-479S
syntax 1-469S
table names 1-475S, 1-477S
used in column naming 1-88S
using keywords as column names
1-473S
variable name 1-481S
IF statement
branching 14-22T
syntax 2-24S
syntax and use 2-24S
with null values 2-25S
ILENGTH field
22 Index
SET DESCRIPTOR statement 1-357S
with X/Open programs 1-213S
IMMEDIATE keyword, in the SET
CONSTRAINTS statement 1-349S
Implicit connection
defined 1-46S
with DISCONNECT 1-168S
Implicit temporary table 1-100S
IN keyword
locating BLOB column 10-18T
syntax
in CREATE AUDIT 1-55S
in CREATE DATABASE 1-57S
in CREATE TABLE 1-105S
in LOCK TABLE 1-260S
use
in Condition segment 1-408S
in Condition subquery 1-414S
in CREATE DATABASE 10-5T
in CREATE TABLE 10-6T, 10-8T
with WHERE keyword 1-327S
IN keyword, used to test for equality in
WHERE clause 2-29T
IN relational operator 3-33T
Index
adding for performance 10-21T,
13-34T
allowable characters in index name
1-469S
building with NLS 1-20R
clustered 10-25T
composite 13-31T
creating with CREATE INDEX 1-62S
disk space used by 10-16T, 10-20T,
13-34T
displaying information for 1-242S
dropping 10-24T
dropping with DROP INDEX 1-174S
duplicate entries 10-16T, 10-22T
effect of physical order 13-27T
in GROUP BY 13-10T
in ORDER BY 13-10T
locks table 7-7T
managing 10-19T
naming conventions 1-419S, 1-469S,
1-484S, 1-505S
optimizer 13-29T
optimizer uses 13-9T, 13-10T, 13-26T
ordering columns in composite
13-31T
performance effects 13-18T
sharing with constraints 1-86S
sorting with NLS 1-15R
time cost of 10-20T
updating affects 13-31T
utility to test or repair 13-31T
when not used by optimizer 13-32T,
13-33T, 13-35T
with temporary tables 1-343S
INDEX keyword
syntax
in GRANT 1-235S
in REVOKE 1-301S
use
in GRANT 1-236S
in REVOKE 1-302S
Index Name segment
syntax 1-419S, 1-495S
use 1-504S
Index privilege 1-236S, 11-8T
INDEXES FOR keywords, in INFO
statement 1-242S
Indexes, with dbload utility 5-21R
INDICATOR field
setting with SET DESCRIPTOR 1-358S
INDICATOR keyword, in SELECT
1-319S, 1-320S, 1-321S, 1-432S
Indicator variable
definition of 5-15T
in EXECUTE 1-186S
in expression 1-467S
in SELECT 1-319S, 1-320S, 1-321S,
1-432S
using non-English characters in 1-22R
INFO statement
displaying privileges and status
1-242S
displaying tables, columns, and
indexes 1-241S
syntax 1-241S
informix
environment configuration file 4-4R
privileges associated with user 1-234S
Informix extension checking, specifying
with DBANSIWARN 4-15R
INFORMIX-4GL 12-5T
detecting null value 5-16T
example of dynamic SQL 11-13T
indicator variable not used 5-16T
program variable 5-5T
STATUS variable 5-11T
terminates on errors 5-36T, 6-14T
timing operations in 13-6T
using SQLCODE with 5-11T
WHENEVER ERROR statement 5-36T
INFORMIXC environment variable
4-31R
INFORMIXCOB environment variable
4-32R
INFORMIXCOBDIR environment
variable 4-32R
INFORMIXCOBSTORE environment
variable 4-33R
INFORMIXCOBTYPE environment
variable 4-33R
INFORMIXCONRETRY environment
variable 4-34R
INFORMIXCONTIME environment
variable 4-34R
INFORMIXDIR environment variable
4-36R, 12-14T
INFORMIX-OnLine
disk access by 13-17T
INFORMIX-OnLine Dynamic Server
allows views on external tables 11-23T
and triggering statement 1-112S
archiving 4-26T
characteristics of 1-10T
creating demonstration database
Intro-10R, Intro-13S
disk page size 13-16T
disk storage methods 10-3T to 10-12T
is NLS-ready 1-15R
optimizer input with 13-9T
signalled in SQLAWARN 5-12T
when tables are locked 7-7T
INFORMIX-OnLine/Optical 12-6T
list of statements 1-7S
INFORMIX-SE
characteristics of 1-10T
creating database 9-23T
creating demonstration database
Intro-10R, Intro-13S
is NLS-ready 1-15R
INFORMIXSERVER environment
variable 4-36R, 1-46S, 12-14T
INFORMIXSHMBASE environment
variable 4-37R
INFORMIX-SQL
Index 23
creating database with 5-34T, 9-26T
UNLOAD statement 9-27T
INFORMIXSTACKSIZE environment
variable 4-38R
INFORMIXTERM environment variable
4-38R
informix.rc file 4-4R
Insert buffer
counting inserted rows 1-205S, 1-290S
filling with constant values 1-286S
inserting rows with a cursor 1-248S
storing rows with PUT 1-285S
triggering flushing 1-289S
Insert cursor 1-148S
closing 1-39S
definition of 1-148S, 6-8T
in INSERT 1-248S
in PUT 1-286S
opening 1-266S
reopening 1-267S
result of CLOSE in SQLCA 1-39S
use of 1-149S, 6-11T
with hold 1-157S
writing buffered rows with FLUSH
1-204S
INSERT INTO keywords
in INSERT 1-245S
in LOAD 1-258S
INSERT keyword
syntax
in GRANT 1-235S
in REVOKE 1-301S
use
in GRANT 1-236S
in REVOKE 1-302S
Insert privilege 11-8T, 11-28T
INSERT REFERENCING clause
and FOR EACH ROW section 1-121S
correlation name 1-118S
syntax 1-118S
INSERT STATEMENT
using functions in the VALUES clause
1-252S
INSERT statement
and end of data 6-14T
character-position form 5-28R
constant data with 6-11T
count of rows inserted 6-11T
delimiter form 5-24R
duplicate values in 4-7T
24 Index
effect of transactions 1-249S
embedded 6-8T to 6-14T
filling insert buffer with PUT 1-285S
in dynamic SQL 1-253S
in trigger event 1-111S
in triggered action 1-122S
inserting
multiple rows 4-9T
nulls with the VALUES clause
1-252S
rows 4-6T
rows through a view 1-246S
rows with a cursor 1-248S
single rows 4-7T
values into SERIAL columns 3-19R
null values in 4-7T
number of rows 5-12T
privilege for 11-6T, 11-8T
SELECT statement in 4-9T
SERIAL columns 1-251S
specifying values to insert 1-250S
syntax 1-245S
for character position form 5-29R
for delimiter form 5-25R
time to update indexes 10-20T
use with insert cursor 1-157S
VALUES clause 4-7T
with
a view 11-25T
DECLARE 1-145S
SELECT 1-253S
with dbload 5-23R
Inserting rows of constant data 6-11T
Installation directory, specifying with
INFORMIXDIR 4-36R
INT data type. See INTEGER data type.
INTEGER data type
changing data types 3-23R
description of 3-13R, 9-7T
syntax 1-425S
using as default value 1-19S, 1-89S
Integrity. See Data integrity.
Integrity. See Referential integrity.
Integrity. See Semantic integrity.
Intensity attributes, setting
INFORMIXTERM for 4-38R
Interrupt key
with dbexport 5-9R
with dbimport 5-14R
with dbload 5-21R
Interrupted modifications 4-22T
INTERVAL data type
adding or subtracting from 3-30R
adding or subtracting from
DATETIME values 3-27R
as quoted string 1-498S
description of 3-13R, 9-14T
display format 9-16T
field delimiters 3-15R
field qualifier, syntax 1-485S
in expression 1-441S
in INSERT 1-498S
in relational expressions 2-29T
multiplying or dividing values 3-31R
precision and size 9-14T
range of expressions 3-26R
range of operations with DATE and
DATETIME 3-25R
syntax 1-425S, 1-491S
with EXTEND function 3-26R, 3-28R
See also Literal INTERVAL.
INTERVAL Field Qualifier segment
1-485S
INTO keyword
choice of location 5-22T
in FETCH statement 5-22T
in SELECT 1-318S
mismatch signalled in SQLAWARN
5-12T
restrictions in INSERT 4-10T
restrictions in prepared statement
5-29T
retrieving multiple rows 5-20T
retrieving single rows 5-13T
syntax
in FETCH 1-194S
in SELECT 1-310S
use
in FETCH 1-199S
in SELECT 1-318S
INTO TEMP keywords
description of 2-83T
restrictions in view 11-22T
syntax in SELECT 1-310S
use
in SELECT 1-341S
with UNION operator 1-344S
IS keyword
in Condition segment 1-409S
with WHERE keyword 1-327S
IS NOT keywords, syntax in Condition
segment 1-405S
IS NULL keywords 1-327S
ISAM error code 2-31S, 2-36S, 5-12T
Isolation level
Committed Read 1-367S, 7-10T
Cursor Stability 1-367S, 7-11T
default in ANSI-compliant database
1-13R
definitions 1-367S
description of 7-9T
Dirty Read 1-367S, 7-10T
in external tables 1-368S
Repeatable Read 1-367S, 7-12T
setting 7-9T
use with FETCH statement 1-201S
items table in stores6 database, columns
in A-3R
ITYPE field
SET DESCRIPTOR statement 1-357S
setting with SET DESCRIPTOR 1-359S
with X/Open programs 1-213S
J
Join
associative 2-76T
creating 2-71T
definition of 2-8T
dominant table 3-21T
effect of large join on optimization
13-36T
equi-join 2-71T
in Condition segment 1-331S
multiple-table join 1-332S, 2-77T
natural 2-75T
nested outer 3-28T
nested simple 3-25T
outer 3-21T
outer join 1-333S
restrictions in modifiable view 11-24T
self-join 1-333S, 3-11T
sort merge 13-27T
subservient table 3-21T
two-table join 1-332S
Join column. See Foreign key.
Join condition. See Condition segment.
Journal updates 10-33T
Index 25
K
Key lock 7-8T
Keywords, using in triggered action
1-123S
Key, candidate. See Candidate key.
Key, composite 8-23T
Key, foreign. See Foreign key.
Key, primary 8-22T
Key, primary. See Primary key
constraint.
Korn shell
how to set environment variables
4-5R
.profile file 4-4R
L
Label 2-49T, 3-48T
LANG environment variable 1-16R,
4-49R
Language supplement for added NLS
functionality 1-22R
LAST keyword
syntax in FETCH 1-194S
use in FETCH 1-196S
Latency 13-17T
LC_COLLATE environment variable
1-16R, 4-50R
LC_CTYPE environment variable 1-16R,
4-51R
LC_MONETARY environment variable
1-17R, 4-52R
LC_NUMERIC environment variable
1-17R, 4-53R
LC_TIME environment variable 1-17R,
4-53R
LENGTH field
setting with SET DESCRIPTOR 1-357S
with DATETIME and INTERVAL
types 1-358S
with DECIMAL and MONEY types
1-358S
LENGTH function
in expression 1-314S
on TEXT 2-64T
on VARCHAR 2-64T
syntax in expression 1-443S, 1-453S
use in expression 1-453S, 2-63T
26 Index
LET statement
assigning values 14-21T
executing a procedure 14-9T
syntax 2-28S
LIKE keyword
syntax in Condition segment 1-405S
use in SELECT 1-328S
wildcard characters 1-328S
LIKE keyword, used to test for equality
in WHERE clause 2-29T
LIKE relational operator 2-37T
LIKE test 13-32T
Literal
DATETIME
in Condition segment 1-405S
in expression 1-436S, 1-441S
segment 1-487S
syntax 1-488S
syntax in INSERT 1-250S
use in ALTER TABLE 1-18S
use in CREATE TABLE 1-88S
with IN keyword 1-327S
DATE, using as a default value 1-19S,
1-89S
INTERVAL
in Condition segment 1-405S
in expression 1-436S, 1-441S
segment 1-490S
syntax 1-491S
syntax in INSERT 1-250S
using as default value 1-19S, 1-89S
Number
in Condition segment 1-405S
in expression 1-436S, 1-439S
segment 1-493S
syntax 1-493S
syntax in INSERT 1-250S
with IN keyword 1-409S
LOAD statement
DELIMITER clause 1-258S
input formats for data 1-256S
INSERT INTO clause 1-258S
loading VARCHAR, TEXT, or BYTE
data types 1-257S
specifying field delimiter with
DBDELIMITER 4-18R
specifying the table to load into 1-258S
syntax 1-255S
the LOAD FROM file 1-256S
Loading data from a command file into a
table 5-20R
Local loopback 12-9T
Local server 12-5T
LOCK MODE keywords
syntax
in ALTER TABLE 1-15S
in CREATE TABLE 1-108S
use
in ALTER TABLE 1-33S
in CREATE TABLE 1-108S
LOCK TABLE statement
in databases with transactions 1-261S
in databases without transactions
1-262S
locking a table explicitly 7-7T
syntax 1-260S
Locking
and concurrency 4-27T
and integrity 7-3T
deadlock 7-14T
description of 7-5T
during
delete 1-159S
inserts 1-249S
updates 1-152S, 1-385S
granularity 7-6T
in OnLine 1-5R
in SE 1-6R
lock duration 7-8T
lock mode 7-13T
not-wait 7-14T
wait 7-13T
locks released at end of transaction
7-18T
mode 1-5R
overriding row-level 1-261S
releasing with COMMIT WORK 1-43S
releasing with ROLLBACK WORK
1-306S
scope 1-5R, 7-6T
scope of lock 7-6T
setting lock mode 7-13T
shared locks 1-6R
types of locks
database lock 7-6T
exclusive lock 7-6T
key lock 7-8T
page lock 1-108S, 7-8T
promotable lock 7-6T, 7-9T
row lock 1-108S, 7-8T
shared lock 7-6T
table lock 7-7T
update cursors effect on 1-152S
update locks 1-385S
waiting period 1-370S
with
DELETE 6-4T
FETCH 1-201S
scroll cursor 1-369S
SET ISOLATION 1-366S
SET LOCK MODE 1-370S
UNLOCK TABLE 1-381S
update cursor 7-9T
within transaction 1-35S
See also Table locking.
LOG IN keywords, syntax in CREATE
DATABASE 1-57S
LOG10 function
syntax in expression 1-452S
use in expression 1-452S
Logarithmic function
syntax
LOG10 function 1-451S
LOGN function 1-451S
use
LOG10 function 1-452S
LOGN function 1-452S
Logging
buffered 9-22T
buffered vs. unbuffered 1-372S
cascading deletes 1-24S, 1-98S
changing mode with SET LOG 1-372S
choosing for OnLine database server
9-22T
choosing for SE database server 9-23T
finding log file location 1-60S
renaming log 1-377S
setting with CREATE TABLE 1-104S
starting with START DATABASE
1-60S, 1-376S
stopping 1-377S
stopping with START DATABASE
1-376S
unbuffered 9-22T
with INFORMIX-OnLine 1-59S
with INFORMIX-SE 1-60S
with triggers 1-134S
Logical log
definition of 4-25T
Logical operator
AND 2-36T
in Condition segment 1-417S
NOT 2-36T
Index 27
OR 2-36T
LOGN function
syntax in expression 1-452S
use in expression 1-452S
.lok extension 1-370S
Loop
controlled 2-16S
creating and exiting in SPL 14-23T
exiting using RAISE exception 14-32T
indefinite with WHILE 2-46S
Loopback, local 12-9T
LOW keyword 1-374S
M
Machine notes Intro-9R, Intro-11S, 6T
Mandatory, entity in relationship 8-9T
Many-to-many relationship 8-9T, 8-11T,
8-26T
Mapping files for non-standard code sets
5-5R
MATCHES keyword
syntax in Condition segment 1-405S
use
in Condition segment 1-409S
in SELECT 1-328S
with NLS 2-42T
used to test for equality in WHERE
clause 2-29T
wildcard characters 1-329S
MATCHES relational operator
in WHERE clause 2-37T
MAX function
as aggregate function 2-53T
syntax in expression 1-462S
use in expression 1-464S
MDY function
as time function 2-56T
syntax in expression 1-454S
Memory
allocating for a system sqlda structure
1-9S
shared 12-7T
Message files
error messages Intro-9R, Intro-11S, 7T
setting LANG for NLS 4-49R
specifying subdirectory for NLS 1-22R
specifying subdirectory with
DBLANG 4-19R
28 Index
MIN function
as aggregate function 2-53T
syntax in expression 1-462S
use in expression 1-464S
Minus (-) sign, arithmetic operator
1-431S
MINUTE keyword
syntax
in DATETIME data type 1-428S
in INTERVAL data type 1-485S
use
as DATETIME field qualifier 3-8R,
1-488S
as INTERVAL field qualifier 3-14R,
1-491S
Mirror. See Disk mirroring.
MOD function
syntax in expression 1-444S
use in expression 1-446S
MODE ANSI keywords
ANSI-compliant database 1-15T
ANSI-compliant logging 9-23T
specifying ANSI-compliance 1-11R
specifying transactions 4-24T
syntax
in CREATE DATABASE 1-57S
in START DATABASE 1-376S
use
in CREATE DATABASE 1-60S
in START DATABASE 1-377S
Model. See Data model.
MODIFY keyword
syntax in ALTER TABLE 1-15S
use in ALTER TABLE 1-27S
MODIFY NEXT SIZE keywords
syntax in ALTER TABLE 1-15S
use in ALTER TABLE 1-33S
MONEY data type 9-12T
changing data types 3-23R
description of 3-16R, 9-10T
display format 9-12T
in INSERT 4-8T
syntax 1-425S
using as default value 1-19S, 1-89S
See also DECIMAL data type.
MONEY value
setting DBMONEY environment
variable 4-20R
setting LC_MONETARY
environment variable 4-52R
specifying European format with
DBMONEY 4-20R
specifying for NLS 4-53R
Money, representing with NLS 1-15R
MONTH function
as time function 2-56T
syntax in expression 1-454S
use in expression 1-456S
MONTH keyword
syntax
in DATETIME data type 1-428S
in INTERVAL data type 1-485S
use
as DATETIME field qualifier 3-8R,
1-488S
as INTERVAL field qualifier 3-13R,
1-491S
Multiple triggers
column numbers in 1-115S
example 1-114S
order of execution 1-115S
preventing overriding 1-132S
Multiple-table join 2-77T
Multi-row query
destination of returned values 1-198S
managing with FETCH 1-195S
N
Naming convention
column 1-87S, 1-102S, 1-294S
database 1-422S
index 1-419S, 1-484S, 1-505S
table 1-84S, 1-470S, 1-507S
See also Database Name segment.
See also Index Name segment.
See also Table Name segment.
Naming conventions
tables 12-16T
Native Language Support. See NLS.
Natural join 2-75T
NCHAR data type
description of 3-17R, 9-15T
syntax 1-425S
versus CHAR data type 1-19R
Nested ordering, in SELECT 1-339S,
2-15T
Network
computer 12-4T
connection information 12-15T
data sent over 13-21T
performance of 13-20T
simple model of 13-21T
site 12-4T
Network environment variable
DBPATH 4-21R
SQLRM 4-42R
SQLRMDIR 4-43R
NEW keyword
in DELETE REFERENCING clause
1-119S
in INSERT REFERENCING clause
1-118S
in UPDATE REFERENCING clause
1-120S
NEXT keyword
syntax in FETCH 1-194S
use in FETCH 1-196S
NEXT SIZE keywords
specifying size of extents 10-8T
use in CREATE TABLE 1-107S
use in GRANT 1-233S
NLS 1-14R
activating 2-25T
activating in Informix products 1-16R
and collation order 2-25T
and dbexport utility 5-12R
and dbimport utility 5-13R
and MATCHES keyword 2-42T
and ORDER BY keywords 2-25T,
2-42T
checking products for functionality
1-18R
COLLCHAR environment variable
4-45R
creating character mapping files for
5-5R
data types for 1-19R
database server compatibility 1-19R
DBAPICODE environment variable
4-47R
DBNLS environment variable 4-48R
environment variables listed 4-9R
error messages for incompatibility
1-21R
functionality in Informix products
1-22R
functionality listed 1-15R
installation notes for language
supplement 1-22R
Index 29
LANG environment variable 4-49R
LC_COLLATE environment variable
4-50R
LC_CTYPE environment variable
4-51R
LC_MONETARY environment
variable 4-52R
LC_NUMERIC environment variable
4-53R
LC_TIME environment variable 4-53R
NCHAR data type 3-17R
NVARCHAR data type 3-18R
populating with dbimport 5-18R
setting environment variables 1-16R,
4-44R
specifying a language environment
2-25T
viewing characteristics of 1-18R
NLS Database
description of 1-16T
NLS database
versus non-NLS database 1-19R
Nondecomposable attributes 8-15T
Nonsequential access. See Disk access,
nonsequential.
Normal form 8-29T
Normalization
benefits 8-29T
first normal form 8-29T
of data model 8-29T
rules 8-29T
rules, summary 8-32T
second normal form 8-31T
third normal form 8-32T
NOT CLUSTER keywords
syntax in ALTER INDEX 1-12S
use in ALTER TABLE 1-13S
NOT FOUND keywords, in the
WHENEVER statement 1-398S,
1-400S
NOT IN keywords, use in Condition
subquery 1-414S
NOT keyword
syntax
in Condition segment 1-404S,
1-405S
with BETWEEN keyword 1-327S
with IN keyword 1-329S
use
in Condition segment 1-410S
30 Index
with LIKE, MATCHES keywords
1-328S
NOT logical operator 2-36T
NOT NULL keywords
syntax
in ALTER TABLE 1-17S
in CREATE TABLE 1-88S
use
in ALTER TABLE 1-27S
in CREATE TABLE 1-90S, 9-24T
with IS keyword 1-327S
NOT operator
condition 1-405S
NOT relational operator 2-32T
NOT WAIT keywords, in SET LOCK
MODE 1-370S
NULL keyword, ambiguous as
procedure variable 1-480S
NULL relational operator 2-35T
NULL value
testing in BYTE expression 3-5R
testing with TEXT data type 3-21R
Null value
checking for in SELECT 1-184S, 1-318S
defined 8-23T
detecting in ESQL 5-15T
in INSERT statement 4-7T
in SPL IF statement 2-25S
inserting with the VALUES clause
1-252S
restrictions in primary key 8-22T
returned implicitly by stored
procedure 2-38S
specifying as default value 1-20S
testing for 2-35T
updating a column 1-387S
used in Condition with NOT operator
1-405S
used in the ORDER BY clause 1-339S
with logical operator 2-36T
with SPL WHILE statement 2-46S
NUMERIC data type. See DECIMAL data
type.
NVARCHAR data type
description of 3-18R, 9-15T
syntax 1-425S
versus VARCHAR data type 1-19R
O
OF keyword
syntax in DECLARE 1-145S
use in DECLARE 1-153S
OLD keyword
in DELETE REFERENCING clause
1-119S
in INSERT REFERENCING clause
1-119S
in UPDATE REFERENCING clause
1-120S
ON DELETE CASCADE keyword
DELETE trigger event 1-112S
ON EXCEPTION statement
placement of 2-32S
scope of control 14-29T
syntax 2-31S
trapping errors 14-27T
user-generated errors 14-30T
ON keyword
syntax
in CREATE INDEX 1-63S
in GRANT 1-231S
in REVOKE 1-300S
use
in CREATE INDEX 1-64S
in GRANT 1-237S
ON-Archive utility, using the
ARC_DEFAULT environment
variable 4-14R
ON-Archive utility, using the
ARC_KEYPAD environment
variable 4-15R
oncheck utility 10-7T, 10-12T, 13-31T
ONCONFIG environment variable 4-39R
onconfig file, specifying with
ONCONFIG 4-40R
One-to-many relationship 8-9T, 8-11T
One-to-one relationship 8-9T, 8-11T
OnLine 5-10T
On-line
files Intro-8R, Intro-11S, 6T
help Intro-9R, Intro-11S, 7T
onload utility 4-27T, 10-11T
onstat utility 10-12T
onunload utility 4-27T, 10-11T
OPEN statement
activating a cursor 5-20T
constructing the active set 1-264S
opening a procedure cursor 1-265S
opening an insert cursor 1-266S
opening select or update cursors
1-264S, 5-20T
reopening a cursor 1-267S
substituting values for ? parameters
1-268S
syntax 1-263S
with concatenation operator 1-432S
with FREE 1-269S
Opening a cursor 5-20T, 5-24T
Operating system
DOS 12-4T
UNIX 12-4T
Optical device 12-6T
Optimization, specifying a high or low
level 1-374S
Optimizer
and GROUP BY 13-10T, 13-12T,
13-27T
and ORDER BY 13-10T, 13-12T,
13-27T
and SET OPTIMIZATION statement
1-374S, 13-36T
autoindex path 13-29T
composite index use 13-31T
data distributions 13-29T
disk access 13-14T
display query plan 13-12T
filter selectivity 13-30T
index not used by 13-32T, 13-35T
index used by 13-9T, 13-10T
methods of 13-8T
query plan 13-22T
sort merge join 13-27T
sorting 13-12T
specifying high or low level of
optimization 13-36T
system catalog use 13-9T
when index not used 13-33T
with UPDATE STATISTICS 1-394S
Optimizing
a query 1-360S
a server 1-374S
across a network 1-374S
techniques 13-3T
Optional, entity in relationship 8-9T
OR keyword
syntax in Condition segment 1-404S
Index 31
use in Condition segment 1-417S
OR logical operator 2-36T
OR relational operator 2-33T
ORDER BY keywords
and NLS 2-25T
ascending order 1-338S, 2-14T
DESC keyword 2-15T, 2-25T
descending order 1-338S
display label with 2-52T
indexes for 13-10T, 13-34T
multiple columns 2-15T
relation to GROUP BY 3-7T
restrictions in INSERT 1-253S, 4-10T
restrictions in view 11-22T
restrictions with FOR UPDATE 6-8T
select columns by number 1-339S,
2-24T
sorting rows 2-13T, 13-12T
syntax in SELECT 1-310S
use
in SELECT 1-337S
with UNION operator 1-344S
Order of execution, of action statements
1-122S
orders table in stores6 database, columns
in A-3R
Outer join
forming 1-324S
OUTER keyword, with FROM keyword
in SELECT 1-323S
Output from TRACE command 15-14T
OUTPUT statement, syntax and use
1-271S
Owner
in ALTER TABLE 1-16S
in CREATE SYNONYM 1-80S
in dbschema 5-35R
in Index Name segment 1-419S,
1-484S, 1-495S, 1-505S
in RENAME COLUMN 1-294S
in RENAME TABLE 1-296S
in Table Name segment 1-469S, 1-507S
in View Name segment 1-510S
of view in CREATE VIEW 1-511S
Owner-privileged procedure 14-13T
Ownership 11-7T
32 Index
P
Page buffer
cost of nonsequential access 13-18T
description of 13-16T
effect on performance 13-17T
restrictions with BLOB data 10-19T
PAGE keyword
use in ALTER TABLE 1-33S
use in CREATE TABLE 1-108S
Page lock 7-8T
Page, definition of 10-4T
Parameter
BYTE or TEXT in SPL 2-13S
in CALL statement 2-4S
to a stored procedure 14-25T
Parameterizing a statement
with SQL identifiers 1-279S
Parent-child relationship 1-21S, 1-94S
Parts explosion 5-26T
PATH environment variable 4-54R,
12-14T
Pathname
including in SQLEXEC 4-42R
specifying with DBPATH 4-21R
specifying with PATH 4-54R
Percent (%) sign, wildcard in Condition
segment 1-410S
PERFORM keyword, in the WHENEVER
statement 1-398S
Performance
adding indexes 13-34T
assigning table to dedicated disk
10-6T
bottleneck tables 10-35T
buffered log 9-22T
clustered index 10-25T
depends on concurrency 7-3T
disk access 13-14T, 13-17T, 13-34T
disk access by rowid 13-18T
disk arm motion 10-8T
disk latency 13-17T
dropping indexes to speed
modifications 10-24T
duplicate keys slow modifications
10-22T
effect of
BLOB location 10-18T
correlated subquery 13-32T
filter expression 13-23T, 13-32T,
13-33T
index damage 13-31T
indexes 10-21T to 10-22T, 13-26T
regular expressions 13-32T
table size 13-19T, 13-34T
updates 13-31T
filter selectivity 13-30T
“hot spots,” finding 13-7T
improved by specifying optimization
level 13-36T
improved with temporary table
13-36T
improving 13-27T
increasing with stored procedures
14-4T
index time during modification
10-20T
interleaved dbspaces 10-10T
journal updates 10-33T
measurement 13-6T
multiple access arms per table 10-7T
network access 13-20T
nonsequential access 13-18T
optimizing 13-3T to 13-42T
references to other books 13-3T
reorganizing a dbspace 10-10T
row access 13-16T
seek time 13-17T
sequential access 13-17T, 13-34T
sorting replaces nonsequential access
13-37T
splitting tall tables 10-29T
splitting wide tables 10-28T
time costs of query 13-14T
use of derived data 10-30T
use of redundant data 10-31T
using CHAR instead of NCHAR
1-19R
Performance analysis
“80-20 rule” 13-7T
measurement 13-6T
methods 13-27T to 13-41T
nonsequential access 13-37T to 13-41T
optimizing techniques 13-4T
setting up test environment 13-28T
timing
from 4GL program 13-6T
from command script 13-6T
from watch 13-6T
using query plan 13-29T
verifying problem 13-4T
Permission, with SYSTEM 2-40S
Phantom row 1-367S
PIPE keyword, in the OUTPUT
statement 1-272S
Pipe symbol. See concatenation operator.
Pipes, unnamed 12-7T
Plus (+) sign, arithmetic operator 1-431S
Populating tables 9-27T
POW function
syntax in expression 1-444S
use in expression 1-446S
Precedence, rules for environment
variables 4-7R
PRECISION field
setting with SET DESCRIPTOR 1-358S
with GET DESCRIPTOR 1-214S
PREPARE statement
description of 5-29T
error return in SQLERRD 5-12T
executing 1-184S
increasing performance efficiency
1-283S
missing WHERE signalled 5-10T
multiple SQL statements 5-30T
multi-statement text 1-277S, 1-281S
parameterizing a statement 1-278S
parameterizing for SQL identifiers
1-279S
preparing GRANT 11-13T
question (?) mark as placeholder
1-273S
releasing resources with FREE 1-208S
restrictions with SELECT 1-276S
statement identifier use 1-274S
syntax 1-273S
valid statement text 1-275S
with concatenation operator 1-432S
Prepared statement
describing returned values with
DESCRIBE 1-162S
executing 1-184S
prepared object limit 1-274S
valid statement text 1-275S
See also PREPARE statement.
PREVIOUS keyword
syntax in FETCH 1-194S
use in FETCH 1-196S
Primary key
definition of 8-22T
Index 33
restrictions with 8-22T
Primary key constraint 1-22S
composite 8-23T
data type conversion 1-28S
defining column as 1-93S
definition of 4-19T
dropping 1-32S
enforcing 1-86S
modifying a column with 1-28S
referencing 1-22S
requirements for 1-20S, 1-93S
rules of use 1-31S, 1-94S
PRIMARY KEY keywords
in ALTER TABLE 1-29S
in ALTER TABLE statement 1-20S
in CREATE TABLE 1-91S, 1-92S
Primary site 12-20T
Printing, specifying print program with
DBPRINT 4-24R
PRIOR keyword
syntax in FETCH 1-194S
use in FETCH 1-196S
Privilege
Alter 1-236S, 11-8T
and views 11-27T to 11-30T
ANSI-compliant databases 1-12R
automating grants of 11-13T
column-level 11-10T
Connect 1-232S, 11-6T
DBA 1-233S, 11-7T
default for stored procedures 14-14T
default for table using CREATE
TABLE 1-85S
Delete 1-236S, 11-8T, 11-28T
displaying 4-16T
displaying with the INFO statement
1-242S
encoded in system catalog 2-28R,
2-32R, 11-9T
Execute 11-12T, 14-14T
for triggered action 1-129S
granting 11-5T to 11-15T
Index 1-236S, 11-8T
Insert 1-236S, 11-8T, 11-28T
needed
to create a view 1-239S, 11-27T
to drop an index 1-174S
to modify data 1-236S, 4-15T
on a synonym 1-80S
on a view 1-137S, 11-28T
on stored procedures 14-13T
34 Index
overview 1-8T
Resource 1-233S, 11-7T, 13-34T
Select 11-8T, 11-10T, 11-27T
Update 1-236S, 11-8T, 11-10T, 11-28T
when privileges conflict 1-232S
with DBA-privileged procedures
14-13T
with owner-privileged procedures
14-13T
See also Database-level privilege.
See also Table-level privilege.
PRIVILEGES FOR keywords, in INFO
statement 1-243S
PRIVILEGES keyword
syntax
in GRANT 1-235S
in REVOKE 1-301S
use
in GRANT 1-236S
in REVOKE 1-302S
Procedure cursor
opening 1-265S
reopening 1-267S
procedure cursor 1-148S
Procedure name
conflict with function name 1-495S
naming conventions 1-495S
Procedure, stored. See Stored procedure.
Processing, distributed 12-8T
Projection, described 2-7T
Project, description of 1-13T
Promotable lock 1-152S, 7-6T, 7-9T
PSORT_DBTEMP environment variable
4-40R
PSORT_NPROCS environment variable
4-41R
PUBLIC keyword
privilege granted to all users 11-6T
syntax
in GRANT 1-231S
in REVOKE 1-300S
use
in GRANT 1-234S
in REVOKE 1-302S
PUT statement
constant data with 6-11T
count of rows inserted 6-11T
impact on trigger 1-112S
sends returned data to buffer 6-10T
source of row values 1-285S
syntax 1-284S
use in transactions 1-285S
with concatenation operator 1-432S
with FLUSH 1-285S
Q
Qualifier, field
for DATETIME 3-8R, 1-428S, 1-488S
for INTERVAL 3-13R, 1-485S, 1-491S
Query
cyclic 4-22T
improving performance of 13-27T to
13-41T
performance of 13-3T to 13-42T
piping results to another program
1-272S
self-referencing 4-22T
sending results to an operating
system file 1-271S
sending results to another program
1-272S
stated in terms of data model 1-7T
time costs of 13-14T
Query optimization information
statements 1-6S
Query optimizer. See Optimizer.
Query plan
autoindex path 13-29T
chosen by optimizer 13-11T
description of 13-22T
display with SET EXPLAIN 13-12T
indexes in 13-26T
use in analyzing performance 13-29T
Question (?) mark
as placeholder in PREPARE 1-273S
naming variables in PUT 1-287S
replacing with USING keyword
1-268S
wildcard in Condition segment 1-411S
Quoted string
in expression 1-436S
syntax
in Condition segment 1-405S
in expression 1-462S
in INSERT 1-250S
use
in expression 1-438S
in INSERT 1-498S
with LIKE, MATCHES keywords
1-328S
See also Quoted String segment.
Quoted String segment
DATETIME, INTERVAL values as
strings 1-498S
syntax 1-497S
wildcards 1-498S
with LIKE in a condition 1-498S
Quotes, single and double Intro-6S
R
RAISE EXCEPTION statement
exiting a loop 14-23T
syntax 2-36S
REAL data type. See SMALLFLOAT data
type.
RECOVER TABLE statement
archiving a database with audit trails
1-292S
manipulating audit trail file 1-293S
syntax 1-292S
Recursion, in a stored procedure 14-24T
Recursive relationship 8-11T, 8-28T
Redundant data, introduced for
performance 10-31T
Redundant relationship 8-29T
REFERENCES FOR keywords, in INFO
statement 1-243S
REFERENCES keyword
in ALTER TABLE 1-21S
in CREATE TABLE 1-94S, 1-96S
syntax
in GRANT 1-235S
in REVOKE 1-301S
use
in GRANT 1-236S
in REVOKE 1-302S
References privilege
definition of 1-236S
displaying with the INFO statement
1-243S
REFERENCING clause
DELETE REFERENCING clause
1-119S
INSERT REFERENCING clause
1-118S
UPDATE REFERENCING clause
1-120S
Index 35
using referencing 1-125S, 15-9T
Referential constraint
and a DELETE trigger 1-112S
data type restrictions 1-96S
definition of 1-21S, 1-94S, 4-19T
dropping 1-32S
enforcing 1-86S
modifying a column with 1-28S
rules of use 1-94S
Referential integrity 4-19T
defining primary and foreign keys
8-24T
Regular expression
effect on performance 13-32T
evaluating with NLS 1-15R
Relational calculus. See also relational
model.
Relational database, defined 1-11T
Relational model
attribute 8-14T
denormalizing 10-26T
description of 1-11T, 8-3T to 8-33T
entity 8-4T
join 2-8T
many-to-many relationship 8-11T
normalizing data 8-29T
one-to-many relationship 8-11T
one-to-one relationship 8-11T
projection 2-6T
resolving relationships 8-26T
rules for defining tables, rows, and
columns 8-20T
selection 2-5T
Relational operation 2-5T
Relational operator
BETWEEN 2-32T
equals 2-30T
EXISTS 3-33T
IN 3-33T
in a WHERE clause 2-29T to 2-45T
in Condition segment 1-405S
LIKE 2-37T
NOT 2-32T
NULL 2-35T
OR 2-33T
segment 1-500S
with WHERE keyword in SELECT
1-326S
Relationship
attribute 8-15T
36 Index
cardinality 8-9T, 8-13T
complex 8-28T
connectivity 8-8T, 8-11T
defining in data model 8-8T
entity 8-5T
existence dependency 8-9T
mandatory 8-9T
many-to-many 8-9T, 8-11T
many-to-many, resolving 8-26T
one-to-many 8-9T, 8-11T
one-to-one 8-9T, 8-11T
optional 8-9T
recursive 8-28T
redundant 8-29T
using matrix to discover 8-10T
RELATIVE keyword
syntax in FETCH 1-194S
use in FETCH 1-196S
Relay Module
SQLRM environment variable 4-42R
SQLRMDIR environment variable
4-43R
Release notes Intro-9R, Intro-11S, 6T
Remote database server 12-8T
RENAME COLUMN statement
restrictions 1-294S
syntax 1-294S
RENAME TABLE statement
ANSI-compliant naming 1-296S
syntax 1-296S
REPAIR TABLE statement, syntax and
use 1-299S
Repeatable Read isolation level
description of 1-367S, 7-12T
emulating during update 1-202S
REPEATABLE READ keywords, syntax
in SET ISOLATION 1-366S
Replication of data 12-19T
Report generator 1-17T
Reserved words 1-470S
Resolution
in UPDATE STATISTICS 1-396S,
1-397S
with data distributions 1-396S
RESOURCE keyword
use in GRANT 1-233S
use in REVOKE 1-303S
Resource manager 12-11T
Resource privilege 1-233S, 11-7T, 13-34T
Restricting access, using file system
11-4T
Result of triggering statement 1-123S
RETURN statement
exiting a loop 14-23T
returning insufficient values 2-38S
returning null values 2-38S
syntax 2-38S
REVOKE statement
column-specific privileges 1-303S
database-level privileges 1-303S
granting privileges 11-5T to 11-15T
in embedded SQL 5-34T to 5-37T
privileges needed 1-301S
syntax 1-300S
table-level privileges 1-301S
with a view 11-29T
ROLLBACK WORK statement
cancels a transaction 4-25T
closes cursors 7-18T
releases locks 7-8T, 7-18T
sets SQLCODE 6-5T
syntax 1-306S
use with WHENEVER 1-36S, 1-42S,
1-307S
with DROP DATABASE 1-173S
with DROP INDEX statement 1-175S
with DROP PROCEDURE statement
1-176S
with DROP SYNONYM statement
1-177S
with DROP TABLE statement 1-179S
with DROP TRIGGER statement
1-181S
with DROP VIEW statement 1-183S
ROLLFORWARD DATABASE
statement
applies log to restored database 4-26T
exclusive locking 1-308S
syntax 1-308S
Root dbspace, definition of 10-5T
ROOT function
syntax in expression 1-444S
use in expression 1-446S
ROUND function
syntax in expression 1-444S
use in expression 1-446S
Row
cost of reading from disk 13-16T
defined 2-5T
defining 8-20T
deleting 1-159S, 4-4T
description of 1-12T
engine response to locked row 1-370S
in relational model 1-12T, 8-20T
inserting 4-6T
inserting through a view 1-246S
inserting with a cursor 1-248S
multi-row queries with FETCH
1-195S
order, guaranteeing independence of
1-117S
phantom 1-367S
retrieving with FETCH 1-197S
rowid definition 1-197S
size of fixed-length 10-13T
updating through a view 1-384S
writing buffered rows with FLUSH
1-204S
ROW keyword
use in ALTER TABLE 1-33S
use in CREATE TABLE 1-108S
Row lock 7-8T
Rowid
locating internal row numbers 3-17T
use in a column expression 1-435S
use in a join 3-16T
use in ORDER BY clause 1-338S
used as column name 1-474S
Rowid function 13-18T
ROWID keyword 1-435S
Rules for stored procedures 1-128S
Run-time program
setting DBANSIWARN 4-15R
setting INFORMIXCOBDIR 4-32R
S
SCALE field
setting with SET DESCRIPTOR 1-358S
with GET DESCRIPTOR 1-214S
Schema. See Data Model.
Scroll cursor
active set 5-25T
definition of 1-149S, 5-23T
use of 1-149S
with FETCH 1-196S
with hold, in a transaction 1-369S
SCROLL keyword
syntax in DECLARE 1-145S
Index 37
use in DECLARE 1-149S, 5-23T
Search condition. See Condition segment.
secheck utility 13-31T
SECOND keyword
syntax
in DATETIME data type 1-428S
in INTERVAL data type 1-485S
use
as DATETIME field qualifier 3-8R,
1-488S
as INTERVAL field qualifier 3-14R,
1-491S
Second normal form 8-31T
Secondary site 12-20T
Security
constraining inserted values 11-20T,
11-25T
database-level privileges 11-5T
making database inaccessible 11-5T
restricting access to columns 11-20T
restricting access to rows 11-20T,
11-21T
restricting access to view 11-27T
table-level privileges 11-10T
using host file system 11-4T
using operating system facilities
11-4T
with stored procedures 11-3T
Seek time 13-17T
Select
description of 1-13T
Select cursor
definition of 1-148S
opening 1-264S, 5-20T
reopening 1-267S
use of 1-148S, 5-20T
SELECT keyword
ambiguous use as procedure variable
1-480S
syntax
in GRANT 1-235S
in REVOKE 1-301S
use
in GRANT 1-236S
in REVOKE 1-302S
Select list
display label 2-49T
expressions in 2-46T
functions in 2-53T to 2-66T
labels in 3-48T
38 Index
selecting all columns 2-12T
selecting specific columns 2-18T
specifying a substring in 2-27T
Select privilege
column level 11-10T
definition of 1-236S, 11-8T
with a view 11-27T
SELECT statement
active set 2-29T
aggregate functions in 1-462S, 2-53T
alias names 2-79T
and COLLCHAR environment
variable 4-46R
and LC_COLLATE environment
variable 4-51R
and NLS collation order 1-15R
as an argument to a stored procedure
2-4S
assigning values with 14-21T
associating with cursor with
DECLARE 1-148S
BETWEEN condition 1-327S
column numbers 1-339S
compound query 3-43T
cursor for 5-19T, 5-20T
date-oriented functions in 2-56T
describing returned values with
DESCRIBE 1-162S
description of advanced 3-4T to 3-55T
description of simple 2-3T to 2-83T
display label 2-49T
DISTINCT keyword 2-19T
embedded 5-13T to 5-16T
for joined tables 2-69T to 2-83T
for single tables 2-11T to 2-66T
FROM Clause 1-323S
functions 2-53T to 2-66T
GROUP BY clause 1-334S, 3-4T
HAVING clause 1-336S, 3-9T
IN condition 1-327S
in FOR EACH ROW section 1-117S
in modifiable view 11-24T
INTO clause with ESQL 1-318S
INTO TEMP clause 1-341S, 2-83T
IS NULL condition 1-327S
join 2-71T to 2-79T
joining tables in WHERE clause
1-331S
LIKE or MATCHES condition 1-328S
multiple-table 2-69T
natural join 2-75T
null values in the ORDER BY clause
1-339S
ORDER BY clause 1-337S, 2-13T
ORDER BY clause and NLS 1-15R
outer join 3-21T to 3-31T
privilege for 11-6T, 11-8T
relational-operator condition 1-326S
restrictions with INTO clause 1-276S
rowid 3-16T, 3-21T
ROWID keyword 1-435S
SELECT clause 1-312S, 2-12T to 2-28T
select numbers 1-339S
selecting a substring 2-27T
selecting expressions 2-46T
selection list 2-12T
self-join 3-11T
single-table 2-11T
singleton 1-318S, 2-29T
subquery 3-32T to 3-42T
subquery with WHERE keyword
1-326S
syntax 1-310S
UNION operator 1-344S, 3-43T
use of expressions 1-313S
using
for join 2-8T
for projection 2-7T
for selection 2-5T
WHERE clause and NLS 1-15R
with
Condition segment 1-404S
DECLARE 1-145S
FOREACH 2-20S
INSERT 1-253S
INTO keyword 1-198S
LET 2-29S
writing rows retrieved to an ASCII file
1-378S
Selection, described 2-5T
Self-join
assigning column names with INTO
TEMP 3-12T
description of 1-333S, 3-11T
See also Join.
Self-referencing query 3-11T, 4-22T
Self-referencing query. See also Self-join.
Semantic integrity 4-18T, 9-3T
Sequential access. See Disk access,
sequential.
Sequential cursor
definition of 1-149S, 5-23T
use of 1-149S
with FETCH 1-195S
SERIAL data type
description of 3-19R, 9-7T
generated number in SQLERRD 5-12T
in ALTER TABLE 1-17S
in INSERT 1-251S
inserting a starting value 4-8T
inserting values 3-19R
resetting values 3-19R
syntax 1-425S
treatment by dbschema 5-34R
with stored procedures 2-8S
Server. See Database server.
SET clause 1-125S, 4-14T
SET CONNECTION statement
syntax and use 1-346S
with concatenation operator 1-432S
SET CONSTRAINTS statement
syntax and use 1-349S
use with CREATE TRIGGER 1-131S
SET DEBUG FILE TO statement
syntax and use 1-351S
with TRACE 2-42S
SET DESCRIPTOR statement
syntax 1-353S
the VALUE option 1-355S
with concatenation operator 1-432S
X/Open mode 1-357S
Set difference 3-53T
SET EXPLAIN statement
interpreting output 1-361S, 13-29T
MERGE JOIN information 1-362S
optimizer access paths 1-361S
output examples 1-362S
SORT SCAN information 1-362S
syntax 1-360S
writes query plan 13-12T
Set intersection 3-51T
SET ISOLATION statement
controlling the effect of locks 4-28T
default database levels 1-368S
definition of isolation levels 1-367S
effects of isolation 1-368S
restrictions 7-9T
syntax 1-366S
SET keyword
syntax in UPDATE 1-383S
use in UPDATE 1-386S, 4-12T
Index 39
SET LOCK MODE statement
controlling the effect of locks 4-28T
description of 7-13T
kernel locking 1-370S
setting wait period 1-371S
syntax 1-370S
SET LOG statement
buffered vs. unbuffered 1-372S, 9-22T
syntax 1-372S
SET OPTIMIZATION statement, syntax
and use 1-374S
Setting environment variables 4-5R
SHARE keyword, syntax in LOCK
TABLE 1-260S
Shared memory
network connection 12-7T
Shared memory parameters, specifying
file with ONCONFIG 4-39R
Shell
setting environment variables in a file
4-4R
specifying with DBREMOTECMD
4-25R
Simple assignment 2-28S
SIN function
syntax in expression 1-458S
use in expression 1-459S
Single-precision floating-point number,
storage of 3-12R
Singleton SELECT statement 1-318S,
2-29T
Site
network 12-4T
primary 12-20T
secondary 12-20T
SITENAME function
returns servername 1-438S
syntax
in expression 1-436S
in INSERT 1-250S
use
in ALTER TABLE 1-18S
in CREATE TABLE 1-88S
in expression 1-438S
in INSERT 1-252S
in SELECT 2-63T, 2-65T, 3-20T
Slash (/), arithmetic operator 1-431S
SMALLFLOAT data type
changing data types 3-23R
40 Index
description of 3-20R, 9-9T
syntax 1-425S
SMALLINT data type
changing data types 3-23R
description of 3-20R, 9-7T
syntax 1-425S
using as default value 1-19S, 1-89S
SOME keyword
beginning a subquery 1-330S, 3-33T
use in Condition subquery 1-415S
Sort merge join 13-27T
Sorting
avoiding nonsequential access 13-37T
avoiding with temporary table 13-36T
effect on performance 13-33T
in a combined query 1-344S
in SELECT 1-337S
nested 2-15T
optimizer estimates cost 13-12T
PSORT_DBTEMP environment
variable 4-40R
PSORT_NPROCS environment
variable 4-41R
sort merge join 13-27T
time costs of 13-15T
when there are multiple active NLS
locales 1-20R
with NLS activated 1-15R, 2-25T
with ORDER BY 2-14T
See also ORDER BY keywords.
Space ( )
as delimiter in DATETIME 3-9R
as delimiter in INTERVAL 3-15R
Specifying ANSI-compliance 1-11R
SPL
flow control statements 14-22T
program variable 5-5T
relation to SQL 14-3T
See also Stored procedure.
SQL
ANSI standard 1-15T
cursor 5-19T
description of 1-14T
error handling 5-16T
history 1-14T
in NLS-ready products 1-22R
Informix SQL and ANSI SQL 1-15T
interactive use 1-17T
optimizing. See Optimizer.
standardization 1-14T
statement types 1-5S
SQL Communications Area (SQLCA)
altered by end of transaction 6-5T
description of 5-8T
effect of setting DBANSIWARN 4-15R
inserting rows 6-11T
result after CLOSE 1-39S
result after DATABASE 1-140S
result after DESCRIBE 1-163S
result after FETCH 1-202S
result after FLUSH 1-204S
result after OPEN 1-264S, 1-265S
result after PUT 1-290S
result after SELECT 1-321S
returning NLS error messages to
1-19R
See also SQLAWARN, SQLCODE, and
SQLERRD.
SQL DESCRIPTOR clause. See
DESCRIBE statement.
SQL Descriptor. See SQL
Communications Area (SQLCA).
SQL statements
FILE 5-23R
INSERT 5-23R
SQLAWARN array
description of 5-12T
syntax of naming 5-11T
with PREPARE 5-30T
sqlca record and EXECUTE statement
1-186S
SQLCA. See SQL Communications Area.
SQLCODE field
after opening cursor 5-20T
description of 5-11T
end of data on SELECT only 6-14T
end of data signalled 5-17T
set by DELETE 6-4T
set by DESCRIBE 5-33T
set by PUT, FLUSH 6-11T
sqlda structure
syntax
in DESCRIBE 1-162S
in EXECUTE 1-184S
in FETCH 1-194S
in OPEN 1-263S
in PUT 1-284S
use
in DESCRIBE 1-164S
in FETCH 1-201S
in OPEN 1-269S
in PUT 1-288S
use with EXECUTE statement 1-186S
SQLERRD array
count of deleted rows 6-4T
count of inserted rows 6-11T
count of rows 6-14T
description of 5-12T
syntax of naming 5-11T
SQLERROR keyword, in the
WHENEVER statement 1-398S
SQLEXEC environment variable 4-41R
sqlexecd 12-14T
sqlhosts. See
$INFORMIXDIR/etc/sqlhosts.
SQLNOTFOUND
error conditions with EXECUTE
statement 1-188S
SQLRM environment variable 4-42R
SQLRMDIR environment variable 4-43R
SQLSTATE
in databases that are not
ANSI-compliant 5-18T
use with a cursor 5-21T
SQLWARNING keyword, in the
WHENEVER statement 1-400S
SQRT function
syntax in expression 1-444S
use in expression 1-447S
START DATABASE statement
adding a transaction log 9-24T
syntax and use 1-376S
state table in stores6 database, columns
in A-6R
Statement
naming with NLS 1-15R
SQL, ANSI compliance and
DBANSIWARN 4-15R
SQL, CONNECT and
INFORMIXSERVER 4-37R
SQL, CREATE TABLE and
COLLCHAR 4-46R
SQL, DESCRIBE and COLLCHAR
4-46R
SQL, editing and DBEDIT 4-18R
SQL, LOAD and DBDELIMITER
4-18R
SQL, SELECT and COLLCHAR 4-46R
Index 41
SQL, SELECT and LC_COLLATE
4-51R
SQL, UNLOAD and DBDELIMITER
4-18R
SQL, UPDATE STATISTICS and
DBUPSPACE 4-30R
Statement identifier
associating with cursor 1-148S
definition of 1-274S
releasing 1-274S
syntax
in DECLARE 1-145S
in DESCRIBE 1-162S
in EXECUTE 1-184S
in FREE 1-207S
in PREPARE 1-273S
use
in DECLARE 1-154S
in FREE 1-208S
in PREPARE 1-274S
Statement types 1-5S
Statement variable name, definition
1-190S
Static SQL 5-5T
STATUS FOR keywords, in INFO
statement 1-244S
STATUS variable (4GL) 5-11T
Status, displaying with INFO statement
1-244S
stock table in stores6 database, columns
in A-4R
STOP keyword, in the WHENEVER
statement 1-398S, 1-402S
Storage device 12-6T
Stored procedure
altering 14-13T
as triggered action 1-128S, 15-10T
branching 14-22T
BYTE and TEXT data types 2-9S, 2-13S
checking references 1-129S
comments in 14-6T
creating from an embedded language
14-5T
creating from DB-Access 14-5T
cursors with 2-20S
DBA-privileged, use with triggers
1-129S, 14-13T
debugging 2-42S, 14-11T
default privileges 14-14T
DEFINE statement 14-17T
42 Index
definition of 14-3T
displaying contents 14-9T
displaying documentation 14-9T
executing 14-9T
general programming 1-17T
granting privileges on 1-237S, 11-12T,
14-15T
handling multiple rows 2-39S
header 2-8S, 14-25T
in SELECT statements 1-315S, 2-67T
in WHEN condition 1-122S
introduction to 14-3T
looping 14-23T
name confusion with SQL functions
14-21T
naming output file for TRACE
statement 1-351S
owner-privileged 1-129S, 14-13T
privileges 1-129S
privileges necessary at execution
14-14T
program flow control 14-22T
receiving data from SELECT 1-318S
recursion 14-24T
REFERENCES clause 14-18T
returning values 14-25T
revoking privileges on 1-301S, 14-16T
security purposes 11-3T
simulating errors 2-36S
tracing triggered actions 15-12T
use 14-3T
variable 14-16T
Stored Procedure Language. See SPL.
stores6 database
call_type table columns A-5R
catalog table columns A-4R
copying Intro-10R, Intro-13S, 8T
creating Intro-10R, Intro-13S, 8T
customer table columns A-2R
cust_calls table columns A-5R
data values A-15R
description of A-1R
items table columns A-3R
manufact table columns A-5R
map of A-6R
orders table columns A-3R
overview Intro-9R, Intro-12S, 7T
primary-foreign key relationships
A-8R to A-15R
state table columns A-6R
stock table columns A-4R
structure of tables A-2R
Structured Query Language. See SQL.
Subquery
beginning with ALL/ANY/SOME
keywords 1-330S
beginning with EXISTS keyword
1-330S
beginning with IN keyword 1-329S
correlated 1-413S, 3-32T, 4-22T, 13-32T
definition of 1-326S
in Condition segment 1-413S
in DELETE statement 4-6T
in SELECT 3-32T to 3-42T
in UPDATE-SET 4-13T
in UPDATE-WHERE 4-12T
performance of 13-32T
restrictions with UNION operator
1-344S
with DISTINCT keyword 1-313S
See also Condition segment.
Subscripting
in a WHERE clause 2-44T
on character columns 1-434S
SPL variables 14-18T
Subservient table 3-21T
Substring 2-27T, 14-18T
SUM function
as aggregate function 2-53T
syntax in expression 1-462S
use in expression 1-465S
Symbol table 10-27T
Synonym
ANSI-compliant naming 1-80S
chaining 1-83S
chains 12-18T
creating with CREATE SYNONYM
1-80S
difference from alias 1-80S
dropping 1-177S
in ANSI-compliant database 1-14R
synonym behavior
in ANSI-compliant database 1-14R
Synonyms for table names 12-17T
Syntax diagram
conventions Intro-5S
elements of Intro-9S
sysdepend system catalog table 1-183S
syssyntable 12-18T
System catalog
accessing 2-8R
altering contents 2-9R
character column data type when
NLS activated 1-19R
database entries 1-57S
description of 2-3R
map of tables 2-33R
NCHAR columns in 1-19R
privileges in 4-16T, 11-9T
querying 4-16T
sysblobs 2-11R
syschecks 2-11R
syscolauth 2-12R, 1-302S, 11-9T
syscoldepend 2-13R
syscolumns 2-13R
sysconstraints 2-16R
sysdefaults 2-17R
sysdepend 2-18R
sysdistrib 2-18R
sysindexes 2-20R
sysopclstr 2-22R
sysprocauth 2-23R
sysprocbody 2-24R, 14-8T
sysprocedures 2-25R
sysprocplan 2-26R
sysreferences 2-26R
syssynonyms 2-27R
syssyntable 2-27R
systabauth 2-28R, 1-239S, 1-302S,
4-16T, 11-9T
systables 2-29R
systrigbody 2-31R
systriggers 2-32R
sysusers 2-32R, 11-9T
sysviews 2-33R
updating 2-9R
updating statistics 2-9R
used by optimizer 13-9T
System catalog tables. See System
catalog.
System descriptor area 1-164S
assigning values to 1-354S
modifying contents 1-354S
resizing 1-355S
use with EXECUTE statement 1-187S
System name, in database name 1-422S
SYSTEM statement
syntax 2-40S
Index 43
T
Table
adding a constraint 1-29S
alias in SELECT 1-323S
ANSI-compliant naming 1-507S
bottleneck 10-35T
candidate keys, defined 8-23T
changing the data type of a column
3-23R
checking with the CHECK TABLE
statement 1-37S
composite key, defined 8-23T
contained in one dbspace 10-5T
creating
a synonym for 1-80S
a table 1-84S, 9-24T
a temporary table 1-100S
dedicated device for 10-6T
description of 1-11T
dropping
a constraint 1-32S
a synonym 1-177S
a table 1-179S
engine response to locked table 1-370S
extent sizes of 10-8T
fixed-length rows 10-13T
in mirrored storage 10-6T
in relational model 1-11T, 8-20T
interleaved dbspaces 10-10T
joins in Condition segment 1-331S
loading data with the LOAD
statement 1-255S
lock 7-7T
locking
changing mode 1-33S
with ALTER INDEX 1-13S
with LOCK TABLE 1-260S
logging 1-104S
multiple access arms for 10-7T
names 12-16T
names, synonyms 12-17T
naming conventions 1-84S, 1-470S,
1-507S
naming with NLS 1-15R
optimizing queries 1-394S
ownership 11-7T
primary key in 8-22T
primary key, defined 8-22T
relation to dbspace 10-6T
repairing with REPAIR TABLE
statement 1-299S
44 Index
represents an entity 8-22T
restoring with audit trail 1-292S
structure in stores6 database A-2R
system catalog tables 2-11R to 2-33R
unlocking 1-381S
variable-length rows 10-14T
See also ALTER TABLE statement.
See also CREATE TABLE statement.
See also Join.
See also Table Name segment.
TABLE keyword, syntax in UPDATE
STATISTICS 1-393S
Table Name segment 1-506S
Table size
calculating 10-12T, 10-19T
cost of access 13-19T, 13-34T
with fixed-length rows 10-13T
with variable-length rows 10-14T
Table-level privilege
column-specific privileges 1-303S,
11-10T
default with GRANT 1-237S
definition and use 1-236S, 11-7T
granting 1-235S
passing grant ability 1-237S
revoking 1-301S
See also ALTER TABLE statement.
TABLES keyword, in INFO statement
1-242S
tabtype 2-29R, 2-30R, 1-60S
TAN function
syntax in expression 1-458S
use in expression 1-460S
tblspace
description of 10-7T
used for BLOB data 10-18T
TEMP keyword
syntax in SELECT 1-310S
use in SELECT 1-341S
TEMP TABLE keywords, syntax in
CREATE TABLE 1-84S
Temporary
files, specifying directory with
DBTEMP 4-27R
tables, specifying dbspace with
DBSPACETEMP 4-26R
Temporary table
and active set of cursor 5-24T
assigning column names 3-12T
building distributions 1-397S
creating constraints for 1-102S
DBSPACETEMP environment
variable 1-100S
example 4-11T
explicit 1-100S
implicit 1-100S
location of 1-100S
naming 1-100S
shared disk space for 10-6T
updating statistics 1-394S
using to speed query 13-36T
when deleted 1-100S
TERM environment variable 4-55R
TERMCAP environment variable 4-56R,
12-14T
termcap file
and TERMCAP environment variable
4-56R
selecting with INFORMIXTERM
4-39R
Terminal handling
and TERM environment variable
4-55R
and TERMCAP environment variable
4-56R
and TERMINFO environment
variable 4-56R
terminfo directory
and TERMINFO environment
variable 4-56R
selecting with INFORMIXTERM
4-39R
TERMINFO environment variable 4-56R
TEXT data type
choosing location for 10-18T
description of 3-21R, 9-17T
disk storage for 10-4T
estimating disk space for 10-17T
inserting values 3-21R
requirements for LOAD statement
1-257S
restrictions
with aggregate functions 3-21R
with GROUP BY 3-21R, 3-7T
with IN clause 3-21R
with LIKE or MATCHES 3-21R,
2-37T
with ORDER BY 3-21R
with relational expression 2-29T
selecting a column 3-22R
syntax 1-425S
use in Boolean expression 3-21R
used for performance 10-27T
with control characters 3-21R
with LENGTH function 2-64T
with stored procedures 2-9S, 2-13S
Text editor, specifying with DBEDIT
4-18R
TEXT value, displaying 2-11T
Third normal form 8-32T
Time function
restrictions with GROUP BY 1-334S
use in SELECT 1-314S
Time, representing with NLS 1-15R
TO CLUSTER keywords, in ALTER
INDEX 1-12S
TO keyword
in expression 1-462S
in GRANT 1-231S
TODAY function
syntax
in Condition segment 1-405S
in expression 1-436S
in INSERT 1-250S
use
in ALTER TABLE 1-18S
in constant expression 1-439S,
2-63T, 4-8T
in CREATE TABLE 1-88S
in INSERT 1-252S
TP/XA. See Transaction manager.
TRACE command
output from 15-14T
TRACE statement
debugging a stored procedure 14-11T
syntax 2-42S
Transaction
and CREATE DATABASE 1-60S
ANSI-compliant database, effects
1-11R
committing with COMMIT WORK
1-43S
cursors closed at end 7-18T
description of 4-22T
example with DELETE 6-5T
global 12-21T
locks held to end of 7-9T
locks released at end 7-8T, 7-18T
logging 1-376S
recovering transactions 1-308S
Index 45
rolling back 1-4R, 1-306S
scroll cursor and data consistency
1-369S
starting with BEGIN WORK 1-35S
stopping logging 1-376S
transaction log 4-24T, 4-26T
transaction log required 9-22T
use signalled in SQLAWARN 5-12T
using cursors in 1-155S
Transaction logging
ANSI-compliant database, effects
1-12R
buffered 9-22T
effect on database server type 1-5R
establishing with CREATE
DATABASE 9-21T
OnLine methods of 9-22T
renaming log 1-377S
stopping 1-377S
turning off for faster loading 9-28T
turning off not possible 9-24T
Transaction log, contents of 4-25T
Transaction manager 12-11T
Transfer of database files 5-19R
Transitive dependency 8-32T
Trigger
creating 15-4T
definition of 15-3T
in client/server environment 1-133S
number on a table 1-112S
preventing overriding 1-132S
when to use 15-3T
Trigger event
definition of 1-111S, 15-5T
example of 15-5T
in CREATE TRIGGER statement
1-111S
INSERT 1-119S
privileges on 1-113S
with cursor statement 1-112S
Trigger name
assigning 15-5T
syntax 1-113S
Triggered action
action on triggering table 1-127S
anyone can use 1-129S
BEFORE and AFTER 15-7T
cascading 1-118S
clause 1-121S
action statements 1-122S
46 Index
syntax 1-121S
WHEN condition 1-121S
correlation name in 1-125S, 1-128S
FOR EACH ROW 15-8T
generating an error message 15-14T
in client/server environment 1-133S
in relation to triggering statement
15-6T
list
AFTER 1-117S
BEFORE 1-116S
FOR EACH ROW 1-116S
for multiple triggers 1-117S
sequence of 1-116S
merged 1-117S
preventing overriding 1-132S
statements 15-3T
tracing 15-12T
using 15-7T
using stored procedures 15-10T
WHEN condition 1-121S, 15-10T
Triggering statement
affecting multiple rows 1-117S
execution of 1-113S
guaranteeing same result 1-112S
result of 1-123S
UPDATE 1-115S
Triggering table
action on 1-127S
and cascading triggers 1-131S
Trigonometric function
ACOS function 1-460S
ASIN function 1-460S
ATAN function 1-460S
ATAN2 function 1-461S
COS function 1-459S
SIN function 1-459S
TAN function 1-460S
TRUNC function
syntax in expression 1-444S
use in expression 1-447S
Truncation, signalled in SQLAWARN
5-12T
Two-phase commit 12-20T
TYPE field
changing from BYTE or TEXT 1-359S
setting in SET DESCRIPTOR 1-356S
setting in X/Open programs 1-357S
with X/Open programs 1-213S
Typographical conventions Intro-5R,
Intro-5S, 5T
U
Unbuffered logging 9-22T
Underscore (_), wildcard in Condition
segment 1-410S
UNION operator
description of 3-43T
display labels with 3-48T
restrictions in view 11-22T
restrictions on use 1-344S
syntax in SELECT 1-310S
use in SELECT 1-344S
Unique constraint
dropping 1-32S
modifying a column with 1-28S
rules of use 1-30S, 1-92S, 1-94S
UNIQUE keyword
constraint in CREATE TABLE 9-24T
restrictions in modifiable view 11-24T
syntax
in CREATE INDEX 1-63S
in CREATE TABLE 1-91S
in SELECT 1-312S
use
in ALTER TABLE 1-29S
in CREATE INDEX 1-64S
in CREATE TABLE 1-92S
in expression 1-462S
in SELECT 1-313S, 2-19T
no effect in subquery 1-414S
UNITS keyword
syntax in expression 1-436S
use in expression 1-442S
UNIX
BSD
default print capability 4-7R, 4-24R
viewing environment settings 4-5R
environment variables listed 4-9R
PATH environment variable 4-54R
specifying directories for
intermediate writes 4-40R
System V
default print capability 4-7R, 4-24R
terminfo library support 4-39R
viewing environment settings 4-5R
TERM environment variable 4-55R
TERMCAP environment variable
4-56R
TERMINFO environment variable
4-56R
UNIX operating system 12-4T, 12-6T
UNLOAD statement
DELIMITER clause 1-380S
exporting data to a file 9-27T
specifying field delimiter with
DBDELIMITER 4-18R
syntax 1-378S
UNLOAD TO file 1-378S
unloading VARCHAR, TEXT, or
BYTE columns 1-379S
UNLOAD TO file 1-378S
Unloading a database 5-8R
UNLOCK TABLE statement, syntax and
use 1-381S
Unnamed pipes 12-7T
Updatable view 1-139S
UPDATE clause, syntax 1-114S
Update cursor 1-148S
definition of 1-148S, 6-15T
locking considerations 1-152S
opening 1-264S
restricted statements 1-152S
use in UPDATE 1-390S
using 1-152S
Update journal 10-33T
UPDATE keyword
syntax
in GRANT 1-235S
in REVOKE 1-301S
use
in GRANT 1-236S
in REVOKE 1-302S
Update privilege
column level 11-10T
definition of 1-236S, 11-8T
with a view 1-384S, 11-28T
UPDATE REFERENCING clause
and FOR EACH ROW section 1-121S
correlation name 1-120S
syntax 1-120S
UPDATE statement
and end of data 6-14T
and transactions 1-384S
applied to view 11-24T
as triggered action 1-122S
as triggering statement 1-112S, 1-114S,
1-115S
Index 47
description of 4-12T
embedded 6-14T to 6-17T
in trigger event 1-111S
locking considerations 1-385S
missing WHERE signalled 5-10T
multiple assignment 4-14T
number of rows 5-12T
preparing 5-30T
privilege for 11-6T, 11-8T
restrictions on columns for update
1-153S
restrictions on subqueries 4-13T
rolling back updates 1-385S
syntax 1-383S
time to update indexes 10-20T
updating a column to null 1-387S
updating through a view 1-384S
updating with cursor 1-390S
use of expressions 1-388S
with
Condition segment 1-404S
FETCH 1-201S
SET keyword 1-386S
WHERE CURRENT OF keywords
1-390S
WHERE keyword 1-388S
with a select..for update 1-340S
with an update cursor 1-152S
UPDATE STATISTICS statement
affect on sysdistrib 2-19R
and DBUPSPACE environment
variable 4-30R
creating distributions 1-396S
dropping data distributions 1-396S
examining index pages 1-394S
optimizing search strategies 1-394S
syntax 1-392S
using the LOW keyword 1-395S
when to execute 1-395S
Update trigger, defining multiple 1-114S
USER function
as affected by ANSI compliance
1-231S, 1-300S, 1-438S
syntax
in Condition segment 1-405S
in expression 1-436S
in INSERT 1-250S
use
in ALTER TABLE 1-18S
in CREATE TABLE 1-88S
48 Index
in expression 1-438S, 2-63T, 2-64T,
3-19T
in INSERT 1-252S
User informix, privileges associated with
1-234S
Using correlation names 1-124S
USING DESCRIPTOR keywords
information from DESCRIBE 1-164S
syntax
in EXECUTE 1-184S
in FETCH 1-194S
in OPEN 1-263S
in PUT 1-284S
use
in FETCH 1-201S
in OPEN 1-269S
in PUT 1-188S, 1-288S, 1-289S
USING keyword
syntax
in EXECUTE 1-186S
in OPEN 1-263S
use
in EXECUTE 1-186S, 5-31T
in OPEN 1-268S
USING SQL DESCRIPTOR keywords
in DESCRIBE 1-164S
in EXECUTE 1-187S
Utility program
chkenv 5-4R
crtcmap 5-5R
dbexport 5-8R
dbimport 5-13R
dbload 5-19R, 9-28T, 10-12T
dbschema 5-33R, 9-26T
oncheck 10-7T, 10-12T
onload 4-27T, 10-11T
onstat 10-12T
onunload 4-27T, 10-11T
V
VALUE clause
after NULL value is fetched 1-215S
relation to FETCH 1-214S
use in GET DESCRIPTOR 1-212S
use in SET DESCRIPTOR 1-355S
VALUES clause
effect with PUT 1-286S
syntax in INSERT 1-245S
use in INSERT 1-250S, 4-7T
VARCHAR data type
considerations for UNLOAD
statement 1-379S
description of 3-22R, 9-15T
effect on table size 10-14T
requirements for LOAD statement
1-257S
syntax 1-425S
used for performance 10-26T
using as default value 1-19S, 1-89S
versus NVARCHAR data type 1-19R
with LENGTH function 2-64T
VARCHAR value, displaying 2-11T
Variable
default values in SPL 2-11S, 2-12S
define in SPL 2-7S
global, in SPL 2-10S, 14-17T
in SPL 14-16T
local, in SPL 2-12S, 14-17T
scope of SPL variable 2-8S
unknown values in IF 2-25S
with same name as a keyword 14-19T
View
creating a view 1-136S, 11-20T
creating synonym for 1-80S
deleting rows in 11-24T
description of 11-19T
display description with dbschema
5-34R
dropped when basis is dropped
11-22T
dropping 1-183S
effect of changing basis 11-23T
effect on performance 13-33T
inserting rows in 11-25T
modifying 11-23T to 11-27T
naming with NLS 1-15R
null inserted in unexposed columns
11-25T
privilege when accessing 11-28T
privilege when creating 1-137S
privileges 11-27T to 11-30T
privileges with GRANT 1-239S
produces duplicate rows 11-22T
restrictions with UNION operator
1-344S
system catalog table 2-33R
updatable 1-139S
updating 1-384S
updating duplicate rows 11-25T
using CHECK OPTION 11-25T
virtual column 1-137S, 11-24T
with SELECT * notation 1-136S
View Name segment 1-510S
W
WAIT keyword, in the SET LOCK
MODE statement 1-370S
WARNING keyword, in the
WHENEVER statement 1-398S
Warnings, with stored procedures at
compile time 14-8T
WEEKDAY function
as time function 2-56T, 2-60T
syntax in expression 1-454S
use in expression 1-456S
WHEN condition
in triggered action 1-122S
restrictions 1-122S
use of 1-122S
WHENEVER statement, syntax and use
1-398S
WHERE clause, subscripting 2-44T
WHERE CURRENT OF clause, impact
on trigger 1-112S
WHERE CURRENT OF keywords
syntax
in DELETE 1-159S
in UPDATE 1-383S
use
in DELETE 6-7T
in UPDATE 1-390S, 6-15T
WHERE keyword
Boolean expression in 2-36T
comparison condition 2-29T to 2-45T
date-oriented functions in 2-60T
enforcing data constraints 11-27T
host variables in 5-14T
in DELETE 4-4T to 4-6T
joining tables 1-331S
null data tests 2-35T
prevents use of index 13-32T, 13-33T,
13-35T
range of values 2-32T
relational operators 2-29T
selecting rows 2-28T
setting descriptions of items 1-354S
subqueries in 3-33T
syntax
in DELETE 1-159S
Index 49
in SELECT 1-310S
in UPDATE 1-383S
testing a subscript 2-44T
use
in DELETE 1-160S
in UPDATE 1-388S
with a subquery 1-326S
with ALL keyword 1-330S
with ANY keyword 1-330S
with BETWEEN keyword 1-327S
with IN keyword 1-327S
with IS keyword 1-327S
with LIKE keyword 1-328S
with MATCHES keyword 1-328S
with NOT keyword 2-32T
with OR keyword 2-33T
with relational operator 1-326S
with SOME keyword 1-330S
wildcard comparisons 2-37T
See also Condition segment.
WHILE keyword
in CONTINUE statement 2-6S
in EXIT 2-14S
WHILE statement
looping in a stored procedure 14-23T
syntax 2-46S
with NULL expressions 2-46S
Wildcard character
asterisk 2-12T
Wildcard characters, with LIKE or
MATCHES 1-498S
Wildcard comparison
in WHERE clause 2-37T to 2-44T
WITH APPEND keywords, in the SET
DEBUG FILE TO statement 1-351S
WITH CHECK keywords
syntax in CREATE VIEW 1-136S
use in CREATE VIEW 1-138S
WITH CHECK OPTION keywords
11-25T
WITH GRANT keywords
syntax in GRANT 1-231S
use in GRANT 1-237S
WITH HOLD keywords
declaring a hold cursor 7-19T, 10-34T
syntax in DECLARE 1-145S
use in DECLARE 1-150S, 1-157S
WITH keyword, syntax in CREATE
DATABASE 1-57S
WITH LISTING IN keywords
50 Index
warnings in a stored procedure 14-8T
WITH LOG IN keywords, syntax in
START DATABASE 1-376S
WITH MAX keywords
relationship with COUNT field 1-354S
WITH NO LOG keywords
syntax
in CREATE TABLE 1-84S
in SELECT 1-341S
use
in CREATE TABLE 1-104S
in SELECT 1-343S
WITH NO LOG keywords, syntax in
START DATABASE 1-376S
WITH RESUME keywords, in RETURN
2-39S
WITHOUT HEADINGS keywords, in
the OUTPUT statement 1-271S
WORM drive 12-6T
Write-once read-many-times device. See
WORM drive.
Writing a dbload command file
in character-position form 5-31R
in delimiter form 5-26R
X
X/Open
and Informix implementation of NLS
1-15R
setting NLS environment variables
4-43R
setting the LC_COLLATE category
4-50R
setting the LC_CTYPE category 4-51R
setting the LC_MONETARY category
4-52R
setting the LC_NUMERIC category
4-53R
setting the LC_TIME category 4-53R
specifications, icon for Intro-8S
X/Open mode
FETCH statement 1-195S
GET DESCRIPTOR 1-213S
SET DESCRIPTOR statement 1-357S
X/Open specification of NLS 1-15R
Y
YEAR function
as time function 2-56T
syntax in expression 1-454S
use in expression 1-456S
YEAR keyword
syntax
in DATETIME data type 1-428S
in INTERVAL data type 1-485S
use
as DATETIME field qualifier 3-8R,
1-488S
as INTERVAL field qualifier 3-13R,
1-491S
as placeholder in PREPARE 1-273S,
5-29T
naming variables in PUT 1-287S
replacing with USING keyword
1-268S
wildcard in Condition segment 1-411S
@, at sign, in database name 1-421S
\, backslash, as escape character
with LIKE 1-410S
with MATCHES 1-411S
^, caret, wildcard in Condition segment
1-411S
_, underscore, wildcard in Condition
segment 1-410S
||, concatenation operator 1-432S
Symbols
$INFORMIXDIR/etc/sqlhosts 12-15T
%, percent sign, wildcard in Condition
segment 1-410S
( ), space, as delimiter
in DATETIME 3-9R
in INTERVAL 3-15R
*, asterisk
arithmetic operator 1-431S
use in SELECT 1-312S
+, plus sign, arithmetic operator 1-431S
-, hyphen, as delimiter
in DATETIME 3-9R
in INTERVAL 3-15R
-, minus sign, arithmetic operator 1-431S
. 4-4R
., decimal point, as delimiter
in DATETIME 3-9R
in INTERVAL 3-15R
..., ellipses, wildcard in Condition
segment 1-411S
/etc/hosts 12-15T
/etc/services 12-15T
/, division symbol, arithmetic operator
1-431S
/, slash, arithmetic operator 1-431S
:, colon, as delimiter
in DATETIME 3-9R
in INTERVAL 3-15R
=, equals, relational operator 2-30T,
2-71T
?, question mark
Index 51
52 Index
Reader-Response Card
Informix Guide to SQL: Syntax, Version 6.0
Dear Reader,
At Informix Software, we think documentation is very important. After all, manuals are
an integral part of our product line. Because documentation is important, we want to know
what you think about our manuals. You can tell us by filling out and returning the ReaderResponse Card.
Thanks for your help!
1.
Overall, how do you rate this manual?
Outstanding
2.
3.
4.
5.
Very good
Good
Average
Poor
Is the manual effective?
• Is it organized so you can find things?
Yes
No
• Is the index adequate?
Yes
No
• Is the table of contents easy to use?
Yes
No
• If applicable, do you find the statement syntax readable?
Yes
No
• Are topics presented in a useful sequence?
Yes
No
• Are the examples useful?
Yes
No
What did you think of the level of description?
• Writing quality:
Very good
Good
Average
• Clarity:
Very clear
Average
Hard to understand
Poor
• Level:
Too technical
Just right
Oversimplified
When you need to find information quickly, which part of the documentation
do you use?
• Index:
Often
Sometimes
Rarely
Never
• Table of Contents:
Often
Sometimes
Rarely
Never
• Quick Reference Card:
Often
Sometimes
Rarely
Never
• Chapter summaries:
Often
Sometimes
Rarely
Never
• On-line help:
Often
Sometimes
Rarely
Never
• Browse through manuals:
Often
Sometimes
Rarely
Never
How long have you been developing database applications?
• How many years have you been programming?
0
1-3
4-5
>5
• How many years have you been using databases?
0
1-3
4-5
>5
• How many years have you been using Informix products?
0
1-3
4-5
>5
6.
Have you used other programming languages? If so, which ones?
7.
Have you used other database products? If so, which ones?
January 1993
8.
What other Informix products do you use?
9.
What is your job title and area of responsibility?
10. Is the format of this manual easy to use? Consider page size, typeface, binding,
diagrams, and code examples.
11. Additional comments:
Company Name:
Your Name:
Address:
City:
State/Province:
Country:
Zip/Postal Code:
Telephone Number:
INFORMIX is a registered trademark of Informix Software, Inc.
To mail this card, please fold on the dotted line and staple or tape the open end.
BUSINESS REPLY MAIL
FIRST CLASS PERMIT NO. 25 MENLO PARK, CA.
POSTAGE WILL BE PAID BY ADDRESSEE
®
Informix Software, Inc.
Technical Publications Department
4100 Bohannon Drive
Menlo Park, California 94025
NO POSTAGE
NECESSARY
IF MAILED
IN THE
UNITED STATES