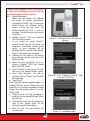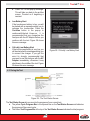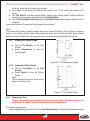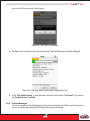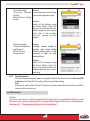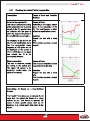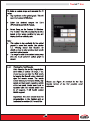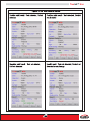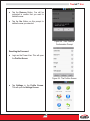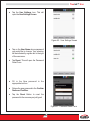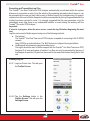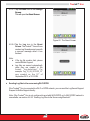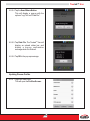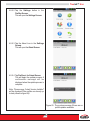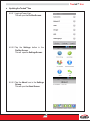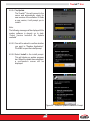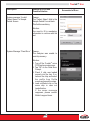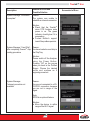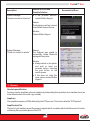
1
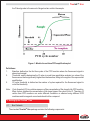
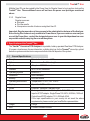
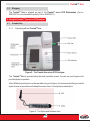
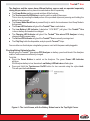
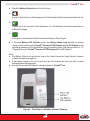
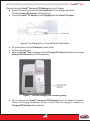
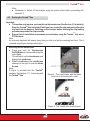
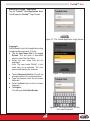
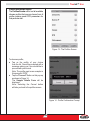
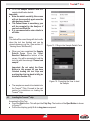
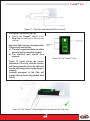
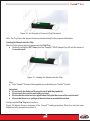
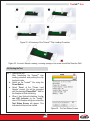
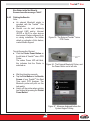
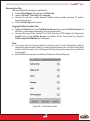
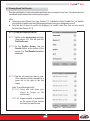
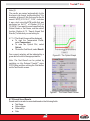
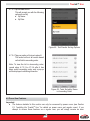
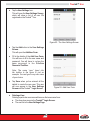
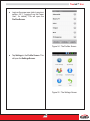
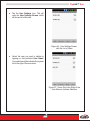
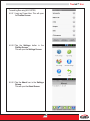
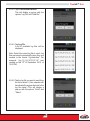
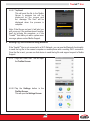
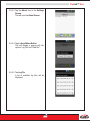
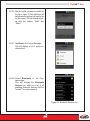
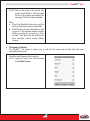
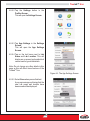
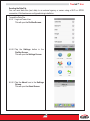
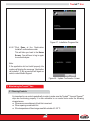
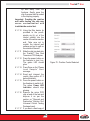
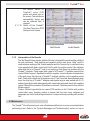
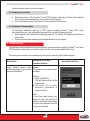
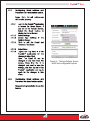
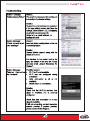
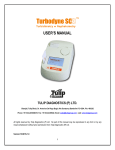
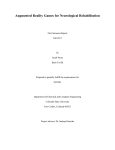
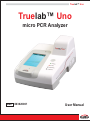
Truelab™ Uno
Truelab™ Uno
micro PCR Analyzer
REF 603020001
User Manual
DIAGNOSTICS
Truelab™ Uno
TABLE OF CONTENTS
7-8
Preface
9 - 10
1. Introduction
1.1
Polymerase Chain Reaction (PCR)
9
1.2
Real-time PCR
9
1.3
Understanding Cycle Threshold (Ct Value)
2. Setting Up the TruelabTM Uno
9 - 10
10 - 12
2.1
Box Contents
2.2
Installation Requirements
11
2.2.1
Installation Precautions
11
2.2.2
Environmental Requirements
11
2.3
10 - 11
Installing the TruelabTM Uno
11
2.3.1
Power Users
11
2.3.2
Regular Users
12
3. Specifications of the TruelabTM Uno
12 - 13
3.1
General Specifications
12
3.2
Shipping
13
4. Using the TruelabTM Uno micro PCR Analyzer
4.1
13 - 17
Introduction
13
4.1.1
Interacting with the TruelabTM Uno
13 - 14
4.1.2
Checking Battery Status before use
14 - 15
4.1.3
Charging/Using the TruelabTM Uno with the AC Adaptor
16 - 17
4.2
Starting the TruelabTM Uno
17 - 20
4.3
Loading the TruenatTM Chip
20 - 23
1
DIAGNOSTICS
Truelab™ Uno
2
DIAGNOSTICS
Truelab™ Uno
TABLE OF FIGURES
Figure 1 : Model of a real-time PCR amplification plot
10
Figure 2 : The TruelabTM Uno micro PCR Analyzer
13
Figure 3 : The Stylus and attached Jack
13
Figure 4 : The Lock Screen, with the Battery Status Icon in the top-right corner
14
Figure 5 : The Amber Low Battery Indicator Glowing
15
Figure 6 : The Charging Port, on the Left Panel of the Analyzer
16
Figure 7 : The Blue Charging LED Indicator Glowing
16
Figure 8 : The Lock Screen, with the green Lock Icon in the bottom-left corner
17
Figure 9 : The TruelabTM Uno Home Screen
17
Figure 10 : The TruelabTM Application Login Screen
18
Figure 11 : User ID Selection
18
Figure 12 : The Login Screen, with the On-screen Keyboard
18
Figure 13 : The Profiles Screen
19
Figure 14 : Profile Confirmation Prompt
19
Figure 15 : Filling-in the Sample Details Form
20
Figure 16 : Prompting the User to load the Sample
20
Figure 17 : Chip Tray, with the Eject Button to its left
21
Figure 18 : The TruenatTM Chip
21
Figure 19 : The TruenatTM Chip being placed correctly onto the Chip Tray
21
Figure 20 : An Example of Incorrect Chip Placement
22
Figure 21 : Loading the Sample onto the Chip
22
Figure 22 : A Summary of the TruenatTM Chip Loading Procedure
23
3
DIAGNOSTICS
Truelab™ Uno
Figure 23 : Incorrect Sample Loading, Showing Spillage of the Elute Around the Reaction Well
23
Figure 24 : The Test Status Screen
23
Figure 25 : The Red In-use LED Indicator glowing
24
Figure 26 : Error in Matching TruenatTM Chip to chosen Test Profile
24
Figure 27 : Low Battery Alert
24
Figure 28 : Critically Low Battery Alert
25
Figure 29 : The Test Status Screen
25
Figure 30 : The Temperature Graph
26
Figure 31 : The Optical Graph
26
Figure 32 : Test Stop Confirmation
27
Figure 33 : The Test Status Screen after Stopping the Test
27
Figure 34 : The Test Results Screen
31
Figure 35 : The External TruelabTM micro PCR Printer
32
Figure 36 : The External Bluetooth Printer, and the Power Button on its left side
32
Figure 37 : Message Displayed before the System begins Printing
32
Figure 38 : The Profiles Screen
33
Figure 39 : The Results Lists
34
Figure 40 : The Optical Graph
35
Figure 41 : The Saved Result Screen
35
Figure 42 : Test Results List
36
Figure 43 : Selecting the Parameter to Search By
36
Figure 44 : Searching by Name
37
Figure 45 : Pop-up to enter the Date into each Text Box
38
Figure 46 : The From and To Fields filled-in
38
Figure 47 : Test Results List
39
4
DIAGNOSTICS
Truelab™ Uno
Figure 48 : Test Results Sorting Options
40
Figure 49 : Tests Sorted by Name in Ascending Order
40
Figure 50 : Error message for invalid recipient e-mail address
43
Figure 51 : The App Settings Screen, with e-mail configuration options
45
Figure 52 : The Profiles Screen
46
Figure 53 : The Settings Screen
46
Figure 54 : The User Settings Screen
47
Figure 55 : Add User Form
47
Figure 56 : The Profiles Screen
48
Figure 57 : The Settings Screen
48
Figure 58 : User Settings Screen, with the List of Users
49
Figure 59 : Green Dot to the Right of the User Name to Indicate Selection
49
Figure 60 : User Deletion Conformation Prompt
50
Figure 61 : The Profiles Screen
50
Figure 62 : User Settings Screen
51
Figure 63 : Password Reset Form
51
Figure 64 : The About Screen
53
Figure 65 : Bluetooth Devices List
58
Figure 66 : The App Settings Screen
60
Figure 67 : The system message if there are no profile updates available
63
Figure 68 : Software Update Installation Prompt
65
Figure 69 : Installation Progress Bar
66
Figure 70 : Update Confirmation Screen
66
Figure 71 : Sample Type Menu
67
Figure 72 : Negative Control Selected
67
Figure 73 : Positive Control Selected
68
5
DIAGNOSTICS
Truelab™ Uno
Preface
I. Contact Addresses
Molbio Diagnostics Pvt. Ltd.,
Corporate Office: Tulip House, Dr. Rego Bagh. Alto Santa Cruz, Bambolim Complex P.O., Goa 403202 , India. Tel: 91 832 2458546 -51 Fax: 91 832 2458544.
Manufacturing: M46/47, Phase III B, Verna Industrial Estate,Verna, Goa - 403722, India.
Tel: +91 832 6682000. Fax: +91 832 2783139.
II. Warranty
Warranty Information would be specified in the sales invoice / contract. Contact your Molbio
representative for further information. Normally the instrument would be under warranty for a
period of twelve (12) months from the date of installation. Post warranty services are also
available from Molbio.
III. Trademarks
Truelab™ / Truelab™ Uno / Truepet™ / Trueprep™ MAG / Truenat™ are registered trademarks
of Molbio Diagnostics Pvt. Ltd.
IV. Intended Use
The Truelab™ Uno Real Time micro PCR Analyzer is intended for performing real time PCR as
well as real time RTPCR of target nucleic acids and works only with Truenat™ analyte specific
micro PCR chips. It is for In Vitro Diagnostics (IVD) use only.
V. Preamble
Before starting real time PCR testing on the Truelab™ Uno analyzer it is important to read this
USER MANUAL thoroughly and completely. All instructions contained in this manual needs to
be adhered to and non adherence may lead to erroneous results and possible damage to the
analyzer.
VI. The Truelab™ User's Manual
The USER MANUAL provides detailed instructions for the use of all the Truelab Uno's available
functions, its technical specifications, a brief introduction to the concept of PCR and a glossary.
VII. Conventions Used in this Manual
This manual uses certain conventions that make it easier for you to differentiate types of
instructions.
Text Conventions:
Text Convention
Numbered Lists
Bold Text
Usage
Numbered Lists indicate that the steps need to be performed
according to the numbering.
When found within a numbered list or explanatory section, Bold
Text is used to indicate an object that the user interacts with,
6
DIAGNOSTICS
Truelab™ Uno
which can be a physical object or an object on the software
interface. For instance Touchscreen, Power Button and AC
Adapter are references to physical objects. Send and OK are
references to objects on the software interface.
Note Conventions:
You will see three types of notes in this manual. Each has a symbol and a particular type of textual
formatting to indicate what type of note it is.
The table below details their use, along with the associated symbol.
Symbol
Text Formatting and Usage
Note
This is a note.
A note communicates information that cannot be included as part
of a procedural list, but is useful for the user to understand what he
is doing in a certain section or to understand the relevance of a
particular section or instruction.
Important
This is an Important Note.
An important note communicates important information that
cannot be included as part of a procedural list, but is integral for the
user to read and understand.
Caution
This is a Cautionary Note.
A cautionary note is placed before or after any instruction or
section that may cause damage to the device or invalidate the test
results if performed, or if performed incorrectly.
It is also used to communicate general precautions and things to
avoid.
7
DIAGNOSTICS
Truelab™ Uno
1
Introduction
Thank you for your purchase of the TruelabTM Uno micro PCR Analyzer.
The TruelabTM Uno micro PCR Analyzer is a revolutionary portable and battery-operated real
time PCR analyzer and works with Truenat™ analyte specific micro PCR chips. It enables fast,
accurate and reliable near-care testing, is easy to use and requires minimal training.
This is the User Guide for the TruelabTM Uno micro PCR Analyzer. Please read through this
manual before beginning to use the TruelabTM Uno and always keep it handy for reference and
trouble shooting.
The latest updated versions of the manual can also be found at www.molbiodiagnostics.com .
1.1 Polymerase Chain Reaction (PCR)
The Polymerase Chain Reaction, invented in 1983 by Kary Mullis, is a technique of amplifying
DNA that has found widespread use among professionals and researchers involved with
analysis of nucleic acids due to its high reliability, speed and sensitivity.
Since Deoxyribonucleic Acid (DNA) is unique to each species and individual, it is currently the
most reliable identifier for any living organism, from microbes to humans. Using the PCR
method, even the smallest amounts of DNA can be amplified in order to analyze it. For example,
it can be used to amplify even the smallest trace of an infectious bacterium or virus from a
biological specimen.
The process involves amplifying a specific piece of DNA in a sample using an enzyme called
DNA polymerase and periodic cycling of temperature, which anneal and split strands,
respectively. With each round of annealing and splitting, the amount of nucleic acid doubles
leading to an exponential amplification of the starting trace nucleic acid in a short amount of
time.
For instance, a typical PCR reaction that runs for thirty-five cycles, at 100% efficiency, will give
you:
235 = 34 billion copies
The amplified DNA is then analyzed separately so that it can be identified.
1.2 Real-time PCR
Real-time PCR is a variant of the regular PCR method. It has several advantages over regular
PCR that has made it the PCR method of choice. A Real-time Polymerase Chain Reaction
involves simultaneously amplifying and detecting the target DNA during every cycle, thus
generating accurate information about the presence of the target DNA and its quantity in each
reaction, thus removing the need to analyze the post-PCR product separately.
The TruelabTM Uno micro PCR Analyzer is a Real-time PCR-based system.
1.3 Understanding Cycle Threshold (Ct Value)
In any Real-time PCR, a positive reaction is detected by the accumulation of the amplicon and
hence of the fluorescence signal. After PCR, each amplification curve is defined by its threshold
cycle (Ct) number. The Ct can thus be defined as the number of cycles required for the
fluorescence signal to cross the threshold (exceeding the background signal of the system). Ct
levels are inversely proportional to the amount of target DNA (or cDNA) in the sample. So lower
8
DIAGNOSTICS
Truelab™ Uno
the Ct level greater is the amount of target nucleic acids in the sample.
Figure 1 : Model of a real-time PCR amplification plot
Definitions:
1.
Baseline: defined as the first few cycles of the PCR reaction where the fluorescent signal is
almost unchanged.
2.
Threshold: used to determine the Ct value in a real time quantitative analysis is a value of the
fluorescence that is significantly higher than the baseline, falling in the region of the exponential
amplification.
3.
Ct (cycle threshold: is defined as the number of cycles required for the fluorescent signal to
cross the threshold).
Note: Cycle threshold (Ct) is a relative measure of the concentration of the target in the PCR reaction.
Many factors besides the concentration of the target impact the value of the Ct. Therefore Ct
values from PCR reactions run under different conditions or obtained using different PCR
machines and/or reagents cannot and should not be compared.
2 Setting Up the TruelabTM Uno
2.1
Box Contents
The standard TruelabTM Uno package contains the following components:
9
DIAGNOSTICS
Truelab™ Uno
♦ One TruelabTM Uno Real Time micro PCR Analyzer
♦ One AC Adapter to power the TruelabTM Uno
♦ One Stylus
♦ One TruelabTM Uno micro PCR Analyzer User Manual
2.2
Installation Requirements
2.2.1
Installation Precautions
♦ Do not install the TruelabTM Uno micro PCR Analyzer next to instruments that may
cause vibrations or electromagnetic interference.
♦ Do not store the instrument in the path of direct sunlight or use it close to any radiating or
heating apparatus, such as a conventional oven, hot plate or infrared lamp.
♦ Do not store the TruelabTM Uno micro PCR Analyzer in an atmosphere of potentially
explosive liquids, vapors and gas.
♦ Always place the TruelabTM Uno on a flat surface in an upright position.
2.2.2
Environmental Requirements
The TruelabTM Uno has been designed to operate safely within the following environment
specifications:
♦ Ambient room temperatures (between 15°C to 35°C)
♦ Relative Humidity (RH) between 10% - 80% (non-condensing)
2.3 Installing the TruelabTM Uno
The TruelabTM Uno micro PCR Analyzer should be positioned on the workspace / tabletop /
workbench in an upright position.
Caution:
The TruelabTM Uno should not be moved when a test is in progress. Attempting to do so may
interfere with its functioning and compromise test results.
At the time of installation, service personnel from Molbio will set up a user profile for the laboratory
on the TruelabTM Uno and designate the head of the health center or any other authority assigned
for the purpose as the “Power User”, who has access to certain special administrative features on it
that regular users do not.
2.3.1
Power Users
There is only one designated Power User for each Analyzer. Power users can:
♦ Edit or change laboratory details, such as laboratory name and location
♦ View results of tests conducted by any user
♦ Generate and send log files
♦ Create new user IDs
♦ Delete users
♦ Reset a user's password
♦ Transfer results to server
♦ Update Profiles and the TruelabTM Software
10
DIAGNOSTICS
Truelab™ Uno
Multiple User ID's can be created by the Power User for Regular Users to log in and run tests on the
TruelabTM Uno. These additional users will not have the power user privileges mentioned
above.
2.3.2
Regular Users
Regular users can:
♦ Run tests.
♦ Print the results.
♦ View previous results of tests run using their User ID.
Important: Regular users do not have access to the administrative features of the Analyzer.
Since the log files feature is only available to Power Users, If you encounter an error and you
are not the Power User, contact the designated power user in your lab/department as soon
as possible so he/she may log the error on the system.
3 Specifications of the TruelabTM Uno
The TruelabTM Uno micro PCR Analyzer is a portable, battery-operated Real time PCR Analyzer.
It houses a touchscreen for user interaction, a sliding chip tray for the TruenatTM microchip, optical
detection systems and electronic components that control all aspects of the system.
3.1
General Specifications
Principle
Optics
Patented real-time micro PCR
Fluorescence, Dual Wavelength
Speed
40 cycles of PCR/35 minutes
Interface
Wi-Fi, GPRS, Bluetooth
Operating System
Android 2.3
Calibration
Auto-calibration
Memory
5000 test results
Operating environment
Temperature: 15-35oC, RH: 10 80%
Display
Capacitive 3.2” Touch Screen
Printer
Power
Weight
External 2” Bluetooth Thermal Printer
Rechargeable Lithium Ion Battery Pack: 7.5V; 2200 mAh
Input to AC/DC adaptor: Single Phase 100-240V; 50/60Hz; 1500 mA
Output from AC/DC adaptor: 10 V; 4500mA; 45VA.
If the input specifications in your country do not meet the above
requirements, please contact your local Molbio representative.
0.9 kgs
Size
210mmX140mmX109 mm
11
DIAGNOSTICS
Truelab™ Uno
3.2
Shipping
TM
TM
The Truelab Uno is shipped as part of the Truelab micro PCR Workstation (Cat no.
603010001) or as a standalone system (Cat no. 603020001).
4 Using the TruelabTM Uno micro PCR Analyzer
4.1
Introduction
4.1.1
Interacting with the TruelabTM Uno
Figure 2 : The Truelab Uno micro PCR Analyzer
The TruelabTM Uno is operated using the touch-sensitive screen. You can use your fingers or the
provided stylus to operate it.
Note: While the touchscreen can be operated using your fingers, it is recommended that you use the
stylus for ease of operation and to keep the screen clean. Use only the provided stylus.
Figure 3 : The Stylus and attached Jack
12
DIAGNOSTICS
Truelab™ Uno
The Analyzer and the screen have different battery sources and are operated separately
during the procedure, so they have to be switched on and off separately.
♦ The Power Button switches on and switches off the Analyzer.
♦ The Touchscreen On/Off Button is used to switch on and off the screen.
This is done by inserting the Jack portion of the provided stylus and pressing and holding the
button for two seconds.
♦ The Screen Wake/Back Zone is pressed firmly to switch the touchscreen from Sleep Mode to
Active mode.
♦ The Power LED Indicator will glow if the TruelabTM Uno is switched on.
♦ The Low Battery LED Indicator (Labeled as “LOW BATT”) will glow if the TruelabTM Uno
is low on battery and needs to be charged.
♦ The Charging LED Indicator will glow if the TruelabTM Uno micro PCR Analyzer is being
charged using the power cable.
♦ The In-Use LED Indicator will glow if the TruelabTM Uno is currently running a test.
♦ The Chip Tray holds the disposable, analyte specific TruenatTM chips.
You can either run the Analyzer using battery power or use it with the power cable plugged in.
Checking Battery Status before Use
TM
Before using the Truelab Uno micro PCR Analyzer on battery, you should check if the Analyzer
and the Touchscreen are sufficiently charged.
To do this,
♦ Press the Power Button to switch on the Analyzer. The green Power LED Indicator
will glow.
If the Analyzer battery is low, the amber Low Battery LED Indicator will also glow.
♦ Press and Hold the Touchscreen On/Off button for two seconds using the stylus Jack.
This will open the Lock Screen.
Figure 4 : The Lock Screen, with the Battery Status Icon in the Top-Right Corner
13
DIAGNOSTICS
Truelab™ Uno
♦ Check the Battery Status Icon on the Lock Screen
a)
A small red bar in the icon with whitespace to its left indicates that the touchscreen battery is low.
b)
A green bar in the icon with a little whitespace to its left indicates the touchscreen battery is
sufficiently charged.
c)
A fully green icon indicates that the Touchscreen Battery is fully charged.
♦ If the Low Battery LED Indicator and/or the Battery Status Icon indicate low battery
charge, you can either use the TruelabTM Uno micro PCR Analyzer with the AC Adaptor or you
can charge it and wait for it to finish before using it on battery power. (See the next section, 4.1.3,
“Charging/Using the TruelabTM Uno micro PCR Analyzer with the AC Adaptor”).
Note:
♦ The Battery Status Icon can also be seen in the Home Screen and Login Screen. However,
it cannot be seen once logged in.
♦ If the battery charge is too low to perform a test, the Analyzer will alert you with a system
message before the test begins.
♦ Use only the provided AC Adaptor to charge or power to TruelabTM Uno.
Figure 5 : The Amber Low Battery Indicator Glowing
14
DIAGNOSTICS
Truelab™ Uno
Charging/Using the TruelabTM Uno micro PCR Analyzer with the AC Adaptor
♦ Switch off the Analyzer by pressing the Power Button, if it isn't already switched off.
The Green Power LED Indicator will stop glowing.
♦ Plug in the TruelabTM AC Adaptor to the Charging Port of the TruelabTM Analyzer.
Figure 6 : The Charging Port, on the Left Panel of the Analyzer
♦ Plug in the other end of the AC Adaptor to a wall socket.
♦ Switch on the wall socket.
♦ When the TruelabTM Uno is charging, the blue Charging LED Indicator will glow, and the Low
Battery LED Indicator will go off if it was glowing.
Figure 7 : The Blue Charging LED Indicator glowing
♦ You can now use the TruelabTM Uno micro PCR Analyzer with the AC Adaptor (Proceed to
Section 4.2) Charging the Analyzer will take ~4 hours. When the charging is complete, the
Charging LED Indicator will stop glowing.
15
DIAGNOSTICS
Truelab™ Uno
Note:
♦ Remember to Switch off the Analyzer using the power button before proceeding with
Section 4.2.
4.2
Starting the TruelabTM Uno
Important:
♦ This section only requires you to switch on the touchscreen (See Section 4.1 for details).
Keep the TruelabTM Uno switched off until you have loaded the chip and pushed the chip
tray back into the Analyzer. Switching on the Analyzer before finishing the chip loading
procedure may make the chip unusable.
♦ Ensure that all installation requirements are met before using the TruelabTM Uno micro
PCR Analyzer.
Note:
An on-screen keyboard will appear every time you click on a text box requiring text input. This is
operated using fingers or the provided stylus.
Switching on the Touchscreen
♦ Press and hold the Touchscreen
On/Off Button for two seconds using the
stylus Jack.
This will switch on the touchscreen and
display the Lock Screen.
♦ Slide the Lock Icon on the Lock Screen
sideways to the right to open the Home
Screen.
Note:
A Stylus is provided with the TruelabTM
package. See Section 4.1.1 “Interacting with
the TruelabTM Uno”.
Figure 8 : The Lock Screen, with the green
Lock Icon in the bottom-left corner
Figure 9 : The Truelab Uno Home Screen
16
DIAGNOSTICS
Truelab™ Uno
Starting the TruelabTM Application
Tap the TruelabTM Uno Application Icon,
this will open the TruelabTM Login Screen.
Figure 10 : The Truelab Application Login Screen
Logging In
You will need to log in to the application using
the appropriate user name. To log in,
♦ Tap the User Name Bar in the Login
Screen, This will open a drop-down
menu to select the User Name.
♦ Select the user name from the list
displayed.
Note: The user name “Molbio” is just
used here as an example. The user
name is definable by the customer.
Figure 11 : User ID selection
♦ Tap the Password text box. You will be
prompted with an On-screen keyboard.
♦ Type the password with the on-screen
keyboard.
♦ Select the Next button on the on-screen
keyboard.
♦ Tap Sign In.
This will open the Profiles Screen.
Figure 12 : The Login Screen, with the
On-screen Keyboard
17
DIAGNOSTICS
Truelab™ Uno
Profiles and Sample Details
The Profiles Screen will list out all available
disease profiles that you can choose from. A
profile contains preset PCR parameters for
that particular test.
Figure 13 : The Profiles Screen
To choose a profile,
♦ Tap on the profile of your choice
from the list. You will be prompted with a
message asking you if you would like to
proceed with your choice.
Note: The profile used as an example in
this manual is “MTB”.
♦ Tap the “Proceed” Button on this pop-up
as shown in Figure 14.
The Sample Details Form will be
displayed.
Note: Selecting the Cancel button
will take you back to the profiles screen.
Figure 14 : Profile Confirmation Prompt
18
DIAGNOSTICS
Truelab™ Uno
♦ Fill in the Sample Details Form with
sample identification details.
Important:
♦ Enter the details carefully, this screen
will not be accessible again once the
chip has been loaded.
♦ The Patient Name is mandatory; you
will be prompted by the Analyzer if
you have not filled it in.
♦ It is recommended to enter details in
all fields.
Note:
This data will be saved along with test results
when the test has finished and can be
viewed whenever you like. (See section 4.7
“Viewing Saved Test Results”).
Figure 15 : Filling-in the Sample Details Form
♦ When you have completed the Sample
Details Form, Press the “Start
Reaction” Button at the bottom of the
screen. You will be prompted to load the
test chip with the message “Please load
sample”.
Important: Do not select the Done
Button in this prompt till you have
finished loading the test chip and
pushing the chip tray back in fully (as
detailed in Section 4.3).
Figure 16 : Prompting the User to load
the Sample
♦ The sample now needs to be loaded onto
the TruenatTM Chip. Proceed to the next
section for instructions on loading the
TruenatTM chip.
4.3
Loading the TruenatTM chip
Accessing the Chip Tray.
♦ Press the Eject button. This will eject the Chip Tray. The location of the Eject Button is shown
in Figure 17.
♦ Pull out the chip tray gently till all six tray pins are exposed.
19
DIAGNOSTICS
Truelab™ Uno
Figure 17 : Chip Tray, with the eject Button to its Left
Placing the Chip on the Chip Tray
♦ Place a new TruenatTM chip on to the
Chip Tray by lowering the chip onto the
chip tray.
Important: Make sure you have placed the
chip correctly onto the tray.
a) The chip's registration holes should be
placed properly onto all the tray pins.
b) The reaction well should face
upwards.
Figure 18 : The TruenatTM Chip
Figure 19 below shows the correct
placement of the chip, with the reaction
well facing upwards and to the right side
and the chip being placed on the tray pins
properly.
Incorrect placement of the Chip will
prevent the tray from being pushed back
in fully.
Figure 19 : The TruenatTM Chip being placed correctly onto the Chip Tray
20
DIAGNOSTICS
Truelab™ Uno
Figure 20 : An Example of Incorrect Chip Placement
Note: The Tray Pins in the figures above are colored red only for the purpose of illustration.
Loading the Sample onto the Chip
After the Chip has been properly placed onto the Chip Tray,
♦ Pipette 6 μl elute from ECT tube (from the TrueprepTM MAG Sample Prep Kit) into the center of
the reaction well.
Figure 21 : Loading the Sample onto the Chip
Note:
a) A 6µl TruepetTM Precision Micropipette is provided with your TruelabTM System.
Important:
♦ Do not touch the bottom of the reaction well with the pipette tip.
♦ Do not touch the reaction well with your hand.
♦ Ensure that the elute has been pipetted out fully into the center of the reaction well.
♦ Ensure that there is no spillage of the elute from or around the reaction.
Gently push the Chip Tray back into place.
Figure 22 (below) shows a summary of the TruenatTM loading procedure. When the chip has been
loaded correctly, proceed to section 4.4.
21
DIAGNOSTICS
Truelab™ Uno
Figure 22 : A Summary of the TruenatTM Chip Loading Procedure
Figure 23 : Incorrect Sample Loading, Showing Spillage of the Elute Around the Reaction Well
4.4 Starting the Test
4.4.1 Starting the Test
After completing the TruenatTM chip
loading procedure and pushing the chip
tray back inside.
♦ Switch on the TruelabTM Uno using the
Power Button.
♦ Select “Done” at the “Please Load
Sample” prompt. You will be prompted
with the message“Please Wait”. Wait for
the Analyzer to finish initializing.
♦ When it has finished initializing, the Inuse LED Indicator on the TruelabTM
micro PCR Analyzer will glow red and the
Test Status Screen will appear. This
indicates that the test has started.
Figure 24 : The Test Status Screen
22
DIAGNOSTICS
Truelab™ Uno
Caution: Do not attempt to eject the chip tray
or switch off the Analyzer once the chip has
been loaded and the test has started.
4.4.2 System Messages
Before the test begins, the Analyzer
will check all system parameters,
including the TruenatTM chip, Touchscreen
battery status and Analyzer battery
status. If there are any errors, the
Analyzer will alert you with a pop-up
message. The alerts you may receive are
as follows:
♦ Loaded TruenatTM Chip and Selected
Test Profile do not match.
If you loaded the wrong TruenatTM
analyte specific chip for the profile you
selected or accidentally chosen wrong
profile, an error message will be
displayed and the test will not be started.
Figure 27 shows this error message.
♦ Pressing the OK button in the pop-up
error message will take you back to the
Profiles Screen.
♦ Select the correct profile (for e.g. if you
loaded a TruenatTM MTB chip, please
select the “MTB” profile.
♦ Press “Proceed” on the pop-up. This will
take you to the Sample Details Screen.
♦ Press “Start Reaction”. You will be
prompted with a “Please Load Sample”
alert message.
♦ Press “Done”.
If the Chip Alert message appears again, it is
possible that the wrong Truenat chip was
loaded (for e.g. the user has loaded a Truenat
Dengue chip but actually wishes to run the
“MTB” profile.
♦ Please look at the chip packaging to
confirm if you have placed the right chip in
the chip tray.
♦ If the chip does not match the analyte you
want to test, please switch off the
Analyzer using the Power Button.
♦ Eject the chip tray and discard the
incorrect chip.
Figure 25 : The Red In-Use LED Indicator
glowing
Figure 26 : Error in Matching TruenatTM Chip
to chosen Test Profile
Figure 27 : Low Battery Alert
23
DIAGNOSTICS
Truelab™ Uno
♦ Press “OK” on the pop-up message.
This will take you back to the profiles
screen. Proceed as if beginning a
new test.
♦ Low Battery Alert
If the touchscreen battery is low, you will
be alerted with a message asking you to
recharge the touchscreen. Press the
Continue button in the pop-up to
continue with the test. However, it is
recommended that you charge/use the
Analyzer with the AC Adaptor before you
continue with the test. Figure 28 shows
this error message.
♦ Critically Low Battery Alert
If the touchscreen battery is very low, you
will be alerted with a message asking you
to connect the charger. If you get this
error, it is strongly recommended that
you need to use the Analyzer with the AC
Adaptor immediately; otherwise it may
shut down in the middle of the test. Figure
29 shows this error message.
Figure 28 : Critically Low Battery Alert
4.5 During the Test
Figure 29 : The Test Status Screen
The Test Status Screen lets you monitor the progress of your current test.
♦ The yellow Cycle Progress Bar is the topmost bar on the Test Status Screen and indicates
the progress of the current cycle.
♦ The Green Test Progress Bar at the top of the Test Status Screen indicates the total progress
24
DIAGNOSTICS
Truelab™ Uno
of the test, along with the current cycle number.
♦ For instance, in the Screen shot above, the current cycle is 2, out of the total number of 40
cycles.
♦ The Test Details, including patient details, sample type, system health, battery level and
current cycle temperature are detailed in the Test Details Bar.
♦ The red Test Completion Indicator on the Test Status Screen will turn green when the test is
complete.
You can also view the Thermal and Optical graphs during the test.
Note:
The screen will go blank (stand-by mode) after every minute of inactivity. This is done to conserve
battery. If you want to see the screen after it has gone blank, press the Screen Wake Zone situated
below the screen. Refrain from waking up the screen unnecessarily as this will drain the battery.
4.5.1 Viewing the Thermal Graph
♦ Tap the Plot Button on the Test
Screen.
♦ Select Temperature to view the
thermal graph.
Figure 30 : The Temperature Graph
4.5.2 Viewing the Optical Graph
♦ Tap the Plot Button on the Test
Screen.
♦ Select Optical to view the Optical
Graph.
Note:
The fluorescence measure in the optical
graph is in arbitrary units.
Figure 31 : The Optical Graph
4.5.3 Stopping the Test
Caution: Stopping the test will make the current chip unusable. To do the test again, you
will have to use a new chip and start the process from the beginning.
If you want to stop the test,
♦Tap the Stop Button at the bottom of the Test Status Screen. A pop-up will be displayed asking
25
DIAGNOSTICS
Truelab™ Uno
you to confirm that you want to stop the test.
Figure 32 : Test Stop Confirmation
♦ Tap Yes in the confirmation pop-up to stop the test. The Test Status screen will be displayed.
Figure 33 : The Test Status Screen after Stopping the Test
♦ In the Test Status Screen, to view the results screen for test results, Tap Result. To go back to
the Profiles Screen, Tap Back.
4.5.4 System Messages
In rare circumstances, the following errors may occur during the test. When one of these errors
occurs, you will be prompted by the Analyzer with a pop-up message.
26
DIAGNOSTICS
Truelab™ Uno
System Message:
Reason:
“Incorrect Thermal Cycle temperature out of range
Cycling”
from normal operation range.
When it Occurs: During
the test.
Solution:
Switch off the Analyzer using
the Power Button. Eject the
chip tray and discard the chip.
Please repeat the test using a
fresh chip. If the problem
persists, please contact
support.
System message
“Incorrect loading/low
amplification”
When it Occurs:
During the test
Reason:
Low/high volume loaded in
reaction well, liquid spilled
outside reaction well or chip
exposed to light for long
periods of time.
Solution:
Switch off the Analyzer using
the Power Button. Eject the
chip tray and discard the chip.
Please repeat the test using a
fresh chip.
4.5.5 Test Completion
The test stops automatically when it is complete. When the test is done, the red In-use LED
indicator on the TruelabTM Uno will go off and you will hear a beep.
Note:
At this point, switch off the TruelabTM Analyzer using the power button, the results can still be
viewed on the touchscreen.
4.6 After the Test
Caution:
It is necessary that you verify the optical plot of your test for irregularities before you view
the test results screen, even though these irregularities happen only in rare circumstances.
(Section 4.6.1, “Checking the Optical plot for Irregularities”).
27
DIAGNOSTICS
Truelab™ Uno
28
DIAGNOSTICS
Truelab™ Uno
DIAGNOSTICS
Truelab™ Uno
DIAGNOSTICS
Truelab™ Uno
Run Status in the Test Results
Screen shows the message “Valid”.
4.6.3
Printing the Results
Note:
♦ An external Bluetooth printer is
provided with the TruelabTM Uno
Workstation.
♦ Results can be sent wirelessly
through SMS and/or Internet
(GPRS or Wi-Fi) to other devices
and servers if it was configured to do
so during installation. For further
details or activation of this feature,
contact Molbio Support.
To print the results of the test,
♦ Click the Printer Power Button on
the left side of TruelabTM micro PCR
Printer.
The amber Power LED will blink,
this indicates that the Printer is
switched on.
Figure 35 : The External TruelabTM micro
PCR Printer
Figure 36 : The External Bluetooth Printer, and
the Power Button on its left side
♦ Wait for at least ten seconds.
♦ Tap the Print Button in the Results
Screen of your TruelabTM Uno Real
Time micro PCR Analyzer. The
Bluetooth printer will print out the
test results.
♦ Switch off the printer when printing
has finished by pressing the Printer
Power Button.
Figure 37 : Message displayed before the
System begins Printing
29
DIAGNOSTICS
Truelab™ Uno
Removing the Chip
After ensuring that the Analyzer is switched off,
♦ Push the Eject Button. This will eject the Chip Tray.
♦ Take the TruenatTM Test Chip off the chip tray.
♦ Discard the chip into a waste disposal container having freshly prepared 1% sodium
hypochlorite solution.
♦ Push the Chip Tray back into place.
Logging Out/Starting a New Test
♦ Tapping the Back button in the Test Results Screen will re-open the Profiles Screen. At
this point, you can begin a new test by choosing a new profile.
♦ You can also logout of the TruelabTM Uno Real Time micro PCR Analyzer by Tapping the
Logoff button in the Profiles Screen, and switch off the Touchscreen by using the
Touchscreen On/Off Button on the Analyzer.
Note:
♦ If you leave the touchscreen switched on without using it, it will automatically switch to
Sleep Mode after a minute. When you want to perform another test, use the Screen Wake
Zone to switch it on again. If you had logged off before leaving the screen idle, you will have
to login again.
♦ Ensure that the touchscreen is switched off at the end of the working day.
Figure 38 : The Profiles Screen
30
DIAGNOSTICS
Truelab™ Uno
4.7 Viewing Saved Test Results
Results and details of previously performed tests can be viewed at any time. You cannot browse
saved test results when a test is currently in progress.
Note:
♦ Unless you are a Power User (see Section 2.3, “Installation of the Truelab Uno”, for details)
you will only be able to view tests that were performed using your designated user ID.
♦ Only the last 30 days of results are displayed, for results older than that use the search
function (See Section 4.7.2)
4.7.1 To view previous test results
4.7.1.1 Switch on the touchscreen and login
(See section 4.2). This will open the
Profiles Screen.
4.7.1.2 At the Profiles Screen, tap the
Results Button at the bottom of the
screen. The Test Results List will be
displayed.
4.7.1.3 Tap the test result you want to view.
(Your selection will be indicated by a
green dot to the right of the test
name).
Note: To scroll through the list,
4.7.1.3.1 Touch and hold down your
stylus or finger on the
touchscreen.
4.7.1.3.2 Swipe upwards or downwards
on the screen till you see the
test result you want to view.
Figure 39 : The Results Lists
31
DIAGNOSTICS
Truelab™ Uno
Note (2):
The results are named automatically by the
Analyzer in the format “profile-date-time”. For
example, in figure 40, the first result in the list
named “MTB_2012-10-27_12-26”, indicates
it was a test using the MTB profile that was
performed on the 27th of October 2012 at
12:26PM. If you want to search specifically by
Patient Name or Test Name, use the search
function (Section 4.7.2, “Search Saved Test
Results”) to find what you are looking for.
4.7.1.4 The Graph Screen will be displayed.
♦ To view the Temperature Profile,
select Temperature.
♦ To view the Optical Plot, select
Optical.
♦ To view the Test Result, select Result.
Your current selection will be indicated by a
green dot to the left of the appropriate title.
Figure 40 : The Optical Graph
Note: The Test Result can be printed by
switching on the External TruelabTM micro
PCR Printer and then clicking the Print button
on the Test Results screen.
Figure 41 : The Saved Result Screen
4.7.2 Search Saved Results
Saved results can also be searched based on the following fields:
♦ Test Name
♦ Patient Name
♦ Referred By
♦ Date
32
DIAGNOSTICS
Truelab™ Uno
To search for saved results,
4.7.2.1 Switch on the touchscreen and login
(See section 4.2).
This will open the Profiles Screen.
4.7.2.2 At the Profiles Screen, tap the
Results Button at the bottom of the
screen.
This will open the Test Results List.
Figure 42 : Test Results List
4.7.2.3 Tap the Search Button.
You will be prompted with a pop-up
display with the following search
options.
Figure 43 : Selecting the Parameter to search by
33
DIAGNOSTICS
Truelab™ Uno
4.7.2.4 Tap the field you want search based
on (In the screenshot, the parameter
is Name). You will be prompted with a
text box.
4.7.2.5 Fill in the text box with what the
information you are searching for.
Figure 44 : Searching by name
4.7.2.6 Tap the Search button on the pop-up
to initiate the search. When the
search is complete, a list of previous
test results will be displayed.
4.7.2.7 Tap the result you want to view to
open the Test Results Screen.
Note:
♦ Refer to section 4.7.1, “Viewing Previous
Test Results”, from 4.7.1.3 to 4.7.1.5 for
instructions on viewing results.
♦ Refer to section 4.6.3, “Printing the
Results”, if you want to print a particular
result from your search.
4.7.2.8 Tap Back to go back to the Profiles
Screen.
Note: In this section, the parameter used to
search by is “Name”. The pop-up textbox is
similar for the “Referred by” and “Patient
Name” searches. However, if you search by
34
DIAGNOSTICS
Truelab™ Uno
date, the pop-up will be a text box with “From”
and “To” fields to enter the range of the
search. Clicking on each of these textboxes
will display another pop-up to select the date
(as shown in figure 46), where you use the “+”
and “-“buttons on the pop-up to change each
parameter of the date.
Figure 45 : Pop-up to enter the Date
into each Text Box
Figure 46 : The From and To Fields filled-in
4.7.3 Sorting Test Results
On the results screen, the list of results can be sorted based on:
♦ Name
♦ Date
35
DIAGNOSTICS
Truelab™ Uno
To sort the list of results,
4.7.3.1 Switch on the touchscreen and login
(See section 4.2).
This will open the Profiles Screen.
4.7.3.2 At the Profiles Screen, tap the
Results Button at the bottom of the
screen. This will open the Test
Results List.
Figure 47 : Test Results List
36
DIAGNOSTICS
Truelab™ Uno
4.7.3.3 Tap the Sort Button.
This will prompt you with the following
options to sort by
♦ By Name
♦ By Date
Figure 48 : Test Results Sorting Options
4.7.3.4 Tap your option of choice to select it
This action will sort all results based
on that field in ascending order.
Note: To view the list in descending order,
repeat steps 4.7.3.3 to 4.7.3.4 after it has
been sorted ascending order, and a pop-up
will be displayed confirming the action.
Figure 49 : Tests Sorted by Name
in Ascending Order
4.8 Power User Features
Important:
♦ The features detailed in this section can only be accessed by power users (see Section
2.3, “Installing the TruelabTM Uno” for details on power users and regular users). If you
attempt to access these features as a regular user, you will simply receive an error
37
DIAGNOSTICS
Truelab™ Uno
message.
♦ In order to use the features in this section, you must log in to the TruelabTM using the power user
ID.
♦ You can use the back button to go back to the previous screen or to cancel a pop-up or
prompt.
Logging In as the Power User
♦ Open the TruelabTM Application.
♦ Click on the User Name box. This will open a drop-down menu.
♦ Select the power user ID that was created for you at the time of installation.
♦ Type the password for this ID in the Password text box.
♦ Tap the Login Button.
Note: If you have forgotten the password for your power user account, please contact Molbio
support.
♦ Creating a New User
Note: You cannot create another Power User. New users will only be regular users.
♦ Login as the power user (refer to previous
section, 4.8.1, “Logging In as the Power
User”, for details). This will open the
Profiles Screen.
Figure 50 : The Profiles Screen
♦ Tap Settings in the Profile Screen. This
will open the Settings Screen.
Figure 51 : The Settings Screen
38
DIAGNOSTICS
Truelab™ Uno
♦ Tap the User Settings Icon.
This will open the User Settings Screen,
which will show a list of all user IDs
registered on the TruelabTM Uno.
Figure 52 : The User Settings Screen
♦ Tap the Add button in the User Settings
Screen.
This will open the Add User Form.
♦ Fill in the details of the Add User Form.
You will have to fill in the user name and
password. You will have to re-type the
same password in the Confirm
Password Text Box.
Note: The name “user” typed into
the textbox in the figure is just an
example. You can type in any user name
of your choice.
♦ Tap Save when you've entered all the
details to create the new user. This user
will now appear in the User Settings
Screen and the TruelabTM Login Screen.
Figure 53 : Add User Form
♦ Deleting a User
Deleting a particular user name will remove that user name from:
♦ The drop-down menu in the TruelabTM Login Screen.
♦ The user list in the User Settings Page.
39
DIAGNOSTICS
Truelab™ Uno
♦ Login as the power user (refer to previous
section, 4.8.1, “Logging In as the Power
User”, for details). This will open the
Profiles Screen.
Figure 54 : The Profiles Screen
♦ Tap Settings in the Profile Screen. This
will open the Settings Screen.
Figure 55 : The Settings Screen
40
DIAGNOSTICS
Truelab™ Uno
♦ Tap the User Settings Icon. This will
open the User Settings Screen, which
will show a list of all users.
Figure 56 : User Settings Screen,
with the List of Users
♦ Select the user you want to delete by
tapping on that particular User Name.
Your selection will be indicated by a green
dot to the right of the user name.
Figure 57 : Green Dot to the Right of the
User Name to Indicate Selection
41
DIAGNOSTICS
Truelab™ Uno
♦ Tap the Remove Button. You will be
prompted to confirm that you want to
delete the user.
♦ Tap the Yes Button on this prompt to
delete the user you selected.
Figure 58 : User Deletion
Conformation Prompt
Resetting the Password
♦ Login as the Power User. This will open
the Profiles Screen.
Figure 59 : The Profiles Screen
♦ Tap Settings in the Profile Screen.
This will open the Settings Screen.
42
DIAGNOSTICS
Truelab™ Uno
♦ Tap the User Settings Icon. This will
open the User Settings Screen.
Figure 60 : User Settings Screen
♦ Tap on the User Name whose password
you would like to change. Your selection
will be indicated by a green dot to the right
of the user name.
♦ Tap Reset. This will open the Password
Reset Form.
♦ Fill in the New password in the
appropriate text box.
♦ Retype the new password in the Confirm
Password Text Box.
♦ Tap the Reset Button to reset the
password to the new one you just typed.
Figure 61 : Password Reset Form
43
DIAGNOSTICS
Truelab™ Uno
Generating and Transmitting Log Files
The TruelabTM Uno Real Time micro PCR Analyzer automatically records data within the system
whenever it encounters an error. A log file, which is file containing information about the error, can
be generated by the user so that it can be sent to Molbio Support for troubleshooting. All support
requests from the user to Molbio Support should be accompanied by the log file generated after the
incident has been reported to occur. It is strongly suggested that the user generates a log file
immediately every time there is any undesirable behavior or event during the working with the
TruelabTM Uno micro PCR Analyzer.
Important:
If a test is in progress when the error occurs, create the log file before beginning the next
test.
Log files can be sent to Molbio support using one of the following methods:
♦ The Internet
The TruelabTM Uno Real Time micro PCR Analyzer is capable of connecting to Wi-Fi/GPRS
network.
Note: GPRS is an optional feature. The Wi-Fi feature is configured during installation.
♦ Via Bluetooth to the nearest computer/mobile phone
The log file should be sent to Molbio support with the TruelabTM Uno Real Time micro PCR
Analyzer ID (in use) and nature of incident. Log files can only be generated by the user of
the Analyzer in question (ID) who has the access to the menu that creates the log file for that
unit.
Creating a log file
4.8.5.1 Login as Power User. This will open
the Profiles Screen.
4.8.5.2 Tap the Settings button in the
Profiles Screen. This will open the
Settings Screen.
44
DIAGNOSTICS
Truelab™ Uno
4.8.5.3 Tap the About Icon in the Settings
Screen.
This will open the About Screen.
Figure 62 : The About Screen
4.8.5.4 Tap the Log icon in the About
Screen. The TruelabTM Uno will now
create a log file and prompt you with
a success message when it has
finished.
Note:
♦ If the log file creation fails, please
contact Molbio Support.
♦ Log files are named automatically
when they are created, in the
format: “log-date-time”. For
example, “log_15_09_2012-22_10”
was created on the 15 t h of
September 2012, at 10:10 PM.
♦ Sending Log files to the server using Wi-Fi/GPRS
If the TruelabTM Uno is connected to a Wi-Fi or GPRS network, you can send the Log file and Support
Request to Molbio Support directly.
Note: If the TruelabTM Uno is not configured to work with Wi-Fi/GPRS or if a Wi-Fi/GPRS network is
unavailable, see section 4.8.5.3 “Sending Log Files to the Server using Bluetooth”.
45
DIAGNOSTICS
Truelab™ Uno
To send log files using Wi-Fi/GPRS,
4.8.5.1 Login as Power User. This will open
the Profiles Screen.
4.8.5.2 Tap the Settings button in the
Profiles Screen.
This will open the Settings Screen.
4.8.5.3 Tap the About Icon in the Settings
Screen.
This will open the About Screen.
46
DIAGNOSTICS
Truelab™ Uno
4.8.5.4 Tap the Send/Share Button.
This will display a pop-up with the
options “Log File” and “Data File”.
4.8.5.5 Tap Log File.
A list of available log files will be
displayed.
Note: Select the correct log file to send. Log
files are named automatically when they are
created, in the format: “log-date-time”. For
example, “log_15_09_2012-22_52” was
created on the 15th of September 2012, at
10:52 PM.
4.8.5.6 Tap the log file you want to send from
the list to select it. (Your selection will
be indicated by a green dot next to the
log file name.) This will display a
pop-up with the options “Send” and
“Share”.
47
DIAGNOSTICS
Truelab™ Uno
4.8.5.7 Tap Send.
This will send the file to the Molbio
Server. A progress bar will be
displayed on the screen and
the message “File Sent” will be
displayed when the process is
complete.
Note: If the file was not sent, it will alert you
with a pop-up. If the problem doesn't resolve
itself on re-trying the procedure, or if the
TruelabTM Uno alerts you with a system error
message, please contact Molbio Support.
♦ Sending Log Files to the Server using Bluetooth
If the TruelabTM Uno is not connected to a Wi-Fi Network, you can use the Bluetooth functionality
to send the log file to the nearest computer or mobile phone with a working Wi-Fi connection.
Once the file is sent, you can use that device to send the log file and support request to Molbio
Support.
4.8.5.1 Login as Power User. This will open
the Profiles Screen.
4.8.5.2 Tap the Settings button in the
Profiles Screen.
This will open the Settings Screen.
48
DIAGNOSTICS
Truelab™ Uno
4.8.5.3 Tap the About Icon in the Settings
Screen.
This will open the About Screen.
4.8.5.4 Tap the Send/Share Button
This will display a pop-up with the
options “Log File” and “Data File”.
4.8.5.5 Tap Log File.
A list of available log files will be
displayed.
49
DIAGNOSTICS
Truelab™ Uno
4.8.5.6 Tap the log file you want to send from
the list to select it (Your selection will
be indicated by a green dot next to the
log file name). This will display a popup with the options “Send” and
“Share”.
4.8.5.7 Tap Share in the Pop-up Message.
This will display a list of options to
choose from.
4.8.5.8 Select Bluetooth in the Popupmessage.
This will display the Bluetooth
Devices List, which is a list of all
available Bluetooth devices that the
TruelabTM Uno can connect to.
Figure 65 : Bluetooth Devices List
50
DIAGNOSTICS
Truelab™ Uno
4.8.5.9 Tap on the name of the device you
want to send the file to. This will send
the file to the device and display the
message “File Sent” when complete.
Note:
♦ Check the Bluetooth device you sent the
file to verify that it was sent successfully.
♦ If the file was not sent, it will alert you with
a pop-up. If the problem doesn't resolve
itself on re-trying the procedure, or if the
TruelabTM Uno alerts you with a Bluetooth
Error message, please contact Molbio
Support.
♦ Changing Lab Details
The TruelabTM Uno allows a power user to edit the lab name and location that has been
recorded on the system.
To edit the Lab Name and Lab Location,
4.8.5.1 Login as Power User. This will open
the Profiles Screen.
51
DIAGNOSTICS
Truelab™ Uno
4.8.5.2 Tap the Settings button in the
Profiles Screen.
This will open the Settings Screen.
4.8.5.3 Tap App Settings in the Settings
Screen.
This will open the App Settings
Screen.
4.8.5.4 Tap on the text boxes next to Lab
Name and Lab Location. This will
display an on-screen keyboard which
can be used to type in the details.
Note: Do not change any other details in this
page as this will affect some features of the
TruelabTM Uno.
Figure 64 : The App Settings Screen
4.8.5.5 Select Save when you are finished.
A pop-up message confirming that the
new Lab name and location have
been saved will be displayed.
52
DIAGNOSTICS
Truelab™ Uno
Sending the Data File
You can send data files (test data) to an external agency or server using a Wi-Fi or GPRS
connection, if this feature was configured during installation.
To send the Data File,
4.8.5.1 Login as Power User.
This will open the Profiles Screen.
4.8.5.2 Tap the Settings button in the
Profiles Screen.
This will open the Settings Screen.
4.8.5.3 Tap the About Icon in the Settings
Screen.
This will open the About Screen.
53
DIAGNOSTICS
Truelab™ Uno
4.8.5.4 Tap the Send/Share Button.
This will display a pop-up with the
options “Log File” and “Data File”.
4.8.5.5 Tap Data File. The TruelabTM Uno will
display an upload status bar, and
display a pop-up confirmation
message when it is finished.
4.8.5.6 Tap OK in the pop-up message.
Updating Disease Profiles
4.8.5.1 Login as Power User.
This will open the Profiles Screen.
54
DIAGNOSTICS
Truelab™ Uno
4.8.5.2 Tap the Settings button in the
Profiles Screen.
This will open the Settings Screen.
4.8.5.3 Tap the About Icon in the Settings
Screen.
This will open the About Screen.
4.8.5.4 Tap Profiles in the About Screen.
This will begin the update process. A
confirmation message will be
displayed when the update process is
complete.
Note: The message “Latest Version Installed”
will be displayed if the profiles are already up
to date (shown in figure 66).
Figure 65 : The system message if there are no
profile updates available
55
DIAGNOSTICS
Truelab™ Uno
♦ Updating the TruelabTM Uno
4.8.5.1 Login as Power User.
This will open the Profiles Screen.
4.8.5.2 Tap the Settings button in the
Profiles Screen.
This will open the Settings Screen.
4.8.5.3 Tap the About Icon in the Settings
Screen.
This will open the About Screen.
56
DIAGNOSTICS
Truelab™ Uno
4.8.5.4 Tap Update
The TruelabTM Uno will connect to the
server and automatically check for
new versions of the software. If it finds
a new version, it will prompt you to
install it.
Note:
The following message will be displayed if the
system software is already up to date:
“Latest Version Installed. No Update
available”
4.8.5.5 You will be asked to confirm whether
you want to “Replace Application”,
Click OK to open the install prompt.
4.8.5.6 Select Install in the install prompt.
This will display an update progress
bar. When the update has completed,
a confirmation screen will be
displayed.
Figure 66 : Software Update Installation Prompt
57
DIAGNOSTICS
Truelab™ Uno
Figure 67 : Installation Progress Bar
4.8.5.7 Click Done at the “Application
Installed” confirmation screen.
This will take you back to the Home
Screen. You will have to log in again
to use the Analyzer.
Note:
If the application did not install properly, the
system will display the message “Application
not installed”. If this procedure fails again on
retrial, contact Molbio Support.
Figure 68 : Update Confirmation Screen
5. Maintaining the TruelabTM Uno
5.1 Running Controls
It is important to run controls periodically in order to make sure the TruelabTM Uno and TruenatTM
chips are functioning properly. It is also advisable to run control tests under the following
circumstances:
¨ Whenever a new shipment of test kits is received.
¨ When opening a new test kit lot.
¨ If the temperature of the storage area falls outside of 2-30° C.
58
DIAGNOSTICS
Truelab™ Uno
¨ By each new user prior to performing testing on clinical specimen.
TruenatTM Universal Control Kit (REF601100008) consisting of a calibrated positive control and a
negative control, is used for the purpose. (Please refer to the TruenatTM Universal Control kit Pack Insert
for details).
Running controls generally follows the same procedure as running patient samples (as detailed in
Section 4.0 of this Manual), with some differences in the selection of parameters and interpretation of
test results. These differences are highlighted in the procedures below.
5.1.1 Performing the Test
5.1.1.1 Switch on the Truelab™ Real
Time micro PCR Analyzer
touch screen.
5.1.1.2 Select the user, enter the
password and Log in.
5.1.1.3 Select the test profile for the
Truenat™ chip based test
being run. For instance,
select the “TB” test profile if
the control test is being
performed on the TB
Truenat™ chip.
5.1.1.4 Select “positive control” or
“negative control”, as the
case may be, from the menu
under sample type in the
Sample Details Form.
5.1.1.5 Press Start Reaction, after
which you will be prompted
with the “Please Load
Sample” message.
5.1.1.6 Press the eject button to open
the chip tray.
5.1.1.7 Open a pouch of Truenat™
chip based test and retrieve
the micro PCR chip.
5.1.1.8 Label the chip as per control
selected using a marker pen
at the space provided on the
lower surface of the chip.
5.1.1.9 Place the micro PCR chip on
the chip tray without touching
the reaction well. The
reaction well should be facing
Figure 69 : Sample Type Menu
Figure 70 : Negative Control Selected
59
DIAGNOSTICS
Truelab™ Uno
up and away from the
Analyzer. Gently press the
chip to ensure that it is seated
in the chip tray properly.
Important: Touching the reaction
well while loading the chip may
cause contamination and
invalidate the control test.
5.1.1.10 Using the filter barrier tip
provided in the pouch,
pipette six (6) µL of the
control solution into the
centre of the white reaction
well. Take care not to
scratch the internal well
surface and not to spill on
the outside of the well.
5.1.1.11 Slide the chip tray back into
the Truelab™ Uno Real
Time micro PCR Analyzer.
5.1.1.12 Press the power button on
the Analyzer to turn it on.
The green LED should
glow.
5.1.1.13 Press Done on the “Please
Load Sample” Alert
message.
5.1.1.14 Read and interpret the
results (See section 5.1.2
below for details).
5.1.1.15 Press the power button on
the Analyzer to switch it off.
The green Power LED
Indicator should stop
glowing.
5.1.1.16 Remove the micro PCR
chip at end of the test and
dispose it as per the
section on “Disposal and
Destruction” (Section 15 of
Universal Control Testing
Package Insert).
5.1.1.17 If you want a hard copy of
Figure 73 : Positive Control Selected
60
DIAGNOSTICS
Truelab™ Uno
the results, switch on
Truelab™ micro PCR
printer and select print on
the screen. Test results are
automatically stored and
can be retrieved later, if
required.
5.1.1.18 Switch off the Truelab™
Uno Real Time micro PCR
Analyzer touch screen.
Valid Results
Invalid Results
5.1.2 Interpretation of the Results
The Test Result Screen shows details of the test, along with the result and the validity of
the test performed. Both positive and negative control must show “Valid” result to
confirm proper working of the Truelab analyzer and the Truenat chip. Invalid tests have
to be repeated with fresh control and if still invalid for positive control, this indicates
either that the lot of Truenat™ test is not working or that there is a problem with the
Truelab™ analyzer. Check again with a new lot of Truenat™. If problem persists then
contact Molbio support. Repeated invalid for negative control indicates contamination
of the work area, the chip tray of Truelab™ analyzer, pipettes, or the negative control
itself. Check with a fresh vial of negative control. If not corrected, decontaminate work
area, the chip tray of Truelab™ analyzer and pipette using a wipe wetted with 0.5 %
sodium hypochlorite and subsequently with clean water wipe and check with negative
control. Repeat this procedure till problem is resolved. If problem persists then contact
Molbio support.
Caution: Sodium hypochlorite can cause PCR reactions to fail. Confirm with positive
control after every cleaning routine to ensure that the work area, surfaces and
equipment are free of sodium hypochlorite or its vapor before proceeding with another
test.
5.2 Maintenance
The TruelabTM Uno will prompt you in case of hardware malfunction or errors encountered when
performing a test. Refer to the “System Messages and Troubleshooting” section on how to
61
DIAGNOSTICS
Truelab™ Uno
resolve common errors or contact support.
5.3 Cleaning instructions
♦ Wipe the exterior of the TruelabTM micro PCR Analyzer with a dry, lint-free cloth ensuring
that no fibrous material adheres to the surface of the Analyzer.
♦ Do not spill water or any other solution on the surface of the Analyzer.
5.4 Disposal of Consumables
All laboratory hardware used for a PCR assay including TruenatTM micro PCR chips,
micropipette tips etc., are to be safely disposed of by using the following method:
1. Submerge all of the materials in a freshly prepared 1% solution of sodium hypochlorite for
30 minutes.
2. Dispose as biological waste as per the applicable laws in your region.
6. Troubleshooting
The following section details some errors you may encounter while using the TruelabTM Uno micro
PCR Analyzer, and provides you with the reason for the error and possible solutions to it.
If the error you encounter is not mentioned in this section, please contact Molbio support.
Description
Reason for Error and
Possible Solution
Screenshot of Error
Login attempt failure, with Reason:
system message “Login Invalid, The password you entered was
Incorrect Password”
incorrect.
Solution:
♦ Tap the OK Button
This will take you back to the
login screen
♦ Re-enter the correct
password (password is
case-sensitive)
Note:
If you have been using your
fingers to type, you may find it
easier to use the provided stylus
to type out the password on the
on-screen keyboard
62
DIAGNOSTICS
Truelab™ Uno
Description
Reason for Error and
Possible Solution
System message “Invalid
Patient Name” in Sample
Details Screen.
Reason:
The “Patient Name” field in the
Sample Details Form is blank.
This field is mandatory.
Screenshot of Error
Solution:
You need to fill in mandatory
information to continue with the
test
System Message “Read Error” Reason:
The Analyzer was unable to
read chip memory.
Solution:
1. Turn off the TruelabTM micro
PCR Analyzer main power.
2. Tap 'OK' on the Read Error
Prompt.
3. Check if chip was loaded
properly into the tray. If so,
remove the chip and select
the profile from Profile
screen and repeat the steps.
4. Load a different chip or the
same chip in case not
loaded before.
If the same message
reappears, please contact
Molbio's support team.
63
DIAGNOSTICS
Truelab™ Uno
Description
System Message “Initilization
incomplete”
Reason for Error and
Possible Solution
Screenshot of Error
Reason:
The system was unable to
establish an internal connection
Solution:
♦ Check that the TruelabTM
micro PCR Analyzer main
power is on. The green
indicator should glow if it is
powered on.
♦ Contact Molbio's support
team if the problem persists.
System Message “Used Chip”, Reason:
after completing TruenatTM chip You have loaded a used chip in
the Chip Tray.
loading procedure
Solution:
Please switch off the Analyzer
using the Power Button.
Pressing “OK” on the pop-up
takes you back to the Profiles
Screen. Choose the desired
profile and continue as if
beginning a new test.
System Message:
“Internet connection not
available”
Reason:
You are not connected to a WiFi/GPRS connection because
you are not in range of the
signal.
Note:
GPRS is an optional feature.
Solution:
♦ Move the device to within
range of the Wi-Fi signal.
64
DIAGNOSTICS
Truelab™ Uno
Description
Reason for Error and
Possible Solution
Screenshot of Error
System Message:
♦ If the problem persists,
“Internet connection timed out”
contact Molbio Support.
Reason:
The Analyzer could not connect
to the Molbio Support Server.
Solution:
Contact Molbio Support
System Message:
“Could not connect to printer”
Reason:
The Analyzer was unable to
successfully initiate Bluetooth
pairing with the printer.
Solution:
♦ Always switch on the printer
and wait at least ten
seconds before selecting
the print button on the
results screen.
♦ If this does not solve this
issue, please contact Molbio
Support.
7. Glossary
Absolute quantification:
An assay used to quantitate unknown samples by interpolating their quantity from a standard curve (as
in the determination of the viral copy number).
Amplicon:
The amplified sequence of DNA obtained by the PCR process. This is also called the “PCR product”.
Amplification Plot:
The plot of cycle number versus fluorescence signals which correlates with the initial amount of nucleic
acid during the exponential phase of the PCR.
65
DIAGNOSTICS
Truelab™ Uno
Baseline:
The initial cycles of the PCR during which there is little change in fluorescence signal (usually cycles 3 to
15).
Ct (threshold cycle):
Threshold cycle reflects the the cycle number at which the fluorescence signal generated within the
reaction crosses the threshold. It is inversely correlated to the logarithm of the initial copy number. The
Ct assigned to a particular sample thus reflects the point during the reaction at which a sufficient number
of amplicons have accumulated. It is also sometimes called the crossing over (Cp) point.
Dynamic Range:
The range of initial template concentrations over which accurate Ct values are obtained. If endogenous
control is used for ΔCt quantitation method, dynamic ranges for sample and control should be
comparable. In absolute quantitation interpolation within this range is accurate but extrapolation
beyond the dynamic range should be avoided. The larger the dynamic range the greater is the ability to
detect samples with both high and low copy number in the same run.
Internal Positive Control (IPC):
An exogenous control that is characterized by spiking DNA at a known concentration into each sample.
This serves to distinguish between true target negatives from PCR inhibition and also monitor the
presence of inhibitors in the template. Most commonly IPC is added to the PCR master mix to determine
whether inhibitors are present in the master mix. Alternatively it can be added at the point of sample
collection or prior to sample nucleic acid extraction to monitor sample stability and extraction efficiency
in addition to presence of any inhibitors in the master mix.
Template:
The nucleic acid sample used to amplify the target sequence is called the template.
Threshold:
Usually 10X the standard deviation of Rn for early PCR cycles (background activity). The threshold
should be set in the region associated with an exponential growth of the PCR product (which may be
easier in the log view of the amplification plot) and not as high as the linear or plateau sections of the
curve. It should be above the highest baseline signal level. It is assigned for each run to calculate the Ct
or Cp value for each amplification. It may be necessary to have separate different Ct thresholds for each
dye used in the reaction.
Y - Intercept:
Ina standard curve the value of y (Ct) where the curve crosses the y-axis at X=1 copy or 3.08 picogram
of DNA equivalent template. The y-intercept value corresponds to the Ct value for a single copy of the
target molecule. The value of around 40 indicates good sensitivity of the assay. Ct values greater than
40 are encountered if PCR efficiency is lower than 100%.
(Glossary adapted from “Glossary of real time PCR terms” by M.Tevfik Dorak, MD. PhD.)
66
DIAGNOSTICS
Truelab™ Uno
i
DIAGNOSTICS
Truelab™ Uno
To Address
Text Box
DIAGNOSTICS
Truelab™ Uno
DIAGNOSTICS
Truelab™ Uno
DIAGNOSTICS
Truelab™ Uno
Figure (ii) : The App Settings Screen,
with E-mail configuration options
DIAGNOSTICS
Truelab™ Uno
DIAGNOSTICS
Molbio Diagnostics Pvt. Ltd.
Tulip House, Dr. Antonio Do Rego Bagh, Alto Santacruz, Bambolim Complex P.O.,
Bambolim Complex P.O., Goa - 403 202, India. www.molbiodiagnostics.com
MB/TU/09-13/VER-2
Manufactured by: