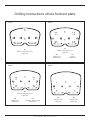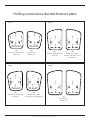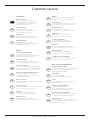
1
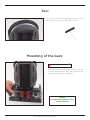
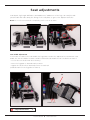
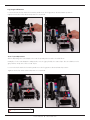
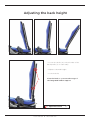
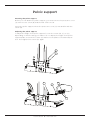
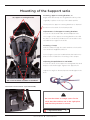
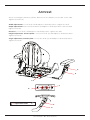
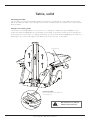
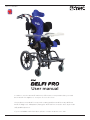
Edition 8 20151021
User manual
In order to use the Zitzi Delfi PRO in its full extent, it is important that you read
this manual. This applies to everyone close to the user.
The product is intended for users with seating problems and fits many different
kinds of diagnoses. Adaptation/fitting the Zitzi Delfi Pro must be done by a medically qualified person.
If you need additional information, please contact Anatomic SITT AB.
Table of content
3
Verktyg
23 Driving bow
3
Mounting of the back
23 Heating package
4
Seat adjustments
24 Foldable headrest bracket
6
Hip angle adjustments
24 Headrest
7
Back height adjustments
25 Play bow
8
Adjustable back
25 Sun cover
9
Pelvic support
26 Mounting on a frame
10
Hip belt
27 Adapter system Pro
11 Mounting of the Support serie
28
Headpod Bracket
12 Armrest
28
HeadActive Bracket
13 Upper arm support
28
Forehead strap Bracket
14 Table, solid
29 Footrest high edge, single stay
15 Table, foldable
30 From single stay to double stay/Technical data
16 Table, reinforced
31
Drilling instructions whole footrest plate
17 Footrest
32
Drilling instructions divided footrest plate
18 Footrest, divided
33 Technical data
19 Footrest, whole adjustable
34 Customer service
20
Footrest, divided adjustable
35 Reconditioning
21 Footrest, turn-up
36 Summary and follow-ups
21 Footrest, flexible adapter
37 Adaptation and customization
38 Terms of sale
22 Calf support
22
Ankle holder
22 Lumbar support
The product is only intended for use as a seating system together with chassis produced by Anatomic SITT AB.
If other uses are desired, please contact Anatomic SITT AB.
Tillverkare / Manufacturer
Anatomic SITT AB
Box 6137, SE-60006 Norrköping
SWEDEN - Phone +46 (0)11-16 18 00
ck
Che
!
here
Check the checkbox if the product is
CUSTOMIZED. The CE Mark is no longer
valid and should be removed.
User manual 2 Zitzi Delfi Pro
Tool
The hexa key (4 mm) is integrated in the top of the
back and can be used to make adjustments.
Mounting of the back
= Adjustment bolts
The backrest is mounted with 4 bolts. Lock the
back profile by tighten the bolts. The back will
automatically be in the right place.
Notice!
For high tonus patients, select
reinforced back!
User manual 3 Zitzi Delfi Pro
Seat adjustments
Seat depth, leg length differance and abduction/ adduction of the legs can easily be adjusted. Start with take away the lining of the seat plate to get to the adjustment bolts.
Note! Do not loosen the bolt completely, just loosen it up a bit.
Seat width adjustment
To increase or reduce the seat width, the leg parts needs to be adjusted. For maximum seat
width, the rim should be in track 3, and for minimal seat width the rim should be in track 1.
- Loosen the two bolts with the hexa key.
- Move the leg part to desired track position.
- Tighten the bolts when desired position is reached.
(Default track for the leg parts is track 1)
Pin
Track 1, 2, 3
= Adjustment bolts
User manual 4 Zitzi Delfi Pro
Leg length differance
Loosen the two bolts with the hexa key and move the leg part to desired track position.
Tighten the bolts when desired position is reached.
Seat slope adjustment
When adjusting the seat depth, the seat slope adjustment also should follow.
Example: If the seat deapth is adjusted to 23 cm (grey field), the seat slope also should be in the
grey field to keep an correct seat slope.
Loosen the bolt with the hexa key and move the leg part to desired track position.
Tighten the bolts when desired position is reached.
= Adjustment bolts
User manual 5 Zitzi Delfi Pro
Abduction och adduction
Loosen the bolt with the hexa key and move the leg part to desired track position. Tighten the
bolts when desired position is reached.
Neutral
Adduction
Abduction
= Adjustment bolts
Hip angle adjustments
To activate the lip, pull it straight out and then
up. To adjust the angle of the back, push the lip
downwards and place it in the desired position.
When desired position is reached, let go of the
lip and put it into ”child safe mode”
!
!
It is very important that the lip is in the
safety mode, resting downwards, when
the adjustments are done.
User manual 6 Zitzi Delfi Pro
Adjusting the back height
- Loosen the bolts (A) on both sides of the
back profile (2 on each side)
- Adjust to desired height
- Lock the bolts
A
Place the back so you can take usage of
the integrated lumber support!
= Adjustment bolts
User manual 7 Zitzi Delfi Pro
Adjustable back
Mounting of chest pads
Mount the chest pads with the enclosed carriage bolt, washer and knob (see picture). The
distance should be placed between the chest
pads and the back so the fabric isn’t squashed.
Knobs
Adjustments
Loosen the knob (2 on each side, 4 totally)
and move the backrest to the desired
position. Tighten the knobs when
desired position is reached.
User manual 8 Zitzi Delfi Pro
Pelvic support
Mounting the pelvic support
Before you can attach the pelvic support, you must remove the protective cover
(A). Remove the screw (B) and then lift off the hood.
Mount the pelvic support where the protective cover (A) was and fix with the
screw (B).
Adjusting the pelvic support
To adjust the angle of the pelvic support, loosen the screw (B), (C) or (D),
depending on which setting you want to do. To adjust the height of the pelvic
support plate, unscrew the screws (E) and move the plate to the desired position. Then tighten the screws (E) again.
B
A
B
C
D
E
User manual 9 Zitzi Delfi Pro
Hip belt
To move the position of the hip belt, loosen the fastening screws (A) slightly and
adjust to desired position. Then tighten the screws (A).
Mounting the hip belt
When mounting the hip belt in the hip belt tracks, use a tri-glide buckle.
For assembly according to the tri-glide method, see picture.
A
The tri-glide method
Ensure that the belt is not clamped between the abutment and fitting.
User manual 10 Zitzi Delfi Pro
Mounting of the Support serie
Mounting, upper mounting bracket - A
(A) Upper mounting bracket
Begin with take away the integrated hexa key that
originally is place in the top of the back profile.
Then push the upper mounting brackets to desired
position in the track of the back profile.
Adjustments of the upper mounting brackets
Loosen the bolts and make desired adjustments.
The height of the upper mounting brackets should
be place so that the pull direction is a bit above the
shoulder area. Tighten the bolts.
Mounting of strap
Pull the strap through the track and into the buckle.
Use attached Triglide buckles E.
Don’t forget to put the headrest bracket back in its
place if removed before mounting of the straps.
Adjusting the pull direction and width
Loosen the bolt of the upper mounting bracket and
adjust to desired height. Tighten the upper bolt.
Adjust the angle to desired position and tighten the
bolt.
E
(B) Lower brackets included as standard
Alternative lower brackets (optional 285140)
!
!
Be sure that there is enough space for the
neck, that the cushions are in the right place
and that the pressure is correct!
= Adjustment bolts
User manual 11 Zitzi Delfi Pro
Armrest
When mounting the armrest, pull the armrest into the bracket on the side of the chair.
Tighten the bolt (A).
Width adjustment: Loosen bolt A and adjust to desired position. Tighten the bolt.
Depth adjustment: Remove bolt B and C and adjust to desired position. Reinsert and
tighten the bolts.
Rotation: Loosen bolt C and adjust to desired position. Tighten the bolt.
Height adjustment, armrest plate: Loosen the knob (D) and adjust to desired position.
Tighten the knob.
Angle adjustment, armrest plate: Loosen the knob (E) and adjust to desired position.
Tighten the knob.
E
D
A
C
B
= Adjustment bolts
E
D
User manual 12 Zitzi Delfi Pro
Upper arm support
Mounting
Assemble the upper arm support with the help of the finger knob (A), washer (B), and
carriage bolt (D). Note that the carriage bolt in the supports must be replaced with
longer supplied carriage bolt.
Pierce the carriage bolt (D) by the trunk support and the back plate. Then meet up with
armrests fittings (C), washer (B), and finally the finger knob (A).
Height adjustment
To adjust the height of the upper arm support, loosen the finger knob (A) and then
adjust to desired height. Tighten the finger knob (A) When you have reached the desired
position.
Width adjustment
To adjust the width of the upper arm support, loosen the screws (E) and then adjust to
the desired width. Tighten the screws (E) When you have reached the desired position.
Cushion
When the upholstery needs cleaning, you simply pull it from the armrest plate by
stretching the elastic on the back of the padding. To reassemble the upholstery, pull the
padding over the armrest pad and make sure it is centered on the armrest.
A
AB
C
B
CD
DE
E
A
A
B
B
C
C
D
D
F
E
E
F
F
er
Finger knob (A)
4 pc
Bricka
Bricka(B)
Washer
4 pc
Carriage bolt (D)
4 pc
Distanser
Distanser
!
Spakvred
!
When mounting the upper arm support, the carriage bolt needs to be
replaced with the longer one supplied.
When adjusting the upper arm support, even the chest pads is loosened.
a
User manual 13 Zitzi Delfi Pro
F
Table, solid
Mounting the table
Put the table on the armrest plates and then rotate the locking lever of the table into position
below the armrest plate. The locking lever must be rotated until it is inside the rim of the raised
armrest plate.
Change of mounting holes
There are 3 mounting widths to choose from. To change the width use any installation hole
under the armrest padding in the rear edge of the table. In the basic model is the locking lever
mounted in the center hole. To change mounting, you must first lift the padding at the rear. The
markings in the outer rear edge of the table only shows the size of the table.
Locking lever
Fastening widths
Choose between three different
mounting holes
!
!
User manual 14 Zitzi Delfi Pro
Be careful not to lift the
table in the forefront.
Table, foldable
Mounting the foldable table
To assemble the table push the table mounting pipe (A) through the tube (B) is located under the
armrest. Slide the table to the desired position and let it rest on the armrest plates. Tighten the finger
knob (C) to lock the table.
Using the folding operation
To fold the table aside first loosen the finger knob (C) slightly. Lift the table slightly and pull it
forward. Lift the table further and fold it aside. When the table is in its lowest position, slide it
backwards again and tighten the finger knob (C).
1) Pull the table forward
2) Lift and pull to the side
3) Fold all the way down so that the table hangs and then slide the table back to its original position
C
B
A
Position 1
!
!
Position 2
Position 3
Do not forget to tighten the finger knob (C) after precipitation of the table.
Make sure to pull the table far enough ahead of the side when folding so that the user is not hurt.
User manual 15 Zitzi Delfi Pro
Table, reinforced
Mounting the reinforced table
To mount the reinforced table, push the table assembly tube (A)
through the pipe (B) located under the armrest. Then slide the table to the desired position and let it rest on the armrest plates.
Tighten the finger knob (C) to lock the table. Then turn the locking lever until it
ends up inside the edge of the armrest pad.
Width adjustment of reinforced table
Instead of adjusting the width of the armrests you can choose to adjust the
width of the table mounting brackets so it fits against the mounting tubes in the
armrests fittings. To adjust the width of the table, loosen the screws (D) slightly
and adjust to desired position. Then tighten the screws (D).
D
D
D
A
B
C
Locking lever
!
!
If the width adjustment of the table attachment fittings is insufficient may
some adjustment of the armrest width may be required.
User manual 16 Zitzi Delfi Pro
Footrest
Mounting the footrest - A
Fit the footrest in the square tube.
Secure the footrest with the locking screw.
Knob for knee joint
Adjusting the knee joint - B
Loosen the knob (B) and adjust to desired position.
Tighten when desired positions is reached.
Important - The ”teeth” have to fit with each other.
Lock the bolt properly!
Angle adjustment, foot joint - C
Loosen the knob (C) and adjust to desired position.
Tighten when desired position is reached.
Height adjustment, foot plate - D
Loosen the knob (D) and adjust to desired position.
Tighten when desired positions is reached.
(A) Attachment, foorest
(B) Angle adjustment knob,
knee-joint
= Adjustment bolts
(C) Bolts for footrest angle
(D) Bolts for footrest height
8
User manual 17 Zitzi Delfi Pro
Divided footrest
(A) Knob for
knee joint
Montering av fotstöd - A
Fit the footrest in the square tube.
Secure the footrest with the locking screw.
Adjusting the knee joint - B
Loosen the knob (A) and adjust to desired position.
Tighten when desired positions is reached.
Important - The ”teeth” have to fit with each other.
Lock the bolt properly!
Height adjustment, foot plate - C
Loosen the knob (C) and adjust to desired position.
Tighten when desired positions is reached.
= Adjustment bolts
(A) Attachment, foorest
(B) Angle adjustment knob,
knee-joint
(C) Screw
(D) Screw
8
User manual 18 Zitzi Delfi Pro
Footrest - whole, adjustable
Angle adjustments, knee joint - A
Loosen the bolt (A) and adjust to desired position. Tighten when desired positions is reached.
Height adjustment, foot plate - B
Loosen the knob (B) and adjust to desired position. Tighten when desired positions is reached.
Angle adjustments, foot joint - C
Loosen the bolts (C) and adjust to desired position. Tighten when desired positions is reached.
Adjusting the foot plate - D
The foot plates width and depth can be adjusted. Loosen the bolts (D) and adjust to desired
position. Tighten when desired positions is reached.
(A) Knob,
knee joint
Footrest
attachment
= Adjustment bolts
(D) Adjusting the foot plate
(C) Angle adjustments, foot joint
(B) Height adjustment, foot plate
User manual 19 Zitzi Delfi Pro
Footrest - Divided adjustable
Angle adjustments, knee joint - A
Loosen the bolt (A) and adjust to desired position. Tighten when desired positions is reached.
Height adjustment, foot plate - B
Loosen the knob (B) and adjust to desired position. Tighten when desired positions is reached.
Angle adjustments, foot joint - C
Loosen the bolts (C) and adjust to desired position. Tighten when desired positions is reached.
Adjusting the foot plate - D
The foot plates width and depth (!) can be adjusted. Loosen the bolts (D) and adjust to desired
position. Tighten when desired positions is reached.
(A) Knob
knee joint
Footrest
attachment
(B) Height adjustment, foot
plate
(C) Angle adjustments, foot joint
(D) Adjusting the foot plate
User manual 20 Zitzi Delfi Pro
Footrest - Turn-up
Mounting the footrest - A
Mount the footrest by push it into the footrest
attachment. Lock the screw securely after mounting.
Angle adjustments, knee joint - B
• Loosen the knob (B)
• Adjust to desired angle
• Tighten the knob (B)
Height adjustment, foot plate - C
• Loosen the knob (C)
• Adjust to desired height
• Tighten the knob (C)
Adjusting the angle at the ankle - D
• Loosen the screw, and then adjust to the desired angle.
• Lock the screw when the desired angle is reached.
= Adjustment bolts
Footrest - Flexible footrest adapter
Flexible footrest
Zitzi Delfi Pro can be equipped with a flexible footrest
adapter to prevent spasticity and create a dynamic sitting.
Height adjustment
Loosen the screws (A)
Angle adjustment, foot rest
Loosen the screw (B) and adjust to desired
angle. Tighten when desired angle is reached.
!
!
To get an optimal function for the flex, the footrest stay should point downwards.
User manual 21 Zitzi Delfi Pro
Calf support
Loosen the screws A to adjust to the desired height
and depth. Tighten the screws when the desired setting
is reached. Release screws B to adjust the width of calf
support. Tighten the screws when the desired setting is
reached.
B
= Adjustment bolts
A
Ankle holder
The footplate is prepared for mounting of the ankle
holder.
The footplate is prepared for mounting of the ankle
holder under the adjustable footrest.
!
!
Be sure that the cushion are in
the right place!
Lumbar support
A) Take away the back lining
B) Attach the lumbar support (within the marked area)
with the following velcro.
C) Put back the back lining
Lumbar support
User manual 22 Zitzi Delfi Pro
17
Driving bow
1)
Take away the wrench-key from the top of
the back profile
2)
Mount the pins (A) in the tracks of the back profile.
3)
Tighten screws when desired position is reached.
A
Heating package
A
B
C
A)
Seat plate
B)
Back plate
C)
Battery and hand control
•
The heating package is attached on the lining with velcro.
The heating package keeps the body temperature on an even level and prevent the patient to be cold.
When normal body temperature has been reached, the heating package will turn off it self.
If the temperature dips, the heating package will automatically activate it self again.
User manual 23 Zitzi Delfi Pro
A
Foldable headrest bracket
A - Mounting of the foldable headrest bracket
C
Begin with take away the integrated hexa key that
originally is placed in the top of the back profile.
Then push the headrest bracket to desired position in
the track of the back profile. Tighten the bolts!
B - Mount the headrest in the headrest bracket and ad-
B
just to desired position is reached. Tighten the knob.
C - Adjusting the headrest
Remove the pin to be able to fold away the head support. When locking the foldable headrest; make sure that
the pin locks.
Headrest
A - Mounting of the headrest bracket
Begin with take away the integrated hexa key that originally
is placed in the top of the back profile. Then push the headrest bracket to desired position in the track of the back
profile. Tighten the bolts!
B - Mount the headrest in the headrest bracket and adjust to
desired position is reached. Tighten the knob.
C
C - Adjusting the headrest
Loosen the adjustment bolts a bit so you can easily adjust
with just your hands. When desired position is reached, tighten the bolts (C).
If the headrest need to be higher, loosen the knob (B) and
then adjust the headrest into to desired position. Tighten the
knob (B).
= Adjustment bolts
(A) Headrest bracket, 4 bolts with pins
(B) Height adjustment knob
User manual 24 Zitzi Delfi Pro
Play bow
The play bow bracket should be mounted on the back profile. Exchange the existing end caps at the
top of the profile behind the backrest to the endcaps that follows the play bow. (These are drilled for
easy mounting). Push the play bow down into the profile behind the backrest (D). Lock the play bow’s
bracket in the back profile (C). Push the play bow down and lock it by using the finger knob (A).
If you are mounting a headrest, the holder for this
D
should be attached together with this bracket. Use
B
the longer screws (B) and a spring washer.
C
A
Sun cover
The sun cover needs to be mounted in the same
bracket as the play bow. These can not be
combined. To mount the bracket, watch page 10.
The headrest needs to be dismantled before
you mount the sun roof. How to dismantle the
headrest, watch page 10.
Mounting of the sun cover:
- Loosen the knob on both sides (A).
- Push the sun roof in the bracket (B).
B
- Tighten the knobs (A).
A
User manual 25 Zitzi Delfi Pro
Mounting on a frame
On a mounting plate:
Install the mounting plate with the supplied
screws, washers and lock nuts on the chassis
plate.
Mounting the Delfi Pro:
A seating system can easily be mounted on
a frame with a mounting plate. The mounting
plate is equipped with 2 bolts that makes the
seating system stay in place. The knob beneath
the mounting plate makes sure that the seating
system do not lose its position.
Push the seating system like shown in the
picture. Keep pushing it until you hear a click.
Then tighten the knob clock-wise underneath
the seat plate to make sure the seating system
stays in its place.
Hole pattern
Pull direction
Pull downwards
Knob
User manual 26 Zitzi Delfi Pro
Adapter system Pro
B
B
B
D
C
E
A
Attach Sharky Pro here
Attach Delfi Pro here
Spacers on this side
Start by mounting the base plate (A) on the frame by fastening it with the
supplied screws, washers and nuts (B).
Then mount the adapter plate (C) by sliding in the rail pins (D) into the outermost tracks in the bottom of the seating system. Tighten the screws (E) when
the desired position is reached.
When both plates are mounted, these can be combined. The seating system is
properly secured when you hear a click.
!
!
Note! Ensure that the seating system is secure on the frame before use.
22
User manual 27 Zitzi Delfi Pro
Headpod Bracket
A
A
B
HeadActive Bracket
A
B
A
Forehead strap Bracket
A
A
Loosen the screws (A) and remove the headrest from the headrest mount.
Attach the bracket with the screws (B) and tighten the screws. Then reinstall
the headrest on the headrest mount and tighten the screws (A).
User manual 28 Zitzi Delfi Pro
B
Footrest high edge, single stay
Mounting the high edge footrest with single stay at after ordering
Replace existing foot plate with the supplied. Since that high edge footrest is designed to
suit both single and double stay, the footrest needs alternative drilling depending on the
type of foot plate you have.
To mount the high edge footrest start by pushing the rim pin (A) on the footrest (B) into the
footrest stay (C). Then set the footrest (D) at the desired height and tighten the lever knob (E).
Set the desired height and width of the footrest using the screws (F) and (G). The plastic
stay (H) on the footrest shall be brought through the track (I) on the footrest stay. Finally,
install the supplied upholstery and check that all screws are tightened.
Mounting the high edge footrest with single stay when ordering with footrest
To mount the high edge footrest start by pushing the rim pin (A) on the footrest (B) into the
footrest stay (C). Then set the
footrest (D) at the desired height and tighten the lever knob (E).
G
Set the desired height and width of the footrest using the screws (F) and (G). The plastic
B
stay (H) on the footrest shall be brought through the track (I) on the footrest stay. Finally,
install the supplied upholstery and check that all screws are tightened.
G
B
A
H
A
F
I
H
D
F
I
D
E
C
!
!
The plastic stay (H) may after adjustment of desired height be cut or heated in under the
footrest plate according to personal preference.
Drillhole markings can also be found under the foot plate.
User manual 29 Zitzi Delfi Pro
From single stay to double stay
From single stay to double stay and vice versa
By default; Footrest high edge size 2, 3 and 4 has the double stay and size 1 has single stay.
To change between the different variants flip the angle plate (A) 180 degrees, and then
change the side on the rim pin (B).
A
A
B
B
Technical data
B
A
Whole/divided foot plate Size
Height (A) Depth (B)
990041 / 990046
1
140 mm
130 mm
990042 / 990047
2
170 mm
160 mm
990043 / 990048
3
205 mm
190 mm
990044 / 990049
4
235 mm
240 mm
User manual 30 Zitzi Delfi Pro
Drilling instructions whole footrest plate
Size 1
Size 2
A
A
B C
A
C B
A
B C
C B
(A)
(A)
Delfi Pro & Anatomic Sits
single stay
Delfi Pro & Anatomic Sits
single stay
Size 3
(B)
(C)
Seabass Pro
double stay
Clozitt
double stay
Size 4
A
CB
BC
A
A
A
A
CB
B
B
BC
A
B
(A)
B
Delfi Pro & Anatomic Sits
single stay
(B)
(C)
Seabass Pro
double stay
Anatomic Sits & Clozitt
double stay
(A)
(B)
Anatomic Sits
single stay
Anatomic Sits
double stay
User manual 31 Zitzi Delfi Pro
Drilling instructions divided footrest plate
Size 1
Size 2
B
B
A
A
A
A
A
A
A
A
B
B
(A)
(B)
Delfi Pro & Anatomic Sits
single stay
Anatomic Sits
double stay
A
A
Size 3
B
B
A
A
A
A
A
B
A
(A)
(B)
Seabass Pro, Clozitt,
Anatomic Sits & Sharky Pro
double stay
B
A
B
A
A
A
A
B
A
A
A
A
A
(A)
(B)
Delfi Pro & Anatomic Sits
single stay
Seabass Pro, Clozitt
& Anatomic Sits double stay
A
Delfi Pro & Anatomic Sits
single stay
Size 4
B
A
B
User manual 32 Zitzi Delfi Pro
(A)
Anatomic Sits
double stay
SEATING PART
TECHNICAL DATA DELFI PRO
Zitzi Delfi Pro
User length, approx.:
Seat width:
Seat depth:
Back height to axilla:
Stl. 0
60–80
24, 27, 30
14 - 20
17 - 27
Stl. 1
70 –100
24, 27, 30
17 - 27
17 - 27
Windswept
Stl. 2
90–130
28, 31, 34
24 - 34
24 - 34
Stl. 3
120–160
32, 35, 38
30 - 40
30 - 40
Abdukcion/Adduction
Stl. 4
140–170
32, 35, 38
37 - 45
37 - 45
Hip angle all sizes: -12o till +26o
Windswept:
Windswept possibility 9o
ARMREST
Size 1
Size 2
Size 3
A x B
230 x 75 mm
230 x 75 mm
230 x 75 mm
Size 1
Size 2
Size 3
C
140-205 mm
140-205 mm
190-280 mm
Abduction:
All sizes 0° to +18°
Adduction:
All sizes 0° to -9°
FOOTREST
A
C
B
Measured from the top of the
seating part
PELVIS SUPPORT
A x B
Size 1 - 150 x 70 mm
Size 2 - 200 x 100 mm
HEADREST
ADJUSTABLE BACK
B
Footrest size 0
Footrest size 1
Footrest size 2
Footrest size 3
A x B
310 x 250 mm
315 x 195 mm
345 x 225 mm
380 x 260 mm
Adjustable size 1
Adjustable size 2
Adjustable size 3
A x B
155 x 190 mm
160 x 220 mm
180 x 255 mm
Divided size 1
Divided size 2
Divided size 3
A x B
155 x 190 mm
160 x 220 mm
180 x 255 mm
Divided adjust. 1
Divided adjust. 2
Divided adjust. 3
A x B
155 x 190 mm
160 x 220 mm
180 x 255 mm
All measurements are including lining
A
D
C
A
Std.
Leg length differene
B
Back size 0
Back size 1
Back size 2
Back size 3
Back size 4
A
170 - 260 mm
170 - 260 mm
190 - 280 mm
220 - 310 mm
220 - 310 mm
Back size 0
Back size 1
Back size 2
Back size 3
Back size 4
B x C
340 x 195 mm
340 x 195 mm
385 x 230 mm
450 x 245 mm
450 x 245 mm
Back size 0
Back size 1
Back size 2
Back size 3
Back size 4
D
125 mm
125 mm
150 mm
175 mm
175 mm
A
Long
B
TABLE
Headrest size 1
Headrest size 1 long
Headrest size 2
Headrest size 2 long
16
A
B
220 x 150 mm
280 x 160 mm
240 x 190 mm
280 x 210 mm
Technical data - Delfi Pro
Measurements
Table size 1
Table size 2
Table size 3
User manual 33 Zitzi Delfi Pro
A
B
480 x 450 mm
540 x 515 mm
570 x 570 mm
C
D
240 x 250 mm
260 x 290 mm
280 x 340 mm
© Anatomic SITT AB
Customer service
Scandinavia
SE
Anatomic SITT AB
Box 6137, SE-600 06 Norrköping
Terminalgatan 1, SE-602 29 Norrköping
Tel. +46 11 161800, Fax +46 11 162005
Email [email protected]
DK
Anatomic SITT A/S
Viengevej 4, DK-8240 Risskov
Tel. +45 861 701 74, Fax +45 861 701 75
Email [email protected]
NO
Bardum AS
Håndverksveien 8, 1405 Langhus, Norge
Tel: +47 64 91 80 60, Fax: +47 64 91 80 66
FI
Handico Finland OY
Turkkirata 28, 33960 Pirkkala
Tel. +358 331 222 700, Fax +358 331 222 710
Email [email protected]
PRT
FR
OX Orthopédix
27 rue François Gillet, FR-42400 St. Chamond
Tel. +33 477 195 994, Fax +33 426 303 789
IT
Creha Distribuzione
Via C. Battisti, 7/A, 22036 Erba (CO)
Tel. +39 314 44 76 744, Fax +39 316 47 04 62
CH
Rehatec AG
Ringstrasse 15, CH-4123 Allschwill
Tel. +41 614 879 911, Fax +41 614 879 910
IS
Stod Hf Stoaekjadmidin
Tronuhraun 8, IS-220 Hafnarfjordur
Tel. +354 565 2885, Fax +354 565 1423
GR
Scan Ideal
28, Tzavela Str. GR-542 49 Thessaloniki
Tel. +302 310 320 150, Fax +302 310 350 151
SVN
Team Nova Reha
Gerecja vas 33, SVN-2288 Hajdina
Tel. +386 278 201 06, Fax +386 278 201 06
Europe
NL
Anatomic SITT Nederland BV
Postbus 6027, 4000 HA TIEL
Tel. +31 344 63 45 40, Fax +31 344 62 33 61
Email [email protected]
MLT
Be Independent Ltd
St Luke’s Road G’Mangia PTA MLT-1027
Tel. +356 214 662 66, Fax +356 214 656 70
GBR
Consolor Ltd Unit A3
The Forelle Centre, Black Moor Road, Ebblake
Industrial Estate, Verwood, Dorset, BH31 6BB
Tel. +44 120 282 76 50, Fax +44 133 273 02 33
GR
GR
CY
HandiTech Scandinavian Reha Aids Center
11 G Seferi Str. GR-542 50 Thessaloniki
Tel. +302 310 324 114, Fax +302 310 324 054
Email [email protected]
Able Tools (Greece)
149K Strovolou Avenue, Strovols, Nicosia, 2048 Cyprus
Tel: +357 22 250 115
Able Tools (Cyprus)
149K Strovolou Avenue, Strovols, Nicosia, 2048 Cyprus
Tel: +357 22 250 115. Fax: +357 22 250 116
EST
Invaru Ltd
Peterburi tee 14A, EST-114 11 Tallin
Tel. +372 621 25 82, Fax +372 638 08 78
IRL
MMS Medical Ltd
51 Eastgate Drive, Little Island, Cork
Tel. +353 021 461 8000, Fax +353 021 461 8099
Mobilitec
Rua dos Verdes 123, PRT-4470-658 Pedras
Tel. +351 229 436 130, Fax +351 229 436 139
ES
Via Libre Fundosa Accesibilidad
Don Ramon de la Cruz 38, ES-28001 MADRID
Tel. +34 911 213 031, Fax +34 911 213 025
Asia, Pacific and Middle East
UAE
NZ
Al Safwa Mobility LLC (ASM)
Al Falah Street Harley Davidson, 2001, Abu Dhabi
Tel. +971 264 242 62, Fax +971 264 242 63
Email [email protected]
Cubro Rehab
PO Box 9144 Tauranga
Tel: +64 757 78 816. Fax: +64 757 78 827
AUS
Motum
3/224 Cambridge Street, Wembley, WA 6014
Tel: (08) 9381 2087
AUS
Paediatric Mobility Equipment
Po Box 1118, Young, AUS-NSW259
Tel. +61 1300 131 884, Fax +61 1300 884 010
Email [email protected]
ISR
MYS
Special needs for Special children
48 Mordey Hagetaot St. Beer Sheva, ISR-84840
Tel. +972 8 62 875 85, Fax +972 862 819 61
The Gym & Care
1F-23 & 24, IOI Business Park, MYS-47100 Puchong
Tel. +603 8070 9166, Fax +603 8073 9166
Email [email protected]
User manual 34 Zitzi Delfi Pro
Reconditioning
Service
Regular maintenance is important for the Zitzi Delfi Pro to funcion safe and
properly. The need for service changes is dependending on use and wear. Check
all moving parts and fasteners regularly. Useoriginal parts from Anatomic SITT
AB when reconditioning the Zitzi Delfi Pro.
Work should always be done by professional and qualified staff.
If you need support, you are always welcome to contact Anatomic SITT AB.
The need of reconditioning varies and must be judged case by case.
Go through all checkpoints at least once per year or as needed.
Functional control should be performed each time the Guppy is used.
Cleaning
Painted surfaces, wheels, front castors and handles is cleaned with cleaning
solvent. Never use paint thinner, gasoline or other solvent.
Warranty
1 year against manufacturing defects. For more detailed information about the
warranty we provide, see page 38 of this manual.
Combinations
Zitzi Delfi Pro and its accessories are CE marked products that can be combined
with all the accessories described in this manual. Zitzi Delfi Pro fits with under
frames such as Zitzi Flipper Pro, Zitzi Seabass Pro and Snapper. For other combinations please contact Anatomic SITT AB.
Spare parts
For the CE marking of the Zitzi Delfi Pro to be valid, the frame may only be fitted
with spare parts delivered by Anatomic SITT AB.
User manual 35 Zitzi Delfi Pro
Notice!
Always check that the device is not customized when reconditioning,
before it is sent to new users.
Marking
Zitzi Delfi Pro and its accessories are CE marked products. A unique serial number is located on a label placed under the activation housing. This serial number
should be quoted in any correspondence regarding the product.
Recycling
A used part or product should be dismantled and discarded. The parts should
be separated by material type, metal, plastic and combustibles (textiles).
Gas piston is sorted as hazardous material.
Summary and follow-ups
Follow-up inspections
Continuously perform the follow-ups specified in each point.
You should check the following points every time the patient uses the seating
system.
• Continue to regularly perform the follow-ups.
• Regularly examine that all the screws are securely locked.
• Regularly examine the wear of straps and cushions.
• Do not place the child in the seat until you hear the click sound
when you mount the seat in an underframe.
• Do not tilt the seat too much forward when the child is placed in the seat.
User manual 36 Zitzi Delfi Pro
Adaptation and customization
Guidelines and recommendations
Every time the Zitzi Delfi Pro is altered in some way, an assessment has to be
made to determine if it is an adaptation or a customization.
An adaptation is any change made in comprehension of the CE mark. All other
changes are customizations. Adaptations must only be made by a person
deemed to be qualified for the task and should always be made in a professional
manner. The CE mark means that the product fulfils all of the essential European
safety requirements.
Risk assessment
Note that a risk assessment always should be done for an adaptation as well as
for a customization of a medical aid. The product must never become dangerous
to use after adaptation.
The product should be fitted with a note that it is adapted to a specific user,
so that it cannot be mistaken for a standard model product.
Note!
The CE-mark is no longer valid if the product is customized.
User manual 37 Zitzi Delfi Pro
Terms of sale
Warranty
Warranty against manufacturing errors is valid for one (1) year from delivery
date. Warranty is void if the product has been subjected to external factors or
rough handling. It’s required that the faulty product is returned for us to process
a warranty claim. Always attach the packing slip of the original delivery.
Warranty claims
Describe the error and the possible cause for this as thoroughly as possible.
Claim repairs or possible replacement under warranty. Always attach a copy of
the invoice and state that the product should be returned to you after repairs.
Provide a shipping address, a contact person and a phone number.
Make sure that you pack the product well to protect it from shocks during the
transportion. Note the shipping number in your documentation. This is so that
you can track the shipment should anything occur during transport.
Returning products
In the event of faulty orders or deliveries, the products should be returned
within 20 days from delivery. Always attach a copy of both the packing slip and
the invoice. Provide your reason for returning the products.
Make sure that you pack the product well to protect it from shocks during the
transportion. Note the shipping number in your documentation. This is so that
you can track the shipment should anything occur during transport.
For products returned more than 20 days from delivery
a refund is made of 80% of the invoice value
For products returned more than 60 days from delivery
a refund is made of 60% of the invoice value
For products returned more than 150 days from delivery
a refund is made of 40% of the invoice value
For products returned more than 360 days from delivery
no refund is made for the products
Customized products cannot be returned
User manual 38 Zitzi Delfi Pro
User manual 39 Zitzi Delfi Pro
SE
Anatomic SITT AB (manufacturer)
Box 6137, SE-600 06 Norrköping, Sweden
Tel +46 11 16 18 00
Fax +46 11 16 20 05
Support +46 11 16 18 05
Street address
Terminalgatan 1, SE-603 61 Norrköping, Sweden
DK
Anatomic SITT A/S
Viengevej 4, 8240 Risskov, Denmark
Tel +45 86 17 01 74
Fax +45 86 17 01 75
NO
Bardum AS
Håndverksveien 8, 1405 Langhus, Norge
Tel: +47 64 91 80 60
Fax: +47 64 91 80 66
NL
Anatomic SITT Nederland BV
Postbus 6027 / 4000 HA Tiel, Netherlands
Tel +31 344 63 45 40
Fax +31 344 62 33 61
anatomicsitt.com
[email protected]
facebook.com/anatomicsitt
youtube.com/anatomicsitt