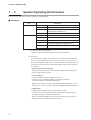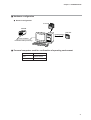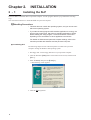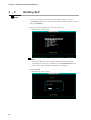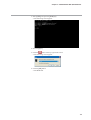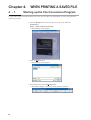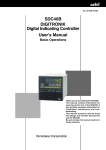
1
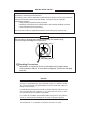
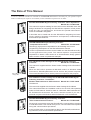
No. CP-SP-1182E
SLP-C4B
Smart Loader Package
for
SDC40B
DIGITRONIK
Digital Indicating Controller
"Installation"
for
Windows 2000 Professional/
XP Professional
User's Manual
Thank you for purchasing the SLPC4B Smart Loader Package for the
SDC40B DIGITRONIK Digital Indicating
Controller.
This manual contains information for
ensuring the correct use of the SLPC4B. It also provides necessary information.
This manual should be read by those
who design and maintain equipment
that use the SLP-C4B. Be sure to keep
this manual nearby for handy reference.
RESTRICTIONS ON USE
This product has been designed, developed and manufactured for general-purpose
application in machinery and equipment.
Accordingly, when used in applications outlined below, special care should be taken to
implement a fail-safe and/or redundant design concept as well as a periodic
maintenance program.
• Safety devices for plant worker protection
• Start/stop control devices for transportation and material handling machines
• Aeronautical/aerospace machines
• Control devices for nuclear reactors
Never use this product in applications where human safety may be put at risk.
IMPORTANT
Do not apply a strong force while connecting the loader plug.
Doing so might damage the instrument.
Handling Precautions
Application of excessive force to the loader plug might cause
communication failure. If such failure happens, reconnect the plug
correctly.
NOTICE
Be sure that the user receives this manual before the product is used.
Copying or duplicating this user’s manual in part or in whole is forbidden. The information and specifications in this manual are subject to
change without notice.
Considerable effort has been made to ensure that this manual is free
from inaccuracies and omissions. If you should find an error or omission, please contact Yamatake Corporation.
In no event is Yamatake Corporation liable to anyone for any indirect,
special or consequential damages as a result of using this product.
©2005 Yamatake Corporation ALL RIGHTS RESERVED
TM
The DIGITRONIK is a trademark of Yamatake Corporation in Japan.
The Role of This Manual
A total of 5 different manuals are available for the SDC40B. Read them as necessary for your specific requirements. If a manual you require is not available, contact Yamatake Corporation or its dealer.
SDC40B DIGITRONIK Digital Indicating Controller: "Basic Operations"
Manual No. CP-UM-1679E
This manual is required reading for those who use the SDC40B, those who
design hardware for integrating the SDC40B into operator control panels,
those who carry out maintenance, and those who operate instruments in
which the SDC40B is integrated.
It describes how to install and wire the SDC40B for integrating into instruments, method of operation, maintenance and inspection, troubleshooting,
and hardware specifications.
SDC40B DIGITRONIK Digital Indicating Controller:
"Computational Functions"
Manual No. CP-UM-1680E
We strongly urge persons responsible for device design and control
programming development on the SDC40B read this manual.
Control computational functions can be loaded onto the SDC40B according
to the application being used. This manual explains computational
expressions in detail. It also serves as an instrumentation design guide in
that it contains control computational examples.
SLP-C4B Smart Loader Package for the SDC40B Digital Indicating
Manual No. CP-UM-1681E
Controller
This manual is supplied with the Smart Loader Package SLP-C4BJ10/SLPC4BJ60.
SLP-C4BJ10 only
1 floppy disk
When the SLP-C4B is operated in MS-DOS mode in a Windows 95/98
environment, SDC40B parameters can be set from the personal computer.
The manual describes how to use the personal computer for this purpose.
SLP-C4B Smart Loader Package for the SDC40B DIGITRONIK Digital
Indicating Controller: "Installation"
Windows 2000 Professional / XP Professional Manual No. CP-SP-1182E
This Manual.
This manual is supplied with the Smart Loader Package SLP-C4BJ60.
The manual describes the installation method for the SLP-C4B operating
under PC DOS 2000 in Virtual PC 2004 in a Windows 2000 Professional or
XP Professional environment. Be sure to read this manual if you use a
personal computer with Windows 2000 Professional or XP Professional.
SDC40B DIGITRONIK Digital Indicating Controller:
"CPL Communication Functions"
Manual No. CP-UM-1683E
We strongly urge persons using the SDC40B CPL communications functions
to read this manual. This manual surreys CPL communications and explains
wiring and communications procedures.
It also provides a list of communications data for the SDC40B, troubleshooting measures, and communications specifications.
i
Organization of This User's Manual
This manual is organized as follows:
Chapter 1.
INTRODUCTION
Be sure to read this chapter before you start using the Smart Loader Package.
It describes the required operating environment for the personal computer and
briefly introduces the loader's features.
Chapter 2.
INSTALLATION
This chapter describes the installation method for this software and for PC
DOS 2000 in Virtual PC 2004.
Chapter 3.
STARTING UP AND QUITTING SLP
This chapter describes how to start up and quit the Smart Loader Package.
Chapter 4.
WHEN PRINTING A SAVED FILE
To print a file saved in Virtual PC 2004, save it once as a CSV file and as a
bitmap file. This chapter describes the procedure.
Conventions Used in This Manual
The following conventions are used in this manual:
Handling Precautions:
Handling Precautions indicate items that the user should pay attention to
when handling the SLP-C4B.
Note:
:
Notes indicate useful information that the user might benefit by knowing.
This indicates the item or page that the user is requested to refer to.
(1), (2), (3):
Numbers within parentheses indicate steps in a sequence or parts of an
explanation.
[OK] button:
[Next] button:
Indicates a selection button in screens displayed on the personal computer.
[Edit], [Settings]:
Indicates messages and menus displayed on the personal computer.
[Edit] → [Settings]: Indicates menu selection on a personal computer.
>>:
Indicates the result of an operation, details displayed on the personal computer or devices, or the state of a device after an operation.
[Enter]key:
Indicates keys on the keyboard.
ii
Contents
The Role of This Manual
Organization of This User's Manual
Conventions Used in This Manual
Chapter 1.
INTRODUCTION
1-1 Overview • • • • • • • • • • • • • • • • • • • • • • • • • • • • • • • • • • • • • • • • • • • • • • • • • • • • • • • • • • • • • • • • • • • • • 1
1-2 System Operating Environment • • • • • • • • • • • • • • • • • • • • • • • • • • • • • • • • • • • • • • • • • • • • • 2
■ Hardware • • • • • • • • • • • • • • • • • • • • • • • • • • • • • • • • • • • • • • • • • • • • • • • • • • • • • • • • • • • • • • • • • 2
■ Hardware configuration • • • • • • • • • • • • • • • • • • • • • • • • • • • • • • • • • • • • • • • • • • • • • • • • • • 3
■ Personal computer used for confirmation of operating environment • • • • 3
Chapter 2.
INSTALLATION
2-1 Installating SLP • • • • • • • • • • • • • • • • • • • • • • • • • • • • • • • • • • • • • • • • • • • • • • • • • • • • • • • • • • • • • • 4
2-2 Installing PC DOS 2000 in Virtual PC 2004 • • • • • • • • • • • • • • • • • • • • • • • • • • • • • • • • • • • 7
Chapter 3.
STARTING UP AND QUITTING SLP
3-1 Starting up SLP • • • • • • • • • • • • • • • • • • • • • • • • • • • • • • • • • • • • • • • • • • • • • • • • • • • • • • • • • • • • • 13
3-2 Quitting SLP • • • • • • • • • • • • • • • • • • • • • • • • • • • • • • • • • • • • • • • • • • • • • • • • • • • • • • • • • • • • • • • • 14
Chapter 4.
WHEN PRINTING A SAVED FILE
4-1 Starting up the File Conversion Program • • • • • • • • • • • • • • • • • • • • • • • • • • • • • • • • • • • 16
iii
Chapter 1.
1 - 1
INTRODUCTION
Overview
The SLP-C4BJ60 (simply called “the SLP” from here on) is an engineering tool for the SDC40B DIGITRONIK
Indicating Controller (simply called “the SDC” from here on).
The SLP runs on Windows 2000 Professional/XP Professional (simply called "Windows" from here on) on a
personal computer.
The SLP performs the following:
(1) Parameter editing function
(2) Communications with the SDC (reading/writing of parameters)
(3) File operations (reading/writing of parameters)
This loader cannot be used in Windows 2000 Professional or XP Professional unless Virtual PC 2004 and PC DOS
2000 are installed. For the installation method, see:
2-2 Installing PC DOS 2000 in Virtual PC 2004 (page 7).
1
Chapter 1. INTRODUCTION
1 - 2
System Operating Environment
The following system environment is required for using the SLP:
■ Hardware
Item
Description
Personal Computer Target model
Memory
PC/AT compatibles with a Pentium chip or higher
256MB or more
Operating system Windows 2000 Professional/XP Professional and
(Japanese) PC DOS 2000 (*1)
Virtual software
Peripheral Devices Display
(Japanese) Virtual PC 2004 (*1)
800 X 600 pixels or more, 16-bit color or more
Serial port (*2)
9-pin, serial port, 1ch or more
Hard disk drive
Hard disk with at least 40MB of free space
Floppy disk drive At least 1 drive capable of reading the floppy disk
in the product package (1.44MB format)
CD-ROM drive
1 drive or more
Pointing device
Windows-compatible mouse or equivalent device
*1: Virtual PC 2004, PC DOS 2000
Virtual PC 2004 and PC DOS 2000 are included with this SLP.
*2: Serial port
Use of a personal computer with a 9-pin serial port built-in is recommended.
If your personal computer does not have any serial port, you may use any of
the extension adaptors listed below to connect the SLP loader cable. However,
note that the operation may be unstable depending on the personal computer
environment.
• Special interface (port replicator)
Adaptor specially designed for each personal computer (special adaptor for
each personal computer model)
• CF card adaptor
CF232 manufactured by Elan Digital systems Ltd.
URL: http://www.elandigitalsystems.com/interface/cf232.php
Tested by Yamatake on an IBM Thinkpad A31.
REX-CF60 manufacture by RATOC SYSTEM ENGINEERING Co.,Ltd.
URL: http://www.ratocsystems.com/products/subpage/cf60.html (Japanese)
• USB adaptor
USB-RSAQ3 manufactured by I•O DATA DEVCE, INC.
URL: http://www.iodata.jp/prod/mobile/serial/2004/usb-rsaq3/(Japanese)
Tested by Yamatake on an IBM Thinkpad A31.
When connecting the USB cable, check the port number, which may vary
depending on the USB cable connection position.
2
Chapter 1. INTRODUCTION
■ Hardware configuration
● General configuration
SLP-C4B
SDC40B
Data disk
Reading/Saving
Communications
Dedicated Cable (Accessory)
■ Personal computers used for confirmation of operating environment
Manufacturer
Model No.
Dell
OptiPlex GX270
IBM
ThinkPad A31
3
Chapter 2.
2 - 1
INSTALLATION
Installing the SLP
Install the SLP on the hard disk of a personal computer. Use the program disk that you purchased as a backup
copy.
This section describes how to install the SLP on a personal computer.
Handling Precautions
• This disk does not contain the operating system, and you cannot use it
without an operating system.
• If you start the setup program while another application is running, the
program may malfunction. Stet memory-resident applications (TSRs)
before starting the setup program. The SLP sometimes cannot start
depending on the combination of other applications and drivers.
For details on Windows and personal computer settings, refer to the
manuals provided with Windows and the personal computer.
● Installating SLP
The following sample screens with descriptions are taken from a personal
computer running the Windows XP operating system:
1. Put floppy disk 1 in the floppy disk drive of your personal computer.
2. Click the Windows [Start] button at the bottom of the screen, and then click
[Run...].
3. Enter "A:\setup" and press the [Enter] key.
>>The following screen appears:
4. Click the [Next >] button.
4
Chapter 2. INSTALLATION
>>The following screen appears:
5. If you agree to the software license agreement and wish to install the SLP, click
the [Agree] button. To abort the installation, click the [Don’t agree] button.
>>If you clicking the [Agree] button, the following screen appears:
Note
• To change the installation destination directory, click the [Browse...]
button.
6. Click the [Next >] button.
>>The following screen appears:
Note
• To change the group folder, enter the new group name.
7. Click the [Next >] button.
5
Chapter 2. INSTALLATION
>>The following screen appears:
8. Click the [Next >] button.
>>The following screen appears:
9. Click [Finish >] button.
>>When the installation is completed successfully, the screen will return to the
Windows screen.
6
Chapter 2. INSTALLATION
2 - 2
Installing PC DOS 2000 in Virtual PC 2004
Virtual PC 2004 (hereafter referred to as Virtual PC) is necessary for starting PC DOS 2000 (hereafter referred to
as PC DOS). Be sure to install the Virtual PC and Virtual PC SP
7
Chapter 2. INSTALLATION
1 upgrade in advance. For installation and operation of Virtual PC, refer to the Virtual PC manual and online help.
(Download Virtual PC SP1 from the Microsoft Corporation website).
• Item to be prepared: CD-ROM of the PC DOS
Handling Precautions
• Be sure to install Virtual PC first. Failure to do so might make the PC
DOS registration inoperable.
1. Click the [Start] button at the lower portion of the screen and select
[Programs] → [Microsoft Virtual PC].
>>Virtual PC starts up, and the virtual machine wizard appears.
Note
• If the virtual machine wizard does not appear, click the [New...] button.
2. Click the [Next >] button.
>>The following screen appears:
3. Select [Create a virtual machine], and click the [Next >] button.
8
Chapter 2. INSTALLATION
>>The following screen appears:
4. Enter “DOS” for [Name and location] and click the [Next] button.
>>The following screen appears:
5. Click the [Next >] button.
>>The following screen appears:
9
Chapter 2. INSTALLATION
6. Select [Using the recommended RAM], and click the [Next >] button.
>>The following screen appears:
7. Click the [Next >] button.
>>The following screen appears:
8. Click the [Next >] button.
>>The following screen appears:
9. Click the [Finish] button.
10
Chapter 2. INSTALLATION
>>The following screen appears:
10. Put the CD-ROM for PC DOS in the CD disk drive of your personal
computer, and click the [Start] button.
11. After selecting [Floppy] → [Capture Floppy Disk Image], select
[D:\IMAGES\DISK1.DSK].
12. Select [Action] → [Reset].
13. Install in accordance with the directions on the screen.
>>The screen for changing disks appears.
14. Select [D:\IMAGES\DISK?. DSK].
15. After selecting [Floppy] → [Release Disk], put DISK2 in the floppy drive.
>>[C:\] appears.
16. Enter [a:\install] from the keyboard, and press the [Enter] key.
>>The SLP is started up.
17. Double-click
[DOS] icon.
11
Chapter 2. INSTALLATION
>>The following screen appears:
18. Select [Edit] → [Settings].
>>The following screen appears:
19. Select [COM1].
>>The following screen appears:
20. Select [Physical serial port:]. To use a built-in port, select [COM1].
If a USB serial cable is used, make a selection from [COM2] to [COM8].
12
Chapter 3.
3 - 1
STARTING AND QUITTING SLP
Starting SLP
The keyboard has been set to Japanese mode. Press [Ctrl]+[Alt]+[F1] key to change to English mode.
Handling Precautions
• Before starting the SLP, quit all other applications. If you start the SLP
while another application is running, the loader may not function. Also, set
the power save setting, infrared communications and screen saver to OFF.
Note
• To use a file saved in Virtual PC from the personal computer, copy it to
[C:\C4BDAT]. Likewise, to use a file from another personal computer, copy the
file to [C:\C4BDAT].
1. Click the [Start] button at the lower portion of the screen and select
[Programs] → [Microsoft Virtual PC].
>>The Virtual PC Console screen appears:
2. Double-click the
[DOS] icon.
>>The following screen appears:
3. Press the [2] key.
>>The SLP start-up screen appears.
For the operation that follows hereafter, refer to:
SLP-C4B Smart Loader Package for the SDC40B, manual CP-UM1681E.
13
Chapter 3. STARTING UP AND QUITTING SLP
3 - 2
Quitting SLP
Note
• To use a file saved in Virtual PC from the personal computer, copy it to
[C:\C4BDAT]. Likewise, to use a file from another personal computer, copy the
file to [C:\C4BDAT].
1. Display the C40B configuration screen from each screen.
>>The following screen appears:
Note
• Pressing the [F1] key from the design sheet screen makes the C40B
configuration screen appear. In addition, selecting [MAIN MENU] from
other screens makes the C40B configuration screen appear.
2. Select [8. EXIT].
>>The following screen appears:
14
Chapter 3. STARTING UP AND QUITTING SLP
3. Select [YES], and press the [Enter] key.
>>The following screen appears:
4. Press the [3] key.
5. Click the
button at the top right of the screen.
>>The following screen appears:
6. Click the [OK] button.
>>The SLP ends.
15
Chapter 4.
4 - 1
WHEN PRINTING A SAVED FILE
Starting up the File Conversion Program
To print a file saved in Virtual PC 2004, save it once as a CSV file or as a bitmap file. To save, start up the file
conversion program.
1. Click the [Start] button at the lower portion of the screen and select
[Programs] →
[SLP] → [SLP-C4B File Converter].
>>The following screen appears:
2. Click the [Open] button.
>>The following screen appears:
3. Select the file, and click the [Open] button.
>>The display changes to one where saving the file is enabled.
16
Chapter 4. WHEN PRINTING A SAVED FILE
4-1. When the file (data sheet) stored in Virtual PC is stored as a CSV
file:
4-1-1. Click the [Save Text...] button.
>>The following screen appears:
4-1-2. Click the [Save] button.
>>Saved as a CVS file.
Note
• CSV files can be opened with applications such as Microsoft Excel.
4-2. When the file (design sheet) saved in Virtual PC is saved as a bitmap file:
4-2-1. Click the [Save Bitmap...] button.
>>The following screen appears:
4-2-2. Click the [Save] button.
>>Saved as a bitmap file.
Note
• Bitmap files can be opened with applications such as Paint.
17
Revision History
Printed
date
Manual Number
Edition
Apr. 2005 CP-SP-1182E 1st Edition
Revised pages
Description
Specifications are subject to change without notice.
Advanced Automation Company
Totate International Building
2-12-19 Shibuya Shibuya-ku
Tokyo 150-8316 Japan
URL: http://www.yamatake.com
Printed on recycled paper.
(04)
Printed in Japan.
1st Edition: Issued in Apr. 2005 (W)