1
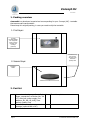
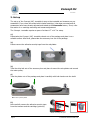
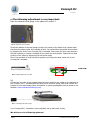
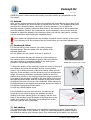
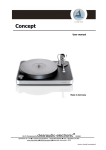
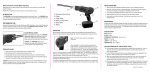
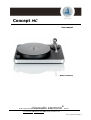
Concept MC User manual Made in Germany [ Hi-Fi Components ] clearaudio electronic® GmbH Spardorfer Str. 150 ● D-91054 Erlangen ● Tel. +49(0)1805/059595 ● FAX +49(0)09131/51683 www.clearaudio.de●[email protected]●copyright clearaudio 2011 Version1_Musical Surroundings_E Concept MC User manual Dear clearaudio customer, Thank you for purchasing the clearaudio Concept – turntable. The clearaudio Concept - turntable sets a new standard in turntable manufacturing. Precision German engineering combined with the latest technology and timeless design signal a New Era in analogue playback. The Concept is equipped with the innovative Verify- tonearm using a friction free magnetic bearing technology. Optionally, a high quality Clearaudio moving magnet or moving coil cartridge is available to complete this set up. All parameters have been adjusted at the clearaudio factory, including the tracking and antiskating force. This genuine, timeless, and modern design guarantees flawless musical enjoyment for decades. Please read this instruction manual carefully to avoid any damage or loss of warranty. This manual will help you properly set up the turntable so it can be enjoyed for a long time to come. We wish you a lot of listening pleasure with your new clearaudio Concept - turntable. clearaudio electronic GmbH This section must be read before any connection is made to the mains supply. CE-MARKING The clearaudio Concept MC meets the regulations concerning electromagnetic disturbance (EMC) and low-voltage appliances. EQUIPMENT MAINS WORKING SETTING Your clearaudio product has been prepared to comply with the household power and safety requirements that exist in your area. This product can be connected to INPUT: 100 V – 240 V ~/ 50 – 60 Hz / 150 mA; OUTPUT: 12 V= / 450 mA COPYRIGHT Recording und reproduction of any sound-material may require the consent of the creator. Please acknowledge the information given in the Copyright Act 1956, Dramatic and Musical Performers Act 1958, Performers Protection Acts 1963 and 1072, any more recent legal regulations. Page 1 clearaudio electronic GmbH 2011 Concept MC User manual Contents Page 1. Packing overview 3 2. Parts list 3 3. Set up 4 4. Cartridge mounting 6 5. Service 8 6. Technical data 9 Warranty information 10 Page 2 clearaudio electronic GmbH 2011 Concept MC User manual 1. Packing overview clearaudio has developed a special and secure packing for your Concept (MC) - turntable that ensures safe transportation. Please keep this original packing, in case you need to ship the turntable. 1. First layer: Concept turntable chassis incl. integrated motor unit and tonearm with cartridge (optional) Accessories-box, user manual, warranty card, clearaudio Quality Card 2. Second layer Turntable Platter 2. Part list 1. 2. Page 3 Accessories: Level gauge, Smart Stylus 3. Gauge, screwdriver, wrenches (No. 2& 2.5), drive belt, power supply (incl. adaptors: EU, UK; US, AUS), User manual, Quality Card Turntable chassis with tonearm and cartridge (optional MM or MC) Turntable - platter clearaudio electronic GmbH 2011 Concept MC User manual 3. Set up The set up of the Concept (MC)- turntable is easy as the turntable and tonearm are preassembled. If you chose the model with included cartridge, it has been mounted and all parameters have been already adjusted and tested at the clearaudio factory. If not, refer the section 4 on cartridge mounting and tonearm adjustment. The Concept - turntable requires a space of at least 17” x 14” for setup. 1.) Please take the Concept (MC)- turntable chassis out of the package and place it on a suitable surface. After that, please take the accessory box out of the package. 2.) Please remove the adhesive security tape from the sub-platter. Pic. 2: Removing the security tape 3.) Take the drive belt out of the accessory box and place it around the sub-platter and around the motor pulley. 4.) Take the platter out of the package and place it carefully with both hands onto the shaft. Pic. 3: Set up of the platter 5.) Now carefully remove the adhesive security tape from the tonearm and the cartridge (optional). Pic. 4: Removing the tapes Page 4 clearaudio electronic GmbH 2011 Concept MC User manual 6.)The following adjustment is very important: Place the clearaudio level gauge on the platter as in picture 5. Pic. 5: Alignment of the turntable Should the bubble of the level-gauge not be in the center of the black circle, please check that that the surface under the turntable is level. You can achieve the perfect level position by adjusting the feet of your Concept (MC)– turntable. First loosen the lock screw and turn the feet clockwise or counter clockwise till you reach the level position. Please fix the ideal position of the spikes by tightening the lock screw again. Only if the turntable is in the ideal level position you will get the best sound out of your Concept MC- turntable. Lock srew Pic. 6: Height adjustment of the feet 7.) Connect the one side of the supplied external Power supply to the socket on the backside of the Concept (MC) – turntable and the other side to a live AC outlet. After that connect the tonearm to your phonostage.(More information on phono-preamplifiers can be found on our Website: www.musicalsurroundings.com). Pic. 7: Connecting the Power supply Your Concept (MC) - turntable is now completely set up and ready to play. We wish you a lot of listening pleasure! Page 5 clearaudio electronic GmbH 2011 Concept MC User manual 4. Cartridge mounting Please pay attention during every step to avoid damaging the cartridge! Please refer to the cartridge manufacturer’s manual during installation and follow the appropriate instructions. 1.) Physically mount the cartridge using mounting hardware supplied with your cartridge. Locate and rotate it as pictured. Fine adjustments will follow later. Pic. 8: Cartridge mounting 2.) Connect the headshell wires carefully using tweezers or fine needle-nose pliers. The headshell wires (cartridge connection leads) are colour coded according to the international standard: Colour code of the Concept tonearm wire: Signal left channel (L+) Signal ground left channel (L -) Signal right channel (R+) Signal ground right channel (R -) → → → → white blue red green 3.) VTF Now adjust the tracking force of the cartridge. Please follow the instructions provided: This position of the diamond correlates to a tracking force of 20 mN (2,0g) F tracking force to high! tracking force to low! 4.) VTA For the next step, place an LP (180 gram preferred) on the platter. Remove the stylus protector from your cartridge. Next, using the cuing lever, lower the cartridge onto the middle of the turntable platter. When looking from the side, check to see that the upper edge of the tonearm tube is parallel to the surface of the record. If necessary you can adjust the height of the tonearm. To do this, hold the tonearm and use the key to loosen the arm locking screw on the side of the black circular tonearm mounting plate. Adjust the height of the tonearm accordingly and rePage 6 clearaudio electronic GmbH 2011 Concept MC User manual tighten the screw. Please recheck the tracking force after making any adjustments to the arm height. 5.) Azimuth Next, use the cueing mechanism to lower the cartridge and check that the upper edge of the cartridge is parallel to the record surface as viewed from the front. This adjustment has been pre-set at the Clearaudio factory. Although it is rarely necessary, you can adjust the cartridge azimuth. Carefully loosen the small screw on the bottom side of the tonearm tube near the headshell (Caution: don’t unscrew the screw completely!). Now you can twist the headshell to adjust the azimuth of the cartridge. When you find the right position, carefully lock the small screw while holding the headshell steady. Don’t adjust the headshell when the cartridge is lowered onto the surface of the record. It is necessary to lift the cartridge from the record before you can make adjustments. 6.) Overhang & Offset For the final set-up of the tonearm, you need a cartridge alignment gauge. Place the gauge over the spindle of the turntable platter and turn the platter into the position as shown in picture 10. Lower the cartridge and place the stylus tip of the cartridge on the reference point on the alignment gauge. Make sure that the cartridge cantilever is absolutely parallel to the marking lines printed on the cartridge alignment gauge. Picture 10: Alignment of the cartridge To adjust the position of the cartridge, loosen the screw on the top of the headshell and move the cartridge into the correct position (picture 11) by sliding forward or back and rotating. Make sure the stylus tip of the cartridge is on the reference point on the alignment gauge, the cartridge cantilever is absolutely parallel to the short marking lines printed on the cartridge alignment gauge and that the front edge of the cartridge is parallel to the long marker lines on the cartridge alignment gauge. Hold the cartridge in the proper position and tighten the screw on the top of the headshell. While making the final adjustments to the tonearm and cartridge, always look down at the alignment gauge from directly above to avoid any optical parallax errors. Picture 11: Fine alignment If the installation has been done correctly, the diamond tip should be on the reference point, the cantilever should be parallel to the short marking lines on the gauge, and the front edge of the cartridge should be parallel to the long lines on the gauge (as in picture 12). Re-check your tracking force as this may have changed during alignment. 7.) Anti-skating Picture 12: Correct installation The Concept tonearm comes factory pre-adjusted for medium anti-skate. Underneath the turntable, at the base of the tonearm, is a knob for further adjustment if needed. Observe the calibration marking as a reference point. From underneath the turntable, turn the knob Page 7 clearaudio electronic GmbH 2011 Concept MC User manual clockwise to increase, counter-clockwise to decrease anti-skate. Do not turn more than 1 complete rotation from reference point to avoid damage to tonearm bearing (not covered by warranty). The general set-up is now finished. Page 8 clearaudio electronic GmbH 2011 Concept MC User manual 5. Service If any service or repair on a clearaudio product is necessary, service for should be done by authorized personal only. Please contact your dealer first then the US distributor: Musical Surroundings at 510 547-5006 or [email protected] In case any repair is needed, the clearaudio Concept -turntable may need to be sent to your authorized dealer or directly to Musical Surroundings. Please contact your dealer to begin the process of obtaining assistance and, if needed, a Return Authorization (RA) number. Transportation advice: If any transportation of the Concept MC- turntable should be necessary, please always remove the turntable platter and fix the sub-platter as well as the tonearm and the cartridge stylus protection. Otherwise serious damage can occur! PLEASE RETAIN ALL ORIGINAL PACKAGING. You will need it if your turntable needs to be transported and/or shipped. The 2 year warranty can only be honoured if the turntable is returned in the original Clearaudio packaging. If you repackage the turntable, please pack the parts in the reverse order that they were taken out of the box. Any further questions you may have about this turntable should be directed to Musical Surroundings Inc. 5662 Shattuck Ave Oakland, CA 94609 tel 510 547-5006, fax 510 547-5009 www.musicalsurroundings.com [email protected] or directly to clearaudio at: clearaudio electronic GmbH Spardorfer Str 150 91054 Erlangen Germany Tel/Phone: +49-(0)1805/059595 www.clearaudio.de [email protected] Page 9 clearaudio electronic GmbH 2011 Concept MC User manual 6. Technical data Concept - Turntable: Construction: Speed ranges: Drive unit (motor): Bearing: Platter: Speed variation: Weight: Dimensions: Warranty: Resonance-optimised chassis 33 1/3 45 and 78 RPM Decoupled DC motor with low noise bearings Polished and tempered steel shaft in a sintered bronze bush, runs on a mirror of Teflon POM, 30 mm thickness +- 0.04 % approx. 7.5 kg incl. motor, tonearm and cartridge mm approx. 420 mm x 350 mm x 140 mm inch approx: 16,.54 x 13.78 x 5.51 2 years Tonearm: Construction: Tonearm weight: Cartridge balance range: Null points: Audio lead: Friction free tonearm with magnetic bearing technology 280 gram 415 gram (incl. counter weight) 2.5 gram – 17 gram Inner: 66,00 mm Outer: 120.9 mm Clearaudio directwire 1.2 m from tonearm: Cable-capacity: 156pF/m Cable – induction: 0,52µH/m Cable – resistance: 0,46Ω/m Overhang: 17.31 mm Overall length: Effective length: Distance from pivot: Offset angle: Maximum offset angle according to the radius: Anti-skating factor at a radius of 62.9 mm and 126.9 mm: Mounting style: Warranty: 302 mm 9 inches (exact 239.31 mm) 222 mm 23,00° 0.123 °/cm 0.43 Linn / clearaudio 2 years MC Cartridge / Pick-up: Output Voltage (1kHz, 5cm/s): 0.4 mV at 5 cm/s Channel Separation (1kHz): Channel Balance (1kHz): Tracking Ability: > 30 dB < 0.5 dB 80 µm Tracking Force: Load Resistance: Load Capacitance: Cantilever: Weight: Warranty: 2.0 gram (+/- 0.2 gram) 100 Ohm 100 pF Boron 8.0 gram 2 Years clearaudio electronic is not responsible for typographical errors in descriptions. Technical specifications subject to change or improvement without prior notice. Availability as long as stock lasts. Copies and imprints- also only in extracts – require written conformation through clearaudio electronic GmbH; Germany May 2011 Page 10 clearaudio electronic GmbH 2011 Concept MC User manual Warranty To achieve the full clearaudio 2 year warranty, it is necessary that you fill out and send the warranty registration certificate /card and a copy of your sales receipt back to Musical Surroundings, within 30 days after purchase. Musical Surroundings Inc. 5662 Shattuck Ave Oakland, CA 94609 tel 510 547-5006, fax 510 547-5009 www.musicalsurroundings.com [email protected] Otherwise clearaudio provides the legal warranty of 1 year. In the case of return for service, only if the product is returned in it’s original packing can clearaudio provide the warranty. WARRANTY TERMS AND CONDITIONS 1. Musical Surroundings warrants the product designated herein to be free of manufacturing defects in material and workmanship, subject to the conditions herein set forth, for a period of 1 year from the date of purchase by the original purchaser. If the purchaser registers the unit with Musical Surroundings by mailing in the warranty card, together with a copy of the bill of sale, within 30 days of the date of purchase, said purchaser will be registered for an extended service contract. The extended service contract extends to a period of 2 years from the date of purchase by the original purchaser or no later than 3 years from the date of shipment to the authorized Musical Surroundings dealer, whichever comes first. 2. CONDITIONS - This warranty is subject to the following conditions and limitations. The warranty is void and inapplicable if the product has been used or handled other than in accordance with the instructions in the owner's manual, abused or misused, damaged by accident or neglect or in being transported, or the defect is due to the product being repaired or tampered with or modified by anyone other than Musical Surroundings or their authorized repair stations. To obtain warranty service, you must first contact Musical Surroundings at 510 547-5006 or [email protected] to obtain a Return Authorization (RA) number. The product must be packed in its original carton and returned to Musical Surroundings or authorized repair station by the customer at his or her sole expense. A returned product must be accompanied by a written description of the defect and a photocopy of the original purchase receipt. This receipt must clearly list model and serial number, the date of purchase, the name and address of the purchaser and authorized dealer and the purchase price. Musical Surroundings reserves the right to modify the design of any product without obligation to purchasers of previously manufactured products and to change the prices or specifications of any product without notice or obligation to any person. 3. REMEDY - In the event the above product fails to meet the warranty, and the above conditions have been met, the purchaser's sole remedy under the limited warranty shall be to return the product to Musical Surroundings where the defect will be rectified without charge for parts or labor. 4. LIMITED TO ORIGINAL PURCHASER - This warranty is for the sole benefit of the original purchaser of the covered product and is NOT TRANSFERRABLE. Page 11 clearaudio electronic GmbH 2011