1
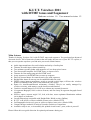
K.I.T.T. Voicebox 2011
with DTMF tones and Sequencer
Hardware revision: 1.0
User manual revision: 1.2
Main features
Thanks for buying Voicebox 2011 with D.TM.F. tones and sequencer. You purchased an advanced
electronic device, full of innovative features that will make the best out of your K.I.T.T. replica, or
that you can operate anywhere you find suits your needs. Main features:
●
●
●
●
●
●
●
●
●
●
●
●
●
●
●
●
●
●
Audio input transformer for total isolation and safety of audio plant
Trimmer for audio input volume/sensitivity
True miniature speaker 8ohm with magnetic coil, no cheap piezo buzzer
True linear audio amplifier for DTMF tones, no square waves
Trimmer for fine-tuning amp gain for DTMF tones
4 step sequencer with DTMF tones on start up sequence
Drives 4 external lamps for count-down in sync with sequencer
Knight Rider theme at start up (can be enabled/disabled at wish)
DTMF request input: a momentary switch to ground on this input, will have the voicebox
produce a random DTMF tone for any button on your replica
Inputs for Auto/Normal/Pursuit momentary switches. They're are totally managed by
voicebox circuitry, with memory on the latest inserted function.
Can drive external lamps for P.A.N.P. keys without any external electronic.
16-segments Bargraph, 100% tv-show accurate, and not cheap 20-segments bargraph found
elsewhere
Hi-Flux, square, extreme angle 120°, leds, with lens, assure optimum illumination without
circle shapes on indicators
Overall dimensions compatible with Knight Rider World overlay (BoBox)
K.I.T.T. or K.A.R.R. versions available at same price (default: KITT)
Led Bargraph led color red, green or yellow at option, same price (default: RED)
Compact design: sandwich of only two boards, not three as competitors
Available ready to use, or in assembly kit: printed circuit board + parts, solder it yourself.
Please follow this user guide direction for optimal performance during use.
Wire connected directly on pads or through screw terminals
General info about connections. It is possible to connect directly copper wires by soldering
(ironing) them to the pads on board. Or you may solder screw terminals on pads, and then use the
screw terminals to secure copper wires. Direct wires occupy less volume. But screw terminals are
somehow more practical. Please specify what you prefer while ordering, if you cannot later modify
it back & forth yourself using a soldering iron.
Basic use
You only need 4 wires for basic use. Power supply rated 12VDC or 13,8VDC between +12V and
GND pads. Please mind the correct polarity! We suggest using red wire for +12V and black wire for
GND. This color scheme is standard among the industry. Then you also need a audio source at
speaker level, to be connected between AUDIO pads. We suggest gray wire for this connection.
Typically you just connect in parallel to the left speaker of your car audio system. Trimmer AUDIO
will fine-tune the input sensitivity of audio input. The other trimmer: DTMF sets volume/gain of
generated DTMF tones. For basic use, that's all you need to know! Have fun!
Basic functions
At start-up, voicebox plays knight rider theme from the tv-show. After the theme, it emits a 4 step
start-up sequence, with DTMF tones, and lights up the 8 side lamps. After that, NORMAL CRUISE
indicator gets lit as well. Where there is an audio signal on AUDIO pads, the triple bargraph vumeter will start flashing at the audio level, with mirror visualization, KIRR or KARR style
depending on your model.
Advanced functions
Advanced funcions are for advanced / experienced users. A wrong connection may damage
Voicebox or external circuitry. In case of doubts, please contact us BEFORE trying something or
linking two wires together.
Cut off initial theme from tv-show
If you don't like the inital theme from tv-show, it can be excluded by putting a wire / jumper
between the COM and GND pads. Sometime you get the voicebox with this mod already done. In
this case, no initial tune plays, but you can recover it by cutting the jumper wire between COM and
GND off. You may also wire up an external switch between COM and GND, so that this function
can be activated/deactivated at wish, via the external switch. When initial theme is off (jumper wire
present / switch from COM to GND closed), at start-up the voicebox will go directly into the 4 step
sequencing.
Shift between auto-normal-pursuit
Please attach three normally open momentary switches to GND, at A N P pads on the 4 pads group
labelled DTMF A N P. When you (momentary) close A to GND, you shift to “AUTO”; when you
(momentary) close N to GND, you shift to “NORMAL”; when you (momentary) close P to GND,
you shift to “PURSUIT”. At mode change, a DTMF tone emits and the right lamp gets lit on – and
it mantain this status: this voicebox stores in internal memory the latest state. Please take a moment
to differentiate between the A N P pads for the momentary switches, and the A N P pads for the
“External Lamp Drive”, on opposite side. BEWARE! A wrong connection of external lamp where
external switches are supposed, or vice-versa, can damage voicebox!
DTMF tone request
Voicebox can emit random DTMF tones at the request by an external momentary switch or other
electronic devices via a relay or optocoupler. Just connect a momentary switch that closes towards
GND to the DTMF pad in the DTMF A N P group. When the switch (momentary) closes, the
voicebox emits a random DTMF tone. To connect other circuitry, just use a normally open contact
of a relay, or the transistor side of an optocoupler. Please don't connect external electronics direcly!
BEWARE! Wrong connections on DTMF inputs can damage voicebox.
External Lamp Drive
This voicebox can drive 4 external lamps for the count-down sequence. These will be in sync with
initial start-up sequence. A typical use of this feature is to light up the count-down display. This
Voicebox will also drive three more external lamps, for the AUTO, NORMAL, PURSUIT
conditions. A typical use of this feature is to light up the lamps inside the P.A.N.P. keys. This way,
you don't need any external circuitry to operate the P.A.N.P. keys. Ideegeniali voicebox does it all!
Please note that Power lamp of the P.A.N.P. keys is wired independentely of the voicebox, and gets
lit by its switch alone. Note also that instead, the lamps inside Auto Normal Pursuit keys are
controlled by voicebox circuitry and are not to be wired to their own switch.
The 7 pads for External Lamp Drive (4 for count-down, and 3 for auto-normal-pursuit) work all the
same way: they can sink a maxium of 250mA of current from a pole of the lamp, the other pole of
the lamp must be wired to +12V. Please note that other circuits output +12V instead. This one does
not. This circuit sinks the negative side of the lamp load. BEWARE. A wrong connection can
damage your voicebox or external circuitry! You can drive lamps of 3W or less directly. Use a relay
for more powerful loads.