1
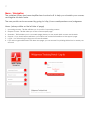
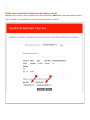
New Walgreens Training Portal - User Manual
New Training Portal - Table of Contents
Page 2 - Menu / Navigation
Page 3 - New User Registration
Page 6 - Claim Courses (Update course records to new Area/District numbers)
Page 10 - Managing Upcoming Courses
Page 13 - Registering Students
Page 14 - Remove a Student (NEW)
Page 15 - Requesting a new course
Page 16 - Searching courses
Page 17 - Searching Students
2
Menu / Navigation
The updated system has been simplified and custom built to help you schedule your courses,
and register students faster.
The new portal can be accessed by going to: http://www.cardiopartners.com/walgreens
Menu: (always visible on the left side of page)
1.
2.
3.
4.
5.
6.
Upcoming courses - This link will take you to your list of upcoming courses
Request Course - This link takes you to the course request page
Searches - This link takes you to our search page where you can search both courses and students
Support - If you should need assistance, you will find our contact information on the support page
Log-in - You will now log in using your own email address
If you did not get redirected to the New User page, you can access it by clicking this button to create your
account
3
New User Registration
The first time you access the system, you will need to create your user account
1.
2.
3.
4.
5.
6.
Select your job position
Enter First Name
Enter Last Name
Enter FIRST part of your email address (only the portion to the left of the "@" symbol)
Enter your direct phone number
Choose your NEW "primary" Area number (Don't worry, you'll be able to view any area)
*Note - The new system allows you to schedule and view courses accross multiple Area's
and Districts!
4
New User Registration - Email Verification
Upon submitting your registration form, you will see the message below. You will be
immediately sent an email with a verification link. Click the verification link in your email to
continue.
5
New User Registration - Create Password
The link in your email will take you to a password creation page. Create and verify your
personal password and click "update" to continue.
You'll need to acknowledge the pop-up message, it is notifying you that you will need to log
in on the next page
6
Claim your previously scheduled upcoming courses
In order to update currently scheduled courses to the new Area and District numbers, we
need you to "claim" your scheduled classes and update them to reflect the new area and
district numbers.
All currently scheduled courses must be "claimed" in order to align with the new field
structure.
To begin, select an "old" district number from the dropdown. If a district number is not in the
dropdown, that means that all upcoming classes for that district have already been
udpated.
To update an individual course, click the "Claim" link associated with the course
*Note: you can easily view other districts by choosing an "Old district number" in the field at
the top, and clicking "Submit" (if a number isn't listed, then there are no upcoming courses in
that district)
7
Claim your previously scheduled upcoming courses
1st select the correct Area number from the dropdown, 2nd select the appropriate district
Click "Update" to update the course and return back to the list
8
Batch Claim your previously scheduled upcoming courses
To update multiple courses at once, select the courses in the list by checking the checkbox,
then click "Edit"
9
Batch Claim your previously scheduled upcoming courses
A small window will pop-up. Select the Area and District numbers from the dropdown, then
click "Update"
The courses will be updated, and the list will update
10
Upcoming Courses
The Upcoming Courses page shows you the list of scheduled courses in your "home" district.
1.
2.
3.
4.
5.
6.
7.
8.
9.
10.
Course Number - This is the unique ID for the course
Date - This is the date that the course is scheduled for
Time - This is the time the course is scheduled to begin
City/State
Estimated Attendance - This lists the estimated number of attendees for the course
Registered - This shows the number of students currently registered in the course
Roster - Click the "Roster" button to view a current roster of students for the course
Accepted - "Yes" means that we have accepted the course for the date/time/location listed.
Status - Lists the current status of the course
Link to "View Other Courses" - allows you to view scheduled courses in other districts
11
Upcoming Courses - View Other District
In order to provide easy management of your courses that may be in districts other than your
home district, you can now access the scheduled courses in other districts.
To view a district, first choose an Area (1), then choose a District (2), then click Filter (3). The
scheduled courses for the chosen district will be displayed.
12
Upcoming Courses - Course Detail
When you select a course in your Upcoming Courses list, the cours details will be displayed.
A menu of actions is available along the top of the course details. These options include
Roster, Cancel, Change Date, Change Time, Change Attendance, and Change Location.
Click on one of these buttons to complete the listed action.
If the course status is "Accepted", and the course is not full, you will see a "Register Student"
link. Click that link to register a student for the course.
13
Register Student
Student registration has been made easier with this update. Simply enter the first name, last
name, and employee number, then select the Area number, District number, and Store
number. The pharmacy email will be populated in the email field. If you know the student’s
personal email, you may enter it.
If you send the registration notice to the pharmacy email, the student will be prompted to
enter their personal email upon accessing the online training.
14
Remove a Student (NEW)
A highly requested feature "Remove a Student" has been added. Now, if you registered a
student into a course, but they are no longer going to attend that couse, you can view the
roster, and click "Remove Student" next to the student's name in order to remove them from
the class.
If you need to a student to a different class, simply remove the student, then register them
into the correct course.
15
Request Course
The Request Course form has been simplified as well.
Select the date, start time, and enter the estimated attendance. Then enter the location
information. Your contact information will be pre-loaded, but you can change it if needed.
Click "Submit" to request course, and be taken back to your upcoming course list.
16
Search Courses
When you click the "Search" link in the menu, you'll be taken to the "Search Courses" page.
On this page, you can search past or future classes (company wide) and view course
details, course rosters, and even access the certificates of course participants.
To search for students, click the "Search Students" button at the top right.
17
Search Students
On the "Search Students" page, you can search by course number, date range, expiration
date range, name, employee ID, Area, District, Store, or any combination of the above.
Results contain student detail, and even a link to their CPR certificate.
*certifiation dates prior to 1/1/14 will not have a certificate listed, as we were issuing printed
cards prior to that date