1
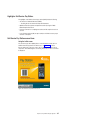
Toshiba Global Commerce Solutions
TCxAmplify
User's Guide
Version 1 Release 1
G362-0616-00
Toshiba Global Commerce Solutions
TCxAmplify
User's Guide
Version 1 Release 1
G362-0616-00
Note
Before using this information and the product it supports, be sure to read Safety Information- Read This First, Warranty
Information, Uninterruptible Power® Supply Information and the information under Appendix C, “Notices,” on page 207.
June 2014
This edition applies to Version 1 Release 1 of the Toshiba TCxAmplify User's Guide, and to all subsequent releases
and modifications until otherwise indicated in new editions.
If you send information to Toshiba Global Commerce Solutions, Inc. (Toshiba), you grant Toshiba a nonexclusive right
to use or distribute whatever information you supply in any way it believes appropriate without incurring any
obligation to you.
© Copyright Toshiba Global Commerce Solutions, Inc. 2014.
Contents
Figures
. . . . . . . . . . . . . . . . . . . . . . . . . . . vii
Tables. . . . . . . . . . . . . . . . . . . . . . . . . . . . xiii
Safety . . . . . . . . . . . . . . . . . . . . . . . . . . . . xv
About this guide . . . . .
Who should read this guide . .
Where to find more information
Notice statements . . . . .
.
.
.
.
.
.
.
.
.
.
.
.
.
.
.
.
.
.
.
.
.
.
.
.
.
.
.
.
.
.
.
.
.
.
.
.
.
.
.
.
.
.
.
.
.
.
.
.
.
.
.
.
.
.
.
.
.
.
.
.
.
.
.
.
.
.
.
.
.
.
.
.
xvii
xvii
xvii
xvii
Part 1. Toshiba TCxAmplify system concepts. . . . . . . . . . . . . . . . . . 1
Chapter 1. Introduction . . . .
Mobile Shopper highlights . . .
Key features . . . . . . .
How the Mobile Shopper works
.
.
.
.
.
.
.
.
.
.
.
.
.
.
.
.
.
.
.
.
.
.
.
.
.
.
.
.
.
.
.
.
.
.
.
.
.
.
.
.
.
.
.
.
.
.
.
.
.
.
.
.
.
.
.
.
.
.
.
.
.
.
.
.
.
.
.
.
Chapter 2. TCxAmplify Mobile Shopper overview
Architectural overview . . . . . . . . . . . .
Mobile Shopper Point of Sale solution . . . . .
POS Integration Hub . . . . . . . . . . .
Wireless network configuration and security . .
.
.
.
.
.
.
.
.
.
.
.
.
.
.
.
.
.
.
.
.
.
.
.
.
.
.
.
.
.
.
.
.
.
.
.
.
.
.
.
.
. 7
. 8
. 8
. 9
. . . . . . . . . . . 12
Chapter 3. Requirements . . . . . . .
Hardware requirements . . . . . . . . .
Toshiba TCxAmplify controller requirements
Software requirements . . . . . . . . .
Store Integrator. . . . . . . . . . .
4690 OS . . . . . . . . . . . . .
Virtual file system setup . . . . . . .
POS applications . . . . . . . . . .
4610 POS printer . . . . . . . . . .
Remote Management Agent requirements .
Data Integration Facility. . . . . . . .
4690 Mobile Shopper system prerequisites .
.
.
.
.
.
.
.
.
.
.
.
.
.
.
.
.
.
.
.
.
.
.
.
.
.
.
.
.
.
.
.
.
.
.
.
.
.
.
.
.
.
.
.
.
.
.
.
.
.
.
.
.
.
.
.
.
.
.
.
.
.
.
.
.
.
.
.
.
.
.
.
.
.
.
.
.
.
.
.
.
.
.
.
.
.
.
.
.
.
.
.
.
.
.
.
.
.
.
.
.
.
.
.
.
.
.
.
.
.
.
.
.
.
.
.
.
.
.
.
.
.
.
.
.
.
.
.
.
.
.
.
.
.
.
.
.
.
.
.
.
.
.
.
.
.
.
.
.
.
.
.
.
.
.
.
.
.
.
.
.
3
3
4
4
15
15
15
15
15
15
15
15
16
16
16
16
Chapter 4. Network setup examples . . . . . . . . . . . . . . . . 19
Example of a network setup for the Mobile Shopper . . . . . . . . . . . 19
Example of a network setup for Associate Line Busting . . . . . . . . . . 19
Part 2. Using the Mobile Shopper for 4690 . . . . . . . . . . . . . . . . . . 23
Chapter 5. Installing the Mobile Shopper components
Installing the Mobile Shopper on a 4690 operating system
Interactively installing Mobile Shopper . . . . . .
Silently installing the Mobile Shopper . . . . . . .
Remotely installing the Mobile Shopper . . . . . .
Point of Sale Integration Hub. . . . . . . . . . .
POS Integration Hub installation . . . . . . . .
Smart phones . . . . . . . . . . . . . . . .
Android installation . . . . . . . . . . . . .
© Copyright Toshiba Global Commerce Solutions, Inc. 2014
.
.
.
.
.
.
.
.
.
.
.
.
.
.
.
.
.
.
.
.
.
.
.
.
.
.
.
.
.
.
.
.
.
.
.
.
.
.
.
.
.
.
.
.
.
.
.
.
.
.
.
.
.
.
.
.
.
.
.
.
.
.
.
.
.
.
.
.
.
.
.
.
.
.
.
.
.
.
.
.
.
25
25
25
25
26
28
28
29
29
iii
iOS installation . . . . . . . . . . . . . . . . . . . . . . . . 29
Self-Service Pay Station installation . . . . . . . . . . . . . . . . . 30
Back Office System Server installation . . . . . . . . . . . . . . . 30
iv
Chapter 6. Configuring the Mobile Shopper on 4690 . . . . . . . . . .
4690 configuration . . . . . . . . . . . . . . . . . . . . . . .
Mobile Engine . . . . . . . . . . . . . . . . . . . . . . . . .
Mobile Engine configuration . . . . . . . . . . . . . . . . . . .
Mobile Engine configuration for 4690 . . . . . . . . . . . . . . . .
Controlling the Mobile Engine . . . . . . . . . . . . . . . . . .
Troubleshooting the Mobile Engine . . . . . . . . . . . . . . . .
Configuring Client Server Session for the Mobile Shopper . . . . . . . . .
Mobile Shopper operator sign-on credentials for ACE . . . . . . . . . . .
ACE input state table changes . . . . . . . . . . . . . . . . . . .
Client Session Server configuration . . . . . . . . . . . . . . . . .
Terminal configurations for the Mobile Shopper . . . . . . . . . . . . .
Configuring Store Integration GUI terminals on 4690 OS . . . . . . . .
Configuration changes for a stand-alone Mobile Store Integrator GUI terminal
Configuration changes for controller/terminals: Mobile Store Integrator GUI
Configuration changes for a stand-alone Self-Service Scale terminal . . . .
Configuration changes for a Self-Service Pay Station terminal . . . . . .
Configuration changes for controller/terminals: Self-Service Scale . . . . .
ACE Personalization option changes . . . . . . . . . . . . . . . .
31
31
32
32
32
38
39
39
39
40
44
45
45
45
47
47
48
49
50
Chapter 7. Additional system components . . . . . .
POS Integration Hub . . . . . . . . . . . . . . .
Included services . . . . . . . . . . . . . . .
Trust Level Management . . . . . . . . . . . . .
Trust Level Management components . . . . . . .
Trust Level Management Scoring based on audit history
Trust Level Management additional scoring inputs . . .
Mobile Reporting Web Application . . . . . . . . . .
Log in Page . . . . . . . . . . . . . . . . .
Daily Statistics Page . . . . . . . . . . . . . .
Daily Statistics History Page . . . . . . . . . . .
Customer Shopping History Page . . . . . . . . .
.
.
.
.
.
.
.
.
.
.
.
.
.
.
.
.
.
.
.
.
.
.
.
.
.
.
.
.
.
.
.
.
.
.
.
.
.
.
.
.
.
.
.
.
.
.
.
.
.
.
.
.
.
.
.
.
.
.
.
.
.
.
.
.
.
.
.
.
.
.
.
.
.
.
.
.
.
.
.
.
.
.
.
.
55
55
55
60
61
61
70
71
71
72
72
73
Chapter 8. Using the Mobile Shopper application .
Smart phone application . . . . . . . . . . .
Phone screen layout . . . . . . . . . . . .
Menu layout . . . . . . . . . . . . . . .
Mobile Shopper POS screen flows. . . . . . .
Self-Service Scale . . . . . . . . . . . .
Self-Service Pay Station . . . . . . . . . . .
Highlights: Self-Service Pay Station . . . . . .
Self-Service Pay Station screen flows . . . . .
Store Integrator GUI . . . . . . . . . . . .
Highlights . . . . . . . . . . . . . . .
Store Integrator GUI screen flows . . . . . .
Audits . . . . . . . . . . . . . . . . . .
Spot audits . . . . . . . . . . . . . . .
Full audit . . . . . . . . . . . . . . .
Visual audit. . . . . . . . . . . . . . .
Audit details request . . . . . . . . . . .
Audit results . . . . . . . . . . . . . .
.
.
.
.
.
.
.
.
.
.
.
.
.
.
.
.
.
.
.
.
.
.
.
.
.
.
.
.
.
.
.
.
.
.
.
Toshiba TCxAmplify: User's Guide
.
.
.
.
.
.
.
.
.
.
.
.
.
.
.
.
.
.
.
.
.
.
.
.
.
.
.
.
.
.
.
.
.
.
.
.
.
.
.
.
.
.
.
.
.
.
.
.
.
.
.
.
.
.
.
.
.
.
.
.
.
.
.
.
.
.
.
.
.
.
.
.
.
.
.
.
.
.
.
.
.
.
.
.
.
.
.
.
.
.
.
.
.
.
.
.
.
.
.
.
.
.
.
.
.
.
.
.
.
.
.
.
.
.
.
.
.
.
.
.
.
.
.
.
.
.
.
.
.
.
.
.
.
.
.
.
.
.
.
. 75
. 75
. 75
. 75
. 79
. 126
. 136
. 137
. 137
. 139
. 139
. 140
. 143
. 144
. 148
. 148
. 149
. 149
Chapter 9. Associate Line Busting . . . . .
Associate Line Busting solution . . . . . . .
Highlights: Associate Line Busting . . . . . .
How it works: Associate Line Busting . . . . .
Deployment and installation . . . . . . . .
Using Associate Line Busting . . . . . . .
Architectural overview: Associate Line Busting . .
Associate Line Busting POS solution . . . .
User interface components . . . . . . . . .
Application screen layout. . . . . . . . .
Menu layout: UI . . . . . . . . . . . .
Associate Line Busting screen flows . . . .
Configuring the Motorola MC40 for Associate Line
Exporting and importing configuration settings .
Copying files to the Motorola MC40 . . . . .
WiFi settings . . . . . . . . . . . . .
Chapter 10. Problem determination
Trace types. . . . . . . . . .
Trace file location . . . . . . .
Store Integrator GUI traces . . .
Minimal logging . . . . . . .
Moderate logging . . . . . .
Maximum logging . . . . . .
CSS (virtual session) trace . . .
Remote GUI trace . . . . . .
POSBC trace . . . . . . . .
Java logging properties . . . .
Redirecting standard error . . . .
Session trace . . . . . . . . .
Audit tracing . . . . . . . .
Device Manager trace . . . . . .
Problem determination scenarios . .
.
.
.
.
.
.
.
.
.
.
.
.
.
.
.
.
.
.
.
.
.
.
.
.
.
.
.
.
.
.
.
.
.
.
.
.
.
.
.
.
.
.
.
.
.
.
.
.
.
.
.
.
.
.
.
.
.
.
.
.
.
.
.
.
.
.
.
.
.
.
.
.
.
.
.
.
.
.
.
.
. . .
. . .
. . .
. . .
. . .
. . .
. . .
. . .
. . .
. . .
. . .
. . .
Busting
. . .
. . .
. . .
.
.
.
.
.
.
.
.
.
.
.
.
.
.
.
.
.
.
.
.
.
.
.
.
.
.
.
.
.
.
.
.
.
.
.
.
.
.
.
.
.
.
.
.
.
.
.
.
.
.
.
.
.
.
.
.
.
.
.
.
.
.
.
.
.
.
.
.
.
.
.
.
.
.
.
.
.
.
.
.
.
.
.
.
.
.
.
.
.
.
.
.
.
.
.
.
.
.
.
.
.
.
.
.
.
.
.
.
.
.
.
.
.
.
.
.
.
.
.
.
.
.
.
.
.
.
.
.
.
.
.
.
.
.
.
.
.
.
.
.
.
.
.
.
.
.
.
.
.
.
.
.
.
.
.
.
.
.
.
.
.
.
.
.
.
.
.
.
.
.
.
.
.
.
.
.
151
151
151
152
152
152
153
153
154
154
154
157
176
187
187
189
.
.
.
.
.
.
.
.
.
.
.
.
.
.
.
.
.
.
.
.
.
.
.
.
.
.
.
.
.
.
.
.
.
.
.
.
.
.
.
.
.
.
.
.
.
.
.
.
.
.
.
.
.
.
.
.
.
.
.
.
.
.
.
.
.
.
.
.
.
.
.
.
.
.
.
.
.
.
.
.
.
.
.
.
.
.
.
.
.
.
.
.
.
.
.
.
.
.
.
.
.
.
.
.
.
.
.
.
.
.
.
.
.
.
.
.
.
.
.
.
.
.
.
.
.
.
.
.
193
193
193
195
196
196
196
196
196
196
197
198
198
199
199
199
Appendix A. Solution extension . . . . . . . . . . . . . . . . . 201
Property extension mechanism . . . . . . . . . . . . . . . . . . 201
Appendix B. Configuring the Toshiba B-EP2DL Printer . . . . . . . . 203
How to disable WiFi printing . . . . . . . . . . . . . . . . . . . 205
Appendix C. Notices . . . . . . . . . . . . . . . . . . .
Electronic Emission Notices. . . . . . . . . . . . . . . . .
Federal Communications Commission (FCC) Statement . . . . .
Industry Canada Class A Emission Compliance statement . . . .
Avis de conformité aux normes d'Industrie Canada . . . . . . .
European Union Electromagnetic Compatibility (EMC) Directive
Conformance Statement . . . . . . . . . . . . . . . .
European Community (EC) Mark of Conformity Statement . . . .
Germany . . . . . . . . . . . . . . . . . . . . . .
Australia and New Zealand . . . . . . . . . . . . . . . .
Electrostatic Discharge (ESD) . . . . . . . . . . . . . . .
Chinese Class A warning statement . . . . . . . . . . . . .
Japanese Electrical Appliance and Material Safety Law statement. .
Japanese power line harmonics compliance statement . . . . . .
Japanese Voluntary Control Council for Interference (VCCI) statement
.
.
.
.
.
.
.
.
.
.
.
.
.
.
.
207
209
209
209
209
.
.
.
.
.
.
.
.
.
.
.
.
.
.
.
.
.
.
.
.
.
.
.
.
209
210
210
211
211
211
211
212
212
Contents
v
Japan Electronics and Information Technology Industries Association (JEITA)
statement . . . . . . . . . . . . . . . . . . . . . . . .
Korean communications statement . . . . . . . . . . . . . . . .
Taiwanese Class A warning statement . . . . . . . . . . . . . . .
Cable ferrite requirement . . . . . . . . . . . . . . . . . . . . .
Product recycling and disposal . . . . . . . . . . . . . . . . . .
Battery return program . . . . . . . . . . . . . . . . . . . . .
For Taiwan:. . . . . . . . . . . . . . . . . . . . . . . . .
For the European Union: . . . . . . . . . . . . . . . . . . . .
For California: . . . . . . . . . . . . . . . . . . . . . . . .
Flat panel displays . . . . . . . . . . . . . . . . . . . . . . .
Monitors and workstations . . . . . . . . . . . . . . . . . . . .
Trademarks. . . . . . . . . . . . . . . . . . . . . . . . . .
212
212
213
213
213
214
214
215
215
216
216
216
Index . . . . . . . . . . . . . . . . . . . . . . . . . . . . 219
vi
Toshiba TCxAmplify: User's Guide
Figures
1. Architectural overview . . . . . . . . . . . .
2. Alert icon. . . . . . . . . . . . . . . . .
3. Item Alerts . . . . . . . . . . . . . . . .
4. Advertising Alerts . . . . . . . . . . . . . .
5. POS Integration Hub . . . . . . . . . . . .
6. Mobile Shopper network architecture . . . . . .
7. Associate Line Busting network architecture . . . .
8. Initial wireless router settings . . . . . . . . .
9. Modified wireless router configuration . . . . . .
10. Change background application . . . . . . . .
11. Define background application . . . . . . . . .
12. MEMANAGE command . . . . . . . . . . .
13. Attributes for function code 241 (1 of 8) . . . . .
14. Attributes for function code 241 (2 of 8) . . . . .
15. Attributes for function code 241 (3 of 8) . . . . .
16. Attributes for function code 241 (4 of 8) . . . . .
17. Attributes for function code 241 (5 of 8) . . . . .
18. Attributes for function code 241 (6 of 8) . . . . .
19. Attributes for function code 241 (7 of 8) . . . . .
20. Attributes for function code 241 (8 of 8) . . . . .
21. WebSphere enterprise applications . . . . . . .
22. Environment entries for Web modules . . . . . .
23. Save . . . . . . . . . . . . . . . . . .
24. Enterprise applications - start . . . . . . . . .
25. Enterprise applications - stop . . . . . . . . .
26. Troubleshooting, Logs and trace . . . . . . . .
27. Change Log Details screen . . . . . . . . . .
28. Mobile Reporting Log In Page . . . . . . . . .
29. Mobile Reporting Daily Stats Page . . . . . . .
30. Mobile Reporting Daily Stats History Page . . . .
31. Mobile Reporting Customer Shop History Page. . .
32. Phone screen layout . . . . . . . . . . . .
33. Mobile Shopper menu with no items in transaction .
34. Menu shopper preferences . . . . . . . . . .
35. Mobile Shopper help (1 of 2) . . . . . . . . .
36. Mobile Shopper help (2 of 2) . . . . . . . . .
37. Mobile Shopper menu with items in the transaction .
38. Shopper enters store . . . . . . . . . . . .
39. Mobile phone application connects to retailer's WiFi .
40. Scan Loyalty Card . . . . . . . . . . . . .
41. Prompt for an item . . . . . . . . . . . . .
42. Scan Barcode . . . . . . . . . . . . . . .
43. Price Check. . . . . . . . . . . . . . . .
44. Press Scan Barcode . . . . . . . . . . . .
45. Scan Barcode - pay station or POS terminal. . . .
46. Transaction number and terminal number . . . . .
47. Press Exit . . . . . . . . . . . . . . . .
48. Starting the Mobile Shopper during a blackout period
49. Mobile Shopper - not enough CSS sessions . . . .
50. Scanning a product that is not found . . . . . .
51. Item exception . . . . . . . . . . . . . . .
52. Price Check - item not in the item file . . . . . .
53. Item not allowed to be sold using the mobile device .
© Copyright Toshiba Global Commerce Solutions, Inc. 2014
.
.
.
.
.
.
.
.
.
.
.
.
.
.
.
.
.
.
.
.
.
.
.
.
.
.
.
.
.
.
.
.
.
.
.
.
.
.
.
.
.
.
.
.
.
.
.
.
.
.
.
.
. .
.
.
.
.
.
.
.
.
.
.
.
.
.
.
.
.
.
.
.
.
.
.
.
.
.
.
.
.
.
.
.
.
.
.
.
.
.
.
.
.
.
.
.
.
.
.
.
.
.
.
.
.
.
.
.
.
.
.
.
.
.
.
.
.
.
.
.
.
.
.
.
.
.
.
.
.
.
.
.
.
.
.
.
.
.
.
.
.
.
.
.
.
.
.
.
.
.
.
.
.
.
.
.
.
. .
.
.
.
.
.
.
.
.
.
.
.
.
.
.
.
.
.
.
.
.
.
.
.
.
.
.
.
.
.
.
.
.
.
.
.
.
.
.
.
.
.
.
.
.
.
.
.
.
.
.
.
.
.
.
.
.
.
.
.
.
.
.
.
.
.
.
.
.
.
.
.
.
.
.
.
.
.
.
.
.
.
.
.
.
.
.
.
.
.
.
.
.
.
.
.
.
.
.
.
.
.
.
.
.
. .
.
.
.
.
.
.
.
.
.
.
.
.
.
.
.
.
.
.
.
.
.
.
.
.
.
.
.
.
.
.
.
.
.
.
.
.
.
.
.
.
.
.
.
.
.
.
.
.
.
.
.
.
.
.
.
.
.
.
.
.
.
.
.
.
.
.
.
.
.
.
.
.
.
.
.
.
.
.
.
.
.
.
.
.
.
.
.
.
.
.
.
.
.
.
.
.
.
.
.
.
.
.
.
.
. .
.
.
.
.
.
.
.
.
.
.
.
.
.
.
.
.
.
.
.
.
.
.
.
.
.
.
.
.
.
.
.
.
.
.
.
.
.
.
.
.
.
.
.
.
.
.
.
.
.
.
.
.
.
.
.
.
.
.
.
.
.
.
.
.
.
.
.
.
.
.
.
.
.
.
.
.
.
.
.
.
.
.
.
.
.
.
.
.
.
.
.
.
.
.
.
.
.
.
.
.
.
.
.
.
. .
.
.
.
.
.
.
.
.
.
.
.
.
.
.
.
.
.
.
.
.
.
.
.
.
.
.
.
.
.
.
.
.
.
.
.
.
.
.
.
.
.
.
.
.
.
.
.
.
.
.
.
.
.
.
.
.
.
.
.
.
.
.
.
.
.
.
.
.
.
.
.
.
.
.
.
.
.
.
.
.
.
.
.
.
.
.
.
.
.
.
.
.
.
.
.
.
.
.
.
.
.
.
.
.
. .
.
.
.
.
.
.
.
.
.
.
.
.
.
.
.
.
.
.
.
.
.
.
.
.
.
.
.
.
.
.
.
.
.
.
.
.
.
.
.
.
.
.
.
.
.
.
.
.
.
.
.
.
.
.
.
.
.
.
.
.
.
.
.
.
.
.
.
.
.
.
.
.
.
.
.
.
.
.
.
.
.
.
.
.
.
.
.
.
.
.
.
.
.
.
.
.
.
.
.
.
.
.
.
.
. .
.
.
.
.
.
.
.
.
.
.
.
.
.
.
.
.
.
.
.
.
.
.
.
.
.
.
.
.
.
.
.
.
.
.
.
.
.
.
.
.
.
.
.
.
.
.
.
.
.
.
.
.
.
.
.
.
.
.
.
.
.
.
.
.
.
.
.
.
.
.
.
.
.
.
.
.
.
.
.
.
.
.
.
.
.
.
.
.
.
.
.
.
.
.
.
.
.
.
.
.
.
.
.
.
. .
.
.
.
.
.
.
.
.
.
.
.
.
.
.
.
.
.
.
.
.
.
.
.
.
.
.
.
.
.
.
.
.
.
.
.
.
.
.
.
.
.
.
.
.
.
.
.
.
.
.
.
.
.
.
.
.
.
.
.
.
.
.
.
.
.
.
.
.
.
.
.
.
.
.
.
.
.
.
.
.
.
.
.
.
.
.
.
.
.
.
.
.
.
.
.
.
.
.
.
.
.
.
.
.
. 8
10
11
11
12
19
20
21
21
37
38
39
40
41
41
42
42
43
43
44
64
65
65
66
66
68
69
71
72
73
74
75
76
77
78
78
79
79
80
80
81
81
82
82
83
83
84
84
85
86
86
87
88
vii
54. Time restricted item entry. . . . . . . . . . . . . . . . . . . . .
55. Scan an item that has been blocked in mobileserver.properties . . . . . .
56. Age-restricted item exception . . . . . . . . . . . . . . . . . . .
57. Scan or key more items . . . . . . . . . . . . . . . . . . . . .
58. Price Check - age restricted item . . . . . . . . . . . . . . . . . .
59. Scan a quantity required item . . . . . . . . . . . . . . . . . . .
60. No exception logged . . . . . . . . . . . . . . . . . . . . . .
61. Price Check - scan or key in a quantity-required item code . . . . . . . .
62. Scan a weight required item entry . . . . . . . . . . . . . . . . .
63. Price Check - scan or key in a weight-required item code . . . . . . . . .
64. Scan Barcode - UPC-5 coupon . . . . . . . . . . . . . . . . . .
65. Removing an item from the Item Entry screen (1 of 4) . . . . . . . . . .
66. Removing an item from the Item Entry (2 of 4) . . . . . . . . . . . . .
67. Removing an item from the Item Entry (3 of 4) . . . . . . . . . . . . .
68. Removing an item from the Item Entry (4 of 4) . . . . . . . . . . . . .
69. Press Item List . . . . . . . . . . . . . . . . . . . . . . . .
70. Touch item to be removed . . . . . . . . . . . . . . . . . . . .
71. Press OK . . . . . . . . . . . . . . . . . . . . . . . . . .
72. Item removed is indicated . . . . . . . . . . . . . . . . . . . .
73. Press Menu . . . . . . . . . . . . . . . . . . . . . . . . .
74. Scan or key in item wanted . . . . . . . . . . . . . . . . . . .
75. Customer presses OK . . . . . . . . . . . . . . . . . . . . .
76. Item removal is completed . . . . . . . . . . . . . . . . . . . .
77. Press Item List . . . . . . . . . . . . . . . . . . . . . . . .
78. Press Scan Barcode on the mobile device . . . . . . . . . . . . . .
79. Displaying the screen with "Done" visible . . . . . . . . . . . . . .
80. Item List with prices displayed . . . . . . . . . . . . . . . . . .
81. Self- Service Scale - pressing Scan . . . . . . . . . . . . . . . .
82. Self-Service Scale - displaying screen with "Done" visible . . . . . . . .
83. Item List - items displayed with prices. . . . . . . . . . . . . . . .
84. Item details (1 of 4) . . . . . . . . . . . . . . . . . . . . . .
85. Item details (2 of 4) . . . . . . . . . . . . . . . . . . . . . .
86. Item details (3 of 4) . . . . . . . . . . . . . . . . . . . . . .
87. Item details (4 of 4) . . . . . . . . . . . . . . . . . . . . . .
88. Customer signed onto the application . . . . . . . . . . . . . . . .
89. New alerts . . . . . . . . . . . . . . . . . . . . . . . . . .
90. Transaction Alert icon. . . . . . . . . . . . . . . . . . . . . .
91. Digital Wallet icon . . . . . . . . . . . . . . . . . . . . . . .
92. Irish Spring alert . . . . . . . . . . . . . . . . . . . . . . .
93. Pressing OK - Transaction Alerts . . . . . . . . . . . . . . . . .
94. Pressing Back - Transaction Alerts . . . . . . . . . . . . . . . . .
95. Viewing daily specials . . . . . . . . . . . . . . . . . . . . .
96. Back icon - viewing daily specials . . . . . . . . . . . . . . . . .
97. Showing unread alerts . . . . . . . . . . . . . . . . . . . . .
98. Item Entry . . . . . . . . . . . . . . . . . . . . . . . . . .
99. Item Alert icon displayed . . . . . . . . . . . . . . . . . . . .
100. Pressing Item Alert icon . . . . . . . . . . . . . . . . . . . . .
101. Coffee Club Alert . . . . . . . . . . . . . . . . . . . . . . .
102. Pressing Yes - Item Alerts . . . . . . . . . . . . . . . . . . . .
103. No advertisements sent to the mobile device . . . . . . . . . . . . .
104. Multiple advertisements sent to the mobile device (1 of 4) . . . . . . . .
105. Multiple advertisements sent to the mobile device (2 of 4) . . . . . . . .
106. Multiple advertisements sent to the mobile device (3 of 4) . . . . . . . .
107. Multiple advertisements sent to the mobile device (4 of 4) . . . . . . . .
108. Transfer order from a failed mobile device to the store's mobile device (1 of 4)
109. Transfer order from a failed mobile device to the store's mobile device (2 of 4)
viii
Toshiba TCxAmplify: User's Guide
.
.
.
.
.
.
.
.
.
.
.
.
.
.
.
.
.
.
.
.
.
.
.
.
.
.
.
.
.
.
.
.
.
.
.
.
.
.
.
.
.
.
.
.
.
.
.
.
.
.
.
.
.
.
.
.
.
.
.
.
.
.
.
.
.
.
.
.
.
.
.
.
.
.
.
.
.
.
.
.
.
.
.
.
.
.
.
.
.
.
.
.
.
.
.
.
.
.
.
.
.
.
.
.
.
.
.
.
.
.
.
.
.
.
.
.
.
.
.
.
.
.
.
.
.
.
.
.
.
.
.
.
.
.
.
.
.
.
.
.
.
.
.
.
.
.
.
.
.
.
.
.
.
.
.
.
.
.
.
.
.
.
.
.
.
.
.
.
.
.
.
.
.
.
.
.
.
.
.
.
.
.
.
.
.
.
.
.
.
.
.
.
.
.
.
.
.
.
.
.
.
.
.
.
.
.
.
.
.
.
.
.
.
.
.
.
.
.
.
.
.
.
.
.
.
.
.
.
.
.
.
.
.
.
.
.
.
.
.
.
.
.
.
.
.
.
.
.
.
.
.
.
.
.
.
.
.
.
.
.
.
.
.
.
.
.
.
.
.
.
.
.
.
.
.
.
.
.
.
.
.
.
.
.
.
.
.
.
.
.
.
.
.
.
.
.
.
.
.
.
.
.
.
.
.
.
.
.
.
.
.
.
.
.
.
.
.
.
.
.
.
.
.
.
.
.
.
.
.
.
.
.
.
.
.
.
. 89
. 90
. 91
. 91
. 92
. 92
. 93
. 93
. 94
. 94
. 95
. 96
. 96
. 97
. 97
. 98
. 98
. 99
. 99
. 100
. 100
. 101
. 101
. 102
. 102
. 103
. 103
. 104
. 104
. 105
. 105
. 106
. 106
. 107
. 107
. 107
. 108
. 108
. 109
. 109
. 110
. 110
. 111
. 111
. 112
. 112
. 113
. 113
. 114
. 115
. 115
. 116
. 116
. 117
. 117
. 118
110. Transfer order from a failed mobile device to the store's mobile device (3 of 4)
111. Transfer order from a failed mobile device to the store's mobile device (4 of 4)
112. Mobile device temporarily loses connectivity while shopping (1 of 5) . . . .
113. Mobile device temporarily loses connectivity while shopping (2 of 5) . . . .
114. Mobile device temporarily loses connectivity while shopping (3 of 5) . . . .
115. Mobile device temporarily loses connectivity while shopping (4 of 5) . . . .
116. Mobile device temporarily loses connectivity while shopping (5 of 5) . . . .
117. Sample screen shots showing T&Cs with links to websites and simple text (1 of
118. Sample screen shots showing T&Cs with links to websites and simple text (2 of
119. Sample HTML for displaying information with web links (1 of 2) . . . . . .
120. Sample HTML for displaying information without web links (2 of 2) . . . . .
121. Initial Self-Service Scale screen with the Mobile Shopper inactive . . . . .
122. Initial Self-Service Scale screen with the Mobile Shopper active . . . . . .
123. Self-Service Scale Mobile Scan Starting screen . . . . . . . . . . . .
124. Self-Service Scale showing items entered on the mobile device . . . . . .
125. Self-Service Scale Weight Entry screen . . . . . . . . . . . . . . .
126. Self-Service Scale Item Entry screen (1 of 2) . . . . . . . . . . . . .
127. Self-Service Scale Item Entry screen (2 of 2) . . . . . . . . . . . . .
128. Self-Service Scale Item Entry Completion screen . . . . . . . . . . .
129. Self-Service Scale Search screen . . . . . . . . . . . . . . . . .
130. Items remaining on the Phone Item List screen . . . . . . . . . . . .
131. Self-Service Scale Item Deletion screen . . . . . . . . . . . . . . .
132. Self-Service Scale with no phone items . . . . . . . . . . . . . . .
133. Self-Service Scale Item Entry screen . . . . . . . . . . . . . . . .
134. Self-Service Scale Quantity Entry screen . . . . . . . . . . . . . .
135. Self-Service Scale Label Printing screen. . . . . . . . . . . . . . .
136. Weight Barcode with No loyalty Pricing . . . . . . . . . . . . . . .
137. Quantity Barcode with Loyalty Pricing . . . . . . . . . . . . . . . .
138. Self-Service Pay Station initial screen. . . . . . . . . . . . . . . .
139. Mobile Transaction Completion screen . . . . . . . . . . . . . . .
140. Mobile Transaction Payment screen . . . . . . . . . . . . . . . .
141. Self-Service Pay Station Exception Processing screen . . . . . . . . .
142. Store Integrator GUI when the Mobile Engine is disconnected . . . . . . .
143. Store Integrator GUI when the Mobile Engine connected. . . . . . . . .
144. Customer Store Integrator GUI screen for Mobile Shopper POS . . . . . .
145. Store Integrator GUI Retrieval with no exceptions . . . . . . . . . . .
146. Store Integrator GUI Retrieval with exceptions . . . . . . . . . . . .
147. Item Exceptions Dialog . . . . . . . . . . . . . . . . . . . . .
148. Spot Audit exception . . . . . . . . . . . . . . . . . . . . . .
149. Spot Audit with required list . . . . . . . . . . . . . . . . . . .
150. Full Audit exception . . . . . . . . . . . . . . . . . . . . . .
151. Full Audit Warning prompt . . . . . . . . . . . . . . . . . . . .
152. Application screen layout . . . . . . . . . . . . . . . . . . . .
153. Associate Line Busting menu . . . . . . . . . . . . . . . . . . .
154. Associate Line Busting preferences . . . . . . . . . . . . . . . .
155. Associate Line Busting icon . . . . . . . . . . . . . . . . . . .
156. Press Done . . . . . . . . . . . . . . . . . . . . . . . . .
157. Prompt for password . . . . . . . . . . . . . . . . . . . . . .
158. Prompt for manager override . . . . . . . . . . . . . . . . . . .
159. Associate's credentials are invalid . . . . . . . . . . . . . . . . .
160. Prompting for WiFi printers. . . . . . . . . . . . . . . . . . . .
161. Skip configuration of WiFi printer . . . . . . . . . . . . . . . . .
162. Associate connecting to a printer . . . . . . . . . . . . . . . . .
163. Application unable to connect (1 of 2). . . . . . . . . . . . . . . .
164. Application unable to connect (2 of 2). . . . . . . . . . . . . . . .
165. Customer's loyalty ID . . . . . . . . . . . . . . . . . . . . . .
.
.
.
.
.
.
.
2)
2)
.
.
.
.
.
.
.
.
.
.
.
.
.
.
.
.
.
.
.
.
.
.
.
.
.
.
.
.
.
.
.
.
.
.
.
.
.
.
.
.
.
.
.
.
.
.
.
.
.
.
.
.
.
.
.
.
.
.
.
.
.
.
.
.
.
.
.
.
.
.
.
.
.
.
.
.
.
.
.
.
.
.
.
.
.
.
.
.
.
.
.
.
.
.
.
.
.
.
.
.
.
.
.
.
.
.
.
.
.
.
.
.
.
.
.
.
.
.
.
.
.
.
.
.
.
.
.
.
.
.
.
.
.
.
.
.
.
.
.
.
.
.
.
.
.
.
.
.
.
.
.
.
.
.
.
.
.
.
.
.
.
.
.
.
.
.
.
.
.
.
.
.
.
.
.
.
.
.
.
.
.
.
.
.
.
.
.
.
.
.
.
.
.
.
.
.
.
.
.
.
.
.
.
.
.
.
.
.
.
.
.
.
.
.
.
.
.
.
.
.
.
.
.
.
.
.
.
.
.
.
.
.
.
.
.
.
.
.
.
.
.
.
.
.
.
.
.
.
.
.
.
.
.
.
.
.
.
.
.
.
.
.
.
.
.
.
.
.
.
.
.
.
.
.
.
.
.
.
.
.
.
.
.
.
.
.
.
.
.
.
.
.
.
.
.
.
.
.
.
.
.
.
.
.
.
.
.
.
.
.
.
.
.
.
.
.
.
.
.
.
.
.
.
.
.
.
.
.
.
.
.
.
.
.
.
.
.
.
.
.
.
.
.
.
.
.
.
.
.
.
.
.
.
.
.
.
.
.
.
.
.
.
.
.
.
.
.
.
.
.
.
.
.
.
.
.
.
.
.
.
.
.
.
118
119
120
120
121
121
122
123
123
124
124
128
128
129
130
130
131
131
131
132
132
133
133
134
135
135
136
136
137
138
138
139
140
141
142
142
143
143
145
145
148
148
154
156
157
157
158
158
159
159
160
160
161
161
162
162
Figures
ix
166. Completing steps . . . . . . . . . . . . . . . . . .
167. Looking up an item . . . . . . . . . . . . . . . . .
168. Message window . . . . . . . . . . . . . . . . . .
169. Press Finish - suspending a transaction . . . . . . . . . .
170. Obtaining a manager override . . . . . . . . . . . . .
171. WiFi printing is enabled . . . . . . . . . . . . . . . .
172. WiFi printing is not enabled . . . . . . . . . . . . . .
173. Beginning a new transaction . . . . . . . . . . . . . .
174. Cancel Transaction . . . . . . . . . . . . . . . . .
175. Confirmation request . . . . . . . . . . . . . . . . .
176. Processing Yes . . . . . . . . . . . . . . . . . . .
177. Add item mode . . . . . . . . . . . . . . . . . . .
178. Product not found in item file . . . . . . . . . . . . . .
179. Item exception is registered . . . . . . . . . . . . . .
180. Finish to complete transaction . . . . . . . . . . . . .
181. Associate signing in . . . . . . . . . . . . . . . . .
182. Pressing Menu, then Alerts options. . . . . . . . . . . .
183. Pressing Store Event . . . . . . . . . . . . . . . . .
184. Associate presses Alert . . . . . . . . . . . . . . . .
185. Getting to the Alerts menu . . . . . . . . . . . . . . .
186. Accessing eCoupons . . . . . . . . . . . . . . . . .
187. Pressing the eCoupons button . . . . . . . . . . . . .
188. Sign Off button enabled . . . . . . . . . . . . . . . .
189. Pressing Sign Off . . . . . . . . . . . . . . . . . .
190. Associate signing out . . . . . . . . . . . . . . . . .
191. Android home button . . . . . . . . . . . . . . . . .
192. Starting the MC40 DataWedge Configuration Application (1 of 2).
193. Starting the MC40 DataWedge Configuration Application (2 of 2).
194. Android menu button - DataWedge Profile screen . . . . . .
195. Creating a new MC40 configuration profile (1 of 4) . . . . . .
196. Creating a new MC40 configuration profile (2 of 4) . . . . . .
197. Creating a new MC40 configuration profile (3 of 4) . . . . . .
198. Creating a new MC40 configuration profile (4 of 4) . . . . . .
199. MC40 Profile screen . . . . . . . . . . . . . . . . .
200. MC40 configuration profile (1 of 4) . . . . . . . . . . . .
201. MC40 configuration profile (2 of 4) . . . . . . . . . . . .
202. MC40 configuration profile (3 of 4) . . . . . . . . . . . .
203. MC40 configuration profile (4 of 4) . . . . . . . . . . . .
204. MC40 "Decoders" configuration screens (1 of 6) . . . . . . .
205. MC40 "Decoders" configuration screens (2 of 6) . . . . . . .
206. MC40 "Decoders" configuration screens (3 of 6) . . . . . . .
207. MC40 "Decoders" configuration screens (4 of 6) . . . . . . .
208. MC40 "Decoders" configuration screens (5 of 6) . . . . . . .
209. MC40 "Decoders" configuration screens (6 of 6) . . . . . . .
210. MC40 "Decoder Params" (1 of 5) . . . . . . . . . . . .
211. MC40 "Decoder Params" (2 of 5) . . . . . . . . . . . .
212. MC40 "Decoder Params" (3 of 5) . . . . . . . . . . . .
213. MC40 "Decoder Params" (4 of 5) . . . . . . . . . . . .
214. MC40 "Decoder Params" (5 of 5) . . . . . . . . . . . .
215. MC40 File Browser App (1 of 2) . . . . . . . . . . . . .
216. MC40 File Browser App (2 of 2) . . . . . . . . . . . . .
217. MC40 "Keystroke output" configuration . . . . . . . . . .
218. MC40 "Intent output" configuration (1 of 3) . . . . . . . . .
219. MC40 "Intent output" configuration (2 of 3) . . . . . . . . .
220. MC40 "Intent output" configuration (3 of 3) . . . . . . . . .
221. Android menu button - DataWedge Profile screen . . . . . .
x
Toshiba TCxAmplify: User's Guide
.
.
.
.
.
.
.
.
.
.
.
.
.
.
.
.
.
.
.
.
.
.
.
.
.
.
.
.
.
.
.
.
.
.
.
.
.
.
.
.
.
.
.
.
.
.
.
.
.
.
.
.
.
.
.
.
.
.
.
.
.
.
.
.
.
.
.
.
.
.
.
.
.
.
.
.
.
.
.
.
.
.
.
.
.
.
.
.
.
.
.
.
.
.
.
.
.
.
.
.
.
.
.
.
.
.
.
.
.
.
.
.
.
.
.
.
.
.
.
.
.
.
.
.
.
.
.
.
.
.
.
.
.
.
.
.
.
.
.
.
.
.
.
.
.
.
.
.
.
.
.
.
.
.
.
.
.
.
.
.
.
.
.
.
.
.
.
.
.
.
.
.
.
.
.
.
.
.
.
.
.
.
.
.
.
.
.
.
.
.
.
.
.
.
.
.
.
.
.
.
.
.
.
.
.
.
.
.
.
.
.
.
.
.
.
.
.
.
.
.
.
.
.
.
.
.
.
.
.
.
.
.
.
.
.
.
.
.
.
.
.
.
.
.
.
.
.
.
.
.
.
.
.
.
.
.
.
.
.
.
.
.
.
.
.
.
.
.
.
.
.
.
.
.
.
.
.
.
.
.
.
.
.
.
.
.
.
.
.
.
.
.
.
.
.
.
.
.
.
.
.
.
.
.
.
.
.
.
.
.
.
.
.
.
.
.
.
.
.
.
.
.
.
.
.
.
.
.
.
.
.
.
.
.
.
.
.
.
.
.
.
.
.
.
.
.
.
.
.
.
.
.
.
.
.
.
.
.
.
.
.
.
.
.
.
.
.
.
.
.
.
.
.
.
.
.
.
.
.
.
.
.
.
.
.
.
.
.
.
.
.
.
.
.
.
.
.
.
.
.
.
.
.
.
.
.
.
.
.
.
.
.
.
.
.
.
.
.
.
.
.
.
.
.
.
.
.
.
.
.
.
.
.
.
.
.
.
.
.
.
.
.
.
.
.
.
.
.
.
.
.
.
.
.
.
.
.
.
.
.
.
.
.
.
.
.
.
.
.
.
.
.
.
.
.
.
.
.
.
.
.
.
.
.
.
.
.
.
.
.
.
.
.
.
.
.
.
.
.
.
.
.
.
.
.
.
.
.
.
.
.
.
.
.
.
.
.
.
.
.
.
.
.
.
.
.
.
.
.
.
.
.
.
.
.
.
.
.
.
.
.
.
.
.
.
.
.
.
.
.
.
.
.
.
.
.
.
.
.
.
.
.
.
.
.
.
.
.
.
.
.
.
.
.
.
.
.
.
.
.
.
.
.
.
.
.
.
.
.
.
.
.
.
.
.
.
.
.
.
.
.
.
.
.
.
.
.
.
.
.
.
.
.
.
.
.
.
.
.
.
.
.
.
.
.
.
.
.
.
.
.
.
.
.
.
.
.
.
.
.
.
.
.
.
.
.
.
.
.
.
.
.
.
.
.
.
.
.
.
.
.
.
.
.
.
.
.
.
.
.
.
.
163
163
164
164
165
165
166
166
167
167
168
168
169
169
170
171
171
172
172
173
173
174
175
175
176
176
177
177
177
178
178
179
179
180
181
181
182
182
183
183
183
183
183
183
184
184
184
184
184
185
185
186
187
187
187
187
222. Launching the "File Browser" application from the All Applications
223. Android home button . . . . . . . . . . . . . . . . .
224. Android menu button . . . . . . . . . . . . . . . . .
225. WiFi settings - network notification . . . . . . . . . . . .
226. MC40 Advanced WiFi settings (1 of 3) . . . . . . . . . .
227. MC40 Advanced WiFi settings (2 of 3) . . . . . . . . . .
228. MC40 Advanced WiFi settings (3 of 3) . . . . . . . . . .
229. B-EP Setting Tool . . . . . . . . . . . . . . . . . .
230. Setting the Print Command Language . . . . . . . . . .
screen
. . .
. . .
. . .
. . .
. . .
. . .
. . .
. . .
.
.
.
.
.
.
.
.
.
.
.
.
.
.
.
.
.
.
.
.
.
.
.
.
.
.
.
.
.
.
.
.
.
.
.
.
.
.
.
.
.
.
.
.
.
.
.
.
.
.
.
.
.
.
.
.
.
.
.
.
.
.
.
.
.
.
.
.
.
.
.
.
.
.
.
.
.
.
.
.
.
188
189
189
190
191
191
191
203
204
Figures
xi
xii
Toshiba TCxAmplify: User's Guide
Tables
1.
2.
3.
4.
5.
6.
7.
8.
9.
10.
11.
12.
13.
14.
15.
16.
17.
18.
19.
20.
21.
22.
23.
24.
25.
26.
27.
28.
29.
30.
31.
32.
33.
34.
35.
36.
37.
38.
39.
40.
41.
42.
43.
44.
45.
46.
47.
48.
49.
50.
51.
52.
53.
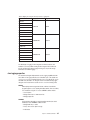
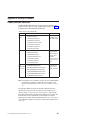
Store Integrator GUI Pay Station - minimum hardware requirements . . .
Self-Service Pay Station - minimum hardware requirements . . . . . .
SSL component communications . . . . . . . . . . . . . . . .
JAVAAPP.XML sample Java applications . . . . . . . . . . . . .
Mapping quantity barcode options . . . . . . . . . . . . . . .
Mapping weight barcode options . . . . . . . . . . . . . . . .
Mapping store options . . . . . . . . . . . . . . . . . . . .
Mapping SurePOS ACE options for Self-Service Scale . . . . . . . .
Mapping SurePOS ACE options for mobile sessions . . . . . . . . .
Mapping SurePOS ACE options for Mobile SI GUI . . . . . . . . .
Mapping of SurePOS ACE options for the Self-Service Pay Station . . .
Daily Statistical Information . . . . . . . . . . . . . . . . . .
Customer Shopping Daily Statistical History Information . . . . . . .
Mobile Shopper Help . . . . . . . . . . . . . . . . . . . .
Normal checkout . . . . . . . . . . . . . . . . . . . . . .
Mobile Shopper - during a blackout period . . . . . . . . . . . .
Mobile Shopper - not enough CSS sessions . . . . . . . . . . . .
Mobile Shopper - various item exceptions. . . . . . . . . . . . .
Mobile Shopper - item not allowed to be sold exceptions . . . . . . .
Time restricted item entry. . . . . . . . . . . . . . . . . . .
Value card processing . . . . . . . . . . . . . . . . . . . .
Age-restricted item exception . . . . . . . . . . . . . . . . .
Quantity required item entry . . . . . . . . . . . . . . . . . .
Weight required item entry . . . . . . . . . . . . . . . . . .
Coupon scanned during the transaction . . . . . . . . . . . . .
Removing an item from the Item Entry screen . . . . . . . . . . .
Removing an item from the Item List . . . . . . . . . . . . . .
Removing an item using the menu icon . . . . . . . . . . . . .
Using the Self-Service Scale for items already in a transaction . . . .
Using the Self-Service Scale to add items to a transaction . . . . . .
Item details flow. . . . . . . . . . . . . . . . . . . . . .
Transaction Alerts . . . . . . . . . . . . . . . . . . . . .
Item Alerts . . . . . . . . . . . . . . . . . . . . . . . .
No advertisements sent to the mobile device . . . . . . . . . . .
Multiple advertisements sent to the mobile device . . . . . . . . .
Transfer Order from a failed mobile device to the store's mobile device .
Mobile device temporarily loses connectivity while shopping . . . . .
Sample screen shots shows T&Cs with links to websites and simple text.
Properties added to the mobileserver.properties file. . . . . . . . .
Self-Service Scale Item Entry screens . . . . . . . . . . . . .
Required audit information from retailer's host system . . . . . . . .
Audit results . . . . . . . . . . . . . . . . . . . . . . .
Sign on user ID and password . . . . . . . . . . . . . . . .
WiFi printing enabled . . . . . . . . . . . . . . . . . . . .
Loyalty number . . . . . . . . . . . . . . . . . . . . . .
Normal checkout . . . . . . . . . . . . . . . . . . . . .
Finishing and suspending transactions . . . . . . . . . . . . .
Cancelling a transaction . . . . . . . . . . . . . . . . . . .
Various item exceptions . . . . . . . . . . . . . . . . . . .
Viewing transaction alerts . . . . . . . . . . . . . . . . . .
Accessing eCoupons . . . . . . . . . . . . . . . . . . . .
Sign off the application . . . . . . . . . . . . . . . . . . .
Starting the MC40 DataWedge Configuration Application. . . . . . .
© Copyright Toshiba Global Commerce Solutions, Inc. 2014
.
.
.
.
.
.
.
.
.
.
.
.
.
.
.
.
.
.
.
.
.
.
.
.
.
.
.
.
.
.
.
.
.
.
.
.
.
.
.
.
.
.
.
.
.
.
.
.
.
.
.
.
.
.
.
.
.
.
.
.
.
.
.
.
.
.
.
.
.
.
.
.
.
.
.
.
.
.
.
.
.
.
.
.
.
.
.
.
.
.
.
.
.
.
.
.
.
.
.
.
.
.
.
.
.
.
.
.
.
.
.
.
.
.
.
.
.
.
.
.
.
.
.
.
.
.
.
.
.
.
.
.
.
.
.
.
.
.
.
.
.
.
.
.
.
.
.
.
.
.
.
.
.
.
.
.
.
.
.
.
.
.
.
.
.
.
.
.
.
.
.
.
.
.
.
.
.
.
.
.
.
.
.
.
.
.
.
.
.
.
.
.
.
.
.
.
.
.
.
.
.
.
.
.
.
.
.
.
.
.
.
.
.
.
.
.
.
.
.
.
.
.
.
.
.
.
.
.
.
.
.
.
.
.
.
.
.
.
.
.
.
.
.
.
.
.
.
.
.
.
.
.
.
.
.
.
.
.
.
.
.
.
.
.
.
.
.
.
.
.
.
.
.
.
.
.
.
.
.
.
.
.
.
.
.
.
.
.
.
.
.
.
.
.
.
.
.
.
.
.
.
.
.
.
.
.
.
.
.
.
.
.
.
.
.
.
.
.
.
.
.
.
.
.
.
.
.
.
.
.
.
.
.
.
.
.
.
.
.
.
.
.
.
.
.
.
.
.
.
.
.
.
.
.
.
.
.
.
.
.
.
.
.
.
.
.
.
.
.
.
.
.
.
.
.
.
.
.
.
.
.
.
.
.
.
.
.
.
.
.
.
.
.
.
.
.
.
.
.
.
.
.
.
.
.
.
.
.
.
.
.
.
.
.
.
.
.
.
.
.
.
.
.
.
. 17
. 17
. 34
. 45
. 50
. 50
. 51
. 51
. 52
. 53
. 53
. 72
. 73
. 78
. 79
. 84
. 85
. 86
. 88
. 89
. 90
. 91
. 92
. 94
. 95
. 96
. 98
. 100
. 102
. 104
. 105
. 107
. 112
. 115
. 115
. 117
. 120
. 123
. 125
. 131
. 149
. 149
. 157
. 160
. 162
. 163
. 164
. 167
. 169
. 171
. 173
. 175
. 177
xiii
54.
55.
56.
57.
58.
59.
60.
61.
62.
xiv
MC40 "Decoders" configuration screens . . . . . .
MC40 "Decoders Params" configuration screens. . .
MC40 File Browser application . . . . . . . . .
MC40 "Intent output" configuration . . . . . . . .
MC40 Advanced WiFi settings . . . . . . . . .
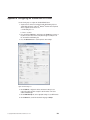
Trace types . . . . . . . . . . . . . . . .
Properties of AEFLOAD.PRO . . . . . . . . . .
Mapping Store Integrator GUI response files to logging
Properties files for Mobile POS . . . . . . . . .
Toshiba TCxAmplify: User's Guide
. . .
. . .
. . .
. . .
. . .
. . .
. . .
levels .
. . .
.
.
.
.
.
.
.
.
.
.
.
.
.
.
.
.
.
.
.
.
.
.
.
.
.
.
.
.
.
.
.
.
.
.
.
.
.
.
.
.
.
.
.
.
.
.
.
.
.
.
.
.
.
.
.
.
.
.
.
.
.
.
.
.
.
.
.
.
.
.
.
.
.
.
.
.
.
.
.
.
.
.
.
.
.
.
.
.
.
.
.
.
.
.
.
.
.
.
.
.
.
.
.
.
.
.
.
.
.
.
.
.
.
.
.
.
.
183
184
185
187
191
193
193
197
201
Safety
Before installing this product, read the Safety Information- Read This First.
Antes de instalar este produto, leia as Informações de Segurança.
Pred instalací tohoto produktu si prectete prírucku bezpecnostních instrukcí.
Læs sikkerhedsforskrifterne, før du installerer dette produkt.
Lees voordat u dit product installeert eerst de veiligheidsvoorschriften.
Ennen kuin asennat tämän tuotteen, lue turvaohjeet kohdasta Safety Information.
Avant d'installer ce produit, lisez les consignes de sécurité.
Vor der Installation dieses Produkts die Sicherheitshinweise lesen.
Prima di installare questo prodotto, leggere le Informazioni sulla Sicurezza.
Les sikkerhetsinformasjonen (Safety Information) før du installerer dette produktet.
Antes de instalar este produto, leia as Informações sobre Segurança.
© Copyright Toshiba Global Commerce Solutions, Inc. 2014
xv
Antes de instalar este producto, lea la informaci¾n de seguridad.
Läs säkerhetsinformationen innan du installerar den här produkten.
xvi
Toshiba TCxAmplify: User's Guide
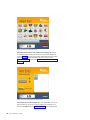
About this guide
This guide describes how to install and configure Version 1 Release 1 of the
Toshiba® TCxAmplify product.
Who should read this guide
This guide is intended for the personnel who will install, configure, and use Toshiba
TCxAmplify.
Where to find more information
Current versions of Toshiba publications are available on the Toshiba support
website at www.toshibacommerce.com/support.
1. Select a product from the hardware or software drop-down list.
2. Click on the appropriate machine type or model for your product.
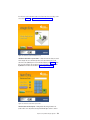
Notice statements
Notices in this guide are defined as follows:
Notes
These notices provide important tips, guidance, or advice.
Important
These notices provide information or advice that might help you
avoid inconvenient or problem situations.
Attention
These notices indicate potential damage to programs, devices, or
data. An attention notice is placed just before the instruction or
situation in which damage could occur.
CAUTION
These statements indicate situations that can be potentially
hazardous to you. A caution statement is placed just before the
description of a potentially hazardous procedure step or situation.
DANGER
These statements indicate situations that can be potentially lethal or
extremely hazardous to you. A danger statement is placed just
before the description of a potentially lethal or extremely hazardous
procedure step or situation.
© Copyright Toshiba Global Commerce Solutions, Inc. 2014
xvii
xviii
Toshiba TCxAmplify: User's Guide
Part 1. Toshiba TCxAmplify system concepts
© Copyright Toshiba Global Commerce Solutions, Inc. 2014
1
2
Toshiba TCxAmplify: User's Guide
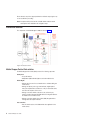
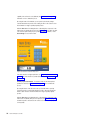
Chapter 1. Introduction
Toshiba TCxAmplify is a complete consumer mobile shopping and associate line
busting software solution that creates an interactive and personalized shopping
experience for consumers in a retail store environment. The consumer mobile
shopping and associate line busting software components work together to create
the Toshiba TCxAmplify solution.
Note: In this publication, the Toshiba TCxAmplify consumer mobile shopping
component refers to the Mobile Shopper, and the associate line busting
component refers to Associate Line Busting (ALB).
The Mobile Shopper component of Toshiba TCxAmplify creates a personalized,
end-to-end shopping experience for consumers while also offering a faster and
more convenient checkout process. Shoppers use their personally-owned mobile
devices to scan items while shopping, thereby reducing or eliminating the need to
re-scan items at the checkout lane. The Mobile Shopper solution also sends alerts
to customers on their mobile devices about additional items they might want to
purchase and any offers, discounts, or store events that are available. This
communication connects the shopper and the retailer, providing valuable insights to
the retailer while delivering unobtrusive messages and alerts to the customer.
The Associate Line Busting (ALB) component of Toshiba TCxAmplify allows store
associates to use an iOS®or Android mobile device to assist shoppers with the
checkout process. Associate line busting capability gives retailers increased
flexibility during peak shopping periods, as well as the ability to send information
about available eCoupons that are pertinent to the transaction directly to the store
associate. If ALB is used, the store associate can suspend the transaction and
allow the shopper to retrieve the transaction at a pay station. For more details on
Associate Line Busting, see Chapter 9, “Associate Line Busting,” on page 151.
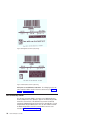
Mobile Shopper highlights
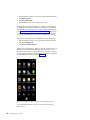
When a shopper scans or keys in an item code using their mobile device, the
Mobile Shopper application sends the item code to the Mobile Engine running on a
server in the store. The Mobile Engine communicates with the 4690 Point of Sale
(POS) system to create a POS transaction and retrieves the item description, price,
and other specific data. The item details are sent back to the mobile device and are
displayed to the shopper. The shopper uses the Mobile Shopper application at
checkout to scan a barcode on the pay station. The Mobile Engine retrieves the
scanned items, which allows for a quicker checkout.
The Mobile Shopper uses the 4690 POS solution and its various components for
loyalty pricing, weight processing for produce, and tendering capabilities to generate
an actual POS transaction with customer-specific pricing. All payment operations
are done using PCI-compliant payment devices. The Mobile Shopper application
integrates across a wireless network in the store with a virtual session of the POS
application, which is hosted on a 4690 store server. This extends the retailer's
current (and often highly-customized and proprietary) POS application functionality
to the mobile device. The camera in the mobile device is used for item bar code
scanning, and for scanning bar code images on the welcome screens of self-service
scales (to transfer weighted item information) and self-service pay stations (to
transfer the transaction to the pay station for payment).
© Copyright Toshiba Global Commerce Solutions, Inc. 2014
3
As previously mentioned, the Mobile Shopper application sends alerts to shoppers.
This Alert feature is simply a mechanism for sending information to shoppers about
store specials, additional items they might want to purchase, discounts, coupons,
and store events. The mobile device can be configured to play a distinctive audio
tone or vibrate whenever a new alert is received, ensuring that the shopper is
aware that new information is available to view. The mobile device also sends
information to the Mobile Engine about which alerts the shopper viewed, providing
the retailer with statistics about which alerts shoppers took the time to read.
Key features
The Mobile Shopper provides the following benefits:
v Creates a personalized, end-to-end mobile device shopping experience for
consumers.
v Makes use of both the Application Client/Server Environment (ACE) and Store
Integrator (SI) to extend POS functionality from the front-end lanes to the Mobile
Shopper (such as: loyalty programs and loyalty pricing).
v Integration with self-service scales to provide a "weights and measures" certified
solution for handling produce with mobile devices.
v Integration with Toshiba Self Checkout (CHEC) Systems to allow self-service pay
stations (SSPS) to expedite customer payment and checkout.
v Integration with Toshiba Store Integrator GUI to expedite customer payment and
checkout.
v An "Exception Framework" to minimize customer interruptions during their
shopping experience, but still provide an optimized means of handling exceptions
prior to leaving the store (for example, age-restricted items or price required
items).
v Establishes a portal or a point of entry from the retailer to the shopper through
their mobile device to drive sales and enhance their shopping experience.
v Uses a new Data Integration Facility (DIF) based Point of Sale (POS) Integration
Hub that sends customer-specific alerts to the mobile device.
How the Mobile Shopper works
To use the Mobile Shopper, shoppers must download a retail version of the
application to their mobile device from either the retailer's website or from an
application store. The retailer is responsible for defining how the application is
deployed to a shopper's mobile device and how shoppers receive any additional
information that is required for installation. For more details, see “Architectural
overview” on page 8.
v To get started, the shopper presses the icon for the store branded mobile
application icon on their mobile device to launch the Mobile Shopper application.
Note: The Android application can be pre-configured using the appropriate
network connection settings. The iOS application must be configured with
the appropriate network connection settings using the device's Settings
feature.
v If a loyalty ID or number is required but was not entered, the shopper is
prompted to scan or key in their loyalty number. This loyalty number is saved in
the application for future use, and can be changed in the application settings if
necessary. If the retailer's POS system supports an Alternate ID entry, the
shopper can enter their 10-digit phone number to use as their loyalty ID.
v The shopper can either scan an item with their mobile device camera or use a
touch screen keypad to enter item numbers.
4
Toshiba TCxAmplify: User's Guide
v The retailer can send transaction alerts to the shopper's mobile device, which are
dependent on either store events or the shopper loyalty number that was used to
start the application. Examples of these alerts could include:
– Deli order ready
– Pharmacy prescription ready
– Store events
- Fresh bread available
- Wine tasting
– Digital wallet
- Coupons that have either been previously selected from a website or
targeted to this shopper
v As the shopper adds items to their transaction:
– The item number, description, net price, and loyalty savings of the most
recently scanned item are displayed, along with the running totals and total
loyalty savings of the entire transaction. Additional item information can be
displayed by touching the item icon and selecting Display Item Details.
v Shoppers can display and review all items in the transaction by touching the Item
List icon.
v Shoppers can use the self-service scale for items that have to be weighed. After
scanning the produce barcode or entering the product look-up (PLU) on their
mobile device, shoppers can follow the steps on the "weights and measures"
certified scale to:
– Scan the barcode on a self-service scale to associate the mobile device
transaction with the scale. The scale displays the produce items previously
scanned or entered on the mobile device and prompts the shopper to weigh
the item and add it.
– The shopper can also key in the produce PLU or perform an item lookup by
using an image search capability if they have not previously entered the items
on their mobile device while shopping.
v After shopping, the customer scans a barcode on either:
– A self-service pay station (a Toshiba Self Checkout System 6 model running
the self-checkout (CHEC) system), or
– A Store Integrator GUI terminal to suspend the order on the mobile device
and retrieve it at the self-service pay station or a Store Integrator GUI
terminal.
The information scanned by the customer is transferred from the mobile
device to a self-service pay station or to a Store Integrator GUI terminal
before the transaction is completed.
v Shoppers can scan all coupons if they are at a self-service pay station, or they
can have the cashier scan them if they are at a Store Integrator GUI terminal.
v If the order contains any exception items (age-restricted item or items that need
to be weighed), a trained store employee can help shoppers with questions and
operational procedures, and will handle these exceptions at the self-service pay
station lane.
v The system provides optional auditing capabilities to validate that what the
customer purchased using their mobile device matches the items in their basket.
v The shopper pays with any allowed tender and completes their shopping order.
Chapter 1. Introduction
5
6
Toshiba TCxAmplify: User's Guide
Chapter 2. TCxAmplify Mobile Shopper overview
This section describes how to install, configure, and use the following components
of the Mobile Shopper application. For details on Associate Line Busting, see
Chapter 9, “Associate Line Busting,” on page 151.
v
v
v
v
v
v
v
v
Smart phones
Mobile Engine
4690 Controllers/Terminals
Self-Service Pay Station
Self-Service Scales
Store Integrator GUI (Attended Pay Station)
POS Integration Hub
CHEC BOSS
Note: The following information is primarily targeted to 4690 ACE customers who
want to leverage consumer mobile shopping and associate line busting
solutions from Toshiba to their 4690 system.
The goal of this information is to provide an overview on how to integrate the
Mobile Shopper application into the retailer's network.
To install and configure the Mobile Shopper, complete the following steps:
1. Verify that all prerequisites are met for your 4690 system.
2. Install the Mobile Shopper on the 4690 store controller, see Chapter 5,
“Installing the Mobile Shopper components,” on page 25. Configure the Store
Integrator Client Session Server (CSS) to support the POS application virtual
sessions (this assumes that Store Integrator is already installed).
3. Install the POS Integration Hub. This assumes that the base Data Integration
Facility (DIF) is already installed on the 4690 store controller.
4. Install the Back Office System Server (BOSS).
5. Configure the POS Integration HUB to support the exception framework, alerts,
and audits.
6. Configure the Mobile Engine to support the Mobile Shopper or Associate Line
Busting (ALB) users.
7. Configure ACE for either the Mobile Shopper or ALB solutions.
8. Configure the front-end systems that will finalize the mobile transactions for:
v The Store Integrator GUI, or
v The self-service pay station (SSPS).
9. Verify that Store Integrator, POS Integration Hub, and the Mobile Engine are all
functioning properly.
10. Set up the wireless networking environment.
11. Install either the Mobile Shopper or ALB on supported devices.
12. Verify basic communications between devices and the Mobile Engine.
13. Optionally, configure the CHEC lanes to support the retrieval of mobile
transactions.
14. Optionally, configure the self-service scales for in-aisle weighed and quantity
item support for Mobile Shopper customers.
© Copyright Toshiba Global Commerce Solutions, Inc. 2014
7
Ensure that each step is done properly and that the verification steps along the way
are successful before proceeding.
Note: An experienced IT professional who is familiar with the retailer's network
should perform these installation and configuration steps.
Architectural overview
The components of the Mobile Shopper for 4690 are shown in Figure 1.
Figure 1. Architectural overview
Mobile Shopper Point of Sale solution
The Mobile Shopper Point of Sale (POS) consists of the following components:
Smart phone
v A very thin interface
v Multi-platform (iOS and Android) phones and other mobile devices
Mobile Engine
v Manages the flow control for each mobile device to facilitate adding new
mobile devices.
v Manages exceptions (such as age restricted items, weight-required
items, price-required items, and items not on file) for each mobile device
and stores the exceptions on the server.
v Manages connections with the self-service scale, self-service pay
stations, and Store Integrator GUI POS terminals for integration between
the mobile devices and other devices.
v Manages connections with the Point of Sale (POS) Integration Hub to
manage alerts and analytic information.
4690 controllers
v Runs the virtual sessions of the POS terminal sales application for the
mobile devices.
8
Toshiba TCxAmplify: User's Guide
v Uses Store Integrator Version 3 Release 5 to support up to 80 concurrent
ACE sessions on one 4690 controller, and up to 300 concurrent sessions
per store.
Self-Service Pay Station
v Handles both cash and non-cash transactions.
v Manages audit transactions.
v Interfaces with the Mobile Engine to retrieve a current transaction and
any exceptions for the specific transaction.
v The solution prevents transactions from completing until all exceptions (if
any) are cleared.
Self-Service Scales
v Uses 4690 terminals re-purposed to be a "weights and measures"
certified scale for adding weight items to the mobile transaction.
v Assumes the graphics used for the self-service scale have a screen
resolution of 1024 x 768.
Store Integrator GUI (Attended Pay Station)
v Interfaces with the Mobile Engine to retrieve the current transaction and
any exceptions for the specific transaction. The solution prevents
transactions from completing until all exceptions (if any) are cleared.
v Manages audit transactions.
POS Integration Hub
v The POS Integration Hub integrates external systems with the mobile
device. Some examples include:
– Promotion Connector – Provides up-sell and cross-sell opportunities
for items purchased.
– In-store Connector – Notifies shoppers of in-store events.
– Additional Services – The Retrieve Digital Wallet and Retrieve
Shopping List.
v Provides the retailer with a portal to the shopper to help increase their
sales volume.
v Uses the Data Integration Facility (DIF) to facilitate messaging.
CHEC BOSS
v The mobile install for BOSS creates an additional database which will
contain mobile shopper audit criteria and item alert data.
v Two web applications are installed on the BOSS. The first provides web
services and database access for auditing, item alerts, and reports. The
second application is used to display mobile shopper reports in a web
browser.
v Reports can be viewed by opening the 'Mobile Reporting' shortcut that
the install places on the desktop. The reports application can be
accessed with the ScsBoss user credentials.
POS Integration Hub
The Point of Sale (POS) Integration Hub is based on the a Data Integration Facility
(DIF) solution that receives events from the Mobile Engine specific to a shopper’s
behavior, and forwards these events to any services the retailer chooses to
implement (see Figure 2 on page 10). These services can then send alerts to the
Mobile Engine, specific to the particular event, which forwards them to the
Chapter 2. TCxAmplify Mobile Shopper overview
9
shopper's mobile device. Sample services have been implemented in the base
solution to provide the retailer with examples of the types of services that can be
provided to the shopper.
The following sections describe the alert categories that can be sent to the
shopper's mobile device.
Transaction Alerts
Transaction Alerts notify customers of communications not related to a specific item.
For example:
v "Persistent Notifications" are notifications that all customers will receive on their
mobile device as soon as they start the Mobile Shopper application. Examples
include:
– Daily specials
– Weekly ads
– Scheduled store events (like "Wine tasting tonight from 7 p.m. to 9 p.m.")
v "Real-time notifications" are notifications that occur during the shopping
experience and can be sent to all customers, or to a specific customer. Examples
include:
– Hot Bread fresh out of the oven! Come try it!
– Your prescription is ready at the Pharmacy.
– Your deli order is ready.
– Your Digital Wallet coupons – Could be downloaded from a retailer's website.
Transaction Alerts can be displayed by touching the Alert icon at the bottom of the
screen. The number that appears in the Alert icon indicates the number of alerts
that have not yet been selected or viewed by the shopper.
Figure 2. Alert icon
Item Alerts
Item Alerts notify customers about up-sell or cross-sell offers that are specific to an
item that was just scanned during the transaction. Examples include:
v If the customer purchased a coffee maker, they might receive an item notification
to add a warranty to their purchase directly from their mobile device. This is
called up-selling.
v If the customer purchased coffee beans, they might receive an item notification to
join a coffee club and add that item to their purchase from their mobile device.
This is called cross-selling.
v If the customer purchased hot dogs and buns, they might receive a notification
that ketchup is on sale (up-selling, but requires the customer to enter the item
during their shopping experience).
10
Toshiba TCxAmplify: User's Guide
Item Alerts can be displayed by touching the Alert icon that appears next to the
item, either on the main screen or in the item list. The number that appears in the
Alert icon indicates the number of alerts that have not yet been displayed or viewed
by the shopper.
Figure 3. Item Alerts
Advertising Alerts
Advertising Alerts are intended to be used by the retailer to sell advertising space
on the mobile device to third party companies. They can be displayed by touching
the gray horizontal bar that appears just below the transaction totals.
Figure 4. Advertising Alerts
Notes:
1. If there are no advertisements sent to the mobile device, the gray bar shown in
Figure 4 will not be displayed on the screen.
2. If there are multiple advertisements, each will be displayed individually for a few
seconds and then "roll" to the next advertisement.
Alert types - For each of the three alert categories (transaction, item, and
advertising) previously described, the alert type can be one of the following:
Display message
v Displays a message to the shopper in a dialog.
v Displays an OK button that when selected, removes the dialog.
Item entry message
v Displays a message that includes an item that can be added to the
transaction in a dialog.
v Displays Yes and No buttons to allow the shopper to add the item to
their transaction, then remove the dialog.
URL
v Starts a browser on the mobile device and goes to the specified URL.
v When the shopper backs out of the browser, the Mobile POS application
is displayed again.
Chapter 2. TCxAmplify Mobile Shopper overview
11
Figure 5. POS Integration Hub
Note: The base product provides infrastructure for some of the connectors
described in the POS Integration Hub. For details on specific support
statements, see “POS Integration Hub” on page 55.
Wireless network configuration and security
As shown in Figure 1 on page 8, the mobile device communicates with the Mobile
Engine over an in-store wireless network using Internet Protocol version 4 (IPv4).
The mobile device obtains an IP address on the wireless network from a Dynamic
Host Configuration Protocol (DHCP) server for the Mobile Shopper. For Associate
Line Busting (ALB), static or DHCP can be used. The mobile device application
discovers the IP address of the Mobile Engine by sending a multicast message to a
multicast group. Therefore, the wireless router or firewall must be configured to
forward Internet Group Management Protocol (IGMP) traffic. The port used for the
multicast messages and the port that connects the mobile device to the Mobile
Engine is configurable in the mobileserver.properties file, or one of its extensions
(see “Property extension mechanism” on page 201 for details).
The mobile application can support various wireless security protocols, such as
WPA2, WPA, and WEP. The security parameters required for connecting to the
wireless network are pre-configured in the mobile application for Android phones.
The security parameters must be configured on an iOS device using its Settings
feature. Networks are pre-configured in the mobile phone application.
The wireless network must be isolated by a firewall from the store network used by
the POS system. It is the responsibility of the retailer to configure the firewall to
ensure it provides the required separation from the POS network, while still allowing
communication between mobile devices connected to the wireless network and the
server on which the Mobile Engine is running.
The mobile application does not require access to the Internet, so the link between
the wireless router and the Internet shown in Figure 1 on page 8 is not absolutely
required. Connectivity between the wireless network and the Internet is only
12
Toshiba TCxAmplify: User's Guide
required if the retailer defines an alert that requires access to the Internet. For
example, if an alert is defined that includes a URL to the retailer's website to display
the weekly specials, there would need to be connectivity between the wireless
network and the retailer's website.
The mobile application does not store, process, or transmit cardholder data. The
process of paying for a transaction that was created using the mobile application is
handled entirely by the POS application. The transaction is transferred from the
mobile device to either the self-service pay station or a POS terminal before the
payment process is started. This means that the mobile application is never
exposed to cardholder data, and the cardholder data is not transmitted over the
wireless network used by the mobile application.
It is the responsibility of the retailer to ensure the overall security of the wireless
network, firewall and router configuration, and to ensure the systems that customers
use to pay their transactions comply with PCI requirements.
Chapter 2. TCxAmplify Mobile Shopper overview
13
14
Toshiba TCxAmplify: User's Guide
Chapter 3. Requirements
This section describes the hardware and software requirements for the Mobile
Shopper and the Associate Line Busting (ALB) components of Toshiba TCxAmplify.
Hardware requirements
For detailed information about the Mobile Shopper resource requirements, use the
Knowledgebase search at www.toshibacommerce.com/support and search on Store
Integrator Resource Requirements article.
Toshiba TCxAmplify controller requirements
The Mobile Shopper and Associate Line Busting (ALB) components require virtual
sessions running on a controller, and a 4690 Version 6 Release 4 OD10 or later
operating system. These virtual sessions are called the Store Integrator Client
Sessions Server (CSS) sessions. The Mobile Shopper and ALB virtual sessions do
not use the same amount of 4690 controller processor and disk resources. The ALB
sessions use more 4690 controller processor and disk resources. For more details,
use the Knowledgebase search at www.toshibacommerce.com/support and search
on the Store Integrator Resource Requirements article.
Toshiba TCxAmplify requires a dedicated 4900-785 subordinate controller with 4 GB
of RAM and the Intel® Core i3 2120 processor option to host the Mobile Shopper
virtual sessions.
Software requirements
This section describes the software requirements for the Mobile Shopper
component of the Toshiba TCxAmplify for 4690.
Store Integrator
Toshiba TCxAmplify for 4690 requires Store Integrator Version 3 Release 5.
4690 OS
For use with Store Integrator, the 4690 V6 R4 (2D) Operating System or later is
required. Store Integrator running with the 4690 OS does not support separating
controllers on different networks.
Virtual file system setup
Java™ programs often have file names greater than eight characters in length, so
the 4690 operating system provides support for these file names by using a virtual
file system (VFS). VFS must be enabled in the 4690 operating system before you
install Store Integrator.
For more information, see the latest 4690 OS Programming Guide at
www.toshibacommerce.com.
POS applications
This section describes the current requirements for using Store Integrator with
Application Client/Server Environment (ACE). Before installing Store Integrator,
contact Toshiba support to identify and obtain the most recent interim fixes
© Copyright Toshiba Global Commerce Solutions, Inc. 2014
15
applicable to the software. The interim fix numbers listed in this guide could have
been superseded as a result of a future Authorized Program Analysis Report
(APAR) activity.
Contact your application provider or integrator for the requirements for using Store
Integrator with another POS application.
ACE requirements
Store Integrator requires ACE Version 7 Release 4 or later.
4610 POS printer
4610 POS printer support is required.
Remote Management Agent requirements
Using Store Integrator with the Remote Management Agent (RMA) requires a V3 or
later RMA Master Agent in the store. Any RMA General Agent on a Store Integrator
system must be Version 2 Release 6 or later for the Store Integrator Agent to be
discovered.
Data Integration Facility
The 4690 Data Integration Facility (DIF) Version 2 Release 2 or later is required for
customers who use the POS Integration Hub.
4690 Mobile Shopper system prerequisites
The 4690 Mobile Shopper solution requires the following system prerequisites.
4690 Operating Environment:
v 4690 Enhanced Operating System Version 6 Release 4 OD10 or later.
v 4690 Store Integrator Version 3 Release 5 for the Mobile Shopper and Associate
Line Busting (ALB) – full version including Client Session Server (CSS) and
Graphical User Interface (GUI). The base version of Store Integrator must be
coordinated with the build level of the Mobile Shopper software as it extends
Store Integrator in several areas.
v 4690 Data Integration Facility (DIF) Version 2 Release 2 or later.
v Optionally, if implementing the self-service paystation or using Self Checkout
Lane as a payment station, the Mobile Shopper for 4690 requires CHEC Version
6 Release 7 Refresh or later. (If using CHEC in the Mobile Shopper solution,
most of the software prerequisites for CHEC will govern the prerequisites for
Mobile Shopper since they use many of the same infrastructure and system
components.)
Consumer mobile devices for the Mobile Shopper require the following
minimum platform levels:
v Android Operating System Version 2.2
v iOS Version 4.3 (phones 3GS or later)
Associate Line Busting requires one or more of the following devices:
v Motorola® MC40 (Android)
v Ingenico ISMP for iPod® Touch (iOS)
v Honeywell Captuvo SL22 SLED for iPod Touch (iOS)
v Other devices might be available through other service offerings
16
Toshiba TCxAmplify: User's Guide
Terminal peripherals - A scanner or scale is required for the self-service scale,
Store Integrator GUI pay station, and the self-service pay station (SSPS).
Table 1. Store Integrator GUI Pay Station - minimum hardware requirements
OS
Terminal
OS 4690 Version 6 Release 4
Classic or later
2.0 GHz / 512 MB
OS 4690 Version 6 Release 4
Enhanced or later
SurePOS™ 350 / At least 1 GB RAM
or any SurePOS 700
terminal supported by
Enhanced 4690 OS
Version 6 Release 4 or later.
Table 2. Self-Service Pay Station - minimum hardware requirements
CHEC OS
Terminal models and (RAM) Controller (RAM)
Note: See the CHEC Software Planning, Installation, Maintenance Programming Guide
Version 6.7, or later for minimum terminal requirements.
CHEC on 4690
4800-742, 4800-743, and
4900-785
2 GB RAM or more
BOSS:
v CHEC 6.7 BOSS or later.
v See the CHEC Software Planning, Installation, Operations, Maintenance and
Programming Guide Version 6.7 (see the section on minimum hardware
requirements).
Chapter 3. Requirements
17
18
Toshiba TCxAmplify: User's Guide
Chapter 4. Network setup examples
This chapter contains examples of network setup planning for the Mobile Shopper
and Associate Line Busting solutions.
Example of a network setup for the Mobile Shopper
There are a variety of network topologies that can be used with the Mobile Shopper.
See Figure 6 for an example of the Mobile Shopper.
Figure 6. Mobile Shopper network architecture
Example of a network setup for Associate Line Busting
The Associate Line Busting (ALB) solution should be configured in a similar way to
the layout in Figure 7 on page 20. This layout also illustrates how the ALB solution
uses the Back Office System Server (BOSS) in its network setup.
© Copyright Toshiba Global Commerce Solutions, Inc. 2014
19
Figure 7. Associate Line Busting network architecture
After configuring the system as shown, the final step in setting up the networking
hardware is configuring the wireless router. Typically, wireless routers use
configuration software that is accessed from a web browser. Review the instructions
provided with the wireless router to complete configuration.
The remainder of this section contains the basic steps on how to configure a router
using a NETGEAR® router as an example. The specific configuration program for
your router may be slightly different, but these instructions provide a general idea of
what must be done:
1. To access the NETGEAR configuration program, enter the following URL:
http://192.168.1.1
2. Enter your username and password on the initial screen. See the instructions
for your router to find the default settings for these fields.
3. Look for a configuration screen that allows you to set the LAN IP Address and
the DHCP starting and ending addresses (see Figure 8 on page 21). In some
router configuration utilities, these parameters are set on two different screens.
For the NETGEAR router used in this example, both of these settings appear on
the same configuration screen:
20
Toshiba TCxAmplify: User's Guide
Figure 8. Initial wireless router settings
4. Set the LAN IP address to 10.10.1.15 as shown in Figure 9. The IP
SubnetMask defaults to 255.255.255.0, which is the same subnet mask used
for the wired network, so no changes are required to the wireless router subnet
mask configuration.
Note: The default LAN IP address is typically 192.168.1.1, but this must be
changed to match the IP address range of the wired network used for
your 4690 controllers and the Back Office System Server (BOSS). When
configuring the wireless router, a LAN IP address must be selected that
is in the same subnet as these other systems, but the router does not
conflict with the addresses used by these other systems. For example,
an IP address of 10.10.1.15 could be used for the wireless router since
this address is greater than any of the addresses used by the 4690
controllers and the BOSS.
Figure 9. Modified wireless router configuration
Note: The wireless router serves out IP addresses to the mobile devices and
the wireless router configuration utility allows the user to define the range
Chapter 4. Network setup examples
21
of addresses that will be used. A range must be used that does not
conflict with any of the other IP Addresses used by other systems. Since
the other systems are using addresses in the range of 10.10.1.2 through
10.10.1.15, the DHCP range should be set to 10.10.1.16 through
10.10.1.254. Figure 9 on page 21 shows the two changes that were
made to the wireless router configuration to set the LAN IP address and
the DHCP range. The areas changed are circled in red.
22
Toshiba TCxAmplify: User's Guide
Part 2. Using the Mobile Shopper for 4690
© Copyright Toshiba Global Commerce Solutions, Inc. 2014
23
24
Toshiba TCxAmplify: User's Guide
Chapter 5. Installing the Mobile Shopper components
This section contains information on how to download and install the Mobile
Shopper component.
The Mobile Shopper installation extends the 4690 Store Integrator Client Session
Server (CSS) component of the system that runs virtual sessions of the point of
sale (POS) terminal sales application for the mobile devices or Associate Line
Busting (ALB) devices.
The changes for CSS, along with the Mobile Shopper, are installed through the
4690 Apply Software Maintenance (ASM). Once installed, you can configure the
sessions to run on the store controller. The instructions in this section assume that
Store Integrator has already been installed on the controller.
Note: Store Integrator Version 3 Release 5 is a required prerequisite of the Mobile
Shopper package.
Installing the Mobile Shopper on a 4690 operating system
The Mobile Shopper can be installed interactively, silently, or remotely.
Interactively installing Mobile Shopper
Perform the following steps to interactively install the Mobile Shopper on a 4690
controller:
1. If the Mobile Shopper is already installed, check Apply Software Maintenance
to verify that it is not in backup mode. Cancel or accept before proceeding.
2. To begin installing the Mobile Shopper, insert the installation CD into the master
controller and type the following at a command prompt:
p:\4690\install
3. Accept the license agreement for the Mobile Shopper. An installation menu is
displayed.
4. Select option 4 to install the Mobile Shopper. The installation process takes
several minutes.
5. After the installation is complete, select the option to view the installation log
(C:\MOBSMSTR.LOG). Verify that no errors occurred during the installation.
Note: If there are any errors, contact Toshiba support personnel before
continuing.
6. From the 4690 System Main Menu, select Installation and Update Aids.
7. Select option 5, Apply Software Maintenance.
8. Select option 2, Activate Maintenance.
9. From the Activate Maintenance panel, click Test or Accept to process the
Mobile Shopper. The software maintenance files are distributed to other
controllers on the local area network (LAN). The controllers will restart after the
distribution is completed.
Silently installing the Mobile Shopper
To install the Mobile Shopper using the silent mode, run the following command:
1. If the Mobile Shopper is already installed, check Apply Software Maintenance
to verify that it is not in backup mode.
© Copyright Toshiba Global Commerce Solutions, Inc. 2014
25
2. To install the Mobile Shopper using the silent mode, run the following at a
command prompt:
p:\4690\install mob
3. After the installation is complete, select the option to view the installation log
(C:\MOBSMSTR.LOG). Verify that no errors occurred during the installation.
4.
5.
6.
7.
Note: If there are any errors, contact Toshiba support personnel before
continuing.
From the 4690 System Main Menu, select option 4, Installation and Update
Aids.
Select option 5, Apply Software Maintenance.
Select option 2, Activate Maintenance.
From the Activate Maintenance panel, click Test, or Accept to process the
Mobile Shopper. The software maintenance files are distributed to other
controllers on the local area network (LAN). The controllers will restart after the
distribution is completed.
Note: To review the results of the silent installation, edit the C:\MOBSMSTR.LOG file.
Remotely installing the Mobile Shopper
To prepare a directory for a remote distribution, the Mobile Shopper installation
must be prepared on a local master controller with all controllers on a LAN system
up and running.
Note: Prior to starting the remote install, it is necessary to verify that there are no
products or components in backup. If products or components are in backup,
use ASM to cancel or accept each one.
The remote install will delete the contents of C:\ADX_IMNT when it begins.
1. To prepare the remote installation for Mobile Shopper, insert the installation CD
into the master controller on the local system.
2. From command mode, type p:\4690\install and press Enter.
3. An installation menu is displayed.
a. Select option 5 to prepare a remote installation directory for Mobile
Shopper.
4. A warning is displayed prior to the deletion of the contents in C:\ADX_IMNT.
Select one of the following:
a. Press 1 to proceed.
b. Press 2 to stop the process and return to the main menu.
5. The remote installation directory create procedure produces several files in
ADX_IMNT with 2,500,000 bytes or less. The newly created files are
MOBRINST.ZIP and MOBRINST.Zxx, where xx ranges from 00 to 99 for as many
files that are needed. If this file size is too big or small for your location, you
can change the batch file to create an acceptable file transmission size for
your location.
6. After the directory preparation is complete, the installation menu is displayed
again.
a. Select option 8 to display the installation log file for the current installation
and check for error messages.
b. The output from this step can also be viewed by reviewing the
C:\MOBPREP.LOG file.
26
Toshiba TCxAmplify: User's Guide
Note: If there are any errors, contact Toshiba support personnel before
continuing.
7. If you are using ADCS/HCP to transmit the files from the host-based controller to
the host, there are two problems you might encounter when storing the files:
a. Advanced Data Communications for Stores (ADCS) has a 8 MB file size
limit. The size of the Mobile Shopper maintenance packages exceeds this
limit.
b. ADCS has a 6-character file name limit, so you will need to use an
ADCS/HCP coded name that will get or put the files in the correct 4690
subdirectory.
To transfer the MOBRINST.* files with ADCS/HCP coded names, first
rename each of the files to ADXSIFxF.DAT so that each file has a unique
name.
Use the ADCS/HCP name !SIFxF to transmit each of the files. You will
need to rename the files back to the original MOBRINST.* file names at
the remote location before continuing.
8. Create or update the Remote Command Processor (RCP) selection file
(ADXCSHCF.DAT in ADX_IDT1) and create an RCP command file, EAMRCP1F.DAT, to
decompress the ADX_IMNT directory.
9. Initiate the REMOTE batch file to copy the files and perform an
installation/migration, and put the installation/maintenance into test mode on
the remote controller. The selection file (ADXCSHCF.DAT) needs to contain the
name of the command file: EAMRCP1F.DAT. The command file (EAMRCP1F.DAT)
needs to contain the following command:
a. The selection file (ADXCSHCF.DAT) needs to contain the name of the
command file: EAMRCP1F.DAT.
b. The command file (EAMRCP1F.DAT) needs to contain the following command:
C:\ADX_SPGM\COMMAND -C C:\ADX_IMNT\MPREMOTE.BAT
c. ADXCST0L N 1CC to install the Mobile Shopper.
Note: You may also include the command to run Apply Software Maintenance
(ASM) in this file.
10. Transfer the MOBRINST.* files from C:\ADX_IMNT to your host processor, and
then to the ADX_IMNT directory in your target store.
Transfer the Compression Utility MPCMPUTL.BAT, and the Remote Install
Utility MPREMOTE.BAT, to the ADX_IMNT directory in your target store. The BAT
files can be found on the Mobile Shopper installation CD in the \4690
subdirectory.
Transfer the RCP selection file(s) and the RCP command file(s) to the
ADX_IDT1 directory of your target store.
Note: ADCS users must rename the transmitted files to the original file names
before continuing.
11. Invoke the RCP using the START USER PROGRAM feature of ADCS or the
INITIATE CLIST command of Netview Distribution Manager (Netview DM).
After the installation or maintenance has been applied, retrieve the following
files to ensure the maintenance was successful:
v ADX_SDT1:ADXCSHSF.DAT
v C:\MPREMOTE.LOG
12. If the installation was successful and you did not include the ASM command in
the RCP selection file, apply the software maintenance at this time.
Chapter 5. Installing the Mobile Shopper components
27
See the Toshiba Global Commerce Solutions Store Integrator User's Guide for
details on installing Store Integrator components.
Point of Sale Integration Hub
The Point of Sale (POS) Integration Hub is based on the Data Integration Facility
(DIF) that integrates external systems with the Mobile Shopper to allow a retailer to
communicate directly with a customer's mobile device. POS IH is required for
handling alerts and managing customer audits.
POS Integration Hub installation
The Mobile Shopper Point of Sale (POS) Integration Hub installation consists of
running the Application Software Maintenance (ASM) package and modifying the
DIF configuration to start the Mobile Shopper POS Integration Hub services.
The following instructions assume that Data Integration Facility (DIF) and the Mobile
Shopper have already been installed on the controller.
1. Accept or cancel any previous level of the Mobile Shopper POS Integration
Hub. If the previous maintenance is not accepted, from the 4690 main menu:
a. Select '4' - Installation and Update Aids.
b. Select '5' - Apply Software Maintenance.
c. Select '2' - Activate the maintenance.
d. Select '3' - Accept the following product (or '2' to cancel the following
product: Mobile Shopper POS Integration Hub).
2. To install the Mobile Shopper POS Integration Hub, use the following procedure:
a. Insert the installation CD into the drive.
b. Enter p:\4690\install.
c. Select Install Mobile POS Integration Hub from the menu and follow the
prompts.
d. After the installation ends, select option 9 to exit the installation.
e. After you exit the command window:
1) Select '4' - Installation and Update Aids.
2) Select '5' - Apply Software Maintenance.
3) Select '2' - Activate the maintenance.
4) Select 'Test' - the maintenance for: Mobile Shopper POS Integration
Hub.
5) Wait for all controllers to reboot.
3. To integrate the Mobile Shopper POS Integration Hub into the DIF configuration,
use the following procedure:
a. The environment configuration for the Mobile Shopper POS Integration Hub
is performed by ADX_IPGM:DIFPIH.BAT. Add the following line to
ADX_IPGM:DIFUSER.BAT if it is not already present:
If exist DIFPIH.BAT batch DIFPIH.BAT
b. The DIF configuration properties that are needed to enable the Mobile
Shopper POS Integration Hub are located in ADX_IPGM:DIFPIH.TXT.
c. If ADX_IPGM:SIIBMDIF.PRO exists, check to see if the Mobile Shopper POS
Integration Hub properties from ADX_IPGM:DIFPIH.TXT are already present in
ADX_IPGM:SIIBMDIF.PRO. If the values that are already in
ADX_IPGM:SIIBMDIF.PRO are acceptable, no further action is necessary.
28
Toshiba TCxAmplify: User's Guide
Individual values can be changed by placing a line containing the desired
property value in ADX_IPGM:SIUSERDI.PRO.
d. If ADX_IPGM:SIIBMDIF.PRO does not exist or does not contain the Mobile
Shopper POS Integration Hub properties from ADX_IPGM:DIFPIH.TXT, then
perform the following:
1) If neither ADX_IPGM:DIFUSER.PRO or ADX_IPGM:SIUSERDI.PRO exists, copy
ADX_IPGM:DIFPIH.TXT to ADX_IPGM:SIUSERDI.PRO.
2) If ADX_IPGM:DIFUSER.PRO does exist, then the Mobile Shopper POS
Integration Hub configuration will be merged into this file. Otherwise, the
configuration will be merged into the existing ADX_IPGM:SIUSERDI.PRO file.
a) Save the current DIFUSER.PRO or SIUSERDI.PRO if it already exists.
b) Merge the container.services value from DIFPIH.TXT with the
container.services value from DIFUSER.PRO; or, SIUSERDI.PRO so
that container.services contains the desired Mobile Shopper POS
Integration Hub services along with the existing Data Integration
Facility services that were in use prior to the Mobile Shopper POS
Integration Hub software installation. MobileBrokerService,
ItemExceptionsSuspendService, ItemExceptionsSaveService,
ItemExceptionsRetrieveService, and ItemExceptionsRemoveService
are required in all installations and therefore, are the minimum
services that must be configured. Other Mobile Shopper POS
Integration Hub services are optional.
c) Copy the remaining properties from DIFPIH.TXT to DIFUSER.PRO, or to
SIUSERDI.PRO.
3) If using the Mobile Shopper, change the value of
AuditSoapRequestActor.host.url to the URL of the Mobile Audit Web
Service.
4) If using the Associate Line Busting component, comment out the
AuditSoapRequestActor.host.url and EventSoapRequest
Actor.host.url lines.
e. In order to activate the configuration, stop DIF, and then wait one minute to
restart it. Examine ADX_IPGM:DIFLOG.0 and verify that all DIF services started
successfully.
Smart phones
The following sections describe how to install smart phones for the Mobile Shopper.
A retailer must brand the smart phone application to match their look and feel, and
then use the appropriate channel to distribute the software (either through the
Google Play Store, their own website for Android phones, or the Apple® Retail Store
for iPhones®).
Android installation
Customer installation - It is the retailer's responsibility to provide an installable
application through the Google Play™ Store or the retailer's website.
iOS installation
It is the retailer's responsibility to provide an installable application through iTunes®
or the retailer's website.
Chapter 5. Installing the Mobile Shopper components
29
Self-Service Pay Station installation
Version 6.7 of CHEC must be installed prior to installing the CHEC Mobile
extensions. The CHEC Mobile extensions for 4690 are installed as a part of the
Mobile Shopper component. The CHEC Mobile extension requires that the CHEC
application be installed on the 4690 before the extension can be used.
For details on creating a 4690 CHEC terminal, refer to the Toshiba Checkout
Environment for Consumer-Service Software Planning, Installation, and
Maintenance Guide Version 6.7.
Back Office System Server installation
Version 6.7 of CHEC must be installed prior to installing the CHEC Mobile
extensions. Installing the Mobile Shopper on the CHEC Back Office System Server
(BOSS) will provide auditing capability for mobile transactions and viewing Mobile
Shopper reports. It is a requirement to install the Mobile Shopper on the BOSS, not
an option.
The install creates the MobileE database. The MobileE database contains sample
Mobile Shopper audit criteria and item alert data.
There are two web applications that are installed. The first application provides web
services and database access used for auditing, item alerts, and reports. The
second application is used to display reports in a web browser.
Installation
Perform the following steps to install the BOSS:
1. Insert the Mobile Shopper CD into the CD drive on the BOSS (for example,
D:).
2. Open a command window and change the directory to D:tools\install.
3. Type install to start the installation. The install logs are located in
C:\install\log\MobileInstall.log. The database creation log is located in
C:\install\log\BuildMobileE.log.
For more information on creating a CHEC BOSS, refer to the Toshiba Checkout
Environment for Consumer-Service Software Planning, Installation, and
Maintenance Guide Version 6.7.
30
Toshiba TCxAmplify: User's Guide
Chapter 6. Configuring the Mobile Shopper on 4690
This section describes how to configure the Mobile Shopper component on 4690.
4690 configuration
The TCP/IP hostname resolution can be done through a local host file or domain
name server. If you are not using a domain name server, make sure the resolv file
does not contain a reference to a name server. Inspect the resolv file
(ADX_SDT1:ADXHSIRF.DAT) and comment out or delete any reference to name server
IP addresses that are not used.
1. Add the following entries to the hosts file (\adx_sdt1\adxhsihf.dat) file:
a. yyy.yyy.yyy.yyy MobileEngineHostname where yyy.yyy.yyy.yyy is the IP
Address of the machine where the Mobile Engine will be executing.
b. zzz.zzz.zzz.zzz POSIntegrationHub where zzz.zzz.zzz.zzz is the IP Address
of the machine where the POSIntegrationHub will be executing.
c. www.www.www.www MobileDBHostname where www.www.www.www is
the IP address of the machine where the mobile database resides.
d. Ensure an entry exists for each controller in the environment as follows:
v xxxx.xxxx.xxxx.xxxx CC
v xxxx.xxxx.xxxx.xxxx DD
v xxxx.xxxx.xxxx.xxxx EE
v xxxx.xxxx.xxxx.xxxx FF
2. Ensure the hosts file is distributed to all controllers (ADXCSU0L 3 5 hosts).
Validate the network by pinging MobileEngineHostname from the 4690.
3. Ensure that each store controller has their Hostname User Logical Filename
assigned to their controller ID. To check this, you can go to the command mode
on each controller and enter define –s –n hostname. For example, if you
issued the define command on the EE controller, you should see the following
"hostname = EE". If the hostname definition is not correct, use Controller
Configuration to set it properly for each controller.
4. Configure Suspend Retrieve.
Suspend Retrieve configuration for the ACE environment
a. Configure the ACE suspend/retrieve, including local suspend/retrieve on all
controllers. This information can be found in the SurePOS Application
Client/Server Environment for 4690 OS Planning and Installation Guide (see
the section on planning the system environment).
b. Confirm that the controller specific logical names for the local suspend
retrieve file were successfully defined during the ACE install. For each
controller ID xx, there should be logical names for xx_SRTRX: and xx_SRKYC:,
where xx is the controller ID for each specific controller on the system. If
these logical names do not exist after ACE has been installed, then
user-defined logical file names must be defined for each. Search on
knowledgebase article R1004936 at www.toshibacommerce.com for more
information.
c. Modify C:/ADX_IPGM/ACECMISC.USx (where x is an available number in your
ACE environment). This file allows suspended transactions to be ready for
retrieval sooner. The C:/ADX_IPGM/ACECMISC.USx file should include the
following lines (";" and the "/A:" are significant):
© Copyright Toshiba Global Commerce Solutions, Inc. 2014
31
;The idle time to wait between suspended transactions in milliseconds
;Range is 3000 to 10000 milliseconds(3 to 10 seconds)
/A:[Suspend]
/A:SuspendInterval = "3000"
Ensure the new file is distributed (ADXCSU0L 3 5 ACECMISC.USx).
5. Ensure ACEGIPC is configured to run on the controller where Mobile Shopper
CSS sessions are running. For information on ACE configuration, reference the
chapter on planning the system environment in the SurePOS Application
Client/Server Environment for 4690 OS Planning and Installation Guide, Version
7 Release 4 (G362-0548).
6. Reboot all controllers once the activation has completed.
Mobile Engine
The Mobile Engine component of the Mobile Shopper performs the following tasks:
v Manages the UI for each mobile device.
v Manages exceptions (for example, age restricted items, weight required items,
price required items, and items not on file) for each mobile device and stores
them for retrieval by the Store Integrator GUI or the self-service pay station when
appropriate.
v Manages the connections with the self-service scale, self-service pay stations,
and the Store Integrator GUI POS terminals for integration between a mobile
device and these devices.
v Manages the connections with the POS Integration Hub to manage alerts and
analytic information.
Mobile Engine configuration
The Mobile Engine is configured using the file ADX_IPGM:MECFG00F.DAT. To activate a
configuration, copy MECFG00F.DAT and replace the '00' with the controller node ID.
Distribute this file (ADXCSU0L 3 5 MECFGxxF.DAT). See ADX_IPGM:MECFG00F.DAT for an
explanation of the Mobile Engine configuration properties.
Mobile Engine configuration for 4690
The Mobile Engine requires IBM® Java 6 and runs on the Linux side of the 4690
operating system.
Perform the following to create the Mobile Engine configuration file:
1. Create a directory, M:\mobuser, on the file server controller if it does not already
exist.
2. In the M:\mobuser directory, copy the c:\adx_ipgm\mserpro.mob file to the
siusermobileserver.properties configuration file. The mserpro.mob file is a
sample file delivered with the Mobile Shopper package that you can use to
create the production properties that the Mobile Shopper uses in the
siusermobileserver.properties file.
In the siusermobileserver.properties file, make any changes to the
mobileserver.properties file for your specific environment, including networking
information and controller and session information. In order to define a property,
you must remove the # at the beginning of the line.
Add siusermobileserver.properties to the ADX_IPGM:mobuser.jar file. This step
must be performed on the file server controller. For this step to complete
32
Toshiba TCxAmplify: User's Guide
successfully, all controller processes using the ADX_IPGM:mobuser.jar file must be
stopped, including Client Session Server (CSS), Data Integration Facility, and any of
the controller terminals.
1. Go to each controller that is running CSS and issue the adxcss1l stat
command to determine if CSS is running. If CSS is running on this controller,
issue the adxcss1l stop command. Stop any background applications that
might reference the Mobile Shopper files, which can include both Data
Integration Facility (DIF) or the Mobile Engine running on the 4690.
2. Change to the m:\mobuser directory.
3. If ADX_IPGM:mobuser.jar exists, run: m:\java2\bin\jar -uvf
adx_ipgm:mobuser.jar siusermobileserver.properties.
4. If ADX_IPGM:mobuser.jar does not exist, run: m:\java2\bin\jar -cvf
adx_ipgm:mobuser.jar siusermobileserver.properties.
5. Distribute mobuser.jar by running: adxcsu0l 3 5 adx_ipgm:mobuser.jar.
6. In adx_ipgm:
adxnszzl -c mobj6pat.zip mobuser.jar
adxcsu01 3 5 adx_ipgm:mobj6pat.zip
On all the controllers, run: adx_ipgm:mobj6pat.bat.
7. Restart any of the controller processes that use ADX_IPGM:mobuser.jar,
including the Mobile Engine background application and CSS adxcss1l start.
SSL configuration
Communications between mobile devices and the Mobile Engine use Secure
Socket Layer (SSL) by default. SSL can also be enabled for some of the other
component communications as shown in Table 3 on page 34.
Chapter 6. Configuring the Mobile Shopper on 4690
33
Table 3. SSL component communications
Communication Link
Configuration
Mobile Engine –
POSBC/CSS controller
The SSL alias, SSL, is used by the mobile solution (Mobile
Shopper or Associate Line Busting). The SSL alias is an alias
for AEF.
v POSBC/CSS runs the JIF server (POSBC).
1. To enable SSL in POSBC/CSS, create a
siuserssl.properties file with AEF.enable=true.
2. Put the siuserssl.properties file in siuser.jar, in
C:\ADX_IPGM. Create a CSSJ6PAT.ZIP file containing the
siuser.jar and distribute it using the file distribution
utility (ADXCSU0L).
3. On each system, run C:\ADX_IPGM\CSSJ6PAT.BAT to
copy the files to the F: drive.
4. Restart CSS on the appropriate system.
v Mobile Engine uses two clients – one for communicating
with POSBC/CSS and the other for communicating with
DIF/POSIH. Only communication between the Mobile
Engine and POSBC/CSS will use SSL communication.
1. To enable SSL in the Mobile Engine client, use the
same siuserssl.properties file with
AEF.enable=true.
2. Put the mobuser.jar file in C:\ADX_IPGM. Create a
MOBJ6PAT.ZIP file containing this mobuser.jar file and
distribute it using the file distribution utility (ADXCSU0L).
3. On each system, run C:\ADX_IPGM\MOBJ6PAT.BAT to
copy the files to the F: drive.
4. Restart the Mobile Engine on the appropriate system.
Note:
The property in the mobileserver.properties file that defines
the SSL alias being used can be overridden. The property is:
posbc.server.soep.ssl.alias=SSL
By default, the posbc.server.soep.ssl.alias property points
to SSL. If you want to turn off SSL from the Mobile Engine to
POSBC/CSS for whatever reason, you can change the
posbc.server.soep.ssl.alias property to point to a new alias
that you will have to define in the SSL bundle as previously
described.
34
Toshiba TCxAmplify: User's Guide
Table 3. SSL component communications (continued)
Communication Link
Configuration
Mobile Engine –
SI Mobile GUI terminal;
Self-Service Scale terminal
The configuration for Mobile Engine to the Store Integrator
GUIs (that is, mobile GUI and self-service scale GUI) is
accomplished similarly to the configuration described
previously. However, this communication uses
SISocketFactory (still using the SSL alias SSL). Configuring
the SI GUIs is the last step.
1. An SSL bundle can be created with:
v C:\ADX_IDT1\rsskeys
v C:\ADX_IDT1\rssstore
This bundle should be loaded to the root of the Q: drive.
2. An siuserssl.properties extension file that has
AEF.enable=true should also be in an siuser.jar file
that is in C:\ADX_IPGM. This jar is already included in an
existing bundle for the GUI terminal.
3. Activate the terminal configuration and reload the Mobile
GUI or self-service scale.
Notes:
1.
Custom SSL files (key store and trust store) must be
used in a production environment. The SSL bundle would
then be created with the custom SSL files (for example,
custkeys and custstor). See the Store Integration (SI)
documentation on SI SSL Certificate Update Instructions
for details on creating and using custom SSL files,
including the complete contents of the
siuserssl.properties file.
2. The property in the mobileserver.properties file that
defines the SSL alias being used can be overridden. The
property is:
si.gui.ssl.alias=SSL
By default, the alias is SSL. If you want to turn off the
SSL alias, you can change the si.gui.ssl.alias property to
point to a new alias that you will have to define, and must
also be prefixed by the new alias in the SSL bundle of
Store Integrator.
Chapter 6. Configuring the Mobile Shopper on 4690
35
Table 3. SSL component communications (continued)
Communication Link
Configuration
Mobile Engine –
CHEC Self-Service
Pay Station terminal
The configuration for the Mobile Engine to the CHEC
self-service pay station GUI is completed like the
configuration for POSBC/CSS and Mobile Engine described
previously. This communication also uses SISocketFactory
(still using the SSL alias SSL). Configuring the self-service
pay station GUI terminal definition is all that is the last step.
1. Create jar file C:\ADX_IDT1\ mobstore.jar file which
contains an siuserssl.properties extension file with the
following properties:
v AEF.enable=true
v AEF.KeyFileName=/cdrive/f_drive/rsskeys
v AEF.TrustFileName=/cdrive/f_drive/rssstore
2. A new SSL preload bundle should be created with the
following:
v C:\ADX_IDT1\rsskeys
v C:\ADX_IDT1\rssstore
v C:\ADX_IDT1\mobstore.jar (that was created in the
previous step)
This new bundle should be loaded in the root of the F:
drive in the self-service pay station terminal load
definition.
3. Activate the terminal configuration and reload the CHEC
self-service pay station.
Notes:
1. Custom SSL files (key store and trust store) must be
used in a production environment. The
siuserssl.properties in mobstore.jar would have, for
example, AEF.KeyFileName=/cdrive/f_drive/custkeys
and AEF.TrustFileName=/cdrive/f_drive/custstor. The
SSL preload bundle would then be created with the
custom SSL files (for example, custkeys and custstor).
See the Store Integrator (SI) documentation on SI SSL
Certificate Update Instructions for details on creating and
using custom SSL files, including the complete contents
of the siuserssl.properties file.
2. The property in the mobileserver.properties file that
defines the SSL alias being used can be overridden. The
property is:
si.gui.ssl.alias=SSL
By default, the alias is SSL. If you want to turn off the
SSL alias, you can change the si.gui.ssl.alias property to
point to a new alias that you will have to define, and must
be prefixed by the new alias in the SSL bundle of Store
Integrator.
Running the Mobile Engine
The Mobile Engine is run by the Mobile Engine Launcher background task on 4690.
The Mobile Engine Launcher must be set up one time on the 4690 controller where
the Mobile Engine runs. The Mobile Engine can be controlled from the command
line.
36
Toshiba TCxAmplify: User's Guide
Setting up the Mobile Engine Launcher background task
Edit the controller configuration to add a background task for the controller that runs
on the Mobile Engine. From the 4690 Main Menu, do the following:
1. Select '4' - Installation and Update Aids.
2. Select '1' - Change Configuration Data.
3. Select '2' - Controller Configuration.
4. Press Enter to continue past the LAN Configuration in a single controller
configuration. In a multi-controller configuration, go to the controller
configuration screen for the controller where the Mobile Engine will be running.
5. Place an X next to Background Application.
6. Select 1 next to Define a Background Application.
7. Fill in the necessary information as shown Figure 10.
Figure 10. Change background application
8. Press PgDn and select Y to start the background task on IPL.
Chapter 6. Configuring the Mobile Shopper on 4690
37
Figure 11. Define background application
In a multi-controller system, select Yes to 'Start when master', 'Start when not
master', 'Start when file server', and 'Start when not file server'. Press ENTER
to complete background task definition.
9. Press F3 to go back to the Configuration menu and select 4 - Activate
Configuration.
10. Select 2 - Controller Configuration.
11. After the activation completes, reboot the controller.
Controlling the Mobile Engine
The Mobile Engine can be controlled using the MEMANAGE command found in
ADX_IPGM. Figure 12 on page 39 shows the function that MEMANAGE provides:
38
Toshiba TCxAmplify: User's Guide
Figure 12. MEMANAGE command
Troubleshooting the Mobile Engine
Logs from the Mobile Engine Launcher and the Mobile Engine are located in the
f:\mobile\logs directory. The log files located here are useful to service personnel.
Configuring Client Server Session for the Mobile Shopper
If you already have a C:\adx_idt1\aefio.xml file, merge the C:\adx_imnt\
aefio.mob with your existing aefio.xml file to include the self-service scale
(SSScale) entries. Otherwise, the mobile installation will install a file for you.
Note: If the aefio.xml file did not exist prior to the mobile installation, the size of
the C:\adx_idt1\aefio.xml and C:\adx_idt1\aefio.mob will be the same.
Mobile Shopper operator sign-on credentials for ACE
For the Mobile Shopper ACE environment, you must configure the operator IDs and
passwords for all of your mobile terminals in both ACE Data Maintenance and the
si*logon.properties bundle. Make sure the mobile operators are authorized for all
necessary terminal functions and procedures, such as, No-Sale Price Verify and
Training Mode.
Ensure the Birth Date for all mobile operators is defined as 1/1/1960 (Data
Maintenance --> Operator Authorization Records --> Personal --> Birth Date).
The self-service scale user IDs and passwords require a specific format and can be
obtained from your Toshiba engagement representative.
Chapter 6. Configuring the Mobile Shopper on 4690
39
ACE input state table changes
The state table EAMS@000 must be changed so that function code 241 can accept
data. This function code is used for TLOG logging by the Mobile Engine in ACE. If
this function code is not already added for state 10, then it should be added as a
common function code defined in state 10 (MAIN). The attributes of the function
code are the same as the attributes for function code 63 (DATA ENTRY), see the
diagrams starting with Figure 13 through Figure 20 on page 44. You should make
these changes regardless of the Mobile Shopper or Associate Line Busting
solutions.
Figure 13. Attributes for function code 241 (1 of 8)
40
Toshiba TCxAmplify: User's Guide
Figure 14. Attributes for function code 241 (2 of 8)
Figure 15. Attributes for function code 241 (3 of 8)
Chapter 6. Configuring the Mobile Shopper on 4690
41
Figure 16. Attributes for function code 241 (4 of 8)
Figure 17. Attributes for function code 241 (5 of 8)
42
Toshiba TCxAmplify: User's Guide
Figure 18. Attributes for function code 241 (6 of 8)
Figure 19. Attributes for function code 241 (7 of 8)
Chapter 6. Configuring the Mobile Shopper on 4690
43
Figure 20. Attributes for function code 241 (8 of 8)
Client Session Server configuration
The Client Session Server (CSS) in a mobile shopper environment must use a
modified launch command. Starting with Store Integrator V3 R5, the launch
command filename can be specified in the C:\ADX_IPGM\ADXAExxF.dat file (where xx
is the controller ID), using the property file css.launchFileName.
Toshiba TCxAmplify V1 R1 supplies a CSS launch command file for the mobile
environment named C:\ADX_IPGM\AEFVIRT.MO6.
Note: CSS in a mobile environment will run in the Java 6 JVM.
Standard output and error stream file locations should specify (using the property
css.stdStreamsDir) when CSS runs in the Java 6 JVM to a location on the f: drive.
Use f:/si/logs as the location of the standard output and error stream files so that
the captured files are located with the CSS runtime log files. See the following
example from an ADXAExxF.DAT file:
css.launchFileName=ADX_IPGM:aefvirt.mo6
css.stdStreamsDir=f:/si/logs
Note: The TCxAmplify installation will always replace the ADX_IPGM:aefvirt.mo6
file. If the customer has modified this file, it is important that they save a
copy of their modified ADX_IPGM:aefvirt.mo6 file prior to a new TCxAmplify
installation in order to make the same modifications to the newly-installed
version.
44
Toshiba TCxAmplify: User's Guide
Terminal configurations for the Mobile Shopper
Configuring Store Integration GUI terminals on 4690 OS
Sample files are included on the TCxAmplify Installation CD in the /4690/GUI
directory. These files are in application-specific directories, for example, the
/4690/GUI/ACE directory.
The following files are found in each application-specific /4690/GUI folder:
v JAVAAPP.XML
v PRELOAD.XML
The following files are found on the Store Integrator installation CD in the
4690/GUI/ACE folder:
v SAVECFG.BAT
v RESTCFG.BAT
The JAVAAPP.XML file contains sample Java applications for the various terminal
configurations. Each character in the application name represents one part of the
application's configuration. The list in Table 4 describes what each character means.
Table 4. JAVAAPP.XML sample Java applications
Terminal configuration
Characters
POS application
[A|S|G|O] (ACE, SA, GSA or Other)
Terminal type
[T|C] (Stand-alone Terminal or
Controller/Terminal)
Display configuration
[O|C|D|S] (Operator, Customer, Dual Display,
and Self-Service Scale)
Heap size
[S|M] (Small-68M, Medium-96M)
Mobile extensions
[M] (Mobile)
Note: For example, ATOMM represents an ACE terminal, operator display, and a
medium-sized heap for use with the Silver Theme for the TCxAmplify Mobile
Shopper GUI.
For more information, refer to the Toshiba Store Integrator User's Guide (V3 R5), in
the section that discusses using OS 4690 advanced Java configuration and
bundling instead of .RSP files for the Store Integrator GUI application. This section
gives guidance on importing the Store Integrator GUI Java application and the
preload bundle samples. The same instructions will apply to importing the sample
TCxAmplify Java application definitions and preload bundle definitions.
Configuration changes for a stand-alone Mobile Store Integrator GUI
terminal
To change the configuration of a Store Integrator GUI stand-alone terminal,
complete the following steps:
1. Go to the Device Characteristics for the TCxAmplify SI GUI Terminal window:
a. Select RAM disks.
1) Select the Q disk only.
2) Enter the disk size (minimum of 85 or 5 MB larger than current
non-mobile store configuration).
Chapter 6. Configuring the Mobile Shopper on 4690
45
b. Select Java Redirection, and then select Enable Advanced Java
Redirection.
1) Select Advanced Java Redirection, and then select the following:
ANDISPLAY
ANDISPLAY2
I/O Processor and Tone
c. Serial Devices:
1) Port A: Logical Port 1
2) Port B: Logical Port 2 (If you are using the Toshiba BEV4 label printer,
its default port is COM 2. If you need to use COM 1, change your
mobileserver.properties value for label.printer.portID to COM 1.)
3) First Additional Port: Disabled
4) Second Additional Port: Disabled
5) Third Additional Port: Disabled
6) Fourth Additional Port: Disabled
d. Video Display:
1)
2)
3)
4)
5)
Character format: 25 lines by 80 characters
Graphics format: 1024 by 768
Color format: Maximum available (64K or more)
Screen saver: Enabled
System display: Yes
2. Go to Load definitions:
a. Select the terminal you want to change.
b. Select Java Applications.
c. For the "Select the type of Java application to configure:" choice, select
Java 2.
d. Select the primary application that matches the configuration you are
running (TCxAmplify operator GUI or Dual Display GUI {ATOMM or other
applications}).
e. Change the preload drive to Q.
f. Save your changes and exit.
3. Select JVM preload from the left hand side of the screen.
a. Ensure you change the JVM preload drive value to Q or M.
b. The M drive can only be used if you have a hard drive in the terminal.
c. Selecting Q will cause the JVM to be preloaded to the Enhanced RAM disk
instead of the terminal hard-drive.
d. Save your changes and exit.
4. Select Preload Bundles from the left hand side of the screen.
a. Change the drive letter to Q.
b. Select the bundles from the left hand side to the right hand side of the
screen.
The bundles are:
PRO
SVUSER
ACEJARS
ELITE (optional)
46
Toshiba TCxAmplify: User's Guide
4690JARS
AEFJARS
COMMON
POSBC
THEME (or whatever bundle you created to contain the SILVER.JAR)
MOBGUI
c. Save your changes and exit.
5. Activate the terminal configuration and reload the terminals.
Note: Whenever a *.JAR file, *.ZIP file, or *.PRO file contained in any of your
defined preload bundles is modified by replacing it on the system, you must
run ADXPLDRB in command mode before reloading the terminals.
Configuration changes for controller/terminals: Mobile Store Integrator
GUI
To change the configuration for a controller/terminal, complete the following steps:
1. Go to the Device Characteristics for the TCxAmplify SI GUI Terminal window:
a. Select Java Redirection, select Enable Advanced Java Redirection.
b. Select Advanced Java Redirection, and select Use default Advanced
Java Redirection Settings.
2. Go to Load definitions:
a. Select the terminal you want to change.
b. Select Java Applications.
c. For the "Select the type of Java application to configure:" choice, select
Java 2.
d. Select the primary application (ACOMM).
e. Change the preload drive to C.
f. Save your changes and exit.
3. Select JVM preload from the left hand side of the screen.
a. Change the JVM preload drive to M.
b. Save your changes and exit.
4. Activate the terminal configuration and reload the controller/terminals.
Configuration changes for a stand-alone Self-Service Scale terminal
Shoppers use the Mobile Shopper self-service scale to enter weight required items
into their mobile transaction while they are in the produce section of the store.
These scales are 4690 terminals that are repurposed to be a "weights and
measure" certified scale for adding weighted items to the mobile transaction.
To change the configuration of a self-service scale stand-alone terminal, complete
the following steps:
1. Go to the Device Characteristics for the TCxAmplify Self-Service Scale terminal:
a. Select RAM disks.
b. Select the Q disk only.
c. Enter the disk size (75 to 100 MB is usually enough).
1) Select Java Redirection, and select Enable Advanced Java
Redirection.
2) Select Advanced Java Redirection, and select the following:
Chapter 6. Configuring the Mobile Shopper on 4690
47
ANDISPLAY
ANDISPLAY2
I/O Processor and Tone
Printer Handler
d. Save your changes and exit.
2. Go to Load definitions:
a. Select the terminal you want to change.
b. Select Java Applications.
c. For the "Select the type of Java application to configure:" choice, select
Java 2.
d. Select the primary application that matches the configuration you are
running (TCxAmplify self-service scale {ATSMM}).
e. Change the preload drive to Q.
f. Save your changes and exit.
3. Select JVM preload from the left hand side of the screen.
a. Ensure you change the JVM preload drive value to Q or M.
b. The M drive can only be used if you have a hard drive in the terminal.
c. Selecting Q will cause the JVM to be preloaded to the Enhanced RAM disk
instead of the terminal hard-drive.
d. Save your changes and exit.
4. Select Preload Bundles from the left hand side of the screen.
a. Change the drive letter to Q.
b. Select the bundles from the left hand side to the right hand side of the
screen.
The bundles are:
PRO
SVUSER
ACEJARS
ELITE (optional)
4690JARS
AEFJARS
COMMON
POSBC
THEME (or whatever bundle you created to contain the SILVER.JAR)
MOBSSS
c. Save your changes and exit.
5. Activate the terminal configuration and reload the terminals.
Note: Whenever a *.JAR file, *.ZIP file, or *.PRO file contained in any of your
defined preload bundles is modified by replacing it on the system, you must
run ADXPLDRB in command mode before reloading the terminals.
Configuration changes for a Self-Service Pay Station terminal
To enable CHEC Mobile configuration for a Self Service Pay Station, complete the
following steps:
1. From Generic Terminal Configuration, select Load Definitions.
2. Select the Self-Service Pay Station terminal, then edit it.
48
Toshiba TCxAmplify: User's Guide
3. Select Extensions.
4. Select the check box for CHEC Mobile (ADXXTDAE.DAT).
5. Select Preload Bundles from the left hand side of the screen, and then:
a. Change the drive letter to F.
b. Select the MOBCHEC bundle from the left hand side to the right hand side
of the screen.
6. Select Save, and then exit.
7. Activate the terminal configuration and reload the terminals.
By default, the Mobile Extensions allow the CHEC lane to function as a normal self
checkout, as well as, a Mobile retrieval pay station. You can disable the mobile
configuration from your CHEC lane or force the CHEC lane to operate as Mobile
Only (that is, Mobile retrieval required to start a transaction). Changing this behavior
requires the following configuration on the Back Office System Server (BOSS):
1. Select Start/ALL Programs/Toshiba Checkout Environment for
Consumer-Service/Configure BOSS and Lanes.
2. Select the Asset layer from the left side of the window, and the terminal
number you would like to edit from the right side.
3. Select the Integration Options tab.
4. There are two configurations related to the Mobile Extensions:
a. EnableMobileHandling - Choosing False for EnableMobileHandling will
disable all the mobile features and the lane will function as a normal CHEC
lane.
b. Allow Item Scan First - Choosing False for the Allow Item Scan First
option will force the lane to be Mobile Only. This means you will be required
to retrieve orders from the mobile device to start a transaction. The lane will
function like a normal CHEC lane after the mobile order has been retrieved.
For more information on the CHEC configuration tool, refer to Toshiba Checkout
Environment for Consumer-Service Software Planning, Installation, and
Maintenance Guide Version 6.7.
Configuration changes for controller/terminals: Self-Service Scale
To change the configuration for a controller/terminal, complete the following steps:
1. Go to the Device Characteristics for the TCxAmplify Self-Service Scale
controller/terminal:
a. Select Java Redirection, and select Enable Advanced Java Redirection.
b. Select Advanced Java Redirection, and select the following:
ANDISPLAY
ANDISPLAY2
I/O Processor and Tone
Printer Handler
c. Save your changes and exit.
2. Go to Load definitions:
a. Select the terminal you want to change.
b. Select Java Applications.
c. For the "Select the type of Java application to configure:" choice, select
Java 2.
d. Select the primary application (ACSMM).
Chapter 6. Configuring the Mobile Shopper on 4690
49
e. Change the preload drive to C.
f. Save your changes and exit.
3. Select JVM preload from the left hand side of the screen.
a. Change the JVM preload drive to M.
b. Save your changes and exit.
4. Activate the terminal configuration and reload the controller/terminals.
Important Note: After successfully loading your terminals or controllers, you may
(optionally) change the Java Application Advanced characteristics and remove the
entries for Redirected STDERR and STDOUT. If you do not remove these entries, the
STDERR and STDOUT files in the SILOGS directory will grow forever. You should
continue to redirect the STDERR file, this file can be used in problem determination.
After making a change to either the STDOUT or STDERR redirection files, Terminal
Configuration Activation is required.
ACE Personalization option changes
This section describes the ACE Personalization configuration for the store, the
self-service scale, mobile sessions, the mobile SI GUI, and the self-service pay
station.
ACE store options
Use these table descriptions to configure the following store options.
Table 5. Mapping quantity barcode options
SurePOS ACE option
location
Options -> Barcode ->
Formats
SurePOS ACE option name Details
ID
Use the next ID for your
options.
Note: Do not use ID 46 or
47. If your last ID is 45, use
48 or later (skip 46 and 47).
Description
SSScale Quantity
In use
Enabled
Family
3=EAN
Format
00IIIIIIIIIIIIIIAAAAQQQQ
Lookup Key Format
IIIIIIIIIIIIII
Is Coupon?
Disabled
Table 6. Mapping weight barcode options
SurePOS ACE option
location
Options -> Barcode ->
Formats
50
Toshiba TCxAmplify: User's Guide
SurePOS ACE option name Details
ID
Use the next ID for your
options.
Note: Do not use ID 46 or
47. If your last ID is 45, use
48 or later (skip 46 and 47).
Description
SSScale Weight
In use
Enabled
Family
3=EAN
Format
10IIIIIIIIIIIIIIIWWWW0000
Table 6. Mapping weight barcode options (continued)
SurePOS ACE option
location
SurePOS ACE option name Details
Lookup Key Format
IIIIIIIIIIIIII
Is Coupon?
Disabled
Table 7. Mapping store options
SurePOS ACE option
location
SurePOS ACE option name Details
Options-> Store->
Suspend/Retrieve
Use Suspend/Retrieve
barcode
Enabled
Options-> Store->
Suspend/Retrieve
Allow Local
Suspend/Retrieve
Enabled
Self-Service Scale options for ACE
Create terminal-specific or terminal group options for each of the terminals or
terminal groups that will be running the self-service scale.
Table 8. Mapping SurePOS ACE options for Self-Service Scale
SurePOS ACE option
location
SurePOS ACE option name Details
Options -> Security ->
Manager IDs
Mgr ID
Add 373737
Options -> Security ->
Manager IDs
Manager's key needed
Disabled
Options -> Security -> Item
Entry2
Quantity required items
bypass B029 prompt
Enabled
Options -> Department
Groups
Maximum keyed quantity
limits
+++ +++ +++
Options -> Tender -> Generic Void transaction limit
99999.99
Options -> Tender -> Generic Exchange transaction limits
+++ +++ +++
®
Options -> Store -> Coin
Dispenser
Current selection
0
Options -> Weight/Volume ->
Limits
Type of override required to
accept same weight as
previous item
0
Loyalty -> General -> ID
Entry
Type of override required for
keyed customer ID
0
Loyalty -> General -> ID
Entry
Type of override required for
new customer ID
0
EPS -> Device -> PIN Pad
Config
PIN pad type
0
Note: The label printer for the self-service scale must be plugged in to Logical Port
2 (Serial Port B in most cases). If not, change the label.printer.portID
property in siusermobileserver.properties to match the setting defined in
your Device Characteristics for the self-service scale.
Chapter 6. Configuring the Mobile Shopper on 4690
51
Mobile session options for ACE
Create terminal-specific or terminal group options for each of the terminals or
terminal groups that will be running the Client Session Server (CSS) sessions for
mobile shoppers.
Table 9. Mapping SurePOS ACE options for mobile sessions
SurePOS ACE option
location
SurePOS ACE option name Details
Options -> Security ->
Manager IDs
Mgr ID
Add 373737
Options -> Security ->
Manager IDs
Manager's key needed
Disabled
Options -> Security -> Item
Entry2
Quantity required items
bypass B029 prompt
Enabled
Options -> Security -> Voids
Prompt for reason code when Disabled
Void key pressed
Options -> Department
Groups
Maximum keyed quantity
limits
+++ +++ +++
Options -> Tender -> Generic Void transaction limit
99999.99
Options -> Tender -> Generic Exchange transaction limits
+++ +++ +++
Options -> Store ->
Suspend/Receive
Suspend needs manager's
override
Disabled
Options -> Store -> Coin
Dispenser
Current selection
0
Options -> Weight/Volume ->
Limits
Type of override required to
accept same weight as the
previous item
0
Options -> Restricted Sales
-> General
Re-check Periods Before
Tender
0
Print -> Sales Receipt ->
Digital Receipt
Enable Digital Receipt
Support to generate format:
Image copy
Disabled
Print -> Sales Receipt ->
Digital Receipt
Enable Digital Receipt
Support to generate format:
Semantic copy
Disabled
EPS -> Device -> PIN Pad
Config
PIN pad type
0
Loyalty -> General -> ID
Entry
Type of override required for
keyed customer ID
0
Loyalty -> General -> ID
Entry
Type of override required for
new customer ID
0
Options tender-> TDR Limits
Note: This option should be
set for all tenders.
Auto loan amount
0.00
Options-> Store -> Devices
Auto Sign Off Idle Time
9999.99
Options-> Store -> Devices
Auto Subtotal Time Period
0
Mobile SI GUI options for ACE
Create terminal-specific or terminal group options for each of the terminals or
terminal groups that will be running the Mobile SI GUI.
52
Toshiba TCxAmplify: User's Guide
Table 10. Mapping SurePOS ACE options for Mobile SI GUI
SurePOS ACE option
location
SurePOS ACE option name Details
Options-> Restricted Sales->
General
Re-check Periods Before
Tender
1
Self-Service Pay Station options for ACE
Create terminal-specific options or terminal group options for each of the terminals
that will run the self-service pay station (CHEC).
Table 11. Mapping of SurePOS ACE options for the Self-Service Pay Station
SurePOS ACE option
location
SurePOS ACE option name Details
Options -> Store -> Self
Checkout
Terminal function
1: Self Checkout
Options -> Store -> Self
Checkout
Version
1: Store Integrator
Options -> Store ->
Suspend/Retrieve
Use suspend/retrieve
barcode
Enabled
Options -> Store ->
Suspend/Retrieve
Maximum number of
suspended transactions per
terminal
999
Options -> Store ->
Suspend/Retrieve
Suspend needs manager's
override
Disabled
Options -> Store ->
Suspend/Retrieve
Retrieve needs manager's
override
Disabled
Options -> Store -> Devices
Auto sign off idle time
9999.99
Options -> Store -> Coin
Dispenser
Current selection
0
Options -> Store -> Food
Stamps/Tax
Prompt for Eat-in or Take-out Disabled
Options -> Security ->
Manager's ID
Mgr ID
Add 373737
Options -> Security ->
Manager's ID
Manager's Key Needed
Disabled
Options -> Weight/Volume ->
Limits
Type of override required to
accept same weight as
previous item
0
Options -> Security -> Cash
Drawer
Open time limit
999999
Options -> Security ->
Overrides
Void of item not sold
Disabled
Options -> Security -> Item
Entry2
Quantity required items
bypass B029 prompt
Enabled
Options -> Security -> Void
Void Reason ID
Note: The entry here is
optional, but must match the
"SCS Security Void" reason
code shown next.
Chapter 6. Configuring the Mobile Shopper on 4690
53
Table 11. Mapping of SurePOS ACE options for the Self-Service Pay Station (continued)
SurePOS ACE option
location
Options -> Security -> Void
54
SurePOS ACE option name Details
SCS Security Void reason
code
Note: This value must be
included in Void reason ID
list.
Options -> Tender -> Generic Void Transaction Limit
99999.99
Options -> Tender -> Generic Exchange Transaction Limits
+++ +++ +++
Options -> Tender -> Tdr
Limits -> Cash
Change Limit
+++ +++ +++
Options -> Tender -> Tdr
Limits -> Cash
Max Tender Entry
+++ +++ +++
Options -> Tender -> Tdr
Limits -> Cash
Max Quantity Limit
999
Options -> Tender -> Tdr
Limits -> Cash
Verification Limit
0
Options -> Tender -> Tdr
Limits -> Cash
Auto Reconcile Limit
Amount=9999.99
Count=9999
Loyalty -> General -> ID
Entry
Prompt checker to ask for
customer ID
Disabled
Loyalty -> General -> ID
Entry
Type of override required for
keyed customer ID
0
Loyalty -> General -> ID
Entry
Type of override required for
new customer ID
0
Print -> Post Print -> General Print Post Transaction
Enabled
Options -> Restricted Sales
-> General
0
Toshiba TCxAmplify: User's Guide
Re-check Periods Before
Tender
Chapter 7. Additional system components
This chapter discusses the Point of Sale (POS) Integration Hub configuration
properties, Trust Level Management, and the Mobile Report Web Application for the
Mobile Shopper.
POS Integration Hub
Unless indicated otherwise in the following sections, all configuration properties for
the POS Integration Hub are specified in ADX_IPGM:SIUSERDI.PRO or
ADX_IPGM:DIFUSER.PRO depending on which of these two files is used by the retailer
to provide user configuration for DIF.
Included services
The base Mobile Shopper solution includes the POS Integration Hub (PIH) services
described in the following sections. The MobileBrokerService is required for all
mobile implementations. The other services are optional and should be included
only if required for a particular retailer implementation.
MobileBrokerService
The MobileBrokerService provides outside applications, such as the Mobile Engine
and mobile payment stations, with access to the POS Integration Hub. The
MobileBrokerService receives messages from applications such as the Mobile
Engine and publishes those messages to the POS Integration Hub broker. In
addition, the MobileBrokerService subscribes to messages on behalf of the
application and delivers those messages to the application.
ClassPreloadService
The ClassPreloadService loads necessary classes such as JDBC drivers that are
not loaded automatically. This service must be enabled if the
TransactionAlertService, ItemAlertService , or TargetedCouponAlertService is
enabled.
AuditService
The AuditService is the audit connector and must be enabled if audits are
performed during checkout. The AuditService interacts with the retailer’s audit
enterprise web service and provides the audit input from the web service to the
payment station.
The AuditService subscribes to the "transaction transfer initiated" event message
that is published by the Mobile Engine when the shopper scans the payment
station. On startup, each payment station (self-service pay station or a Store
Integrator GUI attended pay station) connects to the POS Integration Hub through
the MobileBrokerService and registers a subscription to receive audit response
messages. When the shopper scans the payment station, the Mobile Engine
publishes a "transaction transfer initiated" event message to the POS Integration
Hub via the MobileBrokerService. Since the AuditService is subscribed to the
"transaction transfer initiated" event message, it will receive the event message,
encapsulate it in an audit request, and send the audit request to the audit enterprise
web service.
When the audit response is received from the enterprise web service, it is published
to the POS Integration Hub, addressed to the payment station indicated in the
"transaction transfer initiated" event message. Since the MobileBrokerService is
© Copyright Toshiba Global Commerce Solutions, Inc. 2014
55
subscribed to audit response messages on behalf of the payment station, it will
receive the audit response message and forward it to the payment station to be
used in the audit process.
The AuditService supports the following configuration properties.
AuditSoapRequestActor.timeout
This property specifies the amount of time in milliseconds to wait for a
response. This property is optional. The default value is 5000 (5 seconds).
AuditSoapRequestActor.host.url
This property specifies the URL of the SOAP server or web service. This
property is required.
AuditSoapRequestActor.soap.action.url
This property specifies the value to be placed in the SoapAction header of
the request. This property is optional. The default value is
http://mobile.retail.ibm.com/PosIntegration/ws/audit/V1/
MobileAuditInterface/processRequest.
MobileEventLogService
The MobileEventLogService logs incoming mobile events to the C:\SILOGS
directory on the controller on which POSIH is running, and can serve as a simple
implementation of an analytics connector. Writes to the event log file are not
'assured', in that data may be lost in the case of unexpected failures such as
hardware failures, application crashes, and operating system crashes. The event
log is implemented as a rotating set of files. As each file reaches the given size
limit, it is closed, rotated out, and a new file opened.
Successively older files are named by adding "0", "1", "2" into the base filename,
such that if mobevent.0 is the current file, mobevent.1 is the previous file, and
mobevent.2 is the oldest file (where X is determined by the 'number of log files to
keep' configuration option). The retailer is responsible for retrieving the files after
they are rotated off, archiving them if desired, and processing the file contents as
appropriate.
The MobileEventLogService supports the following configuration properties.
MobileEventLogService.subscription-list.include
This property indicates whether the subscription includes or excludes the
events specified by subscription-list. A value of true indicates that the
subscription consists of only the events specified by subscription-list. A
value of false indicates that the subscription consists of all events except
those specified by subscription-list. This property is optional, and
defaults to false if not set.
MobileEventLogService.subscription-list
This property specifies a comma separated list of event type names
defining the events that the broker should provide to the service instance.
This property is optional. The default value is NotificationMsg. Since the
default value of subscription-list.include is false, the default behavior
of MobileEventLogService is to log all mobile events except for customer
notification (alert) events. See SIMobileInterface.doc for a description of
the various mobile events.
AuditSoapRequestActor.soap.action.url
This property specifies the value to be placed in the SoapAction header of
the request. This property is optional. The default value is
56
Toshiba TCxAmplify: User's Guide
http://mobile.retail.ibm.com/PosIntegration/ws/audit/V1/
MobileAuditInterface/processRequest.
Item Exceptions Services
The Item Exceptions Services: ItemExceptionsSuspendService,
ItemExceptionsSaveService, ItemExceptionsRetrieveService, and
ItemExceptionsRemoveService provide for the reliable transfer of item exception
data between the Mobile Engine and pay station terminals. In some installations a
relational database may be used for item exception data transfer, and the Item
Exceptions Services do not need to be started in these installations.
TransactionAlertService
The TransactionAlertService is the transaction alert connector. Transaction Alerts
are the means by which customers are notified of communications not related to a
specific item. Examples include:
v Daily specials
v The current adds for the week
v Scheduled store events, such as, "Wine tasting tonight from 7-9 p.m."
By default, the TransactionAlertService will check a database table for relevant
transaction alerts whenever a customer starts the Mobile Shopper application, and
when the customer scans an item using their mobile device. The
TransactionAlertService can be used to trigger alerts for:
v All shoppers when they start the Mobile Shopper application.
v Specific shoppers when they start the Mobile Shopper application.
v All shoppers when they scan a particular item.
v Specific shoppers when they scan a particular item.
ItemAlertService
The ItemAlertService is the item alert connector. Item Alerts notify customers of
up-sell and cross-sell offers that are specific to an item that was just scanned
during the transaction. Examples include:
v If the customer purchased a coffee maker, they may receive an item notification
to add a warranty to their purchase directly from the mobile device (up-selling).
v If the customer purchased coffee beans, they may receive an item notification to
join a coffee club and add that item to their purchase directly from the mobile
device (cross-selling).
v If the customer has purchased hot dogs and buns, they may receive a
notification that ketchup is on-sale (up-selling, but requiring a customer to enter
the item during their shopping experience).
v The ItemAlertService will check a database table for relevant item alerts
whenever a customer scans an item using their mobile device. Item alerts cannot
be limited to specific customers. Item alerts are defined in a similar manner to
transaction alerts.
TargetedCouponAlertService
The TargetedCouponAlertService is the targeted coupon alert connector. The
TargetedCouponAlertService generates transaction alerts for EM/EME coupons that
are targeted to a customer. In order for an alert to be generated for a particular
targeted coupon, the characteristics of the alert must be defined in a database
table. If an alert is defined for an EM/EME coupon targeted to a customer, then the
defined alert will be delivered to the customer when the Mobile Shopper application
Chapter 7. Additional system components
57
is started. Alerts are generated only for coupons targeted to the customer at the
beginning of the shopping trip. Alerts are not generated for coupons targeted to the
customer during the shopping trip.
The TargetedCouponAlertService supports the following configuration properties:
TargetedCouponAlertService.consolidateNotifications
Indicates whether a separate notification should be generated for each
occurrence of a particular targeted coupon number in the customer record,
or whether a single notification should be generated regardless of the
number of instances. If true, then a single notification will be generated for
each unique targeted coupon number. If false, a notification will be
generated for each targeted coupon number, and if a given targeted coupon
number is present multiple times, then multiple notifications will be
generated. The initial notification for a given targeted coupon number will
use the MsgId value defined in the database. Subsequent notifications for
the same targeted coupon number will append a sequence number to the
MsgId value from the database. The sequence number begins at 2, and
increases by one for each subsequent notification for the same targeted
coupon number. This property is optional. If this property is not specified, a
value of false will be used.
TargetedCouponAlertService.msgIdSuffixSeparator
This is the string to use to separate the MsgId value from the database
from the sequence number in the case where consolidateNotifications is
false and the customer record contains multiple occurrences of a given
targeted coupon number. This property is optional. If this property is not
specified, a value of "." will be used.
PointsAlertService
The PointsAlertService is the points balance alert connector. The
PointsAlertService generates transaction alerts for EM/EME points clubs in which
the customer is enrolled. In order for an alert to be generated for a particular points
club, the characteristics of the alert must be defined in the file
ADX_IPGM:PIHPOINT.PRO. The format of this file is described below. If an alert is
defined for an EM/EME points club in which the customer is enrolled, then the
defined alert will be delivered to the customer when the Mobile Shopper application
is started.
Alerts are generated only for clubs in which the customer is enrolled at the
beginning of the shopping trip. Alerts are not generated for clubs in which the
customer enrollment changes during the shopping trip. In addition, if the alert
contains the points balance, the points balance as of the start of the transaction will
be shown to the shopper. The points balance displayed to the shopper will not be
updated during the shopping experience, that is, there will be no 'running total'
displayed for point balances.
The PointsAlertService requires the CustomerAddedParserService, and if the
PointsAlertService is enabled, then the CustomerAddedParserService must also be
enabled in order for club points alerts to be generated.
The PointsAlertService supports the following configuration properties:
PointsAlertService.includeZeroBalance
Indicates whether a notification should be generated for points clubs in
which the customer has a balance of zero. If true, then a notification will be
generated for points clubs having a zero balance. If false, a notification will
58
Toshiba TCxAmplify: User's Guide
not be generated for points clubs having a zero balance. This property is
optional. If this property is not specified, a value of false will be used.
PointsAlertService.includeUnavailableBalance
Indicates whether a notification should be generated for points clubs for
which a balance is not available, for example, because the customer is not
enrolled in the points club. If true, then a notification will be generated for
points clubs for which a balance is not available. If false, a notification will
not be generated for points clubs for which a balance is not available. This
property is optional. If this property is not specified, a value of false will be
used.
PointsAlertService.unavailableBalanceValue
Specifies a numeric balance value that should be used for points clubs for
which a balance is not available. If this property is not specified, a value of
null will be used.
PointsAlertService.refreshMillis
Specifies how often to reread PIHPOINTS.PRO in order to load changes
made to the customer points notification definitions. The value is specified
in milliseconds. If this property is not specified, a value of 300000 (five
minutes) will be used.
The alert characteristics for individual EM/EME clubs are defined in the file
ADX_IPGM:PIHPOINT.PRO. This file is structured as a Java properties file. The
property names must be prefixed with "N." where N is the club number. For
example, the following entry specifies the title for club 1:
1.title=Your Baby Bucks balance is {1}
The following properties are supported in PIHPOINTS.PRO:
groupingName
The text name of the notification grouping. If this property is not specified,
the default value is "Points Balances".
title
The notification title that will be displayed to the customer. The title is
processed using a Java MessageFormat that supports the following
arguments:
0 is the club number.
1 is the points balance as a string value.
2 is the points balance as an integer value.
3 is the points balance as a decimal value.
If this property is not specified, the default value is "Your club {0} balance is
{1}".
In general, argument 1 (string value) is used to display the balance exactly
as it was received from the POS application, argument 2 (integer value) is
used to display the balance as a numeric value formatted according to the
default locale, and argument 3 (decimal value) is used to display the
balance as a currency value formatted according to the default locale.
If the includeUnavailableBalance configuration property is true and the
balance for a points club is not available, then the value of argument 1 will
be the value of the balanceUnavailable property from PIHPOINTS.PRO, or
the text "unavailable" if no value is specified for the balanceUnavailable
property. The value of arguments 2 and 3 will be the value of the
unavailableBalanceValue configuration property.
Chapter 7. Additional system components
59
contentType
The notification content type.
0 indicates the content is text that should be displayed with an OK
button.
1 indicates the content is text that should be displayed with a Yes or No
button.
2 indicates the content is a URL.
If this property is not specified, the default value is 0.
content
The content of the notification to be displayed when the customer touches
the notification title. The title is processed using a Java MessageFormat that
supports the same arguments as the title. If this property is not specified,
the content will contain the same text as the title.
imageLocation
The location of the image to display next to the notification title. The image
location must be in the class path of the application. If this property is not
specified, the default value is clubN.png, where N is the club number.
The following is an example PIHPOINTS.PRO file defining alerts for clubs 9, 11, and
14. The lines beginning with # are comments included to explain the entries.
#
# Club 9 balance formatted as a currency value
9.title=Your Rx Bucks balance is {3,number,currency}
# Club 9 alert content is a URL
9.contentType=2
9.content=http://www.retailer.com
# Club 9 image in ADX_IPGM:resource
9.imageLocation=resource/Rx.png
#
# Club 11 balance formatted as a numeric value
11.title=Your Baby Club balance is {2}
# Club 11 alert content is text
11.content=Redeem 500 baby club points for a $5 gift certificate good on
hundreds of baby items
# Club 11 image in ADX_IPGM:resource
11.imageLocation=resource/baby.png
#
# Club 14 balance formatted as a numeric value if balance is
# available, or the string "unavailable" if the balance is
# not available.
14.title=Your Family Club balance is {2,choice,-1#unavailable|-1<{2}}
14.imageLocation=resource/coins.png
CustomerAddedParserService
The CustomerAddedParserService is the Customer Added Event Parser. This service
is an internal service that is used by the following service: PointsAlertService.
If any of the above services are enabled, then the CustomerAddedParserService
must also be enabled.
Trust Level Management
The Trust Level Management (TLM) system calculates a "level of trust" for each
shopper that can be used to determine how often the shopper should be subjected
to an audit. The TLM system consists of the following major features:
Scoring Based on Audit History
Allows a retailer to base future mobile transaction audit decisions on past
60
Toshiba TCxAmplify: User's Guide
audit performance. For example, customers can be subjected to more
frequent and increasingly severe audits when they have a history of audit
failures. Inversely, customers can be subjected to less frequent and less
severe audits as they establish trust by passing audits.
Scoring Inputs
Builds on Scoring Based on Audit History by adding additional inputs that
influence audit decisions such as random chance. With the Scoring Based
on Audit History alone, audits occur at a given frequency based on the
customer trust level, so it is possible for an observant customer to predict
the transaction in which they will be audited, and potentially modify their
behavior based on the knowledge that they will be audited. Adding more
inputs, such as a random chance to the audit decision makes it much more
difficult for a customer to predict when they will be audited, which in turn
makes audit performance a more reliable measure of customer trust.
Trust Level Management components
The Trust Level Management system consists of the following components, which
will be discussed in more detail in the following sections.
Customer Data Store
A relational database table that contains audit information related to a
particular customer, including performance on past audits.
Template
The overall container for the configuration of the audit service.
Audit Class
A classification of a customer for audit purposes, along with the
configurable parameters defining the class.
Configuration Data Store
A set of relational database tables containing the templates and audit
classes.
Audit Request Web Service
A web service called to determine how to audit a particular mobile
transaction.
Events Web Service
A web service called when various events occur during the mobile shopping
trip, such as customer added, item added, or audit results.
Audit Results Event Handler
Called by the Events Web Service to update the Customer Data Store with
the results of an audit for a particular mobile transaction.
Properties Store
Contains the configuration properties for the web services. The properties
store is implemented using JNDI environment entries.
Trust Level Management Scoring based on audit history
The Scoring Based on Audit History feature allows the retailer to separate
customers into different classes based on past audit performance. Each of these
audit classes supports parameters that define how often to audit the customer and
what type of audit to perform. For spot audits, the number of items to scan, as well
as, the number of failed items allowed can also be defined.
Chapter 7. Additional system components
61
Trust Level Management Scoring based on audit history
configuration
The Scoring Based on Audit History feature requires the creation of a template that
serves as a container for the customer audit classes. A template is defined by a row
in the TLM_AUDIT_TEMPLATE table in the relational database. Multiple templates
can be defined, but only a single template is active at any given time. Templates
are defined by adding rows to the TLM_AUDIT_TEMPLATE table using a tool, such
as, the DB2® Control Center or by issuing SQL commands.
The TLM_AUDIT_TEMPLATE table contains the following data elements:
TEMPLATE_ID
A number uniquely identifying the template.
DESCRIPTION
A text description of the audit template.
Each template has one or more audit classes. Each template must have a class
where both MIN_AUDITS and TRUST_LEVEL are equal to zero. Similar to
templates, audit classes are defined by adding rows to the TLM_AUDIT_CLASS
table using a tool, such as, the DB2 Control Center or by issuing SQL commands.
The TLM_AUDIT_CLASS table contains the following data elements.
CLASS_ID
An auto-generated number identifying the audit class.
DESCRIPTION
A text description of the audit class.
TEMPLATE_ID
The number identifying the audit template with which this class is
associated.
MIN_AUDITS
The number of times the customer must have been audited in order to be in
this class.
TRUST_LEVEL
The percentage of audits the customer must have passed in order to be in
this class.
MAX_TRANS_NO_AUDIT
The maximum number of mobile transactions the shopper can perform
without an audit.
AUDIT_TYPE
The type of audit to perform. Valid values are None, Spot, and Full.
NUM_TO_SCAN
The number of items required to be scanned during a Spot audit. This value
is relevant only for a Spot audit. A value of NULL indicates that no value
should be sent (so that the default configured on the store controller will be
used). A value of less than zero indicates that a default value from the
Properties Data Store should be used.
NUM_FAILED_ALLOWED
The number of failed items allowed before escalating to a Full audit. A failed
item is an item scanned or entered during the audit that is not present in
the transaction. This value is relevant only for a Spot audit. A value of NULL
indicates that no value should be sent (so that the default configured on the
62
Toshiba TCxAmplify: User's Guide
store controller will be used). A value of less than zero indicates that a
default value from the Properties Data Store should be used.
Audit classes are typically defined in such a way that audits become more frequent
and/or more severe as the customer trust level decreases. See your Toshiba
engagement representative for an example of audit classes that implement this
behavior.
The TLM Web Services supports several properties that control various aspects of
their operation. These property values can be changed using application
configuration tools provided by the Web server, such as the Administrative Console
provided with WebSphere®.
MobileAuditService/AuditTemplateId
The number identifying the audit template to use to process audit requests.
This number must correspond to a TEMPLATE_ID value in the
TLM_AUDIT_TEMPLATE table in the relational database.
MobileAuditService/NumItemsToScan
The number of items required to be scanned during a Spot audit to return in
the audit response if the audit class indicates the default value should be
returned.
MobileAuditService/NumFailedItemsAllowed
The number of failed items allowed before escalating to a Full audit to
return in the audit response if the audit class indicates the default value
should be returned.
MobileEventService/RequestHandler
The request handler for the Mobile Event Web Service. This value may be
changed to the fully-qualified class name of a custom event request handler
implementation class. For example, a custom event request handler may
return alerts informing the shopper of special promotions in response to
Mobile Shopping events such as customer added and item added to cart.
An event request handler class must implement the
com.tcx.mobile.posintegration.ws.request.handler.EventRequestHandler
interface.
The following properties control error handling and should be customized with care.
MobileEventService/RetriableExceptions
A space separated list of the fully-qualified class names of exceptions that
are considered "retriable" by the Mobile Event Web Service. If one of these
exceptions occurs while invoking the configured event handlers, then the
current transaction will be rolled back and each event handler will be
recalled to process the same event again. This prevents a transient error
from causing a permanent failure. This feature is intended primarily for use
with event handlers that perform operations in a transactional context. If
there are a mix of transactional and non-transactional handlers, then the
transactional handlers should be listed first in the MobileEventService/
EventHandlers property so that the non-transactional handlers are not
called multiple times due to a "retriable" exception from a transactional
handler. An event handler must be prepared to receive the same event
twice if a "retriable" exception occurs in a subsequent event handler.
The following exceptions are retried by default:
Chapter 7. Additional system components
63
OptimisticLockException
Two handlers simultaneously attempted to update the same
database row(s).
DuplicateKeyException
Two handlers simultaneously attempted to retrieve a database row
for updating and inserted a new row if no row was found on the
retrieval.
StaleConnectionException
The underlying connection to the database is no longer usable.
MobileEventService/MaxRetries
The maximum number of times event processing should be retried for a
particular event.
MobileEventService/RetryDelay
A space separated list of the fully-qualified class names of exceptions that
are considered "retriable" by the Mobile Audit Request Web Service. If one
of these exceptions occurs while processing the audit request, then the
request processing will be attempted again. This prevents a transient error
from causing a permanent failure.
The following exception is retried by default:
StaleConnectionException
The underlying connection to the database is no longer usable.
MobileAuditService/MaxRetries
The maximum number of times a particular audit request should be retried.
MobileAuditService/RetryDelay
The amount of time in milliseconds to delay between retries of an audit
request.
In order to access and modify the TLM Web Services properties via the
Administrative Console provided with WebSphere, do the following:
1. In the Tasks list on the left, expand Applications, expand Application Types, and
then click WebSphere enterprise applications.
2. Click mobile_web_services_war.
Figure 21. WebSphere enterprise applications
3. Under Web Module Properties, click Environment entries for Web modules.
64
Toshiba TCxAmplify: User's Guide
Figure 22. Environment entries for Web modules
4. Make any necessary changes to the values and click OK.
5. Click the Save link in the Messages box.
Figure 23. Save
6. The configuration changes will take effect the next time the
mobile_web_services_war application is restarted.
Trust Level Management scoring based on audit history
administration
The following sections describe the Trust Level Management (TLM) scoring based
on the audit history.
Starting and stopping the TLM Application: In order to start the Trust Level
Management application through the Administrative Console provided with IBM
WebSphere, do the following:
1. In the Tasks list on the left, expand Applications, expand Application Types, and
then click WebSphere enterprise applications.
Chapter 7. Additional system components
65
2. Click the checkbox next to mobile_web_services_war.
3. Click the Start button at the top of the Enterprise applications frame.
Figure 24. Enterprise applications - start
In order to stop the Trust Level Management application through the Administrative
Console provided with IBM WebSphere, do the following:
1. In the Tasks list on the left, expand Applications, expand Application Types, and
then click WebSphere enterprise applications.
2. Click the checkbox next to mobile_web_services_war.
3. Click the Stop button at the top of the Enterprise applications frame.
Figure 25. Enterprise applications - stop
Messages and logging: The Trust Level Management application logs messages
to the Web server standard log. For WebSphere on the BOSS, this log is located in:
C:\Program Files\IBM\WebSphere\AppServer\profiles\default\logs\server1\SystemOut.log
All messages will begin with the string MobileXXX:, e.g. MobileInit, MobileDAO,
MobileEvent, and MobileAudit. The following messages are taken from the
WebSphere SystemOut.log file. The header information may appear differently in a
different Web server; however, the message text should remain the same.
The following informational messages are logged at application startup:
[6/17/13 17:02:17:656 EDT] 00000025 WASAxis2Exten I WSWS7037I: The /PosIntegration/ws/event/V1/MobileEventService
URL pattern was configured for the com.tcx.mobile.posintegration.ws.event.v1.MobileEventService servlet located
in the mobile_web_services.war web module.
66
Toshiba TCxAmplify: User's Guide
This WebSphere specific message indicates the URL pattern where the Mobile
Event Web Service is located. The Audit Result event handler is deployed within the
Mobile Event Web Service. The path component of the URL specified in the POSIH
configuration for EventSoapRequestActor.host.url must match this URL pattern, for
example:
EventSoapRequestActor.host.url=http://MobileDBHostname/PosIntegration/ws/event/V1/MobileEventService
[6/17/13 17:02:17:656 EDT] 00000025 WASAxis2Exten I WSWS7037I: The /PosIntegration/ws/audit/V1/MobileAuditService
URL pattern was configured for the com.tcx.mobile.posintegration.ws.audit.v1.MobileAuditService servlet located in
the mobile_web_services.war web module.
This WebSphere specific message indicates the URL pattern where the Mobile
Audit Request Web Service is located. The path component of the URL specified in
the POSIH configuration for AuditSoapRequestActor.host.url must match this URL
pattern, for example:
AuditSoapRequestActor.host.url=http://MobileDBHostname/PosIntegration/ws/audit/V1/MobileAuditService
[6/17/13 17:02:17:734 EDT] 00000025 MobileServlet I
MobileInit: Initializing Mobile Context
This message indicates the Web server is loading the Audit Web Services.
[6/17/13 17:02:17:750 EDT] 00000025 EventHandlerF I MobileEvent: Event handlers list
[com.tcx.mobile.posintegration.ws.event.handler.AuditResultsEventHandler
com.tcx.mobile.posintegration.ws.event.handler.LoggingEventHandler]
This message indicates the configured event handlers.
This message indicates the configured event handlers.
[6/17/13 17:02:17:937 EDT] 00000025 jdbc_JDBC
I CWWJP9990I: openjpa.jdbc.JDBC: Info:
Using dictionary class "com.ibm.ws.persistence.jdbc.sql.DB2Dictionary" (DB2/NT SQL09075,
IBM Data Server Driver for JDBC and SQLJ 4.13.80).
This is a WebSphere specific message that indicates the database type and JDBC
driver that is used to access the relational database.
[6/17/13 17:02:18:609 EDT] 00000025 TLMAuditReque I
MobileAudit: Loaded audit template OrderedAuditTemplate [templateId=0,
description=Default audit template, auditClasses=[AuditClassImpl [classId=36, description=If the
customer has been audited at least ten times and has never failed an audit,
spot audit every fiftieth transaction, minAudits=10, trustLevel=100, maxTransNoAudit=49,
auditType=1, numToScan=3, numFailedAllowed=2], AuditClassImpl [classId=35, description=If the
customer has passed at least 95% and has been audited at least ten times, spot audit every
twentieth transaction, minAudits=10, trustLevel=95, maxTransNoAudit=19, auditType=1, numToScan=3,
numFailedAllowed=2], AuditClassImpl [classId=34, description=If the customer has
passed at least 90% and has been audited at least three times, spot audit every tenth
transaction, minAudits=3, trustLevel=90, maxTransNoAudit=9, auditType=1, numToScan=-1,
numFailedAllowed=-1], AuditClassImpl [classId=33, description=If the customer has passed at
least 75% but less than 90% and has been audited at least three times, spot audit every
fifth transaction, minAudits=3, trustLevel=75, maxTransNoAudit=4, auditType=1, numToScan=null,
numFailedAllowed=-1], AuditClassImpl [classId=32, description=If the customer has passed at
least 60% but less than 75% and has been audited at least three times, spot audit every third
transaction, minAudits=3, trustLevel=60, maxTransNoAudit=2, auditType=1, numToScan=8, numFailedAllowed=null],
AuditClassImpl [classId=31, description=If the customer has passed at least 30% but less than 60%
and has been audited at least three times, spot audit every third transaction, minAudits=3, trustLevel=30,
maxTransNoAudit=2, auditType=1, numToScan=10, numFailedAllowed=-1], AuditClassImpl [classId=30,
description=If the customer has passed less than 30% of their audits and has been audited at least three times,
spot audit every transaction, minAudits=3, trustLevel=0, maxTransNoAudit=0, auditType=1, numToScan=10,
numFailedAllowed=0], AuditClassImpl [classId=29, description=Initially spot audit each transaction,
minAudits=0, trustLevel=0, maxTransNoAudit=0, auditType=1, numToScan=null, numFailedAllowed=null]]]
This message shows the definition of the audit template that will be used to process
the audit request.
Chapter 7. Additional system components
67
[6/17/13 17:02:21:093 EDT] 00000025 MobileServlet I
MobileInit: Mobile Context initialization completed
This message indicates that the initialization of the Mobile Audit Web Service is
complete.
In the interest of performance, the Mobile Audit Web Service does not typically log
informational messages during normal operations following service startup.
However, if the LoggingEventHandler is configured, the XML content of each event
will be logged as an informational message similar to the following:
[6/21/13 17:23:25:788 EDT] 00000045 LoggingEventH I MobileEvent:<?xml version="1.0" encoding="UTF-8"
standalone="yes"?><ns3:eventRequestPayload xmlns:ns5="http://mobile.tcx.com/PosIntegration/alert"
xmlns:ns6="http://mobile.tcx.com/PosIntegration/messages/audit" xmlns:ns2="http://mobile.tcx.com/PosIntegration"
xmlns:ns3="http://mobile.tcx.com/PosIntegration/messages/event"
xmlns:ns4="http://bc.si.retail.ibm.com/POSBCSchema"><ns3:RequestTime>2013-0621T17:23:19.429</ns3:RequestTime><ns3:StoreNumber>0</ns3:StoreNumber><ns2:Event
xsi:type="ns2:CustomerAddedEventContainerType" xmlns:xsi="http://www.w3.org/2001/XMLSchemainstance"><ns2:deviceID>0000000000000001</ns2:deviceID><ns2:MessageType>CUSTOMER
ADDED</ns2:MessageType><ns2:CustomerAddedEvent><ns2:CustomerInfo><ns4:AddCustomerResult><Result
Extension><KeyValuePair><Key><TerminalNumber></Key><Value>701</Value></KeyValuePair><KeyValuePair>
<Key>TransactionID</Key><Value><799</Value></KeyValuePair></ResultExtension><RequestID>2</RequestID>
<CustomerInfo xsi:type="ns8:CustomerInfoType"
xmlns:ns8="http://bc.mobile.si.retail.ibm.com/POSBCSchema"><CustomerID>42222222222</CustomerID><Name></Name>
<LoyaltyMessage>" VALUED CUSTOMER Valued Customer"
</LoyaltyMessage></CustomerInfo>/ns4:AddCustomerResult></ns2:CustomerInfo>
</ns2:CustomerAddedEvent><ns2:Event></ns3:eventRequestPayload>
Debug Logging for Problem Determination: Debug messages can be used to
track the operation of the Mobile Audit Web Service for problem determination
purposes.
WebSphere on the BOSS writes debug and trace messages to:
C:\Program Files\IBM\WebSphere\AppServer\profiles\default\logs\server1\trace.log
Debug messages can be enabled in WebSphere using the WebSphere
Administrative Console.
1. From the task list on the left side of the Administrative console, click
Troubleshooting, Logs and trace, then click server1.
Figure 26. Troubleshooting, Logs and trace
2. On the next screen, click Change Log Detail Levels.
3. On the Change log detail levels screen, click the Runtime tab. Click in the text
box and enter a colon followed by com.tcx.mobile.posintegration.ws.*=fine
or use the All Components tree list to navigate to
com.tcx.mobile.posintegration.ws. If you want the log level changes to remain
68
Toshiba TCxAmplify: User's Guide
in place after an application restart, then click Save runtime changes to
configuration as well.
Figure 27. Change Log Details screen
4. Scroll to the bottom of the screen, then click the Apply button. If you selected
Save runtime changes to configuration as well, then you will be prompted to
save the changes to the master configuration. Click Save to save the changes.
5. When the trace state changes, WebSphere will log a message similar to the
following to the trace log:
[6/24/13 16:48:56:040 EDT] 00000045 ManagerAdmin I TRAS0018I: The trace state has changed.
The new trace state is *=info:com.tcx.mobile.posintegration.ws.*=fine.
The following are sample debug messages displayed by the Mobile Event Web
Service:
[6/24/13 14:08:18:790 EDT] 00000058 MobileEventIm 1
MobileEvent: Beginning transaction
[6/24/13 14:08:18:790 EDT] 00000058 MobileEventIm 1
MobileEvent:
Calling event handler com.tcx.mobile.posintegration.ws.event.handler.AuditResultsEventHandler
[auditCustomerDAOFactory=DAOFactory [ctor=protected com.tcx.mobile.posintegration.ws.dao.AuditCustomerDAOImpl
(javax.persistence.EntityManager)]]
[6/24/13 14:08:18:790 EDT] 00000058 MobileEventIm 1
MobileEvent:
Calling event handler com.tcx.mobile.posintegration.ws.event.handler.LoggingEventHandler@17ea17ea
[6/24/13 14:08:18:806 EDT] 00000058 MobileEventIm 1
MobileEvent: Committing transaction
[6/24/13 14:08:18:806 EDT] 00000058 MobileEventIm 1
MobileEvent: Completed request handling
From these debug messages it is possible to determine exactly which event
handlers are being invoked, as well as, how long the event processing takes. The
following are sample debug messages displayed by the Mobile Audit Request Web
Service:
[6/24/13 17:04:22:681 EDT] 00000045 TLMAuditReque 1 MobileAudit: New customer AuditCustomerImpl
[loyaltyId=42044612390, transSinceAudit=0, numAudits=0, numFailedAudits=0, lastAudit=null, lastAuditUpdate=null]
This message indicates that the customer is a new customer and a record for the
customer loyalty ID does not exist in the Customer Data Store. In addition, this
message displays the audit history for the customer:
Chapter 7. Additional system components
69
[6/24/13 17:16:29:634 EDT] 00000047 TLMAuditReque 1 MobileAudit: Retrieved customer AuditCustomerImpl
[loyaltyId=400747320406, transSinceAudit=7, numAudits=3, numFailedAudits=0, lastAudit=Mon Jun 24 17:16:29 EDT 2013,
lastAuditUpdate=Sat Jun 22 22:21:32 EDT 2013]
This message indicates the customer is an existing customer and a record for the
customer already exists in the Customer Data Store. In addition, this message
displays the audit history for the customer:
[6/24/13 17:04:22:681 EDT] 00000045 AuditStrategy 1 MobileAudit: Best audit class for customer 42044612390
with 0 audits and trust level 0 is AuditClassImpl [classId=29, description=Initially spot audit each
transaction, minAudits=0, trustLevel=0, maxTransNoAudit=0, auditType=1, numToScan=null, numFailedAllowed=null]
This message indicates the customer trust level that was calculated for the
customer, as well as, the audit class that was selected for the customer:
[6/24/13 17:04:22:681 EDT] 00000045 AuditStrategy 1
MobileAudit: Audit is required
This message indicates whether an audit is required based on the audit class.
[6/24/13
[6/24/13
[6/24/13
[6/24/13
[6/24/13
[6/24/13
17:04:22:681
17:04:22:681
17:04:22:681
17:04:22:681
17:04:22:681
17:04:22:681
EDT]
EDT]
EDT]
EDT]
EDT]
EDT]
00000045
00000045
00000045
00000045
00000045
00000045
AuditStrategy
AuditStrategy
AuditStrategy
AuditStrategy
AuditStrategy
AuditStrategy
1
1
1
1
1
1
MobileAudit:
MobileAudit:
MobileAudit:
MobileAudit:
MobileAudit:
MobileAudit:
Setting CustomerId to 42044612390
Setting CustomerTrustLevel to 0
Setting CustomerNumAudits to 0
Setting TypeOfAudit to SPOT_AUDIT
Omitting NumItemsToScan
Omitting NumFailedItemsAllowed
These messages specify the audit parameters based on the audit class that will be
returned in the audit response.
Trust Level Management additional scoring inputs
With the Scoring Based on Audit History feature, audits occur at a given frequency
based on the customer trust level. It is possible for an observant customer to
predict the transaction in which they will be audited, and potentially modify their
behavior based on the knowledge that they will be audited. Adding more input, such
as random chance to the audit decision, makes it much more difficult for a customer
to predict when they will be audited. This in turn makes audit performance a more
reliable measure of customer trust.
Trust Level Management additional scoring inputs configuration
The Additional Scoring Inputs feature adds additional data elements to the TLM
audit classes described in the preceding sections. Specifically, Additional Scoring
Inputs adds the following additional data elements to the TLM_AUDIT_CLASS
table.
PERCENT_CHANCE
The percent chance an audit will be triggered for any given transaction,
assuming the shopper has not reached the maximum number of Mobile
transactions allowed without an audit (see MAX_TRANS_NO_AUDIT). Each
audit class can have a separate value for PERCENT_CHANCE.
Trust Level Management scoring based on audit history
administration
The Additional Scoring Inputs feature adds the following debug messages:
70
Toshiba TCxAmplify: User's Guide
[8/26/13 18:51:32:759 EDT] 00000021 AuditStrategy 1
number 1 and percent chance 5
[8/26/13 18:51:32:759 EDT] 00000021 AuditStrategy 1
MobileAudit: Random audit will be performed based on random
MobileAudit: Randomly selected for Audit
These messages indicate that the transaction was randomly selected for an audit.
[8/26/13
[8/26/13
[8/26/13
[8/26/13
[8/26/13
[8/26/13
[8/26/13
18:51:32:759
18:51:32:759
18:51:32:759
18:51:32:759
18:51:32:759
18:51:32:759
18:51:32:759
EDT]
EDT]
EDT]
EDT]
EDT]
EDT]
EDT]
00000021
00000021
00000021
00000021
00000021
00000021
00000021
AuditStrategy
AuditStrategy
AuditStrategy
AuditStrategy
AuditStrategy
AuditStrategy
AuditStrategy
1
1
1
1
1
1
1
MobileAudit:
MobileAudit:
MobileAudit:
MobileAudit:
MobileAudit:
MobileAudit:
MobileAudit:
Setting
Setting
Setting
Setting
Setting
Setting
Setting
CustomerId to 400661966817
CustomerTrustLevel to 100
CustomerNumAudits to 10
TypeOfAudit to SPOT_AUDIT
NumItemsToScan to 3
NumFailedItemsAllowed to 2
RandomAudit to true
These messages specify the audit parameters based on the audit class that will be
returned in the audit response.
Mobile Reporting Web Application
The following sections describe the Mobile Reporting Web Application. In order to
support Mobile Reporting, customer IDs must be present in transactions.
Log in Page
The Mobile Reporting Web Application is restricted to users configured in
WebSphere with a role of administrator. See the WebSphere installation instructions
for more information about defining users. Log into the Mobile Reporting Web at
https://mobilewebhostname/mobileReporting:9443. Your URL may change
depending on your host name. Next, enter the username and password and press
OK.
See Figure 28 for the screen layout.
Figure 28. Mobile Reporting Log In Page
Chapter 7. Additional system components
71
Daily Statistics Page
The Daily Statistics Page displays the statics for all mobile transactions performed
today. See Table 12 that shows how the information is displayed.
Table 12. Daily Statistical Information
Current Transactions
The number of mobile transactions currently
in the store.
Total Audits
Total number of audits performed.
Total Passed Audits
Total number of audits that passed.
Total Failed Audits
Total number of audits that failed.
Maximum Concurrent Transactions
The maximum number of mobile transactions
at any given time during the day.
Total Transactions
Total number of mobile transactions today.
Total Incomplete Transactions
Total number of incomplete transactions.
These are transactions that were voided on
the device, the pay station or the customer
walked out of the store.
Total Sales Amount
Total currency amount of all mobile
transactions.
Figure 29. Mobile Reporting Daily Stats Page
Daily Statistics History Page
You can search for past daily statistics based on a user-selected date range. Future
date searches are not allowed, and the start date cannot be greater than the stop
date (see Figure 30 on page 73).
72
Toshiba TCxAmplify: User's Guide
Figure 30. Mobile Reporting Daily Stats History Page
Customer Shopping History Page
The shopper can search for customer and transaction information by date range
and hour range. Each row in the table summary will represent one transaction.
Dates prior to the current day's date are not allowed and the start date cannot be
greater than the stop date. Also, the start hour cannot be greater than the stop hour
and all searches are based solely on the End Time. The Start Time is not
considered.
Table 13 shows how the information is displayed in each row.
Table 13. Customer Shopping Daily Statistical History Information
Customer ID
The unique identifier of the customer, Loyalty
ID, or Price Plus Number.
Customer Name
The name of the customer
Start Time
The time that the transaction started.
End Time
The time that the transaction ended.
Total Items
Total number of items in the mobile
transaction. This does not include items
added or removed at the pay station.
Total Amount
The total currency amount of the transaction.
This does not include items added or
removed at the pay station.
Audited (Y/N)
A yes or no, indicated whether the
transaction was audited.
Transaction Number
The unique identifier of the transaction,
within the store.
Pay Station Terminal ID
The unique identifier of the pay station, used
for check out within the store.
Device ID
The unique identifier of the mobile device.
Chapter 7. Additional system components
73
Figure 31. Mobile Reporting Customer Shop History Page
74
Toshiba TCxAmplify: User's Guide
Chapter 8. Using the Mobile Shopper application
This section provides information on how to use the Mobile Shopper.
Smart phone application
The Android and iOS® application user interfaces are very similar. The following
screens have been captured from an Android application. Any significant differences
between the Android and iOS application screens are described in the following
sections.
Phone screen layout
The layout of the main screen of the Mobile Shopper application is shown in
Figure 32.
Figure 32. Phone screen layout
Menu layout
The following are the menu layouts that are available.
Menu layout with no Items in the transaction
When the Menu icon is selected prior to a transaction being started, the mobile
device displays the screen, as shown in Figure 33 on page 76. From this menu, the
shopper can select the following options:
v Settings: To modify the application configuration.
v Help: To view information about using the application.
© Copyright Toshiba Global Commerce Solutions, Inc. 2014
75
v Instructional Video: To see a video about using the application. How the mobile
system is configured determines whether or not this is displayed.
v Cancel Transaction: To exit the application.
Figure 33. Mobile Shopper menu with no items in transaction
Note: iOS information:
v The Settings option does not appear on the application menu. Settings
are accessed through the settings area of the iOS and not within the
application menu.
v A traditional application navigation bar on the top of the screen is used for
screen navigation on the iOS. The navigation bar contains a button to
return to the previous screen. There is no Back button at the bottom of
the screen.
From the Mobile Shopper menu, a shopper can select:
1. Settings: (Accessed using the iOS settings area) allows the shopper to:
a. Enter or change their loyalty number. No default is specified.
b. Enable or disable the ability of the mobile device to vibrate when a new alert
arrives. The default is "On".
c. Enable or disable the ability for the mobile device to play an alert sound
when a new alert arrives. The default is "On".
d. Select the screen orientation (Left Hand and Right Hand). The default is
"Right Hand".
e. Select the text language you want to display.
f. Display the application version information.
g. Put the application in debug mode.
76
Toshiba TCxAmplify: User's Guide
Figure 34. Menu shopper preferences
2. Help: Shows the shopper how to use the application with screens similar to the
following:
Chapter 8. Using the Mobile Shopper application
77
Table 14. Mobile Shopper Help
Figure 35. Mobile Shopper help (1 of 2)
Figure 36. Mobile Shopper help (2 of 2)
3. Instructional Video: Launches the mobile device web browser to play a
shopper-oriented instructional video. This option will not be displayed on the
menu if a URL has not been defined in the Mobile Shopper configuration (see
the instructional.video.url property in the mobileserver.properties file or
one of its extensions. See “Property extension mechanism” on page 201 for
details.
4. Cancel Transaction: Cancels the existing transaction, exits the application, and
disconnects from the store's WiFi network if using the Android application.
5. Create Error Report: Creates an error report from the mobile device and sends
the information to the Mobile Engine where it is written to the Mobile Engine
diagnostic log file. This is only displayed when the debug mode is enabled in
Settings.
Menu layout with items in the transaction
When the Menu icon is selected after one or more items have been added to the
transaction, the mobile device displays an expanded menu of selections (see
Figure 37 on page 79). From this expanded menu, the shopper can select the
following options:
v Apply eCoupons: To perform a complete analysis of the transaction and apply
any coupons that are applied only when the transaction is totaled.
v Remove Item from Cart: To remove an item from the cart by scanning or keying
in the item number (see “Removing items” on page 95).
v Setting, Help, Instructional Video, Cancel Transaction, and Create Error
Report (not shown): The same as described in “Menu layout with no Items in the
transaction” on page 75.
78
Toshiba TCxAmplify: User's Guide
Figure 37. Mobile Shopper menu with items in the transaction
Mobile Shopper POS screen flows
The following sections show the screen flows for the Mobile Shopper point of sale
(POS) solution.
Normal checkout: start application, sell item, price check,
complete Txn.
Table 15. Normal checkout
Mobile Device Display
Customer
Steps
The customer
enters the
store and
starts the
retailerbranded
mobile phone
application.
Notes/Message Flow
This icon shows the application as if it is a
"Together Commerce" branded application.
The scenario assumes the shopper has
already downloaded and installed the
application, and that this is the first time they
have shopped in the store.
Figure 38. Shopper enters
store
Chapter 8. Using the Mobile Shopper application
79
Table 15. Normal checkout (continued)
Mobile Device Display
Customer
Steps
Notes/Message Flow
The mobile phone application connects to the
retailer's WiFi network and shows multiple
messages to indicate its progress. The
messages include:
v Connecting...Please wait... which
indicates the mobile device is connecting
to the WiFi network.
v WiFi connected. Discovering mobile
server... which indicates that the
connection has been made with the store's
network and the mobile device is
attempting to connect to the Mobile
Engine.
v WiFi connected. Discovered mobile
server. Initializing... which indicates that
the connection has been made with the
Mobile Engine and transaction initialization
has started.
Figure 39. Mobile phone
application connects to
retailer's WiFi
This prompt is only displayed if the loyalty
number is required, as specified by the
loyalty.id.required.for.transaction=true
property in the mobileserver.properties file.
Scan the
Loyalty Card
or key in the
loyalty
number.
The first time the application is started, the
customer is prompted to enter their loyalty
number. The loyalty number can be scanned
or keyed. If the retailer's POS system
supports a 10-digit alternate ID, the customer
can enter that here.
After the loyalty number is entered, it is
stored in Settings and does not have to be
entered again.
Figure 40. Scan Loyalty
Card
80
Toshiba TCxAmplify: User's Guide
Table 15. Normal checkout (continued)
Mobile Device Display
Customer
Steps
Notes/Message Flow
After entering the loyalty number, or if the
loyalty number has already been entered or is
not required, the mobile device shows this
screen (see Figure 41) that prompts for an
item entry.
At this point, the customer can scan or key
an item to add it to the transaction, or
perform a price check by pressing the Price
Check icon.
Figure 41. Prompt for an
item
Press the
Scan
Barcode
button and
scan "Chicken
Egg Rolls".
While the application is looking up the item,
the mobile device displays the message
"Processing scanned data...”
After the mobile device adds the item to the
order, item details are displayed and
transaction totals are updated.
The prompt now asks the customer to scan
or key the next item, or scan a pay station to
complete the order.
Figure 42. Scan Barcode
Chapter 8. Using the Mobile Shopper application
81
Table 15. Normal checkout (continued)
Mobile Device Display
Customer
Steps
Notes/Message Flow
The mobile device prompts the customer to
Press the
Price Check scan or key in an item to determine the price.
icon to check
the price of an
item.
Figure 43. Price Check
Press the
1. The mobile device displays the price of
Scan
the item.
Barcode
2. The customer can enter Yes to add the
button and
item to the order, or enter No to return to
scan "Chicken
item entry.
Egg Rolls".
Note: If the item has a loyalty price, it is
not the price that will be shown for the
price check. The regular price is shown
due to base ACE behavior for the Price
Check function.
If the customer presses Yes to add the item,
the loyalty price is the price of the item that is
added to the transaction.
Figure 44. Press Scan
Barcode
82
Toshiba TCxAmplify: User's Guide
Table 15. Normal checkout (continued)
Mobile Device Display
Customer
Steps
Notes/Message Flow
Press the
Scan
Barcode icon
and scan the
barcode
displayed on
the pay station
or POS
terminal in
order to
complete the
transaction.
The mobile device shows the message
"Preparing order for retrieval."
Every pay station and POS terminal will use a
single barcode to specify the terminal number
that indicates the end of an order.
The mobile
device shows
the message
"Preparing
order for
retrieval."
Figure 45. Scan Barcode pay station or POS terminal
The mobile device will display the transaction
number and terminal number until the order is
accepted at the terminal.
The Checkout Lane must be in a state to
receive the order: "logged on and not in a
transaction".
If the Checkout Lane is not in a state to
receive an order, the mobile device will
prompt the customer to scan again or have
the cashier retrieve the transaction.
Figure 46. Transaction
number and terminal
number
Chapter 8. Using the Mobile Shopper application
83
Table 15. Normal checkout (continued)
Mobile Device Display
Customer
Steps
Notes/Message Flow
Press Exit to
exit the
application.
After the transaction is retrieved at a pay
station (either self-service or attended), the
Mobile Shopper application ends.
Figure 47. Press Exit
Starting Mobile Shopper during a blackout period
Blackout periods can be defined in the mobileserver.properties file or one of its
extensions (see “Property extension mechanism” on page 201). If a shopper
attempts to begin an order by starting the Mobile Shopper during a blackout period,
they will not be allowed to start the order. Blackout periods should be configured to
coincide with the times that the store does not want to enable mobile shopping.
Table 16. Mobile Shopper - during a blackout period
Mobile Device Display
Customer Steps
Notes/Message Flow
Customer starts
the Mobile
Shopper during a
"blackout period".
The current system time falls within a
blackout period, as defined in the
mobileserver.properties file or one of
its extension files. The remaining time in
the blackout period is displayed.
When the display timer expires, the
mobile device attempts to start a
transaction automatically.
To end this function, press the Back
button on the mobile device. For an
Android phone, the customer can use
the hardware Back button. For an iOS
phone, the customer can press the
Home button to exit the application.
Figure 48. Starting the
Mobile Shopper during a
blackout period
84
Toshiba TCxAmplify: User's Guide
Starting the Mobile Shopper when not enough Client Session
Server sessions
If a customer attempts to begin an order by starting the Mobile Shopper and there
are not enough Client session Server (CSS) sessions, the application ends.
Table 17. Mobile Shopper - not enough CSS sessions
Mobile Device Display
Customer Steps
Notes/Message Flow
The mobile device shows the following
1. Start the
screen and a chance to retry.
application
when there are
not enough
CSS sessions
to start the
transaction.
2. Press Yes to
retry, or No to
end the phone
application.
Figure 49. Mobile Shopper not enough CSS sessions
Various item exceptions
This scenario describes an attempt to sell an item under any one of the following
conditions:
v
v
v
v
Item is not in the ACE item file.
Item is configured as "not for sale" in the ACE item file.
Item is configured as "price required" in the ACE item file.
Too many items purchased.
These scenarios involve exceptions, but they are handled differently:
v Item is configured as "quantity restricted" in the ACE item file and the maximum
number of items has already been sold (the restrictions are defined in ACE
Personalization).
v Item requires an account number (such as Gift Card activation) in the ACE item
file.
v Item has a barcode that includes an account number for the item (such as
Blackhawk One-Stop Gift Cards).
v EAS items follow the Normal Checkout flow, but they do log an exception.
Note: UPC-2 items, other item types (deposit items and miscellaneous sale items),
other pricing methods (1-4) all work like normal sale items. See “Normal
checkout” on page 162 for these items. The mobile device must be in a
"ready to scan" mode.
Chapter 8. Using the Mobile Shopper application
85
Table 18. Mobile Shopper - various item exceptions
Mobile Device Display
Customer Steps
Notes/Message Flow
1. Press Scan
Barcode and
scan a product
not found in
the ACE item
file.
Application prompts: "Item requires
Cashier help. Do you still want to
buy it?"
2. Press No to
return to Item
Entry.
The display is the same for all these
exceptions:
v Item not found
v Not auth for sale
v Price-Required
3. Press Yes, and v Time-Restricted
the item is
v Too many items purchased
added to the
order.
Figure 50. Scanning a
product that is not found
Scan or key in
more items at this
point.
Assuming the customer pressed Yes to
purchase the item anyway, an item
exception is registered that will be
visible to the cashier at checkout time.
The item is displayed and appears in
the item list, but no price is included in
the totals and the details of the
exception will be shown on the screen the example is "Item not found".
The display will vary based on the item
exception:
v Item not found
v Not authorized for sale
v Price-Required
v Time-Restricted
v Too many items purchased
Figure 51. Item exception
86
Toshiba TCxAmplify: User's Guide
Table 18. Mobile Shopper - various item exceptions (continued)
Mobile Device Display
Customer Steps
Notes/Message Flow
1. Press Price
Check, and
scan an item
that is not in
the item file.
The mobile
device
responds that a
price is not
available for
this item. There
is no chance to
add the item.
The display is the same for these item
exceptions:
v Item not found
v Not authorized for sale
These exceptions will show a price and
allow you to add the item to the order:
v Price Required (price is zero)
v Time-Restricted
2. Press OK to
continue with
the order.
Figure 52. Price Check - item
not in the item file
Item type not allowed to be sold exceptions
This scenario describes an attempt to sell an item that is only allowed to be entered
at the pay station by a cashier. The item types that are not allowed on the mobile
device are:
v Item is configured as "not for sale" in the ACE item file.
v Item is configured as a "refund" item type in the ACE item file.
v Item is configured as a "deposit return" item type in the ACE item file.
v Item is configured as a "miscellaneous payout" item type in the ACE item file.
Note: UPC-2 items and other item types (deposit items and miscellaneous sale
items), other pricing methods (1-4) all work like normal sale items. See
“Normal checkout” on page 162 for these items. The mobile device must be
in a "ready to scan" mode.
Chapter 8. Using the Mobile Shopper application
87
Table 19. Mobile Shopper - item not allowed to be sold exceptions
Mobile Device Display
Customer Steps
Notes/Message Flow
1. Press Scan
Barcode, and
key in an item
code of an item
type that is not
allowed to be
sold using the
mobile device.
In Figure 53
the item to be
scanned is
"Chicken Egg
Rolls".
Application prompts: "Item name
requires Cashier help. Do you still want
to buy it?"
2. Press OK to
return to the
item entry.
Figure 53. Item not allowed
to be sold using the mobile
device
88
Toshiba TCxAmplify: User's Guide
If the customer presses Yes, an
exception is logged that will have to be
resolved at checkout by a sales
associate.
Time restricted item entry
This scenario describes an attempt to sell an item that is only allowed to be sold at
certain times based on time restrictions defined in ACE personalization. The mobile
device must be in a "ready to scan" mode.
Table 20. Time restricted item entry
Mobile Device Display
Customer Steps
Notes/Message Flow
1. Press Scan
Barcode and
scan a product
that is not
allowed to be
sold at this
time.
The item description displayed on the
mobile device matches the item
description in the item file.
2. The application
prompts:
"Buddy's Beer
cannot be
purchased at
this time".
3. Press OK to
return to the
item entry.
Figure 54. Time restricted
item entry
Chapter 8. Using the Mobile Shopper application
89
Value card processing
This scenario describes an attempt to sell an item (such as value cards) that is
blocked in the mobileserver.properties file or one of its extensions (see “Property
extension mechanism” on page 201). The flow is also used for Blackhawk Gift Card
processing. The mobile device must be in a ready to be in the "ready to scan"
mode.
Table 21. Value card processing
Mobile Device Display
Customer Steps
Notes/Message Flow
1. Press Scan Barcode and
scan an item (such as a
value/gift card) that has
been blocked in the
mobileserver.properties
file or one of its
extensions.
From the customer’s
perspective, this is the same
flow for Blackhawk Gift Cards.
However, Blackhawk Gift Cards
are a different type of bar code
(Code 128) and does not need
to be blocked in the properties
file.
2. The following prompt is
displayed: "Item xxxx
requires cashier help. Do
you still want to buy it?",
where xxxx is the item
code that was scanned or
keyed in.
Figure 55. Scan an item
that has been blocked in
mobileserver.properties
90
Toshiba TCxAmplify: User's Guide
3. Press Yes to add the
item to their order. An
exception is added to
their order that must be
resolved by a sales
associate before the
customer is allowed to
complete their order. If
the customer presses No,
the item is not added to
the order.
Age-restricted item exception
This scenario describes an attempt to sell an item (such as alcohol, tobacco, or
fireworks) that is age restricted. The restriction types are defined in “ACE
Personalization option changes” on page 50 and set in the Item Data Maintenance
for the item.
Table 22. Age-restricted item exception
Mobile Device Display
Customer Steps
Notes/Message Flow
1. Press Scan
Barcode and
scan an
age-restricted
item.
The age displayed on the mobile device
matches the appropriate age set in the
item restriction.
After the customer has answered "Yes"
to this prompt for a specific age, it is not
2. The application necessary to prompt the customer again
prompts: "Must for another item with the same (or
be 21 to
lower) age restriction.
purchase. Do
you want to
Press No to return to item entry.
purchase the
item?"
3. Press Yes and
the item is
added to their
order.
Figure 56. Age-restricted
item exception
The customer is
ready to scan or
key more items.
An item exception is registered that will
be visible to the cashier at checkout
time.
Figure 57. Scan or key more
items
Chapter 8. Using the Mobile Shopper application
91
Table 22. Age-restricted item exception (continued)
Mobile Device Display
Customer Steps
Notes/Message Flow
1. Press Price
Check and
scan an
age-restricted
item.
If the price check is done before an
age-restricted item is added to the
transaction, and the customer adds the
item to the order, a prompt is displayed,
"Must be 21 to purchase. Do you want
to purchase the item?"
2. Press Yes to
add the item,
or No to
continue to the
item entry
without adding
the item.
Figure 58. Price Check - age
restricted item
Quantity required item entry
This scenario describes an attempt to sell an item which requires a quantity entry
(such as lemons). The Quantity Required flag is set in Item Data Maintenance for
the item.
Table 23. Quantity required item entry
Mobile Device Display
Customer Steps
Notes/Message Flow
Press Cancel to return to item entry.
1. Press Scan
Barcode and
iOS Note: The iOS application displays
scan a quantity
a numeric keypad for the quantity entry.
required item.
2. The application
prompts for
quantity.
3. Enter the
quantity and
press OK.
Figure 59. Scan a quantity
required item
92
Toshiba TCxAmplify: User's Guide
Table 23. Quantity required item entry (continued)
Mobile Device Display
Customer Steps
Notes/Message Flow
Lemons are added
to the order. No
exception is
logged.
The customer is
ready to scan or
key more items.
Figure 60. No exception
logged
1. Press Price
Check and
scan or key in
a
quantityrequired item
code. The price
shown is for a
single item.
2. Press Yes to
add the item,
or No to
continue the
item entry
without adding
the item.
Figure 61. Price Check scan or key in a
quantity-required item code
3. If the customer
presses Yes to
add the item,
they are
prompted to
enter a quantity
for the item.
Chapter 8. Using the Mobile Shopper application
93
Weight required item entry
This scenario describes an attempt to sell an item that requires a weight entry (such
as bananas). The Weight Required flag is set in Item Data Maintenance for the
item. The mobile device must be in a "ready to scan" mode.
Table 24. Weight required item entry
Mobile Device Display
Customer Steps
Notes/Message Flow
1. Press Scan
Barcode and
scan a
weight-required
item.
This will generate an exception.
However, if the customer goes to the
self-service scale to add the item prior
to checkout, the exception will be
removed. If they do not, the exception
will need to be handled during checkout.
2. Application
prompts to
weigh at the
self-service
scale or hold
for assistance
at checkout.
3. The item is
added to the
transaction as
an exception
item with no
price.
Figure 62. Scan a weight
required item entry
4. The customer
is ready to
scan or enter
more items.
1. Press Price
Check and
scan or key in
a
weight-required
item code. The
price shown is
for a single unit
of measure.
2. Press Yes to
add the item,
or No to
continue item
entry without
adding the
item.
Figure 63. Price Check scan or key in a
weight-required item code
94
Toshiba TCxAmplify: User's Guide
See “Using the Self-Service Scale for
items already in a transaction” on page
102 for details on adding weight items
using the self-service scale.
Coupon scanned during the transaction
This scenario describes a coupon being scanned during the transaction. The mobile
device must be in a "ready to scan" mode.
Table 25. Coupon scanned during the transaction
Mobile Device Display
Customer Steps
Notes/Message Flow
1. Press Scan
Barcode and
press UPC-5
coupon during
a transaction.
2. The application
states that
"Coupons will
be taken during
payment."
3. Press OK to
continue with
item entry.
Figure 64. Scan Barcode UPC-5 coupon
Removing items
There are two ways to remove an item:
v Touch the item from the Item Entry screen or from the item list to get the Item
Action Menu. From this menu, you can view item details or remove the item.
Press Remove to remove the item.
v Touch the Menu icon, and press Remove Item. You are prompted to scan or key
in an item number to remove the item.
After the item is removed, the display will indicate that the item was removed. It will
no longer be in the item list. This is true for all items, including exception items.
Removing an item from the Item Entry screen: This flow demonstrates the
steps to remove a normal barcoded item from the Item Entry screen. (Items are
required as a part of this transaction.)
Chapter 8. Using the Mobile Shopper application
95
Table 26. Removing an item from the Item Entry screen
Mobile Device Display
Customer Steps
The customer has
previously entered
Chicken Egg
Rolls.
Figure 65. Removing an item
from the Item Entry screen (1
of 4)
Touch the screen
inside the box that
shows the item
description, item
number, and price.
Figure 66. Removing an item
from the Item Entry (2 of 4)
96
Toshiba TCxAmplify: User's Guide
Notes/Message Flow
Table 26. Removing an item from the Item Entry screen (continued)
Mobile Device Display
Customer Steps
Notes/Message Flow
Press OK.
The item is removed. The display
indicates that the item was removed.
Figure 67. Removing an item
from the Item Entry (3 of 4)
The display indicates that the item was
removed. The customer is now in item
entry mode.
Figure 68. Removing an item
from the Item Entry (4 of 4)
Chapter 8. Using the Mobile Shopper application
97
Removing an item from the Item List: This flow demonstrates the steps to
remove a normal barcoded item from the Item List. (Items are in the transaction.)
Table 27. Removing an item from the Item List
Mobile Device Display
Customer Steps
Notes/Message Flow
Press Item List at
the bottom of the
screen to display
the item list.
If the customer presses the Shop
button here, they will return to item
entry.
Touch the item
they want to
remove. The Item
Action menu is
displayed.
If the customer presses the Back
button, they will return to item list.
Figure 69. Press Item List
Figure 70. Touch item to be
removed
98
Toshiba TCxAmplify: User's Guide
iOS Note: The customer should do a
"swipe" key movement to remove the
item from the item list.
Table 27. Removing an item from the Item List (continued)
Mobile Device Display
Customer Steps
Notes/Message Flow
Press OK.
The item is removed. The display
indicates that the item was removed.
Figure 71. Press OK
The display indicates that the item was
removed. The customer is now in item
entry mode.
Figure 72. Item removed is
indicated
Chapter 8. Using the Mobile Shopper application
99
Removing an item using the menu icon: This flow demonstrates the steps to
remove a normal barcoded item from the application menu. (Items are required as a
part of this transaction.)
Table 28. Removing an item using the menu icon
Mobile Device Display
Customer Steps
Notes/Message Flow
Press Menu at the
bottom of the
screen to display
the application
menu, and press
Remove Item
from Cart.
Figure 73. Press Menu
Scan or key in the The customer is prompted to scan or key
item they want to in an item to remove it from the order.
remove.
Figure 74. Scan or key in
item wanted
100
Toshiba TCxAmplify: User's Guide
Table 28. Removing an item using the menu icon (continued)
Mobile Device Display
Customer Steps
Notes/Message Flow
Press OK.
The item is removed. The display
indicates that the item was removed.
Figure 75. Customer presses
OK
The display indicates that the item was
removed. The customer is now in item
entry mode.
Figure 76. Item removal is
completed
Chapter 8. Using the Mobile Shopper application
101
Using the Self-Service Scale for items already in a transaction
This flow demonstrates the steps needed when weight items have been added to
the mobile device transaction and then the customer goes to the "weights and
measures" certified self-service scale (SSScale) to weigh the items. (Items are
required as a part of this transaction.)
See “Various item exceptions” on page 168 for details on how these were added.
For this example, assume that bananas (weight required) and asparagus (weight
required) were added to the transaction.
Table 29. Using the Self-Service Scale for items already in a transaction
Mobile Device Display
Customer Steps
Notes/Message Flow
Press Item List.
The item list displays asparagus and
bananas that have not been weighed.
On the SSScale,
press Scan
Barcode on the
mobile device, and
"scan the barcode"
is displayed on the
self-service scale.
The SSScale displays the items that
were added to the transaction that are
required to be weighed. In this example,
the icons for bananas and asparagus
appear on the scale display.
Figure 77. Press Item List
The mobile device
displays: "Waiting
for Self-Service
Scale. Press
CANCEL to
return."
Figure 78. Press Scan
Barcode on the mobile
device
102
Toshiba TCxAmplify: User's Guide
See “Self-Service Scale screen flows”
on page 127 for details of how the
SSScale operates.
Table 29. Using the Self-Service Scale for items already in a transaction (continued)
Mobile Device Display
Customer Steps
Notes/Message Flow
After all items have
been processed
(weighed) at the
SSScale, the Done
button is displayed
on the base
screen.
The mobile device returns to item entry.
The price field has been updated for the
items that were weighed. The last item
weighed at the SSScale is displayed.
Press Done and
the scale goes
back to the original
display.
Figure 79. Displaying the
screen with "Done" visible
If the customer
presses Item List,
the items are
displayed,
complete with
prices.
The items that were weighed at the
SSScale do not have to be reprocessed
at the checkout lane.
Press Shop to
return to Item List.
Figure 80. Item List with
prices displayed
Chapter 8. Using the Mobile Shopper application
103
Using the Self-Service Scale to add items to a transaction
This flow demonstrates the steps needed to add items with weight or quantity to the
transaction using the "weights and measures" certified self-service scale (SSScale).
Your mobile device should be in a ready state to scan an item and the customer
should not have added any weight-required items to the transaction.
Table 30. Using the Self-Service Scale to add items to a transaction
Mobile Device Display
Customer Steps
Notes/Message Flow
On the self-service
scale, press Scan
on the mobile
device, and scan
the barcode
displayed on the
self-service scale.
Since no items have been previously
entered on the mobile device, the
SSScale does not display a list of items.
Instead, it will just show the main
screen where the shopper can either
scan an item barcode, key in the
product look-up (PLU) number, or
search images for an item to add.
The mobile device
displays: "Waiting
for Self-Service
Scale. Press
Cancel to return."
See “Self-Service Scale” on page 126
for details on how the SSScale operates
in this mode.
Figure 81. Self- Service
Scale - pressing Scan
After all items have
been processed at
the SSScale, the
Done button is
displayed on the
base screen.
Press Done and
the scale goes
back to the original
display.
Figure 82. Self-Service Scale
- displaying screen with
"Done" visible
104
Toshiba TCxAmplify: User's Guide
The mobile device returns to item entry.
The items processed at the SSScale
have been added to the transaction.
The last item added at the SSScale is
displayed.
Table 30. Using the Self-Service Scale to add items to a transaction (continued)
Mobile Device Display
Customer Steps
Notes/Message Flow
If the customer
presses Item List,
the items are
displayed,
complete with
prices.
The items that were added at the
SSScale will not need to be
reprocessed at the checkout lane.
Press Shop to
return to Item
Entry.
Figure 83. Item List - items
displayed with prices
Item details
This flow demonstrates the steps to view the item details for an item that has been
added to the transaction.
Table 31. Item details flow
Mobile Device Display
Customer Steps
Notes/Message Flow
The customer has
previously entered
"Chicken Egg
Rolls".
Figure 84. Item details (1 of
4)
Chapter 8. Using the Mobile Shopper application
105
Table 31. Item details flow (continued)
Mobile Device Display
Customer Steps
Notes/Message Flow
1. Touch the item If the customer presses Back, they will
return to the previous screen.
and the Item
Action menu is
For an Android phone, the customer can
displayed.
press the hardware back button to exit
2. Select Display this dialog. For an iOS phone, the
Item Details.
customer presses Cancel to exit.
Figure 85. Item details (2 of
4)
If you have an
Android phone,
press the Back
button at the
bottom of the
screen to return to
the item screen.
If you have a
mobile device,
press the Back
button in the top
navigation to return
to the item screen.
Figure 86. Item details (3 of
4)
106
Toshiba TCxAmplify: User's Guide
Table 31. Item details flow (continued)
Mobile Device Display
Customer Steps
Notes/Message Flow
The customer is now in item entry
mode.
Figure 87. Item details (4 of
4)
Transaction Alerts (mobile screens)
This flow demonstrates the steps to view transaction alerts that can occur during
the shopping experience. See “Transaction Alerts” on page 10 for an overview.
Table 32. Transaction Alerts
Mobile Device Display
Customer Steps
Notes/Message Flow
The customer has
just signed onto
the application.
There are seven new alerts available for
viewing on the Alert icon.
Figure 89. New alerts
The number on the Alert icon indicates
the number of unread alerts that are
available.
Figure 88. Customer signed
onto the application
Chapter 8. Using the Mobile Shopper application
107
Table 32. Transaction Alerts (continued)
Mobile Device Display
Customer Steps
Notes/Message Flow
Press the
Transaction Alert
icon and the
transaction alerts
are displayed.
Note: The Transaction Alert icon
indicated that there were seven unread
alerts:
v One for Deli Order
v One for Pharmacy
v Two for Digital Wallet
v Two for Store event
v One for Daily Special
When the customer presses the
Transaction Alert icon, the mobile
phone application sends a message to
the Analytics service to track how many
times this customer pressed that icon.
Figure 90. Transaction Alert
icon
Press the Digital
Wallet icon.
The system displays all digital coupons
that were sent from the POS Integration
Hub (that were "downloaded" for this
customer).
When the customer presses the Digital
Wallet icon, the phone application
sends a message to the Analytics
service to track how many times this
customer pressed that icon.
Figure 91. Digital Wallet icon
108
Toshiba TCxAmplify: User's Guide
Table 32. Transaction Alerts (continued)
Mobile Device Display
Customer Steps
Notes/Message Flow
Press the Irish
Spring alert.
The system displays the details for this
coupon. The alert can be textual as
shown here. It can allow an item to be
added, or it can be a web page that will
be displayed
When the customer presses the Irish
Spring alert, the mobile phone
application sends a message to the
Analytics service to track how many
times this customer pressed that icon.
Figure 92. Irish Spring alert
Press OK.
The Irish Spring coupon text turns
orange to indicate it has already been
viewed.
Figure 93. Pressing OK Transaction Alerts
Chapter 8. Using the Mobile Shopper application
109
Table 32. Transaction Alerts (continued)
Mobile Device Display
Customer Steps
Notes/Message Flow
Press Back.
The Digital Wallet icon now shows one
unread alert instead of two.
Press View our
Daily Specials
and you are taken
to the website.
For example, this URL goes to the
Toshiba Global Commerce Solutions
website.
Figure 94. Pressing Back Transaction Alerts
Figure 95. Viewing daily
specials
110
Toshiba TCxAmplify: User's Guide
Table 32. Transaction Alerts (continued)
Mobile Device Display
Customer Steps
Notes/Message Flow
Press Back.
The View our Daily Specials icon now
has orange text to indicate it has been
viewed.
Press the Back
button and the
customer is ready
to scan items.
The Transaction Alert indicates that
there are now four unread alerts: one
Pharmacy alert, two store event alerts,
and one Digital Wallet alert.
Figure 96. Back icon viewing daily specials
Figure 97. Showing unread
alerts
Chapter 8. Using the Mobile Shopper application
111
Item Alerts
This flow demonstrates how an item alert (up-sell and/or cross-sell) is displayed and
can be added to the transaction. See “Item Alerts” on page 10 for an overview.
Table 33. Item Alerts
Mobile Device Display
Customer Steps
Notes/Message Flow
The customer is in
"Item entry" mode.
There is no item notification icon to the
left of the item description.
After the customer
scans an item that
has an item alert,
an Item Alert icon
is displayed to the
left of the item
information.
The number inside the Item Alert icon
indicates the number of alerts
associated with the item.
Figure 98. Item Entry
Figure 99. Item Alert icon
displayed
112
Toshiba TCxAmplify: User's Guide
Table 33. Item Alerts (continued)
Mobile Device Display
Customer Steps
Notes/Message Flow
Press the Item
Alert icon for the
Coffee Club
Membership.
When the customer presses the Item
Alert icon, the mobile phone application
sends a message to the Analytics
service to track how many times this
customer pressed that icon.
Press the Coffee
Club offer.
When the customer presses the Coffee
Club alert, the phone application sends
a message to the Analytics service to
track how many times this customer has
viewed the alert information.
Figure 100. Pressing Item
Alert icon
Figure 101. Coffee Club Alert
Chapter 8. Using the Mobile Shopper application
113
Table 33. Item Alerts (continued)
Mobile Device Display
Customer Steps
Notes/Message Flow
Press Yes to add
the offer to their
transaction and the
display shows that
the Coffee Club
item was added to
the transaction.
The mobile device sends a message to
the Analytics service to track that this
customer purchased this item.
The customer is now in item entry
mode.
Figure 102. Pressing Yes Item Alerts
Advertisements
Advertisements are intended to be an area on the screen where a retailer could
optionally "sell space" on the mobile device for advertisements. See “Advertising
Alerts” on page 11 for an overview.
No advertisements sent to the mobile device: Since advertisements are
optional, Figure 103 on page 115 shows what the screens would look like with no
advertisements being sent.
114
Toshiba TCxAmplify: User's Guide
Table 34. No advertisements sent to the mobile device
Mobile Device Display
Customer Steps
Notes/Message Flow
The customer has There is no bar between the "Together
started the
Commerce" logo and the instructions.
application, but no
advertisements are
available.
Figure 103. No
advertisements sent to the
mobile device
Multiple advertisements sent to the mobile device: Table 35 shows how
multiple advertisements are displayed on the mobile device.
Table 35. Multiple advertisements sent to the mobile device
Mobile Device Display
Customer Steps
Notes/Message Flow
The customer has
started the
application and the
first advertisement
displays.
There is a bar between the "Together
Commerce" logo and the instructions
that is touchable and shows all
advertisements in a "rolling" display
(rolling through the advertisements one
at a time as opposed to scrolling
constantly across the screen).
Figure 104. Multiple
advertisements sent to the
mobile device (1 of 4)
Chapter 8. Using the Mobile Shopper application
115
Table 35. Multiple advertisements sent to the mobile device (continued)
Mobile Device Display
Customer Steps
Notes/Message Flow
Subsequent
advertisements
display every xx
seconds.
The amount of time each advertisement
is displayed before rolling to the next
advertisement is configurable. The
default is 5 seconds.
The customer
presses the
Advertisement
bar.
A list of advertisements is displayed.
Figure 105. Multiple
advertisements sent to the
mobile device (2 of 4)
Figure 106. Multiple
advertisements sent to the
mobile device (3 of 4)
116
Toshiba TCxAmplify: User's Guide
Table 35. Multiple advertisements sent to the mobile device (continued)
Mobile Device Display
Customer Steps
Notes/Message Flow
The alert can be textual and can allow
The customer
presses Select for an item to be added, or it can be a web
page that will be displayed
deals at Deli
locations.
See “Advertising Alerts” on page 11,
"Alert types", for details on the types of
alerts that can be used.
The mobile device sends a message to
the Analytics service to track that the
customer purchased this item.
Figure 107. Multiple
advertisements sent to the
mobile device (4 of 4)
Transfer order from a failed mobile device to the store's mobile
device
This flow shows how a transaction can be transferred from one mobile device to
another. This can occur if the original mobile device had some type of pending
failure (for example, low battery warning). In order for this scenario to work, the
Loyalty ID must be the same on both mobile devices.
Table 36. Transfer Order from a failed mobile device to the store's mobile device
Mobile Device Display
Customer Steps
Notes/Message Flow
Customer #1 has
been running the
application and
has various items
and notifications as
a part of their
transaction.
Assume at this point that something
happens to the customer's mobile
device (for example, low battery
warning).
Figure 108. Transfer order
from a failed mobile device
to the store's mobile device
(1 of 4)
Chapter 8. Using the Mobile Shopper application
117
Table 36. Transfer Order from a failed mobile device to the store's mobile
device (continued)
Mobile Device Display
Customer Steps
Notes/Message Flow
If the customer enters No, the
The customer's
application ends.
family member or
one of the store
personnel who has
a mobile device
with the Mobile
POS application
on, starts the
application on their
mobile device with
the same loyalty
number as the
original device.
Figure 109. Transfer order
from a failed mobile device
to the store's mobile device
(2 of 4)
When the customer presses OK, the
If Customer #1’s
mobile device is in application ends.
a state that the
screen can be
updated, the
system notifies the
customer that their
order has been
transferred.
Figure 110. Transfer order
from a failed mobile device
to the store's mobile device
(3 of 4)
118
Toshiba TCxAmplify: User's Guide
Table 36. Transfer Order from a failed mobile device to the store's mobile
device (continued)
Mobile Device Display
Customer Steps
Notes/Message Flow
After the customer The customer can continue their
shopping as normal.
presses the Yes
button on the
mobile device that
the new order was
started, the entire
transaction (that is,
all items and
alerts) is
transferred to this
new mobile device.
Figure 111. Transfer order
from a failed mobile device
to the store's mobile device
(4 of 4)
Mobile device temporarily loses connectivity while shopping
This flow shows how the Mobile Shopper device handles a temporary loss of
connectivity to the Mobile Engine. This might occur if there are areas within the
store that the wireless network signal does not reach. When the Mobile Shopper
application detects a loss of connectivity, it only notifies the customer if necessary. If
the customer is not actively using the application when the loss of connectivity
occurs, the application might be able to restore connectivity before the customer
attempts the next action (for example, adding an item to the order). However, if the
loss of connectivity occurs in the middle of an action, the shopper will immediately
be notified of the connectivity loss and be provided instructions for operating the
application while offline.
Chapter 8. Using the Mobile Shopper application
119
Table 37. Mobile device temporarily loses connectivity while shopping
Mobile Device Display
Customer Steps
Notes/Message Flow
A loss of
connectivity is
detected in the
middle of a
customer action
(for example,
adding an item,
performing a price
check, or removing
an item).
The customer is notified of the loss of
connectivity. The customer can press
HELP to get a detailed explanation
about operating while offline or press
OK to resume shopping.
When the
customer presses
OK on the
previous screen,
they are taken
back to this screen
prompting them to
scan or key in an
item code.
Since neither the item description or
pricing information is available while
offline to the Mobile Engine, no detailed
item information can be displayed.
Figure 112. Mobile device
temporarily loses connectivity
while shopping (1 of 5)
If the customer
scans or keys an
item code, the field
that normally
displays the price
will contain the
text, "Item
information is not
available while
offline."
Figure 113. Mobile device
temporarily loses connectivity
while shopping (2 of 5)
120
Toshiba TCxAmplify: User's Guide
Table 37. Mobile device temporarily loses connectivity while shopping (continued)
Mobile Device Display
Customer Steps
If the customer
presses (clicks) an
item that was
added while
offline/online,
normally a menu
will be displayed
with various
actions that can be
performed on that
item (such as,
displaying the item
details or removing
the item). If the
customer presses
an item that was
entered while
offline, they will get
a screen informing
them that no
Figure 114. Mobile device
additional actions
temporarily loses connectivity
can be performed
while shopping (3 of 5)
on the item until
communication
with the Mobile
Engine is restored.
Notes/Message Flow
When connectivity is restored, the item
will be updated and at that point the
customer can display the item details or
remove the item.
When connectivity This process is typically completed in
just a few seconds.
is restored, the
customer is
temporarily
blocked from
adding new items
to their order until
items that were
entered while
offline are updated.
Figure 115. Mobile device
temporarily loses connectivity
while shopping (4 of 5)
Chapter 8. Using the Mobile Shopper application
121
Table 37. Mobile device temporarily loses connectivity while shopping (continued)
Mobile Device Display
Customer Steps
Notes/Message Flow
After all items in
the order have
been updated, the
customer is
notified that
communication to
the mobile
shopping system
has been restored.
When the
customer clicks
OK, they can
resume shopping.
In addition to the items in the order
being updated, the transaction total and
savings are also updated. The "No
Connection" message is removed and
the transaction totals and savings are
displayed in the upper right-hand portion
of the screen as a visual indicator that
the customer is now back online.
Figure 116. Mobile device
temporarily loses connectivity
while shopping (5 of 5)
The Shopper "walks away" in the middle of a transaction
A transaction is started if a shopper adds at least one item using the Mobile
Shopper application. If the shopper walks away without completing the transaction,
the transaction will be cancelled after a set amount of time. The default time is 40
minutes, but is specific to each implementation.
Displaying the retailer’s terms and conditions on your mobile
device
This flow shows how the mobile device can display a retailer's terms and conditions
(T&Cs), privacy policy, or any other information that needs to be displayed at
startup using the Mobile Shopper application. At a high level, the following steps
describe the process for displaying this information:
1. The retailer creates HTML formatted text with the information they want to
display when the Mobile Shopper application is first started. Multiple translations
of this HTML can be created so the information is shown in the language the
user has configured on the mobile device. The HTML can contain links to
websites if desired.
2. The retailer configures the Mobile Engine to send the HTML formatted
information to the mobile device. The retailer can choose to have the
information displayed on the mobile device:
v Just once
v When the mobile device application is started
v When the information is updated
The retailer assigns a "version" to the HTML file they created and the version
information is used to trigger the mobile device application to re-display the
information if and when it is updated, if the retailer chooses.
3. When the Mobile Shopper is started, it connects with the Mobile Engine and the
Mobile Engine decides whether the HTML needs to be sent to the mobile device
based on the configuration properties the retailer has defined. If the Mobile
122
Toshiba TCxAmplify: User's Guide
Engine sends the HTML to the mobile device and the user presses the Yes
button, the phone application stores the version of information you have
accepted. If the retailer has configured that the information should be
re-displayed whenever it changes, the version field is used to detect when the
information should be re-displayed to you.
The retailer is responsible for creating HTML formatted text that contains the
information they want displayed on the mobile device. The HTML formatted text can
include links to websites.
Figure 117 includes two screen shots that show how the retailer can format the
HTML to display the required information.
v Figure 117 shows how the information can be formatted so the shopper can click
on a link to a website to read the detailed information. When the shopper clicks
on the link, a Web browser is launched displaying the website.
v Figure 118 shows how the detailed information can be displayed directly to the
shopper in a scrollable window. This mode must be used if the WiFi used for the
mobile shopping application does not have internet connectivity.
In both cases, a Yes and No button displays at the bottom of the screen.
Table 38. Sample screen shots shows T&Cs with links to websites and simple text
Figure 117. Sample screen shots showing
T&Cs with links to websites and simple text
(1 of 2)
Figure 118. Sample screen shots showing
T&Cs with links to websites and simple text
(2 of 2)
Chapter 8. Using the Mobile Shopper application
123
The retailer has complete control of what information is displayed and how it is
displayed (within the limits of HTML). The only restriction is that the HTML file
cannot have links to other HTML files. The HTML file the retailer supplies must be
written so that you will be prompted to click on the Yes button to accept the terms,
and click No to decline the terms. The title displayed in the window with the Yes
and No buttons is the title in the HTML file, so the retailer has control over what is
displayed in the window title bar.
For example, the HTML file used to create Figure 117 on page 123 is shown in
Figure 119, and the HTML file used to create Figure 118 on page 123 is shown in
Figure 120. How the information is displayed is dependent on the web viewer used
for each mobile device platform, so it is the retailer’s responsibility to test using both
the Android and iOS shopping applications to ensure the information they have
provided in the HTML file is formatted correctly on each mobile device platform.
Figure 119. Sample HTML for displaying information with web links (1 of 2)
Figure 120. Sample HTML for displaying information without web links (2 of 2)
The retailer configures the Mobile Engine to send the terms and conditions
information to the mobile device by adding properties to the
mobileserver.properties and mobiletext.properties files or one of the extension
files. See “Property extension mechanism” on page 201 for more information about
using property extension files.
124
Toshiba TCxAmplify: User's Guide
Table 39 describes the properties that need to be added to the
mobileserver.properties file or one of its extensions files (that is,
siusermobileserver.properties).
Table 39. Properties added to the mobileserver.properties file
Property
Description
terms.version
The version of the termsAndConditions
HTML file in the mobiletext.properties file
(or one of its extension files).
terms.policy
Set to one of the following numeric values:
0 – Disable display of
termsAndConditions HTML default.
1 – Display termsAndConditions HTML
once for the life of the application.
2 – Display termsAndConditions HTML
whenever the terms.version on the
mobile device does not match the
terms.version on the Mobile Engine (that
is, display each time the terms are
updated). It is the retailer’s responsibility
to update the terms.version each time
they change the termsAndConditions
HTML.
3 – Display termsAndConditions
whenever the shopper launches the
mobile device application.
If the termsAndConditions HTML is
displayed, the user must press the Yes
button before they can proceed with using
the application.
Note: Information indicating what
terms.version has been accepted by the
shopper is stored on the mobile device. If the
shopper clears the data associated with the
mobile shopper application, they will have to
accept the terms again the next time they
launch the application so that the application
can restore the terms.version information.
The HTML that the retailer wants to display must be added to the
mobiletext.properties file or one of its extensions files (for example,
siusermobiletext.properties). The HTML must include the <html> tag with
<html> all in lowercase. The mobile device application determines the text to be
displayed is HTML by searching for the <html> tag with "html" all in lowercase.
The property to use when defining the HTML is:
termsAndConditions=
Since the HTML file will usually consist of multiple lines of text, the backslash (‘\’)
character must be used at the end of each line as a continuation character. An
example of how to set the termsAndConditions property with multiply lines of HTML
code is shown below:
termsAndConditions=<html><head> \
<style>title {text-align:center;} \
body {background-color: white;color: black;fontChapter 8. Using the Mobile Shopper application
125
family: \
Arial sans-serif;font-size: 12pt;} \
ul.touchable li {padding-top:8px;paddingbottom:8px;}</style> \
<title>Mobile Shopper Terms and Conditions</title> \
</head><body><p>Click on the Yes button below to
indicate \
that by using this app you are agreeing to the Toshiba \
<a href+"http://www.retailer.com/terms">Terms \
and Conditions</a> \
and <a
href="http://www.retailer.com/privacy/">Privacy \
Policy</a>,</body></html>
If the retailer wants to provide the information in multiple languages, they must
include additional files for each language. The naming convention for these files is:
[filename] [underscore] [two-letter ISO-639 language code] [.properties]
For example, if the siusermobiletext.properties file is used for the English text,
the Spanish text would be stored in a file named siusermobiletext_es.properties.
A full list of the ISO-639 two-letter language codes are available at
http://www.loc.gov/standards/iso639-2/php/English_list.php.
When the mobile phone application is started, it connects to the Mobile Engine and
exchanges initialization messages. During this exchange of messages, the mobile
phone application will send the Mobile Engine the terms.version stored on the
mobile device (if any). When the Mobile Engine receives this information, it will
determine (based on the terms.policy configuration parameter) whether the
termsAndConditions text needs to be sent to the mobile device. If the HTML is sent
to the mobile device, it will be displayed as shown in Figure 5 on page 12. When
the shopper presses either the Yes or No button, that information will be sent back
to the Mobile Engine and if only Yes is pressed, the Mobile Engine will proceed with
initializing so that the shopper can use the application.
The acceptance of the terms will occur before the user is prompted to enter their
loyalty number. In some instances, the user will accept the terms and after their
loyalty information is processed, they might be informed that they are not allowed to
use the application.
When the mobile phone application receives information from the Mobile Engine
that the user is allowed to use the application, the mobile device will store
terms.version on the mobile device so that it can be sent to the Mobile Engine the
next time the application is started.
Self-Service Scale
The self-service scale (SSScale) is a "weights and measures" certified Store
Integrator GUI Front-End Register User Interface that has been modified from an
Operator Store Integrator GUI display to a customer facing display. This guides the
shopper through the process of purchasing and weighing produce for either mobile
shoppers or non-mobile shoppers.
Highlights: SSScale
The highlights of the self-service scale (SSScale) include the following:
v Runs on a real 4690 register:
126
Toshiba TCxAmplify: User's Guide
– Using only the terminal, the touch display, and scale. No other hardware is
needed unless label printing is desired.
– Using "Training mode" in ACE to prevent anything from being placed in
TLOGS, using transaction numbers.
– Currently prints labels on either a Toshiba B-EV4 or Zebra LP 2824 Plus
printer connected through a serial port to the 4690 (but can use any serial
connected label printer).
– No separate item file maintenance is required.
– Consistent loyalty pricing with front-end (that is, no duplicate processing).
– No hard drive maintenance.
– No CSS sessions required.
v Displays and processes both regular price and loyalty price (including linked
coupons, excluding targeted coupons) since it is just an extension of the Mobile
Shopper POS system.
v Has a "walk away" timer that resets the terminal after a configurable amount of
time (currently set to 2 minutes).
– Navigating through the screens prevents the timer from firing and logging off
the system.
v Is Weights and Measures certified.
Self-Service Scale screen flows
The following are self-service scale (SSScale) screen flows:
Initial Screen: The self-service scale (SSScale) can run in two different modes.
One mode is where the Mobile Shopper is active and the other mode is when it is
inactive. Even when the Mobile Shopper system is active, the SSScale allows
labels to be printed since not all shoppers will have mobile devices to do their
shopping. See “Print barcodes and check prices” on page 133 for details on using
the self-service scale to print produce labels and check prices.
When the Mobile Shopper system is inactive, the initial screen Figure 121 on page
128 is displayed.
Chapter 8. Using the Mobile Shopper application
127
Figure 121. Initial Self-Service Scale screen with the Mobile Shopper inactive
When the Mobile Shopper system is active, the initial screen shown in Figure 122 is
displayed, reflecting that both mobile and non-mobile consumers can use the
self-service scale. The Start button on the left will be used to initiate the Barcode
Printing and Price Check functions (see “Print barcodes and check prices” on page
133), while the Start button and/or the barcode on the right is used by the Mobile
Shopper POS shoppers to connect their mobile device with this terminal. See
“Pressing "Start" from the "Mobile Scan"” or “Scanning Self-Service Scale after
entering weight required items” on page 129 to see how to use the system as a
Mobile Shopper customer.
Figure 122. Initial Self-Service Scale screen with the Mobile Shopper active
Pressing "Start" from the "Mobile Scan": If the shopper cannot get the barcode
on the initial screen to scan, they can press the Start button under the "Mobile
Scan" header. The screen shown in Figure 123 on page 129 is displayed that
128
Toshiba TCxAmplify: User's Guide
includes a larger barcode to scan. See “Print barcodes and check prices” on page
133 for details on using the self-service scale to print produce labels and check
prices.
When the Mobile Shopper system is inactive, the initial screen (see Figure 123) is
displayed, which includes a larger barcode to scan.
Figure 123. Self-Service Scale Mobile Scan Starting screen
Scanning Self-Service Scale after entering weight required items: If the
shopper scans the barcode for this self-service scale and has already scanned (or
keyed) some produce items with their mobile device, Figure 124 on page 130 is
displayed showing all weight required items the customer has entered. From this
screen, the customer can select one of the items from the list, or select Search
images to search for their item. (See “Self-Service Scale with no phone items” on
page 133 for the screen that is displayed if the shopper scans the barcode for this
self-service scale when there are no weight required items previously entered on
the mobile device.)
Chapter 8. Using the Mobile Shopper application
129
Figure 124. Self-Service Scale showing items entered on the mobile device
Weight required item entered: After a customer enters an item that requires
weight to be entered, this screen displays information specific to the item and will
prompt for the weight, as shown in Figure 125.
Figure 125. Self-Service Scale Weight Entry screen
Adding an item to the mobile device: After the shopper places the bananas on
the scale, a screen is displayed. Figure 126 on page 131 to the left shows an item
with loyalty pricing, and the screen on the right (see Figure 127 on page 131)
shows an item without loyalty pricing. If the shopper presses No, they are returned
to the screen that shows the produce items that have been scanned. If they select
Yes, the item is added to the mobile device transaction.
130
Toshiba TCxAmplify: User's Guide
Table 40. Self-Service Scale Item Entry screens
Figure 126. Self-Service Scale Item Entry
screen (1 of 2)
Figure 127. Self-Service Scale Item Entry
screen (2 of 2)
After adding an item to the mobile device: If the shopper presses Yes to add
the item to their mobile order, a screen is displayed instructing the shopper to
remove the item and place it in their cart (see Figure 128).
Figure 128. Self-Service Scale Item Entry Completion screen
Search images: If a shopper presses the Search Images button, a screen is
displayed (see Figure 129 on page 132) to allow the shopper to search for an item,
and then select that item by touching the button. Press the Back to Item Entry
button to return to the item entry screen.
Chapter 8. Using the Mobile Shopper application
131
Figure 129. Self-Service Scale Search screen
After removing item from the scale and placing it in shopping cart: If there
are still produce items remaining in the Phone Item List, they will be displayed, as
shown in Figure 130. Processing should continue until all items have been weighed.
If there are no additional items in the Phone Item List, the screen shown in
Figure 132 on page 133 is displayed (see “Self-Service Scale with no phone items”
on page 133).
Figure 130. Items remaining on the Phone Item List screen
Removing an item from the Phone Item List: If the shopper wants to remove an
item from the phone, select it just as if they are adding it to the transaction, and
then select the Delete button (see Figure 131 on page 133). After deleting the item,
132
Toshiba TCxAmplify: User's Guide
the self-service scale would either return to the Phone Item List or it would go to the
screen. See Figure 132 and “Self-Service Scale with no phone items.”
Figure 131. Self-Service Scale Item Deletion screen
Self-Service Scale with no phone items: If all phone items have been processed
or the shopper has not scanned any produce, but scanned the barcode on the
self-service scale (SSScale), the screen would be displayed (see Figure 132). From
this screen, the shopper can scan an item, key an item number, or select Search
by Picture to enter items as described in “Search images” on page 131.
Figure 132. Self-Service Scale with no phone items
Print barcodes and check prices: Printing labels with pricing information for
produce that is not to be purchased using the Mobile Shopper solution is another
Chapter 8. Using the Mobile Shopper application
133
capability of the self-service scale (SSScale). See “Initial Screen” on page 127 for
information on how to initiate this process.
By using the feature of the SSScale, you can speed up checkout by having a
scanned label attached to produce, thus reducing the time for the cashier to enter
this information for weight or quantity required produce.
When the Start button for Printing Barcodes or Checking Prices is pressed on the
initial screen, the shopper will see the screen in Figure 133. The shopper can either
scan a barcode (UPC or GS1), key in a product look-up (PLU) number, or select
Search Images to search for their item.
Figure 133. Self-Service Scale Item Entry screen
If the item entered is a weight-required item, see “Weight required item entered” on
page 130. If the item entered is a quantity required item, see “Quantity required
item entered.”
Quantity required item entered: If a customer enters an item that requires a
quantity to be entered, see “Initial Screen” on page 127 on how to initiate this
process.
By using this feature of the self-service scale you should be able to speed up
checkout by having a scanned label attached to produce, thus reducing the time
that the cashier needs to enter this information for weight or quantity required
produce.
When the Start button for Printing Barcodes or Checking Prices is pressed on the
initial screen, the Quantity Entry screen is displayed (see Figure 134 on page 135).
Information specific to the item is shown on this screen and the user is prompted
for the quantity.
134
Toshiba TCxAmplify: User's Guide
Figure 134. Self-Service Scale Quantity Entry screen
Printing a label: After the shopper places an item on the scale, the Weight Entry
screen (see Figure 135) is displayed (both an item with loyalty and without loyalty
are available, but only the non-loyalty screen is shown here). If the shopper presses
No, they are returned to the previous screen. If they select Yes, the item label is
printed so the customer can place the label on the produce.
Figure 135. Self-Service Scale Label Printing screen
Sample produce labels: Figure 136 on page 136 shows a sample barcoded
produce label for a weight required item, and Figure 137 on page 136 shows a label
for a quantity required item. ACE needs to be modified to be able to scan these
unique Code 128 Barcodes that can include the GS1 item number and the weight
and quantity of the items (see “ACE options to read Self-Service Scale labels” on
page 136).
Chapter 8. Using the Mobile Shopper application
135
Figure 136. Weight Barcode with No loyalty Pricing
Figure 137. Quantity Barcode with Loyalty Pricing
ACE options to read Self-Service Scale labels: The following figures show the
options required for ACE to read the self-service scale barcodes (see Table 5 on
page 50 and Table 6 on page 50).
Self-Service Pay Station
The self-service pay station (SSPS) is an extension to the TGCS Self Checkout
Solution (CHEC) that has been optimized for payments. The Mobile Shopper POS
transactions can be retrieved on the SSPS and loss prevention is handled by
managing the TGCS Mobile Exception Framework issues that might have occurred
during the Mobile Shopper POS transaction. It has also been modified to maintain
the Mobile Shopper POS look and feel consistent with the self-service scale
described in “Self-Service Scale” on page 126.
136
Toshiba TCxAmplify: User's Guide
Highlights: Self-Service Pay Station
The highlights of the TGCS self-service pay station (SSPS) include the following:
v An extension of TGCS Self Checkout (CHEC):
– Providing full self checkout functionality and infrastructure.
v Optimizes transaction payment and problem resolution by using the TGCS
Mobile Exception Framework.
v Prevents customers from completing transactions until all exceptions have been
resolved.
v Logs all shopper assistant (SA) exception activity to the TLOG to ensure proper
resolution of exceptions.
Self-Service Pay Station screen flows
Using the Initial screen
The self-service pay station (SSPS) allows connectivity with the mobile device to
facilitate transaction payments. The initial screen, see Figure 138, provides a
barcode similar to the self-service scale to allow communication between the two
components. If the Mobile Engine is not running, the barcode on this screen will not
be displayed.
Figure 138. Self-Service Pay Station initial screen
Chapter 8. Using the Mobile Shopper application
137
Completing a mobile transaction
After the order is retrieved, the customer is prompted to scan any coupons, enter
any additional items, or select Finish and Pay. If any exceptions occurred during
the mobile transaction, the lane light will be flashing to notify a shopper assistant
(SA) that this customer needs assistance prior to completing their transaction.
Figure 139. Mobile Transaction Completion screen
Paying for a mobile transaction
If no exceptions occurred during the mobile shopping experience and the customer
selects Finish and Pay (or exceptions occurred but were handled by a shopper
assistant), the customer can select their tender, pay, receive their receipt, and their
checkout is completed.
Figure 140. Mobile Transaction Payment screen
138
Toshiba TCxAmplify: User's Guide
Exceptions on the Self-Service Pay Station
If (and only if) there were exceptions in the order, the transaction cannot be
completed until a shopper assistant handles all exceptions. Once the exceptions
have been entered, the shopper assistant leaves and the customer can continue
payment options.
Exceptions can be any number of things that occurred during the mobile shopping
experience, such as, age-restricted items purchased, weight required items
purchased but not weighed, or price required items purchased. The buttons that are
displayed on the right side of the screen are context sensitive to the specific
exception, and are intended to help resolve the exception. If an audit is required, it
is handled by this same exception process, but will have screens specific to the
audit processing. There is a similar exception processing component of the Store
Integrator GUI. See “Store Integrator GUI” for details.
Figure 141. Self-Service Pay Station Exception Processing screen
Store Integrator GUI
The Store Integrator GUI has been modified to allow Mobile Shopper POS
transactions to be retrieved on the operator attended front-end lanes of your store,
and to address loss prevention by managing the Exception Framework issues that
might have occurred during the Mobile Shopper POS transaction. If a Mobile
Shopper POS transaction has been suspended and cannot be retrieved by
scanning the barcode on the customer's display, the cashier can still retrieve the
transaction using the normal "Retrieve Transaction" capability on the Store
Integrator GUI register as a backup.
Highlights
The highlights of the Store Integrator GUI enhancements for the Mobile Shopper
POS include the following:
v Integrates into your existing Store Integrator GUI front-end configuration.
v Uses the Store Integrator GUI customer display to display the barcode used to
retrieve the mobile transaction to a specific terminal.
Chapter 8. Using the Mobile Shopper application
139
v Uses the TGCS Mobile Exception Framework to prevent any mobile transaction
that has exceptions from being completed until the cashier resolves the issues.
v Logs all cashier exception activity to the TLOG to ensure proper resolution of
exceptions.
Store Integrator GUI screen flows
Using the initial screen for the Store Integrator GUI
The self-service pay station (SSPS) allows connectivity with the mobile device to
facilitate transaction payments. See Figure 142 for the initial screen that displays
when the Mobile Engine is not connected and see Figure 143 on page 141 for the
initial screen when the Mobile Engine is connected.
Figure 142. Store Integrator GUI when the Mobile Engine is disconnected
140
Toshiba TCxAmplify: User's Guide
Figure 143. Store Integrator GUI when the Mobile Engine connected
Retrieving a Mobile Shopper POS transaction
In order to retrieve a Mobile Shopper POS transaction, the Store Integrator GUI
must be in a signed state and cannot be in an active transaction (see Figure 143).
When in this state, the customer can scan the barcode showing on the Store
Integrator GUI customer display that is similar to the process for both the
self-service scale and the self-service pay station (SSPS). See Figure 144 on page
142 for an example of the customer screen that could be implemented.
When this barcode is scanned, the mobile device transaction is suspended and the
transaction is transferred to this terminal for payment. If there are no exceptions in
the mobile device transaction, a screen similar to the one shown in Figure 145 on
page 142 will be shown and the cashier can select Total and tender out the
transaction.
Chapter 8. Using the Mobile Shopper application
141
Figure 144. Customer Store Integrator GUI screen for Mobile Shopper POS
Figure 145. Store Integrator GUI Retrieval with no exceptions
Retrieving a Mobile Shopper POS transaction with exceptions
If a Mobile Shopper POS transaction has been retrieved and there are exceptions
in the order, a screen similar to the one shown in Figure 146 on page 143 is
displayed. The cashier cannot select the Total button since it will not be visible until
all exceptions have been processed. When the Item Exceptions button is pressed,
all exceptions in the transaction will be displayed, see Figure 147 on page 143. The
buttons shown below the selected exception are context-sensitive to the specific
exception. Any action taken by the cashier might be optionally logged to the TLOG.
During the handling of each exception, if there is additional information needed for
the exception (like a birth date, a quantity, or a weight), the cashier will be prompted
for this additional information. In addition, the cashier can select the Item Entry
142
Toshiba TCxAmplify: User's Guide
button to return to normal Store Integrator GUI processing, but must return to these
exceptions and process them successfully before the transaction can be completed.
Figure 146. Store Integrator GUI Retrieval with exceptions
Figure 147. Item Exceptions Dialog
Audits
The auditing for the Mobile Shopper depends on information provided by the POS
Integration Hub (PIH) to trigger an audit during checkout. The PIH interfaces with
the retailer’s process, which maintains the logic for determining when a shopper
audit is to be conducted. For auditing purposes, a payment station can be either a
self-service pay station (SSPS) or a Store Integrator GUI attended pay station (for
example, a front-end lane).
Chapter 8. Using the Mobile Shopper application
143
Note: For this publication, auditing procedures will focus on the Store Integrator
GUI lane, but the flow should be the same for a self-service pay station (only
displayed slightly different). In order to support auditing, customer IDs must
be present in transactions.
When a Mobile Shopper POS transaction is retrieved during checkout, a request for
audit details is sent to the PIH. The POS Integration Hub responds to the "audit
details request" message indicating whether the shopper is flagged for an audit. A
"full audit" indicates the transaction is to be voided and the entire order re-scanned
through the pay station. Alternately, a "spot audit" indicates only a limited number of
items should be re-scanned and the scanning will occur using the pay station. In
the case of a "spot audit", the number of items requiring re-scanning is defined in
the application configuration, but can also be specified in the PIH response to the
"audit details request" received from the retailer.
When an audit is indicated by the POS Integration Hub, the Mobile Shopper POS
session generates an "audit required" exception. This exception is included with any
other exceptions (for example, quantity required exceptions, weight required
exceptions, or unexpected weight change exceptions) that occurred during the
Mobile Shopper POS transaction. This exception is added so that it will be the last
entry on the exceptions list when processed during checkout. All other exceptions
must be handled prior to performing an audit.
Spot audits
When an audit exception is selected, there are two options available to the cashier:
v A Spot or Full Audit
v A Bypass Audit
Selecting the Spot or Full Audit option closes the GUI exceptions list (see
Figure 148 on page 145). If a spot audit is required, the Transaction Audit window
will display (see Figure 149 on page 145). This window can have two variations
depending on the type of spot audit that is specified:
v A spot audit with recommended items
v A spot audit with no recommended items
The TLOG will be updated if the cashier bypasses an audit (whether it is a spot or
full audit).
Note: For a spot audit without a required list, the top table will still be visible, but
no items will be listed.
144
Toshiba TCxAmplify: User's Guide
Figure 148. Spot Audit exception
Figure 149. Spot Audit with required list
The Transaction Audit window displays the following two lists:
v The list of required items to be audited (see “Audit required list” on page 146 for
details).
v The list of items scanned for audit (see “Audit items list” on page 146 for details).
The information on both lists are non-selectable and view-only. The Transaction
Audit window also shows the number of remaining items required to be audited and
gives the cashier the option to do a visual audit rather than a scanning audit. The
Visual Passed/Failed buttons in the Transaction Audit window indicate whether
there is an option to do a visual audit. See “Visual audit” on page 148 for more
details.
Chapter 8. Using the Mobile Shopper application
145
The Keypad button allows the cashier to enter the item number for weight or
quantity required items during the audit. When multiple quantities of an item are
scanned during an audit, the Audit Keypad opens so the cashier can validate the
quantity purchased. See “Audit keypad” for more details. A self-service scale
barcode can be scanned as part of the audit and could launch the Weight
Confirmation window or Keypad window depending on the item information. See
“Audit weight confirmation dialog” for more details.
The Transaction Audit window remains displayed until either the required number of
items have been successfully scanned or the cashier presses one of the visual
audit buttons.
Audit required list
Items displayed in the list of required audit items will be defined by the retailer’s
host system. The number of items displayed in this list, as well as the count of
required items, defaults to a predetermined number that is set in the application's
configuration properties (for example, the number 5). However, this number can
also be determined by the retailer's host system and included in the audit results
returned by the PIH. This list is not frequently used.
Audit items list
As items are scanned by the pay station for spot audits, the items are displayed in
the Audit Items list. If the item scanned is an item in the transaction, the item
information is displayed over a green background, and the count of remaining items
to be audited is reduced by one. If the item scanned is not in the transaction, the
item information is displayed over a red background alerting the cashier to the
discrepancy, and the item is automatically added to the transaction. A discrepancy
item scan does not reduce the count of required items to be audited.
If a certain number of discrepancy items are encountered, the entire transaction is
voided and must be scanned manually by the cashier. This number defaults to a
predetermined number that is set in the application's configuration properties (for
example, the number 5). This number can also be determined by the retailer's host
system and included in the audit results returned by the PIH.
Audit keypad
The Keypad button on the Spot Audit window opens the keypad window for
entering the product look-up (PLU) for non-barcoded items during the audit. This
window is also launched to validate the quantity on multiple quantity items.
Processing a weight required item will launch the new Audit Weight Confirmation
window. See “Audit weight confirmation dialog” for more details.
When the weight or quantity entry is completed, the results will be displayed on the
Spot Audit window in the Audit Items List (see Figure 149 on page 145) with a
green or red background. See the detailed description in “Audit items list.”
Audit weight confirmation dialog
This window provides instructions to the cashier to place the item on the scale for
validation of the weight and requires pressing an OK button to complete the
process. A configured tolerance will be considered for validation. Validation of the
audit is handled within the Store Integrator GUI and the tolerance will default to 0.1
lbs. This tolerance is configured in the mobileserver.properties file or one of its
extensions (see“Property extension mechanism” on page 201). When the weight
entry is completed, the results will be displayed on the Spot Audit dialog in the
Audited Items List (Figure 149 on page 145).
146
Toshiba TCxAmplify: User's Guide
Mobile Transaction Monitor
The Mobile Transaction Monitor consumes events produced by the POS Integration
Hub (PIH) during the course of a transaction’s lifecycle. The Mobile Transaction
Monitor evaluates the transaction at various stages and determines whether a spot
audit should be required based on a set of configurable properties found in
mobileserver.properties. Please see the properties defined below from
mobileserver.properties:
v audit.mobile.number.item.voids.allowed, and
v Properties that begin with audit.mobile.transaction.* for detailed options that
can be set for your environment.
Chapter 8. Using the Mobile Shopper application
147
Full audit
For a full audit, the entire Mobile Shopper POS transaction is voided and the items
must be re-scanned by the cashier. A full audit exception will be indicated as
follows:
Figure 150. Full Audit exception
When the Full Audit button is pressed, the following warning screen is displayed
(see Figure 151). If the operator presses Yes, the entire transaction will be voided
and must be re-entered by the cashier.
Figure 151. Full Audit Warning prompt
Visual audit
The option to perform a visual audit can be presented to the cashier depending on
the size of the transaction (number of items, that is, 10 or less). The maximum
number of items that will allow a visual audit defaults to a predetermined number
set in the application configuration properties (see the
audit.num.items.allowed.for.visual.audit property). However, this number can
also be determined by the retailer's host system and included in the audit results
returned by the POS Integration Hub (PIH).
The option to perform a visual audit is indicated by the display of the Visual
Passed or Visual Failed buttons in the audit window. The Visual Passed button is
initially displayed, while the Visual Failed button is only shown if there are
exceptions noted while scanning items during the audit. Any items found by the
148
Toshiba TCxAmplify: User's Guide
cashier during a visual audit that are not in the transaction should be scanned (as is
done in the normal audit process). These items appear in the audited items list as
failing items (see “Audit items list” on page 146) and cause the visibility of the
"visual passed or failed" buttons to be swapped.
Audit details request
When the Mobile Shopper POS transaction is retrieved at the self-service pay
station, the retailer's host system will be responsible for responding with the
information shown in Table 41. An entry is only required if there is a valid value (that
is, if the "TypeOfAudit" indicates "Full Audit Required", then there will not be an
entry for NumItemsToScan).
Table 41. Required audit information from retailer's host system
Key
Values (Integer)
typeOfAudit
v 0 = No Audit Req
v 1 = Spot Audit Req
v 2 = Full Audit Req
numItemsToScan
The number of items required to be scanned
during a spot audit.
numRequiredItems
The number of required items to display.
numFailedItemsAllowed
The number of audit exceptions to allow
before requiring a “full audit”.
maxNumItemsForVisualAudit
The maximum number of items that are
allowed to be “Visually Audited”.
requiredItems
A list of items to be found in the transaction.
Audit results
After an audit is complete and the transaction is final, the different results of the
audit are listed Table 42.
Table 42. Audit results
Key
Values (Integer)
auditType
The Audit Type passed from PIH
getAuditDetails() method as an Integer.
custID
The customer ID number.
cashierID
The ID number of the cashier who performed
the audit.
auditResults
v 0 = No Validation Occurred
v 1 = Validation Passed
v 2 = Validation Failed
v 3 = Visual Audit Passed
v 4 = Visual Audit Failed
v 5 = Full Audit required (either from PIH or
the fact that there were too many failures
during the spot audit)
v 6 = Cashier Bypassed the Audit
numFailedItems
The number of failed items in the audit, if
any.
Chapter 8. Using the Mobile Shopper application
149
150
Toshiba TCxAmplify: User's Guide
Chapter 9. Associate Line Busting
This section describes how to deploy, install, and use the Associate Line Busting
(ALB) solution.
Associate Line Busting solution
The Associate Line Busting (ALB) solution allows store associates to use an iOS or
Android capable mobile phone to scan the items in a shopper's cart so they can
speed through the checkout process. The solution can also send information to the
associate about eCoupons related to the transactions.
When an associate scans or keys in an item code using a retailer-supplied mobile
device, the ALB application sends the item code to the Mobile Engine running on a
server in the store. The Mobile Engine communicates with the 4690 Point of Sale
(POS) system to create a POS transaction, and retrieve the item description and
price. The item information is sent back to the mobile device so that it can be
displayed to the associate. When the transaction is finished, the associate may print
a suspend slip with a barcode to give to the shopper. At checkout, the shopper
simply scans the barcode on a pay station and the Mobile Engine retrieves the
transaction, which allows them to check out without having to re-scan the items
selected for purchase.
The ALB solution uses 4690 POS (and its various components for loyalty pricing,
weight processing for produce, and tendering capabilities) to generate an actual
POS transaction with customer-specific pricing. All payment operations are done
using the retailer’s PCI-compliant payment devices at the checkout lane. The mobile
application integrates across a wireless network in the store with a virtual session of
the POS application which is hosted on a 4690 store server, extending the retailer's
current (and often highly-customized and proprietary) POS application functionality
to the mobile device. The scanner in the mobile device is used for item bar
scanning.
The ALB application also provides a way to send alerts to associates. This Alert
feature is simply a mechanism for sending information to associates to let shoppers
know about store specials, additional items they may want to purchase, discounts,
coupons, or store events. The mobile device can be configured to sound a tone or
vibrate whenever a new alert is received to ensure the associate is aware that new
information is ready to view. The ALB application also sends information to the
Mobile Engine about which alerts the associate viewed. This allows the retailer to
maintain statistics about which types of alerts the associate took the time to read.
Highlights: Associate Line Busting
The highlights of the Associate Line Busting (ALB) solution include the following:
v Enables retailer-owned mobile devices to be used for queue busting.
v Uses ACE and Store Integrator to extend point of sale (POS) functionality from
the front-end lanes to the queue busting space (for loyalty programs, loyalty
pricing, and payment).
v Integrates with Toshiba Store Integrator GUI to expedite customer payment and
checkout.
v Allows the associate to sign in using the same 4690 user ID and password they
use to sign in at a POS terminal.
© Copyright Toshiba Global Commerce Solutions, Inc. 2014
151
v Entering an item on a mobile device starts a transaction.
v If the Loyalty ID is required, the associate can enter it prior to entering an item. If
it is optional, it can be entered at any time during a transaction.
v Item exceptions are auto processed by the POS Business Component (POSBC)
and handled at the pay station.
v Audits are suppressed.
v Transactions may be suspended without transferring an order.
v Functionality to end a transaction and print a transaction slip that can be used at
the Store Integrator GUI register to retrieve the suspended transaction.
How it works: Associate Line Busting
Deployment and installation
As a part of the Associate Line Busting (ALB) solution, the store associate receives
a retailer-owned mobile device with the application preinstalled.
v The retailer is responsible for defining how the application will be deployed to
their associates' mobile devices, and they are responsible for any additional
information required to configure the application to the store network.
v For iOS, the purchase of an enterprise license from Apple® may be required to
distribute the application internally to retailer-owned mobile devices.
v The following devices have been tested with ALB:
– Motorola MC40 (Android)
– Ingenico ISMP for iPod Touch (iOS)
– Honeywell Captuvo SL22 SLED for iPod Touch (iOS)
v Other devices may be available through other service offerings.
Using Associate Line Busting
The following is an overview of how the Associate Line Busting (ALB) application
works.
v In the store, the associate presses the icon for the ALB application on their
retailer-owned mobile device to launch the application.
v The mobile device must be pre-configured with the appropriate network
connection settings.
v The associate is prompted to enter their user ID and password to sign onto the
application.
v If WiFi printing is enabled in the store, the application will prompt for the WiFi
printer connection information. The connection information can be an IPv4
address or hostname, and can be scanned or keyed into the mobile device. The
associate may skip entering the WiFi printer connection information at this point,
choosing to provide it later using the menu options.
v If the loyalty number is required, the associate will be prompted to enter the
shopper's loyalty number (by either scanning or keying in the number). This
loyalty number is saved for the duration of the transaction. If the retailer's POS
system supports the Alternate ID entry, the associate can enter a 10-digit phone
number to use as the loyalty ID.
v The associate can either scan items with their mobile device scanner or enter
item numbers on the mobile device touch screen keypad. If the retailer is using
Single Large Expensive Disks (SLED) devices, such as the Motorola MC40, the
associate can use the rapid scanning buttons on the device.
152
Toshiba TCxAmplify: User's Guide
v As the associate scans the items in the shopper's transaction, the item number,
description, net price, and loyalty savings of the most recent item scanned are
displayed along with the running totals and total loyalty savings of the entire
transaction. Additional item information can be displayed by touching the item
and selecting Display Item Details.
v The associate can display and review all items in the transaction by using the
Item List icon.
– Associates inform shoppers that weight-required items are weighed at
checkout.
v The associate finishes scanning the items, then presses the Finish button which
suspends the transaction. If WiFi printing is enabled in the store, the associate
can optionally print a suspend transaction slip that the shopper can use to
retrieve the transaction at a pay station and complete their checkout.
v The shopper pays and completes their shopping.
Note: The Associate Line Busting function, including printing suspended transaction
slips, is not supported unless the ALB device is connected to the Mobile
Engine through the WiFi network.
Architectural overview: Associate Line Busting
Associate Line Busting POS solution
In addition to the components referenced in “Architectural overview” on page 8 for
the Mobile Shopper, the Associate Line Busting (ALB) solution consists of the
following components (see Figure 7 on page 20) to provide a total mobile solution
for your 4690 Point of Sale (POS) system:
Handheld mobile computer (Motorola MC40, Honeywell Captuvo SL22
Enterprise SLED, and others)
v Very thin interface.
v No sensitive shopper payment information (such as, credit and debit
account numbers) is ever entered or stored on the mobile device.
Mobile printers (Toshiba B-EP2DL)
WiFi-based mobile printers allow associates to print suspend transaction
slips so that customers can retrieve them at pay stations.
POS Integration Hub: Associate Line Busting
The POS Integration Hub supports the same alert services and mechanisms that
the Mobile Shopper supports, with the exception of advertising alerts. See “POS
Integration Hub installation” on page 28 for additional details.
Using wireless network configuration and security
The wireless network information for Associate Line Busting (ALB) and the Mobile
Shopper are the same. See “Wireless network configuration and security” on page
12 more information. However, for ALB running on Android devices, the wireless
network configuration parameters can be configured on the mobile device by using
the application settings. For the ALB running on iOS devices, the wireless network
configuration parameters must be configured using the iOS device settings.
Chapter 9. Associate Line Busting
153
User interface components
Many of the Associate Line Busting and Mobile Shopper application screens are
similar. The following sections describe the differences between the two
applications.
For screen flows common to both applications, see “Smart phone application” on
page 75.
Application screen layout
The following layout is a view of the Associate Line Busting application screen.
Figure 152. Application screen layout
Menu layout: UI
The following are included on the Associate Line Busting menu. See Figure 153 on
page 156 for details.
Enter Loyalty ID
If the customer's Loyalty ID is required, then the application will require the
associate to input the information at the start of each transaction and the
menu option will not be available.
Remove Item from Cart
To remove an item from the cart by scanning or keying in the item number.
This option will only be available if the transaction has items.
Check Item Price
Allows you to check the prices of items you want to purchase.
154
Toshiba TCxAmplify: User's Guide
Alerts
Alerts will inform an associate of alerts specific to a customer, if the Loyalty
ID is provided to the application.
Cancel Transaction
Allows a transaction to be cancelled, and a new transaction to start.
Connect WiFi Printer
If WiFi Printing is enabled, then the sales associate can use this option to
connect to a WiFi Printer.
Settings
Allows modification of the application configuration. See Figure 154 on page
157 for more details.
Help
Allows the associate to access help information.
Notes:
1. On iOS devices, the Settings option does not appear on the application menu.
Settings are accessed through the Settings area of the iOS and not within the
application menu.
2. A traditional application navigation bar on the top of the screen is used for
screen navigation on the mobile device. The navigation bar contains a button to
return to the previous screen. The Back button does not exist on the bottom of
the screen.
Chapter 9. Associate Line Busting
155
Figure 153. Associate Line Busting menu
Settings
Settings are used to modify the application configuration and are accessed
through the Settings area on the iOS. These settings allow the associate to
do the following:
v Enter or change the customer loyalty number. No default is specified.
v Enable or disable the ability of the mobile phone to vibrate when a new
alert arrives. The default is On.
v Enable or disable the ability for the mobile phone to play an alert sound
when a new alert arrives. The default is On.
v Select the screen orientation (left hand or right hand). The default is right
hand.
v Select the language of the text that is displayed.
v Access advanced settings to change network and security information.
For the iOS, there is no Advanced Settings entry. The Advanced
Settings are displayed in the same list as the other settings.
v Display the application version information.
156
Toshiba TCxAmplify: User's Guide
Figure 154. Associate Line Busting preferences
Associate Line Busting screen flows
In general, the screen flows between the Associate Line Busting (ALB) and the
Mobile Shopper applications are similar. The following sections describe the
significant differences.
Sign on user ID and password
The following depicts the scenario for signing on with an ID and password:
Table 43. Sign on user ID and password
Mobile Device Display
Associate Steps
Notes/Message Flow
Press the ALB icon on the
retailer-supplied mobile
device.
This scenario assumes the
retailer has already installed
the application on the mobile
device.
Figure 155. Associate Line
Busting icon
Chapter 9. Associate Line Busting
157
Table 43. Sign on user ID and password (continued)
Mobile Device Display
Associate Steps
Notes/Message Flow
The application prompts the
associate for their user ID.
Enter the user ID and press
Done.
Figure 156. Press Done
The application prompts the
associate for their password.
After validating the user ID
and password, continue to
the next step.
Figure 157. Prompt for
password
158
Toshiba TCxAmplify: User's Guide
The passwords are masked
for security. On some Android
devices it is possible to turn
off "Visible passwords" so
that the user input is
displayed for a brief moment
before it is masked. This
feature is provided by the
manufacturer of the device.
Table 43. Sign on user ID and password (continued)
Mobile Device Display
Associate Steps
Notes/Message Flow
If the associate is logged on
a different terminal, the
application prompts for a
manager override.
In order for the application to
prompt for the manager
override, the POS system
needs to be configured to
require a manager override if
an operator is already active
on a different terminal.
If the associates' credentials
are invalid, the screen shown
in Figure 159 is displayed
and the associate presses
OK to try again.
The credentials will also be
returned as invalid if either
the length of the operator ID
or password submitted
exceeded the length values
set in the
mobileserver.properties
file.
Figure 158. Prompt for
manager override
Figure 159. Associate's
credentials are invalid
Chapter 9. Associate Line Busting
159
WiFi printing
WiFi printing must be enabled in the store for the following screens to appear:
Table 44. WiFi printing enabled
Mobile Device Display
Associate Steps
Notes/Message Flow
The application prompts the
associate to provide their
WiFi printer connection
information.
Information can be an IPv4
address or hostname if DNS
is enabled in the store
network.
The information can be
scanned in using a Code
128, a QR barcode, or by
keypad.
The associate can skip
providing the printer
information by pressing the
Apple and Android back
buttons, and can provide the
information later using the
menu options.
Figure 160. Prompting for
WiFi printers
The associate can choose to The WiFi printer can be
configured from the menu
skip configuration of a WiFi
printer for their mobile device options.
by pressing the Android back
button.
For iOS, the associate can
press the back button to skip
the configuration of a WiFi
printer.
Figure 161. Skip
configuration of WiFi printer
160
Toshiba TCxAmplify: User's Guide
Table 44. WiFi printing enabled (continued)
Mobile Device Display
Associate Steps
Notes/Message Flow
The menu options provide
the ability for an associate to
connect to a printer.
This can be used if the
printer setup was skipped
during the sign on process. It
can also be used to
substitute a failing printer (for
example, a low battery) with
a new printer.
This capability can be used
during a transaction
regardless of the cart having
items.
Figure 162. Associate
connecting to a printer
The message in Figure 163
is displayed if the application
is unable to connect with a
printer during the initial
printer setup.
If the associate selects Yes,
they are returned to the
screen where they can
provide the connection
information to attempt to
connect with the printer
again.
Figure 163. Application
unable to connect (1 of 2)
Chapter 9. Associate Line Busting
161
Table 44. WiFi printing enabled (continued)
Mobile Device Display
Associate Steps
Notes/Message Flow
The message in Figure 164
is displayed if the application
is unable to connect with a
printer during the request to
print a suspend slip.
If the associate selects Yes,
the application attempts to
print the slip again.
Figure 164. Application
unable to connect (2 of 2)
Loyalty number
The following depicts the scenario if the Loyalty number is required or optional:
Table 45. Loyalty number
Mobile Device Display
Associate Steps
Notes/Message Flow
Scan or key in the customer's If the loyalty number is
loyalty ID.
required, the associate is
prompted for it prior to being
able to add items. If the
loyalty ID is optional, the
associate can provide it
through menu options.
After the loyalty number is
entered, it is displayed in
Settings and does not have
to be entered again during
the transaction.
Figure 165. Customer's
loyalty ID
Normal checkout
After the associate has signed onto the application, provided the WiFi printer
information is enabled and the customer loyalty information is entered (if required),
162
Toshiba TCxAmplify: User's Guide
the associate can start entering items for the transaction. See “Normal checkout:
start application, sell item, price check, complete Txn.” on page 79 for additional
details on adding items to the application.
If the retailer is using supported handheld mobile computers, such as the Motorola
MC40, the associate can use the hardware scanning buttons to add items to a
transaction in addition to using the touch screen Scan Barcode button.
Table 46. Normal checkout
Mobile Device Display
Associate Steps
Notes/Message Flow
After completing the previous
steps, Figure 166 is
displayed.
At this point, the associate
can scan or key an item to
add it to the transaction, or
perform a price check by
pressing the Menu button,
then pressing Price Check.
Figure 166. Completing steps
Press the Scan Barcode
button and scan the product
barcode.
While the application is
looking up the item, the
mobile device displays the
message "Processing
scanned data..."
After the item is added to the
order, item details are
displayed and transaction
totals are updated.
The next message asks to
scan or key the next item, or
press Finish to complete the
order.
Figure 167. Looking up an
item
Chapter 9. Associate Line Busting
163
Table 46. Normal checkout (continued)
Mobile Device Display
Associate Steps
Notes/Message Flow
The associate can press the
Press the screen inside the
Android back button to end.
box that shows the item
description, item number, and
price. A message is displayed
(see Figure 168) and you
must choose to either
remove the item or display
the item details.
Figure 168. Message window
Finish and suspend transaction
The following section describes how to finish and suspend a transaction.
Table 47. Finishing and suspending transactions
Mobile Device Display
Associate Steps
Press the Finish button and
the application will prompt
you to confirm and finish the
transaction.
Figure 169. Press Finish suspending a transaction
164
Toshiba TCxAmplify: User's Guide
Notes/Message Flow
Table 47. Finishing and suspending transactions (continued)
Mobile Device Display
Associate Steps
Notes/Message Flow
If Retrieve needs managers'
override is turned on in the
POS system, the application
prompts the associate to
obtain a manager override for
the transaction.
Figure 170. Obtaining a
manager override
If WiFi printing is enabled,
the application prompts the
associate to print a slip.
The slip can be used to
retrieve a transaction for the
shopper at a pay station. The
shopper can then check out.
Figure 171. WiFi printing is
enabled
Chapter 9. Associate Line Busting
165
Table 47. Finishing and suspending transactions (continued)
Mobile Device Display
Associate Steps
Notes/Message Flow
If WiFi printing is not
enabled, the application will
inform the associate that the
transaction has been
suspended.
Figure 172. WiFi printing is
not enabled
The associate begins a new
transaction.
If a Loyalty ID is required, the
application will prompt the
associate for the customer's
Loyalty number (see “Loyalty
number” on page 162) before
allowing the associate to
enter items.
Figure 173. Beginning a new
transaction
Starting the Associate Line Busting application during a blackout
period
Blackout periods are not a feature in Associate Line Busting. This feature is only
available in the Mobile Shopper. For blackout periods in the Mobile Shopper, see
“Starting Mobile Shopper during a blackout period” on page 84.
166
Toshiba TCxAmplify: User's Guide
Starting the Associate Line Busting application when not enough
Client Session Server sessions
If an associate attempts to begin a session when there are an insufficient number of
client sessions, a message is displayed to the associate. See “Starting the Mobile
Shopper when not enough Client Session Server sessions” on page 85 for more
information.
Cancelling a transaction
The following scenarios demonstrate what happens when an associate decides to
cancel a transaction in the middle of an order. The application is in the "add item"
mode.
Table 48. Cancelling a transaction
Mobile Device Display
Associate Steps
Notes/Message Flow
Press Menu, and then
Cancel Transaction. The
mobile device responds with
"Are you sure you want to
cancel your order?"
If the associate presses No
here, they will return to the
"add item" mode.
Press Yes.
Figure 174. Cancel
Transaction
Press Yes when the
confirmation request is
displayed.
If the associate presses No,
they are returned to the "add
item" mode.
Figure 175. Confirmation
request
Chapter 9. Associate Line Busting
167
Table 48. Cancelling a transaction (continued)
Mobile Device Display
Associate Steps
Notes/Message Flow
The "Processing yes..."
message is displayed while
the order is being canceled.
Figure 176. Processing Yes
The associate is returned to
the add item mode where
they may begin a new
transaction.
Figure 177. Add item mode
Various item exceptions
This scenario describes an attempt to sell an item having any of the following
conditions:
v Item is not in the item file.
v Item is configured as "not for sale" in the item file.
v Item is configured as "price required" in the item file.
v Too many items purchased.
These scenarios involve exceptions and are handled differently:
v Item is configured as "quantity restricted" in the item file and the maximum
number of items have already been sold (the restrictions are defined in the point
of sale (POS) application personalization).
168
Toshiba TCxAmplify: User's Guide
v Item requires an account number (such as: Gift Card activation) in the item file.
v Item has a barcode that includes an account number for the item (such as:
Blackhawk 1-step Gift Cards).
v EAS items follow the "Normal Checkout flow", but they do log an exception.
Note: UPC-2 items, other item types (deposit items and miscellaneous sale items),
other pricing methods (1-4) all work like normal sale items. See “Normal
checkout” on page 162 for these items. The mobile device should be in a
state where it is ready to scan an item.
Table 49. Various item exceptions
Mobile Device Display
Associate Steps
Notes/Message Flow
1. The associate presses
Scan, then scans a
product not found in the
item file.
Application prompts: "Item
requires cashier help. Do you
still want to buy?”
2. Then presses No to
return to Item Entry.
The display is the same for
all these exceptions:
v Item not found
The associate presses Yes to v Not auth for sale
add the item to the order.
v Price-Required
v Time-Restricted
v Too many items purchased
Figure 178. Product not
found in item file
The associate can scan or
key more items at this point.
Assuming the associate
pressed Yes to purchase the
item, an item exception is
registered that will be visible
to the cashier at checkout
time.
The item is displayed and will
appear in the item list, but no
price is included in the totals
and the details of the
exception will be shown on
the screen (here the example
is "Item not found").
The display is the same for
all these exceptions:
v Item not found
v Not auth for sale
Figure 179. Item exception is
registered
v Price-Required
v Time-Restricted
v Too many items purchased
Chapter 9. Associate Line Busting
169
Table 49. Various item exceptions (continued)
Mobile Device Display
Associate Steps
Notes/Message Flow
The associate presses the
For more details on finishing
Finish button to complete the the transaction, see “Finish
transaction.
and suspend transaction” on
page 164.
The associate presses Yes to
finish the transaction.
Figure 180. Finish to
complete transaction
For more details on Associate Line Busting screen flows, see the following sections:
v "Item type not allowed to be sold exceptions" - see “Item type not allowed to
be sold exceptions” on page 87.
v "Time restricted item entry" - see “Time restricted item entry” on page 89.
v "Value card processing" - see “Value card processing” on page 90.
v "Age restricted item exception" - see “Age-restricted item exception” on page
91.
v "Quantity required item entry" - see “Quantity required item entry” on page 92.
v "Coupon scanned during the transaction" - see “Coupon scanned during the
transaction” on page 95.
v "Removing items" - see “Removing items” on page 95, “Removing an item from
the Item Entry screen” on page 95, “Removing an item from the Item List” on
page 98, and “Removing an item using the menu icon” on page 100.
v "Item details" - see “Item details” on page 105.
170
Toshiba TCxAmplify: User's Guide
Transaction alerts
This flow demonstrates the steps to view transaction alerts that can occur while
shopping. See Table 50 for an overview.
Table 50. Viewing transaction alerts
Mobile Device Display
Associate Steps
Notes/Message Flow
Associate has signed in to
the application and has
entered a customer loyalty
number.
There will be an audible
notification on the mobile
device if it is enabled in the
settings.
The associate presses the
Menu button and then
presses the Alerts option
from the menu.
When the associate presses
the Alerts option, the mobile
application sends a message
to the Analytics service to
track how many times this
associate pressed that
option.
Figure 181. Associate signing
in
Figure 182. Pressing Menu,
then Alerts options
Chapter 9. Associate Line Busting
171
Table 50. Viewing transaction alerts (continued)
Mobile Device Display
Associate Steps
The associate presses the
Store Event button from the
Menu.
Figure 183. Pressing Store
Event
The associate presses the
Alert option.
Figure 184. Associate
presses Alert
172
Toshiba TCxAmplify: User's Guide
Notes/Message Flow
Table 50. Viewing transaction alerts (continued)
Mobile Device Display
Associate Steps
Notes/Message Flow
The associate presses OK
and is returned to the
previous screen. If the
associate presses Back, the
application displays the
Alerts menu.
Figure 185. Getting to the
Alerts menu
eCoupons
This flow demonstrates the steps to view and use the eCoupon feature.
Table 51. Accessing eCoupons
Mobile Device Display
Associate Steps
Notes/Message Flow
If the transaction has items,
the eCoupons button is
available.
Figure 186. Accessing
eCoupons
Chapter 9. Associate Line Busting
173
Table 51. Accessing eCoupons (continued)
Mobile Device Display
Associate Steps
Notes/Message Flow
The associate presses the
eCoupons button and the
totals section will update with
any savings the shopper is
entitled to once the
eCoupons are applied.
Figure 187. Pressing the
eCoupons button
For more details on the Mobile Shopper, see the following sections:
v "Item alerts" - see “Item Alerts” on page 112.
v "Transfer order from failed mobile device to a different mobile device" - see
“Transfer order from a failed mobile device to the store's mobile device” on page
117.
v "Mobile device temporarily loses connectivity while shopping" - see “Mobile
device temporarily loses connectivity while shopping” on page 119.
174
Toshiba TCxAmplify: User's Guide
Sign off
This flow demonstrates the steps to sign off the application.
Table 52. Sign off the application
Mobile Device Display
Associate Steps
Notes/Message Flow
If the transaction does not
have any items, the Sign Off
button is enabled.
Figure 188. Sign Off button
enabled
When the associate presses
Sign Off, the application
prompts the associate for
confirmation.
If the associate selects No,
they are returned to the Add
Items screen.
Figure 189. Pressing Sign Off
Chapter 9. Associate Line Busting
175
Table 52. Sign off the application (continued)
Mobile Device Display
Associate Steps
Notes/Message Flow
If the associate selects Yes,
the application will sign the
associate out and display a
confirmation message. Next,
press Exit to terminate the
application.
Figure 190. Associate signing
out
Configuring the Motorola MC40 for Associate Line Busting
The Motorola MC40 is a pocket-sized handheld mobile computer that can be used
with the Associate Line Busting (ALB) application. Before using the Motorola MC40
with ALB, it must be configured to read various barcode symbols and to
communicate with the Mobile Shopper application. You must install ALB on the
Motorola MC40 before you start configuration.
The MC40 DataWedge application must be used to create a profile that includes
the required configuration information. See detailed instructions on using the
DataWedge application in the MC40 Integrator Guide. The following information is
provided to show how to set various DataWedge configuration options and to allow
the Motorola MC40 to function correctly when used with ALB.
As shown in Figure 192 on page 177, you can access the DataWedge application
by doing the following:
1. Press the Android Home button to display the home screen.
Figure 191. Android home button
2. Select the All Apps launcher icon.
3. Select the DataWedge launcher icon from the list of applications.
176
Toshiba TCxAmplify: User's Guide
Table 53. Starting the MC40 DataWedge Configuration Application
Figure 192. Starting the MC40 DataWedge
Configuration Application (1 of 2)
Figure 193. Starting the MC40 DataWedge
Configuration Application (2 of 2)
A DataWedge profile must be created that specifies how the Motorola MC40 will
function with the Associate Line Busting application. To create a new profile, start
the DataWedge application and perform the following steps:
1. Press the Android Menu button from the DataWedge Profile screen to see a list
of actions at the bottom of the screen.
Figure 194. Android menu button - DataWedge Profile screen
See Figure 195 on page 178, Figure 196 on page 178, Figure 197 on page 179,
and Figure 198 on page 179 for information on creating a new MC40
Configuration Profile.
Chapter 9. Associate Line Busting
177
Figure 195. Creating a new MC40 configuration profile (1 of 4)
Figure 196. Creating a new MC40 configuration profile (2 of 4)
178
Toshiba TCxAmplify: User's Guide
Figure 197. Creating a new MC40 configuration profile (3 of 4)
Figure 198. Creating a new MC40 configuration profile (4 of 4)
Chapter 9. Associate Line Busting
179
2. If you make a mistake and want to delete the profile you just created, press and
hold the entry you created from the DataWedge Profiles screen, and then select
Delete profile.
3. From the DataWedge Profiles screen, touch the profile you just created to
display the profile details. Ensure the Profile enabled checkbox and the
Barcode Input Enabled checkbox are selected. The Scanner selection should
be set to "Auto" (2D image), as shown in Figure 199.
Figure 199. MC40 Profile screen
4. Select Associated apps, press the Android Menu button, and select New
app/activity (see Figure 200 on page 181).
5. On the Select application screen (see Figure 201 on page 181), scroll through
the list of applications and select the application named com.tcx.mobile.alb.
6. On the Select activity screen (see Figure 202 on page 182), rotate the mobile
device (landscape mode) and select the asterisk entry. After you have
completed the Associated apps step, the associations listed should match
what is shown in Figure 203 on page 182.
180
Toshiba TCxAmplify: User's Guide
Figure 200. MC40 configuration profile (1 of 4)
Figure 201. MC40 configuration profile (2 of 4)
Chapter 9. Associate Line Busting
181
Figure 202. MC40 configuration profile (3 of 4)
Figure 203. MC40 configuration profile (4 of 4)
7. Press the Android Back button to return to the Profile screen (see Figure 199
on page 180), and then select Decoders to see the list of barcode symbols that
can be enabled and read by the Motorola MC40. Add a check to the checkbox
of each symbol you want to enable (see Table 54 on page 183 for details). For
better performance, only enable the barcode symbols that are required.
182
Toshiba TCxAmplify: User's Guide
Table 54. MC40 "Decoders" configuration screens
Figure 204. MC40
"Decoders" configuration
screens (1 of 6)
Figure 205. MC40
"Decoders" configuration
screens (2 of 6)
Figure 206. MC40
"Decoders" configuration
screens (3 of 6)
Figure 207. MC40
"Decoders" configuration
screens (4 of 6)
Figure 208. MC40
"Decoders" configuration
screens (5 of 6)
Figure 209. MC40
"Decoders" configuration
screens (6 of 6)
8. Press the Android Back button to return to the Profile screen (see Figure 199
on page 180), and then select Decoder Params. A list of the barcode symbols
that can be configured are shown. Select the symbols (see Table 55 on page
184) and ensure they are configured as shown. Contact the Toshiba Global
Commerce Solutions support personnel for help with configuring barcode
symbols that are not included in Table 54.
Chapter 9. Associate Line Busting
183
Table 55. MC40 "Decoders Params" configuration screens
Figure 210. MC40 "Decoder
Params" (1 of 5)
Figure 211. MC40 "Decoder
Params" (2 of 5)
Figure 213. MC40 "Decoder
Params" (4 of 5)
Figure 214. MC40 "Decoder
Params" (5 of 5)
Figure 212. MC40 "Decoder
Params" (3 of 5)
9. Press the Android Back button to return to the Profile screen (see Figure 199
on page 180), and then select UPC EAN Params. The UPC EAN Params
configuration can be used to enable UPC/EAN supplemental 2 and 5 barcodes
that are typically found on magazines and books. Normally the ACE and/or SA
applications do not support these barcode symbols without modifications to the
Label Format Table. If these changes have not been made to your POS system,
do not enable these symbol types on the associated device.
If your POS system supports these barcode formats, enable the check boxes as
shown in Table 56 on page 185:
1. Ensure the "Supplemental Mode" is set to "Supplemental Auto" and "Convert
Databar to UPC' is not not checked. "Bookland" and "Coupon" can be checked
if desired.
184
Toshiba TCxAmplify: User's Guide
Table 56. MC40 File Browser application
Figure 215. MC40 File Browser App (1 of 2)
Figure 216. MC40 File Browser App (2 of 2)
2. Press the Android Back button to return to the Profile screen (see Figure 199
on page 180), and then scroll down to the "Keystroke output" section as shown
in Figure 217 on page 186. Ensure the Enabled checkbox is not checked.
Enabling keystroke output will cause the results of a scan to be entered in fields
that expect keyed input, and therefore this feature should be disabled.
Chapter 9. Associate Line Busting
185
Figure 217. MC40 "Keystroke output" configuration
Press the Android Back button to return to the Profile screen (see Figure 199 on
page 180), and then scroll down to the "Intent output" section. Perform the following
steps:
1. Check the Enabled checkbox.
2. Select Intent Action and enter an action name of:
com.tcx.MC40ScannerAction
3. Select Intent delivery and choose Broadcast intent.
After you have completed these steps, the Profile screen should match what is
shown in the third screen shot of Table 57 on page 187.
186
Toshiba TCxAmplify: User's Guide
Table 57. MC40 "Intent output" configuration
Figure 218. MC40 "Intent
output" configuration (1 of 3)
Figure 219. MC40 "Intent
output" configuration (2 of 3)
Figure 220. MC40 "Intent
output" configuration (3 of 3)
4. Start the Associate Line Busting application and ensure the Motorola MC40
scanner functions properly. Use either the Associate Line Busting application
scanner button or the MC40 hardware scanner button to start the Motorola
MC40 scanner.
Exporting and importing configuration settings
The DataWedge configuration can be exported to the microSD card so that it can
be copied and imported to other Motorola MC40 devices. To export the
configuration, do the following:
1. Press the Android Menu button from the DataWedge Profile screen to see a list
of actions at the bottom of the screen (see Figure 192 on page 177).
Figure 221. Android menu button - DataWedge Profile screen
2. Select Settings.
3. Select Export.
4. Ensure you select the SD Card radio button and then press Export.
The configuration will be exported to a file named datawedge.db in the/sdcard
directory of the MC40 device. Copy this file to the /sdcard directory of another
MC40 device (see “Copying files to the Motorola MC40”) and repeat the steps
above, but select Import in step 3 to import the configuration to the other device.
Refer to the MC40 Integrator Guide for additional information on the Motorola
DataWedge application.
Copying files to the Motorola MC40
To copy files to the Motorola MC40, do the following:
1. Connect the MC40 to a computer through a USB cable.
Chapter 9. Associate Line Busting
187
2.
3.
4.
5.
Swipe downward from the top of the screen to display the Android notifications.
Select USB connected.
Click Turn on USB storage.
Click the OK button on the "Turn on USB storage" screen.
Performing the previous steps will enable you to copy files from your computer to
the MC40 device. On Windows, the MC40 device will appear as some drive letter
after the steps above are performed. You can copy an exported datawedge.db file
(see “Exporting and importing configuration settings” on page 187) from the device
to your computer or copy the file from your computer to a new MC40 device. You
can also copy an Android application .APK file to your MC40 device to install it.
After you have copied the files to/from your MC40 device, do the following steps:
1. Swipe downward from the top of the screen to display the Android notification.
2. Select Turn off USB storage.
3. Click the Turn off USB storage button.
When the “Turn on USB storage” is enabled, you cannot access the files from your
MC40 device. You must turn off the USB storage option first and then you can
import the datawedge.db file you copied to the device, or access files you copied to
the device using the "File Browser" application (launch the File Browser application
from the All Applications screen), as shown in Figure 222.
Figure 222. Launching the "File Browser" application from the All Applications screen
To install an Android application .APK file, click on the .APK file from the File
Browser screen.
188
Toshiba TCxAmplify: User's Guide
WiFi settings
The MC40 Integrator Guide (accessible at www.motorolasolutions.com) provides
detailed instructions for configuring the Motorola MC40 WiFi settings. This section
only highlights some of the WiFi settings that can require special settings.
To access the WiFi settings on the MC40, do the following:
1. Press the Android Home button.
Figure 223. Android home button
2. Press the Android Menu button.
Figure 224. Android menu button
3. Select Settings.
4. Select Wireless & networks.
5. Select WiFi settings.
Deselecting the Network notification checkbox can result in better WiFi stability,
especially when there are multiple WiFi networks available as is often the case in a
test lab (see Figure 225 on page 190). The Toshiba Global Commerce Solutions
Android application automatically connects to the required WiFi network, so it is not
necessary for the Android WiFi to continuously scan for new WiFi networks and
notify the user when one is discovered. Un-checking this setting might also result in
a better battery life.
Chapter 9. Associate Line Busting
189
Figure 225. WiFi settings - network notification
Pressing the Android Menu button from the WiFi settings screen will cause the
Scan and Advanced options to be displayed (see Figure 225). Press Advanced to
display additional WiFi options.
For better performance, consider setting the WiFi sleep policy to "Never" (see
Table 58 on page 191). Setting the WiFi sleep policy to "Never" should prevent the
mobile device from disconnecting from the Mobile Engine when the MC40 device
screen goes off (that is, the device switches to power saving mode). If the WiFi is
configured to sleep when the screen goes off, Mobile Shopper might go offline
when the first item is scanned after reactivating the screen due to the time it takes
the application to reconnect to the Mobile Engine. The application will automatically
recover from going offline, so you should consider whether that scenario is
acceptable, as compared to the potential decrease in battery life that can result
from changing the WiFi setting to "Never".
Some WiFi routers/access points might not support the 802.11d specification, and
therefore it might be necessary to un-check this option in order to get the MC40 to
connect to your WiFi network (see Table 58 on page 191). Enabling the 802.11d
specification results in country information being sent from the MC40 in beacons
and probe requests or responses, and some WiFi routers or access points might
not support the country information being included. However, disabling the 802.11d
specification might violate the regulations of some countries. Disabling this option
may not be appropriate in all areas of the world. Disabling 802.11d should only be
considered if your MC40 fails to connect to your WiFi router or access point.
190
Toshiba TCxAmplify: User's Guide
Table 58. MC40 Advanced WiFi settings
Figure 226. MC40 Advanced
WiFi settings (1 of 3)
Figure 227. MC40 Advanced
WiFi settings (2 of 3)
Figure 228. MC40 Advanced
WiFi settings (3 of 3)
In areas with multiple WiFi networks, it might also be necessary to disable one of
the band selections. Enabling only the 2.4 GHz band or 5.0 GHz band (the band
matches the WiFi network you are using), can result in the MC40 maintaining a
more stable WiFi connection.
Chapter 9. Associate Line Busting
191
192
Toshiba TCxAmplify: User's Guide
Chapter 10. Problem determination
This section describes the troubleshooting and debugging resources provided by
Toshiba TCxAmplify and explains how to use them.
Trace types
Several types of traces are available to aid you in troubleshooting program
execution problems. Table 59 lists the trace types and describes the information
they provide.
Table 59. Trace types
Type of trace
Trace contents
SI GUI, AEF, and CSS trace
Output from Java classes. Good for tracing
the startup of the SI GUI and AEF classes.
Session trace
Session information such as state changes,
input data, traction events, application XML,
and SI GUI XML diagnostics.
Java I/O processor (JIOP)
Output from the Java I/O processor such as
keyboard, scanner, states and 2x20
information from the JIOP.
Device manager trace
Output from the device manager.
For details on how to take a CHEC extract (capture data for error analysis), see the
Checkout Environment for Consumer-Service Version 6.6 Operations Guide in the
section that outlines the procedures on performing an extract.
Trace file location
To facilitate troubleshooting the configuration and program execution problems,
Store Integrator produces trace logs in the C:\SILOGS directory. For Store Integrator
GUI, the level of logging is determined by the log properties file specified in the
response file that starts the terminal (see Table 61 on page 197). For CSS (virtual
sessions), the level of logging is determined by the value specified in the aef.logger
property in the AEFLOAD.PRO file (see Table 60).
Note: Setting your logging levels to FINE, FINER, or FINEST will degrade the
system performance. See “Java logging properties” on page 197 for
additional information about these options.
Table 60. Properties of AEFLOAD.PRO
Property
Description
aef.logger
This property selects which logger file is to be used,
sminlogs.pro, smidlogs.pro, or smaxlogs.pro for minimal
logging, moderate logging or maximum logging, in that order.
For moderate logging, smidlogs.pro, is the recommended
default.
© Copyright Toshiba Global Commerce Solutions, Inc. 2014
193
Table 60. Properties of AEFLOAD.PRO (continued)
Property
Description
aef.enhanced.logger
This property is used when running CSS under Java 6. The
property selects which logger file is to be used,
sminlogs.pro, smidlogs.pro, or smaxlogs.pro for minimal
logging, moderate logging or maximum logging in that order.
For moderate logging, smidlogs.pro is the recommended
default.
ramDisk.enable
To speed up the loading time for virtual sessions, a controller
RAM disk can be used to store JAR files that are only used
during initialization. The default value of this property is true.
However, if the system does not contain a defined controller
RAM disk, the normal loading process is followed.
Note: All of the following properties are ignored if ramDisk.enable is false.
194
ramDisk.drive
Sets the disk drive assignment for the controller RAM disk.
Only the Q: drive is supported.
ramDisk.filex
Files to be loaded into the controller RAM disk where x is a
distinct, but not necessarily a sequential number. Files
maintain the same directory structure in the RAM disk. If the
directories do not exist in the RAM disk, they are created,
such as ramDisk.file1 = ADX_IPGM:aef.jar. If the file does
not exist, a message is logged in virtout.xx and the system
continues without modifying the classpath for the missing file.
There is no limit to the number of files that can be moved to
the RAM disk as long as the RAM disk is configured to a
correct size. The RAM disk loader always looks at the first 50
entries, and then scales back to 10 entry increments. As long
as it continues to find file entries, it looks for 10 more.
ramDisk.loadx
This property defines extra files that you want the loader to
place into RAM disk. None of these files will modify the
generated classpath. Resources, images, and other user files
can be placed here. Only user programs or extensions will
have access to the loaded files.
ramDisk.verifyx
The files defined with this property must be placed in the
RAM disk before AEF can launch. If these files cannot be
located, the system will cancel the operation and exit. The
defined RAM disk drive letter will be prepended to the "verify"
files before the file search begins. CSS cancels the operation
after the verify timeout (the default is 60 seconds) if the files
are not found. Error messages for the files that are not
located will be written to the virterr.xx file.
verify Timeout
This is the maximum time (in seconds) that CSS will wait for
verification files (specified through ramDisk.verifyx) to be
loaded or available. If the files are not present by the end of
the timeout, CSS will cancel the operation and a list of the
missing files will be displayed in virterr.xx status files. All
missing files must be found in this time period; this is not a
per file delay. The default value is 60 seconds.
ramDisk.verbose
This property controls the controller RAM disk classloader log
output level to virterr and virtout. The default value is
false. If true, the classpath and class loader information are
logged to show the location of each loaded file.
ramDisk.veryVerbose
When this property is set to true, the log displays all loads of
classes into the ClassLoader. It is used primarily for
debugging; the default value is false.
Toshiba TCxAmplify: User's Guide
Table 60. Properties of AEFLOAD.PRO (continued)
Property
Description
ramDisk.disableClassLoader
If true, the classpath is not substituted with any files that
were defined with the ramDisk.filex properties. Those files will
still be loaded to the RAM disk; but if they are to be used,
the classpath must be manually updated. The default value is
false.
You can configure your logging so that SILOG entries on both the 4690 and client
machines trigger event notifications to Remote Management Agent (RMA). To
enable this capability:
1. Set the create.SI.RMA.LogMonitor property in the config.properties bundle to
true.
2. Select which log messages trigger events to RMA.
You can specify a log level and class (or package) name using the properties
SI.RMA.LogMonitor.include.x and SI.RMA.LogMonitor.exclude.x in the
config.properties bundle.
Notes:
1. The x in the previous include and exclude properties is a unique number. The
include numbers are separate from the exclude numbers so they can be
identical.
2. You can specify as many include or exclude values as required. However, after
a break of more than five numbers in the sequence, Store Integrator ignores the
subsequent entries.
The following example illustrates how you can use property settings to configure an
event notification on all:
v INFO messages that occur within the POSAutomationProviderImpl class
v WARNING messages that occur within the automation package
v SEVERE messages, except those that occur within the AEFSessionImpl class.
create.SI.RMA.LogMonitor=true
SI.RMA.LogMonitor.include.0=WARNING,com.ibm.retail.AEF.automation
SI.RMA.LogMonitor.include.1=SEVERE
SI.RMA.LogMonitor.include.2=INFO,com.ibm.retail.AEF.automation.POSAutomationProviderImpl
SI.RMA.LogMonitor.exclude.0=SEVERE,com.ibm.retail.AEF.session.AEFSessionImpl
Store Integrator GUI traces
The Store Integrator GUI log files are written to the C:\SILOGS directory. For a
stand-alone terminal with a DHCP assigned IP address, the file name is
Tssss###.n, where ssss is the store number, ### is the terminal number and n is a
unique number (with 0 being the most recent). For a stand-alone terminal with a
static IP address, the file name is termip.n where termip is the resolved IP name
of the terminal and n is the unique number (with 0 being the most recent).
Depending upon the logging level that you selected (see Table 61 on page 197), the
system might generate a second trace file. This file uses the same naming
convention as described previously, but with an m following the unique number.
This log contains additional tracing that might assist in resolving a severe error.
Chapter 10. Problem determination
195
Minimal logging
The response files (see Table 61 on page 197) are set to use the SVLOG.PRO log
property file in the C:\ADX_IPGM directory for systems with the Store Integrator GUI.
These property files are set to log severe errors, with the resulting trace file placed
in the C:\SILOGS directory.
Moderate logging
For moderate logging, use the response files that have MID in their names (see
Table 61 on page 197). These response files are set to use the SVLOGMID.PRO log
property file in the C:\ADX_IPGM directory for systems with the Store Integrator GUI.
These property files are set to log startup information, with the resulting trace file
placed in the C:\SILOGS directory.
Maximum logging
For maximum logging, use the response files that contain DBG in the name (see
Table 61 on page 197). These response files are set to use the SVLOGDBG.PRO log
property file in the C:\ADX_IPGM directory for systems with the Store Integrator GUI.
These property files are set to log startup information, with the resulting trace file
placed in the C:\SILOGS directory, just as is done with the moderate logging.
Maximum logging captures all startup information, as well as any errors that could
keep the Store Integrator GUI or AEF from starting. If the Store Integrator GUI or
AEF does not start and maximum logging does not provide enough information to
determine what the problem is, see “Redirecting standard error” on page 198.
CSS (virtual session) trace
The CSS (virtual session) log files are also written to the f:\si\logs directory. The
file format is Sxx.n, where xx is the controller node ID and n is a unique number
(with 0 being the most recent). Each controller that you defined to support virtual
sessions has a separate set of logs.
Depending on the logging level that you selected, a second trace file might be
generated. This file uses the same naming convention as described previously, but
with an m following the unique number. This log contains additional tracing that
might assist in resolving a severe error.
See Table 60 on page 193) for instructions on selecting the AEF logging level.
Minimal, moderate or maximum logging levels are available.
Remote GUI trace
Trace files for the Remote GUI are written to the %SI_HOME%\silogs directory. These
filenames are log_termnum.n.txt where termnum is the remote terminal number,
and n is the unique number (with 0 being the most recent).
POSBC trace
The POSBC trace files are on the Windows machine in the %SI_HOME%\silogs
directory. The file name for the POSBC logs is posbc_log.# where # is a unique
number (with 0 being the most recent).
196
Toshiba TCxAmplify: User's Guide
Table 61. Mapping Store Integrator GUI response files to logging levels
Response file
Logging properties file
Logging level
SVLOG.PRO
Minimal
SVLOGMID.PRO
Moderate
SVLOGDBG.PRO
Maximum
OPER.RSP
OPERCT.RSP
CUST.RSP
CUSCT.RSP
DUALDISP.RSP
DDCT.RSP
OPERMID.RSP
OPRCTMID.RSP
CUSTMID.RSP
CSTCTMID.RSP
DUALMID.RSP
DDCTMID.RSP
OPERDBG.RSP
OPRCTDBG.RSP
CUSTDBG.RSP
CSTCTDBG.RSP
DUALDBG.RSP
DDCTDBG.RSP
The default types of logging for Store Integrator are minimal, moderate, and
maximum. If you have problems starting the Store Integrator GUI, examine the
trace file generated by moderate logging. If that log does not provide enough
information, use maximum logging.
Java logging properties
The current Store Integrator implementation uses the logging capabilities built into
Java's JDK 1.4. The log properties files are all modified copies of the default Java
logging.properties file. For detailed information on how to modify this file, see the
Java JDK 1.4 documentation. To change the amount of information being logged,
change the level in each line that contains .level = to one of the following values:
SEVERE
Extremely important messages that indicate conditions from which the
program might not recover, requiring immediate attention. This level is likely
to be included in all log files or consoles. SEVERE conditions include:
v Java exceptions
v Missing EALAEFXF.DAT or EAMAEFXF.DAT files
v Missing property files
WARNING
Serious problems that might not require immediate attention, but should
definitely be noted. WARNING conditions include:
v Missing bundle keys or values
v Factory cannot create object messages
v Invalid values
Chapter 10. Problem determination
197
v Condition lock timeouts which will include condition states
INFO
Informational messages resulting from normal operation. This level is the
default for loggers and handlers, so INFO messages are seen during
normal runs. INFO events include:
v Error Helper creation
v Error Helper handleError() return values
v AEFBase configuration
v Dump of the bundles which includes all the values from the property files
v Java health pipe creation
CONFIG
Informational messages about configuration or setup information, usually
displayed at startup. This level indicates what the program intends to do
and how it will do it, rather than what it is actually doing.
FINE
Messages that provide greater detail for debugging and diagnosing
problems. FINE information includes:
v Automation call summary (for example, Operator 999999 logon called).
v SalesTransaction call summary (for example, Add item 3 (itemid
toString())called).
v XML statements received from base application.
FINER Messages providing even more detail for debugging and diagnosing
problems. These log records are so numerous that they are typically not
logged unless it is absolutely necessary.
FINEST
Messages providing the most detail for debugging and diagnosing
problems. These log records are so numerous that they are typically not
logged unless it is absolutely necessary. FINEST records are generated
when entering and leaving methods.
Note: Logging at this level will impact system performance, especially on
larger session loads. Prudent application of this level of logging is
required.
ALL
Enables logging of all records.
OFF
Disables logging.
Redirecting standard error
If the selected logging level does not provide enough information to identify an
error, refer to c:/silogs/stderr.txt and c:/silogs/stdout.txt on the controller
that is defined in LAN Terminal Definition to control the terminal whose information
you want to see.
Session trace
Session trace information, such as states and application data, along with XML
processing, is logged to the session trace. If you are using a Store Integrator GUI
terminal, you can access this trace by clicking on the operator ID at the bottom of
the Store Integrator GUI screen. Doing so displays a dialog where you can select
Terminal Trace. The session trace information is displayed in a dialog. Clicking
198
Toshiba TCxAmplify: User's Guide
Save in the dialog saves the session trace to the C:\SILOGS directory, with the
name SAVExxx.yyy, where xxx is the terminal number and yyy is a rotating
number from 0 to 999.
The session trace is also saved to a file automatically when a severe error occurs.
When a severe error occurs, the error is written to the session trace and the
session trace is written to the C:\SILOGS directory with a file name of AUTOterm.n,
where term is the terminal number, and n is a unique number (with 0 being the
most recent).
Audit tracing
Currently, session trace logs from the Store Integrator GUI are only captured
through manual interaction with the Terminal Trace menu option. Store Integrator
GUI, Remote GUI and virtual sessions can also create a session trace log if a
severe error occurs. You might not obtain a timely session trace if a problem occurs
that is not severe in Store Integrator terms. However, you can maintain the session
trace logs for extended time frames in an automated manner.
Device Manager trace
The Device Manager trace is used to get detailed information from the Device
Manager about the POS devices. The default configuration for this type of trace is
stored in com/ibm/retail/DevMgr/logging/logging.properties. This file is delivered
in OS4690.ZIP, which is part of the 4690 operating system. Because OS4690.ZIP is
listed in the classpath for the Store Integrator applications, the Device Manager
code will find it and initialize itself based on its contents. All Device Manager logging
is disabled by default.
To change the default logging behavior, create a modified version of
com/ibm/retail/DevMgr/logging/logging.properties (using the original as a
model) and include it in a ZIP or JAR file that is ahead of OS4690.ZIP in the
classpath. It is recommended that the new com/ibm/retail/DevMgr/logging/
logging.properties file be zipped into USER.JAR. This JAR file is already referenced
in the response files provided for the GUI (such as OPERMID.RSP) or in the file that is
used to start CSS (AEFVIRT.TXT).
This properties file must contain the following properties:
Terminals
Defines which terminals have tracing enabled. Valid values for this property
are none (the default), all, or a range of terminal numbers. A range is
specified as either a single integer (example: 45) or two integers separated
by a hyphen (example: 37-42).
ALLDevices
Enables or disables tracing for all devices. Valid values are true and false.
Problem determination scenarios
Following are problem and resolution sequences:
Problem: I completed all the steps, but the self-service scale will not load.
Resolution: Check the trace logs for the terminal to identify the problem.
Chapter 10. Problem determination
199
Problem: My self-service pay station (or CHEC) lane will not load, and the
Mobile Server is giving a "cannot sign on" to terminal IDs message.
Resolution: Confirm that the ACE operator authorization records match the
operator IDs and passwords defined in siuserlogon.properties in
siuser.jar.
Problem: The self-service scale is printing to the 4690 printer.
Resolution: Make sure the aefio.xml file in c:\adx_idt1 on the 4690 is
accurate and distributed to all controllers.
Problem: When ending an order on the mobile device, the Store Integrator
GUI or CHEC Lane will display B678 Unable to Retrieve Data.
Resolution: Make sure to follow the instructions for ACECMISC. For more
details, see item 4c on page 31.
Problem: When entering a weight required or quantity required item, the item
description has strange characters that do not match the ACE description.
Resolution: The item file may have a different key length, size, or
description offset than that used by the Mobile Shopper. The default values
for the Mobile Shopper are:
itemFile.name=R::$AMITEMR
itemFile.record.size=169
itemFile.key.length=7
itemFile.desc.offset=26
itemFile.desc.length=18
If you need to change these values, place them in
siusermobileserver.properties, then zip them into siuser.jar and place
this file in the classpath.
Problem: Mobile transaction transfer does not complete successfully on ACE.
Resolution: Perform the following steps:
1. Verify the acting master/file server is online.
2. Verify that both the ACEGIPC and ACESRBKL background applications are
running as documented in Chapter 6, “Configuring the Mobile Shopper
on 4690,” on page 31.
3. Verify that you have changed the suspend interval to 3000ms as
documented in Chapter 6, “Configuring the Mobile Shopper on 4690,”
on page 31.
4. Verify that the barcodes on the terminals reflect the correct terminal
number.
Problem: Mobile shoppers experience connectivity problems despite a strong
WiFi signal.
Resolution: The Mobile Engine should be restarted by using the
MEMANAGE command described in “Controlling the Mobile Engine” on
page 38.
200
Toshiba TCxAmplify: User's Guide
Appendix A. Solution extension
Property extension mechanism
The Mobile Shopper POS solution uses the same extension mechanism as Store
Integrator to allow a retailer to override configuration property values. See Table 62
for properties files for the Mobile Shopper POS solution.
Table 62. Properties files for Mobile POS
Bundle Name Files
Description
Mobile
Server*
Specifies various
configuration options
for the mobile engine.
1. mobileserver.properties
2. siibmmobileserver.properties
3. sibuspmobileserver.properties
4. sicompanymobileserver.properties
5. sistoremobileserver.properties
6. siusermobileserver.properties
7. usermobileserver.properties
Mobile Text*
1. mobiletext.properties
2. siibmmobiletext.properties
3. sibuspmobiletext.properties
4. sicompanymobiletext.properties
5. sistoremobiletext.properties
6. siusermobiletext.properties
Specifies the text
used by the Mobile
Engine to display on
the mobile device,
Mobile GUI,
self-service scale, and
the self-service pay
station.
7. usermobiletext.properties
Store
1. mobilePOSLabelText.properties
Integrator GUI
2. TGCSCustMobilePOSLabelText.properties
Button Text
3. BuspCustMobilePOSLabelText.properties
Specifies the text
displayed as Store
Integrator GUI labels.
4. CompCustMobilePOSLabelText.properties
5. StoreCustMobilePOSLabelText.properties
6. CustMobilePOSLabelText.properties
Note: *These bundles can be configured for specific roles such as Mobile Shopper
or Line Buster. For example, to extend mobile server properties for Line
Buster we would name the file siusermobileserver_LineBuster.properties,
etc.
If the properties updated only affect the mobile device application, then these
extension files can be placed in the same directory as the start up file for the
solution (normally c:\Program Files\StoreIntegrator\Mobile). If the properties
being updated extend the Store Integrator GUI or CHEC system, you must include
these files in the necessary extension files for these solutions. For the Store
Integrator GUI for example, the files would be placed in the svuser.jar file. If you
are modifying files that apply to the self-service scale, the files would be placed in
sssuser.jar.
© Copyright Toshiba Global Commerce Solutions, Inc. 2014
201
202
Toshiba TCxAmplify: User's Guide
Appendix B. Configuring the Toshiba B-EP2DL Printer
Use the following steps to configure the Toshiba B-EP2DL Printer:
1. Acquire the device drivers and configuration utility (B-EP Setting Tool) from
Toshiba TEC and install to a Microsoft® Windows® machine where the printers
will be configured. Current versions are:
a. B-EP Setting Tool v 1.2
b. Driver v. 7.3.3 M-1
2. Press and hold the Feed button, and then press the Power button to power on
the printer in system mode. Connect the printer through the USB port to the
PC, and launch the B-EP Setting Tool.
3. Press the Get Param button to load the printer's current settings.
Figure 229. B-EP Setting Tool
4. On the WLAN tab, configure the wireless and network settings for your
network. The printer should be assigned a static IP address on the same
subnet as Mobile Engine.
5. On the WLAN Security tab, set the appropriate settings for your WiFi network.
6. On the General tab, set the Print Command Language to Receipt.
© Copyright Toshiba Global Commerce Solutions, Inc. 2014
203
Figure 230. Setting the Print Command Language
7. When finished, press Set Param to send the settings to the printer.
8. Power-cycle the printer and disconnect it from the USB cable.
9. To verify the printer is on the network, ping the IP address of the printer. (This
assumes that ping is available on your network.)
10. For convenience, you may print a code 128 or QR barcode that contains the
connection information (IP address or hostname) to affix to the printer. You can
then scan the barcode to pair with the printer when prompted in the Associate
Line Busting application.
11. If you are not using the default port (8000) for the Toshiba B-EP2DL Printer,
you must update the port in the siusermobileserver.properties file and
update the Mobile Engine.
a. If you are running Mobile Engine on 4690 and the ADX_IPGM directory
contains mserpro.mob, open the ADX_IPGM:mserpro.mob file for editing.
b. To modify the siusermobileserver.properties file:
1) Change to the m:\mobuser directory.
2) Extract the siusermobileserver.properties file for editing:
m:\java2\bin\jar -xvf ADX_IPGM:mobuser.jar
siusermobileserver.properties.
3) Modify the siusermobileserver.properties as follows:
mobile.printer.connect.port=9100.
4) Update the jar file to contain the changes: m:\java2\bin\jar -uvf
ADX_IPGM:mobuser.jar siusermobileserver.properties.
5) Distribute mobuser.jar by running: a dxcsu0l 3 5
ADX_IPGM:mobuser.jar.
6) In adx_ipgm, run adx_ipgm:mobj6pat.bat on all controllers:
204
Toshiba TCxAmplify: User's Guide
adxnszzl -c mobj6pat.zip mobuser.jar
adxcsu01 3 5 adx_ipgm:mobj6pat.zip
c. If you were editing the mserpro.mob file, save and close the file.
d. Restart any controller processes that use ADX_IPGM:mobuser.jar.
How to disable WiFi printing
For Associate Line Busting, printing is enabled and configured to print using the
Toshiba B-EP2DL mobile printer. To turn off WiFi printing, modify the
siusermobileserver_LineBuster.properties file using the following steps:
1. If you are running Mobile Engine on 4690 and the ADX_IPGM directory contains
mserpro.mob, open ADX_IPGM:mserpro.mob file for editing.
2. Otherwise, do the following:
a. Change to the m:\mobuser directory.
b. Extract the siusermobileserver.properties file for editing:
m:\java2\bin\jar -xvf ADX_IPGM:mobuser.jar
siusermobileserver.properties
c. Modify the siusermobileserver.properties as follows:
allow.wifi.printing=false
d. Update the jar file to contain the changes: m:\java2\bin\jar -uvf
ADX_IPGM:mobuser.jar siusermobileserver.properties
e. Distribute mobuser.jar by running: adxcsu0l 3 5 ADX_IPGM:mobuser.jar
3. If you were editing the mserpro.mob file, save and close the file.
4. Restart any controller processes that use ADX_IPGM:mobuser.jar. In adx_ipgm,
run adx_ipgm:mobj6pat.bat on all controllers:
adxnszzl -c mobj6pat.zip mobuser.jar
adxcsu01 3 5 adx_ipgm:mobj6pat.zip
Appendix B. Configuring the Toshiba B-EP2DL Printer
205
206
Toshiba TCxAmplify: User's Guide
Appendix C. Notices
This information was developed for products and services offered in the U.S.A.
Toshiba Global Commerce Solutions may not offer the products, services, or
features discussed in this document in other countries. Consult your local Toshiba
Global Commerce Solutions representative for information on the products and
services currently available in your area. Any reference to a Toshiba Global
Commerce Solutions product, program, or service is not intended to state or imply
that only that Toshiba Global Commerce Solutions product, program, or service may
be used. Any functionally equivalent product, program, or service that does not
infringe any Toshiba Global Commerce Solutions intellectual property right may be
used instead. However, it is the user's responsibility to evaluate and verify the
operation of any non-Toshiba Global Commerce Solutions product, program, or
service.
Toshiba Global Commerce Solutions may have patents or pending patent
applications covering the subject matter in this document. The furnishing of this
document does not give you any license to these patents. You can send license
inquiries, in writing, to:
Toshiba Global Commerce Solutions
Attn: General Counsel
3039 E. Cornwallis Rd
RTP, NC 27709
The following paragraph does not apply to the United Kingdom or any other country
where such provisions are inconsistent with local law: TOSHIBA GLOBAL
COMMERCE SOLUTIONS PROVIDES THIS PUBLICATION "AS IS" WITHOUT
WARRANTY OF ANY KIND, EITHER EXPRESS OR IMPLIED, INCLUDING, BUT
NOT LIMITED TO, THE IMPLIED WARRANTIES OF NON-INFRINGEMENT,
MERCHANTABILITY, OR FITNESS FOR A PARTICULAR PURPOSE. Some states
do not allow disclaimer of express or implied warranties in certain transactions,
therefore, this statement may not apply to you.
This information could include technical inaccuracies or typographical errors.
Changes are periodically made to the information herein; these changes will be
incorporated in new editions of the publication. Toshiba Global Commerce Solutions
may make improvements and/or changes in the product(s) and/or program(s)
described in this publication at any time without notice.
Toshiba Global Commerce Solutions may use or distribute any of the information
you supply in any way it believes appropriate without incurring any obligation to
you.
Any references in this information to non-Toshiba Global Commerce Solutions Web
sites are provided for convenience only and do not in any manner serve as an
endorsement of those Web sites. The materials at those Web sites are not part of
the materials for this Toshiba Global Commerce Solutions product and use of those
Web sites is at your own risk.
Information concerning non-Toshiba Global Commerce Solutions products was
obtained from the suppliers of those products, their published announcements or
other publicly available sources. Toshiba Global Commerce Solutions has not tested
those products and cannot confirm the accuracy of performance, compatibility or
© Copyright Toshiba Global Commerce Solutions, Inc. 2014
207
any other claims related to non-Toshiba Global Commerce Solutions products.
Questions on the capabilities of non-Toshiba Global Commerce Solutions products
should be addressed to the suppliers of those products.
This information is for planning purposes only. The information herein is subject to
change before the products described become available.
208
Toshiba TCxAmplify: User's Guide
Electronic Emission Notices
Federal Communications Commission (FCC) Statement
This equipment has been tested and found to comply with the limits for a Class A
digital device, pursuant to Part 15 of the FCC Rules. These limits are designed to
provide reasonable protection against harmful interference when the equipment is
operated in a commercial environment. This equipment generates, uses, and can
radiate radio frequency energy and, if not installed and used in accordance with the
instruction manual, may cause harmful interference to radio communications.
Operation of this equipment in a residential area is likely to cause harmful
interference, in which case the user will be required to correct the interference at
his own expense.
Properly shielded and grounded cables and connectors must be used in order to
meet FCC emission limits. Toshiba Global Commerce Solutions is not responsible
for any radio or television interference caused by using other than recommended
cables and connectors or by unauthorized changes or modifications to this
equipment. Unauthorized changes or modifications could void the user's authority to
operate the equipment.
This device complies with part 15 of the FCC Rules. Operation is subject to the
following two conditions:
1. This device may not cause harmful interference, and
2. This device must accept any interference received, including interference that
may cause undesired operation.
Industry Canada Class A Emission Compliance statement
This Class A digital apparatus complies with Canadian ICES-003.
Avis de conformité aux normes d'Industrie Canada
Cet appareil numérique de la classe A est conforme à la norme NMB-003 du
Canada.
European Union Electromagnetic Compatibility (EMC) Directive
Conformance Statement
This product is in conformity with the protection requirements of EU Council
Directive 2004/108/EC on the approximation of the laws of the Member States
relating to electromagnetic compatibility. Toshiba Global Commerce Solutions
cannot accept responsibility for any failure to satisfy the protection requirements
resulting from a non-recommended modification of the product, including the fitting
of non-Toshiba Global Commerce Solutions option cards.
This product has been tested and found to comply with the limits for Class A
Information Technology Equipment according to CISPR 22/European Standard EN
55022. The limits for Class A equipment were derived for commercial and industrial
environments to provide reasonable protection against interference with licensed
communication equipment.
Attention: This is a Class A product. In a domestic environment this product may
cause radio interference in which case the user may be required to take adequate
measures.
Appendix C. Notices
209
European Community (EC) Mark of Conformity Statement
This product is in conformity with the protection requirements of EC Council
Directive 89/336/EEC on the approximation of the laws of the Member States
relating to electromagnetic compatibility. Toshiba Global Commerce Solutions
cannot accept responsibility for any failure to satisfy the protection requirements
resulting from a non-recommended modification of the product, including the fitting
of non-Toshiba Global Commerce Solutions option cards.
This product has been tested and found to comply with the limits for Class A
Information Technology Equipment according to CISPR 22 / European Standard EN
55022. The limits for Class A equipment were derived for commercial and industrial
environments to provide reasonable protection against interference with licensed
communication equipment.
Warning: This is a Class A product. In a domestic environment this product may
cause radio interference, in which case the user may be required to take adequate
measures.
Germany
Zulassungsbescheinigung laut dem Deutschen Gesetz über die
elektromagnetische Verträglichkeit von Geräten (EMVG) vom 30. August 1995
(bzw. der EMC EG Richlinie 89/336).
Dieses Gerät ist berechtigt in Übereinstimmung mit dem Deutschen EMVG das
EG-Konformitätszeichen - CE - zu führen.
Verantwortlich für die Konformitätserklärung nach Paragraph 5 des EMVG ist die
Toshiba Global Commerce Solutions (Germany) GmbH.
Informationen in Hinsicht EMVG Paragraph 3 Abs. (2) 2:
Das Gerät erfüllt die Schutzanforderungen nach EN 50082–1 und EN 55022 Klasse A.
EN 55022 Klasse A Geräte müssen mit folgendem Warnhinweis versehen werden:
"Warnung: dies ist eine Einrichtung der Klasse A.Diese Einrichtung kann im
Wohnbereich Funkstörungen verursachen; in diesem Fall kann vom Betreiber
verlangt werden, angemessene Maβnahmen durchzuführen und dafür
aufzukommen."
EN 50082–1 Hinweis:
"Wird dieses Gerät in einer industriellen Umgebung betrieben (wie in EN 50082–2
festgelegt), dann kann es dabei eventuell gestört werden. In solch einem Fall ist der
Abstand bzw. die Abschirmung zu der industriellen Störquelle zu vergröβern."
Anmerkung:
Um die Einhaltung des EMVG sicherzustellen sind die Geräte, wie in den Toshiba
Global Commerce Solutions Handbüchern angegeben, zu installieren und zu
betreiben.
210
Toshiba TCxAmplify: User's Guide
Australia and New Zealand
Attention: This is a Class A product. In a domestic environment this product may
cause radio interference, in which case the user may be required to take adequate
measures.
Electrostatic Discharge (ESD)
Attention: Electrostatic discharge (ESD) damage can occur when there is a
difference in charge between the part, the product, and the service person. No
damage will occur if the service person and the part being installed are at the same
charge level.
ESD damage prevention
Anytime a service action involves physical contact with logic cards, modules,
back-panel pins, or other ESD sensitive (ESDS) parts, the service person must be
connected to an ESD common ground point on the product through the ESD wrist
strap and cord.
The ESD ground clip can be attached to any frame ground, ground braid, green
wire ground, or the round ground prong on the AC power plug. Coax or connector
outside shells can also be used.
Handling removed cards
Logic cards removed from a product should be placed in ESD protective containers.
No other object should be allowed inside the ESD container with the logic card.
Attach tags or reports that must accompany the card to the outside of the container.
Chinese Class A warning statement
Attention: This is a Class A product. In a domestic environment this product may
cause radio interference, in which case the user may be required to take adequate
measures.
Japanese Electrical Appliance and Material Safety Law statement
Appendix C. Notices
211
Japanese power line harmonics compliance statement
Japanese Voluntary Control Council for Interference (VCCI) statement
Attention: This is a Class A product based on the standard of the VCCI Council.
If this equipment is used in a domestic environment, radio interference may occur,
in which case, the user may be required to take corrective actions.
Japan Electronics and Information Technology Industries Association
(JEITA) statement
Japanese Electronics and Information Technology Industries Association (JEITA)
Confirmed Harmonics Guideline (products less than or equal to 20 A per phase).
Korean communications statement
Please note that this device has been approved for business purposes with regard
to electromagnetic interference. If you find this is not suitable for your use, you may
exchange it for a non-business purpose one.
212
Toshiba TCxAmplify: User's Guide
Taiwanese Class A warning statement
Cable ferrite requirement
All cable ferrites are required to suppress radiated EMI emissions and must not be
removed.
Product recycling and disposal
This unit must be recycled or discarded according to applicable local and national
regulations. Toshiba Global Commerce Solutions encourages owners of information
technology (IT) equipment to responsibly recycle their equipment when it is no
longer needed. Toshiba Global Commerce Solutions offers a variety of product
return programs and services in several countries to assist equipment owners in
recycling their IT products. Information on Toshiba Global Commerce Solutions
product recycling offerings can be found at the product recycling programs Web site
.
Español:
Esta unidad debe reciclarse o desecharse de acuerdo con lo establecido en la
normativa nacional o local aplicable. Toshiba Global Commerce Solutions
recomienda a los propietarios de equipos de tecnología de la información (TI) que
reciclen responsablemente sus equipos cuando éstos ya no les sean útiles. Toshiba
Global Commerce Solutions dispone de una serie de programas y servicios de
devolución de productos en varios países, a fín de ayudar a los propietarios de
equipos a reciclar sus productos de TI. Se puede encontrar información sobre las
ofertas de reciclado de productos de Toshiba Global Commerce Solutions en el sitio
webproduct recycling programs.
Notice: This mark applies only to countries within the European Union (EU) and
Norway.
Appliances are labeled in accordance with European Directive 2002/96/EC
concerning waste electrical and electronic equipment (WEEE). The Directive
determines the framework for the return and recycling of used appliances as
Appendix C. Notices
213
applicable throughout the European Union. This label is applied to various products
to indicate that the product is not to be thrown away, but rather reclaimed upon end
of life per this Directive.
Remarque : Cette marque s’applique uniquement aux pays de l’Union Européenne
et à la Norvège. L’etiquette du système respecte la Directive européenne
2002/96/EC en matière de Déchets des Equipements Electriques et Electroniques
(DEEE), qui détermine les dispositions de retour et de recyclage applicables aux
systèmes utilisés à travers l’Union européenne. Conformément à la directive, ladite
étiquette précise que le produit sur lequel elle est apposée ne doit pas être jeté
mais être récupéré en fin de vie.
In accordance with the European WEEE Directive, electrical and electronic
equipment (EEE) is to be collected separately and to be reused, recycled, or
recovered at end of life. Users of EEE with the WEEE marking per Annex IV of the
WEEE Directive, as shown above, must not dispose of end of life EEE as unsorted
municipal waste, but use the collection framework available to customers for the
return, recycling, and recovery of WEEE. Customer participation is important to
minimize any potential effects of EEE on the environment and human health due to
the potential presence of hazardous substances in EEE. For proper collection and
treatment, contact your local Toshiba Global Commerce Solutions representative.
Disposal of IT products should be in accordance with local ordinances and
regulations.
Battery return program
This product may contain sealed lead acid, nickel cadmium, nickel metal hydride,
lithium, or lithium ion battery. Consult your user manual or service manual for
specific battery information. The battery must be recycled or disposed of properly.
Recycling facilities may not be available in your area. For information on disposal of
batteries go to the Battery disposal Web site or contact your local waste disposal
facility.
For Taiwan:
Please recycle batteries.
214
Toshiba TCxAmplify: User's Guide
For the European Union:
Notice: This mark applies only to countries within the European Union (EU)
Batteries or packaging for batteries are labeled in accordance with European
Directive 2006/66/EC concerning batteries and accumulators and waste batteries
and accumulators. The Directive determines the framework for the return and
recycling of used batteries and accumulators as applicable throughout the European
Union. This label is applied to various batteries to indicate that the battery is not to
be thrown away, but rather reclaimed upon end of life per this Directive.
Les batteries ou emballages pour batteries sont étiquetés conformément aux
directives européennes 2006/66/EC, norme relative aux batteries et accumulateurs
en usage et aux batteries et accumulateurs usés. Les directives déterminent la
marche à suivre en vigueur dans l'Union Européenne pour le retour et le recyclage
des batteries et accumulateurs usés. Cette étiquette est appliquée sur diverses
batteries pour indiquer que la batterie ne doit pas être mise au rebut mais plutôt
récupérée en fin de cycle de vie selon cette norme.
In accordance with the European Directive 2006/66/EC, batteries and accumulators
are labeled to indicate that they are to be collected separately and recycled at end
of life. The label on the battery may also include a chemical symbol for the metal
concerned in the battery (Pb for lead, Hg for mercury and Cd for cadmium). Users
of batteries and accumulators must not dispose of batteries and accumulators as
unsorted municipal waste, but use the collection framework available to customers
for the return, recycling and treatment of batteries and accumulators. Customer
participation is important to minimize any potential effects of batteries and
accumulators on the environment and human health due to the potential presence
of hazardous substances. For proper collection and treatment, contact your local
Toshiba Global Commerce Solutions representative.
This notice is provided in accordance with Royal Decree 106/2008 of Spain: The
retail price of batteries, accumulators and power cells includes the cost of the
environmental management of their waste.
For California:
Perchlorate material – special handling may apply
Refer to www.dtsc.ca.gov/hazardouswaste/perchlorate.
Appendix C. Notices
215
The foregoing notice is provided in accordance with California Code of Regulations
Title 22, Division 4.5, Chapter 33: Best Management Practices for Perchlorate
Materials. This product/part includes a lithium manganese dioxide battery which
contains a perchlorate substance.
Flat panel displays
The fluorescent lamp in the liquid crystal display contains mercury. Dispose of it as
required by local ordinances and regulations.
Monitors and workstations
Connecticut: Visit the website of the Department of Environmental Protection at
www.ct.gov/dep for information about recycling covered electronic devices in the
State of Connecticut, or telephone the Connecticut Department of Environmental
Protection at 1-860-424-3000.
Oregon: For information regarding recycling covered electronic devices in the state
of Oregon, go to the Oregon Department of Environmental Quality site at
www.deq.state.or.us/lq/electronics.htm.
Washington: For information about recycling covered electronic devices in the State
of Washington, go to the Department of Ecology Website at https://fortress.wa.gov/
ecy/recycle/ or telephone the Washington Department of Ecology at 1-800Recycle.
Trademarks
The following are trademarks or registered trademarks of Toshiba, Inc. in the United
States or other countries, or both:
Toshiba
The Toshiba logo
The following are trademarks of Toshiba Global Commerce Solutions in the United
States or other countries, or both:
AnyPlace
SureMark
SurePoint
SurePOS
The following are trademarks of International Business Machines Corporation in the
United States or other countries, or both:
DB2
DB2 Universal Database
IBM and the IBM logo
PS/2
Wake on LAN
WebSphere
Linux is a trademark of Linus Torvalds in the United States, other countries, or both.
Magellan is a registered trademark of Datalogic Scanning, Inc.
216
Toshiba TCxAmplify: User's Guide
NETGEAR is a trademark or registered trademark of NETGEAR, Inc., in the United
States, or other countries.
SYMBOL is a registered trademark of Symbol Technologies, Inc.
Microsoft, Windows, Windows NT, and the Windows 95 logo are trademarks of
Microsoft Corporation in the United States, other countries, or both.
Celeron and Intel are trademarks of Intel corporation in the United States, or other
countries.
Apple, iTunes, and iPhone are trademarks or registered trademarks of Apple, Inc.,
in the United States, or other countries.
Java and all Java-based trademarks and logos are trademarks or registered
trademarks of Oracle and/or its affiliates.
Android, Google, and Google Play are trademarks or registered trademarks of
Google, Inc., in the United States, or other countries.
iOS is a trademark or registered trademark of Cisco in the United States or other
countries, and is licensed by Apple, Inc.
Motorola is a trademark or registered trademark of Motorola Trademark Holdings,
LLC, in the United States, or other countries.
Ingenico Inc. is a trademark or registered trademark of Ingenico S.A., in the United
States, or other countries.
Honeywell is a trademark or registered trademark of Honeywell International, Inc., in
the United States, or other countries.
Other company, product, or service names may be trademarks or service marks of
others.
Appendix C. Notices
217
218
Toshiba TCxAmplify: User's Guide
Index
Numerics
4610 POS printer support 16
4690 configuration 31
4690 Mobile Shopper system prerequisites
configuring Motorola MC40 for Associate Line
Busting 176
configuring Store Integration GUI terminals on 4690
OS 45
controlling the mobile engine 38
16
A
ACE input state table changes 40
ACE Personalization option changes 50
ACE requirements 16
ACE store options 50
age-restricted item exception 91
android installation 29
Appendix A. Solution extension 201
Appendix B. configuring the Toshiba B-EP2DL
Printer 203
applications, POS 15
architectural overview 8
Associate Line Busting during a blackout period
Associate Line Busting solution 151
audit details request 149
audit items list 146
audit keypad 146
audit required list 146
audit results 149
audit weight confirmation dialog 146
audits 143
D
damage from electrostatic discharge
disposal of equipment 213
E
166
B
battery return program
211
214
C
cable ferrite requirement 213
Class A compliance statement
Australia and New Zealand 211
China 211
European Union 209, 210
FCC (USA) 209
Germany 210
Industry Canada 209
Japan 212
Taiwan 213
Client Session Server configuration 44
Configuration changes for a self-service pay station
terminal 48
Configuration changes for controller/terminals: Mobile
Store Integrator GUI 47
Configuration changes for controller/terminals:
Self-Service Scale 49
Configuration changes for stand-alone Mobile Store
Integrator GUI terminal 45
Configuration changes for stand-alone Self-Service
Scale terminal 47
configuring CSS for the Mobile Shopper 39
© Copyright Toshiba Global Commerce Solutions, Inc. 2014
edition notice ii
electronic emissions notices 209
Australia and New Zealand 211
China 211
European Union 209, 210
FCC (USA) 209
Germany 210
Industry Canada 209
Japan 212
Korea 212
Taiwan 213
electrostatic discharge (ESD) 211
end of life disposal 213
equipment disposal 213
European Union battery recycling statement
215
F
ferrite requirement 213
flat panel displays 216
full audit 148
H
hardware requirements 15
highlights, Store Integrator GUI 139
how it works, Mobile Shopper 4
I
initial screen, Store Integrator GUI
interactive installation 25
iOS installation 29
140
J
Japan Electronics and Information Technology Industries
Association statement 212
Japanese Electrical Appliance and Material Safety Law
statement 211
Japanese power line harmonics compliance
statement 212
Japanese VCCI Council Class A statement 212
219
K
key features, Mobile Shopper 4
Korean communications statement
retrieving a Mobile Shopper POS transaction with
exceptions 142
running the mobile engine 36
212
S
L
loyalty number
162
M
menu layout 75
menu layout with items in the transaction 78
menu layout with no items in the transaction 75
mercury-added statement 216
mobile device temporarily loses connectivity while
shopping 119
mobile engine 32
mobile engine configuration 32
mobile engine configuration for 4690 32
Mobile Reporting Web Application 71
Mobile session options for ACE 52
Mobile Shopper highlights 3
Mobile SI GUI options for ACE 52
Mobile Transaction Monitor 147
N
notices 207
battery recycling 214, 215
cable ferrites 213
electronic emissions 209
electrostatic discharge (ESD)
end of life disposal 213
Toshiba 207
T
211
Taiwanese battery recycling statement 214
TCxAmplify Mobile Shopper overview 7
terminal configurations for the Mobile Shopper 45
time restricted item entry 89
Toshiba 4690
TCxAmplify 3
Toshiba TCxAmplify system concepts 3
trace types 193
trademarks 216
transaction alerts (mobile screens) 107
transfer order from failed mobile device to store's mobile
device 117
troubleshooting the mobile engine 39
Trust Level Management 60
Trust Level Management, audit history
administration 65
P
perchlorate 215
phone screen layout 75
POS applications 15
POS Integration Hub installation 28
POS screen flows, Mobile Shopper 79
problem determination 193
problem determination scenarios 199
Q
quantity required item entry
92
V
R
remote installation 26
removing an item from the Item Entry screen
removing an item from the Item List 98
removing items 95
requirements 16
hardware 15
software 15
220
safety information xv
screen flows, Associate Line Busting 157
self service paystation installation 30
Self-Service Pay Station options for ACE 53
self-service scale 126
self-service scale for items already in a
transaction 102
Self-Service Scale options for ACE 51
self-service scale to add items to a transaction 104
services, POS Integration Hub 55
setting up the Mobile Engine Launcher background
task 37
silent installation 25
smart phone application 75
smart phones 29
software requirements 15
spot audits 144
SSL configuration 33
starting Mobile Shopper during a blackout period 84
starting Mobile Shopper when not enough CSS
sessions 85
Store Integrator GUI 139
Store Integrator GUI screen flows 140
Toshiba TCxAmplify: User's Guide
95
various item exceptions 85
Virtual file system setup 15
visual audit 148
W
weight required item entry 94
WiFi settings 189
wireless network configuration and security
12
G362-0616-00