1
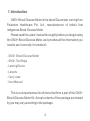
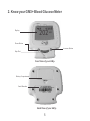
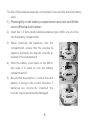
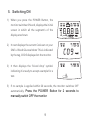
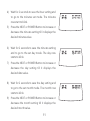
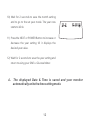
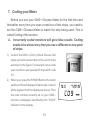
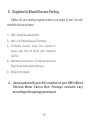
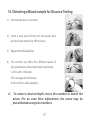
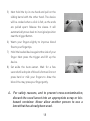
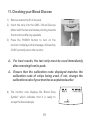
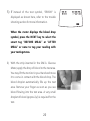
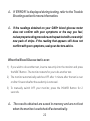
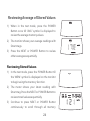
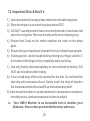
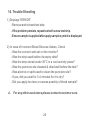
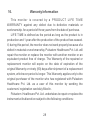
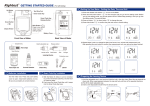
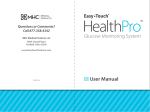
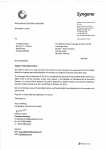
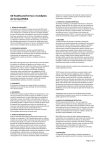
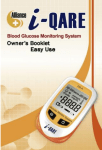
G M 3+ Blood Glucose Monitoring System Revised 2014 Operating Instructions NOTICE: The essential features of the type described and illustrations herein remaining unaltered, Pulsatom Healthcare Pvt. Ltd. reserves the right to carry out modifications at any moment on the monitor, strips or any other accessories as may be convenient and necessary without being obliged to bring this booklet up-to-date. The descriptions and illustrations in this booklet are not to be taken binding on the manufacturers. Any text that appears in bold italics and with these symbols is important information that should be read carefully and 2 CONTENTS: 1. Introduction 2. GM3+ Blood Glucose Meter 3. GM3+ Blood Glucose Test Strips 4. Batteries 5. Switching ON 6. Date and Time Settings 7. Coding your Meter before use 8. Supplies for Blood Glucose Testing 9. Preparing the Puncture Site 10. Obtaining a Blood sample for Glucose Testing 11. Checking your Blood Glucose 12. Memory Function 13. Important Do’s & Don't’s 14. Trouble Shooting 15. Specifications 16. Warranty Information 17. Service Instructions 3 4 5 7 8 9 10 13 15 16 17 19 23 25 26 27 28 31 1. Introduction GM3+ Blood Glucose Meter is the latest Glucometer coming from Pulsatom Healthcare Pvt. Ltd., manufacturers of India's first indigenous Blood Glucose Meter. Please read this users’ manual thoroughly before you begin using the GM3+ Blood Glucose Meter, as it provides all the information you need to use it correctly. It consists of : - GM3+ Blood Glucose Meter - GM3+ Test Strips - Lancing Device - Lancets - Carry-case - User Manual. This is a comprehensive list of items that form a part of the GM3+ Blood Glucose Meter Kit. Actual contents of the package purchased by you may vary according to the package. 4 2. Know your GM3+ Blood Glucose Meter Display 10:01 17-02-09 202 Power Button Increase Button Strip Slot Front View of your GM3+ Battery Compartment Serial Number Back View of your GM3+ 5 Date Units - mg/dl Memory Symbol Time 17-02-09 10:01 Result/ Code Display 202 Low Battery Symbol Apply Sample Symbol Display Panel GM3+ Blood Glucose Meter 3. GM3+ Blood Glucose Test Strips 1 2 6 Code Symbol Error Symbol Strips for ACE and GM3+ Blood Glucose meter are compatible for each other. 1) Contact Area - Indicated by the arrow mark. Insert this end of the test strip into the GM3+ Blood Glucose Meter with the arrow facing upwards and towards the monitor. 2) Test Area - Blood Sample is applied to this area of this test strip for testing. 4. Installing Batteries in your GM3+ Your monitor requires two external 1.5 Volts (AAA) alkaline batteries (type LR 03) that need to be installed in the monitor before the monitor can be used. When replacing external batteries, always replace both batteries at the same time and both should be of the same brand. Use good quality alkaline batteries only. Inferior/ Cheap batteries may damage your monitor. If the batteries show signs of leakage, please replace immediately. Leaking batteries will damage your monitor. 7 The life of the batteries depends on the extent of use and the brand of battery used. 1) Press lightly on the battery compartment cover lock and lift the cover off the back of monitor. 2) Insert two 1.5 Volts (AAA) alkaline batteries (type LR03) one at a time into the battery compartment. 3) While inserting the batteries into the compartment, ensure that the positive & negative terminals are aligned correctly as marked in the compartment. 4) Place the battery cover back on the GM3+ and snap it in place to lock the battery compartment lid. 5) Be sure that the positive (+) side of the each battery is facing in the correct direction. If batteries are incorrectly installed, the monitor may be permanently damaged. 8 5. Switching ON 1) When you press the POWER Button, the monitor switches ON and, displays the initial screen in which all the segment’s of the display are shown. 2) It next displays the current Code set on your GM3+ Blood Glucose Meter This is indicated by the tag, CODE displayed on the monitor. 3) It then displays the “blood drop” symbol indicating it is ready to accept a sample for a test. 5) If no sample is applied within 60 seconds, the monitor switches OFF automatically. Press the POWER Button for 2 seconds to manually switch OFF the monitor 9 6. Date and Time Settings Your GM3+ Blood Glucose Meter is preset with IST date and time. Even if the date and time, are incorrect, test results are not affected. You can reset the date and time on your GM3+ Glucose Meter. 1) When you press the POWER Button, the monitor switches ON and displays the initial screen in which all the segment’s of the display are shown. 2) Press the POWER button once again on your monitor when the initial display (as shown in the picture) is shown to enter the time and date setting mode. 3) Your monitor now displays the current time and date set on your monitor and the hour is blinking. Press NEXT or POWER Button to increase or decrease the hour setting till it displays the desired hour value. 10 4) Wait for 2 seconds to save the hour setting and to go to the minutes set mode. The minutes now start to blink. 5) Press the NEXT or POWER Button to increase or decrease the minutes setting till it displays the desired minutes value. 6) Wait for 2 seconds to save the minutes setting and to go to the set day mode. The day now starts to blink. 7) Press the NEXT or POWER Button to increase or decrease the day setting till it displays the desired date value. 8) Wait for 2 seconds to save the day setting and to go to the set month mode. The month now starts to blink. 9) Press the NEXT or POWER Button to increase or decrease the month setting till it displays the desired month value. 11 10) Wait for 2 seconds to save the month setting and to go to the set year mode. The year now starts to blink. 11) Press the NEXT or POWER Button to increase or decrease the year setting till it displays the desired year value. 12) Wait for 2 seconds to save the year setting and return to using your GM3+ Glucose Meter. The displayed Date & Time is saved and your monitor automatically exits the time setting mode. 12 7. Coding your Meter Before you use your GM3+ Glucose Meter for the first time and thereafter every time you open a new box of test strips, you need to set the GM3+ Glucose Meter to match the strip being used. This is called Coding of the monitor. Incorrectly coded monitors will give false results. Coding needs to be done every time you use a different or new pack of strips. 1) Code of the GM3+ (Gm3+) Blood Glucose Test strips can be found printed on the vial of strips as shown in the figure. For example, let us code your monitor to use a packet of strips with Code C11. 2) When your press the POWER Button, the meter switches ON and displays initial screen in which all the segment’s of the display are shown. Then the code number currently set on your GM3+ monitor is displayed, identified by the “CODE” indicator on the display. 13 3) Press both the buttons on your meter simultaneously to change the calibration code. The CODE symbol begins to blink. 4) Now, press the NEXT or POWER Button to increase or decrease the code setting till it displays the desired code. For example, C11 to use a pack of strips with code C11. 5) DO NOT press any key for 2 seconds and the code will be saved and the monitor will return to the operational mode. If no Button is pressed for 2 seconds, the displayed code is saved and your monitor automatically exits the code setting mode. 14 8. Supplies for Blood Glucose Testing Gather all your testing supplies before you begin to test. You will need the following items: 1) GM3+ Blood Glucose Monitor 2) GM3+/ ACE Blood Glucose Test Strips 3) Comfylets Lancets- Super Fine Lancets to ensure easy flow of blood with maximum comfort. 4) Safecare Lancing Device- To help you prick your finger for a blood sample with ease. 5) Sterile Cotton Swab Items packed with your Kit is marked on your GM3+ Blood Glucose Meter Carton Box. Package contents vary according to the package purchased. 15 9. Preparing the Puncture Site 1) Wash your hands with soap and water. Wipe dry. 2) If you use an alcohol wipe or medicated spirit to clean the puncture site, ensure that you let your finger dry completely before testing. 3) Wait for at least for 3 to 4 minutes before testing. 4) NOW Wipe the test area with sterile dry cotton. 5) Take your Auto Lancet Device and Comfylets lancet and follow instructions given in Section10 to draw a sample of blood. If you are using any other lancet device or other method of obtaining blood, follow manufacturers instruction for the same. Ensure puncture site is cleaned as indicated above. Failure to clean puncture site as indicated above may result in wrong results. 16 10. Obtaining a Blood sample for Glucose Testing 1) Unscrew the Auto-Lancet tip. 2) Insert a new lancet firmly into the carrier and pinch the lancet to twist off the cover. 3) Replace the threaded tip. 4) The comfort tip offers five different levels of skin penetration. Select best depth as follows: 1-2 for soft or thin skin 3 for average skin thickness 4-5 for thick or calloused skin To select a desired depth, move the number to match the arrow. For an even finer adjustment, the arrow may be placed between any two numbers 17 5) Next hold the tip in one hand and pull on the sliding barrel with the other hand. The device will be cocked when a click is felt, as the ends are pulled apart. Release the sleeve. It will automatically move back to its original position near the trigger Button. 6) Warm your fingers slightly to improve blood flow to your fingertips. 7) Hold the loaded device against the side of your finger. Next press the trigger and lift up the device. 8) Set aside the Auto-Lancet. Wait for a few seconds till a droplet of blood is formed. Do not press hard or milk your fingers to draw the blood. You may press your finger gently. For safety reasons, and to prevent cross-contamination, discard the used lancet into an appropriate scrap or biohazard container. Never allow another person to use a lancet that has already been used. 18 11. Checking your Blood Glucose 1) Remove a test strip from its pack. 2) Insert the strip into the GM3+ Blood Glucose Meter with the two electrodes pointing towards the monitor and facing upwards. 3) Press the POWER Button to turn on the monitor. It displays initial message, followed by CODE currently set on the monitor. For best results, the test strip must be used immediately after removing from its pack. Ensure that the calibration code displayed matches the calibration code of strips being used. If not, change the calibration code of your monitor as explained earlier. 4) The monitor now displays the ‘Blood Drop Symbol’ which indicates that it is ready to accept the blood sample. 19 5) If instead of the test symbol, “ERROR” is displayed as shown here, refer to the trouble shooting section for more information. When the meter displays the blood drop symbol, press the NEXT key to select the smart tag “BEFORE MEAL” or “AFTER MEAL” or none to tag your reading with your testing status. 6) With the strip inserted in the GM3+ Glucose Meter, apply the drop of blood to the test area. You may lift the monitor in your hand and move it to come in contact with the blood drop. The blood droplet automatically fills up the test area. Remove your finger as soon as you see blood flowing into the test area. A very small droplet of blood (approx 2µl) is required for the test. 20 7) As soon as the sample is applied, the machine begins a countdown of 20 seconds and displays the time remaining for test to complete as 20..19..18...17.. ... . . 9) At the end of 20 seconds, your blood glucose value is displayed in mg/dl (units) on the GM3+ monitor. This is also saved in the memory along with the time and date of the test. 10) If the blood glucose result is higher than 600mg/dl, ‘Hi ’ is displayed and if the blood glucose result is lesser than 20mg/dl, ‘ Lo’ is displayed. GM3+ can store the last 75 test results in its memory. To maintain a permanent log, record the glucose values in your health log. 11) Remove the test strip from the meter and discard it safely. Unscrew the Auto-Lancet tip. Carefully stick the protective disk cover back on the used lancet. Grip the holder firmly and pull the lancet safely out of the holder. Dispose the lancet safely. 21 If 'ERROR' is displayed during testing, refer to the Trouble Shooting section for more information. If the readings obtained on your GM3+ blood glucose meter does not confirm with your symptoms or the way you feel, review proper testing procedure and repeat test with a new strip/ new pack of strips. If the reading that appears still does not confirm with your symptoms, seek your doctors advice. When the Blood Glucose test is over: 1) If you wish to do another test, insert a new strip into the monitor and press the NEXT Button . The monitor restarts for you to do another test. 2) The monitor automatically switches OFF after 1 minute after the test is over or after 10 seconds after the used strip is removed . 3) To manually switch OFF your monitor, press the POWER Button for 2 seconds. The results obtained are saved in memory and are not lost when the monitor is switched off automatically. 22 12. Memory Function GM3+ Glucose Meter has a memory capacity to automatically store your last 75 Blood Glucose test results along with smart tags. You can review these readings in order from the most recent reading to the oldest reading or vice versa. The Smart-tag, Date and Time of the test result is also displayed enabling you to know when those readings were taken. GM3+ also displays the average of the all Random values saved , followed by the Before Meal Average and After Meal average of the values saved in its memory. While calculating the average, it ignores all results under 20 mg/dl and above 600mg/dl. If the memory is full with 75 glucose results and a new result is added, then, the oldest result is automatically deleted. If there is no Button input for 4 seconds, the program automatically exits the memory mode and returns to test mode. 23 Reviewing Average of Stored Values 1) When in the test mode, press the POWER Button once till “AVG” symbol is displayed to review the average memory values. 2) The monitor shows your average readings with Smart-tags. 3) Press the NEXT or POWER Button to review other averages sequentially. Reviewing Stored Values 1) In the test mode, press the POWER Button till the ‘MEM’ symbol is displayed on the monitor to begin using the memory function. 2) The meter shows your latest reading with Smart-tag. Press the NEXT or POWER Button to review stored values sequentially. 3) Continue to press NEXT or POWER Button continuously to scroll through all memory 24 13. Important Do’s & Don't’s 1) Use strips before the expiry date marked on the test strip pack. 2) Store the strips in a cool and dry place below 30oC 3) DO NOT use strips which have incorrectly stored or have been left open for a long time. Remove the strip at the time of testing only. 4) Ensure that Code on the meter matches the code on the strips pack. 5) Ensure that your hands are clean at the time of obtaining a sample. 6) If using spirit or alcohol swab before pricking your finger, wait for 34 minutes for the finger to dry completely before pricking. 7) Use only freshly obtained capillary or venous blood for testing. DO NOT use stored blood for testing. 8) A very small drop of blood is required for the test. Do not flood the test strip with excessive blood. Gently touch the drop of blood to the test area and the blood will fill up the test area by itself. 9) Care should be taken to avoid extremes in temperature variations, humidity shock, dust and exposure to direct sunlight. Your GM3+ Monitor is an invaluable tool to monitor your Diabetes . Ensure that you handle the meter with care. 25 14. Trouble Shooting 1) Displays “ERROR” - Remove and reinsert test strip - If the problem persists, repeat test with a new test strip. - Ensure sample is applied after apply sample symbol is displayed. 2) In case of Incorrect Blood Glucose Values, Check - Was the correct code set on the monitor? - Was the strip used before its expiry date? - Was the strip stored under 30oC in a cool and dry place? - Was the puncture site cleaned & dried well before the test? - Was alcohol or spirit used to clean the puncture site? - If yes, did you wait for 3-4 minutes for it to dry? - Did you apply too less or excess quantity of blood sample? For any other assistance please contact customer care. 26 15. Product: Specification GM3+ Blood Glucose Monitor Application: To determine blood glucose in whole blood by amperometric method Size: 120 mm x 70 mm x 24 mm Weight: 125 grams (including batteries) Operating Conditions: Temperature: 10oC to +40oC; Humidity: <98% Power Supply: Two 1.5V AAA batteries (Type LR 03) Battery Life: Approx.2,000 tests 1 test/ day. Display: Large Display with 12 mm characters for results Measuring range: 20 mg/dl to 600 mg/dl Measuring time: 20 seconds Test strip Storage: Between +10oC and +30oC Memory Capacity: Last Test Value with Time and Date or 75 Blood Glucose Test Results with Time, Date and Smart Tag for Random or Before or After Meal. It also displays average for each tag 27 16. Warranty Information This monitor is covered by a P R O D U C T L I F E T I M E WARRANTY against any defect due to defective materials or workmanship. for a period of three years from the date of purchase. LIFE TIME is defined as the period as long as the product is in production and 1 year after the production of the product has ceased. If, during this period, the monitor does not work properly because of a defect in material or workmanship, Pulsatom Healthcare Pvt. Ltd. will repair the monitor or replace the monitor with another monitor or an equivalent product free of charge. The Warranty of the repaired or replacement monitor will expire on the date of expiration of the original Warranty or ninety (90) days after shipment of a replacement system, whichever period is longer. This Warranty applies only to the original purchaser of the monitor who has registered with Pulsatom Healthcare Pvt. Ltd. as a user of this monitor by sending the customers' registration card duly filled in. Pulsatom Healthcare Pvt. Ltd. undertakes to repair or replace the instrument at its discretion subject to the following conditions: 28 1) The purchase Memo/ Bill/ Invoice must be preserved and produced along with the defective unit. 2) In an event of any complaint, the unit must be returned to the nearest service center or to us, freight paid for examination. 3) This Warranty is not valid for damages resulting from accident, mishandling, negligence, improper repair, tampering, loss of components or accessories or if the instrument is not used according to the manual. 4) The purchaser’s exclusive remedy with respect to the GM3+ Blood Glucose meter shall be repair or replacement, at the option of Pulsatom Healthcare Pvt. Ltd. 5) In no event shall Pulsatom Healthcare Pvt. Ltd. be liable to the purchaser or any other person for any direct, incidental, consequential, special or punitive damages arising from or in any way connected with the purchaser or operation of the monitor or its 29 parts, even if Pulsatom Healthcare Pvt. Ltd. has been advised of the possibility of such damages. 6) No Warranty of merchantability or fitness for a particular purpose, if any is implied from the sale of the monitor, shall extend for longer duration than product lifetime as defined earlier. 7) While the company will make every effort to repair or replace the unit under this Warranty as soon as possible, it is expressly made clear that the company shall not be liable to do so within any specified time or period. 8) All warranties covering GM3+ blood glucose monitoring systems are valid only when GM3+ is used with GM3+/ GM3+ Blood Glucose Strips. All warranties covering the GM3+ meter are voided by use of any other strips other than GM3+/ GM3+ Strips. 9) Claims, if any, to this Warranty shall be made only before the courts having jurisdiction in Bengaluru. 30 17. Service Instructions Customers experiencing difficulties should review the troubleshooting guide of their user manual. For your service requirements and any other enquires, please contact us. You can contact us by any of the following means: Online: E-mail: Tel.: Mail to: http://www.pulsatom.com [email protected] +91-80-2357-9166, +91-990-003-1600 Pulsatom Healthcare Pvt. Ltd. 86D2/A, Industrial Suburb, Yeshwanthpur, Bengaluru - 560 022 Karnataka, INDIA 31 Healthcare Pvt. Ltd. 86D2/A, Industrial Suburb, Yeshwanthpur, Bengaluru 560 022 INDIA Tel: +91-80-23579166 Fax: +91-80-23579170 Email: [email protected] Web: www.pulsatom.com