1
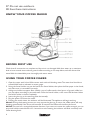
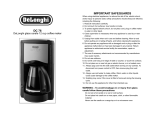
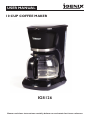
USER MANUAL
10 CUP COFFEE MAKER
IG8126
Please read these instructions carefully before use and retain for future reference
CONTENTS
Important safeguards......................................... 2-3
Know your coffee maker...................................... 4
Using the appliance............................................ 4-5
Cleaning & maintenance....................................... 5
Removing mineral deposits.................................. 5
Hints for great tasting coffee............................... 5
Igenix warranty................................................... 6-7
Product disposal and recycling............................ 8
IMPORTANT SAFEGUARDS
Important: Before using this electrical appliance, the following
basic precautions should always be followed including the following:
1. Read all instructions.
2. Make sure that your outlet voltage corresponds to the voltage
stated on the rating label of the coffee maker.
2. Do not operate any appliance with a damaged cord or plug.
If the main cord is damaged, it must be replaced by the
manufacturer, the nearest service agent or a qualified person.
3. Do not touch hot surfaces. Use handles or knobs.
4. To protect against fire, electric shock and injury to persons
do not immerse cord or plug in water or other liquid.
5. Remove plug from wall outlet before cleaning and when not
in use. Allow appliance to cool down completely before taking
off, attaching components or before cleaning.
6. Do not use accessories that are not recommended by Igenix
as it may result in fire, electric shock and/or injury.
7. The glass jug is designed for use with this appliance. It can
not be used on a range top.
8. Do not clean glass jug with cleansers, steel wool pads, or
other abrasive materials.
9. Do not hang power cord over the edge of table or counter,
or touch hot surface.
10. Do not place the coffee besides or on top of a hot surface.
11. To disconnect, remove plug from wall outlet. Always hold the
plug, but never pull the cord.
2
12. Do not use appliance for anything other than its intended
use and place it in a dry environment.
13. Close supervision is necessary when your appliance is being
used near children.
14. Be careful not to get burnt by the steam.
15. To disconnect, turn control to “Off”, then remove plug from
wall outlet.
16. Do not let the coffee maker operate without water.
17. Never use the appliance if the glass jug shows any signs of cracks.
Only use the glass jug that comes with this appliance.
Use carefully as the glass jug is very fragile.
18. Do not place a hot container on the worktop.
19. Do not use a cracked glass jug or a glass jug with a loose
or weakened handle.
20. Scalding may occur if the cover is removed during the
brewing cycles.
21. Some parts of the appliance are hot when operated, so do
not touch with your hand. Use handles or knobs only.
22. Never leave the empty glass jug on the warming plate
otherwise the glass jug is liable to crack.
23. Do not sit a hot container on a hot or cold surface.
24. This appliance is not intended for use by persons (including
children) with reduced physical, sensory or mental capabilities,
unless they have been given supervision or instruction
concerning use of the appliances by a person responsible for
their safety.
25. Children should be supervised to ensure that they do not play
with the appliance.
26. This appliance is intended to be used in household and similar
applications such as:
– staff kitchen areas in shops, offices and other working
environments;
– by clients in hotels, motels and other residential type
environments;
– bed and breakfast type environments. [PTO]
3
27. Do not use outdoors.
28. Save these instructions.
KNOW YOUR COFFEE MAKER
BEFORE FIRST USE
Check that all accessories are complete and the unit is not damaged. Add clean water up to maximum
level to brew several times without ground coffee according to the steps below, and then discard the
water. Wash the detachable parts thoroughly with warm water.
USING YOUR COFFEE MAKER
1. Open the water tank lid and fill the water tank with cold drinking water. The water level should not
exceed MAX level as indicated on water gauge.
2. Swing the funnel holder out, put the funnel into funnel holder, then place the filter paper in the funnel,
and make sure it is assembled correctly.
3. Add ground coffee into paper filter. Usually a cup of coffee needs a level spoon of ground coffee, but
you may adjust according to personal taste. Close the funnel holder, a click sound will be heard when
the funnel holder is closed completely.
4. Insert the glass jug on the warming plate horizontally.
5. Plug the power cord into the outlet.
6. Pressing the switch down, the indicator will be illuminated. The appliance will begin working.
Note1: During the brewing process you may remove the glass jug to serve, the coffee maker will stop
dripping automatically If the serve time exceeds 30 seconds the coffee will overflow the funnel.
Note2: This unit has a strength adjustment function, if you want to increase the coffee strength, you can
press and hold the switch button for 4 seconds to start brewing, the indicator will flash constantly until
coffee brewing finish.
4
7. Upon completion of brewing the coffee, (this is about one minute later after the coffee stops dripping
out) you can remove the glass jug, pour and serve.
Note: the brewed coffee you get will be slightly less than the water you have added as some water is
absorbed by ground coffee. DO NOT touch the cover or the warming plate when operating as they are
very hot.
8. When the process is finished, if you do not want to serve immediately, keep the switch on, the coffee
can be kept warm on the warming plate for 40 minutes and the appliance will be cut off automatically
after 40 minutes. For an optimum coffee taste, serve it just after brewing.
9. Always turn the coffee maker off and disconnect the power supply after use.
Note: Be careful when pouring the coffee out, as the coffee will be very hot and could cause scalding.
CLEANING AND MAINTENANCE
Caution: Always unplug the product from the plug socket and allow the warming plate to cool
completely before cleaning it. Never immerse the unit or power cord in water or any other liquid for
cleaning.
1. Clean all detachable parts after each use in hot, soapy water.
2. Wipe the product’s exterior surface with a soft, damp cloth to remove stains.
3. Water droplets may buildup in the area above the funnel and drip onto the product base during
brewing. To control the dripping, wipe off the area with a clean, dry cloth after each use of the
product.
4. Use a damp cloth to gently wipe the warming plate. Never use abrasive cleaner to clean it.
5. Replace all parts and keep for next use.
REMOVING MINERAL DEPOSITS
To keep your coffee maker operating efficiently, periodically you should clean away the limescale left
by the water according to the water quality in your area and the frequency of use. We recommend
descaling your coffee maker as follows, using a solution of white vinegar and cold water. A solution of two
tablespoons (30ml) white vinegar in one glass jug of cold water works best.
1. Fill the tank with the vinegar solution to the maximum level as indicated on water gauge.
2. Insert glass jug onto the warming plate.
3. Ensure that the paper filter (without ground coffee) and funnel are assembled in place.
4. Switch on the appliance and allow it to “brew” de-scaling solution.
5. After “brewing” one-cup solution, switch off the appliance.
6. Leave the solution for 15 minutes and repeat step 3-5.
7. Switch on the appliance and run off the solution until the water tank is completely empty.
8. Rinse by operating the appliance with water at least 3 times.
HINTS FOR GREAT-TASTING COFFEE
1.
2.
3.
4.
5.
6.
A clean coffee maker is essential for making great-tasting coffee. Regularly clean the coffee maker as
specified in the “CARE AND CLEANING” section. Always use fresh, cold water in the coffee maker.
Store unused ground coffee in a cool, dry place. After opening a package of ground coffee, reseal it
tightly and store it in a refrigerator to maintain its freshness.
For an optimum coffee taste, buy whole coffee beans and finely grind them just before brewing.
Do not reuse ground coffee as this will greatly reduce the coffee’ flavour. Reheating coffee is not
recommended as coffee is at its peak flavour immediately after brewing.
Clean the coffee maker when over-extraction causes oiliness. Small oil droplets on the surface of
brewed, black coffee are due to the extraction of oil from the ground coffee.
Oiliness may occur more frequently if heavily roasted coffees are used.
5
6
7
IMPORTANT
THERE ARE NO USER SERVICEABLE PARTS INSIDE AND THE CASING SHOULD
NOT BE OPENED BY AN UNQUALIFIED PERSON
THIS APPLIANCE IS INTENDED FOR DOMESTIC USE ONLY
This product carries a 2 year guarantee.
If you experience any problems with your Igenix
product please call our Customer Services
Department on 01473 271 272.
DISPOSAL INFORMATION
The European Directive 2012/19/EU on Waste Electrical and Electronic
Equipment (WEEE), requires that old household electrical appliances must not be
disposed of in normal unsorted municipal waste.
Old appliances must be collected separately in order to optimise the recovery
and recycling of the materials they contain and reduce the impact on human
health and the environment.
The crossed out “wheeled bin” symbol on the product reminds you of your
obligation, that when you dispose of the appliance it must be separately collected.
Consumers should contact their local authority or retailer for information
concerning the correct disposal of their old appliance.
Distributed by Pik-a-Pak Electrical Distributors
38 Bluestem Road, Ransomes Europark, Ipswich, IP3 9RR
Tel. 01473 271 272