1
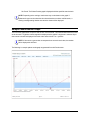
Laboratory Information System
User Handbook
SoftWebPlus
– [Extract of SCC SoftComputer User Manual]
The content is compiled from the SoftWebPlus User
Manual issued by SCC SoftComputer. The handbook
comprises the core areas covered in the 2-hour training
programme organized and conducted by the UWI LIS
training team.
This handbook is targeted at our primary users at the University
Hospital of the West Indies.
Table of Contents
General Information ......................................................................................................................................4
Becoming an authorized user ................................................................................................................4
Obtaining alerts and results using your mobile .....................................................................................4
About the LIS Information Desk.............................................................................................................4
Introduction ..................................................................................................................................................5
Logging On..................................................................................................................................................6
Logging Off (Exiting SoftWebplus) ..............................................................................................................7
Creating a Desktop Icon ..............................................................................................................................7
Managing Patient Information .....................................................................................................................8
Entering Patient Information- Adding a New Patient ..................................................................................8
Editing Patient Information .....................................................................................................................9
Ordering - Adding Requisitions ................................................................................................................... 10
Adding a Requisition in Order Entry ...................................................................................................... 10
Verifying the Requisition Summary ...................................................................................................... 13
Entering the Collection Details ............................................................................................................. 14
Collecting - Managing Specimens ............................................................................................................... 15
Collecting Specimens ........................................................................................................................... 15
Creating the Shipping Manifest ............................................................................................................ 16
Viewing and Editing the Status of the Shipping Manifest...................................................................... 17
Managing Orders - Processing Standing Orders .......................................................................................... 41
Generating an Order from a Standing Orders List................................................................................. 41
Printing the Standing Orders Report ..................................................................................................... 41
Managing Processed Orders .................................................................................................................... 51
Viewing Recent Orders ........................................................................................................................ 51
Viewing Uncollected Orders and Collecting Specimens ........................................................................ 52
Reprinting Requisitions and Labels ....................................................................................................... 52
Results Viewing - Viewing Results ............................................................................................................... 53
Viewing Results .................................................................................................................................... 53
Bridging to SoftMedia........................................................................................................................... 55
Viewing the Results Trend/Graph ........................................................................................................ 55
Signing off Test Results ........................................................................................................................ 57
Report Viewing - Specimen Tracking ........................................................................................................... 59
Generating a Specimen Status Report ................................................................................................. 59
Generating a Manifest Status Report................................................................................................... 59
Viewing Results Reports .......................................................................................................................... 59
Viewing and Printing a Scheduled Report ............................................................................................. 60
Generating a Results Report ................................................................................................................ 61
Signing off a Results Report .................................................................................................................. 62
Changing your Password ...................................................................................................................... 62
General Information
Becoming an authorized user
Before anyone is allowed to gain access to the LIS system (in this case SoftWebPlus) the UHWI and all
other entities having permission to use the facility, must request that you be granted access. This request
is expected to be made by the head of section. For instance the sister with responsibility for overall
administration of a particular ward would be expected to identify the users on her ward by submitting to
the Laboratory Information Systems Administrator a list of the names of the persons, their ID and their Job
function. If there is a special function that an individual must or must not carryout (such as results printing)
this should be noted. A Form is available for collecting this information.
The system will not allow access to anyone who has not previously been identified to the system by the
System Administrator as a valid user.
Email contact of Laboratory Information Systems Administrator :
Obtaining alerts and results using your mobile
The system allows doctors to be alerted via their mobile of the availability of a test result. This applies to
the originating doctor and/or others that he/she has approved to receive the test results. The doctor(s)
may then log in and obtain the result.
One must first make contact with the Laboratory Information Systems Administrator to have the said
device enabled for receiving.
About the LIS Information Service
An Information Service has been created in the Central Accessioning Area. The purpose is to respond to
queries or direct them appropriately. The Service will serve as the centralizing point for queries from users
of the Laboratory Information System. Where a query cannot be dealt with by the operators of the Service
it will be forwarded to the appropriate person or office. It is expected that most of the user queries should
be answerable by the Service – eg usability issues, basic tracking of tests, pricing, general LIS
information.
Tel.No: (876) 927-1620 extn. 2352
Email: [email protected]
Temporary contact :(876) 867-8161 - this number may be used temporarily as the telephone installation
is still ongoing.
Note that these are the telephone numbers at the moment. They may be changed or added to over the
coming months
Introduction
The SoftWebplus™ system is a web-based application that allows integrated real-time results query as
well as computerized order entry (CPOE) via the Internet.
SoftWebplus provides practical, robust solutions for clinical office staff and physicians that are fast,
convenient, and easy to learn. SoftWebplus is specifically designed for use within an outreach suite of
applications to facilitate front end processing and billing for clinical laboratories. SoftWebplus also provides
order entry and test results viewing in a seamless package. End users are able to quickly and efficiently
register new patients, order tests, enter diagnosis codes, check medical necessity, place orders, and
review patients' integrated clinical results. User specific viewing of clinical results via the Internet allows
filtering, sorting, and trending results that ultimately simplify interpretation and ensure prompt response to
critical results.
SoftWebplus uses a Graphical User Interface (GUI), and click navigation. The system is easily customized
to match individual workflows, and provides reliable 24/7 access to results.
SoftWebplus supports laboratory, microbiology, blood bank, pathology, and reference lab results which
reside in a single database repository. SoftWebplus is also HIPAA enabled with multiple Security Controls.
Logging On
The following steps are used to log on to the system:
Steps:
1. Enter the SoftWebplus™ address (http://clinicallabs.mona.uwi.edu:25013/swp/office) in the
URL field.
Result: The SoftWebplus login screen is displayed.
2. Type your user ID in the field labeled User ID.
3. Enter your password as assigned by the system administrator.
NOTE: Users are issued a unique user ID and Password by the system administrator
consisting of numeric and alphanumeric characters. New users logging on to SoftWebplus
for the first time will be asked to change their password.
4. Click the Log In button.
5. Enter your Current Location or click the search button to open the location lookup window and
search for your facility name and ID. Click OK.
6. SoftWebplus main user interface is displayed.
Logging Off (Exiting SoftWebplus)
When you leave your terminal, remember to log out of the system. This will prevent other users from
working on the system using your ID and stamping your initials on their transactions.
The following steps are used to log out of the SoftWebplus™ application:
Logging off of SoftWebplus:
Steps:
Select Log Out from the main menu toolbar.
Result: The systems signs you out and the login screen is displayed. .
Closing SoftWebplus:
Steps:
Click the standard close icon in the upper right corner of the window after logging out.
Creating a Desktop Icon
The following steps are used to add a desktop icon for easy access to the SoftWebplus™ system:
Steps:
1. Access the SoftWebplus Login Screen.
2. Right-click in the SoftWebplus window and select Create Shortcut.
Result: The message, "Do you want to put a shortcut to this website on your desktop?" is
displayed.
3. Click Yes.
Result: The SoftWebplus icon
is displayed on your desktop.
Managing Patient Information
Entering Patient Information- Adding a New Patient
The Patient pane of the Patient Maintenance window is used to enter or edit patient information including
the patient's name, address, demographic information, and contact details.
The following steps are used to add a new patient in Patient Maintenance:
Steps:
NOTE: To create a new patient, you must first search for that patient using the patient
search bar to verify that he or she does not already exist in the system.
1. Select Patient Maintenance from the main menu.
Result: The Patient Maintenance Search Window is displayed.
2. Enter the patient search criteria in the search bar, including the patient's Last name, First name,
Date of Birth (DOB), Social Security Number (SSN), Medical Record Number (MRN), and/or
Chart Number.
3. Click the Find button.
Result: The Search Results window is displayed with patients matching the search criteria.
4. If the patient is not found in the search, click the Create New Patient button.
Result: The Search Results window is closed and the Patient Maintenance window becomes
editable.
5. Add all the information in the required fields for the newly created patient:
6. To add or view a patient comment, click the Patient Comment button. Enter a free-text
comment and click OK.
7. Enter the Address for the patient:
8. Enter the patient's Visit information, if available, by defining the Room and Bed number fields.
9. Enter the patient's Phone number.
10. Once you have entered all of the patient’s information, including the Emergency Contact
information, and Payor/Insurance provider, click the Save.
Result: The patient information is saved.
NOTE: A message prompting you to enter required information will be displayed if any of the
required fields have not been populated. The required fields needed to save a patient record
can be set by the system administrator. Fields where information must be entered will be
highlighted.
Editing Patient Information
The following steps are used to edit patient information as entered in Patient Maintenance:
Steps:
1. Select Patient Maintenance from the main menu.
Result: The Patient Maintenance Search Window is displayed.
2. Enter the patient search criteria in the search bar, including the patient's Last name, First name,
Date of Birth (DOB), Social Security Number (SSN), Medical Record Number (MRN), and/or
Chart Number.
3. Click the Find button.
Result: The Search Results window is displayed with patients matching the search criteria.
4. Select the matching patient from the Search Results window.
Result: The Patient Maintenance window is opened in edit mode.
5. Edit the information in the Patient, Emergency Contact, Payor/Insurance, and Policy
Holder/Insured areas as necessary.
6. Click the Save button to save any modified information.
Chapter 2: Managing Patient Information
Page 9
Ordering - Adding Requisitions
Adding a requisition in SoftWebplus™ involves verifying the patient and insurance information, entering
requisition details, selecting the tests, selecting the diagnosis, entering test information and checking
compliance.
Adding a Requisition in Order Entry
Adding a requisition in Order Entry involves verifying the patient and insurance information, entering
requisition details, selecting the tests, selecting the diagnosis, entering test information, and checking
compliance.
NOTE: Processes and windows may vary depending on the type of test, the recurrence
pattern, and if the test is being collected at the time of ordering.
The following steps are used to add a requisition in Order Entry:
Steps:
1. Select Order Entry from the main menu.
Result: The Order Entry window is displayed.
2. Enter the patient search criteria in the search bar, including the patient's Last name, First name,
Date of Birth (DOB), Social Security Number (SSN), Medical Record Number (MRN), and/or
Chart Number.
3. Click Find.
Result: The Search Results window displays the matching search criteria.
4. Select the matching patient from the Search Results window and click OK.
Result: The patient's information is populated in the Patient & Payor/Insurance area of the Order
Entry window. If the patient is not found in the search, click the Create New Patient button. The
Search Results window is closed and the Patient Maintenance pop-up window is opened over
the Order Entry screen.
Entering Requisition Details
5. Enter the requisition details for the order in the Requisition Details area:
l
l
Confirm the Order Location. If the field is not populated, enter an Order Location or click
the search button to make a selection from the location lookup window.
Select the Billing Method drop-down arrow to select a billing method from the drop-down
list. Available Billing Methods depend on your current login location.
Enter the physician who requested the order in the Requested by field, click the search
button to make a selection from the physician lookup window, or click the drop-down arrow
to select a favorite physician.
l Select the Priority from the drop-down list. Choices include: Routine, Urgent, Stat, and
Timed.
l In the Copy report to area, enter any physician IDs to have a copy of the results sent to
them, or click the browse button to display the physician lookup and search for a physician.
You can enter up to 3 physicians.
l
Defining Recurrence (Optional)
6. To place a recurring order, select the Standing Order button to open the Define Recurrence
window and define the frequency, dates, and/or times that the order will be generated.
l If the recurrence occurs at a specific date in the future, click the Future radio button and
enter the expected date or select a date from the calendar.
NOTE: The expected date cannot occur in the past.
l
If the test(s) need to be ordered multiple times, select the Recurring radio button. Enter the
Pattern ID or select a pattern from the Recurrence pattern lookup. Set the total number of
times the test will be ordered, if necessary. Enter the start date and the end date of the
recurrence.
NOTE: The start date cannot occur in the past. The end date cannot be earlier than the start
date.
l
Click the Pattern ID lookup window to open the Recurrence Pattern Lookup window to
define the specific recurrence pattern.
NOTE: If a recurrence was entered for the order, the Standing Order button will display a
green checkmark.
NOTE: Select the Reset radio button in the Define Recurrence window to remove the
defined recurrence pattern from the order. The green checkmark of the Standing Order
button becomes blue "-" (minus).
Adding Special Requests (Optional)
7. To add specific requests, select the Special Requests button to open the Special Requests
window and enter requests in free text.
NOTE: If a special request was entered for the order, the button will display a green
checkmark.
Selecting a Test
8. Select the test(s) for the patient:
l
l
Select a test from one of the templates/panels.
-ORClick the Test Lookup button to open the Test Lookup window and search for a specific
test.
-OREnter the test ID(s), separating multiple entries by a comma, into the free text field on the
Summary tab, and press Enter.
NOTE: Clicking the main test category checkbox will automatically select all pertaining
tests for that category. For instance, if you select the main Chemistry checkbox, all tests
under the chemistry category will be selected.
9. Click the Summary Tab to review all selected tests.
Entering a Requisition Diagnosis
10. In the Requisition Diagnoses pane, select the appropriate reason(s) for the tests:
l
Select a diagnosis from the displayed category.
-OR-
Click the Diagnosis Lookup button to open the Diagnosis Lookup window and search for a
specific diagnosis reason.
-OREnter the diagnosis code(s), separating multiple entries by a comma, into the free text field
on the Summary tab, and press Enter
11. Click Summary in the Requisition Diagnoses window to review the select diagnosis reasons
for ordering the test(s).
l
Entering Specimen Collection Information
12. At the bottom area of the Order Entry window, enter collection information for the order:
NOTE: This section is disabled if a Recurrence Pattern is defined (the Standing Order button
has a green check mark).
Select the Collect Now checkbox if the specimen is to be collected when the requisition is
submitted. If the Collect Now checkbox is selected, the system will also require the entry of
a phlebotomist.
l If the Collect Now check box is selected, select a Phlebotomist ID from the favorites
drop-down list, or click the search button to make a selection from the Phlebotomist
Lookup window.
l Click the calendar icon in the Collection D&T field to select a collection date for the order
from the calendar. Click the right and left directional arrows to select a date.
l Enter/modify the collection time, as required.
l
13. Once all of the information has been entered for the order, click the Submit Requisition button
at the bottom of the Order Entry window.
NOTE: If insurance information was not entered for the patient, you will have to select a
different billing method or add an Insurance.
Verifying the Requisition Summary
The Requisition Summary Preview window is used to verify the requisition information before submitting.
The requisition data can be edited from this preview window, if necessary.
The following steps are used to edit the requisition information from the Requisition Summary Report
Preview:
Steps:
1. Verify that the information in the Requisition Summary window is correct.
2. To modify the patient information, click the Edit Patient button.
Result: The Edit Patient window is displayed.
3. Edit the patient information as necessary.
4. To modify the order, diagnosis, or other order information, click the Close Preview button.
Result: The Order Entry window is displayed.
5. Edit the requisition information as necessary.
6. To check compliance on the order, click the Check Compliance button.
Result: The Check Compliance window is displayed.
7. Once all of the information has been verified and/or modified, click Submit Requisition.
Result: The order is submitted and the requisition report/labels are printed. The Collection
Details window is displayed if Collect Now was selected.
NOTE: The specifications of the Print Requisition and Print Labels options may vary
depending on the related settings in the Administrative Application.
Entering the Collection Details
If the Collect Now checkbox was selected at the time the requisition was submitted, the Collection Details
pop-up window will appear after the order is submitted.
The following steps are used to enter collection details:
Steps:
1. Verify the Collection information.
NOTE: The defined Collection Date and Time on the Order Entry screen are copied to the
corresponding fields in the Collection Details window by default.
2. Make any changes as necessary.
3. If some specimen(s) were not collected, change the specimen status by selecting CNC (Could
Not Collect) or the Skip radio button.
Result: Collection Date and Time fields for the specimen are disabled.
4. Click OK if all entered information is correct.
Result: The collection information is saved.
Collecting - Managing Specimens
The Collections menu enables you to collect specimens from the draw list, view specimens to be shipped,
create a shipping manifest for collected specimens, and manage the created manifests.
Collecting Specimens
The Draw List tab enables you to search uncollected specimens by Ordering location, To be collected date,
patient name, and/or Specimen status. Printing labels and entering collection information are also available.
The following steps are used to verify orders and collect specimens on the draw list.
Steps
:
1. From the main menu, select Collections.
Result: The Collections window is displayed.
2. Select the Draw List tab.
3. Verify or edit the information on the search bar, including the Location, Collection Date,
Patient Name, and Specimen Status.
4. Click Find.
Result: The specimens on the draw list are found by the entered search criteria.
5. To print the draw list, click the Print Draw List button.
Result: The Draw List is printed.
6. Select an uncollected specimen from the list, and click the Collect Specimen button.
Result: The Collection Details window is displayed.
NOTE: The current date and time will be displayed in the collection date and time fields by
default.
7. Verify the collection information and make any modifications as necessary. Click OK.
Result: The Collection Details window is closed. Collected specimens are removed from the
Draw list.
Creating the Shipping Manifest
The Shipping tab displays the specimens that have been collected and are available for shipping.
The following steps are used to create a shipping manifest on the Shipping tab.
Steps:
1. From the Collections menu, select the Shipping tab.
2. Enter the Phlebotomist ID in the Collected by field as appropriate and select a Laboratory from
the drop-down where the specimens will be sent. Select the desired storage type check boxes
(optional) and click the Find button.
NOTE: Select Main Laboratory unless you are creating a shipping manifest for an alternate
(external) laboratory.
NOTE: Specimens with undefined (blank) storage types will be found when "Ambient" is
selected. Setting the Specimen Storage type is an optional function and you may not see
this option in your system.
3. To easily find specimens to add to the shipping list, click the Scan Tubes button to scan the
specimen labels.
Result: The Scanned Tubes window is displayed.
4. Scan all barcodes you want to add to the Scanned Tubes list, or manually enter the barcode and
press enter or click the arrow icon.
Result: The scanned barcode number, tube type, and status will be added to the grid.
5. To remove the barcode number last scanned, click the Remove Last button.
Result: The scanned barcode number, tube type, and status, "Removed" will be added to the
grid.
NOTE: Depending on the SoftLab® version, SoftWebplus™ can be configured to remove a
previously scanned tube when the same barcode is scanned again.
6. Once all barcodes are added, click OK.
Result: The Scanned Tubes window is closed and all of the scanned specimens are checked
and moved to the beginning of the shipping list.
7. Verify that the correct specimens are listed to be shipped.
8. Select the appropriate checkboxes next to the Patient name column if not done so already, and
select the Create Shipping Manifest button to create a shipping manifest based on the chosen
specimens.
NOTE: Once the Shipping Manifest is created, all selected specimens for the Manifest are
removed from the shipping tab. If all specimens are removed, the message "No specimens
found." will be displayed. The generated shipping manifest is displayed on the shipping
manifest tab.
Viewing and Editing the Status of the Shipping
Manifest
The Shipping Manifest tab displays the shipping manifest list that is ready to be sent to the laboratory for
testing or have been picked up.
The following steps are used to view and edit the status of the shipping manifest:
Steps:
1. From the Collections menu, select the Shipping Manifests tab.
Finding the Shipping Manifest
2. Modify the query on the search bar, including the person who created the manifest, the shipping
status, and the picked up date.
3. Click Find.
Result: The shipping manifests are found by the entered search criteria.
Changing the Status of the Shipping Manifest to Picked Up
4. Find manifests using the Not shipped status radio button.
5. Highlight a Manifest ID row from the Shipping Manifest list and click Pick Up to acknowledge
that the specimen has been picked up by the courier.
Result: The Picked Up By window is displayed.
6. Specify the courier's last and first name in the free-text field and click OK
Result: The manifest is removed from the displayed Not shipped status manifest list.
Changing the Status of the Shipping Manifest to Received (Optional)
1. Find manifests using the Picked Up status radio button.
2. Highlight a Manifest ID row from the Shipping Manifest list and click the Receive button.
Result: The manifest is removed from the displayed Picked up status manifest list.
NOTE: Receive button enables only when a Shipping Manifest for alternate (external)
laboratory is selected. All specimens sent to laboratories other than alternate (external)
laboratory will get Received status automatically when specimen is received in SoftLab®.
Managing Orders - Processing Standing Orders
For orders in SoftWebplus™ that need to be placed on a recurring basis, the Standing Orders grid of the
Orders menu enables you to generate these orders and print the report.
Generating an Order from a Standing Orders
List
The Standing Order grid of the Orders menu displays the cycle pattern for the patient's tests if they need to
be ordered multiple times on a recurring basis.
The following steps are used to generate an order from a Standing Orders list from the Orders menu option:
Steps:
1. Select Orders from the main menu. Search for and select a patient.
2. Highlight a standing order from the Standing Orders table.
3. Click the Generate Order button.
Result: A message asking if you really want to generate a new order is displayed.
4. Click Yes.
Result: A child order is generated. If the tests include order entry questions, the Ordered Tests
details window is displayed which allows you to answer questions.
5. If the order was set to check compliance and there was a failed test, the Check Compliance
window appears. Edit the Diagnosis Code or print the ABN form.
Result: The Requisition Summary window is displayed.
6. Edit any information as necessary. Click Submit Requisition.
Result: The Print Report window is displayed.
7. Select the printer and the number of copies to generate. Click OK.
Result: The Standing Orders report is sent to the selected printer.
Printing the Standing Orders Report
The following steps are used to print a Standing Orders report from the Orders menu option.
Steps:
1. Select Orders from the main menu. Search for and select a patient.
2. Click the Print Report button.
Result: The Standing Orders Report is displayed in a PDF file.
Related Tasks
Generating an Order from a Standing Orders List
43
Related Information
Orders - Standing Orders
133
Managing Processed Orders
The lower portion of the Orders menu enables you to track the status of recently placed orders and
uncollected orders for a particular patient. You are also able to enter collection information for uncollected
specimens, reprint specimen labels, and reprint the requisition summary from this menu option.
Viewing Recent Orders
For viewing recent orders, the Orders grid of the Orders menu displays the order information for the patient
with recently placed orders.
The following steps are used to view recently placed orders for a patient:
Steps:
1. Select Orders from the main menu.
2. Search for and select a patient.
3. Select the Recent radio button.
Result: The range field is enabled.
4. Select the desired range from the drop-down menu.
Result: All collected and uncollected orders which were ordered within the selected time range
are displayed.
5. To preview/print the requisition, select a row from the grid and click the Preview Requisition or
Print Requisition button.
Result: The Requisition Report for the selected order is displayed/printed.
6. To print labels, select a row from the grid and click the Print Labels button.
Result: Specimen label(s) within the selected order are printed.
Viewing Uncollected Orders and Collecting
Specimens
For viewing uncollected orders, the Orders grid of the Orders menu displays the specimen information for
patients with orders that have been placed but not yet collected.
The following steps are used to view uncollected orders for a patient:
Steps:
1. Select Orders from the main menu.
2. Search for and select a patient.
3. Select the Uncollected radio button.
Result: All uncollected orders are displayed in the lower grid of the Orders window.
4. To preview/print the requisition, select a row on the grid and click the Preview Requisition or
Print Requisition buttons.
Result: The Requisition Report for the selected order is displayed/printed.
5. To print labels, select a row on the grid and click the Print labels button.
Result: The uncollected specimen label(s) within the selected order is printed.
6. To collect a specimen(s), select a row on the grid and click the Collect Specimen button.
Result: The Collection Details window is displayed.
7. Once all of the information for the order has been verified, click OK.
Result: The orders are removed from the uncollected orders table.
Reprinting Requisitions and Labels
Reprinting requisitions and labels for previously submitted orders can be performed from the orders menu.
The following steps are used to print labels from the Orders menu:
Steps:
1. Select Orders from the main menu. Search for and select a patient.
2. Highlight a requisition from the Uncollected/Recent Orders grid.
3. To print the Requisition Report, click the Print Requisition button.
Result: The Requisition Report for the selected order is printed.
4. To print labels, click the Print Labels button.
Result: The uncollected specimen label(s) within the selected order is printed.
NOTE: The specifications of the Print Requisition and Print Labels options may vary
depending on the related setting in the Administrative Application.
Results Viewing - Viewing Results
The Results menu in SoftWebplus™ enables you to search, view, and sign off patient results. Results are
displayed in table format on the Results menu screen and are able to be printed in various formats
including, a Summary Report, a Results History Report, an On-Demand Report, and a Trend Report.
Viewing Results
All patients with unsigned new results are displayed in the Patient List pane with colored flags to notify you
that critical/abnormal, STAT, or Timed orders are waiting for your review. Tests with comments or group
test results are displayed by clicking the + icon next to the test, expanding the test details. Individual test
results and statuses are contained in the row where the corresponding test is displayed.
The following steps are used to view test results in the Results menu.
Steps:
1. Select the Results menu option.
Result: The Results window is displayed.
2. Select a patient from the New Results pane, or search for and select a patient by utilizing the
patient search bar.
Result: The patient is selected and the results are displayed in the Summary View.
3. Select New Results in the Order Status field to view only unsigned results, or select Today,
Last 2 days, Last 7 days, Last 30 days, Last 60 days, or Last 90 days, to view results within
a specific date range.
4. Click the Find button.
Result: Results are filtered according to the selected Order Status.
5. Select the Completed, Partial, Pending, or Canceled check boxes in the Test Status field to
view results defined by a specific test status.
6. Click the Find button.
Result: Results are filtered according to the selected Test Status.
7. Define the User View field to view results from a predefined test group.
8. Click the Find button.
Result: Results are filtered according to the selected User View.
NOTE: The available options in the User View field can be customized in the User Settings
menu option of the Administrative Application of the SoftWebplus™ system.
9. Click the Order ID hyperlink to view the On-Demand report for the order.
Result: The On-Demand report for the order is displayed.
NOTE: It is recommended to view the On-Demand report for comprehensive details
regarding all tests and results associated with the order.
10. To print all results currently displayed on the Results table, click the Print Summary button.
Result: The Patient Results Report is printed.
11. To view results for a particular patient that were ordered more than 90 days prior, click the
Results History button.
Result: The Results History window is displayed. You are able to query test results by Location,
Physician, User View, Order range, Test Status, and Criticality.
12. Define the desired search criteria and click the Preview Report/Print Report button.
Result: The Patient Results History Report is displayed/printed.
Bridging to SoftMedia
The following steps are used to bridge to SoftMedia® from the Results menu:
Steps:
1. Select the Results menu option.
Result: The Results window is displayed.
2. Select a patient from the Patient List
pane.
Result: The patient name is highlighted and the results are displayed in the Summary View. The
SoftMedia indicator is displayed next to the Order # field if a document is attached.
next to the desired patient's Order # field.
3. Click the SoftMedia indicator
Result: SoftMedia validates the user's access rights, and opens in a separated window.
NOTE: If the user does not have the proper access in SoftSecurity™, SoftMedia will not
log the user into the system.
Viewing the Results Trend/Graph
The following steps are used to view the Results Trend/Graph from the Results menu:
Steps:
1. Select the Results menu option.
Result: The Results window is displayed.
2. Select a patient from the Patient List pane.
Result: The patient name is highlighted and the results are displayed in the Summary View.
"Order Status: New Results" and "Test Status: Completed" are selected.
3. Click the View Trend/Graph button.
Result: The Select Tests window is displayed.
4. Select a test or a maximum of 5 tests from the grid to view the trend graph or table format.
NOTE: If the test does not display in the grid of available tests, click the Test Lookup
window. This button is only available if less than 5 tests have been selected from the grid.
5. In the Trend/Graph Range area, select the range for which test results will appear on the graph:
Select the Last radio button and click the spin buttons to specify how many previous test
results will be displayed on the graph/trend. A maximum of 99 test results can be displayed.
l Select the Verified radio button and click the calendar button in each date field to specify a
range for the test results which will be displayed on the grid.
6. Once all of the filter criteria has been specified, select one of the following options to the view the
trend information:
l Click the View Graph button to view the test results in graph format.
l Click the Open Trend as PDF button to view the test results in PDF table format.
l
l
Click the Open Trend in Excel button to view the test results in a Microsoft® Excel
file.Result: The Patient Results graph is displayed with the specified search criteria.
NOTE: Depending on the settings, certain tests may not be shown on the graph. If
alphanumeric type test is selected or the selected test does not have verified results, a
warning message stating that the test cannot be shown will be displayed.
Sample Patient Results Graph
The Trend view graph allows for up to 5 tests in PDF or Excel format. The collection date and time is used
as the time axis. A light blue normal range belt is displayed on the graph if a single test is selected. Up or
down arrow icons will be displayed if the result value starts with the < or > symbols.
NOTE: If the numeric type test has an unexpected non-numeric result value, the notation
will be displayed in the footer.
The following is a sample patient results graph as generated from the Results menu:
Signing off Test Results
The Sign Off Test(s) window is used to sign off new results for a selected patient. Review the unsigned
results for the patient and select the appropriate checkbox in each test row. Add any comments as
necessary for the tests.
The following steps are used to sign off results from the Results menu:
Steps:
Select the Results menu option.
Result: The Results window is displayed.
Signing off by Individual Patient
1. Select a patient from the New Results pane.
Result: The patient name is highlighted and the results are displayed in the Summary View.
"Order Status: New Results" and "Test Status: Completed" are selected.
2. Click the Sign off button.
Result: The Sign Off Test(s) window is displayed.
3. Review each test and select the Sign Off checkbox for each result that needs to be signed off.
Remove the checkmarks as necessary.
4. Add a comment in the Add Comment free-text field.
5. Enter your Password in the Confirmation area and click OK.
NOTE: Password entry may not be required according to your user settings.
NOTE: Sign Comment "Signed by: User name, ID on : MM/DD/YYYY HH:MM, free text
comment" will be displayed for the results signed off with this option.
Batch Signing Off
1. If the results for the patients in the New Results pane have been reviewed and are ready to be
signed off, click the Print/Sign All Results button.
Result: The Print/Sign All Results window is displayed with the following confirmation message
displayed, "You can print and sign of all New Results for all patients at once, or sign all new
results without printing. Please select one of the options below. Note: All patients will be
removed from New Results list after sign off."
2. Click the Cancel button if you want the patients to remain on the patients list.
Result: The Print/Sign All Results window is closed.
3. Click the Print and Sign Off button if you want to print and signs off all new results for all
patients at once.
Result: Unsigned results for all patients in the patient list are printed and signed off. The New
Results pane is empty.
NOTE: Sign Comment, "Printed and Signed by : User name, ID on : MM/DD/YYYY
HH:MM" will be displayed for the results signed off with this option.
4. Click the Sign off button if you have previously viewed new results for all patients and want to
sign off results at once, without printing.
Result: Unsigned results for all patients in the patient list are signed off without printing. The
New Results pane is empty.
NOTE: Sign Comment, "Signed by : User name, ID on : MM/DD/YYYY HH:MM" will be
displayed for the results signed off with this option.
Report Viewing - Specimen Tracking
The Specimen Tracking tab of the Reports menu in SoftWebplus™ is used to query, view, and print a
Specimen Status report and a Manifest Status report.
Generating a Specimen Status Report
The Specimen Status Report pane of the Specimen Tracking tab enables you to enter search criteria to
generate the status report of a specimen. You can specify search criteria including, the date range, the date
and time, the order location, draw location, laboratory, and specimen status.
The following steps are used to view and print a specimen status report from the Reports menu:
Steps:
1. Select the Reports from the main menu.
Result: The Reports window is displayed.
2. Select the Specimen Tracking tab.
3. Enter the search criteria and select Specimen Status check boxes for the Specimen Status
Report.
4. Select to Preview or Print the Specimen Status Report based on the entered information.
Generating a Manifest Status Report
The Manifest Status Report pane of the Specimen Tracking tab enables you to view the report of the
manifest status, which may contain more than one specimen. You can specify search criteria, including the
draw location, manifest ID, laboratory, pick up date, received date, and shipping status.
The following steps are used to view and print a manifest status report from the Reports menu:
Steps:
1. Select the Reports from the main menu.
Result: The Reports window is displayed.
2. Select the Specimen Tracking tab.
3. Enter the search criteria and select the Shipping Status check boxes for the Manifest Status
Report.
4. Select to Preview or Print the Manifest Status Report based on the entered information.
Viewing Results Reports
The Scheduled Reports, Results Reports, and Sign off Results Report options in SoftWebplus™enable
you to view scheduled Result Reports from other integrated SCC modules, create Results reports, and
sign-off all new results for a specific ordering physician at once.
Viewing and Printing a Scheduled Report
The Scheduled Reports tab enables you to access the available scheduled reports by location, date range,
and status. You can view SoftLab®, SoftMic®, SoftBank® II and SoftPath® reports by a specific clinic.
The following steps are used to view and print a scheduled report from the Reports menu:
NOTE: A specific run must be created on the print schedulers from other SCC modules in
order to generate these reports and have them appear as an Adobe Acrobat PDF.
Steps:
1. Select the Reports module from the main menu.
Result: The Reports window is displayed.
2. Select the Scheduled Reports tab.
3. Search by verifying the Location, Date Range, and Status of the report which you are
attempting to access. Click Find.
Result: Scheduled Reports matching the search criteria are displayed in the Scheduled Reports
- Report File Name grid.
4. To view the Scheduled Report, select the blue hyperlink in the Report File Name column.
Result: The corresponding report is displayed in Adobe Acrobat PDF format.
5. To print the Scheduled Report(s), select the checkbox of the desired reports and click the Print
Report button.
Result: The corresponding report(s) print and the status becomes "Printed."
NOTE: To view scheduled reports, the user must have the proper Permission Class in
SoftSecurity™ or Accessible Location(s) in the Administrative Application.
Generating a Results Report
The Results Report tab enables you to query, view, and print a results report. The patient search bar is
used to specify one particular patient for the Results report. If one patient is selected from patient search,
the patient brief information will be displayed under the Patient Search bar. If a particular patient is not
selected, the Results Report Search Criteria will be applied to all patients.
The following steps are used to generate a Results Report from the Reports menu:
Steps:
1. Select the Reports from the main menu.
Result: The Reports window is displayed.
2. Select the Results Report tab.
3. To search for a particular patient, enter the patient search criteria in the patient search bar. You
can include the last name, first name, date of birth, social security number, medical record
number, chart number, and order number in the search. Click Find and select a patient.
4. Enter the search criteria and select the Test Status check boxes and Criticality radio button for
the Results Report.
5. Select to Preview or Print the Results Report based on the entered information.
NOTE: To clear the entered information, click the Reset Filter button.
Signing off a Results Report
The Sign off Results Report tab of the Reports menu option is used to mark new results as signed off after
they were printed. This enables the user to review all designated patient
results via a Summary Report and sign them off at once.
The following steps are used to sign off a results report from the Results menu:
1. Select the Reports menu option.
Result: The Reports window is displayed.
2. To specify an ordering physician, enter the Physician ID or click the search button to select a
physician from the physician lookup window.
3. Once the Physician ID has been entered, click the Print & Sign off button .
Result: All new results ordered by the defined physician and accessible to the current user are
printed and signed off.
NOTE: Sign Comment, "Printed and Signed by: User name, ID on: MM/DD/YYYY HH:MM"
will be displayed on the Results menu for the results signed off with this option.
Changing your Password
To change the login password for the SoftWebplus™ system, select Settings > Change Password tab
from the main menu.
Steps:
1. Enter the current password in the first field.
2. Place your cursor in the New Password field and press the tab key.
3. Enter a new password between 8 and 16 characters and containing at least one digit and one
lower and uppercase character.
4. Place your cursor in the Confirm New Password field and re-enter the new password.
5. Click the Confirm button.