1
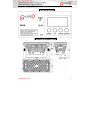
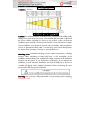
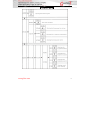
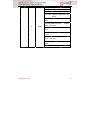
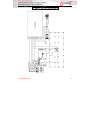
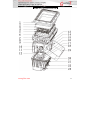
1. GENERAL INFORMATION INTRODUCTION: Congratulations, you have just purchased one of the most innovative and reliable LED fixtures on the market today. Our company has been designed to perform reliably for years when the guidelines in this booklet are followed. Please read and understand the instructions in this manual carefully and thoroughly before attempting to operate this unit. These instructions contain important information regarding safety during use and maintenance. Notice: As part of our ongoing commitment to continuous products update, company will keep the right to improve this products, the information in this menu may be changed in the future, the company reserve the right to change the data without any advises. UNPACKING: Thank you for purchasing our company products. Every product has been thoroughly tested and has been shipped in perfect operating condition. Carefully check the shipping carton for damage that may have occurred during shipping. If the carton appears to be damaged, carefully inspect your fixture for damage and be sure all accessories necessary to operate the fixture have arrived intact. In the event damage has been found or parts are missing, please contact our customer support team for further instructions. Inside the box you should find: the fixture, a DMX XLR cable, a power cable, and this user manual. Please do not discard the shipping carton in the trash. Please recycle whenever possible. 2. SAFETY INSTRUCTIONS www.g-lites.com 2 Notice: To guarantee proper and consistent operation, it is important to follow the guidelines in this manual. Our company will not accept responsibility for damages resulting from the misuse of this fixture due to the disregard of the information printed in this manual. ●1.In order to ensure the light could operate normally, the ambient temperature couldn't be higher than 35ª and no lower than 2 ª. ●2.Under normal condition, the highest sectional surface temperature may be up to 50°C. ●3.These projectors are designed depends on the electric shock protection, the projector should be connected with the power supply system which connected ground enough. The projector's ground cable should be connected with the ground cable of the power supply system as well. The ground mark of the light metal cover should be connecting with the installation bricked steadily. ●4.Connecting the main power supply should be done by the professional person. ●5.Please check the voltage, frequency data of power supply system is suitable for the mentioned on the projector. Please do avoid the different voltage between them and burn the projector. ●6.Do not attempt to operate this fixture if the power cord has become damaged or frayed. ●7.Never open this fixture while in use. ●8.Never look directly into the light source. You risk injury to your retina, which may induce blindness. ●9.Please be aware that damages caused by modifications to the device are not subject to warranty. www.g-lites.com 3 3. PERFORMANCE TRAIT AND SKILL SPECIFICATIONS Lighting equipment is installed with 56pcs LED. We use EDISON LED chip as default LED chip. Client also can choose LUXEON K2 high power LED chip. Low power consumption, super luminance, rich and splendid color. It adopt the LCD display, as its operating in terrace, the words can also be plus or reverse settled by 180°, very easy for using on the floor or hang on. With inner automatic run function, master/slave setting very easy to operate by users. The fixture's out shape adopt pressed construction design and strong wind refrigeration system which be know as a good cooling system. DMX channel: Two or three different DMX modes. Standard DMX-512. Color mixing: color additive mixing. Dimmer: continuous dimming 0~100%. Strobe: electronic strobe 0~18 fps. LED life: 100,000 hours rated life. LED power: 3W Voltage: AC90-260V/50-60Hz Power: 169W LED QTY: R20 + G18 + B18 N.W.: 10.8 Kg. G.W.: 11.9 Kg. Carton size: 495 x 270 x 290 (mm) Body size: 428 x 202 x 246 (mm) IP rate: IP65 Lens angle: 45° Choice lens angle: 60° www.g-lites.com 4 4. OPERATION PANEL 5. DIMENSIONAL DRAWINGS www.g-lites.com 5 6. PHOTOMETRIC DATA PL5603CT:40° lens 7. MOUNTING AND INSTALLATION Cautions: For added protection mount the fixtures in areas outside walking paths, seating areas, and away from areas were unauthorized personnel might reach the fixture. Before mounting the fixture to any surface, make sure that the installation area can hold a minimum point load of 10 times the device's weight. Fixture installation must always be secured with a secondary safety attachment, such as an appropriate safety cable. To avoid injury, never stand directly below the device when mounting, removing, or servicing the fixture. Mounting points: Overhead mounting requires extensive experience, including amongst others calculating working load limits, a fine knowledge of the installation material being used, and periodic safety inspection of all installation material and the fixture. If you lack these qualifications, do not attempt the installation yourself. Improper installation can result in bodily injury. Be sure to complete all rigging and installation procedures before connecting the main power cord to the appropriate wall outlet. Mounting: Our company is fully operational in any mounting position, hanging www.g-lites.com 6 upside-down, side mounted, or set on a flat level surface, etc. Be sure this fixture is kept at least 0.5m (1.5 feet) away from any flammable materials (decoration etc.). When clamp mounting; always use and install the supplied safety cable as an added safety measure to prevent accidental damage in the event of a clamp failure. See the image below. 8. POWER SUPPLY AND SIGNAL CONNECTION 1. Power supply Use the professional plug to connect the projector and main power supply. Please pay attention to the voltage, frequency the same as the mentioned on the projector. Suggest each light has separately switched of the power supply so that could turn on or turn off each projector desultorily. 2. Signal connection Please use the round 3-pin XLR plugs & sockets offered by menu facture to connect the first projector's output to the second projector' input and connect the second projector's output to the third projector's input. And in the same way for the rest, eventually connect the last projector's output, all the projectors are together as the following figure. www.g-lites.com 7 The projectors’ control signal output or input by using the 3-pin XLR pug and socket. If need to long then the communication cable, please make sure the both side of 3-pin plug is one to one (one to one, two to two, three to three). Otherwise, the communication cable will be interrupted. The communicate cable is 2-pin shielded cable 75Ω Resistance with each core is at least a 0.5mm diameter. (Caution: All the inside leading wire of 3-pin XLR plug couldn't touch each other or plinth). Recommend to use the DMX signal terminator for the installation to avoid the electronic noise damage the digital control signal. Simply speaking, DMX terminator is an XLR connector with a 120Ω/1w resistor connected across pin 2 and 3.Which is then plugged into the output socket on the last projector in the chain. Refer to the connection as above: (Picture ). We suggest using the DMX signal distributor when the distance of the lights over 15meter. In case of effect the light communication because of the signal feeble. 3. Light power connection: After doing the above operation and making sure all the projectors had been installed with natural operate, press the power switch to check whether everything is working normally. www.g-lites.com 8 9. DISPLAY MENU www.g-lites.com 9 www.g-lites.com 10 10. DMX TRAITS When controlled by DMX512 control, there are three control modes: 3,4,6-channel mode, the settings from the display menu to choose to identify. Channel Mode Channel NO. function 1 Red 2 Green 3 Blue 0-1, no light 2-255, 0%~100% blue 1 Red 0-1, no light 2-255, 0%~100% red 2 Green 3 Blue 0-1, no light 2-255, 0%~100% blue 4 Dimmer 0-255, 0%~100% light 1 Red 2 Green 3 Blue 0-1, no light 2-255, 0%~100% blue 4 Color 0, no function 1-255, color macro 3 4 6 Channel Mode Channel NO. 6 5 www.g-lites.com function Dimmer DMX value and effect 0-1, no light 2-255, 0%~100% red 0-1, no light 2-255, 0%~100% green 0-1, no light 2-255, 0%~100% green 0-1, no light 2-255, 0%~100% red 0-1, no light 2-255, 0%~100% green DMX value and effect 0-255,0%~100% light 11 0-1,no effect 2-159,strobe from slow to fast 160-169,no effect 170-189,random strobe from slow to fast 190-199,slow shadow open,fast close 6 Strobe 200-209,Medium-speed open,fast close shadow 210-219,fast shadow open,fast close 220-229,slow shadow close,fast open 230-239 , Medium-speed shadow close,fast open 240-249,fast shadow close,fast open 250-255,no effect www.g-lites.com 12 11. CIRCUIT CONNECTING DIAGRAM www.g-lites.com 13 12. EXPLODE DIAGRAM AND LIST www.g-lites.com 14 No. Inquire number No. Inquire number 1 M0400150 13 M0300774 2 M0300772 14 M0101976 3 M0600825 15 Z0600160 4 M0101977 16 Z0600323 5 M0202129 17 M0101965 6 M0600908 18 M0300768 7 Z0600722 19 M0101979 8 M0400149 20 M0300773 9 M0101945 21 M0400151 10 M1000921 22 M1300767 11 M0101978 23 M1300768 12 M0300507 13. TROUBLE DISPOSE It is recommended some solution for some normal trouble shooting. Any electrical problem should always be handled by the professional person. Disconnect the power supply before maintenance the light. ●LED off: 1. Please check if install the suitable voltage 2. Please check whether the led will reach the end of their life can explode; please replace a same description led. 3. Please check if the power supply is enough. 4. Please check whether the DMX 512 controller pass the "turn on" order. ●Though the light is lighting, but it couldn't accept the control order: 1. Please check the start code address and the function option are correct. 2. Please check whether the communicate control cable is on good connection or the cable is too long or interrupt. 3. Please check the control system is not valid, check the signal amplifier of chain connected is valid. www.g-lites.com 15 4. Please check whether the communicate cable is too long or the other equipment is mutually conjugate. 5. Please arrange the wire well, shorter the signal cable, put the high voltage cable and low voltage cable separately. 6. Add the signal amplify isolator. 7. Signal cable is used the excellent screening doublet (Resistance 75 OHM) 8. The end the light and the end resistance. ●The light can't move: 1. Please check if the power supply is suitable for the light voltage data. 2. Please check the fuse of input voltage is defective. 3. Please check the light if there is deformation, inside parts is broken, become wet etc, will lead the loose contact. 14. CLEANING AND MAINTENANCE ■1. In order to ensure the projector could work normally. It should be kept clean always .The lens should also be regularly cleaned to maintain an optimum light output. Do not use any type of solvent on lens. It will damage the projector. ■2. Suggestion: The continue usage of the light don't exceed 4 hours. Or it will shorter the usage of the lamp. Please use the alternative operation to solve this problem. ■3. Please disconnect the power supply when begin to maintenance take down the light. Please let the parts cool down 10 minute at least then begin to install. ■4. Please inspect the lens or other moving parts timing and keep them clear and static. If find anything damaged or looseness must change a lamp or fix the lamp in order to avoid the accident. www.g-lites.com 16 15. DUTY EXONERATIVE AND COPYRIGHT PROTECTION Any products broken that didn't according to the instruction is not guarantee to keep it in good repair. The commentary for all the instruction belongs to the supplier in final. No authorize can't copy. www.g-lites.com 17