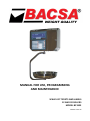
1
MANUAL FOR USE, PROGRAMMING
AND MAINTENANCE
SCALES OF TICKETS AND LABELS
12 AND 20 SELLERS
MODEL BC1303
VERSION 14.09.18
VERSIÓN 14.09.18
INDEX
1.
SCALE COMPONENTES .................................................................................................................................... 1
1.1.
1.2.
1.3.
1.4.
1.5.
1.6.
1.7.
2.
MODEL PL (PLANE) .............................................................................................................................................. 1
MODEL TR (TOWER) ............................................................................................................................................ 1
MODEL DC (TWO BODIES) ................................................................................................................................... 2
MODEL DV (TWO BODIES GRAPHIC) ................................................................................................................... 2
MODEL SC (HANGING) ........................................................................................................................................ 3
MODEL SV (HANGING GRAPHIC) ......................................................................................................................... 3
VIEW PRINTER TICKETS-LABEL ............................................................................................................................ 4
KEYBOARD ...................................................................................................................................................... 5
2.1.
2.2.
2.3.
3.
KEYBOARD 12V.................................................................................................................................................... 5
KEYBOARD 20V.................................................................................................................................................... 5
SPECIAL FEATURES KEYBOARD 20V ..................................................................................................................... 6
SCALE INDICATORS .......................................................................................................................................... 7
3.1.
4.
GRAPHIC DISPLAY ................................................................................................................................................ 7
TECHNICAL SPECIFICATIONS ............................................................................................................................ 8
4.1.
4.2.
4.3.
4.4.
5.
INDIVIDUAL TECHNICAL SPECIFICATIONS ........................................................................................................... 8
GENERAL TECHNICAL SPECIFICATIONS ............................................................................................................... 8
PRINTER TECHNICAL SPECIFICATIONS ................................................................................................................. 8
OPTIONAL SPECIFICATIONS ................................................................................................................................. 8
PRECAUTIONS ON INSTALLATION.................................................................................................................... 9
5.1.
5.2.
WARNINGS .......................................................................................................................................................... 9
PRECAUTIONS ON INSTALLATION ....................................................................................................................... 9
6.
INSTALLATION ................................................................................................................................................10
7.
PRECAUTIONS FOR USE ..................................................................................................................................11
8.
MANUAL FOR USE ..........................................................................................................................................12
8.1. WORKING MODES AND TIMES OF DISPLAY....................................................................................................... 12
8.1.1.
WORKING MODES ..................................................................................................................................... 12
8.1.2.
TIMES OF DISPLAY ..................................................................................................................................... 12
8.1.3.
LABELER WORKING MODES ...................................................................................................................... 12
8.2. PRELIMINARY CONSIDERATIONS ...................................................................................................................... 13
8.3. INDICATORS ...................................................................................................................................................... 13
8.3.1.
STABLE WEIGHT INDICATOR (5) ................................................................................................................ 13
8.3.2.
ZERO INDICATOR (6) ................................................................................................................................. 13
8.3.3.
NET WEIGHT INDICATOR (7) ..................................................................................................................... 13
8.3.4.
MINIMUM WEIGHT INDICATOR (8) .......................................................................................................... 13
8.3.5.
FIXED PRICE INDICATOR (9) ....................................................................................................................... 13
8.3.6.
INTERCONNECTION INDICATOR (10) ........................................................................................................ 13
8.3.7.
LABEL PRINTER CONNECTION INDICATOR (11) ......................................................................................... 13
8.3.8.
PC CONNECTION INDICATOR (12) ............................................................................................................. 13
8.3.9.
DATA SEND TO PC INDICATOR (13) ........................................................................................................... 13
8.3.10. BATERY CHARGE INDICATOR (14) not applicable...................................................................................... 13
8.4. WEIGHTING OPERATIONS ................................................................................................................................. 13
8.4.1.
WEIGHTING ............................................................................................................................................... 13
8.4.2.
TARE .......................................................................................................................................................... 14
8.4.3.
PRESSETING TARE ..................................................................................................................................... 14
8.4.4.
ANNULATION OF TARE .............................................................................................................................. 14
8.5. OPERATIONS WITH WEIGHT ............................................................................................................................. 14
8.5.1.
PRICE INTRODUCTION ............................................................................................................................... 14
8.5.2.
PROGRAMMED PRICE INTRODUCTION (PLUS).......................................................................................... 14
8.5.3.
PLU PRICE MODIFICATION ........................................................................................................................ 14
I
VERSIÓN 14.09.18
DISCOUNT ONLINE (ONLY FOR SCALES OF 20 SELLERS) ............................................................................ 14
8.5.4.
8.5.5.
QUICK CHANGE OF PRICES OF VARIOUS PLUS .......................................................................................... 15
8.5.6.
FIXING PRICE ............................................................................................................................................. 15
8.6. ADDITION OF AMOUNTS ................................................................................................................................... 15
8.7. OPERATIONS WITHOUT WEIGHT ...................................................................................................................... 15
8.7.1.
ADDITION AND SUBTRACTION .................................................................................................................. 15
8.7.2.
SUSTRACTION............................................................................................................................................ 15
8.7.3.
POSITIVE AND NEGATIVE MULTIPLICATION.............................................................................................. 15
8.7.4.
NEGATIVE MULTIPLICATION ..................................................................................................................... 15
8.8. TOTALS .............................................................................................................................................................. 16
8.8.1.
TOTAL WITH INVOICE ................................................................................................................................ 16
8.8.2.
SIMPLIFIED INVOICE .................................................................................................................................. 16
8.8.3.
SUBTOTAL CONSULTATION ....................................................................................................................... 16
8.8.4.
INVOICE CONTINUATIÓN .......................................................................................................................... 16
8.8.5.
OPERATIÓN CANCELLATION...................................................................................................................... 16
8.8.6.
CALCULATION OF CHANGE ....................................................................................................................... 17
8.8.7.
TICKET COPY .............................................................................................................................................. 17
8.8.8.
LABEL COPY ............................................................................................................................................... 17
8.8.9.
FEED PAPER PRINTER ................................................................................................................................ 17
8.9. STOCK CONTROL OF PLUS (MODE PRINTER) ..................................................................................................... 17
8.9.1.
INPUTS, OUTPUTS AND MINIMUM OF STOCK .......................................................................................... 17
8.9.2.
MAKE AN INPUT ........................................................................................................................................ 17
8.9.3.
MODIFY STOCK .......................................................................................................................................... 17
8.9.4.
PROGRAM MINIMUM ............................................................................................................................... 17
8.9.5.
FULL LISTING ............................................................................................................................................. 19
8.10.
CANCELLATION OF WEIGHTS PLUS (ONLY FOR MACHINES OF 20 SELLERS) .................................................. 19
8.11.
MESSAGES D'AVERTISSEMENT ...................................................................................................................... 19
9.
MANUAL OF FUNCTIONS AND PROGRAMMATION ........................................................................................21
9.1. GENERAL ........................................................................................................................................................... 21
9.2. KEYBOARD FOR RECORDING ............................................................................................................................. 21
9.3. F0 WORKING MODES CODES............................................................................................................................. 22
9.3.1.
PERSONAL SECRET CODE FOR DELETE GREAT TOTAL ............................................................................... 23
9.3.2.
DELETE THE GREAT TOTAL BY PERSONAL SECRET CODE .......................................................................... 23
9.4. F1 PRINTING TOTAL FAMILIES ........................................................................................................................... 23
9.5. F2 PRINTING GREAT TOTAL ............................................................................................................................... 23
9.6. F4 COMMUNICATION MODES........................................................................................................................... 24
9.7. F5 DATE AND TIME ............................................................................................................................................ 25
9.8. F6 MENU OF FORMATS OF LABELS .................................................................................................................... 25
9.8.1.
SELECT FORMAT ........................................................................................................................................ 25
9.8.2.
CREATING FORMAT ................................................................................................................................... 25
9.8.3.
COPY FORMAT .......................................................................................................................................... 25
9.8.4.
EDITING FORMAT ...................................................................................................................................... 25
9.8.5.
MODES ...................................................................................................................................................... 26
9.9. F7 HEADER AND FAREWELL LINES ..................................................................................................................... 26
9.10.
F8 SELLERS NAMES ........................................................................................................................................ 26
9.11.
F9 FAMILIES NAMES ...................................................................................................................................... 26
9.12.
F10 PLUS PROGRAMMATION ........................................................................................................................ 26
9.13.
F11 MENSSAGE ADVERTISING ....................................................................................................................... 28
9.14.
F12 DIRECT PLUS KEYS TO PLUS ASIGNATION ............................................................................................... 28
9.15.
F13 PERCENTAGE OF VAT .............................................................................................................................. 28
9.16.
F14 TYPE OF VAT ASSIGNED TO THE FAMILIES .............................................................................................. 28
9.17.
F15 BAR CODE PARAMETERS PROGRAMMATION ........................................................................................ 28
9.18.
F16 WEIGHT PARAMETERS PROGRAMMATION ............................................................................................ 29
9.19.
F17 NET MACHINE NUMBER PROGRAMMATION.......................................................................................... 29
9.20.
F18 PROGRAMMATION DE TARES ................................................................................................................. 29
9.21.
F19 NETWORK SETTING FROM MASTER SCALE ............................................................................................. 29
II
VERSIÓN 14.09.18
9.22.
9.23.
9.24.
10.
EQUIPMENT CONNECTIONS ...........................................................................................................................31
10.1.
10.2.
11.
F20 SETTING THE IP ADDRESS OF THE SCALE ................................................................................................. 29
F21 SETTING THE PORT OF THE SCALE ........................................................................................................... 30
TABLE OF CHARACTERS ................................................................................................................................. 30
RS232 CONNECTOR (OPTIONAL) .................................................................................................................. 31
INTERCONNECTION CONNECTOR (OPTIONAL) ............................................................................................. 31
MAINTENANCE ...............................................................................................................................................32
10.3.
CLEANING...................................................................................................................................................... 32
10.4.
PAPER REFIL .................................................................................................................................................. 32
10.4.1. CHARGING ROLLER LABEL ......................................................................................................................... 33
10.4.2. LOAD CONTINUOUS PAPER ....................................................................................................................... 34
12.
WHAT TO DO IN CASE OF FAILURE .................................................................................................................35
III
VERSIÓN 14.09.18
IV
VERSIÓN 14.09.18
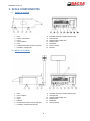
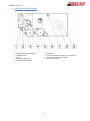
1. SCALE COMPONENTES
1.1. MODEL PL (PLANE)
1
2
3
4
5
6
7
LEVEL
DISPLAY COSTUMER
PLATE
FOOT LOCKNUT
FOOT
INTERCONNECTION OR RS232 (OPTION)
ETHERNET CONNECTOR
8
9
10
11
12
13
14
EXTERNAL BATTERY CONNECTOR (OPTION)
FUSE HOLDER
POWER CORD CONNECTOR
MAIN SWITCH
KEYBOARD
DISPLAY SELLER
PRINTER
8
9
10
11
12
13
EXTERNAL BATTERY CONNECTOR (OPTION)
FUSE HOLDER
POWER CORD CONNECTOR
MAIN SWITCH
KEYBOARD
DISPLAY SELLER
1.2. MODEL TR (TOWER)
1
2
3
4
5
6
7
FOOT
FOOT LOCKNUT
PLATE
LEVEL
PRINTER
INTERCONNECTION OR RS232 (OPTION)
ETHERNET CONNECTOR (OPTION)
1
VERSIÓN 14.09.18
1.3. MODEL DC (TWO BODIES)
1
2
3
4
5
6
7
FOOT
FOOT LOCKNUT
PLATE
LEVEL
INTERCONNECTION OR RS232 (OPTION)
ETHERNET CONNECTOR (OPTION)
EXTERNAL BATTERY CONNECTOR (OPTION)
8
9
10
11
12
13
FUSE HOLDER
POWER CORD CONNECTOR
MAIN SWITCH
KEYBOARD
PRINTER
DISPLAY
8
9
10
11
12
13
FUSE HOLDER
POWER CORD CONNECTOR
MAIN SWITCH
KEYBOARD
PRINTER
DISPLAY
1.4. MODEL DV (TWO BODIES GRAPHIC)
1
2
3
4
5
6
7
FOOT
FOOT LOCKNUT
PLATE
LEVEL
INTERCONNECTION OR RS232 (OPTION)
ETHERNET CONNECTOR (OPTION)
EXTERNAL BATTERY CONNECTOR (OPTION)
2
VERSIÓN 14.09.18
1.5. MODEL SC (HANGING)
1
2
3
4
5
6
PRINTER
DISPLAY SELLER
KEYBOARD
PLATE
ETHERNET CONNECTOR (OPTION)
EXTERNAL BATTERY CONNECTOR,
INTERCONNECTION OR RS232 (OPTION)
7
8
9
10
11
12
FUSE HOLDER
MAIN SWITCH
POWER CORD
BOLT CLAMPING
SCREW BRAKE
SCREW CLAMPING
7
8
9
10
11
12
FUSE HOLDER
MAIN SWITCH
POWER CORD
BOLT CLAMPING
SCREW BRAKE
SCREW CLAMPING
1.6. MODEL SV (HANGING GRAPHIC)
1
2
3
4
5
6
PRINTER
DISPLAY SELLER
KEYBOARD
PLATE
ETHERNET CONNECTOR (OPTION)
EXTERNAL BATTERY CONNECTOR,
INTERCONNECTION OR RS232 (OPTION)
3
VERSIÓN 14.09.18
1.7. VIEW PRINTER TICKETS-LABEL
1
2
3
4
5
SENSOR THERMAL HEAD OPEN
THERMAL HEAD
BOLT
OPENING LEVER HEAD
POSITION SENSOR LABEL
6
7
8
9
4
REWINDER
GUIDE FOR SETTING THE WIDTH OF THE PAPER
AXIS OF CONTINUOUS ROLL PAPER
AXIS OF ROLL LABEL
VERSIÓN 14.09.18
2. KEYBOARD
2.1. KEYBOARD 12V
2.2. KEYBOARD 20V
1
2
3
4
5
6
7
8
DIRECT AND SEMIDIRECT PLUS KEYS
PAPER FEED KEY
INDIRECT PLU KEY
CAPTURE KEY BARCODE AND FIXING
CHANGE
TARE KEY
SHIFT KEY (PLUS, SELLERS AND TARES)
CLEAR KEY
NUMERIC KEYS
9
10
11
12
13
14
15
5
DOUBLE CERO, COMMA KEY
SUBTOTAL KEY
TOTAL WITH PRINTING KEY
MULTIPLICATION AND PROGRAMMATION INPUT
KEY
CONSTANT NEGATIVE AND CANCELLATION OF
OPERATIONS KEY
CONSTANT POSITIVE KEY
SELLERS KEYS
VERSIÓN 14.09.18
2.3. SPECIAL FEATURES KEYBOARD 20V
The keyboard of 20 sellers has special functions for the manual design of labels that haven’t the keyboard of
12 sellers. Keys are shown in the follow drawing.
6
VERSIÓN 14.09.18
3. SCALE INDICATORS
3.1. GRAPHIC DISPLAY
There are two sizes of graphic display depending on the model of the scale, but both have the same format.
1
2
3
4
5
6
7
WEIGHT DISPLAY
TARE DISPLAY
PRICE DISPLAY
TOTAL DISPLAY
STABLE WEIGHT INDICATOR
CERO INDICATOR
NET WEIGHT INDICATOR
8
9
10
11
12
13
14
7
MINIMUM WEIGHT INDICATOR
FIXED PRICE INDICATOR
INTERCONNECTION INDICATOR
LABEL PRINTER CONNECTION INDICATOR
ETHERNET CONNECTION INDICATOR
SENDING DATA TO PC INDICATOR
BATTERY CHARGE INDICAYOR
VERSIÓN 14.09.18
4. TECHNICAL SPECIFICATIONS
SPECIFICATIONS ARE SUBJECT TO CHANGE WITHOUT NOTICE
4.1. INDIVIDUAL TECHNICAL SPECIFICATIONS
MODEL
TYPE
DIM WxLxH (mm)
WEIGHT
SELLERS
DIRECT PLU KEYS
PL
DESK
373X447X172
9,55 kg
12 (6+6)
40
TR
DESK
373X497X471
7,3 kg
12 (6+6)
40
DC
DESK
373X447X548
11,3 kg
20 (10+10)
50
DV
DESK
373X452X585
14,9 kg
20 (10+10)
50
SC
HANGING
379X330X700
11,85 kg
12 (6+6)
40
SV
HANGING
379X330X700
11,4 kg
20 (10+10)
50
4.2. GENERAL TECHNICAL SPECIFICATIONS
SCOPE
STEPS OIML
DIVISIONS OIML
STEPS NON OIML (NO RETAIL)
DIVISIONS NON OIML (NO RETAIL)
FAMILIES
PROGRAMMED PRICES (PLUS)
PLU FIELDS
PROGRAMMED TARES
TYPES OF VAT PER FAMILY
PRICE
MAXIMUM MULTIPLICATION
AMOUNT
CHANGE INPUT
TOTAL
CUSTOMER OPERATIONS
GREAT TOTAL
GREAT TOTAL DAILY
CAPACITY MEMORY FISCAL
OPERATION FOR PLU AND FAMILY.
UNITS NO WEIGHED BY PLU AND FAMILY
ACCUMULATED WEIGHT FOR PLU AND FAMILY
ACCUMULATED AMOUNT BY PLU AND FAMILY
CUSTOMERS GREAT TOTAL
BAR CODE
ETHERNET CONNECTION
NOMINAL INPUT VOLTAGE
POWER
FUSE
INSTALATION AND OVERVOLTAGE CLASS
OPERATING TEMPERATURE
OPERATING HUMIDITY
6 kg
15 kg
30 kg
2g
5g
10g
3000
3000
3000
0.5g/1g
1g/2g
2g/5g
12000/6000
15000/7500
15000/6000
30
2000
NAME, PRICE, MODE OF WORK, ASSOCIATED TARE, FAMILY, BARCODES, INPUTS, STOCK,
MINIMUM, ASSOCIATED LABEL, INGREDIENTS, DAYS EXPIRY AND TWO TEXTS ASSOCIATES.
10
5 (FROM 0,01 % TO 99,99 %)
5 DIGITS
99
6 DIGITS
6 DIGITS
8 DIGITS
60
10 DIGITS
40 DAYS BY SELLER
9000 TICKETS (MEDIA) OR 21500 OPERATIONS
65.000
65.000
400.000.000 g
10 DIGITS
65.000
PROGRAMMABLE BY THE USER
STANDARD FOR THE PROGRAMMATION AND DATES DOWNLOAD
UNIVERSAL 90/230 VAC 50/60 Hz
Máx. 40 W
5 X 20 mm, 1,5 A, 250 V, Type T (slow fussion)
II
0 ºC / 40 ºC
20%-80%
4.3. PRINTER TECHNICAL SPECIFICATIONS
PRINTING METHOD
PAPER TYPE
PRINTING SPEED
MAXIMUM WIDTH OF PRINTING
MAXIMUM WIDTH PAPER HOLDER
NUMBER OF POINTS BY LINE
POINT SIZE (mm)
MAXIMUM LABEL LENGTH
DETECTION PAPER / LABELS
SENSOR TEMPERATURE HEAD
SENSOR OPEN HEAD
LIFE HEAD
LIFE MECHANICAL
SEPARATOR LABEL
DIRECT THERMAL
LABELS OR THERMAL PAPER
120 mm / sec MAX
56 mm
62 mm
448
0,125mm X 0,125mm
100 mm
OPTO SENSOR
THERMISTOR
OPTO SENSOR
PULSE 5x10⁷, 50 km ABRASION
100 km PAPER / LABELS
AUTOMATIC
4.4. OPTIONAL SPECIFICATIONS
•
•
•
•
INTERCONNECTION BETWEEN SCALES
OUTPUT CASH DRAWER
OUTPUT RS232
EXTERNAL BATTERY
8
VERSIÓN 14.09.18
5. PRECAUTIONS ON INSTALLATION
5.1. WARNINGS
READ THESE INSTRUCTIONS CAREFULLY BEFORE YOU PUT THE EQUIPMENT IN OPERATION. CONTAINS
IMPORTANT INFORMATION FOR USER’S SECURITY AND EQUIPMENT’S USE.
MANUFACTURER ASSUMES NO RESPONSIBILITY IF NOT LOOK THE INSTRUCTIONS OF THE MANUAL.
5.2. PRECAUTIONS ON INSTALLATION
The environmental conditions can affect the performance and accuracy of the equipment.
Avoid the following conditions:
•
•
•
•
•
•
•
Areas where the temperature and humidity are high or low or positions close to the fire: For
example, some boilers, stoves or other sources of heat, water outlets or humidifiers.
Do not leave your equipment exposed to direct sunlight or in the interior of a closed car: High
temperatures could reach to damage electronic components.
Never work in the rain: In the event of having to work abroad keep your equipment protected
under an awning.
Avoid excessive dust: Small particles of sand can deteriorate the thermal printer head.
Rapid changes in temperature: Sudden changes in temperature can lead to condensation that can
affect the accuracy of the equipment.
Air flow on the platform, since it can vary the presentation of the equipment.
Electromagnetic Fields: For example stations or mobile phones, as they may affect the accuracy of
the equipment.
9
VERSIÓN 14.09.18
6. INSTALLATION
1. Choose a suitable place for installation. Have at least 80cm by the user side to be able to comfortably conduct
the operations of weight, and leaves open the platform for placing and removing loads.
2. Before connecting the equipment to the platform we must levelling the platform, turning the legs and trying
to be sitting well.
3. Connect the cable from the platform to the connector (4) of the equipment.
4. Connect the cable RS232 from the computer to connector (5) of the equipment (optional).
5. Connect the cable RJ45 from the computer to connector (6) of the equipment (optional).
6. Connect the external battery cable to connector (10) of equipment (optional).
7. Insert the supplied power cord into the connector (7) of the equipment by pressing firmly and plug the other
end of the cable into a wall socket with appropriate ground system, the manufacturer assumes no liability for
accidents or malfunctions due to the lack of ground system.
8. Do not connect other devices to the same electrical outlet where the equipment is connected.
9. Attach the support (11) to a team's bench or the wall and tilt it to improve the visibility of the display.
10
VERSIÓN 14.09.18
7. PRECAUTIONS FOR USE
• If the power cord is damaged, contact your nearest dealer for repair: for example cuts or cracks, as there may
be a risk of fire or electric shock.
• The power cord must be connected to the equipment first and then to the outlet, never the opposite. To
disconnect the equipment from the power supply must be disconnected from the wall outlet, never from the
connexion of the equipment.
• Avoid excessive bending and not pull the cord when you disconnect, use the plug.
• Disconnect the equipment if you're not going to use it for long time period.
• Do not leave objects too heavy on the platform.
• To prevent electrical shocks, do not open your equipment, there are no user-serviceable parts inside it. Leave
the technical service in the hands of qualified staff.
• To start work on the equipment turn on the switch (8) located at the rear. If the power fail while the
equipment is turned on, with the restoration of the same, the equipment automatically turns on. To turn off
the equipment again actuate the switch (8).
• CAUTION: RISK OF EXPLOSION IN CASE OF REPLACEMENT OF THE BATTERY BY AN INCORRECT TYPE. DISPOSE
OF USED BATTERIES ACCORDING TO THE INSTRUCTIONS.
• CAUTION: PART MOBILE. READ THE MANUAL.
11
VERSIÓN 14.09.18
8. MANUAL FOR USE
TO CHANGE MODE TICKETS TO LABEL MODE AND VICE VERSA Press "" AND "" (IF
SYMBOL 11 IS LIT THE LABELING MODE IS ON)
8.1. WORKING MODES AND TIMES OF DISPLAY
8.1.1. WORKING MODES
The transactions, for which prices are obtained through any of the 2000 programmed prices (PLUS), as
well as having name and price, are stored in their associate family. The totals are obtained by families
with their PLUS associate. Programmed prices are modifiable unless you mark as protected.
•
•
•
•
•
PLU Mode; code 000920:
Only works with programmed prices (protected or not). Faster access to PLUS..
PRICES PROTECTED mode; code 000870:
Programmed prices, PLUS, may not be modified. With PROTECTED Mode off, you can PROTECT
individually every PLUS desired.
ONLY ONE OPERATIÓN mode; code 000900:
Each transaction generates a printed ticket.
VAT mode; code 000880:
Totals are printed with the VAT displayed.
TICKET FISCAL STORE mode; code 000840:
Are saved all the machine operations up to fill the memory.
PLU MODE
PRICES PROTECTED
ONLY ONE OPERATIÓN
VAT SHOWN
TICKET FISCAL STORE
BARCODE
CASHIER'S CHECK
YES
[000920]
[000870]
[000900]
[000880]
[000840]
[000960]
[000940]
NO
[000930]
[000860]
[000910]
[000890]
[000850]
[000970]
[000950]
8.1.2. TIMES OF DISPLAY
The user can configure the times of display of some events that suit their taste:
• Time shows the total.
• Time that will show the names of the programmed PLUS.
• Time that will show the PLUS unprogrammed.
• Time that will show the vendors open.
• Time that will show the amount.
• Time of duration of beep.
• SCANNER readout mode.
These functions are explained in detail in the F4 function of the machine settings.
8.1.3. LABELER WORKING MODES
•
•
•
Mode WEIGHT STABLE; code 000620: When the weight is stable a label is printed.
If a PLU is selected, the label associated with this PLU is printed, otherwise the default "Label
Weight" is printed.
ACCUMULATION OF OPERATION Mode; code 000660: Whenever we do an accumulation, a label is
printed, as in the mode WEIGHT STABLE. If a PLU is selected, the label associated with this PLU is
printed, otherwise the default "Label Weight" is printed.
CLOSE SELLER Mode; code 000640: Whenever a seller is closed, a label is printed with the total
amounts and the total weight of the seller.
Note 1: All modes are supported at a time, but if the modes CLOSE SELLER and ACCUMULATION OF
OPERATION are enabled on the label, every time a transaction is made, two labels, one for
ACCUMULATION and one for CLOSE are generated.
12
VERSIÓN 14.09.18
8.2. PRELIMINARY CONSIDERATIONS
The equipment is initially in the following state: erased the lines of header an farewell, message, PLUS
names, family names, sellers names, prices, VAT type, associations, operations, total partial (seller, family
and department), great totals and programmed tares.
The working modes: PLU MODE, PRICES PROTECTED, ONLY ONE OPERATIÓN, VAT SHOWN, TICKET FISCAL
STORE, BARCODE and CASHIER'S CHECK disabled.
Bar code format 25MWCCCIIIII.
Times of display in 2.5 seconds
Currency Decimal Number 2 (Euro).
GREAT TOTAL erasing code 999999.
WHEN TURN ON, THE SCALE SHOW FIRST THE VERSION (Ej. 20V2.20GLP).
AFTER, SHOW THE WORD TEST, WITH A NUMBER DECREASING FROM 9 TO 0.
WHILE DISPLAY TEST, YOU CAN ENTER IN FUNCTION BY PRESSING X [F▲] (12).
GETS ZERO (Show -0-), THIS MAY TAKE A FEW SECONDS.
IF THERE IS NO ERROR THE SCALE IS IN OPERATION.
8.3. INDICATORS
8.3.1. STABLE WEIGHT INDICATOR (5)
Lights to indicate that stable weight
8.3.2. ZERO INDICATOR (6)
Lights to indicate the zero of equipment, If there is residue on the platform, the indicator can be turned
off and the weight display (1) show zero.
8.3.3. NET WEIGHT INDICATOR (7)
Lights to indicate that the weight presented in the weight display (1) is net (gross less tare).
8.3.4. MINIMUM WEIGHT INDICATOR (8)
Lights to indicate the area where the percentage error of weight is high (rules). NO LABELS PRINTED
BELOW THE MINIMUM WEIGH.
8.3.5. FIXED PRICE INDICATOR (9)
Lights to indicate that the price is not deleted when you remove the merchandise from the platform.
8.3.6. INTERCONNECTION INDICATOR (10)
Lights to indicate that the equipment Is working in a network.
8.3.7. LABEL PRINTER CONNECTION INDICATOR (11)
Lights to indicate that the equipment is connected to a label printer.
8.3.8. PC CONNECTION INDICATOR (12)
Lights to indicate that the equipment is connected to a PC through the ETHERNET connexion.
8.3.9. DATA SEND TO PC INDICATOR (13)
Lights to indicate that the equipment is sending or receiving data from the PC.
8.3.10. BATERY CHARGE INDICATOR (14) not applicable.
8.4. WEIGHTING OPERATIONS
8.4.1. WEIGHTING
Place the goods on the plate. The weight of the goods is indicated in the weighting display (1)
13
VERSIÓN 14.09.18
8.4.2. TARE
Place the container to Weigh on the platform and press the T (5). The indication of weight will be zero;
the tare weight will be indicated in the tare display (2) and net weight indicator (7) lights. You can
increase the value of the tare if you tare again.
8.4.3. PRESSETING TARE
If preset tares are programmed on your equipment, press SHIFT (6), press T (5), introduce the number
of programmed tare (1 to 10) with the numeric keys and press T (5). The indication of weight will be ---(underweight). When the weight placed on the platform is greater than the tare weight, shows the net
weight in the weight display (1), the value of the tare in the tare display (2), and net weight indicator
(7) lights.
8.4.4. ANNULATION OF TARE
Remove any goods which may have been on the platform and press T (5). The indication of weight will
be zero, the zero indicator (6) lights and turns off the tare display (2).
8.5. OPERATIONS WITH WEIGHT
PRESS THE KEY CE (7) TO DELETE PRICES
In weighing operations, first must place the goods on the plate to prevent erase device by zero weight
(unless has been programmed the PLU time), except in the MODE PLU (code 000920), in which the device
is not operational.
8.5.1. PRICE INTRODUCTION
Enter the price using the numeric keypad (8) which is displayed in the display of Price (3), the result of
the weight for the price is displayed in the display of amount (4).
8.5.2. PROGRAMMED PRICE INTRODUCTION (PLUS)
The balance can be up to 2000 prices programmed in memory (PLUS):
• 1 to 25 in keyboard 20 V / 1 to 20 in keyboard 12 V - direct: press the corresponding key on the
keyboard of Direct PLUS (1).
• 26 to 50 in keyboard 20 V / 21 to 40 in keyboard 12 V - semi direct: press the shift key (6) and the
corresponding key on the keyboard of Direct PLUS (1).
• 51 to 2000 in keyboard 20 V / 41 to 2000 in keyboard 12 V - indirect: enter with the numeric
keypad (8) the number of PLU and press the PLU key (3) again.
Enter the number of the PLU as noted above, the price of the PLU will be displayed on the display price
(3), the result of the weight for the price will be displayed on the display of amount (4).
The PLUS, which have assigned a bar code can be read directly with a SCANNER. To enter it manually, if
you can’t read it, press the shift key (6) and 00 S▲ (9) and enter it manually using the keypad to confirm
or exit press the shift key (6) and 00 S▲ (9).
8.5.3. PLU PRICE MODIFICATION
Only for PLUS not defined like protected and with the machine with the prices unprotected; code
000860
Select the PLU with the price programmed, enter the new price. If you want to program the price of the
PLU for subsequent operations, press the F1 key (4), the scales gives two beeps, the second to indicate
the price has changed.
8.5.4. DISCOUNT ONLINE (ONLY FOR SCALES OF 20 SELLERS)
This discount it’s applied to transactions of weight, price and amount and to weighed PLUs, even if
they are protected and the machine it’s with prices protected; code 000870
If you want to apply a discount to a weighed product (from 1% to 99%) when the machine is showing
the weight, price and amount, you have to press the F2 key, then the machine presents "dto% 0", you
have to enter the discount in integers numbers and press F2 again, the product price with the discount
is displayed.
14
VERSIÓN 14.09.18
8.5.5. QUICK CHANGE OF PRICES OF VARIOUS PLUS
If we want to change the price on several PLUS (which are unprotected) from any machine in the
network without entering in the programming functions, press the shift key (6) and PLU (3) key, the
display shows the number of PLU , price and name. Press the keys + (14) or - (13) to move forward or
backward between PLUS or PLU key (3) to advance 50 PLUs. When we reach to a PLU that we want to
change the price; type it and continue till we have modified the PLUS desired. To exit the function press
the shift (6) and PLU (3) keys.
8.5.6. FIXING PRICE
If we make several weighings of a product, we can make the machine don’t clear the price for not having
to type it every time. Situate the goods on the plate, enter the price with the keypad (8), or the
programmed price and press the key + (14), the fixed price indicator (9) lights. From this moment the
price is not erased even if the weight is zero.
To override the pricing press CE (7) key and indicator fixed price (9) turns off.
8.6. ADDITION OF AMOUNTS
FOR ACCUMULATE AMOUNTS, THE WEIGHT HAS TO BE STABLE.
NOTE: If you do not use fixed sellers, to know what seller is available press the F1 key (5).
To build up the amounts in one of the sellers press the corresponding button on the seller (15) or SHIFT (6)
and Seller (15), in order to accumulate to the sellers 10 to 20 (20V) or to the sellers 7 to 12 (12 V). The scale
gives two beeps to indicate the accumulation
8.7. OPERATIONS WITHOUT WEIGHT
PLUS defined as NOT WEIGTHED (Types 2 and 3) go directly into OPERATIONS WITH PRODUCTS NOT
WEIGHTED.
The PLUS cannot be subtracted.
8.7.1. ADDITION AND SUBTRACTION
Push + (14)
(show “E” in the weight display)
If you want to subtracts press the key - (13)
(show “-E” in the weight display)
Enter the programmed PLU, if desired and the weight with the numeric keys (8)
Push seller (15)
(double beep to indicate the Accumulation)
8.7.2. SUSTRACTION
Push - (13)
(show “-E” in the weight display)
Enter the programmed PLU, if desired and the weight with the numeric keys (8)
Push seller (15)
(double beep to indicate the Accumulation)
8.7.3. POSITIVE AND NEGATIVE MULTIPLICATION
Push + (14)
(show “E” in the weight display)
Enter the programmed PLU, if desired and the weight with the numeric keys (8)
Push X (12)
(show “P” in the weight display)
If you want to subtracts press the key - (13)
(show “-P” in the weight display)
Type the products number
Push seller (15)
(double beep to indicate the Accumulation)
8.7.4. NEGATIVE MULTIPLICATION
Push - (13)
(show “-E” in the weight display)
Enter the programmed PLU, if desired and the weight with the numeric keys (8)
Push X (12)
(show “-P” in the weight display)
Type the products number
Push seller (15)
(double beep to indicate the Accumulation)
15
VERSIÓN 14.09.18
8.8. TOTALS
The operation number 60, activates the impression of total seller.
In ONLY ONE OPERATION mode (code 000900), the printing is done every operation of accumulation.
In these cases you may NOT have ticket continuation.
8.8.1. TOTAL WITH INVOICE
Push */ (11), show
Push seller (15) or SHIFT (6) seller (15).
TOT
Show seller number, total net with sign and print the ticket
Double beep when closing the seller or, if the seller was closed, print COPY OF THE TICKET
To exit push CE (7).
Notes:
If code 000880 is set, prints the totals by type of tax.
If code 000940 is set, prints on the cash receipt.
If code 000960 is set, prints the bar code.
8.8.2. SIMPLIFIED INVOICE
The Order 1619/2012 concerning simplified invoice indicates that the invoice must contain:
• The data and the VAT identification number of the seller are to be programmed in one of the
header or farewell lines.
• If there’s a single tax just write "TAX included" in one of the header or farewell lines
• If there are multiple taxes we must specify the tax distribution with the taxable amount of
each. To do this we have to program tax rates (see 9.15 - F13 PERCENTAGES VAT), assign the
tax to the families (see 9.16 - F14 TYPE OF TAX ASSIGNED TO FAMILIES) and program the PLUS,
associating the corresponding family and activate the tax distribution; code 000880.
• The numbers of sequential invoice, for do this we have to activate the TAX TICKET, code
000840. (The first time you active it you need to delete the tax ticket; code 000767).
• If you want to enter customer data on the invoice, we have two lines of 24 characters. While in
the normal screen, press "* /" (11) and then "F1" (4). Press the key corresponding to the seller
(15) edit the first line to the VAT identification number and if you want to put the name, press
"00" (9) and edit the second line. When we’re finished press "F1" (4) to leave. When the ticket
is printed two lines after the invoice number will be printed.
8.8.3. SUBTOTAL CONSULTATION
If we want to know the total accumulated of a costumer without closing the seller
Press the key * (10) shows
TOT
Press Seller (15) or SHIFT (6) + Seller (15).
The display show the number of the seller, Total net signed, the ticket is not printed the seller is not
closed.
To exit press the CE (7) key or, if ther’s a programmed time of total, this will be deleted automatically
after this time
8.8.4. INVOICE CONTINUATIÓN
Being in TOTAL FROM A SELLER, press the key of the seller to continue with the client.
Double beep, the second by open the customer.
Prints INVOICE CONTINUATIÓN and the previous and new operations.
8.8.5. OPERATIÓN CANCELLATION
Being in total from a vendor, press X (12), show
PESO PRECIO
V? n? IMPORTE
Double beep, the second by opening customer.
Where V? is the seller number in which we are going to cancel the operation and n? the number of
operation
Select with the key + (14) the operation to cancel or enter the operation number to cancel and press
the key - (13).
Double beep, the second by cancel operation.
Continue canceling operations or press the key X (12) to exit and print the new ticket with the
canceled operations.
If you have not made any cancellation the ticket is printed when you exit.
16
VERSIÓN 14.09.18
8.8.6. CALCULATION OF CHANGE
Press - (13), show
ENTRA
0.00
CAMBIO
?????
Enter the change and press * (10) or * / (11), shows
Where ????? is the change to return. To print it press * / (11).
To delete or leave without calculating the change press the key CE (7).
8.8.7. TICKET COPY
Press the key * / (11), and press the seller (15) or SHIFT (6) and seller (15).
Shows the number of the seller, the total net with sign and it’s printed one copy of last ticket of this
seller.
8.8.8. LABEL COPY
Press the key SHIFT (6) and press the key * (10) or */ (11). The scale repeats the last printed label.
8.8.9. FEED PAPER PRINTER
Press the PAPER FEED key (2), hold it down while you want to feed paper into the printer
8.9. STOCK CONTROL OF PLUS (MODE PRINTER)
The stock control can be performed manually from the balance at any time. To do this, while the balance
show zero in displays of weight, price and amount, press * / (11) and DIRECT PLU keys.
For example, if the PLU 1 are apples and select the PLU, the scale prints a ticket with the following format:
LINE
LINE
LINE
LINE
HEADER
HEADER
HEADER
HEADER
1
2
3
4
STOCKS PLU (kg)
HOUR AND DATE
PLU0001 APPLES
Inputs:
0.000
Stocks:
0.000
Minimum:
0.000
MINIMUM LISTING
This would be the format if you have not entered PLU entries and have not programmed mínimum.
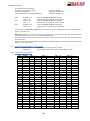
8.9.1. INPUTS, OUTPUTS AND MINIMUM OF STOCK
If we make an entry of goods, modify or program minimum stock, we must go to the programming
functions, select function 10 and select the number of PLU that you want to program.
8.9.2. MAKE AN INPUT
1 / press "00" until the balance show F10E??????.???
2 / press "+"
3 / enter the input of goods in grams
4 / Press "+" again
8.9.3. MODIFY STOCK
1 / press "00" until the balance show F10S??????.???
2 / press "+" or "-" to increase or decrease stock.
3 / enter the amount of goods in grams
4 / Press "+" or "-" again
8.9.4. PROGRAM MINIMUM
1 / press "00" until the balance show F10M??????.???
2 / press "+"
3 / enter the minimum in grams
4 / Press "+" again
17
VERSIÓN 14.09.18
Example: Suppose the PLU number 1 that you have made an entry of 50 kg and we have programmed a
minimum of 10 kg. If you press "* /" and "DIRECT PLU 1", the scale prints the following ticket:
LINE
LINE
LINE
LINE
HEADER
HEADER
HEADER
HEADER
1
2
3
4
STOCKS PLU (kg)
HOUR AND DATE
PLU0001 APPLES
Inputs:
50.000
Stocks:
50.000
Minimum:
10.000
MINIMUM LISTING
Suppose that we made several sales of this PLU (42 kg). If you press "* /" and "DIRECT PLU 1", the scale
prints the following ticket:
LINE
LINE
LINE
LINE
HEADER
HEADER
HEADER
HEADER
1
2
3
4
STOCKS PLU (kg)
HOUR AND DATE
PLU0001 APPLES
Inputs:
50.000
Stocks:
8.000
Minimum:
10.000
MINIMUM LISTING
If we make a new entry of merchandise of 30 kg you press "* /" and "DIRECT PLU 1", the scale prints the
following ticket:
LINE
LINE
LINE
LINE
HEADER
HEADER
HEADER
HEADER
1
2
3
4
STOCKS PLU (kg)
HOUR AND DATE
PLU0001 APPLES
Inputs:
30.000
Stocks:
38.000
Minimum:
10.000
MINIMUM LISTING
NOTE: ALWAYS PRINTED LAST ENTRY.
IMPORTANT: When the stock of a PLU is requested; in the list of minimum PLUS will print all that are at
a minimum, for example, if we ask the stock PLU 1 and PLU 2 and PLU 3 are under minimum, the ticket
would be:
LINE
LINE
LINE
LINE
HEADER
HEADER
HEADER
HEADER
1
2
3
4
STOCKS PLU (kg)
HOUR AND DATE
PLU0001 APPLES
Inputs:
30.000
Stocks:
38.000
18
VERSIÓN 14.09.18
Minimum:
10.000
MINIMUM LISTING
PLU0002 PEARS
Inputs:
40.000
Stocks:
7.500
Minimum:
10.000
PLU0003 ORANGES
Inputs:
100.000
Stocks:
13.200
Minimum:
15.000
8.9.5. FULL LISTING
If you want a complete list of all PLUS with the dates you have to use the technical code 000 100.
To do this, with the scale showing zero on the display of weight, price and amount, press the key "X" for
two seconds, the first screen allows us to directly select a function, press again the key "X" and the scale
goes to show COD, enter the code 000 100 and the scale will print a list of the status of the scale and the
list of programmed PLUS, each with its entry (last), and minimum stock, if you have programmed.
8.10. CANCELLATION OF WEIGHTS PLUS (ONLY FOR MACHINES OF 20 SELLERS)
The cancellation of weight it’s made to cancel operation tickets other than the latter (if it’s the last ticket
see section 8.8.5 OPERATIÓN CANCELLATION).
To do this, being in operation (PLU), with weight, price and amount other than zero, then press the key F3
and then, before a second, press the key of the corresponding seller.
The cancellation is done whenever the PLU has sufficient operations, kilos and Euros.
These cancellations are subtracted from the Grand Total, Total Seller and Total families. Are not recorded in
the Grand Total daily either the list of tickets.
8.11. MESSAGES D'AVERTISSEMENT
Show
NO PAPER
Solution: Put paper into the printer.
There is no paper
Show
HEAD-UP
Solution: Place the head.
Printer head up
Show
TEMPERATURE
Head temperature high
Solution: Turn off the scale to allow the printer gets cold.
Show
OUT OF MEMORY
Memory full (fiscal version)
Solution: Print the ticket for the totals (COD 000200 to print the list of tickets and COD 000767 to delete all
tickets and empty memory).
Show
2 MASTERS
Two master machines on the network
Solution: Correct the number of the scales on the network.
Show
2 SLAVES
Two slave machines with the same number
Solution: Correct the number of the scales on the network.
Show
REVIEW DATA DF
Solution: If it is common, is a technical error.
Usually occurs if the memory is broken
Show
REVIEW DATA RAM
Error in the programmed data
Solution: Check the data of PLUS, the names of families and departments and the head of the ticket (000100
code). Normally don't is significant, since the machine does not delete the data, but if repeated is a technical
error.
Show
REVIEW WEIGHT DATA
Solution: Adjust the balance.
Error of the weight data
19
VERSIÓN 14.09.18
Show
WEIGHT OUT OF RANGE
Error in the weight converter
Solution: Make sure the plate is well placed and do not touch it at all or that there is no overload. If it does
not solve the problem is a technical error.
Show
FILE FAIL
Solution: Set the new network scales.
Transmission of files over the network fails
Show
ERROR CLOCK
Clock error
Technical error. The scale can work, but the clock data will be wrong.
Show
MAXIMUM MAT
Mathematical maximum error
Solution: Ask GRAND TOTAL and delete the totals.
Show
DELIVERY MAL
Error of the Change
Solution: We have tried to introduce a total negative change or the amount paid is less than the total. We
must correct delivery.
Show
REMOVE TARE
tare weight mistake
Solution: A PLU with tare was introduced and the balance is already tare. Tare the balance before entering
the PLU
Show
NO LABEL
Solution: Place the labels on the label printer
The beginning of the label is not detected
Show
CONTINUOUS PAPER
Need continuous paper into the Label Printer
Solution: Put continuous paper into the Label Printer
Show
HEAD DAT
Error in the transmission of data to the print head.
Solution: Stop the scale to restart the label printer.
If that does not help, it is a technical error. The scale can operate without print labels.
Show
DEFECTIVE MEMORY
Memory error on the label printer
Solution: Remove the label formats or ingredients on the label, the memory may be full
Show
COMMUNICATION DEFECTIVE
Communication error with the label printer
Solution: Error receiving the frame into the Label Printer. Reprint
Show
DEFECTIVE FORMAT
Programming error in the label format. The field is
incorrectly programmed or at the time of impression of
this label may not get all the information. For example,
PLU text and sends a transaction where there is no PLU
Solution: Press the CE key to exit the state and check the format assigned to PLU or examine the fields of the
assigned label
20
VERSIÓN 14.09.18
9. MANUAL OF FUNCTIONS AND PROGRAMMATION
9.1. GENERAL
To enter in the programming functions of the equipment, press X [F▲] (12) while test or while normal
operation, keeping down for 2.5 seconds (with weight zero and without tare scheduled). To exit the
programming functions press X [F▲] (12) for 2.5 seconds or turn off the equipment.
The first screen that appears allows us to select the function number we want to program. Select it with the
keyboard and press X [F▲] (12) or press repeatedly to show it.
If the scale is in a network, the MASTER has different functions that the SLAVE. The MASTER scale has all the
parameters that are common in the network while the SLAVES scales are only the parameters of such
equipment.
0
1
2
4
5
7
8
9
10
11
12
13
14
15
16
17
18
19
20
21
MASTER SCALE FUNCTIONS
WORKING MODES CODES
PRINTING OF TOTALS FAMILIES
PRINTING (AND CLEAR) GREAT TOTAL
COMMUNICATION PROTOCOL
DATE AND TIME
HEADER AND FAREWELL LINES
SELLERS NAMES
FAMILIES NAMES
PLUS PROGRAMMATION
MESSAGE ADVERTISING
DIRECT PLUS KEYS TO PLUS ASIGNATION
PERCENTAGE OF VAT
TIPE OF VAT ASSIGNED TO FAMILIES
BAR CODE
WEIGHT PARAMETERS
NETWORK SCALE NUMBER
TARES SETTING
NET SETTING FROM MASTER
SETTING THE IP ADDRESS OF THE SCALE
SETTING PORT OF THE SCALE
SLAVE
IDEM
IDEM
IDEM
IDEM
IDEM
-
9.2. KEYBOARD FOR RECORDING
Almost every key have in the upper right part a letter or symbol of black color. The keyboard to record texts,
or modify the values of the fields, consists of these keys plus the numeric keys. There are a number of special
symbols whose meaning, for recording is as follows
C
C
|
C▲
C▼
P▲
P▼
F▲
S▲
INSERT A CHARACTER IN THE CURRENT POSITION
DELETE A CHARACTER IN THE CURRENT POSITION
CENTER UP THE TEXT OF THE HEAD OR FAREWELL LINE (SET THE CURSOR ON THE LAST
CHARACTER RECORDED)
INCREASES THE CHARACTER IN THE CURRENT POSITION
DECREASES THE CHARACTER IN THE CURRENT POSITION
INCREASES A POSITION. (You can also increase a field value).
DECREASES A POSITION. (You can also decrease a field value).
GO OVER THE FUNCTIONS
GO TO THE NEXT FIELD TO MODIFY INSIDE THE FUNCTION (THE SELECTED FIELD BLINK)
21
VERSIÓN 14.09.18
9.3. F0 WORKING MODES CODES
Show
Show
F0 COD
CODIG ACCESO
F0 CLAVE 000
COD FUNCION
Type 000
Type the last three numbers of code
TECHNICAL CODES:
000100 Print the PROGRAMMATION STATUS of equipment
000111 Factory internal use (DON’T USE, LOST YOUR OWN INFORMATION).
WORKING MODES ACTIVATION CODES:
000800 Enables message advertising different on each scale (NET*)
000820 Enables header and farewell lines different on each scale (NET *).
000840 Enables save fiscal tickets (NET *).
000860 Enables PLUS prices free, without protection against price change.
000880 Enables DETAILS VAT mode
000900 Enables SINGLE OPERATION mode
000920 Enables PLU mode.
000940 Enables cash receipt.
000960 Enables bar code
CODE DE DÉSACTIVATION DU MODE DU TRAVAIL:
000810 Disables message advertising different on each scale (NET*)
000830 Disables header and farewell lines different on each scale (NET *).
000850 Disables save fiscal tickets (NET *).
000870 Disables PLUS prices free, without protection against price change.
000890 Disables DETAILS VAT mode
000910 Disables SINGLE OPERATION mode
000930 Disables PLU mode.
000950 Disables cash receipt.
000970 Disables bar code
CODE LABELER:
000600 Enable continuous paper into the label printer
000610 Disable continuous paper into the label printer
000620 Enable weight stable mode for label printer
000630 Disable weight stable mode for label printer
000640 Enable closed mode seller for label printer
000650 Disable the seller for the label printer closed
000660 Enable accumulation mode for the label printer
000670 Disable the accumulation mode for the label printer
000710 Print quality 0 (lowest quality).
000711 Print quality 1
000712 Print quality 2
000713 Print quality 3
000714 Print quality 4
000715 Print quality 5
000716 Print quality 6
000717 Print quality 7(High quality).
000751 Initialize label printer (for security, when the label printer does not work).
TICKET FISCAL CODES:
000200 Print the list of tickets from the scale. If any error (missing paper) occurs, re-enter and
resume printing where you left off.
000767 Clears the list of tickets from the memory of the scale
* MODES IN NETWORK MUST BE MADE FROM MASTER AND WITH THE NETWORK RUNNING (SCALES
INTERCONNECTED).
22
VERSIÓN 14.09.18
DELETE CODES:
000222 Delete head and farewell lines (NET *).
000323 Delete labels
000340 Clears the list of ingredients
000341 Delete Format 1 label
000342 Delete Format 2 label
000343 Delete Format 3 label
000344 Delete Format 4 label
000345 Delete Format 5 label
000222 Delete the text header and farewell (NET *).
000333 Delete PLUS and his properties.
000444 Delete the text and the VAT associated with families.
000555 Delete message advertising (NET *).
000565 Delete key association
000666 Delete sellers names
000777 Delete the percentage of VAT rates.
000888 Delete Great Total
!!WARNING: DELETE ALL EQUIPMENT AND PUT IT IN INITIAL STATE FROM FACTORY!!
000999: Clears the grand total (GT), the serial number of the GT, the total families, the header and farewell
ticket, the names of the vendors, family names, data PLUS the advertising message, the VAT rates, VAT
assignment, the programmed tares, leave the default barcode, assign hot keys to their numbers PLUS deletes
all label formats, clears the list of ingredients do the functions: 000222, 000333, 000444, 000555, 000565,
000666, 000777, 000888, 000810, 000830, 000850, 000870, 000890, 000910, 000930, 000950, 000970,
000767.
9.3.1. PERSONAL SECRET CODE FOR DELETE GREAT TOTAL
The scale leaves factory with GREAT TOTAL 999999. This code allows delete the GREAT TOTAL of the
scale from the GREAT TOTAL printing, by pressing the CE key (7).
To change the code of delete GREAT TOTAL:
Show
Show
Show
F0 COD
CODIG ACCESO
F0 CLAVE 000
COD FUNCION
SET GT
NUEVO CODIGO
Type 000
Type 000
Type six digits, between 100000 and 999999
9.3.2. DELETE THE GREAT TOTAL BY PERSONAL SECRET CODE
Show
F0 COD
CODIG ACCESO
Type six digits from secret code
The scale print the GREAT TOTAL y reset it. If the secret code does not act, indicates that the scale has
been manipulated.
9.4. F1 PRINTING TOTAL FAMILIES
Show
F1 FD
IMPRESIÓN FA
Press the key */ (11)
9.5. F2 PRINTING GREAT TOTAL
Show
F2 GT
IMPRESIÓN GT
Press the key */ (11)
PRINTING THE "OPERATION CANCELLED": Press the key * (10).
TOTAL DAILY BY THE SELLER OF THE LAST 40 DAYS: Press the key T (5).
DELETE THE GRAND TOTAL (if the delete code is 999999): Press the key CE (7).
23
VERSIÓN 14.09.18
9.6. F4 COMMUNICATION MODES
Show
F4 R 1 V ?
COMUNICACIÓN
Press the key + ▲ (14) or - ▼ (13)
Press the key 00 S▲ (9) to move between fields and enter the new registry value using the numeric keypad.
The registers are:
• R1: modes of serial communication (RS232), values of 0-5.
• R2: total sleep time, values from 0 to 20 (0 no turn off the total).
• R3: display time of the programmed PLU when no weight, values from 0 to 20 (0 no programmed
PLU).
• R4: display time of the not programmed PLU values from 0 to 20 (0 does not clear the not
programmed PLU, you must press CE (7)).
• R5: display time of the open sellers, values from 0 to 20 (0 no display the open sellers). To display
open sellers when there’s a display time, you must press the key F1 (5).
• R6: time duration of the buzzer, values from 0 to 10 (0 no buzzer).
• R7: display time of the amount (REMOVE GOODS), values from 0 to 10 (0 does not clear the amount
you have to press the key CE (7).
• R8: SCANNER reading mode: 0 normal codes, 1 codes with weight and 2 codes with amount.
As for the RS223 communication modes, there are six modes (always N81):
N never sends data.
C complete & continuously mode:
• Frame <02>XXXX.XXXgXXXX.XXXRXXXXX.XXEXXXXX.XXIXXVXXXXP<byte>L<03>
• Where <02> is start of transmission, g is the weight in kg with decimals, R is the tare in kg with
decimals, E is the price with decimals, I is the amount with decimals, V seller number, P PLU number,
L is operation and status byte and <03> is end of transmission.
• In the operation and status byte, the first four bits indicate the type of operation and the last four of
the state flags:
bit7
bit6
bit5
bit4
type of operation
bit3
bit2
bit1
bit0
0
0
0
1
no operation
zero tare
pmin pfixex
0
0
1
0
PPI operation
0
0
1
1
K operation
0
1
0
0
K- operation
0
1
0
1
X operation
0
1
1
0
X- operation
0
1
1
1
TOT operation
1
0
0
0
open seller
1
0
0
1
GRAND TOTAL
E stable weight mode:
• Frame <02>XXXX.XXXgXXXX.XXXR<03>
• Where <02> is start of transmission, g is the weight in kg with decimals, R is the tare in kg with
decimals and <03> is end of transmission.
OP by operation mode:
• Frame <02>XXXX.XXXgXXXX.XXXRXXXXX.XXEXXXXX.XXIXXVXXXXP<03>
• Where <02> is start of transmission, g is the weight in kg with decimals, R is the tare in kg with
decimals, E is the price with decimals, I is the amount with decimals, V seller number, P PLU number
and <03> is end of transmission.
DS on request always mode:
• The computer can send two commands: P<CR> to ask for weight o I<CR> to ask for weight, price and
amount.
• Frame weight _XXXX.XXXg
• Where _ are white spaces and g is the weight in kg with decimals
• Frame WPA <02>XXXX.XXXgXXXX.XXXRXXXXX.XXEXXXXX.XXIXXVXXXXP<03>
24
VERSIÓN 14.09.18
•
Where <02> is start of transmission, g is the weight in kg with decimals, R is the tare in kg with
decimals, E is the price with decimals, I is the amount with decimals, V seller number, P PLU number
and <03> is end of transmission.
DE on request with stable weight mode:
• The computer can send two commands: P<CR> to ask for weight o I<CR> to ask for weight, price and
amount.
• Frame weight _XXXX.XXXg
• Where _ are white spaces and g is the weight in kg with decimals
• Frame WPA <02>XXXX.XXXgXXXX.XXXRXXXXX.XXEXXXXX.XXIXXVXXXXP<03>
• Where <02> is start of transmission, g is the weight in kg with decimals, R is the tare in kg with
decimals, E is the price with decimals, I is the amount with decimals, V seller number, P PLU number
and <03> is end of transmission.
9.7. F5 DATE AND TIME
Show
F5 H ? M ?
D?M?A?
Press the key 00 S ▲ (9) to change field
Type the new value with the numerical keys
9.8. F6 MENU OF FORMATS OF LABELS
Show
F6 and a menu with the following options:
• Select Format
• Creating Format
• Copy Format
• Editing Format
• Modes
Press the *(10) key or * / (11) key to move through the menu and when we are on the desired option, press
the F4 key. To exit, press the F2 key.
9.8.1. SELECT FORMAT
It allows selecting one of the programmed formats into the scale to copy, edit or delete. Press the *(10)
key or * / (11) key to move for the formats and press the F4 key to select it.
If we want to remove a format, press the V1 (C) key to confirm and press the F4 key.
9.8.2. CREATING FORMAT
Display a menu where you can set the height, width and name of the label (the number is automatically
assigned).
Press the key 00 S ▲ (9) to change field.
The height of the label can be changed by pressing the keys * (10) or * / (11), if you press the F3 key,
the scale automatically detects the top of the label
The width of the label can be changed by pressing the keys * (10) or * / (11).
Press the key 00 S ▲ (9) to change field.
Enter the new name with the alphanumeric keypad.
To confirm press the F4 key.
9.8.3. COPY FORMAT
If we want to create a similar label to one that is already designed, we can copy the label and make
small changes instead of creating it again.
To do this first select the format to copy and press the F4 key to validate.
Press the keys * (10) or * / (11) to select "COPY FORMAT" and press the F4 key to make the copy. An
identical format to the selected it does generate with the name “formato_c”.
9.8.4. EDITING FORMAT
If you want to edit a format, you must first select it and press the F4 key to validate
Press the keys * (10) or * / (11) to select "EDITING FORMAT" and press the F4 key to access editing.
This opens a menu to add items to the label.
This procedure is explained in the manual of the design of the label on the CD which goes with the scale.
Although you can edit any type of label; is more comfortable do it with the DESIGNER LABEL program
also included on the CD.
25
VERSIÓN 14.09.18
9.8.5. MODES
Display a menu where you can change the units of measurement (mm, inches, or pixels), the conversion
factor of the second currency, and the second decimal currency.
Press the key 00 S ▲ (9) to change field.
The units of measure can be changed by pressing the key * (10) or * / (11).
The conversion factor of the second currency is introduced with the numeric keypad.
The second decimal currency can be changed by pressing the key * (10) or * / (11).
To confirm, press the F4 key.
9.9. F7 HEADER AND FAREWELL LINES
Press the key 00 S ▲ (9) to change field
Type the new value with the numerical keys
where: L
Values 1 to 6 (numerical keys).
1 - first header line (*)
2 - second header line (*)
3 - third header line
4 - fourth header line
5 - first farewell line
6 - second farewell line
where: N
Net machine number
Values 0 to 9 (numerical keys).
Text field (24 characters) text keyboard (**)
(*)These lines are always printed in double size
(**)Characters from 032 till 169 and 213 (€) (see ASCII table in page 21). To access characters not in the
keyboard press the key * (10) or */ (11)
Note: For a sample of the header, move to the field L and press the * / (11) key.
Show
F7 L ? N ?
?
Line number
9.10. F8 SELLERS NAMES
F8 V ?
Press the key 00 S ▲ (9) to change field
?
Type the new value with the numerical keys
where: V
Seller number
Values 1 to 20 (12 at 12V) (numerical keys).
Text field (16 characters) text keyboard (*)
(*) Characters from 032 till 169 and 213 (€) (see ASCII table in page 21). To access characters not in the
keyboard press the key * (10) or */ (11)
Show
9.11. F9 FAMILIES NAMES
F9 F ?
Press the key 00 S ▲ (9) to change field
?
Type the new value with the numerical keys
where: F
Family number
Values 1 to 30 (numerical keys).
Text field (16 characters) text keyboard (*)
(*) Characters from 032 till 169 and 213 (€) (see ASCII table in page 21). To access characters not in the
keyboard press the key * (10) or */ (11)
Show
9.12. F10 PLUS PROGRAMMATION
Show
F10 N ?
?
Where N is the number of PLU: values from 1 to 2000 (keypad) or + keys ▲ (14) or - ▼ (13)
Press the key 00 S ▲ (9) to change field.
Show
F10 P ?
?
Where P is the price of PLU: 5 digits (numeric keyboard).
Press the key 00 S ▲ (9) to change field
Show
F10 F ?
?
Text field (24 characters)
text keyboard (*)
(*) Characters from 032 till 169 and 213 (€) (see ASCII table in page 21). To access characters not in the
keyboard press the key * (10) or */ (11)
26
VERSIÓN 14.09.18
NOTE: If you wish to cancel a text, write the character " " code (032) in the first position.
Press the key 00 S ▲ (9) to change field.
Show
F10 M ?
?
Mode and type of PLU: 0-3; keys + ▲ (14) o - ▼ (13)
• Type 0: weighed and unprotected
• Type 1: weighed and protected
• Type 2: not weighed and unprotected
• Type 3: not weighed and protected
Press the key 00 S ▲ (9) to change field
Show
F10 T ?
?
Where T is the tare associated PLU: 5 digits (numeric keyboard) or press the T key (5) and placed on the plate
to tare weight. Press the T key (5) again to exit.
Press the key 00 S ▲ (9) to change field.
Show
F10 F ?
?
Where F is the family of PLU: values 1-30 (keypad).
Press the key 00 S ▲ (9) to change field.
Show
F10E?????.???
?
Where E is the amount of goods entered the last time. Press the + key (14) to add an entry, enter the amount
of goods and re-press the same key to confirm.
Press the key 00 S ▲ (9) to change field.
Show
F10S?????.???
?
Where S is the stock that we have of PLU, press the + key (14) or the - key (13) to add or remove stocks from
inventory and press again the same key to confirm.
Press the key 00 S ▲ (9) to change field.
Show
F10 M ?????.???
?
Where M is the minimum amount of goods we want, press the + key (14) to modify and re-press the same
key to confirm.
Press the key 00 S ▲ (9) to change field.
Display a screen with information about the PLU where you can select the format with keys + (14) or - (13).
Select the desired format and press the F4 key to validate.
Change the field on the previous screen to select the ingredients (if has added a list of ingredients from the
computer). We can see the ingredients with keys + (14) or - (13).
To add ingredients, press the F3 key to open a menu where you can move using the + (14) key or - (13) key.
Select the desired ingredient and press the F4 key to validate.
Press the key 00 S ▲ (9) to change field.
Show
F10 D ????
?
Where D is the expiration date of the PLU: values 1-9999 (keypad).
Press the key 00 S ▲ (9) to change field.
Show
F10 1
TEXTO UNO
Text associated with the PLU 1 (24 characters), keyboard text (*)
(*) Characters from 032 till 169 and 213 (€) (see ASCII table in page 21). To access characters not in the
keyboard press the key * (10) or */ (11)
Press the key 00 S ▲ (9) to change field.
27
VERSIÓN 14.09.18
Show
F10 2
TEXTO DOS
Text associated with the PLU 2 (24 characters), keyboard text (*)
(*) Characters from 032 till 169 and 213 (€) (see ASCII table in page 21). To access characters not in the
keyboard press the key * (10) or */ (11)
NOTE 1: If the scale has a SCANNER (option) and read a bar code being anywhere of the F10 function, the
scale will assign this barcode to the PLU and will give an audible indication. If you want to see and/or edit
manually, press the key shift (6) and key 00 (9), being in any point in the F10 function, then the text
disappears and the value of PLU barcode appears. If you press again the key shift (6) and key 00 (9), the
menu come back to the previous state.
The type of bar code can be type 0 normal (not weight), type 1 normal and codes with the last five digits
representing the weight (must start with 2) and normal type 2 and codes with the last five digits representing
the amount (must start with 2).
NOTE 2: To enter manually a barcode EAN8, insert first five zeros, then the bar code.
NOTE 3: On the PLUS edition, to see the status of a PLU, station oneself in the field number of the PLU and
press the key * / (11).
NOTE 4: If you wish to cancel a text, write the character " " code (032) in the first position.
9.13. F11 MENSSAGE ADVERTISING
F11 N ?
Press the key 00 S ▲ (9) to change field
?
Type the new value with the numerical keys
M PUBLICITARIO
Where N is the net machine number: values 0 to 9 (numerical keys).
Text field (63 characters)
keyboard text (*)
Show
(*) Characters from 032 till 169 and 213 (€) (see ASCII table in page 21). To access characters not in the
keyboard press the key * (10) or */ (11)
9.14. F12 DIRECT PLUS KEYS TO PLUS ASIGNATION
F12 T ? N ?
Press the key 00 S ▲ (9) to change field
TECLAS PLUS
Type the new value with the numerical keys
Where T is the direct key number
Direct PLU key and SHIFT + direct PLU key
N is the PLU number assigned to the key
Numerical keys or keys + ▲ (14) and - ▼ (13)
Show
9.15. F13 PERCENTAGE OF VAT
F13 N ? V ?
Press the key 00 S ▲ (9) to change field
PORCENT IVA
Type the new value with the numerical keys
Where N is the number of VAT
values from 1 to 5 (keypad)
Where V is the value of the VAT rate
values from 0 to 99.99% (keypad)
Show
9.16. F14 TYPE OF VAT ASSIGNED TO THE FAMILIES
Show
F14 F ? I ?
IVA FAMILIA
Where F is the number of family
Where I is the VAT rate
Press the key 00 S ▲ (9) to change field
Type the new value with the numerical keys
values 1-30 (keypad)
values from 1 to 5 (keypad)
9.17. F15 BAR CODE PARAMETERS PROGRAMMATION
Show
F15
25MVCCCIIIII
25MVCCCIIIII is the default bar code, enter the new values with the keyboard text.
28
VERSIÓN 14.09.18
MEANINGS:
• Digit
• Character
• Character
• Character
• Character
• Character
• Character
• Character
• Character
• Character
• Character
• Character
(0 à 9)
V
C
L
F
O
W
P
I
M
T
G
Literal presentation of digit.
Seller number.
Number of ticket of the seller.
PLU number (single operation).
Family number (single operation).
Operation number of the seller.
Weight (single operation).
Price (single operation).
Net Amount.
Number of Scale.
Tare (single operation).
Code aassociated with the PLU (single operation).
There is no minimum or maximum limit of repetition or size of the fields. If they exceed, are supplemented
with zeros, and by default, presents the least significant digits. In case of typing any character without
meaning in the bar code is printed a 0.
Example: The Code (250VCCCIIIIII) of a scale with the seller number 4, in the client number 39, which has
bought valued at € 25.60. Generates the code 250403902560X (X is a digit of control and nonprogrammable to calculate the processor)
NOTE: The net negative amounts do not generate bar code
9.18. F16 WEIGHT PARAMETERS PROGRAMMATION
This function can be performed by AUTHORIZED PERSONNAL ONLY AND IT’S ACTIVATE UNDER ONE
ELECTRONIC KEY.
9.19. F17 NET MACHINE NUMBER PROGRAMMATION
Show
F17 N ?
Values 0-9 (keypad)
NUMERO RED
Type the new value with the numerical keys
The master equipment must be the number 0. There should be no two equipments with the same number
in the network. If there is only one in network must be always zero.
9.20. F18 PROGRAMMATION DE TARES
Show
F18 N ? T ?
TARAS PROG
Values 1-10 (keypad)
Press the key 00 S ▲ (9) to change field
The new tare value can be introduced by two ways:
• Enter the new value, using the numeric keypad, that is less than the maximum range of machine (for
example, to introduce 1.3 kg press the 1 key, the key 00' and the key 3).
• Weighing one container for perform the Tara. Press the key T (5) to enter in weight, put the weight
on the plate and press the key T (5) again.
9.21. F19 NETWORK SETTING FROM MASTER SCALE
Show
F19 PR RED
Press the key */ (11)
PROG RED
Will be programmed every scale on the network, making three data downloads from the MASTER scale:
RAM memory, DataFlash memory and FISCAL memory, if it is enabled.
9.22. F20 SETTING THE IP ADDRESS OF THE SCALE
If the scale has the option of Ethernet, the scale functions as a web server, so you can access it from the
browser on your PC and edit and read the data from the scale (PLU, grand totals, etc. ). You will need to
define the parameters of the scale to be accessible on your local network (LAN).
29
VERSIÓN 14.09.18
You should know the following:
IP address of the router (IP GATE):
Subnet mask (IP MASK):
A free IP address for the scale (IP ADDRESS):
Show
Press the key 00 S ▲ (9) to change field
Type the new value with the numerical keys
Press the key 00 S ▲ (9) to change field
Type the new value with the numerical keys
Press the key 00 S ▲ (9) to change field
Type the new value with the numerical keys
IP ADDR 192
,168, 1, 10
IP GATE 192
,168, 1, 1
IP MASK 255
,255,255, 0
Show
Show
Example: 192.168.1.1
Normally: 255.255.255.0
Example: 192.168.1.10
You must press the X key [F ▲] (12) to save the changes in memory. New address will be considered after a
power cycle of the scale.
NOTE: Some antivirus or versions of them, do not allow the connection for testing. We recommend that
you disable antivirus and in some cases, the Windows firewall.
Open your browser, type in the search bar the IP address of the scale and you can see the menu to inquiries
and set the scale.
There is a separate manual to explain the operation of the Web page and an Excel spreadsheet to schedule
PLUS a more convenient way.
9.23. F21 SETTING THE PORT OF THE SCALE
Show
F21 P 80
PUERTO IP
Enter the port using the numeric keypad
Use port 80 for direct connection and port 8080 for other
9.24. TABLE OF CHARACTERS
032
033
034
035
036
037
038
039
040
041
042
043
044
045
046
047
048
049
050
051
052
053
054
055
056
057
058
059
060
(SPACE)
!
“
#
$
%
&
'
(
)
*
+
,
.
/
0
1
2
3
4
5
6
7
8
9
:
;
<
061
062
063
064
065
066
067
068
069
070
071
072
073
074
075
076
077
078
079
080
081
082
083
084
085
086
087
088
089
=
>
?
@
A
B
C
D
E
F
G
H
I
J
K
L
M
N
O
P
Q
R
S
T
U
V
W
X
Y
090
091
092
093
094
095
096
097
098
099
100
101
102
103
104
105
106
107
108
109
110
111
112
113
114
115
116
117
118
30
Z
[
\
]
^
_
`
a
b
c
d
e
f
g
h
i
j
k
l
m
n
o
p
q
r
s
t
u
v
119
120
121
122
123
124
125
126
127
128
129
130
131
132
133
134
135
136
137
138
139
140
141
142
143
144
145
146
147
w
x
y
z
{
|
}
~
(SPACE)
Ç
ü
é
â
ä
à
å
ç
ê
ë
è
ï
î
ì
Ä
Å
É
æ
Æ
ô
148
149
150
151
152
153
154
155
156
157
158
159
160
161
162
163
164
165
166
167
168
169
213
ö
ò
û
ù
ÿ
Ö
Ü
ø
£
Ø
×
ƒ
á
í
ó
ú
ñ
Ñ
ª
°
¿
¡
€
VERSIÓN 14.09.18
10. EQUIPMENT CONNECTIONS
10.1. RS232 CONNECTOR (OPTIONAL)
(5)GND
(3)RXD (2)TXD
10.2. INTERCONNECTION CONNECTOR (OPTIONAL)
(4 Y 5) LINEA B
(6 Y 7) LINEA A
31
VERSIÓN 14.09.18
11. MAINTENANCE
10.3. CLEANING
• Before cleaning the equipment disconnect from the power.
• The equipment has plastics materials. To perform the cleaning, never use gasoline, thinners or other
chemicals products, since it could change the colour and damage the surface of these materials.
• Avoid using insecticides spray, some contain chemicals that could distort the covers.
• Clean the body of the equipment with a soft, clean cloth for cleaning difficult stains, use a wet cloth in
a solution of mild soap and water
• For cleaning use a cloth soaked blankets (not wet) in a mild solution of soap and water.
10.4. PAPER REFIL
TO CHANGE MODE TICKETS TO LABEL MODE AND VICE VERSA Press "" AND "" (IF SYMBOL 11 IS LIT
THE LABELING MODE IS ON)
The printer can use continuous paper or labels.
To change the paper in the suspended scale, simply pull the handle to open the door and have access to the
printer, and in the desk scales pulled sideways handle to leave the block printer and access.
Once we have access to the printer to release the head to change the paper as shown in the following
diagram:
32
VERSIÓN 14.09.18
10.4.1. CHARGING ROLLER LABEL
ROLL LABELS USING A LARGE SUPPORT MAXIMUM 63 MM AND DIAMETER MAXIMUM OF 80 MM.
1.
2.
3.
4.
5.
6.
OPEN THE DOOR OF THE LABEL MACHINE BY PULLING THE DOOR HANDLE.
RELEASE THE PRINT HEAD PRESSING THE HANDLE OF OPENING OF THE PRINT HEAD.
PLACE THE AXIS OF THE ROLL OF LABELS
CLEAR THE FIRST LABELS OF THE NEW ROLL OF LABELS AND TO PLACE IT IN THE AXIS OF THE ROLL
OF LABELS
PASS THE PAPER AS INDICATES ON THE FIGURE:
ADJUST THE WIDE GUIDE OF PAPER SO THAT THE LABEL REMAINS WITHOUT WIDTH AND
WITHOUT WRINKLING THE SUPPORT
NOTE: START PRINTING IS LOSING A LABEL UNTIL THE MACHINE DETECTED THE BEGINNING OF THE
SAME.
The printer can use a continuous paper to test while we're designing labels by choosing the code 000600
(000610 code to disable).
33
VERSIÓN 14.09.18
10.4.2. LOAD CONTINUOUS PAPER
USE THERMAL PAPER WITH WIDE OF 58MM AND MAXIMUM DIAMETER OF 60MM
1.
2.
3.
4.
OPEN THE DOOR OF THE LABEL MACHINE BY PULLING THE DOOR HANDLE.
RELEASE THE PRINT HEAD PRESSING THE HANDLE OF OPENING OF THE PRINT HEAD.
CLEAR THE AXIS OF THE ROLL OF LABELS IF THIS EXIST
PASS THE PAPER AS IT’S INDICATED IN THE FIGURE:
5.
ADJUST THE WIDE GUIDE OF PAPER SO THAT THE PAPER REMAINS WITHOUT WIDTH AND
WITHOUT WRINKLING THE SUPPORT
34
VERSIÓN 14.09.18
12. WHAT TO DO IN CASE OF FAILURE
BEFORE YOU CALL FOR TECHNICAL ASSISTANCE, MAKE SURE:
1. THE EQUIPMENT NOT LIGHT
• If your equipment does not turn on, verify the power.
• Make sure the power cord is connected to the plug from the outlet.
• Make sure the power switch is in on position.
• Check fuse.
2.
THE EQUIPMENT SHOW [ -0- ]
• Check for any goods on the platform.
• Check for air flow.
3.
THE EQUIPMENT SHOW [ ERR DATOS DS ]
• Check the equipment recording.
4.
THE EQUIPMENT HAS ANY OTHER KIND OF ERROR (SEE SECTION 8.9)
• If it is an error handling is solved by pressing “CE” or performing the indicated action..
• Any other type of error check with technical service.
TO CONTACT THE NEAREST SERVICE, CALL YOUR DEALER OR TELEPHONE +34 96 150 09 11.
DEALER
35
VERSIÓN 14.09.18
36