1
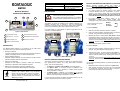
Technical Features Operating Temperature Storage Temperature BM100 Humidity max. BACKUP MODULE BACKUP AND RESTORE PROCEDURE (CONTINUED) -35° to 50 °C (-31° to 122 °F) -35° to 70 °C (-31° to 158 °F) 90% non condensing INSTALLATION BM100 provides complete backup and restore functions (Configuration and Environmental parameters) and cannot be interrupted once started (LED quickly blinking). For network nodes, the backup module of the ID-NET™ (or Lonworks) Master saves the configuration of all the reading devices in the network, Master and all individual Slaves. The Slaves must be configured with the same network baudrate as the Master before performing the Restore procedure. For single reading device stations, Slaves, or for RS232 Master/Slave networks, the backup module saves the configuration only of the specific connected reading device. INSTRUCTION MANUAL Power must be off during this operation. 6 5 7 1 CAUTION 4 2 3 Figure 1 General View 1 Backup/Restore button 5 Network Address Switches 2 BM150 Display connector 6 Backup/Restore Indicator LEDs 3 Write Protection Lock 7 Network Type Switch 4 For Subzero environments (CBX100 LT), installation must be made at a temperature not lower than -20 °C. The BM100 can easily be installed into the CBX100, CBX100 LT or CBX500 connection box by aligning it over its corresponding connector and pushing down until correctly seated. When closed, the plastic support inside the CBX cover holds the module in place. For further details on using BM100 in Subzero applications see the CBX100 LT Installation Manual. These functions are cyclical every 3 seconds: Backup Restore No Action To perform Backup: 1. Make sure the Write Protection switch is unlocked. 2. Press and hold the Backup & Restore button for approximately 3 seconds. The green Backup LED (B) lights up. CBX500 CBX100 ID-NET™ Baudrate Switch 3. Release the button to select Backup and within 1 second press and release it again to activate the procedure. The green Backup LED (B) blinks quickly indicating the backup procedure is active. At the end of the procedure both B and R LEDs turn on for about 2 seconds. When the LEDs turn off the procedure is complete. 4. Set the Write Protection switch to locked. DESCRIPTION To perform Restore: The BM100 Backup Module is an accessory for the CBX series connection boxes. It provides the following functions: 1. Press and hold the Backup & Restore button for approximately 6 seconds. The yellow Restore LED (R) lights up. Backup and Restore Complete Configuration and Environmental parameter storage for network and reading devices. Includes write protection. 2. Network Address Selection Hardware Address selection for Host network or ID-NET™ Slave devices (overrides software configuration). BACKUP AND RESTORE PROCEDURE Network Type Selection Selection of Host network or ID-NET™ Slave type networking depending on application and installed accessories. The backup and restore functions are valid for any application layout type (point-to-point, network, etc.) using CBX series connection boxes. They can be performed by: BM150 Accessory Display Connection (CBX500 only) Connection to flat cable for BM150 Display and Keypad. the Genius™ or VisiSet™ Device Menu commands (always). the BM150 Menu, (if Fam2/4K scanner X-PRESS™ Key Functionality parameter is enabled, or if Matrix Family Keypad Status parameter is enabled) the BM100 button, (if BM150 is not installed and if Fam2/4K scanner X-PRESS™ Key Functionality parameter is enabled, or if Matrix Family Keypad Status parameter is enabled) NOTE When using BM100 in a CBX for Backup & Restore functions, the network Master only recognizes slaves of its own type (either scanners or imagers). Use the SC4000 ID-NET Controller for Backup & Restore functions on networks with both scanners and imagers (mixed). 821001404 (Rev. D) Figure 2 – BM100 Mounting If it ever becomes necessary to replace the reading device it can be quickly configured through the restore procedure. Release the button to select Restore and within 1 second press and release it again to activate the procedure. The yellow Restore LED (R) blinks quickly indicating the restore procedure is active. At the end of the procedure both B and R LEDs turn on for about 2 seconds. When the LEDs turn off the procedure is complete. To exit without performing Backup or Restore procedures do one of the following: Release the button while both LEDs are off (No Action) After releasing the button the first time, do not re-press the button to activate the procedure but wait about 3 seconds (timeout during which the relative LED blinks slowly). NETWORK TYPE SELECTION The network type depends on the application layout and installed accessories. Net Type Switch 0 = None (no network present) 1 = Ethernet/IP 2 = Profibus 3 = DeviceNet 4 = CC-Link 5 = Profinet 6 = CANopen 7 = Software Configuration Controlled Host Interface Network 8 = ID-NET™ Slave Synchronized 9 = ID-NET™ Slave Multidata For all CBX series connection boxes the Net Type selector switch allows setting the ID-NET™ network: ID-NET™ Masters communicating with the Host through the main serial interface, and all other non network applications must be set to None (0). If BM100s are used for ID-NET™ Slaves, this switch must be set to Slave Synchronized (8) or Slave Multidata (9) depending on the ID-NET™ network Topology Role (same as Master). Through the CBX500, several types of accessory Host Interface Modules are available to connect a reader, (including Masters with an ID-NET™ sub-network), to a Host network as a Slave node of that network. Note: ID-NET™ Slaves (positions 8 and 9) exclude Host network configuration. The Net Type switch settings (1 – 6) assign the Host network type through the hardware switch; the Node Address is assigned by the Network Address Selection switches. These settings override the software configuration and therefore when used, must match the actual Host Interface Module. The Net Type switch setting Software Configuration Controlled Host Interface Network (7) allows the Host network type and Node Address to be set through the software configuration program; the hardware switches are ignored. This position is valid for all the Host network types including Module types that have no hardware switch position (i.e. Modbus TCP or Ethernet TCP/IP). NETWORK ADDRESS SELECTION Figure 3 – Address Selection Switches BM100 provides hardware network address selection for rapid installation of ID-NET™ networks and for some of the Host Interface Modules. These switch settings are read at each power-up or reset, and override software configuration settings except where specified otherwise. Valid address selection depends on the network type: Ethernet/IP and Profinet The Ethernet IP or Profinet address refers to the last three digits of the IP address (i.e. 2/4K default value: 172.16.11.xxx; Matrix Family default value: 172.24.24.xxx). The valid selection range is from 000 to 255. Address selections outside of this range are not accepted by the network except for a few special switch settings that allow the software to determine the IP address for Ethernet IP and Profinet interfaces. These settings correspond to the IP Addressing parameter in Genius™ or VisiSet™. 777 = 888 = 999 = Remote Assignment through the IPConfig application available on the reader CD-ROM. Static Assignment – set manually through Genius™ or VisiSet™ set through a DHCP server Profibus The valid selection range for the Profibus address is from 000 to 126. Address selections outside of this range are not accepted. Address 126 is a special address which allows the Profibus Master, through software, to set the node address in the range from 000 to 125. DeviceNet BAUDRATE SELECTION The Host network baudrates cannot be set through the BM100 switches. When the BM100 is used for ID-NET™ network Slaves, the ID-NET™ baudrate is selected through the baudrate switch and must match the Master ID-NET™ baudrate. The settings are: ID-NET™ Baudrate Switch 0 = 19200 Baud 5 = 500 kBaud The valid selection range for the CC-Link address is from 01 to 64. Address selections outside of this range are not accepted. The x100 switch is ignored. See the reader Help On-Line Node Address parameter for address restrictions. CANopen The valid selection range for the CANopen address is from 001 to 128. Address selections outside of this range are not accepted. Address 128 is a special address which allows the CANopen Master, through software, to set address and baud rate. 6 = 1 MBaud 2 = 57600 Baud 7 = Reserved 3 = 125 kBaud 8 = Reserved 4 = 250 kBaud 9 = Reserved SEARCH FOR BACKUP MEMORY AT DEVICE STARTUP This reader configuration parameter is enabled by default, so that at startup, the reader sends a message to recognize the presence of, and communicate with, the Backup Module. If using the Backup Module, this parameter must be enabled. WRITE PROTECTION LOCK The valid selection range for the DeviceNet address is from 00 to 64. Address selections outside of this range are not accepted. The x100 switch is ignored. Address 64 is a special address which allows the DeviceNet Master, through software, to set the node address in the range from 00 to 63. CC-Link 1 = 38400 Baud Figure 4 – Write Protection A write protection switch is provided to protect configuration data from being inadvertently overwritten. When this switch is in the lock position, the Backup function is not available (data cannot be written to the backup memory) and a diagnostic warning message can be sent. The Restore function is available. S/N LABEL A duplicate Serial Number label is included in the BM100 package. This label can be applied onto the outside of the CBX for quick reference. ID-NET™ The valid selection range for the ID-NET™ Slave addresses is from 01 to 31. Address selections outside of this range are not accepted by the ID-NET™ network. The x100 switch in this case refers to the ID-NET™ baudrate. BM150 DISPLAY CONNECTOR BM100 provides the flat cable connector for connection of the BM150 Display and Keypad accessory for the CBX500. When the BM150 accessory is used the Backup and Restore functions are managed through the Display and Keypad and therefore are disabled at the BM100 Backup/Restore button. The BM150 has an extended menu which allows complete backup and restore functions.