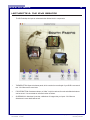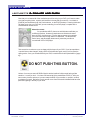
1
Multimedia Module iDVD 2 USER MANUAL For information and permission to use these training modules, please contact: Limell Lawson - [email protected] - 520.621.6576 or Joe Brabant - [email protected] - 520.621.9490 Modules available online at http://mll.arizona.edu/workshops.shtml?tutorialpdfs iMovie2_User.pmd Last modified: 05/30/02 2 iDVD 2: User Manual TABLE OF CONTENTS Introduction and Overview .............................................................................................................. 3 Lecturette 1: iDVD and DVD Authoring .......................................................................................... 4 Lecturette 2: The iDVD Desktop .................................................................................................... 5 Exercise 1: Quick Review .............................................................................................................. 6 Lecturette 3: Themes ..................................................................................................................... 7 Exercise 2: Themes ...................................................................................................................... 7 Exercise 3: Slideshows ............................................................................................................... 10 Lecturette 4: Slideshow Options .................................................................................................. 10 Lecturette 5: Finalize and Burn ..................................................................................................... 11 Lecturette 6: Technical Details ..................................................................................................... 12 Conclusion ................................................................................................................................... 12 Criterion Test ................................................................................................................................ 13 File name: iDVD2_User.pmd Last modified: 05/30/02 Copyright Arizona Board of Regents, 2002 University of Arizona 3 iDVD 2: User Manual INTRODUCTION AND OVERVIEW The purpose of this class is to familiarize you with the basics of DVD Authoring and design. We will be using iDVD 2 as a means for this instruction, as it is without a doubt the most simple and straightforward program for authoring a DVD. By the end of this class you will be an expert on the use of iDVD2, and you will understand the uses of consumer DVDs. The following are the key points we will be covering: ♦ ♦ ♦ ♦ ♦ ♦ File name: iDVD2_User.pmd Last modified: 05/30/02 iDVD 2 and DVD Authoring Key Concepts/terms for iDVD 2 Preparing Files for iDVD 2 Themes, Movies, and Slideshows Design Decisions Burning a DVD Copyright Arizona Board of Regents, 2002 University of Arizona 4 iDVD 2: User Manual LECTURETTE 1: IDVD AND DVD AUTHORING DVD Authoring, put simply, is the creation of a DVD disc which will play on any home DVD player or home computer with DVD playback capabilities. iDVD is by far, the easiest way for a non-professional to author a high quality DVD. Just like the DVD movies available for rent, DVDs produced by iDVD have menus, pictures, movies, and sound. There are, however some differences between the two that we will cover later. With a basic knowledge of iDVD, you will be able to create a DVD of your home movies, art portfolio, short film, etc. DVDs can store a large amount of data, and can be an extremely useful means of storing or distributing many types of media for many different uses. To better understand DVDs and their creation, there are a few concepts to keep in mind. ♦ CONSUMER VS. PROFESSIONAL DVDS- consumer DVDs store only 4.5GB of data, or approximately 90 minutes of video. Professionally burned DVDs store 9GB of data and can contain feature-length films. Keep in mind that professional burners are NOT currently available to the average consumer. ♦ IMAGES- DVDs can be used for slideshow applications, and although color resolution can be excellent, keep in mind that images will be displayed at 640 x 480pixels, which is perfect for a TV but is by no means photo quality. ♦ MOVIES- iDVD accepts a wide range of file formats (all formats accepted by quicktime), but all video will be converted into MPEG 2. This is a minor issue for most users but it is important to know. ♦ AUDIO- All audio is converted into AC3 or AIFF. Again, a non-issue for most but important to know. All music or audio must be in a quicktime-recognized format. Dolby ProLogic, Dolby 5.1, and DTS are available sound formats to the DVD media, but not to iDVD. ♦ DESIGN- If youve seen The Matrix and The Lord of the Rings on DVD, you know that a DVD can be styled to effectively convey the style of the media it contains through its menus and background graphics, and even with movies during menu transitions.. iDVD is not this robust. However, you can still convey a style, within limitations, in a fraction of the time. ♦ BURNING- Just like a CD-R, DVD-Rs can be written to only once. If there is an error, the DVD is no longer usable. Youll need anywhere from actual time to double the time to wait for movies to encode in the proper format, and then about one hour for a full 4.5GB DVD to burn. ♦ QUICKTIME- Apples media recognition software. Movies, images, and sounds are all recognized and made useable for iDVD 2 by Apples Quicktime software. Note, however, that there are files that Quicktime cannot use. If you wish to use a file of this nature, you must convert it to a Quicktime-ready file. For a full list of the media types used by Quicktime, check Apples information at www.apple.com/quicktime. File name: iDVD2_User.pmd Last modified: 05/30/02 Copyright Arizona Board of Regents, 2002 University of Arizona 5 iDVD 2: User Manual LECTURETTE 2: THE IDVD DESKTOP The iDVD desktop is simple to understand when divided into its components. 1 THEME BUTTON- Opens the theme panel, which controls the overall style of your DVDs menus and text. Well discuss this more later. 2 FOLDER BUTTON- Creates a submenu; a folder in which a sub-set of movie and slideshow buttons can be stored. You can create an unlimited number of folders. 3 SLIDESHOW- A slideshow is just that, a slideshow of images that you import. Well discuss slideshows in more detail later as well. File name: iDVD2_User.pmd Last modified: 05/30/02 Copyright Arizona Board of Regents, 2002 University of Arizona 6 iDVD 2: User Manual 4 MOTION BUTTON- Turns motion on and off. The backgrounds of your DVD can be images or movies; if you want the movie in your background to play, just press the motion button. Note that if motion is turned off when you burn the DVD, it will be not be animated during playback. 5 PREVIEW BUTTON- With DVDs costing about $5 a pop, no one wants to burn their DVD project just to test out how it looks. Simply hit the preview button, and youll be able to view your DVD in the same way you would with a set-top DVD player and a remote control. 6 BURN- There it is, the burn button. Push this to burn your DVD. Remember though, DVDs cost $5 each, and 1 to 3 hours of your time to burn. Make sure that you have what you want before you put that blank DVD in the tray. Other points of interest on the iDVD desktop (refer back to page 7 if necessary): When designing your DVD, note the option called Show TV-Safe Area In the Advanced menu. Keeping your buttons within this area will ensure that they are seen properly when played on any TV. The globe in the background is a background movie; this will play on a loop while this screen is being viewed. There are three buttons in this DVDs title screen, Celebration, Pictures, and More Movies. Celebration represents a movie that can be viewed, Pictures represents a slideshow, and More Movies is a folder containing more media. South Pacific, is, of course, the title of this tutorial DVD. EXERCISE 1: QUICK REVIEW ♦ What is the difference between a consumer DVD and a professional DVD? ♦ How long does it take to burn a full DVD, provided that you dont have to compress or convert any video? ♦ Who can use a DVD that you have burned? File name: iDVD2_User.pmd Last modified: 05/30/02 Copyright Arizona Board of Regents, 2002 University of Arizona 7 iDVD 2: User Manual LECTURETTE 3: THEMES Open the themes panel by pressing the themes button. Themes control the style of your DVD. The themes panel contains three tabs. The first, Themes, contains Apples premade themes. Feel free to browse these, but remember that the best themes will be the ones that you make on your own. Apples themes are divided by their content: some have pictures, some have movies, and some have movies with sound. The third tab, status, gives you info on how close to full your DVD is, providing you with a list of media contained in your DVD. Use the status tab to manage the files contained in your DVD and to check on how much space (or minutes of video) that you have left. The most useful tab, however, is the second one: Customize. Customize gives you the most choice in how you want your DVD to look. You can add a background image, movie, and/or sound. (See the top section of the window, Background.) You can also change the font and position of the title text you will use. (See the middle section of the window, Title.) Keep in mind you can only use one line of text for your title. Finally, you can use the customize panel to change the look of your buttons. (See the bottom section, Button) There is a large range of shapes to choose from, and in addition you can set the font that appears below each button that you make. Also notice that you can change the way the buttons are arranged: either iDVD 2 will arrange them for you, or you can set them to free position and move them to exactly where you want them. Through the use of the Customize tab and the button creation buttons, (labeled 2 and 3 in the image on page seven) the overall look, feel, and organization of your DVD can be created and customized. EXERCISE 2: THEMES Our first exercise will show you how to create a theme, and layout your DVD. Well be using the iDVD 2 Tutorial, included with the program, as a basis for our DVD. The first step is to open the iDVD 2 application. Locate the application on the dock, and launch it. Youll now be viewing the iDVD desktop. If you get a title prompt instead, click on New Project, and youll see a file creation screen. If you got the iDVD desktop, go to the File menu and select New Project In either case, hit return when you get to the file creation screen; the name doesnt matter. File name: iDVD2_User.pmd Last modified: 05/30/02 Copyright Arizona Board of Regents, 2002 University of Arizona 8 iDVD 2: User Manual We are now ready to create our theme and layout for our DVD. First, enter the finder, and open folders in this path: Hard Drive/ Applications/ iDVD 2/ Tutorial/ Media. This folder contains all of the media we will be using for our DVD. Now, go back to the iDVD 2 application, and open the themes panel, and select the Custom tab. To create our desired background and layout, follow the steps listed. Creating Your Theme Steps: 1. Drag the file named Background Movie.mov from the Media folder to the Image/ Movie well in the Background section of the theme panel. 2. Set motion duration to 30 seconds. 3. Select a position and style for the DVDs title, in the title section of the theme panel. 4. Select the title text and rename it to whatever title you want. 5. Resize the text to whatever size you desire. 6. Choose a button style by experimenting with the options in the Button section of the theme tab. Now that we have set up the theme for our DVD, well lay out the buttons that we want in our DVD. All of the buttons are related to the media in the media folder. Creating Buttons Steps: 1. Create a slideshow button by clicking the slideshow button. 2. Create a folder by clicking the folder button. 3. Create a button for the Beach.mov file by dragging the Beach.mov file into the iDVD 2 desktop. 4. Drag the Button Image.jpeg file on to the folder you created in the DVD. This gives the folder an interesting image. 5. Double click the folder that you just added an image to, which will show you the contents of the folder. 6. Add the remaining movies, Celebration.mov and Play Time.mov to the inside of the folder you have created. 7. Give all of the buttons a name. File name: iDVD2_User.pmd Last modified: 05/30/02 Copyright Arizona Board of Regents, 2002 University of Arizona 9 iDVD 2: User Manual A QUICK REVIEW OF THE LAST EXERCISE We should now have three movies, one folder, and one slide show in our DVD. Your two screens should look something like this: Of course, you can make your DVD look however you want. The purpose of this lesson is to make sure you know how. Before we continue to the next exercise, there are a few interesting options that we have not covered. First, when you click on movie, youll notice a slider bar and a checkbox named Movie. If you check the box, the movie will play inside of the button. If the box is unchecked, you can drag the slider to pick a frame of the movie to be displayed on the button. Also, notice that you can have different text styles for the title and the button text on different screens. File name: iDVD2_User.pmd Last modified: 05/30/02 Copyright Arizona Board of Regents, 2002 University of Arizona 10 iDVD 2: User Manual EXERCISE 3: SLIDESHOWS In this exercise, well be showing you how to modify the slideshow that you created in the previous exercise. Slideshows are easy to arrange and are a nice way to present your images on a DVD. Importing Your Images: 1. Double click on the slideshow that you have created. 2. Open the folder called slideshow media, contained inside the media folder. 3. Select the .tiff image files, and drag them into the iDVD window. Adding sound to your slideshow: 1. Locate the slideshow audio.mp3 file in the Slideshow media folder. 2. Drag the file into the audio tab, located near the bottom of the iDVD window. 3. Select the .tiff image files, and drag them into the iDVD window. LECTURETTE 4: SLIDESHOW OPTIONS There are a few options at the bottom of the iDVD slideshow window that must be explained. 1. Display <> during slideshow - this adds arrows to the bottom of a slideshow, indicating to the users that they may skip to the next slide at any time. 2. Add to DVD-ROM - Adds the contents of your slideshow to a directory on the DVD, so that when the disc is inserted in a computer, your slides may be copied to their hard drive. 3. Slide Duration - Slides may either last up to 30 seconds, or their duration may be set so that they fit the audio that you have added to the slideshow. Note that a five minute music file attached to a slideshow with five slides will make each slide last one minute! 4. Thumbnail - Changes the size of the thumbnail in the slideshow editing window. Also, have a look in the preferences, under the the iDVD menu. Youll notice a checkbox that says Always scale slides to TV-safe area. By checking this box, the images will be sized slightly smaller, so that the full image will appear inside of any TV. File name: iDVD2_User.pmd Last modified: 05/30/02 Copyright Arizona Board of Regents, 2002 University of Arizona 11 iDVD 2: User Manual LECTURETTE 5: FINALIZE AND BURN! Now that youve inserted all of the media that you will be using in your DVD, youll want to make sure that everything looks, sounds, and interacts in the way that you want it to. Look back to [PAGE #] and locate button #5, the Preview button, on the iDVD 2 desktop. Pressing this button will allow you to view your DVD as if you were watching it on a DVD player, complete with a simulated DVD remote control. About the remote: On a professional DVD, the menu and title buttons will take you to different locations. However, these buttons are linked to the same place in iDVD: the title screen. The four way arrows serve to navigate your menus and skip through slides in a slideshow. The fast forward, rewind, stop, and pause/play buttons work just as they would on a conventional VCR or DVD player. Take some time to make sure you are happy with the layout of your DVD. If you have problems, or would like to make changes, simply click the Preview button again, and you will re-enter the editing mode. Once you are satisfied with your DVD, locate the Burn button (labeled #6 on [page #]). DO NOT PUSH THIS BUTTON. Unless, of course you want a $5 DVD of Apples tutorial media of a fake couple having a fake vacation. Im sure you dont. You have now learned all of the possibilities of iDVD 2. With your own movies, pictures, and sound, you can create the DVD of your vacation, or portfolio, or band, or whatever you want. But before you do, we will cover a few of the technical details that have the potential of getting in the way of your DVD. File name: iDVD2_User.pmd Last modified: 05/30/02 Copyright Arizona Board of Regents, 2002 University of Arizona 12 iDVD 2: User Manual LECTURETTE 6: TECHNICAL DETAILS MOVIE FORMATS: Quicktime can handle a variety of movie formats, including MPEG, .mov, and .avi formats. However, there are many more formats that movies can come in. .wmv, .asf, and .rm formats, for example, are not recognized by Quicktime. This means that these movies MUST be converted into a quicktime-ready format, or you will not be able to use them in your DVD. Other programs, and other classes offered will teach you how to make use of formats that are not Quicktime-compatible. Also, for a list of compatible formats, check www.apple.com/quicktime IMAGES AND SOUND: The same is true of images and sound. These files must be in a format that Quicktime can read. Virtually all sounds obtained from the internet are recognized by Quicktime, and if an image is not recognized by Quicktime, it is easily converted by a program such as Photoshop. For this reason, images and sound are less problematic than movie files. FAILED BURNS: Sometimes, a DVD will burn improperly. Luck, specks of dust, and small bumps to a computer can all potentially affect this. At $5, an improperly burned disc is a pain, but sometimes this can happen. Keep in mind a DVD that skips or does not work properly is a result of a burn error, not a mistake you made in iDVD. The program is simple enough that as long as you see the right thing in preview mode, you will see a matching product in a burned DVD. CONCLUSION You may have noticed that iDVD 2 is a relatively simple program. Once you have the media that you want to use in your DVD, going from start to finish is a matter of a few hours or less. Remember that the themes provided by Apple are attractive, but you will achive much more desireable and longerlasting results by customizing your design with your own media. If there are no questions then we will be taking the criterion test now. File name: iDVD2_User.pmd Last modified: 05/30/02 Copyright Arizona Board of Regents, 2002 University of Arizona 13 iDVD 2: User Manual CRITERION TEST: 15 min This is the criterion test for the iDVD 2 module. It will test your comprehension of the module you just participated in or allow you to test out of the iDVD 2 module. 1. Create a new DVD. 2. Using the media in the tutorial folder of iDVD 2, add a background and a background sound to the DVD 3. Create a title called Fun Vacation for the DVD, and color the text white. Center it on the Screen. 4. Change the buttons to be a heart shape, and the button text to be white. 5. Create a Slideshow called My pictures 6. Add the pictures in the media folder to the slideshow, and add the slideshow music also. Make sure that the pictures are resized to be contained in the TV safe area. 7. Create folder called My Movies 8. In the folder, add the movie files, and name them based on their content, making sure that the text is of the same style as the 1st screen. 9. Make sure all buttons are contained inside the TV-Safe area, on both screens. 10. Title the second screen in the same style as the first, and call it Happy Movies. File name: iDVD2_User.pmd Last modified: 05/30/02 Copyright Arizona Board of Regents, 2002 University of Arizona