1
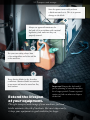
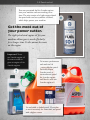
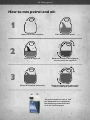
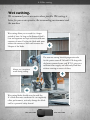
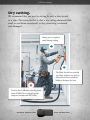
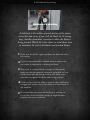
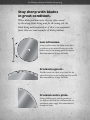
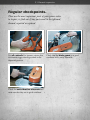
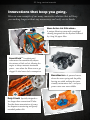
Discover more safe, ergonomic and efficient cutting. Welcome to our Power Cutter User Guide. It’s a useful source of information for both full-time users and those who use power cutters less frequently. You’ll learn safer and more efficient cutting, proper machine care and how our power cutters help you work powerfully with less strain. 1. INTRODUCTION 2. PREPARATION 3. START WORKING 4. CUTTING 5. MAINTENANCE 6. ERGONOMICS 7. ENVIRONMENT 1. Introduction Be prepared and work wisely. This user guide shows the most important aspects of safe, ergonomic and productive cutting and works as a complement to the Operator’s Manual. We recommend that you read the Operator’s Manual thoroughly before using the power cutter. Training is essential for using a power cutter. Use your common sense at all times. If you’re feeling uncertain in any situation, don’t hesitate to consult us. Also very important: never work with the power cutter if you are not physically able or understand how to use the machine. 2.Preparation 2.1 Safety clothing 2.2 Transport and storage 2.3 Choosing your blade 2.4 Mounting the blade 2.5 Petrol and oil 2.6 Mixing petrol 2.7 Refuelling 2.1 Safety clothing Helmet with approved eye protection, such as a visor or protective glasses. Including ergonomic hearing protection. Respirator mask that protects against unhealthy particles. Tight-fitting, yet comfortable clothing that gives great freedom of movement. Protective gloves. Protective boots with steel toecaps and non-slip soles. Dress right from head to toe. Although we’re actively working on how to make our machines even safer, it’s always important that you’re properly dressed when you’re working with a power cutter. This is what you should wear. 2.2 Transport and storage Store the power cutter safely without a blade mounted on it. This is to prevent damage to the blade. Always use approved containers for fuel and oil (in accordance with national legislation), and make sure they are properly secured. For your own safety, always have a fire extinguisher and a first aid kit at the work site. Keep abrasive blades in dry, frost-free conditions. Abrasive blades are sensitive to moisture and must be stored on flat, level surfaces. Extend the lifespan of your equipment. Important! Empty the fuel tank if you’re planning to store the machine for a longer period. Contact a petrol station to find out where to dispose of the fuel. The right transport and storage of your machines, fuel and blades minimises the risk of incidents. But most importantly, it keeps your equipment in good condition for longer. 2.3 Choosing your blade Keep up the pace. Your power cutter is designed for a certain type of blade. Using the right blade increases the lifespan of your tool and gives you a higher cutting speed and, most importantly, the best possible results. 2.3 Choosing your blade Blade Packaging – Material Blade Packaging – Material WONDERING WHAT BLADE TO USE? is connected to each material. The The colorcolor is connected to each material. onAthe you which applications the blade Apackaging color istells displayed on back the back of package. the package. color key iskey displayed on the of the Blade Blade Blade Packaging Packaging Packaging – –Material Material – Material The recommendation chart is suitable for. Never choose a blade that’s not recommended for your power cutter. And don’t use a blade with a maximum speed rating that is lower than your machine. Wet andThe dry cutting require different types of blade. Make sure that you choose the The The color color is connected color is connected is connected to each to each material. to each material. material. A color A blade color key A color is key displayed iskey displayed is displayed on the on back the on back the of the back of package. the of package. the package. right for your application. Material Material . ackage. he package. te 0/100/0 0/100/100/0 87/0 30/0 0/0/30/0 Husqvarna packaging designde m Husqvarna packaging 201 Asphalt Asphalt cMYK 0/0/0/100 cMYK 0/0/0/100 Asphalt Asphalt Asphalt Asphalt Husqvarna packaging design manual Concrete 2012: 1.0 Concrete cMYK 10/100/100/0 cMYK 10/100/100/0 cMYK cMYK 0/0/0/100 cMYK 0/0/0/100 0/0/0/100 Concrete Granite Concrete Concrete Concrete Granite Granite Granite cMYK cMYK 10/100/100/0 cMYK 10/100/100/0 10/100/100/0 cMYK cMYK 0/73/87/0 cMYK 0/73/87/0 0/73/87/0 Granite Granite cMYK 0/73/87/0 cMYK 0/73/87/0 Marble Marble cMYK 0/10/100/0 cMYK 0/10/100/0 Marble Marble cMYK 0/10/100/0 Abrasive Abrasive Abrasive cMYK 50/0/100/0 cMYK 50/0/100/0 Tiles Tiles Tiles cMYK 90/0/30/0 cMYK 90/0/30/0 Abrasive Abrasive Abrasive cMYK cMYK 50/0/100/0 cMYK 50/0/100/0 50/0/100/0 Tiles TilesTiles cMYK cMYK 90/0/30/0 cMYK 90/0/30/0 90/0/30/0 Universal Universal Universal Reinforced concrete / Asphalt Reinforced concrete/Asphalt Reinforced concrete/Asphalt cMYK 0/10/100/0 cMYK 0/10/100/0 cMYK 100/70/10/0 cMYK 100/70/10/0 Universal Universal Universal cMYK cMYK 100/70/10/0 cMYK 100/70/10/0 100/70/10/0 Granite Granite cMYK 0/73/87 cMYK 0/73/87/0 Marble Marble Marble cMYK cMYK 0/10/100/0 cMYK 0/10/100/0 0/10/10 Universal Universal cMYK 100/70/ cMYK 100/70/10/0 Reinforced Reinforced Reinforced concrete concr co cMYK cMYK 0/10/100/0 cMYK 0/10/100/0 0/10/10 2.4 Mounting the blade Here’s the correct way to mount a blade to ensure that it will work properly when you start cutting. Watch the video above or read the instructions below. 1 Before you start, make sure that the stop button is in the STOP position. 2 Check the spindle and flange washers and change parts that are warped, notched or indented. 3 Check the arrow on the blade to make sure that the diamond blade will rotate in the right direction when mounted on the machine. 4 If there’s no rotation arrow, check the direction of the tails attached to the diamonds found on each segment. The tails should follow the diamonds when the blade rotates. 5 Use an arbour bushing with the right dimension to the centre hole in the blade. The power cutters K 760 and K 970 have a reversible arbour bushing that fits both a 20 mm and a 25.4 mm centre hole. 6 Place the blade on the bushing between the inner and outer flange washers. 7 Tighten the bolt holding the blade. Tightening torque is 25 Nm. 8 Finally, pull the blade guard forward and backward check that it’s working properly. 2.5 Petrol and oil Pour our pre-mixed fuel for 2-stroke engines into your machine and start working in no time. The mix consists of a high-octane ethanol free petrol with our best synthetic oil blend, which helps protect your machine. Get the most out of your power cutter. The right petrol and engine oil for your machine allows you to work efficiently for a longer time. It also means less wear on the engine. Important! Never use 2-stroke engine oil for water-cooled engines or engine oil for 4-stroke engines. To increase performance and machine life – use an alkylate petrol. Preferably Aspen 2-stroke petrol or environmental petrol for 4-stroke engines, and blend it with our 2-stroke engine oil. Use unleaded or leaded petrol. If you plan to work intensively for some time, use petrol with a higher octane. 2.6 Mixing petrol How to mix petrol and oil: 1 Always use a clean container. Fill it halfway with petrol. Pour in all engine oil. Shake the container thoroughly to mix the petrol and engine oil. Fill up the container with petrol. Shake thoroughly again. Now you’re ready to refuel your power cutter. 2 3 The correct petrol / oil ratio is 1:50 (2 % Husqvarna oil or equivalent). Our dispensing bottles hold 10 cl of oil for 5 litres of petrol. 2.7 Refuelling Here are some basic tips on how you should refuel in order to get started quickly and stay safe. Watch the video above or read the instructions below. 1 If you’ve just used the machine, let the engine cool down for a few minutes. 2 Keep a safe distance of at least three metres from the working area. 3 Lay the machine down on its side and open the fuel tank cap. 4 Use a container with a spout to avoid spilling fuel. 5 Tighten the fuel cap on the power cutter (and also on the container, if the spout is removed). 6 Wipe off any fuel that has spilled on the machine or on the ground. If you’ve got fuel on your clothes – change them. 3. Start working 3.1 Safe work area 3.2 Plan your work 3.3 Start the machine 3.1 Safe work area Have a look around, for your safety and others. Checklist before you start working: Weather forecast. 15 m safety distance. Avoid working in extremely bad weather. Heavy rain and strong winds could affect the power cutter’s performance, making it unsafe and dangerous for you to work. Maintain a minimum of 15 metres safety distance from other people. Make sure that no people or objects can come into contact with the power cutter or be struck by parts thrown by the blade. Dangerous objects. Beware of pipes, electrical cables routed in the working area or in the material that you’re about to cut. Never cut into asbestos material. The work area. Make sure that nothing can affect your control of the machine, and that you have both sufficient working light and a firm foothold – especially on sloping ground. Never work in confined spaces with a petrol-driven power cutter. 3.2 Plan your work Be one step ahead. Firstly, check that the blade will not come in contact with anything when you start the power cutter. Secondly, try to predict what’ll happen when the material is cut through to avoid unpleasant surprises and accidents. Before you start working, draw accurate lines for straight horizontal and vertical cutting. When cutting on the ground, make sure to support the material properly to avoid getting stuck and exposing yourself to pinching kickbacks. Important! Plan the operation so that you’re able to cut straight. Twisting and turning the machine might damage it. 3.3 Start the machine Here’s how you start your power cutter properly, depending on if it’s cold or warm. Watch the video above or read the instructions below. COLD ENGINE START: 1 Press the air purge 4–6 times until the bulb is filled with fuel. 2 Press the decompression valve to reduce the compression, which facilitate an easier start. The decompression valve automatically returns to its initial position after the machine has been started. 3 Pull out the choke control. This will also put the throttle in high speed idle. 4 Put your right foot in the rear handle and your left hand on the front handle. 5 Pull the starter handle firmly with your right hand until you feel resistance. Then pull firmly and rapidly. Don’t pull the starter cord all the way out, as this can damage the power cutter. Also, never twist the starter cord around your hand. 6 When the engine starts, press the choke control in (otherwise the engine will stop). 7 Push full throttle to disengage the start throttle and the machine will idle. WARM ENGINE START: 1 Press the decompression valve. 2 Pull the choke control out and then press it in again. This puts 3 the throttle in high speed idle and you can start without choke. Start the power cutter as described for cold engine start. 4. Cutting 4.1 Basic technique 4.2 Horizontal, vertical & pipe cutting 4.3 Wet cutting 4.4 Dry cutting 4.5 Kickbacks & pinching 4.6 Blade problems & blade sharpening 4.1 Basic technique Get a grip on your cutting: Hold the rear handle with your right hand and the front handle with your left hand. Keep a firm grip with thumbs and fingers encircling both handles. Adjust the blade guard so that the rear section is flush with the work piece.This is to protect you from spatter and sparks. Before you start cutting, always make sure that you have good balance and a firm foothold. 4.1 Basic technique Important! For ergonomic and safety reasons, never cut above shoulder height. Stand on a scaffold or a platform (never a ladder) to make high cuts. Apply the cutting blade gently at full throttle and maintain full speed until you’re finished. To avoid injury if a kickback occurs, stand parallel to the cutting blade (instead of directly behind it). 4.1 Basic technique Always maintain a safe distance from the blade when the engine is running. Never force the machine or press the blade. Always cut straight. Pressure from the side can damage the blade and be potentially dangerous. 4.2 Horizontal, vertical & pipe cutting Here’s how to make horizontal and vertical cuts as well as cutting pipes. Watch the video above or read the instructions below. HORIZONTAL CUTTING: 1 To start with, mark where you should cut. 2 To cut horizontally, start by making a guide cut 3 a pproximately 2 cm deep. Cut from left to right, to have a clear view of the cutting line. Then go deeper, using step cutting, approximately 5 cm deep at a time. VERTICAL CUTTING: 1 To cut vertically, start by making a guide cut approximately 2 2 cm deep. Cut from the bottom to the top, to have a clear view of the cutting line. Then go deeper, using step cutting, approximately 5 cm deep at a time. Cut from the top to the bottom. Always maintain full speed for best cutting performance. PIPE CUTTING: Always cut pipes in the following three steps. 1 To cut a pipe, start by cutting the top. 2 Then cut one side of the pipe from the top to the bottom. 3 Move to the other side and cut the remaining part of the pipe, from the top to the bottom. 4.3 Wet cutting Wet cutting. We recommend you to use water where possible. Wet cutting is better for you as an operator, the surrounding environment and the machine. DRY CUTTING WET CUTTING 4.3 Wet cutting Wet cutting. We recommend you to use water where possible. Wet cutting is better for you as an operator, the surrounding environment and the machine. Wet cutting allows you to work for a longer period of time. As long as the diamond blade’s core and segments are kept cool with sufficient amounts of water. Cooling the blade with water reduces the amount of dust and increases the lifespan of the blade. Always use a respirator mask during cutting. The new wet cutting kit with progressive valve for the power cutters K 760 and K 970 along with the battery-powered water tank WT 15 give you a sufficient water supply and efficiently bind dust without creating an excess of slurry. Wet cutting blades should never be used dry. If a blade becomes overheated it can negatively effect performance, seriously damage the blade and be a potential safety hazard. DRY CUTTING WET CUTTING 4.4 Dry cutting Dry cutting. We recommend that you use dry cutting for only a short period at a time. The reason for this is, that a dry cutting diamond blade needs to cool down occasionally to keep from being overheated and damaged. Tap the switch below the picture to see and read more. WITHOUT VACUUM UNIT WITH VACUUM UNIT 4.4 Dry cutting Dry cutting. We recommend that you use dry cutting for only a short period at a time. The reason for this is, that a dry cutting diamond blade needs to cool down occasionally to keep from being overheated and damaged. Always use a respirator mask during cutting. The blade should occasionally run freely without any load to allow the airflow around the blade to dissipate the heat. For best dust collection, use the power cutter K 3000 Vac connected to the compact vacuum unit DC 1400. WITHOUT VACUUM UNIT WITH VACUUM UNIT 4.5 Kickbacks & pinching A kickback is the sudden upward motion of the power cutter that can occur if you stall the blade in the wrong way. Another hazardous situation is when the blade is being pinched. Watch the video above or read about how to minimize the risk of kickbacks and pinched blades. 1 Never user the blade’s upper quadrant, the kickback zone, for cutting. 2 If you’re using the blade’s kickback zone to make a cut, you might be exposed to a climbing kickback. 3 When you’re cutting a block or a pipe on the ground, make sure that the material is properly supported and can neither move nor roll during cutting. Also make sure to place the cut right to avoid the blade being pinched. 4 If the cut closes and the blade is pinched, this could cause an aggressive reaction force that makes you lose control of the machine. 5 Be careful when you insert the blade in an existing cut. If you don’t insert the blade straight it might become pinched and cause a kickback. 4.6 Blade problems & blade sharpening Stay sharp with blades in great condition. When blade problems occur they are often caused by the wrong blade being used for the wrong job, the blade being used incorrectly or if there’s an equipment fault. Here are some examples of blade problems: Loss of tension. Some possible causes: the blade is too hard in relation to the material being cut or the blade is used at the wrong speed of rotation. Recommendation: change the blade. Cracked segment. Possible causes: the blade is too hard for the material being cut or the cutting speed is too fast. Recommendation: change the blade. Cracked centre plate. Some possible causes: cutting pressure is too high or the blade has overheated due to inadequate water supply. Recommendation: change the blade. 4.6 Blade problems & blade sharpening Eccentricity. Some possible causes: the bond is too hard for the material being cut or the spindle bearings are worn. Recommendation: change the blade. Glazed. Possible cause: the blade hasn’t had adequate pressure when placed against the material being cut. Recommendation: sharpen the blade. Regain sharpness. A diamond blade can become dull when the wrong feeding pressure is used or when cutting certain materials such as heavily reinforced concrete. To sharpen the blade, cut in a soft material such as sandstone or a brick. 5. Maintenance 5.1 General inspection 5.2 External cleaning 5.3 Long service intervals 5.4 Husqvarna Service 5.5 Changing the drive belt 5.6 Changing the air filter 5.1 General inspection Regular checkpoints. These are the most important parts of your power cutter to inspect, to find out if any parts need to be tightened, cleaned, repaired or replaced. Check screws and bolts. Tighten them if necessary. Check the drive belt and, if necessary, tighten it. Check the spark plug. If it is defective, replace it. If you feel your machine losing power, replace the air filter. 5.1 General inspection Regular checkpoints. These are the most important parts of your power cutter to inspect, to find out if any parts need to be tightened, cleaned, repaired or replaced. Test all controls. For instance, ensure that the throttle trigger doesn’t get stuck in the depressed position. Check the anti-vibration elements and make sure that they are in good condition. Check that the blade guard is in good condition and is easily adjustable. 5.2 External cleaning Take good care of your power cutter. Clean your power cutter when you’re finished for the day. Flush the machine with water and dry with a clean cloth. 5.3 Long service intervals Innovations that keep you going. Here are some examples of our many innovative solutions that will keep you working longer without any unnecessary and costly service breaks. New Active Air Filtration™ A unique filtration system with centrifugal cleaning integrated into the flywheel followed by a long life paper filter. SmartCarb™ A sophisticated carburettor that automatically adjusts the mixture of fuel and air, allowing the engine to always maintain maximum power – even when the filters start to get clogged. It also lowers fuel consumption. DuraStarter™ A patented starter, where the return spring and the pulley bearing are sealed, making the starter virtually maintenance free – and your power cutter even more reliable. Poly-V belt Specially designed to last longer than conventional V-belts. Provides better transmission of power, less frequent re-tensioning and greatly extended product life. 5.4 Husqvarna Service At your service around the world. Even if you handle your power cutter correctly and maintain it daily, your machine still needs to be serviced periodically. Check the Operator’s Manual for recommended service intervals for your power cutter. 5.5 Changing the drive belt The drive belt is exposed to wear and needs to be replaced occasionally; of course this depends on how much you use the power cutter. Watch the video above on how to change the drive belt or read the instructions below. 1 Use your combination tool to loosen the adjuster screw and release the belt tension. Then release the two bar bolts. 2 Unscrew the bolts and dismantle the front belt guard. Remove the loose bearing housing. 3 Dismantle the rear belt guard by releasing the two screws holding the guard. 4 Replace the drive belt. Always use Husqvarna original parts. 5 Assemble all parts in reverse order. 6 Finally, tension the belt and tighten the two bar bolts. 5.6 Changing the air filter A loss of power indicates that you should check and probably replace the air filter. Watch the video above on how to change the air filter or read the instructions below. 1 Loosen the four screws on the filter cover and remove it. 2 Never clean the air filter with compressed air or a vacuum cleaner! This will damage the filter. 3 Use a vacuum cleaner to remove dust around and inside the filter area. 4 Remove the used filter and dispose of it. 5 Install a new filter. Always use Husqvarna original parts. 6 Put the filter cover back on and tighten the screws. 6.Ergonomics 6.1 Design solutions 6.2 Vibrations 6.1 Design solutions Our power cutters help you stay efficient at all times – without wearing yourself out. Watch the video above or read about the main ergonomic solutions for our machines. 1 Our power cutters have a well-balanced design and a great power-to-weight-ratio that make your work less tiring. 2 A shoulder width distance between the handles gives you a natural position to lift and hold the machine. 3 The centre of gravity is between the handles, which facilitates the handling of the machine. Especially when you’re carrying out horizontal cutting. 4 Thanks to the optimal distance between the handles, little force is needed during vertical cutting. 5 Power cutters that have a much shorter distance between the handles require more force, which makes cutting more strenuous. 6.2 Vibrations Low vibrations keep you highly productive. All our power cutters have effective anti-vibration systems that allow you to work comfortably and efficiently – even during longer shifts. By separating the tank and handles from the engine and blade with carefully tuned anti vibration elements, we have managed to keep the vibrations in the handles at very low levels. Many of our power cutters, such as the K 760, have vibrations below 2.5 m/s², which means that you can use the machines for a full day without any restrictions. The low vibrations spare your arms and hands, minimising the risk of you getting HAVS (Hand-Arm Vibration Syndrome), which was previously known as “white fingers”. 7.Environment 7.1 DEX & water solutions 7.2 Dust collection solutions 7.3 X-Torq® engine technology 7.1 DEX & water solutions Efficient, clean cutting. DEX is our comprehensive Dust Extinguisher System, which consists of solutions and products that allow you to work efficiently at all times – without creating a mess of water, slurry and dust around you. Automatic, powerful water flow. Perfect water supply for wet cutting. The new wet cutting system makes dust control easier. A progressive valve with distinct end positions allows you to adjust the water volume exactly as required, which greatly reduces water consumption and slurry. The Husqvarna WT 15 is a compact, easy-to-use 15-litre water tank with electric pump. The tank is batterypowered and provides a powerful flow of water for approximately 45 minutes – without you having to pump manually. 7.2 Dust collection solutions Portable, powerful dust collection. The Husqvarna DC 1400 is an effective dust collector for both wet and dry applications. It’s a powerful, portable unit ideal for smaller jobs. Attachable, effective dust collection. The Vac attachment for the K 3000 models gives you unbeatable dust collection and allows cutting without water. The vacuum unit is easy to install and remove thanks to its quick connection. 7.3 X-Torq® engine technology More power, less fuel and emissions. X-Torq® is our patented technology for powerful, fuel-efficient engines with impressively low exhaust emissions. These light and durable engines require a minimum of maintenance and service. The secret behind X-Torq® is that it uses dual flushing ducts: one for clean air and one for the fuel and air mixture. First, a barrier of clean air presses out the burnt gases, after which the fuel and air mixture is flushed in. X-Torq gives up to 20 % lower fuel consumption and up to 75 % lower exhaust emissions. At the same time, the engine delivers extra torque over a wider rpm range, providing raw power and rapid acceleration. All compared to conventional engines. ® As the air and fuel mixture in the crank case is more concentrated, the bearings in the engine will be more effectively lubricated. Thank you and be safe! www.husqvarnacp.com Dealer locator Service literature