1
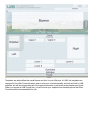
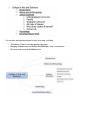
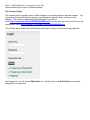
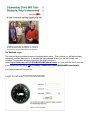
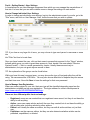
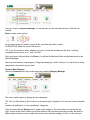
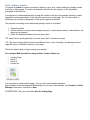
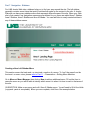
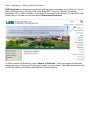
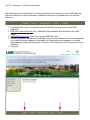
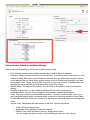
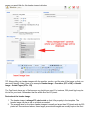
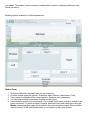
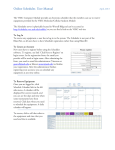
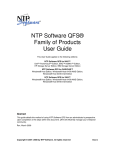
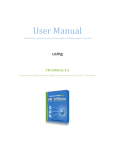
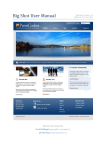
Joomla User Manual, Version 1.5 Joomla is a content management system that enables you to make and update Web pages easily.
Many aspects, including its ease of use and the ability to add to its capabilities, have made Joomla
very popular software for building Web sites. The following chapters will help you to use the Joomla
software.
Part 1 - Joomla at 30,000 Feet
Part 2 – Planning Your Site
Part 3 - Logging into the site
Part 4 - User Settings
Part 5 ‐ Sections and Categories
Part 6 - Articles
Part 7 - Sidebars
Part 8 - Green Horizontal Bar
Part 9 - Editing QuickLinks Menu
Part 10 - Editing Footer Menu
Part 11 - Editing Menu Modules
Part 12 - Editing Header Image Modules
Part 13 - Other Module Types
Part 1 - Getting Started – Joomla at 30,000 Feet
What is a content management system (CMS)?
A content management system is software that keeps track of every piece of content on your Web
site, much like your local public library keeps track of books and stores them. Content can be simple
text, photos, music, video, documents, or just about anything you can think of. A CMS is used to
administer (create, copy, move, delete, and archive) the content on your Web site. A major advantage
of using a CMS is that it requires limited technical skill to manage; however, basic HTML knowledge
is strongly encouraged. Another advantage of a CMS is that the CMS will take care of the look and
feel and layout on the site, and the user can focus on providing the content and navigation for their
website.
What is Joomla?
Joomla is an excellent example of a content management system that enables you to make and
update Web pages easily. Many aspects, including its ease of use and the ability to add to its
capabilities, have made Joomla very popular software for building Web sites. With Joomla, a template
is set up by the developer, and then the owner/administrator can give permission to others who would
simply need Internet access to log in and enter content on their own schedule. There are tools built
into the administrative side to customize the look and feel of the page, much like you would use in
creating a Word document. The administrator can allow others to publish directly or have it approved
first.
When you first approach Joomla, one of the most important things to understand is how the system
itself is organized. In order to help you remember what to do, think of this acronym –C.A.M.
S - First, you need a Section.
C - Next, you need a Category that lives in your Section.
A - Create your Article and assign it to the appropriate section and category
M - Create a Menu item linking to the article
It is straightforward enough to add content using an article, but how do you determine where on the
site that content will be displayed? The answer to this question is menus.
The entire Joomla system is organized around menus. Nearly every piece of content on a Joomla site
needs to be connected to a menu or module item entry before it is available to visitors.
Joomla menus define how the user will access the content of a site. The presentation of that menu is
controlled in the UAB sites by modules and by the template that has been designed for you.
Modules are the components that make up a page on your site. For example, the top banner, each of
the menus, the main content area, the right hand content area, and the footer are all modules. Joomla
comes with a number of layouts that combine these modules to create web pages. To create the look
of any particular page, you assign some combination of these modules to each menu item. Then,
when the user clicks on that menu item, Joomla assembles the resulting page by bringing in each of
those modules and displaying them to the user.
Here is a mockup of the available module positions.
Templates are what define the overall theme and look for your Web site. At UAB, the templates are
designed by the Web Communications team to ensure a consistent quality and look and feel to UAB
websites, as well as incorporating all of the required elements, such as the proper header and footer.
When you request a UAB Joomla site, you will choose your template from several options that Web
Communications has assembled for you.
Part 2 – Getting Started – Planning Your Site
When you decide you want a new Web site, the first thing to do is plan the site. A site plan will help
you create a Web site that meets your needs and the needs of your visitors. By taking the time at the
beginning to draft a plan, you can avoid pitfalls and make sure you have the content needed to get
your site off the ground.
Your site plan should include:
Project Summary: State general project information, goals, and relevant background information.
This
paragraph should be an overview of the project as a whole. Here are some questions to ask:
1. What is the single purpose of the Web site?
2. What organizational units will be promoted by this Web site? (List all that apply)
3. Who will be the primary contact for Web site administration?
Audience Profile: Profile the target audience. Provide enough detail to enhance everyone’s
understanding of who the audience is. Include some audience demographic information. Use these
questions as a guide. Add some of your own. It is typical for UAB Web sites to have multiple target
audiences. Answer the questions below for each recognized target audience.
1. Who is your target audience?
2. What are the secondary goals of the Web site?
3. What is a typical task the visitor might perform on the site? (For example: apply, register, log
on, search for information, send their e-mail address, call for more information.)
4. What do these people care about? Why are they interested in visiting the site? What trigger
would prompt them to visit the site, and why would they be enticed to return?
The Timeline: Once you have the pieces of the plan together, you should decide on a schedule.
Don't forget to include time for testing, revision, and user feedback.
Write Down Your Plan
When you start planning a project, it can get very messy very quickly, so if you have lots of ways to
capture your ideas, you'll be in better shape. Planning sessions can quickly become brainstorming
sessions as well. This is good, but don't let the brainstorming get in the way of getting a solid plan in
place for the site. If you find you still want to brainstorm more, then put that into the plan.
What Does a Site Plan Look Like?
A site plan can be as simple as a sketch on a piece of paper or a plan that resembles a table of
contents
for a paper.
You can also use digital software to build your map, including:
•
•
•
Photoshop, Paint, or another graphics program
Mapping software such as Mindjet MindManager, Visio, or Inspiration
Site map tools such as WriteMaps.com
Part 3 - Getting Started – Logging into the site
There are two ways to login to Joomla websites.
The Frontend Login:
The frontend login is typically used to make changes to an existing article or add new content. You
may access the frontend login by going to your domain and typing in /login at the end of the
address. The complete address should look like this if your site is
public https://www.uab.edu/YOURDOMAINNAME/login or it may look like this if your site is on the
development serverhttps://wwwpj1.it.uab.edu/YOURDOMAINNAME/login .
You will then see a screen that looks similiar to the below; enter your user name and password.
Once logged on, you will see an Edit Article icon. Simply click on the Edit Article icon to make
changes to your document.
The Backend Login:
The backend login provides access to the administrator panel. This is where you will add sections,
categories, articles, and menus. It includes the user manager where you can add or edit user
accesss. The complete address should look like thisif your site is
public https://www.uab.edu/YOURDOMAINNAME/administrator or it may look like this if your site
is on the development server https://wwwpj1.it.uab.edu/YOURDOMAINNAME/administrator .
Your login screen will look like this:
Part 4 - Getting Started - User Settings
In Joomla there is one User Manager component from which you can manage the users/authors of
that site. It is here that you can add or delete users or change the settings for each author.
How to Change Individual User Settings
In order to change an individual's user settings, log into the administrator area of your site, go to the
"Site" menu, and click on User Manager. Next, locate the user that you wish to update.
TIP: If you have a very large list of users, you may choose to type each person's username or name
into
the "Filter" text box to locate them.
Once you have located the user, click on their name to access their account. In the "Group" window,
indicate which group you wish to grant them access to. Next, decide if the user should "Receive
System E-mails" — that is, e-mails generated by Joomla. Usually these are sent only to
administrators, but you can grant anyone access to them.
TIP: An explanation of the groups can be found below.
While you have this user’s account open, you may choose the type of front-end editor they will be
using. We recommend the JCE Editor. You may also choose what kind of helpsite they can access
and their time zone. Now click Save to have the settings for that user preserved.
How to Manage User Registration
When new users register for your site, their user type will be classified depending upon how the
administrators originally set up user registration. The login address for a site in development is
https://www.uab.edu/YOURDOMAINNAME/login
There are four different public front-end settings:
•
•
•
•
Registered: users can see content that non-registered users cannot, but they do not have the
ability to edit anything.
Author: users can create articles and edit the ones they created, but do not have the ability yo
edit anything else, including articles by other authors.
Editors: are virtually the same as authors, but they can edit all author articles, not just their
own.
Publishers: are the same as editors, but they can also determine whether articles can be
published, unpublished, or deleted.
There are also three different levels of back-end settings: manager, administrator, and super
administrator. These levels have varying degrees of access to back-end tools with manager being the
lowest level of access and super administrator having complete access to all site tools.
Part 5 ‐ Content ‐ Sections and Categories
Sections and categories in Joomla provide a method for organizing your content/articles. Here's how
it works. A Section contains one or more categories, and each Category can have articles assigned to
it. Imagine the Sections as the drawers in a cupboard that contain the folders (categories), filled with
articles (content items).
Another way to consider this organization is to have a section called “Pets,” and two categories, one
called “Dogs” and one called “Cats.” Articles about dogs would be assigned to the “Dogs” category
and ones about cats the “Cats” category. So an article about dogs would be in the “Pets” section and
the “Dogs” category. You could not have one article that is in both the “Cats” and “Dogs” categories.
To work around this, you could either (1) create a new category called “Cats and Dogs” or (2) create
a second article to put in the second category.
TIP: Sections must be made first, and then categories need to be made before you add your articles,
if you are going to use sections and categories to organize your site.
Why Use Sections and Categories?
There are two main reasons you might want to organize your articles in sections and categories.
These
are listed here, but will be described in detail in a later document.
1. List and Blog Layouts
2. Organizing Articles in Article Manager
Let’s begin by logging into the administrator back-end using your user details.
Create a Section:
Navigate to the Content menu. In the drop-down list a menu item named Section Manager will
appear. Click it.
Once you reach the Section Manager, on the top right you will see several icons. Click the one
marked
New to create a new section.
On the next screen you need to type in a title, and then optionally an alias.
SUGGESTION: Make the section title Area 5.
TIP: If you do not add an alias, whatever you put in as the title will become the alias, including
unimportant words such as ‘a,’ ‘and,’ and ‘the.’
Once you have a title and alias, click Save. You will exit the Section Editor and be taken back to the
Section Manager.
Now you must create a new category. Categories always go “inside” sections. You can have as many
categories in any section as you want.
Create a New Category
Using the Content menu click on the menu item marked Category Manager.
The next screen is going to display all your categories.
TIP: You can filter these by their sections or by searching for keywords. You can also choose whether
to
display only published, or only unpublished, categories.
From this area click the New button to create a new category. The new button is found on the top
right. Just as in the Section Editor you will be writing a title, and then optionally an alias. But what is
different here is that you have to select the section you want the category to be in. In this case you
will be selecting the section we just created. Once you have a title, and optionally the alias, click
Save.
SUGGESTION: Make the category title Area 5.
After you’ve saved the new category you will be taken to the Category Manager.
Part 6 - Content – Articles
In Joomla, an article is content you want to display on your site. It can include text, images, media,
and links to other assets. For many Joomla sites, articles form the majority of the information
presented in the Web site.
It is important to understand that with Joomla the content of the site (for example, articles) is totally
separate from the presentation of the site (the way it looks on the page). So it is best to think of
articles as pure content, independent of the way it might be presented.
The process for creating a new article and getting it online is as follows:
1. Create the article
2. Add the article to a menu (almost always required; in some special cases, outlined below, this
step may be skipped)
3. Attach the desired modules to the new menu item.
TIP: Know that an article generally cannot be seen until it is linked in a menu.
TIP: The same article might be shown with different fonts, colors, headings, and background and
might be shown in different locations on the page.
Follow the steps below to begin creating your articles.
Our example Web site will have many articles. Some of these are:
•
•
•
•
Landing Page
Article 1
Article 2
Contact Us
It is very easy to create articles/pages. Just go to the administrative interface
(http://wwwpj1.it.uab.edu/sitename/administrator) if you aren’t there already, click Content > Article
Manager in the menu, and click on New.
SUGGESTION: Title your new article Area 5 Landing Page.
Fill in the title for the page, select the section and category, place the content in the page and click on
the Save button at the top right.
After saving the article/page, you will be taken to the article manager, where you can edit any article,
delete any article, or make new articles. Continue to create all of your articles before you create the
rest of your site.
TIP: Articles can be created without completing all of the article content. Just fill out the top of the
article and then place a few “placeholder” words in the body, such as “waiting for content.” You can
easily come back and fill in these articles after your navigation is in place and you can see the article
from the user side.
Joomla allows you to write the articles/pages using a rich text editor called JCE Editor, as shown in
the picture below. This means that you can make the text appear the way you want it. Use this rich
text editor just as you would use any word processing software.
TIP: Always use the “Tree” icon within the editor to insert images.
TIP: The articles created by you are not visible on the Web site. They will be visible only after we
create a menu link for them.
SUGGESTION: You will need to make a second article for your new sidebar so that you will be ready
when you begin building your left sidebar navigation. Call it Article 1 and apply Section 5.
Now that we have our pages ready, let’s move on to the next step and create sidebar menu links for
those pages.
Part 7 ‐ Navigation ‐ Sidebars
For UAB Joomla Web sites, sidebars help you to find your way around the site. The left sidebar
generally contains menu items that point to articles that make up the content in the site. A Joomla
Web site can have many sidebar menus that represent different areas of the site. When your Web
site is first created, four navigation menus are pre-defined for you; these are called Area 1 Sidebar,
Area 2 Sidebar, Area 3 Sidebar and Area 4 Sidebar. You can add links to newly created articles in
any of these sidebar menus.
Creating a New Left Sidebar Menu
This section covers the back-end—or structural—creation of a menu. To “see” the menu from the
front-end—or user—view, please refer to Part 11 – Presentation – Editing Menu Modules.
Go to Menus > Menu Manager then click on New to add an additional menu. Fill out the form to
name the menu so you will be able to identify which menu it is when it is time to work in that area of
the site.
SUGGESTION: Make a new menu and call it Area 5 Sidebar menu. You will need to fill all four fields
(copy-and- paste is acceptable). When you are complete, click Save. See example below.
In order to access your new menu, click on the Menus dropdown at the top of the page and find your
menu title, or click on the Menu Items graphic from the Menu Manager.
Adding Items to the Menu
Access Area 5 Sidebar and click on New in the top section of icons. You will be shown a list of menu
item types.
1. Click Articles, because we want this menu link to link to an article.
2. Click Article Layout when the articles list expands. This means the full article has to be shown
whenthe link is clicked.
Select Article > Article Layout. Fill in the title. The alias can be left blank and the Joomla system will
automatically fill it in. The alias in a menu is what displays in the page URL. If you would like a
particular alias, then you may choose your own.
SUGGESTION: Make the menu item title Area 5 Sidebar.
TIP: In the alias, all small words such as ‘a,’ ‘and,’ and ‘the’ will be included in the alias unless you
remove them.
From the Parameters (Basic) area on the right of the screen, click Select and choose the article that
you want the menu item to point to. Then click Save.
SUGGESTION: Select Area 5 Landing Page.
SUGGESTION: Add a second item to the Area 5 Sidebar. This is done in the same way you added
the first item, except this time you will select a parent item for your new menu link. Select Area 5
Sidebar as the parent so the menu items will be indented.
Horizontal Navigation Menu Bar
The items in the Horizontal Navigation Menu Bar then point to each of the individual sidebars using
an alias link. (This alias creates a link to an existing menu item.) An exception might be an item in the
horizontal menu that just points to a single page of content such as a “Contact Us” page.
If you visit the site now, you will see the links in the horizontal menu, and upon clicking one you will
see a list of all the articles/pages belonging to that area.
Part 8 - Navigation – Green Horizontal Bar
The Horizontal Menu has already been created for you. Generally UAB templates are designed for
you to create individual left sidebars for each area of your site. The horizontal navigation menu is
used to point to the left sidebar menus using an alias link.
To access the menu select Menu > Horizontal Navigation from the Menu dropdown at the top of the
page.
TIP: Make sure your left sidebar menus have been created before you begin.
Select the first menu item, Area 1, and open it to change the item name to one of your choice. If this
is a new item on the menu, select New, then click on Alias.
Add the title, and then from the Parameters dropdown (on the upper right) select the left sidebar
menu to which you want this alias to link. Make sure all items on the horizontal menu have the correct
names and are pointed to the appropriate menu.
Parameters (Basic)
In the event you have a single page to which you want to link from the horizontal menu, click New,
select Articles > Article Layout, and fill out the information as you did for the left sidebar items.
Part 9 - Navigation – Editing QuickLinks Menu
UAB QuickLinks is a dropdown menu found in the top right of every page in your Web site. The top
links to UAB resources—including UAB Home, BlazerNET, Directory, Calendar, Emergency
Information, Give to UAB, and Apply—are mandatory and must not be removed. To the left the UAB
QuickLinks you can add your own site-specific Department QuickLinks.
In order to access the QuickLinks, click on Menus > Quicklinks. Feel free to publish the links and
change the name of Department QuickLinks to reflect your entity name. The UAB QuickLinks should
not be edited without coordination with UAB Web Communications.
Part 10 - Navigation - Editing Footer Menu
The Web page footer is mandatory. The following elements are required for every UAB Web page.
(With the exception of contact information, these links have been populated when your site was
delivered.)
1. Accessibility link. Links to a text-only version of the Web site in an effort to meet ADA
guidelines.
2. UAB Web Pages Disclaimer Link. UAB Web Policy mandated link. Must be on ALL Web
pages.
3. UAB WWW Policy Link. A link to the current UAB Web Policy.
4. Contact Information. Mandated by UAB Web Policy, this link should point to an e-mail address
ora contact information page with information for contacting the site manager or the entity
responsible for placing the information on the site. This information is also convenient for your
audience.
5. Copyright.
To access the footer, click Menu > Footer and then edit the menu items as you would for any menu.
Part 11 - Presentation – Editing Menu Modules
A module provides useful information or interactive functions to site visitors. Modules act like mini
applications
that can be embedded most anywhere within a web page.
All Joomla websites require at least one sidebar menu module.
TIP: Every menu has a corresponding module that controls on what pages and in what position the
menu will display.
How to Access the Module Manager
Select Extensions > Module Manager from the drop-down menu on the back-end of your Joomla
installation.
What do you edit in a Module Manager?
In order to edit a menu module select the menu you want to customize. For this training select the
Menu 1 Sidebar module and click to open it. The most important function of the module manager is
to allow you to set which pages you want this menu to display on. It can appear on just one page or
on as many pages as you like—including all pages on your site. The Menu Selection area on the
bottom left controls this function. In order to change the highlighted items, hold the Control key down
on your computer keyboard and click or unclick the item.
TIP: The position of a sidebar menu is always left.
Other functions of the menu module can be found on the right in the same screen.
TIP: Module Parameters has a useful item called “Always show sub-menu items.” This allows you to
choose whether a menu displays its sub-pages all the time.
Column Headers Defined on the Module Manager
Click on the column heading to sort the list by that column's value.
•
•
•
•
•
•
#. An indexing number automatically assigned by Joomla for ease of reference.
Checkbox. Check this box to select one or more items. To select all items, check the box in the
column heading. After one or more boxes are checked, click a toolbar button to take an action
on the selected item or items. Many toolbar actions, such as Publish and Unpublish, can work
with multiple items. Others, such as Edit, only work on one item at a time. If multiple items are
checked and you press Edit, the first item will be opened for editing.
Module Name. The name of the module. You can click on the name to open the module for
editing.
Enabled. A green tick or a red X showing whether the use of the component is
enabled/disabled. Click the icon to toggle the item between enabled and disabled.
Order. The order to display modules within a position. If the list is sorted by this column, you
can change the display order of modules within a position by selecting a position in the Select
Position filter and then clicking the arrows or by entering the sequential order and clicking Save
Order.
Access Level. Determines who has access to this item. Current options are:
•
o
o
o
Public: Everyone has access
Registered: Only registered users have access
Special: Only users with author status or higher have access
You can change an item's Access Level by clicking on the icon in the column.
•
•
•
•
•
Position. The position on the page where this module is displayed. Positions are locations on
the page where modules can be placed (for example, "left" or "right"). Positions are defined in
the template in use for the page.
Pages. The menu Items where this module will be displayed. Options are "All" for all Menu
Items, "None" for no Menu Items, and "Varies" for selected Menu Items. A module will only
display on Menu Items where it is selected.
Type. The system name of the module. Joomla installs 20 standard modules. Many Joomla
extensions contribute additional modules.
ID. The ID number. This is a unique identification number for this item assigned automatically
by Joomla. It is used to identify the item internally, for example in internal links. You cannot
change this number.
Display #. The number of items to display on one page. If there are more items than this
number, you can use the page navigation buttons (Start, Prev, Next, End, and page numbers)
to navigate between pages. Note that if you have a large number of items, it may be helpful to
use the Filter options, located above the column headings, to limit which items display.
Part 12 - Presentation - Editing Header Image Modules
The Header Image Module controls the graphic at the top of a Web page immediately below the
UAB logo. There is no limit to the number of header images you may have on your site. With large
sites, each section will often have an identifying graphic at the top of the page that will remain
throughout the section.
TIP: You may change the image yourself and you may make it any height. The width is required to be
972 pixels.
1. Header Image. This area can be used to showcase your offerings to students, faculty, donors,
or other potential audiences. Promotional elements are typically relegated to the front door
header image of a site and/or on major landing pages (like a department landing page).
2. Site Navigation. The green horizontal navigation bar is specific to each Web site and will be
located on all pages just below the header image.
The header image is in a module, so it can be found by accessing Extensions > Module Manager >
Header Image. If you are making a new header image, click New and select Custom HTML module.
Click Next and fill in the fields like you did for the other modules. You will also select the Position
(banner) and fill in the Menu Assignment. Since this is called a Custom HTML module, the banner is
inserted in the editor area at the bottom of the page. TIP: This is where you will decide on which
pages you would like for this header image to display.
TIP: Always title your header images with the position, section, and the size of the image so that you
can easily identify it later. Here is an example: Header Image - Frontdoor (972 x 250) or Header
Image - Inside Pages (972 x 174)
Tip: Feel free to have any of the banners any height you need. For instance, 250 pixels high may be
too tall for your taste. Remember that the width must be 972 pixels.
Facts about the header image
1. The header image is always 972 pixels wide so that it fits properly in the template. The
header image can be as tall or as short as needed.
2. The average size for front door header images is usually no larger than 972 pixels wide by 250
pixels tall. As mentioned above, these larger promotional images are usually kept on the front
door or major landing pages.
3. Smaller header images can be used to add visual interest to a page for a user or to help raise
awareness of where a user currently is within the site.
Part 13 - Presentations – Other Module Types
The module manager is the place you go to add and edit all different types of Joomla modules.
Joomla modules are used to display content and/or media around the main content. We have looked
at menu modules, header image modules, and footer modules, but there are several other modules
available for your use. The following are a few that you may want to try:
•
•
•
•
•
•
•
Breadcrumbs – displays the navigation path from the home page to the current page in text
below the green horizontal navigation bar
Banner – allows you to show the active banners out of the component within your site
Feed Display – RSS, etc. – allows the displaying of a syndicated feed
Custom HTML modules – allows you to create your own text boxes with custom HTML code
using a WYSIWYG editor
Latest News – shows a list of the most recently published and current articles. Some that are
shown may have expired even though they are the most recent.
Most Read Content – shows a list of currently published articles which have the highest
number of page views
Poll – complements the Polls Component as it is used to display the configured polls
Third-party modules or plugins – modules that are not loaded in a default Joomla install
• JQuery Tabs – allows you to put content on a page in a tabbed environment
•
•
BigShot Google Analytics – allows you to add analytics to your site with no configuration
www.joomla.org has many modules – but note that Web Communications will need to test the
module and IT must evaluate the security of the module before it can be loaded onto your site.
Module Positions
Module positions are specific locations in a template that are allocated for displaying modules.
Modules can be positioned anywhere the template allows, making these very flexible elements for
your pages. This makes Joomla extremely versatile when it comes to displaying what you want,
where you want it.
Module positions available for UAB templates are:
Module Facts:
1.
2.
3.
4.
5.
All Joomla Web sites require at least one menu module
All other module types are optional. (Examples: News, Banner, Latest News, Polls)
Every menu is accompanied by a menu module. (Example: mod_mainmenu)
You can have multiple occurrences of similar module types.
Some modules are linked to components. For example, each menu module is related to one
menu component. To define a menu in Joomla, create the menu and menu items using the
Menus screens and then create the module for the menu using this screen. Other modules,
such as Custom HTML and Breadcrumbs, do not depend on any other content.