1
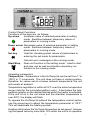
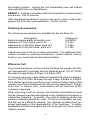
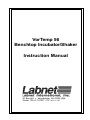
VorTemp 56
Benchtop Incubator/Shaker
Instruction Manual
Copyright October 1999, Labnet International Inc.
All rights reserved.
Reproduction without prior written permission is prohibited.
Information contained herein subject to change without
notice.
Introduction
The VorTemp 56 is a small benchtop shaker/incubator for samples
in microtubes and microplates. It replaces two pieces of equipment,
reduces time and conserves bench space. The VorTemp 56 is suitable for biological, biochemical and clinical laboratories where thermal shaking of samples is done routinely.
The VorTemp 56 is supplied with platforms for both microtubes and
microplates. Changing of platforms is quick and simple. The tube
platform will hold fifty-six 1.5/2.0ml tubes. Smaller tubes are accommodated through the use of adapters (sold separately). The
microplate platform will accommodate 4 standard microplates or two
deep well plates.
All operations, including speed, temperature and time are controlled
by a microprocessor. Functions are set and displayed digitally. Speed
is continuously variable from 200 to 1500rpm (max 1300rpm in 220V
unit). Three rates of acceleration may be selected. The shaker orbit
is 3mm. Temperature can be set and precisely controlled to a maximum of 100ºC. Time is set in 1 minute increments to 999 minutes.
The VorTemp 56 is constructed of heavy gauge, enamel coated steel.
The housing resists corrosion and is easy to clean with a damp cloth.
The unit is designed with a stable base for vibration free operation,
even at maximum speed.
Before attempting to operate the VorTemp 56, read this instruction
manual thoroughly. All persons operating this piece of equipment
should review the Safety Precautions section of this manual.
1
Table of Contents
Introduction
1
Warranty
2
Specifications
3
Unpacking and Installation
3
Changing Platforms
4
Operation
5
Safety Precautions
9
Care and Maintenance
9
Troubleshooting and Error Codes
10
Ordering Accessories
11
Where to Call
11
Warranty
Labnet International guarantees that the VorTemp 56 you have received meets its published specification. The VorTemp 56 is guaranteed to be free of defects in materials and workmanship for a
period of one year from the date of purchase. This guarantee is
valid only if the unit has been used in accordance with the instructions in this manual and for its intended purpose. Labnet International shall not be responsible for consequential damages or damages resulting from the abuse or misuse of this equipment. Labnet
International’s liability shall be limited to the repair or replacement of
the unit or refund of the purchase price, at Labnet’s discretion.
In the event that service is required, Labnet International’s Service
Department must first be contacted to receive a return authorization
number.
Labnet International reserves the right to alter the specification of
the VorTemp 56 without notice. This allows the incorporation of improvements as they are developed.
Please fill in the following information. This information will be required in the event that service becomes necessary.
Serial Number _________________________________
Date of Purchase _______________________________
2
Specifications
Temperature range
Temperature uniformity
Temperature display precision
Environmental operating temperature
Timer
Speed - 120V
- 220V
Display
Control
Shaker orbit
Power
Heater power
Maximum capacity
microplates
Dimensions (mm)
Weight
Ambient +5º to 100ºC*
Absolute deviation ±1ºC**
Absolute deviation ±1ºC
0º to 40ºC
1-999 minutes in 1 minute
increments, momentary
and hold functions
200-1500rpm
200-1300rpm
Digital
Microprocessor
3mm
515W
500W
56 microtubes/4
265W x 245D x 222H
11kg
*Note: Most microplates can not withstand temperatures as high as 100ºC. Check
manufacturers specifications before using microplates in the VorTemp 56.
**Uniformity is dependent upon platform used, shaking speed and platform load.
Specification given is for microtube platform, shaking between 500 and 1500rpm.
Temperature uniformity when using microplates will be different.
Unpacking and Installation
Upon receipt of the VorTemp 56, examine the exterior carton for
damages. In the event of shipping damage, a claim must be filed
with the transportation carrier within 10 days of receipt.
Remove the packing material and accessories from the box. Take
care that the accessories are not thrown away with the packing material. Remove the packing material from around the VorTemp 56
and lift the unit out of the box. Do not lift the VorTemp 56 by the
lid! Check that all items have been received. Included in the carton
should be the following:
VorTemp 56 unit
Power cord
Instruction Manual
Microplate platform, 4 washers and attachment
bolts
Microtube platform (in unit)
Tool for changing platforms
3
If any of these items are missing, contact Labnet International’s Service Department immediately.
Save the original packaging until the unit has been shown to be
operating properly.
Verify that the unit is rated for the proper voltage by checking the
panel on the back. Check that the proper power cord has been
received. The serial number is also found on the back panel. Make
note of the serial number in the space provided in the Warranty Section of this manual.
The VorTemp 56 should be located on a level, stable surface near a
grounded electrical outlet. Allow sufficient clearance on all sides of
the unit, at least 3 inches, for proper ventilation. Do not place the
unit in an environment where the temperature and/or humidity are
probe to sudden changes. Avoid locations in direct sunlight or near
heat producing equipment such as a refrigerator.
Plug the power cord into the back of the VorTemp 56 and then into a
grounded wall socket. Ideally the unit should be plugged directly
into a dedicated line to avoid interference such as spikes and surges
from other equipment. If such a line is not available, avoid circuits
which already have compressors and powerful motors connected to
the.
Power to the unit can be turned on and off by means of the switch
located on the front panel. When power is turned on, the switch will
glow.
Changing Platforms
The VorTemp 56 is supplied with platforms for both microtubes and
microplates. These plates are easily and quickly interchanged using the tool provided with the unit. Before attempting to change the
platforms, be sure to turn off the power to the unit.
Microtube platform
The VorTemp 56 is shipped with the microtube platform in place.
The microtube platform will hold 56 x 1.5/2.0ml tubes. Adapters can
be used in the platform to accommodate smaller sized tubes. See
The Ordering Accessories section for additional information. The
microtube platform may also be used as a storage or transport rack
when working with large volumes of samples. Additional racks may
be purchased separately.
4
To remove the microtube platform, simply grasp the knob in the center of the platform and pull gently upward. To replace, hold the platform by the center knob and line up the corner holes with the corner
posts of the unit. When lined up, simply press the platform into place.
Microplate platform
The microplate platform will hold up to 4 standard microplates or 2
deep well plates. Temperature uniformity is affected by the number
of plates loaded on the platform.
Most standard microplates are made of styrene or PVC. These plates
should not be used above 45ºC as they will warp and melt. Be sure
to check the manufacturers recommendations before using any
microplate in the VorTemp 56.
To replace the microtube platform with the microplate platform:
1. Remove the microtube platform as described earlier in
this section.
2. Remove the four corner posts using the tool provided with
the unit. Remove the stainless steel tube guard held in place
by the corner posts.
3. Center the microplate platform on the four corner post
mounting screws.
4. Press the platform down gently so that it is seated on the
screws. Using the tool provided with the unit, place the nuts
packaged with the platform onto the screws.
Take care not to lose the mounting posts as these will be needed to
change back to the microtube platform. To replace the microtube
platform, simply reverse the process.
Warning: If the unit has been in use prior to changing the platform, the platform and chamber walls may be hot. Take care
not to touch the heating element located below the fan. Be
sure that the unit is turned off prior to attempting to change the
platforms.
When replacing the tube guard, it is extremely important that it
is placed with the flat side down. Failure to do so may result in
damage to the temperature sensor.
Operating the VorTemp 56
The front panel of the VorTemp 56 contains the mains power switch,
display and 4 key membrane keypad. A representation of the front
panel follows.
5
Control Panel Functions
Functions of the keys are as follows:
Up arrow
Increases value of selected parameter in setting
mode. Switches between temporary values of
parameters in running mode.
Down arrow Decreases value of selected parameter in setting
mode. Switches between temporary values of
parameters in running mode.
Set key
Used for checking preset values of parameters or
entering the set mode for parameters.
Cancels error messages in the running mode.
Start/Stop
Does not function in the setting mode. Used to start
and stop unit as well as activate momentary run
function in the running mode
Operating parameters
Temperature - Temperature in the VorTemp 56 can be set from 1º to
100ºC in 1º increments. The unit does not have a cooling system,
therefore, for values set at or below ambient temperature, the unit
will remain at ambient.
Temperature regulation is within ±0.5ºC over the entire temperature
range (valid for the microtube platform only). A bar below the temperature graphic on the display flashes when the heater is activated.
If the unit is not in the run mode and the chamber temperature is
over 60ºC, the display will flash.
To operate the VorTemp 56 without the temperature control option,
use the arrow keys to adjust the temperature parameter to “OFF”.
This will deactivate the heating system.
Heating starts when the VorTemp 56 reaches its set speed. Increasing the speed value by more than 10% while the unit is in operation
6
can cause a malfunction of the heater. If this occurs, the unit will
cease operation and “ERROR 6” will be displayed. Ppen the lid to
decrease the temperature of the chamber and press the set key to
clear the error.
The VorTemp 56 incorporates an independent thermal switch that
will shut down operation of the heating system if the chamber temperature reaches 135º.
For incubations where temperature is crucial, the VorTemp 56 should
be allowed to heat up for at least 30 minutes before the samples are
placed in the unit. This ensures a stable temperature environment.
RPM - The speed of the unit can be set from 200 to 1500rpm (200 to
1300rpm in 220V version) in 10rpm increments. The display shows
the speed divided by 10, ie a display of 118 represents a shaking
speed of 1180rpm.
Acceleration - Three levels of acceleration can be preselected. The
level selected is dependent upon the sample.
Level 1 - soft acceleration. Acceleration from 0 to 500rpm is
very soft. Maximum speed is reached slowly. Suitable for
fragile samples or low mixing speeds.
Level 2 - middle acceleration. Suitable for less fragile samples
and mixing at lower speeds.
Level 3 - fast acceleration. Suitable for robust samples and
all speed ranges.
Timer - time of operation can be set from 1 to 999 minutes in 1
minute increments. An alarm will sound when time runs out. Continuous operation may be selected by using the arrow keys to adjust
the time parameter to “HLD”. The unit will run at the preset speed
until the stop key is preset or the parameter value is changed.
The time of operation may be changed while the unit is running.
However, it is important to remember the following: When time is
increased, the new period of time will be equal to the difference
between the time already passed and the new set time. (ie timer
originally set for 12 minutes. After 5 minutes have passed, the time
is increased to 15 minutes. After the change, the unit will run for an
additional 10 minutes: 5-15=10)
If the time value is decreased during operation, the unit will run for a
period equal to the difference between the new preset time and the
time remaining for the old value. If the new value is less than the
amount of time already elapsed, the unit will stop.
7
In addition to continuous and timed operation, the VorTemp 56 can
be run in momentary mode. A momentary run is activated by holding down the start/stop key when the unit is not in operation. The
unit will operate on the preset parameters as long as the key is
pressed. Elapsed time is shown on the display.
Setting Run Parameters
Press the up and down arrow keys to scroll through the parameters.
The display will show a graphical representation of the function as
well as the parameters current value. When the parameter to be
changed is displayed, press the set (star) key. The display will show
the current set value and the word SET will be shown on the display.
Change the parameter using the arrow keys. The confirm the new
setting, press the set key. Setting of a new value overwrites the old
value in the memory.
Note: if no key is pressed for 15 seconds while in the set mode, the
displayed value will then be stored in memory and the unit will exit
the set mode.
Starting Operation
When the start/stop key is pressed, the VorTemp 56 will enter the
running mode. This is indicated by the word RUN in the display All
four keys on the keypad are active in the run mode. Their functions
are as follows.
Pressing the Start/Stop key the first time will activate the running
mode using the last set parameter values. Holding this key for more
than one second will activate the momentary run function. The timer
will count the elapsed time and the unit will run until the key is released. Pressing the Start/Stop key while the unit is running will
stop operation.
The up and down arrow keys are used in the running mode to scroll
between the current parameter values. Set values can be viewed
by pressing the star key.
Note: While in the run mode, the values of certain parameters, including time and temperature can be changed. The shaking speed
cannot be changed while in the run mode. If this is attempted, the
unit will enter system error and an alarm will sound.
The set key, while used to enter the set mode for a limited number of
parameters while the unit is in operation, is also used to cancel error
messages and to cancel the alarm mode.
8
Safety Precautions
The following precautions should be taken when operating or working near the VorTemp 56.
Always disconnect the unit from the power source when
changing platforms.
Take care when changing the platforms as the platform and
walls may be hot. Protect hands if the unit has been used at
elevated temperatures.
Disconnect the unit from the power source before cleaning.
The unit should be cleaned with a soft, slightly damp cloth.
Do not submerge the unit or use harsh cleaners or aerosols.
Do not use the unit near water sources. Take care that liquids do not enter the chamber, especially during the cleaning procedures.
Be sure that the caps on all tubes are secured before closing
the lid of the unit.
Do not place electrical conducting objects into the VorTemp
56’s chamber. In the case of a malfunction, do not attempt to
service the unit. Contact qualified service personnel.
Never operate the shaker without a platform securely
attached.
Always wear shatterproof eye protection.
Always make certain that the platform and any hardware are
secure before operating the VorTemp 56.
Solvents and flammables should not be used on or near the
unit.
Hazardous samples should be shaken only in appropriate
containment vessels.
Care and Maintenance
The VorTemp 56 should be wiped down after each use with a soft
cloth. Do not immerse in water or pour liquids over the unit as electrical shock may occur.
The VorTemp 56 requires no routine maintenance or lubrication. To
assure a long life, the unit should be used in a dry, non-aggressive
environment.
9
Troubleshooting and Error Codes
The microprocessor in the VorTemp 56 continuously runs a self diagnostic program to ensure safe and reliable operation. If a problem is found, an error code appears in the display and an alarm
sounds. To stop the alarm and return to the run display, press the
set key.
ERROR 1: Signifies a problem with motor regulation. The unit will
automatically stop. Check for an obstruction of the platform or platform that is placed in the unit improperly. This code may also appear is the start/stop button is pushed rapidly and repeatedly while
the unit is in operation. If ERROR 1 appears repeatedly, call for
service.
ERROR 2: This code appears when there is a problem with the
temperature sensor. Unit automatically stops.
ERROR 5: This error appears when the lid is opened during normal
operation. Opening the lid during operation allows ambient air to
flow into the chamber, thereby lowering the temperature. To compensate for this the heater is activated.. Continued operation with
the lid open would cause the unit to overheat and damage samples
upon closing the lid.
The lid may be opened for up to 5 seconds without the device stopping. When the lid is opened, ERROR will flash on the display. After
5 seconds, ERROR 5 will be displayed, an alarm will sound and the
unit will cease operation. If the lid is closed and the start/stop key
pressed within 10 seconds of ERROR 5 appearing, operation will
resume.
If ERROR 5 is displayed and cannot be cancelled with the set key,
there may be a problem with the lid sensor. Push and pull the sensor (sliver post located on the top of the machine under the lid - is
depressed when the lid is closed) gently several times. If the message still does not disappear, call for service.
ERROR 6: If the temperature of the chamber rises more than 2º
above the set temperature, this code will appear and operation of
the unit will stop. Common causes of this error are changing the set
temperature value to one lower than the chamber temperature, opening the lid frequently during operation and changing the speed by
more than 10% during operation. Error 6 may also signify a malfunction of the heating system.
If this code appears, open the lid to cool the chamber. Switch the
display to show the actual chamber temperature. This temperature
should decrease fairly quickly. If it does not, there may be a failure in
10
the heating system. Unplug the unit immediately and call Labnet
International’s Service Department.
ERROR 7: Indicates a problem with the temperature measurement
electronics. Call for service.
If the displayed temperature is not correct and no error code is displayed, the unit may need calibration. Call for service.
Ordering Accessories
The following accessories are available for the VorTemp 56.
Description
Extra microplate platform/transfer rack
Adapters for 0.2ml tubes, pack of 6
Adapters for 0.4/0.25ml tubes, pack of 6
Adapters for 0.5/0.6ml tubes, pack of 6
Catalog no.
S-2020-R
C-1222
C-1206
C-1205
Labnet also has a full line of deep well plates. For additional information of plates or ordering accessories, contact Labnet International or your local Labnet International dealer.
Where to Call
If you have a question concerning the VorTemp 56, please call Labnet International’s Customer Service Department at 732 417-0700,
Monday through Friday, 8:30am to 5:30pm, EST.
For service inquiries, contact Labnet International’s Service Department at 732 417-0700, Monday through Friday, 9:00am to 5:00pm,
EST. Before returning a unit for service, a Return Authorization (RA)
number must first be obtained from the service department. Equipment sent in without prior authorization will be returned at the
customer’s expense.
When returning a unit for service, the chamber and platforms must
first be cleaned and decontaminated of any hazardous biological or
radioactive materials. If possible, the original shipping carton and
packing materials should be used. If this is not possible, be sure
that the unit is sufficiently packed. Any damage resulting from improper packaging is the responsibility of the customer. A written
explanation should accompany the unit along with the return authorization number.
11