1
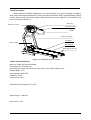
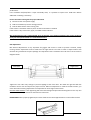
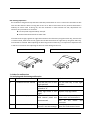
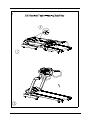
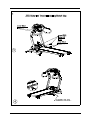
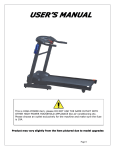
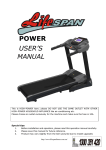
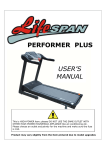
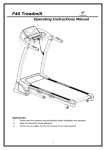
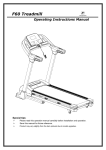
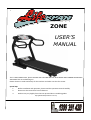
f ZONE USER’S MANUAL This is HIGH-POWER item; please DO NOT USE THE SAME OUTLET WITH OTHER HIGH-POWER HOUSEHOLD APPLIANCE like air-conditioning etc. Please choose an outlet exclusively for the machine and make sure the fuse is 10A.. Special tips: 1. Before installation and operation, please read this operation manual carefully. 2. Please save this manual for future reference. 3. Product may vary slightly from the item pictured due to model upgrades http://www.lifespanfitness.com.au/ Table of Contents 1 Brief Description………………………………………………………………1 2 M a i n Te c h n i c a l F e a t u r e s … … … … … … … … … … … … … … … … … … … … … … 1 3 I m p o rt a nt s a fe t y, e l e c t r ic a l & o pe ra t i o na l I ns t r u ct i ons … …… … … …… 2- 3 4 Installation………………………………………………………………………3 5 Use and Operation………………………………………………… …………3-4 6 Maintenance……………………………………………………………………4-6 7 Guides for malfunction…………………………………………………………6-7 8 Warranty………………………………………………………………………7 9 Error and self-inspect ion………………………………………………………7- 8 10 I n s t a l l a t i o n S k e t c h … … … … … … … … … … … … … … … … … … … … … … … 9 - 1 1 1. Brief Description ZONE motorized treadmill (diagram 1) can help complete your goal of keeping fit together with unique and elegant appearance. Easily read panel parameter. Easily operated folding system realizes space-saving. Auto speed range 1-20km/h and auto incline range 0-15. All makes it a hot home use fitness equipment. Safety key Meter accessories Heart rate sensor Handle Pillar accessories Footplate Power switch Running belt Running belt adjustor Diagram 1: ZONE Motorized Treadmill 2. Main Technical Features Main use: Body and beauty building This treadmill is for home use Panel displays speed, time, distance, heart rate, calorie, MP3, body fat, etc. Display Mode:LCD Input voltage: 240V±10% Frequency: 50HZ Input current: ≤8A Temperature for working: 5℃∽40℃ Speed range: 1∽20km/h Auto incline: 0-15 -1- Time display range:0:00∽99:59(minute : second); Distance display range:0.1~9.99kms 3. IMPORTANT SAFETY INSTRUCTIONS WARNING - Read all instructions before using this treadmill. It is important your treadmill receives regular maintenance to prolong its useful life. Failing to regularly maintain your treadmill may void your warranty. Danger–To reduce the risk of electric shock disconnect your treadmill from the electrical outlet prior to cleaning and/or service work. DO NOT USE AN EXTENSION CORD: DO NOT ATTEMPT TO DISABLE THE GROUNDED PLUG BY USING IMPORPER ADAPTERS OR IN ANY WAY MODIFY THE CORD SET. Install the treadmill on a flat level surface with access to a 220-240 volt (50/60Hz), grounded outlet. Do not operate treadmill on deeply padded, plush or shag carpet. Damage to both carpet and treadmill may result. Do not block the rear of the treadmill. Provide a minimum of 1 metre clearance between the rear of the treadmill and any fixed object. Place your unit on a solid, level surface when in use. Never allow children on or near the treadmill. When running, make sure the plastic clip is fastened on your clothing. It is for your safety, should you fall or move too far back on the treadmill. Keep hands away from all moving parts. -2- Never operate the treadmill if it has a damaged cord or plug. Keep the cord away from heated surfaces. Do not operate where aerosol spray products are being used or where oxygen is being administered. Sparks from the motor may ignite a highly flammable environment. Never drop or insert any object into any openings. The treadmill is intended for in-home use only and not suitable for long time running. To disconnect, turn all controls to the off position, remove the safety key, and then remove the plug from the outlet. The pulse sensors are not medical devices. Various factors, including the user’s movement, may affect the accuracy of heart rate readings. The pulse sensors are intended only as exercise aids in determining heart rate trends in general. Use handrails provided; they are for your safety. Wear proper shoes. High heels, dress shoes, sandals or bare feet are not suitable for use on your treadmill. Quality athletic shoes are recommended to avoid leg fatigue. Allowed temperature: 5 to 40 degrees. Before starting any exercise program, consult with your physician or health professional. Check all the bolts locked. We take no responsibility for any injuries due to above. Not recommend to do exercise within 40 minutes after meal. To prevent injury , please warm up before exercise. Consult with doctor before exercise if you have high blood pressure or any underlying conditions. The treadmill is designed for adults use only. Please Provide supervision for , elderly, children and handicapped with good care, guidance. Do not plug anything into any parts of this equipment, or it may cause damage to machine Do not change power lead length or change the cable plug; do not put anything heavy on cable or put the cable near the heat source; do not use power board socket with multiple outlets ,these may cause over load Turn off the power at wall outlet when the equipment is not in use. Do not pull on power lead to unplug always use the plug to remove from wall . -3- Remove the safety key after use to prevent unauthorized treadmill operation. IMPORTANT ELECTRICAL INFORMATION WARNING! NEVER use a ground fault circuit interrupt (GFCI) wall outlet with this treadmill. Route the power cord away from any moving part of the treadmill including the elevation mechanism and transport wheels. NEVER remove any cover without first disconnecting AC power. NEVER expose this treadmill to rain or moisture. This treadmill is not designed for use outdoors, near a pool, or in any other high humidity environment. IMPORTANT OPERATION INSTRUCTIONS Be sure to read the entire manual before operating your machine. Understand that changes in speed and incline do not occur immediately. Set your desired speed on the computer console and release the adjustment key. The computer will obey the command gradually. Use caution while participating in other activities while walking on your treadmill; such as watching television, reading, etc. These distractions may cause you to lose balance or stray from walking in the centre of the belt; which may result in serious injury. In order to prevent losing balance and suffering unexpected injury, NEVER mount or dismount the treadmill while the belt is moving. This unit starts with a very low speed. Simply standing on the belt during slow acceleration is proper after you have learned to operate this machine. Always hold on to handrail while making control changes. A safety key is provided with this machine. Remove the safety key will stop the walking belt immediately; the treadmill will shut off automatically. Insert the safety key will reset the display. Do not use excessive pressure on console control keys. They are precision set to function properly with little finger pressure. -4- 4. Installation: See “Installation sketch” 5. Use and Operation 5.1 Panel Keys and Function (6)program (12)mode (1)incline shortcut key (3)speed shortcut key (15)LCD window (13)music (11)speed-up (4)incline-up (10)speed-down (5)incline-down (14)stop (7)start (9)safety key -5- (1) “program” Under ready condition, press this key to select programs from P1 to P99. (2)“mode” Under ready condition , there are three different manual models . .TIME is countdown time model , DIST is countdown distance model , CAL means countdown calorie model . As you select these three models , you can use “ speed-up “ or “speed – down” to set the countdown value you need . .Then press “start” to run . (3)“speed-up” & “speed-down” Under running condition ,These keys are used for adjusting the speed. Adjustment range:0.1KM / time . (4)“incline-up” & “incline-down” Under running condition ,These keys are used for adjusting the incline value .Adjustment range:1 level / time . (5)“start” Under ready condition ,Press this key to make treadmill run . (6)“stop” Under ready condition ,Press this key to stop running . (7)“speed shortcut key” Under running condition ,Press this key to directly set the speed you need . (8)“incline shortcut key ” Under running condition ,Press this key . The incline goes directly to the chosen height . (9) LCD Window a.“ SPEED” : It shows speed ( range:1KM/H-20KM/H) b. “ INCLINE” : It shows incline (range:0-15 levels) c. “ TIME”: It shows time ( range:00:00---99.95) d. “ DIST” : It shows the distance ( range:00:00---99.95) e. “ CAL” : It shows the Calorie (range:0---995calorie) f.“ PULSE” : As two hands touch the heart rate sensor , it shows the heart rate value (range :60---200/minute) 5.2 Unload operating 1. Insert power plug into the socket with earth wire, turn the switch to “1” position which is on the frame 2. Put the safe key in the right position, then circuit is on, press “start”, keep it run in unload -6- condition. Test the condition of running belt (testing from low speed to high ones), after testing, press “stop”. 3. If everything is ok, then start to run. 5.3 Meter operating instruction 5.3.1 1. Insert power plug into the socket with earth wire, turn the switch to “1” position which is on the frame. Place the safe key to the appointed position. After a few seconds, panel will show that the machine is ready. 2. Nip another end of safe key to your clothes, and stand on the footplate on both sides. 3. Press "start” key, running belt moves at the lowest speed (0.8km/h). Speed windows will display your running speed. 4. Start to run. 5 . Press speed key or incline key to adjust speed and incline, speed window and incline window will display your speed and incline . 6. To end your exercise in a safe way, please first press “stop” key to close the treadmill. Please leave the running belt until it stops slowly. Turn off the power. 5.3.2 Heart Rate Testing Our treadmill can test your heart rate via the heart rate sensor. The data is only for reference. 5.4 Folding and Opening Treadmill 5.4.1 Folding Firstly lift and fold the back part of the frame board by hand till you hear a light sound, which means the folding system has been locked. At this time running board can’t be turned to the opposite direction 5.4.2 Opening Put the folded treadmill in a capacious position when you want to run. Then pull the adjusting parts by hand to keep it is unlocked. Press the back part by your hands down to about 10%, release it, then it will open automatically. 6. MAINTENANCE Reasonable cleaning/lubricating should be made to extend the life time of this unit. Performance is maximized when the belt and mat are kept as clean as possible. WARNING: THE MAT/DECK FRICTION MAY PLAY A MAJOR ROLE IN THE FUNCTION AND LIFE OF YOUR TREADMILL AND THAT IS WHY WE RECOMMEND YOU CONSTANTLY LUBRICATE THIS FRICTION POINT TO PROLONG THE USEFUL LIFE OF YOUR TREADMILL. FAILING TO DO THIS MAY VOID YOUR WARRANTY. WARNING: UNPLUG POWER CORD BEFORE MAINTENANCE. WARNING: STOP TREADMILL BEFORE FOLDING. Maintenance and servicing -7- AFTER EACH USE (DAILY) Clean and inspect, following these steps: • Turn off the treadmill with the on/off switch, then unplug the power cord at the wall outlet. • Wipe down the running belt, deck, motor cover, and console casing with a damp cloth. Never use solvents, as they can cause damage to the treadmill. • Inspect the power cord. If the power cord is damaged, contact Lifespan Fitness. • Make sure the power cord is not underneath the treadmill or in any other area where it can become pinched or cut. • Check the tension and alignment of the running belt. Make sure that the treadmill belt will not damage any other components on the treadmill by being misaligned. EVERY WEEK Clean underneath the treadmill, following these steps: • Turn off the treadmill with the on/off switch, then unplugs the power cord at the wall outlet. • Fold the treadmill into the upright position, making sure that the lock latch is secure. • Move the treadmill to a remote location. • Wipe or vacuum any dust particles or other objects that may have accumulated underneath the treadmill. • Return the treadmill to its previous position. EVERY MONTH -IMPORTANT! • Inspect all assembly bolts of the machine for proper tightness. • Turn off the treadmill with the on/off switch, then unplug the power cord and wait 60 seconds. • Remove the motor cover. Wait until ALL LED lights turn off. • Clean the motor and lower board area to eliminate any lint or dust particles that may have accumulated. Failure to do so may result in premature failure of key electrical components. EVERY 6 MONTHS It may be necessary to lubricate your treadmill running deck at least once every six months to maintain optimal performance of your treadmill (refer to section 4.4 for information). Only use lubricant provided by Lifespan Fitness! Please contact Lifespan Fitness with questions about applying lubricant to your treadmill. • Turn off the treadmill with the on/off switch, then unplug the power cord at the wall outlet. • Loosen both the rear roller bolts. (For best results, place two removable marks on both sides of the frame and note roller position).Once the belt is loosened, take the bottle of lubricant and apply it to the entire top surface of the running deck. Tighten both rear roller bolts (matching up the marks for proper position) to original position. After you have applied lubricant, plug in the power cord, key, start the treadmill and walk on the belt for two minutes to spread the lubricant. • Lubricate the air shocks with Teflon based spray. EVERY 2 YEARS It is necessary that you change your treadmill motor brushes once every 2 years to avoid damaging your motor. If you fail to change the brushes this may cause the motor to burn out, voiding any warranty. -8- SERVICING: IF YOU FAIL TO COMPLY WITH LIFESPAN’S MAINTENANCE AND SERVICING STEPS ABOVE, YOU MAY VOID YOUR WARRANTY. IF YOU REQUIRE A SKILLED LIFESPAN REPRESENTATIVE TO UNDERTAKE ONE OF THE STEPS ABOVE, PLEASE EMAIL US AT [email protected]. General Cleaning Use a soft, damp cloth to wipe the edge of the belt and the area between the belt edge and frame. A mild soap and water solution along with a nylon scrub brush will clean the top of the textured belt. This task should be done once a month. Allow to dry before using. On a monthly basis, vacuum underneath your treadmill to prevent dust build up. Once a year, you should remove the black motor shield and vacuum out dirt that may accumulate. General Care Check parts for wear before use. Pay particular attention to the fixing knobs and make sure they are tight. Always replace the mat if worn and any other defective parts. If in doubt, do not use the treadmill and contact our helpline. TAKE CARE TO PROTECT CARPETS AND FLOOR in case of leakages. This product is a machine that contains moving parts which have been greased / lubricated and could leak. Belt/Deck/Roller Lubrication The mat/deck friction may play a major role in the function and life of your treadmill and that is why we recommend you constantly lubricate this friction point to prolong the useful life of your treadmill. . You should apply the enclosed lubrication after approximately the first 50 hours of operation. We recommend lubrication of the deck according to the following timetable: Light use (less than 3 hours per week) every 6 months Medium use (3-5 hours a week) every 3 months Heavy use (more than 5 hours per week) every 6-8 weeks. See below procedures for lubricating: 1) Use a soft, dry cloth to wipe the area between the belt and deck. 2) Spread lubricant onto the inside surface of belt and deck evenly (make sure the machine is turned off and power is disconnected). 3) Periodically lubricate the front and rear rollers to keep them at their peak -9- performance. If the treadmill belt/deck/roller is kept reasonably clean, it is possible to expect over 1200 hours before additional re-lobbing is necessary. How to check the running mat for proper lubrication 1) Disconnect the main power supply. 2) Fold the treadmill up into the storage position. 3) Feel the back surface of the running mat. If the surface is slick when touched, then no further lubrication is needed. If the surface is dry to the touch, apply a suitable silicone lubricant. We recommend you use a silicone based spray to lubricate your Lifespan Treadmill. This can be purchased from your local sports Retailer or a local hardware store. Belt Adjustment Belt Tension Adjustment-It is very important for joggers and runners in order to provide a smooth, steady running surface. Adjustment must be made from the right and left rear roller in order to adjust tension with the Allen Key provided in the parts package. The adjustment bolt is located at the end of the rails as noted in diagram below: Left bolt Right bolt Note: Adjustment is thru small hold of end cap Tighten the rear roller only enough to prevent slippage at the front roller. Turn both the right and left bolt clockwise one full turn and inspect for proper tension. When an adjustment is made to the belt tension, you must also make a tracking adjustment to compensate for the change in belt tension. DO NOT OVER TIGHTEN - Over tightening will cause belt damage and premature bearing failure. This may also cause reduced motor performance and excessive roller wear. PLEASE NOTE: When properly tightened, the sides of belt can be raised approximate 2-3 inches off the board. - 10 - Belt Tracking Adjustment This treadmill is designed to keep the belt reasonably centred while in use. It is normal for some belts to drift near one side while the belt is running with no one on it. After a few minutes of use, the belt should have a tendency to centre itself. If during use, the belt continues to move toward one side, adjustments are necessary. The procedures are as below: ▲ First set speed at approximately 3.5km/h. ▲ Second check the belt shifts to which side. If the belt shifts to right, tighten the right bolt and loosen the left bolt by using 6mm Allen Key, until the belt is centered itself; If belt shifts to left, tighten the left bolt and loosen the right bolt by using 6mm Allen Key, until the belt is centered. When adjusting the belt using the 6 mm Allen Key, it is important to adjust the belt in half turn increments. Over adjusting the belt can cause damage to the mat. If the belts has drifted to the RIGHT If the belts has drifted to the LEFT 7. Guides for malfunction 7.1 Analyzing and eliminating malfunction Item. Malfunction Reasons 1 2 3 Treadmill can’t be started Meter can’t display Solution The safe key isn’t in the right position The electrical switch is placed to “0” creep age switch is not right The meter control line and control panel are unconnected Put the safe key in the right position Turn the electrical switch to “1” Replace creep age switch Pull the bolt out and open the motor cover and reconnect it Turn on the meter and reconnect Heart rate can’t be displayed The pole of heart rate Wet the pole with water or sensor is not wet enough liquor for hard contact lenses - 11 - Disturbed by Stay away from electromagnetism electromagnetism 4 Incline doesn’t work The motor wire is not Open the motor cover and well connected reconnect it 5 Running belt runs faster or Unadjusted Readjust it slower than what has been displayed 6 Running belt slips Running belt is not tight Please read point 3.3 enough Adjustment steps for tightening running belt for reference 7 Running belt is deflected The running belt is Please read point 3.4 The steps unadjusted. for adjusting the deflected running belt for reference 7.2 If you still can’t solve the problems after taking the solutions above, we hope that you can contact our dealer or company as soon as possible. 8. Warranty 8.1 We have assigned well-trained professionals at the dealers’. They are ready to serve for you at any time. You can purchase any spare parts you need. 8.2 Within the warranty time, and under your correct operations, our technicians will replace or repair the defective accessories in free(exclude shipping charges). But you will have to pay our technicians for the cost of broken parts if the warranty is expired or you use them in an incorrect way. 8.3 The warranty for spare parts under the correct operation. a) Life time frame:5Years b) Running belt and running board: 1 year c) Life time motor: 3 years d) Other parts: 1 year 8.4 Condition beyond Manufacturer’s warranty: If the product you purchase has the problems as follows, the manufacturer’s warranty is not effective: a) Improper operating, negligence, accident b) Wrong adjustment of running belt and poly V-belt c) Unauthorized take-down d) Improper maintenance 9 Error and self-inspection 9.1 Error:Treadmill gives the following error code if anything wrong,please contact the professional service people soon if it happens. E1:communication failure E2:over speed protection E3:sensor test error E4:incline error E5:over current protection E6:control self-test error E7: safety switches cut off - 12 - 9.2 Self-inspection No need to self-inspect unless special situation. If necessary, please do it under the instruction of professional technical people or sales because of the high voltage. a,open up motor cover b,Press the switch on the motor drive board c,Turn on the treadmill d,Undo the switch Treadmill raises up first, and then drops down。Self-inspection is completed 20 seconds after dropping down. The whole self-inspection process takes about 2 minutes. - 13 - - 14 - - 15 - Proofreading has been carefully done to the manual, if there are printing mistakes, please kindly understand. If pictures and the real product doesn’t match, please take the product as the final and correct one. If any improvement on function and specification, please kindly understand if you are not informed. WARRANTY REGISTRATION Please visit the following link to complete the product warranty form online. Please visit http://warrantyform.lifespanfitness.com.au/ PLEASE NOTE: YOUR WARRANTY IS ONLY VALID IF YOU CAN PROVE YOU ARE THE ORIGINAL PURCHASER ON THIS ITEM (i.e. A copy of the receipt, invoice, delivery date or internet confirmation). SERVICING: IF YOU FAIL TO COMPLY WITH LIFESPAN’S MAINTENANCE AND SERVICING STEPS ABOVE, YOU MAY - 16 - VOID YOUR WARRANTY. IF YOU REQUIRE A SKILLED LIFESPAN REPRESENTATIVE TO UNDERTAKE ONE OF THE STEPS ABOVE, PLEASE EMAIL US AT lifespanfi[email protected]. - 17 -