1
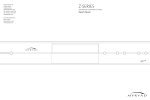
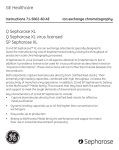
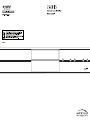
CONTENTS
INTRODUCTION
•
Accessories
2
•
Introduction
2
•
Installation and Safety
2
•
Setting up your CD player
Rear panel connections
3
•
Operating your CD player
Front panel controls
4
•
Remote Control Handset
Operation
5
•
System operation with
‘Smart My-Link’
6
•
Installing and replacing
batteries in the remote control
7
•
Care and handling of
compact discs
7
•
Trouble-shooting guide
7
•
Specifications
7
The Myryad Z112 has been designed to offer
a combination of high quality sound
reproduction and elegant styling in keeping
with other Myryad Z-Series products.
The Z112 is a full-function remote-controlled
CD player. It has fixed-level low-impedance
audio outputs to drive a Myryad integrated
amplifier or pre-amplifier - or other high
quality amplifier. In addition it has a digital
output on a single RCA phono socket
(SPDIF standard), suitable for feeding a
digital recorder or processor.
The Z112 also has a Smart My-Link® control
input and output for communication with
other Myryad Z-Series or MX Series
products.
The Z112 offers a range of expansion
possibilities:
•
The digital output can be used to feed a
digital recorder or processor.
•
The Smart My-Link® input can be
connected to a Myryad integrated
amplifier or pre-amplifier so that the
Z112 will automatically be switched on
or off when the amplifier is switched on
or off.
•
The Smart My-Link® input/output can
be coupled to other Myryad products
that can then be remote-controlled via
the Z112's infra-red receiver - or viceversa.
•
The Z112 can be controlled from a
remote room via its Smart My-Link®
input.
•
When linked via the Smart My-Link® to
a compatible Myryad integrated
amplifier or preamplifier a number of
extra features become available which
make the system as a whole easier and
quicker to operate.
INSTALLATION AND
SAFETY
This CD player generates very little heat but
still requires some ventilation. Do not place it
on a rug or other soft surface into which it
could sink, obstructing the air inlets in its
underside. Do not allow any obstruction to
the ventilation slots in the rear panel. The
CD player should not be installed in a built-in
situation such as a bookcase or rack unless
proper ventilation is provided.
CAUTION: THIS APPARATUS MUST
NOT BE EXPOSED TO DRIPPING OR
SPLASHING. OBJECTS FILLED WITH
LIQUIDS SUCH AS VASES MUST NOT BE
PLACED ON THE APPARATUS.
THE REAR PANEL POWER SWITCH
DISCONNECTS MAINS LIVE ONLY. THE
POWER CORD MUST BE
DISCONNECTED FROM THE REAR OF
THE APPARATUS, OR THE WALL
SOCKET, TO PROVIDE TOTAL
ISOLATION. ONE OR OTHER OF THESE
CONNECTIONS MUST BE READILY
ACCESSIBLE WHEN THE APPARATUS IS
IN USE.
2
Do not remove the cover, or attempt to
modify or repair the CD player yourself.
Refer all servicing to a qualified technician.
The CD laser radiation is Infra-Red, so you
cannot see it. If the cover is removed for any
reason, you MUST pay attention to the
following warning.
CAUTION - INVISIBLE LASER RADIATION
WHEN OPEN. DO NOT STARE INTO
BEAM OR VIEW DIRECTLY WITH
OPTICAL INSTRUMENTS.
ATTENTION - RADIATION INVISIBLE DU
LASER QUAND OUVERT. NE PAS
REGARDER FIXEMENT LE RAYON OU
DIRECTEMENT AVEC DES
INSTRUMENTS D’OPTIQUE.
WARNUNG - UNSICHTBARE
LASERSTRAHLEN IN GEÖFFNETEM
ZUSTAND VORHANDEN. NICHT IN DEN
STRAHL BLICKEN BZW DIREKT MIT
OPTIKINSTRUMENTEN ANSEHEN.
ADVARSEL - USYNLIG LASERSTRÅLING
VED ÅBNING. SE IKKE IND I STRÅLEN HELLER IKKE OPTISKE INSTRUMENTER.
ADVARSEL - USYNLIG LASERSTRÅLING
NÅR DEKSEL ÅPNES. STIRR IKKE INN I
STRÅLEN ELLER SE DIREKTE MED
OPTISKE INSTRUMENTER.
VARNING - OSYNLIG LASERSTRÅLNING
NÄR DENNA DEL ÄR ÖPPNAD. STIRRA
EJ IN I STRÅLEN OCH BETRAKTA EJ
STRÅLEN MED OPTISKA INSTRUMENT.
VAROI AVATAESSA OLET ALTTIINA
NÄKYMÄTÖNTÄ LASERSÄTEILYLLE. ÄLÄ
TUIJOTA SÄTEESEEN ÄLÄKÄ KATSO
SITÄ OPTISEN LAITTEEN LÄPI.
This product complies with DHHS 21 CFR
Chapter 1, Subchapter J.
ACCESSORIES
Your Z112 is supplied complete with the
following accessories:
•
•
•
•
•
Separate mains power cord to suit
country of sale.
My-Link interconnect (0.5m RCA-RCA)
Remote control handset.
Two AAA batteries for handset
(not in some countries)
MSR2 System Remote Control Owner’s
Manual
SETTING UP YOUR CD PLAYER
REAR PANEL
CONNECTIONS
1. Power Inlet
4. My-Link input/output
5. Line outputs
Before making any connection, check that
the mains voltage marked on the rear panel
is the same as your local mains supply.
When this CD player is used in a system
with other Z-Series products (or Myryad MXSeries), all may be joined together via the
My-Link. My-Link is a communications bus
that allows all the linked components to
operate together as a system and distributes
the remote commands received by any one
to each of the others.
These outputs are suited to the “CD” or other
“Line” inputs (e.g. AUX or TUNER) of any
integrated amplifier or pre-amplifier.
Plug the female (socket) end of the power
cord into the power inlet on the rear of the
CD player, making sure it is pushed in firmly.
Plug the male (plug) end of the cord into a
"live" wall socket or a suitable heavy-duty
extension cable.
2. Power Switch
Press one side of this rocker switch (the side
nearer the edge of the rear panel) to switch
the CD player ON and the other side
(towards the output sockets) to switch it
OFF. When the POWER switch is in the
OFF position all power is disconnected from
the CD player. In this condition the CD
player cannot be powered up from the front
panel or the remote control. When the
POWER switch is in the ON position (and
the power cord correctly inserted and
plugged in to a live wall socket) the CD
player will power up in standby mode (see
FRONT PANEL CONTROLS, STANDBY,
page 4).
It is recommended that the POWER switch
is turned OFF if the CD player is not going to
be used for an extended period of time.
3. Digital output
This is a serial electrical digital output to the
“SPDIF” standard. It should be connected
via a suitable interconnect to the SPDIF
input of a separate DAC (Digital-toAnalogue-Converter), digital pre-amp or
digital recorder. The cable should be of
standard 75Ω impedance for best
performance.
The simplest function provided by the MyLink bus is that all linked units will switch into
or out of standby mode when the amplifier’s
front panel or remote control standby key is
pressed.
The My-Link bus allows any linked product to
be remote-controlled via the CD player's
infra-red receiver - or vice-versa.
The CD player (or any other product on the
My-Link bus) can be controlled from a
remote room via a suitable interface to the
My-Link bus.
Use a short RCA-to-RCA (phono-to-phono)
interconnect cable to connect from the MYLINK IN socket on the Z112 to the MY-LINK
OUT socket on the amplifier. A second cable
may then be run from the MY-LINK OUT
socket on Z112 to the MY-LINK IN socket on
a Myryad tuner – “daisy-chain” fashion.
Further compatible Myryad products can be
linked in the same way, running from the
MY-LINK OUT socket on the tuner.
Inexpensive interconnects may be used as
the My-Link bus carries only control signals,
not audio, so these cables have no effect on
sound quality.
When other Myryad products equipped with
Smart My-Link® (e.g. Z-Series or MX-Series)
are connected via the My-Link many more
powerful system features are available (see
page 6).
3
Never connect to the amplifier’s PHONO
inputs.
OPERATING YOUR CD PLAYER
FRONT PANEL
CONTROLS
1. STANDBY
3. Disc drawer
6. PLAY/PAUSE
When the CD player is plugged into a live
wall socket and the POWER switch is turned
ON, it will power up in "standby" mode and
the LED (Light Emitting Diode) by the
STANDBY button will glow red. In this mode
the internal circuitry of the Z112 is powered
up but disabled, so that it consumes very
little power and its audio output is muted by
a relay.
The OPEN/CLOSE button controls the
drawer. It will accept either normal 120mm
CDs, or small 80mm CDs.
When a disc is present and the player is in
STOP mode, a single press of the
PLAY/PAUSE key will start the disc playing
from the first track, and illuminate the
symbol. When the disc is playing, pressing
PLAY/PAUSE again will put the player in
(see
PAUSE mode and illuminate
Figure 3). In PAUSE mode the disc is still
spinning and the laser head is kept at the
same location, so that if PLAY/PAUSE is
pressed yet again the disc will re-start from
exactly the same point in the music at which
it was originally paused.
When the STANDBY button is pressed the
Z112’s circuitry will be activated and, after a
few seconds delay, the audio outputs will be
enabled. During this delay period the
STANDBY LED in the display will flash blue.
When the outputs are un-muted it will glow
blue continuously. The blue coloured display
will illuminate, briefly showing “READ”,
followed by “NO DISC“.
When the STANDBY button is pressed
again the CD player will be returned to
standby mode, the LED in the display will
glow red again and the display will be
extinguished.
CAUTION: WHEN IN STANDBY MODE
THE INTERNAL CIRCUITRY OF THE Z112
IS STILL LIVE, SO ALL SAFETY
PRECAUTIONS MUST BE FOLLOWED.
2. Display
The operation of the player is indicated on a
high quality blue Vacuum Fluorescent
Display (VFD). Track number and track time
are shown simultaneously, together with
indication of the operating mode - see Figure
1 below.
4. Infra-red receiver
The infra-red (IR) remote control receiver is
mounted behind the window, just to the right
of the display. It must not be obscured when
the CD player is to be operated using the
remote control handset. Where possible it is
best to arrange that the IR receiver is in
"line-of-sight" of the remote handset. When
components are connected via the My-Link
bus, only one needs to receive IR command
signals in order to control any of the linked
units.
5. OPEN/CLOSE
Press this button to open or close the disc
drawer. The drawer may also be closed by
pushing the drawer front gently. When the
drawer is open the display read “OPEN”.
When the drawer is closed with no disc in
the player the display will read “NO DISC“.
When a disc is inserted and the drawer
closed the display will indicate “READ”
briefly while it reads the disc’s Table of
Contents (TOC). The display will then show
the total number of tracks and total playing
time of the disc (see Figure 2). This
condition is called STOP mode.
Table of contents (Figure 2)
Whole CD display (Figure 1)
4
With the disc drawer open, it is possible to
load a disc and press PLAY/PAUSE directly
(without pressing OPEN/CLOSE). This
action causes the drawer to close and the
disc to start playing from the first track. The
TOC is not displayed.
Pause mode (Figure 3)
7. Stop
When the STOP button is pressed the music
stops playing, the disc stops spinning, the
laser head is returned to the beginning of the
disc and the TOC is displayed. The player is
now in STOP mode.
The player automatically returns to STOP
mode when a disc has finished playing.
8. Skip/scan
The SKIP/SCAN keys are used to select the
track, or section within a track, to be played.
A brief press of one of these keys invokes
the SKIP function. Pressing the key and
holding it down continuously invokes the
SCAN function.
While a disc is playing, pressing
SKIP/SCAN
briefly will cause the player
to skip to the beginning of the next track. If
SKIP/SCAN
is pressed once, the player
will skip to the beginning of the current track.
If SKIP/SCAN
is pressed twice in quick
succession the player will skip to the
beginning of the previous track. Repeated
pressing of SKIP/SCAN
or
will make
the player skip forward or back over any
number of tracks. When playing the last
track of a disc, SKIP
will “wrap around” to
track 1 (and similarly, SKIP
from track 1
will skip to the last track). The SKIP keys
have the same function in PAUSE mode.
The SKIP function may also be used in
STOP mode to select a track number. The
selected track will play automatically shortly
after the last key press.
The SCAN function is used to select a
specific passage within a music track. While
a disc is playing, pressing SKIP/SCAN
or
and holding it down continuously will
cause the laser to scan rapidly forward (or
backward) through the music. Snatches of
music will be heard through the
loudspeakers at a reduced volume level. If
the SKIP/SCAN key is held down longer the
player will scan faster, but there will be no
sound from the loudspeakers.
It is not possible to SCAN back before the
beginning of track 1, or SCAN forward after
the end of the last track. The SCAN function
does not operate in PAUSE mode.
REMOTE CONTROL
HANDSET
OPERATION
The MSR2 handset supplied with the Z112
has been ergonomically designed to be easy
and comfortable to use. It will also control
Myryad’s Integrated Amplifiers,
Preamplifiers, Tuners and DVD Players.
See the separate MSR2 System Remote
User Manual for details of its use with these
products.
Important. In order to use the MSR2
handset to control your Z112 you must first
press the ‘CD’ input select button in the
middle of the handset to switch it to
‘CD/Amplifier’ mode. The handset will
remain in this mode until either the ‘DVD’ or
‘TUN’ key is pressed to change to DVD/Amp
or Tuner/Amp mode respectively.
The functions available in ‘CD mode’ are
described as follows.
Stop (g
g ) and Open/Close (▲)
These two keys operate exactly as the front
panel buttons with the same names.
Play (
) and Pause (
)
The handset has separate keys for PLAY
and PAUSE. Pressing PLAY from STOP
mode will cause the disc to start playing.
Subsequent pressing of PLAY during
PLAY mode will have no effect. If PAUSE is
pressed during PLAY mode, then the player
goes into PAUSE mode. Press PLAY to
return to PLAY mode.
REPEAT
A single press of the REPEAT key puts the
player into REPEAT 1 mode and the
“REPEAT 1” icon will be illuminated at the
bottom of the display. The currently playing
track will play to the end and then be
repeated - ad infinitum.
When the REPEAT key is pressed a second
time, REPEAT ALL mode is engaged and
the “REPEAT” icon will be illuminated at the
bottom of the display. When the disc has
played to the end it will immediately return to
the first track and start playing again - ad
infinitum.
A third press of the REPEAT key returns the
player to normal operation.
Skip
Track number keys (0-9)
The remote control SKIP
keys carry
out exactly the same SKIP function as the
front panel keys, but they cannot perform the
SCAN function.
Direct access to any track is possible using
the numbered keys on the remote handset.
To play a specific track (e.g. track 26) press
the track number keys “2” then “6”. After the
second key is pressed the player will play
track 26. If only one key (e.g. key “2”) is
pressed, the player will pause briefly before
playing track 2.
Scan
These keys allow direct access to the SCAN
function which can also be accomplished by
pressing and holding down one of the front
panel SKIP/SCAN
keys.
SHUFFLE
When in STOP mode, press the SHUFFLE
key. The SHUFFLE icon will light at the
bottom of the display and the disc will start
to play in SHUFFLE mode – playing all the
tracks on the disc in random order. In
SHUFFLE mode, when any track ends, the
remaining unplayed tracks are “shuffled” for
about a second and a random new track
selected. SHUFFLE mode can also be
entered direct from normal PLAY mode –
when pressing SHUFFLE will cause the
player to jump immediately to a new,
randomly selected, track.
Pressing SKIP
in SHUFFLE mode will
cause the player to shuffle and select the
next new track. Pressing SKIP
in
SHUFFLE mode has no effect.
Pressing SHUFFLE again returns the player
to normal operation. Pressing SCAN
or
in SHUFFLE mode will also cause the
player to drop out of SHUFFLE mode and
return to normal operation.
TIME
The TIME key controls what is shown in the
time (MIN and SEC) section of the display
when a disc is playing. During normal play
and in pause mode the display shows the
elapsed time of the track currently being
played (see Figure 3). If TIME is pressed
once, the remaining time of the current track
is displayed. If TIME is pressed again, the
remaining time of the whole disc is
displayed. When remaining time is
displayed, the time is preceded by a “−” sign.
A third press of the TIME key returns the
display to the normal indication of elapsed
track time.
5
DIM (Calendar and Display Off)
The DIM key may be used to activate the
track calendar or to switch the display off
while a disc is playing. The first press of the
DIM key will switch on the track calendar at
the right hand side of the display. The track
calendar displays the number of the current
track and all the other tracks that have not
yet been played – up to a maximum of 15.
It can be particularly useful when
programming, when it indicates only the
numbers of the tracks already programmed.
A second press of the DIM key will switch
the player into Display Off mode and turn the
display off. A third press will turn the display
on again. When the display is switched off,
operation of any of the player’s controls - on
the front panel or remote control - will cause
the display to switch on for about 2 seconds,
before it switches off again.
If there is no disc playing (i.e. disc in STOP
or PAUSE mode or no disc) the second
press of the DIM key will not blank the
display but it will still switch the player into
Display Off mode – indicated briefly by
“OFF” in the display. In this mode, when a
disc is played the display will switch off after
about 2 seconds. The Display Off mode can
be cancelled at any time by pressing the
DIM key again. If in STOP or PAUSE mode
display will then briefly read “ON” to indicate
the return to normal operation.
PROGRAM
Repeat A-B
An individual compilation of tracks may be
played by using the PROGRAM function. Up
to 16 tracks can be included in a program in
any order - including repeats of the same
track if desired. It is recommended that the
track calendar be switched on during
programming to make the operation easier
to follow. The procedure for storing a
program is as follows.
This key allows a specified section of a track
or disc to be repeated.
In STOP mode first press the PROGRAM
key to enter Program mode. The small
PROGRAM icon at the bottom of the display
will start to flash. This indicates that the
player is in Program Enter mode, waiting for
a track number. Use the number keys on the
remote control to enter the number of the
first track to be programmed (one or two
digits as necessary).
When the track number has been entered it
will appear in the “track” section of the
display, followed by “P 1”, indicating that this
is the first programmed track. Then proceed
to enter the second track in the same
manner. If you make an error, press the
STOP button or the STOP key on the
remote and the currently displayed
programmed track will be deleted. Continue
entering tracks, up to a maximum of 16, until
your program is complete. The display will
be similar to that shown in Figure 4.
Program mode (Figure 4)
First play the CD until it reaches the desired
start point and press the “A-B” key. A display
icon will illuminate reading “REPEAT A -”.
Continue to play the disc until the desired
end point is reached and press the “A-B” key
again. The display will then read “REPEAT
A-B” and the desired selection will be played
repeatedly.
To cancel A-B repeat mode, press the “A-B”
key once more, the “REPEAT A-B” icon will
be switched off and normal play will resume.
Pressing either SKIP
or SCAN
automatically exits REPEAT A-B mode.
STANDBY
Pressing the STANDBY key sends the
command to switch your Myryad Integrated
Amplifier or Preamplifier into or out of
standby. If the Z112 is My-Linked to the
Integrated Amplifier or Preamplifier then it
too will be switched into or out of standby.
It is also possible to switch only the Z112
into or out of standby by using the “CD
STANDBY” command. Press and hold down
the “CD” key (on the bottom row of the
handset), then press the STANDBY key at
the same time. This will switch the standby
status of the Z112 without affecting any
other unit.
SYSTEM
OPERATION WITH
SMART MY-LINK®
When used as a linked system (which must
include a Smart My-Link® equipped
Integrated Amplifier or Preamplifier) Myryad
products equipped with Smart My-Link®
have a number of extra features that make
the system as a whole easier and quicker to
use than a normal hi-fi. These include:
Start-on-Play (CD)
Press play on the CD player (or the remote
control) and both the CD player and amplifier
will switch out of standby (if necessary) and
play the CD. The amplifier will automatically
select the CD source.
Start-on-Open (CD)
Press open/close on the CD player (or the
remote control) and both the CD player and
amplifier will switch out of standby (if
necessary) and the CD drawer will open. The
amplifier will automatically select the CD
source.
Intelligent Input Selection (Amplifier)
Press a source select button on the remote
control and the system will awaken only the
amplifier and the selected source (if in
standby).
Mute/Pause Control (Amplifier/CD)
When using the CD player, selecting mute
from the remote control will mute the
amplifier and pause the CD. When the
amplifier mute is cancelled, the CD will
continue playing.
If you now press PLAY (or PLAY/PAUSE)
the PROGRAM icon will stop flashing and
the programmed tracks will play, beginning
with from program step 1.
Power-Saving Mode (Amplifier)
The amplifier will switch the CD Player or
Tuner into standby if either source remains
unselected for more than ten minutes.
Alternatively, if you press PROGRAM, the
PROGRAM icon will stop flashing and the
display will show the total number of tracks
programmed, followed by the total time of
the program. From this “Program Stop”
state, you can add more tracks to your
program by pressing PROGRAM to go back
to Program Enter mode, or press Play or
Play/Pause to play the programmed tracks.
Automatic Switch-On (CD/Tuner)
If the standby button on the Tuner or CD
player is pressed, the amplifier will also
awaken and select the correct source.
Whilst playing a program the display will be
the same as during normal play – except
that the PROGRAM icon remains illuminated
– and all the normal control functions can be
used including Repeat and Repeat 1, but not
Shuffle. The TIME key will switch the display
between elapsed track time, remaining track
time and remaining program time. If the
SHUFFLE key is pressed the program is
erased and the player immediately enters
Shuffle mode.
If STOP is pressed during program play the
player returns to the “Program Stop” state. If
STOP is pressed again in the “Program
Stop” state, then Program mode is deleted
and the program erased. Pressing
OPEN/CLOSE will also leave Program mode
and delete the program.
6
CARE AND
HANDLING OF
COMPACT DISCS
•
•
•
•
•
Fingerprints and dust should be carefully
wiped off the disc’s signal surface (shiny
side) with a soft cloth. Unlike vinyl
records, the CD has no grooves to
collect microscopic debris, so gentle
wiping with a soft cloth should remove
most particles. Wipe in a straight motion
from the inside to the outside of the disc.
Small dust particles and light stains
should have absolutely no effect on
reproduction quality.
Never use chemicals such as record
sprays or fluid, benzene or other
solvents to clean CDs. Such chemicals
will irreparably damage the disc’s plastic
surface.
Discs should be returned to their case
after use to avoid serious scratches that
could cause the laser pickup to skip.
Do not expose discs to direct sunlight,
high humidity or high temperatures for
extended periods. Long exposure to high
temperatures can warp the disc
Do not stick paper or write anything with
a ball-point pen on the disc surface.
INSTALLING AND
REPLACING
BATTERIES
The remote handset uses two 1.5 V type
AAA batteries. To fit new batteries first open
the battery compartment at the base of the
handset and remove any existing batteries.
Fit the new ones as directed by the symbols
moulded inside the battery compartment,
then replace the battery compartment cover.
The batteries should always be removed if
they are discharged (indicated by no remote
control operation or by operation only at very
short range), or if the remote control is not
going to be used for an extended period.
TROUBLESHOOTING GUIDE
Some of the most common problems:
No sound:
•
Power turned off or system in standby
mode. Check that the LED by the
STANDBY button is illuminated blue.
•
Amplifier source selection incorrect.
Check that CD is selected.
•
UK version only: The fuse in the mains
plug has failed. Check and replace if
necessary.
Disc does not PLAY:
•
No CD is inserted. Insert a CD, label
side up.
•
The CD has been loaded upside down.
Re-load the disc label side up.
•
The CD is badly scratched or dirty.
Check the CD and clean or replace as
necessary.
The CD skips part of the music:
•
The CD is badly scratched or dirty.
Check the CD and clean or replace as
necessary.
Sound in one channel only:
•
Interconnect cable pulled loose or
making poor contact. Check and, if
necessary, un-plug and re-plug all
cables.
Loud buzz or hum:
•
Interconnect cable pulled partially out of
its socket.
•
Defective interconnect cable.
Incorrect operation - some functions not
working:
•
Control processor latched. Switch off
POWER on rear panel and wait for at
least one minute. Then switch POWER
on and switch out of standby. Normal
operation should resume.
For further help please visit the Myryad
website at: www.myryad.co.uk
SPECIFICATIONS
Disc capacity
Digital-to-Analogue Converter.
Frequency Response
THD
Signal-to-Noise Ratio
Channel Separation
Output Level at 0 dB
Output Impedance.
Digital Code Output
Physical Specification
Dimensions (width x height x depth)
Weight, Net.
120 or 80mm
24 bit / 192kHz fifth-order Delta-Sigma
<± 0.5dB (20Hz – 20kHz)
0.0025% (1kHz)
105dB (A weighted)
.>80 dB (20Hz – 20kHz)
2.3Vrms
240 Ohms
Coaxial 75Ω, to SPDIF standard
436 x 78 x 286mm
5.3 kg
7