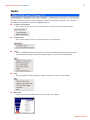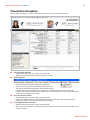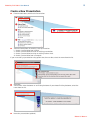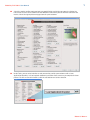
1
CHOOSE A TOPIC BELOW:
Main Menu
Toolbar
Presentation Navigation
Create a Presentation
Loan Comparison Worksheet
Using Scenario Studio™ with BOOM!
Preview Presentation
Edit an Existing Presentation
View an Existing Presentation
BOOM! by ENVISION™
user manual v. 3.1.5
Web Site Presentation:
Create and Send
Delete Web Site
Print a Presentation
Create a Feature Sheet
Edit, View or Delete a Feature Sheet
Add/Edit Co-Brand Information
Edit Personal Information
Open Contact Manager
Import Records From Other Programs
Export Records to Other Programs
Search Contact Manager
Using the Task Manager
Adjust General Settings
Self-Paced Online Training
Join Online Training
Check for Software Updates
© 2011 Citibank, N. A. equal housing lender, member FDIC. Citi, Citibank, Arc Design and Citi with Arc Design
are registered service marks of Citigroup Inc. BOOM! by ENVISION™ is a trademark of ENVISION Real Estate
Software, Inc. ENVISION Real Estate Software, Inc. is a subsidiary of CitiMortgage, Inc.
2
BOOM! by ENVISION User Manual
TM
Main Menu
The Main Menu is your gateway to BOOM! by ENVISION’s many functions. BOOM! by ENVISION’s Toolbar
offers the same options as the Main Menu. Throughout the program, you can click on Main Menu in the
toolbar to access all BOOM! by ENVISION sections.
■ Customer Presentation
• Create presentation.
• Edit/view presentation.
■ Feature Sheet
• Create Feature Sheet.
• Edit, view or delete a Feature Sheet.
■ Tools
• Add/edit co-brand information.
•Edit Personal Information that appears on web sites.
•Open Contact Manager to view or edit client information.
•Search Contact Manager to find selected records of clients or import your contact list from
Microsoft Office Outlook.
• Access Preferred Settings in BOOM! by ENVISION.
■ Help
• Self-paced Online training.
• Register for live, online training courses.
• Check for software updates.
• View/Print the User Manual.
Return to Menu >>
3
BOOM! by ENVISION User Manual
TM
Toolbar
The toolbar along the top of the screen replicates some of the Main Menu’s functions, but it also gives
you additional navigation to various other BOOM! functions.
■ Customer Presentation
•Gives you the option to create a new presentation or edit/view an existing presentation.
■
Feature Sheet
• Gives you the options to create, edit, view or delete a Feature Sheet.
■
Tools
•Choose to Add/Edit Co-Brand Information, Edit Personal Information, Open Contact Manager,
Search Contact Manager, change the program Settings, or Sync Personal Information.
■
Help
•Sign up for Online Training, Check for Software Updates or access the User Manual.
■
Main Menu
• Returns you to the Main Menu where all your options are available.
Return to Menu >>
4
BOOM! by ENVISION User Manual
TM
Presentation Navigation
Some navigation options are only available when you are in Preview Presentation mode.
■
■
Edit Presentation Button
•Available only when you are viewing a presentation.
• Allows you to edit the presentation that you are viewing.
Web Site Button
•Available only when you are viewing a presentation.
•After you have prepared a presentation, create the web
site and send the link to consumers and co-brand sources.
•Delete a web site you no longer want a customer or co-brand source to access. Web sites
normally remain active for 60 days. If anyone uses the link after 60 days, they are instructed to
contact their mortgage professional.
■ Print Presentation Button
• Available only when you are viewing a presentation.
• Change the footer containing your contact information for all future printed presentations.
•Review the contents of the presentation before printing.
■ Create/Update Web Site Button
•Available only when you are viewing a presentation.
•After you have prepared a presentation, create the web site and send the link to consumers and
co-brand sources.
Return to Menu >>
5
BOOM! by ENVISION User Manual
TM
Create a New Presentation
■
From the Main Menu, click Create Presentation.
■ You have four options for creating a new presentation:
1. Create a presentation from scratch.
2. Create a presentation based on an existing presentation.
3. Create a presentation based on an existing feature sheet.
4. Create a presentation from a Template.
If you are creating a presentation using options two, three or four, select the name from the list.
■
■
Click Next.
Select either a New Customer or an Existing Customer. If you choose Existing Customer, select the
name from the list.
■
Name the presentation (optional).
Return to Menu >>
6
BOOM! by ENVISION User Manual
TM
■To co-brand the presentation, click the check box and select a name from the list.
(NOTE: Before you can co-brand your presentation with a Realtor, Builder or Financial Adviser, you
must first set up their information. Click here to learn how).
■ Click Next.
■ If you are creating a presentation for a new customer, enter the client’s information. Name and
email address are required.
■
Click Next.
Return to Menu >>
7
BOOM! by ENVISION User Manual
TM
■Select the movies and/or mortgage tools you would like to send to the consumer by clicking the
box next to the title. Use the Movie Preview Window to familiarize yourself with the content of the
movies. Select the appropriate mortgage tools for your customer.
■Under Tools, you can select whether or not you want to provide your customer with a Loan
Application Checklist, a list of required documents and other items necessary to complete the loan
process. To edit or view this Checklist, click the edit button next to the selection.
Return to Menu >>
8
BOOM! by ENVISION User Manual
TM
■Review the default items in the Checklist. To add any items throughout the checklist, click the Add
item button beside the appropriate category. Enter your new Checklist item. To remove an item,
select it from the box, then click the Delete button.
■To save your modified version of the Checklist as a recurring template, click the Save as Template
button at the bottom of the screen, name your template, then click Save.
■ Click Apply to Presentation. You will be returned to the movie selection screen.
■To open a previously saved template, click the Load/Delete a Template button, locate your template
in the list, click Load, then click Apply to Presentation.
■To delete a previously saved template, click the Load/Delete a Template button, locate your
template in the list and click Delete.
Return to Menu >>
9
BOOM! by ENVISION User Manual
TM
Loan Comparison Worksheet
■Select whether this loan will be a purchase or refinance by clicking the appropriate radio button in
the upper left corner.
■
Purchase
•Complete the Autofill section. These numbers will automatically fill in for all of the loan options.
The values can be edited individually if necessary.
•To select a mortgage product, or create your own custom loan program, select the box labeled
< - Click here to select a loan - >.
Return to Menu >>
10
BOOM! by ENVISION User Manual
TM
•Click on the loan type you want to include in the presentation. If the loan you want to use is
not in the list, complete the steps in the section below titled Selecting/Creating Custom Loan
Programs.
•Enter product and MI factors you want to be used in the calculations. Click Save for this
presentation if you only want these factors to be used in this one instance, or Click Save for all
presentations, if you want these factors to be used for all future presentations as well.
•Click Select.
• Preset MI Factors, such as FHA, are automatically set and uneditable.
• If no second mortgage is included, leave the fields blank.
•Enter the interest rate (required) and any additional information you would like to include in the
comparisons.
•If you have selected a VA mortgage product, click the VA Funding Fee % box. Select the
category from the list and click OK.
Return to Menu >>
11
BOOM! by ENVISION User Manual
TM
•If you are comparing fewer than three loans, check the disable box at the top of the loans you
are not using.
• Click Calculate. All the gray boxes will automatically be calculated.
•Click Preview Presentation to view the presentation as it will appear to your customer.
■
Selecting/Creating Custom Loan Programs
•In the Custom Loan Products section, select <Click Here to Add New Products>, enter the name
of the new loan product (Note: custom loan products cannot have identical names to existing
loan products; i.e., a custom 30 Year Fixed Loan would need to be abbreviated to 30 Yr. fixed).
The name you choose will appear in the presentation.
•When you have named your new loan product, click Save. Select the loan from the Custom Loan
Products window.
• Click Select.
• If no second mortgage is included, leave the fields blank.
• Enter the interest rate (required) and any additional information you would like to include in the
comparisons.
• If you are comparing fewer than three loans, check the disable box at the top of the loans you
are not using.
• Click Calculate. All the gray boxes will automatically be calculated.
• Click Preview Presentation to save the presentation and view as it will appear to your customer.
Return to Menu >>
BOOM! by ENVISION User Manual
TM
12
■ Scenario Studio™
• Scenario Studio is not available for Correspondent lenders.
•To obtain loan information from Citi Scenario Studio™, from the Loan Comparison
Worksheet, click Launch Scenario Studio.
•Log in to Citi Broker Referral Website. Click Go.
•At the top of the screen, click Scenario Studio.
Return to Menu >>
13
BOOM! by ENVISION User Manual
TM
•Enter loan data to build your loan scenarios.
•Click Save Scenario and Run Citi Scenario Studio. Give the Scenario a name, then click Submit.
Return to Menu >>
14
BOOM! by ENVISION User Manual
TM
•Click the check box next to each loan scenario you wish to compare (maximum three).
•Click Compare in the Comparison Queue at the top of the page.
•Minimize the Scenario Studio comparison window (DO NOT CLOSE). Maximize the BOOM! Loan
Comparison window. Click Fill From Scenario Studio. Your Scenario Studio loan comparisons will
populate in your BOOM! presentation.
Return to Menu >>
15
BOOM! by ENVISION User Manual
TM
■
Refinance
• Click the radio button in the upper left corner of the screen to select Refinance.
• Fill in the Customer’s Situation section. Notice that monthly payments, property tax, insurance
and association fees are automatically calculated for each loan option.
• When you click in the box that reads “Click here to select a loan,” a box will open with Citi loan
programs and custom loan programs (click here to learn how to create custom loan programs).
Select the desired loan program, set the variables, if necessary, and choose Select.
•If you have selected a VA mortgage product, click the VA Funding Fee % box. Select the
category from the list and click OK.
• Complete the additional fields.
• The Note boxes enable you to fill in extra information pertaining to each loan.
• Check the Disable box at the top of the loan option column for any loan you will not be using.
• Click Calculate. All the gray boxes will automatically be calculated. Total Monthly Savings is a
comparison between the customer’s current monthly payments and the new loan. If the Total
Monthly Savings is a negative number, it will not display in the presentation.
• Click Preview Presentation. You can preview the presentation as it will appear to your customer.
Return to Menu >>
16
BOOM! by ENVISION User Manual
TM
■
Second Mortgage
• To add a second mortgage to your loan worksheet, click the 2nd Mtg - Program window.
•See “Loan Comparison Worksheet” or “Selecting/Creating Custom Loan Programs” to complete
the second mortgage loan program section.
Preview Presentation
■
To make changes to the Loan Comparison Worksheet, click Edit.
■To print the scripts for the movies included in this presentation, click Print Presentation. Follow the
instructions for Print Presentation.
■You can change the text in the title bar. Click Edit Title. Enter your text and click save. This text will
also appear as the subject of the email that is sent to your customers with the link to the presentation.
Return to Menu >>
17
BOOM! by ENVISION User Manual
TM
Web Site Presentation: Create and Send
■With the presentation open, click the Create Web Site button (located in the top right corner of the
screen). If you are editing a previously created presentation, this button will say Update Web Site.
■The email address in your Contact Manager autofills in the address box. If you do not want to send
it to this email address, deselect the check box. If you want to send it to an additional address,
complete the cc: field (or bcc). To see when the borrower views your email, click Read Receipt
Request. If you would like to receive an email each time the presentation is viewed on the web,
check the box Presentation Hit eMail.
■You can create the link and save it for later use by leaving the box unchecked. You will always
receive an email with the link to the presentation when you click Create Web Site or Update Site.
■Type the message you would like to accompany the link. If you do not write a message, your
contact will receive the default message: “Thank you for the opportunity to present the services
and products I offer. I have prepared this presentation specifically to address your questions.”
You can also change your signature in the box below.
■To set a default signature and message, follow the instructions for changing your general settings,
found here.
■Spell check.
■If you would like to send emails to additional addresses in your Contact Manager, click the Add
Email Addresses button in the bottom left corner.
■Select a field to search by. Type in the parameters and click Add. Click Show Search Results. If you
would like to send it to everyone in the database, click Select All Records. A dialogue box will open
Return to Menu >>
18
BOOM! by ENVISION User Manual
TM
with a list of all the email addresses who will receive the presentation. Click Okay to proceed. You
can edit the list on the next screen, if necessary.
■Click Create Site (if this is a new presentation) or Update Site (if this is an existing presentation).
Progress will be tracked in the text box.
■When the link appears in the box, click on View Site. Your Web browser should open (if your
computer’s settings allow the action). If it does not open, click on Copy Link. Open your Web
browser, select the address bar, then Edit and Paste.
■Clicking Exit returns you to the Presentation Preview. BOOM! by ENVISION software is open and
you can go anywhere in the program by selecting Main Menu from the Tool Bar.
Edit an Existing Presentation
To edit a presentation you have already created for a customer, follow these steps:
■From the Main Menu, select Edit or View Presentation.
■
■
Click the plus sign beside the customer’s name.
Select the presentation from the list.
■ Click Edit.
■ Name the presentation (Optional).
■ If you have a co-branding partner for this presentation, check the box and select a name from the list.
■ Click Next.
■Select the movies you would like to send to the consumer by clicking the box next to the title.
Use the Movie Preview Window to familiarize yourself with the content of the movies. Select the
Mortgage Tools you would like to include in your presentation.
■ Follow the instructions for the loan application checklist found here.
■ Follow the Loan Comparison instructions found here.
Return to Menu >>
19
BOOM! by ENVISION User Manual
TM
View an Existing Presentation
If you have created a presentation for a customer and now want to view it, follow these steps:
■From the Main Menu, select Edit or View Presentation.
■ Click the plus sign beside the customer’s name.
■Select a presentation from the list.
■Click View. Preview the presentation as your client will see it.
■You can Update the Web Site, Print the Presentation, Edit the loan comparison worksheet, or print
the loan comparison worksheet.
■Although this creates a customer presentation, there are a few final steps. Click here for
instructions on how to create and send a presentation.
Return to Menu >>
20
BOOM! by ENVISION User Manual
TM
Delete Web Site
If you have created a web site for a customer and now want to delete it, follow these steps:
■ View the presentation. From the presentation screen toolbar, select Web Site, then Delete.
■A pop-up box will appear asking you, “Are you sure you want to delete the web site for the current
presentation?” Click Yes. A confirmation box will appear letting you know the web site has been
deleted.
Print a Presentation
■ Open the presentation you would like to print.
■Click the Print Presentation button on the toolbar. (The Print button in the presentation will only
print the Loan Comparison Worksheet and Loan Application Checklist.)
Return to Menu >>
21
BOOM! by ENVISION User Manual
TM
■From the list on the left side of the screen, deselect any movie scripts you do not want to print. You
can preview each page by clicking on the arrows at the bottom of the preview page. If you want to
add a movie that is not currently in the list, click Return to Presentation, then click Edit Presentation.
• Add the movie(s) you would like.
• Click Next
• Preview the Presentation
•Print Presentation. Your logo and photo will appear at the top of the Loan Comparison Worksheet
printout.
■Use the Print Current Page button to print the page that appears in the preview screen, or the Print
All Selected button to print all pages you have selected in the left column.
■To change your contact information at the bottom of the page, click Edit Footer. Enter your
changes. It will be changed for all future presentations. The text for the movies is copyrighted and
cannot be edited.
Return to Menu >>
22
BOOM! by ENVISION User Manual
TM
Feature Sheet
Provide a valuable service for your Realtor co-branding partners by creating a custom Feature Sheet to
promote individual properties.
■ From the Main Menu, click Create Feature Sheet.
■You have four options for creating a feature sheet.
1. Create a feature sheet from scratch.
2. Create a feature sheet based on an existing feature sheet.
3. Create a feature sheet based on an existing presentation.
4. Create a feature sheet based on a template.
Return to Menu >>
23
BOOM! by ENVISION User Manual
TM
■Enter a name for this Feature Sheet, then click the check box below and select a name if you would
like to Co-Brand this Feature Sheet with one of your partners. Click Next.
■Complete the Loan Comparison Worksheet for the property (Click here if you would like to see
instructions on how to do so). Click Continue.
Return to Menu >>
24
BOOM! by ENVISION User Manual
TM
■Enter an address in section 1 of the left column. The fields will auto-populate on the right as you
enter information. Click Next to continue, or click on one of the numbered bars below to move on
to any of the other sections. You can also click the Back button to return to the previous section.
■Click Add a New Photo button to insert a saved image onto the feature sheet. Acceptable file
formats are .jpg, .png or .gif. Use the slider control to zoom in and out. Click and drag the image
into position the picture inside the crop box. Click Done to crop the image and continue, or click
Cancel to revert to the previously saved image.
■You may include up to five images. The layout on the right will update as photos are added. Change
the order of the pictures by clicking and dragging into place. Click the image to replace or delete it.
■Enter any features you wish to highlight on your Feature Sheet in the appropriate boxes. Any
sections you choose to leave blank will not appear on the final sheet. Click Next to continue.
Return to Menu >>
25
BOOM! by ENVISION User Manual
TM
■Enter a few descriptive sentences about the property. If you choose to skip this field, the field name
will not appear on your presentation. Click Next to continue.
■Make any additions or changes to the legal disclaimer language. Click Next to continue.
Return to Menu >>
26
BOOM! by ENVISION User Manual
TM
■Make any additions or changes to your contact info that you want to appear on the Feature Sheet.
Click Next to continue.
■Make any additions or changes to the Realtor’s contact info that you want to appear on the Feature
Sheet. Click Next to continue.
■Choose a Layout and color to personalize your feature sheet. Click Next to continue.
■Review and make any corrections to the Feature Sheet before finalizing it. Click Edit Loan
Comparison at the bottom of the column to make changes. Click View Web Preview to see what
the custom web version of the Feature Sheet will look like. Click Print to see a paper copy of the
Feature Sheet. Or click Create Web Site to finalize your custom Feature Sheet.
Return to Menu >>
27
BOOM! by ENVISION User Manual
TM
■Make any changes you want to the standard e-mail message before sending it out. Add additional
recipients for this e-mail by clicking Add email Addresses at the bottom of the window. Check your
spelling by clicking the Check Spelling button. For instructions on creating a default message and
signature for the email that accompanies your feature sheet, click here. When you are ready to
send your message, click Create Site.
Edit, View or Delete a Feature Sheet
■To Edit, View or Delete a previously created Feature Sheet, from the main menu, click the Edit,
View or Delete Feature Sheet button.
■Select the feature sheet from the list, then click Edit, View, or Delete.
■ Click Print.
Return to Menu >>
28
BOOM! by ENVISION User Manual
TM
Add/Edit Co-Brand Information
■Click Add/Edit Co-Brand Information to create a record for a co-brand source.
■Click Add. Click the appropriate radio button.
■ Type in the person’s name, company and email address. Additional information is optional, but will
be included in presentations and Feature Sheets if completed here. Click Next.
Return to Menu >>
29
BOOM! by ENVISION User Manual
TM
■ Load a photo
•
•
•
•
•
•
•
•
•
•
Select Add a photo.
Click Browse.
Navigate to your photo file.
Select the file and click Open.
Click Show Image.
Use the slider bar to zoom in and out.
To position your photo within the box, click on the photo and hold the mouse button down.
Drag the photo into position within the frame.
When you are satisfied with the positioning of your photo, click Save.
Click Next.
Return to Menu >>
30
BOOM! by ENVISION User Manual
TM
■ Load a logo
•If Envision has created a logo for your Builder or Financial Adviser
(Realtors do not appear in this list):
> Select My Company is in This List.
> Click the arrow for the drop down menu and select the company name.
> If the logo is correct, click Next.
•If you are loading a logo that is not in the drop down menu:
> Click Load.
> Click Browse and locate your digital logo file (acceptable formats are .jpg and .gif).
> Click Open.
> Use the slider bar to zoom in and out on your image.
> To position the logo within the box, click on the image and hold. A hand cursor will appear.
> Drag the image within the frame.
> When you are satisfied with the positioning of your logo, click Save.
> Click Next.
Return to Menu >>
31
BOOM! by ENVISION User Manual
TM
■ Add/Edit Co-Brand Information
•When you create a presentation with a co-brand partner, the contact information will appear as
it is formatted in this section. It should include your co-brand partner’s information as well as
your own.
•If you are entering an email address or a website, complete the corresponding link so that your
clients can click the link in your presentation. When they do, a new window will open so that they
can view your website or send an email.
■ Edit an Existing Co-Brand Partner’s Information
•From the Main Menu, under Tools, click Add/Edit Co-Brand Information.
•In the grid, select the field to be edited. To change the co-brand partner’s company name, name,
email or type, select from the Edit Co-brand Info column.
•Complete the sections, following the instructions to Add a Co-brand Partner’s Photo,
Add a Co-brand Partner’s Logo and Create Presentation Contact Information.
•When you have completed your changes, you must click Main Menu to synchronize the
information with your computer.
Return to Menu >>
32
BOOM! by ENVISION User Manual
TM
Edit Personal Information
The contact information included in your online presentations is stored on a Web server; therefore you
must connect to the Internet to update your information. After you click Edit Personal Information, you
will then be connected to a Web Page. You can edit any of the fields described below. When you are
ready to save any changes made, click Main Menu.
■Click Edit Registration Info to review your master record in the BOOM! by ENVISION database.
You would make changes to this section only if your primary email has changed or if you need to
change your company name or address. This is not the information that will be on your web site
presentations or your printed presentations.
Return to Menu >>
33
BOOM! by ENVISION User Manual
TM
■Edit Your Presentation Contact Info.
•
•
•
Maximum number of Lines: 14
Maximum number of Characters: 40
Suggested Content:
Line One: Your Name
Line Two: Your Title
Line Three: Company Name
Line Four: Office Phone Number
Line Five: Cell Phone Number
Line Six: Web Site. To create a web link:
> Type the words you want to appear on the screen, such as “Visit My Web Site” or “Click Here to
Apply Online”.
> Select Web as the Link Type.
> Type in the Web address, including http:// In the Link box.
Line Seven: email address. To create a link to your email:
> Type the words you want to appear on the screen, such as “Contact Me” or
“Send Me An email”.
> Select email as the Link Type.
> Type your email address in the Link box.
Line Eight: Blank
Line Nine: Address
Line Ten: City, State, Zip
Lines Eleven through Fourteen: Your slogan or other contact info.
• Click Save.
Return to Menu >>
BOOM! by ENVISION User Manual
TM
34
■ Load a photo.
• Click Add a Photo.
• Click Browse and locate your digital photo file (acceptable formats are .jpg and .gif).
• Select you photo file and click Open.
•Use the slider bar to zoom in and out on your image.
•To position the photo within the box, click on the image and hold. A hand cursor will appear.
• Drag the image within the frame.
•When you are satisfied with the positioning of your photo, click Save.
■ Load a logo
•If Envision has created a logo for your Company:
> Select My Company is in This List.
> Click the arrow for the drop down menu and select the company name.
•If you are loading a logo that is not in the drop down menu:
> Click Load.
> Click Browse and locate your digital logo file (acceptable formats are .jpg and .gif).
> Select your file and click Open.
> Click Show Image.
> Use the slider bar to zoom in and out on your image.
> To position the logo within the box, click on the image and hold. A hand cursor will appear.
> Drag the image within the frame.
> When you are satisfied with the positioning of your logo, click Save.
Return to Menu >>
35
BOOM! by ENVISION User Manual
TM
■ Add a brief summary of your credentials to your presentations.
• Click Edit your credentials in the left column.
•Enter the title for your credentials. This will be the name of the button viewers will click in your
presentations.
• Enter your credentials.
• Click Save/Update.
• Click Main Menu when you have finished editing your personal information.
•To view your credentials in a presentation, click The Mortgage Professional and select your
credentials button.
•Your credentials and/or testimonial(s) will replace The Mortgage Professional movie.
■ Add one or more testimonials to your presentations.
• Click Edit your testimonial in the left column.
• Click New Testimonial.
•Enter the title of your testimonial. This will be the name of the button viewers will click in your
presentations.
• Enter the text of your testimonial.
• Click Save.
• Click Main Menu when you have finished editing your personal information.
•To view your testimonial(s) in a presentation, click The Mortgage Professional and select the
testimonial.
•Your testimonial(s) and/or credentials will replace The Mortgage Professional movie.
Return to Menu >>
36
BOOM! by ENVISION User Manual
TM
■ To delete a testimonial.
•
•
•
•
Click the drop down arrow in the list field.
Select the testimonial.
Click Delete.
Click Main Menu when you have finished editing your personal information.
Open Contact Manager
While contact information for presentations must be stored in BOOM! by ENVISION’s Contact Manager,
all of your contacts can be included for easy access.
■ From the Main Menu, select Open Contact Manager.
Return to Menu >>
37
BOOM! by ENVISION User Manual
TM
■
■
■
■
■
■
■
■
To view a record already in the Contact Manager:
•Select the record from the list at the bottom of the page.
• Use the scroll bar to view all the records.
•To expand or contract the width of the columns, drag the vertical line that separates the columns.
To sort the records in the list:
• Click the field name at the top of the list.
•The field that the records are sorted by will be highlighted.
•An up/down arrow will appear so that you can sort A-Z or Z-A.
To add a new client:
• Click Add.
• Complete each field at the top of the page.
• Use the Tab Key to advance to the next field.
•If the loan type is not in the drop down list, click the plus sign and enter the name of
the loan program. Click OK. From the drop down menu, select the new loan program.
•Check the box next to the contact type. To add a new contact type, click Add.
Enter the new contact type and click OK. Select the contact types for this client.
•After you have completed all the information, click Save.
To delete a record:
•Select the record you wish to delete from the list of All Records.
• Click Delete.
• Confirm the deletion.
To find an individual record or to define a group:
• Click Search.
• Follow the steps in Search Contact Manager.
To navigate to the next record:
•Use the arrow buttons to navigate forward or backward through the list of All Records or the list
of Filtered Records.
To edit presentation:
•Click Edit/View Presentation to make changes in your presentation. This button is active only if
you have created a presentation for the client whose record is open.
•Follow Edit an Existing Presentation.
To view a presentation:
•If you have created a presentation for the selected contact, click Edit/View Presentation to
preview your work.
•This button will be active only if you have created a presentation for the client whose record is open.
Return to Menu >>
38
BOOM! by ENVISION User Manual
TM
Import Records From Other Programs
BOOM! by ENVISION enables you to import a .txt file from ACT by Sage, Goldmine by Frontrange
Solutions, Microsoft Outlook, Calyx Point and other contact management programs. You must first
export a file from one of these programs in a comma-quote, comma-delimited, or tab-delimited format.
■
To import from Microsoft Office Outlook:
• From the Main Menu, click on Open Contact Manager.
• Click Import.
• Select Outlook.
•If a pop-up opens regarding a program trying to access email addresses, allow access for two
minutes.
•In the dialogue box, click on the field in the box on the left, then click on the best match in the
Import Field. Click Add.
• Repeat for each field that you want to import. Email is a required match.
• When you have finished matching the fields, click Import.
• A confirmation box will open.
■
To import records (contacts) from software programs other than Outlook:
•Before you can import records from other software programs, you must save the data as a
comma-quote, comma-delimited or tab-delimited file. These file types are generally available as
choices in the Export function of the software.
•In the dialogue box, click on the field in the box on the left, then click on the best match in the
Import Field. Click Add.
• Repeat for each field that you want to import. Email is a required match.
• When you have finished matching the fields, click Import.
• A confirmation box will open with a success or failure message.
• If successful, the records will be displayed in the list at the bottom of the Contact Manager.
Please note: If you have previously imported files and want to import the new contacts you have
added to other software, BOOM! will append the new records, not create duplicate records. The
unique field is the email address.
Return to Menu >>
39
BOOM! by ENVISION User Manual
TM
Export Records to Other Programs
■You can export records from BOOM! by ENVISION to other programs (to make mailing labels, for
example).
• From the Main Menu, click Open Contact Manager.
• Click Export.
•BOOM! will create a .csv file and save it as C:BOOM/data/contacts.csv. To view and save the file in
another format, click yes in the dialogue box.
• Microsoft Office Excel will open. You can view the data and save the file.
Search Contact Manager
To find a record(s) you have entered into the Contact Manager, follow these steps:
■ From the Main Menu, click Search Contact Manager.
■From the Select a Field box, choose the first search criteria.
■If a Select a Condition box appears, make your selection and continue. Click Add.
■If a Search Text box appears, type the word(s) you want to search for or select from the drop down
list if it is available. Click Add.
■ When you have defined all your search criteria, click Show Search Results.
■ Only those records that meet your criteria will appear in the list.
Example: If you want to create a list of all your contacts who live in Michigan and you haven’t
contacted in more than two years:
•From the Main Menu, click Search Contact Manager.
• Select State from the Select a Field box.
• In the Search Text box, type MI.
• Click Add.
•In the Select a Field box, choose Last Contact Date.
•In the Search Text field, click the drop-down arrow and choose Greater Than Two Years.
• Click Add.
• Click Show Records.
■ To return to the full list of records in your Contact Manager, click Show All.
Return to Menu >>
40
BOOM! by ENVISION User Manual
TM
Using the Task Manager
You can set the Task List in BOOM! to alert you to upcoming dates.
■To set up the task list reminder details, click settings on the main menu.
■In the Task List section, check the box if you would like the Task List to display each time you open
BOOM!
■Enter how many days before a birthday, loan anniversary and last contact anniversary you would
like the reminder to appear in the Task List. If you select 30 days, for example, the task will appear
in the list each day for 30 days prior to the event.
■When you have made your selections, click Save Settings. Click OK.
■To view the task list at any time, click Open Contact Manager on the Main Menu. Click Task List. All
currently scheduled tasks, as defined in the Settings, will appear in the Task List.
Return to Menu >>
BOOM! by ENVISION User Manual
TM
41
Adjust General BOOM! by ENVISION Settings
To change the default email message, or to cancel the animation when the program opens:
■ From the Main Menu, click on Settings.
■To set the program so that the animation does not play at startup, uncheck the box labeled
Animation at Start, then click Save Settings.
■ To change the default email message, enter your text into the box, then click Save Settings.
■The default email signature can also be customized for presentations and feature sheets.
■ For additional technical support options, click the Advanced button.
Return to Menu >>
42
BOOM! by ENVISION User Manual
TM
Self-Paced Online Training
Clicking this button will launch interactive training for BOOM! Here you will find a selection of interactive
movies designed to show you how to use BOOM!, as well as a collection of interactive and printable
prospecting tips to help you build your business. Click any of the buttons in the left column to begin the
training. You can Play, Pause, Stop or Rewind the training at any time using the controls below each
video. All printable resources will appear in Adobe PDF format.
®
Join Online Training
To sign up for an upcoming live, online training session:
■ From the Main Menu, click Online Training.
■Click the check box next to any of the online training events you would like to attend. Click Register.
To register for multiple classes, click more than one check box, then click the Register for Selected
Event(s) button at the bottom of the screen.
■Enter your contact information, then click Submit Registration.
Return to Menu >>
43
BOOM! by ENVISION User Manual
TM
Check for Software Updates
At least once a month, we recommend that you follow these steps:
■ From the Main Menu, click on Check for Software Updates.
■Your computer will communicate with the BOOM! by ENVISION server.
■Any updates to the software will automatically be downloaded. The download will not affect any
presentations you have prepared. (Please Note: the software will also automatically search for and
allow you the opportunity to download updates whenever you perform a function that connects
you to the Web server.)
■ When the download is finished you may relaunch the program.
Return to Menu >>