1
SHSI Series V
Accounting Systems
Professional
Invoicing
Version 1.0
October-21-14
Sentinel Hill
Software Inc.
www.sentinel-hill.com
800-663-8354
© 2007 - 2014 by Sentinel Hill Software, all rights reserved
2
Series 5 Professional Invoicing - User Help
Table of Contents
Part I Welcome to Series 5 Professional Invoicing
Part II Introduction
9
12
1 Product
...................................................................................................................................
Overview
12
2 Professional
...................................................................................................................................
Invoicing Features
13
3 History
...................................................................................................................................
of Enhancements
18
4 Getting
...................................................................................................................................
Help
58
Part III P/I Setup and Implementation
61
1 Initial...................................................................................................................................
Setup Steps
61
2 Time ...................................................................................................................................
Charges Entry / Invoicing Cycle
61
3 P/I Status
...................................................................................................................................
and Type Codes
61
4 G/L Account
...................................................................................................................................
Distributions
64
5 Assignment
...................................................................................................................................
of Unit Rates
70
6 Costing
................................................................................................................................... 75
7 Daily ...................................................................................................................................
Processing
77
8 Month-End
...................................................................................................................................
Processing
78
9 Year-End
...................................................................................................................................
Processing
78
Part IV The Basic User Interface
80
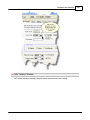
1 Professional
...................................................................................................................................
Invoicing Application Menu
80
Multi-Threaded
..........................................................................................................................................................
Window s
84
Scheduled Menu
..........................................................................................................................................................
Functions
87
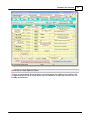
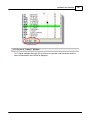
2 Grid Processing
...................................................................................................................................
Screens
90
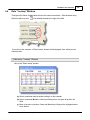
3 Code...................................................................................................................................
"Lookup" Window
102
4 Date...................................................................................................................................
"Lookup" Window
107
5 Date...................................................................................................................................
Range "Lookup" Window
108
Part V Quick Start Tutorials
112
1 Adding
...................................................................................................................................
a New Project
112
2 Entering
...................................................................................................................................
Time Sheets
112
3 Selecting
...................................................................................................................................
Items for Billing
112
4 Generating
...................................................................................................................................
Invoices
112
5 Interface
...................................................................................................................................
Invoices to A/R
112
6 Reprinting
...................................................................................................................................
an Invoice
112
Part VI Starting and Using the P/I System
114
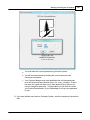
1 User...................................................................................................................................
Logon
114
© 2007 - 2014 by Sentinel Hill Software, all rights reserved
Contents
3
...................................................................................................................................
117
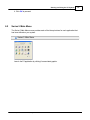
2 Series
5 Main Menu
Part VII Basic Processing Procedures
119
1 Background
...................................................................................................................................
or Night Processing
119
Selecting Jobs
..........................................................................................................................................................
for Background Processing
120
Batch Job Managem
..........................................................................................................................................................
ent
122
The Batch Job
..........................................................................................................................................................
Processor
129
2 Data...................................................................................................................................
Importing and Exporting
133
Data Export Functions
.......................................................................................................................................................... 133
Data Im port Functions
.......................................................................................................................................................... 138
3 Record
...................................................................................................................................
Processing Filters
142
Project Filters
.......................................................................................................................................................... 142
WIP Filters .......................................................................................................................................................... 147
Custom er Filters
.......................................................................................................................................................... 151
Custom er Dem
..........................................................................................................................................................
ographics Filters
156
4 Report
...................................................................................................................................
Generation and Printing
159
Report Options
..........................................................................................................................................................
Screen
160
Report Brow ..........................................................................................................................................................
ser
165
Archived Reports
..........................................................................................................................................................
Managem ent
166
5 Search
...................................................................................................................................
and Replace
172
Search and Replace
..........................................................................................................................................................
Options Screen
173
6 User...................................................................................................................................
Access Management
179
Defining Users'
..........................................................................................................................................................
Access Rights
180
Users Scheduled
..........................................................................................................................................................
Menu Functions
186
7 Wizard
...................................................................................................................................
Management
189
Maintaining Your
..........................................................................................................................................................
Wizards
190
Wizard Execution
..........................................................................................................................................................
Screen
195
8 Monitor
...................................................................................................................................
System Usage
197
Part VIII Your Business and Professional Invoicing
200
1 Managing
...................................................................................................................................
the Professional Invoicing
200
How Do I ... .......................................................................................................................................................... 200
2 Getting
...................................................................................................................................
Data into P/I
200
How do I ... .......................................................................................................................................................... 200
Part IX Professional Invoicing Menu Functions
202
1 The ...................................................................................................................................
P/I Menu
202
2 P/I E-Billing
...................................................................................................................................
Menu
203
3 File ...................................................................................................................................
Management
204
Archive Historic
..........................................................................................................................................................
Data
205
Clear All Credit
..........................................................................................................................................................
Card Num bers
207
4 Inquiry
...................................................................................................................................
Functions
210
Project Dashboard
..........................................................................................................................................................
Inquiry
211
Project Inquiry
.......................................................................................................................................................... 215
Work-in-Progress
.........................................................................................................................................................
(WIP) Inquiry
216
WIP Adjustments
......................................................................................................................................................... 220
Disbursements
.........................................................................................................................................................
Inquiry
225
Print WIP Items Report
......................................................................................................................................... 229
Recalculate
.........................................................................................................................................................
Project Rates
230
© 2007 - 2014 by Sentinel Hill Software, all rights reserved
4
Series 5 Professional Invoicing - User Help
..........................................................................................................................................................
235
Invoice History
Inquiry
Invoice History
.........................................................................................................................................................
Inquiry Grid Screens
236
Historic Invoice
.........................................................................................................................................................
Display Screens
239
Invoice History
.........................................................................................................................................................
Filters
243
Invoice History
.........................................................................................................................................................
Totals
245
Invoice Register
.........................................................................................................................................................
Reports
246
Enter Credit
.........................................................................................................................................................
Notes to Historic Invoices
248
Generate.........................................................................................................................................................
an Invoice's Recap Detail Spreadsheet
255
Rates Query/Calculator
.......................................................................................................................................................... 255
WIP Periods ..........................................................................................................................................................
Analysis
258
WIP Revenue..........................................................................................................................................................
GL Account Analysis
260
Em ployee Cross
..........................................................................................................................................................
Utilization Analysis
261
5 Operational
...................................................................................................................................
Functions
262
Em ployee Tim
..........................................................................................................................................................
esheet Entry
263
About,Concepts
.........................................................................................................................................................
and Features
265
Timesheet.........................................................................................................................................................
Batch Selection
270
Timesheet.........................................................................................................................................................
Batch Control Properties
271
Timesheet.........................................................................................................................................................
Entry Grid Screen
276
Employee.........................................................................................................................................................
Timesheet Entry Screen
277
Timesheet.........................................................................................................................................................
Charges Data Screens
281
Posting Employee
.........................................................................................................................................................
Timesheet Batches
289
General WIP ..........................................................................................................................................................
Entry
289
Em ail Blank Em
..........................................................................................................................................................
ployee Tim esheets
299
Load Tim esheets
..........................................................................................................................................................
from Em ployee Em ails
305
Load WIP/Recap
..........................................................................................................................................................
for General WIP Entry
312
Load User Tim
..........................................................................................................................................................
esheets from Spreadsheet
322
Load WIP/Recap
..........................................................................................................................................................
for Tim esheet Entry
329
Undo Prior Recap
..........................................................................................................................................................
Interface
338
Interface/Invoicing
..........................................................................................................................................................
Wizard
340
Disbursem ents
..........................................................................................................................................................
Entry
349
Entering a Credit
..........................................................................................................................................................
Note
361
Recalculate Project
..........................................................................................................................................................
Rates
368
Writing Off a ..........................................................................................................................................................
Project's WIP Item s
373
6 E-Billing
...................................................................................................................................
Menu Operational Functions
379
E-Billing Wizard
.......................................................................................................................................................... 380
7 Invoicing
...................................................................................................................................
Functions
384
Clear All Prior
..........................................................................................................................................................
Selections
385
General Select
..........................................................................................................................................................
for Billing
385
Select Projects
..........................................................................................................................................................
for Billing
386
About, Concepts
.........................................................................................................................................................
and Features
388
Project Billing
.........................................................................................................................................................
Selection Grid Screen
390
General Project
.........................................................................................................................................................
Selection for Billing
396
Select WIP
.........................................................................................................................................................
Items for Billing
400
Marking Up/Dow
.........................................................................................................................................................
n WIP Charges
401
Defer WIP.........................................................................................................................................................
Items from Billing
405
Write-Off .........................................................................................................................................................
WIP Items
408
Editing or .........................................................................................................................................................
Fixing WIP Bill Codes
413
Print Pre-Invoicing
..........................................................................................................................................................
Report
413
Invoice Grid Processing
.......................................................................................................................................................... 415
Concepts.........................................................................................................................................................
and Features
416
Invoicing Grid
.........................................................................................................................................................
Screen
419
Generating
.........................................................................................................................................................
Invoices
422
Print Invoices
......................................................................................................................................................... 426
Automatic.........................................................................................................................................................
Emailing of Invoices
428
© 2007 - 2014 by Sentinel Hill Software, all rights reserved
Contents
5
.........................................................................................................................................................
432
Post Invoices
to Accounts Receivable
Generate Invoices
.......................................................................................................................................................... 436
DeGenerate Invoices
.......................................................................................................................................................... 436
Print and Post
..........................................................................................................................................................
Invoices
440
Reconcile Paym
..........................................................................................................................................................
entech Charges
443
Post Invoices..........................................................................................................................................................
to Accounts Receivable
449
Em ail EDI Generated
..........................................................................................................................................................
PDF Invoices
453
Reprint Historical
..........................................................................................................................................................
or Overdue Invoices
456
Launch On-Dem
..........................................................................................................................................................
and Invoicing Service
460
Launch Auto..........................................................................................................................................................
Invoicing Wizard
467
8 Reporting
...................................................................................................................................
Functions
471
Pre-Billing Aging
..........................................................................................................................................................
Report
472
Pre-Invoicing..........................................................................................................................................................
Report
475
WIP Detail Report
.......................................................................................................................................................... 477
Recap Detail ..........................................................................................................................................................
Spreadsheet / Report
479
Em ployee Cross
..........................................................................................................................................................
Utilization Report
485
Cross Utilization
.........................................................................................................................................................
Preview Grid
487
Build Analysis
.........................................................................................................................................................
Options
492
Period Trend
.........................................................................................................................................................
Analysis Drill Dow n
495
Exported .........................................................................................................................................................
Data Layouts
496
Em ployee Period
..........................................................................................................................................................
Activity Report
499
Tim e-Sheet Exceptions
..........................................................................................................................................................
Report
503
WIP Period Analysis
..........................................................................................................................................................
Report
506
WIP Analysis
.........................................................................................................................................................
Preview Grid
508
Build Analysis
.........................................................................................................................................................
Options
513
Period Trend
.........................................................................................................................................................
Analysis Drill Dow n
515
Exported .........................................................................................................................................................
Data Layouts
516
WIP Revenue..........................................................................................................................................................
Analysis Report
519
WIP Revenue
.........................................................................................................................................................
Analysis Preview Grid
520
Revenue .........................................................................................................................................................
Analysis Build Options
524
Exported .........................................................................................................................................................
Data Layout
526
Historic Invoices
..........................................................................................................................................................
Register Report
529
9 Master
...................................................................................................................................
Code Maintenance Functions
532
Project Code..........................................................................................................................................................
Maintenance
533
P/I Projects
.........................................................................................................................................................
Maintenance Grid Screen
535
Project Description
.........................................................................................................................................................
Tab Screen
535
Project Notes
.........................................................................................................................................................
Tab Screen
539
Project Billing
.........................................................................................................................................................
Tab Screen
540
Project G/L
.........................................................................................................................................................
Accounts Tab Screen
545
Project Deposits
.........................................................................................................................................................
Tab Screen
547
Project Accruals
.........................................................................................................................................................
Tab Screen
549
Project Cost
.........................................................................................................................................................
Plus Tab Screen
551
Project EDI
.........................................................................................................................................................
Invoice Controls Tab Screen
552
Reporting.........................................................................................................................................................
and Exporting Filters
555
Project Properties
.........................................................................................................................................................
Export
555
Project Data
.........................................................................................................................................................
Import
557
Project Tem plates
..........................................................................................................................................................
Maintenance
559
Project Budgets
.......................................................................................................................................................... 561
Client Codes..........................................................................................................................................................
Maintenance
570
Disbursem ent
..........................................................................................................................................................
Codes Maintenance
573
Em ployee Codes
..........................................................................................................................................................
Maintenance
576
Task Codes ..........................................................................................................................................................
Maintenance
581
3rd Party Bill..........................................................................................................................................................
Codes Maintenance
591
Multi-Client Bill-To
..........................................................................................................................................................
Codes Maintenance
594
Budget Group
..........................................................................................................................................................
Codes Maintenance
597
© 2007 - 2014 by Sentinel Hill Software, all rights reserved
6
Series 5 Professional Invoicing - User Help
..........................................................................................................................................................
599
Com m ent Codes
Maintenance
Cost Ctr CrCard
..........................................................................................................................................................
Mapping Maintenance
601
Departm ent Codes
..........................................................................................................................................................
Maintenance
605
EDI Specifications
..........................................................................................................................................................
Codes Maintenance
608
EDI Controls
.........................................................................................................................................................
Maintenance Grid Screen
609
EDI Controls
.........................................................................................................................................................
Properties Screen
609
About Ariba
.........................................................................................................................................................
cXML Invoices
612
About Ariba
.........................................................................................................................................................
CSV Invoices
616
About Ariba
.........................................................................................................................................................
EDI Invoices
619
About PDF
.........................................................................................................................................................
Invoices
619
About Excel
.........................................................................................................................................................
Workbook Invoices
624
About ANSI
.........................................................................................................................................................
X12 4010-810 EDI Invoices
624
About Tab-Delimited
.........................................................................................................................................................
Text Invoices
624
About LEDES
.........................................................................................................................................................
98b Invoices
624
About LEDES
.........................................................................................................................................................
2000s XML Invoices
627
About Paymentech
.........................................................................................................................................................
CrCard Invoices
630
About Paymentech
.........................................................................................................................................................
XML Invoices
634
Custom Character-Delimited
.........................................................................................................................................................
Text Invoices
638
About BB.........................................................................................................................................................
& T Invoices
641
About LaSalle
.........................................................................................................................................................
Excel Invoices
641
About Riemer
.........................................................................................................................................................
Invoices
641
About Wilmington
.........................................................................................................................................................
Trust Invoices
641
Em ployee Rate-Group
..........................................................................................................................................................
Codes Maintenance
643
Assign Valid..........................................................................................................................................................
Projects to Em ployees
645
Invoice Group
..........................................................................................................................................................
Codes Maintenance
650
Invoice Layout
..........................................................................................................................................................
Codes Maintenance
654
Invoice Layouts
.........................................................................................................................................................
Grid Screen
655
Invoice Layouts
.........................................................................................................................................................
Properties Screen
655
Job Class Codes
..........................................................................................................................................................
Maintenance
664
Location Codes
..........................................................................................................................................................
Maintenance
666
Rate Class Codes
..........................................................................................................................................................
Maintenance
669
Special Rates..........................................................................................................................................................
Maintenance
671
Special Accounts
..........................................................................................................................................................
Maintenance
677
Tax Exem pt Codes
..........................................................................................................................................................
Maintenance
680
Ariba Invoice..........................................................................................................................................................
Code Mapping Maintenance
683
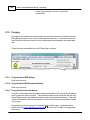
10 Purging
................................................................................................................................... 690
Purge Archived
..........................................................................................................................................................
WIP History
690
Purge Archived
..........................................................................................................................................................
Disbursem ent History
690
Purge Archived
..........................................................................................................................................................
Invoice History
690
11 Control
...................................................................................................................................
Option Functions
692
P/I Control Preferences
.......................................................................................................................................................... 693
General Tab
.........................................................................................................................................................
Screen
694
Rates and.........................................................................................................................................................
Revenue Tab Screen
697
Costing Tab
.........................................................................................................................................................
Screen
700
Default G/L
.........................................................................................................................................................
Accounts Tab Screen
702
Cost Plus .........................................................................................................................................................
Control Tab Screen
705
Invoice Wizard
..........................................................................................................................................................
Codes Maintenance
707
On-Dem and Invoicing
..........................................................................................................................................................
Controls
715
Part X Appendix
726
1 P/I Data
...................................................................................................................................
Files
726
Data Directory
..........................................................................................................................................................
Structure
726
P/I System Control
..........................................................................................................................................................
Files
727
P/I Com pany..........................................................................................................................................................
Data Files
728
© 2007 - 2014 by Sentinel Hill Software, all rights reserved
Contents
7
..........................................................................................................................................................
732
Em ail Message
Text Files
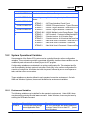
2 System
...................................................................................................................................
Operational Variables
735
Environm ent..........................................................................................................................................................
Variables
735
Configuration
..........................................................................................................................................................
Variables
736
3 Runtime
...................................................................................................................................
Error Codes
747
Application Error
..........................................................................................................................................................
Codes
748
Microsoft Utility
..........................................................................................................................................................
Errors
749
4 Series
...................................................................................................................................
5 Encryption
749
5 Frequently
...................................................................................................................................
Asked Questions
751
Index
© 2007 - 2014 by Sentinel Hill Software, all rights reserved
752
Part
I
Welcome to Series 5 Professional Invoicing
1
9
Welcome to Series 5 Professional Invoicing
The Series 5 Professional Invoicing system is one
segment of a fully integrated set of Financial
Applications. It provides for entry and control of Project
oriented Invoicing needs. It handles employee
chargeable or non-chargeable time that can be entered
as timesheets, or it provides for the interface of external
data from other systems that generate billable charges.
A variety of different invoices may be generated either as
printed forms, or in a number of different EDI formats.
Project revenue and/or costs may be tracked by Project
or Department.
The Professional Invoicing system runs in conjunction
with the Series 5 Accounts Receivable system, and
optionally with Accounts Payable, WEB Access
Management and General Ledger systems.
This help is designed both as a course in using the
Series 5 Professional Invoicing and as an ongoing
reference while you are working with the program.
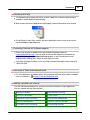
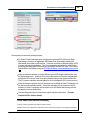
Getting started – new users
Study the Introduction 12 and Quick Start Tutorials
with the basics of the application.
112
sections to familiarize yourself
Check out all the links in the Help tab – plenty of help is available!
Getting started – users upgrading from prior revisions
See the History of Enhancements 18 for a quick summary of the major changes and
where to find the functions you are looking for.
Even if you are an experienced Professional Invoicing user, please run through the
Introduction 12 and Quick Start Tutorials 112 sections quickly to get up to speed with
what has changed in the latest version of the program.
Copyright Notice
Sentinel Hill Software Inc. has made every effort to ensure that the material published in
this Help file and/or manual is correct and accurate, but reserves the right to make
changes without notice at it's sole discretion at any time.
PROPRIETARY RIGHTS NOTICE: All rights reserved. This material contains the
valuable properties and trade secrets of Sentinel Hill Software Inc. of West Vancouver,
BC, Canada, (Sentinel Hill), embodying substantial creative efforts and confidential
information, ideas and expressions, no part of which may be reproduced or transmitted
© 2007 - 2014 by Sentinel Hill Software, all rights reserved
10
Series 5 Professional Invoicing - User Help
in any form or by any means, electronic, mechanical, or otherwise, including
photocopying and recording or in connection with any information storage retrieval
system without the permission in writing from Sentinel Hill Software Inc.
Copyright 2008-2014. -- An Unpublished Work by Sentinel Hill Software Inc. -- Printed
in Canada
© 2007 - 2014 by Sentinel Hill Software, all rights reserved
Part
II
12
2
Series 5 Professional Invoicing - User Help
Introduction
The topics in this section provide some basic information about the Professional Invoicing
system, what it is for and what you can do with it.
2.1
Product Overview
The Professional Invoicing system basically records any activity and disbursements
performed by your company's professional staff as a service to your customers. Data may
be entered from employees' timesheets, or interfaced directly from user supplied sequential
data files, or from Excel spreadsheets. The system will automatically determine rates based
on the given Project, Employee and/or Task performed. Invoices are generated and posted to
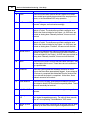
the Accounts Receivable system. To summarize, the following functions are performed:
?
?
?
?
?
?
?
?
?
?
?
?
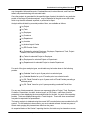
Captures Data from Employee Timesheets or Interfaced from
data files
Automatically assign Unit Rates and G/L Revenue Accounts
based on a variety of User Configurable Rules
Captures any Disbursement Charges that might be incurred
Track Revenue either by Project or Department
Generates Invoices in different formats for different Customers
Generates EDI Invoices, cXML Invoices or batched Paymentech
Visa charge requests
Generates instant On-Demand Invoices, when requested from
Service Agents
Provides assorted Invoice and Work-In-Progress Inquiry
functions
Automatically computes Tax
Invoices may be De-Generated, or Re-Printed as the case may
be
Interface Invoices to the Accounts Receivable system
Provides for Cost Analysis of Professional Services
The Professional Invoicing system handles Project Costing for a single company. If you have
more than one company, then you need only to set up additional Series 5 company systems,
one for each. Each P/I company may be interfaced into it's own G/L, or into a corporate G/L
system.
The Professional Invoicing system system must be used with the Series 5 Accounts
Receivable system.
© 2007 - 2014 by Sentinel Hill Software, all rights reserved
Introduction
2.2
13
Professional Invoicing Features
A brief summary of some of the major features of the Series 5 Professional Invoicing system!
Projects, Tasks and Employees
The basic codes used in the P/I system that are used to track revenues from
professional activity would be the Projects that are worked on, the Employees
performing the work, and what Tasks were performed that are charged to the
customers. Once these codes are set up, chargeable, or non-chargeable, activity
may be recorded. Note that an Employee might also be a machine or an internet
service that is used to accumulate charges.
For any given employee, the Projects that they have access to may be assigned.
Also, specific Tasks that are associated to that Project for the Employee may also
be assigned.
Charge-Out and Cost Rates
The system is designed to provide for the entry of employee Work-In-Progress,
(WIP), activity, comprised of chargeable or non-chargeable time sheet information,
with little or no knowledge of charge-out rates. To accomplish this feat, an
algorithm is employed to examine possible Standard Rates associated with
Projects, Customers, or Tasks, and to search for any Special Rates that might
have been defined. When the time sheet information is entered, the system
determines both the Chargeable and/or Non-Chargeable rates, and the internal
Cost rate for each item.
Project to Customer Relationship
A Project Code is used to define a collection of Work-In-Progress activity and
Disbursements associated to a project. A Project belongs to a Customer for
which chargeable activity is being performed. You may define multiple Projects for
a given customer. Projects can be long term, that is, they might span a time frame
of several years. A given job performed by your company that will be charged to a
customer, should be entered under a defined Project. A simple way of
categorizing the definition of a project is that one or more Invoices are generated
for each Project.
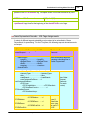
Special Rates and the Rate Class
The Professional Invoicing system provides for the definition of Special Rates used
for unit Costs or Billing rates which differ from that of the Standard Rates. There
are five Special Billing Rate types and two Special Cost Rate types, that can be
defined:
Special Billing Rates
by Employee
© 2007 - 2014 by Sentinel Hill Software, all rights reserved
Special Cost Rates
by Employee
14
Series 5 Professional Invoicing - User Help
by Employee Group
by Task Group
by Employee/Task
by Task Adjusted by a
given %
by Task
Special rates are allocated to a Rate Class. When Projects are defined to the
system, they can be associated to a Rate Class. A Rate Class might be
considered as a column of rates found in matrix if all the Special Rates are
represented by rows in a matrix. You may then define a class of rates that a given
Project, or set of Projects, are going to use.
Revenue Allocation
The Professional Invoicing system provides for the option of having revenue
determined at the point that Time Sheets and/or data is interfaced, or at the time
that Invoices are generated and printed. (On some systems, this difference could
effect the P&L statement significantly). Revenue is accumulated by assigning a G/
L Revenue Account for either a Project, a Department, Groups of Tasks, or
Groups of Invoice Sections. For special cases, a Revenue Account can be
defined for specific Tasks when used on specific Projects. At all times during the
billing cycle, an accurate account for both time and revenue charges is available to
the General Ledger system utilizing WIP, assorted Revenue, Unearned Revenue
and Deferred Revenue accounts.
Project Deposits
The P/I system provides for a Project Deposit to be recorded, prior to any activity
or billing. A special WIP record will record the amount of the deposit. When an
invoice is eventually generated, any deposit found on file will be applied, and the
appropriate Balance Due Total will be computed and printed.
Project Budgeting
The P/I system provides for a number of different ways to set up and maintain
Project Budgets. Budget versus Actual figures are kept for WIP # of Units, WIP
Costs and Revenues, and Disbursement Costs and Revenues for user defined
periods of time. Budgets can be set up as follows:
by Project so one record holds all amounts for WIP, Disbursements
and Cost Plus amounts
by Project for just WIP # of Units, WIP Revenue, Cost-Plus and/or
Disbursements for all activity associated to the Project. (So these
types of activities may be budgeted for independent of one another)
by Project for just WIP # of Units, WIP Revenue and/or
Disbursements for specific Budget Groups assigned to Tasks and/or
Employees
by Budget Groups associated to Tasks, regardless of the Project, so
© 2007 - 2014 by Sentinel Hill Software, all rights reserved
Introduction
15
budgets can be established for a single or group of different types of
activity.
by Budget Groups associated to Employees, regardless of the
Project, so budgets can be established for a specific employee or
groupd of employees.
by user defined Budget Groups that create categories of budgets that
can include groups of employees, tasks or disbursements. Using
Groups, a separate Budget can be kept for specific Tasks or
Employees
The Budgets may be set up for a specified period of time, which may be broken
down by week, month, quarter, year, (for up to 26 periods), or for just the life of the
project.
The system maintains and accumulates Actual Figures for each Budget that is
created. You may have multiple types of budgets for a single Project depending on
what activity is to be tracked.
Cost Plus Charges
For companies dealing with government contracts, or when revenue needs to be
determined based on fixed fee percentages, the P/I system offers the capability to
automatically computed Cost Plus Charges. As a part of the billing procedure,
after all Work-In-Progress and Disbursement items have been selected for billing,
the Cost Plus Generation option is selected to be executed. Based on Selected
and Un-selected items, Cost Plus Factors are applied to compute predefined Cost
Plus charges. These Cost Plus charges are recorded as special WIP items and
will be printed on the invoice, and available for the assorted analysis reports. The
percentages used in the calculations are pre-determined, by Project, and the
formulas customized per site. Up to six different Cost Plus factors may be
defined. Budgets are available for Cost Plus revenue.
Project Billing
Work-In-Progress items may be selected for billing using two different methods.
First, a Generalized Billing process is available which automatically selects all
eligible WIP and Disbursements within a specified date range. Alternatively, a
Selective Billing and Adjustments option may be used to individually select WIP
items for billing.
When using Selective Billing, a scrolling screen of up to 14 WIP items are
displayed. Individual items can be selected using the mouse. Once an item is
selected, it’s invoice amount can be Marked Up or Marked Down, it can be Partially
Billed, Deferred, or even Written Off. If the WIP item selected has Budgets
defined, the Budget Actual, Committed and Remaining amounts are displayed.
When WIP items are billed, both the Original Rate and Amount and the Invoiced
Rate and Amount figures are kept with the item. These amounts are available for
inquiry or reporting purposes. Also, when invoiced, each WIP and Disbursement
charge retains the Invoice Number and Invoice Date for future reference.
© 2007 - 2014 by Sentinel Hill Software, all rights reserved
16
Series 5 Professional Invoicing - User Help
3rd Party Billing and Multi-Client Billing
Invoices are normally generated for a given Project that is associated to a
particular Customer. As an additional feature, the P/I system supports 3rd Party
Billing, on behalf of the customer associated to the Project. Charges accumulated
to the Project, as one of their properties, has a Bill-Code. The Billing Code is used
to identify which items belong to which 3rd Party Customer. Two variations exist.
First, for 3rd Party Billing, a given invoice is sent both to the primary customer and
to the 3rd party customer. However, the receivable is only registered for the
primary customer associated to the Project. This approach may typically be used
by large legal firms.
In the second variation, invoices are only sent to the 3rd Party Customer and the
receivable is registered to that customer. This approach may be used where
charges are recorded by a head office on behalf of a number of branch offices.
Invoice Printing
The P/I system provides for a number of different types of Invoices to be printed.
That is, for a given project, WIP and/or Disbursement items may be grouped in
various was to produce one or more invoices. An Invoice Layout Maintenance
application allows you to configure a number of different types of Invoices by
selecting from the following characteristics.
WIP grouped by Project, Employee, Department, Task Group,
Reference, (or Job), or Date
WIP detail with Task description, Employee name, or WIP Description
You can specify which Layout is used by Project. As well, by project, you may
specify Detail, Task Group Summary, or Invoice Section Summary, each providing
different levels of sub-totalling. If detail is selected, you may choose whether to
group items by Employee, or by Task. Tax, where applicable, is calculated using
the Tax Codes defined for the Customer.
EDI Invoices
Projects may be set up to produce electronic Invoice data files, as well as a printed
Invoice. Different types of EDI invoices may be generated at the same time, for
different Projects. The following types of invoice may be generated:
Ariba cXML Invoices
Traditional ANSI X12 4010-810 EDI
Excel Workbook Invoices, (with a summary worksheet, and a detail
worksheet)
LEDES 2000S and LEDES 98B for legal firms
as VISA Credit Card charges submitted to Paymentech in 120-Byte
Batch Files or Orbital XML Files
© 2007 - 2014 by Sentinel Hill Software, all rights reserved
Introduction
17
For a variety of different user defined Invoice Interface files for
customers' A/P systems
On-Demand Invoicing
With On-Demand Invoicing, billable activity is generated immediately after a
customer's interaction with a web-site or telephone sales agent. These charges
are then grouped as a packet of information in a file, and delivered to an accounting
server to be deposited to a pre-designated directory. The system's On-Demand
Servicing function detects the presence of this file, reads the data, generates the
invoice, delivers it back to the requesting agent or system, and posts it into the
Accounts Receivable system.
Invoicing Wizard
A wizard program is one that handles a number of standard repetitive functions.
There is a wizard that handles the loading of user third party chargeable data, the
billing process, the printing of Invoices, and the posting to Accounts Receivables.
It examines specific folders for the presence of specific files, and process them
accordingly. Invoices may be generated and printed, or created as separate PDF
documents and automatically emailed to the customers.
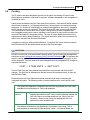
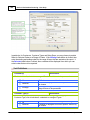
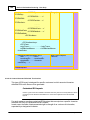
User Defined G/L Account #
ie., 9999-99-9999999 - 999
The G/L Account number is divided into two parts. The Main Account #, and the
Profit Center. The Main Account can have up to 18 digits and can be segmented
into up to four segments. The Profit Center may be 3, 4 or 5 digits in size. You get
to define the size as required.
Extensive Export to Spreadsheet capabilities
The Series 5 provides for the loading or dumping of data from or to your favorite
spreadsheet. Data can be read or written directly to Microsoft's Excel, or tabdelimited text files.
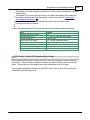
Data Import/Export is offered for the following transactions, master records or
analysis:
Project Master Properties
Task Master Properties
Cost Center Credit Card Numbers
Invoice Group Master Codes
WIP Period Analysis Totals
© 2007 - 2014 by Sentinel Hill Software, all rights reserved
18
Series 5 Professional Invoicing - User Help
Using the Series 5 Professional Invoicing can be fun
Don't believe it? Give it a try.
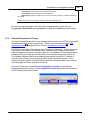
2.3
History of Enhancements
Over the lifespan of the Professional Invoicing system a number of major enhancements and
minor fixes have been applied. Following is a brief summary.
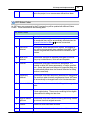
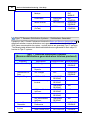
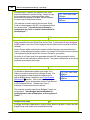
New and Different – Enhancements and Fixes in P/I
For 2014
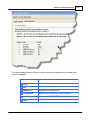
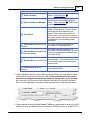
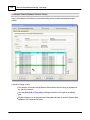
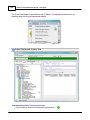
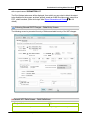
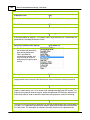
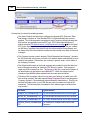
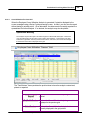
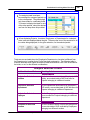
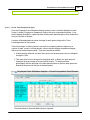
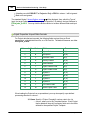
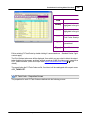
Work-in-Progress Revenue Analysis Inquiry/Report/Export
This new analysis function produces totals of PI WIP activity recorded to each of the G/
L Revenue Accounts. Sub-Totals may also be generated for the following
combinations:
Revenue Accounts
by Customer for each Account
by Project for each Account
by Task for each Account
by Employee for each Account
by Task/Invoice Group for each Account
by EDI Control Codes for each Account
by Invoice Layout for each Account
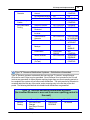
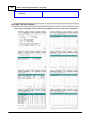
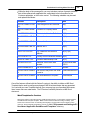
The totals may be displayed to an inquiry grid screen, output to a report, or exported to
spreadsheets, tab-delimited, or CSV data files. The following totals are presented:
# WIP Items
Chargeable WIP Units
Non-Chargeable WIP Units
Chargeable WIP $ value
Non-Chargeable WIP $ value
Overhead $ Amount
Invoiced $ Amount
Mark-Up Invoice $ Amount
Discounted Invoice $ Amount
WIP $ Amount Written-Off
Unbilled WIP $ Amount
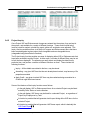
The WIP detail that contribute to each data-set may also be exported to spreadsheet.
The analysis may be run for a calendar year, calendar month, or user specified date
range. (Oct 21-2014)
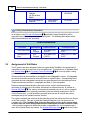
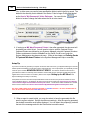
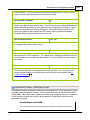
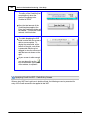
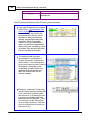
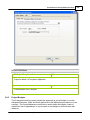
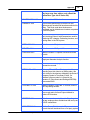
Remote Timesheet Entry using Emails
Two new functions has been introduced into the PI system to manage the process of
entering timesheet information from employee emails.
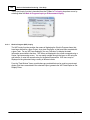
First, there is a new operation that for each employee will generate an Excel
spreadsheet that contains the potential activity that employee would need to record as
© 2007 - 2014 by Sentinel Hill Software, all rights reserved
Introduction
19
WIP activity. These spreadsheets are automatically emailed, by the system, to each
employee to be filled in. The spreadsheet would be edited, and emailed back.
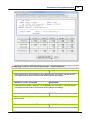
The second new operation will read a designated Outlook inbox for those emails from
employees sending back their completed timesheet spreadsheets as attachments.
The emails are processed and the spreadsheets read to record their timesheets into
the PI system. (May 10-2014)
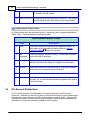
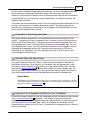
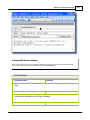
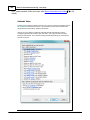
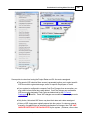
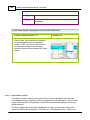
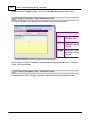
New Invoice E-Billing File Generation
A new function has been introduced into the P/I system. The E-Billing Wizard is a
program that will generated EDI Invoicing files from Invoices that were generated from
other software packages. The invoice information is provided as a text CSV file that
contains the detail that was used to generated the invoice. The detail is loaded into the
PI system, an invoice history record is written, and the appropriate EDI file is created
ready to be transmitted to the customers' BtoB services. (April 15-2014)
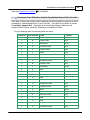
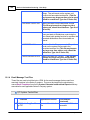
The following EDI Invoice format types are supported:
Ariba cXML
Ariba CSV
Ariba EDI
Ledes 98B
Ledes 2000S XML
Traditional EDI
Paymentech CrCard - ASCII
Paymentech CrCard - XML
JP Morgan Non-PO
Riemer Law
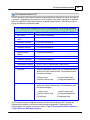
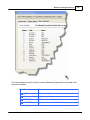
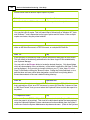
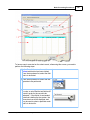
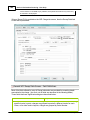
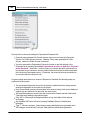
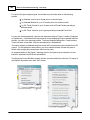
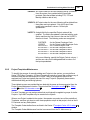
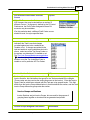
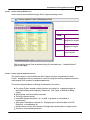
Project Inquiry Dashboard
A Project Dashboard has been introduced to the P/I system. Utilizing a Windows tree
display, projects may be listed by Code, Description, or grouped by Customer, Project
Manager, Project Leader, Location or Invoice Layout. When a given Project is
selected, assorted related information may be displayed in the following tabbed-subscreens:
Project Properties
Assigned Employees
Budgets
Employee WIP Totals
Task WIP Totals
Disbursement Totals
Sub-Contractor Totals
Purchased Items
Inventory Issued
Invoice History
For the totaling screens a date range filter may be specified (March-10-2014)
For 2013
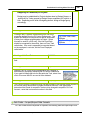
Proforma Invoices
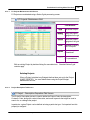
Once P/I invoices are generated, they are presented in the Invoice processing grid.
When selecting a specific invoice, and right-clicking to have the pop-up menu
presented, new functions are available. You may now have a "Proforma" copy of the
invoice printed, and optionally emailed. Once printed, it's status is set as "Proforma",
© 2007 - 2014 by Sentinel Hill Software, all rights reserved
20
Series 5 Professional Invoicing - User Help
and it will remain until the "Approve Proforma Invoice" pop-up menu function is
executed. (Apr-12-2013)
For 2012
On-Demand Re-Invoicing
The P/I system now provides support for the generation of "On-Demand" Correction of
Invoices. With On-Demand Invoicing, billable activity is generated immediately after a
customer's interaction with a web-site or telephone sales agent. These charges are
then grouped as a packet of information in a file, and delivered to an accounting server
to be deposited to a pre-designated directory. If after either a system generated
Invoice, or an On-Demand Invoice has been produced, it is discovered that a change
needs to be made, the On-Demand Service routine will now be able to handle a
request to Re-Generate an Invoice. In this case, the Invoice Number of the original
Invoice is passed in the file name. For the original Invoice, a Credit is generated
reversing all it's charges and G/L distributions; and the new revised information is used
generate a totally new Invoice. (Nov-15-2012)
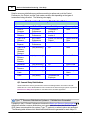
EDI Invoice Generation
When generating EDI Invoices for a Project having different charges with different bill
codes, the system will create a separate Invoice for each bill code. For EDI Invoices, if
the WIP item value is ZERO, then it is automatically written off, and not invoiced. In the
case where all the charges with the same bill code have ZERO value, the associated
invoice is not generated. In this instance, any subsequent WIP items not yet invoiced,
were not being invoiced at all. The problem has been identified and fixed. (Nov-022012)
Invoice Degenerate Function
The function used to degenerate Invoices has been revised to provide an enhanced
message to the operator to verify that De-Generation is supposed to be executed.
(Oct-08-2012)
Task Codes Codes Spreadsheet Export
The Date-Last-Used field associated to the Task will now be output when Exporting
Task information. (Sept-28-2012)
Project Master Codes Spreadsheet Import
The Invoice Layout associated to the Project will now be input when Importing Project
information. (Sept-28-2012)
Recap Record - "Search Court Information" field
A new field has been introduced to the Recap Charges record. The "Court Information"
field is used to hold information relating to charges associated to customers that are
legal firms. This new field is dealt with in the User Interface functions, the General WIP
Transactions Entry (and related spreadsheet interface), and Invoice generation. When
loading charges from spreadsheet as General WIP transactions, this new field
must be available in column AK. Please ensure your applicable spreadsheets
© 2007 - 2014 by Sentinel Hill Software, all rights reserved
Introduction
are revised accordingly.
21
(Sept-21-2012)
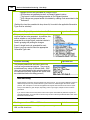
Apply Credits to Posted Invoices
From the Historic Invoices Inquiry function, the function to apply credits to posted
invoices has been enhanced as follows:
When an invoice is selected from the grid to be displayed, a new Apply Credits
push button is offered at the bottom of the screen, thus letting you browse
through the invoices and then being able to launch the function to apply the
credits.
You may now apply credit amounts to specific WIP items, without 1st computing
the total amount of the credits. A new push-button labeled Adjust CR Total to
Amts Applied when clicked will use the total amounts marked for Credit as the
Total
Once credit amounts have been applied to specific WIP items, and the Enter
the Credit push-button is clicked, then both the original WIP records and Recap
records are replicated with the negative amounts of the credits assigned; a Credit
Invoice is generated and printed, and it will be recorded as an entry in the Invoice
Processing grid, waiting to be posted to A/R
Once Invoices are posted to an A/R Sales Batch, all applicable reversing G/L
Distributions are generated for the Credit. (Sept-21-2012)
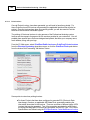
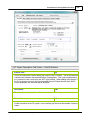
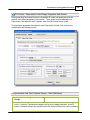
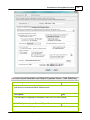
Automated Invoicing Wizard
A new function has been introduced available within the "Invoice Processing" dropdown menu. "Launch Auto-Invoicing Wizard" is a routine that when executed, will start
up a process in a new window that will be used to automatically execute the Invoicing
Wizard. You may specify that it is to execute every 1/2 hour, hourly, or every 2 or 4
hours. A status sub-screen is displayed showing when the next and previous
executions have occurred. The option also exists to have the process automatically
hibernate overnight.
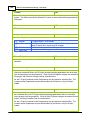
In order to use this new function, you MUST first add a new User Logon Profile named
AUTOWIZARD, (using the System Maintenance's "User Logon Profile" maintenance
function). You must also, add a new variable to the runtime Configuration file named
AUTO_WIZARD_AUDITLOG_PATH which specifies the full path to the directory/
folder that an audit log file, for the process, is to be written. (Sept-21-2012)
Customer Service Reps
The Professional Invoicing system has been enhanced to provide the ability to identify
and record the "Customer Service Reps", (CSR), that are associated to work-inprogress charges. You may specify 2 different CSRs; one for the Customer and one
for the individual WIP item. (The one for the Customer is assumed to be the "Team
Leader". These CSR are set up in the Accounts Receivable system using one of the
user defined Demographic Codes. The CSRs are specified as new fields in each of
the applicable interface functions, and may be entered using the General Work-InProgress or Timesheet Entry applications. When invoices are printed, the description
associated to the Client CSR, (assumed to be name and phone #), will be printed in
the footer of client's invoices. (July 28-2012)
© 2007 - 2014 by Sentinel Hill Software, all rights reserved
22
Series 5 Professional Invoicing - User Help
Upgrade instructions
When the software with this enhancement is installed, you MUST execute the PI
Upgrade utility to have all applicable records rebuilt. Please contact Sentinel Hill
Software for further information.
Invoice Reprints
From the Historic Invoice Inquiry function, when a given invoice is selected to be
reprinted, if that invoice is associated to a 3rd party billed client, both the client's invoice
is printed, and the 3rd party invoice is printed too. (July 19-2012)
Paymentech XML Invoices
A new EDI Invoice type has been introduced. Invoices may now be generated as Visa
Credit Card charges using the Chase Paymentech Orbital Gateway Batch XML
Interface. The appropriate batch file is produced to be submitted. Also, the
Paymentech "Response" file is processed to identify rejected requests. (July-162012)
PDF and MS Word Invoices are now generated with Assorted Formatting
Options
Invoices will now be generated and output with assorted formatting features. These
include, and limited to, the following:
Text is output in user defined fonts such as variable pitch Trebuchet MS
Columns of information may now be aligned using left, right and center tab sets
Segments of the invoicing page may be defined in a different font and font size
Specific fields may be output as bold, italic, reverse and/or highlighted; and as a
different font and font size
Graphic lines may now be inserted as segment delimiters or underlines for totals
(June-20-2012)
Invoicing Wizard
The Invoicing Wizard routine calls the "General WIP Interface", to validate and load
charges that are to be interfaced into the system. The Wizard routine has been
revised to abandon the interface if the "General WIP Interface" detected an attempt to
re-load a given set of files. The appropriate message is displayed to the status screen,
and is output to the exception report. (May-28-2012)
General WIP Interface
When user WIP data is interfaced as "General WIP Transactions", a log file will now be
kept to record information associated to the file being interfaced. If the operator
attempts to repeat the interface on a particular file, the log file will be examined to see if
it had already been loaded or not. A message will be displayed, and the operator will
have the option to re-load it. (When the interface is called from the Invoicing Wizard, if
a file has already been loaded, then an error will be returned to the Invoicing Wizard,
and the file will not be loaded). (May-28-2012)
Recap Export Spreadsheet
The Recap Export has been revised to now allow for over 65,000 charges to be
© 2007 - 2014 by Sentinel Hill Software, all rights reserved
Introduction
23
exported. If output to Office 2003 Excel workbooks, a 2nd worksheet will be created.
As well, The Rate, # of Units and Fee columns of the spreadsheet will be correctly
formatted as $ amounts, or not. (May-28-2012)
Invoice Layout Type "O" for On-Demand Invoices
A new Invoice Layout Type "O" has been introduced. This layout is similar to the Type
"L" layouts, except all charges reported on a single invoice are for the same Recap
Order Number. As well, up to 20 characters of each of the 8 possible Recap
Reference fields will be printed in the header of the invoice; and any taxes that are
computed will be listed with each charge. The Invoice Layout Maintenance function
has been revised accordingly. This Invoice Layout will be used for all On-Demand
Invoice requests. (May-18-2012)
Invoice Layout Types for Invoices Generated as Separate Documents
The Invoice Layout Maintenance function has been revised to provide a new property
for those layouts that have the property set to Generate a Separate Document for each
Invoice. This new property named MS Word Template Override, is used to specify the
name of the MS Word template that is to be applied when the invoice is printed as an
MS Word or PDF document. (May-15-2012)
Invoice Layouts "L" and "F" for Daily Legal Invoices
Invoices produced for Projects defined with Type "L" Invoice Layouts have been totally
revised. As well, a new Invoice Layout "F" has been defined. These invoices have
been revised to take advantage of the new formatting capabilities when outputting them
as MS Word, or PDF documents. Type "F" invoices, (for Financial Institutions), group
charges by Bill-Code, and then again by the WIP Reference, (for the Debtor name).
Bill Code totals, and Debtor sub-totals are printed. Type "L" invoices are similar to
Type "F" invoices, except all charges for a given Bill Code are generated on a separate
invoice.
For both these types of invoices, the MS Word documents are now output with a
variety of formatting options. These include the following:
Variable pitch font, (Trebuchet MS in 8, 9 and 10 point)
Line and section tab settings utilizing left, right, center and decimal-place tabs
The drawing of graphic lines for separation of sub-sections and underlining
Sub-string formatting for bold, italic, reverse-video, text highlighting, and alternate
font sizes
Note that, these invoice require the use of a new MS Word Template which must be
available to each user who generates invoices. (May 15-2012)
Invoice Layout Types "F" and "R" for DFS Invoices
The definitions of, and invoice layouts for these types of invoices have been removed
from the system. The Invoicing routines have also been revised accordingly. If any
layout records defined for these types are still on file, they should be deleted.
(May-02-2012)
Option to "Cancel" specific Operations in P/I
A number of functions, once initiated, may now be cancelled, prior to completion. This
© 2007 - 2014 by Sentinel Hill Software, all rights reserved
24
Series 5 Professional Invoicing - User Help
is accomplished by clicking on the "Cancel" button presented on the progress bar
screen. The following functions may be cancelled:
Archiving of Historical Invoice Data
General WIP Transactions Entry "Import" Function
General WIP Transactions Entry "Revalidate WIP" function
General WIP Transaction Entry "Delete ALL Transactions" function
After Hours Emailing of EDI-PDF Invoices
In each case, the process will stop processing once a given function for a given
transaction is completely finished. (April-04-2012)
"After Hours" Emailing of EDI PDF Invoices with Recap Reports
For those invoices generated as EDI PDF type invoices with Recap Reports that are to
be subsequent emailing to respective customers using "After Hours" function, new
functionality has been introduced. You will now be able to have these invoices reemailed. When the "Email EDI Gen'ed PDF Invoices" function is selected, a screen
will now be presented on which you may set the option to Repeat the email process for
a range of Invoice number. For a given invoice to be re-emailed with it's recap
report, it must have already been generated in the past, and reside as a PDF in
the directory folder associated to the EDI/XML Specifications Code. (April-042012)
Invoice Posting to A/R
The Invoice Posting function typically should be executed when no other users are
executing a function that opens, or has access to, the active Invoice file. Previously,
when Invoices were posted, the Invoice file was opened exclusively, and all other users
were locked out from any function that attempted to open it. Now, a software controlled
locking mechanism has been introduced. A record in the A/R Passing file is now used
to monitor how many users are executing any functions that open the Invoice file. That
record also has a flag that gets set to indicate that the Invoice file is open by the Invoice
Posting function. Now when the Invoice Posting function is selected, if any other users
have the Invoice file open, a message will be displayed to the operator, and they may
choose to proceed with the posting, or not. Also, if while the Posting function is
executing, if any of the other functions that open the Invoice file is selected, that
operator will be informed and have the option to continue or not.
Abandoning the system's file exclusive locking mechanism was necessary in order to
allow for "On-Demand" Invoicing to continue during the times when normal daily
Wizard Invoicing and "Month-End" Invoicing was executing. (March-07-2012)
Print/Outputting EDI Invoices
When EDI Invoices are output, the system is now able to handle up to 12 different EDI
Invoice Control Types at a time. Previously, only 10 different sets could be output
when Invoices were printed.
Also, previously when EDI invoices were generated to be automatically emailed, the
system assumed that recipient email addressed were always available. (Typically from
the Customer master record's profile). The system has been enhanced so that if no
email address is provided, or is blank, then the invoice will be skipped from being
© 2007 - 2014 by Sentinel Hill Software, all rights reserved
Introduction
25
processed. If this is the case, a message will be displayed accordingly. (March-022012)
Reprinting Historical and/or Overdue Invoices
The function to have Invoices reprinted has been enhanced to offer the option to print
ONLY those Invoices that are considered "Overdue". When selecting to print overdue
invoices, the operator may choose to select only those invoices for customers with a
specified Terms Code. As well, a filter is offered allowing selection of only those
invoices that are 15, 30, 45, 60, 90 or 120 days overdue, based on either the Invoice
Date or the Due Date. An new additional option to have the invoices automatically
emailed to those customers with email addresses has also been introduced.
The body of the email message is loaded from a file named
OverDue_Invoice_EmailMessage.TXT that must be located in the directory named
Email-Templates located in each Company System's designated reports directory.
This text file may be either a plain ASCII text, or an HTML file and contain up to 8192
characters. (Feb-12-2012)
P/I Projects Codes Maintenance
When adding a new Project, if the associated invoices were to be generated as one of
the defined EDI layouts, it was necessary to finish the add process first, and then
select to Modify the Project to enter the EDI properties. Now, the EDI properties may
be entered when the Project is added. (Feb-15-2012)
P/I Data Files "Archiving" Function
The "Archive" function has been enhanced to now read through the Historic Invoices
file using the new Invoice History Date key. As a result, only those invoices that are to
be archived are processed. Previously, all record in the Invoice History file were being
read. (Feb-14-2012)
P/I Invoice Inquiry
From the Historic Invoices Inquiry function grid screen, you may now select to have
invoices displayed sorted by Invoice Date. (Feb-14-2012)
EDI Control Properties - "Suppress ZERO value WIP"
A new control property has been introduced to the EDI Specifications Maintenance
screen. Labeled as "Automatically Suppress and Write-off ZERO value WIP
items", is a check-box that when set will not include any WIP items that have a ZERO
value in those EDI formats listing detail charges. As well, when these ZERO value
items are encountered, they will automatically be flagged as "Written-Off" WIP items.
(Feb-09-2012)
Custom Character Delimited ASCII EDI Invoice Formats
A new type of EDI Invoice format has been introduced. Custom "Character-Delimited"
Text EDI invoices are now supported. These are ASCII text files that contain invoicing
information in fields that are separated by different characters. (Including, <,>, <~> and
the <|> characters.) The different formats available are customized for specific
customer's requirements. (Feb-08-2012)
LEDES 98B Invoices
© 2007 - 2014 by Sentinel Hill Software, all rights reserved
26
Series 5 Professional Invoicing - User Help
The system now supports a number of variations to the standard LEDES 98B Format
of invoices. The existing LEDES 98B EDI Control Properties has been revised with a
new field to indicate the given company to which the unique settings and values are to
be applied to. The invoicing routines have been revised as required. (Feb-06-2012)
Paymentech Orbital Gateway Batch XML Invoices
The system now supports the generation of Orbital Gateway Batch XML Credit Card
charges for submission to Paymentech for invoices generated from PI. A new EDI
Control Type with applicable properties screen has been introduced to the EDI Control
Settings Maintenance routine. The invoicing routines, and the Paymentech Response
Reconciliation routine, have both been revised as required. (Jan-27-2012)
LEDES 2000 XML Invoices
The system now supports the generation of LEDES2000 XML invoices. A new EDI
Control Type with applicable properties screen has been introduced to the EDI Control
Settings Maintenance routine. The invoicing routines have been revised as required.
(Jan-18-2012)
EDI PDF Invoices with Recap Reports
The generation of the EDI PDF type invoices with Recap Reports, and subsequent
emailing to respective customers, has been enhanced. As an option associated to the
EDI Specifications, you may now have the production of these invoices broken into two
steps. If two-steps is selected, as the 1st step, when these invoices are "Printed" only
the PDF Invoice document is built. The 2nd step, launched by a Invoice Processing
sub-menu item, will have each invoice's corresponding Recap Report generated, and
both the Invoice and the Recap Report is emailed to the customer. Using this two-step
method, or which has The Generation of Recap Reports and subsequent emailing
"Performed as a Separate After Hours" Operation, will significantly reduce the time
required to generate invoices at the end of the month. (Jan-16-2012)
For 2011
Enhancements to the Invoicing Wizard
The P/I system for the past few years has provided an Invoicing Wizard application that
automatically inputs user interface data and automatically generates and prints
invoices; and posts them to the Accounts Receivable system. The invoices were
generated as a set that was printed. The process has been enhanced to now provide
the option to select the type of invoice to be generated. Invoices may still be generated
as a set and printed, but as well, they may now be generated as individual MS Word or
PDF documents, and automatically emailed to each customer. New fields associated
to the options for generating invoices have been introduced to the Invoice Wizard
Codes Maintenance function screen. (Dec-09-2011)
On-Demand Invoicing
The P/I system now provides support for the generation of "On-Demand" Invoices.
With On-Demand Invoicing, billable activity is generated immediately after a
customer's interaction with a web-site or telephone sales agent. These charges are
then grouped as a packet of information in a file, and delivered to an accounting server
© 2007 - 2014 by Sentinel Hill Software, all rights reserved
Introduction
27
to be deposited to a pre-designated directory. The Series 5 Professional Invoicing
system's On-Demand Servicing function detects the presence of this file, reads the
data, generates the invoice, delivers it back to the requesting agent or system, and
posts it into the Accounts Receivable system. The process is accomplished typically
all in a time-frame of less than 10 seconds.
On Demand Control Sets are used to define the options associated to these invoicing
related operations. Each On Demand Control Set could be established to represent a
unique set of options perhaps representing charges accumulated for different branch
offices, geographic regions, or sales agents. Invoices associated to each Control Set
is then dealt with separately, having their accumulated activity loaded, billed, invoices
generated, and moved to A/R. (Dec-09-2011)
Recap Report/Spreadsheet Export
The export function has been revised. A new column, "F", has been introduced that
contains a flag indicating that the charge is either a "Service" or a "Disbursement". All
columns to the right have been shifted accordingly. (Dec-06-2011)
Revised PI Menu Menu-Bar
In the PI menu-bar, the Operations drop-down menu set has been divided into two
drop-down menus. All the menu items relating to the generation and processing of
invoices has been moved to a new menu-bar set titled Invoice Processing. As a
result user access rights to each of the menu items that previously were associated to
the Operations drop-down menu will have to be reset for each user having access to
PI. (Nov-04-2011)
New WIP Field - Working Location of WIP Activity
A new field has been introduced to the P/I system Work-In-Progress record. It is used
to record where the WIP activity was performed. A number of different pre-defined
locations are provided to be selected. (Nov-02-2011)
150 Character Customer Company Names
The P/I system has been enhanced to support the 150 character Customer Company
Names that are provided by the Accounts Receivable system. Where applicable, the
full 150 character name is now displayed. (Nov-02-2011)
8 Digit Invoice Numbers
The P/I system has been enhanced to now provide 8 digit Invoice Numbers. (Nov-022011)
General WIP Entry Inteface from Spreadsheet
Several new fields have been added to the WIP, (Work-in-Progress), record definition.
As a result, the layout of fields used for the "Interface from Spreadsheet" has been
revised. For users that load WIP charges you must re-configure the layout of your
input spreadsheets. Briefly, the following columns have been inserted or shifted:
Column K is a new field used to indicate whether the WIP activity is Service or
Disbursement oriented
Column L now holds the Invoice Consolidation field that used to be in Column T
© 2007 - 2014 by Sentinel Hill Software, all rights reserved
28
Series 5 Professional Invoicing - User Help
Column M is a new field used to provide a code indicating where the WIP activity
was performed
Column Q is a new field that provides the option to override the P/I Task's
Description that is printed on specific Invoice Layouts
Refer to the documentation below for the General WIP Entry
layout information. (Nov-02-2011)
297
operation for specific
Email Addresses
With the P/I system, specific types of Invoices may be emailed. The email address
fields have been increased in size from 40 to 120 characters. The email addresses
are obtained either from the Customer's Properties record, from the Multiple Client
Project Bill-To record, or as passed within On-Demand Billing parameters. All P/I
applications providing the option to have reports or invoices emailed will be revised
accordingly. - or from Task Code has been increased in size from 8 to 10 characters.
The Task Code Description field has been increased from 40 to 100 characters. All
routines that require entry or display of the Task Code have been revised accordingly.
(Oct-28-2011)
Task Codes and Associated Descriptions
The P/I Task Code has been increased in size from 8 to 10 characters. The Task
Code Description field has been increased from 40 to 100 characters. All routines that
require entry or display of the Task Code have been revised accordingly. The Time
Sheet Entry and General WIP Charges Entry functions have been revised to display
the 100 character description. (Oct-28-2011)
Invoice Group Codes
The P/I Invoice Group and Invoice Section Code fields have been increased in size
from 6 to 10 characters in size. All routines that require entry or display of these codes
have been revised accordingly. (Oct-28-2011)
Upgrade instructions
When the software with this enhancement is installed, you MUST execute the PI
Upgrade utility to have all applicable records rebuilt. Please contact Sentinel Hill
Software for further information.
LaSalle Excel Invoices
For the EDI controlled LaSalle Excel Invoices, they will now be emailed using the new
interface to MS Office Outlook. These email messages will be sent as "Plain Text"
invoices. The body of the email message is now loaded from a file named
LaSalle_Invoice_EmailMessage.TXT that must be located in the same directory that
the Excel invoices are generated in. (As determined by a property in the EDI Control
maintenance function). It now means that users may edit the message that is
emailed. (Oct-05-2011)
Wilmington Trust Excel Invoices
For the EDI controlled Wilmington Trust Excel Invoices, they will now be emailed using
the new interface to MS Office Outlook. These email messages will be sent as "Plain
© 2007 - 2014 by Sentinel Hill Software, all rights reserved
Introduction
29
Text" invoices. The body of the email message is now loaded from a file named
WTrust_Invoice_EmailMessage.TXT that must be located in the same directory that
the Excel invoices are generated in. (As determined by a property in the EDI Control
maintenance function). It now means that users may edit the message that is
emailed. (Oct-05-2011)
Generic Excel Invoices
For the EDI controlled Excel Invoices, they will now be emailed using the new interface
to MS Office Outlook. These email messages will be sent as "Plain Text" invoices.
The body of the email message is now loaded from a file named
Excel_Invoice_EmailMessage.TXT that must be located in the same directory that
the Excel invoices are generated in. (As determined by a property in the EDI Control
maintenance function). It now means that users may edit the message that is
emailed. (Oct-05-2011)
Emailing of PDF Invoices
For the EDI controlled PDF Invoices, they will now be emailed using the new interface
to MS Office Outlook. These email messages will be sent as "Plain Text" invoices.
(Sept-21-2011)
Employee Daily/Period Activity Report Enhancements
The Employee Daily Activity Report has been enhanced as follows:
It has now been renamed to the "Employee Period Activity Report" since you may
now defined periods as Daily, Weekly, Monthly or Yearly
The following Analysis, where totals are accumulated, may be generated:
For each Employee, which Projects was WIP activity recorded for
For each Employee, which Tasks was WIP activity recorded for
For each Task, which Employees recorded WIP activity for
For each Project, which Employees recorded WIP activity for
The report can be generated with or without detail WIP activity being listed
Summary totals may, as an option be exported to spreadsheet
For a given date range, sub-totals are accumulated and reported, by Day, Week,
Month or Year
As well, the generic P/I WIP and P/I Projects and A/R Customer Selection Filters
screens are presented to allow for the entry of additional filters. (Aug-10-2011)
Enhancements to Project Budgets
The Budgeting process has been partially overhauled. It is now possible to define
multiple types of budgets for a given Project. You may now also budget for Employee
WIP activity or Task WIP activity, independent of the Projects being recorded to. Some
of the new features to note:
A single budget may be set up for the Project, or multiple budgets, each for WIP
# of Units, WIP revenue, Cost-Plus charges and Disbursements Revenue
Budgets may be set up for a specific Task, or for sets of Tasks based on user
defined Budget Groups, that is kept regardless of the Project recorded for
Budgets may be set up for a specific Employee, or for sets of Employees based
© 2007 - 2014 by Sentinel Hill Software, all rights reserved
30
Series 5 Professional Invoicing - User Help
on user defined Budget Groups, that is kept regardless of the Project recorded
for
Each Budget is assigned for a period of time which the system will break down
into periods of weeks, months, quarters or years for up to 26 periods
For each combination of budget defined, figures may be recorded and actuals
accumulated for WIP # of Units, WIP Revenue, WIP Costs, Disbursements
Revenues and Disbursement Costs
For each combination of budget defined, an inquiry function presents a display of
budgeted amount and actual amount along with variance amount and % by each
period. As well, Accumulated Totals-To-Date are displayed for each period.
Budgets may be entered manually and imported or exported from/to a spreadsheet.
(July-25-2011)
Time Sheet Exception Report Enhancements
The Time Sheet Exception Report has been enhanced as follows:
A date Range may be specified as a filter rather than just a cut-off date
You may now select to list those employees that have weekly total hours either
over and/or under specified thresholds
Total time-sheet hours recorded will be accumulated and reported for each week
that falls within the date range entered
Employees will be listed either by their Employee Code, or by Name
Employees may be grouped either by Department, Location, Job Classification,
or by their Supervisor
Entry function has been enhanced to provide support for Employee assigned
Projects.
As well, the generic P/I WIP and P/I Projects and A/R Customer Selection Filters
screens are presented to allow for the entry of additional filters. (July-14-2011)
Time Sheet Entry Enhanced for Support for Assigned Projects and Tasks
The Time Sheet Entry function has been enhanced to provide support for Employee
assigned Projects. When entering a time sheet for a particular Employee, if Projects
have been assigned to that employee, then a drop-down list will be presented with
ONLY those projects that have been assigned. Once the Project is chosen, if Tasks
have been assigned too, a drop-down list will be presented with those tasks that have
been assigned. (July-12-2011)
New Feature to Assign Projects and Tasks to Employees
The ability to assign Projects to an Employee has been introduced. A new Codes
Maintenance function offers the ability to assign Projects to Employees. When a
Project is assigned, then in the time sheet entry operation, only those Projects may be
recorded. In addition to assigning Projects, Tasks can also be assigned to those
Projects that are assigned to a given Employee. Both an Import and an Export function
are provided for loading and outputting valid combinations or Employees/Projects and
Tasks to spreadsheet. (July-10-2011)
Invoice Generation and De-Generation functions
© 2007 - 2014 by Sentinel Hill Software, all rights reserved
Introduction
31
The Invoice Processing Grid screen routines have been revised so that the A/R
Distribution file is opened only during the Invoice Generation and the Invoice DeGeneration functions. The A/R Distribution file in various A/R related applications is
opened Exclusively. Now, in the P/I Invoicing system, it is only opened when actually
being used. (July-04-2011)
Invoice "Archiver" function
A problem has been discovered associated to the function that archives Invoice History
records to their applicable Archive file. When a PI Invoice or Credit is archived, the
given record, along with it's Invoice Line Items records and any Recap Detail records,
are copied to the archive files. For a Credit, there is no associated Recap records. A
situation arose where Recap records that actually belonged to a valid Invoice were
archived because a Credit document was on file with the same document # as that
Invoice. When that Credit was archived, the invoice's Recap records were archived.
The problem has been fixed. The system will no longer attempt to archive Recap
records when a Credit is being archived. (June-30-2011)
Invoice De-Generation Function
When Invoices are de-Generated, the option exists to have a Credit document
automatically created. (In the case where the Invoices had already been interfaced to
Accounts Receivable). When creating Credit Notes, the document # that is assigned
is determined from the A/R Control preferences. The function has been enhanced that
when Credits are generated, a test is performed to make sure the Credit document #
would not exceed 999999. If the number of invoices to be de-generated is greater than
difference between 999999 and the Next # to Assign, then the De-Generation function
is aborted and a message is displayed. (June-30-2011)
Employee Cross Utilization Analysis
This report has been totally revised. The analysis is generated showing total WIP
activity that was recorded by employees for work performed on projects associated to
other Locations or Departments. Totals are now tallied for all combinations of
Employee, Location, Department and Project. Output is displayed to a Series 5 grid
screen, from which different variations of combinations of Employee, Location
Department and Project may be displayed. Also, totals may either be output to a
report, or to a spreadsheet. (June-03-2011)
Disbursement Expense - Interface from Accounts Payable
With the new option to record Disbursements directly into P/I, you still have the
possibility, desire and need, to enter the associated supplier Invoices into the A/P
system. The A/P transaction entry function has been enhanced to now allow the
operator to view any Disbursements, for the given Vendor, that had been previously
entered into the P/I system. If selected, the particulars about the Voucher being added
will be recorded into the P/I's Disbursement. Alternatively, Disbursements not already
found in the P/I system may still be loaded. (May-11-2011)
Disbursement Expense Entry
Up to this point, disbursements to be charged to a Project were loaded into the P/I
system when supplier Invoices were entered into the Accounts Payable system. When
expenses were distributed to their applicable G/L distributions, a P/I Project could also
be specified. When the Invoice was posted to Payables, the Disbursements were
© 2007 - 2014 by Sentinel Hill Software, all rights reserved
32
Series 5 Professional Invoicing - User Help
recorded to the specified Project.
A new function has been introduced that provides for the entry of Disbursements
directly into the P/I system. Also, you may now enter three types of disbursements;
These include Regular Purchases, Sub-Contracted Services and Inventory Items. The
Project Inquiry and Billing Selection functions have been enhanced to support these
new types. Disbursement expenses may be entered directly, or imported from Excel
worksheets, CSV or tab-delimited files. (May-06-2011)
General WIP and Time Sheet Entry Posting functions
The operation of posting General WIP charges and/r Time Sheets may improve
dramatically depending on the type of operating system that it is being executed on.
When the Work-in-Progress records are written, the Time-of-Day is used as part of the
key to make sure those transactions having the same Project, Date, Employee and
Task codes have a unique key. In any operating systems that can only report the
Time-of-Day to the the nearest second, or 1/10th of second, that would mean that only
1 or 10 such WIP records could be written per second. A change was made that now
would allow up to 1,000 such WIP records to be written per second, (if the network and
machine could go that fast). (Apr-21-2011)
Weekly Employee Time Sheet Entry
The Time Sheet Entry functions have been enhanced to provide for the entry of
employee time for a particular Project and Task, daily over the period of a week. When
creating a new Time Entry Batch, you may choose to create a batch that has it's time
sheet activity entered either as Individual WIP Items, or as Daily Items for a Week by
Project/Task. The new option, entering charges by the week, presents an entry
screen to enter the Project, the Task, and Hours for the 7 days of the week starting
from a Monday. (Apr-21-2011)
New Feature to Attach Supporting Documents to Projects
You may now attach a variety of different documents to Master Project records. Up to
15 separate documents may be selected, and attached and viewed from the Project
Codes Maintenance functions. The different types of documents support are as
follows:
PDF
Bitmap ( *.BMP files)
JPEG
TIFF
ASCII Text ( *.TXT files)
MS Word 2003 documents
MS Word 2007 documents
MS Excel 2003 documents
MS Excel 2007 documents
ASCII Text ( *.txt files)
(Apr-14-2011)
Ariba CSV Invoice Generation
A new EDI invoicing format has been introduced to the P/I system. Invoice may now
be generated as CSV text files that are ready to be sent to Ariba for processing. A new
EDI specification type has been introduced called ARIBA CSV Text Invoices. If using
this method, an empty CSV Invoice file must be created in the designated output folder
that contains the contractual and format information for Ariba. (Apr-10-2011)
© 2007 - 2014 by Sentinel Hill Software, all rights reserved
Introduction
33
Projects Maintenance
From the Project Maintenance routine, the existing function to Import Project data from
spreadsheet has been enhanced. When loading data, there were two Processing
Directives, %RADD% and %DELE%, which would either Re-Add Projects, or just
Delete those Project Codes that followed. A new directive has been introduced, %
UPDT%, that provides for the option to Update a particular field in existing Project
records. The field to be updated is identified by the code provided in column 2 of the
row the %UPDT% directive is in. In column 2, enter PARTNER, LEADER, INVLAYOUT, KEYWORD-1, KEYWORD-2, KEYWORD-3 or KEYWORD-4 to indicate
which field is to be updated. In the rows that follow, in column 1 specify the Project
Code, and in column 2, the new value of the indicated field to be replaced. (Feb-012011)
cXML Invoice Generation
The program the generates traditional cXML Invoices has been enhanced. Now any
text string that represents a Customer Name, a Search Name or any other text string
will be examined to ensure that it does not contain any of the cXML data record or field
terminator characters. These include [ / ], [ ' ], [ " ], [ % ], [ < ] and [ > ] characters
which will be converted to [ | ], [ ^ ], [ ^ ], [ p ], [ { ] and [ } ] respectively. (Jan-27-2011)
Ariba EDI Invoice Generation
The program the generates traditional EDI Invoices has been enhanced. Now any text
string that represents a Customer Name, a Search Name or any other text string will
be examined to ensure that it does not contain any of the EDI data record or field
terminator characters. These include [ * ], [ ~ ], [ < ] and [ > ] characters which will be
converted to [ + ], [ ^ ], [ - ] and [ - ] respectively. (Jan-27-2011)
EDI Invoice Generation
The program the generates traditional EDI Invoices has been enhanced. Now any text
string that represents a Customer Name, a Search Name or any other text string will
be examined to ensure that it does not contain any of the EDI data record or field
terminator characters. These include [ ~ ], [ | ], [ < ] and [ > ] characters which will be
converted to [ ^ ], [ / ], [ - ] and [ - ] respectively. (Jan-27-2011)
Interface User WIP Records to Either Time Sheets or General WIP Transaction
Entry
These two operations have been enhanced to ensure that all characters loaded from
the user supplied file are ASCII characters. In some cases, non-ASCII characters
were being loaded into characters strings that were eventually passed on in files that
were being submitted as EDI Invoices that caused rejection. Now any character that is
not a valid ASCII character is converted to the <?> character.. (Jan-27-2011)
For 2010
General WIP Transaction Entry and Posting
General WIP Entry is used to enter Work-in-Progress charges that are not directly
associated to an employee's time sheet. When the User Charges Interface is
© 2007 - 2014 by Sentinel Hill Software, all rights reserved
34
Series 5 Professional Invoicing - User Help
executed, it loads it's charges, and optional Recap Detail records, into a General WIP
Transaction batch. A General WIP transactions has associated to it a Recap Detail
record only if a WIP/RECAP Record ID Number had been specified.
When a General WIP Transaction Batch was being posted, if a WIP/RECAP Record
ID was specifed, it assumed that a valid Recap Record had also been defined. If there
actually was not Recap Detail record, the transaction still had been posted. The
Posting function has been enhanced so that now, if the General WIP Transaction had a
non-zero WIP/RECAP Record ID Number, but no associated Recap Detail record was
on file, that transaction will now be flagged, and it WILL NOT be posted. (Nov-222010)
EDI Invoices for Bank 1 & JP Morgan Chase
Occasionally, a company name, address, or Recap Search-Name or Recap OrderedBy name would have a <~>, <|> or <*> character embedded. These are used as field
and/or line terminators in the EDI file that is generated and transmitted. As a result,
these files would be rejected. The EDI Invoicing routines have been enhanced to
replace these special characters with <^>, </> and <+> characters respectively.
(Nov-17-2010)
Invoice Generation - Automatically Emailed PDF Invoices
To automatically email generated invoices as PDF documents, for those Projects that
have been set up to do so, the operator must now click on the Push Button labeled
Email/Post Finals found on the Invoice Grid Processing screen. If the Print/Post
Finals push button is selected, those invoices for Projects set up to be automatically
emailed are skipped. (June-02-2010)
Invoice Generation - Automatically Emailed PDF Invoices
The P/I system has been enhanced to offer the ability to generate PDF invoices and
have them automatically emailed to the respective customer. A new EDI Specification
Type has been introduced. To set up to have invoices emailed, the following steps
need to be done:
Add a new EDI Specification code record, of type "Auto-Emailed PDFs". Enter
it's properties. These include the Root Name of the generated file, the directory
where the PDF files are created, the name of the text file that holds the email
message, and the names of the MS Word Templates used to format the output
files.
Create the directory designated to hold the PDF Invoices
For each Project that is to have it's invoices emailed, assign the EDI
Specification Control Code that was created above.
For each Customer associated to the above Projects, on their A/R Profile tabbed
sub-screen, set the Email Statements and Invoices property. Specify whether
which email address is to be used; the company's, or either one of the Contacts.
Create the MS Word Template that is to be used to format the appearance of the
invoices. Set the margins, font, orientation, spacing and as an option, a
watermark. (This template must be installed on the Windows client machine
where the invoices are generated.)
Generate the invoices in the normal fashion.
A new push button function has been added to the Invoice Grid Processing
© 2007 - 2014 by Sentinel Hill Software, all rights reserved
Introduction
35
screen labeled "Email/Post Finals". Click this button, and only those invoices for
those Projects that have been set up for emailed invoices will be automatically
created as PDF files, and emailed.
As an option, defined by a property associated to the EDI Specification Control
record, a Recap Report for each invoice will also be generated as a PDF, and
attached to the email.
The PDF files for the Invoices, and their Recap Reports, are created in the
designated directory. They will remain on the system until they are deleted from
Windows.
Note that when PDF Invoices are generated, they are really generated as an MS
Word document, and from within Word, is saved as a PDF. This functionality
ONLY works if Microsoft Office 2007, or later, is installed on your client
computer. (Mar-18-2010)
EDI Specifications for PDF Invoices
A new type of EDI Specifications Control record has been introduced. It is used to
designate that invoices, for the Projects to which it is assigned, will be generated as a
PDF document and automatically emailed to the customer. As an option, a Detail
Recap report will also be generated which is also emailed. (Mar-05-2010)
EDI Specifications Maintenance
The EDI Specifications record have been increased in size to accommodate larger
fields. As well, the Historic Statistics table has been broken out and is now kept in a
separate file that now holds up to 25 entries, (up from 15). In the Specifications record,
the Data Directory Path has been increased to handle names up to 100 characters in
length. (Feb-25-2010)
Upgrade instructions
When the software with this enhancement is installed, you MUST execute the PI
Upgrade utility to have your existing EDI Control records rebuilt. Please contact Sentinel
Hill Software for further information.
BB & T Generated EDI Invoices
The Invoice EDI file that is generated has a summary total line as the last record in the
file. The total number of Credit Units reported was incorrect. The problem has been
fixed. (Feb-03-2010)
EDI Invoices for Bank 1 & JP Morgan Chase
Those Invoices that had tax amounts allocated to charges were not reporting the tax
amounts correctly. The TXI record was being output, but the amount was not being
included. The problem has been fixed. (Jan-28-2010)
cXML Invoices
For the cXML invoices that are generated, the Search Company Name, and the
Ordered By fields that are loaded from the Recap records, are appended together into
a string as information within the <Description> tag of the
<InvoiceDetailItemReference> tag. The logic has been revised so that any <%>
© 2007 - 2014 by Sentinel Hill Software, all rights reserved
36
Series 5 Professional Invoicing - User Help
characters will be replaced with the <p> character, and any <'> or <"> characters will
be removed. (Jan-07-2010)
For 2009
WIP Period Analysis Inquiry/Report
The option to export data to spreadsheet has been enhanced. There are up to 8
different types of data that may be output to an Excel spreadsheet. Each type will now
be output to it's own worksheet within the Excel workbook. (Dec-16-2009)
Functions Exporting to Excel Spreadsheets
For those functions that export data to Excel spreadsheets, the following
enhancements have been made:
When titles are output, they will be formatted as bold in 14-point
When legends are output, they will be formatted as bold in 12-point
When headers are output, they will be formatted as bold and italic
Dollar amount data column will be formatted for "Currency", (where $ signs will
be displayed with 2 decimal places)
The following applications have been revised accordingly, where applicable (Dec-152009) :
Task Codes Maintenance – Properties Export
Invoice Group Codes Maintenance – Properties Export
XML Supplier Part Mapping Maintenance – Properties Export
Credit Card / Cost Center Mapping Maintenance – Properties Export
Project Codes Maintenance – Properties Export
WIP Period Analysis – Export functions
Recap Detail Spreadsheet/Reports – Generating Invoiced Recap and Recap Detail
Spreadsheet functions
Project Write-Offs
This was provided as a function from the the Select Project for Billing application. It
now may be accessed with a menu item from the P/I menu's Operations drop -down
menu. (Nov-10-2009)
Invoice History Inquiry
Context sensitive Help has been introduced to the screens offered in the Invoice
History Inquiry functions. (Nov-10-2009)
Invoice History Inquiry - Credit Note Entry
Credits may be entered and applied against a selected Historic Invoice. A number of
cosmetic enhancements have been made to the screens used to enter the Credits. In
particular the operator may now switch between the Credit Note Entry and the Apply to
© 2007 - 2014 by Sentinel Hill Software, all rights reserved
Introduction
37
Invoiced WIP Item tabbed sub-screens at will. (Nov-10-2009)
Invoice History Inquiry
Both Historic Invoices and Archived Invoices may be inquired upon. From this function,
the Historic Invoices Register report may be selected. A number of cosmetic changes
have been made to identify which types of historic records are being displayed, and
reported on. (Nov-10-2009)
Project Inquiry
Context sensitive Help has been introduced to the Project Inquiry function. (Nov-102009)
Project Inquiry
The functions to Apply Credit to WIP items, and to Write-Off a Project's WIP items
have been removed from the Project Inquiry application. Entry of Credits to specific
Invoices is provided only as a function within the Historic Invoice Inquire application.
Writing Off a Project is provided as a function within the Select Project for Billing
application. (Nov-10-2009)
WIP Adjustments
When a WIP item's Extended Amount is edited, from the P/I Project Inquiry function,
the Unit Rate will now be recomputed and displayed accordingly based on the revised
Extended Price and the # of Units. (Nov-02-2009)
Invoice Generation - cXML Invoices
To correctly handle Credits, the cXML invoicing routine has been revised as follows:
If a negative Recap charge is encountered it is assumed to be a Credit item
For a negative Recap charge, the Quantity field will now always be output as a
negative value and the Unit Rate field will be output as a positive value,
(regardless of the signs that were recorded in the Recap record).
This was needed because there was some inconsistency with how the signs were
passed in the Unit Rate and the Quantity fields in the Recap records. (Aug-25-2009)
Invoice Generation - LEDES98B Invoices
The LEDES98B Invoice Generation program has been revised to output a variation to
the standard as required by Kilpatrick Stockton. (Aug-25-2009)
EDI Specifications Maintenance - LEDES98B Invoices
The LEDES98B Invoice Generation program has been revised to accommodate
variations needed for Kilpatrick Stockton. The EDI Control maintenance screen has
been revised offering a new field used to indicated the version of LEDES that is to be
used. Also, a 2nd new field was added to provide the Line Item Expense Code that
must be output. (Aug-25-2009)
Invoice Generation
The Invoice Generation routines have a feature to honor a $ Value Limit of Invoices
defined by the Invoice Layout records. As each WIP charge is assigned to an invoice,
if the amount that it contributes to the total value of the invoice exceeds the $ Limit
© 2007 - 2014 by Sentinel Hill Software, all rights reserved
38
Series 5 Professional Invoicing - User Help
defined by the Layout, it is not included, and the invoice is completed. If the value of an
individual WIP item was greater than the $ Limit, a problem occurred, in that the
system would create up to 999,999 Zero Valued invoices. The system has been
revised to ignore any WIP items whose $ value exceeds the Limit defined by the
corresponding Invoice Layout. (Aug-05-2009)
cXML Invoices
For the cXML invoices that are generated, the Search Company Name, and the
Ordered By fields that are loaded from the Recap records, are appended together into
a string as information within the <Description> tag of the
<InvoiceDetailItemReference> tag. The logic has been revised so that any "<" or ">"
characters will be removed. This was necessary so the XML processor system would
not think that a new tag was in the file. (Aug-05-2009)
EDI Invoices for Bank 1 & JP Morgan Chase
The logic for the EDI Invoices has been revised so that if Credit Invoices are generated,
the minus sign will now be on the leading edge of the numbers that are reported.
(July-29-2009)
cXML (Ariba), Invoices for Bank-of-America
Tax charges will now be reported within the <Tax>....</Tax> tag within the
<InvoiceDetailItem>....</InvoiceDetailItem> area of the cXML file. (For JP Morgan/
Chase, no tax detail information is recorded). (July-2-2009)
cXML (Ariba), Invoices for Bank-of-America and JP Morgan/Chase
The generated XML code has been revised so that commas in numeric quantity or
amount fields will now be removed. (June-30-2009)
Invoice Generation - LEDES98B Invoices
The Invoice Generation program has been revised to consolidate the charges for a
given invoice to a single charged item. This consolidation is done when the
LEDES98B output interface file is generated. (Note that the detail associated to
charges are lost). (June-24-2009)
Invoice Generation - VISA Paymentech Invoices
The Invoice Generation program has been revised to consolidate the charges for a
given invoice to a single charged item. This consolidation is done when the
Paymentech output interface file is generated. (Note that the detail associated to
charges are lost). (June-24-2009)
EDI Specifications Layout - LEDES98B Invoices
The control properties for EDI Invoices generated to be submitted to customers that
require Invoices to be submitted using LEDES98B has been enhanced. A new option
has been introduced to have the all invoice detail items consolidated to a single a single
charge when the LEDES98B output interface file is generated. (Note that the P/I
Invoices will still show the detail when inquired upon). (June-23-2009)
EDI Specifications Layout - VISA Paymentech Invoices
The control properties for EDI Invoices generated to be submitted to Paymentech has
been enhanced. A new option has been introduced to have the all invoice detail items
© 2007 - 2014 by Sentinel Hill Software, all rights reserved
Introduction
39
consolidated to a single a single charge when the Paymentech output interface file is
generated. (Note that the P/I Invoices will still show the detail when inquired upon).
(June-23-2009)
Invoice Generation
The Invoice Generation routines have been enhanced to honor the new $ Value Limit of
Invoices property that was introduced to the Invoice Layout records. As each WIP
charge is assigned to an invoice, if the amount that it contributes to the total value of
the invoice exceeds the $ Limit defined by the Layout, it is not included, and the invoice
is completed. A new invoice will be started for the remaining charges to be billed for
the given Project. (June-18-2009)
Invoice Layout - Limit the $ Value of an Invoice
A new property has been introduced to the Invoice Layout record to define a dollar
value limit that is allowed for any given invoice that is generated. The limit will apply to
all P/I Projects that use the specified Layout. If a $ limit is applicable, a check-box is
set and the maximum $ value may be set. The limit field has a maximum value of $
999,999. (June-18-2009)
Upgrade instructions
When the software with this enhancement is installed, you MUST visit each existing
Invoice Layout Code that has been defined in the P/I system, and clear the Limit the $
Value of an Invoice check-box before invoices are generated.
LEDES98B EDI Invoicing
For numeric fields in the Ledes EDI output file, for numbers greater than zero, the first
character of the field was output as a space. Leading spaces are not allowed in
numeric fields. The program was revised to set this field to the number ZERO where
applicable. For negative numbers, the first digit will continue to hold the "-" negative
sign. Note that the formal specifications of LEDES98B states that leading ZEROS are
acceptable in numeric fields, and leading and trailing blanks in character fields are
acceptable. (June-16-2009)
Clear Credit Card Numbers
A new function has been introduced to the P/I system. Under the menu's File dropdown menu, Clear All Credit Card Numbers may be invoked to have all occurrences
of credit card numbers cleared. That is, in those data records where a credit card
number is stored, the number 1111-1111-1111-1111 will be assigned to the card
number. A cutoff date may be entered as a filter to limit the records that have the
numbers cleared for those files were dates would be applicable. This function should
be executed on a regular basis to ensure that historic Invoice records have their credit
card fields cleared. Also, if data files are being used in a test environment, all data files
should have the credit card fields cleared. (June-01-2009)
Accounts Receivables Purge A/R Function
When the Purge A/R function is executed in the Accounts Receivable system, if the
items being purged originated from the P/I system, the associated P/I Invoice history
record is read, and flagged as having had it's Cash Payments applied. For a specific
© 2007 - 2014 by Sentinel Hill Software, all rights reserved
40
Series 5 Professional Invoicing - User Help
situation, if the Cash Payment Open Item had an earlier, or the same date as the
Invoice and a different Invoice in the PI system had the same Invoice # as the
payments Check Number, it was incorrectly being flagged as being paid. Also, the
Payment Date will now be correctly recorded in the P/I Invoice History record. These
problems have been fixed. (April-21-2009)
XML (Ariba), Invoices for Bank-of-America and JP Morgan/Chase
The generated XML code has been revised so that leading ZEROS in numeric quantity
or amount fields will now be removed. (April-17-2009)
P/I Interface to Accounts Receivable
When prepaid P/I Invoices are posted to Accounts Receivable as Sales Transactions,
if paid with Credit Cards, the Credit Card number is passed as xxxxxxxxxxxx9999,
where 9999 is the last 4 digits. The Credit Card # as stored in the Sales Transaction is
not encrypted. (Mar-11-2009)
P/I Files Rebuild for Encryption
A new program has been developed that will process all PI records that contain Credit
Card numbers. It reads the Credit Card Mapping, Invoice and Invoice History files and
encrypts any Credit Card Numbers that have been previously stored. (Mar-11-2009)
Upgrade function
When the software with this enhancement is installed, the program
UPGRADPI_ENCRYPT must be compiled, defined as a User Function, and executed.
Paymentek Invoicing function
The function to generate charges submitted to Paymentek has been revised to deal
with the encryption/decryption of the Credit Card numbers used for generating invoice
for designated Projects. When these invoices are created, the credit card # is
encrypted. The encrypted Credit Card numbers are also moved into the A/R system's
Sales transactions. (Mar-11-2009)
Cost Center Credit Card Mapping Maintenance
The Credit Card fields in the mapping records are now encrypted. The encryption is
considered a "strong" encryption based on a Vigenere Cipher algorithm using multiple
dynamically built conversion tables. The file is also encrypted using Acucobol's ISAM
file encryption, (which is a "soft" encryption). (Mar-11-2009)
For 2008
Active and Historic Invoice Records
The definition of the Invoice and Historic Invoice records has been revised. These
records had a field that carried an applicable Bill Code associated to the Invoice. This
field has been increased from 20 to 30 characters in size. A rebuild must be executed
on the Invoice file, the Invoice History file, and the Archived Invoice History file. All
© 2007 - 2014 by Sentinel Hill Software, all rights reserved
Introduction
41
related PI functions have been modified to use the 30 character code. (Nov-11-2008)
General WIP Entry - Import from Spreadsheet function
The input column for the Recap Search Time may now be either blank, a 6 digit
number representing hhmmss, or a text string of "hh:mm:ss". Previously, if the text
string was input, it was interpreted as an error, and the remaining Recap fields of the
item was not being input. (Nov-3-2008)
Recap Detail Spreadsheet/Report function
A problem has been fixed. When generating a Recap Report or Spreadsheet for UnPosted Invoices sorted by Invoices, no detail was not being reported. (Nov-3-2008)
XML (Ariba), Invoices for Bank-of-America and JP Morgan/Chase
A new Codes Maintenance function has been added to the P/I system. This maintains
records that will map product codes, (that are actually segments of the P/I Task Code),
to the Ariba Line Reference code. When cXML invoices are generated, a segment of
the PI Task Code will be used to look up the Line Reference code which is assigned to
the argument in the <InvoiceDetailItemReference lineNumber=99999> tag. Also the
segment of the PI Task Code will be inserted in the <ItemID><SupplierPartID>.....</
SupplierPartID></ItemID> tag. (Nov-3-2008)
XML (Ariba), Invoices for Bank-of-America and JP Morgan/Chase
A number of fixes were required for files submitted to Ariba to be accepted (Oct-152008)
Leading spaces in dollar value amounts are removed.
The EDI-OUTPUT record was increased from 420 to 500 bytes to handle larger
output records
The <cXML payloadID> tag was revised to be made up of the
"Date.Time.PID600.999", where 999 is an Invoice counter.
The WIP record's Recap-ID Number and Counter will be assigned to the
<InvoiceDetailItem invoiceLineNumber=> tag argument
The Recap record's Order Number and Line Number will be assigned to the
<InvoiceDetailItemReference LineNumber=> tag argument
The <Description > tag portion of the <InvoiceDetailItemReference ... > will now
be as follows:
Date: Recap Search Date Name: Recap Searched Company User: Recap
Searched By Desc: Recap Activity Description
Wilmington Trust EDI Invoices
Minor changes to the data being generated in the spreadsheet. (Oct-15-2008)
The constant in column C was changed from "VN123456" to "VN011273".
The Cost Center in column H is now obtained from the 1st four characters of the
Bill Code. (Previously it was bytes 12-15)
Find and Replace for P/I Project Records
The Find/Replace function was enhanced to provide for the searching and replacing
© 2007 - 2014 by Sentinel Hill Software, all rights reserved
42
Series 5 Professional Invoicing - User Help
the fields associated to a Project's EDI controlling fields. These were in a different
record, and were not handled correctly. Now, you can use whatever Search criteria
you wish to select projects, and specify to assign, or replace, settings of the EDI
control fields. If originally, the record did not exist, it will now be written. This makes it
easy now to assign EDI options to may projects. (Oct-15-2008)
EDI - XML Invoices
The generation of XML Invoices has been revised so that each invoice produces a
separate XML file. (Oct-7-2008)
RECAP Detail Record
The definition of one of the fields of the Recap Detail record has been changed. What
used to be the RECAP-DETAIL-DFS-NUMBER field is now used to hold information
passed from the WIP record. Specifically, it will hold a copy of the WIP's Task Code
from the Recap's associated WIP record. The WIP Task Code is moved into the
Recap Detail record when Invoices are generated. This new field is needed in the
Recap Record so to be available when cXML invoices are generated. (Aug-28-2008)
cXML Invoices
The invoicing function producing cXML invoices for submission to Ariba has been
modified. The <Supplier Secret> tag field is now obtained from the P/I Projects
associated EDI Control specification record. Also, the <Supplier Part ID> tag will be
determined as either the entire, or part of the P/I WIP Task Code, as determined by a
setting in the EDI Control specification record. (Aug-28-2008)
ANSI X12 4010-810 EDI Invoices
The [PER] Invoice Header Data record used to provide information about each Invoice
has it's CONTACT-NAME field. This field now contains the Customer Code, and the
Invoices "Attention To" individual as a text string "XXXXXX-Attention Name". It used to
just have the Search Date of the charge. (Aug-28-2008)
EDI Control Specifications Maintenance
In the EDI Specification Control record used for ARIBA cXML Invoices, a new field has
been added, and an existing fields has expanded in size. The new field Supplier
Secret, defines one of the required tags; and the Remit-To Identifier field was
increased from 10 to 30 characters in size. The EDI Control Maintenance application
screen has been revised accordingly. The UPGRAD_UCC3 utility must be
executed to have the existing EDI Control records rebuilt to accommodate the
new and larger fields. (Aug-28-2008)
On-Line Help
The Professional Invoicing system now has On-Line Help. You can access these help
files from the application's screens or menu bars. (Aug-10-2008)
New and Different – Enhancements and Fixes in all Series 5 Systems
© 2007 - 2014 by Sentinel Hill Software, all rights reserved
Introduction
43
For 2014
Support for Office 365
The printing routines, and the import/export routines have been enhanced to provide
support for MS Word and MS Excel in Office 365. (Oct-01-2014)
Series 5 User Logon Profile Maintenance
A new property has been introduced to the Series 5 Logon User's profile. You may
now specify the Default Import/Export File type for each user. When Importing or
Exporting data the selected default will now be automatically set. The Import/Export
routines has been revised to use the specified default. (Mar-26-2014)
For 2013
Generating Documents and Reports as MS Word Documents
When output is generated as an MS Word Document, an entry in the runtime
configuration file is used to define the output orientation, font name, font size, and
where applicable, a Template. The system has been enhanced to now provide for 40
character font names and template filenames. (Increased from 25 characters) (July03-2013)
Attach Supporting Documents function
The ability to attach documents to different Series 5 Transactions Master Code records
has been enhanced. You may now attach an HTML file or a link to a Web Page. Also,
when displaying JPEG or Bit-Map files, the Microsoft Office Picture Viewer Utility will be
employed.
Also, when adding a new attachment, the system will default the path to a folder that
should exist in the directory designated to be the "Temporary" directory associated to
each Company System. You should create a directory named "Attachments" in that
directory, (if it's not already there).
(Jun-27-2013)
Series 5 Outlook Email Reading
Series 5 applications may now make use of a new routine that provides the ability to
read email from MS Outlook. Currently used by the A/P and O/P Manager Approval
functions, emails are read that were sent from designated approval managers. The
internal driver used to read emails using calls to Microsoft Office Outlook. The
following capabilities associated to reading emails are now possible:
Emails are read from program selected in-boxes
Filters may be set to read only emails from selected Senders or emails with a
specified character string within the Subject line
Up to 3 attachments may be read and passed to the S5 application
Sub-folders withing a designated In-Box may be created by the system
Emails may be deleted or moved to different sub-folders
© 2007 - 2014 by Sentinel Hill Software, all rights reserved
44
Series 5 Professional Invoicing - User Help
(May-26-2013)
For 2012
Series 5 Import/Export Functions
When importing or exporting data fields from/to MS Excel, after the process has been
completed, the EXCEL.EXE process was not being terminated, (due to a problem with
Windows, or there is some secret function to do so). The problem has been fixed.
Now, when Excel is launched from Series 5, it's Process Id is detected, and once the
import/export is completed, the process is "Killed" using a system call using the
TASKKILL DOS command. (Nov-12-2012)
Series 5 Import/Export Functions
When importing or exporting data fields from MS Excel, tab-delimited, or CSV data
files, the system will now handle text fields up to 200 characters in length. (Sept-182012)
Series 5 Launching Microsoft Calendar
The Series 5 Applications make calls to the Microsoft Calendar routine to display a
calendar, and accept the operator's selection of a date. In order to make use of this
feature, the Microsoft Calendar must be registered on all client computers executing
Series 5. MSCAL.OCX may be found in \ms\ocx on the AcuGT, (Extend 9.xx),
installation CD for Windows. If you cannot locate it on the release CD, a copy is
included in the Series 5 release directory in S5\UTIL . (June 25-2012)
This is accomplished by executing the following command from the designated DOS
Command Prompt:
REGSVR32.EXE S5\UTIL\MSCAL.OCX
where:
For System
Windows Server 2003 &
2008 - 64 bit
From Directory
C:\Windows
\SysWOW64
Windows XP and 7
C:\Windows
\System32
earlier Windows
C:\Windows\System
Comments
Right click on the Command
Prompt and select "Run as
Administrator"
Right click on the Command
Prompt and select "Run as
Administrator"
Reports and Forms generated as MS Word Documents
All reports and forms that are generated as MS Word Documents may now have an
assorted formatting properties applied to the text that is generated. The following
formatting capabilities may be applied:
"Formatting Regions", defined as ranges of lines, for a page may be formatted
© 2007 - 2014 by Sentinel Hill Software, all rights reserved
Introduction
45
with a particular font type and size and be set as Bold, Italic, Underlined, Shaded,
or as Reverse Video. Up to 5 different regions may be defined and activated
under program control as the page is being populated with text.
"Tab Sets" may be defined consisting of up to 10 tab settings per line. The types
of tabs include Left-Tab, Right-Tab, Center-Tab, and Decimal-Aligned-Tab. Up to
20 different Tab Sets may be defined and activated under program control as the
page is being populated with text. As the line of reporting text is output, the tabs
are inserted and any preceding spaces are removed. (This basically now allows
the use of variable pitch fonts, when outputting columns of data, ensuring proper
alignment).
Individual words or sub-strings, within a print line, may now be output as Bold,
Italic, Underlined, Shaded, or as Reverse Video. On a given page, up to 50 substrings may be formatted in this manner. On a given line, up to 6 sub-strings
may be formatted in this manner.
Single, (thick or thin), and Double Lines may now be inserted at any position
within a page. As the page is being populated with text, the lines are defined to
the printing routines with position and sizing set under program control. Up to 40
line may be output per page.
These types of formatting controls could be implemented for Invoices, Purchase
Orders, Customer Statements, A/P Checks or Customer Quotes. In order to take
advantage of these features, the appropriate applications' program must be programmatically customized. Contact Sentinel Hill Software Inc., for more information.
further details. (Apr-24-2012) HS5_Enhancements_to_ALL_Systems-2011-2013.xml
All Series 5 Applications offering Export Functions
When entering export selection options, if the operator was to click on the "About
Exporting" information tab, an error was being reported that the "File did not exits".
This problem has been fixed. Now you may freely select any filtering or output options
tab when they are presented without any problems. (March-09-2012)
Using Windows' Logon Usernames
New functionality has been introduced to the Series 5 Main menu Signon process.
You may now define to have the Series 5 system use the client's Windows Logon
Code as the User Code for signing in to Series 5. If set, when Series 5 is launched,
the Windows Signon Code will be used. The User-Logon screen will be presented, but
only the Password field may be displayed for keyboard entry. (If the given Series 5
User Logon profile had a blank password entered, then the User-Logon screen
will not be presented at all. Control will be transferred directly to the Main Menu
screen.)
For systems that are set to use the Windows User Logon code, user's will ONLY be
able to log in to Series 5 using the Windows Logon Code. The function to "Repeat
User's Logon", found under the Main Menu's File drop-down menu will be disabled.
Note however, if a user has their System Management Access set to Full, they
will still be able to "Repeat User's Logon", and sign on as a different user.
For systems that do not wish to use the Windows logon, the default will still be set to
that defined by the PC Client user's SHSI_USER_NAME environment variable. (Feb-
© 2007 - 2014 by Sentinel Hill Software, all rights reserved
46
Series 5 Professional Invoicing - User Help
28-2012)
Bitmapped Images in Series 5
All Series 5 applications that load bitmapped images have been revised to expect the
image filenames to be in upper case. (Feb-28-2012)
Upper Case Bitmap Files
On UNIX systems, please make sure that all bitmap files in the bin/images
folder have uppercase file names.
Series 5 File Error Handling Routine
The logic used to report serious file I/O errors has been enhanced to correctly identify
the full folder path for any sequential text files that might be generated. Previously in
some cases, the error message displayed incorrectly showed the path that was
assigned as the Data Files Directory assigned to the Company System. This problem
has been fixed. (Jan-30-2012)
Series 5 Directory/Folder Selection "Browse" Feature
For any application that requires entry or selection of a directory path, a "Browse" push
button is presented. The operator could click this button, and the Windows Folder
browse dialogue window would be presented. Previously, only descendants of the
user's default working folder are shown. The system has been revised to now display
only those folders which are descendants of the root directory of the Directory Path
field associated to the "Browse" button. So now, if you were to enter C:\ in the
Directory Path, when the "Browse" button is clicked, you would be able to browse any
directory on your computer's "C" drive. Setting the Directory Path blank, or to
something other that a drive letter designation, would result in only being able to
browse descendants of the user's default working directory. (Jan-18-2012)
"Series 5 File Error Handling Routine
The logic used to report serious file I/O errors has been enhanced to identify errors
associated to the use of AcuServer. Previously, 9D-104 errors were reported as an
"AcuServer Connection Failure". Now, all 9D-XX errors are identified, and the
applicable message displayed. (Jan-10-2012)
Reports and Forms generated as MS Word Documents
All reports and forms that are generated as MS Word Documents are now created
protected as "Read-Only" documents. A password may be used to un-lock them.
Refer to the applicable documentation for further details. (Jan-10-2012)
For 2011
Series 5 Import/Export Routine
The generic routine to handle importing and exporting of data, (to spreadsheet or
© 2007 - 2014 by Sentinel Hill Software, all rights reserved
Introduction
47
character delimited files), has been enhanced to provide for CSV files that do not have/
allow quotes around character strings. (Dec-12-2011)
"CALLEREQ" Program
The CALLEREQ program has been revised to call either the W/M's E-Request Service
routine or the new P/I's On-Demand Billing Service routine. It no longer resides as a
program belonging to the W/M system, rather, it has been moved into the S/M,
(System's Management) directory and library. Please ensure the correct compile
script files are installed. (Nov-11-2011)
Interfacing with MS Office Excel and Word
The logic provided to launch MS Excel or MS Word has been expanded to handle the
case where MS Office was installed in C:\Program Files (x86)\Microsoft Office
\Office. (Previously the system only looked in in C:\Program Files\Microsoft Office
\Office . (Oct-03-2011)
Series 5 Email Generation
A number of different application functions offer the ability to automatically generate and
send emails. This includes the emailing of invoices, purchase orders, statements,
customer quotes, reports and other messages.
The internal driver used to send emails has been enhanced to generated and send
emails using calls to Microsoft Office Outlook, (rather than to the MAPI library). As a
result, the following capabilities associated to sending emails are now possible:
Emails may be sent as Plain Text, Rich Text, or as HTML
Emails may be generated when executing as either a thin-client of FAT client
Emails may now be sent with copies going to Cc users and Bcc
The text message associated to emails are now loaded from user created/
maintained data files, rather than being coded from within the application
software. These text files may be either plain ASCII text, or HTML files and
contain up to 8192 characters. Except for specific types of emails, these files
MUST BE LOCATED in the directory named Email-Templates located in each
Company System's designated reports directory.
Provides support for 120 character email addresses, and 140 character subject
line
(Sept-20-2011)
Importing $ Numeric Cells from Spreadsheet
A problem has been identified and fixed when importing $ formatted columns of data
from spreadsheet. If any headings were specified, and they exceeded 22 characters in
length, the number being input and recorded was ZERO. The problem has been fixed.
(July-25-2011)
Generating Reports as MS Word Documents
The Series 5 printing routines had the ability to generate output as an MS Word
document. This function has been enhanced to provide support for Office 2010 Word
utility. Now, when presented with the print options screen, and the operator chooses to
© 2007 - 2014 by Sentinel Hill Software, all rights reserved
48
Series 5 Professional Invoicing - User Help
"Save To Disk", they may choose to output as an Office 2007/2010 or Office 2003
Word document. The system will automatically append either the .DOCX or the .DOC
extension, and generate the document using the correct file format. (June-14-2011)
Import/Export Functions
The import and export function has been enhanced to provide support for Office 2010
EXCEL utility. Now, when presented with the import/export options screen, the
operator may select to load from, or output to, either an Excel 2007/2010 Workbook, or
an Excel 97-2003 Workbook. The system will automatically append either the .XLSX or
the .XLS extension, and read or write the spreadsheet using the correct file format.
(June-14-2011)
Generic Search Function
In all Series Series 5 applications where a grid screen is presented for the entry of
transactions, or the maintenance of master codes, a "Search" function is provided.
This function has been enhanced in the cases where the operator has chosen to
search for a given record where a Date is chosen as the search criteria. Now the
following literal label is displayed, "mm/dd/yy", indicating the desired format that the
date should be entered as. As well, the date entered may now be as "mmddyy",
"mmddyyyy", "mm/dd/yy", or "mm/dd/yyyy", depending on the mood of the operator.
(May-02-2011)
New Feature to Attach Supporting Documents to assorted Master Code
Records and Transactions
You may now attach a variety of different documents to assorted Master Code records,
and Transactions. Up to 15 separate documents may be selected, and attached and
viewed from the applicable functions in assorted Series 5 systems. These documents
may also be viewed where applicable. The different types of documents supported
are as follows:
PDF
Bitmap ( *.BMP files)
JPEG
TIFF
ASCII Text ( *.TXT files)
MS Word 2003 documents
MS Word 2007 documents
MS Excel 2003 documents
MS Excel 2007 documents
ASCII Text ( *.txt files)
(Apr-14-2011)
Printing to Windows Spooler
The Series 5 provides for the definition of Printer Queues. As a property to each
Series 5 Printer Queue, you may define a "Captured Printer". When a report is
generated and a given Series 5 Printer Queue is chosen that has a "Captured Printer",
the report prints directly to the associated network printer. If the Printer Queue does
not have a "Captured Printer" defined, then a Windows "Printer Select" dialogue box
window is displayed. Previously, the the Series 5 system made a call to have the
"Printer Select" window displayed which was an older style, compatible with older
versions of Windows. Now a new call is made displaying a modern Windows XP/7
"Printer Select" Window. (Feb-09-2011)
© 2007 - 2014 by Sentinel Hill Software, all rights reserved
Introduction
49
System Captured Windows Maintenance
The Series 5 provides for the definition of Printer Queues. As a property to each
Series 5 Printer Queue, you may define a "Captured Printer". When a report is
generated and a given Series 5 Printer Queue is chosen that has a "Captured Printer",
the report prints directly to the associated network printer. The routine used to capture
a Windows printer was not working correctly under Windows 7. This problem has
been fixed. (Feb-09-2011)
For 2010
Default Reporting Output Destination
In all Series 5 applications that generate reports that might normally be printed, a Print
Options screen is presented. From this screen, the operator may choose to have the
output directed to a printer; to be "Archived", to be just displayed to the screen to
"Browse"; or output as an MS Word or PDF file. The default output has been changed
to be just displayed to the screen to be "Browsed". (Previously it was defaulted to be
output to a printer).
Additionally, should you desire to set the default output, you may do so by inserting a
variable in the runtime Configuration file. The variable SHSI_RPT_DESTINATION with
a single numeric argument, will provide the default target for generated reports, where
you would set the argument as follows:
1 - To the Printer 17 - To Disk as an MS Word 2003 document
26 - To Disk as an MS Word 2007 document
2 - Archived
3 - Both the Printer 35 - To Disk as a PDF document
and Archived
4 - To be just
Browsed
Note that if the applicable application already determined the target output, these
defaults will NOT be used. (Oct-13-2010)
Data File "Properties" function
In all Series 5 applications that maintain master codes records, or provide for the entry
or inquiry of transaction or history records, under File on the menu bar, the Properties
function will display information about the related files. This function has been
enhanced to now display 12 numeric digits for both the files size, and the number of
records in the file. Also, now the version of the Vision file is displayed, along with the
number of volumes that are used to hold the data and the index keys for the associated
file(s). (Sept-01-2010)
Using the Mouse Wheel to navigate Series 5 Grid Screens
In all Series 5 applications that use a paged grid screen, (those showing rows of
master codes and/or transaction records similar to a spreadsheet), the operator may
now navigate forwards and backwards through the records using the Mouse Wheel. If
© 2007 - 2014 by Sentinel Hill Software, all rights reserved
50
Series 5 Professional Invoicing - User Help
the Ctrl-Key is also pressed while twirling the mouse, 4 rows of data are skipped
instead of just 1. (If when you spin the mouse too fast, and a "Stack Overflow" error
occurs, in the runtimes Configuration file, add the variable PERFORM_STACK 384
and it should work OK ) Note that this new feature is only available for systems with at
least AcuGT Rev 8.1.3 (July 27-2010)
MS Excel System Error Recovery
The Series 5 family of applications offers the ability to import to, and export from, an
MS Excel Workbook document. System error that could be generated while outputting
to and/or inputting from, MS Excel documents were causing Series 5 applications to
terminate with a not too friendly error message. The errors that were particularly
annoying were as follows:
When importing from an Excel document with a filename, selected from the
application, that did not actually exist, (and the operator had forgotten to "Browse"
to choose the particular file).
When a user attempted to generate output as an MS Excel document, but they
did not have MS Excel installed, or it was installed in a location other than the
default, a fatal error occurred.
The import/export routines have been enhanced to now capture any system errors that
were being generated from MS Excel. A reasonably friendly error message will now be
displayed, and the particular application will continue processing. (In most cases, the
import/export will just be abandoned). (May-31-2010)
Compiling with INTEL Native mode
A problem has been discovered when compiling with the Intel native mode. This option
must be removed from the S5_GCBL.BAT compiler macro that can be found in the S5
\util directory. (Basically replace the set NATIVE=--intel command with set NATIVE=
command. (May-21-2010)
Generating Standard Forms as MS Word Documents
The Series 5 generates a number of different forms. For example, A/P Checks,
Invoices, Picking Tickets, Statements and Purchase Orders. Variables within the
runtime configuration file may be set up that are used to indicate how the forms are to
be generated and/or printed. Arguments to these variables indicated whether the form
was printed, archived, and/or saved as MS Word documents. The 2nd argument,
used to define the output, may now have the following values:
WORD2003
PRINT&WORD2003
ARCHIVE&WORD2003
WORD2007
PRINT&WORD2007
ARCHIVE&WORD2007
Existing arguments associated to WORD will be interpreted as WORD2003.
The applications that generated these forms have been enhanced to now recognize
arguments that indicate the forms are to be generated as Office 2007 Word or Office
2003 Word documents. (May-21-2010)
MS Word System Error Recovery
© 2007 - 2014 by Sentinel Hill Software, all rights reserved
Introduction
51
The Series 5 printing routines had the ability to generate output as an MS Word
document. System error that could be generated while outputting to and/or automatic
printing of MS Word documents were causing Series 5 applications to terminate with a
not too friendly error message. The errors that were particularly annoying were as
follows:
When outputting to an MS Word document that had a template defined, and the
given template file was not set up for that user, a fatal error occurred.
When outputting to an MS Word document that was supposed to be
automatically printed, but the given network printer was either offline, or that
segment of the network was not active, a fatal error occurred.
When a user attempted to generate output as an MS Word document, but they
did not have MS Word installed, or it was installed in a location other than the
default, a fatal error occurred.
The printing routines have been enhanced to now capture any system errors that were
being generated from MS Word. A reasonably friendly error message will now be
displayed, and the particular application will continue processing. (In most cases, the
generation of the report will just be abandoned). (May-21-2010)
Generating Reports as MS Word Documents
The Series 5 printing routines had the ability to generate output as an MS Word
document. This function has been enhanced to provide support for Office 2007 Word
utility. Now, when presented with the print options screen, and the operator chooses to
"Save To Disk", they may choose to output as an Office 2007 or Office 2003 Word
document. The system will automatically append either the .DOCX or the .DOC
extension, and generate the document using the correct file format. For users that
have Office 2007 installed, the default File Type will be the Office 2007 Word, but they
may choose either Office formats. For users that do not have Office 2007 installed,
the default File Type will be the Office 2003 Word, and they will not be able to choose
Word 2007 or the PDF formats. (May-20-2010)
Automatic Sending of Emails
The Series 5 system has the capability of automatically sending emails. Emails are
sent by making a call to a MAPI.Library, which in turn sends the email using Microsoft
Outlook. If the receiver's email address is prefixed with "LN:" or "Ln:", (indicating that
they are Lotus Notes users), then instead of using MAPI, a DOS command call is
made using the command line defined by the runtime configuration variable
"DOS_MAIL_CMD", to actually send the email. Within this command line, there are
pseudo variables, that would be replaced with the Subject, Receivers Name and
Address and the path to an Attachment. This capability has been enhanced to now
provide for sending the email with 2 attachments. The new pseudo variable %
ATTACHMENT2% will be replaced with the full path to a 2nd attachment, if applicable.
(May-03-2010)
Import/Export Functions
The import and export function has been enhanced to provide support for Office 2007
© 2007 - 2014 by Sentinel Hill Software, all rights reserved
52
Series 5 Professional Invoicing - User Help
EXCEL utility. Now, when presented with the import/export options screen, the
operator may select to load from, or output to, either an Excel 2007 Workbook, or an
Excel 97-2003 Workbook. The system will automatically append either the .XLSX or
the .XLS extension, and read or write the spreadsheet using the correct file format.
For users that have Office 2007 installed, the default File Type will be the Excel 2007
Workbook, but they may choose either Excel format. For users that do not have Office
2007 installed, the default File Type will be the Excel 97-2003 Workbook, and they will
not be able to choose Excel 2007. (May-03-2010)
Import/Export Functions
When the import/export screen is presented and a particular directory and file is
selected for processing, if the operator clicks on the Back push-button, (to go back and
change an option of prior screens), upon re-displaying the import/export screen, the
originally selected file/directory was being reset to the program's default. This problem
has been fixed. (Mar-24-2010)
Generating Sub-Documents as MS Word or PDF Files
The Series 5 printing routines had the ability to generate a sub-document as an MS
Word document. (A sub-document might be a single Invoice or Customer Statement,
generated with a unique filename). This functionality has been enhanced to have the
sub-document generated as either an MS Word document, or a PDF document.
These sub-documents may be generated at the same time, totally independent from,
their normal "printed" versions. When generated as Word documents or PDF
documents, MS Word Templates may be used to define the properties of the resulting
document with watermarks and headers and footers. (Mar-15-2010)
Import functions from Excel Spreadsheets
The Series 5 import function offers the option to input from an Excel spreadsheet. In
any application that loaded data in this manner, it was difficult to determine when all
valid rows of data had been loaded. The Excel import function has been enhanced so
that it will correctly stop once valid rows of data have been loaded. (Previously, the
system would attempt to load up to 65,436 rows of data and when executing any given
Import function it would appear as if the system has hanging). (Mar-03-2010)
Printing of Report as PDF Documents
All reports and forms that are generated from the Series 5 applications may now be
saved as PDF documents. This option is available only to users that have Microsoft's
Office 2007 installed on their systems. When the Print Options screen is presented,
click the Save To check box, and select PDF Document from the associated Save
As drop list. (Feb-23-2010)
Browsing to Select Files and/or Directories Functions
All routines that offer the functionality to click a "Browse" button to present the operator
with a window from which a directory, or a file, can be selected have been revised.
Under Windows 7, the clicking of the "Browse" caused a "nested input of events"
syndrome to occur. In effect, repeatedly displaying the browse window. The logic for
these routines have been revised to avoid this problem. (Jan-28-2010)
© 2007 - 2014 by Sentinel Hill Software, all rights reserved
Introduction
53
Encryption/Decryption Function
The subroutine has been revised to now handle 8 digit numeric seeds. This was done
to accommodate the A/R system that now has 8 digit documents numbers. All existing
encrypted fields will still be able to be decrypted. (Jan-24-2010)
For 2009
Printing of Reports in Series 5
The Series 5 printing function has been enhanced to offer the option of printing multiple
copies of reports, forms, invoices, orders, etc. A new entry field has been added to the
print options sub-screen labeled # of Copies. You may select to have up to 9 copies
printed. These copies printed will be automatically collated.
Multiple Copies
The ability to have the system print multiple copies is a a feature that is provided as a
function of the Windows operating system, and the driver for your printer. If either does not
support multiple copies, then setting a value other than 1, will have no effect.
This feature is available only to users executing on Windows system, either directly, or as
thin clients.
As well, fields on the Print Options sub-screen have been reorganized slightly to
accommodate the new field. (Fields and display prompts associated to outputting
reports to a Print Queue are now enclosed within a frame.
Where applicable, in all Series 5 applications, the size of display windows and/or tab
sub-screens have been adjusted accordingly. (Dec-22-2009)
Export functions to Office 2007 Excel Spreadsheets
The Series 5 import/export function offers the option to output/input to an Excel
spreadsheet. Office 2003 Excel had allowed for 65,500 rows, and Office 2007 Excel
allows for 1,000,000 rows. When exporting data, the Series 5 system would
automatically start outputting to a 2nd worksheet when 65,500 rows were reached.
The system will now switch to a 2nd worksheet depending on which version is being
used.
As well, the Spreadsheet I/O routines have been enhanced to support up to 999,999
rows of data. (Dec-16-2009)
Exporting to Excel Spreadsheets functions
The logic used to export to Excel spreadsheets has been enhanced. In the assorted
Series 5 applications, those functions that offer functions to export to an Excel
spreadsheet have the ability to perform the following:
Create multiple worksheets
Select a specific worksheet to be populated
Format titles, legends and headers in larger fonts, as bold, and/or as italic
© 2007 - 2014 by Sentinel Hill Software, all rights reserved
54
Series 5 Professional Invoicing - User Help
Have data columns justified left, center or right
Have a data column formatted for "Currency", (where $ signs will be displayed
with 2 decimal places)
For Office 2003 Excel negative numbers are displayed with parenthesis
around them
For Office 2007 Excel negative numbers are displayed in red with
parenthesis around them
Where applicable, in most of the Series 5 applications, these new capabilities have
been introduced. (Dec-10-2009)
Import and Export functions to Excel Spreadsheets
The Series 5 import/export function offers the option to output/input to an Excel
spreadsheet. If the user selected to launch Excel after exporting data, the system
incorrectly assumed Office 2003 was installed, and it's Excel utility was being
executed. If you only have Office 2003, then this would not have been a problem. The
system now correctly detects the version of Excel to launch. (Nov-11-2009)
Selecting Dates from Lookup Calendars
When executing under Windows VISTA, dates were not properly being returned. The
year was loaded incorrectly as year ZERO which resolved to a date falling in the year
2000. The problem has been fixed. (Oct-28-2009)
Automatic Disabling of User who Fail to Correctly Logon
As a new security feature, as an option, you may select to have users that fail to
correctly log in to Series 5 after a specified number of times, automatically disabled
from logging in again. Before they can use the Series 5 system again, the System's
Manager, or Series 5 Gatekeeper must modify their Logon Properties record. This
option may be selected with a new field found on System Control Options screen.
(Oct-22-2009)
User Logon Passwords
Passwords now must contain at least one numeric digit, and one alpha character, and
be at least 8 characters in length. (Oct-22-2009)
Import and Export functions to Excel Spreadsheets
The Series 5 import/export function offers the option to output/input to an Excel
spreadsheet. If that output/input option is selected, and Excel is not installed on the
user's workstation, a message will now be displayed. Previously, the system
assumed it was installed, and when it attempted to call Excel to build/read the
spreadsheet, the program would bomb out with an error. This will no longer happen.
(June-02-2009)
Outputting Reports and Invoices as MS Word Documents
Any Series 5 generated reports, invoices, statements, etc, may be output as an MS
Word document. For any MS Word documents that are generated, a Template may
also be specified, (as defined in a Series 5 Configuration file variable). These
templates must be installed on each users workstation in the C:\Documents and
© 2007 - 2014 by Sentinel Hill Software, all rights reserved
Introduction
55
Settings\<PC UserName>\Application Data\Microsoft\Templates folder. For users
with Office 2007 these templates need an extension of .DOTX. For earlier versions of
MS Office, the templates need an extension of .DOT. The system has been enhanced
so that if from the Series 5 Print Options screen, MS Word output is chosen, it will test
for the occurrence of the designated template file for the particular type of output being
generated. If the template cannot be located, an error message is displayed.
Previously, if when generating the output, the MS Word utility could not find the
template, the system displayed an evil looking message, and would abort. (June-022009)
Main Menu User Logon
When a user fails to logon after 5 attempts of entering their User Code and Password,
the system exits. Now, as well, an entry will be recorded in the User Access Log file.
(April-04-2009)
Encryption/Decryption Function
A new subroutine has been developed that provides the functionality to encrypt and
decrypt data fields. The algorithm used is based on a Vigenere Cipher. This would be
considered a "strong" encryption. The subroutine is made available to any Series 5
application that requires encryption of any given data record field. (March-11-2009)
Series 5 Grid Management Screens
In any of the Maintenance or Transaction Inquiry routines that listed items in a grid
whereby a given item, such as a Customer Code or a G/L Account, could be selected.
If there were no item on file to be listed, sometimes transactions for the next item on
file were being displayed, but the entry field was not being updated. This problem has
been fixed. Also, now a message will be displayed indicating that no records were
found for the item entered, but the next highest item's items were being displayed.
(Feb-03-2009)
For 2008
Using AcuGT Rev 8.1
With the recent release of Rev 8.1 of AcuGT, we have discovered that the INTEL native
mode, on certain occasions cause Memory Access errors. The batch file used to
compile programs S5\util\s5_gcbl.bat must be edited to have the variable NATIVE set
to nothing. (Nov-15-2008)
User Logon Passwords
The Series 5 system now requires all passwords to be made up of at least 8 nonspace characters, at lease one of which must be a numeric digit. Also, if a users
password has expired, they will be offered the opportunity to assign a new password,
after entering the old password. The rules for password entry will apply. (Oct-72008)
Import and Export and User Interface Applications
© 2007 - 2014 by Sentinel Hill Software, all rights reserved
56
Series 5 Professional Invoicing - User Help
An error occurred when exporting to an Excel spreadsheet if the 1st character the
output string was a "+", "=", or "-" character. In this case, Excel expected a valid
formula. If this was not the case, a terminating error was displayed. The problem has
been fixed. Now the Series 5 software will automatically insert a single quote"'"
character in front of the string before inserting to the cell. (Oct-7-2008)
User Access Maintenance
The Series 5 User Access maintenance routine has been enhanced to simplify the
steps to establish new users and give/deny access rights. (Sept-24-2008)
The Enable and Enable-Like functions have been simplified. In each case, you
now just highlight the "Red" head that is to be given access rights, and click the
Enable or Enable-Like push button, (or right click, and select the desired function
from the pop-up menu.
For the Enable-Like function, a drop-down list will be presented, from which you
can select the user that already has access rights, whose rights are assigned to
the new user.
The Copy function has been simplified. If you highlight a "Green" head user that
is already enabled, and select Copy from the Edit menu's drop-down menu, you
will be able to select one of the users that has no access rights in drop-down list
that is presented. (The Copy is basically the reverse of the Enable-Like
function)
For "Green" head users that are already enabled, when right-clicked, the pop-up
menu has 2 new functions - "Set All Items to Full Access" - "Set All Items to No
Access". These will make it easier to set up and maintain the users' access
rights.
A pop-up window will now be displayed, when any given menu-item in the tree is
right-clicked. You will be able to set the access to either "No Access", or to "Full
Access" directly, without having to edit the properties sub-screen.
User Access Maintenance
The Series 5 User Access has been enhanced to support up to 250 Logon Users.
Formerly was limited to 100 users. (Sept-10-2008)
Print Manager and Browser
The Series 5 reporting and printing routines have been enhanced to handle filenames
of up to 30 characters long. The UPGRADSM utility must be executed to have the
Report-Manager file's records rebuilt to accommodate the larger field. (Aug-25-2008)
Import and Export and User Interface Applications
In all applications that offer the opportunity to load from or read a text based interface
file where a BROWSE button had been provided, you will now be able to select files that
have a "—" or a SPACE in the filename or the directory path. (Aug-25-2008)
Import/Export Functions
© 2007 - 2014 by Sentinel Hill Software, all rights reserved
Introduction
57
The import and export function has been enhanced to provide support for Office 2007
EXCEL utility. The system will identify Office 2007 utilities by seeing if Excel.EXE can
be found in the clients's C:\Program Files\Microsoft Office\Office12 folder. For
exporting, the files will be created with the *.XLSX extension; and if selected to be
launched, Office 2007 Excel will now correctly be executed. (Aug-25-2008)
On-Line Help
The Series 5 systems now have On-Line Help. You can access these help files from
the application. In all functions that offer a menu bar, clicking Help will display a dropdown menu offering General Help, Help on the particular function, and Help about
Grids. For menu items that don't have a menu bar, if help is available, a help icon may
be clicked to display Help about the particular screen. (Note that help may not actually
be available in all cases where offered in the drop down menus) (Aug-10-2008)
Broadcast Messages
The Series 5 Broadcast messages have been increased in size. You may now specify
3 lines of 80 character lines of message text to be displayed. The files used to hold
these messages have been renamed to be EMERGENCY.DAT and
BROADCASTS.DAT. (Aug-10-2008)
Application User Access Analysis Export
A new function has been introduced to each applications' User Access Maintenance
function. You may now Export to a spreadsheet an analysis table of users access
rights. Each row of the table is a menu item, and each column is a Logon User. It
provides a quick snapshot of which users have access to any particular function.
(July-15-2008)
User Access Logging
As an option, your systems manager can turn on the option to log user access to all
the systems' menu items. (June-15-2008)
Major P/I Features not Found in Series 4
New Search and Replace function has been introduced
The Project, Task, Employee, Vendor Master records, the Invoice History and Work-InProgress records may now be processed with a search/replace function.
Generic Project and WIP selections for Reports
All reporting functions now have a generic Project and Work-In-Progress transaction
selection filter screens. It allows you to randomly select different Projects and/or WIP
items to be reported.
Enhanced Interfaces for Generic types of Chargeable Data Types
© 2007 - 2014 by Sentinel Hill Software, all rights reserved
58
Series 5 Professional Invoicing - User Help
New interface routines have been introduced to provide for fast and efficient input of
data to a "Generalized WIP" entry function
Interface/Invoicing Wizard
A wizard program is one that handles a number of standard repetitive functions. There
is a wizard that handles the interface of data, the billing process, the printing of
Invoices, and the posting to Accounts Receivables. It examines specific folders for the
presence of specific files, and process them accordingly.
Enhanced Invoicing Capabilities
The generation of Invoicing has been enhanced to provide a grid display of the Invoices
being generated. All the functions associated to generating, printing proofs, final
printing, and posting of invoices is easily available from a single screen. Invoices may
also be de-generated should the need arise.
EDI Billing
The generation of Invoicing has been enhanced to provide a grid display of the Invoices
being generated. All the functions associated to generating, printing proofs, final
printing, and posting of invoices is easily available from a single screen. Invoices may
also be de-generated should the need arise.
Enhanced Interfaces for Generic Types of Chargeable Data Types
New interface routines have been introduced to provide for fast and efficient input of
data to a "Generalized WIP" entry function.
3rd Party Billing
Charges for specific Projects may be designated as to be billed to pre-defined 3rd
parties, based on billing codes associated to the charges. This may be useful where
a given head office is generating charges on behalf of a number of subsidiary or branch
offices. Based on a billing code, the invoices will be generated and sent to the 3rd
specified 3rd party.
2.4
Getting Help
There are a number of different sources of help in Series 5. In addition to this help file you can
also access the Power Point tutorials and Sentinel Hill Software support.
To get started, your main source of information should be this help file. We have designed it
to provide all the information you will need for using and learning the Professional Invoicing.
Before contacting support, please make sure that you really can't find the information you
need here. Thanks!
© 2007 - 2014 by Sentinel Hill Software, all rights reserved
Introduction
59
Displaying the help
The quickest way to display the help is to press shift-F1. If context-sensitive help is
available it will be displayed automatically.
Most screens will have a Help button that displays relevant information when clicked.
On the Series 5 main menu screen, and each application menu screen on the menubar click Help then On-Line Help .
Contacting Sentinel Hill Software support
Direct email support is available from the Sentinel Hill Software team at
[email protected]. You can send an email to this address automatically by
clicking on the [email protected] graphic on the Licensing tab screen
displayed after clicking Help / About on each systems' menu.
If you have a Support Contract, you may contact Sentinel Hill support center directly at
1-800-663-8354.
Summary of Fixes and Enhancements
For each application, a detailed history of the changes that have been made is available
from our website at
Series 5 Fixes and Enhancements.
Getting a printed user manual
You can download formatted PDF versions of the documentation for each application
from our website with the following links:
Accounts Payable
Miscellaneous Invoicing
Accounts Receivable
Fixed Assets
Customer Order Processing
Web Access Management
Inventory Management
Series 5 Systems Manager
Purchase Order Processing
Professional Invoicing
© 2007 - 2014 by Sentinel Hill Software, all rights reserved
Part
III
P/I Setup and Implementation
3
61
P/I Setup and Implementation
This chapter provides some information that will be useful during the setup process of the
Series 5 Professional Invoicing system. In particular, sub-sections describe the different
Types of WIP items are utilized and what Status they may take on. Also, descriptions as to
how Unit Rates are assigned, and what G/L Journal entries are generated as project activity is
recorded and invoiced.
Setup and Implementation
Item Type and Status Codes
61
G/L Journal Entry Distributions
64
Assignment of Unit Chargeable Rates
Assignment of Unit Costing Rates
3.1
70
75
Initial Setup Steps
Enter topic text here.
3.2
Time Charges Entry / Invoicing Cycle
Enter topic text here.
3.3
P/I Status and Type Codes
All WIP items that are entered in the system are recorded with a Status Code, and a Type
Code. The values for these fields may change depending on how the WIP item is
processed, or at what stage of the invoicing cycle, it has reached.
Project Inquiry Grid Display Screen
The P/I Project Inquiry grid screen displays summary information about each WIP item. In the
column with the heading C-T-S, the WIP Type Codes and the WIP Status Codes are displayed. (The
C indicates whether the WIP item is Chargeable or Non-Chargeable).
The following sections define what the different values are:
WIP Type Codes
As WIP items are processed by the P/I system they will be updated with different Status
Codes. These are defined in the following table:
WIP Type Codes
© 2007 - 2014 by Sentinel Hill Software, all rights reserved
62
Series 5 Professional Invoicing - User Help
Code
Description
A
Active
These items have been entered and are eligible to be billed.
These would have typically been entered from employee timesheets, or the Generalized WIP entry operation.
D
On-Demand WIP These WIP items were entered into the system as "OnDemand" charges, and invoiced accordingly.
F
Forward Balance These items are represent any credits that have been entered
against a Project. The invoice amount field contributes as a
credit to the invoiced totals for the Project. As WIP items are
marked as having been "Manually Invoiced", this amount will
diminish.
C
Credit Note
These items represent any credits that have been entered
against a Project. The invoice amount field contributes as a
credit to the invoiced totals for the Project. As WIP items are
marked as having been "Credited", this amount will diminish.
I
Manual Invoice
These items represent any manual invoices that have been
entered for the Project. The invoice amount field contributes to
all invoiced totals for the Project. As WIP items are marked as
having been "Manually Invoiced", this amount will diminish.
M
Memo
These items are memo records that have been recorded. Only
the description field is used. These items do not contribute to
any reported totals.
H
Holdbacks
These are system generated holdback amounts for those
projects that have been appropriately flagged. A percentage of
all invoices is computed and subtracted from the invoice total
to be held until the project is completed. At that time, these
holdback amounts are invoiced.
R
Partial Balance
These items are system generated partial balance amounts
associated to those WIP items that were partially billed. These
items will eventually be invoiced.
V
Fully Billed WIP
These items have been invoiced at their original chargeable
amounts.
P
Partially Billed
WIP
These items have been invoiced only at a partial amount of
their original chargeable amounts. For each of these records,
there is a corresponding "Partial Balance" WIP record.
K
Marked Up and
Billed
These items have been invoiced with an amount that has been
marked up or down from their original chargeable amounts.
© 2007 - 2014 by Sentinel Hill Software, all rights reserved
P/I Setup and Implementation
W
Write-Off
63
These Items have been Written-Off. They are considered as a
cost to the project, bu no revenue was derived from them.
WIP Status Codes
As WIP items are processed by the P/I system they will be updated with different Status
Codes. These are defined in the following table:
WIP Status Codes
Code
U Unselected
Description
These items have been entered and are eligible to be billed.
All unselected items will be automatically selected when the
General Selection for Billing 396 function is executed.
B
Force to be
Selected
These items, when entered into the system, are flagged so
they will have automatically been selected to be billed. When
Invoices are generated, these items will be included on the
invoices.
N
Never to be
Selected
These items will never be selected to be billed or invoiced.
They may include Memos, Write-offs and Deposits.
D
Deferred
These items have been Deferred from being billed. It is
possible to defer WIP items permanently, or until a specified
date. (Items that have been deferred to a specified date may
be automatically billed when the General Selection for Billing
function is executed).
T
Temporarily
Deferred
These items have been temporarily deferred from being billed.
The next time when Invoices are generated, these WIP items
will automatically be changed back to the Unselected status.
S
Selected in Full
These items have been selected for billing at their original full
value.
P
Selected Partially
These items have been selected for billing at a partial amount
of their original value. The amounts remaining will be eligible
to be selected for billing at a later time.
M
Selected Marked
Up/Down
These items have been selected for billing after being marked
up or down from their original amounts.
I
Invoiced
These WIP items have been invoiced.
C
Paid
The Invoice for which these items have been billed under have
© 2007 - 2014 by Sentinel Hill Software, all rights reserved
64
Series 5 Professional Invoicing - User Help
been fully paid. (ie., a Cash Receipt has been fully applied to
the invoice in the A/R system).
W
Select to Write-Off These Items have been selected to Written-Off. They remain
with this status until the Write-Off Items have been posted.
Disbursement Status Codes
As Disbursement items are processed by the P/I system they will be updated with different
Status Codes. These are defined in the following table:
Disbursement Status Codes
Code
3.4
Description
A
Active
These items have been entered and are eligible to be billed. All
active items will be automatically selected when the General
Selection for Billing 396 function is executed.
N
NonChargeable
These may never be selected for billing. The amounts contribute
only to the costs of the project.
D
Deferred
These items have been Deferred from being billed. They will remain
deferred until selected for billing, or changed to an active state.
S
Selected
These items have been selected for billing. They will be invoiced
when invoices are next generated for the project.
I
Invoiced
These items have been invoiced.
C
Paid
The Invoice for which these items have been billed under have been
fully paid. (ie., a Cash Receipt has been fully applied to the invoice
in the A/R system).
G/L Account Distributions
The P/I system generates G/L Distributions, as required, basically for all Costs and
Revenues. Depending on the the P/I system is configured and how it is used, different types
of distributions, (which end up in the G/L as journal entries), might be written. This topic will
describe where these accounts are defined, how they are used, and which distributions are
generated for the assorted operations available in the P/I system.
© 2007 - 2014 by Sentinel Hill Software, all rights reserved
P/I Setup and Implementation
65
G/L Accounts Used in P/I
The G/L accounts used by the P/I system must be defined as valid A/R accounts, and valid G/
L accounts. Depending on the account, in the P/I system, they must be assigned to assorted
fields in the different Control Specifications, or Master Codes records. Where they must be
set up are defined in the following table:
G/L Accounts Defined in the Professional Invoicing System
Account Name
AR Control
Work-In-Progress
(WIP)
Unearned Revenue
Invoiced Revenue
Holdback Revenue
Deferred Income
Disbursements
Markup
Accumulated Costs
Suspense Revenue
Suspense Credits
Recoverable Expense
Tax
Revenues
Record or Master Code Record Defined With
A/R Control Preferences
P/I Control Preferences
P/I Control Preferences
P/I Control Preferences
P/I Control Preferences
P/I Control Preferences
P/I Control Preferences
P/I Control Preferences
P/I Control Preferences
P/I Control Preferences
Project Code or Disbursement Code Record
A/R Tax Codes
Source is defined by a field in the P/I Control preferences
and/or in the Task Code records. The possible sources
include the following:
Project Code
Invoice Section Code
Costs
Invoice Group Code
Employee Department
Source is defined by a field in the P/I Control preferences
and/or in the Task Code records. The possible sources
include the following:
Project Code
Invoice Section Code
Task Code
Invoice Group Code
Employee Department
Employee Code
The P/I system may be configured to record revenue either at the time WIP charges are
entered into the system, or at the time that Invoices are generated. Depending on the
selected option, the system is referred to either a Type T Revenue Distribution System, or
a Type I Revenue Distribution System.
© 2007 - 2014 by Sentinel Hill Software, all rights reserved
66
Series 5 Professional Invoicing - User Help
Detail or summary distributions are written according to options set up in the Control
Preferences, the Project, and the Task master records; and depending on the types of
transactions being recorded. The following rules apply:
Detail and/or Summary Distribution Rules
Account Name
Work-InProgress
Type T
Revenue
Type I or A
Revenue
Recoverable
Expense
Type I or A
Systems
Unearned
Revenue
Type T
Systems
Invoiced
Revenue
Holdbacks
Deferred
Revenue
Accumulated
Costs
Costs
Defined By
Detail by
Summary by
P/I Control
Preferences
P/I Control
Preferences
TimeSheet or
Invoice #
TimeSheet or
Invoice #
Date
A/R Control
Preferences
Invoice # or Accrual
Project
Date or Accrual
Date
A/R Control
Preferences
(only summary)
Invoice #
Date
n/a
Date
(only summary)
n/a
Invoice Date
(only summary)
(only summary)
n/a
n/a
Invoice Date
Date
(only summary)
n/a
(only detail)
TimeSheet and
Employee
Time Entry
Batch
n/a
Date
G/L Journal Entry Distributions
All G/L Distributions that are generated from the P/I and A/R applications are written to the A/R
Distribution file. These A/R Distributions are recorded into the General Ledger system only after the
Interface from Subsystem operation is executed from the G/L Menu' application.
Type "T" Revenue Distribution Systems - Distributions Generated
A property in the P/I Control Preferences found on the Rates and Revenue Assignment tab 697
determines whether revenue distributions are to generated at the time that Work-In-Progress
(WIP) items are entered into the system (Type "T" systems); or when Invoices are generated.
The following table defines which debit/credit distributions are generated for each major P/I
© 2007 - 2014 by Sentinel Hill Software, all rights reserved
P/I Setup and Implementation
67
function for Type "T" systems:
Type "T" Revenue Distribution Systems
(Revenue distributions generated when WIP charges are
entered)
Function
Time Sheet Entry
Generalized WIP
Entry
Project BiIling
Invoice Generation
Invoice DeGeneration
On-Demand
Invoices
Description
WIP Charges
Forward Balance
Deposits
WIP Charges
WIP
n/a
REVENUE
n/a
WIP
REVENUE
WIP Write-Offs
Mark WIP Manually
Invoiced
WIP Items Marked
Up/Down
Invoice Amount
REVENUE
SUSPENSE
REVENUE
REVENUE
WIP
WIP
INVOICED
REVENUE
REVENUE
WIP
WIP
INVOICED
REVENUE
REVENUE
WIP Items Marked
Up/Down
P/I Control
Preferences
Invoiced WIP
When Posted in A/R
On-Demand ReGenerate
Invoice Query
Credits
A/R Sales Batch
Posting
Debit Account Credit Account
Credited Invoice
Amount
Re-Generated Invoice
INVOICED
REVENUE
A/R CONTROL
REVENUE
When Posted in A/R
INVOICED
REVENUE
A/R CONTROL
When Posted in A/R
REVENUE
Amount of Invoice
A/R CONTROL
Holdback Amts
Deducted
Holdback Amts
Invoiced
Disbursements
Amounts
Taxes
HOLDBACKS
© 2007 - 2014 by Sentinel Hill Software, all rights reserved
A/R CONTROL
A/R CONTROL
A/R CONTROL
WIP
WIP
INVOICED
REVENUE
A/R
CONTROL
REVENUE
INVOICED
REVENUE
A/R
CONTROL
INVOICED
REVENUE
INVOICED
REVENUE
HOLDBACKS
RECOVERAB
LE EXPENSE
TAX CODE
ACCOUNT
68
Series 5 Professional Invoicing - User Help
Disbursement
Markups
A/R CONTROL
Credit Notes
SUSPENSE
CREDIT
A/R CONTROL
Manual Invoices
Prepaid Amounts
(CrCard)
CASH
DISBURSEM
ENT
MARKUP
A/R
CONTROL
SUSPENSE
REVENUE
A/R
CONTROL
Type "I" Revenue Distribution Systems - Distributions Generated
A property in the P/I Control Preferences found on the Rates and Revenue Assignment tab 697
determines whether revenue distributions are to generated at the time that Work-In-Progress
(WIP) items are entered into the system ; or when Invoices are generated (Type "I" systems).
The following table defines which debit/credit distributions are generated for each major P/I
function for Type "I" systems:
Type "I" Revenue Distribution Systems
(Revenue distributions generated when Invoices produced)
Function
Time Sheet Entry
Generalized WIP
Entry
Project BiIling
Description
Debit Account Credit Account
WIP Charges
WIP
Forward Balance
Deposits
WIP Charges
n/a
WIP Write-Offs
UNEARNED
REVENUE
SUSPENSE
REVENUE
UNEARNED
REVENUE
UNEARNED
REVENUE
UNEARNED
REVENUE
UNEARNED
REVENUE
WIP
Mark WIP Manually
Invoiced
Invoice Generation
WIP Items Marked
Up/Down
Invoice Amount
Invoice DeGeneration
On-Demand
Invoices
WIP Items Marked
Up/Down
P/I Control
Preferences
Invoiced WIP
When Posted in A/R
WIP
n/a
A/R CONTROL
UNEARNED
REVENUE
n/a
UNEARNED
REVENUE
WIP
REVENUE
WIP
WIP
WIP
WIP
UNEARNED
REVENUE
n/a
REVENUE
© 2007 - 2014 by Sentinel Hill Software, all rights reserved
P/I Setup and Implementation
On-Demand ReGenerate
Invoice Query
Credits
A/R Sales Batch
Posting
69
Credited Invoice
Amount
Re-Generated Invoice
When Posted in A/R
When Posted in A/R
REVENUE
Amount of Invoice
Holdback Amts
Deducted
Holdback Amts
Invoiced
Disbursements
Amounts
Taxes
A/R CONTROL
HOLDBACKS
A/R
CONTROL
n/a
REVENUE
A/R
CONTROL
REVENUE
REVENUE
A/R CONTROL
HOLDBACKS
A/R CONTROL
Disbursement
Markups
A/R CONTROL
Credit Notes
SUSPENSE
CREDIT
A/R CONTROL
RECOVERAB
LE EXPENSE
TAX CODE
ACCOUNT
DISBURSEM
ENT
MARKUP
A/R
CONTROL
SUSPENSE
REVENUE
A/R
CONTROL
Manual Invoices
Prepaid Amounts
(CrCard)
n/a
A/R CONTROL
REVENUE
A/R CONTROL
CASH
Type "A" Revenue Distribution Systems - Distributions Generated
Type "A" Revenue systems are basically the same as type "I" systems, except Revenue
Accruals for each Project may be generated. Since Revenue is not recorded to the G/L until
invoices are generated, for those projects requiring longer than your fiscal reporting periods to
be completed, the system will record accrued distributions. The total revenue for the period is
recorded dated the last day of the period, and a reversing entry to the first day of the next
period. The following table defines which debit/credit distributions are generated:
Type "A" Accrual Revenue Distribution Systems
(Un-Invoiced Revenue is accrued from one reporting period to
the next)
Function
Accrual
Posting
Description
Un-Invoiced WIP
Charges
(Last Day of Current
Month)
© 2007 - 2014 by Sentinel Hill Software, all rights reserved
Debit Account
UNEARNED
REVENUE
Credit Account
REVENUE
70
Series 5 Professional Invoicing - User Help
Un-Invoiced WIP
Charges
(1s Day of Next
Month)
Forwarded Balance
Deposits
REVENUE
UNEARNED
REVENUE
DEFERRED
REVENUE
REVENUE
Costing Distributions Generated
As an option in the P/I Control Preferences 700 , applicable Costing Distributions will be
generated when WIP activity is recorded in the system. The following table defines which
debit/credit distributions are generated:
Cost Distributions
Function
Time Sheet Entry
Generalized WIP
Entry
3.5
Description
WIP
Charges
WIP
Charges
Debit Account
Credit Account
ACCUMULATED
COSTS
ACCUMULATED
COSTS
EMPLOYEE or TASK
COST
EMPLOYEE or TASK
COST
Assignment of Unit Rates
The PI system has been designed to allow for a great deal of flexibility in the assignment or
calculation of a rate for a given unit of service performed. Through the use of Standard Rates
and Special Rates 671 and P/I system Control Preferences 697 , the user may define a rating
system which will accommodate various requirements.
All time entered can be classified as chargeable or non-chargeable in nature. All chargeable
time will be invoiced to a client for work performed on a given Project. Corresponding to the
chargeable and non-chargeable concept are two rates assigned to all rate-bearing sources.
These are referred to as Rate 1 (chargeable) and Rate 2 (non-chargeable).
Rates are assigned automatically by the system when project, task and employee
information is entered from a time sheet; interfaced from external sources; or entered as
General WIP Entry 289 . The system will examine the possible sources of a rate in a specific
sequence. The sequence is partially controlled by the user utilizing parameters in the P/I
Control Preferences. It is still possible to manually enter the rate or override the system
developed rate by the "operator override" function.
The system assigned rate is derived by first selecting a rate from either the Client, the Project
or the Task records. This rate is called the Standard Rate and is our first choice for the
candidate rate. (The Candidate Rate is the rate that will be chosen by the system when
no other rates are found during examination of subsequent possible sources of rates).
At this point the program will determine whether a chargeable or a non-chargeable rate is
used, and if Special Rates are needed. If a Special Rate Class Code 669 exists in the Project
© 2007 - 2014 by Sentinel Hill Software, all rights reserved
P/I Setup and Implementation
71
or Client record, the Special Rates table will be examined. An entry in the special rates table
will be searched for utilizing the Special Rate Class Code as a column indicator and
variations of the Employee, Employee Group or Employee/Task Codes as the row indicators.
If a Special Rate is found, it becomes a new Candidate Rate. If no special rate exists, the
Standard Rate will remain.
The system has several parameters which can be set to determine where information is to be
found or in what sequence a Candidate Rate will be derived. The following sections will
describe how a rate becomes chargeable or non-chargeable, when Special Rates are used
and how a final Candidate Rate is chosen..
Chargeable vs Non-Chargeable Rates
The system defines a chargeable or non-chargeable rate only from the Project or Client
records. To determine if a rate is chargeable or not, the system checks the Project and the
Client records for the Active Rate. If the Active Rate is the Default Chargeable Rate, then
the chargeable rate is used. If the Active Rate is Default Non-Chargeable Rate, then the
non-chargeable rate is used. If the Project has been determined to be chargeable, then the
chargeable/non-chargeable flag from the Task record will determine if the WIP item is
chargeable or non-chargeable. Only the chargeable rate, (rate 1) will be invoiced, rate 2
(non-chargeable) is never invoiced.
Standard Rates and Special Rates
The system determines from the Project or Client code records whether a Standard or a
Special rate will be used. It first selects, as a "Candidate" rate, the Standard rate. It then
proceeds to check the Project or Client records for a Special Rate Class Code. If a code
exist then the Special Rates Table 671 will be used to determine a new candidate rate. If a
Special Rate Class Code is not found or if the Special Rates table is examined and there is
not a special rate established, then the Standard rates will remain the candidate rate.
Special Rates
A Special Rate can be established for an Employee, an Employee Group, a Task Group, or for when
an Employee performs a specific Task. These, in turn, can be associated to a specific, (or group of),
projects by assigning a Rate Class Code 669 .
Selection of the Chargeable Unit Rate from the "Candidates"
Control for the steps in determining the final chargeable unit rate is dictated by various options
in the P/I Control Preferences 697 application. The program is designed to perform a
sequence of steps to test for the possible rates that might be defined. At each step, any rate
found becomes the new Candidate Rate. When all possibilities are exhausted, the last
Candidate Rate is assigned to the WIP item. A schematic of the rating procedure is shown in
the section following.
© 2007 - 2014 by Sentinel Hill Software, all rights reserved
72
Series 5 Professional Invoicing - User Help
The first three options defined in the Rates and Revenue tab subscreen of the P/I Controls
Preferences, determine the selection process. The following series of tests are performed to
come up with a rate.
The first step is to determine if the Project or the Client is a Chargeable or NonChargeable one:
Rate Type
Selection
The PI Preferences Rate Select Basis property is tested to
determine whether rates are controlled at the Project level or at the
Client level. This code directs the system to either the Project or
the Client code properties to test whether typically Chargeable WIP
items are recorded and invoiced, or not.
If WIP items are deemed to by typically chargeable, then the
system will be directed to select the Chargeable Rates from the
possible candidate sources.
If they are not typically Chargeable, then the system will be directed
to select the Non- Chargeable Rates from the possible candidate
sources.
The system will now determine a candidate rate from the possible Standard Rates
available from the Client, Project or Task code properties:
Standard Rate
Selection
If non-Zero, the Client Code's properties' rate becomes the new
candidate rate.
The PI Preferences Rate Selection Precedence property is
tested next. It defines the order in which Task and Project Code
properties are tested.
If Projects are precedence over Tasks, then the system first
selects the non-zero rate from the Task's properties; then attempts
to select the non-zero rate from the Project's properties. (Testing
for the Project rate 2nd gives it priority over the Task)
If Tasks take precedence over Projects, then the system first
selects the non-zero rate from the Project's properties; then
attempts to select the non-zero rate from the Task's properties.
(Testing for the Task rate 2nd gives it priority over the
Project)
At this point, the Candidate Rate becomes the Standard Rate. However, the system
will now attempt to determine if any Special Rates were set up. This is
accomplished by examining the Special Rates Tables. If no Special Rates are
defined in the system, the current Candidate rate will be the one assigned to the WIP
item.
Special Rates are created using specific codes. Each combination of codes, related
© 2007 - 2014 by Sentinel Hill Software, all rights reserved
P/I Setup and Implementation
73
to the type of Special Rate, can be considered as a row in a table. The columns of
this table are defined by the P/I as a Rate Class. If you need a Project to test for
Special Rates, it must have a Rate Class defined. Finding a Special Rate is a
process of testing to see if a rate record has been created using specific
combinations of codes related to the WIP item being entered. Each occurrence
found becomes the new Candidate rate.
Special Rates
Test and
Selection
The PI Preferences Special Rates Class Selection Precedence
property is tested next. It defines the order in which the system
looks for special rates set up based on Employee or based on the
Task being performed. and Project Code properties are tested.
If Employee Groups take precedence, then the system first checks
to see if a special rate was set up for the Invoice Group, (similar
types of Tasks may be assigned the same Invoice Group Code).
Then the system checks to see if a special rate was set up for the
Employee's Rate Group, (similar types of Employees may be
assigned the same Rate Group). Then the system checks to see
if a special rate was set up for the Employee. (Remember that
the last source for a rate tested always overrides earlier
selected candidate rates).
If Task/Invoice Groups take precedence, then the system first
checks to see if a special rate was set up for the Employee Rate
Group. Then the system checks to see if a special rate was set up
for the Employee. Then the system checks to see if a special rate
was set up for the Task's Invoice Group.
Finally, the system checks to see if a special rate was set up for
the Employee when they were performing a specific Task. If
found, this rate takes precedence over any previously selected
candidate rate.
At this point, the last selected non-zero Candidate Rate becomes the one that will be
assigned. But wait Batman, there is one more test that the system will perform.
That is there may have been a Task Modifier Percentage special rate that was
established. (This crafty special rate may be used to easily adjust the resulting unit
rate up or down for specific Tasks that are performed).
Task %
Modifier
For the Task associated to the WIP, test to see if a Task Modifier
rate was set up. If found, then multiply the final candidate rate by
the specified coefficient.
The final candidate rate will be assigned as the unit rate to the WIP item being entered. When
entering Employee Time Sheets or Generalize WIP, it will be displayed to the operator. Note
that a code is also assigned to the WIP record indicating which rate was selected.
© 2007 - 2014 by Sentinel Hill Software, all rights reserved
74
Series 5 Professional Invoicing - User Help
Operator Overrided Rates
After the system derived rate is determined and displayed, the operator may override it and enter a
different rate.
Flowchart of the P/I Chargeable Rates Selection
The following chart may help in describing the sequence of selecting the final WIP rate. At
each step, the specified non-zero rate becomes the next candidate rate.
© 2007 - 2014 by Sentinel Hill Software, all rights reserved
P/I Setup and Implementation
3.6
75
Costing
The PI system has been designed to provide, as an option, the tracking of Project Costs.
Both expenses and labour consumed for a project, whether chargeable or non-chargeable is
recorded as costs.
Labour costs are defined using the Task record in the system. Each task will define whether
the unit cost is related to, (or to be determined from), the employee or the actual task being
performed. (ie. An hour of consulting by an employee as opposed to the cost of a megabyte
of disk storage or use of a machine). The cost of a given WIP item is carried with that item.
The cost amount is used in each of the Project Costing reports for both chargeable and
non-chargeable activity and is used to calculate a cost amount for each invoice moved to the
Accounts Receivable for chargeable activity. The cost of a given disbursement item is the
original amount before being marked-up. The original amount is used in the cost amount for
each invoice moved to the Accounts Receivable.
A variation to costing is costing with distributions. If selected, WIP costs will be recorded in
the A/R distribution file and subsequently moved to the General Ledger.
Unit Costs
In order to monitor the costs associated to project activity, you must have set the applicable
check-box on the Costing tab sub-screen in the P/I Control Preferences 700 . For systems that
have the costing option selected, for all WIP and Disbursement entered for a project, a cost
will be computed. The cost amount for both chargeable and non-chargeable WIP charges is
computed as follows:
COST = # TASK UNITS x UNIT COST
The # of Task Units are those entered record with time sheet entries and General WIP
charges. The Unit Cost is obtained from the task record, the employee record, or from the
Special Rates Table.
Determining the Unit Cost Rate uses a similar method to that used in computing the
chargeable unit rates. The following series of tests are performed to come up with a unit
cost.
The system will determine a candidate cost rate from the possible Unit Cost Rates
available from the Employee or Task code properties:
Unit Cost Rate
Selection
A Unit Cost is may be assigned to both Employees and Tasks. A
property associated to each Task is used to indicated whether the
Unit Cost Rate is to be determined from the Task or from the
Employee. Based on the setting, the appropriate Unit Cost
becomes the new candidate rate.
At this point, the Candidate Rate becomes the Unit Cost. However, the system will
now attempt to determine if any Special Unit Cost Rates were set up. This is
accomplished by examining the Special Rates Tables. If no Special Rates are
© 2007 - 2014 by Sentinel Hill Software, all rights reserved
76
Series 5 Professional Invoicing - User Help
defined in the system, the current Candidate cost rate will be the one assigned to the
WIP item.
Special Rates may be established for specific Employee or Task codes. Each code,
related to the type of Special Rate, can be considered as a row in a table. The
columns of this table are defined by the P/I as a Rate Class. If you need a Project to
test for Special Rates, it must have a Rate Class defined. Finding a Special Rate is
a process of testing to see if a rate record has been created using specific
combinations of codes related to the WIP item being entered. Each occurrence
found becomes the new Candidate rate.
Special Unit Cost Rates
You would want to set up Special Cost Rates for Tasks or Employees in order to compute
different costs for different sets of Customers. Remember that different sets of costs can be
defined for different Rate Class Codes 669 , which are assigned to different Projects. (Projects
belong to Customers).
Special Unit
Cost Rate Test
and Selection
The property associated to each Task which is used to indicated
whether the Unit Cost Rate is to be determined from the Task or
from the Employee is examined.
Based on the setting, the system checks to see if a special cost
rate was set up for either the Task or the Employee. (Only one or
the other is tested, not both).
At this point, the last selected non-zero Candidate Cost Rate becomes the one that
will be assigned. But wait Batman, there is one more test that the system will
perform. That is there may have been a Task Cost Modifier Percentage special
rate that was established. (This crafty special rate may be used to easily adjust the
resulting unit cost rate up or down for specific Tasks that are performed).
Task %
Modifier
For the Task associated to the WIP, test to see if a Task Cost
Modifier rate was set up. If found, then multiply the final candidate
rate by the specified coefficient.
Flowchart of the P/I Cost Rates Selection
The following chart may help in describing the sequence of selecting the final WIP rate. At
each step, the specified non-zero rate becomes the next candidate rate.
© 2007 - 2014 by Sentinel Hill Software, all rights reserved
P/I Setup and Implementation
77
Cost Distribution Accounts
For systems that have selected the check-box to Generate G/L Cost Distributions for
Work-In-Progress in the P/I Control Preferences 700 , Cost Distributions will be generated in
the A/R distribution file. The account number is determined using control parameters in the
P/I Control Preferences, and in the Task record. The account may be defined in the Task,
Project, Employee, Department, Invoice Section or Invoice Group records. After the account
is determined, the Special Account file is examined to see if an account had been defined for
a combination of the Employee's Job Class Code and the Task Code. If found, it becomes
the Cost Account. As well, it is possible to override the profit centre of the selected account
with a profit centre code from either the Department record or the Location record.
The G/L accounts used by the P/I system must be defined as valid A/R accounts, and valid G/
L accounts.
3.7
Daily Processing
Enter topic text here.
© 2007 - 2014 by Sentinel Hill Software, all rights reserved
78
3.8
Series 5 Professional Invoicing - User Help
Month-End Processing
Enter topic text here.
3.9
Year-End Processing
Enter topic text here.
© 2007 - 2014 by Sentinel Hill Software, all rights reserved
Part
IV
80
4
Series 5 Professional Invoicing - User Help
The Basic User Interface
Throughout the Series 5 system applications, there are a number of basic common types of
screens to provide a consistent operation. These are discussed in this chapter and it's
related sub-topics.
4.1
Professional Invoicing Application Menu
Each Application has a primary menu screen. These menu programs all operator in the
same manner, and basically offer the same types of functions.
The instructions below explain the features available and how to customize some of the subscreens. For detailed instruction on the actual application, refer to the related topics in the
Professional Invoicing Menu Functions 202 and The P/I Menu 202 chapters.
Here is the P/I menu that will be used to identify the different functions available.
© 2007 - 2014 by Sentinel Hill Software, all rights reserved
The Basic User Interface
Applications' Menu Bar
All functions available to a given user may be accessed from the menu bar at the top of the
screen. Menu items are grouped according to the type of functions for each application.
© 2007 - 2014 by Sentinel Hill Software, all rights reserved
81
82
Series 5 Professional Invoicing - User Help
Applications' Menu Bar
The following menu bar groups of functions are defined:
Menu Bar Types of Application Functions
Group
File
For the Reports Manager, Batch Job Processor, and other File
Management functions
Trx Inquiry For functions that offer screen Inquiry of current or archived data, or
interactive analysis
Operations For Sales Transaction Entry, Cash Receipts Entry, Invoicing, Printing
Customer Statements or Dunning Letters, Purging the Receivables and
other typically daily, monthly or annual functions
Reports
For the generations of reports
Code
Maintenance functions for defining and updating master code files
Maintenan
ce
Purging
Functions that Purge History files
Wizards
For setting up and/or launching user defined Wizards
User
For launching user created programs or other Window's Utilities
Functions
Window
Functions to manage the simultaneous execution of up to 9 of the
applications' functions
Help
Displays licensing information, launches Help, or executes a Monitor
displaying users currently using the system
For example, to select the Customer Codes Maintenance function:
© 2007 - 2014 by Sentinel Hill Software, all rights reserved
The Basic User Interface
83
1. Click Codes Maintenance in the menu bar.
2. Select Customers... from the drop-down menu and the Customer Codes
Maintenance screen will be displayed.
Daily Operations - Monthly Operations, Year-End Operations and Transaction
Entry tabbed sub-screens
Tabbed sub-menus are provide on the application menus that offer common types of
functions. Each of the applications menus offer tabbed sub-screens that have those
functions that would be typically invoked a certain times, or to enter Transactions.
For example, those menu functions in the G/L system that might be executed on a daily
basis:
© 2007 - 2014 by Sentinel Hill Software, all rights reserved
84
Series 5 Professional Invoicing - User Help
1. Click on the applications' Daily Functions tab.
2. Click on the desired function push button.
4.1.1
Multi-Threaded Windows
The applications menus provide the ability to select and execute up to 9 functions all at the
same time. Each executes in their own window independent of one another.
Execute multiple functions from the Applications' menu simultaneously
The functions that have been launched are displayed in the frame at the bottom on the
application menu
© 2007 - 2014 by Sentinel Hill Software, all rights reserved
The Basic User Interface
If you right click the icon associated to an executing function, a drop-down menu will
appear from which you can hide or restore it's screen, or terminate the function.
The functions that have been launched are visible as items under the menu bar's
Window sub-menu
© 2007 - 2014 by Sentinel Hill Software, all rights reserved
85
86
Series 5 Professional Invoicing - User Help
You may terminate, hide or cascade the executing functions windows by selecting the
appropriate function from the menu bar's Window sub-menu
You may hide, or redisplay a particular executing function by clicking on it's entry in the
menu bar's Window sub-menu
© 2007 - 2014 by Sentinel Hill Software, all rights reserved
The Basic User Interface
4.1.2
87
Scheduled Menu Functions
The Series 5 Menus offers the ability to define certain functions to be scheduled for particular
times of the day at specified intervals. Tabbed sub-screens display those functions that have
been scheduled and are Overdue, Due for Today, or Coming Due. The operator must
click the push button in the sub-screen to select these functions to have them executed.
Once the function is finished, the operator will be prompted to reschedule the job.
Refer to the section on Users Scheduled Menu Functions 186 under the User Access
Management 179 Chapter for the steps to set up the Scheduled functions.
Scheduled Menu Sub-Screen Examples
For menu functions that are scheduled to be launched today:
For menu functions that are scheduled, but were not launched on the day they were
due. They are Overdue:
© 2007 - 2014 by Sentinel Hill Software, all rights reserved
88
Series 5 Professional Invoicing - User Help
For menu functions that are scheduled, but for a date in the future:
© 2007 - 2014 by Sentinel Hill Software, all rights reserved
The Basic User Interface
Rescheduling Scheduled Functions
Once a scheduled menu item's process has completed, a screen is presented to the
operator offering to have the menu item rescheduled.
1. The fields will default so the function will be scheduled as defined.
2. You may have the item rescheduled using one of the following intervals:
© 2007 - 2014 by Sentinel Hill Software, all rights reserved
89
90
Series 5 Professional Invoicing - User Help
3. Click on the applicable push button as required.
4.2
Grid Processing Screens
The Series 5 applications have been developed around the concept that the operator should
be able to navigate easily through the master codes data sets or batches of transactions that
are being worked with. To accomplish this, the assorted accounting systems have made use
of a graphical control known as a grid.
The grid control is basically a table that provides the operator with a list of the data records
being worked with, and controls to navigate through the associated file. Individual fields may
be edited, pop-up menus may be displayed for related functions, and the cursor up/down and
Page up/down keys may be used to move around rows and columns of data.
The screens that display these grids also offer a number of functions that the operator can
manage or manipulate the particular records' information. These are fairly consistent
throughout the Series 5 accounting systems.
Grid screens are typically developed for the following types of menu functions:
Master Code Maintenance routines
Transaction Entry routines
Data Inquiry routines
Operations that require the operator to perform some type of function to easily set or
edit properties of a specific type of data record
Here is an example of a grid based screen that offers most of the controls typical of a
Transaction Entry function. (In this case there are 2 rows in information for each data item
being displayed).
© 2007 - 2014 by Sentinel Hill Software, all rights reserved
The Basic User Interface
91
List-By or View Options Menu
In those grid applications where the items may be displayed using different sort criteria, click
on View in the menu-bar for a drop-down menu of selections; or make the selection from the
List-By drop-down list.
© 2007 - 2014 by Sentinel Hill Software, all rights reserved
92
Series 5 Professional Invoicing - User Help
or
A description of the sort order is displayed in the status bar at the bottom of the screen.
"Fast Button" Frame Tasks Push Buttons
In all the grid based screen functions, the major operations that could be performed are
displayed as Push Buttons in a brightly colored frame. This is referred to as the "Fast Button"
Frame.
© 2007 - 2014 by Sentinel Hill Software, all rights reserved
The Basic User Interface
93
Or for another example:
Note that different types of functions have different frame background colors.
- Blue
Active data Inquiry or Analysis
- Burgundy
Codes Maintenance
- Olive Green
Archived transaction Inquiry
- Aqua-Marine Green
Transaction Entry
Selecting to Display Items Associated to a Particular Code
In certain grid based applications, you will be able to display only those items associated to a
particular master code. There is a field in which you can enter the desired code.
In the example, the screen displays all Open Items for a selected Customer.
© 2007 - 2014 by Sentinel Hill Software, all rights reserved
94
Series 5 Professional Invoicing - User Help
In this example there are three ways that a given Customer may be selected:
1. Enter the Customer Code whose items are to be displayed in the grid.
2. Click on the icon to have the Customer "Lookup" window displayed and select the
desired customer.
3. Click on the "Find Prior" or "Find Next" icons for the prior or next Customer Code on file
with items to be displayed
Processing Tip
When a grid application that offers a code to be selected is initially displayed, that field is is normally blank. If
you wish to just display items for the 1st code on file, click on the "Find Next" icon push button and the system
will do the rest.
Search Function
In all the grid based screen functions, a Search function is provided.
1. Click on the Search icon.
© 2007 - 2014 by Sentinel Hill Software, all rights reserved
The Basic User Interface
2. The Search window will be displayed. Enter the string or number to be searched in
the Find field and select the particular field of the given record to be tested.
3. Set the searching options as desired and click on the Find push button. (If you rather
just get a count of the # of records that satisfy the search, click on the Count pushbutton
4. If a record is found, then the grid will be refreshed with that item displayed. Also, the
Search Backward/Forward icons will be enabled, and you could then search back or
forward by clicking on the appropriate buttons.
© 2007 - 2014 by Sentinel Hill Software, all rights reserved
95
96
Series 5 Professional Invoicing - User Help
5. The current search string, and name of the field tested is displayed in the status bar at
the bottom of the screen.
Grid Navigation Buttons
To move through a file of records that are accessed or displayed using the grid, use the
Navigation Buttons found at the right side of the screen.
Navigation To
The next grid row
Keyboard Key or Mouse Graphic
Click
Cursor-Down Key or
rotate the mouse wheel
towards you
© 2007 - 2014 by Sentinel Hill Software, all rights reserved
The Basic User Interface
Down 4 grid rows
The prior grid row
Up 4 grid rows
The 1st row of the
next screen
Hold the Ctrl-key and
rotate the mouse wheel
towards you
Cursor-Up Key or rotate
the mouse wheel away
Hold the Ctrl-key and
rotate the mouse wheel
away
Click bottom down button
The 1st row of the
Click top up button
current screen, or the
row just before the
1st row of the current
screen
The last row of the
next screen
Page-Down key, or click
the lower dbl-down button
The 1st row of the
prior screen
Page-Up key, or click the
top upper dbl-down button
The 1st record on file Hold the shift key and
click the top up button
The last record on file Hold the shift key and
click the bottom down
button
© 2007 - 2014 by Sentinel Hill Software, all rights reserved
97
98
Series 5 Professional Invoicing - User Help
Grid Row Pop-Up Menus
For most of the grid based menu item screens, you can right-click a given row to have a popup menu of the functions that would be applicable to the record represented in the row.
Editing Cell Contents Directly on the Grid
In a number of code maintenance applications, descriptive fields may be edited directly on the
grid. If this is allowed, when those particular cells are double clicked, the contents of the cell
will be highlighted. the operator may then key in the new value.
© 2007 - 2014 by Sentinel Hill Software, all rights reserved
The Basic User Interface
99
Standard Record Editing Functions
Most of the grids in the Series 5 system's applications provide an Edit drop-down menu from
the menu bar. This offers functions to Cut, Copy and Paste the associated records belonging
to the grid. For codes maintenance applications, there are also functions to Undo the last
deleted item; and to Undo the last edited item. From the drop down menu under Edit in the
menu-bar, click the desired function. (In most cases, these functions are also available
from the pop-up menu displayed when a row in the grid is right-clicked).
Warning
The Undo Delete, Undo Modify, Cut, Copy and Paste functions are only
operable while working in the particular function. If you exit the function
associated to the grid, when you return, any Cut, Modified or Deleted
record may not be Pasted or Undone.
Most Recently Accessed Items Menu
In the drop down menu under File in the menu-bar, most grid screens will provide a list of the
© 2007 - 2014 by Sentinel Hill Software, all rights reserved
100
Series 5 Professional Invoicing - User Help
last 6 items that were added or edited . You can click on any one these to position to it.
Grid File Properties Menu Function
In almost all applications using a grid screen, the rows of data displayed represent a data
record in a file. The Properties function found In the drop down menu under File in the menubar, when clicked will display some properties about the displayed file.
© 2007 - 2014 by Sentinel Hill Software, all rights reserved
The Basic User Interface
101
The Properties Screen displayed shows the names of the files, the # of records, and the size.
Grid Slide Bar and Full Screen Expand Push Button
In most cases, the columns of data displayed in the grid can be displayed in the screen's
window. There are a few functions that have too many columns of data to fit.
If there are more columns defined that can't all fit on the screen at once, there will be a slide
bar displayed at the bottom of the grid. The operator may slide it over with the mouse to view
© 2007 - 2014 by Sentinel Hill Software, all rights reserved
102
Series 5 Professional Invoicing - User Help
the hidden columns of data.
If there is an
icon in the lower right corner of the screen, clicking on this will expand the
screen laterally to it's full size. (You will need to have a wide screen for this to be effective).
4.3
Code "Lookup" Window
Throughout each of the Series 5 applications there may be master codes that must be
entered into a field on a screen. In most cases there will be an icon
of a pair of
binoculars located to the right of the field. If you click on the binoculars, a "Codes Lookup"
window will be displayed, from which you can browse for and select a code.
Here is an example of fields with the binoculars icon for entering master codes in the
Professional Invoicing system.
© 2007 - 2014 by Sentinel Hill Software, all rights reserved
The Basic User Interface
Code "Lookup" Window
All "Lookup" windows basically have the same characteristics and controls.
© 2007 - 2014 by Sentinel Hill Software, all rights reserved
103
104
Series 5 Professional Invoicing - User Help
Select a particular code by navigating to it in the window and double clicking the
row, or clicking the Select push button
To exit the Lookup window without selecting an item, click on the Cancel push
button
A Search window may be activated by clicking on the
binoculars icon
Move through the codes in the window by clicking on the grid navigate bar icons
(on the right), or the cursor up/down keys, or the Page Up/Down keys.
If you know the 1st few letters of the code you are wanting, you can type these,
and the grid will redisplay showing the item closest to the Goto Key that you have
typed. (To reset the Goto Key string, strike the ESC key, of click the Reset
pushbutton).
© 2007 - 2014 by Sentinel Hill Software, all rights reserved
The Basic User Interface
G/L Account "Lookup" Window
For "Lookup" windows offering a G/L Account to be selected, a similar window with the
same characteristics and controls is displayed.
© 2007 - 2014 by Sentinel Hill Software, all rights reserved
105
106
Series 5 Professional Invoicing - User Help
The main difference is the entry of the GoTo Key:
As each numeric digit is entered, the system will attempt to redisplay showing the
closest Goto Key account
For systems with more than one G/L Account Main segment, enter either the
Space-Bar, or the "-" character to indicate entry of the next Account Bank segment
Only the G/L Account Main number is recognized. Don't bother trying to enter the
Profit Center portion
In the above screen example, you could have entered 730- or 073090 to have
the system position itself in the grid as shown
Once the number of digits in the G/L Account's Main number has been entered,
the GoTo Key fields is cleared, and a different number may be started
© 2007 - 2014 by Sentinel Hill Software, all rights reserved
The Basic User Interface
4.4
107
Date "Lookup" Window
Throughout the Series 5 applications there is the need to enter dates. With each date entry
field there will be an icon
of a calendar located to the right of the field.
If you click on the calendar, a "Date Lookup" window will be displayed, from which you can
choose a date.
Date entry "Lookup" Window
Here is the "Date Lookup" window.
Select a particular date by double-clicking it on the calendar
Select a particular Month or Year by selecting it from the given drop down list
fields
Move to the next or previous Years and Months by clicking on the navigate buttons
at the bottom
© 2007 - 2014 by Sentinel Hill Software, all rights reserved
108
Series 5 Professional Invoicing - User Help
Exit without selecting a date by clicking on the Cancel push button
4.5
Date Range "Lookup" Window
Throughout each of the Series 5 applications there may be a need to enter a range of dates.
In most cases there will be an icon
of a small calendar located to the right of the fields.
Here is an example of selecting a range of Ledger dates in one of the G/L system's functions.
If you click on the calendar, a "Date Range Lookup" window will be displayed, from which
you can enter the starting/ending dates, or choose from a variety of different date range
possibilities from a drop down select field.
Date Range "Lookup" Window
The window for entering a range of dates, (or selecting one form a drop down list).
© 2007 - 2014 by Sentinel Hill Software, all rights reserved
The Basic User Interface
You may choose, or set, a given date range using a variety of methods:
Enter the dates in the From and To fields
Click on the little calendar icons to have a calendar displayed from which a data
can be chosen
Click on the Prior .... or Next .... push buttons to adjust the dates accordingly
Choose a particular date range from the drop down list
© 2007 - 2014 by Sentinel Hill Software, all rights reserved
109
110
Series 5 Professional Invoicing - User Help
© 2007 - 2014 by Sentinel Hill Software, all rights reserved
Part
V
112
5
Series 5 Professional Invoicing - User Help
Quick Start Tutorials
Enter topic text here.
5.1
Adding a New Project
Enter topic text here.
5.2
Entering Time Sheets
Enter topic text here.
5.3
Selecting Items for Billing
Enter topic text here.
5.4
Generating Invoices
Enter topic text here.
5.5
Interface Invoices to A/R
Enter topic text here.
5.6
Reprinting an Invoice
Enter topic text here.
© 2007 - 2014 by Sentinel Hill Software, all rights reserved
Part
VI
114
6
Series 5 Professional Invoicing - User Help
Starting and Using the P/I System
In order to use any of the Series 5 system applications, each user must go through a sign-on
process.
The following steps are required.
1. Signon using the users assigned User Code and Password.
2. Select the Company System that is to be processed. (If only one Company system
is defined, then this step is not required).
3. From the Main Menu screen, click the Accounts Receivable icon.
6.1
User Logon
Each user must first log in to use any of the Series 5 applications.
Key Information
Your Systems Manager, or designated "Gate Keeper"
must first create a User Profile before any user can
sign on to the system.
User Logon Screens
1. Click on the Series 5 application icon that has been set up on your desktop.
2. Enter your User Code and Password. If setup by your Systems manager, the
Username Code will default to that defined by the SHSI_USER_NAME DOS
Environment Variable.
© 2007 - 2014 by Sentinel Hill Software, all rights reserved
Starting and Using the P/I System
115
You must enter the correct password to get into the system.
You will have five attempts at entering the correct Username and
Password combination
Your Systems Manager may have established the rule that passwords
must be renewed at some interval of time. (ie., every 3 months). If this is
the case, the system will warn you 21 days ahead of time, that you will
need to change the password. If it has expired, you will have to contact
your System Administrator, or your Gatekeeper to set up a new password
for you.
3. If you have defined more that one Company System, select the company to be worked
with:
© 2007 - 2014 by Sentinel Hill Software, all rights reserved
116
Series 5 Professional Invoicing - User Help
Defining a New Password
On occasion, you may be required to define a new password. You can have your Systems
Manager, or the designated Gate Keeper assign you a new password, or you can do that
yourself.
1. From the Main Menu's menu bar, click on My Own Setup, and from the drop down
menu, click on Change My Password. The following screen will be displayed:
2. Enter your old password
3. Enter your new password in both fields presented. There are a few rules about the
password you are allowed to use:
The password must contain at least 8 non-space characters
The password must contain at least 1 numeric digit and 1 alpha character
You cannot use the same password that you have used for the last 3 times
The password will time-out after a pre-determined period of time. (As setup by
your Systems Manager)
If you fail to enter the password correctly after a number of tries, (as setup by
your Systems Manger), you will be disabled from logging in. You will have to
contact your System Manager to have your profile re-enabled.
© 2007 - 2014 by Sentinel Hill Software, all rights reserved
Starting and Using the P/I System
117
4. Click OK to proceed.
6.2
Series 5 Main Menu
The Series 5 Main Menu screen provides each of the bitmap buttons for each application that
has been defined on your system.
Series 5 Main Menu
Launch the P/I application by clicking it's associated graphic.
© 2007 - 2014 by Sentinel Hill Software, all rights reserved
Part
VII
Basic Processing Procedures
7
119
Basic Processing Procedures
Throughout the Series 5 system applications, a variety of functions provide standard
processing options screens. These are documented in this chapter and it's related subtopics.
7.1
Background or Night Processing
Many of the Series 5 applications provide the ability to execute a number of their reporting and
processing functions in the background as a batch job. You might choose to execute an
application as a Batch Job so that your terminal may be free to be used for other activity, or
so that a report could be delayed to be executed in the evening when the demands on your
computer system are less. In order to process jobs in the background a PC terminal, running
Windows, must be dedicated to executing the Batch Job Processor utility.
Some of the features of Batch processing:
Jobs may be queued to one of 5 different Job Queues
Jobs may be queued with different Priorities
Jobs may be queued to execute after a specified time of day (for Night
Processing)
Jobs may be defined as "Re-Occurring" at a variety of time intervals
A Batch Job Manager can control and/or change individual jobs waiting
to be executed
Each Job has a Parameter Control file that can be edited
Each completed Job has an Execute Audit Log file that may be viewed
Multiple Batch Job Processor may execute simultaneously
The ability to submit jobs to execute in the Background Job Processor is a privilege granted to
individual users for each application's menu functions. It is also possible to define the option
that a given operation MUST be executed by the Job Processor; and alternatively, that the job
must execute after 6:00 PM in the evening.
© 2007 - 2014 by Sentinel Hill Software, all rights reserved
120
7.1.1
Series 5 Professional Invoicing - User Help
Selecting Jobs for Background Processing
Only certain jobs have been set up to optionally execute using the Batch Job Processor.
These are mainly functions that generate reports, or functions that need to be executed every
night, or those functions requiring extensive CPU processing.
Processing Note
Batch Processing is a feature that carried over from the days when processors were
relatively slow compared to today. As such, only a limited number of functions have been
set up to execute in this manner. If there are any functions that you feel should be revised
to execute in the Batch, please make your request to the development team at Sentinel
Hill Software Inc.
If an application has been set up for Batch Processing, then typically on the last screen used
to enter processing options, there will be a prompt at the bottom. Set the check box if you
wish to execute the job in Batch. If the user's access for the given menu item is set such that
the job must be executed as a batch job, the check-box will be set, and disabled.
If you set the Execute as Batched Background Job check-box, the following options
screen is displayed:
© 2007 - 2014 by Sentinel Hill Software, all rights reserved
Basic Processing Procedures
121
Once the OK push button is clicked, then the job will be submitted to the Job Batch Queue to
wait for it's time to be executed. In the meantime, you may continue with other functions, or
exit the Series 5 application totally. Notice that every job is assigned a unique number. This
may be used to track the job using the Batch Job Manager.
Batch Execute Setup Field Definitions
Job Name
X(30)
By default, is the name of the Report or Operation. The job may easily be tracked by the
Batch Job Manager using this name.
Batch Queue
drop-list
The system provides pre-defined Batch
Queue names. Each job may be dispatched
to a particular queue to be processed. Your
System's Manager may have defined multiple
queues, each with different execute priorities,
or on different processors.
Program
This field defines the name of the Series 5 program this is executed. It may not be
changed.
Priority
© 2007 - 2014 by Sentinel Hill Software, all rights reserved
radio-buttons
122
Series 5 Professional Invoicing - User Help
The priority will determine how quickly the
batch request is executed. The default setting
is determined from the User's access
properties for the given application.
Delayed Processing
Low
Normal
High
check-box
Should you wish to have this job execute at some designated time of the day, set this
check-box. You will then be able to set the Delay Hours and Minutes. The delay will
default such that the job would executed after 6:00 pm today.
Re-Occurring
drop-list
When a job is initially queued, you may set this
option to have it automatically re-occur at one
of the defined intervals. After it eventually
executes, it will automatically re-queue itself to
execute. Note that any date parameters or
filters associated to the application, will
automatically be updated based on the given
interval chosen.
7.1.2
Batch Job Management
The Batch Job Manager is available to each of the Series 5 applications. Whenever an
application's function is queued to be executed by the Batch processor, an entry is recorded
in the Batch Job file. The Batch Manager allows you to view the status of the job, put it on
Hold, have it re-queued, or even delete it.
Accessing the P/I Batch Job Manager
From either the P/I Main menu, or any application, select Batch Job Processing
from the File drop-down menu.
© 2007 - 2014 by Sentinel Hill Software, all rights reserved
Basic Processing Procedures
© 2007 - 2014 by Sentinel Hill Software, all rights reserved
123
124
Series 5 Professional Invoicing - User Help
Batch Job Queue Manager Grid Screen
Maintenance and monitoring of the Batch Jobs is done with a Series 5 grid screen.
"Fast Buttons"
Hold
Put a Hold on the
the selected Job
Modify Modify the
properties of the
selected job
Delete Delete the selected
Job
Display and edit the
Job
Params Job's execution
parameters with
Notepad
Output View the output log
Log generated when
the selected job
was executed.
Purge Have those jobs
satisfying a number
of filters deleted
from the system
Select Set filters for the
items that are
displayed in the
grid
Modifying a Job in the Batch Queue
1. In the grid, navigate to the row listing the job that is to be modified.
2. Double-click the row, or right-click the row to have a drop-down menu displayed, then
click Modify, .... or just click on the Modify button in the "Fast Button" frame. The Job's
properties screen will be displayed.
© 2007 - 2014 by Sentinel Hill Software, all rights reserved
Basic Processing Procedures
3. Edit any given field as required. Note in particular, that if a job has been placed on
"Hold", or if it has completed, you can click on the Reset Status to "WAITING" check
box, and the job will be executed at the next opportunity after the specified execution
time.
4. You can also view and edit the system command line that is used to launch the
particular job. This is the shell or Command Prompt command that is issued. YOU
SHOULD NOT NORMALLY EVER NEED TO EDIT THIS COMMAND LINE.
5. Click the Update push button at the bottom of the screen.
Batch Job Properties Screen Field Definitions
Batch Queue
© 2007 - 2014 by Sentinel Hill Software, all rights reserved
drop-list
125
126
Series 5 Professional Invoicing - User Help
The system provides pre-defined Batch
Queue names. Each job may be dispatched
to a particular queue to be processed. Your
System's Manager may have defined multiple
queues, each with different execute priorities,
or on different processors.
Re-Occurring
drop-list
A job that has already completed, may be set
up to have it automatically re-occur at one of
the defined intervals. After it eventually
executes, it will automatically re-queue itself to
execute. Note that any date parameters or
filters associated to the application, will
automatically be updated based on the given
interval chosen.
Priority
radio-buttons
The priority will determine how quickly the
batch request is executed. The default setting
is determined from the User's access
properties for the given application.
Queued for Execution - Date and Time
Low
Normal
High
(mm/dd/yy)
You can set to have this job execute at some designated time of a particular date.
Reset Status to "WAITING"
check-box
If a job has completed, or if it has been placed
"On-Hold", then you can reactivate it and have
it execute again. (Depending on the function,
you may have to re-edit the Job Parameters
to set up correct dates of report options).
Grid Display Search options
You may search for specific records displayed in the grid using a number of relevant fields.
Click on the
Search icon.
A search string may be entered for the following fields:
Job Name
Job Number
© 2007 - 2014 by Sentinel Hill Software, all rights reserved
Basic Processing Procedures
127
Grid Display and Purge Filters Screen
If your company makes use of Batched Jobs, over a period of time you may have a great
number of Job History records. You can limit the number of items that are displayed in the
grid. The same filter fields are also available to the Purge function.
1. Click on Selections in the "Fast Button" frame. The Archive Report selection filters
screen will be displayed.
2. Set the applicable filters
3. Click the OK push-button. The grid will be redisplayed showing only those reports
satisfying the selected filters.
Filters Screen Field Definitions
Systems
radio-buttons & drop down list
Click the All button, or the Selected button with a specific application from the drop down
list. Only those jobs generated from the selected system will be listed.
© 2007 - 2014 by Sentinel Hill Software, all rights reserved
128
Series 5 Professional Invoicing - User Help
Company System
radio-buttons & drop down list
Click the All button, or the Selected button with a specific Company for which job
records are to displayed or processed.
Batch Execute Queue
radio-buttons & drop down list
Click the All button, or the Selected button with a specific Batch Queue. Only those jobs
generated and processed by by the selected queue will be listed.
Execute Date
radio-buttons & (mm/dd/yy) entry fields
Click the All button, or the Selected button with a date range. Only those jobs that
executed within the range of dates entered will be listed.
Putting a Job "On-Hold"
If a job has not yet executed, and for whatever reason, you want to put it on hold, you can do
so. (Perhaps to change a parameter or priority).
1. In the grid, navigate to the row listing the Job to be put on-hold.
2. Right-click the row to have a drop-down menu displayed, then click Hold, .... or just
click on the Hold button in the "Fast Button" frame.
3. A hold verification screen will be displayed. Click the Put On Hold button to proceed.
4. The Job's status will be set accordingly.
5. To re-activate the Job, you will have Modify it, and click the Rest Status to "WAITING"
check-box.
Purging old "Completed" Job Control Records
Over a period of time, your users may have generated a great number of Job records. If you
wish, you may delete them to reduce the overhead, make available more disk space, or just
to get rid of them.
1. Click on the Purge button in the "Fast Button" frame.
2. The Purge options screen will be displayed. (This is the same screen as used for the
Grid Display filters).
3. Click the OK push-button. The system will remove all those jobs satisfying the
selected filters.
© 2007 - 2014 by Sentinel Hill Software, all rights reserved
Basic Processing Procedures
7.1.3
129
The Batch Job Processor
In order to process any Professional Invoicing function jobs that might have been queued to
be run in the background, or at night, a PC terminal running Windows must be dedicated to
executing the Batch Job Processor utility. This is basically another Series 5 program that
gets launched from the Batch Job Management function.
Some of the features of Batch Processor Utility:
The Processor Utility is launched from the File drop-down menu from
the Batch Job Manager
Multiple instances of the Processor Utility may execute at the same time
on different client terminals
Each Processor Utility may be set up to service jobs sent to a particular
Batch Execute Queue
Each Processor Utility may be set up to service jobs generated for a
particular Company Systems
Each Processor Utility may be set up to service jobs generated for a
particular application
An Execution Log screen is available that displays the last 10 jobs that
have executed
The window within which the Job Processor executes can be toggled
between two sizes. In Expanded mode it shows the details and log of
executing jobs; In Brief mode, it just shows a small general status
screen
Launching the Series 5 Batch Job Processor Utility
From the Batch Job Manager screen:
1. Click on Start Batch Processor from the File drop-down menu. A prompt will be
displayed confirming the launch of the Job Processor.
© 2007 - 2014 by Sentinel Hill Software, all rights reserved
130
Series 5 Professional Invoicing - User Help
2. Click the Yes button, then the Job Service Handler screen will be displayed and
you will be able to set a number of filters that are used to select particular jobs that
are to be accepted. (By default All jobs will be processed).
3. Click OK and the Job Processor will trundle off and wait for a job that it can
execute.
Processing Note
© 2007 - 2014 by Sentinel Hill Software, all rights reserved
Basic Processing Procedures
131
The Batch Job Processor, when launched, is executed as an entirely new task in it's own
window. You can switch back to the Batch Job Manager window, exit that, and do
whatever you please without disturbing the Job Processor.
Processing Status Tab Screen
As jobs are executing, you can view their status on the Processing Status tab screen. It
displays the jobs that is currently executing, or the last job that was executed.
Execution Log Tab Screen
A table is kept displaying the last ten jobs that have executed since the Job Processor has
started.
© 2007 - 2014 by Sentinel Hill Software, all rights reserved
132
Series 5 Professional Invoicing - User Help
Job Processor "Brief" Window
If you are not interested in view the progress of the batched jobs, you can switch the
window to a "Brief" display. From which you can switch back to an "Expanded" display.
Job Select Filters Screen Field Definitions
Systems
radio-buttons & drop down list
© 2007 - 2014 by Sentinel Hill Software, all rights reserved
Basic Processing Procedures
133
Click the All button, or the Selected button with a specific application from the drop down
list. Only those jobs generated from the selected system will be executed.
Company System
radio-buttons & drop down list
Click the All button, or the Selected button with a specific Company for which job
records are to be executed.
Batch Execute Queue
radio-buttons & drop down list
Click the All button, or the Selected button with a specific Batch Queue. Only those jobs
submitted to the selected queue will be executed.
7.2
Data Importing and Exporting
In several Series 5 applications, the ability to import or export data from/to external sources
has been implemented. There are standard import/export data screens that are displayed.
A number of different data formats are supported. These include:
MS Excel Workbooks
Tab Delimited Text
Lotus Text (Comma Delimited with quotation marks)
Slash "\" Delimited Text
CSV Text (Comma Delimited)
7.2.1
Data Export Functions
Many of the Inquiry and assorted master Code Maintenance menu items offer the ability to
export data.
When selected, the following options screen is presented:
© 2007 - 2014 by Sentinel Hill Software, all rights reserved
134
Series 5 Professional Invoicing - User Help
Selecting Export Format Options
Normally, the Export Options screen will be presented with all fields defaulted for the
particular application and function. However, you may want to revise the format of the output
data and where it is to be generated. The following steps may be taken:
1. Determine the format of the data to be output. From the drop down list select from the
following:
Data Input Format
Comments
An Office 2007 or 2010 MS Excel workbook is opened,
EXCEL 2007/2010 and data is output directly to the 1st worksheet's
designated rows and columns. A maximum of 950,000
Workbook
rows may be output to each sheet.
EXCEL 97-2003
Workbook
An Office 2003, or earlier, MS Excel workbook is
opened, and data is output directly to the 1st
worksheet's designated rows and columns. A
maximum of 65,530 rows may be output.
The output columns of data are separated with the
Tab Delimited Text <tab> character. A maximum of 65,530 rows may be
output.
CSV Comma
Delimited Text
The columns of data are output separated with a
comma <,> character. Strings are output within the
© 2007 - 2014 by Sentinel Hill Software, all rights reserved
Basic Processing Procedures
135
double quote, <">, character. A maximum of 99,999
rows may be processed.
20/20 Text
Formatted for an older spreadsheet utility.
Lotus Text
The columns of data must be comma separated with
quotation marks around each field.
Slash Delimited
The columns of data must be separated with the "\"
character.
Text
2. You may then select the folder to which the file is created and the name of the file. You
can click the
push button to locate or change the location.
Thin Client Processing Tip
If executing as a Thin Client user you should select output as Tab Delimited Text. Over a slow network, output
to an Excel Spreadsheet is disgustingly slow. If you want the output to be on your PC, then make sure that the
"Thin Client" Unix Home Page in your User Logon Profile contains a path on the UNIX server. (Files are
actually 1st created on the UNIX server, then copied to the PC client).
Field Definitions
drop-down list
File Type:
Select the file type that is to be generated. This field will default to the type that is defined
in the Series 5 User Logon Profile. (Note that if the the particular import/export function
requires a specific format other that an Excel Spreadsheet, the default from the User
Logon Profile is not set as the default).
Folder:
© 2007 - 2014 by Sentinel Hill Software, all rights reserved
X(90)
136
Series 5 Professional Invoicing - User Help
Enter the name of the directory folder to which the exported data is to be written to. This
will default to the directory path defined in the Users Logon Profile established by your
Systems Manager. You may click the Browse button to select a different folder.
You may click on the Browse button to locate the desired directory. Only those folders
which are descendants of the root directory, of that which is defined by the Folder field,
can be displayed. So if you wish to choose a folder on your "C" drive, enter C:\ in the
Folder field before clicking the "Browse" button. Setting the Folder field blank, or to a path
that does not have a drive letter designation, would result in only being able to browse
descendants of the user's default working directory.
Filename:
X(50)
The filename will default to a name applicable to the type of data. You may change if you
so desired.
About Exporting Tab Screen
Along with the Export Options tab screen there will be an About Exporting tab screen. This
provides the operator with information about which fields are output to which columns,
(assuming MS Excel output).
© 2007 - 2014 by Sentinel Hill Software, all rights reserved
Basic Processing Procedures
The codes displayed under the Format column indicated the type and size of the data. Here
are some examples:
Data Format
Comments
X(30)
30 character alphanumeric
9(6)
6 digit numeric integer
MM/DD/YY
6 digit date in mm/dd/yy order
-9,999,999.99
signed numeric amount with 2 decimal places
© 2007 - 2014 by Sentinel Hill Software, all rights reserved
137
138
7.2.2
Series 5 Professional Invoicing - User Help
9(8)-9(5)
G/L Account # 999999999999999999-99999
S9(9)
signed 9 digit integer
Data Import Functions
Many of the Inquiry and assorted master Code Maintenance menu items offer the ability to
import data.
When selected, the following options screen is presented:
Selecting Import Format Options
Normally, the Import Options screen will be presented with all fields defaulted for the particular
application and function. However, you may want to revise the format of the input data and
where it is to be loaded from. The following steps may be taken:
1. Determine the format of the data to be input. From the drop down list select from the
following:
Data Input Format
Comments
EXCEL 2007/2010 An Office 2007 or 2010 MS Excel workbook is opened,
and data is read directly from the 1st worksheet's
Workbook
© 2007 - 2014 by Sentinel Hill Software, all rights reserved
Basic Processing Procedures
139
designated rows and columns. A maximum of 950,000
rows may be processed.
EXCEL 97-2003
Workbook
An Office 2003, or earlier, MS Excel workbook is
opened, and data is read directly from the 1st
worksheet's designated rows and columns. A
maximum of 65,530 rows may be processed.
The input columns of data must be separated with the
Tab Delimited Text <tab> character. A maximum of 65,530 rows may be
processed.
CSV Comma
Delimited Text
The columns of data must be separated with a comma
<,> character. Strings must begin and end with the
double quote, <">, character. A maximum of 99,999
rows may be processed.
20/20 Text
Formatted for an older spreadsheet utility.
Lotus Text
The columns of data must be comma separated with
quotation marks around each field.
Slash Delimited
The columns of data must be separated with the "\"
character.
Text
2. You may then select the folder from which the file is to be loaded from and the name of the
file. You can click the
push button to locate or change the location.
Thin Client Processing Tip
If executing as a Thin Client user you will appreciate considerably faster processing of large data files when
you process input as Tab Delimited Text. Over a slow network, input to an Excel Spreadsheet is disgustingly
slow. If loading the input from your PC, then make sure that the "Thin Client" Unix Home Page in your User
Logon Profile contains a path on the UNIX server. (Files are actually 1st copied to the UNIX server, then read
© 2007 - 2014 by Sentinel Hill Software, all rights reserved
140
Series 5 Professional Invoicing - User Help
into the system).
Field Definitions
File Type:
drop-down list
Select the type of data that is to be loaded. This field will default to the type that is defined
in the Series 5 User Logon Profile. (Note that if the the particular import/export function
requires a specific format other that an Excel Spreadsheet, the default from the User
Logon Profile is not set as the default).
Folder:
X(90)
Enter the name of the directory folder from which the imported data is to be read from.
This will default to the directory path defined in the Users Logon Profile established by
your Systems Manager. You may click the Browse button to select a different folder.
Filename:
X(50)
The filename will default to a name applicable to the type of data. You may change if you
so desired.
About Importing Tab Screen
Along with the Export Options tab screen there will be an About Exporting tab screen. This
provides the operator with information about which fields are output to which columns,
(assuming MS Excel output).
© 2007 - 2014 by Sentinel Hill Software, all rights reserved
Basic Processing Procedures
The codes displayed under the Format column indicated the type and size of the data. Here
are some examples:
Data Format
Comments
X(30)
30 character alphanumeric
9(6)
6 digit numeric integer
MM/DD/YY
6 digit date in mm/dd/yy order
-9,999,999.99
signed numeric amount with 2 decimal places
9(8)-9(5)
G/L Account # 999999999999999999-99999
S9(9)
signed 9 digit integer
© 2007 - 2014 by Sentinel Hill Software, all rights reserved
141
142
Series 5 Professional Invoicing - User Help
In some of the import functions, you can specify a Processing Directive in column 1 of your
input data file. These are basically commands that direct the system to process the rows of
data following in a special way. These commands are typically only provided for the input of
Master Code records.
Pseudo Command
7.3
Comments
%RADD%
If the data record being input is already defined on file, it
is 1st deleted. Then a new record is written with the
data loaded. (In some cases, the record being written
may have other fields that would be initialized when the
new record is written.
%DELE%
Once a Master Code is identified, the associated record
on file is deleted. No data is subsequently input.
Record Processing Filters
In each Series 5 application, there is normally a primary Master Code or Transaction that is
typical to most reporting and query activities. As such, in these functions, there is usually a
screen that displays a number of fields associated to the Master Code or Transaction that
may be set in order to limit the records or transactions being processed.
These filtering or selection screens provide the ability to select all codes, ranges of codes, or
selected codes of the assorted Master Codes.
7.3.1
Project Filters
Most reporting and inquiry functions available in the Professional Invoicing application, are
based on the P/I Project Master record. These routines provide the operator an opportunity to
set filters such that only selected customer are reported or inquired. The following screen is
presented where applicable:
© 2007 - 2014 by Sentinel Hill Software, all rights reserved
Basic Processing Procedures
In particular, for Projects, Locations and Departments, you may choose to provide filters for
Selected Codes or a Range of Codes. If the A Range radio button is clicked, then enter the
starting and ending codes for the range of items that are wanted on the report. It the
Selected radio button is clicked, then a window will be displayed from which you can select
codes that are to be reported.
Field Definitions
Project(s)
radio-buttons
Click to include all, selected or a range of Projects that are to be processed.
All
Selected
A Range
All Projects are considered
A window is displayed from which specific items may be
chosen
Specify a Starting and Ending Project Code for a range of
items to be processed
Select ONLY Projects flagged to generate
EDI Invoices
check-box
Set the check-box to include ONLY those Projects that have been set up to generate
Electronic Invoices.
© 2007 - 2014 by Sentinel Hill Software, all rights reserved
143
144
Series 5 Professional Invoicing - User Help
With Billing Status of:
check-boxes
Click to select or unselect Projects of different status.
Of Type(s)
check-boxes
Click to select or unselect Projects of different types.
Chargeable or Non-Chargeable
check-boxes
Click or unclick to include or exclude those Projects that have been defined as being
Chargeable or Non-Chargeable.
Project Location(s)
radio-buttons
To consider only those Projects that have been assigned to a particular Location, click to
include all, a selected, or a range of Locations.
All
Selected
A Range
All Projects are considered regardless of Location
A window is displayed from which specific items may be
chosen
Specify a Starting and Ending Location for a range of items to
be processed
Project Department(s)
radio-buttons
To consider only those Projects that have been assigned to particular Department, click
to include all, a selected, or a range of Departments.
All
Selected
A Range
All Projects are considered regardless of Department
A window is displayed from which specific items may be
chosen
Specify a Starting and Ending Department Code for a range of
items to be processed
with Matching - Partner-In-Charge
X(6)
Select only those Projects whose Partner-In-Charge matches that entered. Leave the
field blank if it is NOT to be considered as a filter.
with Matching - Project Leader
X(6)
Select only those Projects whose Project Leader matches that entered. Leave the field
blank if it is NOT to be considered as a filter.
© 2007 - 2014 by Sentinel Hill Software, all rights reserved
Basic Processing Procedures
with Matching - Keywords 1 - 4
145
X(10)
Select only those Projects with a Keyword that matches any that are entered. Leave the
field blank if it is NOT to be considered as a filter.
with Matching - User Project Type Code
X(5)
Select only those Projects whose User Project Type Code matches that entered. Leave
the field blank if it is NOT to be considered as a filter.
with Matching - User Billing Type Code
X(4)
Select only those Projects whose User Billing Type Code matches that entered. Leave
the field blank if it is NOT to be considered as a filter.
with Matching - Rate Type Code
X(1)
Select only those Projects whose Rate Type Code matches that entered. Leave the field
blank if it is NOT to be considered as a filter.
with Matching - Invoice Cycle Code
X(1)
Select only those Projects whose Invoice Cycle Code matches that entered. Leave the
field blank if it is NOT to be considered as a filter.
with Matching - Rate Class Code
X(6)
Select only those Projects whose Rate Class Code matches that entered. Leave the field
blank if it is NOT to be considered as a filter.
with Matching - Invoice Layout Code
999
Select only those Projects whose Invoice Layout Code matches that entered. Leave the
field blank if it is NOT to be considered as a filter.
with Matching - EDI/XML Invoicing Code
drop-list
Select only those projects that generate EDI Invoices of the type selected. Select the {n/
a} option if it is NOT to be considered as a filter.
© 2007 - 2014 by Sentinel Hill Software, all rights reserved
146
Series 5 Professional Invoicing - User Help
Selecting Specific Projects, Locations or Departments for Reporting
If you clicked to have Selected Projects, Locations or Departments from the Project
Select Filters screen, then a window, similar to the one that follows, is displayed. From
the grid display on the left, double-click the items that are to be included in the report, or
query.
1. Double click an item in the left pane to have it included.
2. The codes of those Items that have been chosen are displayed in the right pane.
3. Search for a particular code by clicking on the
binoculars icon.
4. Click on the
push button icons to position to the previous or next item, in the left
pane, that has already been selected.
5. Click to have "ALL" items selected or unselected.
6. When a particular previously selected item is highlighted in the right pane, click the
button to have it unselected.
7. Use the grid navigate buttons to move through the list of possible items.
© 2007 - 2014 by Sentinel Hill Software, all rights reserved
Basic Processing Procedures
147
8. If you know approximately the code that you wish to select, start typing it. As each
character is keyed in, the system will reposition itself to the closest matching item,
and redisplay the items in the left pane. As each character is typed, it will be displayed
as the GoTo string. To clear the GoTo string, press the <Esc> key on the keyboard.
Processing Tip
Selecting specific items in this manner requires more overhead when
processing. If possible, you should select a range of items from the
filters screen.
7.3.2
WIP Filters
Most reporting and inquiry functions available in the Professional Invoicing application, are
based on the P/I Work-In-Progress, (WIP), record. These routines provide the operator an
opportunity to set filters such that only selected WIP are reported or inquired. The following
screen is presented where applicable:
© 2007 - 2014 by Sentinel Hill Software, all rights reserved
148
Series 5 Professional Invoicing - User Help
In particular, for Employees and Tasks, you may choose to provide filters for Selected Codes
or a Range of Codes. If the A Range radio button is clicked, then enter the starting and
ending codes for the range of items that are wanted on the report. It the Selected radio
button is clicked, then a window will be displayed from which you can select codes that are to
be reported.
Field Definitions
Employees(s)
radio-buttons
To consider only those WIP items that have been recorded for a particular Employee,
click to include all, a selected or a range of Employees.
All WIP items are considered regardless of Employee
All
Selected A window is displayed from which specific items may be
chosen
A Range Specify a Starting and Ending Employee Code for a range of
items to be processed
Task(s)
radio-buttons
To consider only those WIP items that have been recorded for a particular Task, click to
include all, a selected or a range of Tasks.
All WIP items are considered regardless of Task
All
Selected A window is displayed from which specific items may be chosen
A Range Specify a Starting and Ending Task Code for a range of items to
be processed
Of Type(s)
check-boxes
Click to select or unselect WIP of different types.
With Status of:
check-boxes
Click to select or unselect WIP of different status.
Chargeable or Non-Chargeable
check-boxes
Click or unclick to include or exclude those WIP items that have been defined as being
Chargeable or Non-Chargeable.
with Matching - Partner-In-Charge X(6)
© 2007 - 2014 by Sentinel Hill Software, all rights reserved
Basic Processing Procedures
149
Select only those WIP for Projects whose Partner-In-Charge matches the code entered.
Leave the field blank if it is NOT to be considered as a filter.
with Matching - Project Leader
X(6)
Select only those WIP for Projects whose Project Leader matches the code entered.
Leave the field blank if it is NOT to be considered as a filter.
with Matching - Employee
Department
99
Select only those WIP items for Employee's who's Department matches the code
entered. Leave the field blank if it is NOT to be considered as a filter.
with Matching - Employee Job
Class
X(6)
Select only those WIP items for Employee's who's Job Class matches the code entered.
Leave the field blank if it is NOT to be considered as a filter.
with Matching - Employee
Location
X(6)
Select only those WIP items for Employee's who's Location matches the code entered.
Leave the field blank if it is NOT to be considered as a filter.
with Matching - Leader Location
X(6)
Select only those WIP items for Projects whose Project Leader's Location matches the
code entered. Leave the field blank if it is NOT to be considered as a filter.
with Matching - Invoice Group
Code
X(6)
Select only those WIP items that have an Invoice Group that matches the code entered.
Leave the field blank if it is NOT to be considered as a filter.
with Matching - Taxable Status
Code
X(1) - "Y" or "N"
Select only those WIP items that have a Taxable Status of Y or N, matching the code
entered. Leave the field blank if it is NOT to be considered as a filter.
© 2007 - 2014 by Sentinel Hill Software, all rights reserved
150
Series 5 Professional Invoicing - User Help
with Matching - Invoice Number(s) radio-buttons with 9(6) Invoice #s
Select only those WIP items that have been invoiced with Invoice Numbers that fall within
the range entered.
with Matching - Date(s)
radio-buttons with (yymmdd) dates
Select only those WIP items that have been recorded with a date that falls in the range
entered.
Selecting Specific Employees or Tasks for Reporting
If you clicked to have Selected Employees or Tasks from the WIP Select Filters screen,
then a window, similar to the one that follows, is displayed. From the grid display on the
left, double-click the items that are to be included in the report, or query.
1. Double click an item in the left pane to have it included.
2. The codes of those Items that have been chosen are displayed in the right pane.
3. Search for a particular code by clicking on the
binoculars icon.
© 2007 - 2014 by Sentinel Hill Software, all rights reserved
Basic Processing Procedures
151
4. Click on the
push button icons to position to the previous or next item, in the left
pane, that has already been selected.
5. Click to have "ALL" items selected or unselected.
6. When a particular previously selected item is highlighted in the right pane, click the
button to have it unselected.
7. Use the grid navigate buttons to move through the list of possible items.
8. If you know approximately the code that you wish to select, start typing it. As each
character is keyed in, the system will reposition itself to the closest matching item,
and redisplay the items in the left pane. As each character is typed, it will be displayed
as the GoTo string. To clear the GoTo string, press the <Esc> key on the keyboard.
Processing Tip
Selecting specific items in this manner requires more overhead when
processing. If possible, you should select a range of items from the
filters screen.
7.3.3
Customer Filters
Most reporting and inquiry functions available in the Professional Invoicing application, are
based on the A/R Customer Master record. These routines provide the operator an
opportunity to set filters such that only selected customer are reported or inquired. The
following screen is presented where applicable:
© 2007 - 2014 by Sentinel Hill Software, all rights reserved
152
Series 5 Professional Invoicing - User Help
In particular, for Customers, Customer Types and Sales Reps, you may choose to provide
filters for Selected Codes or a Range of Codes. If the A Range radio button is clicked, then
enter the starting and ending codes for the range of items that are wanted on the report. It
the Selected radio button is clicked, then a window will be displayed from which you can
select codes that are to be reported.
Field Definitions
Customer(s)
radio-buttons
Click to include all, selected or a range of Customers that are to be processed.
All
Selected
A Range
Customer Type(s)
All Customers are considered
A window is displayed from which specific items may
be chosen
Specify a Starting and Ending Customer Code for a
range of items to be processed
radio-buttons
To consider only those Customers that have been assigned as being a particular
Customer Type, click to include all, a selected or a range of Types.
All
Selected
All Customers are considered regardless of Type
A window is displayed from which specific items may
be chosen
© 2007 - 2014 by Sentinel Hill Software, all rights reserved
Basic Processing Procedures
A Range
153
Specify a Starting and Ending Customer Type for a
range of items to be processed
Sales Representative(s)
radio-buttons
To consider only those Customers that have been assigned to particular Sales
Representatives, click to include all, a selected or a range of Sales Reps.
All
Selected
A Range
All Customers are considered regardless of Sales Rep
A window is displayed from which specific items may
be chosen
Specify a Starting and Ending Sales Rep Code for a
range of items to be processed
Customer Status
radio-buttons
To consider only those Customers that have been flagged as having a given Status, click
the appropriate radio button.
All
Only Active
Only Canceled
All Customers are considered regardless of status
Only those Customers whose status is Active.
Only those Customers marked as being Canceled will
be processed.
Credit Rating Code
radio-buttons
Each Customer may have a Credit Rating status assigned to them. Consider only those
Customers with the status as clicked.
All Customers are considered regardless of Rating
All
Different Name Only those Customers whose Remit-To Company Name is
different from it's own name will be processed.
Only those Customers whose Remit-To address is different
Different
from it's own address will be processed.
Address
Only those Customers whose Remit-To name or address is
Either
different from it's own l be processed
Email-Status
radio-buttons
To consider only those Customers that have or have not been enabled to have their
Customer Statements emailed to them.
All
Only Enabled
Only NOT Enabled
All Customer are considered regardless of status
Only Customers enabled for emailed statements are
processed
Only Customers NOT enabled for emailed statements
are processed
© 2007 - 2014 by Sentinel Hill Software, all rights reserved
154
Series 5 Professional Invoicing - User Help
with Matching - City
X(25)
Select only those customers whose City matches that entered. Leave the field blank if it
is NOT to be considered as a filter.
with Matching - Country
X(20)
Select only those customers whose Country matches that entered. Leave the field blank
if it is NOT to be considered as a filter.
with Matching - State/Province
X(5)
Select only those customers whose State or Province matches that entered. Leave the
field blank if it is NOT to be considered as a filter.
with Matching - Primary Phone Area Code
9(3)
Customers have phone numbers. Select only those customers whose Area Code
matches that entered. Leave the field blank if it is NOT to be considered as a filter.
with Matching - Tax Code 1
X(6)
Customers are assigned a primary Tax Code. Select only those customers whose Tax
Code 1 matches that entered. Leave the field blank if it is NOT to be considered as a
filter.
with Matching - Tax Code 2
X(6)
Customers are assigned a secondary Tax Code. Select only those customers whose
Tax Code 2 matches that entered. Leave the field blank if it is NOT to be considered as a
filter.
with Matching - Sales Territory
X(5)
Customers may be assigned to a particular Territory. Select only those customers
whose Territory Code matches that entered. Leave the field blank if it is NOT to be
considered as a filter.
© 2007 - 2014 by Sentinel Hill Software, all rights reserved
Basic Processing Procedures
155
Selecting Specific Customers, Customer Types or Sale Reps for Reporting
If you clicked to have Selected Customers, Customer Types, or Sales Reps from the
Customer Select Filters screen, then a window, similar to the one that follows, is
displayed. From the grid display on the left, double-click the items that are to be included
in the report, or query.
1. Double click an item in the left pane to have it included.
2. The codes of those Items that have been chosen are displayed in the right pane.
3. Search for a particular code by clicking on the
binoculars icon.
4. Click on the
push button icons to position to the previous or next item, in the left
pane, that has already been selected.
5. Click to have "ALL" items selected or unselected.
6. When a particular previously selected item is highlighted in the right pane, click the
button to have it unselected.
7. Use the grid navigate buttons to move through the list of possible items.
© 2007 - 2014 by Sentinel Hill Software, all rights reserved
156
Series 5 Professional Invoicing - User Help
8. If you know approximately the code that you wish to select, start typing it. As each
character is keyed in, the system will reposition itself to the closest matching item,
and redisplay the items in the left pane. As each character is typed, it will be displayed
as the GoTo string. To clear the GoTo string, press the <Esc> key on the keyboard.
Processing Tip
Selecting specific items in this manner requires more overhead when
processing. If possible, you should select a range of items from the
filters screen.
7.3.4
Customer Demographics Filters
As well as being able to set filters associated to the Customer Master records, you may also
set filters for the Customer Demographic codes that have been assigned to your Customer
Master records. These routines provide the operator an opportunity to set filters such that
only selected customers, based on whichever Customer Demographics have been assigned
to them, are reported or inquired. The following screen is presented where applicable:
© 2007 - 2014 by Sentinel Hill Software, all rights reserved
Basic Processing Procedures
For each Demographic Code, you may choose to provide filters for Selected Codes or a
Range of Codes. If the A Range radio button is clicked, then enter the starting and ending
codes for the range of items that are wanted on the report. It the Selected radio button is
clicked, then a window will be displayed from which you can select codes that are to be
reported.
Point of Interest
Please note that the Demographic Codes are dreamed up by
you, the user. The screen here shows some creative, or
maybe not so creative, examples.
Field Definitions
Xxxxxx Code(s)
radio-buttons
To consider only those Customers that have been assigned a particular Demographic
Code, click to include all, or selected codes.
© 2007 - 2014 by Sentinel Hill Software, all rights reserved
157
158
Series 5 Professional Invoicing - User Help
All
Selected
All Customers are considered
A widow is displayed from which specific items may be
chosen
Selecting Specific Demographic Codes
If you clicked to have Selected a code from the Demographic Selects screen, then a
window, similar to the one that follows, is displayed. From the grid display on the left,
double-click the items that are to be included in the report, or query.
1. Double click an item in the left pane to have it included.
2. The codes of those Items that have been chosen are displayed in the right pane.
3. Search for a particular code by clicking on the
4. Click on the
binoculars icon.
push button icons to position to the previous or next item, in the left
© 2007 - 2014 by Sentinel Hill Software, all rights reserved
Basic Processing Procedures
159
pane, that has already been selected.
5. Click to have "ALL" items selected or unselected.
6. When a particular previously selected item is highlighted in the right pane, click the
button to have it unselected.
7. Use the grid navigate buttons to move through the list of possible items.
Processing Tip
Selecting specific items in this manner requires
more overhead when processing. If possible, you
should select a range of items from the filters
screen.
7.4
Report Generation and Printing
Most of the Series 5 applications generate reports or forms that need to be printed. The
system offers a variety of options for selecting the format in which reports are generated and
how they are actually to be printed. Reports may be generated as follows:
Viewed by the Series 5 Report Browser
Printed to a selected printer
"Archived" for later reference
Saved as an ASCII text file or MS Word file
Emailed to specified recipients
Any combination of the above
When a report is to be actually printed, any of the Series 5 defined Print Queues may be
selected. An unlimited number of Printer Queues may be set up by your System
Administrator. Each Queue has a variety of properties associated that means you can pretty
well print to any of your network defined printers using different fonts or margin settings.
(Refer to the chapter on Defining Series 5 Print Queues in the Systems Management
Help or manuals).
© 2007 - 2014 by Sentinel Hill Software, all rights reserved
160
7.4.1
Series 5 Professional Invoicing - User Help
Report Options Screen
When any kind of report or form output is to be generated, the following window screen is
displayed:
Selecting Report Generation Options
Normally, the Print Options screen will be presented with all fields defaulted for typical report
handling. However, you may want to revise how and where the report is to be generated.
The following steps may be taken:
1. Determine where the generated report is to be directed. Click the appropriate checkbox. You may choose one or more from the following:
Output To
Comments
© 2007 - 2014 by Sentinel Hill Software, all rights reserved
Basic Processing Procedures
161
Screen Browser
Output is displayed to the screen using the
Series 5 Report Browser 165 .
Archived to Report Manager
Output is saved as an "Archived" report. It
may be viewed and reprinted using the
Series 5 Report Manager 166 . It will remain
on the system until purged.
Print Queue
Output will be directed to the selected
Series 5 Printer Queue. This may be any
printer that has been defined on your
network. When selecting to output to a
Printer Queue, you may select to have up
to 9 copies printed, (as long as that feature
is supported by your operating system,
and printer).
Saved to Disk as an MS Word The output is written to an MS Word
Document in the specified folder.
Document
The output is written to an MS Word
Saved to Disk as an MS Word Document in the specified folder. It is also
printed to the designated Captured Printer
Document and printed
from within Word.
file
The output is written as a text file to the
Saved to Disk as an ASCII Text specified folder. This would be useful only
if you needed to parse the file with some
3rd party utility.
Saved to Disk as a PDF
Document
The output is written to a PDF Document
in the specified folder.
2. When selected to direct the report output to a Printer Queue, you may select a Series
5 Printer Queue from the drop down list. (The list will contain each of the printers
that has been assigned to the particular Company System that you are working
in). When the Print Queue has been selected, the system will echo the Description,
the Font, and if applicable, the network assigned printer name of the Captured printer.
3. When selected to direct the report Saved To Disk you must select to save it as an MS
Word Document, an MS Word Document Printed, a PDF Document, or an ASCII Text
© 2007 - 2014 by Sentinel Hill Software, all rights reserved
162
Series 5 Professional Invoicing - User Help
File. In either case you need to have specified the folder to which the file is saved. The
default is the directory that is defined in the Series 5 User's Logon Profile field labeled
as the User's "My Documents" folder Pathname. You can click the
button to locate or change the folder where the file is to be stored.
push
4. If saving to an MS Word Document Printed, then after generated, the document will
be printed from within Word. You will need to select a specific Captured Printer.
Captured Printers are defined by your Systems Manager using the Captured Windows
Printers maintenance function available from the Series 5 main menu under the
System Maintenance drop down sub-menu. (Refer to the chapter on Defining Series
5 Captured Windows Printers in the Systems Management Help or manuals).
Setup Tip
If you wish to be able to generate your reports as Word or PDF documents, your Systems Manager must have
defined pertinent variables in the AcuGT runtime configuration file. For simple reports you specifically need to
have set up the variable MSWORD-DEFAULT-SPECS . This defines whether the document is
generated as Portrait or Landscape, the Font Name and Font Size and an optional Template that might be
applied to the document when it is created. (Refer to the chapter Setting up for MS Word in the
Systems Management Help or manuals.)
If templates are used to format the output to MS Word or PDF documents, they must be installed on each
user's individual client PC. On Windows XP clients, these must be saved to the C:\Documents and Settings
\<PC UserName>\Application Data\Microsoft\Templates folder. On Windows VISTA and Windows 7 clients,
these must be saved to the C:\Users\<PC UserName>\AppData\Roaming\Microsoft\Templates folder.
For users of Office 2003 the file must be named with a xxxx.dot extension. For users of Office 2007 or
later, the file must be named with a xxxx.dotx extension.
5. When a report is saved to disk, you may also select to have the generated disk file
email to a given recipient. Set the check-box accordingly. After the report is generated,
the window to send an email will be displayed. You can select the recipient(s), and edit
the text of the message and click the Send button to send the email.
© 2007 - 2014 by Sentinel Hill Software, all rights reserved
Basic Processing Procedures
163
Protected MS Word Documents
When reports of forms are output as MS Word Documents, they are generated in protected "Read-Only"
mode. If you really need to un-protect it, the password is SENTINELHILL.
Field Definitions
Screen Browser:
check-box
Set the check mark to have the report displayed to the screen using the Screen Browser
utility.
Archive to Reports Manager:
check-box
Set the check mark to have the report output as an "Archived Report". This may later be
viewed and/or reprinted from the Reports Manager.
Print Queue:
© 2007 - 2014 by Sentinel Hill Software, all rights reserved
check-box
164
Series 5 Professional Invoicing - User Help
Set the check mark to have the report output to a printer.
Print Queue:
drop-down list
Select the the Series 5 Printer Queue to which the report is to be output to.
# of Copies:
9
When outputting to a Printer Queue, you may specify how many copies are to be printed.
You can print up to 9 copies. This is a feature that is offered only on WIndows XP, VIsta
and Windows 7, and is dependant on the type of printer and it's drivers. When multiple
copies are chosen, they are printed collated.
Save To:
check-box
Set the check mark to have the report output to a disk file, or folder, on your system as
either an MS Word Document, a PDF Document, or a simple ASCII text file.
Save To:
X(90)
Enter the name of the directory folder to which the saved-to-disk report is to be written.
This will default to the directory path defined in the Users Logon Profile established by
your Systems Manager.
You may click on the Browse button to locate the desired directory. Only those folders
which are descendants of the root directory, of that which is defined by the Save-To field,
can be displayed. So if you wish to choose a folder on your "C" drive, enter C:\ in the
Save-To field before clicking the "Browse" button. Setting the Folder field blank, or to a
path that does not have a drive letter designation, would result in only being able to
browse descendants of the user's default working directory.
Save As:
drop-down list
Select to have the output saved as an Office Word document, an Office Word document
that is printed from Word, as a PDF document, or as an ASCII text file. If chosen to Save
to "MS Word Printed", then you must select the Captured Printer to which the report is to
be printed.
To Captured Printer:
X(12)
If chosen to Save to "MS Word Printed", then you must select the Captured Printer to
which the report is to be printed. This must be a valid network printer that was captured
using the Captured Windows Printers maintenance function available from the Series 5
main menu under the System Maintenance drop down sub-menu. (Refer to the Systems
© 2007 - 2014 by Sentinel Hill Software, all rights reserved
Basic Processing Procedures
165
Management Help if required).
Send a copy to E-Mail Recipient:
check-box
If chosen to save the report to a disk file, you may also select to have an email sent with
the generated disk file as an attachment. Set the check mark to have the report emailed.
Report Header User Note:
X(100)
If you need to personalize the report, the text you enter here will be printed at the top of the
1st page.
7.4.2
Report Browser
When selected to direct a report output to the Screen Browser, or from the Reports Manager
you have selected a particular report, the Series 5 Report Browser screen window will be
shown.
© 2007 - 2014 by Sentinel Hill Software, all rights reserved
166
Series 5 Professional Invoicing - User Help
You may navigate around the report in number of ways:
Graphic or Control to click
Slide bar to the right
Action
Position to up or down through the pages
of the report. As you drag the slide bar, the
1st data line of each page is displayed at
the bottom of the screen.
Enter a search string. This may be text, or
a number as it would be printed in the
report. The drop down list contains
previously entered search strings.
Search for the entered search string. The
page where the string is found will be
displayed, and the line containing the text
will be displayed in red.
Search Forward or Backward for the
entered search string.
Display the select Page.
Display the Prior or Next page of the
report.
7.4.3
Archived Reports Management
The Reports Manager is available to each of the Series 5 applications. Whenever a report is
generated, the operator may have chosen to direct the output to be "Archived". These
archived reports may be viewed and printed using the Reports Manager.
Accessing the P/I Reports Manager
From either the P/I Main menu, or any application, select Reports Manager from
the File drop-down menu.
© 2007 - 2014 by Sentinel Hill Software, all rights reserved
Basic Processing Procedures
167
Reports Manager Grid Screen
Maintenance of the Archived reports is done with a Series 5 grid screen.
"Fast Buttons"
Re-Print Print the selected
report
Browse Browse the selected
report
Delete
Delete the selected
Archived report
Purge
Have reports
satisfying a number
of filters deleted from
the system
Selection Set filters for the
items that are
s
displayed in the grid
Viewing an Archived Report
1. In the grid, navigate to the row listing the report that is to be viewed.
2. Double-click the row.
3. The Report Browser
166
window will be displayed.
© 2007 - 2014 by Sentinel Hill Software, all rights reserved
168
Series 5 Professional Invoicing - User Help
Process Warning
The "archive" report files are stored in a sub-directory under the folder specified to be used for the company's
data files. These files are not in any type of format that can be used, other than directly from the Reports
Manager utility.
Re-Printing an "Archived" Report
1. In the grid, Navigate to the row listing the report that is to be printed.
2. Right-click the row to have a drop-down menu displayed, then click Re-Print, .... or
just click on the Re-Print button in the "Fast Button" frame. The Re-Print options
screen will be displayed.
3. Enter the reprint options. Basically you can either print the report, or save it to disk as
© 2007 - 2014 by Sentinel Hill Software, all rights reserved
Basic Processing Procedures
169
an MS Word or ASCII text file. Notice that you can also specify a range of pages that
are to be printed.
4. Click the Reprint Report push button at the bottom of the screen.
Grid Display Search options
You may search for specific records displayed in the grid using a number of relevant fields.
Click on the
Search icon.
A search string may be entered for the following fields:
Sequence #
Report Name
Grid Display Sort options
You may choose to have the items in the grid displayed using a number of sorts. These
include:
By Sequence #
By System then Report Name
By Report Name Extension, then System, then most recent date
By the date created (with the most recent ones listed first)
To change the displayed sort order:
1. Click on the heading of the column of data which is to be used for the sort. Only those
columns with a [.] can be used. The column that is currently used for the sort has [*]
displayed.
Grid Display and Purge Filters Screen
Over a period of time, your users will probably be generating a great number of "Archived"
reports. You can limit the number of items that are displayed in the grid. The same filter
fields are also available to the Purge function.
© 2007 - 2014 by Sentinel Hill Software, all rights reserved
170
Series 5 Professional Invoicing - User Help
1. Click on Selections in the "Fast Button" frame. The Archive Report selection filters
screen will be displayed.
2. Set the applicable filters
3. Click the OK push-button. The grid will be redisplayed showing only those reports
satisfying the selected filters.
Filters Screen Field Definitions
Systems
radio-buttons & drop down list
Click the All button, or the Selected button with a specific application from the drop down
list. Only those reports generated from the selected system will be listed.
Report Types
radio-buttons & drop down list
Click the All button, or the Selected button with a specific report name extension from
the drop down list. Only those reports with their report name extension matching that
© 2007 - 2014 by Sentinel Hill Software, all rights reserved
Basic Processing Procedures
171
which was selected will be listed.
Users
radio-buttons & drop down list
Click the All button, or the Selected button with a specific user from the drop down list.
Only those reports generated by the selected user will be listed.
Date Generated
radio-buttons & (mm/dd/yy) entry fields
Click the All button, or the Selected button with a date range. Only those reports
generated within the range of dates entered will be listed.
Report Name Template
X(20)
Enter a template to be used to match the report names to be listed. The "$" will match
any single character. Use the "*" character immediately before or after the ".", or as the
1st character, to match a string of characters.
Delete an "Archived" Report
1. In the grid, navigate to the row listing the report that is to be deleted.
2. Right-click the row to have a drop-down menu displayed, then click Delete, .... or just
click on the Delete button in the "Fast Button" frame.
3. A delete verification screen will be displayed. Click the Remove-It button to proceed.
4. Both the entry in the tables, and it's corresponding "Archive" file will be deleted.
Purging old "Archived" Reports
Over a period of time, your users will probably be generating a great number of "Archived"
reports. If you wish, you may delete them to reduce the overhead, make available more disk
space, or just to get rid of them.
1. Click on the Purge button in the "Fast Button" frame.
2. The Purge options screen will be displayed. (This is the same screen as used for the
Grid Display filters).
3. Click the OK push-button. The system will remove all reports satisfying the selected
filters.
© 2007 - 2014 by Sentinel Hill Software, all rights reserved
172
7.5
Series 5 Professional Invoicing - User Help
Search and Replace
In each Series 5 application, there is normally a function that provides a Search and Replace
operation on a variety of different records. (The replace phase of the function is optional).
This function is particularly useful if you need to change a code that exists within a great
number of, say for example, P/I Project master or A/R Customer master records.
The operation of the screen controls available to these Search/Replace functions are the
same for all types of records for each of the Series 5 applications for which it exists. Only
the field names for each type of record may differ.
The Search and Replace function, is accessed from the drop-down menu under the P/I
system's menu bar under Operations
© 2007 - 2014 by Sentinel Hill Software, all rights reserved
Basic Processing Procedures
173
For the Professional Invoicing system, the Search and Replace function is provided for the
following record types:
Project Master
Records
Client Master Records
Employee Master
Records
Task Master Records
WIP Charges
Process Warning
Access to this menu item should only be granted to those individuals
that know what's going on. Malicious or ignorant use of this function
could cause a great deal of grief.
Transactions
Invoice History
Records
7.5.1
Search and Replace Options Screen
For the Search and Replace function, you must 1st select the record that is to be searched.
© 2007 - 2014 by Sentinel Hill Software, all rights reserved
174
Series 5 Professional Invoicing - User Help
Once selected, the Search and Replace Options screen will be displayed. At this point you
must enter the Search options and the Replace options. This requires the operator to choose
the field to be tested, it's test value, and the field which is to have a new value assigned along
with it's new assigned value.
The Series 5 system basically breaks the Search/Replace function into three main phases.
1. Search
Phase
- Read through the chosen set of records examining the
selected search field for the test string or code that was
entered. After all records have been processed, those records
found will be displayed in the grid.
2. Preview
Phase
- You can then browse through the list if records that have been
identified as having the search field matching the given test
field.
3.
- The last phase is the Replacement pass. Note that this pass
Replacement is started only if initiated by the operator by clicking on the
Phase
Start Searching push-button.
Processing Tip
You may use the Search and Replace function, identifying a particular field to be replaced, in order to have
its' existing value displayed in the preview grid without actually having new values assigned. JUST MAKE
SURE YOU CHECK THE Preview Items Before Replacement BOX, AND CLICK ON THE Cancel BUTTON
AFTER BROWSING THE PREVIEW GRID.
Search and Replace Options Screen
The Search and Replace Options and Preview widow screen is displayed as follows:
© 2007 - 2014 by Sentinel Hill Software, all rights reserved
Basic Processing Procedures
To have a search executed on the select record, referencing this screen, you need to
perform the following steps:
1) In the Search frame, make sure the
Select radio-button has been clicked.
From the drop-down list, select the field
that is to be tested.
2) From the drop-down list, select the test
operation to be performed.
3) In the Test String field, enter the string,
or code, or value that the test field must
match in order for the record to be
"selected". If the field is for a standard
code that is defined by the system, the
binoculars icon will be displayed, and
may be used to select a particular code
that is to be test for.
© 2007 - 2014 by Sentinel Hill Software, all rights reserved
175
176
Series 5 Professional Invoicing - User Help
4) In the Replacing frame, click on the
The Contents radio-button. Note that
you may choose to select a "replacing"
field to have it's current value displayed,
but not actually proceed with the
replacement phase.
5) From the Of Field drop-down list, select
the field that is to have it's value
replaced.
6) In the field provided, enter the value to be
assigned to the selected field. If the field
is for a standard code that is defined by
the system, the binoculars icon will be
displayed, and may be used to select a
particular code that is to be assigned.
7) The Preview Items check-box should
always be checked. After the "search"
phase, if this check-box is set, then the
system will display a list of those
records that have matched the test
successfully. If this box is not checked,
and you have chosen to actually have a
field's values replaced, then the system
will just go ahead and do it without first
asking.
8) Before the replacement pass, the
records that have been selected will be
displayed in the grid. Use the standard
grid navigation buttons to view those
selected records. It's an opportunity to
verify that you have entered the correct
search values.
9) Initially, after the Search and Replacing
options have been entered, click on the
Start Searching push-button to start the
search.
10 After the selected items have been
) displayed to the grid, you may choose to
proceed and have all records found
updated, or you can select those items
that are to be updated. Click the
Replace All push-button to have all
records updated.
© 2007 - 2014 by Sentinel Hill Software, all rights reserved
Basic Processing Procedures
To select specific items, double click
each of the records' entries in the grid.
Once all items have been checked off,
then click the Start Replacing pushbutton to proceed with the "replacement"
phase.
Should you want to revise the search,
click on the Revise Search pushbutton.
11 To exit without having any records
) updated, click on the Cancel pushbutton.
© 2007 - 2014 by Sentinel Hill Software, all rights reserved
177
178
Series 5 Professional Invoicing - User Help
Sample Search/Replace Preview Screen
Here is an example of the Search screen after finding some records matching the search
criteria.
A couple of things to note:
The number of records with the Search field matches the test string is displayed at
the top of the screen.
You may Select All or Clear All by clicking the buttons to the right of the display
grid.
Double clicking a row in the grid selects that particular item to have it's Replace field
updated in the "replacement" pass
© 2007 - 2014 by Sentinel Hill Software, all rights reserved
Basic Processing Procedures
Click on the Previous/Next Selected icons
item that has already been selected
179
to position the grid to the prior/next
Once ready, click on the Start Replacing button to proceed to have those items
that have been checked processed.
To exit without having anything replaced, click the Cancel button.
7.6
User Access Management
The Series 5 system provides for User Access security at the menu item level for each
application, based on a users' sign-on code.
There are two user access records that must be established before any given user can
access the system.
Data
1. User Logon
Profile Record
Accessed From
The main menu's
System
Maintenance
drop-down menu
Comments
Each user must have a Logon Profile record
before they can be set up with any Application's
Access rights. The user's sign-on code,
password, email address, and default documents
pathname are defined. Only users with full system
Management access rights can maintain the
Logon Profile records.
2. User Application The P/I menu's
A separate Access record must be established in
Access Record Control Options each application that the user needs to execute. In
drop-down menu those Professional Invoicing systems with multiple
companies, a separate Access record must be
defined for each company. The user's default
printer and each individual menu items access
rights are defined.
Once the User Access for a user is established, they may define specific menu items to be
scheduled. That is, an icon will appear in a tabbed sub-screen in the applications menu on
the date that it has been scheduled. Refer to the section on Scheduled Menu Functions 87
under the Professional Invoicing Application Menu 80 Chapter for further information and the
topic following.
© 2007 - 2014 by Sentinel Hill Software, all rights reserved
180
Series 5 Professional Invoicing - User Help
Accessing P/I Users' Access Maintenance Function
From the P/I menu, select User Access Privileges from the Control Options dropdown menu.
Processing Tip
If your company requires strict controls as to
which individual is entitled to set up User
Access rights, then a Gate Keeper may have
been established. (See the topic on System
Control Options found in the Systems
Manager's Help for further information). If this is
the case, then the designated Gate Keeper will
be the only individual that will be able to select
the User Access Privileges maintenance
function.
7.6.1
Defining Users' Access Rights
The Users' Access Rights record holds information about the users' privileges - ie., which
menu items they can access.
P/I User Access Maintenance Tree Screen
Maintenance of the User Access properties is done in a tree structure. Following is the
screen that is displayed listing each user that has been defined with a Logon Access record.
© 2007 - 2014 by Sentinel Hill Software, all rights reserved
Basic Processing Procedures
181
"Fast Buttons"
Enable
Enable Like
Modify
Setup to give the highlighted
"Red Head" user access rights
Select a "Red Head" that is to be
enabled just like one of the
already enabled "Green Head"
user's access rights. (A drop
down list will presented listing
those users that already have
been enabled)
Modify the General Access
properties of the highlighted
"Green Head" user.
Remove
Remove all access rights of the
highlighted "Green Head" user.
Export
Generate a spreadsheet of all
users' menu access rights
showing Users in each column,
and the applications' menu items
in each row.
Characteristics of the screen to note:
Each user defined with a Logon Access record is shown. Those users with a green
head have a User Access record set up for this application. Those with red heads have
no access.
Click on the
next to the green heads to expand the tree to display the applications'
menu bar topics.
Click on the
next to the topic to expand the tree to display each of the associated
drop-down menu functions. You can easily identify the access rights by the graphic
next to the menu name.
- All users always have access
- Full access
- Restricted access
- No access
The top right pane of the screen is used to edit the properties associated to the user.
The bottom right pane of the screen is used to assign the access rights to the selected
menu item
Note that you can set the check-box to the menu item displayed in the My Favorites tab
© 2007 - 2014 by Sentinel Hill Software, all rights reserved
182
Series 5 Professional Invoicing - User Help
sub-screen of the application menu.
Expand or collapse the sub-trees of all Users with access by clicking the
icons.
Establishing Access for a User
1. First make sure that the user's User Code is visible in the tree as a
red head. If a
User Code has not been set up, this needs to be done. User Logon Profiles are defined
by your Systems Manager using the User Logon Profiles maintenance function
available from the Series 5 main menu under the System Maintenance drop down submenu. (Refer to the chapter on Defining Series 5 User Logon Profiles in the
Systems Management Help or manuals).
2. You can Enable the User using one of four methods:
I.
Double click the
red head, ..... or
II. Highlight the node of the user to be set up, and click Enable in the "Fast
Button" frame,..... or
III. Highlight the node of the user to be set up, and right-click to display the
pop-up menu. Then click on Enable This User, ..... or
IV. Highlight the node of the user to be set up, and right-click to display the
pop-up menu. Then click on Enable User Like Another
In each case, the General Access tab sub-screen on the top of the right pane of the
window will be activated.
o If the user is to have access to all menu items, set the Full-Access checkbox
o Select, if any, the Print Queue that this user is most likely to be using. This
will be displayed as the default when they generate a report.
o Click on the Add It push button
3. At this point, the user is established, but if you had not given them Full Access, you
need to set the Access Rights of each of the menu items that they are allowed to
access.
o Expand the tree of the newly added user by clicking on the
now
green head
icon next to his
o Expand the tree of each of the application's menu bar topics
o Double-click the menu item to which you want to allow access. The Access
Properties fields for the given menu item will be displayed at the bottom of
© 2007 - 2014 by Sentinel Hill Software, all rights reserved
Basic Processing Procedures
183
the right pane of the window.
o Click the applicable Access Rights radio-button
o If this menu item is to be shown in the User's Favorites sub-screen, set the
check-box
o If this menu item is to be scheduled, select the desired Re-Occurring
frequency and set an initial scheduled date
o Click the OK push button
o Repeat for the next menu item
4. This potentially could be a lot of effort to set up all your users. If you have a number of
users that will each have the same access rights, you can build the table for the 1st
user, then copy it. Perform the following steps:
o Highlight the read head of the User that you wish to enable access for
o Click on Enable Like in the "Fast Button" frame or in the pop-up menu
o Select the User Code of the currently enabled user that you want the new
user to have the same access privileges.
o Click on the Select User push button
o Keep the same access rights values, or change them as required.
o Click on the Add It push button again
o The new user is now set up with the copied user's access rights
o You may now go ahead and change any of the Access Rights of the menu
items as needed
Batch Job Execution Access
If the particular menu item has been set up to provide the option to be executed in the
Series 5 Batch Job Processor, then in order for the user to make use of this, the
appropriate access rights must be assigned. Four variations are offered:
Allowed - The user can decide when the menu item is executed, whether
or not to submit it to the Job Processor
Not Allowed - The user may not select to execute the job using the Job
Processor
Forced - When the menu item is chosen, and after any processing options
or filters are entered, the job will be automatically submitted to the Job
Processor to be executed
© 2007 - 2014 by Sentinel Hill Software, all rights reserved
184
Series 5 Professional Invoicing - User Help
Delayed - The job will be automatically submitted to the Job Processor to
be executed after 6:00 pm the same day.
Modifying Access for a User
1. Highlight the
green head of the User to modified
2. If you wish to modify the General Access properties
o Click Modify in the "Fast Button" frame, .... or right-click and click on Modify
in the pop-up-menu
o The right pane of the window will be activated
o Make the necessary changes and click the Update push-button
3. If you wish to change the Access properties of a particular menu item
o Double-click the menu item to which you want to allow access. The Access
Properties fields for the given menu item will be displayed at the bottom of
the right pane of the window.
o The Access Properties fields for the given menu item will be displayed at the
bottom of the right pane of the window
o Make the necessary changes and click the OK push-button.
4. If you wish to change the Access properties of a particular menu item in a slightly more
elegant manner
© 2007 - 2014 by Sentinel Hill Software, all rights reserved
Basic Processing Procedures
185
o Highlight the menu item of interest, and right-click to display the pop-up
menu.
o You can either give full access, or remove access totally, depending on the
already assigned access
o Make the necessary changes and click the OK push-button.
Removing Access for a User
1. Highlight the
green head of the User to removed.
2. Click Remove in the "Fast Button" frame, .... or right-click and click on Remove in the
pop-up-menu:
3. Click the Yes push-button in the prompt.
General Access tab sub-screen Field Definitions
Full Access to All Menu Selections
check-box
For the user if checked, then he/she will have full access to all menu items.
Default Print Queue
X(20)
Select the Series 5 Printer Queue that this user would typically by using. When any of
the reporting functions are executed, this printer will be displayed as the default. Print
Queues are defined by a System Maintenance function. (Refer to the Systems
Management Help if required).
Batch Execution - Default Queue
drop down list
Jobs submitted by this user to the Series 5 Batch Job Processor will use the selected
Queue
Batch Execution - Priority
radio-buttons
Jobs submitted by this user to the Series 5 Batch Job Processor will have the selected
priority
© 2007 - 2014 by Sentinel Hill Software, all rights reserved
186
Series 5 Professional Invoicing - User Help
Menu Item Access Property sub-screen Field Definitions
Access Rights
radio-buttons
Click Full, Semi-Restricted, Restricted, or None. Those menu items that offer SemiRestricted or Restricted as options generally have multiple functions, some of which will
not be granted to the user.
Show in the 'Favorites' Tab
Menu
check-box
If checked, the corresponding menu item will be displayed as a push-button on the
Professional Invoicing application's menu on the My Favorites tabbed sub-screen.
Scheduled Function - ReOccurring
drop down list
To set up this menu item to be
scheduled, select a frequency,
other than "No". The
corresponding menu item will be
displayed as a push-button in either
the Scheduled for Today, Overdue
Function or Coming Due tabbed
sub-screen on the Professional
Invoicing application's menu.
Scheduled Function - Next
Scheduled For
(mm/dd/yy)
Enter the date and time at which this particular scheduled function is to be executed.
7.6.2
Users Scheduled Menu Functions
Users may choose to select specific menu items to appear on the Favorites or Scheduled
sub-screens when the Professional Invoicing menu is displayed. (Refer to the Scheduled
Menu Functions topic in the chapter on The Basic User Interface for a description of these
menu sub-screens).
My Scheduled Menu Items Screen
Users set up the scheduled functions in a tree structure. Following is the screen that is
© 2007 - 2014 by Sentinel Hill Software, all rights reserved
Basic Processing Procedures
187
displayed listing each menu-set and sub-functions.
Characteristics of the screen to note:
Click on the
next to each of the primary menu
topics to expand the tree to display each of the
associated drop-down menu functions. Only those
items with the
icon can be scheduled.
The right pane of the screen is used to edit the
properties associated to the scheduled item.
Note that you can set the check-box to the menu item
displayed in the My Favorites tab sub-screen of the
application menu.
Expand or collapse the sub-trees of all Users with
access by clicking the
icons
Defining a Scheduled Menu Item
1. When the screen is displayed, click on the green "Plus-sign" of the
expand the tree structure to show each menu item.
icons to
2. Double-click the clock icon next to the menu item to be scheduled. The right pane of the
window will be activated.
o If this menu item is to be shown in the User's Favorites sub-screen, set the
check-box
o Select the desired Re-Occurring frequency and set an initial scheduled date
o Click the OK push button
o Repeat for the next menu item
3. The menu item will appear on the applicable Professional Invoicing tabbed sub-screen
when next refreshed displayed.
© 2007 - 2014 by Sentinel Hill Software, all rights reserved
188
Series 5 Professional Invoicing - User Help
Menu Item Access Property sub-screen Field Definitions
Show in the 'Favorites' Tab
Menu
check-box
If checked, the corresponding menu item will be displayed as a push-button on the
Professional Invoicing application's menu on the My Favorites tabbed sub-screen.
Scheduled Function - ReOccurring
drop down list
To set up this menu item to be
scheduled, select a frequency,
other than "No". The
corresponding menu item will be
displayed as a push-button in either
the Scheduled for Today, Overdue
Function or Coming Due tabbed
sub-screen on the Professional
Invoicing application's menu.
Scheduled Function - Next
Scheduled For
(mm/dd/yy)
Enter the date and time at which this particular scheduled function is to be executed.
© 2007 - 2014 by Sentinel Hill Software, all rights reserved
Basic Processing Procedures
7.7
189
Wizard Management
Each of the Series 5 system provides for the opportunity to define a number of Wizards. A
wizard is a program that automatically performs a series of steps. Each step is a menu item
that is associated to the application.
Basic properties and features of a Wizard:
Wizards are user defined
Define up to 20 Wizards for each application
Each Wizard can be created with up to 10 menu functions
Wizards can be launched from the applications' menu
As Wizards are executed, each step is displayed on the screen and it can be
aborted at any time
Accessing the P/I Wizard Functions
From the P/I menu, click on Wizards to display the drop-down menu. Select Wizard
Manager to maintain your Wizards, or if any are defined, click to launch.
Processing Tip
If in a given application there are a series of
menu items that are always performed, a
Wizard may be created that will automatically
launch each of these steps.
© 2007 - 2014 by Sentinel Hill Software, all rights reserved
190
7.7.1
Series 5 Professional Invoicing - User Help
Maintaining Your Wizards
Wizard Manager Grid Screen
Maintenance of the Wizards is done with a Series 5 grid screen.
"Fast Buttons"
New Add a new Wizard
Modify Modify the Wizard
highlighted in the grid
Delete Delete the Wizard
highlighted in the grid
Building a New Wizard
Setting up a Wizard consists of two basic parts. First, enter it's properties, then secondly,
define each of the application's menu items that are to be executed by the wizard.
© 2007 - 2014 by Sentinel Hill Software, all rights reserved
Basic Processing Procedures
191
1. In the grid, click on the New button in the "Fast Button" frame.
2. The Properties screen will be displayed.
3. Enter a Wizard #, description, and any instructions to be displayed when it executes.
4. Click the Next > button at the bottom of the screen to proceed to the next tabbed subscreen to define each step to be performed.
5. The Processing Steps grid screen will be displayed.
6. Click the New button to display a screen listing each of the possible menu items that
can be used by the Wizard.
7. Select the item from the list and click the OK button. Each item selected will be
displayed in the Processing Steps grid.
Modify an existing Wizard
1. In the grid, navigate to the row displaying the wizard that is to be modified.
2. Double-click the row, .... or right-click the row to have a drop-down menu displayed,
then click Modify, .... or click on the Modify button in the "Fast Button" frame.
3. The Wizard Properties sub-screen is displayed with two tabbed sub-screens. Make
the necessary changes to either sub-screens, and click the Update button to proceed.
Delete an existing Wizard
1. In the grid, navigate to the row displaying the wizard that is to be modified.
2. Double-click the row, .... or right-click the row to have a drop-down menu displayed,
then click Modify, .... or click on the Modify button in the "Fast Button" frame.
3. The Wizard Properties sub-screen is displayed with two tabbed sub-screens. Make
the necessary changes to either sub-screens, and click the Update button to proceed.
Wizard Properties tab Screen
The Properties screen displays those fields used to identify it, and displayed when used.
© 2007 - 2014 by Sentinel Hill Software, all rights reserved
192
Series 5 Professional Invoicing - User Help
Wizard Properties Screen Field Definitions
Wizard #
9(2)
This is a unique # used to identify the wizard.
Menu Bar Description
X(25)
This is the description that will be displayed on the applications menu.
Title
X(70)
This is a title that is displayed on the Wizard's execution screen.
Launch Instructions
4 lines of X(90)
These instructions are displayed on the Wizard's execution screen
© 2007 - 2014 by Sentinel Hill Software, all rights reserved
Basic Processing Procedures
Background Execution
193
check-box
Set to determine whether or not the Wizard can be executed in the Series 5 Background
processor. (The feature associated to this field has not yet been implemented).
Confirmation Email
check-box and X(40)
Set to have an email sent when the wizard is finished processing. (The feature
associated to these fields has not yet been implemented).
Wizard Processing Steps tab Screens
The Processing Steps screen is a grid that displays each of the the menu items that are
executed by the Wizard.
"Fast Buttons"
New
Add a new Process
Step
Modify Modify the Process Step
highlighted in the grid
Remove Delete the Process Step
highlighted in the grid
Move Up Shift the highlighted
Process Step up 1 row in
the grid
Move Shift the highlighted
Down Process Step down 1
row in the grid
.
The following functions are provided for using the push-buttons:
New
- To add a new step to the table
Modify
- To change the currently selected grid item
Remove
- To delete the currently selected grid item
© 2007 - 2014 by Sentinel Hill Software, all rights reserved
194
Series 5 Professional Invoicing - User Help
Move Up
- To move the currently selected grid item up in the table
Move Down - To move the currently selected grid item down in the table
The following screen is provided for selection of each step. The items listed are those P/I
system menu items that have been configured to be executed using the Wizard.
Wizard Steps Screen Field Definitions
Menu Item
list-box
The list is made up of those menu items that may be selected as a step by the Wizard.
Title
X(40)
This is the title of the processing step. This field defaults to the name used in the
applications' menu. It may be changed.
Grid Display Search Options
You may search for specific records displayed in the grid using a number of relevant fields.
© 2007 - 2014 by Sentinel Hill Software, all rights reserved
Basic Processing Procedures
Click on the
Search icon.
A search string may be entered for the following fields:
Title
Wizard ID #
7.7.2
Wizard Execution Screen
When a Wizard is launched from a given applications' menu, the following screen is
displayed.
© 2007 - 2014 by Sentinel Hill Software, all rights reserved
195
196
Series 5 Professional Invoicing - User Help
Click on the Launch this Wizard push-button to have it started. As each step is executed it's
status is displayed in the table.
© 2007 - 2014 by Sentinel Hill Software, all rights reserved
Basic Processing Procedures
197
As each step is finished, you must click on the Proceed with the Next Step button, or you
can abandon the Wizard by clicking on the Cancel push-button.
7.8
Monitor System Usage
TheSeries 5 keeps track of which users are currently logged into the system, and what menu
function they are executing.
This screen may be displayed by selecting Monitor System Usage from the drop-down menu
under any applications' menu bar that contains Help as a topic.
© 2007 - 2014 by Sentinel Hill Software, all rights reserved
198
Series 5 Professional Invoicing - User Help
The following is an example of the Monitor display screen:
Processing Tip
Should you discover that there are items listed, but you know
that there are no users in the system, ask your Systems
Manager to purges these records. (There is a System
Maintenance function that will delete all the records used in
displaying the items on this screen).
© 2007 - 2014 by Sentinel Hill Software, all rights reserved
Part
VIII
200
8
Series 5 Professional Invoicing - User Help
Your Business and Professional Invoicing
Enter topic text here.
8.1
Managing the Professional Invoicing
Enter topic text here.
8.1.1
How Do I ...
Enter topic text here.
8.2
Getting Data into P/I
Enter topic text here.
8.2.1
How do I ...
Enter topic text here.
© 2007 - 2014 by Sentinel Hill Software, all rights reserved
Part
IX
202
9
Series 5 Professional Invoicing - User Help
Professional Invoicing Menu Functions
All functions for the P/I system can be accessed from the menu bar at the top of the menu
screen.
They are divided into types of functions. Each section following describes each set of
common types of functions.
9.1
The P/I Menu
The Professional Invoicing Menu screen provides your access to all functions offered in the P/
I system.
Professional Invoicing Main Menu
All functions associated to the Series 5 Professional
Invoicing system are available from this screen
Each function can be found within the sub-menu
displayed under the menu-bar associated to the type
of the function
A number of tab sub-screens are available from
which associated functions may be selected
If menu functions have been set up to be scheduled,
they may appear within tabbed sub-screens labeled
Scheduled for Today, Overdue Functions, or
Coming Due
The My Favorites tab sub-screen will have any
menu-functions that have been so define by the User
Access Privileges function that may have been set up
by your Systems Manager or Gate Keeper
You can select up to 9 menu item functions at a time,
each executing in their own window
Access to specific menu items may be granted or
denied from the User Access privileges function.
(Those functions that you are denied access to
will be displayed in the drop-down menus as
dimmed items)
© 2007 - 2014 by Sentinel Hill Software, all rights reserved
Professional Invoicing Menu Functions
203
Menu Bar Headings
The menu bar is divided into major categories of functions. (Follow the link in each item below
for further information on each function).
File
For accessing the Archived Reports Manager, and the Batch Job
Processor utilities.
Trx Inquiry
For those functions that provide inquiry to assorted historic transactions
and/or analysis.
210
Operations
For those menu items that provide basic operational functions.
262
Reports
471
Codes
Maintenance
For generating all the reports associated to the Professional Invoicing
system.
Those menu items for maintaining the assorted master codes used in
the Professional Invoicing system.
532
Purging
690
Wizards
189
For user defined Wizards.
User
Functions
For menu items to launch user defined programs or Windows utilities.
(Refer to the Systems Management Help for details on setting up)
Control
Options
692
For setting up control preferences and User Access rights to the
Professional Invoicing system.
Window
84
Help
9.2
Those menu items for Purging outdated historical transaction records
used in the Professional Invoicing system.
For managing the multi-threaded windows that might have been
activated by the user.
Basic help, and a function to display those users currently in the Series
5 system.
P/I E-Billing Menu
A sub-set to the standard Professional Invoicing Menu is the P/I E-Billing Menu. This is a
specialized menu offering a subset of the functions found in the P/I Menu. The initial screen
displayed offers options to select which type of EDI, (Electronic Data Interchange), data types
are to be generated, and automatically launches the "E-Billing Wizard" function. Other
pertinent functions may be selected from the Menu Bar
© 2007 - 2014 by Sentinel Hill Software, all rights reserved
204
Series 5 Professional Invoicing - User Help
P/I E-Billing Interface Menu
All functions associated to the Series 5 E-Billing
system are available from this screen
Each function can be found within the sub-menu
displayed under the menu-bar associated to the type
of the function
The E-Billing Wizard may be launched directly after
selecting the type of EDI file to be generated
You can select up to 9 menu item functions at a time,
each executing in their own window
Access to specific menu items may be granted or
denied from the User Access privileges function.
(Those functions that you are denied access to
will be displayed in the drop-down menus as
dimmed items)
9.3
File Management
The topics in this chapter describe functions and procedures that are a available under the
File drop down menu on the Professional Invoicing menu. These menu items are used to
perform assorted File Processing type functions. In particular, the function to access and
view Archived Reports is found here.
These functions are available from the P/I Menu Bar as shown:
© 2007 - 2014 by Sentinel Hill Software, all rights reserved
Professional Invoicing Menu Functions
9.3.1
205
Archive Historic Data
Depending on the volume of charges being processed, and the number of invoices that are
produced from the Professional Invoicing system, a number of the data files may grow to an
unruly size. To process very large files, the system requires a fair amount of overhead in the
number of disk reads made. This function attempts to address this problem by copying the
data records from those significant production files that tend to grow large, to Archived
equivalent files.
Records are moved based on a specified cut-off date that is used to select those invoices.
For each Invoice, the following related data records are moved to their respective "Archived"
equivalent files:
Invoice Header record
Invoice Line Item records
Work-in-Progress History records
Disbursement History records
Recap Detail records
Archived Invoice History Inquiry
Both the normal Invoice History, and the Archived Invoice History records may be inquired upon from
the Invoice History Inquiry function 235 . (From that functions View drop down menu, you may choose
to view either the normal Invoice History records, or the Archived records).
Accessing the Archive Historic Data function
From the P/I Main menu, select Archive Historic Data from the File drop-down menu.
© 2007 - 2014 by Sentinel Hill Software, all rights reserved
206
Series 5 Professional Invoicing - User Help
Archive Historic Data - Options Screen
The following screen is presented to enter the cut-off date, and to display statistical
information:
© 2007 - 2014 by Sentinel Hill Software, all rights reserved
Professional Invoicing Menu Functions
207
Archive Historic Data Screen - Field Definitions
Clear Cutoff Date
radio-buttons and (mmddyy)
You may choose to specify the cutoff date in two modes. Either by choosing to have
items older that a specified number of months archived; or to keep all items since a
specified date. (Is the glass half empty or half full ? ). Click your preference.
Next Scheduled Date
(mmddyy)
This field is for information purposes only. It is reserved for use in a future enhancement.
PROCEED
X(7)
Enter the word PROCEED to continue with this function.
9.3.2
Clear All Credit Card Numbers
This Professional Invoicing function is used to clear those data fields from assorted data files
that would be considered sensitive. In particular, Credit Card Numbers that have been
recorded for all prepaid invoices entered into the P/I system will be cleared.
Also, as an option, the P/I Credit Card to Bill-Code mapping file records card number fields
are also cleared. This is provided so that if this file is copied into a test environment, real card
numbers would not be available.
Some points to note when having Credit Card Numbers cleared:
When a Credit Card field is cleared, it is assigned the number 1111-1111-11111111.
The Credit Card Expiry date is set to 12/06
The function to clear the Credit Card Numbers for historic and archived invoice files,
should be executed at least every 6 months setting the cut-off date so that only the
last 6 months of card #s are available. (Note that in the P/I Invoice Inquiry functions,
only the last 4 digits of the card number are displayed. Also, when credit card
numbers are stored, they are encrypted).
© 2007 - 2014 by Sentinel Hill Software, all rights reserved
208
Series 5 Professional Invoicing - User Help
Caution
The Bill-Code Credit Card Mapping file, and the Invoices file should ONLY have their credit cards
cleared if these files have been copied to a test environment. These files, and the credit card
numbers contained within, are critical in the production of invoices that have been pre-paid.
Accessing the Clear Credit Card Numbers function
From the P/I Main menu, select Clear All Credit Card Numbers from the File dropdown menu.
The following verification to proceed screen will be displayed. Type the word PROCEED
in the field provided.
© 2007 - 2014 by Sentinel Hill Software, all rights reserved
Professional Invoicing Menu Functions
209
Clear Credit Card Numbers - Options Screen
The following screen is presented to enter the cut-off date, and to indicate which files are to
be processed:
Clear Credit Card Number Screen - Field Definitions
Clear Cutoff Date
(mmddyy)
For the Invoice History records, specify the cutoff date. All invoices that were prepaid with
a credit card, dated on or before the date entered, will have their credit card number fields
cleared. (The cutoff date does not apply to the Bill Code Credit Card Mappings file).
Select Files for Clearing:
check-boxes
Set the check box for each of the files that are to be processed to have their credit card
numbers cleared. By default, only the historic Invoice files are pre-checked. (You would
not normally want to clear the active Invoices file, or to the Bill-Code Mapping file because
for production purposes, their credit card fields are required for invoicing).
File
Bill Code Credit Card
Mappings
Fields Cleared
Credit Card numbers are set to 1111-1111-11111111
Expiry dates are set to 12/06
© 2007 - 2014 by Sentinel Hill Software, all rights reserved
210
Series 5 Professional Invoicing - User Help
Card holder name and address are set to
Joe Smith
1234 Main Street
Happyville, QQ, 123456
9.4
Invoices
Credit Card numbers are set to 1111-1111-11111111
Expiry dates are set to 12/06
Historic Invoices
Credit Card numbers are set to 1111-1111-11111111
Expiry dates are set to 12/06
Archived Historic Invoices
Credit Card numbers are set to 1111-1111-11111111
Expiry dates are set to 12/06
Inquiry Functions
The topics in this chapter describe functions and procedures that are a available under the
Trx Inquiry Options drop down menu on the Professional Invoicing menu. These
menu items are used to perform assorted screen inquiry functions. In particular, the function
to query the Work-In-Progress Items and Invoice History records for your Projects are found
here.
These functions are available from the P/I Menu Bar as shown:
© 2007 - 2014 by Sentinel Hill Software, all rights reserved
Professional Invoicing Menu Functions
9.4.1
211
Project Dashboard Inquiry
The PI system records all WIP activity and generates Invoices for each project defined in the
system. As well, Employees may be assigned to a Project; there may be Budgets set up;
and there certainly is history to be kept.
The Project Dashboard Inquiry function provides the means to displaying most, if not all,
information about each Project in one place. A Windows tree structure is employed where
Projects my be presented either by Code or Description; or they may be shown grouped as
offspring nodes to Customer, Project Leader, Project Partner, Location, or Invoice Layout
parent nodes. When a given Project in the left hand pane tree is selected, all relevant data is
displayed in the right pane of the screen.
For each project, different types of data are displayed presented in separate tabbed subscreens. These include the following:
Properties – a summary of significant properties associated to the Project
Assigned Employees – displays a list of Employees that have been assigned to the
Project
Budgets – if used, lists each Budget period, and amounts
Employee Totals – sub-totals of WIP activity, costs, and profit by Employee
Task Totals – sub-totals of WIP activity, costs, and profit by Task
Disbursement Totals – sub-totals of WIP activity, costs, and profit by Disbursement
Sub-Contractors – sub-totals of Disbursements recorded to Sub-Contractors
Purchases – sub-totals of Disbursements recorded as Purchases
Inventory Issued – sub-totals of Disbursements recorded as items pulled from Inventory
Invoice History – a list of Invoices and their totals
© 2007 - 2014 by Sentinel Hill Software, all rights reserved
212
Series 5 Professional Invoicing - User Help
The Project Dashboard is launched from the P/I Menu's Trx Inquiry drop-down menu by
selecting either the Project Dashboard Inquiry.
Project Dashboard Inquiry Tree
Characteristics of the Tree screen to note:
Project nodes in the tree are shown with a green circle -© 2007 - 2014 by Sentinel Hill Software, all rights reserved
Professional Invoicing Menu Functions
Click on the
Projects.
213
next to a group icon to expand the tree to display the associated
The top right pane of the screen is used to display properties of the code under which
Projects are grouped.
The bottom right pane holds the tabbed sub-screens of information, associated to each
project, that is available for display
When the tree has been expanded, click on the
or next top-level group code.
icons to position to the prior,
Expand or collapse the sub-trees of all Projects by clicking the
icons.
You may increase or decrease the size of the tree screen window by clicking on the
bottom of the window, and dragging it up or down
Some of the special features of this "Inquiry" tree are as follows:
Select how Projects are
presented in the tree from the
"View" drop-down list. Projects
may be listed as the primary
nodes, either by Project Code or
Description or, they may be
shown as the secondary nodes
of the tree, grouped by
Customers, Project Leaders,
Project Partners, Locations or by
Invoice Layouts.
Should you wish to display the
information associated to a
specific Project, enter the
Project code in the "Find Project"
field, (or invoke the Lookup
function and select the Project).
The system will search tree, and
refresh it with the Project node
shown at the bottom of the tree
panel.
On the right pane of the window,
you may set a date range to be
used as filters that are applied
when having the Invoice History,
Employee Totals and Task
© 2007 - 2014 by Sentinel Hill Software, all rights reserved
214
Series 5 Professional Invoicing - User Help
Totals tabbed sub-screens
displayed.
Project Tab Sub-Screens
Following are examples of each of the Project tabbed sub-screens that may be displayed:
© 2007 - 2014 by Sentinel Hill Software, all rights reserved
Professional Invoicing Menu Functions
9.4.2
215
Project Inquiry
Once Project WIP and Disbursement charges are entered into the system, they are kept in
the system, and available for a variety of different functions. These would include being
invoiced, used for analysis, printed to a report, written-off, archived or even adjusted. This
Inquiry function provides access to all Work-in-Progress and Disbursement items that have
been recorded against a given project, both chargeable and non-chargeable items,
(chargeable being those that are invoiced).
The Project Inquiry function provides a means of displaying either WIP or Disbursements that
have been recorded to a given Project. In either case, a number of different filters may be set
to limit the items displayed. The operator can easily select and display the detail for any
particular item, and perform a number of different functions on them. These include the
following functions:
Inquiry – All the details associated to the item, may be viewed
Amending – any given WIP item that has not already been invoiced, may have any of it's
properties amended
Apply Credit – any given invoiced WIP item may be marked as being associated to a
Credit that might have been issued
Some of the features of the Inquiry function are as follows:
In the grid display, WIP or Disbursement items for a selected Project may be listed
sorted by Date, Status or Invoice Number.
In the grid display, WIP items may be listed for a selected Project, or regardless of
Project, by Employee or by Task.
A function is provided that will generate a brief report listing all the WIP items for the
selected Project.
A function is provided that will generate a WIP Items report, which is basically the
WIP Detail Report 477 .
© 2007 - 2014 by Sentinel Hill Software, all rights reserved
216
Series 5 Professional Invoicing - User Help
The Project Inquiry function is launched from the P/I Menu's Trx Inquiry drop-down menu by
selecting either the Work In Progress Inquiry or Disbursement Inquiry.
9.4.2.1
Work-in-Progress (WIP) Inquiry
The WIP Inquiry function provides the means of displaying the Work-in-Progress items that
have been entered for a given Project, by a given Employee, or that have been recorded with
a given Task. For any WIP item displayed, you may "drill-down" to display the detail
information associated to that item. WIP items are displayed to the screen managed using a
Series 5 grid processing screen. You can easily navigate through the items on file using the
grid buttons, or enter the respective key for the desired transaction. WIP items may be
displayed to the grid sorted using a variety of different criteria.
From the "Fast Buttons" frame, push buttons are provided that can be used to compute and
display Print items associated to the selected Project, generate the WIP Detail Report or Set
Display Filters.
© 2007 - 2014 by Sentinel Hill Software, all rights reserved
Professional Invoicing Menu Functions
217
Project WIP Inquiry Grid
"Fast Buttons"
Print Grid Items
To have all WIP items for the selected
Project output to a report.
Print WIP Items Report
To have the WIP Detail Report 477 generated
listing selected WIP for selected Projects.
Set Filters
To have a number of different filters set to
limit the WIP items that are displayed to the
grid.
When selected, the operator is presented
with the standard WIP Select Filters 147
screen, the Project Select Filters 142 screen
and the Customer Select Filters 151 screen.
These allow you to specify selected or
ranges of WIP Items, Projects, Project
Locations, Project Departments,
Customers, Customer Types, Sales
Representatives, and/or only those
© 2007 - 2014 by Sentinel Hill Software, all rights reserved
218
Series 5 Professional Invoicing - User Help
customers and/or projects satisfying a
variety of filter criteria.
Some of the special features of this "Inquiry" grid are as follows:
WIP Items may be listed either
for a selected Project,
Employee or Task by a number
of different criteria.
If listing for a particular Project,
Task or Employee, they may be
chosen either by entering their
assigned code, choosing it
using the Lookup binoculars
icon, or by having the next or
previous code displayed that
has items on file. (Click the
binocular icon with the up/down
arrow to display WIP items that
exist for the prior/next
occurrence of that code on file).
Depending on the List By
selection, a field will be
presented, in which the operator
may enter a value for the
applicable key of the items of
interest to be displayed. The
system will attempt to read to
the closest order for the data
entered and display it in the grid.
For the selected Project, Task or Employee, totals are displayed below the grid
display.
Once a Project is selected, you
may switch to display either
WIP items or Disbursement
items by clicking on the
© 2007 - 2014 by Sentinel Hill Software, all rights reserved
Professional Invoicing Menu Functions
219
applicable tab.
Within the grid, right-click a row
to have a pop-up menu
displayed offering available
functions that may be
performed on the associated
WIP item.
The column with the heading C-T-S displays a number of different codes.
o The 1st letter indicates whether the WIP item is Chargeable or Non-Chargeable
o The 2nd letter indicates Type of WIP item.
o The 3rd letter indicates the Status of the WIP item.
For a description of what each letter represents, refer to the chapter titled P/I Status
and Type Codes 61 found in the Setup and Implementation section.
Show WIP Detail Screen
When a given row in the grid is double-clicked, the detail information for the WIP item is
displayed in the following screen:
© 2007 - 2014 by Sentinel Hill Software, all rights reserved
220
Series 5 Professional Invoicing - User Help
The Next or Previous WIP item on file may be displayed by clicking the Page Forward/
Backward icons,
9.4.2.2
or striking the Page Down or Page Up keys,
WIP Adjustments
Some times you just don’t get it right the first time. You’re in a hurry and you record the wrong
Task Code or the wrong Project for work that has been performed and your secretary bangs
in the times charges before you know it. For just these particular instances, the WIP
Adjustment function comes to your rescue.
You can select a WIP item and change the Project Code, the Employee Code, the Task Code
© 2007 - 2014 by Sentinel Hill Software, all rights reserved
Professional Invoicing Menu Functions
221
and even the # of Units and the Rate. For any change made, the system will automatically
make any correcting adjustments for G/L revenue distributions that should be generated. If
any of the Project, or Employee or Task codes are changed, the system automatically looks
up and reassigns the Charge Rate and the Revenue Account for the WIP item.
Only items that have not yet been invoiced are eligible to be adjusted. WIP items created
from the Generalized WIP Entry application are not adjusted.
To adjust a particular WIP item displayed within the grid, right-click it's associated row. From
the displayed pop-up menu, click offering available functions that may be performed on the
associated WIP item.
Project WIP Adjustment Screen
The following screen is displayed:
© 2007 - 2014 by Sentinel Hill Software, all rights reserved
222
Series 5 Professional Invoicing - User Help
WIP Adjustments Edit Screen - Field Definitions
Project
X(6)
Enter the Project Code for which the WIP item is to be associated with. The Customer
will be automatically assigned, and it's information displayed.
Employee
X(6)
Enter the Employee Code for which the WIP item is to be associated with.
Task
X(8)
Enter the Task Code which would be used to describe the activity associated to the
activity performed by the employee.
Transaction Date
(mmddyy)
This is the actual date which the activity associated to the WIP item was performed on.
Ledger Date
(mmddyy)
For WIP activity entered that will generate either Revenue or Costing G/L distributions,
they will be recorded in the General Ledger system with the Ledger Date that is entered.
(This date is used to determine which G/L Fiscal Period the Revenue or Cost will
be recorded to).
# of Units
99,999.99-
Enter the number of hours, or times that the selected Task was performed.
Negative # of Units for Recording Credit Amounts
If you need to reverse a previous charge, or record a credit amount that is to be shown on this
Project's invoice, enter a negative number of units. (WIP Rates must always be positive).
Rate
$ 999,999.99
This is the Unit Rate used to compute the extended charge associated to the WIP item.
This is normally always computed by the system, however it may be overridden.
© 2007 - 2014 by Sentinel Hill Software, all rights reserved
Professional Invoicing Menu Functions
223
System Assigned Unit Rates
The Professional Invoicing system, based on the Project, Task and Employee will always want to
automatically determine the Unit Rate based on established rates and rules that have been set up.
You normally should never have to enter the Charge Rate, the Cost Rate, or the Revenue Account.
If the system computed rate would change as a result of a different Project, Employee or Task being
entered, then you will be prompted as to whether or not it should be assigned.
The unit rate may be set manually if so required.
Extended Amount
$ 9,999,999.99-
This is the Extended dollar amount associated to the WIP item. For Chargeable WIP
items, this is the amount that will be invoiced to the customer. This amount is always
computed from the # of Units and the Unit Rate. If this amount is overridden, then the Unit
Rate is adjusted accordingly.
The system has the option of automatically generating an Overhead Amount. If this is the
case, and then if the Extended Amount is revised, then the system will compute a new
Overhead Amount.
Overhead Amount
$ 999,999.99-
The system has the option of automatically generating an Overhead Amount. If this is the
case, then when a new Extended Amount is computed, an Overhead Amount is also
computed. (Overhead amounts are computed only if the option is defined for the
Project, and the Project is a "Chargeable" Project).
Chargeable / Non-Chargeable Item
radio-buttons
WIP items are recorded as Chargeable or Non-Chargeable. Chargeable items are
invoiced to the Projects' customers. WIP items will be automatically recorded either way
based on whether the Project is defined as a Chargeable or Non-Chargeable one; and
whether the Task is defined as a Chargeable or Non-Chargeable one.
Description
X(50)
This field is used to record a brief description of the activity performed. For Projects
using specific Invoice Layouts, this field may be used to sort items printed on invoices.
Reference 1 and 2
X(40)
These fields are used to record codes relating to sub-contracts, job numbers, billing
codes, contact names, etc., or to record more verbiage describing the WIP activity. For
Projects using specific Invoice Layouts, and/or that generate EDI invoices, segments of
these fields may be used to determine how items are grouped or sorted for invoicing.
© 2007 - 2014 by Sentinel Hill Software, all rights reserved
224
Series 5 Professional Invoicing - User Help
Task Description Override
X(60)
This field is used to provide an opportunity to override the description that is associated to
the Task. For a particular Invoice Layout, detail is listed with the description derived from
the Task Code. If a description is entered in this field, then this text is printed on the
invoice instead. For WIP recorded not using the mentioned Invoice Group, it may be
used to record further description associated to the activity.
Promotional/Discounted Savings
Amount
$ 9,999,999.99-
This information field is used to record the amount of savings that the customer
appreciated as a result of a discounted or promotional charge rate associated to the
service. The Rate provided is the discounted rate. On selected types of invoices, the
total of these Savings Amount are accumulated and printed in the footer of the invoice.
(No G/L Distributions are generated as a result of any amount entered to this field).
Type "C" Invoice Layout Grouping
drop-down list
When invoices are generated for a Project, the P/I system provides for a number of
different sorting and grouping options. Invoice Layouts are created and assigned to every
Project. For Projects that have a Type "C" Invoice Layout, these radio-buttons are offered
so a Group and/or Consolidation code may be recorded with their associated WIP items.
WIP charges may be recorded into the P/I system with a Consolidation Flag. This is a 1
character field that can take a value of D, F, or a number from 1, .... 9. Depending on the
options specified, all WIP charges may be grouped and sub-totalled by their
Consolidation Flag. All WIP having the same Consolidation Flag are grouped together.
As an additional option, the WIP within each Group will be sorted by the WIP Reference
field. In some cases, the Reference field holds an individuals's name, or a Billing-Code.
All charges with the same Reference field would be sub-totalled and printed as one line
on the invoice.
No consolidation is performed. Each WIP
charge is printed in detail
Sum items within a Group printed All the charges with the same Consolidation Flag
are sub-totalled and printed as one line.
as a total
WIP for a Group are sub-totalled by All the charges with the same Consolidation Flag
are sub-totalled by their WIP Reference field. An
Reference
additional sub-total is printed for each
Consolidation Group.
Sub-Total by Reference Bill-Code All the charges with the same Bill-Code, that is
determined from the WIP's Reference field, are
sub-totalled and printed. When selected, you
must also specify which portion of the Reference
field is to be used as the Bill-Code. (The
Consolidation Flag is not used in this case).
None
© 2007 - 2014 by Sentinel Hill Software, all rights reserved
Professional Invoicing Menu Functions
225
Consolidation Flags in the Configuration File
Using type B or C Invoice Layouts with Consolidation Flags requires the definition of up to 9
variables in the runtimes Configuration file. Each variable is associated to the 9 numeric values that
the Consolidation Flag may take. The variable is defined as follows:
PI-INV-DESCn <flag> <description text>
where:
n is the value 1 - 9;
<flag> will be either an A or a B indicating the Generation Type rule to be used, (or ignored for
the B layouts);
<description text> will be printed as the description on the invoice for the consolidated total
of all items flagged with n.
WIP Revenue Account
9(18) - 9(5)
This is the G/L Revenue Account that is used to record the revenue in the General Ledger
system. This is normally always computed by the system, however it may be overridden.
9.4.2.3
Disbursements Inquiry
The Disbursements Inquiry function provides the means of displaying the extra charge items
that have been entered for a given Project. These include purchases from suppliers, subcontracted services, and inventory items that were pulled from inventory. For any item
displayed, you may "drill-down" to display the detail information associated to that item.
Disbursement items are displayed to the screen managed using a Series 5 grid processing
screen. You can easily navigate through the items on file using the grid buttons, or enter the
respective key for the desired transaction. Disbursement items may be displayed to the grid
sorted by date, Disbursement Code, or Invoice Number.
From the "Fast Buttons" frame, push buttons are provided that can be used to compute and
display Print items associated to the selected Project, Set Display Filters, or Purge Historic
records.
© 2007 - 2014 by Sentinel Hill Software, all rights reserved
226
Series 5 Professional Invoicing - User Help
Project Disbursement Inquiry Grid
"Fast Buttons"
Print Grid Items
Set Filters
To have all Disbursement items for the
selected Project output to a report.
To have a number of different filters set to
limit the Disbursement items that are
displayed to the grid.
Purge History
Some of the special features of this "Inquiry" grid are as follows:
Disbursement Items are listed
for a selected Project. These
may may be listed sorted by
Date, Disbursement Code, or
by the Invoice Number charged
to the Project's Customer.
The Project to list items for may
© 2007 - 2014 by Sentinel Hill Software, all rights reserved
Professional Invoicing Menu Functions
be chosen either by entering
their assigned code, choosing it
using the Lookup binoculars
icon, or by having the next or
previous code displayed that
has items on file. (Click the
binocular icon with the up/down
arrow to display Disbursement
items that exist for the prior/
next occurrence of that code on
file).
Depending on the List By
selection, a field will be
presented, in which the operator
may enter a value for the
applicable key of the items of
interest to be displayed. The
system will attempt to read to
the closest order for the data
entered and display it in the grid.
For the selected Project, Task or Employee, totals are displayed below the grid
display.
Once a Project is selected, you
may switch to display either
Disbursement items or
Disbursement items by clicking
on the applicable tab.
Within the grid, right-click a row
to have a pop-up menu
displayed offering available
functions that may be
performed on the associated
Disbursement item.
© 2007 - 2014 by Sentinel Hill Software, all rights reserved
227
228
Series 5 Professional Invoicing - User Help
Show Disbursement Detail Screen
When a given row in the grid is double-clicked, the detail information for the Disbursement
item is displayed in the following screen:
The Next or Previous Disbursement item on file may be displayed by clicking the Page
Forward/Backward icons,
or striking the Page Down or Page Up keys,
© 2007 - 2014 by Sentinel Hill Software, all rights reserved
Professional Invoicing Menu Functions
229
9.4.2.3.1 Print WIP Items Report
The WIP Items Report is a detailed listing of Work-in-Progress items for each Project. Items
may be sorted by Project, Employee or Task, and a variety of different filters may be entered.
WIP Items Report Filters Screen
The following screen is displayed for entry of a number of different filters that may be set to
limit the audit records that are output to the report.
When selected, the operator is presented with the standard WIP Select Filters 147 screen, the
Project Select Filters 142 screen and the Customer Select Filters 151 screen. These allow you
to specify selected or ranges of WIP Items, Projects, Project Locations, Project Departments,
Customers, Customer Types, Sales Representatives, and/or only those customers and/or
projects satisfying a variety of filter criteria.
The report generated, if archived, will be catalogued with a report name of
PIPROJECTWIP.RPT.
The Print Options tab screen will be displayed, from which you can select to direct the output
to be displayed to the screen, archived, printed, saved as an MS Word document, saved as a
PDF, and/or emailed. (Refer to the topic titled Report Generation and Printing 159 for full
© 2007 - 2014 by Sentinel Hill Software, all rights reserved
230
Series 5 Professional Invoicing - User Help
details).
WIP Items Report Filters Screen - Field Definition
WIP Items Sort
drop-down list
To have the WIP Items listed grouped by one of the
available fields.
9.4.2.4
Recalculate Project Rates
When time charges are recorded for an employee’s time sheet, basically a Project Code, a
Task Code and a Quantity of Units is all that is needed to be entered. From this information
the system will determine the Unit Charge Rate with a G/L Revenue account, and a Cost
Rate with a G/L Cost account. If budgets are maintained for the selected Project, then they
also are updated. There are also codes assigned that affect the way that items are listed on
invoices. Determining the values assigned by the system to these fields is a process that
involves examining a number of control options associated to the Project, Employees and
Tasks, and possibly the use of special rates tables.
If the situation arises that a particular control code was not set correctly, or if special rates
were not right, you may discover that the amounts charged to your customers for work
performed is not what you had hoped; or perhaps revenue earned was not being allocated to
the correct department. There is silver bullet for this problem. This function exists to
recalculate charge rates and revenues, and all other codes for the WIP items associated to a
Project.
For a selected Project, you may choose a range of WIP items that will have their Charge
Rates, Revenue Account, Cost Account, Cost Rate reassigned by the system. Not only are
these fields changed, but all the appropriate correcting G/L Distributions will be made also.
From the P/I Main menu, multiple Projects may be processed by selecting Recalc Project
WIP Rates from the Operations drop-down menu. A single Project may be processed when
selected from Work in Progress Inquiry of the Trx Inqury drop-down menu, and from it's
Operations drop-down menu, Recalc Project Default Rates .
© 2007 - 2014 by Sentinel Hill Software, all rights reserved
Professional Invoicing Menu Functions
231
Some points to note when having the Project Rates and G/L Accounts reassigend:
The generic WIP selection filters screen is presented to allow you to select specific
WIP items within a given date range, and/or for specific Employees or Tasks.
If your system is configured to compute Cost Plus Charges, then as an option, you
may select to have these items also deleted. Cost Plus charges are recorded as
WIP items using designated Task Codes as determined by the P/I Control
Preferences 705 function. These WIP charges are recorded with an employee code
of $CSTPL.
Only Active, Uninvoiced WIP items may have their rates and codes reassigned.
If when a WIP charge was originally entered into the system, it's rate was entered
manually, of supplied from an externally interfaced set of charges, then THE UNIT
INVOICE RATE IS NOT RECALCULATED by the system. (However, other codes
© 2007 - 2014 by Sentinel Hill Software, all rights reserved
232
Series 5 Professional Invoicing - User Help
and Costs and Revenue Accounts are reassigned).
The following codes associated to a WIP item are reassigned:
Code
Client/Customer Code
Partner-In-Charge
Project Leader
Person/Machine Flag
Foreign Flag
Invoice Section Code
Invoice Group Code
Budget Group
Taxable Status
Dervied from
Project properties record
Project properties record
Project properties record
Employee properties record
Task properties record
Assorted properties defined by Preferences
rules
Assorted properties defined by Preferences
rules
Assorted properties defined by Preferences
rules
Task properties record
The following rates and/or G/L Accounts are reassigned to each WIP item:
Code
G/L Revenue
Account
Unit Invoice Rate
Extended WIP
Amount
Overhead Amount
Cost Amount
G/L Cost Account
Dervied from
Assorted properties defined by Preferences rules
Assorted properties defined by Preferences rules
Computed
Computed
Computed from assorted properties defined by
Preferences rules
Assorted properties defined by Preferences rules
If the system is configured to maintain Budgets, they are updated with any newly
created amounts,
For those systems that generate Revenue Distributions at the time WIP charges are
entered into the system, reversing and new distributions are recorded.
Only Eligible WIP items are Recalculated
In addition to the filters offered, only those WIP items of the following Types or Status will
have their Rates and G/L Accounts reassigned:
© 2007 - 2014 by Sentinel Hill Software, all rights reserved
Professional Invoicing Menu Functions
Note that regardless of the selections made to these WIP filters by the operator, the
displayed WIP Type and Status settings shown will apply.
Recalculate Single Project's WIP Rates - Options Screen
The following screen is presented when selecting to have a given Project's WIP rates and
codes reassigned:
© 2007 - 2014 by Sentinel Hill Software, all rights reserved
233
234
Series 5 Professional Invoicing - User Help
When selected, the operator is presented with the standard WIP Select Filters 147 screen.
This allows you to specify WIP for selected or ranges of Employees and Tasks, and/or only
those WIP items satisfying a variety of filter criteria.
Recalculate Project Rates Options Screen - Field Definitions
Remove
Unbilled
system
Generated
Cost-Plus
Charges
check-box
If your system is configured to compute Cost Plus Charges, then as an
option, you may select to have these items also deleted. Cost Plus charges
are recorded as WIP items using designated Task Codes as determined by
the P/I Control Preferences 705 .
© 2007 - 2014 by Sentinel Hill Software, all rights reserved
Professional Invoicing Menu Functions
9.4.3
235
Invoice History Inquiry
Once P/I Invoices have been generated, printed and posted to A/R, they will be recorded in
the P/I system as Historic Invoices. Their respective data records, along with the WIP and
Recap Detail records, are available for display, and to be reprinted if necessary.
This Inquiry function provides access to all Historic Invoices that have been from P/I to the
Accounts Receivable system.
You can easily bring up and display the details and the total amounts for each Invoice. As
well, a selected Invoice may be reprinted.
Some of the features of the Inquiry function are as follows:
In the grid display, Invoices may be listed for a selected Project, for a selected
Customer, or regardless of customer or Project, by Invoice #.
Once an Invoice is selected, a screen is displayed offering tabbed sub-screens for
the Invoice Totals, a list of the associated WIP charges, and a list of related Recap
Detail records.
Selected Invoices may be reprinted. For 3rd Party Invoices, both the client and the
3rd Party Invoice is printed.
A function is provided that willl purge Historic Invoices records
Either normal Historic Invoices may be displayed, or "Archived" Invoices may be
displayed.
A Credit Note may be entered and applied against a given Invoice.
Historic Invoices are classified as being either "Current" or "Archived".
invoices are those invoices that have not yet been "Archived".
The "Current"
Archived Invoice History Inquiry
When Invoices are generated, printed and posted, they are copied to the Invoice History file. Over
time, if the Invoice History files become exceedingly large and unruly, they may be "Archived". This
process basically moves Invoices, and their associated data, for specified dates, into their
corresponding "Archive" files. Invoices are archived using the Archive Historic Data function 205
provided by the P/I Menu's File drop-down menu.
Both the normal Invoice History, and the Archived Invoice History records may be inquired upon from
this Inquiry function. (From that functions View drop down menu, you may choose to view either the
normal Invoice History records, or the Archived records).
The Historic Invoices Inquiry function is launched from the P/I Menu's Trx Inquiry drop-down
© 2007 - 2014 by Sentinel Hill Software, all rights reserved
236
Series 5 Professional Invoicing - User Help
menu.
9.4.3.1
Invoice History Inquiry Grid Screens
Historic P/I Invoices are displayed to the screen managed using a Series 5 grid processing
screen. You can easily navigate through the items on file using the grid buttons, or enter the
Invoice Number key for the desired transaction. A list of Invoices may be displayed to the grid
sorted using a variety of different criteria.
From the "Fast Buttons" frame, push buttons are provided that can be used to Re-Print an
Invoice, compute and display Totals, Set Display Filters, have items Purged, and even issue
a Credit Note for a selected Invoice. Either "Current" Invoice History records or "Archived"
Invoice History records may be selected to be displayed. (By selecting the respective item
from the menu-bar's View drop-down menu). The selected function will be applied to
those Invoice History records that are being displayed at the time.
© 2007 - 2014 by Sentinel Hill Software, all rights reserved
Professional Invoicing Menu Functions
237
Historic Invoices Inquiry Grid
"Fast Buttons"
RePrint Invoice
Set Filters
Purge History
Totals
© 2007 - 2014 by Sentinel Hill Software, all rights reserved
To have the current highlighted Invoice in
the grid reprinted. For those Projects where
an EDI file is generated, then the designated
type of EDI file is re-generated. (The
invoice may be reprinted also by Rightclicking the particular row of the invoice,
and selecting the Invoice Reprint option).
To have a number of different filters set to
limit the Invoices that are displayed to the
grid.
To have the Historic Invoices records
purged. A range of dates, Invoice Numbers
and other filters may be entered thus
purging only selected items up to a
specified date.
To compute totals of the different types or
238
Series 5 Professional Invoicing - User Help
Invoices in the system. The number of
each type of document is displayed, along
with a dollar amount breakdown of the types
of charges.
Credit Invoice
To have a Credit Note generated and issued
against the selected Invoice. The credit
amount, which may be less that the original
amount of the invoice, may be applied to All
related WIP charges, or selected items.
Some of the special features of this "Inquiry" grid are as follows:
Historic Invoices may be listed
belonging to just a selected
Project or Customer. As well,
all invoices may be displayed
listed either by Invoice Number
or Invoice Date.
If listing for a particular Project
or Customer, a given code may
be chosen either by entering
their Project or Customer Code,
choosing it using the Lookup
binoculars icon, or by having the
next or previous Project or
Customer displayed that has
items on file. (Click the
binocular icon with the up/down
arrow to display Invoices that
exist for the prior/next
occurrence of that code on file).
Depending on the List By
selection, a field may be
presented, in which the operator
may key in an Invoice #, or a Bill
Code. The system will attempt
to read to the closest
transaction for the data entered
and display it in the grid.
Either "Current" Invoice History
records or "Archived" Invoice
© 2007 - 2014 by Sentinel Hill Software, all rights reserved
Professional Invoicing Menu Functions
History records may be
selected to be displayed. To
switch between "Current" and
"Archived", from the menu bar's
View drop-down menu, click
either Show Current Data
Records or Show Archived
Data Records.
When displaying Archived
Invoices, the "Fast Frame"
background color changes from
the normal olive green to a
lovely orange.
A Credit may be entered against
an Invoice by clicking on the
push button in the "Fast Button
Frame". A window is displayed
for entry of the particulars, and
to apply the credit amount to
specific WIP charges.
9.4.3.2
Historic Invoice Display Screens
When a particular row in the Invoice Inquiry grid screen is double-clicked, a window is
displayed showing the header summary and totals for that historic Invoice transaction.
Some of the features associated to the display of the Invoice are as follows:
Within the screen displayed, a Totals, WIP Items and Recap Detail tabbed sub© 2007 - 2014 by Sentinel Hill Software, all rights reserved
239
240
Series 5 Professional Invoicing - User Help
screens may be clicked to show different information associated to the Invoice.
The Previous or Next Invoice on file may be easily navigated to by clicking the
icons at the right top of the window.
The Invoice may be Reprinted, or for those customers utilizing EDI invoices, the
applicable EDI file may be re-generated.
If Recap Detail is associated to the Invoices, a Recap Detail spreadsheet may be
generated for the invoice.
When displaying the WIP or Recap tabbed sub-screens, there are more columns of
information available than will fit on the screen. At the bottom of the grid, a scroll-bar
is presented which may be dragged to view the columns of data that are not shown
on the right. (If your screen is wide enough, you may also click on the
the bottom right corner of the window, to expand it.
icon at
The following function may be launched, associated to the Invoice, using the displayed pushbuttons at the bottom of the window.
Generate a RecapRecap Detail records hold additional information relating
Spreadsheet – to WIP charges. If used each WIP record may have one
or more Recap records associated to it. The Recap
Detail spreadsheet basically lists all the Recap charges
that were invoiced by the given invoice.
Reprint the Invoice – If needed, you may have the Invoice reprinted. If it's a
3rd Party Invoice, both the client's and the 3rd party's
Invoices are printed together as a single document.
Re-Generate EDI File – If needed, you may have the associated EDI file regenerated. (This option is only available to those
Projects that have been set up to produce EDI Invoice.
Invoice Inquiry – Totals tab Screen
The following sub-screen is displayed when the Totals tab is clicked. It shows the Totals for
the Invoice:
© 2007 - 2014 by Sentinel Hill Software, all rights reserved
Professional Invoicing Menu Functions
241
Invoice Inquiry – WIP Items tab Screen
The following sub-screen is displayed when the WIP Items Invoiced tab is clicked. It shows
a grid listing each WIP item that was invoiced:
© 2007 - 2014 by Sentinel Hill Software, all rights reserved
242
Series 5 Professional Invoicing - User Help
Invoice Inquiry – Recap Detail tab Screen
The following sub-screen is displayed when the Recap Detail tab is clicked. It shows a grid
listing each Recap extended information record associated to the Invoice:
© 2007 - 2014 by Sentinel Hill Software, all rights reserved
Professional Invoicing Menu Functions
9.4.3.3
243
Invoice History Filters
The following functions may be executed from the Invoice Inquiry grid screen, where a
number of assorted selection filters may be entered.
Enter a number of different filters set to limit the
Set Grid Display Filters —transactions that are displayed to the grid.
Tally and display totals of the Invoices sub-totalled over a 12
Compute and Displaymonth period broken down to the types of amounts. Note
Totals — that either "Current" Invoice History records or "Archived"
Invoice History records may be displayed to the grid screen.
When the totalling function is invoked, those history
records that are being displayed will be the ones that are
purged.
Have older Historic Invoice Transactions Purged from the
Purge Historic Invoices —system. Note that either "Current" Invoice History records
or "Archived" Invoice History records may be displayed to
the grid screen. When the purge function is invoked, those
history records that are being displayed will be the ones that
are purged.
© 2007 - 2014 by Sentinel Hill Software, all rights reserved
244
Series 5 Professional Invoicing - User Help
Archiving or Purging
When displaying "Current" Invoice History records you should not really ever execute
the Purge function. Instead, execute the Archive Historic Data function 205 provided
by the P/I Menu's File drop-down menu. That will move the "Current" invoices into
the "Archived" Invoice file, and they can them be inquired upon.
Should the "Archived" Invoices file become too large, then select to view the
"Archived" Invoices, and execute the purge.
The following screen, or something very similar, is displayed for each of these functions:
When having the history records purged or accumulating the Totals for display, the operator
is also presented with the standard Project Select Filters 142 screen, the Customer Select
Filters screen 151 . and Demographic Selects screen 156 . These allow you to specify selected
or ranges of Projects, Project Locations, Project Departments, Customers, Customer Types,
Sales Representatives, and/or only those customers and/or projects satisfying a variety of
filter criteria.
© 2007 - 2014 by Sentinel Hill Software, all rights reserved
Professional Invoicing Menu Functions
245
Processing Filter Options Screen - Field Definition
Historic Invoice Number(s)
radio-buttons and 9(6)
To select All Invoices regardless of their Invoice numbers; or for only those that fall within
a range of numbers. If a range is selected, enter the starting/ending Invoice numbers.
For the 12 Periods — in Intervals of
radio-buttons and (mmddyy)
Totals are accumulated for up to 12 periods, of either Months, Quarters or Years. Based
on the selection, the system will default the From/To dates displayed. (If a different date
range is selected, the 12 periods tallied for will commence from the Starting Date
ending up to the ending date, or up to the end of the 12th period, which ever is
earliest).
Include only Invoices — for Invoice Layout Code
9(3)
To have only those Invoices that were generated based on a particular Invoice Layout
Code. (Leave the field blank if it is not to be considered as a selection filter).
Include only Invoices — for Customer
X(6)
When entering grid display filters, to have only those Invoices that were generated for a
particular Customer Code. (Leave the field blank if it is not to be considered as a
selection filter).
Include only Orders — for Tax Codes 1 & 2
X(6)
When entering grid display filters, to have only those Orders processed that were
recorded with a particular Tax Code. (Leave the field blank if it is not to be considered as
a selection filter).
9.4.3.4
Invoice History Totals
This function accumulates totals for the Historic Invoices on file in the P/I system. It breaks it
down in to 12 reporting periods and displays the number of Invoices, and a break down of the
dollar amounts contributing to the values of invoices for the transactions satisfying the filters
selected.
The following screen is displayed:
© 2007 - 2014 by Sentinel Hill Software, all rights reserved
246
9.4.3.5
Series 5 Professional Invoicing - User Help
Invoice Register Reports
The Invoices Register report provides a simple list of all the Invoices that were generated
within a specific range of Dates and/or Invoice Numbers. You may choose to have the items
listed sorted by Invoice #, Project Code, or Customer Code.
When viewing "Current" Historic Invoices, click Print Invoice Register or when viewing
"Archived" Historic Invoices, click Print Archived Inv Register, from the grid screen's menubar File drop-down menu.
Archived Invoices or Historic Invoices
© 2007 - 2014 by Sentinel Hill Software, all rights reserved
Professional Invoicing Menu Functions
247
When Invoices are generated, printed and posted, they are copied to the Historic Invoices file. Over
time, if the Invoice History files become exceedingly large and unruly, they may be "Archived". This
process basically moves Invoices, and their associated data, for specified dates, into their
corresponding "Archive" files. Invoices are archived using the Archive Historic Data function 205
provided by the P/I Menu's File drop-down menu.
Depending whether Archived or Current Invoice History records are being displayed, either the
Archived register or the Historic register report is generated.
Invoices Register Reports Filters Screen
The following screen is displayed for entry of a number of different options and filters that may
be set to limit the records that are output to the report.
When selected, the operator is presented with the standard Project Select Filters 142 screen
and the Customer Select Filters 151 screen. These allow you to specify selected or ranges of
Projects, Project Locations, Project Departments, Customers, Customer Types, Sales
Representatives, and/or only those customers and/or projects satisfying a variety of filter
criteria.
When the "Archived" Register is generated, if archived, will be catalogued with a report name
© 2007 - 2014 by Sentinel Hill Software, all rights reserved
248
Series 5 Professional Invoicing - User Help
of PINVARCHIVE.RPT. For the "Historic" Invoice Register is generated, it is catalogued with
a name of of PINVHISTORY.RPT.
The Print Options tab screen will be displayed, from which you can select to direct the output
to be displayed to the screen, archived, printed, saved as an MS Word document, saved as a
PDF, and/or emailed. (Refer to the topic titled Report Generation and Printing 159 for full
details).
Invoices Register Filters Screen - Field Definition
Historic Invoice Number(s)
radio-buttons and 9(6)
To select All Invoices regardless of their Invoice numbers; or for only those that fall within
a range of numbers. If a range is selected, enter the starting/ending Invoice numbers.
Invoices Dated
radio-buttons and
(mmddyy)
Select to have Invoices selected regardless of their dates; or only those for a given date
range. If an inclusive range is selected, enter the starting/ending dates. Click the
calendar icon for a common set of ranges to be presented.
Include only Invoices — for Invoice Layout Code
9(3)
To have only those Invoices that were generated based on a particular Invoice Layout
Code. (Leave the field blank if it is not to be considered as a selection filter).
Invoices Sort
drop-down list
To have the Invoices listed sorted by one of the
available fields.
9.4.3.6
Enter Credit Notes to Historic Invoices
This function is used when you wish to generate a Credit against an invoice that has already
been printed and posted to the Accounts Receivable system. The Credit Note will be printed
the next time the Generate and Print Invoices function is selected. When the Credit is posted
to the Receivables system, a type [C] credit document is recorded.
When a Credit Note is entered and applied to specific WIP charges of the invoice, negative
valued WIP and Recap records are written. These in turn are used to generate a Credit
Invoice document, and used to reduced the amount of revenue, that might be reported for the
associated Project in assorted inquiry and reporting functions. When the credit document
eventually is posted to the Accounts Receivables system, applicable reversing distributions
are made to the A/R Control account and associated Revenue accounts.
© 2007 - 2014 by Sentinel Hill Software, all rights reserved
Professional Invoicing Menu Functions
249
Presumably, credited amounts would be for specific WIP items that contributed to the
charges on the Invoice. Once the initial credit information is entered, a second tabbed subscreen is displayed, titled [Apply to Invoiced WIP Items]. Here you may have the system
select ALL the WIP items associated to the original Invoice, or apply the credit amount
selectively to specfic WIP items. (If you are not sure of the total amount that is to be credited,
just go ahead and select the WIP items that need to be credited, then you can click the
[Adjust CR Total to Amts Applied] push-button and the system will tally the total for you).
Once all WIP items have been credited, click the [Enter the Credit] push button at the
bottom of the screen to have the Credit Note generated and printed.
From the P/I Main menu, select Enter Credit to an Invoice from the Operations dropdown menu or select Invoice History Inquiry from the Trx Inquiry drop-down menu.
Locate the Invoice in the displayed grid and click the [Credit Invoice] push button from the
"fast buttons" frame; or select the Invoice in the displayed grid, and click the [Apply Credits
to this Invoice] push button at the bottom of the screen.
Some points to note about the automatic selection process:
The Credit Note can only be applied to a single Invoice. That invoice must have
been already generated and posted to Accounts Receivable.
The Credit Note must have a unique document number. It should not have the
same number as the Invoice that it is being applied to. By default, it will be assigned
from the Next Credit Document Number field, as defined in the A/R Control
Preferences.
© 2007 - 2014 by Sentinel Hill Software, all rights reserved
250
Series 5 Professional Invoicing - User Help
Enter the amount of the Credit as a positive value
The amount of the Credit may be applied to all, or specific WIP items, associated to
the Invoice to which the Credit applies to.
After the Credit is entered, it will be written to the P/I Invoices file as a Credit
document, and it will be printed according to the properties of the original invoices
Invoice Layout. It will be displayed as a Credit in the grid display screen from the
Invoice Grid Processing 419 Operations function. When Invoices are next posted to
A/R, it will be written to the designated A/R Sales Batch as a Credit Note.
Entering Credits - Data Entry Screen
The following screen is presented for entry of fields associated to entry of the Credit:
Credit Entry Data Screen - Field Definitions
Credit Document Number
9(6)
This will be the number identifying the Credit document and will be assigned to the
© 2007 - 2014 by Sentinel Hill Software, all rights reserved
Professional Invoicing Menu Functions
251
resulting Open Item record in the Accounts Receivable system. The default is
determined from a field defined in the A/R Control Preferences. When assigning the
Document Number, it is important that you assign a range of numbers that will not conflict
with the invoices that are generated by the system. Do not use the number of the
invoice to which the credit is to be applied against for the Credit’s document
number.
Document Date
(mmddyy)
This is the date that will be assigned to the Credit Note.
Reference
X(30)
A brief description may be recorded. This will be carried through to the A/R system and
used as the reference in the resulting Open Item record.
WIP and Overhead Credit Amounts
$ 9,999,999.99
Enter the portion of the Credit that is to be applied against WIP charges, and any
Overhead charges that were computed for the invoice. Enter this amount as a positive
value.
The total of all Credit amounts cannot exceed the original total of the invoice to which the
credit is being applied.
Tax 1 and 2 Credit Amounts
$ 99,999.99
Enter the portion of the Credit that is to be applied against Tax amounts that were
computed for the invoice. You will not have to enter the Tax amounts as these will be
automatically computed when the Credit Invoice is generated. Enter these amounts as
a positive values.
The total of all Credit amounts cannot exceed the original total of the invoice to which the
credit is being applied.
Applying Credit to Invoiced WIP Items - Grid Select Screen
The following grid screen is presented for selection of those WIP items to which the credit
amounts are to be applied:
© 2007 - 2014 by Sentinel Hill Software, all rights reserved
252
Series 5 Professional Invoicing - User Help
Some of the special features of this "Apply Credit to WIP" grid are as follows:
To select a particular WIP item to be Credited, double-click the row that it's
information is displayed in.
WIP tems that have had a Credit Amount applied to them have the
in the 1st column of the grid.
icon shown
To apply the total amount of the
Credit to All WIP items, click
the Apply to ALL push button.
To clear any previously applied
amounts, click the Clear ALL
push button.
The WIP amounts Remaining
to be Credited, and the amount
© 2007 - 2014 by Sentinel Hill Software, all rights reserved
Professional Invoicing Menu Functions
Already Credited are displayed.
The entry of the Credit may be
completed only when the
Amount Remaining to be
Credited is ZERO.
If the amounts applied do not
equal the expected amount
originally entered, click the
Adjust CR Total to Amts
Applied button to have the total
computed from the amounts
applied.
Once the total amount of the
Credit has been applied, the
Enter the Credit push-button will
be enabled. To have the Credit
entered, click this button.
The table displaying the WIP
fields is wider than the screen is
able to accommodate. To
display the extra fields, at the
bottom of the grid, a scroll-bar
is presented which may be
dragged to view the columns of
data that are not shown on the
right.
(If your screen is wide enough,
you may also click on the
icon at the bottom right corner
of the window, to expand it.
Applying Credit to WIP - Data Entry Screen
When a given WIP item's grid row is double-clicked, the following screen is presented for
entry of the Credit amounts to be applied to that WIP:
© 2007 - 2014 by Sentinel Hill Software, all rights reserved
253
254
Series 5 Professional Invoicing - User Help
Applying Credit to WIP Data Entry Screen - Field Definitions
Amount to Credit – WIP Amount
$ 9,999,999.99-
Enter the amount of the Credit that is to be applied to the WIP items Charged amount.
The respective New Invoice Amount field will be adjusted accordingly.
Amount to Credit – Overhead
$ 999,999.99-
Enter the amount of the Credit that is to be applied to the WIP item's Overhead amount.
The respective New Invoice Amount field will be adjusted accordingly.
New Invoice Amounts – # of Units
99,999.99-
As a result of the Credit, enter the new # of Units that would be considered as having
been invoiced.
New Invoice Amounts – Unit Rate
$ 999,999.99
If the credit is issued because the rate was incorrect, enter the correct Unit Rate. The
© 2007 - 2014 by Sentinel Hill Software, all rights reserved
Professional Invoicing Menu Functions
255
New WIP amount will be automatically recomputed.
New Invoice Amounts – WIP & Overhead
$ 9,999,999.99-
As a result of the Credit, this is the new amount that would be recognized as being
invoiced for this WIP item.
9.4.3.7
Generate an Invoice's Recap Detail Spreadsheet
Enter topic text here.
9.4.4
Rates Query/Calculator
The P/I system provides for the automatic assignment of Billing Unit Rates, Unit Costs Rates,
and the G/L Accounts used for recording revenues and cost. There are a variety of different
sources and combinations of settings that are employed. This function attempts to display
the different alternatives as to how the rates and the accounts are derived. You will basically
enter a Project Code, Employee Code and a Task Code, and the system will determine and
display the associated Chargeable Rate that will be assigned to WIP items. Each possible
“candidate” rates and accounts will be displayed showing the priority of how the final rate is
achieved.
As well as charge-out rates, the G/L Revenue account that is assigned to the WIP item is
also displayed, showing each “candidate” account.
If the P/I system is also tracking Costs, (as determined by a preference in the P/I Control
Preferences), the operator will be invited to also show the steps in obtaining the Cost Rate for
the WIP item that would be generated.
From the P/I Main menu, select Rates Query from the Trx Inquiry drop-down menu.
Some points to note about the automatic selection process:
© 2007 - 2014 by Sentinel Hill Software, all rights reserved
256
Series 5 Professional Invoicing - User Help
Two tabbed sub-screens are presented. One for the Revenue Rates and one for
the Costing Rates.
Displaying Cost Rates
The Costing Rates sub-screen is offered only if Costing has been enabled in the system.
Also, if you do not wish all users to view the Cost Rates, a setting in the P/I Control Preferences may
be used to define a single logon user who is allowed. (If that field is blank, all users may view the
costs).
Rates Query - Codes Entry Screen
The following screen is presented for entry of the Project, Employee and Task codes for
which Rates are displayed:
Rates Query Codes Entry Screen - Field Definitions
For Project
X(6)
Enter the Project for which Rates are to be displayed.
For Employee
X(6)
Enter the Employee for which Rates are to be displayed.
For Task
X(8)
© 2007 - 2014 by Sentinel Hill Software, all rights reserved
Professional Invoicing Menu Functions
257
Enter the Task for which Rates are to be displayed.
Rates Query - Invoice Rate and Revenue Account Display Sub-Screen
The following tabbed sub-screen is displayed showing the candidate sources for the derived
Unit Rate and G/L Revenue Account:
© 2007 - 2014 by Sentinel Hill Software, all rights reserved
258
Series 5 Professional Invoicing - User Help
Rates Query - Cost Rate and Account Display Sub-Screen
The following tabbed sub-screen is displayed showing the candidate sources for the derived
Unit Cost and G/L Cost Account:
9.4.5
WIP Periods Analysis
The Professional Invoicing system records all chargeable and non-chargeable employee
activity, and/or external system generated charges to the Work-In-Progress, WIP, file. These
records represent a history of all activity, and are available for analysis. The WIP Period
Analysis function accumulates sub-totals for the WIP for a variety of related codes, including
and not limited to, Project, Task and Employee. Analysis may be done for periods of
calendar years or months, or G/L Fiscal years or periods. The number of Chargeable and
© 2007 - 2014 by Sentinel Hill Software, all rights reserved
Professional Invoicing Menu Functions
259
non-chargeable Units and Amounts, Overhead Amount, Invoiced Amount, and Costs are
tallied, and presented along with assorted totals.
Once the analysis is generated for the specified type of period, the totals for any particular
period, of the range of periods analyzed, may be displayed to the grid screen with totals,
which may then be reviewed, exported, or printed as a report.
Analysis with sub-totals by assorted periods of time, are available as follows:
by Project
by Task
by Employee
by Customer
by Department
by Location
by Invoice Layout Codes
by EDI Control Codes
by Projects for selected Customer, Employee, Department, Task, Project
Leader, EDI Code or Invoice Layout
by Tasks for selected Project or Employee
by Employees for selected Project or Department
by Departments for selected Project or Leader Department
For each of the given analysis types, a sub-totals may be broken down to the following
periods:
by Calendar Year for up to 9 year prior to a selected year
by Calendar Months for up to 47 months prior to a selected month
by G/L Fiscal Periods for up to 2 years worth of Fiscal Periods preceding a
selected period
by G/L Fiscal Years for up to 8 years preceding a selected Fiscal Year
For any row of data presented, (where a row represents either a Project, Task, Employee,
Customer, Department, Location, Invoice Layout, or EDI Code), a drill down function
presents a screen displaying the accumulated totals for the item, for each of the reporting
periods. Totals are displayed along with a Trend Analysis. These drill down screen data
may also be exported to a spreadsheet.
The inquiry analysis is obtained using the current WIP records that are accumulated in the P/I
system. For this analysis to be accurate, you must maintain at least the last ten years of
historic data, purging only transactions older than ten years.
As a special feature of the Series 5 reporting function, the totals may be viewed on screen,
© 2007 - 2014 by Sentinel Hill Software, all rights reserved
260
Series 5 Professional Invoicing - User Help
printed or exported to an MS Excel spreadsheet.
The P/I WIP Analysis Inquiry function and the P/I WIP Analysis Report function are in fact the
same function. For a full description, refer to the topic titled WIP Period Analysis Report 506
found under the chapter on Reporting Functions 471 later in this documentation.
9.4.6
WIP Revenue GL Account Analysis
The Professional Invoicing system records all chargeable and non-chargeable employee
activity, and/or external system generated charges to the Work-In-Progress, WIP, file. These
records represent a history of all activity, and are available for analysis. Each WIP item that is
invoiced is assigned a G/L account representing the P/L Income to which the revenue is to be
assigned. The WIP Revenue Analysis function accumulates sub-totals for each assigned G/
L Account for a variety of related codes, including and not limited to, Project, Task and
Employee. Analysis may be done for periods of calendar years or months. The number of
Chargeable and non-chargeable Units and Amounts, Overhead Amount, Invoiced Amount,
and Write-Off Amounts are tallied, and presented along with assorted totals.
Once the analysis is generated for the specified type of period, the totals for the date range
analyzed, may be displayed to the grid screen with totals, which may then be reviewed,
exported, or printed as a report.
Analysis with sub-totals are available as follows:
by G/L Account
by Project for select G/L Account
by Customer for selected G/L Account
by Task for selected G/L Account
by Employee for selected G/L Account
by Invoice Group for selected G/L Account
by EDI Control Code for selected G/L Account
by Invoice Layout Codes for selected G/L Account
The inquiry analysis is obtained using the current WIP records that are accumulated in the P/I
system. For this analysis to be accurate, you must maintain at least the last ten years of
historic data, purging only transactions older than ten years.
As a special feature of the Series 5 reporting function, the totals may be viewed on screen,
printed or exported to an MS Excel spreadsheet.
The P/I WIP Revenue Accounts Inquiry function and the P/I WIP Revenue Analysis Report
function are in fact the same function. For a full description, refer to the topic titled WIP
Revenue Analysis Report 519 found under the chapter on Reporting Functions 471 later in this
documentation.
© 2007 - 2014 by Sentinel Hill Software, all rights reserved
Professional Invoicing Menu Functions
9.4.7
261
Employee Cross Utilization Analysis
Chargeable and non-chargeable activity by employees is recorded as Work-In-Progress
items against specific Projects. All employees belong to both a Department and a Location;
and all Projects also are associated to both a Department and a Location. Generally,
employees for a given department or location will perform work on projects that belong to the
same department or location. However, if this is not always the case, you may want to
determine how much WIP activity is being performed by employees associated to a given
department or location on projects belonging to other departments or location. This is
referred to as "Employee Cross Utilization".
The Employee Cross Utilization Analysis function accumulates sub-totals for the WIP
recorded be employees on projects for other departments or locations for a variety of related
codes, including and not limited to, Project, Department, Location and Employee. Analysis
may be done for periods of calendar years or months, or G/L Fiscal years or periods. The
number of Chargeable and non-chargeable Units and Amounts, Overhead Amount, Invoiced
Amount, and Costs are tallied, and presented along with assorted totals.
Once the analysis is generated for the specified type of period, the totals for any particular
period, of the range of periods analyzed, may be displayed to the grid screen with totals,
which may then be reviewed, exported, or printed as a report.
Analysis with sub-totals by assorted periods of time, are available as follows:
by Projects for selected Location, Employee, Department, or Location
by Locations for selected Project, Department, Leader Location or Employee
by Employees for selected Location, Department or Project
by Departments for selected Location, Project, Employee or Leader
Department
For each of the given analysis types, a sub-totals may be broken down to the following
periods:
by Calendar Year for up to 9 year prior to a selected year
by Calendar Months for up to 47 months prior to a selected month
by G/L Fiscal Periods for up to 2 years worth of Fiscal Periods preceding a
selected period
by G/L Fiscal Years for up to 8 years preceding a selected Fiscal Year
For any row of data presented, (where a row represents either a Project, Location, Employee,
or Department), a drill down function presents a screen displaying the accumulated totals for
the item, for each of the reporting periods. Totals are displayed along with a Trend Analysis.
These drill down screen data may also be exported to a spreadsheet.
The inquiry analysis is obtained using the current WIP records that are accumulated in the P/I
system. For this analysis to be accurate, you must maintain at least the last ten years of
historic data, purging only transactions older than ten years.
As a special feature of the Series 5 reporting function, the totals may be viewed on screen,
© 2007 - 2014 by Sentinel Hill Software, all rights reserved
262
Series 5 Professional Invoicing - User Help
printed or exported to an MS Excel spreadsheet.
The P/I Employee Cross Utilization Analysis Inquiry function and the P/I Cross Utilization
Report function are in fact the same function. For a full description, refer to the topic titled
Employee Cross Utilization Report 485 found under the chapter on Reporting Functions 471
later in this documentation.
9.5
Operational Functions
The topics in this chapter describe functions and procedures that are a available under the
Operations drop down menu on the Professional Invoicing menu. These menu items are
used to perform the major processing functions in the Professional Invoicing system. In
particular, the functions for entering Employee Timesheets, entering General Work-InProgress charges, and Interfacing 3rd party generated WIP activity are found here.
These functions are available from the P/I Menu Bar as shown:
© 2007 - 2014 by Sentinel Hill Software, all rights reserved
Professional Invoicing Menu Functions
9.5.1
263
Employee Timesheet Entry
This Series 5 Professional Invoicing system primary purpose is to capture your Employee's
working activity. This may include both billable time, and non-chargeable time. Depending on
how rigorous you wish to track your employee's working hours, the system provides for entry
of different types of time.
Given that generally employees are performing work on different projects, when activity is
recorded in the P/I system as Work-In-Progress, (known as WIP), it must be entered for predefined Projects. WIP can be recorded as chargeable or non-chargeable depending on
whether it can be billed out to a customer. Also, a P/I employee could also be a machine that
you wish to track the number of chargeable or non-chargeable hours that it is used.
© 2007 - 2014 by Sentinel Hill Software, all rights reserved
264
Series 5 Professional Invoicing - User Help
WIP that is directly associated to employee or machine hours, is normally kept track of using
a Time Sheet and is recorded in the P/I system manually using this Employee Timesheet
Entry function.
There are a number of features associated the recording of WIP activity. These are
highlighted under the topic titled About, Concepts and Features that follows:
Time Sheets are entered under the control of Timesheet Entry Batches 265 as either
a Regular Batch or a Permanent Entry Batches. Permanent Batches are used for
WIP activity that is the same on a regular reoccurring basis.
Employee hours may be entered as individual WIP items, or as a traditional weekly
timesheets. The "Weekly" timesheet mode for an employee provides for the entry of
the Project and the Task codes, for which associated hours may be entered Monday
thru Sunday.
WIP may be recorded basically as one of four Types of WIP Activity
Force Billed, Deferred and Memos.
268
. Active,
When an Employee's activity is entered, all that needs to be recorded is the # of
Hours, a Project, and a Task. The system will automatically determine Charge-out
Rates 268 , Cost rates and G/L Revenue and Costing Accounts.
If you wish to restrict the entry of specific Projects and Tasks to individual
Employees, this can be accomplished by defining those projects using Employee
Assigned Projects Codes Maintenance 645 function.
WIP activity may be entered directly to a time sheet, interfaced from a user supplied
data file 269 , or loaded from a spreadsheet.
In the event you have activity, or charges that you wish to bill your customer for, but
they are not really directly associated to a a particular employee or machine, they
may be entered as Generalized WIP charges 270 . These can be entered directly, or
they can be interfaced from data files 270 that are generated from another system, or
they can be loaded from a spreadsheet 270 .
Before entering the individual Employee Time Sheets, a Timesheet Entry Batch must be
created. These are created directly from the Employee Timesheet Entry routine.
Employee Timesheet Entry
Concepts and Features
265
Timesheet Batch Selection
270
Timesheet Batch Properties
271
Employee Timesheet Entry Grid Screen
276
Adding or Editing Employee Time Sheets
277
© 2007 - 2014 by Sentinel Hill Software, all rights reserved
Professional Invoicing Menu Functions
Time Sheet Activity Entry Data Screen
Posting Timesheet Batches
265
281
289
Accessing the P/I Timesheet Entry Function
From the P/I Main menu, select Employee Timesheet Entry from the Operations dropdown menu.
9.5.1.1
About,Concepts and Features
There are a number of features associated to Order Entry. These are highlighted under the
following sub-topics. (Click the green plus sign to expand the display for the related text).
Time Entry Batches
Batching is provided as the method for entering transactions in those Series 5 applications
requiring operator interaction with the screen. Examples of such transactions include the
following:
Accounts Receivable Cash and Sales Transaction Entry
General Ledger Standard and General Journal Entry
Professional Invoicing Time Sheet Entry
Accounts Payable Suppler Invoice Entry
Batching was introduced as a concept to the Series 5 family of applications for three main
reasons:
1) To provide a method of validating figures, representing totals of all Invoice
transactions, entered into the system. A fixed number of transactions can be
assigned for entry under a given Batch, and in advance, the total of all amounts may
© 2007 - 2014 by Sentinel Hill Software, all rights reserved
266
Series 5 Professional Invoicing - User Help
be computed. This Batch Total may then be used as a check against the total
actually entered. If the amounts do not match, the operator is then alerted.
2) To provide for the capability of a great number of transactions to be entered into the
system by a number of different operators at the same time. Employees may enter
their own activity using their own Time Entry batch, or a group of data entry clerks
can enter activity separately. Each batch may be entered, and posted
independently from one another.
3) To ensure that transactions are entered under a rigorous control system. They are
first entered into a batch. An edit list may be generated and it's transactions verified
to be correct. That batch of transactions are then "posted", moving them into their
respective active data files. During the post process, and transaction posting
journal is generated and archived, providing an audit trail for future reference.
In essence, transactions are divided into groups of batches prior to data entry. Each batch is
allocated a batch number or code, and the sum of all the transactions may be determined and
used as a Control Total. A batch is created in the respective system, and the various totals
and defaults pertinent to the batch are entered. Each transaction is then entered under that
batch number, and prior to posting, is only accessible via that batch number. A Transaction
Edit List for the batch may be printed prior to the it being posted.
During entry of transactions for a Batch, the current state of the totals is displayed whenever
possible. Separate totals, for number of transactions and transaction totals, both expected
and actually entered, are maintained in the Batch Header file. When the Batch Posting option
is selected, if the Batch entered values do not match the expected values, the user is warned,
and given the option of allowing transaction entry to continue. If a transaction being added
causes the number of transactions expected to be exceeded, the user is informed and the
entry aborted.
Two types of batches are available, Regular and Permanent. Normally, time sheet activity is
entered in a Regular batch, and they are posted. The batch is deleted when posted. When
entering time sheets in a Permanent batch, after posting the batch remains on the system.
The next time the Permanent batch is used, the operator only needs to change the Ledger
Date and the Transaction Date, and perhaps only a few selected items on the existing time
sheets.
The process of entering one or more employees' activity can be summarized as follows:
Example using a Regular Time Entry Batch
Over the period of week, an employee needs to record the number of hours that
they had spent on a variety of different Projects. On Friday afternoon, Time Sheets
have to be recorded into the system. The following steps might be followed:
First thing Monday morning, each employee, or their secretary, needs to
create the Time Entry Batch that they will be recording their time to. From
the P/I system's Operations drop-down menu select Employee
© 2007 - 2014 by Sentinel Hill Software, all rights reserved
Professional Invoicing Menu Functions
267
Timesheet Entry. At the bottom of the screen displayed, click the
Create and Select a New Time Entry Batch push-button. They would
create their own Time Entry Batch and enter the appropriate control
figures. If the activity from week to week tended to be the same, a
Permanent Batch could be created, otherwise if employees worked on
many different Projects, then a Regular Batch should be employed. For
control purposes, as an option, specify the number of time sheets and/or
the total number of units, or hours, that will be entered. (Depending on
the number of entries that would have to be recorded, you could set
up for a separate time sheet for every day of the week, or just have
one for the week). Either way, a separate time sheet must be created for
each employee.
At the end of every day, activity for the employee should be entered.
Invoke the Timesheet Entry operation and choose the appropriate Time
Entry Batch from the drop-list, (or if displayed, select it from the Recently
Accessed or Created Batch table).
If the Time Sheet for the day, or week, already exists, it will be displayed in
the grid. Double-click the Time Sheet to be used.
If the Time Sheet does not already exist, click on the New push button in
the "Fast Frame", to create a new one. The system will assign the
Timesheet Number. Enter the Employee code and the default dates that
are to be assigned to each WIP activity. Control totals may be entered for
the time sheet. (If there are no Time Sheets already entered, the system
will automatically display the screen to have the first one added).
Add each WIP charge to the Time Sheet by clicking on the New push
button. A screen will be displayed on which the employees activity is to
be recorded. Normally only the Project, the Task and the Number of Units
need be entered. All other fields should be automatically assigned by the
system.
At the end of the week, on Friday, after all Time Sheets are entered
satisfactorily, the operator may wish to check that all was entered
correctly. Click on the Print Edit List push button in the "Fast Frame",
and an Timesheet Edit List may be printed, which will list all the
information about each time sheet. This could be checked against the
employees' time card or paper timesheet.
Once the operator is content that everything is correct, they would then
click on the Post push button. All time sheets for the selected batch
would then be Posted to the active WIP file, ready for Invoicing. At this
time a Time Sheet Entry Posting Register is generated, which may be
printed, providing a hard copy audit trail of the activity entered.
© 2007 - 2014 by Sentinel Hill Software, all rights reserved
268
Series 5 Professional Invoicing - User Help
Types of WIP Charges
There are four types of WIP activity that may be entered into the system. Basically,
depending on the type of WIP specified when the activity is entered, determines how the item
is billed. The following types may be entered:
Type of WIP
Items
Description
Active WIP
Charge
An Active WIP Item is one that is either Chargeable or NonChargeable. Chargeable Items may eventually be selected
for billing and contribute to charges on a Customer's Invoice
to be generated for the Project.
Force Billed WIP
A Force Billed WIP Item is similar to an Active WIP, but
when posted to the WIP file it is automatically selected for
billing. These items would appear on the next Invoice
produced for the Project. (Only chargeable WIP items may be
entered as Force Billed ones).
Deferred WIP
Deferred WIP Items are similar to Active Items, but are
posted to the WIP file marked as Deferred from Billing.
These items can be selected for billing only by specifically
being selected from the Selective Billing and Adjustments 400
function.
Memo
Memos are WIP records that carry text information only.
They are used only to record information about the Project, or
describe events associated to a specific date. Memo WIP
items are typically never allowed to be selected for billing.
However, if a Project has a specific Invoice Layout, these
Memo records may be used for information printed in the
headers of invoices.
System Assigned Chargeable and Non-Chargeable WIP Rates
The P/I system has been designed to allow for a great deal of flexibility in the assignment or
calculation of a rate for a given unit of service performed. Through the use of Standard Rates
and Special Rates and system control parameters, the user should be able to define a rating
system which will accommodate their requirements.
All employee WIP activity entered can be classified as chargeable or non-chargeable in
© 2007 - 2014 by Sentinel Hill Software, all rights reserved
Professional Invoicing Menu Functions
269
nature. All chargeable time will be invoiced to a client for work performed on a given Project.
Corresponding to the chargeable and non-chargeable concept are two rates assigned to all
rate-bearing sources. These are referred to as Rate 1 (chargeable) and Rate 2
(non-chargeable).
Rates are assigned automatically by the system when project, task and employee information
is entered to a time sheet. The system will examine the possible sources of a rate in a
specific sequence. The sequence is partially controlled by the user utilizing parameters in
the P/I Control Preferences 697 . It is still possible to manually enter the rate or override the
system developed rate.
The system assigned rate is derived by first selecting a rate from either the Client, the Project
or the Task records. This rate is called the Standard Rate and is our first choice for the
candidate rate (the Candidate Rate is the rate that will be chosen by the system when
no other rates are found during examination of subsequent possible sources of rates).
At this point the program will determine whether a chargeable or a non-chargeable rate is
used, and if any Special Rates 671 have been established. If a Special Rate Class Code
exists in the Project or Client record, the Special Rates table will be examined. An entry in the
special rates table will be searched for utilizing the Special Rate Class Code as a column
indicator and variations of the Employee, Employee Group or Employee/Task Codes as the
row indicators.
If a Special Rate is found, it becomes a new Candidate Rate. If no special rate exists, the
Standard Rate will remain.
The system has several parameters which can be set to determine where information is to be
found or in what sequence a Candidate Rate will be derived. The following sections will
describe how a rate becomes chargeable or non-chargeable, when Special Rates are used
and how a final Candidate Rate is chosen.
Loading Employee Timesheet Activity from Spreadsheet
The Series 5 system offers a simple interface to/from spreadsheets or tab-delimited text files.
Should you wish to accumulate employee activity within a spreadsheet, or from another
application, Time Sheet activity can be loaded accordingly.
Amending Posted Timesheet Charges
Should you discover that you have posted charges against the wrong Project, or Task or
Employee, you may correct the entry by selecting it from the Work In Progress Inquiry 215
screens. Locate the WIP item in the grid display screen, right-click to have the pop-up menu
displayed, and select the Adjust This WIP Item 220 function. Any changes made to the Unit
Rate or the Amount will cause correcting distributions to be made to the appropriate G/L
Revenue and WIP accounts.
If you find that rates or revenue accounts, or costs or cost accounts were incorrectly
© 2007 - 2014 by Sentinel Hill Software, all rights reserved
270
Series 5 Professional Invoicing - User Help
assigned to WIP items, you may have new rates and accounts assigned, based on any of the
new rules or rates that have been set up since the items were posted from time sheets.
Select Recalc Project WIP Rates 368 from the P/I menu bar's Operations drop-down menu.
For a range of Projects, Task Codes or Employees, their WIP items will have their cost and
charge rates recomputed, have their cost and revenue accounts re-assigned, and budget
figures adjusted. (Alternatively, from the Work In Progress Inquiry screen, select a specific
Project for which rates are to be recomputed, etc., and from that window's Operation dropdown menu, select Recalc Project Default Rates 230 .
General WIP Charges Entry
When the occasion arises that you need to record charges, or events, that are not directly
associated to an employee or a machine, you may record the time as a Generalized WIP
Entry. Generalized WIP items are not recorded from the Employee Timesheet Entry function.
Instead use the General WIP Entry operation 289 to enter a single set of these items. When
all entries have been added, the transaction file is then Posted to the W-I-P file.
When entering Generalized WIP entries, you have the opportunity to enter the Cost and Billing
Rates, and other fields normally assigned by the system, directly. Other than that, once
posted they are the same as other WIP items. They can be billed and invoiced, might be
chargeable or non-chargeable, and have costs associated to them.
Loading General WIP Charges from Spreadsheet
The Series 5 system offers a simple interface to/from spreadsheets or tab-delimited text files.
Should you wish to accumulate these General WIP charges within a spreadsheet, or from
another application, they can then be loaded accordingly. .
Loading General WIP Charges or Timesheet Activity from External Data
Sources
The P/I system may be used primarily for the extensive variation of Invoices that it can
produce, and charges are actually derived from some other application, or even from services
offered over the Work WIde Web. If this is the case, then two different User Interface menu
operations are available. Pre-defined sequential files may be processed, and loaded either
into the General WIP Charges entry batch, or into an Employee Time Sheet Entry batch. In
either case, the sequential file provided must conform to a defined format.
9.5.1.2
Timesheet Batch Selection
The first screen that is displayed when the Employee Timesheet Entry operation is selected,
is one that lets you select an already establish Time Entry Batch, or create a new one. It will
display push-buttons of the most recently created or accessed Batches. A given Time Entry
© 2007 - 2014 by Sentinel Hill Software, all rights reserved
Professional Invoicing Menu Functions
271
Batch may be selected by clicking on the button, or selecting one from the drop-down list.
Time Entry Batch Selection Screen Grid
If the Time Entry Batch has not yet been created, you can do so by clicking on the Create
and Select a New Time Entry Batch push button.
A Processing Tip
Before setting up a Time Entry Batch, tally the number of Timesheets, and the total number of
units that is to be entered. These figures can be recorded with the Time Entry Batch properties,
and before a batch is posted, the system will compare the expected totals to those that have
been entered.
For further discussion, and detailed description of the screen used for adding a new Order
Entry Batch refer to the topic titled Timesheet Batch Control Properties 271 found later in this
documentation.
9.5.1.3
Timesheet Batch Control Properties
Batching was introduced as a concept to the Series 5 family of applications for three main
reasons:
1) To provide a method of validating figures, representing totals of all Invoice
© 2007 - 2014 by Sentinel Hill Software, all rights reserved
272
Series 5 Professional Invoicing - User Help
transactions, entered into the system. A fixed number of transactions can be
assigned for entry under a given Batch, and in advance, the total of all amounts may
be computed. This Batch Total may then be used as a check against the total
actually entered. If the amounts do not match, the operator is then alerted.
2) To provide for the capability of a great number of transactions to be entered into the
system by a number of different operators at the same time. Each Order Entry
clerk may be assigned a different batch. The transactions may be divided into
workable sets of transactions, with each set being allocated to a separate operator,
and to a separate batch. Each batch may be entered, and posted independently
from one another.
3) To ensure that transactions are entered under a rigorous control system. They are
first entered into a batch. An edit list may be generated and it's transactions verified
to be correct. That batch of transactions are then "posted", moving them into their
respective active data files. During the post process, and transaction posting
journal is generated and archived, providing an audit trail for future reference.
In essence, transactions are divided into groups of batches prior to data entry. Each batch is
allocated a batch number or code, and the sum of all the transactions may be determined and
used as a Control Total. A batch is created in the respective system, and the various totals
and defaults pertinent to the batch are entered. Each transaction is then entered under that
batch number, and prior to posting, is only accessible via that batch number. A Transaction
Edit List for the batch may be printed prior to the it being posted.
Two types of batches are available, Regular and "Quick". Normally, orders are entered in a
Regular batch, and they are posted. The batch is deleted when posted. When entering
orders in a "Quick" batch, after the order is entered, the system automatically transfers
control to the "Quick Post & Pick Print" sub-menu option so the order can be posted with
either an Invoice or a Pick Ticket printed immediately. A "Quick" batch should be used for
"Point-of-Sale" order entry.
Time Entry Batch - Properties Screen
The properties for eachTime Entry Batch are defined with the following screen:
© 2007 - 2014 by Sentinel Hill Software, all rights reserved
Professional Invoicing Menu Functions
273
Operational Tip
You can edit the properties for the batch while executing the Timesheet Entry
function. From the Time Sheet Entry grid screen, on the menu bar, click Edit, then
from the drop down menu, click on Edit Time Batch Properties.
Field Definitions
Time Entry Batch Code
X(6)
This is the code assigned to the Time Entry Batch. It can be either numeric, or
alphanumeric. There should not be any spaces or punctuation in the batch code, as it is
used within the name of one of the Series 5 data files.
Assigning Order Entry Batch Codes
When a new Batch is created, the following default code is provided:
© 2007 - 2014 by Sentinel Hill Software, all rights reserved
274
Series 5 Professional Invoicing - User Help
UUMMDD
where: UU is the first 2 characters of the operators signon code
MMDD is the numeric month and day of the system date
Time Entry Batch Codes should normally not be re-used. It is possible, and my be necessary,
to trace a transaction back to a particular Batch Code. Also, when a batch of orders is posted,
the Batch Code is embedded within the name of the posting journal report.
Batch Type
radio-buttons
Specify the type of batch that is being created. Normally
most batches will be a Regular Batch used to enter time
sheets.
Regular
Permanent
A Permanent Batch would be used to enter employee or
machine activity that is re-occurring with the same number of
hours in a given period. After a Permanent Batch is posted, it
remains on the system to be re-used at some point in the
future. (Regular Batches and their Time Sheets are deleted
after they are posted).
Entry of Employee Timesheet Activity
radio-buttons
WIP items are created as the result of employee worked hours, or use of a given
resource, both of which is associated to a Project and a Task. Both of these types of
activities may be entered to an employee's timesheet.
Entering activity as an individual event results in a single WIP item being generated for the
Project/Task combination of codes entered. You might employ this approach if you just
accumulate totals for a given period of time and it just needs to be entered as a single
item.
Choosing to enter hours daily for a given week's worth of activity associated to a specific
Project and Task offers a traditional day-to-day entry of employee hours over a 7 day
period. For weekly oriented timesheets, each recorded entry potentially results in up to 7
WIP items being generated. (One for each day of the week having non-zero hours
recorded).
Default Transaction & Ledger Dates
(mmddyy)
When new Time Sheets are added for this batch, these dates will be automatically
© 2007 - 2014 by Sentinel Hill Software, all rights reserved
Professional Invoicing Menu Functions
275
assigned to their respective date fields, which in turn may be edited. When WIP activity is
added to a given Time Sheet, the default dates assigned to that Time Sheet are also
assigned to WIP items.
Time Sheet Activity Dates
Once a Time Sheet has been added to the system, it's Transaction and Ledger
Dates may not be changed. Also, all WIP activity added to a Time Sheet, will
carry these dates and may not be changed.
Batch Control Totals - # of Time Sheets
9(6)
If known, you may enter the expected # of time sheets to be entered under the control of
this batch. It's used by the system for control purposes, to verify that the correct number
of time sheets have been entered prior to them being posted. This option may be
disabled if not needed.
Batch Control Totals - Expected # of Units
999,999.99-
If known, you may enter the expected # of units, or hours, for all the time sheets to be
entered under the control of this batch. It's used by the system for control purposes, to
verify that employee activity has been correctly entered prior to the time sheets being
posted. This option may be disabled if not needed.
© 2007 - 2014 by Sentinel Hill Software, all rights reserved
276
9.5.1.4
Series 5 Professional Invoicing - User Help
Timesheet Entry Grid Screen
Time Sheets are maintained using a Series 5 grid processing screen.
Employee Timesheet Entry Grid
The "Fast Buttons" frame provides the push buttons to launch the most common functions
associated to the entry of Time Sheets.
"Fast Buttons"
New
Add a new Time Sheet
Modify
Modify the Time Sheet highlighted in the grid
Delete
Delete the Time Sheet highlighted in the grid
Print Edit List Print an Edit List showing the details of each Time Sheet
entered into the batch
Post
Post the Batch of Time Sheets
Edit an existing Time Sheet by double-clicking it's associated row. Standard Series 5 grid
© 2007 - 2014 by Sentinel Hill Software, all rights reserved
Professional Invoicing Menu Functions
277
controls apply.
If the function to have the Edit List printed is selected, the report if archived, will be catalogued
with a report name of TIME_XXXXXX.LST. where XXXXXX is the code assigned to the
Time Sheet Entry Batch.
The Print Options tab screen will be displayed, from which you can select to direct the output
to be displayed to the screen, archived, printed, saved as an MS Word document, saved as a
PDF, and/or emailed. (Refer to the topic titled Report Generation and Printing 159 for full
details).
Other functions are available from the menu bar's Edit drop-down menu. These include the
following:
Menu Bar Edit drop-Down functions
New, Modify or Delete
Pretty self explanatory if you ask me.
Delete All Time Sheets
All Time Sheets associated to the Batch are deleted from the
system. There is no Undo associated to this function.
Edit Time Sheet Batch Properties
The Time Sheet Batch properties screen is displayed, and its
fields may be edited.
9.5.1.5
Employee Timesheet Entry Screen
A separate Time Sheet must be created for each employee for which activity needs to be
recorded. Each Time Sheet has associated to it, a Transaction Date and a Ledger Date.
The dates that were assigned to the batch will be assigned as the default, although they may
be changed as needed. Many Time Sheets can be added for a particular batch. A new Time
Sheet could be set up every day, or every week.
Some points to note about adding new Time Sheets:
The system will automatically assign the Time Sheet Numbers. The next number is
obtained from a field defined by the P/I Control Properties. 694
Once a Time Sheet has been added, YOU WILL NOT BE ABLE TO CHANGE THE
TRANSACTION DATE OR THE LEDGER DATE. All WIP activity recorded to the
Time Sheet will have these dates assigned to them.
© 2007 - 2014 by Sentinel Hill Software, all rights reserved
278
Series 5 Professional Invoicing - User Help
The properties associated to each Time Sheet are maintained using a Series 5 grid
processing screen. This grid screen offers the operator a summary display of the individual
WIP items belonging to the Time Sheet. From this grid screen, push-buttons are provided
that may be used to add, modify or delete employee time sheet activity. (When adding or
editing a Time Sheet Item, a new window is displayed).
Adding a New Employee Time Sheet — Data Entry Screen
Field Definitions
Employee
X(6)
Select the code for the employee for which activity is to be recorded on the timesheet.
Keep in mind that this could be an employee, or a resource which is utilized for
completion of a job associated to the project.
Transaction & Ledger Dates
(mmddyy)
When new Time Sheet activity is recorded, these dates will be automatically assigned to
their respective WIP items.
For Time Entry Batches that have been marked as Daily for a Week by Project/Task,
© 2007 - 2014 by Sentinel Hill Software, all rights reserved
Professional Invoicing Menu Functions
279
this date MUST fall on a Monday. When the WIP items are generated for the 7 days of
hours entered, they will be assigned dates relative to this date.
Time Sheet Activity Dates
Once a Time Sheet has been added to the system, it's Transaction and Ledger
Dates may not be changed. Also, all WIP activity added to a Time Sheet, will
carry these dates and may not be changed.
Timesheet Control Totals - # of Time Sheets
9(6)
If known, you may enter the expected # of charges to be entered under the control of this
Timesheet. It's used by the system for control purposes, to verify that the correct number
of items have been entered prior to them being posted. This option may be disabled if not
needed.
Timesheet Control Totals - Expected # of
Units
999,999.99-
If known, you may enter the expected # of units, or hours, for all the items to be entered
under the control of this Timesheet. It's used by the system for control purposes, to verify
that employee activity has been correctly entered prior to the time sheet being posted.
This option may be disabled if not needed.
Employee Time Sheet Entry — WIP Activity Grid Screen
© 2007 - 2014 by Sentinel Hill Software, all rights reserved
280
Series 5 Professional Invoicing - User Help
For Time Entry Batches where items are entered as individual items, the following grid
screen is displayed:
For Time Entry Batches where daily hours are entered on a weekly basis, the following
grid screen is displayed:
© 2007 - 2014 by Sentinel Hill Software, all rights reserved
Professional Invoicing Menu Functions
281
Some of the special features of either of the Timesheet items "Selection" grid are as follows:
To add new WIP activity to the
Time Sheet, click the New
push-button.
Edit a particular WIP item by double clicking the row it is displayed upon.
For the selected Time Sheet,
totals are displayed below the
grid display.
Within the grid, right-click a
row to have a pop-up menu
displayed offering available
functions that may be
performed on the associated
WIP item.
In particular, a function is
provided that will delete all the
items on the Time Sheet.
9.5.1.6
Timesheet Charges Data Screens
To add a new WIP item, from the Time Sheet entry grid screen click the New button. To edit
an existing WIP item, double-click the row of the WIP item to be edited.
Some points to note about entering Time Sheet activity:
When WIP activity is added, they are assigned a unique Line ID #. Once assigned,
these cannot be changed. Items will be presented in the Time Sheet sortd by these
© 2007 - 2014 by Sentinel Hill Software, all rights reserved
282
Series 5 Professional Invoicing - User Help
Line ID numbers.
If Projects have been assigned to an Employee, then those projects will be presented in
a drop-down list. Any other Project may not be selected on the time-sheet. Additionally,
if Tasks were assigned to the chosen Project, they will be presented in a drop-down list.
All employee WIP activity entered can be classified as chargeable or non-chargeable in
nature. All chargeable time will be invoiced to a client for work performed on a given
Project. Corresponding to the chargeable and non-chargeable concept are two rates
assigned to all rate-bearing sources. These are referred to as Rate 1 (chargeable) and
Rate 2 (non-chargeable).
Rates are automatically assigned by the system from the Project, Task and Employee
codes entered to the time sheet. The system will examine the possible sources of a
rate in a specific sequence. The sequence is partially controlled by the user utilizing
parameters in the P/I Control Preferences 697 . It is still possible to manually enter the
rate or override the system developed rate.
If the activity being entered is for a Project that is designated to compute Overhead
charges, then it will be automatically computed and displayed.
The Revenue Account that is shown is automatically determined by the assorted rules
defined for the Project, the Task, and the P/I Control Preferences 697 .
For Weekly based entry, time is recorded as hours and minutes for each day of the
week from Monday though Sunday. The transaction date assigned to the Timesheet
must have been for the 1st Monday for which time is entered. Note that time is entered
as hours and minutes for each day, but is then converted to units with 2 decimal places.
Time Sheet WIP Item Entry Screen
The following screen is presented for entry of the WIP activity items where they are entered
as individual items:
© 2007 - 2014 by Sentinel Hill Software, all rights reserved
Professional Invoicing Menu Functions
The following screen is presented for entry of the employee WIP activity items as hours for
each day of the week. Note that Unit Rate and Extended Amounts may be displayed by
clicking the Show Rates and $ Extended button.
© 2007 - 2014 by Sentinel Hill Software, all rights reserved
283
284
Series 5 Professional Invoicing - User Help
Time Sheet WIP Items Screen - Field Definitions
Project Code
X(6)
Select or enter the Project Code for which the activity being recorded was performed for.
If Projects have been assigned to an Employee, then only those Projects will be
presented in a drop-down list. Projects may be assigned to Employees using the
Employee Assigned Projects Codes Maintenance 645 function.
Task Code
X(10)
Select or enter the Task Code for the activity that was performed. If Projects have been
assigned to an Employee, and Task assigned to that Project, then only those Tasks will
be presented in a drop-down list. Project and Tasks may be assigned to Employees
using the Employee Assigned Projects Codes Maintenance 645 function.
# of Units
99,999.99-
Enter the number of Units associated to the activity that is to be invoiced and or charged
© 2007 - 2014 by Sentinel Hill Software, all rights reserved
Professional Invoicing Menu Functions
285
to the Project. For chargeable WIP activity, this is the number of units that will be used,
along with the Unit Rate, to compute the amount that is invoiced.
When recording a Credit to the Project, the # of Units should be entered with a
minus sign. WIP Rates cannot be negative.
Unit Rate
$ 99,999.99
For chargeable WIP items, this is the Unit Charge-out Rate associated to the activity that
is to be invoiced and charged to the Project.
When recording a Credit to the Project, the # of Units should be entered with a
minus sign. WIP Rates cannot be negative.
Extended $ Amount
$ 999,999.99-
This is the Extended dollar amount associated to the WIP item. This is the amount that
will be invoiced to the customer. This amount is always computed from the # of Units
and the Unit Rate. If this amount is overridden, then the Unit Rate is adjusted accordingly.
Overhead $ Amount
$ 999,999.99-
When the WIP item is selected to be billed, this is the Overhead Amount associated to
the activity that is to be invoiced and charged to the Project.
Promotional/Discounted Savings Amount
$ 999,999.99-
This information field is used to record the amount of savings that the customer
appreciated as a result of a discounted or promotional charge rate associated to the
service. The Rate provided is the discounted rate. On selected types of invoices, the
total of these Savings Amount are accumulated and printed in the footer of the invoice.
(No G/L Distributions are generated as a result of any amount entered to this field).
Table of Daily Hours for the Week
hh:mm, or hh, or hh.mm
For the selected Project and Task, enter the number of hours to be recorded on each
given day of the week. Time may be recorded to the minute, (separating hours from
minutes by either a space, or the [:] or the [.] characters.
Converting Hours:Minutes to Units of WIP
In the case where activity is recorded down to the minute, the resulting total for the week will be
converted to a decimal value with 2 decimal places. This amount will then be used to compute the
chargeable or non-chargeable amounts associated to the resulting WIP records.
Also, if any Costs or Overhead is computed for the Employee, Project, Customer combination of
codes, when each of up to 7 WIP records are generated, will be pro-rated based on the ratio of daily
to total hours:minutes.
© 2007 - 2014 by Sentinel Hill Software, all rights reserved
286
Series 5 Professional Invoicing - User Help
Chargeable or Non-Chargeable
radio-buttons
Defines whether the WIP item is to be invoiced or not. This setting will always default
depending on the properties set up for the Project and/or the Task the activity is being
recorded for. (If a Project is defined as a Non-Chargeable Project, then selecting
the item to be Chargeable has no effect. However setting the item to nonchargeable for Projects that do get invoiced results in this item never being
invoiced).
WIP Transaction Type
radio-buttons
There are four types of WIP activity that
may be entered into the system.
Basically, depending on the type of WIP
specified when the activity is entered,
determines how the item is billed.
The Types are defined as follows:
Type of WIP
Items
Description
Active WIP
Charge
An Active WIP Item is one that is either Chargeable or NonChargeable. Chargeable Items may eventually be selected for
billing and contribute to charges on a Customer's Invoice to be
generated for the Project.
Force Billed
WIP
A Force Billed WIP Item is similar to an Active WIP, but when
posted to the WIP file it is automatically selected for billing.
These items would appear on the next Invoice produced for
the Project. (Only chargeable WIP items may be entered as
Force Billed ones).
Deferred WIP
Deferred WIP Items are similar to Active Items, but are
posted to the WIP file marked as Deferred from Billing.
These items can be selected for billing only by specifically
being selected from the Selective Billing and Adjustments 400
function.
Memo
Memos are WIP records that carry text information only. They
are used only to record information about the Project, or
describe events associated to a specific date. Memo WIP
items are typically never allowed to be selected for billing.
However, if a Project has a specific Invoice Layout, these
Memo records may be used for information printed in the
headers of invoices.
© 2007 - 2014 by Sentinel Hill Software, all rights reserved
Professional Invoicing Menu Functions
Type "C" Invoice Layout Grouping
287
drop-down list
When invoices are generated for a Project, the P/I system provides for a number of
different sorting and grouping options. Invoice Layouts are created and assigned to every
Project. For Projects that have a Type "C" Invoice Layout, these radio-buttons are offered
so a Group and/or Consolidation code may be recorded with their associated WIP items.
WIP charges may be recorded into the P/I system with a Consolidation Flag. This is a 1
character field that can take a value of D, F, or a number from 1, .... 9. Depending on the
options specified, all WIP charges may be grouped and sub-totalled by their
Consolidation Flag. All WIP having the same Consolidation Flag are grouped together.
As an additional option, the WIP within each Group will be sorted by the WIP Reference
field. In some cases, the Reference field holds an individuals's name, or a Billing-Code.
All charges with the same Reference field would be sub-totalled and printed as one line
on the invoice.
No consolidation is performed. Each WIP
charge is printed in detail
Sum items within a Group printed All the charges with the same Consolidation Flag
are sub-totalled and printed as one line.
as a total
WIP for a Group are sub-totalled by All the charges with the same Consolidation Flag
are sub-totalled by their WIP Reference field. An
Reference
additional sub-total is printed for each
Consolidation Group.
Sub-Total by Reference Bill-Code All the charges with the same Bill-Code, that is
determined from the WIP's Reference field, are
sub-totalled and printed. When selected, you
must also specify which portion of the Reference
field is to be used as the Bill-Code. (The
Consolidation Flag is not used in this case).
None
Consolidation Flags in the Configuration File
Using type B or C Invoice Layouts with Consolidation Flags requires the definition of up to 9
variables in the runtimes Configuration file. Each variable is associated to the 9 numeric values that
the Consolidation Flag may take. The variable is defined as follows:
PI-INV-DESCn <flag> <description text>
where:
n is the value 1 - 9;
<flag> will be either an A or a B indicating the Generation Type rule to be used, (or ignored for
the B layouts);
<description text> will be printed as the description on the invoice for the consolidated total
of all items flagged with n.
© 2007 - 2014 by Sentinel Hill Software, all rights reserved
288
Series 5 Professional Invoicing - User Help
Working Location of WIP Activity
drop-down list
This field is used to record
the location that the activity
was actually performed.
This is provided for
information purposes, and
may be used as a filter or
analysis by third party report
writers.
Description
X(50)
This field is used to record a brief description of the activity performed. For Projects
using specific Invoice Layouts, this field may be used to sort items printed on invoices.
Reference 1 and 2
X(40)
These fields are used to record codes relating to sub-contracts, job numbers, billing
codes, contact names, etc., or to record more verbiage describing the WIP activity. For
Projects using specific Invoice Layouts, and/or that generate EDI invoices, segments of
these fields may be used to determine how items are grouped or sorted for invoicing.
No Reference 2 for Weekly Timesheet Entries
The Reference 2 field associated to WIP items is not available to record information when entering
Timesheets for employee WIP activity items as hours for each day of the week.
Also, the WIP's Reference 1 field is labeled as the Billing Code
Task Description Override
X(60)
This field is used to provide an opportunity to override the description that is associated to
the Task. For a particular Invoice Layout, detail is listed with the description derived from
the Task Code. If a description is entered in this field, then this text is printed on the
invoice instead. For WIP recorded not using the mentioned Invoice Group, it may be
used to record further description associated to the activity.
Recap Detail ID Number
9(8)
For WIP charges that are interfaced from another users system, as an option, a Recap
Detail record may be associated to them. These Recap records contain additional fields
used to describe the charge in more detail, and may contain billing information. These
Recap records must have a Recap ID Number. To tie these Recap records to WIP
items, this number is also carried in the WIP record, thus is presented for display.
© 2007 - 2014 by Sentinel Hill Software, all rights reserved
Professional Invoicing Menu Functions
289
Generally, these numbers should never be changed.
Recap Id Numbers are not used when entering Timesheets for employee WIP activity
items as hours for each day of the week.
9.5.1.7
Posting Employee Timesheet Batches
The process of posting a Time Entry Batch, moves the WIP items associated to each Time
Sheet, to the active Work-in-Progress file. These items will then be available for billing and/or
analysis. Once WIP items are posted, they may also be viewed using the Project Inquiry 216
application.
When a Time Entry Batch is posted, a Posting Journal report will be produced. This may be
printed, or saved to disk for later reference. If the journal that is generated, is archived, it will
be catalogued with a report name of TIME_XXXXXX.JRN, where XXXXXX is the code
assigned as the Time Entry Batch.
The Print Options tab screen will be displayed, from which you can select to direct the output
to be displayed to the screen, archived, printed, saved as an MS Word document, saved as a
PDF, and/or emailed. (Refer to the topic titled Report Generation and Printing 159 for full
details).
9.5.2
General WIP Entry
This function is used to enter WIP activity that is not directly related to an employee or a
machine. This is referred to as Generalized WIP Entries. Generalized WIP items are not
recorded to an Employee's Timesheet. Instead, they are entered as a single batch of
transactions. When all entries have been added, the transaction file is then Posted to the WI-P file.
When entering Generalized WIP entries you have the opportunity to enter the Cost and Billing
Rates, and other fields normally assigned by the system, directly. Other than that, once
posted they are the same as other WIP items. They can be billed and invoiced, might be
chargeable or non-chargeable, and have costs associated to them.
One additional feature associated to the entry of Generalized WIP, is the opportunity to enter
extended information about the activity. This extended information is referred to a WIP's
Recap Detail. Some of the fields associated to Recap records are as follows:
Customer's Order Number, and Billing Codes
3rd Party Client Bill Codes
Alternate Company Names, City and State (if different from the Customer's office
© 2007 - 2014 by Sentinel Hill Software, all rights reserved
290
Series 5 Professional Invoicing - User Help
address)
Extended Activity Description fields
Customer Department Codes, Names and Manager
An additional 7 Reference fields of up to 90 characters each
Interfaced WIP & Recap Detail
For users providing interfaced detail charges from a different application, the Load WIP/Recap
for General WIP Entry operation may be used. It reads a sequential file and will populate a
General WIP Transaction Entry Batch. It is assumed that this data has been validated, and that
for each WIP charge, an optional associated Recap Detail record exists.
When a given General WIP Transaction Batch is posted, each record is tested to validate the
Project, Employee and Task codes; and if a Recap is expected, then that too is validated. If an
error is encountered, the associated transaction WILL NOT be posted.
From the P/I Main menu, select General WIP Entry from the Operations drop-down menu.
General WIP Items - Grid Select Screen
The following grid screen is presented for entry and maintenance of General WIP charges:
© 2007 - 2014 by Sentinel Hill Software, all rights reserved
Professional Invoicing Menu Functions
291
The "Fast Buttons" frame provides the push buttons to launch the most common functions
associated to entry of General WIP.
"Fast Buttons"
New
Add a new General WIP Transaction
Modify
Modify the General WIP Transaction highlighted in the grid
Delete
Delete the General WIP Transaction highlighted in the grid
Edit List
Print an Edit List showing the details of each General WIP
Transaction entered into the batch
Post
Import
Post the Batch of General WIP Transactions
Import General WIP transactions from an Excel
spreadsheet, or a tab-delimited text file. Both the WIP
information and Recap information is loaded.
Revalidate WIPs When transactions are imported, or interfaced from a user
© 2007 - 2014 by Sentinel Hill Software, all rights reserved
292
Series 5 Professional Invoicing - User Help
supplied data file, there is a chance that some of the codes
that are loaded are undefined to the P/I system. These
transactions are loaded, but they are flagged as having a
problem. After any of the identified undefined codes are
added to the P/I system, execute this function to revalidate
any of the flagged transactions.
Some of the special features of this General WIP entry grid are as follows:
Transactions may be listed by
either the Transaction ID, or by
Project. (The ID is just a
sequential counter assigned
when the transaction is added).
Depending on the List By
selection, a field is presented, in
which the operator may key in
an ID #, or a Project Code. The
system will attempt to read to
the closest transaction for the
data entered and display it in the
grid.
If after interfacing from
Spreadsheet, you realize that
you didn't really want to do that,
you can delete all the
transactions. From the Edit
drop-down menu, click Delete
All Transactions.
If the function to have the Edit List printed is selected, the report if archived, will be catalogued
© 2007 - 2014 by Sentinel Hill Software, all rights reserved
Professional Invoicing Menu Functions
293
with a report name of GENWIPTRX.LST.
The Print Options tab screen will be displayed, from which you can select to direct the output
to be displayed to the screen, archived, printed, saved as an MS Word document, saved as a
PDF, and/or emailed. (Refer to the topic titled Report Generation and Printing 159 for full
details).
Entering General WIP Charges - Data Entry Screen
The following screen is presented for entry of fields associated to entry of the WIP charges:
General WIP Data Screen - Field Definitions
Project Code
X(6)
Select or enter the Project Code for which the activity being recorded was performed for.
© 2007 - 2014 by Sentinel Hill Software, all rights reserved
294
Series 5 Professional Invoicing - User Help
Employee Code
X(6)
Select or enter the Employee Code who performed the activity that is being entered.
Task Code
X(8)
Select or enter the Task Code for the activity that was performed.
Transaction and Ledger Dates
(mmddyy)
Enter these dates as required. The Ledger Date is used when any G/L Distributions are
generated for recording Revenue or Costs.
Working Location of WIP Activity
drop-down list
This field is used to record
the location that the activity
was actually performed.
This is provided for
information purposes, and
may be used as a filter or
analysis by third party report
writers.
Description
X(50)
This field is used to record a brief description of the activity performed. For Projects
using specific Invoice Layouts, this field may be used to sort items printed on invoices.
Reference 1 and 2
X(40)
These fields are used to record codes relating to sub-contracts, job numbers, billing
codes, contact names, etc., or to record more verbiage describing the WIP activity. For
Projects using specific Invoice Layouts, and/or that generate EDI invoices, segments of
these fields may be used to determine how items are grouped or sorted for invoicing.
Task Description Override
X(60)
This field is used to provide an opportunity to override the description that is associated to
the Task. For a particular Invoice Layout, detail is listed with the description derived from
the Task Code. If a description is entered in this field, then this text is printed on the
© 2007 - 2014 by Sentinel Hill Software, all rights reserved
Professional Invoicing Menu Functions
295
invoice instead. For WIP recorded not using the mentioned Invoice Group, it may be
used to record further description associated to the activity.
Recap Detail ID Number
9(8)
For WIP charges that are interfaced from another users system, as an option, a Recap
Detail record may be associated to them. These Recap records contain additional fields
used to describe the charge in more detail, and may contain billing information. These
Recap records must have a Recap ID Number. To tie these Recap records to WIP
items, this number is also carried in the WIP record, thus is presented for display.
Generally, these numbers should never be changed.
WIP Revenue Account
9(18) - 9(5)
Enter the G/L Revenue account that is to be assigned to the WIP activity to be used if it is
a chargeable item that is to be invoiced.
WIP Cost Amount
9(8)
If the system is configured to maintain costs, this amount will be used as the Cost
associated to this WIP charge item. The system does not attempt to determine the Unit
Cost Rate using the rules that have been defined. For General WIP entry, the cost must
be entered.
Cost Account
9(18) - 9(5)
If the system is configured to maintain costs, and a Cost Amount was entered, enter the
G/L Cost account that is to be assigned to the WIP activities Cost. The system will
assign a default Cost Account based on the rules that have been defined by the P/I
Control Preferences 700 .
General WIP Recap - Data Entry Screen
One additional feature associated to the entry of Generalized WIP, is the opportunity to enter
extended information about the activity. This extended information is referred to as a WIP's
Recap Detail. Most of this data is kept as information to be viewed for reference. Depending
on the customer to which the Project is associated with, Recap Detail may be used for
generation of Invoices.
Account Status on the WEB
For users utilizing the Series 5 Web Management System and offering the Web based
© 2007 - 2014 by Sentinel Hill Software, all rights reserved
296
Series 5 Professional Invoicing - User Help
"Account Status on the WEB" inquiry software, Recap detail associated to any invoice may
be selected to be displayed.
When a Recap ID # is provided on the WIP Charge tab screen, then the Recap Detail tab
screen will be presented:
General WIP Recap Data Screen - Field Definitions
Most of the fields offered for entry of Recap information are provided for recording details
associated to the charge. (As such, not all fields are described in the following tables).
Those fields that have significant settings are described below:
Customer Order Number
9(10)
The Order Number associated to the original WIP activity. For certain customers having
specific Invoice Layouts, charges are grouped to produce a different invoice for each
Order, or for other Invoice Layouts, charges are grouped by Order Number
© 2007 - 2014 by Sentinel Hill Software, all rights reserved
Professional Invoicing Menu Functions
Customer Service Rep
297
X(6)
When the Recap information records are loaded, if a value is provided in this field, then it
will be assigned to the associated Customer's CSR Demographic Code field. It will be
assumed that the provided CSR Code has already been defined. The name and
description associated to the CSR Code will be printed on Invoices generated from
specific Invoice Layouts.Select or enter the Employee Code who performed the activity
that is being entered.
Order Service Rep
X(6)
The Order Service Rep code field is provided form information purposes.
Customer Billing Code
X(40)
For a number of different Invoice Layouts, when Invoices are generated, charges are
either grouped by this Billing Code, or separate Invoices are generated for each Billing
Code
General WIP Entry Import Data Formats
When the General WIP charges are imported, the following fields are input from an
Excel spreadsheet, a tab-delimited text file, or a CSV text file. The default input
filename is GenWIPTrxIn.XLS.
Column # Excel Column
Field
Format
1
A
Project Code
X(6)
2
B
Employee Code
X(6)
3
C
Task Code
X(10)
4
D
Transaction Date
MM/DD/YY
5
E
Ledger Date
MM/DD/YY
6
F
# of Units of Task
99,999.99-
7
G
Unit Charge Rate (only positive)
99,999.99
8
H
Overhead Amount
999,999.99-
9
I
Promo/Discount Savings Amount
999,999.99-
10
J
Chargeable/Non-Chargeable Flag X(1)
11
K
WIP Transaction Type
© 2007 - 2014 by Sentinel Hill Software, all rights reserved
X(1)
298
Series 5 Professional Invoicing - User Help
12
L
Service of Disbursement Flag
[S] or [D]
X(1)
13
M
Invoice Consolidation Flag
[space], [0-9], [D] or [F]
X(1)
14
N
Work Location
9(2)
1 - Admin Office 8 - Retail Store
2 - Service Desk 9 - Web Site
3 - Shop
10 -Customer
Site
4 - Warehouse 11 Building Site
5 - Head Office 12 -In the Field
6 - Remote
13 -In Transit
Office
7 Home Office 14 Other
-
15
O
Description
X(50)
16
P
Reference 1
X(40)
17
Q
Reference 2
X(40)
18
R
Task Description Override
X(60)
19
S
Revenue Acct - Main #
9(18)
20
T
Revenue Acct - Profit Center
9(5)
21
U
Cost Amount
9,999,999.99-
22
V
Cost Acct - Main #
9(18)
23
W
Cost Acct - Profit Center
9(5)
24
X
Recap ID Number (-1 to have
system assigned Recap #).
9(8)
The following columns are used to supply Recap Detail. (These
are NOT processed if Column [X] is blank).
25
Y
Order Number
9(10)
26
Z
Order Line Number
9(3)
27
AA
Client Service Rep
X(6)
28
AB
Order Service Rep
X(6)
29
AC
Billing Code
X(40)
30
AD
3rd Party Bill Code
9(6)
31
AE
Search Date
MM/DD/YY
32
AF
Search Time
hhmmss
33
AG
Ordered By
X(35)
© 2007 - 2014 by Sentinel Hill Software, all rights reserved
Professional Invoicing Menu Functions
9.5.3
34
AH
Search Company Name
X(50)
35
AI
Search County
X(30)
36
AJ
Search State Code
X(2)
37
AK
Search Court Info
X(200)
38
AL
Activity Description
X(60)
39
AM
Lease Number
X(20)
40
AN
Reference 2
X(40)
41
AO
Reference 3
X(100)
42
AP
Reference 4
X(94)
43
AQ
Reference 5
X(90)
44
AR
Reference 6
X(90)
45
AS
Reference 7
X(90)
46
AT
Reference 8
X(90)
47
AU
Application Code
X(3)
48
AV
Company ID Flag
X(1)
49
AW
Ordering Department Code
X(15)
50
AX
Ordering Department Name
X(50)
51
AY
Subsidiary Search ID Number
X(15)
299
Email Blank Employee Timesheets
The Series 5 Professional Invoicing system offers this function that will generate a
spreadsheet for each employee pre-listing potential time sheet activity to be recorded. A
number of standard entries are created assigned to a specific administrative Project, but as
well, entries for the Projects and Tasks that are defined by this maintenance function are also
created. This time-sheet spreadsheet is then automatically emailed to each employee.
The spreadsheet may then be edited as required, and emailed back. An associated function,
that may be executed, will read the returned emails from employees containing the completed
time-sheet spreadsheet as an attachment. (See the topic titled Load Timesheets from
Employee Emails 305 for more information).
Some points to note when generating timesheet spreadsheets and having them emailed, as
follows:
A number of filters may be set should you wish to restrict generation of emails to
employees associated to a given Department, Job Class, Location, or with a given
Supervisor.
© 2007 - 2014 by Sentinel Hill Software, all rights reserved
300
Series 5 Professional Invoicing - User Help
The generated spreadsheet has a separate row for each Project / Task
combination. Then a separate column is provided for each day falling within the
specified date range. The employee completes the spreadsheet by filling in the # of
hours associated to each Task/Project for each day.
If Projects, along with selected Tasks, have been assigned to an employee, they will
be listed in the spreadsheet. (See the topic titled Assign Valid Projects to
Employees 645 on assigning Projects to an employee).
Up to 25 additional Tasks may be defined that will automatically be recorded to the
spreadsheet. These might be those tasks associated to any non-chargeable activity
that the employee might perform. (Ie., Holiday, Sick-Time, Administration, Meetings,
etc.). These additional Tasks will be written with a designated Project, that
presumably will be set up for Company non-chargeable activity.
The spreadsheets will be created in the directory defined by the runtime
Configuration file variable WEB_EDOCS_DIRECTORY.
For the emails that are created, the body of the email message, is loaded from the
file named Employee_Tsheet_EmailMessage.TXT that must be located in the
directory named Email-Templates located in each Company System's designated
reports directory. This text file may be either a plain ASCII text, or an HTML file and
contain up to 8192 characters.
In the event you have activity, or charges that you wish to bill your customer for, but
they are not really directly associated to a a particular employee or machine, they
may be entered as Generalized WIP charges 270 . These can be entered directly, or
they can be interfaced from data files 270 that are generated from another system, or
they can be loaded from a spreadsheet 270 .
From the P/I Main menu, select Email Blank Employee Timesheets from the Operations
drop-down menu.
Generate Timesheet Emails - Options Screen
The following screen is presented for entry of options and filters when generating Employee
Timesheet emails:
© 2007 - 2014 by Sentinel Hill Software, all rights reserved
Professional Invoicing Menu Functions
301
Some of the special features of this General WIP entry grid are as follows:
Transactions may be listed by
either the Transaction ID, or by
Project. (The ID is just a
sequential counter assigned
when the transaction is added).
Generate Timesheet Emails - Field Definitions
Generate Timesheets for Entry Of
Radio-Buttons
Select the time frame for which the timesheets will be representative of. This may be for
a one or two week period; or where each item is for a separate WIP activity, (assuming
one WIP per spreadsheet row).
© 2007 - 2014 by Sentinel Hill Software, all rights reserved
302
Series 5 Professional Invoicing - User Help
Depending on the selection, different layouts of spreadsheets are generated. In the 1st
row of the spreadsheet the Timesheet Layout will be identified as follow:
For 1 Week Timesheet - Layout W
For 2 Week Timesheet - Layout B
For Individual Item Timesheet - Layout S
For WIP Date, or Week(s) Starting
(mmddyy)
For one and two week layouts, enter the starting date for which charges are to be
recorded. For Individual layouts, enter the data to be used as the default, (which would
either be the specific date, or the date of the most recent entry).
Department
X(2)
Select only those Employees who's Department matches the code entered. Leave the
field blank if it is NOT to be considered as a filter.
Job Class
X(6)
Select only those Employees who's Job Class matches the code entered. Leave the field
blank if it is NOT to be considered as a filter.
Location
X(6)
Select only those Employees who's Location matches the code entered. Leave the field
blank if it is NOT to be considered as a filter.
WIth Supervisor
X(6)
Select only those Employees who's assigned Supervisor matches the code entered.
Leave the field blank if it is NOT to be considered as a filter.
Additional Standard Tasks to be Included
List-Box Table
This table lists those default Tasks that are to be generated in the timesheet's
spreadsheet. When this function is first executed, a default list of Tasks will be assigned.
These may be edited to suite your requirements. (Note that any Tasks defined here
© 2007 - 2014 by Sentinel Hill Software, all rights reserved
Professional Invoicing Menu Functions
303
must also be set up as Tasks in the P/I system).
The set of Tasks may be edited by double-clicking the table, of clicking the small icon in
the top right corner of the table.
Use with Project
X(6)
Timesheet entries must be made up of a Task and a Project. The default timesheet WIP
entries created in the spreadsheet, will be written with the Project Code that is defined
here. Typically, this would be a project that is set up in the P/I system to record the time
employees spend on non-chargeable activity.
Timesheet Spreadsheet Layouts
When the spreadsheets are generated, the following fields are output as an Excel
spreadsheet. The files are created with the filename of
Tsheet_XXXXXX_yyyymmdd.XLS. where XXXXXX is the employee code.
Note that the 1st 5 rows of the spreadsheet will contain titles and header information;
and those fields below that are show in blue are to be entered by the user.
For 1 week layout "W":
Column # Excel Column
Field
Format
1
A
Project Code
X(6)
2
B
Project Description
X(30)
3
C
Task Code
X(10)
4
D
Task Description
X(40)
5
E
Task Units
X(12)
6
F
Chargeable/Non-Chargeable flag
"N" or "C"
7
G
WIP Description
© 2007 - 2014 by Sentinel Hill Software, all rights reserved
304
Series 5 Professional Invoicing - User Help
8
H
Day 1 - Monday-date
9
I
Day 2 - Tuesday-date
10
J
Day 3 - Wednesday-date
11
K
Day 4 - Thursday-date
12
L
Day 5 - Friday-date
13
M
Day 6 - Saturday-date
14
N
Day 7 - Sunday-date
15
O
Sum of Columns H thru N
16
P
Reference 1
17
Q
Reference 2
18
R
Task Description Override
19
S
Working Location
999,999.99
For 2 week layout "B":
Column # Excel Column
Field
Format
1
A
Project Code
X(6)
2
B
Project Description
X(30)
3
C
Task Code
X(10)
4
D
Task Description
X(40)
5
E
Task Units
X(12)
6
F
Chargeable/Non-Chargeable flag
"N" or "C"
7
G
WIP Description
8
H
Week 1 - Day 1 - Monday-date
9
I
Week 1 - Day 2 - Tuesday-date
10
J
Week 1 - Day 3 - Wednesdaydate
11
K
Week 1 - Day 4 - Thursday-date
12
L
Week 1 - Day 5 - Friday-date
13
M
Week 1 - Day 6 - Saturday-date
14
N
Week 1 - Day 7 - Sunday-date
15
O
Week 2 - Day 1 - Monday-date
16
P
Week 2 - Day 2 - Tuesday-date
17
Q
Week 2 - Day 3 - Wednesdaydate
18
R
Week 2 - Day 4 - Thursday-date
© 2007 - 2014 by Sentinel Hill Software, all rights reserved
Professional Invoicing Menu Functions
19
S
Week 2 - Day 5 - Friday-date
20
T
Week 2 - Day 6 - Saturday-date
21
U
Week 2 - Day 7 - Sunday-date
22
V
Sum of Columns H thru U
23
W
Reference 1
24
X
Reference 2
25
Y
Task Description Override
26
Z
Working Location
305
999,999.99
For Individual WIP Items layout "S":
Column # Excel Column
9.5.4
Field
Format
1
A
Project Code
X(6)
2
B
Project Description
X(30)
3
C
Task Code
X(10)
4
D
Task Description
X(40)
5
E
Date
MM/DD/YY
6
F
# of Hours or Task Units
7
G
Task Units
X(14)
8
H
Chargeable/Non-Chargeable flag
"N" or "C"
9
I
WIP Description
10
J
Reference 1
11
K
Reference 2
12
L
Task Description Override
13
M
Working Location
Load Timesheets from Employee Emails
The Series 5 Professional Invoicing system offers the function that will generate a
spreadsheet for each employee, pre-listing potential time sheet activity to be recorded. A
number of standard entries are created assigned to a specific administrative Project, but as
well, entries for the Projects and Tasks that are defined by this maintenance function are also
created. This time-sheet spreadsheet is then automatically emailed to each employee.
(See the topics titled Email Blank Employee Timesheets 299 for more information).
The spreadsheet may then be edited as required, and emailed back. This function is used
examine a designated Outlook Inbox to read any returned emails from employees containing
the completed time-sheet spreadsheet as an attachment. The spreadsheet are loaded, and
WIP activity is recorded in a Time Entry Batch, that is posted into the PI system.
© 2007 - 2014 by Sentinel Hill Software, all rights reserved
306
Series 5 Professional Invoicing - User Help
Some points to note associated to the loading of timesheets from employee emails, as
follows:
The employees must maintain the original layouts of the spreadsheets
When the spreadsheets are returned, the original email must be replied to, and the
subject line contain the following string:
RE: Your Timesheet for
As the emails are read and processed, they will be moved to sub-folders withing the
designated Inbox. Those loaded without a problem are moved to the Loaded folder;
those that had some sort of coding error are moved to the Not-Loaded folder, and
those that could not be properly identified as an Reply with an employee timesheet
are moved to the the Un-Related folder.
From the P/I Main menu, select Load Timesheets from Emails from the Operations dropdown menu.
Load Employee Timesheets from Emails - Options Screen
The following screen is presented for entry of options when loading Employee Timesheet
from emails:
© 2007 - 2014 by Sentinel Hill Software, all rights reserved
Professional Invoicing Menu Functions
307
Default Input From Folder
You would typically always have the interface file that is generated from the invoicing or order entry
system deposited into the same folder. As such, it would be nice to have this interface function load
the file without the operator having to hunt for it.
A variable may be be added to the Runtime Configuration file 736 that specifies the path from where
the interface files are always loaded. It needs to be defined as follows:
xxx-TRXTXT-PATH full-directory-path
Where: xxx is the Series 5 company system code
full-directory-path is the full path to the directory
Contact your system or accounting manager to have this capability set up.
The Interface Journal/Edit list report generated, if archived, will be catalogued with a report
name of EMAIL_TIMESHEETS.JRN.
The Print Options tab screen will be displayed, from which you can select to direct the output
to be displayed to the screen, archived, printed, saved as an MS Word document, saved as a
© 2007 - 2014 by Sentinel Hill Software, all rights reserved
308
Series 5 Professional Invoicing - User Help
PDF, and/or emailed. (Refer to the topic titled Report Generation and Printing
details).
159
for full
Outlook's Inbox
In order for this function to operate correctly, you must have created a sub-folder named
S5 TimeSheets within Outlook's Inbox. The sub-folders used to hold emails that are
completed and moved will be created by the system.
As well, you must create an Outlook E-mail Rule that will automatically move the
managers' approval reply emails to this new folder. You might name the rule S5 PI
Employee Timesheets. You must then assign the following settings as shown below,
and turn on the rule.
© 2007 - 2014 by Sentinel Hill Software, all rights reserved
Professional Invoicing Menu Functions
309
Field Definitions
Post Charges to a Timesheet Entry Batch
check-box
When loading the interface data, if you wish to actually perform the interface and have
time sheet transactions generated, then set this check box. (Leave it un-checked if you
just wish to validate the input data, and have an exception report generated).
Print an Interface Journal/Edit List
radio-buttons
When loading the Time Sheet transactions from employee emails, if you wish to have an
edit list, an exception report, or a journal report generated, set this applicable radio-button.
© 2007 - 2014 by Sentinel Hill Software, all rights reserved
310
Series 5 Professional Invoicing - User Help
The Full Detail report list all transactions. The Exception report lists only those
transactions that have undefined Projects, Task or Employee codes.
Time Entry Batch Code
X(6)
This is the code assigned to the Time Sheet Entry Transaction Batch. It can be either
numeric, or alphanumeric. There should not be any spaces or punctuation in the batch
code, as it is used within the name of one of the Series 5 data files. By default, a code of
UImmdd is used, (where mmdd is the current month and day).
Ledger Date
(mmddyy)
When loading WIP charges from employee emails, only the WIP Transaction date is
input. You must specify the Ledger date to be assigned by this field. It would normally be
the date of the most recent WIP charge. When associated G/L distributions are
generated, this is the date that is used.
Mark Items "Pre-Selected for Billing"
check-box
Normally when WIP items are recorded, they remain on the system until their associated
Project is selected to be billed; or they are individually selected to be billed.
As an option, WIP items that are interfaced may be automatically selected to be billed.
These will be flagged with a status of "Force Billed", and the original rates, units and
amounts will be used as the corresponding amounts for invoicing.
Timesheet Spreadsheet Layouts
The spreadsheets were initially generated with the following fields in the Excel
spreadsheets. The files were created with the filename of
Tsheet_XXXXXX_yyyymmdd.XLS. where XXXXXX is the employee code.
It is important that the employees maintain the same layout as was generated, when
the enter the timesheet activity.
Note that the 1st 5 rows of the spreadsheet will contain titles and header information;
and those fields below that are show in blue were to be entered by the user.
For 1 week layout "W":
Column # Excel Column
Field
Format
1
A
Project Code
X(6)
2
B
Project Description
X(30)
3
C
Task Code
X(10)
© 2007 - 2014 by Sentinel Hill Software, all rights reserved
Professional Invoicing Menu Functions
4
D
Task Description
X(40)
5
E
Task Units
X(12)
6
F
Chargeable/Non-Chargeable flag
"N" or "C"
7
G
WIP Description
8
H
Day 1 - Monday-date
9
I
Day 2 - Tuesday-date
10
J
Day 3 - Wednesday-date
11
K
Day 4 - Thursday-date
12
L
Day 5 - Friday-date
13
M
Day 6 - Saturday-date
14
N
Day 7 - Sunday-date
15
O
Sum of Columns H thru N
16
P
Reference 1
17
Q
Reference 2
18
R
Task Description Override
19
S
Working Location
999,999.99
For 2 week layout "B":
Column # Excel Column
Field
Format
1
A
Project Code
X(6)
2
B
Project Description
X(30)
3
C
Task Code
X(10)
4
D
Task Description
X(40)
5
E
Task Units
X(12)
6
F
Chargeable/Non-Chargeable flag
"N" or "C"
7
G
WIP Description
8
H
Week 1 - Day 1 - Monday-date
9
I
Week 1 - Day 2 - Tuesday-date
10
J
Week 1 - Day 3 - Wednesdaydate
11
K
Week 1 - Day 4 - Thursday-date
12
L
Week 1 - Day 5 - Friday-date
13
M
Week 1 - Day 6 - Saturday-date
14
N
Week 1 - Day 7 - Sunday-date
15
O
Week 2 - Day 1 - Monday-date
© 2007 - 2014 by Sentinel Hill Software, all rights reserved
311
312
Series 5 Professional Invoicing - User Help
16
P
Week 2 - Day 2 - Tuesday-date
17
Q
Week 2 - Day 3 - Wednesdaydate
18
R
Week 2 - Day 4 - Thursday-date
19
S
Week 2 - Day 5 - Friday-date
20
T
Week 2 - Day 6 - Saturday-date
21
U
Week 2 - Day 7 - Sunday-date
22
V
Sum of Columns H thru U
23
W
Reference 1
24
X
Reference 2
25
Y
Task Description Override
26
Z
Working Location
999,999.99
For Individual WIP Items layout "S":
Column # Excel Column
9.5.5
Field
Format
1
A
Project Code
X(6)
2
B
Project Description
X(30)
3
C
Task Code
X(10)
4
D
Task Description
X(40)
5
E
Date
MM/DD/YY
6
F
# of Hours or Task Units
7
G
Task Units
X(14)
8
H
Chargeable/Non-Chargeable flag
"N" or "C"
9
I
WIP Description
10
J
Reference 1
11
K
Reference 2
12
L
Task Description Override
13
M
Working Location
Load WIP/Recap for General WIP Entry
The Series 5 Professional Invoicing system is designed as a stand-alone system that can
generate invoices for charges as a result of employee activity recorded as time sheets, or by
other system's home grown servicing or production packages. Either way, WIP end up in the
© 2007 - 2014 by Sentinel Hill Software, all rights reserved
Professional Invoicing Menu Functions
313
P/I system ready to be invoiced.
This menu function provides the means to load WIP activity or charges from an external
source such as a custom developed Web servicing system or employee time keeping
system. That system needs only to generate a sequential file in a specifically designed
format. That file is then read and interfaced as General WIP 289 transactions for the Series 5
system.
Some points to note when interfacing WIP charges and activity:
The interface file may be processed either to be read to generate a report, or to
actually generate General WIP Transactions, or both. The report may be generated
as a full interface journal, or as just an exception report.
The interface handles both WIP records data, and Recap Detail record data.
(Recap data provides the opportunity to record extended information about the WIP
activity). The interface function offers the option to load just the WIP data, just the
Recap data, or both.
The P/I system provides support for 3rd Party billing. When interfacing WIP activity,
that has associated to it Recap Detail, these charges may be applicable for 3rd
Party Invoicing. For these Projects, a 3rd Party Billing Address needs to be defined
based on a Bill Code. The 3rd Party Bill Code, along with the billing Company Name
and Address must be provided within the interfaced Recap data records. This data
is recorded as a 3rd Party Billing Address and may be viewed or edited using the
3rd Party Bill Codes Maintenance function 591 . (The USER-RECAP2-SUBCLIENT-CODE field is used to provide the Billing Code).
All input data is validated. Any Project code, Employee code and Task codes are all
validated within the system. If an undefined code is encountered, the transaction is
recorded, but it is flagged as having a problem. (These are easily identified within
the General WIP Entry function 289 , and may be fixed).
The system, by default, will look for the interface file in a sub-folder on your system
that is defined by a variable in the runtime configuration file 736 . Your System's
Manager can set this up for you.
After interfacing the transactions, you must select General WIP Entry function 289
from the P/I's Operations drop-down menu and post it to have the transactions
recorded as WIP items ready to be processed for invoicing.
When WIP interface files are successfully loaded, an entry is recorded into an
Interfaced File Audit Log. If an attempt is made to re-load the same file, the operator
will be advised and may choose to repeat the interface, or not. (When the interface
is called from the Invoicing Wizard, if a file has already been loaded, then an error
will be returned to the Invoicing Wizard, and the file will not be loaded).
© 2007 - 2014 by Sentinel Hill Software, all rights reserved
314
Series 5 Professional Invoicing - User Help
Accessing the "Interface User WIP/Recap to General WIP" function
From the P/I Main menu, select Load WIP/Recap to GenWIP Entry from the
Operations drop-down menu.
Interface User WIP/Recap to General WIP - Options Screen
The following screen is presented when interfacing the user defined WIP and Recap charges
as General WIP Transactions:
© 2007 - 2014 by Sentinel Hill Software, all rights reserved
Professional Invoicing Menu Functions
315
Default Input From Folder
You would typically always have the interface file that is generated from your external system
deposited into the same folder. As such, it would be nice to have this interface function load the file
without the operator having to hunt for it.
A variable may be be added to the Runtime Configuration file 736 that specifies the path from where
the interface files are always loaded. It needs to be defined as follows:
xxx-TRXTXT-PATH full-directory-path
Where: xxx is the Series 5 company system code
full-directory-path is the full path to the directory
Contact your system or accounting manager to have this capability set up.
The Interface Journal/Edit list report generated, if archived, will be catalogued with a report
name of PIUSERIFAC.JRN.
© 2007 - 2014 by Sentinel Hill Software, all rights reserved
316
Series 5 Professional Invoicing - User Help
The Print Options tab screen will be displayed, from which you can select to direct the output
to be displayed to the screen, archived, printed, saved as an MS Word document, saved as a
PDF, and/or emailed. (Refer to the topic titled Report Generation and Printing 159 for full
details).
Field Definitions
Data Record Types to be Loaded
radio-buttons
The interface function is basically designed to load WIP charges, and as an option,
associated Recap Detail information. Select to have one or the other file loaded, or both.
(Each type of data is read from different files, but Recap data is tied to WIP data
using a Recap ID Number that needs to be assigned by the system that generates
the interface files).
As a custom feature for one Series 5 customer, the option to load Chase Bank Cost
Center mapping codes has been added.
Input Files From Folder and Filename
X(30) and X(120)
Enter the folder location and filename of the file to be interfaced. Click the Browse
button to navigate to the file to be interfaced. Separate files are loaded for the WIP and
the Recap data.
Record Charges as General WIP Transactions check-box
When loading the interface data, if you wish to actually perform the interface and have
transactions generated, then set this check box. (Leave it un-checked if you just wish
to validate the input data, and have an exception report generated).
Ledger Date and Transaction Date
(mmddyy)
If not provided by the interface file, when WIP transactions are generated, these dates will
be automatically assigned as the Ledger Date and the Transaction Date. When
associated G/L distributions are generated, the Ledger Date is used.
Mark Items "Pre-Selected for Billing" ?
check-box
Normally when WIP items are recorded, they remain on the system until their associated
Project is selected to be billed; or they are individually selected to be billed.
As an option, WIP items that are interfaced may be automatically selected to be billed.
These will be flagged with a status of "Force Billed", and the original rates, units and
amounts will be used as the corresponding amounts for invoicing.
© 2007 - 2014 by Sentinel Hill Software, all rights reserved
Professional Invoicing Menu Functions
Print an Interface Journal/Edit List
317
radio-buttons
When loading the A/R transactions interface data, if you wish to have an edit list, a
exception report, or a journal report generated, set this applicable radio-button.
The Full Detail report list all transactions. The Exception report lists only those
transactions with the following problems:
Undefined Project, Customer, Task or Employee Codes
Invalid type of Charge was specified, or not set as a Chargeable or Non-Chargeable
item
Derived Unit Rate for the charge was ZERO
Undefined G/L Revenue Account was assigned
User WIP/Recap Sequential File Import - Input Record Definition
When loading P/I charges information from from a sequential file, up to three different file
layouts may be employed.
For the WIP Charge data
For the Recap Detail data
For the Chase Cost Center Mapping data
Three records are used for each WIP charge. The 2nd record is optional, and is required only
if WIP Reference information is available. The 3rd record is also optional. It is used to either
add or update the A/R systems' Customer Service Rep codes. (Note that the Customer
Service Rep is really just one of the A/R Customer Demographic Codes. Before using
the 3rd record you must have already defined in the P/I Control Preferences, which
Demographic Code is designated as the Customer Service Rep. See below under
Control Preferences - General Tab Screen 694 ) .
The following record layouts are used:
© 2007 - 2014 by Sentinel Hill Software, all rights reserved
318
Series 5 Professional Invoicing - User Help
Three records are provided for each Recap Detail item.
© 2007 - 2014 by Sentinel Hill Software, all rights reserved
Professional Invoicing Menu Functions
319
The 1st one, (identified as USER-RECAP-RECORD-0), is used only by the On-Demand
Invoicing routines. It provides information associated to the origin of the request of the
production of the on-demand invoice.
The 2nd record, (identified as USER-RECAP-RECORD-0), provides the detail, and charges
associated to the corresponding service that was provided.
Assigning CSR Codes to Customers
When the Recap information records are loaded, if a value is provided in the USER-RECAPCLIENT-CSREP-CODE field, then it will be assigned to the associated Customer's CSR
Demographic Code field. It will be assumed that the provided CSR Code has already been
defined.
The 3rd record, (identified as USER-RECAP-RECORD-2), is optional, and is required only if
extra Reference information is available, or if 3rd Party Billing Customer information is
applicable.
Assigning 3rd Party Billing Address Information
In order to process 3rd party billing, the USER-RECAP2-SUB-CLIENT-xxxxxx fields must have
the appropriate values. If no USER-RECAP2-SUB-CLIENT-CODE field is included, then the
associated charges will only be invoiced to the primary Customer owning the Project. When
Sub-Client fields are provided, for the given Customer, a 3rd Party Billing master record will be
written, or updated, in the Professional Invoicing system. (See the topic titled 3rd Party Codes
Maintenance 591 for further information).
The following record layouts are offered for reference:
© 2007 - 2014 by Sentinel Hill Software, all rights reserved
320
Series 5 Professional Invoicing - User Help
© 2007 - 2014 by Sentinel Hill Software, all rights reserved
Professional Invoicing Menu Functions
321
For the loading of Case/JP Morgan Cost Center Mapping Codes the following record layout is
used:
© 2007 - 2014 by Sentinel Hill Software, all rights reserved
322
9.5.6
Series 5 Professional Invoicing - User Help
Load User Timesheets from Spreadsheet
The Series 5 Professional Invoicing system is designed as a stand-alone system that can
generate invoices for charges as a result of employee activity recorded as time sheets, or by
other system's home grown servicing or production packages. Either way, WIP end up in the
P/I system ready to be invoiced.
This menu function provides the means to load WIP activity or charges from an external
source such as a custom developed Web servicing system or employee time keeping
system. That system needs only to generate an Excel spreadsheet, or a tab-delimited text
file in a specifically designed format. That file is then read and interfaced as Time Sheet 263
transactions for the Series 5 system.
Some points to note when interfacing Time Sheet WIP charges and activity:
The interface file may be processed either to be read to generate a report, or to
actually generate Time Sheet Transactions, or both. The report may be generated
as a full interface journal, or as just an exception report.
For Time Sheet activity, the interface handles ONLY WIP records data, no Recap
Detail.
By default, the import will assume a tab-delimited text file is input. You may
designate the input as an Excel spreadsheet from the Import Options tabbed subscreen.
Three types of spreadsheet input rows may be input from the same input file.
These include the following:
Employee Time Sheet activity, (WIP Item)
Employee Time Sheet Memo WIP references
Customer name and address load/update fields
For WIP activity, a time sheet entry is recorded. For Customer loading or
updating, if the customer is already defined, it us updated with the supplied
information. If the customer is not yet on file, it is written. (For CT Lien Solutions
Inc., Default Customer Layout # 60 is used to provide codes for the fields for newly
added customers).
All input data is validated. Any Project code, Employee code and Task codes are all
validated within the system. If an undefined code is encountered, the transaction is
recorded, but it is flagged as having a problem. (These are easily identified within
the General WIP Entry function 289 , and may be fixed).
For Series 5 Company System Codes "40", "98" and "UCC where the Series 5
License is "80001" or "90001", the Unit Rate supplied is the one that is used. For all
other systems, the Unit Rate is computed based on the rules that have been
established for the Project, Employee and Task.
If the given Project has been set up for computing Overhead Amounts, then the
© 2007 - 2014 by Sentinel Hill Software, all rights reserved
Professional Invoicing Menu Functions
323
Overhead amount is computed.
If Costing is enabled for the system, then Unit Costs are computed based on the
rules that have been established for the Project, Employee and Task.
The system, by default, will look for the interface file in a sub-folder on your system
that is defined by a variable in the runtime configuration file 736 . Your System's
Manager can set this up for you.
After interfacing the transactions, you must select Employee Timesheet Entry
function 263 from the P/I's Operations drop-down menu, choose the specified Time
Entry Batch and post it to have the transactions recorded as WIP items ready to be
processed for invoicing.
Accessing the "Load User Timesheets from Spreadsheet" function
From the P/I Main menu, select Load User Timesheets from Spreadsheet from
the Operations drop-down menu.
Interface User Timesheets from Spreadsheet - Options Screen
The following screen is presented when interfacing the user Time Sheet WIP Charges from
Spreadsheet:
© 2007 - 2014 by Sentinel Hill Software, all rights reserved
324
Series 5 Professional Invoicing - User Help
Default Input From Folder
You would typically always have the interface file that is generated from the invoicing or order entry
system deposited into the same folder. As such, it would be nice to have this interface function load
the file without the operator having to hunt for it.
A variable may be be added to the Runtime Configuration file 736 that specifies the path from where
the interface files are always loaded. It needs to be defined as follows:
xxx-TRXTXT-PATH full-directory-path
Where: xxx is the Series 5 company system code
full-directory-path is the full path to the directory
Contact your system or accounting manager to have this capability set up.
© 2007 - 2014 by Sentinel Hill Software, all rights reserved
Professional Invoicing Menu Functions
325
The Interface Journal/Edit list report generated, if archived, will be catalogued with a report
name of PIUSERIFAC.JRN.
The Print Options tab screen will be displayed, from which you can select to direct the output
to be displayed to the screen, archived, printed, saved as an MS Word document, saved as a
PDF, and/or emailed. (Refer to the topic titled Report Generation and Printing 159 for full
details).
© 2007 - 2014 by Sentinel Hill Software, all rights reserved
326
Series 5 Professional Invoicing - User Help
Field Definitions
Post Charges to a Timesheet Entry Batch
check-box
When loading the interface data, if you wish to actually perform the interface and have
time sheet transactions generated, then set this check box. (Leave it un-checked if you
just wish to validate the input data, and have an exception report generated).
Print an Interface Journal/Edit List
radio-buttons
When loading the Time Sheet transactions interface data, if you wish to have an edit list,
a exception report, or a journal report generated, set this applicable radio-button.
The Full Detail report list all transactions. The Exception report lists only those
transactions that have undefined Projects, Task or Employee codes.
Time Entry Batch Code
X(6)
This is the code assigned to the Time Sheet Entry Transaction Batch. It can be either
numeric, or alphanumeric. There should not be any spaces or punctuation in the batch
code, as it is used within the name of one of the Series 5 data files. By default, a code of
UImmdd is used, (where mmdd is the current month and day).
Ledger Date and Transaction Date
(mmddyy)
If not provided by the interface file, when Time Sheet transactions are generated, these
dates will be automatically assigned as the Ledger Date and Transaction Date. When
associated G/L distributions are generated, this is the date that is used.
Mark Items "Pre-Selected for Billing"
check-box
Normally when WIP items are recorded, they remain on the system until their associated
Project is selected to be billed; or they are individually selected to be billed.
As an option, WIP items that are interfaced may be automatically selected to be billed.
These will be flagged with a status of "Force Billed", and the original rates, units and
amounts will be used as the corresponding amounts for invoicing.
User Timesheet Import Data Formats
When the Timesheet activity is imported, the following fields are input from an Excel
spreadsheet, a tab-delimited text file, or a CSV text file. The default input filename is
UserTsheetWIPIn.XLS.
© 2007 - 2014 by Sentinel Hill Software, all rights reserved
Professional Invoicing Menu Functions
327
There are three types of records, or rows, that may be loaded. The first 2 rows may be
left blank, of used to define headings.
The following table defines the WIP Timesheet entry fields:
Column #
Excel
Column
1
A
Row Counter
9(6)
2
B
Record Identifier (must be "E")
X(1)
3
C
Customer Code
X(6)
4
D
Project Code
X(6)
5
E
Employee Code
X(6)
6
F
Task Code (if blank use
"ASUMMARY" )
X(10)
7
G
Transaction Date (if blank today's
date)
MM/DD/YY
8
H
# of Units of Task
99,999.99-
9
I
Unit Charge Rate (only positive)
99,999.99
10
J
Overhead Amount
999,999.99-
11
K
Promo/Discount Savings Amount
999,999.99-
12
L
Billing Consolidation Flag
D - Detail
F - Grouped no consolidation
1, 2, 3, 4, ... 8, 9 - Consolidation
Group
X(1)
13
M
Filing State
X(2)
14
N
DFS Billing Code
X(12)
15
O
DFS Batch Code
X(11)
16
P
Reference 1
X(17)
17
Q
Reference 2
X(40)
18
R
WIP Description (Bytes 1-30)
X(30)
19
S
WIP Description (Bytes 31-50)
X(20)
20
T
Chargeable / Non-Chargeable Flag
"C" or "N"
X(1)
21
U
Service/Disbursement Flag "S" or
"D"
X(1)
22
V
Task Description Override
X(60)
23
W
Work Location
9(2)
© 2007 - 2014 by Sentinel Hill Software, all rights reserved
Field
Format
328
Series 5 Professional Invoicing - User Help
1 - Admin Office
2 - Service Desk
3 - Shop
4 - Warehouse
8 - Retail Store
9 - Web Site
10 - Customer Site
11 Building Site
5 - Head Office 12 - In the Field
6 - Remote Office 13 - In Transit
7 Home Office 14 Other
-
The following table define the WIP Memo entry fields:
Column #
Excel
Column
Field
Format
1
A
Row Counter
9(6)
2
B
Record Identifier (must be "F")
X(1)
3
C
Customer Code
X(6)
4
D
Project Code
X(6)
5
E
DFS Billing Code
X(12)
6
F
DFS Batch Code
X(11)
7
G
Reference 1
X(17)
8
H
Reference 2
X(40)
9
I
WIP Description
X(50)
The following table define the Customer to Add or Update fields:
Column #
Excel
Column
Field
Format
1
A
Row Counter
9(6)
2
B
Record Identifier (must be "C")
X(1)
3
C
Customer Code
X(6)
4
D
Customer Company Name
X(150)
5
E
Address Line 1
X(40)
6
F
Address Line 2
X(40)
7
G
Address Line 3
X(40)
8
H
City
X(25)
© 2007 - 2014 by Sentinel Hill Software, all rights reserved
Professional Invoicing Menu Functions
9.5.7
9
I
State/Province
X(5)
10
J
ZIP/Postal Code
X(10)
11
K
Country
X(20)
12
L
Phone Number (999-999-9999)
X(16)
13
M
Fax Number
X(16)
14
N
Email Address
X(120)
15
O
Contact 1 "Sss Ffffffff Lllllllll"
( where Ssss is the salutation
Fffffff is the 1st name
Lllllllll is the last name )
X(40)
16
P
Contact 1 Email Address
X(120)
17
Q
Contact 2 (as for Contact 1)
X(25)
18
R
Contact 2 Email Address
X(120)
19
S
Customer Remit-To Code
X(6)
20
T
Salesman Code (ignored)
X(3)
21
U
Territory Code
X(5)
22
V
Customer Type Code
X(5)
23
W
Customer Tax Code 1
X(6)
24
X
Customer Tax Code 2
X(6)
25
Y
Customer Member Code (OW ID #)
X(15)
26
Z
Demographic Code 1 (optional)
X(6)
...
...
... ...
40
AN
Demographic Code 15 (optional)
... ...
(999-999-9999)
... ....
329
...
X(6)
Load WIP/Recap for Timesheet Entry
The Series 5 Professional Invoicing system is designed as a stand-alone system that can
generate invoices for charges as a result of employee activity recorded as time sheets, or by
other system's home grown servicing or production packages. Either way, WIP end up in the
P/I system ready to be invoiced.
This menu function provides the means to load WIP activity or charges from an external
source such as a custom developed Web servicing system or employee time keeping
system. That system needs only to generate a sequential file in a specifically designed
© 2007 - 2014 by Sentinel Hill Software, all rights reserved
330
Series 5 Professional Invoicing - User Help
format. That file is then read and interfaced as Time Sheet
system.
263
transactions for the Series 5
Some points to note when interfacing Time Sheet WIP charges and activity:
The interface file may be processed either to be read to generate a report, or to
actually generate Time Sheet Transactions, or both. The report may be generated
as a full interface journal, or as just an exception report.
The interface handles both WIP records data, and Recap Detail record data.
(Recap data provides the opportunity to record extended information about the WIP
activity). The interface function offers the option to load just the WIP data, just the
Recap data, or both. There are separate files for each type of data types. WIP
records are input first, and then if selected, the Recap data records are input.
Recap WIP ID Numbers
Recap records are linked to WIP records utilizing an 8 digit Recap WIP ID number, and a 2 digit
Recap Counter. You may load up to 99 Recap records which belong to a single WIP record.
When WIP records are invoiced, the system locates any associated Recap records, and records
the WP's assigned Invoice Number to each Recap. In some cases, depending on the Project,
invoices are generated from the Recap records.
Recap records are tied to WIP records by a Recap WIP ID#.
All input data is validated. Any Project code, Employee code and Task codes are all
validated within the system. If an undefined code is encountered, the transaction is
recorded and it is reported on the Exceptions report. (It is important the you identify
these problems and fix them prior to the Time Sheets being posted).
For Series 5 Company System Codes "40", "98" and "UCC where the Series 5
License is "80001" or "90001", the Unit Rate supplied is the one that is used. For all
other systems, the Unit Rate is computed based on the rules that have been
established for the Project, Employee and Task.
If the given Project has been set up for computing Overhead Amounts, then the
Overhead amount is computed.
If Costing is enabled for the system, then Unit Costs are computed based on the
rules that have been established for the Project, Employee and Task.
The system, by default, will look for the interface file in a sub-folder on your system
that is defined by a variable in the runtime configuration file 736 . Your System's
Manager can set this up for you.
After interfacing the transactions, you must select Employee Timesheet Entry
function 263 from the P/I's Operations drop-down menu, choose the specified Time
Entry Batch and post it to have the transactions recorded as WIP items ready to be
© 2007 - 2014 by Sentinel Hill Software, all rights reserved
Professional Invoicing Menu Functions
331
processed for invoicing.
To Improve Performance
WIP data is loaded in the order it is read from the sequential file. When either a new Employee
or a new Date is encountered, the system sets up a new Time Sheet. To improve performance,
ensure that the data presented is sorted by Employee. This way one time sheet is created for
each employee.
Accessing the "Interface User WIP/Recap to Time Sheet" function
From the P/I Main menu, select Load WIP/Recap to Tsheet Entry from the
Operations drop-down menu.
Interface User WIP/Recap to Time Sheet - Options Screen
The following screen is presented when interfacing the user defined WIP and Recap charges
as Timesheet Transactions:
© 2007 - 2014 by Sentinel Hill Software, all rights reserved
332
Series 5 Professional Invoicing - User Help
Default Input From Folder
You would typically always have the interface file that is generated from the invoicing or order entry
system deposited into the same folder. As such, it would be nice to have this interface function load
the file without the operator having to hunt for it.
A variable may be be added to the Runtime Configuration file 736 that specifies the path from where
the interface files are always loaded. It needs to be defined as follows:
xxx-TRXTXT-PATH full-directory-path
Where: xxx is the Series 5 company system code
full-directory-path is the full path to the directory
Contact your system or accounting manager to have this capability set up.
The Interface Journal/Edit list report generated, if archived, will be catalogued with a report
name of PIUSERIFAC.JRN.
© 2007 - 2014 by Sentinel Hill Software, all rights reserved
Professional Invoicing Menu Functions
333
The Print Options tab screen will be displayed, from which you can select to direct the output
to be displayed to the screen, archived, printed, saved as an MS Word document, saved as a
PDF, and/or emailed. (Refer to the topic titled Report Generation and Printing 159 for full
details).
Field Definitions
Select Data to be Loaded
radio-buttons
The interface function is basically designed to load WIP charges, and as an option,
associated Recap Detail information. Select to have one or the other file loaded, or both.
(Each type of data is read from different files, but Recap data is tied to WIP data
using a Recap ID Number that needs to be assigned by the system that generates
the interface files).
Input Files From Folder and Filename
X(30) and X(120)
Enter the folder location and filename of the file to be interfaced. Click the Browse
button to navigate to the file to be interfaced. Separate files are loaded for the WIP and
the Recap data.
Post Charges to a Timesheet Entry Batch
check-box
When loading the interface data, if you wish to actually perform the interface and have
time sheet transactions generated, then set this check box. (Leave it un-checked if you
just wish to validate the input data, and have an exception report generated).
Print an Interface Journal/Edit List
radio-buttons
When loading the Time Sheet transactions interface data, if you wish to have an edit list,
a exception report, or a journal report generated, set this applicable radio-button.
The Full Detail report list all transactions. The Exception report lists only those
transactions that have undefined Projects, Task or Employee codes.
Time Entry Batch Code
X(6)
This is the code assigned to the Time Sheet Entry Transaction Batch. It can be either
numeric, or alphanumeric. There should not be any spaces or punctuation in the batch
code, as it is used within the name of one of the Series 5 data files. By default, a code of
UImmdd is used, (where mmdd is the current month and day).
Ledger Date and Transaction Date
(mmddyy)
If not provided by the interface file, when Time Sheet transactions are generated, these
© 2007 - 2014 by Sentinel Hill Software, all rights reserved
334
Series 5 Professional Invoicing - User Help
dates will be automatically assigned as the Ledger Date and Transaction Date. When
associated G/L distributions are generated, this is the date that is used.
Mark Items "Pre-Selected for Billing"
check-box
Normally when WIP items are recorded, they remain on the system until their associated
Project is selected to be billed; or they are individually selected to be billed.
As an option, WIP items that are interfaced may be automatically selected to be billed.
These will be flagged with a status of "Force Billed", and the original rates, units and
amounts will be used as the corresponding amounts for invoicing.
User WIP/Recap Sequential File Import - Input Record Definition
When loading Work-In-Progress transactions interfaced from sequential file
the following record layout defines the fields:
Three records are used for each WIP charge. The 2nd record is optional, and is required only
if WIP Reference information is available. The 3rd record is also optional. It is used to either
add or update the A/R systems' Customer Service Rep, (CSR), codes. (Note that the
Customer Service Rep, is really just one of the A/R Customer Demographic Codes.
Before using the 3rd record you must have already defined in the P/I Control
Preferences, which Demographic Code is designated as the Customer Service Rep.
See below under Control Preferences - General Tab Screen 694 ) .
The following record layouts are used:
© 2007 - 2014 by Sentinel Hill Software, all rights reserved
Professional Invoicing Menu Functions
Three records are provided for each Recap Detail item.
© 2007 - 2014 by Sentinel Hill Software, all rights reserved
335
336
Series 5 Professional Invoicing - User Help
The 1st one, (identified as USER-RECAP-RECORD-0), is used only by the On-Demand
Invoicing routines. It provides information associated to the origin of the request of the
production of the on-demand invoice.
The 2nd record, (identified as USER-RECAP-RECORD-0), provides the detail, and charges
associated to the corresponding service that was provided.
Assigning CSR Codes to Customers
When the Recap information records are loaded, if a value is provided in the USER-RECAPCLIENT-CSREP-CODE field, then it will be assigned to the associated Customer's CSR
Demographic Code field. It will be assumed that the provided CSR Code has already been
defined.
The 3rd record, (identified as USER-RECAP-RECORD-2), is optional, and is required only if
extra Reference information is available, or if 3rd Party Billing Customer information is
applicable.
Assigning 3rd Party Billing Address Information
In order to process 3rd party billing, the USER-RECAP2-SUB-CLIENT-xxxxxx fields must have
the appropriate values. If no USER-RECAP2-SUB-CLIENT-CODE field is included, then the
associated charges will only be invoiced to the primary Customer owning the Project. When
Sub-Client fields are provided, for the given Customer, a 3rd Party Billing master record will be
written, or updated, in the Professional Invoicing system. (See the topic titled 3rd Party Codes
Maintenance 591 for further information).
The following record layouts are offered for reference:
© 2007 - 2014 by Sentinel Hill Software, all rights reserved
Professional Invoicing Menu Functions
© 2007 - 2014 by Sentinel Hill Software, all rights reserved
337
338
9.5.8
Series 5 Professional Invoicing - User Help
Undo Prior Recap Interface
The Series 5 Professional Invoicing system is designed as a stand-alone system that can
generate invoices for charges as a result of employee activity recorded as time sheets, or by
other system's home grown servicing or production packages. Either way, WIP end up in the
P/I system ready to be invoiced.
One of the interfaces used to load charges into the Professional Invoicing system handles
both WIP records data, and Recap Detail record data. Recap data provides the opportunity to
record extended information about the WIP activity. The Load Timesheet WIP Interface
function 329 offers the option to load just the WIP data, just the Recap data, or both. There are
separate files for each type of data types. WIP records are input first, and then if selected,
the Recap data records are input.
If you discover that the wrong Recap file was loaded, or it should not have been loaded at all,
this menu function provides the means to Unload a specific range of Recap records. (Recap
records are keyed by a WIP Recap ID number, that is used to tie them to their associated
WIP records).
Some points to note when Undoing the Recap Interface:
The specified range of Recap records are deleted from the system. If they were tied
to WIP records the system does not really care.
A big assumption is made ....
When Recap records are interfaced, they are written directly into the Recap Detail file. When
WIP records are interfaced, they are written either to a Time Sheet Entry batch, or the General
WIP Entry session, and they don't end up in the working WIP record file until they are posted.
© 2007 - 2014 by Sentinel Hill Software, all rights reserved
Professional Invoicing Menu Functions
339
It is assumed that in deleting the Recap records, their corresponding WIP records are still
unposted.
However, if you really wish to just delete Recap Records, irregardless of any associations that
have been established to WIP records, this function will do just that.
Accessing the "Undo Recap Interface" function
From the P/I Main menu, select Undo Prior Recap Interface from the Operations
drop-down menu.
Undo Recap Interface - Options Screen
The following screen is presented for entry of the starting and ending Recap ID for the range
of records to be deleted:
© 2007 - 2014 by Sentinel Hill Software, all rights reserved
340
Series 5 Professional Invoicing - User Help
Field Definitions
Starting and Ending Recap ID Numbers
2 x 9(8)
Recap records are keyed by a Recap ID Number. Determine the range of the Recap
records that are to be deleted and enter their Starting and Ending Numbers.
9.5.9
Interface/Invoicing Wizard
The Series 5 Professional Invoicing system provides an Invoicing Wizard that that may be
invoked to automatically process the sequence of functions typically associated to daily
operation. A wizard is really just another operation that automatically steps through a number
of other operations associated to the application.
The wizard will automatically attempt to execute itself for each Invoicing Wizard Code 707 that
has been defined to the P/I system. It reads the Invoicing Wizard Codes file for each code
that has been created. It examines the designated folder, for each code, to see if any
interface files exist. If files are found, then that Wizard Code is set up to be processed. Up to
© 2007 - 2014 by Sentinel Hill Software, all rights reserved
Professional Invoicing Menu Functions
341
12 Wizard Codes will be processed at once. For each Invoicing Wizard Code found, the
wizard basically performs the following steps:
1) Calls the Load WIP/Recap to Generalized WIP Entry 312 operation to validate the
interface files provided from other sources. The files are read and any Project
Codes, Task Codes and Employee codes are validated. Should any invalid codes
be found, the Interface is abandoned. Also, this step will verify that the associated
interface file have not previously been loaded. If this is the case, then the interface
is abandoned, and an appropriate message is displayed to the status screen, and is
output to the exception report.
2) Calls the Load WIP/Recap to Generalized WIP Entry 312 operation to interface
chargeable activity that had been generated from other sources. An example would
be data that represents charges to be billed to customers that make assorted
queries to a Web based data archiving system. The data is loaded and validated,
and ends up as transactions that might normally be entered manually using the P/I
system's General WIP Entry 289 function. There are actually two sets of data that
are loaded; the 1st is what is referred to as "Remote" charges, and the second set
is "Local" charges. Both types of data are converted to a single set of transactions
that are ready to post. When the files have been successfully loaded, they are
rename with the extension of .loaded.
3) Calls the Load WIP/Recap to Generalized WIP Entry 312 operation to have the
interfaced transactions, loaded from step 1, posted to the PI system. This step
generates the Work-in-Progress, (WIP), items that will eventually be used to
generated invoices. When these WIP items are created, they are automatically
recorded marked as selected to be invoiced. Once posted, they are on file waiting
to be invoiced.
4) Calls the P/I operation to Generate Invoices 436 . For all Projects that have WIP
items that have been selected, invoices will be generated. Note that any other WIP
items, other than those that were interfaced from steps 1 and 2 by the Wizard, will
also be invoiced. The generated invoices would be listed in the grid screen
associated to the Invoice Grid Processing 415 operation.
5) Calls the P/I operation to Print and Post Public Invoices 440 . All Invoices that have
not yet been printed, are printed. Should any of these invoices really generated EDI
versions of the invoices, the applicable EDI files are also generated. If defined as a
property associated to the Invoice Wizard Code being processed, the invoices may
be archived, printed as normal text on pre-printed forms, or printed as MS Word
documents. When invoices are physically printed, they might be printed on a local
printer, or on a network printer in some branch office.
6) Calls the Post Invoices to Accounts Receivable 432 operation. All Invoices that have
been printed, are moved to a designated Accounts Receivable Sales Batch. If the
batch does not exist, it is created. If it already exists, with transactions from a prior
posting, then the new invoices are simply appended to the batch. Note that if
another user has that Sales Batch open, the posting will not be able to proceed.
For each Invoicing Wizard code that is being processed, a separate tabbed status subscreen is provided for. As each step is performed, the status is displayed. If any of the called
applications produces a report that is printed, that report is printed. An audit log report is also
generated, which once all Wizard Codes are dealt with, is printed.
© 2007 - 2014 by Sentinel Hill Software, all rights reserved
342
Series 5 Professional Invoicing - User Help
Dealing with Failures
There is a potential for the Invoicing Wizard to fail. If there are any problems associated to the
interface files, then the whole process will abort. (Ie., if there are undefined Project, Task or
Employee codes, or invalid dates, then the interface cannot proceed).
In an attempt to catch these problems, once each Wizard Code has been identified, the system
will call the Interfacing Operation for each Wizard Code's set of data to have an Exception report
generated and printed. If all Wizard Codes are processed without errors, then the Invoicing
Wizard will proceed. If problems were encountered, they must be fixed before the Invoicing
Wizard can be launched again.
Accessing the P/I Invoicing Wizard
From P/I Main menu, select Interface/Invoicing Wizard from the Operations dropdown menu.
© 2007 - 2014 by Sentinel Hill Software, all rights reserved
Professional Invoicing Menu Functions
Invoicing Wizard – Select-to-Execute Screen
© 2007 - 2014 by Sentinel Hill Software, all rights reserved
343
344
Series 5 Professional Invoicing - User Help
When launching the Invoicing Wizard operation, each of the eligible Wizard Codes are
tested to see if any data files have been provided to be interfaced. Each is displayed,
and those with data are enabled.
The Invoicing Wizard uses the Name Prefix to build the names of the files that are to be
loaded. The Invoicing Wizard loads basic WIP charge records for the Wizard Code, and
Recap supporting records. Each Wizard Code represents the charges, say for a
particular office. The File Name Prefix is used to identify the interface files for each
office. The Recap data is loaded from one file identified with a specific name. (If there
are more than one sets of files for multiple offices, or multiple Wizard Codes, to be
loaded, the Recaps are still loaded from only one file).
For each Wizard Code, when the Invoicing Wizard is executed, there are two types of
WIP charges files that are loaded. These are referred to as Remote charges and Local
charges. Hence for each Wizard Code there potentially are 4 interface files that could be
processed.
The following filenames are expected for the Recap detail record files:
UDS_DyRecapyymmddR_hhmmss.dat
UDS _DyRecapyymmddL_hhmmss.dat
The following filenames are expected for the WIP charges record files:
PPPPPP_DyInvoiceyymmddR_hhmmss.dat
PPPPPP_DyInvoiceyymmddL_hhmmss.dat
Where:
PPPPPP
yymmdd
hhmmss
R or L
- Is the File Name Prefix associated to the Wizard Code
- Is the date the interface files were created
- Is the time the interface files were created
- Indicates the files as being either the Remote or Local
charges
When the Invoicing Wizard is executed, it first attempts to find the earliest pair of
Remote and Local Recap files in the selected directory. Once these are found it uses
the date and time stamp embedded within the filename, along with the File Name Prefix,
to form the WIP charges filenames.
The following screen is displayed:
© 2007 - 2014 by Sentinel Hill Software, all rights reserved
Professional Invoicing Menu Functions
345
Invoicing Wizard Select-to-Execute Screen - Field Definitions
For Files Dated
(mmddyy)
Enter the date to define which sets of interface files are to be loaded. The interface files,
have embedded within their names, the date of the charges for which the represent.
Today's date will be the default, but it may be changed as needed. Based on the date
entered, the system will test for the occurrence of each Wizard Code's files.
XXXXXX - Select to Interface
check-box
Set or clear the check-box to have the corresponding set of files for the associated
Wizard Code loaded or not.
Recaps Loaded with - Remote and Local
radio-buttons
When the Invoicing Wizard is executed, it first attempts to find the earliest pair of Remote
and Local Recap files in the selected directory. Once these are found it uses the date
and time stamp embedded within the filename, along with the File Name Prefix, to form
the WIP charges filenames.
For each time the Invoicing Wizard is executed, it needs to load a set of Recap files. The
radio buttons indicate with which Invoice Wizard Code the Recap files are to be loaded
with.
Loading Recap Data Files
For a given set of files processed by the Invoicing Wizard, there must be at least
one pair of Record files defined. These files must contain Recap detail records
that are associated to the WIP file records being loaded.
Invoicing Wizard – Launch Screen
The following screen is displayed after the Invoicing Wizard selection options are entered.
For each of the Invoice Wizard Codes found to have data that is ready to be loaded, a
separate tab sub-screen will be provided. As the Wizard is processing, the status of each
step will be displayed.
Click to have the Wizard launched, or it may be aborted by clicking Cancel.
© 2007 - 2014 by Sentinel Hill Software, all rights reserved
346
Series 5 Professional Invoicing - User Help
Invoicing Wizard – Interface Error Screen
There is a potential for the Invoicing Wizard to fail during the interfacing operation. If there
are any problems associated to the interface files, then the whole process will abort. (Ie.,
if there are undefined Project, Task or Employee codes, or invalid dates, then the
interface cannot proceed).
In an attempt to catch these problems, once each Wizard Code has been identified, the
system will call the Interfacing Operation for each Wizard Code's set of data to have an
Exception report generated and printed. If all Wizard Codes are processed without errors,
then the Invoicing Wizard will proceed. If there are any errors encountered, the following
screen is presented, and none of the data files for any of the Wizard Codes are
processed.
© 2007 - 2014 by Sentinel Hill Software, all rights reserved
Professional Invoicing Menu Functions
347
The Launch screen status tab sub-screens will be refreshed indicating the problems. Those
Wizard Codes with errors are indicated with a red X in the tab as shown:
© 2007 - 2014 by Sentinel Hill Software, all rights reserved
348
Series 5 Professional Invoicing - User Help
Interface Exception Reports
An Interface Exception report is created for each Invoice Wizard Code that is processed. If any
errors are encountered, it will have to be reviewed to determine what codes were undefined or
invalid. These reports are archived, or printed, or both, depending on one of the properties
associated to the Invoice Wizard Code 707 .
Invoicing Wizard – Interface Done Screen
When the Invoicing Wizard has successfully finished, each of the tab sub-screens for the
Wizard Codes that were processed, are updated with applicable statistics. Click on the
tab assigned to each Wizard Code for it's statistical totals.
© 2007 - 2014 by Sentinel Hill Software, all rights reserved
Professional Invoicing Menu Functions
349
9.5.10 Disbursements Entry
This function is used to enter Disbursement Expense transactions that are associated to a
given Project. These items may, or may not, be eventually passed on to the customer as a
recoverable expense. If they are invoiced to the Project, they may be marked up be a given
percentage. Either way, the cost amount of these items are recorded as a cost against the
Project.
Three types of Disbursements may be recorded. These are as follows:
1. Purchases
– These are purchases that were made that are associated to
the completion of the Project. These may be entered directly
using this function, or they may be entered in the Accounts
Payable system when the supplier's Invoice is entered. If
known, you may record the PO #, Invoice # and Date.
2. Sub-Contracted
Services
– These are services that were sub-contracted to a third party,
for which all, or a portion of the Project required for
completion. Starting and Ending Dates may be recorded,
along with the # of applicable units of time and the unit rate
for the cost of the service.
3. Inventory Items
– If parts were pulled from your in-house Inventory for use by
the Project, these may be recorded. For these you may
© 2007 - 2014 by Sentinel Hill Software, all rights reserved
350
Series 5 Professional Invoicing - User Help
record the Quantity, and the Unit Cost of these items. If
necessary, the total cost may also be marked up for when
the customer is invoiced.
When entering Disbursements you have the opportunity to enter the Cost, the Date, and the
Employee that used, or was responsible for acquiring the goods or services.
Interfaced Disbursement Detail
For users providing interfaced detail charges from a different application, the option to Import
Disbursements is offered. You may import from an Excel spreadsheet, a CSV file or a tabdelimited file.
If during the import, an invalid code is detected, the transaction is loaded, but it is flagged with
an error code, and set with a status of ON-HOLD.
From the P/I Main menu, select Disbursements Entry from the Operations drop-down
menu.
Project Disbursements Entry - Grid Select Screen
The following grid screen is presented for entry and maintenance of Project Disbursement
charges:
© 2007 - 2014 by Sentinel Hill Software, all rights reserved
Professional Invoicing Menu Functions
351
The "Fast Buttons" frame provides the push buttons to launch the most common functions
associated to entry of General WIP.
"Fast Buttons"
New
Add a new Disbursement Transaction
Modify
Modify the Disbursement Transaction highlighted in the grid
Delete
Delete the Disbursement Transaction highlighted in the grid
Edit List
Print an Edit List showing the details of each Disbursement
Transaction entered into the batch
Import
Import Disbursement transactions from an Excel
spreadsheet, or a tab-delimited text file.
© 2007 - 2014 by Sentinel Hill Software, all rights reserved
352
Series 5 Professional Invoicing - User Help
Some of the special features of this Disbursement entry grid are as follows:
Transactions may be listed by
Date, or for a selected Project,
Disbursement Code or Vendor.
If listing for a particular Project,
Disbursement or Vendor, they
may be chosen either by
entering their assigned code,
choosing it using the Lookup
binoculars icon, or by having the
next or previous code displayed
that has items on file. (Click the
binocular icon with the up/down
arrow to display Disbursement
items that exist for the prior/
next occurrence of that code on
file).
Depending on the List By
selection, a field is presented, in
which the operator may key in a
Date or Disbursement code.
The system will attempt to read
to the closest transaction for the
data entered and display it in the
grid.
If the function to have the Edit List printed is selected, the report if archived, will be catalogued
with a report name of PROJDISBMNTS.LST.
The Print Options tab screen will be displayed, from which you can select to direct the output
to be displayed to the screen, archived, printed, saved as an MS Word document, saved as a
PDF, and/or emailed. (Refer to the topic titled Report Generation and Printing 159 for full
details).
Entering Disbursement Charges - Data Entry Screen
The following screen is presented for entry of fields associated to entry of the Disbursement
charges:
© 2007 - 2014 by Sentinel Hill Software, all rights reserved
Professional Invoicing Menu Functions
For Sub-Contracted Disbursements, the middle section offers the following fields:
For Inventory Item Disbursements, the middle section offers the following fields:
© 2007 - 2014 by Sentinel Hill Software, all rights reserved
353
354
Series 5 Professional Invoicing - User Help
Disbursement Data Screen - Field Definitions
Project Code
X(6)
Select or enter the Project Code for which the Disbursement being recorded was
performed for. If In the PI Control Preferences, if the option to derive the Recoverable
Expense account from the Project is set, then it is assigned accordingly. Also, if for the
Project, its Markups on Disbursement property is set, and a Markup % is set up, then
that % is assigned.
Disbursement Code
X(6)
Select or enter the Disbursement Code for the charge that is being recorded against the
project. The Taxable Status, and the default Markup % is obtained from the selected
Disbursement Code's properties. In the PI Control Preferences, if the option to Derive
the Recoverable Expense account from the Disbursement is set, then it is also assigned
accordingly.
If for the Project, its Markups on Disbursement property is set, and a Markup % is
ZERO, then the Markup % will be assigned from that which is defined by the
Disbursement.
Employee Code
X(6)
Select or enter the Employee Code who was responsible for purchasing or using the
Disbursement that is being recorded. In the PI Control Preferences, one of the
properties determines whether the Profit Center assigned to any Revenue distribution is
derived from Project, the Employee's assigned Location Code, or the Employee's
assigned Department Code. If to be obtained from the Department or Location, then the
chosen Employee's applicable code is read to assign the Profit Center.
Date
(mmddyy)
This is the date that the disbursement is used for the selected Project.
© 2007 - 2014 by Sentinel Hill Software, all rights reserved
Professional Invoicing Menu Functions
Type
drop-down list
Select the type of disbursement
which is being recorded against the
Project
Type of
Disbursement
Description
Purchases
These are purchases that were made that are associated to the
completion of the Project. These may be entered directly using
this function, or they may be entered in the Accounts Payable
system when the supplier's Invoice is entered. If known, you may
record the PO #, Invoice # and Date.
Sub-Contracted
Services
These are services that were sub-contracted to a third party, for
which all, or a portion of the Project required for completion.
Starting and Ending Dates may be recorded, along with the # of
applicable units of time and the unit rate for the cost of the service.
Inventory Items
If parts were pulled from your in-house Inventory for use by the
Project, these may be recorded. For these you may record the
Quantity, and the Unit Cost of these items. If necessary, the total
cost may also be marked up for when the customer is invoiced.
Disbursement Charge Status
radio-buttons
Select the Status of the charge being entered. Initially, you would choose from either
Eligible for Billing, or Non-Recoverable, (basically Chargeable or Non-Chargeable). You
might wish to initially select to put the item On-Hold, so it would not be automatically
invoiced until it is take off On-Hold status.
The different Status options are defined as follows:
Status
Description
Eligible for
Billing
This disbursement is for a Chargeable service or item for
which the customer associated to the Project will eventually
be invoiced for.
© 2007 - 2014 by Sentinel Hill Software, all rights reserved
355
356
Series 5 Professional Invoicing - User Help
NonRecoverable
This disbursement is for a Non-Chargeable, or Nonrecoverable, service or item for which the customer
associated to the Project will NOT be invoiced for. The costs
for this disbursement will be associated to the Project.
Selected for
Billing
A disbursement that is Selected for Billing is a Chargeable
item, that will automatically be selected to be invoiced the next
time an invoice is generated for the associated Project.
On-Hold
On-Hold Items are similar to Eligible for billing Items, but are
marked as On-Hold. These items can be selected for billing
only by specifically being selected from the Selective Billing
and Adjustments 400 function.
Invoiced
You would normally not select this as the assigned status
when entering a new disbursement. Once this chargeable
item is invoiced, this status will be set by the system.
Invoiced and
Paid
You would normally not select this as the assigned status
when entering a new disbursement. Once the Invoice on
which this item has been assigned to has been paid, this
status will be set by the system.
Vendor - (for Purchased items or SubContracted Service)
X(6)
Select or enter the A/P system defined Vendor that the goods were purchased from, or
the sub-contracted service obtained from. (If the disbursement is entered prior to the
supplier's invoice being received, then when it is received, the Vendor # will be used to
attempt to link it to this Disbursement so the Voucher #, Invoice # and Invoice Date fields
may be assigned).
Purchases - PO Number
X(11)
Enter the PO Number, if applicable, that was used to purchase the goods or services
associated to the Disbursement. (If the disbursement is entered prior to the supplier's
invoice being received, then when it is received, the PO # will be used to attempt to link it
to this Disbursement so the Voucher #, Invoice # and Invoice Date fields may be
assigned).
© 2007 - 2014 by Sentinel Hill Software, all rights reserved
Professional Invoicing Menu Functions
Purchases - A/P Voucher Number
357
9(6)
This field is used to record the A/P Voucher Number that is assigned to the supplier's
Invoice. It will be assigned when the A/P Invoice is entered, and it can be tied to this
Disbursement from the PO# and Vendor Code.
Purchases - A/P Invoice Number
X(12)
If known, and Disbursements are entered manually, rather than being created when the
supplier's Invoice is entered in Accounts Payable, enter the Invoice number "for the
record". (If the disbursement is entered prior to the supplier's invoice being received,
then when it is received, the PO # and the Invoice Number fields will be used to attempt
to link it to this Disbursement so the Voucher # and Invoice Date fields may be
assigned).
Purchases - A/P Invoice Date
(mmddyy)
If known, and Disbursements are entered manually, rather than being created when the
supplier's Invoice is entered in Accounts Payable, enter the Invoice Date "for the record".
(If the disbursement is entered prior to the supplier's invoice being received, then when it
is received, the Invoice # and Invoice Date fields will be assigned).
Purchases - Expense Account
9(18) - 9(5)
This is the G/L Expense account that is used to record the cost of the goods or services
purchased. This field is updated when the supplier's invoice is entered into the Accounts
Payable system.
Purchases - Disbursement Charge
$ 999,999.99
This is the purchase cost of the goods used for the project.
Sub-Contracted Services – Start/End
Dates
(mmddyy)
Used to record the dates which the sub-contracted services were performed. Used for
information purposes only.
Sub-Contracted Services – # of Units
and Type
9,999 and drop-down list
Used to record the # of units, and the type of units that was
© 2007 - 2014 by Sentinel Hill Software, all rights reserved
358
Series 5 Professional Invoicing - User Help
sub-contracted for. The # of Units along with the Unit Rate
field, are used to compute the Extended Cost of the subcontracted services.
Sub-Contracted Services – Unit Rate
$ 999,999.99
For sub-contracted services this the Unit cost of the services which the supplier
charged.
When recording a Credit to the Project for Disbursements, the # of Units should
always be entered as a positive value and the Unit Rate with a minus sign.
Sub-Contracted Services – Extended $
Amount
$ 999,999.99-
This is the purchase cost of the sub-contracted services used for the project. It will be
computed from the # of UNits and the Unit Rate as entered.
Inventory – Warehouse Location
X(6)
Enter the Warehouse Location code that the Inventory was obtained from. This is a code
that is defined in the Series 5 Inventory Management system.
Inventory – Item Code
X(23)
Enter the Inventory Item code that is associated to the Inventory that was used for the
Project. This is a code that is defined in the Series 5 Inventory Management system.
Inventory – # of Units
9,999
Used to record the # of inventory items that were used for the Project. The # of Units
along with the Unit Rate field, are used to compute the Extended Cost of the inventory
items.
Inventory – Unit Cost Rate
$ 999,999.99
For Inventory items is the Unit cost of the items. This is not the Unit Selling Price -- It
is the Cost of inventory and is used in computing the Cost associated to the
Project.
© 2007 - 2014 by Sentinel Hill Software, all rights reserved
Professional Invoicing Menu Functions
Inventory – Extended Amount
359
$ 999,999.99
For Inventory items that were used for the Project. This is the Extended Cost of the
items used for the Project.
X(40)
Brief Description
This field is used to record a brief description of the purchases or services associated to
the Project. It will default to the description recorded with the Disbursement Code on file.
Extended/Invoice Descriptions 1 and 2
X(50)
These fields are used to record additional information to describe the purchases or
services associated to the Project.
Markup %
999.99 %
Enter a markup percentage that is to be applied to the purchased cost of the goods or
services, to be used to determine the amount to be invoiced. This will default either to
the Markup % that was assigned to the Project, or to the Disbursement master records.
(The % from the Project takes precedence over the % from the Disbursement). The
Markup % may be entered, or cleared, regardless of the default that is set.
Invoice Amount
$ 999,999.99-
This is the amount that will be charged to the customer on the invoice that is generated
for the Project. If a Markup % is entered the amount will be computed as follows:
Invoice Amount = Disbursement Charge x (1 + Markup% /100)
Billing Code
X(6)
This field may be used to record a Billing Code. It may be used to determine how this
charge is to be invoiced for those Projects that generate multiple Invoices based on a
user supplied Bill Code.
Recoverable Expense Account
9(18) - 9(5)
This is the G/L Revenue Account which the chargeable, recoverable, expense amount
will be recorded to when the invoice is generated and passed on to the Accounts
Receivable system. This will be assigned by the system either from the Project Code's
properties or from the Disbursement Code's properties, as determined by a setting in
the P/I Control Preferences 700 . Also, the Profit Center will also be assigned either from
© 2007 - 2014 by Sentinel Hill Software, all rights reserved
360
Series 5 Professional Invoicing - User Help
the Project, the Employee's Location or from the Employee's Department properties, as
determined by a setting in the P/I Control Preferences 700 .
Disbursement Entry Import Data Formats
When the Disbursement charges are imported, the following fields are input from an
Excel spreadsheet, a tab-delimited text file, or a CSV text file. The default input filename
is GenWIPTrxIn.XLS.
Column #
Excel
Column
Field
Format
1
A
Project Code
X(6)
2
B
Disbursement Code
X(6)
3
C
Employee Code
X(6)
4
D
Transaction Date
MM/DD/YY
5
E
Type - [P]urchase, [S]ub-Contracted X(1)
Service or [I]nventory Items
6
F
Status - [C]hargeable, [N]onChargeable, [S]elect to Invoice, On[H]old
X(1)
7
G
Vendor Code
X(6)
8
H
PO Number
X(11)
9
I
Sub-Contracted Start Date
MM/DD/YY
10
J
Sub-Contracted End Date
MM/DD/YY
11
K
Sub-Contracted Units Type - [H]ours, X(1)
[D]ays, [W]eeks, [M]onths
12
L
Inventory Warehouse
X(6)
13
M
Inventory Item
X(23)
14
N
# of Inventory or Sub-Contracted
Units
9,999
15
O
Unit Cost of Inventory or SubContract
999,999.99
16
P
Extended Cost Amount of
Disbursement
999,999.99
17
Q
Description
X(40)
18
R
Invoice/Extended Reference 1
X(50)
© 2007 - 2014 by Sentinel Hill Software, all rights reserved
Professional Invoicing Menu Functions
361
13
S
Invoice/Extended Reference 2
X(50)
14
T
Markup Percentage
999.99
15
U
Amount to be Invoiced
999,999.99
16
V
Billing Code
X(6)
17
W
Recoverable Expense Acct - Main #
9(18)
18
X
Recoverable Expense Acct - Profit
Center
9(5)
9.5.11 Entering a Credit Note
This function is used when you wish to generate a Credit against an invoice that has already
been printed and posted to the Accounts Receivable system. The Credit Note will be printed
the next time the Generate and Print Invoices function is selected. When the Credit is posted
to the Receivables system, a type [C] credit document is recorded.
When a Credit Note is entered, a type [C] WIP record is written with Task Code and
Employee Code of $CRDNT. This, in effect, is used to reduced the amount of revenue, that
might be reported for the associated Project in assorted inquiry and reporting functions.
When the credit document eventually is posted to the Accounts Receivables system, a debit
is made to the A/R Control account and a credit to Suspense Credit; and the Credit is
recorded in the P/I Invoice History file.
Presumably, specific WIP items that contributed to the charges on the Invoice that was
credited will have to be marked down. Once the initial credit information is entered, a second
tabbed sub-screen is displayed, titled [Apply to Invoiced WIP Items]. Here you may have
the system select ALL the WIP items associated to the original Invoice, or apply the credit
amount selectively to specfic WIP items. The Credit amount recorded with the type [C]
$CRDNT WIP record will be reduced, the Suspense Credit will be debited and the WIP’s
Revenue will be credited.
From the P/I Main menu, select Enter Credit to an Invoice from the Operations dropdown menu; or click the Credit Invoice push button from the Invoice History Inquiry "fast
buttons" frame.
© 2007 - 2014 by Sentinel Hill Software, all rights reserved
362
Series 5 Professional Invoicing - User Help
Some points to note about the automatic selection process:
The Credit Note can only be applied to a single Invoice. That invoice must have
been already generated and posted to Accounts Receivable.
The Credit Note must have a unique document number. It should not have the
same number as the Invoice that it is being applied to. By default, it will be assigned
from the Next Credit Document Number field, as defined in the A/R Control
Preferences.
Enter the amount of the Credit as a positive value
The amount of the Credit may be applied to all, or specific WIP items, associated to
the Invoice to which the Credit applies to.
After the Credit is entered, it will be written to the P/I Invoices file as a Credit. It will
be displayed as a Credit in the grid display screen from the Invoice Grid Processing
419 Operations function. When Invoices are next printed, it will be printed as a
Credit Note.
Entering Credits - Data Entry Screen
The following screen is presented for entry of fields associated to entry of the Credit:
© 2007 - 2014 by Sentinel Hill Software, all rights reserved
Professional Invoicing Menu Functions
363
Credit Entry Data Screen - Field Definitions
Credit Document Number
9(6)
This will be the number identifying the Credit document and will be assigned to the
resulting Open Item record in the Accounts Receivable system. The default is
determined from a field defined in the A/R Control Preferences. When assigning the
Document Number, it is important that you assign a range of numbers that will not conflict
with the invoices that are generated by the system. Do not use the number of the
invoice to which the credit is to be applied against for the Credit’s document
number.
Document Date
(mmddyy)
This is the date that will be assigned to the Credit Note.
Reference
X(30)
A brief description may be recorded. This will be carried through to the A/R system and
used as the reference in the resulting Open Item record.
© 2007 - 2014 by Sentinel Hill Software, all rights reserved
364
Series 5 Professional Invoicing - User Help
WIP and Overhead Credit Amounts
$ 9,999,999.99
Enter the portion of the Credit that is to be applied against WIP charges, and any
Overhead charges that were computed for the invoice. Enter this amount as a positive
value.
The total of all Credit amounts cannot exceed the original total of the invoice to which the
credit is being applied.
Tax 1 and 2 Credit Amounts
$ 99,999.99
Enter the portion of the Credit that is to be applied against Tax amounts that were
computed for the invoice. Enter these amounts as a positive values.
The total of all Credit amounts cannot exceed the original total of the invoice to which the
credit is being applied.
Applying Credit to Invoiced WIP Items - Grid Select Screen
The following grid screen is presented for selection of those WIP items to which the credit
amounts are to be applied:
© 2007 - 2014 by Sentinel Hill Software, all rights reserved
Professional Invoicing Menu Functions
365
Some of the special features of this "Apply Credit to WIP" grid are as follows:
To select a particular WIP item to be Credited, double-click the row that it's
information is displayed in.
WIP tems that have had a Credit Amount applied to them have the
in the 1st column of the grid.
To apply the total amount of the
Credit to All WIP items, click
the Apply to ALL push button.
To clear any previously applied
amounts, click the Clear ALL
push button.
The WIP amounts Remaining
to be Credited, and the amount
© 2007 - 2014 by Sentinel Hill Software, all rights reserved
icon shown
366
Series 5 Professional Invoicing - User Help
Already Credited are displayed.
The entry of the Credit may be
completed only when the
Amount Remaining to be
Credited is ZERO.
Once the total amount of the
Credit has been applied, the
Enter the Credit push-button will
be enabled. To have the Credit
entered, click this button.
The table displaying the WIP
fields is wider than the screen is
able to accommodate. To
display the extra fields, at the
bottom of the grid, a scroll-bar
is presented which may be
dragged to view the columns of
data that are not shown on the
right.
(If your screen is wide enough,
you may also click on the
icon at the bottom right corner
of the window, to expand it.
Applying Credit to WIP - Data Entry Screen
When a given WIP item's grid row is double-clicked, the following screen is presented for
entry of the Credit amounts to be applied to that WIP:
© 2007 - 2014 by Sentinel Hill Software, all rights reserved
Professional Invoicing Menu Functions
Applying Credit to WIP Data Entry Screen - Field Definitions
Amount to Credit – WIP Amount
$ 9,999,999.99-
Enter the amount of the Credit that is to be applied to the WIP items Charged amount.
The respective New Invoice Amount field will be adjusted accordingly.
Amount to Credit – Overhead
$ 999,999.99-
Enter the amount of the Credit that is to be applied to the WIP item's Overhead amount.
The respective New Invoice Amount field will be adjusted accordingly.
New Invoice Amounts – # of Units
99,999.99-
As a result of the Credit, enter the new # of Units that would be considered as having
been invoiced.
New Invoice Amounts – Unit Rate
$ 999,999.99
If the credit is issued because the rate was incorrect, enter the correct Unit Rate. The
© 2007 - 2014 by Sentinel Hill Software, all rights reserved
367
368
Series 5 Professional Invoicing - User Help
New WIP amount will be automatically recomputed.
New Invoice Amounts – WIP & Overhead
$ 9,999,999.99-
As a result of the Credit, this is the new amount that would be recognized as being
invoiced for this WIP item.
9.5.12 Recalculate Project Rates
When time charges are recorded for an employee’s time sheet, basically a Project Code, a
Task Code and a Quantity of Units is all that is needed to be entered. From this information
the system will determine the Unit Charge Rate with a G/L Revenue account, and a Cost
Rate with a G/L Cost account. If budgets are maintained for the selected Project, then they
also are updated. There are also codes assigned that affect the way that items are listed on
invoices. Determining the values assigned by the system to these fields is a process that
involves examining a number of control options associated to the Project, Employees and
Tasks, and possibly the use of special rates tables.
If the situation arises that a particular control code was not set correctly, or if special rates
were not right, you may discover that the amounts charged to your customers for work
performed is not what you had hoped; or perhaps revenue earned was not being allocated to
the correct department. There is silver bullet for this problem. This function exists to
recalculate charge rates and revenues, and all other codes for the WIP items associated to a
Project.
For a selected Project, you may choose a range of WIP items that will have their Charge
Rates, Revenue Account, Cost Account, Cost Rate reassigned by the system. Not only are
these fields changed, but all the appropriate correcting G/L Distributions will be made also.
From the P/I Main menu, multiple Projects may be processed by selecting Recalc Project
WIP Rates from the Operations drop-down menu. A single Project may be processed when
selected from Work in Progress Inquiry of the Trx Inqury drop-down menu, and from it's
Operations drop-down menu, Recalc Project Default Rates .
© 2007 - 2014 by Sentinel Hill Software, all rights reserved
Professional Invoicing Menu Functions
369
Some points to note when having the Project Rates and G/L Accounts reassigend:
The generic WIP selection filters screen is presented to allow you to select specific
WIP items within a given date range, and/or for specific Employees or Tasks.
If your system is configured to compute Cost Plus Charges, then as an option, you
may select to have these items also deleted. Cost Plus charges are recorded as
WIP items using designated Task Codes as determined by the P/I Control
Preferences 705 function. These WIP charges are recorded with an employee code
of $CSTPL.
Only Active, Uninvoiced WIP items may have their rates and codes reassigned.
If when a WIP charge was originally entered into the system, it's rate was entered
manually, of supplied from an externally interfaced set of charges, then THE UNIT
INVOICE RATE IS NOT RECALCULATED by the system. (However, other codes
© 2007 - 2014 by Sentinel Hill Software, all rights reserved
370
Series 5 Professional Invoicing - User Help
and Costs and Revenue Accounts are reassigned).
The following codes associated to a WIP item are reassigned:
Code
Client/Customer Code
Partner-In-Charge
Project Leader
Person/Machine Flag
Foreign Flag
Invoice Section Code
Invoice Group Code
Budget Group
Taxable Status
Dervied from
Project properties record
Project properties record
Project properties record
Employee properties record
Task properties record
Assorted properties defined by Preferences
rules
Assorted properties defined by Preferences
rules
Assorted properties defined by Preferences
rules
Task properties record
The following rates and/or G/L Accounts are reassigned to each WIP item:
Code
G/L Revenue
Account
Unit Invoice Rate
Extended WIP
Amount
Overhead Amount
Cost Amount
G/L Cost Account
Dervied from
Assorted properties defined by Preferences rules
Assorted properties defined by Preferences rules
Computed
Computed
Computed from assorted properties defined by
Preferences rules
Assorted properties defined by Preferences rules
If the system is configured to maintain Budgets, they are updated with any newly
created amounts,
For those systems that generate Revenue Distributions at the time WIP charges are
entered into the system, reversing and new distributions are recorded.
Only Eligible WIP items are Recalculated
In addition to the filters offered, only those WIP items of the following Types or Status will
have their Rates and G/L Accounts reassigned:
© 2007 - 2014 by Sentinel Hill Software, all rights reserved
Professional Invoicing Menu Functions
Note that regardless of the selections made to these WIP filters by the operator, the
displayed WIP Type and Status settings shown will apply.
Recalculate Multiple Projects WIP Rates - Options Screen
The following screen is presented when selecting to have a Projects' WIP rates and codes
reassigned:
© 2007 - 2014 by Sentinel Hill Software, all rights reserved
371
372
Series 5 Professional Invoicing - User Help
When having Projects' WIP Rates recomputed, the operator is also presented with the
standard WIP Select Filters 147 screen, the Project Select Filters 142 screen and the
Customer Select Filters screen 151 . These allow you to specify selected or ranges of
Projects, Project Locations, Project Departments, Customers, Customer Types, Sales
Representatives, and/or only those customers and/or projects satisfying a variety of filter
criteria; And to specify WIP for selected or ranges of Employees and Tasks, and/or only those
WIP items satisfying a variety of filter criteria.
Recalculate Project Rates Options Screen - Field Definitions
Remove
Unbilled
system
Generated
Cost-Plus
Charges
check-box
If your system is configured to compute Cost Plus Charges, then as an
option, you may select to have these items also deleted. Cost Plus charges
are recorded as WIP items using designated Task Codes as determined by
© 2007 - 2014 by Sentinel Hill Software, all rights reserved
Professional Invoicing Menu Functions
the P/I Control Preferences
705
373
.
9.5.13 Writing Off a Project's WIP Items
In the event a given chargeable WIP item, or set of WIP items, should never be invoiced, then
they should be written off. By writing off a WIP item, any revenue distributions that might have
been generated when it was originally entered into the system will be reversed.
To have WIP items for a given Project written off, requires three step process:
1. Select the Project whose WIP items are to be written off.
2. Select the WIP items that are to be written off, either individually, or as a set.
3. Execute the function to Post the WIP items that have been selected to be Written Off
Project WIP Write Off Selection Grid
© 2007 - 2014 by Sentinel Hill Software, all rights reserved
374
Series 5 Professional Invoicing - User Help
"Fast Buttons"
Post Items Marked for Write- Those WIP items that had been marked to
be Written Off will be written off. (See the
Off
section following on Writing Off a Project's
WIP Items 373 ).
Some of the special features of this "Selection" grid are as follows:
WIP Items or Disbursement
Items are listed for a selected
Project. Projects may be
chosen either by entering their
assigned code, choosing it
using the Lookup binoculars
icon, or by having the next or
previous code displayed that
has items on file. (Click the
binocular icon with the up/down
arrow to display WIP items that
exist for the prior/next
occurrence of that code on file).
If a particular row in the grid, representing a given WIP Item, is double clicked, it will
be "Selected to Be Written Off" (If that item was already selected, then it will be
"Unselected From Being Written Off".
The last column of each row,
for each item displayed,
contains an graphic designating
the billing status of the item.
These are defined as follows:
Permanently Deferred
Temporarily Deferred
Selected for Billing
Marked Up/Down
Selected to be Partially Paid
Selected to be Written Off
For the selected Project applicable totals are displayed below the grid display.
© 2007 - 2014 by Sentinel Hill Software, all rights reserved
Professional Invoicing Menu Functions
In the screen's menu-bar at the
top of the screen, under the
Operations drop-down menu, a
variety of functions are available
that might be performed on all,
or the selected Project.
In particular, the function to
have Multiple WIP Items
selected to be Written Off is
found here.
Within the grid, right-click a row
to have a pop-up menu
displayed offering available
functions that may be
performed on the associated
WIP item. The function to have
a single WIP item selected, or
de-selected, for Write Off is
found here.
Some points to note about having WIP Written Off:
The WIP Description, and Reference Fields may also be edited. (You might wish to
record a reason as to why the item was not invoiced).
When items have been marked to be Written Off, when displayed in the Project
Selection grid screen, a
, will be displayed in the right-most column.
© 2007 - 2014 by Sentinel Hill Software, all rights reserved
375
376
Series 5 Professional Invoicing - User Help
The WIP item may have it's Selected for Write Off Status cleared by selecting the Clear
WIP Write Off Request from the pop-up menu.
Once the selected items have been Posted for Write-Off, they may not be reinstated to
the status where they can be billed.
Selecting a Single WIP Item to be Written Off
The following screen is presented for having a WIP item Written Off. Basically you need to
enter the Ledger Date that will be used when applicable G/L Reversing Distributions are
generated.
Selecting a Single WIP to be Written Off - Field Definitions
Description
X(50)
This field is used to record a brief description of the activity performed. For Projects
using specific Invoice Layouts, this field may be used to sort items printed on invoices.
Reference 1 and 2
X(40)
© 2007 - 2014 by Sentinel Hill Software, all rights reserved
Professional Invoicing Menu Functions
377
These fields are used to record codes relating to sub-contracts, job numbers, billing
codes, contact names, etc., or to record more verbiage describing the WIP activity. For
Projects using specific Invoice Layouts, and/or that generate EDI invoices, segments of
these fields may be used to determine how items are grouped or sorted for invoicing.
Type "C" Invoice Layout Grouping
drop-down list
When invoices are generated for a Project, the P/I system provides for a number of
different sorting and grouping options. Invoice Layouts are created and assigned to every
Project. For Projects that have a Type "C" Invoice Layout, these radio-buttons are offered
so a Group and/or Consolidation code may be recorded with their associated WIP items.
WIP charges may be recorded into the P/I system with a Consolidation Flag. This is a 1
character field that can take a value of D, F, or a number from 1, .... 9. Depending on the
options specified, all WIP charges may be grouped and sub-totalled by their
Consolidation Flag. All WIP having the same Consolidation Flag are grouped together.
As an additional option, the WIP within each Group will be sorted by the WIP Reference
field. In some cases, the Reference field holds an individuals's name, or a Billing-Code.
All charges with the same Reference field would be sub-totalled and printed as one line
on the invoice.
No consolidation is performed. Each WIP
charge is printed in detail
Sum items within a Group printed All the charges with the same Consolidation Flag
are sub-totalled and printed as one line.
as a total
WIP for a Group are sub-totalled by All the charges with the same Consolidation Flag
are sub-totalled by their WIP Reference field. An
Reference
additional sub-total is printed for each
Consolidation Group.
Sub-Total by Reference Bill-Code All the charges with the same Bill-Code, that is
determined from the WIP's Reference field, are
sub-totalled and printed. When selected, you
must also specify which portion of the Reference
field is to be used as the Bill-Code. (The
Consolidation Flag is not used in this case).
None
Write-Off Ledger Date
(mmddyy)
Enter the Ledger Date that will be used for any reversing G/L Distributions that are
generated.
Selecting Multiple WIP Items to be Written Off
The following screen is presented to have all, or a filtered set, of WIP items selected to be
Written Off. Basically you need to enter the Ledger Date that will be used when applicable G/
© 2007 - 2014 by Sentinel Hill Software, all rights reserved
378
Series 5 Professional Invoicing - User Help
L Reversing Distributions are generated, and any filters to be used in limiting those WIP items
to be selected.
When selected, the operator is presented with the standard WIP Select Filters 147 screen.
This allows you to specify WIP for selected or ranges of Employees and Tasks, and/or only
those WIP items satisfying a variety of filter criteria.
Selecting Multiple WIP Items to be Written Off - Field Definitions
Write-Off Ledger Date
(mmddyy)
Enter the Ledger Date that will be used for any reversing G/L Distributions that are
generated.
© 2007 - 2014 by Sentinel Hill Software, all rights reserved
Professional Invoicing Menu Functions
9.6
379
E-Billing Menu Operational Functions
The topics in this chapter describe functions and procedures that are a available under the
Operations drop down menu on the P/I E-Billing menu. These operations are the same
as those offered from the standard P/I Menu, with the E-Billing Wizard, that can be launched
only from the E-Billing menu.
These functions are available from the E-Billing Menu Bar as shown:
© 2007 - 2014 by Sentinel Hill Software, all rights reserved
380
9.6.1
Series 5 Professional Invoicing - User Help
E-Billing Wizard
The Series 5 Professional Invoicing system is designed to either generate invoices for
charges as a result of employee activity recorded as time sheets, or by other system's home
grown servicing or production packages; or to build the appropriate EDI interface files from
Invoices that have been generated by other software packages. The E-Billing Wizard is the
routine that will build EDI data files from other system generated invoices.
This menu function provides the means to build EDI data files, ready to be transmitted,
formatted as determined by the selected EDI Control Code. (The EDI Control Codes must
have been already established using the EDI Specifications Codes Maintenance 608 function).
Some points to note when executing the Wizard:
The function may be launched directly from the P/I E-Billing menu, where a specific
EDI Control Code may be pre-selected.
EDI data files are built for invoices that have already been created by other software
packages.
The detail used to generate the Invoices must be presented in a CSV file named in
the following format:
PPPPPP_NNNNNNNN.xxx.CSV
where: PPPPPP is the Project Code and NNNNNNNN is the Invoice Number
By default, the import will assume a CSV text file is input. You may designate the
input as an Excel spreadsheet from the Import Options tabbed sub-screen.
All input data is validated. Any Project code, Employee code and Task codes are all
validated within the system. If an undefined code is encountered, the generation of
the EDI file will be aborted.
Once a given invoice file has been successfully processed, it will be renamed with a
".loaded" extension, and moved to a sub-directory, (that must exist in the same
directory as where the input files are read from), named Loaded.
Accessing the "E-Billing Wizard function
Launch directly from the P/I E-Billing menu for
a specified EDI Control.
or, ... From the P/I E-Billing Main
menu, select Launch E-Billing
Wizard from the Operations dropdown menu.
© 2007 - 2014 by Sentinel Hill Software, all rights reserved
Professional Invoicing Menu Functions
E-Billing Wizard - Options Screen
The following screen is presented when the E-Billing Wizard is launched:
© 2007 - 2014 by Sentinel Hill Software, all rights reserved
381
382
Series 5 Professional Invoicing - User Help
The Interface/EDI Generation audit report generated, if archived, will be catalogued with a
report name of EBILL_WIZLOG.RPT.
The Print Options tab screen will be displayed, from which you can select to direct the output
to be displayed to the screen, archived, printed, saved as an MS Word document, saved as a
PDF, and/or emailed. (Refer to the topic titled Report Generation and Printing 159 for full
details).
Field Definitions
EDI Control Specs Code
X(6)
This is the code that is used to identify the EDI Control in the P/I system. When launched
directly from the P/I EDI-Billing menu, this code will have been already assigned.
This code must have already been assigned to the P/I Project that is associated to
each input file being processed.
Import User Generated Invoice Detail - From
Folder
X(120)
Select the folder from which the user generated Invoice Detail data files are to be read
from. Once a given folder has been selected, the system will remember the full path, up
to and NOT INCLUDING the lowest level sub-folder. On subsequent execution of the
Wizard, the saved path will be used with the EDI Control Code being appended to form
the default input folder path.
E-Billing Output
The generated EDI output file will be created with a filename in the folder as determined
from the properties associated to the EDI Control.
Make sure there are no WIP or Recap records check-box
on file .....
The detail associated to each interfaced Invoice, is recorded in the PI system as WIP and
Recap Detail records. These are written keyed with Recap ID numbers, and the supplied
Invoice Number. If a given set of Invoices are repeatedly interfaced, this check-box
should be set to ensure that any WIP or Recap records on file with the same Invoice #
are first deleted. Failure to set this option may result in faulty EDI files being generated.
E-Bill Wizard CSV File Import Data Formats
When the Invoiced detail files are loaded, the following fields are input from a CSV text
file. The default input filename must be named as PPPPPP_NNNNNNNN.xxx.CSV,
© 2007 - 2014 by Sentinel Hill Software, all rights reserved
Professional Invoicing Menu Functions
where PPPPPP is the P/I Project Code, and NNNNNNNN is the Invoice Number.
The following table defines the input file entry fields:
Column # Column
Field
Format
1
A
Order Number
9(10)
2
B
Order Line #
9(3)
3
C
Client Service Rep
X(6)
4
D
Order Service Rep
X(6)
5
E
Billing Code
X(40
6
F
WIP Task Code
X(10)
7
G
Service/Disbursement Flag "S" or X(1)
"D"
8
H
Search Date/Time
MM/DD/YYYY
HH:MM
9
I
Ordered By
X(35)
10
J
Search Company Name
X(50)
11
K
Search State Code
X(2)
12
L
Search Location/County
X(30)
13
M
Application Code
X(3)
14
N
Activity Description
X(60)
15
O
Search Court Information
X(200)
16
P
Unit Charge Rate
99,999.99
17
Q
# of Units of Task
99,999.99-
18
R
Total Fee Amount
999,999.99-
19
S
Tax Amount
9,999.999-
20
T
Promo/Discount Savings Amount
999,999.99-
21
U
Invoice Number
9(8)
22
V
Invoice Date
MM/DD/YY
23
W
Client/Customer Code
X(6)
24
X
3rd Party Billing Code
X(6)
25
Y
WIP/Recap ID Number
9(8)
26
Z
Reference 2
X(40)
27
AA
Reference 3
X(100)
28
AB
Reference 4
X(96)
29
AC
Reference 5
X(90)
© 2007 - 2014 by Sentinel Hill Software, all rights reserved
383
384
9.7
Series 5 Professional Invoicing - User Help
30
AD
Reference 6
X(90)
31
AE
Reference 7
X(90)
32
AF
Reference 8
X(90)
Invoicing Functions
The topics in this chapter describe functions and procedures that are a available under the
Invoice Processing drop down menu on the Professional Invoicing menu. These
menu items are used to perform the functions associated to selecting items/projects to be
billed, the generation and printing of invoices, and the posting to Accounts Receivable. In
particular, the functions for entering managing Invoices, and for handling the On-Demand
Invoicing requests are found here.
These functions are available from the P/I Menu Bar as shown:
© 2007 - 2014 by Sentinel Hill Software, all rights reserved
Professional Invoicing Menu Functions
9.7.1
385
Clear All Prior Selections
This function provides an automatic process to have all WIP and Disbursement items that
had been previously selected to be billed, unselected.
This function is one that is associated to the Select Projects for Billing operation application.
As a convenience, it is offered as a menu item under the P/I's Operations drop-down menu.
For a full description, refer to the topic titled Project Billing Selection Grid Screen 391 found
under the chapter on Select Projects for Billing 386 earlier in this documentation.
9.7.2
General Select for Billing
This function provides an automatic process to have all eligible WIP and Disbursement items
selected to be billed and invoiced at the next earliest opportunity. (That would be when the
Generate Invoices function is next performed). You will specify the Invoice Date, and a
Cut-off Date, and be able decide if Holdback Charges and/or Disbursement Charges are to
be billed or not. You may also choose to automatically select either a range, or a specific
Project that is to be billed.
© 2007 - 2014 by Sentinel Hill Software, all rights reserved
386
Series 5 Professional Invoicing - User Help
The function to have Projects' items selected for billing is one that is associated to the Select
Projects for Billing operation application. As a convenience, it is offered as a menu item
under the P/I's Operations drop-down menu. For a full description, refer to the topic titled
General Project Selection for Billing 396 found under the chapter on Select Projects for Billing
386 earlier in this documentation.
9.7.3
Select Projects for Billing
This operational function is used to handle the selection, and/or de-selection, of WIP and
Disbursement items, associated to a Project, for billing purposes. Work-In-Progress items
entered into the system from time sheets or from the various import processes remain on file
and will not be invoiced until they are Selected for Billing. You may choose to have the
system select all eligible WIP and Disbursement items, as of a particular date, and mark
them for billing; or you may select WIP items on an individual basis. When items are
specifically selected, you may also mark the Amount to be Invoiced up or down as desired.
One of the sub-menu options offers a Pre-Invoicing report, that lists all WIP and
Disbursement items that have been selected to be billed. Another sub-menu function
provides the capability of having WIP items written-off, assuming they will never be invoiced.
When a Project is selected, its' WIP items and Disbursement items are presented in a grid
display. Only those items that have not been invoiced are presented. Individual items may be
selected for billing, deferred from being billed, marked up or down, or written-off.
There are a number of features associated to the Selection of item to be Billed. These are
highlighted under the topic titled About, Concepts and Features that follows:
The function to Clear All Previous Selections 388 may be executed in the event you
wish to undo and restart the selection process.
The system will Automatically Select Projects' Items for Billing 388 . For a variety of
processing options and Project filters, the system can automatically select all
eligible items to be billed.
WIP and Disbursement items may be Individually Selected and/or Adjusted for
Billing 389 .
A Pre-Invoicing Report
be generated.
389
listing all items that have been selected for Invoicing may
As an option, the system may be configured to Generate Cost Plus Billing Charges
389 . This is a process that may be used to automatically generated Management
and/or Overhead fees, based on billable charges.
Projects, or individual WIP Items may be Written-Off 389 . In other words, billable
items that can never be Invoiced will be marked accordingly, and applicable G/L
Distributions made.
The operator can easily select and display the detail for any particular item, and perform a
number of different functions on them. These include the following functions:
Inquiry – All the details associated to the item, may be viewed
© 2007 - 2014 by Sentinel Hill Software, all rights reserved
Professional Invoicing Menu Functions
387
Select for Billing – individual WIP or Disbursement items may be selected for billing
Invoice Rates may be Marked Up or Down – adjust then # of units, or Unit Rate that will
actually be invoiced
Defer from being Billed – WIP items may be deferred until after the next Invoice run, a
specific date, or until specifically selected for billing
Write-Off WIP Items – if the WIP item is never going to be invoiced, it can be written off.
In this case then applicable reversing distributions are generated
Other functions that apply to one or more Projects are as follows:
Clear All Selections – all WIP and Disbursements that have been selected for billing
are restored to being eligible for billing.
General Selection for Billing – all eligible WIP and Disbursements will be selected for
billing for all, or a range of Projects that satisfy a variety of selections filters.
Select a Project's WIP for Billing – for the selected Project, all eligible WIP items are
selected to be billed.
Clear a Projects WIP from Billing – for the selected Project, all selected WIP items
are unselected from being billed.
Generate a Pre-Invoicing Report – which lists all items that have been selected for
billing.
The Project Billing Selection function is launched from the P/I Menu's Invoice Processing
drop-down menu by selecting Select Projects for Billing.
© 2007 - 2014 by Sentinel Hill Software, all rights reserved
388
9.7.3.1
Series 5 Professional Invoicing - User Help
About, Concepts and Features
There are a number of features associated to the Billing Selection process. These are
highlighted under the following sub-topics. (Click the green plus sign to expand the display for
the related text).
Clearing All Previously Selected Items
If after executing the Generalized Selection function, you have realized that the wrong
parameters had been entered, you may have the previous selections Un-Done. Any items
that had been Partially Selected, or that had been Marked Up or Down are also cleared.
This function will unselect all Work-In-Progress items which have been previously selected,
or temporarily deferred. Any Disbursement items that had been selected for billing are also
unselected. Items that had been marked deferred from being billed are NOT cleared. If
budgets are defined, the associated Committed fields are also cleared.
Automatic Selection of Project Charges for Billing
This function is used to have all possible WIP and Disbursement items selected to be billed
and invoiced.
The system will automatically mark all eligible WIP and Disbursement items as selected to be
billed and invoiced at the next earliest opportunity. (That would be when the Generate
Invoices function is next performed). You will be able to specify the Invoice Date, and a Cutoff Date, and be able decide if Holdback Charges and/or Disbursement Charges are to be
© 2007 - 2014 by Sentinel Hill Software, all rights reserved
Professional Invoicing Menu Functions
389
billed or not. You may also specify to automatically select items for Selected Project, a range
of Projects, or only those that satisfy a variety of selection filters.
Selecting, Deferring and Marking Up/Down WIP for Billing
These functions provide the ability to select a specific WIP item for the purpose of billing, or
not. That item may be selected in full, it's charge-out rate marked up or down, partially or
fully billed, deferred temporarily or deferred until a specific date. Items may also be
unselected, written-off or marked as manually paid. For each item displayed, its associated
budget values (budget, actual, committed and remaining values) are displayed.
Pre-Invoicing Report
The Pre-Invoicing report provides a list of all the WIP and Disbursement items that have been
selected for billing. You may choose to have the items listed grouped by their Invoice Group
Codes, or by their Budget Group Codes.
Budget amounts, if maintained, are printed showing the Original, Committed and Remaining
amounts as a result of each item being selected for billing.
This report may be distributed to the Project Leaders to verify or authorize the Invoicing of the
selected items.
Generation of Cost Plus Charges
Cost Plus Billing is available in the PI system. When a contract is negotiated with your
customer, it may involve a situation where you will be able to charge an amount that
represents a fixed percentage of the labor charges and/or disbursements recorded against
the project. These charges are sometimes referred to as Overhead, or General and
Administration Charges. Up to six different Cost Plus items may be defined in the system.
Prior to performing the generation of Invoices, this function can be used to compute and
generate Cost Plus charges. These will be recorded as WIP items. The Cost Plus Task
Codes and the % values are defined using the PI Control Maintenance application. There are
currently two sets of formulas that may be used to compute the Cost Plus Charges. (These
formulas are coded into the system. If you require different computations, please contact
Lions Gate Software and they can be added).
Cost Plus charges are generated into a temporary transaction file and may be revised prior to
being posted to the WIP files.
Writing Off Project WIP Charges
This function provides the ability to have all or selected WIP items Written Off. That is,
because a given project never got completed, or there was billable activity recorded that you
know could not actually be invoiced, these will be marked as Written Off. These items do
remain on the system contributing to assorted costing and/or labor analysis reports.
© 2007 - 2014 by Sentinel Hill Software, all rights reserved
390
Series 5 Professional Invoicing - User Help
When items are written off, applicable reversing G/L distributions are also generated.
9.7.3.2
Project Billing Selection Grid Screen
The Project Billing function provides the means of selecting eligible Work-in-Progress and
Disbursement items recorded against a Project to be invoiced. For any displayed WIP item, it
may be individually selected, it's rate or charge amount marked up or down, deferred from
being billed, or written-off.
WIP items and Disbursement items are displayed, each in their own tab sub-screens,
managed using a Series 5 grid processing screen. You can easily navigate through the items
on file using the grid buttons, or enter the respective key for the desired transaction. Only
unbilled items associated to a selected Project are displayed to the grid.
From the "Fast Buttons" frame, push buttons are provided that can be used to automatically
select items for billing for all Projects; and a Pre-Invoicing report may be generated.
Project Billing Selection Grid
When the Disbursement's tab is selected, the following grid screen is displayed:
© 2007 - 2014 by Sentinel Hill Software, all rights reserved
Professional Invoicing Menu Functions
391
"Fast Buttons"
Clear All Selections
To have all WIP items and Disbursement
charges that had previously been selected
for billing, for all Projects, unselected. As
well, if these items had been marked up or
down, or had been set as Temporarily
Deferred, these settings are also cleared.
General Select for Billing
For all Projects, a range of Projects, or
selected Projects, automatically select all
eligible WIP and Disbursement items to be
billed. (Refer to the topic following titled
General Project Selection for Billing 396 .)
Print Pre-Invoicing Report
To have the Pre-Invoicing Report 413
generated listing all those WIP and
Disbursement items that have been
selected to be billed and invoiced.
Post Items Marked Manually Reserved for a future enhancement.
Invoiced
Post Items Marked for Write- Those WIP items that had been marked to
be Written Off will be written off. (See the
Off
section following on Writing Off a Project's
WIP Items 373 ).
© 2007 - 2014 by Sentinel Hill Software, all rights reserved
392
Series 5 Professional Invoicing - User Help
Some of the special features of these "Selection" grid are as follows:
WIP Items or Disbursement
Items are listed for a selected
Project. Projects may be
chosen either by entering their
assigned code, choosing it
using the Lookup binoculars
icon, or by having the next or
previous code displayed that
has items on file. (Click the
binocular icon with the up/down
arrow to display WIP items that
exist for the prior/next
occurrence of that code on file).
If a particular row in the grid, representing a given WIP or Disbursement Item, is
double clicked, it will be "Selected to be Billed 400 ". (If that item was already
selected, then it will be "Unselected From Being Billed".
On the WIP and Disbursement
display screens, the last
column of each row, for each
item displayed, contains an
graphic designating the billing
status of the item.
These are defined as follows:
Permanently Deferred or On-Hold
Temporarily Deferred
Selected for Billing
Marked Up/Down
Selected to be Partially Paid
Selected to be Written Off
For the selected Project applicable totals are displayed below the grid display.
© 2007 - 2014 by Sentinel Hill Software, all rights reserved
Professional Invoicing Menu Functions
Once a Project is selected, you
may switch to display either
WIP items or Disbursement
items by clicking on the
applicable tab.
In the screen's menu-bar at the
top of the screen, under the
Operations drop-down menu, a
variety of functions are available
that might be performed on all,
or the selected Project.
In particular, the function to
have all eligible items, for the
selected Project, selected to be
billed is found here. There is
one for WIP and a separate one
for Disbursements.
Within the WIP display grid,
right-click a row to have a popup menu displayed offering
available functions that may be
performed on the associated
WIP item.
Within the Disbursement
© 2007 - 2014 by Sentinel Hill Software, all rights reserved
393
394
Series 5 Professional Invoicing - User Help
display grid, right-click a row to
have a pop-up menu displayed
offering available functions that
may be performed on the
associated Disbursement item.
© 2007 - 2014 by Sentinel Hill Software, all rights reserved
Professional Invoicing Menu Functions
395
Show WIP Detail Screen
When the function to Show WIP Item Details is selected from a given rows pop-up
menu, the detail information for the WIP item is displayed as in the following screen:
Show Disbursement Detail Screen
When the function to Show Disbursement Details is selected from a given rows pop-up
menu, the detail information for the Disbursement item is displayed as in the following
screen:
© 2007 - 2014 by Sentinel Hill Software, all rights reserved
396
9.7.3.3
Series 5 Professional Invoicing - User Help
General Project Selection for Billing
This function provides an automatic process to have all eligible WIP and Disbursement items
selected to be billed and invoiced at the next earliest opportunity. (That would be when the
© 2007 - 2014 by Sentinel Hill Software, all rights reserved
Professional Invoicing Menu Functions
397
Generate Invoices function is next performed). You will specify the Invoice Date, and a
Cut-off Date, and be able decide if Holdback Charges and/or Disbursement Charges are to
be billed or not. You may also choose to automatically select either a range, or a specific
Project that is to be billed.
From the P/I Main menu, select General Select for Billing from the Operations drop-down
menu; or click the General Select for Billing push button from the Select Project Items
Billing "fast buttons" frame.
Some points to note about the automatic selection process:
Items that have been permanently deferred will NOT be selected to be billed.
Any WIP or Disbursement items that had been manually selected, or having a Force
Billed status, will not be disturbed. Their settings and invoicing amounts will remain
the same.
All WIP and Disbursement items will be selected be billed at their initial full value.
However for items that have had a partial amount previously invoiced, only the
balance due amount will be billed.
When items have been selected for billing, when displayed in the Project Selection
grid screen, a check mark,
, will be displayed in the right-most column.
Projects Eligible for Automatic Billing Selection
Any Project that has NOT been defined as one that Typically has Chargeable WIP Items entered and
will have Invoices generated and printed, will not be considered in the General Selection process.
© 2007 - 2014 by Sentinel Hill Software, all rights reserved
398
Series 5 Professional Invoicing - User Help
Also, any Project that has had its Billing Status property set as Proposed, On-Hold, or Closed will not
be considered in the General Selection process.
(Refer these Project properties found on the Billing tab sub -screen of Project Maintenance)
540
.
General Selection of Project Items for Billing - Options Screen
The following screen is presented for entry of options when automatically selecting Project
WIP and Disbursement items to be billed:
When automatically selecting items to be billed, the operator is also presented with the
standard Project Select Filters 142 screen and the Customer Select Filters screen 151 . These
allow you to specify selected or ranges of Projects, Project Locations, Project Departments,
Customers, Customer Types, Sales Representatives, and/or only those customers and/or
projects satisfying a variety of filter criteria.
© 2007 - 2014 by Sentinel Hill Software, all rights reserved
Professional Invoicing Menu Functions
399
Item Selection for Billing Options Screen - Field Definitions
WIP Transactions Cutoff Date
(mmddyy)
All WIP and/or Disbursement items that have a transaction date on or before the date
specified will be selected for billing. The default is today's date.
Invoice Date
(mmddyy)
This is the Invoice Date. This date is NOT used in any decision process for selecting
items to be billed. It will, however, be printed on the Pre-Invoicing Report. The date
entered here will be carried forward and used as the default for when Invoice are
eventually generated. (If when invoices are generated, a different date is entered, then
that date will be assigned as the Invoice Date).
Select WIP Previously Deferred to a Given check-box
Date
Set this check-box if you wish to have any WIP items that had been deferred to a
particular date tested to be selected for billing. If the Deferred To date is earlier than the
date entered, then the item will be selected to be billed. Note that if this setting is never
selected, then any items deferred to a particular date would never be selected.
Select INVOICE HOLDBACK Items to be
Billed
check-box
Set this check-box if you wish to have any previously generated Invoice Holdbacks
selected for billing. Project Holdbacks are items that represent a fixed percentage of
invoices that have previously been issued, but can be invoiced only when the project is
completed. If it is time that the customer gets billed, these items will be selected for
billing.
You would typically want to have the Holdback charges invoiced at the completion of a
Project. The automated generation of Invoice Holdbacks is a property associated to each
Project.
Select Eligible DISBURSEMENT Charges to check-box
be Billed
Set this check-box if you wish to have any eligible Disbursements selected for billing.
© 2007 - 2014 by Sentinel Hill Software, all rights reserved
400
9.7.3.4
Series 5 Professional Invoicing - User Help
Select WIP Items for Billing
From the WIP tab sub-screen displayed on the Select for Billing grid screen, a given WIP item
can be selected to be billed. You may wish to employ this method for selecting items for
billing, rather than executing the automated General Billing function, if you need to have only
specific activity invoiced.
From the grid, double-click the row of the WIP item to be billed. A screen is presented, for
verification purposes, and clicking the Select Item to Bill push-button marks the item to be
billed. Alternatively, right-click the row of the WIP item to be billed, and click the Select WIP
for Billing function from the pop-up menu.
Some points to note about selecting the WIP to be billed:
The selected for billing WIP Item may be de-selected from being billed by doubleclicking it's row.
The WIP activity will be selected to be billed at their initial full value. However for items
that have had a partial amount previously invoiced, only the balance due amount will be
billed.
When items have been selected for billing, when displayed in the Project Selection grid
screen, a check mark,
, will be displayed in the right-most column.
Selecting a WIP item for Billing Screen
The following screen is presented to verify the selection of the WIP item to be billed:
© 2007 - 2014 by Sentinel Hill Software, all rights reserved
Professional Invoicing Menu Functions
9.7.3.5
401
Marking Up/Down WIP Charges
If the times comes when a Project is invoiced, you realize that the amount to be invoiced will
be too much, or not enough, this function allows you to adjust the amount of the WIP item to
be billed at the time it is selected.
From the grid, right-click the row of the WIP item to be billed and adjusted. From within the
pop-up menu click the Mark Up/Down WIP for Billing function, and a screen is presented
for entry of the amounts to be invoiced.
© 2007 - 2014 by Sentinel Hill Software, all rights reserved
402
Series 5 Professional Invoicing - User Help
Some points to note about marking up/down WIP charges when they are billed:
The selected for billing WIP Item may be de-selected from being billed by doubleclicking it's row.
The original charge-out values of the WIP items are kept intact for reference.
The WIP Description, and Reference Fields may also be edited. (It's possible customer
Bill Codes are found in these fields, and are used for sorting or grouping of Invoices).
When items have been marked up/down and selected for billing, when displayed in the
Project Selection grid screen, a check mark,
column.
, will be displayed in the right-most
If Budgets have been established for the associated Project, they are updated with the
new revised Invoice amounts.
Marking Up/Down WIP items for Billing Screen
The following screen is presented for entry of the adjusted invoice amounts of the WIP item to
be billed:
© 2007 - 2014 by Sentinel Hill Software, all rights reserved
Professional Invoicing Menu Functions
403
Marking WIP Items Up/Down Screen - Field Definitions
To Invoice – # of Units
99,999.99-
When the WIP item is selected to be billed, this is the # of Units associated to the activity
that is to be invoiced and charged to the Project. By default, this will be the number of
units recorded on the original time sheet. When the WIP item is partially billed, or marked
up/down, the # of Units should be adjusted accordingly.
When recording a Credit to the Project, the # of Units should be entered with a
minus sign. WIP Rates cannot be negative.
To Invoice – Rate
$ 99,999.99
When the WIP item is selected to be billed, this is the Unit Charge-out Rate associated to
the activity that is to be invoiced and charged to the Project. By default, this will be the
rate recorded on the original time sheet. When the WIP item is partially billed, or marked
up/down, the # of Units should be adjusted accordingly, keeping the Rate as is.
When recording a Credit to the Project, the # of Units should be entered with a
minus sign. WIP Rates cannot be negative.
© 2007 - 2014 by Sentinel Hill Software, all rights reserved
404
Series 5 Professional Invoicing - User Help
To Invoice – Extended $ Amount
$ 999,999.99-
This is the Extended dollar amount associated to the WIP item. This is the amount that
will be invoiced to the customer. This amount is always computed from the # of Units
and the Unit Rate. If this amount is overridden, then the Unit Rate is adjusted accordingly.
To Invoice – Overhead $ Amount
$ 999,999.99-
When the WIP item is selected to be billed, this is the Overhead Amount associated to
the activity that is to be invoiced and charged to the Project. By default, this will be the
amount recorded on the original time sheet.
Description
X(50)
This field is used to record a brief description of the activity performed. For Projects
using specific Invoice Layouts, this field may be used to sort items printed on invoices.
Reference 1 and 2
X(40)
These fields are used to record codes relating to sub-contracts, job numbers, billing
codes, contact names, etc., or to record more verbiage describing the WIP activity. For
Projects using specific Invoice Layouts, and/or that generate EDI invoices, segments of
these fields may be used to determine how items are grouped or sorted for invoicing.
Task Description Override
X(60)
This field is used to provide an opportunity to override the description that is associated to
the Task. For a particular Invoice Layout, detail is listed with the description derived from
the Task Code. If a description is entered in this field, then this text is printed on the
invoice instead. For WIP recorded not using the mentioned Invoice Group, it may be
used to record further description associated to the activity.
Type "C" Invoice Layout Grouping
drop-down list
When invoices are generated for a Project, the P/I system provides for a number of
different sorting and grouping options. Invoice Layouts are created and assigned to every
Project. For Projects that have a Type "C" Invoice Layout, these radio-buttons are offered
so a Group and/or Consolidation code may be recorded with their associated WIP items.
WIP charges may be recorded into the P/I system with a Consolidation Flag. This is a 1
character field that can take a value of D, F, or a number from 1, .... 9. Depending on the
options specified, all WIP charges may be grouped and sub-totalled by their
Consolidation Flag. All WIP having the same Consolidation Flag are grouped together.
As an additional option, the WIP within each Group will be sorted by the WIP Reference
field. In some cases, the Reference field holds an individuals's name, or a Billing-Code.
All charges with the same Reference field would be sub-totalled and printed as one line
© 2007 - 2014 by Sentinel Hill Software, all rights reserved
Professional Invoicing Menu Functions
405
on the invoice.
No consolidation is performed. Each WIP
charge is printed in detail
Sum items within a Group printed All the charges with the same Consolidation Flag
are sub-totalled and printed as one line.
as a total
WIP for a Group are sub-totalled by All the charges with the same Consolidation Flag
are sub-totalled by their WIP Reference field. An
Reference
additional sub-total is printed for each
Consolidation Group.
Sub-Total by Reference Bill-Code All the charges with the same Bill-Code, that is
determined from the WIP's Reference field, are
sub-totalled and printed. When selected, you
must also specify which portion of the Reference
field is to be used as the Bill-Code. (The
Consolidation Flag is not used in this case).
None
Consolidation Flags in the Configuration File
Using type B or C Invoice Layouts with Consolidation Flags requires the definition of up to 9
variables in the runtimes Configuration file. Each variable is associated to the 9 numeric values that
the Consolidation Flag may take. The variable is defined as follows:
PI-INV-DESCn <flag> <description text>
where:
n is the value 1 - 9;
<flag> will be either an A or a B indicating the Generation Type rule to be used, (or ignored for
the B layouts);
<description text> will be printed as the description on the invoice for the consolidated total
of all items flagged with n.
9.7.3.6
Defer WIP Items from Billing
If the event a given WIP item should be deferred from being invoiced, this function provides
the ability to do just that. You may choose the following options:
Defer from being Invoiced until after the next Invoice Generation is performed
Defer from being Invoiced until after a specified date
Defer permanently until Cleared and Selected for billing
From the grid, right-click the row of the WIP item to be deferred. From within the pop-up
menu click the Defer WIP from Billing function, and a screen is presented for entry of the
© 2007 - 2014 by Sentinel Hill Software, all rights reserved
406
Series 5 Professional Invoicing - User Help
amounts to be invoiced.
Some points to note about having WIP items deferred:
The WIP Description, and Reference Fields may also be edited. (It's possible customer
Bill Codes are found in these fields, and are used for sorting or grouping of Invoices).
When items have been marked as deferred, when displayed in the Project Selection
grid screen, either a
, or a , will be displayed in the right-most column. (Red for
permanent).
The WIP item may have it's Deferred Status cleared by selecting the Clear Defer Billing
Status from the pop-up menu.
Marking WIP items Deferred from Billing Screen
The following screen is presented for having a WIP item Deferred. Select the type of Deferral
required:
© 2007 - 2014 by Sentinel Hill Software, all rights reserved
Professional Invoicing Menu Functions
407
Marking WIP Deferred Screen - Field Definitions
Description
X(50)
This field is used to record a brief description of the activity performed. For Projects
using specific Invoice Layouts, this field may be used to sort items printed on invoices.
Reference 1 and 2
X(40)
These fields are used to record codes relating to sub-contracts, job numbers, billing
codes, contact names, etc., or to record more verbiage describing the WIP activity. For
Projects using specific Invoice Layouts, and/or that generate EDI invoices, segments of
these fields may be used to determine how items are grouped or sorted for invoicing.
Type "C" Invoice Layout Grouping
drop-down list
When invoices are generated for a Project, the P/I system provides for a number of
different sorting and grouping options. Invoice Layouts are created and assigned to every
Project. For Projects that have a Type "C" Invoice Layout, these radio-buttons are offered
so a Group and/or Consolidation code may be recorded with their associated WIP items.
© 2007 - 2014 by Sentinel Hill Software, all rights reserved
408
Series 5 Professional Invoicing - User Help
WIP charges may be recorded into the P/I system with a Consolidation Flag. This is a 1
character field that can take a value of D, F, or a number from 1, .... 9. Depending on the
options specified, all WIP charges may be grouped and sub-totalled by their
Consolidation Flag. All WIP having the same Consolidation Flag are grouped together.
As an additional option, the WIP within each Group will be sorted by the WIP Reference
field. In some cases, the Reference field holds an individuals's name, or a Billing-Code.
All charges with the same Reference field would be sub-totalled and printed as one line
on the invoice.
No consolidation is performed. Each WIP
charge is printed in detail
Sum items within a Group printed All the charges with the same Consolidation Flag
are sub-totalled and printed as one line.
as a total
WIP for a Group are sub-totalled by All the charges with the same Consolidation Flag
are sub-totalled by their WIP Reference field. An
Reference
additional sub-total is printed for each
Consolidation Group.
Sub-Total by Reference Bill-Code All the charges with the same Bill-Code, that is
determined from the WIP's Reference field, are
sub-totalled and printed. When selected, you
must also specify which portion of the Reference
field is to be used as the Bill-Code. (The
Consolidation Flag is not used in this case).
None
Defer From Billing Until
radio-buttons & (mmddyy)
Select the desired type of deferral.
If Until After Invoices Next Generated is
chosen, then the deferral status remains in effect
for the WIP item until the associated Project is
tested to see if an Invoice is to be generated.
9.7.3.7
After Invoices Next
Generated
A specific Date
Specifically Re-Selected
Write-Off WIP Items
In the event a given chargeable WIP item, or set of WIP items, should never be invoiced, then
they should be written off. By writing off a WIP item, any revenue distributions that might have
been generated when it was originally entered into the system will be reversed.
To have WIP items for a given Project written off, requires three step process:
© 2007 - 2014 by Sentinel Hill Software, all rights reserved
Professional Invoicing Menu Functions
409
1. Select the Project whose WIP items are to be written off.
2. Select the WIP items that are to be written off, either individually, or as a set.
3. Execute the function to Post the WIP items that have been selected to be Written Off
Selecting a Single WIP to be Written Off: Select multiple WIP items to be Written
Off:
From the grid, right-click the row of
the WIP item to be deferred. Then,
from within the pop-up menu, click
the Select WIP to be Written Off
function, and a screen is presented
for confirmation and entry of the
Ledger Date to be used.
From the menu-bar, click
Operations, and then from the
drop-down menu, click Select
Multi-WIP to Write-Off function. A
window will be displayed for entry of
the Ledger Date to be used, and for
entry of any applicable WIP
selection filters.
Then once all desired WIP items for the Project are marked, from the
"Fast Buttons" frame, click the Post Items Marked Writeoff push
button to have them posted.
Some points to note about having WIP Written Off:
The WIP Description, and Reference Fields may also be edited. (You might wish to
© 2007 - 2014 by Sentinel Hill Software, all rights reserved
410
Series 5 Professional Invoicing - User Help
record a reason as to why the item was not invoiced).
When items have been marked to be Written Off, when displayed in the Project
Selection grid screen, a
, will be displayed in the right-most column.
The WIP item may have it's Selected for Write Off Status cleared by selecting the Clear
WIP Write Off Request from the pop-up menu.
Once the selected items have been Posted for Write-Off, they may not be reinstated to
the status where they can be billed.
Selecting a Single WIP Item to be Written Off
The following screen is presented for having a WIP item Written Off. Basically you need to
enter the Ledger Date that will be used when applicable G/L Reversing Distributions are
generated.
Selecting a Single WIP to be Written Off - Field Definitions
Description
X(50)
This field is used to record a brief description of the activity performed. For Projects
© 2007 - 2014 by Sentinel Hill Software, all rights reserved
Professional Invoicing Menu Functions
411
using specific Invoice Layouts, this field may be used to sort items printed on invoices.
Reference 1 and 2
X(40)
These fields are used to record codes relating to sub-contracts, job numbers, billing
codes, contact names, etc., or to record more verbiage describing the WIP activity. For
Projects using specific Invoice Layouts, and/or that generate EDI invoices, segments of
these fields may be used to determine how items are grouped or sorted for invoicing.
Type "C" Invoice Layout Grouping
drop-down list
When invoices are generated for a Project, the P/I system provides for a number of
different sorting and grouping options. Invoice Layouts are created and assigned to every
Project. For Projects that have a Type "C" Invoice Layout, these radio-buttons are offered
so a Group and/or Consolidation code may be recorded with their associated WIP items.
WIP charges may be recorded into the P/I system with a Consolidation Flag. This is a 1
character field that can take a value of D, F, or a number from 1, .... 9. Depending on the
options specified, all WIP charges may be grouped and sub-totalled by their
Consolidation Flag. All WIP having the same Consolidation Flag are grouped together.
As an additional option, the WIP within each Group will be sorted by the WIP Reference
field. In some cases, the Reference field holds an individuals's name, or a Billing-Code.
All charges with the same Reference field would be sub-totalled and printed as one line
on the invoice.
No consolidation is performed. Each WIP
charge is printed in detail
Sum items within a Group printed All the charges with the same Consolidation Flag
are sub-totalled and printed as one line.
as a total
WIP for a Group are sub-totalled by All the charges with the same Consolidation Flag
are sub-totalled by their WIP Reference field. An
Reference
additional sub-total is printed for each
Consolidation Group.
Sub-Total by Reference Bill-Code All the charges with the same Bill-Code, that is
determined from the WIP's Reference field, are
sub-totalled and printed. When selected, you
must also specify which portion of the Reference
field is to be used as the Bill-Code. (The
Consolidation Flag is not used in this case).
None
Write-Off Ledger Date
(mmddyy)
Enter the Ledger Date that will be used for any reversing G/L Distributions that are
generated.
© 2007 - 2014 by Sentinel Hill Software, all rights reserved
412
Series 5 Professional Invoicing - User Help
Selecting Multiple WIP Items to be Written Off
The following screen is presented to have all, or a filtered set, of WIP items selected to be
Written Off. Basically you need to enter the Ledger Date that will be used when applicable G/
L Reversing Distributions are generated, and any filters to be used in limiting those WIP items
to be selected.
When selected, the operator is presented with the standard WIP Select Filters 147 screen.
This allows you to specify WIP for selected or ranges of Employees and Tasks, and/or only
those WIP items satisfying a variety of filter criteria.
Selecting Multiple WIP Items to be Written Off - Field Definitions
Write-Off Ledger Date
(mmddyy)
Enter the Ledger Date that will be used for any reversing G/L Distributions that are
generated.
© 2007 - 2014 by Sentinel Hill Software, all rights reserved
Professional Invoicing Menu Functions
9.7.3.8
413
Editing or Fixing WIP Bill Codes
Enter topic text here.
9.7.4
Print Pre-Invoicing Report
The Pre-Invoicing report provides a simple list of all the WIP and Disbursement items that
have been selected for billing. You may choose to have the items listed grouped by their
Invoice Group Codes, or by their Budget Group Codes. If Cost Plus charges have been
generated for a Project, these will also be printed.
From the P/I Main menu, select Print Pre-Invoicing Report from the Invoice Processing
drop-down menu or the Reports drop-down menu; or click the Print Pre-Invoicing Report
push button from the Select Project Items Billing "fast buttons" frame.
Budget amounts, if maintained, are printed showing the Original, Committed and Remaining
amounts as a result of each item being selected for billing.
Pre-Invoicing Report Filters Screen
The following screen is displayed for entry of a number of different options and filters that may
© 2007 - 2014 by Sentinel Hill Software, all rights reserved
414
Series 5 Professional Invoicing - User Help
be set to limit the records that are output to the report.
When selected, the operator is presented with the standard Project Select Filters 142 screen
and the Customer Select Filters 151 screen. These allow you to specify selected or ranges of
Projects, Project Locations, Project Departments, Customers, Customer Types, Sales
Representatives, and/or only those customers and/or projects satisfying a variety of filter
criteria.
The report generated, if archived, will be catalogued with a report name of
PIPREINVOICE.RPT.
The Print Options tab screen will be displayed, from which you can select to direct the output
to be displayed to the screen, archived, printed, saved as an MS Word document, saved as a
PDF, and/or emailed. (Refer to the topic titled Report Generation and Printing 159 for full
details).
Pre-Invoicing Report Filters Screen - Field Definition
WIP Items Sort
drop-down list
© 2007 - 2014 by Sentinel Hill Software, all rights reserved
Professional Invoicing Menu Functions
415
To have the WIP Items listed grouped by one of the
available fields.
9.7.5
Invoice Grid Processing
This Series 5 Professional Invoicing system primary purpose is to generate and print your
Customers Invoices for the billable activity that have been record against their defined
Projects.
There are a number of features associated to generating and printing Invoices. These are
highlighted under the topic titled About, Concepts and Features that follows:
There are a certain sequence of steps that must be performed when Generating
Invoices 416 .
Once Invoices are generated, prior to having the formal invoices printed, Draft
Invoices 417 may be printed.
When Printing the Final Invoices
417
, a variety of different formats are available.
When printing the final Invoices, some Projects may generated EDI Invoice Interface
418 files, that are sent to the customer, to Ariba, or to Paymentech for processing.
There is also the option of have a PDF version of each invoices Automatically
Emailed 417 to the customer.
If there is a problem with the Invoices that have been generated or printed, they may
be De-Generated 418 .
All P/I Invoices must be Posted to the Accounts Receivable
419
system.
After Invoices have been posted to A/R, an Invoice History record is recorded.
There is an Historic Invoice Inquiry function 419 , and an operation to have Historic
Invoices Reprinted 419 .
Invoice Processing
Concepts and Features
416
Invoice Processing Grid Screen
Generate Invoices
Printing Invoices
419
422
426
Automatic Emailing of Invoices
428
Reconcile Paymentech Credit Card Charges
© 2007 - 2014 by Sentinel Hill Software, all rights reserved
443
416
Series 5 Professional Invoicing - User Help
Post Invoices to Accounts Receivable
432
Accessing the P/I Invoice Processing Functions
From the P/I Main menu, select Invoice Grid Processing from the Invoice Processing
drop-down menu.
9.7.5.1
Concepts and Features
There are a number of features associated to the generation of Professional Invoicing
Invoices. These are highlighted under the following sub-topics. (Click the green plus sign to
expand the display for the related text).
Preparing for the Generation of Invoices
The generation and printing of Invoices is really accomplished in three steps.
1) First, all WIP charges and Disbursements must have been selected to be billed. If nothing
has been selected, then no invoice will be generated.
2) Next, the invoices must be generated. This process may be simple, or complex,
depending on the types of invoices that are to be produced. Depending on the rules that
have been set up for a given Project it is possible that one or more invoices will be
generated. Typically, though, only one invoice is printed per Project. Other formatting
options are defined for each Project, and you might have different types of Invoice Layouts
that govern the generation of invoices. When invoices are generated, an Invoice Header
© 2007 - 2014 by Sentinel Hill Software, all rights reserved
Professional Invoicing Menu Functions
417
with Invoice Detail records are created. These records hold all information including the
charges, sub-totals and totals, the formatting and the sort order of items. These Invoice
Header and Detail records remain on the system until they are purged. That means that
you may print Draft Invoices, Final Invoices, and you can even reprint invoices in the future
if necessary. The process of generating invoices may be broken into multiple cycles.
That is, you can specify an Invoice Cycle Code such that only those Projects that have a
matching code will have an invoice generated. For example, perhaps you wish to invoices
Projects whose customers start with A-K at the beginning of the month, and those with L-Z
at the middle of the month. You would then have two cycle codes, [1] and [2]. Or maybe
you have two or three different types of customers that each require totally different invoice
stationary. Get the idea ?
3) The third step is the actual printing of the invoices. This step is finalized in the sections
below. There is one more step after the printing of invoices, and this is the Posting of
Invoices to Accounts Receivable.
Printing Draft Invoices
Draft Invoices are useful for ensuring that the correct information has been invoiced and that
Customer addresses are correct. You may wish to distribute these to the various department
Managers for authorization. The printing of Draft Invoices is strictly an option.
Printing the Final Invoices
Printing Final Invoices is the last step to the generation of invoices. This process not only
prints the final version, but marks the Invoice Header records with a status of being printed.
Automatic Emailing of Invoices
The Series 5 P/I system provides for the ability to automatically have project invoices
automatically emailed to their designated customers. Once invoices are generated, for those
Projects and Customers that have been correctly setup, a given function is selected and the
system will generated the invoices as PDF documents and automatically email them. The
steps required to set up a Project and it's Customer for automatic emailing of invoices are as
follows:
Add a new EDI Specification code record, of type "Auto-Emailed PDFs". Enter it's
properties. These include the Root Name of the generated file, the directory where the
PDF files are created, the name of the text file that holds the email message, and the
names of the MS Word Templates used to format the output files.
Create the directory which will be used to hold the PDF Invoices
For each Project that is to have it's invoices emailed, assign the EDI Specification
Control Code that was created above.
For each Customer associated to the above Projects, on their A/R Profile tabbed subscreen, set the Email Statements and Invoices property. Specify whether which email
© 2007 - 2014 by Sentinel Hill Software, all rights reserved
418
Series 5 Professional Invoicing - User Help
address is to be used; the company's, or either one of the Contacts.
Create the MS Word Template that is to be used to format the appearance of the
invoices. Set the margins, font, orientation, spacing and as an option, a watermark.
(This template must be installed on the Windows client machine where the invoices are
generated.)
Generate the invoices in the normal fashion.
A new push button function has been added to the Invoice Grid Processing screen
labeled "Email/Post Finals". Click this button, and only those invoices for those Projects
that have been set up for emailed invoices will be automatically created as PDF files,
and emailed.
As an option, defined by a property associated to the EDI Specification Control record, a
Recap Report for each invoice will also be generated as a PDF, and attached to the
email.
The PDF files for the Invoices, and their Recap Reports, are created in the designated
directory. They will remain on the system until they are deleted from Windows.
Generating EDI Invoices
The Series 5 P/I system provides for the ability to generated electronic invoices. These are
commonly referred to as EDI invoices.
There are a variety of different EDI invoices that may be generated. Some of these are
unique to specific customer, and some are generated using specific standard formats For
each of the types of EDI invoices that may be generated, the P/I system has an EDI
Specifications Control code that is created. This Control Code defines the different properties
associated to each type of EDI invoice.
In order for a particular project to have it's invoices generated as EDI invoices, it must select
as one of it's properties, one of the EDI Control Codes that you have defined to the system
using the EDI Specifications Codes Maintenance 608 function.
De-Generation of Invoices
Some times you just don’t get it right the first time. You’re in a hurry and you enter the wrong
Invoice Date, or you realize that one of the properties of the Invoice Layout being used was
not set correctly. The De-Generate Invoices 436 function comes to your rescue. This
basically undoes the generation of invoices. Every function performed by the generation and
posting of invoices is reversed. All WIP and Disbursement items that contributed to the
invoice will have its status reset to being active. You will need to re-select these items for
billing.
Even if you have posted your invoices to the Accounts Receivable system, you may still DeGenerate. Also, if you have posted the A/R Sales Entry batch of transactions for the invoice
run, it can be reversed using a function in that application.
Note that only computer generated invoices will be reversed. Credit Notes and Manual
© 2007 - 2014 by Sentinel Hill Software, all rights reserved
Professional Invoicing Menu Functions
419
Invoices cannot be de-generated. Also, if in the A/R system, payment has been received
against the invoice, it may not be de-generated.
Posting Invoices to Accounts Receivable
To finish up the billing process you MUST Post Invoices to the Accounts Receivable 432
system. A Sales Batch will be created in the A/R, and each invoice will be recorded as a
Sales Transaction. When that Sales Batch is posted, the invoices will become Open Items.
Historic Invoice Inquiry
When Invoices are posted to Accounts Receivable, an entry is also recorded in the P/I
Historic Invoices files. There is an Inquiry function that offers the ability to browse through the
historic Invoices, and have the charges associated to an invoice displayed. You can even
have the Invoice reprinted in necessary.
Reprint Historic Invoices
If for whatever reason, you need to have sets of P/I invoices re-printed, this function is
available. It basically lets you re-print invoices based on a range of Dates, Projects,
Customers or Invoice Numbers. It might be a handy function if you need to re-print all the
invoices for a given customer.
9.7.5.2
Invoicing Grid Screen
P/I Invoices are Generated and Printed, and basically managed, maintained using a Series 5
grid processing screen.
© 2007 - 2014 by Sentinel Hill Software, all rights reserved
420
Series 5 Professional Invoicing - User Help
P/I nvoice Processing Grid
The "Fast Buttons" frame provides the push buttons to launch the most common functions
associated to the P/I Invoices.
"Fast Buttons"
Generate Invoices
Have the P/I Invoices Generated for all Projects that
have had items selected for billing
Print Proofs
Print Draft Invoices. These are useful if you need to
ensure that the invoices are correct before the final
ones are printed. These could be distributed to the
various Project Managers for approval. The printing
of Proof Invoices is strictly an option.
Print/Post Finals
Have the final Project Invoices Printed. EDI
Interface files are generated for those Projects so
designated.
Email/Post Finals
ONLY those Projects and Customers that have
been set up for automatic emailing, generate their
invoices as PDF documents, and automatically
email them. Invoices that are emailed may also
have hardcopy versions printed and/or archived.
© 2007 - 2014 by Sentinel Hill Software, all rights reserved
Professional Invoicing Menu Functions
421
Note that when selecting this option, any
invoices that have been generated, that are NOT
to be printed as PDFs and emailed, are NOT
printed or posted.
Also, Projects that generated EDI invoices are
not processed when this function is envoked.
Paytech Reconcile
Post to A/R
For Invoices that were produced as EDI Visa
Charges that had been submitted to Paymentech for
approval, when Paymentech returns it's
authorization file, select this push-button to have it
loaded.
Post the P/I Invoices to the Accounts Receivable
system. These will become Sales Transactions
within the specified Sales Batch
Details associated to an existing Invoice may be displayed by by double-clicking it's
associated row. Standard Series 5 grid controls apply.
If the function to have Draft Invoices printed is selected, the report if archived, will be
catalogued with a report name of DRAFT_PI.INV.
When the final Invoices are printed, if archived, will be catalogued with a report name of
PI_yymmdd_hhmmss.INV.
The Print Options tab screen will be displayed, from which you can select to direct the output
to be displayed to the screen, archived, printed, saved as an MS Word document, saved as a
PDF, and/or emailed. (Refer to the topic titled Report Generation and Printing 159 for full
details).
Other functions are available from the menu bar's File drop-down menu. These include the
following:
Menu Bar File drop-Down functions
Approve ALL Prepay Invoices
This function is applicable for any Projects that are invoiced and
pre-paid with VISA credit cards, whereby an EDI file to be sent to
Paymentech. Normally, a Paymentech Approval file must be
loaded that is used to identify which charges are approved, and
which ones were rejected. If that function cannot be processed,
this function will just go through all the applicable invoices and
mark them approved. (Approved Invoices may then be posted to
Accounts Receivable).
© 2007 - 2014 by Sentinel Hill Software, all rights reserved
422
Series 5 Professional Invoicing - User Help
This function should not normally be executed, unless
something is wrong with the Paymentech Approval file.
De-Generate Invoices
This function is used to De-Generated Invoices. This is useful if
you had realized that the wrong date was specified, or if the wrong
Invoice Layout options were used. (Refer to the topic titled
DeGenerate Invoices 436 below).
9.7.5.3
Generating Invoices
Once all active WIP and Disbursement items for Projects have been selected for billing,
invoices can then be generated. Invoices need to be generated before they can be printed.
The system will read through the WIP and Disbursement files and generate Invoices for items
that have been selected. Normally a single invoice will be generated for each Project,
although, if Invoice Layout Codes are utilized, depending on the option chosen, multiple
invoices could be created for a given Project.
From the P/I Main menu, select Generate Invoices from the Operations drop-down menu;
or click the Generate Invoices push button from the Invoice Grid Processing "fast buttons"
frame.
Some points to note when generating Invoices:
For those Projects that have been configured to generate EDI, (Electronic Data
Interchange), invoices are generated using the same process as other Projects.
© 2007 - 2014 by Sentinel Hill Software, all rights reserved
Professional Invoicing Menu Functions
423
The EDI interface files are generated when the P/I Invoices are printed.
There are a variety of different sets of rules that have been established for the
generation of Invoices. Normally, these rules are defined as properties associated
to each Project. In some cases, special rules are in place that dictate how charges
are to be grouped, how taxes are computed and presented, the format in which
charges are presented, and whether for a given Project whether multiple invoices
are generated. These rules are defined as properties associated to P/I Invoice
Layouts 654 . An Invoice Layout may be assigned to each Project.
If a Project has it's Billing Status property set as On-Hold, Proposed, or Closed, an
invoice will not be generated. Also, if no items have been selected to be billed, and
invoice will not be generated.
Invoice Numbers are assigned sequentially starting with the number specified from
the selection parameters entered. This field is initialized from the Next Invoice
Number that is kept in the P/I Control Preferences 694 . When posted to the
Accounts Receivable, the invoice becomes a sales transaction with the invoice
number assigned. Care must be taken to ensure that invoice numbers assigned
from the Order Processing system do not conflict with sales transaction document
numbers that originated from A/R or other systems.
When assigning the next Invoice Number, if the system finds that the invoice
number has already been used, the value is incremented.
Public and Private Invoice Processing
Invoices may be generated as Private or Public Invoices.
Private Invoices are maintained in a file that may be accessed only be the user that generated them.
The concept was developed so that the files associated to private invoices reside in folders on the
client's PC.
Public Invoices are those that are generated and available to all users of the Professional Invoicing
system. The Public data files are stored on the server.
Normally, all Invoice generation processes should be done using Public Access options.
Generating Invoices - Options Screen
The following screen is presented when generating the P/I Invoices:
© 2007 - 2014 by Sentinel Hill Software, all rights reserved
424
Series 5 Professional Invoicing - User Help
When generating the Invoices, the operator is also presented with the standard Project Select
Filters 142 screen and the Customer Select Filters screen 151 . These allow you to specify
selected or ranges of Projects, Project Locations, Project Departments, Customers,
Customer Types, Sales Representatives, and/or only those customers and/or projects
satisfying a variety of filter criteria.
Invoice Generation Options Screen - Field Definitions
For Project Invoice Cycle Code
radio-buttons and
X(1)
One of the properties associated to Projects is an Invoice Cycle Code. If you wish to
generate Invoices in groups, you may assign an Invoice Cycle Code to a particular set of
Projects. Click the Specify radio button and enter the Cycle Code for the Projects that
are to be invoiced. Cycle Codes are user defined, and are not validated, so you MUST
dream up a standard set of codes, like A, B, C, D, or 1, 2, 3 ,4 etc. If you have some
Projects with a code, and other that have no code, you may click the That are Blank
radio-button to just generate invoices for the project that have no code assigned. Should
you just want to generate invoices for all Projects, regardless of Cycle Code, click the All
radio button.
Starting with System Assigned Invoice Number
9(6)
© 2007 - 2014 by Sentinel Hill Software, all rights reserved
Professional Invoicing Menu Functions
425
The Next Invoice Number field is retrieved from the P/I Control Preferences. This value
will automatically be incremented as the invoices are printed. If different number is
entered from that which is from the control, it must be greater in value.
Invoice Numbers
Invoice Numbers are assigned sequentially starting with the number specified from the selection
parameter entered. When the invoices are posted to the Accounts Receivable, the invoice becomes
a Sales Transaction with the invoice number that is assigned from the Professional Invoicing
system. Care must be taken to ensure that invoice numbers assigned from P/I do not conflict with
sales transaction document numbers that originated from A/R or other systems.
Invoice Print Date
(mmddyy)
The date entered here will be printed on the Invoices.
Sub-Section Title Suffix
2 x X(15)
When invoices standard invoices are printed, the charges are divided into two main
sections. One is for listing the WIP charges, the other for Disbursements. A sub-title is
printed at the top of each section. The titles printed are defined as properties in the P/I
Control Preferences 694 . The text entered in these fields are appended to the titles
obtained from the Control Preferences. Note that these Sub-Section titles are printed only
for standard P/I invoices. Those invoices generated using the rules from an Invoice
Layout do not print these titles.
Bottom of Invoice Comments
3 x X(55)
Three brief comments may be entered that will be printed at the bottom of all invoices that
are printed.
Generating Private or Public Invoices
radio-buttons
Invoices may be generated as Private or Public Invoices. Private Invoices are maintained
in a file that may be accessed only be the user that generated them. The concept was
developed so that the files associated to private invoices reside in folders on the client's
PC. Public Invoices are those that are generated and available to all users of the
Professional Invoicing system. The Public data files are stored on the server.
Normally you would only have generated Private invoices if there were networking
performance issues on your system.
Private Access (Local to this PC)
Public Access (Server Side to All Users)
© 2007 - 2014 by Sentinel Hill Software, all rights reserved
426
9.7.5.4
Series 5 Professional Invoicing - User Help
Print Invoices
Once all Project Invoices have been generated, you will need to have them printed. For
those Projects where EDI Invoices are generated, the applicable interface files will also be
printed. Once the Invoices have been successfully printed, you will also need to Post the
Invoices to the Accounts Receivable system.
The printing of Customer Invoices is a key process of the Professional Invoicing system.
Invoices are the requests for payment for the services provided to your customers. You will
probably have special forms that were designed and printed, that have your company name,
remit address, along with your logo.
From the P/I Main menu, select Print/Post Public Invoices or Print/Post Private Invoices
from the OInvoice Processing drop-down menu; or click the Print/Post Finals push button
from the Invoice Grid Processing "fast buttons" frame.
Some points to note when printing Invoices:
For those Projects that have been configured to generate EDI, (Electronic Data
Interchange), invoices, an applicable ASCII data file is generated containing the
information associated to the invoices. There are a number of different types of EDI
invoices that may be generated. Two of the properties associated to each Project
are a flag indicating that EDI invoices are generated, and the EDI Type. EDI Control
Specifications are defined using the EDI Specifications Codes Maintenance function
© 2007 - 2014 by Sentinel Hill Software, all rights reserved
Professional Invoicing Menu Functions
608
427
.
When Invoices are printed, up to ten different type of EDI output interface files may
be generated at once. When the P/I Invoices are printed, all Projects designated to
a particular EDI Control Code have their invoices output to the same interface file.
The P/I system maintains internal tables for up to ten different EDI Controls at once.
When Invoices are printed, they will eventually be recorded as Sales Transactions in
the Accounts Receivable system. When the operation to Post Invoices to A/R is
selected, a Sales Transaction will be written to an A/R Sales Batch along with the
necessary revenue distributions.
The formatting and layout of the Invoice output may be customized. (Contact
Sentinel Hill for further details).
Public and Private Invoice Processing
Invoices may be generated as Private or Public Invoices.
Private Invoices are maintained in a file that may be accessed only be the user that generated them.
The concept was developed so that the files associated to private invoices reside in folders on the
client's PC.
Public Invoices are those that are generated and available to all users of the Professional Invoicing
system. The Public data files are stored on the server.
Normally, all Invoice generation processes should be done using Public Access options.
One of the features offered with the Series 5 system is the ability to define an MS Word
Template that is used to configure each page of MS Word documents that are generated.
You can build your own Template that has your company logo, pre-formatted field names,
lines, boxes and even watermarks. The P/I Invoices could be printed to an MS Word
document.
Word Templates for Invoices
Should you select to output the Invoices as MS Word documents, you may define a page template.
Use MS Word to build your template. Make sure that the text of the Invoice align correctly. (You
should use a test form when constructing the template). The template must be stored on each
user's PC, that will actually generate the invoices, in their C:\Documents and Settings\<PC
UserName>\Application Data\Microsoft\Templates" directory.
Additionally, a variable must be added to the Runtime Configuration file
of the template. It needs to be defined as follows:
736
that specifies the name
MSWORD-PI-INV-SPECS LANDSCAPE "Courier New" 8 "My-PI-Invoice-Template"
Contact your system or accounting manager to have this capability set up.
© 2007 - 2014 by Sentinel Hill Software, all rights reserved
428
Series 5 Professional Invoicing - User Help
Invoice Printing - Options Screen
The standard Series 5 print options screen is presented when P/I Invoices are printed:
The Series 5 applications provide a variety of different printing options.
Default Invoice Print Output Options
A print options screen is presented when Invoices are generated. The system may be configured to
present the print options screen with the selections that would always apply.
A variable must be added to the Runtime Configuration file
be presented as follows:
736
that specifies the default options to
cccccc-PI-INVOICE-Q [Printer-Queue] [Create-Option] [Output-Type]
and:
cccccc-PI-INV-REPRINT-Q [Printer-Queue] [Create-Option] [Output-Type]
Where: cccccc is the Series 5 Company System Code
Printer-Queue is the Professional Invoicing Printer Queue
Create-Option would typically always be RECREATE
Output-Type designates whether they are sent to a printer, archived, or created as MS Word
documents
Contact your system or accounting manager to have this capability set up.
The Invoices output generated, if archived, will be catalogued with a report name of
PI_yymmdd_hhmmss.INV. where yymmdd is the date, and hhmmss is the time of day.
9.7.5.5
Automatic Emailing of Invoices
Once all Project Invoices have been generated, you will need to have them printed. As an
extended feature, you could have the Invoices automatically generated as PDF documents
and emailed. The Series 5 P/I system provides for the ability to automatically have project
invoices automatically emailed to their designated customers.
To have the invoices for a Project automatically emailed, assign the "Automatic Emailed" EDI
Control Code to that project. As well, in the Customer master record associated to the
project, specify to use either the Company email address, or that assigned to either of the
Contacts as the recipient of the emailed invoice.
Invoices will be created as a PDF document. The Invoices are actually created as an MS
Word document, and then saved as a PDF. (This feature is available only when using Office
2007 Word). You need to create an MS Word Template that will be used to specify the
assorted properties of the pages. Using Office 2007 Word, build and save a template using
the following steps:
© 2007 - 2014 by Sentinel Hill Software, all rights reserved
Professional Invoicing Menu Functions
429
Launch Word
Click on the Office icon on the top left corner, and click on New in the drop-down menu
Set the assorted page properties to set up margins etc., and optionally define a
watermark and/or headers or footers
Then choose to Save As a Word Template
Under Windows 7, if copying a template from Office 2003 or editing an Office 2007 template,
put that template into the directory C:\Users\<username>\AppData\Roaming\Microsoft
\Templates, then perform the following steps:
Launch Word
Click on the Office icon on the top left corner, and click on New in the drop-down menu
In the left most column of the displayed window, click on My Templates... , then on the
window displayed, click the Create New Template radio-button and then double-click the
template that you are copying. Make any modifications, or not, as required
Then choose to Save As a Word Template, using the same name, and confirming to
have it replaced.
In order to fit an invoice on the page, the following properties in the template must be
established:
Orientation: as Portrait for Legal Letter paper (8 1/2 x 11)
Custom Margins: Top and bottom of 0.4 inches; Left and Right of 0.6 inches
Font: Courier New at 9 or 10 point (or whatever will fit on the page). The font chosen
sould be a fixed size font
Paragraph: Before and After Spacing of ZERO points with Single Line Spacing
Optional Watermarks. (If included make sure any Headers or Footer spacing is as thin
as possible)
When the invoices are emailed, a separate document is created for each invoice in the
directory defined for the EDI Control specifications. The PDF versions of the invoices are
generated regardless whether or not a hardcopy or an archived copy of invoices are also
generated. (When launching the function to have the invoices emailed, the Professional
Invoicing Print Options screen is presented. Select whatever other output option you desire
for the invoices.)
As an option defined by the EDI Control specifications, you may also have the system
generate a Recap Detail Report as a PDF document, and emailed with the Invoice.
From the Invoicing Grid Processing operation screen click the Email/Post Finals push button
found on the "fast buttons" frame.
© 2007 - 2014 by Sentinel Hill Software, all rights reserved
430
Series 5 Professional Invoicing - User Help
Some points to note when emailing Invoices:
Only those Projects that have been configured to generate EDI, (Electronic Data
Interchange), invoices as "Auto-Emailed PDFs" will automatically have invoices
emailed. Two of the properties associated to each Project are a flag indicating that
EDI invoices are generated, and the EDI Type. EDI Control Specifications are
defined using the EDI Specifications Codes Maintenance function 608 . For the given
EDI Control record, you must specify the directory where the PDF files are created,
the MS Word Template to be used for both the Invoice and the Recap Report, and
the name of the file to be used that contains the text inserted in the body of the email
message.
The Customer master record's property "Email Statements and Invoices", (found on
the A/R Profile tab sub-screen), must be set to indicate which email address is to be
used for the recipient. Choose from the company's generic email, or from either of
the Company Contacts.
The Subject and the body of the email message are provided in a text file that must
exist in the same directory as where the PDF files are created. This cannot be
larger that 8100 characters in size. The first line of this file is used as the Subject of
the email and must start with the word SUBJECT:. Within the subject line the
character string 999999 will be replaced with the actual Invoice Number.
The body of this message, which you can edit to your likening, is loaded from a file
that must be located in the folder named Email-Templates found in the designated
Company System's "Generated and Archived Reports" data directory. This file can
be either a simple text file, or an HTML file and must not contain more that 8192
characters. The following files are loaded for the 4 different types of invoices that
may be sent:
File Name
Type of Invoice
DBAgent_Inv_EmailMessage.TXT For On-Demand Invoices sent to just the Agent
DBCust_Inv_EmailMessage.TXT
For On-Demand Invoices sent to the Customer
WIZ_Invoice_EmailMessage.TXT
For "Daily" Wizard Invoices sent to the Customer
OverDue_Invoice_EmailMessage. For Overdue Re-Printed Invoices sent to the
TXT
Customer
© 2007 - 2014 by Sentinel Hill Software, all rights reserved
Professional Invoicing Menu Functions
431
Within the body of the message file, you may include a number of pseudo variables
that will be replaced with applicable text, associated to the information for the
Customer properties, or the Invoice record. The following variables may be used
and replaced as follows:
Variable
Description
Size
%%CUSTOMER-CODE Code assigned to the Customer
%%
X(6)
%%CUSTOMER-NAME
%%
X(40)
Customer's Company Name
%%ATTENTION-TO%% The Invoice's Attention-To field
X(30)
%%ADDRESS-LINE-1% Address line 1
%
X(40)
%%ADDRESS-LINE-2% Address line 2
%
X(40)
%%ADDRESS-LINE-3% Address line 3
%
X(40)
%%CITY-STATE%%
City, State from the Invoice's
Address
X(15), X(5)
%%COUNTRY%%
Country from the Invoice's Address X(20)
%%MY-STRING-1%%
Customer Membership Code
X(15)
%%GEN-DATE%%
Date and Time Invoice was
emailed
hh:mm AM on MM/
DD/YY
%%INV-NUMBER%%
The Invoice Number
999999
%%RECIPIENT-NAME% The name of the person the email
%
is sent to
$ 999,999,999.99CR
%%RECIPIENT-EMAIL% The email address of recipient
%
$ 99,999,999
One of the features offered with the Series 5 system is the ability to define an MS Word
Template that is used to configure each page of MS Word documents that are generated.
You can build your own Template that has your company logo, pre-formatted field names,
lines, boxes and even watermarks. The P/I Invoices could be printed to an MS Word
document.
Word Templates for Invoices
Should you select to output the Invoices as MS Word documents, you may define a page template.
Use MS Word to build your template. Make sure that the text of the Invoice align correctly. (You
should use a test form when constructing the template). The template must be stored on each
user's PC, that will actually generate the invoices, in their C:\Documents and Settings\<PC
UserName>\Application Data\Microsoft\Templates" directory.
© 2007 - 2014 by Sentinel Hill Software, all rights reserved
432
Series 5 Professional Invoicing - User Help
Additionally, a variable must be added to the Runtime Configuration file
of the template. It needs to be defined as follows:
736
that specifies the name
MSWORD-PI-INV-SPECS LANDSCAPE "Courier New" 8 "My-PI-Invoice-Template"
For invoices that are generated as PDF documents, the orientation, font and font-size, and indicated
template are used. The template specified here may be overridden by the template specified in the
EDI Control specifications.
9.7.5.6
Post Invoices to Accounts Receivable
Once all the P/I Invoices have been generated and printed, they need to be posted to an
Accounts Receivable Sales Batch. This is the process required to have the invoices for your
Customers' Projects recorded as Open Items.
You may generate a report the will list the Invoices that will be posted, or you may just go
ahead and post the invoices. You may also post with a register.
When Posting, you need to specify a Sales Batch code, or the system will allocate the next
batch number available as defined by the A/R Control Preferences. The system will check to
see if the given Sales Batch already exists or not. The appropriate Sales Batch records and
files will be created in the A/R.
When PI Invoices are posted to the A/R system, the following functions are performed:
An Invoice History record is written to the PI Invoice History file
The active Invoice record is deleted
Sales Transaction and Revenue Distribution records are written for the A/R Sales Batch
specified.
If the Sub-Ledger option is chosen in the A/R Preferences, then Disbursement Markup
and WIP Revenue distributions will be written with the P/I Project Code recorded as the
G/L Sub-Ledger Code. The respective GL accounts, in the A/R, must be defined with
the P/A Project Revenue Distribution flag set. If this is not set, the Project Code field will
be left blank.
From the P/I Main menu, select Post Invoices to A/R Batch from the Invoice Processing
drop-down menu; or click the Post to A/R push button from the Invoice Grid Processing "fast
buttons" frame.
© 2007 - 2014 by Sentinel Hill Software, all rights reserved
Professional Invoicing Menu Functions
Some points to note when generating Invoices:
Only computer generated Invoices will be de-generated. Credit Notes and Manual
Invoices cannot be de-generated.
If within the A/R system, a payment has been received for a given invoice, it will not be
de-generated.
If de-generating posted Invoices, the option is presented to have a Credit Note
generated. This is a handy feature, if the invoices had been posted to an Accounts
Receivable Sales Batch, and that batch has already been posted. Having the Credit
Notes generated, formally generates all applicable reversing transactions.
When De-Generating Invoices, the following steps are performed:
The unposted Invoice record and/or Invoice History records are deleted
Invoice Items records for the Invoice are deleted
WIP and Disbursement records have their Invoice fields cleared and their Status and
Type fields reset
If any WIP or Disbursement Budget had been set up, their totals will be reduced
accordingly
Any Holdback WIP items will have reversing "Holdback Revenue" distributions
generated
Type "T" Revenue systems, (those where revenue distributions are generated when
WIP charges are introduced), will have "Mark Up/Down distributions generated
Any Partial Payment WIP records that were generated will be deleted
© 2007 - 2014 by Sentinel Hill Software, all rights reserved
433
434
Series 5 Professional Invoicing - User Help
The statistics keep for each Project will be reduced accordingly
If any Recap Detail records are associated to the Invoice charge, their Invoice fields are
cleared, and any Allocated Tax amounts are reset to zero.
Posting the A/R Sales Batch
When posting the invoices to A/R, you are copying all the PI invoices to an Accounts Receivable
Sales Batch. That Sales Batch must be accessed from the A/R Sales Entry application, and
eventually posted.
You can also generated an Edit List report, and even change transactions. (Not recommended,
because your Receivables will not reflect figures maintained in the PI system).
Posting Invoices to Accounts Receivable Sales Batch - Options Screen
The following screen is presented when posting invoices to A/R:
© 2007 - 2014 by Sentinel Hill Software, all rights reserved
Professional Invoicing Menu Functions
435
The Interface Journal/Edit list report generated, if archived, will be catalogued with a report
name of PIARPOST.JRN.
The Print Options tab screen will be displayed, from which you can select to direct the output
to be displayed to the screen, archived, printed, saved as an MS Word document, saved as a
PDF, and/or emailed. (Refer to the topic titled Report Generation and Printing 159 for full
details).
Post Invoices to A/R Options Screen - Field Definitions
Processing Invoices For
radio-buttons
Invoices may be generated as Private or Public Invoices. Private Invoices are maintained
in a file that may be accessed only be the user that generated them. The concept was
developed so that the files associated to private invoices reside in folders on the client's
PC. Public Invoices are those that are generated and available to all users of the
Professional Invoicing system. The Public data files are stored on the server.
Normally you would only have generated Private invoices if there were networking
performance issues on your system.
Private Access (Local to this PC)
Public Access (Server Side to All Users)
Print a Posting Journal/Edit List
check-box
When posting the invoices, should you wish to have an edit list, or a journal report
generated, set this applicable radio-button.
Post Invoices to an A/R Sales Batch
check-box
When this function is executed, you may choose not to actually post the invoices to A/R,
then leave the check-box unchecked. You would do this only if you wanted to generate an
Edit List first, to be reviewed prior to executing the Posting to the Sales Batch.
Record to Sales Batch
check-box
This is the code assigned to the Sales Transaction Batch. It can be either numeric, or
alphanumeric. There should not be any spaces or punctuation in the batch code, as it is
used within the name of one of the Series 5 data files. If you wish to have the system
automatically assign a unique numeric Batch code, press the F1 function key.
Ledger Date
(mmddyy)
The Ledger Date entered will be assigned to each Sales Transaction recorded for each of
the P/I Invoices that are posted. When the A/R Sales Batch is posted within the Accounts
© 2007 - 2014 by Sentinel Hill Software, all rights reserved
436
Series 5 Professional Invoicing - User Help
Receivable system, the distributions generated to the A/R Control Account, and the A/R
Revenue Accounts will be recorded with this Ledger Date.
Accounts Receivable Control Account
9(18)-9(5)
This is the G/L Accounts Receivable Control account to which the amount of the Invoice
is recorded to as a debit. If the Accounts Receivable system was configured with only
one A/R Control Account, then this field is not presented to be edited. It defaults to the
Default A/R Control account defined in the A/R Control Preferences.
9.7.6
Generate Invoices
Once all active WIP and Disbursement items for Projects have been selected for billing,
invoices can then be generated. Invoices need to be generated before they can be printed.
The system will read through the WIP and Disbursement files and generate Invoices for items
that have been selected. Normally a single invoice will be generated for each Project,
although, if Invoice Layout Codes are utilized, depending on the option chosen, multiple
invoices could be created for a given Project.
The function to have invoices generated is one that is associated to the Invoice Grid
Processing operation application. As a convenience, it is offered as a menu item under the P/
I's Invoice Processing drop-down menu. For a full description, refer to the topic titled
Generating Invoices 422 found under the chapter on Invoice Grid Processing 415 earlier in this
documentation.
9.7.7
DeGenerate Invoices
Some times you just don’t get it right the first time. Once all the Invoices have been
generated and printed, and maybe even interfaced to A/R, you may realize that those invoices
should not have been generated. The De-Generate function comes to your rescue. Or
perhaps, they were generated with the wrong Date, or using the wrong formats.
This function basically undoes the generation of invoices. You may select to de-generate
either Posted or Un-posted invoices. Every function performed by the generation and posting
of invoices is reversed. All WIP and Disbursement items that contributed to the invoice will
have its status reset to being active. You will need to re-select these items for billing.
Even if you have posted your invoices to the Accounts Receivable system, you may still DeGenerate.
From the P/I Main menu, select De-Generate Invoices from the Invoice Processing dropdown menu; or select De-Generate Invoices ... from the Invoice Grid Processing screens
menu bar's File drop-down menu. Specific Invoices may be de-generated if when selected
from the Invoicing Processing grid, the applicable function is selected from the pop-up menu
© 2007 - 2014 by Sentinel Hill Software, all rights reserved
Professional Invoicing Menu Functions
that is presented.
Some points to note when generating Invoices:
Only computer generated Invoices will be de-generated. Credit Notes and Manual
Invoices cannot be de-generated.
If within the A/R system, a payment has been received for a given invoice, it will not be
de-generated.
If de-generating posted Invoices, the option is presented to have a Credit Note
generated. This is a handy feature, if the invoices had been posted to an Accounts
Receivable Sales Batch, and that batch has already been posted. Having the Credit
Notes generated, formally generates all applicable reversing transactions.
When De-Generating Invoices, the following steps are performed:
The unposted Invoice record and/or Invoice History records are deleted
Invoice Items records for the Invoice are deleted
WIP and Disbursement records have their Invoice fields cleared and their Status and
Type fields reset
If any WIP or Disbursement Budget had been set up, their totals will be reduced
accordingly
Any Holdback WIP items will have reversing "Holdback Revenue" distributions
generated
Type "T" Revenue systems, (those where revenue distributions are generated when
WIP charges are introduced), will have "Mark Up/Down distributions generated
© 2007 - 2014 by Sentinel Hill Software, all rights reserved
437
438
Series 5 Professional Invoicing - User Help
Any Partial Payment WIP records that were generated will be deleted
The statistics keep for each Project will be reduced accordingly
If any Recap Detail records are associated to the Invoice charge, their Invoice fields are
cleared, and any Allocated Tax amounts are reset to zero.
De-Generating Invoices that have been Posted to Accounts Receivable
Even if you have posted your invoices to the Accounts Receivable system, you may still De-Generate
them.
If the applicable Sales Batch has also been posted within the A/R system, it too may be Un-Posted
using a function associated to Sales Transaction Entry; or .... an option is presented that will
automatically create Credit notes for each Invoice that is de-generated.
De-Genenerate Invoices - Options Screen
The following screen is presented when de-generating the P/I Invoices:
If the option to de-generated Previously Printed and Posted Invoices is chosen, the following
processing options are also presented:
© 2007 - 2014 by Sentinel Hill Software, all rights reserved
Professional Invoicing Menu Functions
439
De-Generate Invoices Options Screen - Field Definitions
Select Invoices to De-Generate
radio-buttons
Select the types of Invoices that
are to be de-generated. These
are not necessarily types of
invoices, but identifying the
status of the invoices to degenerate.
Un-Posted Private Invoices – These are invoices that were generated as
"Private" Invoices that have not yet been posted
to Accounts Receivable. (They are only
available for processing by a specific user as
these are stored on an individuals client PC).
Un-Posted Public Invoices – These are invoices that were generated as
"Public" Invoices that have not yet been posted
to Accounts Receivable. (These are the normal
invoices stored on the server available to all
users).
Previously Printed and Posted These are invoices that are no longer in the P/I
Invoices – system, but have been posted to Accounts
Receivable. (They are, however, available in
the P/I system as historic Invoices).
Invoices Numbered
radio-buttons & 9(6)
Select whether to generate all the possible invoices, of just a range. When A Range is
clicked, enter the starting and ending Invoices to be de-generated. If possible, information
about the specified invoices will be displayed.
Select Only Invoices with Non-Zero Tax check-box
Amount
© 2007 - 2014 by Sentinel Hill Software, all rights reserved
440
Series 5 Professional Invoicing - User Help
If checked, only those invoices with a tax amount will be de-generated, and only after
being confirmed by the operator. This option is useful if you had realized that the wrong
Tax Codes had been specified, or the wrong G/L account was defined for the specified
Tax Codes.
For Posted Invoices – Generate a Credit check-box
Note
When the option to de-generate Previously Posted Invoices is selected, this field is
presented. If checked, then a Credit Note will be generated for each de-generated
invoice. This is a handy feature, if the invoices had been posted to an Accounts
Receivable Sales Batch, and that batch has already been posted. Having the Credit
Notes generated, formally generates all applicable reversing transactions.
If the Sales Batch had not yet been posted, you could just select that Sales Batch, and
click on the function to have all it's transactions deleted. Then all history of the Invoices in
the A/R are removed. In that case, you would not want to have Credit Notes generated.
For Posted Invoices – Confirm Each
Invoice
check-box
When the option to de-generate Previously Posted Invoices is selected, this field is
presented. If you wish, the information for each invoice to be de-generated will be
displayed to the operator for confirmation to be de-generated.
9.7.8
Print and Post Invoices
Once all Project Invoices have been generated, you will need to have them printed. For
those Projects where EDI Invoices are generated, the applicable interface files will also be
printed. Once the Invoices have been successfully printed, you will also need to Post the
Invoices to the Accounts Receivable system.
The printing of Customer Invoices is a key process of the Professional Invoicing system.
Invoices are the requests for payment for the services provided to your customers. You will
probably have special forms that were designed and printed, that have your company name,
remit address, along with your logo.
From the P/I Main menu, select Print/Post Public Invoices or Print/Post Private Invoices
from the OInvoice Processing drop-down menu; or click the Print/Post Finals push button
from the Invoice Grid Processing "fast buttons" frame.
© 2007 - 2014 by Sentinel Hill Software, all rights reserved
Professional Invoicing Menu Functions
441
Some points to note when printing Invoices:
For those Projects that have been configured to generate EDI, (Electronic Data
Interchange), invoices, an applicable ASCII data file is generated containing the
information associated to the invoices. There are a number of different types of EDI
invoices that may be generated. Two of the properties associated to each Project
are a flag indicating that EDI invoices are generated, and the EDI Type. EDI Control
Specifications are defined using the EDI Specifications Codes Maintenance function
608 .
When Invoices are printed, up to ten different type of EDI output interface files may
be generated at once. When the P/I Invoices are printed, all Projects designated to
a particular EDI Control Code have their invoices output to the same interface file.
The P/I system maintains internal tables for up to ten different EDI Controls at once.
When Invoices are printed, they will eventually be recorded as Sales Transactions in
the Accounts Receivable system. When the operation to Post Invoices to A/R is
selected, a Sales Transaction will be written to an A/R Sales Batch along with the
necessary revenue distributions.
The formatting and layout of the Invoice output may be customized. (Contact
Sentinel Hill for further details).
Public and Private Invoice Processing
Invoices may be generated as Private or Public Invoices.
Private Invoices are maintained in a file that may be accessed only be the user that generated them.
© 2007 - 2014 by Sentinel Hill Software, all rights reserved
442
Series 5 Professional Invoicing - User Help
The concept was developed so that the files associated to private invoices reside in folders on the
client's PC.
Public Invoices are those that are generated and available to all users of the Professional Invoicing
system. The Public data files are stored on the server.
Normally, all Invoice generation processes should be done using Public Access options.
One of the features offered with the Series 5 system is the ability to define an MS Word
Template that is used to configure each page of MS Word documents that are generated.
You can build your own Template that has your company logo, pre-formatted field names,
lines, boxes and even watermarks. The P/I Invoices could be printed to an MS Word
document.
Word Templates for Invoices
Should you select to output the Invoices as MS Word documents, you may define a page template.
Use MS Word to build your template. Make sure that the text of the Invoice align correctly. (You
should use a test form when constructing the template). The template must be stored on each
user's PC, that will actually generate the invoices, in their C:\Documents and Settings\<PC
UserName>\Application Data\Microsoft\Templates" directory.
Additionally, a variable must be added to the Runtime Configuration file
of the template. It needs to be defined as follows:
736
that specifies the name
MSWORD-PI-INV-SPECS LANDSCAPE "Courier New" 8 "My-PI-Invoice-Template"
Contact your system or accounting manager to have this capability set up.
Invoice Printing - Options Screen
The standard Series 5 print options screen is presented when P/I Invoices are printed:
The Series 5 applications provide a variety of different printing options.
Default Invoice Print Output Options
A print options screen is presented when Invoices are generated. The system may be configured to
present the print options screen with the selections that would always apply.
A variable must be added to the Runtime Configuration file
be presented as follows:
736
that specifies the default options to
cccccc-PI-INVOICE-Q [Printer-Queue] [Create-Option] [Output-Type]
and:
cccccc-PI-INV-REPRINT-Q [Printer-Queue] [Create-Option] [Output-Type]
Where: cccccc is the Series 5 Company System Code
© 2007 - 2014 by Sentinel Hill Software, all rights reserved
Professional Invoicing Menu Functions
443
Printer-Queue is the Professional Invoicing Printer Queue
Create-Option would typically always be RECREATE
Output-Type designates whether they are sent to a printer, archived, or created as MS Word
documents
Contact your system or accounting manager to have this capability set up.
The Invoices output generated, if archived, will be catalogued with a report name of
PI_yymmdd_hhmmss.INV. where yymmdd is the date, and hhmmss is the time of day.
9.7.9
Reconcile Paymentech Charges
For those Projects that have their invoice charges paid by credit card, an EDI file is generated
and delivered to Paymentech for processing. (These Projects would have had an EDI
Specification Code 608 assigned to them set up for Paymentech Processing 630 ).
The EDI file is submitted to Paymentech with a Request For Response. All data received by
Paymentech must conform to a defined format. All data passed, including card numbers,
name and address information, merchant codes, etc,. are validated. Paymentech generates
a Response file which basically indicates which of the submitted charges are valid, or not.
This validation Response file must be read and processed by the Series 5 P/I system to
reconcile which invoices were successfully loaded by the Paymentech system. Those
charges that were rejected, are identified and removed from the associated invoice, and are
set to be eligible for a future generation of invoices.
From the P/I Main menu, select Reconcile Paymentech Prepays from the Invoice
Processing drop-down menu; or click the Paytech Reconcile push button from the Invoice
Grid Processing "fast buttons" frame.
© 2007 - 2014 by Sentinel Hill Software, all rights reserved
444
Series 5 Professional Invoicing - User Help
Some points to note when loading the Paymentech Response file:
If Invoices were generated for Private Access, then you must select the Reconcile
function For Private Access Invoices. Likewise, if they were generated for Public
Access, make sure Public Access is selected.
You may executed the Paymentech Reconcile function to test the integrity of the
Response file by unselecting the Mark Paymentech Invoices as Approved, Rejected
and/or Declined ? check-box. In other words, any charges that were rejected will not
be removed from the Invoices, and any related Invoices would not be able to be posted
to the Accounts Receivable system. (Eventually, the reconcile function would have to
be executed with this check box set).
If a given charge associated to an invoice is Rejected or Declined, the following steps are
performed by the system:
The associated Invoice Item record for the Invoice is deleted and their charge and tax
amounts subtracted from the totals for the Invoice
If any Recap Detail records are associated to the Invoice charge, their Invoice fields are
cleared, and any Allocated Tax amounts are reset to zero.
WIP and Disbursement records have their Invoice fields cleared and their Status and
Type fields reset waiting to be selected again
If any WIP or Disbursement Budget had been set up, their totals will be reduced
accordingly
Any Holdback WIP items will have reversing "Holdback Revenue" distributions
generated
Type "T" Revenue systems, (those where revenue distributions are generated when
WIP charges are introduced), will have "Mark Up/Down distributions generated
© 2007 - 2014 by Sentinel Hill Software, all rights reserved
Professional Invoicing Menu Functions
445
If all charges on a given invoice are declined, the unposted Invoice record and/or Invoice
History records are deleted
Any Partial Payment WIP records that were generated applicable to the Invoice will be
deleted
The statistics keep for each Project will be reduced accordingly
Rejected and/or Declined charges are listed on the Journal or Exception Report
Reasons for Rejection
It seems that the Paymentech system could have been developed quite a number of years ago. It's
quite surprising some of the limitations that it has, either intentionally or not. It's possible to submit
an EDI file to be processed, and a number of the charges are rejected. Then a few hours later, or
the next day, submitting the same charges. they get accepted.
The most common reasons for rejection is the expiration of the credit card, or the dollar limit
imposed on the card has been exceeded.
Paymentech charges are associated to one or more P/I system WIP charges and Recaps. When
a charge is rejected, the WIP items are reinstated as unbilled items, and remain on the system
until re-billed.
Paymentech Reconciliation - Options Screen
The following screen is presented to have the Paymentech Response files processed:
© 2007 - 2014 by Sentinel Hill Software, all rights reserved
446
Series 5 Professional Invoicing - User Help
De-Generate Invoices Options Screen - Field Definitions
For EDI Code
drop-list
Select the EDI Control Code associated to the Paymentech invoices file that is to be
reconciled.
For Private or Public Access Invoices
radio-buttons
Invoices may have been generated as Private or Public Invoices.
Private Invoices are maintained in a file that may be accessed only be the user that
generated them. The concept was developed so that the files associated to private
invoices reside in folders on the client's PC. Public Invoices are those that are generated
and available to all users of the Professional Invoicing system. The Public data files are
stored on the server.
If the invoices generated for Paymentech were Private, then YOU MUST select the
Private radio-button. If they were Public, YOU MUST select the Public radio-button.
© 2007 - 2014 by Sentinel Hill Software, all rights reserved
Professional Invoicing Menu Functions
Mark Invoices Approved, Rejected or
Declined
447
check-box
All charges associated to Invoices submitted to Paymentech must be either approved,
rejected or declined. Set this check-box to have the system mark them accordingly.
When Invoices for Paymentech are generated, and printed, they are assigned a status of
"Waiting for CrCard Approval". They will hold this status until this Paymentech
Reconciliation process is executed.
You could executed this function to just have the Reconcile Journal or Exception report
generated, and not actually update the status of the Invoices.
Mark Invoices Approved
You would eventually have to execute the function with this check-box set so that Invoices would be
marked as Printed so they could be posted to the Accounts Receivable system.
Input File – Folder & Filename
X(80) and X(30)
Input the Folder name and the Filename of the Paymentech Response file. You may click
the Browse button to locate it using the Windows File select dialogue window. By default,
this will be set to the same folder where the Paymentech output EDI file is created.
Input File – Folder & Filename
radio-buttons
When loading the Response interface data, if you wish to have either the full edit/journal
list generated or just an exception report, set the applicable radio-button.
The Exception report lists only those transactions that were rejected or declined.
Reject Reason Codes
The tables following describe the Reject Reasons that might be returned.
Response Codes:
Action Codes:
R
Rejected
R
ReSend at Any Time
D
Declined
W
Wait 2-3 days, or resolve with customer
C
Try to resolve with customer
F
An invalid field was sent
N
Not applicable
V
Voice authorization required
P
Call Paymentech
© 2007 - 2014 by Sentinel Hill Software, all rights reserved
448
Series 5 Professional Invoicing - User Help
Type Code
R
201
R
202
R
203
R
204
R
205
R
218
R
219
R
220
R
225
R
227
R
231
R
233
R
241
R
253
D
301
D
302
D
303
D
304
D
401
D
501
D
502
D
509
D
510
D
521
D
522
D
530
D
531
D
572
D
591
D
592
D
594
D
605
D
606
D
607
D
825
D
902
D
903
D
904
Description
Action Code
Invalid Credit Card - Bad Check Digit, # or length
C
Bad Amount - Was ZERO, unreadable or greater than limit
F
The amount was ZERO
F
Other unidentifiable error
F
Bad total authorization amount
F
Invalid SKU number
F
Invalid Credit Plan
F
Invalid Store Number
F
Invalid field data within transmission
F
Missing companion data within transaction
F
Invalid Division Number
F
Wrong Card Number for Credit Card Type
F
Illegal Action Code
F
Invalid Transaction Type
F
Issuer Authorization Network Unavailable
R
Insufficient Funds
W
Generic Decline
C
Credit Card not on file
C
Card issuer wants voice contact with customer
V
Card issuer wants card returned
C
Card was reported Lost or Stolen
C
Exceeds Withdrawl/Activity amount limit
C
Exceeds Withdrawl/Activity count limit
C
Insufficient Funds
C
Card has Expired
C
Generic Decline - No information provided by Issuer
C
CVV2/VAK Failure
C
Cardholder has closed this account
C
Invalid Credit Card Number
C
Bad Amount - Was ZERO, unreadable or greater than limit
F
Other Error - Unidentifiable Error
F
Invalid Expiration Date
C
Invalid Transaction Type for issuer
C
Amount not accepted by Network
F
Account does not exist
C
System Error/Malfunction with Issuer Network
C
Invalid Expiration Date
C
Card not activated
C
© 2007 - 2014 by Sentinel Hill Software, all rights reserved
Professional Invoicing Menu Functions
449
9.7.10 Post Invoices to Accounts Receivable
Once all the P/I Invoices have been generated and printed, they need to be posted to an
Accounts Receivable Sales Batch. This is the process required to have the invoices for your
Customers' Projects recorded as Open Items.
You may generate a report the will list the Invoices that will be posted, or you may just go
ahead and post the invoices. You may also post with a register.
When Posting, you need to specify a Sales Batch code, or the system will allocate the next
batch number available as defined by the A/R Control Preferences. The system will check to
see if the given Sales Batch already exists or not. The appropriate Sales Batch records and
files will be created in the A/R.
When PI Invoices are posted to the A/R system, the following functions are performed:
An Invoice History record is written to the PI Invoice History file
The active Invoice record is deleted
Sales Transaction and Revenue Distribution records are written for the A/R Sales Batch
specified.
If the Sub-Ledger option is chosen in the A/R Preferences, then Disbursement Markup
and WIP Revenue distributions will be written with the P/I Project Code recorded as the
G/L Sub-Ledger Code. The respective GL accounts, in the A/R, must be defined with
the P/A Project Revenue Distribution flag set. If this is not set, the Project Code field will
be left blank.
From the P/I Main menu, select Post Invoices to A/R Batch from the Invoice Processing
drop-down menu; or click the Post to A/R push button from the Invoice Grid Processing "fast
buttons" frame.
© 2007 - 2014 by Sentinel Hill Software, all rights reserved
450
Series 5 Professional Invoicing - User Help
Some points to note when generating Invoices:
Only computer generated Invoices will be de-generated. Credit Notes and Manual
Invoices cannot be de-generated.
If within the A/R system, a payment has been received for a given invoice, it will not be
de-generated.
If de-generating posted Invoices, the option is presented to have a Credit Note
generated. This is a handy feature, if the invoices had been posted to an Accounts
Receivable Sales Batch, and that batch has already been posted. Having the Credit
Notes generated, formally generates all applicable reversing transactions.
When De-Generating Invoices, the following steps are performed:
The unposted Invoice record and/or Invoice History records are deleted
Invoice Items records for the Invoice are deleted
WIP and Disbursement records have their Invoice fields cleared and their Status and
Type fields reset
If any WIP or Disbursement Budget had been set up, their totals will be reduced
accordingly
Any Holdback WIP items will have reversing "Holdback Revenue" distributions
generated
Type "T" Revenue systems, (those where revenue distributions are generated when
WIP charges are introduced), will have "Mark Up/Down distributions generated
Any Partial Payment WIP records that were generated will be deleted
© 2007 - 2014 by Sentinel Hill Software, all rights reserved
Professional Invoicing Menu Functions
451
The statistics keep for each Project will be reduced accordingly
If any Recap Detail records are associated to the Invoice charge, their Invoice fields are
cleared, and any Allocated Tax amounts are reset to zero.
Posting the A/R Sales Batch
When posting the invoices to A/R, you are copying all the PI invoices to an Accounts Receivable
Sales Batch. That Sales Batch must be accessed from the A/R Sales Entry application, and
eventually posted.
You can also generated an Edit List report, and even change transactions. (Not recommended,
because your Receivables will not reflect figures maintained in the PI system).
Posting Invoices to Accounts Receivable Sales Batch - Options Screen
The following screen is presented when posting invoices to A/R:
© 2007 - 2014 by Sentinel Hill Software, all rights reserved
452
Series 5 Professional Invoicing - User Help
The Interface Journal/Edit list report generated, if archived, will be catalogued with a report
name of PIARPOST.JRN.
The Print Options tab screen will be displayed, from which you can select to direct the output
to be displayed to the screen, archived, printed, saved as an MS Word document, saved as a
PDF, and/or emailed. (Refer to the topic titled Report Generation and Printing 159 for full
details).
Post Invoices to A/R Options Screen - Field Definitions
Processing Invoices For
radio-buttons
Invoices may be generated as Private or Public Invoices. Private Invoices are maintained
in a file that may be accessed only be the user that generated them. The concept was
developed so that the files associated to private invoices reside in folders on the client's
PC. Public Invoices are those that are generated and available to all users of the
Professional Invoicing system. The Public data files are stored on the server.
Normally you would only have generated Private invoices if there were networking
performance issues on your system.
Private Access (Local to this PC)
Public Access (Server Side to All Users)
Print a Posting Journal/Edit List
check-box
When posting the invoices, should you wish to have an edit list, or a journal report
generated, set this applicable radio-button.
Post Invoices to an A/R Sales Batch
check-box
When this function is executed, you may choose not to actually post the invoices to A/R,
then leave the check-box unchecked. You would do this only if you wanted to generate an
Edit List first, to be reviewed prior to executing the Posting to the Sales Batch.
Record to Sales Batch
check-box
This is the code assigned to the Sales Transaction Batch. It can be either numeric, or
alphanumeric. There should not be any spaces or punctuation in the batch code, as it is
used within the name of one of the Series 5 data files. If you wish to have the system
automatically assign a unique numeric Batch code, press the F1 function key.
Ledger Date
(mmddyy)
The Ledger Date entered will be assigned to each Sales Transaction recorded for each of
the P/I Invoices that are posted. When the A/R Sales Batch is posted within the Accounts
© 2007 - 2014 by Sentinel Hill Software, all rights reserved
Professional Invoicing Menu Functions
453
Receivable system, the distributions generated to the A/R Control Account, and the A/R
Revenue Accounts will be recorded with this Ledger Date.
Accounts Receivable Control Account
9(18)-9(5)
This is the G/L Accounts Receivable Control account to which the amount of the Invoice
is recorded to as a debit. If the Accounts Receivable system was configured with only
one A/R Control Account, then this field is not presented to be edited. It defaults to the
Default A/R Control account defined in the A/R Control Preferences.
9.7.11 Email EDI Generated PDF Invoices
The Series 5 P/I system provides for the ability to generated electronic invoices. These are
commonly referred to as EDI invoices.
There are a variety of different EDI invoices that may be generated. Some of these are
unique to specific customer, and some are generated using specific standard formats For
each of the types of EDI invoices that may be generated, the P/I system has an EDI
Specifications Control code that is created. This Control Code defines the different properties
associated to each type of EDI invoice.
One such type of EDI invoices that can be generated by the system is referred to as Emailed
PDF Invoices. The customer's invoice is generated as a PDF document, and as well, a
Recap Report is generated as a PDF document. The Recap Report lists detailed information
about each charge that contributes to amounts listed on the invoice. Both the invoice and the
Recap Report are automatically emailed to the customer. The properties associated to EDI
invoices is defined by the EDI Specifications Codes Maintenance 608 routine. More specifically
for emailed PDF Invoices refer to the topic titled About PDF Invoices 619 .
The process to generate these invoices, along with their reports, may be defined to be
performed in a single step, or in two steps. Normally, each Invoice is generated with it's
corresponding Recap Report as PDF documents, and emailed at the same time. As an
option, you could break this process into two steps. The 1st step is to have the PDF Invoice
generated. The 2nd step is to have the Recap Report generated and both it and the Invoice
are emailed. The 2nd step is performed by launching the menu item defined by this topic,
(referred to as the "After Hours" Operation).
From the P/I Main menu, select Email EDI Gen'ed PDF Invoices from the Invoice
Processing drop-down menu.
This function also offers the opportunity to repeat the emailing of the PDF Invoices, with their
respective Recap Reports for a specified range of invoice numbers.
© 2007 - 2014 by Sentinel Hill Software, all rights reserved
454
Series 5 Professional Invoicing - User Help
"After Hours" Emailing of PDF Invoices
Only those invoices that had previously been generated as EDI-PDF Invoices will be emailed.
Emailing of EDI-PDF Invoices - Options Screen
The following screen is presented:
© 2007 - 2014 by Sentinel Hill Software, all rights reserved
Professional Invoicing Menu Functions
After Hours Emailing of PDF Invoices Options Screen - Field Definitions
Repeat the Email Process . . . . .
check-box
If you wish to repeat the emailing of any EDI-PDF invoices, set this check box. You will
then be able to specify a range of invoices that are to be re-emailed. Only those
invoices that had previously been generated and still exist in their designated directory/
folder will be emailed with their associated Recap report.
If you are wanting to just perform the normal "After Hours" emailing of the EDIPDF invoices that had previously been generated, leave this check-box
unchecked.
Re-Email PDF Invoices Numbered
9(8)
Enter the starting and ending Invoices numbers of those that are to be re-emailed.
EDI/XML Specs Code
drop-down list
If PDF Invoices are generated under the control of different EDI Control Sets, select the
EDI Control set for which the invoices are to be re-emailed. Only those invoices
© 2007 - 2014 by Sentinel Hill Software, all rights reserved
455
456
Series 5 Professional Invoicing - User Help
associated to the selected EDI Control code will be processed and re-emailed.
9.7.12 Reprint Historical or Overdue Invoices
Once all Project Invoices have been generated, printed and posted, it would be hoped that
that's the end of it. Just in case there is need to reprint a bunch of invoices either because of
a screw up with the postal system, of there was some kind of a form setup malfunction, this
function will accomplish that task. You can also choose to reprint those customer's invoices
that are considered "Overdue". The invoices may be printed, or emailed.
The printing of Customer Invoices is a key process of the Professional Invoicing system.
Invoices are the requests for payment for the services provided to your customers. You will
probably have special forms that were designed and printed, that have your company name,
remit address, along with your logo.
From the P/I Main menu, select Reprint Hist/Overdue Invoices from the Invoice
Processing drop-down menu.
Some points to note when printing Invoices:
Only those invoices that have been posted to the Accounts Receivable system, and
hence recorded to history, will be available for printing.
© 2007 - 2014 by Sentinel Hill Software, all rights reserved
Professional Invoicing Menu Functions
457
Invoices, that when printed really generate EDI files, ARE NOT PROCESSED.
Only paper invoices are reprinted.
When printing "overdue" invoices, as a filter, the operator may select to have only
those that are overdue by 15, 30, 45, 60, 90 or 120 days
When printing "overdue" invoices, as an option, they can be automatically emailed.
If invoices are to be emailed, the body of the email message, is loaded from the file
named OverDue_Invoice_EmailMessage.TXT that must be located in the
directory named Email-Templates located in each Company System's designated
reports directory. This text file may be either a plain ASCII text, or an HTML file and
contain up to 8192 characters.
The formatting and layout of the Invoice output may be customized. (Contact
Sentinel Hill for further details).
One of the features offered with the Series 5 system is the ability to define an MS Word
Template that is used to configure each page of MS Word documents that are generated.
You can build your own Template that has your company logo, pre-formatted field names,
lines, boxes and even watermarks. The P/I Invoices can be printed to an MS Word document
or to a PDF document. (either way, the Word Template is applied).
Word Templates for Invoices
Should you select to output the Invoices as MS Word or PDF documents, you may define a page
template. Use MS Word to build your template. Make sure that the text of the Invoice align correctly.
(You should use a test form when constructing the template). The template must be stored on each
user's PC, that will actually generate the invoices, in their C:\Documents and Settings\<PC
UserName>\Application Data\Microsoft\Templates" directory.
Additionally, a variable must be added to the Runtime Configuration file
of the template. It needs to be defined as follows:
736
that specifies the name
MSWORD-PI-INV-SPECS PORTRAIT "Courier New" 8 "My-PI-Invoice-Template"
Contact your system or accounting manager to have this capability set up.
Re-Printing Historic Invoices - Options Screen
The following screen is presented when re-printing Historic Invoices:
© 2007 - 2014 by Sentinel Hill Software, all rights reserved
458
Series 5 Professional Invoicing - User Help
When selected, the operator is presented with the standard Project Select Filters 142 screen
and the Customer Select Filters 151 screen. These allow you to specify selected or ranges of
Projects, Project Locations, Project Departments, Customers, Customer Types, Sales
Representatives, and/or only those customers and/or projects satisfying a variety of filter
criteria.
The Series 5 applications provide a variety of different printing options.
Default Invoice Print Output Options
A print options screen is presented when Invoices are generated. The system may be configured to
present the print options screen with the selections that would always apply.
A variable must be added to the Runtime Configuration file
be presented as follows:
736
that specifies the default options to
cccccc-PI-INVOICE-Q [Printer-Queue] [Create-Option] [Output-Type]
and:
cccccc-PI-INV-REPRINT-Q [Printer-Queue] [Create-Option] [Output-Type]
Where: cccccc is the Series 5 Company System Code
Printer-Queue is the Professional Invoicing Printer Queue
Create-Option would typically always be RECREATE
© 2007 - 2014 by Sentinel Hill Software, all rights reserved
Professional Invoicing Menu Functions
459
Output-Type designates whether they are sent to a printer, archived, or created as MS Word
documents
Contact your system or accounting manager to have this capability set up.
The Invoices output generated, if archived, will be catalogued with a report name of
REPRINT_PI.LST.
When invoices are emailed, each one is created as a PDF document named INVOICE99999999-REPRINT.PDF in the directory defined by the WEB-EDOCS-DIRECTORY
runtime configuration variable.
The Print Options tab screen will be displayed, from which you can select to direct the output
to be displayed to the screen, archived, printed, saved as an MS Word document, saved as a
PDF, and/or emailed. (Refer to the topic titled Report Generation and Printing 159 for full
details).
Field Definitions
Invoices Numbered
radio-buttons & 9(6)
Select whether to reprint all the possible invoices, of just a range. When A Range is
clicked, enter the starting and ending Invoices to be de-generated. If possible, information
about the specified invoices will be displayed.
Invoices Dated
radio-buttons & (mmddyy)
Select whether to reprint all invoices, or only those dated within a specific date range.
Click the calendar icon to select a pre-defined date range.
Only Reprint Customer "Overdue"
Invoices
check-box
Set the check-box if you wish to ONLY print those Customer's Invoices that are deemed
to be Overdue. (In other words, those invoices that have not yet been fully paid as of a
specified number of days past either the Invoice Date or the Due Date) Select the aging
days as required.
Only for Customers with Specific Terms
Code
check-box
If reprinting Overdue Invoices, you may choose to print only those invoices belonging to
customers that have a specific Terms Code assigned. Set the check-box to enable the
Terms Code entry field, and select the applicable Terms Code.
Email Invoices to Qualified Customers
© 2007 - 2014 by Sentinel Hill Software, all rights reserved
check-box
460
Series 5 Professional Invoicing - User Help
If reprinting Overdue Invoices, you may choose to have the invoices generated as PDF
documents, and automatically emailed to the customer. Only those customers with their
A/R Profile's Email Statements and Invoice property set for emailing will have their
invoices emailed. (Otherwise their invoice will be output assumed ready to be printed).
Emailing of Invoices
When invoices are emailed, the body of the email message, is loaded from the file named
OverDue_Invoice_EmailMessage.TXT that must be located in the directory named EmailTemplates located in each Company System's designated reports directory. This text file may be
either a plain ASCII text, or an HTML file and contain up to 8192 characters. Within the body of that
text, pseudo variables **MY-STRING-2** and **MY-STRING-3** will be replaced by the "# of days
Overdue" and the "# of invoices that have been issued" counters. (Refer to the topic titled Email
Message Text Files 732 in the Appendix)
Aged Over xx Days Old
radio-buttons
Select the number of days overdue for an invoice to be reprinted.
Based On Invoice or Due Date
radio-buttons
Select whether the # of days overdue is relative to the Invoice Date, or the Invoice Due
Date.
9.7.13 Launch On-Demand Invoicing Service
The Series 5 Professional Invoicing system provides support for On-Demand Invoicing.
Traditionally, work-in-progress activity is recorded using batched interface or employee timesheet entry. Invoices are then generated and printed for all those chargeable projects with
billable activity.
With On-Demand Invoicing, billable activity is generated immediately after a customer's
interaction with a web-site or telephone sales agent. These charges are then grouped as a
packet of information in a file, and delivered to an accounting server to be deposited to a predesignated directory. The Series 5 Professional Invoicing system's On-Demand Servicing
function detects the presence of this file, reads the data, generates the invoice, delivers it
back to the requesting agent or system, and posts it into the Accounts Receivable system.
The process is accomplished typically all in a time-frame of less than 10 seconds.
On Demand Control Sets are used to define the options associated to these invoicing related
operations. Each On Demand Control Set could be established to represent a unique set of
options perhaps representing charges accumulated for different branch offices, geographic
regions, or sales agents. Invoices associated to each Control Set is then dealt with
separately, having their accumulated activity loaded, billed, invoices generated, and moved to
A/R.
© 2007 - 2014 by Sentinel Hill Software, all rights reserved
Professional Invoicing Menu Functions
461
When the On-Demand Servicing function is launched as an operation, it may be configured to
service all Control Sets, or a group of Control Sets, or individually selected Control Sets.
(Note that one of the properties associated to a Control Set is a character string that is used
as a prefix to the filenames that contain the packet of charges belonging to each On-Demand
Invoice that is to be generated). You could start multiple instances of the On-Demand Invoice
Servicing function, where each one is looking for On-Demand Invoice requests for all Control
Sets, or specific groups of Control Sets. Each On-Demand charges packet file must be
created in the designated folder and have a predefined filename). For further discussion,
refer to the topic under the Control Options Functions chapter titled On-Demand Invoicing
Control Sets 715 .
Some points to note about the On-Demand Invoicing Server function:
The On-Demand Invoice Server utility is launched from the Invoice
Processing drop-down menu from the P/I System
Multiple instances of the Server may execute at the same time on
different client terminals
Each Server may be configured to service requests for groups of Control
Sets, thus being able to generated invoices only for specific offices or
agents
A Status screen is displayed showing information about the request
being processed
The Status screen displays the # of invoices that have been generated
for each Control Set, along with the Total $ Value of Invoices
The request to have an Invoice generated is triggered by the arrival of a
pair of files in each Control Sets' designated Input Directory. The WIP
charges file contains records associated to the charge includes
information such as the Task, Employee, Unit Rate and Quantity. The
Recap Detail file contains extended information associated to the activity
performed. The 1st record of the Recap file MUST contain information
about who submitted the request .
The WIP and Recap Detail files must have specific filenames. Those files
representing requests for a given Control Set must be named with the File
Prefix that is defined by that Control Set.
When the trigger files are deposited into the designated input directory,
the WIP Charges file MUST be moved in 1st, then followed by the Recap
Detail file. If this is not the case, then the invoice may not be generated.
If errors are encountered in the input trigger files, an Exception Report will
be generated and emailed back to the requesting agent. The request
input files are renamed with a .err extension.
Once an On-Demand Invoice is generated, the WIP and Recap Detail files
for the request are deleted.
© 2007 - 2014 by Sentinel Hill Software, all rights reserved
462
Series 5 Professional Invoicing - User Help
If errors are detected in the data files providing information about the charges, an exception
report is generated. This report will be emailed to the originator of the request, and as an
option, one other email address. The body of this message, which you can edit to your
likening, must be set up in a text file named ODB_ExceptRpt_EmailMessage.TXT that
must be located in the folder named Email-Templates found in the designated Company
System's "Generated and Archived Reports" data directory. This file can be either a simple
text file, or an HTML file and must not contain more that 8192 characters.
Within the body of the message file, you may include a number of pseudo variables that will
be replaced with applicable text, associated to the information in the email and the recipient.
The following variables may be used and replaced as follows:
Variable
String to be replaced with
%%RECIPIENT-NAME%%
Name of the person to whom the email it
sent
%%RECIPIENT-EMAIL%%
The email address of the email recipient
Examples of the Email Message files may be found in the Series 5 release directory, in the
UTIL sub-directory.
Launching the Series 5 On-Demand Invoicing Service
From the P/I Menu:
1. Click on Launch On-Demand Invoicing... from the Invoice Processing drop-down
menu.
© 2007 - 2014 by Sentinel Hill Software, all rights reserved
Professional Invoicing Menu Functions
463
2. The On-Demand Invoicing Server Filters screen will be displayed and you will be able
to set a number of filters that are used to select particular requests that are to be
accepted. Up to 18 On-Demand Control Set that have been defined in the P/I system
are listed. (By default, On-Demand Invoice requests associated to ALL Control Sets
will be processed). Note that after the server is started, you can change the filters.
© 2007 - 2014 by Sentinel Hill Software, all rights reserved
464
Series 5 Professional Invoicing - User Help
3. Click OK and the On-Demand Invoicing Server will trundle off and wait for a job that it
can execute.
Processing Note
The On-Demand Invoicing Server, when launched, is executed as an entirely new task in it's own
window. You can switch back to the P/I System menu window, exit that, and do whatever you please
© 2007 - 2014 by Sentinel Hill Software, all rights reserved
Professional Invoicing Menu Functions
465
without disturbing the Server.
On-Demand Invoicing "Status" Waiting Window
When the On-Demand Invoicing Server is idle and waiting for a request to be processed, the
following screen is displayed.
If you wish to have the On-Demand Invoicing Service hibernate between 10:00 pm and 5:00
am every night, set the applicable check-box. During hibernation, all files are closed so a
proper backup can be taken, and in the morning it will be automatically re-activated. Note that
when the service enters hibernation mode, the Daily Invoice Summary Report will be
automatically generated; and when re-awoke, when the 1st request is serviced, a new A/R
Sales Batch will be automatically created, into which Invoices will be posted.
On-Demand Invoicing "Status" Processing Window
When a request is being serviced, the following screen is displayed. Note that if you wish to
show more information about requests as they are being serviced, set the applicable checkbox.
© 2007 - 2014 by Sentinel Hill Software, all rights reserved
466
Series 5 Professional Invoicing - User Help
The list that is displayed shows each Control Set along with the Sales Batch to which it's
Invoices are posted to in the Accounts Receivable system, the # of Invoices that have been
generated, and the total $ Value.
Request Select Filters Screen Field Definitions
Control Set Launch Group
radio-buttons
One of the properties associated to each On-Demand Invoicing Control Set is a Group
Code. This is used to identify those Control Sets for which associated On-Demand
Invoice requests are to be serviced by the same instance of the server. Click ALL to
display and enable all Control Sets for the operator. Click Selected to have a Launch
Group chosen.
Note that all Control Sets are listed, but only those belonging to the selected Launch
Group will be pre-checked and enabled.
Service Launch Group
X(6)
Select the Launch Group for which On-Demand Invoices are to be generated for.
Control Set(s)
check-box
Up to 18 Control Sets may be defined by the system. Each will be displayed with a
check-box that may be set or cleared by the operator to indicate whether or not
associated requests will be serviced.
If a Service Launch Group was selected, then only those Control Sets belonging to that
Group will be pre-checked and enabled.
© 2007 - 2014 by Sentinel Hill Software, all rights reserved
Professional Invoicing Menu Functions
467
9.7.14 Launch Auto Invoicing Wizard
The Series 5 Professional Invoicing system provides an Invoicing Wizard that that may be
invoked manually to automatically process the sequence of functions typically associated to
daily operation. A wizard is really just another operation that automatically steps through a
number of other operations associated to the application.
The wizard will automatically attempt to execute itself for each Invoicing Wizard Code 707 that
has been defined to the P/I system. It reads the Invoicing Wizard Codes file for each code
that has been created. It examines the designated folder, for each code, to see if any
interface files exist. If files are found, then that Wizard Code is set up to be processed. Up to
12 Wizard Codes will be processed at once.
The Wizard may be launched manually, or there is a service routing that may be launched
that will automatically execute the Wizard are specific intervals of time during the day. This
chapter provides information on how to invoke the Automatic Executing Wizard. You may
refer to the topic titled Interface/Invoicing Wizard 340 found earlier in this document
for information about how the Wizard executes, and the functions that it performs.
Some points to note about the Automated Invoicing Wizard Server function:
The Automated Invoice Wizard Server utility is launched from the Invoice
Processing drop-down menu from the P/I System
It may be started so that the Wizard is executed every 1/2, hourly, or
every 2 or 4 hours.
A Status screen is displayed showing information about when the
Wizard last executed, and when it will next execute
The Status screen displays a list showing a the # of invoices that had
been generated along with the Total $ Value of Invoices for each time the
Wizard executed.
The interface files that are processed to generate the invoices must be
present in their designated directories before the Wizard is executed. IF
THEY ARE NOT PRESENT in time, they will not be processed until the
next scheduled execution. However, their is that ability to have the Wizard
executed manually, which WILL NOT disturb the next scheduled
automatic execution.
If errors are encountered in the input files, an Exception Report will be
generated and the invoices WILL NOT be generated. You must address
the related problems, and then select to repeat the execution of the
Wizard.
Launching the Series 5 Automated Invoicing Wizard Service
From the P/I Menu:
© 2007 - 2014 by Sentinel Hill Software, all rights reserved
468
Series 5 Professional Invoicing - User Help
1. Click on Launch Auto Invoicing Wizard... from the Invoice Processing drop-down
menu.
2. The Auto-Invoicing Wizard Server Filters screen will be displayed and you will be able
to set a number of filters that are used to determine when the Wizard is to be
executed. Note that after the server is started, you can change the filters.
© 2007 - 2014 by Sentinel Hill Software, all rights reserved
Professional Invoicing Menu Functions
469
3. Click OK and the On-Demand Invoicing Server will trundle off and wait for a job that it
can execute.
Processing Note
The Auto-Invoicing Wizard Server, when launched, is executed as an entirely new task in it's own
window. You can switch back to the P/I System menu window, exit that, and do whatever you please
without disturbing the Server.
Auto-Invoicing Wizard "Status" Waiting Window
When the Automated Invoicing Wizard Server is idle and waiting for a request to be
processed, the following screen is displayed.
© 2007 - 2014 by Sentinel Hill Software, all rights reserved
470
Series 5 Professional Invoicing - User Help
If you wish to have the Auto-Invoicing Wizard Service hibernate between 6:00 pm and 8:00
am every night, set the applicable check-box. During hibernation, all files are closed so a
proper backup can be taken, and in the morning it will be automatically re-activated. Note that
when the service enters hibernation mode, the Daily Invoice Summary Report will be
automatically generated.
Auto-Invoicing Wizard Select Filters Screen Field Definitions
Executing Frequency
radio-buttons
Choose how often the Wizard is to be invoked. The system will automatically execute the
Wizard as often as specified.
Note that it will be assumed that the interface files are always available in their
respective folders when the Wizard is executed.
Starting
radio-buttons
Specify whether to the 1st execution of the Wizard immediately, or on hour or 1/2 hour,
depending on the frequency selection.
Enable Night Time Hibernation
check-box
If the Execution of the Wizard is to be suspended overnight between 6pm and 8am, set
the check box.
It is advisable to do so, so that all processing files are closed when the nightly backup is
executed.
Enter Hibernation Mode for 4 Minutes
check-box
© 2007 - 2014 by Sentinel Hill Software, all rights reserved
Professional Invoicing Menu Functions
471
This option is available to test the hibernation function. It is useful if you wish to back-up
or replace any of the data files used in the Invoicing process without shutting down the
service.
9.8
Reporting Functions
The topics in this chapter describe functions and procedures that are a available under the
Reports drop down menu on the Professional Invoicing menu. These menu items are
used to generate and print the reports associated to the Professional Invoicing system.
(Note that those menu items that are dimmed have not yet been ported over from the Series 4
system).
These functions are available from the P/I Menu Bar as shown:
© 2007 - 2014 by Sentinel Hill Software, all rights reserved
472
9.8.1
Series 5 Professional Invoicing - User Help
Pre-Billing Aging Report
The Professional Invoicing system Pre-Billing report provides a listing of WIP and
Disbursements that are eligible for billing. As an option, items previously invoiced may also
be listed. Items are aged and printed in appropriate columns.
Accessing the P/I Pre-Billing Report
From the P/I Main menu, select Pre-Billing Aging Report from the Reports dropdown menu.
© 2007 - 2014 by Sentinel Hill Software, all rights reserved
Professional Invoicing Menu Functions
473
P/I Pre-Billing Report - Options Screen
The following screen is presented when generating the P/I Pre-Billing Report:
When selected, the operator is presented with the standard WIP Select Filters 147 screen, the
Project Select Filters 142 screen and the Customer Select Filters 151 screen. These allow you
to specify selected or ranges of WIP Items, Projects, Project Locations, Project Departments,
© 2007 - 2014 by Sentinel Hill Software, all rights reserved
474
Series 5 Professional Invoicing - User Help
Customers, Customer Types, Sales Representatives, and/or only those customers and/or
projects satisfying a variety of filter criteria.
The report generated, if archived, will be catalogued with a report name of either
PREBILL_DETAIL.RPT or PREBILL_SUMMRY.RPT depending on whether the Detail or
Summary versions were selected.
The Print Options tab screen will be displayed, from which you can select to direct the output
to be displayed to the screen, archived, printed, saved as an MS Word document, saved as a
PDF, and/or emailed. (Refer to the topic titled Report Generation and Printing 159 for full
details).
Field Definitions
Type of Report
Select whether the report is to be generated in
Summary or a Detail. The Summary report
provides totals of Unbilled WIP and
Disbursements for each Projects. The Detail
report list each item with the total amount due
in a separate column depending on it's age.the
customers' totals along with each individual
Open Item.
Reporting Items Dated
radio-buttons
Detail
Summary
radio-buttons & (mmddyy)
Select to have WIP and Disbursements selected regardless of their dates; or only those
with a transaction date since a specified date. Click the calendar icon to select a date.
Aging Items - To Date
(mmddyy)
This is the date used to determine the age of each Item. The total billable amount for
each item that can be invoiced is printed in one of four different columns, depending on
the age of the item relative to this date. Each column corresponds to the aging periods
defined by the A/R Control Preferences. The default is the current system date.
List Previously Invoiced Items
check-box
Normally only unbilled WIP and Disbursement items would be listed in this report. If you
wish to list already invoiced items, set this check-box.
List Credits and Manual Invoice Entries
check-box
When Credit Notes or Manual Invoices are entered against a given Project, a special WIP
item record is written. These hold respective values of balance amounts that have not yet
been applied to specific WIP items. If you wish to list this items, set this check-box.
© 2007 - 2014 by Sentinel Hill Software, all rights reserved
Professional Invoicing Menu Functions
Include Supporting Project Notes
475
check-box
Each Project may have a user defined comment associated with it. These are entered
for each Project using the Project Codes Maintenance 539 function. If you wish to these
notes list on the report for each Project, set this check-box.
Items Sorted by
When the Detail Report is generated, Items
may be listed sorted either by date or by the
Invoice Section and Invoice Group codes that
have been assigned to them.
List Prior Invoices
Should you wish to have a list of prior invoices
listed on the report, for each Project, select the
desired option, and if prompted, enter the cutoff date.
9.8.2
radio-buttons
Date
Invoice Section/Group
check-box & (mmddyy)
None
ALL
As far Back To
Pre-Invoicing Report
The Pre-Invoicing report provides a simple list of all the WIP and Disbursement items that
have been selected for billing. You may choose to have the items listed grouped by their
Invoice Group Codes, or by their Budget Group Codes. If Cost Plus charges have been
generated for a Project, these will also be printed.
Budget amounts, if maintained, are printed showing the Original, Committed and Remaining
amounts as a result of each item being selected for billing.
Pre-Invoicing Report Filters Screen
The following screen is displayed for entry of a number of different options and filters that may
be set to limit the records that are output to the report.
© 2007 - 2014 by Sentinel Hill Software, all rights reserved
476
Series 5 Professional Invoicing - User Help
When selected, the operator is presented with the standard Project Select Filters 142 screen
and the Customer Select Filters 151 screen. These allow you to specify selected or ranges of
Projects, Project Locations, Project Departments, Customers, Customer Types, Sales
Representatives, and/or only those customers and/or projects satisfying a variety of filter
criteria.
The report generated, if archived, will be catalogued with a report name of
PIPREINVOICE.RPT.
The Print Options tab screen will be displayed, from which you can select to direct the output
to be displayed to the screen, archived, printed, saved as an MS Word document, saved as a
PDF, and/or emailed. (Refer to the topic titled Report Generation and Printing 159 for full
details).
Pre-Invoicing Report Filters Screen - Field Definition
WIP Items Sort
drop-down list
To have the WIP Items listed grouped by one of the
available fields.
© 2007 - 2014 by Sentinel Hill Software, all rights reserved
Professional Invoicing Menu Functions
9.8.3
477
WIP Detail Report
The WIP Items Report is a detailed listing of Work-in-Progress items for each Project. Items
may be sorted by Project, Employee or Task, and a variety of different filters may be entered.
From the P/I Main menu, select WIP Detail Report from the Reports drop-down menu.
WIP Items Report Filters Screen
The following screen is displayed for entry of a number of different filters that may be set to
limit the audit records that are output to the report.
© 2007 - 2014 by Sentinel Hill Software, all rights reserved
478
Series 5 Professional Invoicing - User Help
When selected, the operator is presented with the standard WIP Select Filters 147 screen, the
Project Select Filters 142 screen and the Customer Select Filters 151 screen. These allow you
to specify selected or ranges of WIP Items, Projects, Project Locations, Project Departments,
Customers, Customer Types, Sales Representatives, and/or only those customers and/or
projects satisfying a variety of filter criteria.
The report generated, if archived, will be catalogued with a report name of
PIPROJECTWIP.RPT.
The Print Options tab screen will be displayed, from which you can select to direct the output
to be displayed to the screen, archived, printed, saved as an MS Word document, saved as a
PDF, and/or emailed. (Refer to the topic titled Report Generation and Printing 159 for full
details).
WIP Items Report Filters Screen - Field Definition
WIP Items Sort
drop-down list
To have the WIP Items listed grouped by one of the
available fields.
© 2007 - 2014 by Sentinel Hill Software, all rights reserved
Professional Invoicing Menu Functions
9.8.4
479
Recap Detail Spreadsheet / Report
The Series 5 Professional Invoicing system is designed as a stand-alone system that can
generate invoices for charges as a result of employee activity recorded as time sheets, or by
other system's home grown servicing or production packages. Either way, WIP end up in the
P/I system ready to be invoiced.
For some projects where WIP charges are interfaced from an external servicing system,
there may be additional supporting information that needs to be recorded with WIP records.
This is accomplished through the use of Recap Detail records. When WIP charges are
interface into the Professional Invoicing system, as an option, Recap Detail records may also
be loaded.
Recap WIP ID Numbers
Recap records are linked to WIP records utilizing an 8 digit Recap WIP ID number, and a 2 digit
Recap Counter. You may load up to 99 Recap records which belong to a single WIP record.
When WIP records are invoiced, the system locates any associated Recap records, and records
the WP's assigned Invoice Number to each Recap. In some cases, depending on the Project,
invoices are generated from the Recap records.
Recap Detail records may be used for the generation of EDI invoices for those Projects that
have been configured accordingly. However, Recap records are not utilized in the generation
of form printed invoices.
For installations utilizing the Professional Invoicing Web Management system, and the
Account Status on the Web" web based inquiry functions, these Recap records may be
displayed for selected invoices.
Some points to note when generating the Recap Detail report:
Either a detail report or a spreadsheet may be generated
Select to have only Invoice Recap records reported, or to have All Recap records
reported
For filters, you may select a range of Invoices, a range of WIP ID Numbers, or even a
selected Project.
When listing invoiced Recaps, they may be sorted by Invoice #, Project Code, or
Customer Code
When listing all Recap detail, they may be sorted by Invoice #, Customer Code or
Recap Id Number
© 2007 - 2014 by Sentinel Hill Software, all rights reserved
480
Series 5 Professional Invoicing - User Help
When output to an Excel spreadsheet, a maximum of 65,500 items may be output.
The Professional Invoicing system Recap Detail Spreadsheet / Report function provides
either a report, or a spreadsheet listing the Recap information on file for a variety of different
selection criteria.
Accessing the Recap Detail Reporting Function
From the P/I Main menu, select Recap Detail Spsheet/Report from the Reports
drop-down menu. As well, from the Invoice History Inquiry function 235 , when an
Invoice has been selected to be displayed, a push-button is presented which may be
pressed to have an Invoiced Recap Spreadsheet generated.
Recap Detail Report or Spreadsheet - Options Screen
The following screen is presented when generating the Recap Detail Report or Spreadsheet:
© 2007 - 2014 by Sentinel Hill Software, all rights reserved
Professional Invoicing Menu Functions
481
When selected, the operator is presented with the standard Customer Select Filters 151
screen. This allows you to specify selected or ranges of Customers, Customer Types, Sales
Representatives, and/or only those customers and/or projects satisfying a variety of filter
criteria.
If the report is generated, and archived, it will be catalogued with a report name of
RECAPDETAIL.RPT.
The Print Options tab screen will be displayed, from which you can select to direct the output
to be displayed to the screen, archived, printed, saved as an MS Word document, saved as a
PDF, and/or emailed. (Refer to the topic titled Report Generation and Printing 159 for full
details).
Field Definitions
Generate Report Type
© 2007 - 2014 by Sentinel Hill Software, all rights reserved
radio-buttons
482
Series 5 Professional Invoicing - User Help
Select to output either to a report, or to a spreadsheet. Also, select to either list only
those Recap records that have been Invoiced, or all Recap records.
Recap Detail Sort
radio-buttons
If listing only invoiced Recap items,
then they may be grouped by Invoice
Number, Customer Code or Project
Code.
If listing all Recaps, then they may be
listed sorted by Invoice Number,
Customer Code or Recap ID
Number.
Recap Detail from Selected Invoices
radio-buttons
Invoices may be generated as Private or Public Invoices. Private Invoices are maintained
in a file that may be accessed only be the user that generated them. The concept was
developed so that the files associated to private invoices reside in folders on the client's
PC. Public Invoices are those that are generated and available to all users of the
Professional Invoicing system. The Public data files are stored on the server. Once
invoices are posted, they are copied to history.
The Invoice Recap report or spreadsheet is generated by reading through the Invoices,
and listing associated items. Identify which set of Invoices are to be processed.
Normally, all Invoice processing would have been done using Public Access options.
For Invoices Numbered
radio-buttons & 9(6)
Select to have Recap records selected regardless of the Invoice Numbers; or only those
that have been invoiced within a specific Invoice Number range.
Reporting Items Invoiced Dated
radio-buttons & (mmddyy)
Select to have Recap records selected regardless of their dates; or only those that have
been invoiced within a specific date range. Click the calendar icon to select a date.
© 2007 - 2014 by Sentinel Hill Software, all rights reserved
Professional Invoicing Menu Functions
Recap Detail Filters – With WIP ID Number(s)
483
radio-buttons & 9(6)
Select to have Recap records selected regardless of their WIP Id Numbers; or only those
with ID Numbers that fall within a specific range.
Identify and Delete Rogue Recap Records
check-box
"Rogue" Recaps are those records that had been incorrectly interfaced, but remain on the
system. As a special option, when the Recap report is generated, the "Rogue" records
will be identified and deleted. If selected, no reports are actually generated. This was
introduced as a Fix Function in the event that the wrong file was loaded as a Recap
Interface file.
(If this option is selected, you will need to enter a password. The password is, in caps, the
name of Henry's dog).
Recap Detail Filters – with Bill Code
X(35)
Select only those Recap items that have a Bill Code that matches the code entered.
Leave the field blank if it is NOT to be considered as a filter.
Recap Detail Filters – with Ordered By Code
X(35)
Select only those Recap items that have an Ordered By Code that matches the code
entered. Leave the field blank if it is NOT to be considered as a filter.
Recap Detail Filters – with Search Company
X(50)
Select only those Recap items that have a Search Company that matches the code
entered. Leave the field blank if it is NOT to be considered as a filter.
Recap Detail Filters – with Lease Number
X(20)
Select only those Recap items that have a Lease Number that matches the code entered.
Leave the field blank if it is NOT to be considered as a filter.
Recap Detail Export Data Formats
When the Recap spreadsheets are generated, the following fields are output to an Excel
spreadsheet, a tab-delimited text file, or a CSV text file. The default filename for the
output is Recap_Detail.XLS. When called from the Historic Invoice Inquiry function, the
default filename is Inv999999Recap.XLS, where 999999 is the Invoice number.
© 2007 - 2014 by Sentinel Hill Software, all rights reserved
484
Series 5 Professional Invoicing - User Help
The following table defines the format for the Recap Detail output fields:
Column
#
Excel
Column
Field
Format
1
A
Order Number
9(10)
2
B
Order Line Number
9(3)
3
C
Client Service Rep Code
X(6)
4
D
Order Service Rep Code
X(6)
5
E
Bill Code
X(40)
6
F
WIP Task Code
X(8)
7
G
WIP Task Service/
Disbursement Flag
X(1)
8
G
Date/Time
mm/dd/yyyy
hh:mm:ss
9
I
Ordered By
X(30)
10
J
Debtor/Search Name
X(40)
11
K
Lease Number
X(20)
12
L
State Code
X(2)
13
M
Location (county)
X(30)
14
N
Application Code
X(3)
15
O
Description
X(50)
16
P
Rate
-99999.99
17
Q
# of Units
-99999.99
18
R
Charge Amount
-99999.99
19
S
Allocated Tax Amount
-99999.9999
20
T
Promotional/Discounted
Savings
-99999.99
21
U
Invoice Number
99999999
22
V
Invoice Date
mm/dd/yyyy
23
W
Customer Code
X(6)
24
X
3rd Party Customer Code
X(6)
25
Y
Recap ID Number
99999999-9999
26
Z
Reference 2
X(40)
27
AA
Reference 3
X(100)
28
AB
Reference 4
X(100)
29
AC
Reference 5
X(90)
© 2007 - 2014 by Sentinel Hill Software, all rights reserved
Professional Invoicing Menu Functions
9.8.5
30
AD
Reference 6
X(90)
31
AE
Reference 7
X(90)
32
AF
Reference 8
X(90)
485
Employee Cross Utilization Report
Chargeable and non-chargeable activity by employees is recorded as Work-In-Progress
items against specific Projects. All employees belong to both a Department and a Location;
and all Projects also are associated to both a Department and a Location. Generally,
employees for a given department or location will perform work on projects that belong to the
same department or location. However, if this is not always the case, you may want to
determine how much WIP activity is being performed by employees associated to a given
department or location on projects belonging to other departments or location. This is
referred to as "Employee Cross Utilization".
The Employee Cross Utilization Analysis function accumulates sub-totals for the WIP
recorded be employees on projects for other departments or locations for a variety of related
codes, including Project, Department, Location and Employee. Analysis may be done for
periods of calendar years or months, or G/L Fiscal years or periods. The number of
Chargeable and non-chargeable Units and Amounts, Overhead Amount, Invoiced Amount,
and Costs are tallied, and presented along with assorted totals. This may be useful to
determine the cost or revenue that is earned by employees from one department when
allocated to projects of another department.
Assigning Project to Departments or Locations
Projects may be assigned to a Department or Location. This is accomplished by assigning a
Project Leader and/or a Project Partner to a Project. (Project Leaders and Partners are really
just employees). Projects then belong to the Location and/or Department that has been
assigned to the the Project Leader or Partner.
Once the analysis is generated for the specified type of period, the totals for any particular
period, of the range of periods analyzed, may be displayed to the grid screen with totals,
which may then be reviewed, exported, or printed as a report.
Analysis with sub-totals by assorted periods of time, are available as follows:
by Projects for selected Location, Employee, Department, or Location
by Locations for selected Project, Department, Leader Location or Employee
by Employees for selected Location, Department or Project
by Departments for selected Location, Project, Employee or Leader
Department
© 2007 - 2014 by Sentinel Hill Software, all rights reserved
486
Series 5 Professional Invoicing - User Help
For each of the given analysis types, a sub-totals may be broken down to the following
periods:
by Calendar Year for up to 9 year prior to a selected year
by Calendar Months for up to 47 months prior to a selected month
by G/L Fiscal Periods for up to 2 years worth of Fiscal Periods preceding a
selected period
by G/L Fiscal Years for up to 8 years preceding a selected Fiscal Year
For any row of data presented, (where a row represents either a Project, Location, Employee,
or Department), a drill down function presents a screen displaying the accumulated totals for
the item, for each of the reporting periods. Totals are displayed along with a Trend Analysis.
These drill down screen data may also be exported to a spreadsheet.
The inquiry analysis is obtained using the current WIP records that are accumulated in the P/I
system. For this analysis to be accurate, you must maintain at least the last ten years of
historic data, purging only transactions older than ten years.
As a special feature of the Series 5 reporting function, the totals may be viewed on screen,
printed or exported to an MS Excel spreadsheet.
The Employee Cross Utilization Analysis function can be invoked from either the Trx Inquiry or
the Reports drop-down menu from the P/I menu.
© 2007 - 2014 by Sentinel Hill Software, all rights reserved
Professional Invoicing Menu Functions
9.8.5.1
487
Cross Utilization Preview Grid
When the Employee Cross Utilization Analysis is generated, it's data is displayed to the
screen managed using a Series 5 grid processing screen. In effect, you can view the report
without having to actually print it. As an alternative, the data can also be easily exported to a
spreadsheet for further analysis. If so desired, the analysis may also be printed.
Operational Warning
The analysis requires the system to read through the entire P/I WIP History file. These files
may grow fairly large over time due to the number of transactions. This analyses may take
some time to generate. Should you leave this function, and return, the most recent analysis
that had been done will be displayed in the grid.
Employee Cross Utilization "Preview" Grid
The "Fast Buttons" frame provides the push buttons to have the analysis customized,
printed or exported:
"Fast Buttons"
Print Analysis
Report
To have the Cross Utilization Analysis generated and
printed
(Re)Build Preview To have the Cross Utilization Analysis generated and
displayed to the preview grid
Print Preview
To have the Cross Utilization Analysis that is
currently displayed in the grid printed
© 2007 - 2014 by Sentinel Hill Software, all rights reserved
488
Series 5 Professional Invoicing - User Help
Export
To have the Cross Utilization Analysis totals output to
a spreadsheet
Some of the special features of this "Preview" grid are as follows:
If any specific reported row is doubleclicked, then a "Trend Analysis DrillDown" window 515 is displayed. For
the selected P/I code, each of the
totals presented in the row, will be
displayed for each period that the
analysis was generated along with
normalized Trend Percentages.
These in turn may be printed as a
report, or exported to a spreadsheet.
(Right-clicking the cell displays a popup window, from which the drill down
function may also be selected).
The analysis totals have been
accumulated for combinations of
Projects, Employees, Departments
and Locations. From the drop-down
list you may choose the set of codes to
be displayed. Depending on the
combination of codes chosen, the
applicable field is presented from
which the desired code may be
entered to display.
If listing for a particular P/I code, they
may be chosen either by entering their
Code, choosing it using the Lookup
binoculars icon, or by having the next
or previous one displayed that has
totals that were accumulated. (Click
the binocular icon with the up/down
arrow to display Inventory Totals that
exist for the prior/next occurrence of
that code on file).
© 2007 - 2014 by Sentinel Hill Software, all rights reserved
Professional Invoicing Menu Functions
489
The analysis totals have been
accumulated for a range of periods up
to the cutoff-period. The grid displays
only those totals for a selected period.
To choose to display the totals for one
of the other periods, select the desired
one from the drop-down list provided.
When displaying Projects, Locations, Employees, or Departments for a selected
code, totals are displayed below the gird. These are the sum of the amounts for all
the codes being displayed, for the given selection, for the selected period.
Totals are accumulated when the Employee's Department or Location is different from
the Department or Location that a Project has been assigned to. The following table is
meant to describe which fields are tested to determine whether a WIP item is included in
the totals, or not, for the different combinations.
"Analysis Selection Criteria"
Combination of Codes
Matching Criteria
For Project Totals
Projects for Selected
Location
For the Location associated to an Employee's WIP
activity, accumulate totals of WIP that were for
Projects belonging to a different Location.
Projects for Selected
Department
For the Department associated to an Employee's
WIP activity, accumulate totals of WIP that were for
Projects belonging to a different Department.
Projects for Selected
Employee
For the Employee, accumulate totals of WIP that
were recorded for Projects belonging to a different
Department.
For Location Totals
Locations for Selected
Location
© 2007 - 2014 by Sentinel Hill Software, all rights reserved
For the Location to which Projects are assigned to,
accumulate totals of WIP recorded by Employees
belonging to a different Location.
490
Series 5 Professional Invoicing - User Help
Locations for Selected
Department
For the Department to which Projects are assigned
to, accumulate totals of WIP recorded by
Employees belonging to a different Department.
Locations for Selected
Employee
For the Location to which Projects are assigned to,
accumulate totals of WIP recorded by Employees
belonging to a different Location.
Locations for Selected
Project
For the Project, accumulate totals of WIP that were
recorded by Employees belonging to a different
Location.
For Employee Totals
Employees for Selected
Location
For the Location to which Projects are assigned,
accumulate totals of WIP recorded by Employees
belonging to a different Location.
Employees for Selected
Department
For the Department to which Projects are
assigned, accumulate totals of WIP recorded by
Employees belonging to a different Department.
Employees for Selected
Project
For the Project, accumulate totals of WIP that were
recorded by Employees belonging to a different
Department.
For Department Totals
Departments for Selected
Location
For the Location to which Projects are assigned to,
accumulate totals of WIP recorded by Employees
belonging to a different Department.
Departments for Selected
Department
For the Department to which Projects are assigned
to, accumulate totals of WIP recorded by
Employees belonging to a different Department.
Departments for Selected
Employee
For the Employee, accumulate totals of WIP that
were recorded for Projects belonging to a different
Department.
Departments for Selected
Project
For the Project, accumulate totals of WIP that were
recorded by Employees belonging to a different
Department.
© 2007 - 2014 by Sentinel Hill Software, all rights reserved
Professional Invoicing Menu Functions
491
The columns of information displayed consist of the following information, compiled from
the WIP data records:
"Analysis Columns"
Columns
Description
For Project Totals
Project
The code identifying the Project Item
Description
The description of the Project
Customer
The Customer to which the Project belongs to
Leader
The Project Leader assigned to the Project
Status
The Status of the project
Location/
Department
The Location or Department that the Project belongs to
For Location Totals
Location
The code identifying the Location
Description
The description of the Location
For Employee Totals
Employee
The code identifying the Employee
Name
The Employee's name
Location
The Location to which the Employee is assigned to
Job Class Code
The Employee's assigned Job Class code
For Department Totals
Department
The code identifying the Department
Name/
Description
The description of the Department
Totals Reported (for all code types)
WIP Count
Is the # of WIP records that were processed to
accumulate the totals
Chargeable Units This is the sum of all task units recorded for Chargeable
WIP items
Chargeable
Amount
This is the sum of all originally entered extended $
amounts recorded for Chargeable WIP items
Overhead
Amount
This is the sum of all originally entered Overhead
charges $ amounts recorded for Chargeable WIP items.
(These would have been automatically computed by the
system)
Unbilled Amount This is the sum of all Chargeable WIP items that have
© 2007 - 2014 by Sentinel Hill Software, all rights reserved
492
Series 5 Professional Invoicing - User Help
not yet been invoiced.
Invoiced Amount This is the sum of all Chargeable WIP items that have
been invoiced. This amount may differ from the
Chargeable Amounts totals if any charges had been
marked up or down, of if items had been written off.
NonCharge Units This is the sum of all task units recorded for NonChargeable WIP items
9.8.5.2
NonCharge
Amount
This is the sum of all originally entered extended $
amounts recorded for Non-Chargeable WIP items
Cost Amount
This is the sum of Costs that may have been recorded
with WIP items. If Costs are captured in the P/I system,
they are normally assigned by the system based on
hourly rates of employees, or unit rates of tasks
performed.
Profit Amount
This figure is the computed as the difference between
Invoiced Amount and the Cost Amount totals. (If costs
are not recorded, then this amount will be tha same as
the Invoiced Amount)
Build Analysis Options
When having to generate the Analysis, Print the reports, or Export the results, the following
screen is presented. It's possible to limit the amount of data that is output when generating
the report or exporting.
When building the analysis tables, columns of data may be generated for either G/L Fiscal
Periods and Years, or Calendar Months and Years. In each case, you may choose the
period, up to which, the analysis will be tallied for.
© 2007 - 2014 by Sentinel Hill Software, all rights reserved
Professional Invoicing Menu Functions
493
The report generated, if archived, will be catalogued with a report name of
PI_CROSSUTILIZ.RPT.
The Print Options tab screen will be displayed, from which you can select to direct the output
to be displayed to the screen, archived, printed, saved as an MS Word document, saved as a
PDF, and/or emailed. (Refer to the topic titled Report Generation and Printing 159 for full
details).
When generating the report or building the analysis totals, the operator is presented with the
standard Customer Select Filters screen 151 , Project Select Filters screen 142 and WIP Select
Filters screen 147 . These allow you to specify selected or ranges of WIP Items, Projects,
Project Locations, Project Departments, Customers, Customer Types, Sales
Representatives, and/or only those customers and/or projects satisfying a variety of filter
criteria.
© 2007 - 2014 by Sentinel Hill Software, all rights reserved
494
Series 5 Professional Invoicing - User Help
Build/Report Options Screen - Field Definitions
Employee Cross Utilization – for Period Type
drop-down list
Select whether totals are computed for given
Years, Months, or Periods based either on
Calendar of G/L Fiscal Periods.
Employee Cross Utilization – for Period
drop-down list
Depending on the type of Period chosen you
may be able to select the ending Period which
is to be analyzed. In each case, a predetermined number of periods prior to the one
selected will have totals also accumulated.
Period Type
Calendar Months
Calendar Years
Fiscal Periods
Fiscal Years
# of Periods Reported
48
10
2 Fiscal Years worth
8
Cross Utilizations – Projects Based on Leaders or
Partners
radio-buttons
When analysis totals are generated, only those WIP items for
employees that are associated to a Location or Department
that are different from the Location or Department that the
Project belongs to are included. Projects belong to a Location
or Department based on the Location or Department that has
been assigned to it's Project Leader or Project Partner. Select
to perform the analyses for the Projects belonging to
Departments or Locations based either on the Project Leader
or the Project Partner.
Reporting Sets of Data
check-boxes
When the analysis is executed, tables are built for a number of different codes and
combinations of Projects, Locations, Employees and Departments. When the function to
have data output to a report or exported is selected, you can select the particular set of
results that is to be output. (Selecting all of them may generated a length report, or
excessive amount of data to a spreadsheet)
© 2007 - 2014 by Sentinel Hill Software, all rights reserved
Professional Invoicing Menu Functions
9.8.5.3
495
Period Trend Analysis Drill Down
From the Employee Cross Utilization Analysis preview screen, the totals displayed for each
Project, Location, Employee or Department Code is that for a single selected period. If you
wish to display the totals for a particular item showing each period analyzed, then double-click
the row of the item of interest.
A screen will be displayed that shows the totals for each period, along with a Trend
Percentage value for each period.
Trend Percentages, or index numbers, are useful in comparing data from sales over a
number of years, months, or fiscal periods., since trend percentages emphasize changes
that have occurred during the period. They are computed as follows:
1. A base period is selected, and each item amount on the base year column is assigned
a weight of 100%
2. Then each item from the analysis for the periods after, or before, the base period is
expressed as a percentage of its base period amount. To determine these
percentages, the item amounts in the other periods before or after the base period are
divided by the amount of the item in the base period.
Employee Cross Utilization Analysis – Period Comparative Trend Screen
The push buttons to have the detail printed or exported:
© 2007 - 2014 by Sentinel Hill Software, all rights reserved
496
Series 5 Professional Invoicing - User Help
Push Button functions
Print
Export
Reserved for a future enhancement
To have the totals for the selected item output to a
spreadsheet
Drill-Down Period Comparative Select Fields Definitions
Trends Computed Relative To
drop-down list
Select the period that is to be used as the
"Base Period". Each total amount displayed
for the base period column is assigned a
weight of 100%. Amounts in other columns
are then used to compute a percentage
relative to the amount associated to the "Base
Period".
9.8.5.4
Exported Data Layouts
The selected period's totals for each of the Project, Location, Employee, or Department
Code displayed may be exported to an Excel spreadsheet or tab-delimited file. As well, when
a given Code has had it's Comparative Trend drill-down period totals displayed, these may
also be exported.
The Export Options tab screen will be displayed, from which you can select to direct the
output to an MS Excel spreadsheet, CSV text file, or a Tab-delimited text file. (Refer to the
© 2007 - 2014 by Sentinel Hill Software, all rights reserved
Professional Invoicing Menu Functions
topic titled Data Export Functions
133
497
for full details).
Employee Cross Utilization Analysis Spreadsheet Export Data Formats
If the option to Export the analysis totals is selected, the following fields are output to an Excel
spreadsheet, a tab-delimited text file, or a CSV text file. The output file, by default, is named
CrossUtilize_Analysis.XLS. Depending on the item being displayed, data rows will
represent either Projects, Locations, Employees or Department Codes.
For a the Analysis totals, the following fields are output:
Column #
Excel Column
Field
1
A
Grouped by Code
X(6)
2
B
Project Code
X(6)
3
C
Description
X(30)
4
D
Customer Code
X(6)
5
E
Project Leader
X(6)
6
F
Status
X(9)
7
G
Project's Location or Department
X(6)
1
A
Grouped by Code
X(6)
2
B
Location Code
X(6)
3
C
Description
X(30)
4
D
blank
5
E
blank
6
F
blank
7
G
blank
1
A
Grouped by Code
X(6)
2
B
Employee Code
X(6)
3
C
Name
X(30)
4
D
Location Code
X(6)
5
E
Job Class Code
X(6)
6
F
blank
7
G
blank
1
A
Grouped by Code
© 2007 - 2014 by Sentinel Hill Software, all rights reserved
Format
X(6)
498
Series 5 Professional Invoicing - User Help
2
B
Department Code
X(2)
3
C
Description
X(30)
4
D
blank
5
E
blank
6
F
blank
7
G
blank
8
H
# of WIP Items
9,999,999
9
I
Chargeable # of Units
99,999,999
10
J
Chargeable Amount $
-999,999,999.99
11.
K
Overhead Amount $
-999,999,999.99
12
L
Unbilled Amount $
-999,999,999.99
13
M
Invoiced Amount $
-999,999,999.99
14
N
Non-Chargeable # of Units
99,999,999
15
O
Non-Chargeable Amount $
-999,999,999.99
16
P
Cost $
-999,999,999.99
17
Q
Profit $
-999,999,999.99
For an item's Comparative Trend totals is exported from the Drill-Down screens, the following
fields are output. The output file, by default, is named PI_CrossUtilize_SubQuery.XLS.
Column #
Excel Column
Field
Format
1
A
Type of Analysis Total
X(30)
2
B
Period 1 Total
-99,999,999.99
3
C
Period 2 Total
-99,999,999.99
...
...
.....
.....
...
...
.....
.....
N
xx
Period N Total, (n=8, 10, or 24)
-99,999,999.99
N+1
xx+1
blank
N+2
xx+2
blank
N+3
xx+3
Period 1 Trend %
X(40)
N+3
xx+4
Period 2 Trend %
-99,999
...
...
.....
.....
...
...
.....
.....
© 2007 - 2014 by Sentinel Hill Software, all rights reserved
Professional Invoicing Menu Functions
...
9.8.6
yy
499
Period N Trend, (n=8, 10, or 48) -99,999
Employee Period Activity Report
The Series 5 Professional Invoicing system provides the capability to record employee activity
as weekly time-sheets. This report offers a summary of WIP activity breakdown by
Employee, with the option to list each WIP item in detail. The following types of questions can
be answered when this report is produced:
For each Employee, which Projects did they record time against ?
For each Employee, which Tasks did they perform ?
For each Task, which Employees recorded time with it ?
For each Project, which Employees recorded time against it ?
Some points to note when generating the Employee Activity report:
Within the given date range selected, the system will compute total WIP units entered
for each day, week, (Monday thru Sunday), month or year.
Totals for billable WIP activity is accumulated. If it has not yet been invoiced, the initially
entered amounts are used. If the WIP has been invoiced, then the Invoiced amount is
used to compute the totals. If the originally amount was marked up/down, the invoiced
amount would not necessarily be the same as was initially entered.
The Professional Invoicing system Employee Activity Report function provides a report with
the ability to specify an assortment of different selection criteria.
Accessing the Employee Activity Reporting Function
From the P/I Main menu, select
Employee Period Activity Report from
the Reports drop-down menu.
© 2007 - 2014 by Sentinel Hill Software, all rights reserved
500
Series 5 Professional Invoicing - User Help
Employee Activity Report - Options Screen
The following screen is presented when generating the Employee Activity Report:
© 2007 - 2014 by Sentinel Hill Software, all rights reserved
Professional Invoicing Menu Functions
501
When selected, the operator is presented with the standard WIP Select Filters 147 screen, the
Project Select Filters 142 screen and the Customer Select Filters 151 screen. These allow you
to specify selected or ranges of WIP Items, Projects, Project Locations, Project Departments,
Customers, Customer Types, Sales Representatives, and/or only those customers and/or
projects satisfying a variety of filter criteria.
If the report is generated, and archived, it will be catalogued with a report name of
EMPLY_ACTIVITY.RPT.
The Print Options tab screen will be displayed, from which you can select to direct the output
to be displayed to the screen, archived, printed, saved as an MS Word document, saved as a
PDF, and/or emailed. (Refer to the topic titled Report Generation and Printing 159 for full
details).
Field Definitions
For Time-Sheet WIP Activity Dated
radio-buttons with (mmddyy) dates
Enter or select the date range of WIP activity that is to be used in computing the totals for
the report. For the date range selected, totals will be accumulated broken down by the
reporting period selected.
Reporting Period
radio-buttons
Select to have the report list those employees that have a given week of time-sheet
activity that either is greater than or less than the associated thresholds. You may adjust
the cutoff values by clicking the up/down arrows next to the value field.
You may not enter Zero has either threshold cutoff value; and the Under Cutoff must be
less than the Over Cutoff.
Analysis
drop-down list
Basically sub-totals are accumulated for combinations of Employee/Project, Employee/
Task, Task/Employee or Project/Employee. Depending on the desired results, select the
applicable question to be answered.
List WIP Detail ?
check-box
The report accumulates totals for the selected analysis in combination of Employees,
Tasks and/or Projects. If you wish to also list the WIP detail contributing to the totals, set
the check-box.
© 2007 - 2014 by Sentinel Hill Software, all rights reserved
502
Series 5 Professional Invoicing - User Help
Export sub-Totals to Spreadsheet ?
check-box
The report accumulates totals for the selected analysis in combination of Employees,
Tasks and/or Projects. If you wish to have these figures exported to a spreadsheet, CSV
file, or tab-delimited file, set the check-box.
List Employees Sorted By
radio-buttons
Select to have Employees listed either by their Employee Code or by their Name.
Employee Activity Sub-Totals Export Data Formats
When the report is generated with the option to have the sub-totals exported, the
following fields are output to an Excel spreadsheet, a tab-delimited text file, or a CSV text
file. The default filename for the output is Employee_Activity_Summary.XLSX.
The following table defines the format for the output fields:
Column #
Excel
Column
Field
Format
1
A
Employee, Task or Project
Code
X(8)
2
B
Name or Description
X(24) or X(30) or
X(40)
3
C
Employee, Task or Project
Code
X(8)
4
D
Name or Description
X(24) or X(30) or
X(40)
5
E
Period Start Date
mm/dd/yyyy
6
F
Period End Date
mm/dd/yyyy
7
G
# Chargeable Units
99,999,999
8
H
# Non-Chargeable Units
99,999,999
9
I
# Units Invoiced
99,999,999
10
J
WIP Cost Amount
-999,999,999.99
11
K
Un-Billed Chargeable
Amount
-999,999,999.99
12
L
Invoiced Amount
-999,999,999.99
13
M
# of WIP Item Totalled
99,999,999
© 2007 - 2014 by Sentinel Hill Software, all rights reserved
Professional Invoicing Menu Functions
9.8.7
503
Time-Sheet Exceptions Report
The Series 5 Professional Invoicing system provides the capability to record employee activity
as weekly time-sheets. Typically, both chargeable and non-chargeable activity that an
employee performs would be recorded. Thus for a typical work week, each employee should
probably accumulate 40 hours of WIP activity. The Time-Sheet Exception report is an
attempt to identify those employees that either are not entering their time-sheets, not
accumulating expected hours worth of time, or entering too much time.
Time-Sheet Recorded WIP
Note that WIP can be recorded in the system either from Time-Sheet Entry, as General WIP
Entry, or Interfaced from User supplied data files.
The Time-Sheet Exception report only processes WIP records that were entered either using
Time-Sheets or when interfaced from data files or spreadsheet. It does NOT include WIP
entered from the General WIP Entry operation.
Some points to note when generating the Time-Sheet Exception report:
Within the given date range selected, the system will compute total WIP units entered
for each week, (Monday thru Sunday).
When the total Units for the week exceeds or is less than the specified thresholds, then
totals for the week, for the employee are printed.
The Professional Invoicing system Time-Sheet Exception Report function provides a report
with the ability to specify an assortment of different selection criteria.
Accessing the Time-Sheet Exception Reporting Function
From the P/I Main menu, select
TimeSheet Exception Report from the
Reports drop-down menu.
© 2007 - 2014 by Sentinel Hill Software, all rights reserved
504
Series 5 Professional Invoicing - User Help
Time-Sheet Exception Report - Options Screen
The following screen is presented when generating the Time-Sheet Exception Report:
© 2007 - 2014 by Sentinel Hill Software, all rights reserved
Professional Invoicing Menu Functions
505
When selected, the operator is presented with the standard WIP Select Filters 147 screen, the
Project Select Filters 142 screen and the Customer Select Filters 151 screen. These allow you
to specify selected or ranges of WIP Items, Projects, Project Locations, Project Departments,
Customers, Customer Types, Sales Representatives, and/or only those customers and/or
projects satisfying a variety of filter criteria.
If the report is generated, and archived, it will be catalogued with a report name of
TSHEET_EXCEPT.RPT.
The Print Options tab screen will be displayed, from which you can select to direct the output
to be displayed to the screen, archived, printed, saved as an MS Word document, saved as a
PDF, and/or emailed. (Refer to the topic titled Report Generation and Printing 159 for full
details).
Field Definitions
For Time-Sheet WIP Activity Dated
radio-buttons with (mmddyy) dates
Enter or select the date range of WIP activity that is to be used in computing the totals for
the report. For the date range selected, totals will be accumulated broken down weekly.
© 2007 - 2014 by Sentinel Hill Software, all rights reserved
506
Series 5 Professional Invoicing - User Help
List Employees with Weekly Totals
check-box and
9(4)
Select to have the report list those employees that have a given week of time-sheet
activity that either is greater than or less than the associated thresholds. You may adjust
the cutoff values by clicking the up/down arrows next to the value field.
You may not enter Zero has either threshold cutoff value; and the Under Cutoff must be
less than the Over Cutoff.
Employees Grouped By
drop-down list
To have the Employees listed grouped by one of the
available fields. A new page is started for every
occurrence of the select grouping code.
List Employees Sorted By
radio-buttons
Select to have Employees listed either by their Employee Code or by their Name.
9.8.8
WIP Period Analysis Report
The Professional Invoicing system records all chargeable and non-chargeable employee
activity, and/or external system generated charges to the Work-In-Progress, WIP, file. These
records represent a history of all activity, and is available for analysis. The WIP Period
Analysis function accumulates sub-totals for the WIP for a variety of related codes, including
and not limited to, Project, Task and Employee. Analysis may be done for periods of
calendar years or months, or G/L Fiscal years or periods. The number of Chargeable and
non-chargeable Units and Amounts, Overhead Amount, Invoiced Amount, and Costs are
tallied, and presented along with assorted totals.
Once the analysis is generated for the specified type of period, the totals for any particular
period, of the range of periods analyzed, may be displayed to the grid screen, which may
then be reviewed, exported, or printed as a report.
Analysis with sub-totals by assorted periods of time, are available as follows:
by Project
by Task
by Employee
by Customer
by Department
by Location
© 2007 - 2014 by Sentinel Hill Software, all rights reserved
Professional Invoicing Menu Functions
507
by Invoice Layout Codes
by EDI Control Codes
by Projects for selected Customer, Employee, Department, Task, Project
Leader, EDI Code or Invoice Layout
by Tasks for selected Project or Employee
by Employees for selected Project or Department
by Departments for selected Project or Leader Department
For each of the given analysis types, a sub-totals may be broken down to the following
periods:
by Calendar Year for up to 9 year prior to a selected year
by Calendar Months for up to 47 months prior to a selected month
by G/L Fiscal Periods for up to 2 years worth of Fiscal Periods preceding a
selected period
by G/L Fiscal Years for up to 8 years preceding a selected Fiscal Year
For any row of data presented, (where a row represents either a Project, Task, Employee,
Customer, Department, Location, Invoice Layout, or EDI Code), a drill down function
presents a screen displaying the accumulated totals for the item, for each of the reporting
periods. Totals are displayed along with a Trend Analysis. These drill down screen data
may also be exported to a spreadsheet.
The inquiry analysis is obtained using the current WIP records that are accumulated in the P/I
system. For this analysis to be accurate, you must maintain at least the last ten years of
historic data, purging only transactions older than ten years.
As a special feature of the Series 5 reporting function, the totals may be viewed on screen,
printed or exported to an MS Excel spreadsheet.
The WIP Analysis function can be invoked from either the Trx Inquiry or the Reports dropdown menu from the P/I menu.
© 2007 - 2014 by Sentinel Hill Software, all rights reserved
508
9.8.8.1
Series 5 Professional Invoicing - User Help
WIP Analysis Preview Grid
When the WIP Analysis is generated, it's data is displayed to the screen managed using a
Series 5 grid processing screen. In effect, you can view the report without having to actually
print it. As an alternative, the data can also be easily exported to a spreadsheet for further
analysis. If so desired, the analysis may also be printed.
Operational Warning
The analysis requires the system to read through the entire P/I WIP History file. These files
may grow fairly large over time due to the number of transactions. This analysis may take
some time to generate. Should you leave this function, and return, the most recent analysis
that had been done will be displayed in the grid.
© 2007 - 2014 by Sentinel Hill Software, all rights reserved
Professional Invoicing Menu Functions
509
P/I WIP Analysis "Preview" Grid
The "Fast Buttons" frame provides the push buttons to have the analysis customized,
printed or exported:
"Fast Buttons"
To have the WIP Analysis generated and printed
Print Analysis
Report
(Re)Build Preview To have the WIP Analysis generated and displayed to
the preview grid
Print Preview
Export
To have the WIP Analysis that is currently displayed
in the grid printed
To have the WIP Analysis totals output to a
spreadsheet
Some of the special features of this "Preview" grid are as follows:
If any specific reported row is doubleclicked, then a "Trend Analysis DrillDown" window 515 is displayed. For
© 2007 - 2014 by Sentinel Hill Software, all rights reserved
510
Series 5 Professional Invoicing - User Help
the selected P/I code, each of the
totals presented in the row, will be
displayed for each period that the
analysis was generated along with
normalized Trend Percentages.
These in turn may be printed as a
report, or exported to a spreadsheet.
(Right-clicking the cell displays a popup window, from which the drill down
function may also be selected).
The analysis totals have been
accumulated for a variety of P/I codes
including Projects,Task, Employees,
Departments and others. From the
drop-down list, select the set of totals
that are to be displayed.
As well, combinations are offered
whereby only those Projects,
Employees or Tasks for a selected P/I
codes are displayed. In these cases, a
field is presented from which the
applicable P/I code may be chosen.
If listing for a particular P/I code, they
may be chosen either by entering their
Code, choosing it using the Lookup
binoculars icon, or by having the next
or previous one displayed that has
totals that were accumulated. (Click
the binocular icon with the up/down
arrow to display Totals that exist for the
prior/next occurrence of that code on
file).
The analysis totals have been
accumulated for a range of periods up
to the cutoff-period. The grid displays
only those totals for a selected period.
To choose to display the totals for one
© 2007 - 2014 by Sentinel Hill Software, all rights reserved
Professional Invoicing Menu Functions
511
of the other periods, select the desired
one from the drop-down list provided.
When displaying Projects, Task, Employees, or Departments for a selected code,
totals are displayed below the gird. These are the sum of the amounts for all the
codes being displayed, for the given selection, for the selected period.
The columns of information displayed consist of the following information, compiled from
the WIP data records:
"Analysis Columns"
Columns
Description
For Project Totals
Project
The code identifying the Project Item
Description
The description of the Project
Customer
The Customer to which the Project belongs to
Leader
The Project Leader assigned to the Project
Status
The Status of the project
For Task Totals
Task
The code identifying the Task
Description
The description of the Task
Units
The Units defining the activity associated to the Task.
(ie., Hours)
For Employee Totals
Employee
The code identifying the Employee
Name
The Employee's name
Job Class Code
The Employee's assigned Job Class code
© 2007 - 2014 by Sentinel Hill Software, all rights reserved
512
Series 5 Professional Invoicing - User Help
For other P/I Codes types)
Code
Is the code identifying the item listed
Name/
Description
Is the assigned name or description
Totals Reported (for all code types)
WIP Count
Is the # of WIP records that were processed to
accumulate the totals
Chargeable Units This is the sum of all task units recorded for Chargeable
WIP items
Chargeable
Amount
This is the sum of all originally entered extended $
amounts recorded for Chargeable WIP items
Overhead
Amount
This is the sum of all originally entered Overhead
charges $ amounts recorded for Chargeable WIP items.
(These would have been automatically computed by the
system)
Unbilled Amount This is the sum of all Chargeable WIP items that have
not yet been invoiced.
Invoiced Amount This is the sum of all Chargeable WIP items that have
been invoiced. This amount may differ from the
Chargeable Amounts totals if any charges had been
marked up or down, of if items had been written off.
NonCharge Units This is the sum of all task units recorded for NonChargeable WIP items
NonCharge
Amount
This is the sum of all originally entered extended $
amounts recorded for Non-Chargeable WIP items
Cost Amount
This is the sum of Costs that may have been recorded
with WIP items. If Costs are captured in the P/I system,
they are normally assigned by the system based on
hourly rates of employees, or unit rates of tasks
performed.
Profit Amount
This figure is the computed as the difference between
Invoiced Amount and the Cost Amount totals. (If costs
are not recorded, then this amount will be tha same as
the Invoiced Amount)
© 2007 - 2014 by Sentinel Hill Software, all rights reserved
Professional Invoicing Menu Functions
9.8.8.2
513
Build Analysis Options
When having to generate the Analysis, Print the reports, or Export the results, the following
screen is presented. It's possible to limit the amount of data that is output when generating
the report or exporting.
When building the analysis tables, columns of data may be generated for either G/L Fiscal
Periods and Years, or Calendar Months and Years. In each case, you may choose the
period, up to which, the analysis will be tallied for.
The report generated, if archived, will be catalogued with a report name of
PI_WIPANALYSES.RPT.
The Print Options tab screen will be displayed, from which you can select to direct the output
to be displayed to the screen, archived, printed, saved as an MS Word document, saved as a
PDF, and/or emailed. (Refer to the topic titled Report Generation and Printing 159 for full
details).
© 2007 - 2014 by Sentinel Hill Software, all rights reserved
514
Series 5 Professional Invoicing - User Help
When generating the report or building the analysis totals, the operator is presented with the
standard Customer Select Filters screen 151 , Project Select Filters screen 142 and WIP Select
Filters screen 147 . These allow you to specify selected or ranges of WIP Items, Projects,
Project Locations, Project Departments, Customers, Customer Types, Sales
Representatives, and/or only those customers and/or projects satisfying a variety of filter
criteria.
Build/Report Options Screen - Field Definitions
Analysis of WIP Activity – for Period Type
drop-down list
Select whether totals are computed for given
Years, Months, or Periods based either on
Calendar of G/L Fiscal Periods.
Analysis of WIP Activity – for Period
drop-down list
Depending on the type of Period chosen you may
be able to select the ending Period which is to be
analyzed. In each case, a pre-determined number
of periods prior to the one selected will have totals
also accumulated.
Period Type
Calendar Months
Calendar Years
Fiscal Periods
Fiscal Years
# of Periods Reported
48
10
2 Fiscal Years worth
8
Reporting Sets of Data
check-boxes
When the analysis is executed, tables are built for a number of different codes and
combinations of Projects, Tasks, Employees, Customers, Departments, Invoice Layouts
and EDI Codes. When the function to have data output to a report or exported is
selected, you can select the particular set of results that is to be output. (Selecting all of
them may generated a length report, or excessive amount of data to a
spreadsheet)
© 2007 - 2014 by Sentinel Hill Software, all rights reserved
Professional Invoicing Menu Functions
9.8.8.3
515
Period Trend Analysis Drill Down
From the WIP Analysis preview screen, the totals displayed for each Project, Task,
Employee, Customer, Department, Location, Invoice Layout or EDI Code is that for a single
selected period. If you wish to display the totals for a particular item showing each period
analyzed, then double-click the row of the item of interest.
A screen will be displayed that shows the totals for each period, along with a Trend
Percentage value for each period.
Trend Percentages, or index numbers, are useful in comparing data from sales over a
number of years, months, or fiscal periods., since trend percentages emphasize changes
that have occurred during the period. They are computed as follows:
1. A base period is selected, and each item amount on the base year column is assigned
a weight of 100%
2. Then each item from the analysis for the periods after, or before, the base period is
expressed as a percentage of its base period amount. To determine these
percentages, the item amounts in the other periods before or after the base period are
divided by the amount of the item in the base period.
P/I WIP Analysis – Period Comparative Trend Screen
The push buttons to have the detail printed or exported:
Push Button functions
Print
Export
Reserved for a future enhancement
To have the totals for the selected item output to a
spreadsheet
© 2007 - 2014 by Sentinel Hill Software, all rights reserved
516
Series 5 Professional Invoicing - User Help
Drill-Down Period Comparative Select Fields Definitions
Trends Computed Relative To
drop-down list
Select the period that is to be used as the
"Base Period". Each total amount displayed
for the base period column is assigned a
weight of 100%. Amounts in other columns
are then used to compute a percentage
relative to the amount associated to the "Base
Period".
9.8.8.4
Exported Data Layouts
The selected period's totals for each of the Project, Task, Employee, Customer, Department,
Location, Invoice Layout or EDI Code displayed may be exported to an Excel spreadsheet or
tab-delimited file. As well, when a given Code has had it's Comparative Trend drill-down
period totals displayed, these may also be exported.
The Export Options tab screen will be displayed, from which you can select to direct the
output to an MS Excel spreadsheet, CSV text file, or a Tab-delimited text file. (Refer to the
topic titled Data Export Functions 133 for full details).
P/I WIP Analysis Spreadsheet Export Data Formats
If the option to Export the analysis totals is selected, the following fields are output to an Excel
© 2007 - 2014 by Sentinel Hill Software, all rights reserved
Professional Invoicing Menu Functions
517
spreadsheet, a tab-delimited text file, or a CSV text file. The output file, by default, is named
WIP_Analysis.XLS. Depending on the item being displayed, data rows will represent either
Projects, Tasks, Employees, Customers, Departments, Locations, Invoice Layouts or EDI
Codes.
For a the WIP Analysis totals, the following fields are output:
Column #
Excel Column
Field
1
A
Project Code
X(6)
2
B
Description
X(30)
3
C
Customer Code
X(6)
4
D
Project Leader
X(6)
5
E
Status
X(9)
1
A
Task Code
X(8)
2
B
Description
X(30)
3
C
Units
X(12)
4
D
blank
5
E
blank
1
A
Employee Code
X(6)
2
B
Name
X(30)
3
C
Job Class Code
X(6)
4
D
blank
5
E
blank
1
A
Customer Code
X(6)
2
B
Company Name
X(30)
3
C
City - State/Prov
X(30)
4
D
blank
5
E
blank
1
A
Department Code
X(2)
2
B
Description
X(30)
3
C
blank
4
D
blank
5
E
blank
© 2007 - 2014 by Sentinel Hill Software, all rights reserved
Format
518
Series 5 Professional Invoicing - User Help
1
A
Location Code
X(6)
2
B
Description
X(30)
3
C
blank
4
D
blank
5
E
blank
1
A
Invoice Layout Code
9(3)
2
B
Description
X(30)
3
C
Invoice Grouping
X(30)
4
D
blank
5
E
blank
1
A
EDI Control Code
X(6)
2
B
Description
X(30)
3
C
EDI Type
X(30)
4
D
blank
5
E
blank
6
F
# of WIP Items
9,999,999
7
G
Chargeable # of Units
99,999,999
8
H
Chargeable Amount $
-999,999,999.99
9.
I
Overhead Amount $
-999,999,999.99
10
J
Unbilled Amount $
-999,999,999.99
11
K
Invoiced Amount $
-999,999,999.99
12
L
Non-Chargeable # of Units
99,999,999
13
M
Non-Chargeable Amount $
-999,999,999.99
14
N
Cost $
-999,999,999.99
15
O
Profit $
-999,999,999.99
For an item's Comparative Trend totals is exported from the Drill-Down screens, the following
fields are output. The output file, by default, is named PI_WIPAnalysis_SubQuery.XLS.
Column #
Excel Column
Field
Format
© 2007 - 2014 by Sentinel Hill Software, all rights reserved
Professional Invoicing Menu Functions
9.8.9
1
A
Type of Analysis Total
X(40)
2
B
Period 1 Total
-99,999,999.99
3
C
Period 2 Total
-99,999,999.99
...
...
.....
.....
...
...
.....
.....
N
xx
Period N Total, (n=8, 10, or 24)
-99,999,999.99
N+1
xx+1
blank
N+2
xx+2
blank
N+3
xx+3
Period 1 Trend %
X(40)
N+3
xx+4
Period 2 Trend %
-99,999
...
...
.....
.....
...
...
.....
.....
...
yy
Period N Trend, (n=8, 10, or 48) -99,999
519
WIP Revenue Analysis Report
The Professional Invoicing system records all chargeable and non-chargeable employee
activity, and/or external system generated charges to the Work-In-Progress, WIP, file. These
records represent a history of all activity, and are available for analysis. Each WIP item that is
invoiced is assigned a G/L account representing the P/L Income to which the revenue is to be
assigned. The WIP Revenue Analysis function accumulates sub-totals for each assigned G/
L Account for a variety of related codes, including and not limited to, Project, Task and
Employee. Analysis may be done for periods of calendar years or months. The number of
Chargeable and non-chargeable Units and Amounts, Overhead Amount, Invoiced Amount,
and Write-Off Amounts are tallied, and presented along with assorted totals.
Once the analysis is generated for the specified type of period, the totals for the date range
analyzed, may be displayed to the grid screen with totals, which may then be reviewed,
exported, or printed as a report.
Analysis with sub-totals are available as follows:
by G/L Account
by Project for select G/L Account
by Customer for selected G/L Account
© 2007 - 2014 by Sentinel Hill Software, all rights reserved
520
Series 5 Professional Invoicing - User Help
by Task for selected G/L Account
by Employee for selected G/L Account
by Invoice Group for selected G/L Account
by EDI Control Code for selected G/L Account
by Invoice Layout Codes for selected G/L Account
The inquiry analysis is obtained using the current WIP records that are accumulated in the P/I
system. For this analysis to be accurate, you must maintain at least the last ten years of
historic data, purging only transactions older than ten years.
As a special feature of the Series 5 reporting function, the totals may be viewed on screen,
printed or exported to an MS Excel spreadsheet.
The WIP Revenue Accounts Analysis function can be invoked from either the Trx Inquiry or
the Reports drop-down menu from the P/I menu.
9.8.9.1
WIP Revenue Analysis Preview Grid
When the WIP Revenue Accounts Analysis is generated, it's data is displayed to the screen
managed using a Series 5 grid processing screen. In effect, you can view the report without
having to actually print it. As an alternative, the data can also be easily exported to a
spreadsheet for further analysis. If so desired, the analysis may also be printed.
Operational Warning
The analysis requires the system to read through the entire P/I WIP History file. These files
may grow fairly large over time due to the number of transactions. This analysis may take
some time to generate. Should you leave this function, and return, the most recent analysis
that had been done will be displayed in the grid.
© 2007 - 2014 by Sentinel Hill Software, all rights reserved
Professional Invoicing Menu Functions
521
P/I WIP Revenue Accounts Analysis "Preview" Grid
The "Fast Buttons" frame provides the push buttons to have the analysis customized,
printed or exported:
"Fast Buttons"
Print Analysis To have the Revenue Analysis generated and printed
Report
(Re)Build Preview To have the Revenue Analysis generated and displayed to
the preview grid
Print Preview
To have the Revenue Analysis that is currently displayed in
the grid printed
Export Totals
To have the Revenue Analysis totals output to a
spreadsheet
Export Detail
To have the detail contributing to the Analysis totals output to
a spreadsheet
Some of the special features of this "Preview" grid are as follows:
The analysis totals have been
© 2007 - 2014 by Sentinel Hill Software, all rights reserved
522
Series 5 Professional Invoicing - User Help
accumulated for a each G/L Revenue
Account that have been assigned to
WIP items. From the drop-down list,
select the set of totals that are to be
displayed.
As well, combinations are offered
whereby only those Projects,
Customers, Tasks, Employees, Invoice
Groups, EDI Codes or Invoice Layouts
for a selected G/L Account are
displayed. In these cases, a field is
presented from which the desired G/L
Account may be chosen.
If listing for a particular G/L Revenue
Account, they may be chosen either by
entering their account #, choosing it
using the Lookup binoculars icon, or by
having the next or previous one
displayed that has totals that were
accumulated. (Click the binocular icon
with the up/down arrow to display Totals
that exist for the prior/next occurrence
of that code on file).
When displaying analysis totals totals for each account, the data-set totals are
displayed below the gird. These are the sum of the amounts for all the codes being
displayed, or for the given account that has been selected.
The columns of information displayed consist of the following information, compiled from
the WIP data records:
"Analysis Columns"
Columns
Description
For Project Totals
Project Code
The code identifying the Project Item
Description
The description of the Project
Customer
The Customer to which the Project belongs to
For Customer Totals
© 2007 - 2014 by Sentinel Hill Software, all rights reserved
Professional Invoicing Menu Functions
Customer Code
The code assigned to the Customer
Compay Name
The company name
City - State/
Province
The city and state or province
523
For Task Totals
Task
The code identifying the Task
Description
The description of the Task
Units
The Units defining the activity associated to the Task.
(ie., Hours)
For Employee Totals
Employee
The code identifying the Employee
Name
The Employee's name
Job Class Code
The Employee's assigned Job Class code
For other P/I Codes types)
Code
Is the code identifying the item listed
Name/
Description
Is the assigned name or description
Totals Reported (for all code types)
WIP Count
Is the # of WIP records that were processed to
accumulate the totals
Chargeable Units This is the sum of all task units recorded for Chargeable
WIP items
Chargeable
Amount
This is the sum of all originally entered extended $
amounts recorded for Chargeable WIP items
Overhead
Amount
This is the sum of all originally entered Overhead
charges $ amounts recorded for Chargeable WIP items.
(These would have been automatically computed by the
system)
Invoiced Amount This is the sum of all Chargeable WIP items that have
been invoiced. This amount may differ from the
Chargeable Amounts totals if any charges had been
marked up or down, or if items had been written off.
Markup Amount
This is the sum of all Invoiced WIP items' marked up
amounts. (ie., the sum of each WIP Invoiced Amount
less the original Chargeable Amount)
Discount Amount This is the sum of all Invoiced WIP items' discounted
amounts. (ie., the sum of each WIP original Chargeable
© 2007 - 2014 by Sentinel Hill Software, all rights reserved
524
Series 5 Professional Invoicing - User Help
Amount less the Invoiced Amount)
Write-Off Amount This is the sum of all originally entered extended $
amounts recorded for Chargeable WIP items that had
been Written-Off
Unbilled Amount This is the sum of all Chargeable WIP items that have
not yet been invoiced.
NonCharge Units This is the sum of all task units recorded for NonChargeable WIP items
NonCharge
Amount
9.8.9.2
This is the sum of all originally entered extended $
amounts recorded for Non-Chargeable WIP items
Revenue Analysis Build Options
When having to generate the Revenue Account Analysis, Print the reports, or Export the
results, the following screen is presented. It's possible to limit the amount of data that is
output when generating the report or exporting.
When building the analysis tables, columns of data may be generated for either Calendar
Months and Years. In each case, you may choose the period, up to which, the analysis will
be tallied for.
© 2007 - 2014 by Sentinel Hill Software, all rights reserved
Professional Invoicing Menu Functions
525
The report generated, if archived, will be catalogued with a report name of
PI_WIPREVENUE.RPT.
The Print Options tab screen will be displayed, from which you can select to direct the output
to be displayed to the screen, archived, printed, saved as an MS Word document, saved as a
PDF, and/or emailed. (Refer to the topic titled Report Generation and Printing 159 for full
details).
When generating the report or building the analysis totals, the operator is presented with the
standard Customer Select Filters screen 151 , Project Select Filters screen 142 and WIP Select
Filters screen 147 . These allow you to specify selected or ranges of WIP Items, Projects,
Project Locations, Project Departments, Customers, Customer Types, Sales
Representatives, and/or only those customers and/or projects satisfying a variety of filter
criteria.
Build/Report Options Screen - Field Definitions
Analysis of WIP Revenue – for Period Type
Select whether totals are computed for a given
Year or Month.
© 2007 - 2014 by Sentinel Hill Software, all rights reserved
drop-down list
526
Series 5 Professional Invoicing - User Help
Analysis of WIP Revenue – for Period
drop-down list
Depending on the type of Period chosen you will be
able to select the year or month which is to be
analyzed.
Reporting Sets of Data
check-boxes
When the analysis is executed, tables are built for a number of different codes and
combinations of Projects, Tasks, Employees, Customers, Invoice Groups, Invoice
Layouts and EDI Codes. When the function to have data output to a report or exported is
selected, you can select the particular set of results that is to be output. (Selecting all of
them may generated a length report, or excessive amount of data to a
spreadsheet)
9.8.9.3
Exported Data Layout
The selected period's totals for each of the G/L Account, Project, Task, Employee,
Customer, Invoice Group, Invoice Layout or EDI Code displayed may be exported to an Excel
spreadsheet or tab-delimited file. As well, the detail contributing to the totals may also be
exported.
The Export Options tab screen will be displayed, from which you can select to direct the
output to an MS Excel spreadsheet, CSV text file, or a Tab-delimited text file. (Refer to the
topic titled Data Export Functions 133 for full details).
P/I WIP Revenue Analysis "Totals" Export Data Formats
If the option to Export the analysis totals is selected, the following fields are output to an Excel
spreadsheet, a tab-delimited text file, or a CSV text file. The output file, by default, is named
WIP_Revenue_Totals.XLS. Depending on the item being displayed, data rows will
represent either G/L Accounts, Projects, Tasks, Employees, Customers, Invoice Groups,
Invoice Layouts or EDI Codes.
© 2007 - 2014 by Sentinel Hill Software, all rights reserved
Professional Invoicing Menu Functions
For a the WIP Revenue Analysis totals, the following fields are output:
Column #
Excel Column
Field
1
A
G/L Account Main
9999-9999
2
B
G/L Account Profit Center
9(5)
3
C
Description
X(30)
4
D
n/a
5
E
n/a
6
F
n/a
1
A
G/L Account Main
9999-9999
2
B
G/L Account Profit Center
9(5)
3
C
Description
X(30)
4
D
Project Code
X(6)
5
E
Description
X(30)
6
F
Customer Code
X(6)
1
A
G/L Account Main
9999-9999
2
B
G/L Account Profit Center
9(5)
3
C
Description
X(30)
4
D
Customer Code
X(6)
5
E
Company Name
X(30)
6
F
City - State/Province
X(30)
1
A
G/L Account Main
9999-9999
2
B
G/L Account Profit Center
9(5)
3
C
Description
X(30)
4
D
Task Code
X(10)
5
E
Description
X(30)
6
F
"S" or "D" (Service/
Disbursement)
X(1)
1
A
G/L Account Main
9999-9999
2
B
G/L Account Profit Center
9(5)
3
C
Description
X(30)
© 2007 - 2014 by Sentinel Hill Software, all rights reserved
Format
527
528
Series 5 Professional Invoicing - User Help
4
D
Employee Code
X(6)
5
E
Name
X(24)
6
F
Job Class
X(6)
1
A
G/L Account Main
9999-9999
2
B
G/L Account Profit Center
9(5)
3
C
Description
X(30)
4
D
Invoice Group Code
X(6)
5
E
Description
X(24)
6
F
Type
X(30)
1
A
G/L Account Main
9999-9999
2
B
G/L Account Profit Center
9(5)
3
C
Description
X(30)
4
D
Invoice Layout Code
9(3)
5
E
Description
X(24)
6
F
Type
X(30)
1
A
G/L Account Main
9999-9999
2
B
G/L Account Profit Center
9(5)
3
C
Description
X(30)
4
D
EDI Control Code
X(6)
5
E
Description
X(30)
6
F
EDI Type
X(30)
6
G
# of WIP Items
9,999,999
7
H
Chargeable # of Units
99,999,999
8
I
Chargeable Amount $
-999,999,999.99
9.
J
Overhead Amount $
-999,999,999.99
10
K
Invoiced Amount $
-999,999,999.99
11
L
Mark-Up Amount $
-999,999,999.99
12
M
Discount Amount $
-999,999,999.99
13
N
$Unbilled Amount $
99,999,999
14
O
Write-Off Amount $
-999,999,999.99
© 2007 - 2014 by Sentinel Hill Software, all rights reserved
Professional Invoicing Menu Functions
15
P
Non-Chargeable # of Units
-999,999,999.99
16
Q
Non-Chargeable Amount $
-999,999,999.99
529
For the WIP detail contributing to the totals that is exported, the following fields are output.
The output file, by default, is named WIP_Revenue_Detail.XLS.
Column #
Excel Column
Field
Format
1
A
GL Account # Main
9999-9999
2
B
GL Account Profit Center
9(5)
3
C
Description
X(30)
4
D
WIP Ledger Date
YYYYMMDD
5
E
Project Code
X(6)
6
F
Customer Code
X(6)
7
G
Task Code
X(10)
8
H
# of Units
9
I
Unit Rate
10
J
Total $ Amount
11
K
Invoice Number
9(8)
12
L
Invoice Date
YYYYMMDD
13
M
Recap Order Number
9(8)
14
N
Discount $ Amount
-99,999,999.99
15
O
Write-Off $ Amount
-99,999,999.99
16
P
Make-Up $ Amount
-99,999,999.99
99,999,999
999,999.99
-99,999,999.99
9.8.10 Historic Invoices Register Report
The Historic Invoices Register report provides a simple list of all the Invoices that were
generated within a specific range of Dates and/or Invoice Numbers. You may choose to have
the items listed sorted by Invoice #, Project Code, or Customer Code.
© 2007 - 2014 by Sentinel Hill Software, all rights reserved
530
Series 5 Professional Invoicing - User Help
From the P/I Main menu, select Historic Invoices Register from the Reports drop-down
menu; or select Invoice History Inquiry from the Trx Inquiry drop-down menu, then click
Print Invoice Register from that screen's File drop-down menu.
Archived Invoices or Historic Invoices
When Invoices are generated, printed and posted, they are copied to the Historic Invoices file. Over
time, if the Invoice History files become exceedingly large and unruly, they may be "Archived". This
process basically moves Invoices, and their associated data, for specified dates, into their
corresponding "Archive" files. Invoices are archived using the Archive Historic Data function 205
provided by the P/I Menu's File drop-down menu.
This report lists those invoices that are found in the Invoice History file. An Archived Invoice History
Register may be printed from the Invoice History Inquiry function 246 by selecting to Show Archived
Invoice data records, and then selecting to Print Invoice Register from that screen's File drop-down
menu
Historic Invoices Register Filters Screen
The following screen is displayed for entry of a number of different options and filters that may
be set to limit the records that are output to the report.
© 2007 - 2014 by Sentinel Hill Software, all rights reserved
Professional Invoicing Menu Functions
531
When selected, the operator is presented with the standard Project Select Filters 142 screen
and the Customer Select Filters 151 screen. These allow you to specify selected or ranges of
Projects, Project Locations, Project Departments, Customers, Customer Types, Sales
Representatives, and/or only those customers and/or projects satisfying a variety of filter
criteria.
The report generated, if archived, will be catalogued with a report name of
PINVHISTORY.RPT.
The Print Options tab screen will be displayed, from which you can select to direct the output
to be displayed to the screen, archived, printed, saved as an MS Word document, saved as a
PDF, and/or emailed. (Refer to the topic titled Report Generation and Printing 159 for full
details).
Historic Invoices Register Filters Screen - Field Definition
Historic Invoice Number(s)
radio-buttons and 9(6)
To select All Invoices regardless of their Invoice numbers; or for only those that fall within
a range of numbers. If a range is selected, enter the starting/ending Invoice numbers.
© 2007 - 2014 by Sentinel Hill Software, all rights reserved
532
Series 5 Professional Invoicing - User Help
Invoices Dated
radio-buttons and
(mmddyy)
Select to have Invoices selected regardless of their dates; or only those for a given date
range. If an inclusive range is selected, enter the starting/ending dates. Click the
calendar icon for a common set of ranges to be presented.
Include only Invoices — for Invoice Layout Code
9(3)
To have only those Invoices that were generated based on a particular Invoice Layout
Code. (Leave the field blank if it is not to be considered as a selection filter).
Invoices Sort
drop-down list
To have the Invoices listed sorted by one of the
available fields.
9.9
Master Code Maintenance Functions
The topics in this chapter describe functions and procedures that are a available under the
Codes Maintenance drop down menu on the Professional Invoicing menu. These
menu items are used to maintain the Master Codes used in the P/I. In particular, the function
to Maintain your Projects, Employees and Task are found here.
These functions are available from the P/I Menu Bar as shown:
© 2007 - 2014 by Sentinel Hill Software, all rights reserved
Professional Invoicing Menu Functions
9.9.1
533
Project Code Maintenance
All time charges and disbursements entered into Series 5 Professional Invoicing system must
be assigned to a Project. Invoices are generated for each Project in the system. You can
have a number of Projects that belong to a single customer. The Client Code entered must
exist as a Customer in the Accounts Receivable system, and is used for billing purposes. All
invoices are eventually moved to the Accounts Receivable system.
A Project needs to be defined as being either a chargeable or a nonchargeable project.
However, it is possible to enter non-chargeable time against a chargeable project. The
opposite, however, is not true. If you enter chargeable time against a non-chargeable project,
it will NEVER be invoiced. A project is defined chargeable or nonchargeable by setting one of
it's billing properties.
© 2007 - 2014 by Sentinel Hill Software, all rights reserved
534
Series 5 Professional Invoicing - User Help
When developing a new Project, keep in mind that the end result is the Invoice. Basically, one
or more invoices are generated for a given Project. In the cases where multiple Invoices are
generated, these are based all charges having some type of Billing Code. Invoices will then
be generated for each Billing Code for each Project. Work In Progress activity is recorded
against a Project with a variety of different Reference fields. These fields might represent a
Job Number, a Contract Number.
To enhance the process of adding new Projects, a Default Project Templates may be
created. Up to 999 templates may be defined. For each template, you may assign default
values to those fields used for billing. When adding a new Project, the operator can then
select one of the pre-defined templates, and need only to enter the Project Code, Description
and related identification information.
The following functions are managed:
Projects are added, deleted and modified
A Project listing may be generated and printed
Accounts may be imported/exported from/to spreadsheets
Projects may be imported/exported from/to spreadsheets
Setup Advice
To provide a simple interface from other charge generating systems, the ability to add or update
Project information from spreadsheet files exist. This feature may be used initially to load your
Project information from a spreadsheet; or it may be used to update Project information on a
regular basis.
When adding a new Project, or editing an existing one, there are a number of different tabbed
screens that are required. They are all important, but two of these are significant, and care
must be taken with the settings that are chosen. One of these is for the general properties, or
description, of the Project; and the other is to define the billing options to be applied when
generating Invoices. To summarize these screens:
General Description and Properties
Notes that might be used to record billing or contract information
Billing details
G/L Accounts that are used for Revenue, or Costing
Deposits that might be made prior to a Project being started can be entered
For Projects that need any revenue to be Accrued, a tabbed screen is provided
If Cost Plus Invoicing is required, you can set different percentages for each Project,
(overriding the default)
If the Project is billed using Electronic Invoices rather than paper, the type of EDI options
are set
© 2007 - 2014 by Sentinel Hill Software, all rights reserved
Professional Invoicing Menu Functions
9.9.1.1
535
P/I Projects Maintenance Grid Screen
P/I Projects are maintained using a Series 5 grid processing screen.
P/I Projects Maintenance Grid
"Fast Buttons"
New
Add a new Project
Modify Modify the Project
highlighted in the grid
Delete
Print
Delete the Project
highlighted i the grid
Generate a report listing
the P/I Projects
Import Imports Projects from a
spreadsheet
Export Export selected Projects
to a spreadsheet
Edit an existing Project by double-clicking it's associated row. Standard Series 5 grid
controls apply.
Deleting Projects
When a Project is deleted, any Budgets that had been set up for the Project
IS NOT DELETED. You must delete these using the Project Budget
Maintenance function.
9.9.1.2
Project Description Tab Screen
P/I Project - Descriptive Properties Tab Screen
The Project's Description screen is used to define the Project Code, the description,
Customer Code, along with contact information, and some keywords that might be used to
search for, or catalogue the project.
In particular, a given Project can be defined as being a particular type. It's important how this
property is assigned.
© 2007 - 2014 by Sentinel Hill Software, all rights reserved
536
Series 5 Professional Invoicing - User Help
Project Type
Description
Regular
Is a normal project
Master
Is a project for which may have sub-ordinate projects
assigned to it. A Master Project can group subordinate
Projects for reporting purposes in selected reporting
applications. Time sheet information would not be entered for
a Master Project. There is no capability to group subordinate
projects charges under a Master Project's Invoice.
Sub-Ordinate
These project belong to a Master Project.
Multi-Client
Multi-Client projects are specifically set up for legal firms.
Work-in-progress recorded to a multi-client project will
produce multiple invoices for multiple customers.
Some points to note when setting up a project:
The Client Code must be an Accounts Receivable Customer code
When selecting the Project Leader, the Location associated to the Project Leader
employee properties, becomes the Location for the Project
The Keywords may be used as selection filters in all P/I Project oriented reporting
applications, (or in 3rd party report writer utilities)
Setup Tip
When adding a new Project, there certainly are a lot of different fields that have to be entered.
This process can be greatly simplified by using one of the pre-defined Project Templates. (A
Project Template, that you must first create, has all the significant fields relating to billing already
defined). You might have a different Template defined for each of the major types of Invoices
that are produced; or one for a large customer that has many branches, or Projects that need to
be set up.
The descriptive properties associated to each P/I Project are maintained by the following
screen:
© 2007 - 2014 by Sentinel Hill Software, all rights reserved
Professional Invoicing Menu Functions
537
P/I Project Description Tab Screen - Field Definitions
Project Code
X(6)
This is the code that is used to identify the Project in the P/I system. This is the code that
is entered and carried in the assorted Series 5 transactions. (The code is alphanumeric,
so if a numeric code is used, they are NOT right justified). When adding a new project, if
the F1 function key is struck, the next sequential numeric Project Number from the P/I
Control properties, will automatically be assigned.
Description
X(40)
The description is displayed for verification, and in the LOV when invoked.
Client Code
X(6)
The project is tied to the Accounts Receivable system by way of the Client Code. Client
Codes are defined in the PI/ system, but are actually just Accounts Receivable Customer
codes.
© 2007 - 2014 by Sentinel Hill Software, all rights reserved
538
Series 5 Professional Invoicing - User Help
Contact
X(30)
This will be the name of the person, who for the customer, is the primary contact for this
project. This field is used as the Attention-To name on the invoices that are generated for
this project.
Phone
X(12)
This field is for information purposes. It is the contacts phone number.
Project Type
radio-buttons
Defines the type of Project.
Regular
Master
Sub-Ordinate
Multi-Client
Master Project
Is a typical project. Is the default
Is the "Father" project to a number of Sub-Ordinate projects.
Master Projects don't record any WIP charges.
The Project belongs to a Master Project
The Project records charges for a number of different Customers
X(6)
When the project is defined as a Sub-Ordinate project, then a Master Project must be
identified.
Partner-In-Charge
X(6)
The Partner-In-Charge is one of the Employee codes defined in the P/I system. It is
offered as a selection filter in all P/I Project oriented reporting applications and as a code
with which projects may be grouped by. When Work-In-Progress charges are entered for
this project, the Partner-in-Charge code is recorded with it.
As well, Project Locations and/or Departments may be used as a selection filter. The
Location and/or Department may be defined either by the Partner, or by the Project
Leader.
Project Leader
X(6)
The Project Leader is one of the Employee codes defined in the P/I system. It is offered
as a selection filter in all P/I Project oriented reporting applications and as a code with
which projects may be grouped by. When Work-In-Progress charges are entered for this
project, the Project Leader code is recorded with it.
As well, Project Locations and/or Departments may be used as a selection filter. The
Location and/or Department may be defined either by the Partner, or by the Project
Leader.
© 2007 - 2014 by Sentinel Hill Software, all rights reserved
Professional Invoicing Menu Functions
Project Period From/To
539
(mmddyy)
This is the starting and ending dates of the project. These are used for information
purposes only.
Keywords 1, 2, 3 and 4
X(10)
These fields are used for information purposes only. They are used as selection filters in
any report offering the Project Select filters screen. They may be useful for categorizing
your projects, and may be used by any 3rd party report report writer utilities as filters.
9.9.1.3
Project Notes Tab Screen
For each Project, you may record some relevant notes. This might be information about the
billing arrangements, about the contract, or used tor record milestones for review. This
information may be viewed from the WIP Inquiry application or may be printed on the
PreBilling report.
P/I Project - Notes Tab Screen
The notes for each P/I Project are maintained by the following screen:
© 2007 - 2014 by Sentinel Hill Software, all rights reserved
540
Series 5 Professional Invoicing - User Help
P/I Project Notes Tab Screen - Field Definitions
Project Notes ?
check-box
To enable the entry of notes, the check box must be checked.
Text Box
X(1000)
Enter up to 1000 characters of text. Lines will automatically wrap. Separate paragraphs
may be separated by striking the Enter key.
9.9.1.4
Project Billing Tab Screen
The Project Billing screen provides those fields that are used to define how the project is to be
billed. It is probably the most important set of properties that can be recorded for the project.
In particular the following fields are defined here:
The Billing Status indicates whether the project is Active, On-Hold, or Closed
© 2007 - 2014 by Sentinel Hill Software, all rights reserved
Professional Invoicing Menu Functions
541
A flag to indicate whether the project is billable or non-billable
Default Chargeable and non-Chargeable rates (which may not be applicable, depending
on the rules for determining rates)
The Rate Class Code is important if you intend to the the Series 5 P/I Rate Tables
The Invoice Layout Code. This is probably the most significant field used to determine
the type of Invoice that is generated
P/I Project - Billing Properties Tab Screen
The billing properties associated to each P/I Project are maintained by the following screen:
Typically Chargeable or Non-Chargeable
It is very important to set this check-box field if the Project is a Chargeable Project.
Invoices will not be generated for non-Chargeable projects.
© 2007 - 2014 by Sentinel Hill Software, all rights reserved
542
Series 5 Professional Invoicing - User Help
P/I Billing Properties Tab Screen - Field Definitions
Billing Status
drop-list
This Billing Status will determine the state of the project.
Projects on Hold or Proposed will not have any items Invoiced.
Time charges may still be entered though
Inter-Departmental projects will be treated as a normal project
except that any Invoice generated will not be posted as a Sale to
the Accounts Receivable system. It will still be necessary to
have a Customer Record defined in the A/R to provide
compatibility. Group
A Closed Project may not have any time charges entered
against it.
Has Typically Chargeable WIP
check-box
This field dictates whether the project is a Chargeable of Non-Chargeable project. Only
Chargeable project have invoice generated. Non-Chargeable projects might be used to
record employee time that is never going to be invoiced.
Budgets
drop-list
Budgets may be defined for the Project. These are
established using the Project Budgets Maintenance
function 561 . Multiple types of Budgets may be set up for
each Project. If Budgets are used for this project, then
select As Defined, otherwise those operations that test
for and update the associated "actual" figures will NOT
work as expected.
If budgets are to be set up, separate amounts may be
specified for # of WIP Units, WIP Revenue, WIP Costs,
Cost-Plus, Disbursements Revenue and Disbursements
Costs.
If budgets are to be maintained by Invoice Group, a budget record will exist for each of
WIP, disbursement, and cost plus items so that each can be maintained separately. The
Invoice Group used is determined from the Task record. There is no Invoice Group
associated to Disbursements, so the Disbursement Code is used,
If budgets are to be maintained by Budget Group, categories of budgets are defined at the
Task or Employee level. Each Task record will indicate whether the budget code in the
Task record or the Employee record will be used. Disbursements will use the budget
code defined by the Disbursement code record.
Default Chargeable / Non-Chargeable $ Rates
9,999.99© 2007 - 2014 by Sentinel Hill Software, all rights reserved
Professional Invoicing Menu Functions
543
The P/I system provides for a very flexible system for determining the unit rate for activity,
whether chargeable or non-chargeable. If a standard pair or rates is to be assigned to the
project, then they are entered in these fields. The Chargeable rate will be used as a
default for chargeable WIP items. The non-Chargeable rate for non-chargeable WIP
items.
Rate Class Code
X(6)
Within the P/I system you may create Special Rates that are assigned using a variety of
different rules. The P/I system allows you to create different sets of the Special Rates.
Each set corresponds to a specific Rate Class Code. If this Project is to be used to
determine it's rates using the Special Rates tables, enter the applicable Rate Class Code.
User Code - Billing Type and Rate Type
X(4) and X(1)
These field are offered for information purposes. You may use them as you wish. They
are offered as filters in a variety of different reporting functions that are project oriented.
PO Number
X(15)
Record the PO number that was issued for this project by the Customer. It appears on a
number of different reports, and is printed on any invoices that are generated for this
project.
Invoice Cycle Code
X(1)
When Invoices are generated, you may specify a specific Invoice Cycle Code so that only
those projects whose WIP Invoice Cycle Code matches, will have an invoice cut. This is
a one character code that you assign. You might have a different code for every week, of
for different types of Customers, or for different types of Invoices. You may have some
projects that have a Cycle Code, and others that have no code at all.
Invoice Layout Code
9(3)
P/I Invoice Layouts are used to define special invoice formats, WIP item sorting and
grouping options, and whether EDI Invoice can be generated. If this project needs to have
it's charges invoiced in a particular manner, select the desired Invoice Layout code. By
choosing a particular Layout, when invoices are generated the layout will also determine
whether multiple invoices are produced for the project. If no custom layout is required, or
if multiple invoices per Project is not wanted, leave this field as ZERO.
WIP Items Grouped by Invoice Section
check-box
This setting is used to define the format of the default Invoice that is generated for this
Project, (when no Invoice Layout is specified). If Tasks in the P/I system are assigned
© 2007 - 2014 by Sentinel Hill Software, all rights reserved
544
Series 5 Professional Invoicing - User Help
to Invoice Groups, and this check-box is checked, then items for this project will be
grouped by their Tasks Invoice Group codes.
Level of Detail Printed - WIP Items
drop-list
This field is used to define how the Work-In-Progress
charges are printed on the system’s default Invoice that
is generated for this project, (when no Invoice Layout
is specified). You may select to have the WIP charges
listed:
In Detail
As totals sub-totalledin Summary by Invoice Group
As totals sub-totalled in Section Summary by
Invoice Section
Level of Detail Printed - Disbursements
drop-list
This field is used to define the format of the
Disbursement charges printed on the system’s default
Invoice that is generated for this project. You may select
to have the charges listed:
In Detail
As totals sub-totalled in Disbursement Code
Invoice Titles
3 lines of X(35)
These three strings are available to be printed as a title at the start of the Work-InProgress charges on the invoice generated for this project. If an Invoice Layout is used
for this Project, then it is possible that all lines, or only the first line or none of the lines will
be printed.
Compute Overhead Amounts on WIP Charges ?
check-box
A standard Overhead Amount may be automatically computed for all projects and
included in all totals. Setting this field offers a way of turning on or off this feature for this
project. The Overhead Amount is computed when the Time-Sheet entries are entered
into the system, for Chargeable projects only. The rate is determined from the Task
Code record. Overheads may also be adjusted or suppressed by any of the "Special
Rate" that are set up. Overhead amounts are not shown separately on the invoice, but
are reported in the items and totals printed. If the system computes an overhead amount,
the rate printed on a detailed invoice will be adjusted to include the overhead amount.
Completion Holdbacks ?
check-box
For this project, you may wish to have a Holdback amount automatically computed. Enter
© 2007 - 2014 by Sentinel Hill Software, all rights reserved
Professional Invoicing Menu Functions
545
the percentage of each invoice generated that will be withheld for this project. The
amount held will be recorded as a type [H] Work-in-Progress Record. These holdback
charges will remain on the system until they are selected to be billed from the WIP Billing
and Invoicing application.
Holdback %
9,999.99 %
This is the Holdback % for this project.
Have Disbursement Charges Marked Up ?
check-box
If the Disbursement charges for this project are to be marked up, set the check-box. You
will be able to enter the Markup % applicable to this project. Note that when disbursement
charges are entered, you will be able to override this selection.
Markup %
999.99- %
A Markup % rate may be assigned to each Project and to each Disbursement type. If this
field is left as zero, then the % markup will be determined from the corresponding
Disbursement Code record. The % markup rate defined for the Project, if present, will
always be used, overriding the % rate defined by the Disbursement Code.
9.9.1.5
Project G/L Accounts Tab Screen
The Series 5 P/I system generates G/L Distributions, as required, basically for all Costs and
Revenues that are recorded against a particular account. Depending on how the system is
configured and how it is used, different distributions may be written, and their respective G/L
Accounts determined from a number of different sources.
The source of the G/L accounts is determined by settings in the P/I Control Preferences 697 .
When Revenue distributions are generated, the actual G/L Account to be used may be
derived from one the following sources:
The Project's properties record
The Employee's Department properties record
The Invoice Section Code properties record
The Invoice Group Code properties record
Recoverable Expense distributions may be derived from either of the following sources:
The Project's properties record
The Disbursement Code properties record
If Cost distributions are generated, the actual G/L Account to be used may be derived from
one the following sources:
© 2007 - 2014 by Sentinel Hill Software, all rights reserved
546
Series 5 Professional Invoicing - User Help
The Project's properties record
The Employee's properties record
The Employee's Department properties record
The Task properties record
The Invoice Section Code properties record
The Invoice Group Code properties record
If your system is configured to obtain the G/L accounts from the Project, then valid accounts
must be entered using this screen.
Note that the G/L accounts used by the P/I system must be defined as valid accounts in the
A/R system, (and in the G/L).
P/I Project - G/L Accounts Properties Tab Screen
The default G/L accounts associated to each P/I Project are maintained by the following
screen:
G/L Accounts
© 2007 - 2014 by Sentinel Hill Software, all rights reserved
Professional Invoicing Menu Functions
547
Note that the G/L accounts used by the P/I system must be defined as valid
accounts in the A/R system, (and in the G/L).
G/L Accounts Properties Tab Screen - Field Definitions
Project Revenue Account
9(18) - 9(5)
Revenue may be recorded in the General Ledger to an account associated to the Project,
the Employee's Department, the Task's Invoice Section, or to the Task's Invoice Group. If
your system is configured so that the Revenue Account is determined by the Project, (as
determined by a property found in the PI Control Preferences 697 and possibly overridden
by the Task Code Maintenance 583 ), enter the G/L Account used to record the Revenues.
Regardless of the method chosen to assign the Revenue account, the system also offers
a number of ways to derive the Profit Center that is to be assigned. If you have
designated that the Profit Center be derived from the Project, (as determined by a
property found in the PI Control Preferences 697 ), then you must enter that Profit Center in
this field, (if you wish, leaving the main G/L Account portion as ZERO).
Recoverable Expense Account
9(18) - 9(5)
Recoverable Expenses may be recorded in the General Ledger System either to an
account associated to the Disbursement or to the Project. If you have decided to use the
Expense Account associated to the Project, (as determined by a property found in the PI
Control Preferences 697 ), enter that recoverable expense account number in this field.
Cost Distribution Account
9(18) - 9(5)
If your system is configured so that the Cost Account is determined by the Project, enter
the G/L Account used to record the Costs.
9.9.1.6
Project Deposits Tab Screen
The Series 5 P/I system provides for the entry of a Project Deposit. This might be an deposit,
or a down payment in advance to any work being performed and any invoices being
generated. When the project is eventually invoiced, a credit will be shown, and the Deposit
Balance on this screen automatically
P/I Project - Deposits Properties Tab Screen
The following screen is used to display Deposits that have been entered for this Project:
© 2007 - 2014 by Sentinel Hill Software, all rights reserved
548
Series 5 Professional Invoicing - User Help
Entry of Deposits
A Project's Advance Deposit must be entered into the system using the
Enter Open Credit Deposit function available as a menu item under the P/I
menu's Operations drop-down menu.
Project Deposits Properties Tab Screen - Field Definitions
Last Deposit Received $ Amount
$ 9,999,999.99
When a Advanced payment Deposit is recorded for this project, it's amount is displayed
in this field.
Last Deposit Received Date
(mmddyy)
When a Advanced payment Deposit is recorded for this project, it's date displayed in this
field.
© 2007 - 2014 by Sentinel Hill Software, all rights reserved
Professional Invoicing Menu Functions
Accumulated Deposit Balance
549
$ 9,999,999.99
As projects with a Deposit are invoiced, any deposit on file will be shown as a Credit on
the invoice. As credits are applied, this field is automatically updated.
A/R Credit Apply-To Document Number
9(6)
When a deposit is entered and recorded for a Project, it must also be manually entered
as a Credit in the Accounts Receivable system. The document # used in the A/R for the
Credit must be entered in this field in order for the Invoice to have the correct ApplyTo
when it is moved as a Sales Transaction into the A/R system.
9.9.1.7
Project Accruals Tab Screen
The computation and generation of Project Accruals is useful for projects that continue over
several financial reporting periods before actually being invoiced. If in the G/L you need to be
able to record revenue to the period that the work was performed in, but the project has not
actually been invoiced, you will want to generate these Income Accrual figures.
Accruals are calculated based on the outstanding Unbilled Amounts for a project. The
possible Revenue Types are Work-in-Progress, Disbursements and Disbursement Markups.
An accrual is generated for each applicable Revenue Account for the project. The generation
of accrual information should be performed on the last day of a given month after invoices for
that month have been generated and posted to the Accounts Receivable.
P/I Preferences for Project Accruals
If your P/I system is configured such that Revenue Distributions are
generated when WIP Time charges are posted, then accruals are not
applicable, (and don't really make any sense).
The accrual totals are recorded and may be seen on this Project screen.
Regardless whether accruals are applicable to the selected project, this screen also displays
information relating to the last Invoice that was generated.
P/I Project - Accruals Properties Tab Screen
The following screen is used to display the Accruals summary totals, and the information
about the most recently generated Invoice for the Project:
© 2007 - 2014 by Sentinel Hill Software, all rights reserved
550
Series 5 Professional Invoicing - User Help
Project Accruals Properties Tab Screen - Field Definitions
Revenue Accruals are Generated for this
Project ?
check-box
If your system is configured to generated Accruals, then select whether accruals are
generated for this particular project.
Update Customer Monthly Sales Totals with
Accrual Amounts ?
check-box
If accruals are being generated, then you can choose whether or not, the monthly sales
totals associated to this Project's Customer are updated or not. (You would set this
option if you wanted the accrued revenue to show in the Customers' monthly summary
totals).
Accrual Carry-Forward $ Amount
$ 9,999,999.99
© 2007 - 2014 by Sentinel Hill Software, all rights reserved
Professional Invoicing Menu Functions
551
When accruals are computed, this field is updated. This amount is used to compute
Income amounts reported on the Project Income report that might be generated. This
field should not be edited, unless absolutely necessary.
from the Month Of
drop-list
When accruals are computed, this field is updated. This field should not be edited,
unless absolutely necessary.
Prior Month's Accrual $ Amount
$ 9,999,999.99
When accruals are computed, this field is updated. This amount is used to compute
Income amounts reported on the Project Income report that might be generated. This
field should not be edited, unless absolutely necessary.
Prior Year's Ending Accrual $ Amount
$ 9,999,999.99
When accruals are computed, this field is updated. This amount is used to compute
Income amounts reported on the Project Income report that might be generated. This
field should not be edited, unless absolutely necessary.
9.9.1.8
Project Cost Plus Tab Screen
The Series 5 P/I system provides for the automatic generation of Cost Plus amounts when
Invoices are generated. These fields for the project will appear only if you have selected to
have Cost Plus Charges generated, (as determined by setting in the P/I Preferences 705
function). When the project is entered, these percentages will be defaulted to those
percentages entered for the P/I preferences. They may, however, be changed for each
Project. The factor Tasks themselves may only be changed in the P/I preferences.
P/I Preferences for Cost Plus
If your P/I system is not configured for Cost Plust computations, then this
screen is not applicable.
P/I Project - Cost Plus Properties Tab Screen
The following screen is used to display the Cost Plus percentages applicable for the Project:
© 2007 - 2014 by Sentinel Hill Software, all rights reserved
552
Series 5 Professional Invoicing - User Help
Project Cost Plus Properties Tab Screen - Field Definitions
Task Codes
X(8)
The tasks that are used to record Cost Plus charges are defined on a screen associated
to the P/I Preferences. These tasks are fixed for all Projects.
Cost Plus Percentage Rates
999.99- %
These are the rates to be used when computing Cost Plus charges for the project.
These will default to the percentages defined by the P/I preferences, and may be changed
for this project.
9.9.1.9
Project EDI Invoice Controls Tab Screen
The Series 5 P/I system provides for the ability to generated electronic invoices. These are
commonly referred to as EDI invoices.
© 2007 - 2014 by Sentinel Hill Software, all rights reserved
Professional Invoicing Menu Functions
553
There are a variety of different EDI invoices that may be generated. Some of these are
unique to specific customer, and some are generated using specific standard formats For
each of the types of EDI invoices that may be generated, the P/I system has an EDI
Specifications Control code that is created. This Control Code defines the different properties
associated to each type of EDI invoice.
In order for a project to have it's invoices generated as EDI invoices, this screen is used to
specify the particular method. It also provides fields to display information about the most
recent set of EDI invoices to be generated.
Generation of EDI Invoices
In order for a Project to generate EDI invoices, the appropriate fields must
be set on this screen. Also, the Invoice Layout that is assigned to
this project must be correctly configured, and be enabled to
generate EDI Invoices.
P/I Project - EDI/XML Properties Tab Screen
The following screen is used to display the Accruals summary totals, and the information
about the most recently generated Invoice for the Project:
© 2007 - 2014 by Sentinel Hill Software, all rights reserved
554
Series 5 Professional Invoicing - User Help
Project EDI Invoice Properties Tab Screen - Field Definitions
Generate EDI/XML Invoices for this Project
check-box
If EDI Invoices are to be generated for this project, the set the check-box accordingly.
EDI Specifications Control Code
drop-list
Select the EDI Control Code for the method in which invoices are to be generated. The
list is built using the EDI Control Codes that have been defined to the P/I system by the
EDI Specifications Codes Maintenance 608 function.
© 2007 - 2014 by Sentinel Hill Software, all rights reserved
Professional Invoicing Menu Functions
Order Contact
555
X(40)
Used to record information about the individuals to deal with when generating and
transmitting EDI sets of invoices. This field is required when generating ANSI X12 4010810 EDI Invoices and used in the PER Admin Contact information record.
Delivery Contact
X(40)
Used to record information about the individuals to deal with when generating and
transmitting EDI sets of invoices. This field is required when generating ANSI X12 4010810 EDI Invoices and used in the PER Admin Contact information record.
Hardcopy Invoices also generated ?
check-box
If both EDI and paper invoices are to be generated, set this check-box. (Be careful
though, because invoices will be grouped, and their charges arranged in the order that is
dictated to generated the EDI invoices. The paper invoice may not print in a desirable
format).
Temporarily Suspend generating EDI Invoices ? check-box
If you need to suspend the generations of the EDI Invoices for a particular invoice
generation, set the check-box.
9.9.1.10 Reporting and Exporting Filters
Enter topic text here.
9.9.1.11 Project Properties Export
The Series 5 system provides for the capability to export Projects data to a spreadsheet. The
Spreadsheet Export function lets you output selected fields of the Projects to spreadsheet.
Once output to a spreadsheet, assorted analysis can be performed, or data can be easily
moved to a Microsoft Access data file.
The interface is accomplished by generating ASCII text or Excel Workbook files, which in turn
© 2007 - 2014 by Sentinel Hill Software, all rights reserved
556
Series 5 Professional Invoicing - User Help
are populated. The data associated with any given field is stored in a column on the
spreadsheet. The data for a given account is stored in row. The types of text files supported
include the following:
MS Excel Workbooks
Tab Delimited Text
Lotus Text (Comma Delimited with quotation marks)
Slash "\" Delimited Text
CSV Text (Comma Delimited)
The export option presents the operator with the standard Project Select Filters 142 screen.
This allows you to select specific or a range of Projects, Projects for selected Departments
or Locations, or Projects matching a number of assorted properties. It also presents the
operator with the standard Customer Select Filters 151 screen. This allows you to select
specific or a range of Customers, Customers for selected Customer Types or Sales
Representatives, or Customers matching a number of assorted properties.
Some points to note when exporting Projects:
A heading row is output to the spreadsheet.
The standard Series 5 Export Options screen 133 will be displayed, from which the Type of
Output, the target Folder, and the Filename may be specified. By default, the output filename
is PIPROJIN.XLS. You may click the Browse button to locate a different folder and input
file.
Projects Export - Field Selection
There are many different fields that are associated to a Project. To be able to select
specific fields to output would be a nice feature .... would it not. Well, guess what, you
can select the fields you want.
The following screen is displayed from which selected fields may be selected. On the
left side of the screen, double click to have a particular field included, or excluded.
© 2007 - 2014 by Sentinel Hill Software, all rights reserved
Professional Invoicing Menu Functions
557
9.9.1.12 Project Data Import
The Series 5 system provides for the capability to import Project data from a spreadsheet.
The Spreadsheet Import function lets you input a number of your Project properties from a
spreadsheet or tab-delimited file.
The interface is accomplished by reading a selected ASCII text or Excel Workbook files,
which you had created manually, or created by some other means. The data associated with
any given field is loaded from a column on the spreadsheet. The data for a given Project is
loaded from a row. The types of text files supported include the following:
MS Excel Workbooks
Tab Delimited Text
Lotus Text (Comma Delimited with quotation marks)
Slash "\" Delimited Text
CSV Text (Comma Delimited)
Some points to note when importng Project:
© 2007 - 2014 by Sentinel Hill Software, all rights reserved
558
Series 5 Professional Invoicing - User Help
A heading row with PROJECT or Project or Proj or PROJ in column 1 will be ignored
Blank rows are ignored
The standard Series 5 Import Options screen 138 will be displayed, from which the Type of
Input, the target Folder, and the Filename may be specified. By default, the input filename is
PIProjects_In.XLS. You may click the Browse button to locate a different folder and input
file.
Project Properties Import Data Formats
For Project data that are imported, the following fields are input from an Excel
spreadsheet, a tab-delimited text file, or a CSV text file. The default filenames are either
PIProjects_In.XLS.
Column # Excel Column
Field
Format
1
A
Project Code
X(6)
2
B
Description
X(40)
3
C
Customer Code
X(6)
4
D
Primary Contact
X(30)
5
E
Phone Number
X(12)
6
F
Project Partner Code
X(6)
7
G
Project Leader Code
X(6)
8
H
Keyword 1
X(10)
9
I
Keyword 2
X(10)
10
J
Keyword 3
X(10)
11
K
Keyword 4
X(10)
12
L
EDI Control Code
X(6)
13
M
Invoice Layout Code
9(3)
When loading the Projects from a spreadsheet, you may also specify a pre-defined
processing directive in column 1.
%%%nnn Specify a "Project Template" number code in the 1st
– column, where nnn is the Template Number. Each Project
that is added will have all it's property fields set to the fields
defined for the specified Project Template
© 2007 - 2014 by Sentinel Hill Software, all rights reserved
Professional Invoicing Menu Functions
559
%RADD% All Project codes for the rows following will be 1st deleted
– from the system, then updated with the new fields
provided. (Note that all data including PTD, YTD and
Monthly statistics data is lost)
%DELE% All Project codes for the rows following will be deleted from
– the system and not replaced. Only the Project Code
needs to be specified in column 1 of the input
spreadsheet.
%UPDT% A single field for the specified Project codes will be
– updated. The field to be updated is indicated with the code
that is read from the 2nd column in the row the %UPDT%
directive is found. The following codes are recognized:
PARTNER
LEADER
INV-LAYOUT
KEYWORD-1
KEYWORD-2
KEYWORD-3
KEYWORD-4
- for the Partner Employee Code
- for the Project Leader Employee Code
- for P/I Invoice Layout Code
- for the user's Keyword Code 1
- for the user's Keyword Code 2
- for the user's Keyword Code 3
- for the user's Keyword Code 4
In the rows following specify the Project Code in column 1,
and the new value for the designated field in column 2 of
the input spreadsheet
9.9.2
Project Templates Maintenance
To simplify the process of manually adding new Projects to the system, you may define a
Series 5 P/I Project Template. A Project Template is basically a record that contains many of
the same fields that are associated to a Project. Many of the properties that must be
assigned to a Project are typically the same for many Projects. (Especially those used to
define default billing and invoicing options).
Three tabbed screens are provided that are basically the same as those presented from the
Project Codes Maintenance function. These include the Description screen 535 , the Billing
screen 540 and the G/L Accounts screen 545 .
For each Template you may assign values that could typically be applied to groups of similar
Projects. Up to 999 Templates may be created in the system.
When a new Project is added to the system, the operator may select one of the pre-defined
Templates, and then only have to enter those properties unique to that project, such as the A/
R Customer and any Descriptions.
The Template Codes defined here are listed in the Series 5 Termplate Codes LOV Lookup
window.
The Template Codes Maintenance function is accessed from the P/I Main menu, by
© 2007 - 2014 by Sentinel Hill Software, all rights reserved
102
560
Series 5 Professional Invoicing - User Help
selecting Project Template Codes... from the Codes Maintenance drop-down menu.
P/I Project Templates Codes Maintenance Grid
P/I Project Templates are maintained using a Series 5 grid processing screen.
"Fast Buttons"
New
Add a new P/I Project
Templates Code
Modify Modify the P/I Project
Templates Code highlighted
in the grid
Delete Delete the P/I Project
Templates Code highlighted
in the grid
Edit an existing P/I Project Templates Code by double-clicking it's associated row. Standard
Series 5 grid controls apply.
P/I Project Templates Code - Properties Screen
The properties for each P/I Project Templates Code are defined with the following screen:
© 2007 - 2014 by Sentinel Hill Software, all rights reserved
Professional Invoicing Menu Functions
561
Field Definitions
P/I Project Templates Code
X(6)
This is the alphanumeric code assigned to the Template. Enter this code when a new
Project is added, if a Template is applicable.
Description
X(30)
Is a description of the Template.
9.9.3
Project Budgets
The Professional Invoicing system provides the opportunity to set up Budgets, to monitor
anticipated Revenues, Costs and activity performed on the different projects taken on by the
company. This Codes Maintenance menu item is used to define the budgets, import or
export them from/to spreadsheet; or to just inquire to view budget vs actual amounts with
variances.
© 2007 - 2014 by Sentinel Hill Software, all rights reserved
562
Series 5 Professional Invoicing - User Help
Defining Project Budgets
Budgets may be created for each Project either as a whole, or broken down by WIP, Cost-Plus
Charges and/or Disbursements. In addition, these can be further divided into Budget Groups as
determined by properties associated to Task Codes and Employees.
If Budget Groups are to be utilized, they must first be defined by the Budget Group Codes
Maintenance function 597 , and assigned to the relevant Tasks, Employees or Disbursements
depending on how activity is budgeted.
For each Budget defined, amounts may be entered for the # of WIP Units of activity, the
anticipated WIP # of Units and Revenue to be earned, the Cost of WIP activity recorded, the
Cost of Disbursements, and the Revenue earned from chargeable Disbursements. For each
Budget defined, the system will accumulate the actual unit quantities of WIP recorded, the
Cost of WIP and Disbursements entered, and Invoiced amounts of WIP and Disbursements.
Some points to note when setting up Budgets :
A single Budget record may be created for a given Project. In this trivial case, all
WIP activity, and invoice amounts for the Project can be budgeted for as single
amounts.
For a given Project, separate Budget records may be set up for WIP activity
recorded, Cost-Plus charges and Disbursements independent of one another.
These could be further broken down into Budget Groups. The Budget Group
assigned is determined from either the Employee or the Task, depending on one of
the properties associated to the Task.
Budgets may also be created for Budget Groups as determined from Tasks and/or
Employees that are totally oblivious to the Projects that associated WIP activity
belongs to. This is useful if you wish the budget for certain activities performed or
employees utilized by the day-to-day operations of your company.
For each Budget record created, Actual amounts are accumulated. It is possible to
have more that one type of Budget in effect for each Project.
When a Budget record is created, it is assigned to a specific user defined date
range. The system will then provide a further breakdown over the date range
entered as weekly, monthly, quarterly or yearly periods; or you can choose to just
have a single period for the life of the project. As Actuals are accumulated,
separate totals are kept for each period.
The Project Budget Maintenance function is accessed from the P/I Main menu, by selecting
Project Budgets... from the Codes Maintenance drop-down menu.
© 2007 - 2014 by Sentinel Hill Software, all rights reserved
Professional Invoicing Menu Functions
P/I Project Budget Maintenance Grid
Project Budgets are maintained using a Series 5 grid processing screen.
The "Fast Buttons" frame provides the push buttons to launch the most common functions
associated to the entry of Budgets.
"Fast Buttons"
New
Add a new P/I Budget
Modify
Modify the P/I Budget highlighted in the grid
Delete
Delete the P/I Budget highlighted in the grid
Print
Print an Edit List showing the details of each P/I Budget
entered
Import
Load Budgets from a spreadsheet
Export
Export Budgets to a spreadsheet
© 2007 - 2014 by Sentinel Hill Software, all rights reserved
563
564
Series 5 Professional Invoicing - User Help
Purge
Purge those Budgets that have past their time
Edit an existing Budget by double-clicking it's associated row. Standard Series 5 grid
controls apply.
Some of the special features of this General WIP entry grid are as follows:
Budgets may be listed by either
selected Projects, or by
selected Budget Groups. Also,
regardless of Project or Group,
all budgets may be listed by
Type, or by their applicable
Starting Dates.
If listing for a particular Project
or Budget Group, they may be
chosen either by entering their
assigned code, choosing it
using the Lookup binoculars
icon, or by having the next or
previous code displayed that
has items on file. (Click the
binocular icon with the up/down
arrow to display WIP items that
exist for the prior/next
occurrence of that code on file).
Depending on the List By
selection, a field is presented, in
which the operator may key in
an ID #, or a Project Code. The
system will attempt to read to
the closest transaction for the
data entered and display it in the
grid.
The Print Options tab screen will be displayed, from which you can select to direct the output
to be displayed to the screen, archived, printed, saved as an MS Word document, saved as a
PDF, and/or emailed. (Refer to the topic titled Report Generation and Printing 159 for full
details).
The report listing the P/I Task Codes on file, if archived, will be catalogued with a report name
of PROJ_BUGETS.LST.
© 2007 - 2014 by Sentinel Hill Software, all rights reserved
Professional Invoicing Menu Functions
565
Project Budgets - Properties Screen
The properties for each Budget are defined with the following screen:
Note that when editing an existing Budget record, for each Budgeted Amount field, a subscreen tab is presented. Clicking on these tabs displays a sub-screen showing a break-down
of amount for each period of Budget Amounts, Actuals, a Variance and Variance %. As well
Accumulated Totals for each of the periods is displayed.
© 2007 - 2014 by Sentinel Hill Software, all rights reserved
566
Series 5 Professional Invoicing - User Help
Field Definitions
Type of Budget
drop-list
Select the type of Budget that is to be recorded. You may set up a single set of budgets
for a Project; or you may set up multiple budgets for a project — one for each of WIP
activity, Cost Plus Charges, or Disbursements.
You may also set up budgets for ALL WIP associated to Employees and/or Tasks, that
have been assigned a particular Budget Group, irregardless of what project their activity
was recorded against.
Project
X(6)
When setting up a budget that is Project oriented, select the project that they are to be
applied to.
Budgets broken down by Budget Groups ?check-box
For budgets that are set up for ONLY WIP, Cost-Plus or Disbursements, as an option,
you may wish to break the budgets down to a lower level. That is, you can define the
budgets to combinations of Budget Groups that have been assigned to Employees,
Tasks or Disbursements. If this check-box is set, then the Budget Group field will be
© 2007 - 2014 by Sentinel Hill Software, all rights reserved
Professional Invoicing Menu Functions
567
enabled.
As an example, when budgeting for a Project's Disbursements, you may wish to have a
budget for goods that are purchased, and a separate budget for sub-contracted work
performed. You would then have 2 different Budget Groups that are assigned as
properties to the different Disbursement Codes that you have defined. When
disbursements are entered against the project, the applicable budget's actuals would be
updated.
In the case of WIP that is recorded, the Budget Group is determined from either the Task
Code, or the Employee Code, as determined by one of the properties associated to the
Task. (ie., depending on whether or not the activity is Task oriented or Employee
oriented).
Budget Group
X(6)
For budgets that are associated to a Project, whereby they are to be broken down to a
lower Budget Group level, select the Budget Group. For budgets that are for ALL WIP
Activity recorded by Employees or Tasks, enter the Budget Group to which activity is
recorded.
Period Sequence Count
999
The P/I systems may deal with Projects that span a number of years. As a result, you
may wish to define separate sets of budgets for each year for a single Project. This
Period Sequence Counter is basically a counter to group similar budgets that apply to the
same period, and to keep the different years of budgets set separate should you wish to
keep them on file for the duration of the project.
Comment
X(40)
This field is provided to record a brief comment about the budget. It's for information
purposes only.
Budgeted Amounts – Type of Period
radio-buttons
When budgets are created, the Budgeted Amounts are
meant to be recorded for a given time frame. The date
range specified will then be broken up by the system
to an equal number of periods, for which separate
actuals amounts will be recorded. Select the type of
period which is applicable.
Budget Periods
As WIP or Disbursement activity is recorded,
the relevant actuals totals for each defined
© 2007 - 2014 by Sentinel Hill Software, all rights reserved
Weekly
Monthly
Quarterly
Annually
Life of the Project
568
Series 5 Professional Invoicing - User Help
Budget are updated for the particular period
associated to the date of the item. If once a
budget record is defined, and activity is
recorded, you were to change the Type of
Period, or the # of periods, then those actual
figures would no longer be reliable. Once the
type and # of periods are established.
YOU CAN'T JUST CHANGE THEM
WITHOUT INTRODUCING PROBLEMS.
Budgeted Amounts – # of Periods
99
When budgets are created, the Budgeted Amounts are meant to be recorded for a given time
frame. The date range specified will then be broken up by the system to an equal number of
periods, for which separate actuals amounts will be recorded. Specify the number of
periods. You may only select up to 26 Periods. If you require more periods, you will have
to set up an additional Budget record, (with a different Period Sequence Counter).
Budgeted Amounts – Period Start/End
Dates
(mm/dd/yy)
Enter the Starting and Ending dates for which the Budget figures are applicable to.
Budgeted Amounts – WIP # of Units
Entered
99,999,999-
Enter the total # of Units of WIP activity that is to be budgeted for. This would be the sum
of all types of WIP recorded against the Project. For those budgets assigned to Budget
Groups associated to particular Tasks, then this amount is the # of those units.
(For Disbursement Budgets, this field is not applicable).
Budgeted Amounts – WIP # of Units
Invoiced
99,999,999-
Enter the total # of Units of WIP activity that is expected to be invoiced. This would be the
sum of all types of WIP recorded against the Project. For those budgets assigned to
Budget Groups associated to particular Tasks, then this amount is the # of those units.
(For Disbursement Budgets, this field is not applicable).
Budgeted Amounts – WIP Revenue
$ 999,999,999.99-
Enter the total dollar value of invoiced WIP activity that is to be budgeted for. This would
be the sum of all types of WIP for which invoices are generated for the Project. For those
budgets assigned to Budget Groups associated to particular Tasks or Employees, then
© 2007 - 2014 by Sentinel Hill Software, all rights reserved
Professional Invoicing Menu Functions
569
this amount is that which is applicable to them.
(For Disbursement Budgets, this field is not applicable).
Budgeted Amounts – Disbursement
Revenue
$ 999,999,999.99-
Enter the total dollar value of invoiced Disbursement charges that is to be budgeted for,
(including any markup amount that is applied). This would be the sum of all types of
Disbursements for which invoices are generated for the Project. For those budgets
assigned to Budget Groups associated to particular Disbursements, then this amount is
that which is applicable to them.
(For WIP or Cost-Plus Budgets, this field is not applicable).
Budgeted Amounts – WIP Costs
$ 999,999,999.99-
Enter the total dollar value of the costs of WIP activity that is to be budgeted for. This
would be the sum of all types of chargeable and non-chargeable WIP which is recorded
for the Project. For those budgets assigned to Budget Groups associated to particular
Tasks or Employees, then this amount is the total costs that are applicable to them.
(For Disbursement Budgets, this field is not applicable).
Budgeted Amounts – Disbursement Costs $ 999,999,999.99Enter the total dollar value of the costs of Disbursement charges activity that is to be
budgeted for. This would be the sum of all types of chargeable and non-chargeable
Disbursements which is recorded for the Project, (not including markups). For those
budgets assigned to Budget Groups associated to particular Disbursements, then this
amount is the total costs that are applicable to them.
(For WIP or Cost-Plus Budgets, this field is not applicable).
Budgets – Import/Export Data Formats
For Budgets that are imported or exported, the following fields are input/output from/to an
Excel spreadsheet, a tab-delimited text file, or a CSV text file. The default filenames are
either PI_Budgets_In.XLS or PI_Budgets_Out.XLS.
Column
#
Excel
Column
1
A
Field
Budget Type
© 2007 - 2014 by Sentinel Hill Software, all rights reserved
Format
PROJCT, WIP, COST+,
DISBMT, EMPLEE or
TASK
570
9.9.4
Series 5 Professional Invoicing - User Help
2
B
Project Code
X(6)
3
C
Project Description
X(40)
input)
4
D
Budget Group Code
X(6)
5
E
Group Description
X(24)
input)
6
F
Budget Sequence Counter 999
7
G
Starting Date
mm/dd/yy
8
H
Ending Date
mm/dd/yy
9
I
Sub-Period Type
WEEK, MONTH,
QUARTER, YEAR or
LIFE
10
J
# of Sub-Periods
99 (From 1 - 26)
11
K
Comment
X(40)
12
L
Budgeted # WIP Units to
Enter
99,999,999
13
M
Budgeted # WIP Units to
Invoice
99,999,999
14
N
Budgeted WIP Invoice
Amount
$ 999,999,999.99-
15
O
Budgeted Disbursements
Invoice Amount
$ 999,999,999.99-
16
P
Budgeted WIP Cost
Amount
$ 999,999,999.99-
17
Q
Budgeted Disbursements
Cost Amount
$ 999,999,999.99-
18
R
Actual # WIP Units
9,999,999
19
S
Actual WIP Invoice
Amount
$ 999,999,999.99-
20
T
Actual Disbursements
Invoice Amount
$ 999,999,999.99-
21
U
Actual WIP Cost Amount
$ 999,999,999.99-
22
V
Actual Disbursements
Cost Amount
$ 999,999,999.99-
(skipped on
(skipped on
Client Codes Maintenance
P/I Clients are Accounts Receivable customers for which P/I Project activity is recorded for
and eventually billed. Invoices are generated for P/I Clients and become receivables against
the associated A/R Customer. The Client Code is the A/R Customer Code. When
© 2007 - 2014 by Sentinel Hill Software, all rights reserved
Professional Invoicing Menu Functions
571
customers are added to the A/R system, a P/I Client Code is automatically recorded in the P/I
system.
The Client Code record offers properties associated to the billing process within the P/I
system not provided by the A/R Customer properties records. The include the client's default
Chargeable and Non-Chargeable rates, and a Rate Class Code used to identify the applicable
sets of Special Rates that might apply.
The Client Codes defined here are listed in the Series 5 Client Code LOV Lookup 102 window.
The Client Codes Maintenance function is accessed from the P/I Main menu, by selecting
Client Codes... from the Codes Maintenance drop-down menu.
P/I Client Codes Maintenance Grid
P/I Client are maintained using a Series 5 grid processing screen.
"Fast Buttons"
New
Add a new P/I Client Code
Modify
Modify the P/I Client Code
highlighted in the grid
Delete
Delete the P/I Client Code
highlighted in the grid
Print
Generate a report listing the
P/I Client Codes already on
file
Edit an existing P/I Client Code by double-clicking it's associated row. Standard Series 5 grid
controls apply.
The Print Options tab screen will be displayed, from which you can select to direct the output
to be displayed to the screen, archived, printed, saved as an MS Word document, saved as a
PDF, and/or emailed. (Refer to the topic titled Report Generation and Printing 159 for full
details).
The report listing the P/I Client Codes on file, if archived, will be catalogued with a report name
of PIClients.LST.
P/I Client Code - Properties Screen
The properties for each P/I Client Code are defined with the following screen:
© 2007 - 2014 by Sentinel Hill Software, all rights reserved
572
Series 5 Professional Invoicing - User Help
Field Definitions
P/I Client Code
X(6)
The Client Code is used to identify different clients for which Projects are defined. The
Client Code assigned is just the A/R Customer Code. The Customer must exist in the A/
R system prior to being assigned to a client. When charges are recorded a given P/I
Task is associated with a a P/I Employee for a particular P/I Project. P/I Projects belong
to a P/I Client.
Typically Chargeable Projects ?
check-box
Select which rate is to be applicable for this client. The Rate Computation algorithm in P/I
relies on this field as an indicator to the different sources of rates that are available. In
each case there is two rates that may be recorded. Either the Chargeable Rate or the
Non-Chargeable Rate.
Active Client Rates
How this option is set may be crucial. When employee activity is entered for projects
associated to this Client, it determines whether or not it eventually will be invoiced or not.
© 2007 - 2014 by Sentinel Hill Software, all rights reserved
Professional Invoicing Menu Functions
573
If this field is NOT checked, then all time entered for this Client's Projects will be NONChargeable. If it is checked, all time entered will be Chargeable. (At the time charges are
entered they may b e marked as Non-Chargeab le if required).
Default Chargeable Rate
99,999.99-
This is the Client's Chargeable Unit Rate. If the previous field is set specifying that
Projects for the client are Chargeable, then this is the rate that is used as a "Candidiate
Rate" for the rate calculation algorithm.
You may recall that the same properties are associated to each P/I Project. One of the
properties associated to the P/I Control Preferences, is used to indicated which sets of
rates and rules take precedence; the Project, or the Client.
Default Non-Chargeable Rate
99,999.99-
This is the Client's Non-Chargeable Unit Rate. If the previous field is set specifying that
Projects for the client are Non-Chargeable, then this is the rate that is used as a
"Candidiate Rate" for the rate calculation algorithm.
Rate Class Code
X(6)
Within the P/I system you may create Special Rates that are assigned using a variety of
different rules. The P/I system allows you to create different sets of the Special Rates.
Each set corresponds to a specific Rate Class Code. If this Client is to be used to
determine it's rates using the Special Rates tables, enter the applicable Rate Class Code.
The system needs to decide whether to use the Rate Class Code from the Project Code
or the Client Code. The same logic is in effect as for determining the Active Rate. This
choice is also controlled from the property associated to the P/I Control Preferences, as
to which sets of rates and rules take precedence; the Project, or the Client.
9.9.5
Disbursement Codes Maintenance
Disbursements are basically third party expenses that are incurred during the activity of
completing a Project. These expenses are recorded to a Project using a Disbursement
Code.
Some of the properties associated to the Disbursement Code are as follows:
A Markup % may be specified. When the Project is invoiced, the cost of the
expense is marked up by the given percentage
A Recoverable G/L Expense Account may be assigned. Based on a property found
in the P/I Control Preferences, the G/L account used to record the recoverable
charges is derived either from the Disbursement Code, or the Project
© 2007 - 2014 by Sentinel Hill Software, all rights reserved
574
Series 5 Professional Invoicing - User Help
Budgets may be established for each Project, for each Disbursement Code, for
each Project, or for a particular Budget Group
The Disbursement Codes defined here are listed in the Series 5 Disbursement Code LOV
Lookup 102 window.
The Disbursement Codes Maintenance function is accessed from the P/I Main menu, by
selecting Disbursement Codes... from the Codes Maintenance drop-down menu.
Disbursements Codes Maintenance Grid
Disbursements are maintained using a Series 5 grid processing screen.
"Fast Buttons"
New
Add a new Disbursements
Code
Modify
Modify the Disbursements
Code highlighted in the grid
Delete
Delete the Disbursements
Code highlighted in the grid
Print
Generate a report listing the
Disbursements Codes
already on file
Edit an existing Disbursements Code by double-clicking it's associated row. Standard
Series 5 grid controls apply.
The Print Options tab screen will be displayed, from which you can select to direct the output
to be displayed to the screen, archived, printed, saved as an MS Word document, saved as a
PDF, and/or emailed. (Refer to the topic titled Report Generation and Printing 159 for full
details).
The report listing the Disbursements Codes on file, if archived, will be catalogued with a
report name of DISBCODES.LST.
Disbursements Code - Properties Screen
The properties for each Disbursements Code are defined with the following screen:
© 2007 - 2014 by Sentinel Hill Software, all rights reserved
Professional Invoicing Menu Functions
575
Field Definitions
Disbursements Code
X(6)
This is the alphanumeric code assigned to the Disbursement. Enter this code when a
Disbursement code needs to be used within the Professional Invoicing system.
Description
X(24)
Is a description of the Disbursement. This is printed on most reports, and is displayed to
most screens where the code is utilized.
Default Markup %
99.999 %
A Markup % rate may be assigned to each Project and to each Disbursement type. If this
field is left as zero, then the % markup will be determined from the Project, if defined.
The % markup rate defined for the Project Code, if present, will always be used,
overriding the % rate defined here by the Disbursement Code. A Markup will only be
computed if the option to do so, is set for the particular Project.
© 2007 - 2014 by Sentinel Hill Software, all rights reserved
576
Series 5 Professional Invoicing - User Help
Charges are Taxable
check-box
Set this check-box if this Disbursement's charges at to contribute to the Taxable Total of
invoices generated for Projects where is recorded.
Recoverable G/L Expense Account
9(18)-9(5)
Recoverable Expenses may be recorded in the General Ledger System either to an
account associated to the Disbursement or to the Project. If you have decided to use the
Expense Account associated to the Disbursement Code , (as determined by a property
found in the PI Control Preferences 697 ), enter that recoverable expense account number
in this field.
Budget Group
X(6)
Budgets, if used, are defined at the Project level. It’s possible to break down budgets
even further, for a Project, into what is referred to as a Budget Group, or by Invoice
Groups. The level of budgeting is determined for a Project by one of it's properties set up
in Project Codes Maintenance 540 . If that option is set to For Defined Budget Groups,
then budgets for the Project will be kept for pre-defined Budget Group codes. If this is the
case, then the Budget Code to use is derived, for Disbursement charges, from the code
entered here.
9.9.6
Employee Codes Maintenance
All time charges entered into Series 5 Professional Invoicing system must be associated to a
Project and must have a valid Employee Code. The Employee Code may be used to define
an individual person, or it could also represent a machine for which billable, or non-billable,
activity could be recorded for a project.
The Employee Code is used throughout the P/I system. Some of the noteworthy properties
are as follows :
One property field of the Employee code is the Job Class Code. It is used to identify
the type of Job or Position the employee has within the company. Within the
system, it is used as the basis of a number of different analysis reporting functions.
Each Employee may be assigned an Employee Rate Group Code. Rate Groups
are used to identify groups of employees that might fall within a unique set that have
charge-out rates that are derived in a unique way. Within the Series 5 Professional
Invoicing system Special Rate tables may be defined that are used to assign billing
rates based on Employee Rate Groups.
Throughout the PI system with respect to WIP items, there are references to Invoice
Groups. Invoice Groups are a convenient way of grouping activities, either
associated to employees or to tasks, that are treated in the same way for assorted
© 2007 - 2014 by Sentinel Hill Software, all rights reserved
Professional Invoicing Menu Functions
577
processes. When time-sheet information is recorded for this employee for a
particular Task, that Task has, as a property, an Invoice Group Source that is used
to specify whether the Task Invoice Group Code or the Employee Invoice Group
Code is assigned to the WIP record generated. Invoice Groups might be used by
the system to define how items are presented on the Invoice, to keep track of
Budgets, to allocate special charge-out rates, or to assign G/L Revenue account
numbers. It is important to plan ahead the use of Invoice Groups on your system.
The Employee Codes defined here are listed in the Series 5 Employee Code LOV Lookup
window.
The Employee Codes Maintenance function is accessed from the P/I Main menu, by
selecting Employee Codes... from the Codes Maintenance drop-down menu.
102
Employee Codes Maintenance Grid
Employee are maintained using a Series 5 grid processing screen.
"Fast Buttons"
New
Add a new Employee Code
Modify Modify the Employee Code
highlighted in the grid
Delete Delete the Employee Code
highlighted in the grid
Print
Generate a report listing the
Employee Codes already on
file
Edit an existing Employee Code by double-clicking it's associated row. Standard Series 5
grid controls apply.
The Print Options tab screen will be displayed, from which you can select to direct the output
to be displayed to the screen, archived, printed, saved as an MS Word document, saved as a
PDF, and/or emailed. (Refer to the topic titled Report Generation and Printing 159 for full
details).
The report listing the Employee Codes on file, if archived, will be catalogued with a report
name of PIEMPLOYEE.LST.
Employee Code - Properties Screen
The properties for each Employee Code are defined with the following screen:
© 2007 - 2014 by Sentinel Hill Software, all rights reserved
578
Series 5 Professional Invoicing - User Help
Field Definitions
Employee Code
X(6)
This is the alphanumeric code assigned to the Employee. Enter this code when an
Employee code needs to be used within the Professional Invoicing system.
Name
X(24)
Is the Employee's name.
Email Address
X(60)
Is the Employee's address. The P/I system provides the functionality to generate and
email blank spreadsheets to employees that may be completed and re-emailed back.
These emails may be read, and the associated time-sheet information recorded in the
system. This is the email address that will be used. (See the topics titled Email Blank
Employee Timesheets 299 and Load Timesheets from Employee Emails 305 for more
information).
© 2007 - 2014 by Sentinel Hill Software, all rights reserved
Professional Invoicing Menu Functions
Person or Machine
579
radio-buttons
Select whether this Employee Code is either a real person or a machine. If you need to
record charges for activity performed by a machine, it still must be entered with an
Employee Code. Indicate here whether this employee is actually for a person or a
machine. The Inter-Location Utilization report differentiates between people and
machines and charges entered for machines do not contribute to Cost Plus
computations.
Department
X(2)
Assign each employee to a Department. This is especially important if you wish to have
Revenue Accounts or Profit Centers assigned based on the Department that employees
are assigned too. Also, the Inter-Department Revenue Analysis provides a information as
to which employees performed billable work on Projects that are allocated to other
Departments.
Job Class
X(6)
The Job Class is assigned to identify the job group this employee belongs to. This is
printed on a number of reports and is used as a basis of analysis for a couple of
Employee reports.
Location
X(6)
The Location Code for employees is used as a selection parameter for the generation of
a number of different P/I system reports. Locations differ from Departments. The
Location is meant to be a geographical separation, whereas Departments designate
divisions within a specific Location.
Supervisor
X(6)
The Supervisor must be a valid Employee Code. It is used for information purposes only.
Rate Group
X(6)
Special Rates may be defined for a variety of combinations of codes associated to a WIP
item. These include Employees, Employee Rate Groups, Tasks and Invoice Groups. If
a set of rates are created for an Employee Rate Group, then this field is used to identify
the Rate Group for this employee.
Invoice Group
X(6)
Tasks can be grouped by assigning them a common Invoice Group Code. If the
Invoice Groups Assigned to WIP property for a particular Task designates it to be
© 2007 - 2014 by Sentinel Hill Software, all rights reserved
580
Series 5 Professional Invoicing - User Help
derived from the Employee, then this field holds the particular Invoice Group Code.
Invoice Groups might be used by the system to define how items are presented on the
Invoice, to keep track of Budgets, to allocate special charge-out rates, or to assign G/L
Revenue account numbers. It is important to plan ahead the use of Invoice Groups on
your system.
If invoices for a Project need to be generated with their WIP items grouped by Invoice
Group, then it’s this code that is used for the sort. This option is determined as one of the
properties associated to the Project.
Budget Group
X(6)
Budgets, if used, are normally defined at the Project level. It’s possible to break down
budgets even further, for a Project, into what is referred to as a Budget Groups. The level
of budgeting is determined by the existence of a defined Budget record created from the
Project Budgets Maintenance 561 function. If this is the case, then the Budget Code to use
is derived either from the Task Record, or the Employee Record, (as determined by a
setting associated to the Task).
If Budgets have been established for Budget Groups based on groups of Employees, then
that Budget Group code needs to be entered into this field.
Budgeting for Employees and/or Projects
Budget may be established for Projects broken down by Budget Groups, or
specifically for Employees grouped by Budget Groups regardless of
Projects; or both. Depending on the level of budgeting desired, assign a
Budget group accordingly.
Unit Cost Rate
99,999.99-
If Costs are computed, and derived from the Employee, then enter the Unit Cost Rate in
this field, associated to the employee.
Cost Distribution Account
9(18) - 9(5)
The Costs of Work-In-Progress activity may be recorded in the General Ledger System to
an account that is derived from a number of different sources. If the system has
determined that Costs for a specific Employee are to be charged to a specific G/L Cost
Account, enter that cost account number in this field.
Mandatory Time Sheet Entry
check-box
Reserved for a future enhancement.
© 2007 - 2014 by Sentinel Hill Software, all rights reserved
Professional Invoicing Menu Functions
Load Time Sheets from Email
581
check-box
The P/I system provides the functionality to generate and email blank spreadsheets to
employees that may be completed and re-emailed back. These emails may be read, and
the associated time-sheet information recorded in the system. Set the check-box if this
employee is to receive these emails. If this flag is NOT set, then blank email timesheets
will NOT be emailed to this employee. (See the topics titled Email Blank Employee
Timesheets 299 and Load Timesheets from Employee Emails 305 for more information).
9.9.7
Task Codes Maintenance
All time charges entered into Series 5 Professional Invoicing system must be associated to a
Project and must have a valid Task Code. The Task Code is used to define an activity or
function which is to be entered either as a chargeable or non-chargeable event.
Defining Task Codes
Note that a Task need not be restricted to employee hours, but can also be used to input other
unrelated amounts of activity, (i.e. # of megabytes of disk storage or pages printed, or hours usage
of a production machine).
Task codes are defined as being either a chargeable or a nonchargeable. That is, the
activity associated to the task will eventually either be invoiced or not. In each case, there is
both a Chargeable and a Non-Chargeable rate that may be assigned for the task.
The Task Code is used throughout the P/I system. Some of the noteworthy properties are as
follows :
Depending on the types of invoices that are generated, the task's description may
be used in the description field printed on Invoices.
The task may define a rate and an overhead percentage. When an overhead is
calculated, it is carried through the system up to invoicing. On the invoice, overhead
will be accumulated and listed as a single item.
Tasks are associated to Invoice Groups, (which may also be referred to as a Task
Group). Invoice Groups are significant in that the PI system may be configured to
determine Unit Rates, Budget Groups and the assignment of Revenue Accounts
based on Invoice Groups. It is important to plan ahead the use of Invoice Groups by
the system.
When billable activity is recorded, for certain customers where applicable, taxes will
be computed when invoices are generated. One property of the task is whether or
not it is a taxable activity or not. It's possible that activity for the task may be taxable
in some jurisdictions but not in others. In these cases, a Tax Group may be
assigned to the task. The Tax Exempt Codes Maintenance function 680 is used to
defined which tax Groups are taxable or not, for each of the Tax Codes defined in
© 2007 - 2014 by Sentinel Hill Software, all rights reserved
582
Series 5 Professional Invoicing - User Help
the Accounts Receivable system.
You may use the P/I system to keep track of non-billable activity that your
employees spend time on. You would then want to create some Tasks such as
ADMIN, PROFDEV, SICK and TRAVEL that would be non-chargeable tasks, and
the Rate-1 and Rate-2 fields would be left zero since the costs would relate to the
employee.
Throughout the P/I system with respect to WIP items, there are references to
Invoice Groups. Invoice Groups are a convenient way of grouping activities, either
associated to employees or to tasks, that are treated in the same way for assorted
processes. One property of each task is used to indicated that when the task is
assigned to WIP activity is the Invoice Group assigned from the task itself, or from
the employee.
Chargeable and non-chargeable rates, revenue accounts, costing rates, cost
distribution accounts, and budgets may all be assigned to a given task. The
algorithms used in determining the rates and accounts assigned to WIP activity can
be tailored meeting a variety of situations, using control properties associated to the
task and found in the P/I system's Control Preferences 697 . It is important to
understand the different settings when establishing the task codes being used.
The Task Codes defined here are listed in the Series 5 P/I Task Code LOV Lookup 102
window.
The Task Codes Maintenance function is accessed from the P/I Main menu, by selecting
Task Codes... from the Codes Maintenance drop-down menu.
P/I Task Codes Maintenance Grid
P/I Task are maintained using a Series 5 grid processing screen.
© 2007 - 2014 by Sentinel Hill Software, all rights reserved
Professional Invoicing Menu Functions
583
"Fast Buttons"
New
Add a new P/I Task Code
Modify
Modify the P/I Task Code
highlighted in the grid
Delete
Delete the P/I Task Code
highlighted in the grid
Print
Generate a report listing the P/I
Task Codes already on file
Import
Load Tasks from a
spreadsheet
Export
Export Tasks to a spreadsheet
Edit an existing P/I Task Code by double-clicking it's associated row. Standard Series 5 grid
controls apply.
The Print Options tab screen will be displayed, from which you can select to direct the output
to be displayed to the screen, archived, printed, saved as an MS Word document, saved as a
PDF, and/or emailed. (Refer to the topic titled Report Generation and Printing 159 for full
details).
The report listing the P/I Task Codes on file, if archived, will be catalogued with a report name
of PI_TASKS.LST.
P/I Task Code - Properties Screen
The properties for each P/I Task Code are defined with the following screen:
© 2007 - 2014 by Sentinel Hill Software, all rights reserved
584
Series 5 Professional Invoicing - User Help
Field Definitions
P/I Task Code
X(10)
This is the alphanumeric code assigned to the Task.
When Time-Sheets are entered or WIP charges recorded, a particular activity identified
by a Task Code, is performed by an Employee for a particular Project. this is the code
that is entered. Note that the Task Code is alphanumeric. It can include numbers,
alphabetic characters or other special characters, but should not contain any embedded
spaces.
Description
X(100)
Is a description of the Task. This is printed on most reports, and is displayed to most
screens where the Task Code is utilized.
Display Units
X(12)
The Display Units is printed on detailed invoices, and displayed when time-sheet entries
© 2007 - 2014 by Sentinel Hill Software, all rights reserved
Professional Invoicing Menu Functions
585
are entered. Because the entries made on a time-sheet could be time, materials or
services, the unit value is not limited to hours. Therefore the Task Display Units field
allows you to enter your own terminology for the units that a particular Task is expressed
in.
For instance, you might use a Task code having the Task Description Travel Allowance
and the Task Units of Miles. A word processing service bureau might use the Task
Description of Pages printed and the Display Units pages.
Commission Code
X(6)
This field is reserved for a future enhancement. It is used to define a Commission Code
that will be used to determine commissions earned associated to WIP activity performed
on Projects. The Commission Code is recorded within the WIP record and is available
for 3rd party reporting.
Extended Description Comments Code
X(8)
The P/I system offers the capability to define Comments. (Using the Comment Code
Maintenance function 599 ). These comments provide for up to 1000 characters of text to
be recorded. This field provides a way of entering a more complete description of the
Task than offered by the 40 character description field. If this task is used for a Project,
that makes use of an Invoice Layout that has the option to Print Task Code Comment
Descriptions, the text for this Comment Code is printed on the Invoice.
Foreign/Domestic Flag
radio-buttons
This is provided for information purposes only. When time
charges are entered, this flag does get recorded with the WIP
item that is generated. It could be used as a filter when used by a
third party report writer.
Foreign
Domestic
Type of Activity - Service or Disbursement radio-buttons
This field is used to indicate whether the activity associated to this
task is considered to be a Service or a Disbursement. Normally
this would be set as a Service. However where WIP activity is
imported from other user developed applications, these may be
considered to be either Services or Disbursements. (Normally
Disbursements would be entered using the Disbursements Entry
operation, however where WIP activity is imported from other user
developed applications, the WIP could be considered to be either
Services or Disbursements).
When invoices are generated, for a specific Invoice Layout, the
WIP activity will be grouped as either a Service or a
Disbursement.
© 2007 - 2014 by Sentinel Hill Software, all rights reserved
A Service
A
Disbursement
586
Series 5 Professional Invoicing - User Help
Chargeable Unit Rate
99,999.99-
This is the rate that is used in computing the value of chargeable activity recorded with
this task. Depending on how rates are computed, this amount may, or may not actually
ever be used. (Refer to the topic titled Assignment of Unit Rates 70 in this
documentation for a description of how unit rates are derived).
Non-Chargeable Unit Rate
99,999.99-
This is the rate that is used in computing the value of non-chargeable activity recorded
with this task. Depending on how rates are computed, this amount may, or may not
actually ever be used. (Refer to the topic titled Assignment of Unit Rates 70 in this
documentation for a description of how unit rates are derived).
Overhead Charges %
999.99- %
A standard Overhead Amount may be automatically computed for all time charges
entered for a given Project and included in all totals. (The option to have Overhead
computed is determined as a property associated to each Project). This field defines the
percentage factor used in the computation. The Overhead Amount is computed when the
Time-Sheet activity are entered into the system, for Chargeable Projects only.
Overheads may also be adjusted or suppressed by any of the Special Rates that are set
up. Overhead amounts are not shown separately on the invoice, but are reported in the
items and totals printed. If the system computes an overhead amount, the rate printed on
a detailed invoice will be adjusted to include the overhead amount.
Chargeable/Non-Chargeable Flag
radio-buttons
Selected whether the activity represented by this task is
either chargeable or non-chargeable. Chargeable
activity will be eventually billed to the customer.
G/L Revenue Account Source
Chargeable
Non-Chargeable
drop-list
Normally, the G/L Revenue Account assigned to WIP
charges is determined by a property defined by the PI
Control Preferences. If you need to change that rule for this
particular Task, select from which P/I source that G/L
account is to be obtained.
For example, some tasks that was related to employee
driven activity, should probably record revenue earned as
determined from the Employee's Department; but if the task
was related to activity associated to a a machine of some
type, the revenue account would be determined from an
Invoice Section or Group, (which is like a Task Group).
© 2007 - 2014 by Sentinel Hill Software, all rights reserved
Professional Invoicing Menu Functions
G/L Accounts Profit Center Override
Source
587
drop-list
When G/L Revenue and/or Cost accounts are assigned to
WIP charges, they may be derived from a number of
different sources. As a property defined by the PI Control
Preferences, the Profit Center assigned to these G/L
accounts may be overridden.
If for this particular task, a different Profit Center source
should be used, it may be specified here.
Taxable Status (or Tax Group)
drop-list
For the trivial cases, select Yes or No to
indicate if this Task is one that charges
recorded against are to be considered as
Taxable or not. If charges associated to the
task are taxable in some jurisdictions but not in
others, select one of the Tax Group Codes so
the system can determine if it’s taxable or not.
The Tax Code Exempt Maintenance application
680 , described later in this chapter, defines
whether or not the Tax Jurisdiction Code is
taxable or not for particular A/R Tax Codes.
Invoice Section Code
X(10)
For those Projects where invoices are to be generated such that charges are grouped by
Invoice Sections, this field defines that group for the Task associated to the charges.
(These codes are also used as the sorting sequence on the invoice). Enter the Invoice
Group Code for which items entered with this Task are to be grouped under. This field
differs from the Invoice Group defined below, in that this defines the section, and the Task
Invoice Group defines the group under the section.
Invoice Groups and Sections
Invoice Sections are just Invoice Groups, but are used for the purpose of
grouping items together on invoices that are generated and printed.
Invoice Groups Assigned From Source
© 2007 - 2014 by Sentinel Hill Software, all rights reserved
radio-buttons
588
Series 5 Professional Invoicing - User Help
Throughout the P/I system with respect to WIP items,
there are references to Invoice Groups. Invoice Groups
are a convenient way of grouping activities, either
associated to employees or to tasks, that are treated in
the same way for assorted processes.
From Task Codes
Properties
From Employee
Properties
This selection is used to specify which Invoice Group
Code is to be assigned to the WIP record generated from
time-sheet entries. "Should the Invoice Group be
associated to the Task, or should it be associated to
the Employee ? " .
Invoice Group Code
X(10)
Tasks can be grouped by assigning them a common Invoice Group Code. This field
holds the particular Invoice Group Code for this Task. If the Invoice Groups Assigned
to WIP property, was set to From Employee, then this field will not be used and could be
left blank.
Invoice Groups might be used by the system to define how items are presented on the
Invoice, to allocate special charge-out rates, or to assign G/L Revenue account numbers.
It is important to plan ahead the use of Invoice Groups on your system.
If invoices for a Project need to be generated with their WIP items grouped by Invoice
Group, then it’s this code that is used for the sort. This option is determined as one of the
properties associated to the Project.
Budget Groups Assigned From Source
radio-buttons
Budgets, if used, are normally defined at the Project level.
It’s possible to break down budgets even further, for a
Project, into what is referred to as a Budget Groups. The
level of budgeting is determined by the existence of a
defined Budget record created from the Project Budgets
Maintenance 561 function. If this is the case, then the
Budget Code to use is derived either from the Task Record,
or the Employee Record. Whether it be Task or
Employee, it is determined by this selection.
From Task Codes
Properties
From Employee
Properties
This selection is used to specify how Budgets, if used, are
accumulated. "Have Budgets been established for
activity based on sets of Employees, or from groups of
Tasks ? " .
Budget Group Code
X(6)
If Budgets have been established for Budget Groups based on groups of Tasks, then that
Budget Group code needs to be entered into this field.
© 2007 - 2014 by Sentinel Hill Software, all rights reserved
Professional Invoicing Menu Functions
589
Budgeting for Tasks and/or Projects
Budget may be established for Projects broken down by Budget Groups, or
specifically for Tasks grouped by Budget Groups regardless of Projects; or
both. Depending on the level of budgeting desired, assign a Budget group
accordingly.
Costing - Rates Derived From Source
radio-buttons
Costing in the P/I system is determined from one of the
properties defined from the P/I Control Preferences. The
system will attempt to compute a cost that is associated
to every time-charge entered against a Project. When
this task is used for a WIP entry, if the Unit Cost Rate
should be computed for the activity, then set From Task
radio button. If the cost is supposed to computed based
on the employee's cost rate, set the From Employee
radio-button.
Costing - Unit Cost Rate
From Task Codes
Properties
From Employee
Properties
99,999.99-
If Costs are computed, and derived from the Task, then enter the Unit Cost Rate in this
field.
Costing - G/L Cost Account Source
drop-list
Normally, the G/L Costs Account assigned to WIP charges is
determined by a property defined by the PI Control Preferences.
If you need to change that rule for this particular Task, select from
which P/I source that G/L account is to be obtained.
Costing - G/L Cost Account
9(18) - 9(5)
The Costs of Work-In-Progress activity may be recorded in the General Ledger System to
an account that is derived from a number of different sources. If the system has
determined that Costs for a specific Task are to be charged to a specific G/L Cost
Account, enter that cost account number in this field.
Task Codes – Import/Export Data Formats
For Task Codes that are imported or exported, the following fields are input/output from/
© 2007 - 2014 by Sentinel Hill Software, all rights reserved
590
Series 5 Professional Invoicing - User Help
to an Excel spreadsheet, a tab-delimited text file, or a CSV text file. The default
filenames are either PI_Tasks_In.XLS or PI_Tasks_Out.XLS.
Column # Excel Column
Field
Format
1
A
Task Code
X(10)
2
B
Description
X(100)
3
C
Units
X(12)
4
D
Comment Code
X(8)
5
E
Commission Code
X(6)
6
F
Service/Disbursement Flag
X(1) - [S] or [D]
7
G
Chargeable Unit Rate
9,999.99-
8
H
Non-Chargeable Unit Rate
9,999.99-
9
I
Taxable Group/Flag
X(1)
10
J
Overhead %
999.99- %
11
K
Foreign/Domestic Flag
X(1) - [F] or [D]
12
L
Chargeable Flag
X(1) - [C] or [N]
13
M
Revenue Source Flag
X(1)
14
N
Profit Center Source Flag
X(1)
15
O
Invoice Section Code
X(10)
16
P
Invoice Group Code Source
Flag
X(1)
17
Q
Invoice Group Code
X(10)
18
R
Budget Source Source Flag
X(1)
19
S
Budget Group Code
X(6)
20
T
Employee/Task Costing Flag
X(1)
21
U
Task Unit Cost Rate
99,999.99-
22
V
Cost Distributions Source Flag X(1)
23
W
* Cost Account - Main Segment 9(i)
1
24
X
* Cost Account - Main Segment 9(j)
2
25
Y
Cost Account - Profit Center
9(5)
26
Z
Last Date Used (Only on
Export)
YYYY/MM/DD
© 2007 - 2014 by Sentinel Hill Software, all rights reserved
Professional Invoicing Menu Functions
591
* Each segment of the G/L Account's Main number is output into it's own
column.
9.9.8
3rd Party Bill Codes Maintenance
The Series 5 Professional Invoicing system provides the ability to accumulate charges
against a given Project, hence Customer, and have related invoices generated that are sent
to a 3rd party company.
Currently in the P/I system, 3rd Party billing information may be entered either manually using
this maintenance function, or it is loaded from user supplied Recap Detail interface files. Both
the Generalized WIP/Recap Interface 312 and the Timesheet WIP/Recap Interface 329
functions will automatically identify when 3rd party charges are loaded, and if supplied, record
or refresh the 3rd Party Billing address information.
Some of the features associated to the 3rd Party Billing in the P/I are as follows:
When the charges for a Project are billed, items are grouped by, and a separate
invoice created for, the six character Bill-To Code.
Projects that require 3rd Party Billing must have been assigned an Invoice Layout
with the Invoice Generation Type 655 property set to "L".
This 3rd Party Billing scheme was devised to produce invoices for legal firms
utilizing LEDES 1998B formatting.
When 3rd Party Invoices are printed 2 copies are printed. One copy is addressed to
the Customer associated to the Project. The second copy is addressed to the 3rd
party specified in the 3rd Party Code record. In each case, on the invoice, either of
the following messages is printed.
o FOR PROFESSIONAL SERVICES RENDERED on your behalf by: Project's
Customer Name
o FOR PROFESSIONAL SERVICES RENDERED for your client: 3rd Party
Bill-To Company Name
Invoices are issued on behave of the Customer that is associated to the Project.
The invoices are still Receivables to that customer, even though a copy of the
invoices is also issued to a 3rd party.
When these invoices are interfaced to the A/R system as Sales transactions, the
reference is recorded as follows:
3B:PPPP/BBBBBBBBBB/3rd Party Bill-To Company Name
where: PPPP are characters 3 thru 6 of the 3rd Party Bill-To Code
BBBBBBBBBB from the WIP's Referenced assumed to be the
customer's billing reference code
© 2007 - 2014 by Sentinel Hill Software, all rights reserved
592
Series 5 Professional Invoicing - User Help
The 3rd Party Bill Codes Maintenance function is accessed from the P/I Main menu, by
selecting 3rd Party Billing Addresses... from the Codes Maintenance drop-down menu.
3rd Party Bill Codes Maintenance Grid
3rd Party Bill Codes are maintained using a Series 5 grid processing screen.
"Fast Buttons"
New
Add a new 3rd Party Bill
Code
Modify Modify the 3rd Party Bill
Code highlighted in the
grid
Delete Delete the 3rd Party Bill
Code highlighted in the
grid
Print
Generate a report listing
the 3rd Party Bill Codes
already on file
After selecting the applicable Project, edit an existing 3rd Party Bill Code by double-clicking it's
associated row. Standard Series 5 grid controls apply.
Some of the special features of this "Inquiry" grid are as follows:
A given Project may be
chosen either by entering
their Project Code,
choosing it using the
Lookup binoculars icon,
or by having the next or
previous Project
displayed that has Bill-To
Codes defined. (Click
the binocular icon with
the up/down arrow to
display transactions that
exist for the prior/next
occurrence of that code
on file).
© 2007 - 2014 by Sentinel Hill Software, all rights reserved
Professional Invoicing Menu Functions
593
The Print Options tab screen will be displayed, from which you can select to direct the output
to be displayed to the screen, archived, printed, saved as an MS Word document, saved as a
PDF, and/or emailed. (Refer to the topic titled Report Generation and Printing 159 for full
details).
The report listing the 3rd Party Bill Codes on file, if archived, will be catalogued with a report
name of 3RDPTY_BILL.LST.
3rd Party Bill Code - Properties Screen
The properties for each 3rd Party Bill Code are defined with the following screen:
Field Definitions
Project Code
X(6)
Select the P/I Project Code for which 3rd Party Billing Code, and contact properties, are
© 2007 - 2014 by Sentinel Hill Software, all rights reserved
594
Series 5 Professional Invoicing - User Help
to be defined for. Invoices are generated for the Client that is associated to the Project.
3rd Party Bill Code
X(6)
This is the alphanumeric code assigned to the 3rd Party Billing Code. This code is
normally assigned when 3rd Party charges are loaded from user interfaced Recap Detail
charges.
Company Name
X(150)
This is the Company Name for which charges are accumulated on behalf of the
Customer associated to the specified Project. A copy of the invoices that are generated,
is also issued to this company.
Company Address and Contact Information
This is the address of the 3rd Party Bill-To Company. An invoice will be generated and
sent to this address.
9.9.9
Multi-Client Bill-To Codes Maintenance
The Series 5 Professional Invoicing system provides the ability to accumulate charges
against a given Project, hence Customer, and have related invoices generated that are sent
directly to different associated customers. This might be the case where charges are
recorded to a particular Project that is perhaps a head office. The charges are really
associated to branch offices that are set up in the P/I system as separate customers.
Invoices are generated, sent to the branch offices, and recorded as receivables in the Series
5 Accounts Receivable system, against the branch's customer codes.
Some of the features associated to the Multi-Client Project Billing in the P/I are as follows:
When the charges for a Project are billed, WIP items are grouped by a Billing Code
(derived from the WIP Reference field), and a separate invoice is created.
Projects that require Multi-Client Project Billing must have been assigned an Invoice
Layout with the Invoice Generation Type 655 property set to "W".
This 3rd Party Billing scheme was devised to produce invoices for charges incurred
by a number of branch offices associated to a large head office.
When 3rd Party Invoices are generated, the Customer used is that define as the
subordinate Client Bill-To.
The Multi-Client Project Bill-To Codes Maintenance function is accessed from the P/I Main
menu, by selecting Multi-Client Project Bill-To... from the Codes Maintenance drop-down
menu.
© 2007 - 2014 by Sentinel Hill Software, all rights reserved
Professional Invoicing Menu Functions
595
Multi-Client Project Bill-To Codes Maintenance Grid
Multi-Client Project Bill-To Codes are maintained using a Series 5 grid processing screen.
"Fast Buttons"
New
Add a new Multi-Client
Project Bill-To Code
Modify Modify the Multi-Client
Project Bill-To Code
highlighted in the grid
Delete Delete the Multi-Client
Project Bill-To Code
highlighted in the grid
Print
Generate a report listing
the Multi-Client Project
Bill-To Codes already on
file
After selecting the applicable Project, edit an existing Multi-Client Project Bill-To Code by
double-clicking it's associated row. Standard Series 5 grid controls apply.
Some of the special features of this "Inquiry" grid are as follows:
A given Project may be chosen
either by entering their Project
Code, choosing it using the
Lookup binoculars icon, or by
having the next or previous
Project displayed that has Bill-To
Codes defined. (Click the
binocular icon with the up/down
arrow to display transactions that
exist for the prior/next
occurrence of that code on file).
The option to List By provides the
option to browse through the Bill-Tos
associated to the selected Project
either by the Bill-To Codes, or the
Customer Codes.
© 2007 - 2014 by Sentinel Hill Software, all rights reserved
596
Series 5 Professional Invoicing - User Help
Selecting by Customer Code (All
Customers), lists all Bill-To's on file
regardless of which Customer they
belong to.
The Print Options tab screen will be displayed, from which you can select to direct the output
to be displayed to the screen, archived, printed, saved as an MS Word document, saved as a
PDF, and/or emailed. (Refer to the topic titled Report Generation and Printing 159 for full
details).
The report listing the Multi-Client Project Bill-To Codes on file, if archived, will be catalogued
with a report name of PROJ_BILLTO.LST.
Multi-Client Project Bill-To Code - Properties Screen
The properties for each Multi-Client Project Bill-To Code are defined with the following screen:
© 2007 - 2014 by Sentinel Hill Software, all rights reserved
Professional Invoicing Menu Functions
597
Field Definitions
Project Code
X(6)
Select the P/I Project Code for which Multi-Client Project Bill-Toing Code, and contact
properties, are to be defined for. Invoices are generated for the Client that is associated
to the Project.
Multi-Client Project Bill-To Code
X(20)
This is the alphanumeric code which is found in WIP charges that is used to identify the
branch, or sub-ordinate client, that the charges originated for. This code is normally
assigned when charges are loaded from user interfaced Recap Detail charges.
Bill-To Customer Code
X(6)
Each Bill Code can be linked to a Customer Code that has been already established in
the Series 5 Accounts Receivable system. Enter that Customer Code. When Invoices
are generated for the selected Project, they are addressed to this Customer. When the
Invoices are interfaced to Accounts Receivable, they are receivables to this Customer.
Contact Information
This is the contact information for the customer. If the associated invoices are
automatically emailed, these fields define the email recipient's name and address.
9.9.10 Budget Group Codes Maintenance
The Series 5 Professional Invoicing system offers the ability to define Budgets for both
revenues and costs associated to activity charged against all projects.
Budgets may be maintained for each Project separately. You can set up a single Budget for
the Project, where all WIP, Disbursements, and Cost Plus charges are totalled and tracked
as a unit; or you can divide it up so that separate Budgets are maintained for WIP,
Disbursements and Cost Plus charges. When multiple budgets are defined for a Project, it
can be broken down into a user defined Budget Group, or to an Invoice Group and/or a
Disbursement Code. How a Project is budgeted is determined by a property associated to
each Project. You may have no Budgets for a Project at all.
If Budgets are to be maintained by user defined Budget Groups, then you can set up your own
categories of budgets, which are associated to Tasks, Employees, and Disbursements.
Each Task record has a property used to indicate whether the budget codes associated to
the Task record or to the Employee record will be used. Disbursements will use the budget
code defined by the Disbursement code record.
© 2007 - 2014 by Sentinel Hill Software, all rights reserved
598
Series 5 Professional Invoicing - User Help
If you wish to create your own Categories of budgets, you will need to establish Budget Group
Codes. You will then assign Budget Groups to Employees, Tasks and/or Disbursements in
the system. When building your budgets for each Project, you would then set up a WIP, a
Disbursement and a Cost Plus Budget for each of the Budget Groups you created.
The Budget Group Codes defined here are listed in the Series 5 Budget Code LOV Lookup
window.
The Budget Group Codes Maintenance function is accessed from the P/I Main menu, by
selecting Budget Groups... from the Codes Maintenance drop-down menu.
102
Budget Group Codes Maintenance Grid
Budget Groups are maintained using a Series 5 grid processing screen.
"Fast Buttons"
New
Add a new Budget Group
Code
Modify
Modify the Budget Group
Code highlighted in the grid
Delete
Delete the Budget Group
Code highlighted in the grid
Print
Generate a report listing the
Budget Group Codes already
on file
Edit an existing Budget Groups Code by double-clicking it's associated row. Standard Series
5 grid controls apply.
The Print Options tab screen will be displayed, from which you can select to direct the output
to be displayed to the screen, archived, printed, saved as an MS Word document, saved as a
PDF, and/or emailed. (Refer to the topic titled Report Generation and Printing 159 for full
details).
The report listing the Budget Group Codes on file, if archived, will be catalogued with a report
name of PI_BUDCODE.LST.
Budget Groups Code - Properties Screen
The properties for each Budget Group Code are defined with the following screen:
© 2007 - 2014 by Sentinel Hill Software, all rights reserved
Professional Invoicing Menu Functions
599
Field Definitions
Budget Groups Code
X(6)
This is the alphanumeric code assigned to the Budget. Enter this code when a Budget
code needs to be used within the Professional Invoicing system.
Description
X(24)
Is a description of the Budget. This is printed on most, and is displayed to most screens
where the Budget Code is utilized.
9.9.11 Comment Codes Maintenance
Pre-defined Comments may be defined for use in the Professional Invoicing system.
Comment Codes with free flowing text of 50 character lines for a total of up to 1000
characters, may be created.
Text Codes may be assigned as follows:
© 2007 - 2014 by Sentinel Hill Software, all rights reserved
600
Series 5 Professional Invoicing - User Help
To Project records as notes to explain details relating to billing or contractual
agreements. These are printed on the Pre-Billing report, and available for display from
the WIP Billing and Project Inquiry operations.
To Task records as Invoicing Notes, to provided additional explanation of activity being
charged. These notes are printed on detailed invoices as determined by a property
associated to the Invoice Layouts assigned to a Project.
The Comment Codes defined here are listed in the Series 5 Comment Code LOV Lookup
window.
The Comment Codes Maintenance function is accessed from the P/I Main menu, by
selecting Comment Codes... from the Codes Maintenance drop-down menu.
102
Comment Codes Grid
Comment Codes are maintained using a Series 5 grid processing screen.
"Fast Buttons"
New
Add a new Comment
Modify
Modify the Comment
highlighted in the grid
Delete
Delete the Comment
highlighted in the grid
Print
Generate a report listing the
Comment Codes on file
Edit an existing Comment by double-clicking it's associated row. Standard Series 5 grid
controls apply.
Comment Code - Properties
The properties for each Comment are defined with the following screen:
© 2007 - 2014 by Sentinel Hill Software, all rights reserved
Professional Invoicing Menu Functions
601
Field Definitions
Comment Code
X(6)
This is the code used to identify this Comment.
Comment
X(1000)
Enter the text of the comment. Lines of text will automatically wrap at the right edge of the
field. You may press the Enter key to force a new line. Each line can contain up to 50
characters. The entire comment may only contain up to 1,000 characters of text.
9.9.12 Cost Ctr CrCard Mapping Maintenance
The Cost Center / Credit Card Mapping function is used to define credit card numbers to be
used for invoicing projects that have been set up to be paid using Paymentech. Cost Center
© 2007 - 2014 by Sentinel Hill Software, all rights reserved
602
Series 5 Professional Invoicing - User Help
codes that have been assigned to specific WIP items are basically tied to a particular credit
card for payment. This function maintains these mappings. The Cost Center to Credit Card
mapping information may be built from spreadsheet. In this case the client would provide a
file with the pertinent information.
Security Issues
To ensure the security around the use and storage of Credit Cards in the P/I System, the following
precautions have been implemented:
Credit Card Numbers, when stored within all data records are encrypted
When Credit Card Numbers are presented on screens or reports the first 12 digits are
replaced with asterisk characters
The Cost Ctr Credit Card Mapping file is also encrypted
When Invoices are interfaced to A/R, the first 12 digits of the credit card number are replaced
with asterisk characters
The Cost Center / Credit Card Mapping Maintenance function is accessed from the P/I Main
menu, by selecting Cost Ctr. / CrCard Mapping... from the Codes Maintenance drop-down
menu.
Cost Center / Credit Card Maintenance Grid
Cost Center to Credit Card mappings are maintained using a Series 5 grid processing
screen.
"Fast Buttons"
New
Add a new Cost Center to
Credit Card Mapping
Modify
Modify the Cost Center to
Credit Card Mapping
highlighted in the grid
Delete
Delete the Cost Center to
Credit Card Mapping
highlighted in the grid
Print
Generate a report listing the
Cost Center Mappings already
on file
Edit an existing Cost Center / Credit Card Mapping by double-clicking it's associated row.
Standard Series 5 grid controls apply.
The Print Options tab screen will be displayed, from which you can select to direct the output
© 2007 - 2014 by Sentinel Hill Software, all rights reserved
Professional Invoicing Menu Functions
603
to be displayed to the screen, archived, printed, saved as an MS Word document, saved as a
PDF, and/or emailed. (Refer to the topic titled Report Generation and Printing 159 for full
details).
The report listing the Cost Center / Credit Card on file, if archived, will be catalogued with a
report name of PPAYCCR_MAP.LST.
Cost Center / Credit Card Mapping - Properties Screen
The properties for each Cost Center / Credit Card Mapping are defined with the following
screen:
Field Definitions
Prepayment Code
X(3)
This is the A/R system's Prepayment Code that is associated to the Credit Card. When
invoices generated that are paid by credit card, they are interfaced to the Accounts
© 2007 - 2014 by Sentinel Hill Software, all rights reserved
604
Series 5 Professional Invoicing - User Help
Receivable system as Prepaid Sales Transactions. The Prepayment code defines the
G//L Cash account to which the cash receipt amount is recorded to.
Cost Center Code
X(15)
For charges that are loaded into the P/I system that are to be billed and paid using credit
cards, a Cost Center Code must be provided. The system assigns the credit card
number as determined by the Cost Center Code.
Credit Card - Type
drop-list
Select the type of card.
Credit Card - Number & Expiry
9(18)
Enter the credit card # without any spaces.
Credit Card - Verification Code
X(4)
The authorization code, found on the back of the card, is not used. Reserved for future
use.
Credit Card - Last Name & Other Names
X(15) & X(30)
Enter the names on the card.
Credit Card - Billing Address
2 x X(30) and X(20)
Enter the billing address for the card holder.
Cost Center / Credit Card Mapping Import/Export Data Formats
When the Credit Card Mapping information is imported or exported, the following fields
are input/output from/to an Excel spreadsheet, a tab-delimited text file, or a CSV text file.
The default filenames are either PI_CCMaps_In.XLS or PI_CCMaps_Out.XLS.
Column # Excel Column
Field
Format
1
A
Prepay Code
X(3)
2
B
Cost Center Mapping Code
X(15)
© 2007 - 2014 by Sentinel Hill Software, all rights reserved
Professional Invoicing Menu Functions
3
C
Card Type
(MC, VI, AX)
4
D
Card Number
9(18)
5
E
Card Security Code
9(3)
6
F
Card Expiry Month
9(2)
7
G
Card Expiry Year
9(2)
8
H
Card Holder Last Name
X(15)
9
I
Card Holder 1st Name
X(30)
10
J
Billing Address Line 1
X(30)
11
K
Billing Address Line 2
X(30)
12
L
Billing Address City
X(20)
13
M
Billing Address State/Prov
X(2)
14
N
Billing Address Postal/ZIP
X(10)
605
X(2)
9.9.13 Department Codes Maintenance
Department Codes are used to associate employees to specific areas of the company that
might generated revenue that is to be recorded to the G/L system using a common account.
The Series 5 P/I system provides the ability to establish special billing rates and/or the
definition of special G/L Revenue accounts that may be assigned. As defined by properties
in the P/I Control Preferences, or for the Tasks, the following may be assigned:
Revenue and Costing Accounts may be determined from the Employee's
Department code
Revenue and Costing Account Profit Center codes may be determined from the
Employee's Department code
The Department Codes defined here are listed in the Series 5 Department Code LOV Lookup
102 window.
The Department Codes Maintenance function is accessed from the P/I Main menu, by
selecting Department Codes... from the Codes Maintenance drop-down menu.
Department Codes Maintenance Grid
Department Codes are maintained using a Series 5 grid processing screen.
© 2007 - 2014 by Sentinel Hill Software, all rights reserved
606
Series 5 Professional Invoicing - User Help
"Fast Buttons"
New
Add a new Department Code
Modify
Modify the Department Code
highlighted in the grid
Delete
Delete the Department Code
highlighted in the grid
Print
Generate a report listing the
Department Codes already on
file
Edit an existing Department Code by double-clicking it's associated row. Standard Series 5
grid controls apply.
The Print Options tab screen will be displayed, from which you can select to direct the output
to be displayed to the screen, archived, printed, saved as an MS Word document, saved as a
PDF, and/or emailed. (Refer to the topic titled Report Generation and Printing 159 for full
details).
The report listing the Department Codes on file, if archived, will be catalogued with a report
name of PI_DEPTS.LST.
Department Code - Properties Screen
The properties for each Department Code are defined with the following screen:
© 2007 - 2014 by Sentinel Hill Software, all rights reserved
Professional Invoicing Menu Functions
607
Field Definitions
Department Code
X(2)
This is the alphanumeric code assigned to the Department. Enter this code as one of the
properties associated to each P/I Employee when they are added to the system.
Description
X(24)
Is a description of the Department. This is printed on most reports, and is displayed to
most screens where the Department Code is utilized.
Department Revenue Account
9(18) - 9(5)
There are a number of different ways that you can record revenue, derived from P/I, that
is recorded into the General Ledger System. If you have decided that all Revenue for a
specific Employee’s Department is to be charged to a specific G/L Revenue Account,
(as determined by a property in the P/I Control Preferences 697 or the Task Code 583 ),
enter that revenue account number in this field.
© 2007 - 2014 by Sentinel Hill Software, all rights reserved
608
Series 5 Professional Invoicing - User Help
Cost Distribution Account
9(18) - 9(5)
The Costs of Work-In-Progress activity may be recorded in the General Ledger System to
an account that is derived from a number of different sources. If the system has
determined that Costs for a specific Employee’s Department are to be charged to a
specific G/L Cost Account, enter that cost account number in this field.
Profit Center Override
9(5)
Regardless of the method used to obtain the G/L Revenue Account, you may also choose
from different ways of having the Profit Center portion assigned. (As determined by a
property in the P/I Control Preferences 697 ). If you have decided that all Revenue and/or
Cost and/or Recoverable Expense distributions for a specific Employee’s Department be
charged to a specific Profit Center, enter the desired Profit Center number here.
9.9.14 EDI Specifications Codes Maintenance
The Series 5 P/I system provides for the ability to generated electronic invoices. These are
commonly referred to as EDI invoices.
There are a variety of different EDI invoices that may be generated. Some of these are
unique to specific customer, and some are generated using specific standard formats For
each of the types of EDI invoices that may be generated, the P/I system has an EDI
Specifications Control code that is created. This Control Code defines the different properties
associated to each type of EDI invoice.
In order for a particular project to have it's invoices generated as EDI invoices, it must select
as one of it's properties, one of the codes defined by this function.
Generation of EDI Invoices
In order for a Project to generate EDI invoices, it must reference one of the
codes set up here. Also, the Invoice Layout that is assigned to that
project must be correctly configured, and be enabled to
generate EDI Invoices.
The following types of electronic invoice are supported by the P/I system
ANSI X12 4010-810 Invoice EDI formatted Invoices
Ariba EDI, cXML and CSV Invoices
Tab-Delimited ASCII Text - customized for a specific customer
Excel Worksheet - customized for a not to be identified specific customer
Dual Worksheet Excel Workbook - uses 1 worksheet for a summary, and the 2nd
worksheet listing charges detail
Paymentech "120-Byte Batch Processing" and "Orbital Gateway XML" Invoices
© 2007 - 2014 by Sentinel Hill Software, all rights reserved
Professional Invoicing Menu Functions
609
LEDES 98b and 2000S XML - for use by law firms
Customized PDF Invoices automatically emailed with a report detailing charges
Customized Character-Delimited ASCII Text Invoices
And a number of customized formats for specific customers invoiced using the P/I system
9.9.14.1 EDI Controls Maintenance Grid Screen
The "Electronic Invoices" that may be generated in the P/I system are maintained using a
Series 5 grid processing screen.
EDI "Electronic" Invoices Controls Maintenance Grid
"Fast Buttons"
New
Add a new EDI Control
Modify
Modify the EDI Control
highlighted in the grid
Delete
Delete the EDI Control
highlighted i the grid
Print
Generate a report listing
the P/I EDI Controls
Import
Imports EDI Control from
a spreadsheet
Export
Export selected EDI
Controls to a spreadsheet
Edit an existing EDI Control Code by double-clicking it's associated row. Standard Series
5 grid controls apply.
9.9.14.2 EDI Controls Properties Screen
When adding a new EDI Control Code it is important that you have determined all the
appropriate control parameters. Also, it is important that for the applicable Projects, both the
EDI Control, and the correct Invoice Layout Code has been assigned.
Each type of EDI Control has different types of control properties. However, they do have
some common attributes. These include the following:
Next Interchange Number — A unique counter used to identify the set of Invoice being
generated
© 2007 - 2014 by Sentinel Hill Software, all rights reserved
610
Series 5 Professional Invoicing - User Help
Data File Rootname — Is embedded within the name of the data file created
Data File Directory Path — is the directory where the EDI file is created
What is common is that these Electronic Invoices are actually data files. It is important that
you create the applicable data directories prior to adding any of the Control records
Warning
Once you establish the Type of EDI Control, you will not be able to
change it; so get it right the first time.
EDI Control - Add Properties Tab Screen
When adding a new EDI Control Code, those fields that are common to all types of EDI
methods are displayed. Once a type is selected, then fields relating to that type will be
displayed. The following EDI Control screen fields are common to all types:
Note that the bottom half of the properties screen will be different for each type of EDI Control
that is available. A description of each type can be found in the topics following this one.
EDI Control Properties Tab Screen - Field Definitions
Control Code
X(6)
This is the code that is used to identify the EDI Control in the P/I system. This is the code
that is entered and carried in the assorted Series 5 transactions.
Description
X(30)
© 2007 - 2014 by Sentinel Hill Software, all rights reserved
Professional Invoicing Menu Functions
611
The description is displayed for verification, and in the LOV when invoked.
Type
drop-list
The different types of EDI formats are presented in a drop-down list. Select the type to be
used.
Next EDI Interchange Number
9(9)
Every time a set of these EDI Invoices are generated, they will be assigned a unique
counter. This defines the next number that is assigned. In some cases, the Interchange
Number is embedded in the control records associated to an EDI file. A summary of the
last 12 sets of EDI Invoices that were generated is kept on file. Eash set can be identified
using the Interchange Number.
Automatically Suppress ZERO value WIP
check-box
When invoices are selected to be invoiced by the Generalized Select for Billing Operation
385 , or when Invoices are Generated 422 , (prior to being output to their respective EDI file
sets), if this field is checked, then when a WIP item that has a ZERO charge amount is
encountered, it will be suppressed from being output. It will also be automatically marked
as a "Written-Off" WIP Item.
Present this EDI Code to the E-Billing
Wizard
check-box
If this EDI Code is to be used by the E-Billing Wizard 380 , then set this check-box so it will
then be presented as a radio-button on the P/I E-Billing Interface menu 203 screen.
Datafile Root Name
X(8)
The name of the EDI file that is created will be made up of the Root Name and the Next
Interchange Number.
Data Directory Path
X(100)
This is the full path to the directory where the EDI file will be created. This could be on a
different server, or defined with a mapped drive, or defined with AcuServer.
You may click on the Browse button to locate the desired directory. Only those folders
which are descendants of the root directory, of that which is defined by the Directory Path
field, can be displayed. So if you wish to choose a folder on your "C" drive, enter C:\ in
the Directory Path before clicking the "Browse" button. Setting the Directory Path blank,
or to a path that does not have a drive letter designation, would result in only being able to
browse descendants of the user's default working directory.
© 2007 - 2014 by Sentinel Hill Software, all rights reserved
612
Series 5 Professional Invoicing - User Help
9.9.14.3 About Ariba cXML Invoices
Ariba is a company that provides 3rd party automated sourcing and procurement services.
Ariba provides B2B services linking customers and suppliers. As a Supplier, you can submit
electronic invoices through Ariba's network, that will be automatically verified, and distributed
to the appropriate companies. To make use of these types of EDI Invoices, you must be a
registered Ariba Supplier. You may visit www.ariba.com for more information.
Ariba provides support for a number of different formats in which invoices may be submitted.
One such format is cXML, (commerce eXtensible Markup Language). cXML is an open
versatile language for the transaction requirements of E-commerce solutions.
Information Standards for cXML
Specifications for cXML is available as a PDF at http://xml.cxml.org/current/cXMLUsersGuide.pdf
With respect to the P/I system, there are number of points that must be noted when
generating cXML Invoices for submission to Ariba:
A separate cXML file is needed for each Invoice that is generated
A separate invoice is generated for each P/I Project
Each Invoice generated is for a specific Bill Code that is derived from the WIP charges
Reference 1 field
The Bill Code recorded in the <Description> segment of the <Distribution> tag is the Bill
Code that was assigned to the Invoice
Individual items on the invoice are built directly from each Recap charge record
There is only one Recap charge record for each WIP record
A segment of each P/I Task Code must be mapped directly to pre-arranged Reference
ID codes.
In the cXML files, Credit charges must be recorded with # of Units > ZERO and the Unit
Rate < ZERO
In the cXML files, within any descriptive text there cannot be any trailing spaces and the
"&" character is illegal
In the cXML files, leading Zeros and commas are not allowed in numeric fields
Projects that generate cXML invoices must have Invoice Layouts defined as follows:
Field
Multiple Invoices for Project ?
Separate Invoices by
Invoice WIP Print Option
Flag Group Consolidation
Limit # of Items per Invoice
Calculate Allocated Tax to WIP
Enable the generation of EDI or XML
Setting
Yes
B - Project / Reference 1
Reference 1 with Tax
Must be NONE
9,999
Computed for each WIP/Recap for EDI
Yes
© 2007 - 2014 by Sentinel Hill Software, all rights reserved
Professional Invoicing Menu Functions
613
EDI Control - Ariba cXML Properties Sub-Screen
When submitting EDI invoices to Ariba using cXML, there are a number of control codes that
are required. These are used to identify the sender and related contract codes and security
codes. These codes must be obtained from Ariba, and defined to the P/I system.
cXML Formats
Although cXML Invoices has a well defined format of all its data tags, depending on the customer,
there are a number of variations. Currently the Series 5 has formats compatible for Bank of America,
and for JP Morgan Chase. If cXML is required for another customer, the applicable software routine
will have to be revised.
The difference primarily deals with the information that is provided in the <Distribution> set of tags
for each <InvoiceItem>. Be sure to select the correct company in the relevant XML Output Control
Options field.
The descriptive properties associated to each EDI Control Code for cXML invoices are
maintained by the following screen:
© 2007 - 2014 by Sentinel Hill Software, all rights reserved
614
Series 5 Professional Invoicing - User Help
Ariba cXML EDI Controls Screen - Field Definitions
Header From-Identity
X(6)
This code is inserted in the Header to provide authentication information. It identifies the
originator of the cXML request. This code is provided by Ariba. When submitting files for
testing, "-T" must be appended to the code.
Header To-Identity
X(40)
This code is inserted in the Header to provide authentication information. It identifies the
destination of the cXML request. This code is provided by Ariba. When submitting files for
testing, "-T" must be appended to the code.
Header Sender-Identity
X(6)
This code is inserted in the Header to provide authentication information. It allows the
receiving party party to authenticate the party who establishes the connecton. It will
typically be the same as the Header From Identity field. This code is provided by Ariba.
When submitting files for testing, "-T" must be appended to the code.
Master Agreement-ID
X(15)
This code is inserted within the InvoiceDetailOrder section. This code defines a
reference to an earlier Master Agreement document known to the invoiced organization's
system. This code is provided by the customer or by Ariba.
Supplier Secret
X(30)
This code is inserted in the Header to provide authentication information. It is used in the
cXML's Credential's SharedSecret element. It is used as the Sender's password that the
Requester can recognize. This code is provided by Ariba.
Remit-To Identifier
X(12)
This code is inserted in the InvoicePartner section of the Header to provide contact
information. It is used in the cXML's remitTo element. The assigned is either a Remit-To
address, or a prearranged code.
Detail <Distribution> Tags for:
radio-buttons
The cXML specifications have slight variations depending on the customer. The system
currently supports cXML for Bank of America and JP Morgan Chase.
© 2007 - 2014 by Sentinel Hill Software, all rights reserved
Professional Invoicing Menu Functions
615
JP Morgan Chase
Bank of America
Generic
The following variations are dealt with:
Bank of America requires the invoiceID in the <InvoiceDetailRequestHeader to
have a 5 digit Bill Code appended to the Inv# and Customer Code fields, whereas
the Generic and JP Morgan just has the Inv# and Customer Code.
<InvoiceDetailRequestHeader invoiceID='99999999-XXXXXX-BBBBB'
....>
Each charge item that is submitted on an invoice must have a valid Reference
code. These codes are set up by the master agreements made with Ariba and are
validated when the EDI files are sent to Ariba. These codes are assigned to the
<SupplierPartID> segment within the <InvoiceDetailItemReference> tag. All
WIP charges recorded in the P/I system have task codes assigned. These tasks
are basically the supplier part codes. However the P/I Task Codes are not
necessarily the codes that are used to valid the charges with Ariba. There is a
lookup function that is invoked that maps a segment of the Task Code to the
Supplier Part Reference Line of the master agreement. Depending on the prearranged contract, either characters 5-7 or 5-8 are used in the lookup function to get
the correct part ID Reference code. JP Morgan uses characters 5-7. Bank of
America uses 5-8. (If the lookup fails because a Supplier Part Reference was
not established for the given P/I Task code, the system will insert a code of
999999),
To define the billing period, JP Morgan uses their own Extrinsic defined tags
<Extrinsic name="BillingStartDate">2008-11-01</Extrinsic>
<Extrinsic name="BillingEndtDate">2008-11-30</Extrinsic>
Whereas Generic and Bank of America uses the cXML standard
<Period StartDate = "2008-10-01T12:00:00-00:00"
EndDate = "2008-10-31T12:00:00-00:00" />
JP Morgan and Bank of America each use a specific <InvoicePartner><Contact
role="soldTo"><Name> address tag; whereas the Generic format uses the
Invoice's Customer name and address for both the soldTo and the shipTo clauses.
All formats use the Invoice's Customer name and address for the shipTo clause.
Bank of America requires Tax Amounts in the <Tax>...</Tax> tags to be output
within the <InvoiceDetailItem>....</InvoiceDetailItem> section of the invoice
© 2007 - 2014 by Sentinel Hill Software, all rights reserved
616
Series 5 Professional Invoicing - User Help
information. As a result, then within the <InvoiceDetailRequestHeader
..............> tag, the <InvoiceDetailLineIndicator tag needs to have the
isTaxInLine="yes" phrase as follows:
<InvoiceDetailLineIndicator isAccountingInLine="yes"
isTaxInLine="yes"/>
JP Morgan requires that as part of the <Distribution> tag set, a Legal Entity and a
Business Unit be specified. Based on the Cost Center, that is provided in the WIP
charge's Reference 1 field, a table is looked up to derive the Legal Entity code, and
the Business Unit Code. These are used to populate the appropriate
<Distribution> tags for each <InvoiceDetailItem>
Deployment Mode
radio-buttons
Select whether files being transmitted are for testing or for production. Normally test files
are sent only when setting up the contracts with Ariba. Normally, this setting should be
set for Production.
For Production
For Testing
9.9.14.4 About Ariba CSV Invoices
Ariba is a company that provides 3rd party automated sourcing and procurement services.
Ariba provides B2B services linking customers and suppliers. As a Supplier, you can submit
electronic invoices through Ariba's network, that will be automatically verified, and distributed
to the appropriate companies. To make use of these types of EDI Invoices, you must be a
registered Ariba Supplier. You may visit www.ariba.com for more information.
Ariba provides support for a number of different formats in which invoices may be submitted.
One such format is a CSV, (comma sepearated values) text file.
Information Standards for Ariba's CSV format
Search the Ariba website at http://ariba.com for further information on the specific format.
With respect to the P/I system, there are number of points that must be noted when
generating CSV Invoices for submission to Ariba:
A separate CSV file is needed for each Invoice that is generated
A separate invoice is generated for each P/I Project
Each line item on the Invoice represents a sub-total of PI WIP charge items for a given
"Supplier ID" at a particular rate. (All WIP items with the given Supplier ID having the
same unit rate are totalled and presented as an invoice line item).
© 2007 - 2014 by Sentinel Hill Software, all rights reserved
Professional Invoicing Menu Functions
617
The Supplier ID is determined by examining the PI Task Code and locating the rightmost
3 digit number.
The Supplier ID is used as the search key in the Ariba Code Mapping file to determine
the Ariba Line Number and Task Description. (see the discussion on Ariba Invoice
Code Mapping Maintenance 683 ).
Individual items on the invoice are built directly from each PI Invoice line item
Currently taxes are not charged.
Projects that generate Ariba CSV invoices must have Invoice Layouts defined as follows:
Field
Multiple Invoices for Project ?
Separate Invoices by
Invoices Sorted by
Invoice WIP Print Option
Flag Group Consolidation
Limit # of Items per Invoice
Calculate Allocated Tax to WIP
Enable the generation of EDI or XML
Setting
Yes
T - Project (Task/Rate Sub-Totals)
Project Code
n/a - Task or Employee Name
Must be NONE
1,000
n/a
Yes
EDI Control - Ariba CSV Properties Sub-Screen
When submitting EDI invoices to Ariba using CSV, there are a number of control codes that
are required. These are used to identify the sender and related contract codes and security
codes. These codes must be obtained from Ariba, and defined to the P/I system.
The descriptive properties associated to each EDI Control Code for Ariba CSV invoices are
maintained by the following screen:
© 2007 - 2014 by Sentinel Hill Software, all rights reserved
618
Series 5 Professional Invoicing - User Help
Ariba cXML EDI Controls Screen - Field Definitions
Master Agreement-ID
X(8)
This code is the Ariba Contract Number. It will be inserted in column "C" (the one with a
heading of contracNumber ). This code is provided by the customer or by Ariba.
Remit-To Address Identifier
X(8)
This code is the Ariba Remit-To address Id. It will be inserted in column "M" (the one with
a heading of remitToAddressID ). This code is provided by the customer or by Ariba.
Ship-To Address Identifier
X(8)
This code is the Ariba Ship-To address Id. It will be inserted in column "T" (the one with a
heading of shipToAddressID ). This code is provided by the customer or by Ariba.
© 2007 - 2014 by Sentinel Hill Software, all rights reserved
Professional Invoicing Menu Functions
Empty CSV Headings Template
619
X(30)
Specify the name of the file that holds the headings, and standard values for assorted
columns of information that needs to be recorded to the CSV invoice file. The file must be
a CSV file and located in the directory where the CSV invoice files are to be generated.
9.9.14.5 About Ariba EDI Invoices
This topic is not yet completed.
9.9.14.6 About PDF Invoices
PDF Documents have now become an acceptable standard when it comes to having them
emailed. It can be easily viewed and printed by a variety of utilities, without it being altered.
The Series 5 offers the ability to generate any of it's applications forms or reports as PDF
files.
With more and customers making use of the internet, and email capabilities, it is only natural
to be able to have your invoices generated and automatically emailed to your customers. To
take advantage of this capability, you need only to create a type PDF-Emailed EDI
Specification record with the appropriate properties, and assign it to those Projects for which
PDF Invoices are to be generated and automatically emailed.
About Generating PDF Invoices
The Series 5 system generates PDF documents by first outputting the report, or form, as an Microsoft Word
document. It issues a request to Word to have the document saved as a PDF document. This capability
only is available to users that have Office 2007, or later, installed on their client.
With respect to the P/I system, there are number of points that must be noted when
generating PDF Invoices that are automatically emailed:
A separate PDF document is created for each Invoice that is generated
As an option, a Detailed Recap Report is also generated as a PDF file
When generating PDF documents, you must be executing on a Windows client PC, that
has Office 2007, or later, installed.
To have the Invoices automatically emailed, you must have Outlook running
The email address to which the Invoice is emailed must be defined in the Customer
master properties record
The message within the body of the email is obtained from a text file named in the EDI
Specs Control Properties, that must be located in the same directory where the PDF
documents are created
The PDF documents, along with their Recap Reports, are stored and kept on the
system in the designated directory
Projects that generate PDF invoices must have Invoice Layouts defined as follows:
© 2007 - 2014 by Sentinel Hill Software, all rights reserved
620
Series 5 Professional Invoicing - User Help
Field
Multiple Invoices for Project ?
Separate Invoices by
Invoice WIP Print Option
Flag Group Consolidation
Limit # of Items per Invoice
Calculate Allocated Tax to WIP
Enable the generation of EDI or XML
Setting
Yes
any setting
any setting
any setting
any setting
any setting
Yes
EDI Control - PDF Invoices Properties Sub-Screen
When having PDF Invoices generated, there are a number of control codes that are required.
These are used to identify the email sender and provide the optional names of the MS Word
Templates that may be invoked to format both the Invoice and the Recap Report.
MS Word Templates for Invoices
As these Invoices are actually generated as MS Word documents, you may define a page template.
Use MS Word to build your template. Make sure that the text of the Invoice align correctly, and that
any watermarks or graphics do not compete with the text of the invoice. (You should use a test form
when constructing the template). The template must be stored on each user's PC, that will actually
generate the invoices, in their C:\Documents and Settings\<PC UserName>
\Application Data\Microsoft\Templates" directory.
A variable must be added to the Runtime Configuration file
template. It needs to be defined as follows:
736
that specifies the name of the
MSWORD-PI-INV-SPECS LANDSCAPE "Courier New" 8 "My-PI-Invoice-Template"
If you wish to assign a different Template, than that defined in the Configuration file, you may specify
its name as one of the EDI control properties. (Separate Templates are provided for the Invoice and
for the Recap Report). Contact your system or accounting manager to have this capability set up.
The descriptive properties associated to each EDI Control Code for PDF invoices are
maintained by the following screen:
© 2007 - 2014 by Sentinel Hill Software, all rights reserved
Professional Invoicing Menu Functions
PDF Invoices Controls Screen - Field Definitions
Generate Invoices as MS Word Documents instead of
PDF's ?
check-box
Have the invoices generated as MS Word Documents instead of PDF's.
You would normally not set this check-box. You would set this ONLY if your MS Word
editor did not have the ability to "Save-As" a PDF document; or if you were doing testing
on the time required to produce these types of invoices.
Generate a Recap Detail Report ?
check-box
Have a Detail Recap record generated with each Invoice. This is a report that lists the
Recap Detail associated to the charges that make up the invoice. This report is
generated as a separate document, and will be emailed with the invoice.
© 2007 - 2014 by Sentinel Hill Software, all rights reserved
621
622
Series 5 Professional Invoicing - User Help
MS Word - Invoice Template
X(25)
By default, the invoice will be generated using the template that is defined for PI Invoices
found in the runtime Configuration file. If for the invoices associated to this EDI Control,
you wish to use a different template, enter it's filename in this field. Leaving it blank, then
the system uses the default.
MS Word - Recap Report Template
X(25)
By default, the Recap Report will be generated using the template that is defined for
generic Series 5 reports found in the runtime Configuration file. If for the Recap Reports
associated to the invoices of this EDI Control, you wish to use a different template, enter
it's filename in this field. Leaving it blank, then the system uses the default.
Generation of Recap Reports and/or Email of Invoices
radio-buttons
Normally, each Invoice is generated with it's corresponding Recap Report as PDF
documents, and emailed at the same time. As an option, you may now break this
process into two steps. The 1st step is to have the PDF Invoice generated. The 2nd step
is to have the Recap Report generated and both it and the Invoice are emailed. The 2nd
step is performed by launching a separate menu item, once all PDF Invoices are
generated in the 1st step. (Or as referred to the "After Hours" Operation).
You might choose the "After Hours" option if you find that the time required to generate the
Recap Reports is so long that it is impacting the daily production of invoices. Now you
could start the 2nd pass after hours.
As an additional option, you may choose to have the Recap Report generated from the
2nd pass, but the Invoice and the Recap Report is NOT emailed.
If you have selected to Perform the Generation of Recap Reports and Emailing 'After
Hours', then when after the invoices are printed, (after the Print/Post Finals push-button
function is finished), a list of those PDF Invoices are kept by the system. To perform the
2nd step of generating each invoice's Recap Report, and having it and the invoice
emailed, perform the following steps:
Select Invoice Processing from the main PI
Menu screen's menu-bar
Select Email EDI Gen'ed PDF Invoices
© 2007 - 2014 by Sentinel Hill Software, all rights reserved
Professional Invoicing Menu Functions
Email's Message Text File Name
623
X(25)
When the Invoice, and Recap Report, is emailed to the customer, they are attached to the
email. The actual email message will be loaded from the text file specified by this field.
This text file must be located in the same folder as where the PDF Invoices are created,
and must not exceed 8192 characters in size.
If you wish to specify a Subject for the emails that are sent, enter it as the 1st line of this
file prefixed by the word SUBJECT: The maximum length of the Subject line is 140
characters. Within the Subject line you may insert pseudo variables %%TO-CO-CODE
%%, or %FROM-COMPANY%% or the string 99999999.
These variables or string will be replaced as follows:
Replaced by
String
%%TO-CO-CODE%%
The Customer's Company Code
%%FROM-COMPANY%% Your Company Name (Defined in the Series 5 Company
System)
99999999
The Invoice Number
Note that if you use the browse button to locate this file, the Data File Directory
Path that is used to designate where the PDF Invoices are to be created, will also
be updated.
Email Senders Name
X(20)
If the PDF Invoice is emailed, this will be set as the Senders Name in the email.
© 2007 - 2014 by Sentinel Hill Software, all rights reserved
624
Series 5 Professional Invoicing - User Help
Email Senders Name and Email Address
X(120)
If the PDF Invoice is emailed, this will be set as the Senders Name and Email Address in
the email.
9.9.14.7 About Excel Workbook Invoices
This topic is not yet completed.
9.9.14.8 About ANSI X12 4010-810 EDI Invoices
This topic is not yet completed.
9.9.14.9 About Tab-Delimited Text Invoices
Enter topic text here.
9.9.14.10 About LEDES 98b Invoices
LEDES (Legal Electronic Data Exchange Standard) is a file format intended to be used by
the legal industry for the electronic exchange of information. It's primary use is for the
exchange of billing information. You may visit www.ledes.org and select "Format
Specifications" from the menu on the left for more information.
Information Standards for LEDES 98B
Specifications for LEDES98B is available at at http://ledes.org
With respect to the P/I system, there are number of points that must be noted when
generating LEDES98B Invoices for submission to applicable customers:
All records must be delimited by the "[ ]" characters. <CR><LF> may be appended for
readability, but are ignored.
All fields must be delimited by the "|" character.
All fields in the specifications are required. Where data is not available, it may be left as
"null". (Ie., "Field-2||Field-3[]"
Leading and trailing spaces in alphanumeric fields are OK
All dates must be in the format of YYYYMMDD
Spaces are not permitted in numeric fields, and negative numbers are represented with
a "-" sign as the 1st character of the field. Leading ZEROS are acceptable, but for
negative numbers must be to the right of the "-".
The first record is a Version Header and is mandatory
The 2nd record is a Header record that defines the names of each of the fields in a
given record
Projects that generate LEDES98B invoices must have Invoice Layouts defined as follows:
Field
Setting
© 2007 - 2014 by Sentinel Hill Software, all rights reserved
Professional Invoicing Menu Functions
Multiple Invoices for Project ?
Separate Invoices by
Invoice WIP Print Option
Flag Group Consolidation
Limit # of Items per Invoice
Calculate Allocated Tax to WIP
Enable the generation of EDI or XML
625
Yes
L - WIP Reference 1
Task or Employee Name
Must be NONE
none
not computed
Yes
EDI Control - LEDES Properties Sub-Screen
When generating LEDES invoices, the customer's Taxpayer ID must be listed in the body.
This code must be obtained from the customer, and defined to the P/I system within the EDI
Control Specs record.
The descriptive properties associated to each LEDES98B Control Code invoices are
maintained by the following screen:
© 2007 - 2014 by Sentinel Hill Software, all rights reserved
626
Series 5 Professional Invoicing - User Help
LEDES98b Controls Screen - Field Definitions
Consolidate to a Single LEDES
Charge
check-box
The definition for LEDES invoices allows for multiple charges per invoice. In the P/I
system, individual charges are are grouped by the WIP record's Reference 1 field,
containing a common billing code, assigned to a single invoice. There may be multiple
charges per invoice.
If the customer can only handle a single charge per invoice, then this check box may be
set to have the system consolidate all the charges of an invoice to a single charge when
the LEDES98b output. The detail contributing to the invoice within the P/I system is still
available both to the ASOW inquiry, the printed hardcopy invoice, and the P/I Historic
Invoice Inquiry functions.
Setting the Consolidation option
If the option to have charges consolidated to a single charge is selected, then the following detail
fields are set as follows:
LINE-ITEM-NUMBERUNITS –
LINE-ITEM-TOTAL –
LINE-ITEM-DATE –
Computed as the Sum-of-all-Units
Computed as the Sum-of-all-Charges
Set to the date of the most recent charge on the
invoice
LINE-ITEMDESCRIPTION –
"Search Name: *** NOT PROVIDED *** - CTLS
Monthly Charges"
LINE-ITEM-UNITCOST –
Computed as the Sum-of-all-Charges divided by
Sum-of-all-Units
TIMEKEEPER-NAME –
The Recap's Ordered-By field from the 1st charge
belonging to the Invoice
CLIENT-MATTER-ID –
The Recap's Billing Code field from the 1st charge
belonging to the Invoice
Sending Law Firm Taxpayer ID
X(40)
This field is moved to the LAW_FIRM_ID field.
Line Item Expense Code
X(10)
© 2007 - 2014 by Sentinel Hill Software, all rights reserved
Professional Invoicing Menu Functions
627
This field is moved to the LINE_ITEM_EXPENSE_CODE field.
Version/Customized For:
radio-buttons
The LEDES98b specifications have slight variations depending on the customer. The
system currently supports the standard LEDES specifications, and that as implemented
for the companies indicated.
Standard
Kilpatrick Stockton
CitiGroup (NY)
Morgan Stanley Real Estate
Merrill Lynch
The following variations for Kilpatrick Stockton are dealt with:
The [Law Firm Matter Id] is obtained starting from character position 18 of the
Invoice Reference, instead of from character position 8.
The [Invoice Description] field contains the following string:
TRANSACTIONAL SERVICES - Search Company Name - Activity
Description - Search State
[Line Item Number of Units] is always set to 1
[Line Item Unit Cost] is always set to the same value as [Line Item Total] field
[Line Item Description] and [Timekeeper Name] fields are always blank
9.9.14.11 About LEDES 2000s XML Invoices
LEDES (Legal Electronic Data Exchange Standard) is a file format intended to be used by
the legal industry for the electronic exchange of information. It's primary use is for the
exchange of billing information. You may visit www.ledes.org and select "Format
Specifications" from the menu on the left for more information.
Information Standards for LEDES 2000S
Specifications for LEDES 2000 is available at at http://ledes.org/ledes2000.aspx
With respect to the P/I system, there are number of points that must be noted when
generating LEDES 2000 Invoices for submission to applicable customers:
There is one Recap record for each WIP charge record.
The <Firm> tag's <Tax-ID> and <Firm-ID> fields are loaded from the corresponding
© 2007 - 2014 by Sentinel Hill Software, all rights reserved
628
Series 5 Professional Invoicing - User Help
LEDES 2000 Control property screen's fields.
The <Client> tag's <Contact_First & Last_Name> fields is loaded from the Customer
record's primary contact.
The <Matter> tag's <Cl_Matter_ID> field is loaded from the Invoice Bill Code, (which
is the WIP's Reference field).
The <Matter> tag's <Matter_Name> field is loaded from the Invoice Attention-To field,
(which is the WIP's Reference 2 field).
The <Fee> tag's <Charge_Desc> field is loaded from the Recap's Search Name field.
The <Fee> tag's <Acca_Task> field is loaded from the WIP's P/I Task code field.
The <Fee> tag's <Acca_Activity> field is loaded from the Recap's Activity Description
field.
Leading and trailing spaces in alphanumeric fields are OK, (but they are removed in the
generated file)
All dates must be in the format of YYYYMMDD
Spaces are not permitted in numeric fields, and negative numbers are represented with
a "-" sign as the 1st character of the field. Leading ZEROS are acceptable, but for
negative numbers must be to the right of the "-".
Projects that generate LEDES 2000 invoices must have Invoice Layouts defined as follows:
Field
Multiple Invoices for Project ?
Separate Invoices by
Invoice WIP Print Option
Flag Group Consolidation
Limit # of Items per Invoice
Calculate Allocated Tax to WIP
Enable the generation of EDI or XML
Setting
Yes
L - WIP Reference 1
Task or Employee Name
Must be NONE
none
not computed
Yes
EDI Control - LEDES 2000 Properties Sub-Screen
When generating LEDES 2000 invoices, the customer's Taxpayer ID must be listed in the
body. This code must be obtained from the customer, and defined to the P/I system within
the EDI Control Specs record.
The descriptive properties associated to each LEDES 2000 Control Code invoices are
maintained by the following screen:
© 2007 - 2014 by Sentinel Hill Software, all rights reserved
Professional Invoicing Menu Functions
LEDES 2000 Controls Screen - Field Definitions
Your FIrm's Tax ID
X(40)
This field is moved to the <firm> .... <lf_tax_id> tag field.
Your Firm's LEDES ID Code
X(10)
This field is moved to the <firm> .... <lf_id> tag field.
Your Firm's Company Name
X(30)
This field is moved to the <firm> .... <lf_id> tag field.
© 2007 - 2014 by Sentinel Hill Software, all rights reserved
629
630
Series 5 Professional Invoicing - User Help
9.9.14.12 About Paymentech CrCard Invoices
The Paymentech format was developed for merchants and vendors who want to use
Paymentech payment processing services. This format was designed to give great flexibility
to users when transmitting data by using extension and product records related to specific
methods of payments and products. Files are generated as the "120-Byte Batched Format".
This format allows merchants to use only the records that are needed for their business.
Multiple merchant divisions and transaction types (authorizations, refunds, sales/deposits,
pre-notes, ACH debits, ACH credits, etc.) can be sent within a single submission. (The
format contains several layers of record count and dollar amount verification to ensure proper
data validation.) It is batch oriented. It also supports the sending of name and address
information, which is required from all merchants and vendors for the proper processing of
some products. Paymentech accepts files at any time, 24 hours per day, every day of the
year.
You may visit www.paymentech.com for more information, or if available refer to the PDF
document named Batch_Processing_Specs.pdf.
Information Standards for Paymentech
Specifications for Batch processing for Paymentech is available at at http://www.paymentech.com
With respect to the P/I system, there are number of points that must be noted when
generating Visa charged Invoices for submission to applicable customers:
All fields are required
All alpha characters should be in capital letters
The format of files generated is for Procurement Level 3 for VISA
For each P/I WIP charge there is one Recap record
Paymentech charges are derived using information from the Recap records, and the
Invoice Item records
Reference 1 defines the Recap Cost Center that is used to identify the Credit Card
Number
Projects that generate Paymentech CrCard Batched invoices must have Invoice Layouts
defined as follows:
Field
Multiple Invoices for Project ?
Separate Invoices by
Invoice WIP Print Option
Flag Group Consolidation
Limit # of Items per Invoice
Calculate Allocated Tax to WIP
Limit the $ Value of an Invoice
Enable the generation of EDI or XML
Setting
Yes
U - WIP Reference 1 (US Bank)
Reference 1 with Tax
Must be NONE
none
not applicable
$ 4,500
Yes
© 2007 - 2014 by Sentinel Hill Software, all rights reserved
Professional Invoicing Menu Functions
631
EDI Control - Paymentech Visa Charge Properties Sub-Screen
When generating Paymentech invoices, the Header ID codes and passwords must be
passed, using those assigned for the contract. These codes must be obtained from
Paymentech, and defined to the P/I system within the EDI Control Specs record.
The descriptive properties associated to each Paymentech Control Code invoices are
maintained by the following screen:
Paymentech Visa Card Controls Screen - Field Definitions
Consolidate to a Single Credit Card check-box
Charge
The definition for Paymentech Visa card charged invoices allows for multiple charges per
invoice. However, Paymentech charges a fee for every charge submitted. In the P/I
system, individual charges are grouped by the WIP record's Reference 1 field, containing
© 2007 - 2014 by Sentinel Hill Software, all rights reserved
632
Series 5 Professional Invoicing - User Help
a common billing code, assigned to a single invoice. This Bill code is used in the P/I
system to determine the credit card number. (See the topic titled Cost Center Credit
Card Mapping 601 ). There may be multiple charges per invoice.
If you wish to reduce the fees paid to Paymentech, then set this check box to have the
system consolidate all the charges of an invoice to a single charge when the output file is
generated. The detail contributing to the invoice within the P/I system is still available both
to the ASOW inquiry, the printed hardcopy invoice, and the P/I Historic Invoice Inquiry
functions.
Setting the Consolidation option
If the option to have charges consolidated to a single charge is selected, then the following detail
fields are set as follows:
PP1-Item-Quantity –
Computed as the Sum-of-all-Units
PP2-Item-ExtendedAmount –
Computed as the Sum-of-all-Charges
PL2-Invoice-SalesTax-Amt –
PP2-Item-Commoditycode –
PP2-Item-Unit-Cost –
S-Merchant-OrderIdentifier –
Computed as the Sum-of-all-Allocated-TaxCharges
"CTLS MONTHLY CHARGES"
Computed as the Sum-of-all-Charges divided by
Sum-of-all-Units
The first 8 bytes stores the lowest RECAP-DETAILWIP-ID of the items on the invoice
PL3-Item-Description –
"** ASSORTED **"
SEARCH-NAME)
(replacing RECAP-
PL3-Product-Code –
"** ASSORTED **"
REFERENCE-2)
(replacing RECAP-
PL2-CustomerReference-Id –
A/R Prepayment Code
"** ASSORTED **" (replacing RECAPREFERENCE-3)
X(3)
When the invoice is posted to the Accounts Receivable system, it will be recorded as a
Prepaid Sales transaction. Prepayment Codes are used to identify the method of
payment, and the G/L Cash Account number to which the payment amount will be
recorded to. These codes are defined in the Prepayment Code Maintenance routine of
the Accounts Receivable System.
© 2007 - 2014 by Sentinel Hill Software, all rights reserved
Professional Invoicing Menu Functions
Cardholder's Statement - Merchant
Name
633
X(12)
This field would be moved into the Merchant Descriptor record's Item-Description field.
This record is not being used at this time.
Cardholder's Statement - Service
Provided
X(9)
This field would be moved into the Merchant Descriptor record's Name field. This record
is not being used at this time. However, if the literal TEST is entered into this field, a
series of 4 different Visa Card numbers will be inserted, instead of the ones assigned to
the invoice.
Header Codes - Presenter ID &
Password
9(6) & X(8)
This Presenter ID is a 6 digit numeric number assigned by Paymentech. The password
is an 8 character code, also assigned by Paymentech. These are moved to the PID
Batch Header record.
Header Codes - Submitter ID &
Password
9(6) & X(8)
Assigned by Paymentech. These are moved to the "PID" Batch Header record.
Merchant Division Number
9(10)
Assigned by Paymentech. This is moved to the first field, Division Number, of the "S"
Detail record.
Paymentech Records - Field Assignments
A variety of different records potentially may be output to be submitted to Paymentech.
For the P/I system, the following records are output:
Record ID
Prefix
Record Name
PID=
Batch Header Record
M
Merchant Descriptor
© 2007 - 2014 by Sentinel Hill Software, all rights reserved
Comment
Not used by the P/I system
634
Series 5 Professional Invoicing - User Help
S
Detail WIP Item with Action Code
"DC" (or "RF" for refunds)
PPC-001
Procurement Level 2 Customer
Reference/Sales Tax
PP0-001
Procurement Level 3 Visa Charge
Record 1
PP1-002
Procurement Level 3 Visa Detail
Record 1
PP2-002
Procurement Level 3 Visa Detail
Record 2
LA
Card Holder Bill-To Address
B RECS=
Batch Totals
T RECS=
Totals
PID=
Trailer
1 set of PP1/
PP2 records
for each P/I
WIP Charge
For each
Invoice
9.9.14.13 About Paymentech XML Invoices
Chase Paymentech Solutions, LLC., offers a Batched XML Interface for merchants and
vendors who want to use their payment processing services. This format was designed to
give great flexibility to users when transmitting data by using extension and product records
related to specific methods of payments and products. Files are generated as XML files and
is referred to as the Orbital Gateway Batch XML Interface.
The implementation used in Series 5 generates XML files for submission into the Orbital
Gateway Batch SFTP Internet Interface through the Salem platform. The Salem
platform, sometimes referred to as the Stratus, is targeted to "Card-Not-Present" and larger
customers. The other platform is the Tampa or (PNS) platform that is NOT used in Series 5.
Requests for customer payment is done utilizing Customer Profiles. Cardholder information
is stored in Chase Paymentech's Orbital Gateway. Rather than maintaining, and passing,
credit card information, a token customer reference code is passed.
You may visit www.chasepaymentech.com/payment-gateway/ for more information, or if
available refer to the PDF document named
Orbital_Gateway_Batch_XML_Specification.pdf.
Information Standards for Chase Paymentech
Specifications for Batch processing for the Orbital Gateway is available at at http://
www.chasepaymentech.com/payment-gateway/
© 2007 - 2014 by Sentinel Hill Software, all rights reserved
Professional Invoicing Menu Functions
635
With respect to the P/I system, there are number of points that must be noted when
generating Visa charged Invoices for submission to applicable customers:
The values of all XML tags must be left justified without leading spaces or ZEROS
A maximum of 999,999 charges per file can be processed
The format of files generated is for Procurement Level 3 for VISA
For each P/I WIP charge there is one Recap record
Paymentech charges are derived using information from the Recap records, and the
Invoice Item records
Reference 1 defines the Recap Cost Center that is used to identify the Credit Card
Number
Projects that generate LEDES98B invoices must have Invoice Layouts defined as follows:
Field
Multiple Invoices for Project ?
Separate Invoices by
Invoice WIP Print Option
Flag Group Consolidation
Limit # of Items per Invoice
Calculate Allocated Tax to WIP
Limit the $ Value of an Invoice
Enable the generation of EDI or XML
Setting
Yes
U - WIP Reference 1 (US Bank)
Reference 1 with Tax
Must be NONE
none
not applicable
none
Yes
EDI Control - Chase Paymentech XML Properties Sub-Screen
When generating Paymentech XML invoices, the Header ID codes and passwords must be
passed, using those assigned for the contract. These codes must be obtained from Chase
Paymentech, and defined to the P/I system within the EDI Control Specs record.
The descriptive properties associated to each Paymentech XML Control Code invoices are
maintained by the following screen:
© 2007 - 2014 by Sentinel Hill Software, all rights reserved
636
Series 5 Professional Invoicing - User Help
Chase Paymentech XML Controls Screen - Field Definitions
Merchant ID
9(12)
This is the Gateway Merchant Account Number that is assigned by Chase Paymentech.
This account number must match that of your host platform. When transmitting XML files
to Salem, this is a 6-digit Salem Division Number.
Merchant Name
X(12)
This field is used for information purposes only, and is otherwise not being used.
Commodity Code
X(12)
The Commodity Code is used to classify the item that was purchased; and is required for
charges to VISA. When submitting charges using Level 2 Line Item Detail, this string is
© 2007 - 2014 by Sentinel Hill Software, all rights reserved
Professional Invoicing Menu Functions
passed in the <PC3LineItem> tag. Accepted values of this field are defined by VISA.
SFTP User ID & Password
X(15) & X(15)
Assigned by Chase Paymentech. These fields are output to the <userID> and
<password> tags found at the beginning of the <batchFileID> set of tags.
Chase Paymentech Records - XML Tags Assignments
A variety of different tag sets potentially may be output to be submitted to Chase
Paymentech for processing. For the P/I system, the following request elementsrecords
are output:
Tag Set
Comment
<?xml version="1.0" encoding="utf-8"?>
<transRequest........>
File Header Request
Elements
<batchFileID>
<userID> .....................</userID>
<fileDateTime> ...........</fileDateTime>
<fileID> ........................</fileID>
<version> .....................</version>
</batchFileID>
Holds information about the
company submitting files to
Chase Paymentech
<newOrder BatchRequestNo="nnnnnn">
<industryType> ....................</industryType>
<bin> ....................................</bin>
<cardBrand> ........................</cardBrand>
<useCustomerRefNum> .....</
useCustomerRefNum>
<PC3Core>
<PC3FreightAmt>> ................</PC3DiscAmt>
<PC3LineItemCount>> ................</
PC3LineItemCount>
<PC3LineItemArray>
<PC3LineItem>
<PC3DtlIndex> .....</
PC3DtlIndex>
<PC3DtlDesc> ......</
PC3DtlDesc>
<PC3DtlProdCd> ...</
PC3DtlProdCd>
© 2007 - 2014 by Sentinel Hill Software, all rights reserved
Level 3
Detail Line
Items (one
for each P/
I WIP
New Order
Request
Elements
(For each
Invoice)
637
638
Series 5 Professional Invoicing - User Help
<PC3DtlQty> .........</
Charge )
PC3DtlQty>
<PC3DtlUOM> .......</
PC3DtlUOM>
<PC3DtlTaxAmt> ...</
PC3DiscAmt>
.......
.......
<PC3DtlUnitCost> ...</
PC3DtlUnitCost>
<PC3DtlDebitInd> ....</
PC3DtlDebitInd>
</PC3LineItem>
<PC3LineItemArray>
</PC3Core>
<retryTrace> ........................</retryTrace>
<sDMerchantName> ...........</sDMerchantName>
</newOrder>
<endOfDay BatchRequest="nnn">
<bin> .....................</bin>
<merchantID> .......<merchantID>
<terminalID> ..........</amount>
<endOfDay .......>
Batch Close Request
Elements
</transRequest>
9.9.14.14 Custom Character-Delimited Text Invoices
This type of EDI Layout is designed for specific customers to which assorted characterdelimited EDI Invoice files are to be generated.
Customized EDI Layouts
Unless a given customer's definition matches that of any of those currently offered, it will be
necessary to have Sentinel Hill Software Inc. revise the P/I System for the desired field
layouts.
For each customer requiring customized EDI Invoices that are output as a specific character
delimited ASCII text, a customized format is offered.
In each case, the fields of data presented might be thought of as a column of information,
separated by a designated character.
© 2007 - 2014 by Sentinel Hill Software, all rights reserved
Professional Invoicing Menu Functions
639
Currently the following formats are offered:
Customer
Goodwin & Procter, LLP
Field
Delimiter
"|"
Notes
A custom format made up of an Invoice
Summary Line, (indicated by the "#"
character, and Detail lines as needed,
(indicated by the "D" character.
There are NO headers
Mayer, Brown, Rowe & Maw,
LLP
"|"
A custom format made up of an Invoice
Summary Line, (indicated by the "#"
character, and Detail lines as needed,
(indicated by the "D" character.
There are NO headers
Masuda, Funai, Eifert &
Mitchel, Ltd.
"|"
Is a a custom variation of the LEDES
98b format, with only a limited # of
fields being output
There is a one header line output.
Proskauer & Rose,LLP
"~"
Is a totally unique custom format
consisting of a single text line for each
invoice.
There are NO headers
Sidley & Austin, LLP
","
Is a totally unique custom format.
For each set of invoices generated,
there is both an Invoices Summary file
and a Invoices Detail file.
The Invoices Summary file provides a
sub-total of invoices for each
Customer, and a Grand Total line.
The Detail file lists each charge for the
Invoices generated.
For each file, there are headers
Projects that generate these Custom Formatted ASCII Text invoices must have Invoice
Layouts defined as follows:
Field
Multiple Invoices for Project ?
Separate Invoices by
Invoice WIP Print Option
Flag Group Consolidation
Limit # of Items per Invoice
Calculate Allocated Tax to WIP
© 2007 - 2014 by Sentinel Hill Software, all rights reserved
Setting
Yes
L - WIP Reference 1
Task or Employee Name
Must be NONE
none
not computed
640
Series 5 Professional Invoicing - User Help
Enable the generation of EDI or XML Yes
EDI Control - Custom Character Delimited Format Properties Sub-Screen
The descriptive properties associated to each of these Custom Control Code invoices are
maintained by the following screen:
Custom Character Delimited Controls Screen - Field Definitions
Taxpayer ID
X(12)
This field is provided to enter a unique Tax ID code if required by the customized layout
Line Item Expense Code
X(12)
This field is provided to enter a unique Line Item Expense Code if required by the
customized layout
© 2007 - 2014 by Sentinel Hill Software, all rights reserved
Professional Invoicing Menu Functions
Version/Customized For:
641
radio-buttons
Different layout are set up for different companies. Select the Company for which the EDI
Control Code is being defined for.
Goodwin Procter, LLP
Mayer, Brown, Rowe & Maw, LLP
Masuda, Funai, Eifert & Mitchell, Ltd.
Proskauer & Rose, LLP
Sidley & Austin, LLP
9.9.14.15 About BB & T Invoices
This topic is not yet completed.
9.9.14.16 About LaSalle Excel Invoices
This topic is not yet completed.
9.9.14.17 About Riemer Invoices
This topic is not yet completed.
9.9.14.18 About Wilmington Trust Invoices
This is a custom EDI file, that is developed specifically for Wilmington Trust. Each invoice
generates a single Excel worksheet, itemizing the detail charges on each row.
Blank Excel Spreadsheet
Each Invoice generated produces a separate Excel spreadsheet. Initially, a blank spreadsheet, that has
been formatted with the appropriate codes, is used when recording the individual charges. At the time of
this writing, it resides on the Plano Management PC in P:\ausi_data\edi\wilmington named
Blank_WILMTRST_Invoice.xls.
With respect to the P/I system, there are number of points that must be noted when
generating the Wilmington Trust Invoices:
When generating Invoices, P/I should be executed as a FAT client on a PC system, so
the Excel spreadsheet will be created directly into Excel
A separate invoice is generated for each P/I Project
Each PI invoice line item record is a sub-total of all the WIP charges having the same
Bill-Code found in the Reference-1 field
Each Bill-Code represents one of their approximately 75 lenders, each with a unique
Cost Center #.
Individual items on the EDI invoice are built directly from each PI Invoice line item
© 2007 - 2014 by Sentinel Hill Software, all rights reserved
642
Series 5 Professional Invoicing - User Help
record, which is a sub-totalling line.
There is only one Recap charge record for each WIP record, (although they are not
used to build the EDI invoice).
The last 4 digits of the Bill-Code, found in the WIP's Reference field, is used as the
Cost Centre which is appended to "01013686302" which is output to column H of the
spreadsheet.
Projects that generate Wilmington Trust invoices must have Invoice Layouts defined as
follows:
Field
Multiple Invoice, EDI or Grouped
SubTotals ?
Separate Invoices by
Invoice WIP Print Option
Flag Group Consolidation
Setting
Yes
B - Project / Reference 1
Reference 1 with Tax
Regardless of Flag, sub-total by Reference
Bill-Code
Limit # of Items per Invoice
No limit
Calculate Allocated Tax to WIP
Computed and printed as a Sub-Total in own
Tax column
Enable the generation of EDI or XML Yes
EDI Control - Wilmington Trust Properties Sub-Screen
When submitting EDI invoices to Wilmington Trust, there are no special properties, other than
the default root name of the Excel spreadsheet, and the directory path where it is created.
The following screen is displayed:
© 2007 - 2014 by Sentinel Hill Software, all rights reserved
Professional Invoicing Menu Functions
643
9.9.15 Employee Rate-Group Codes Maintenance
The Professional Invoicing Employee Rate-Group Codes are used to categorize and group
employees, or machines, that will be recording activity to different Projects.
The Series 5 P/I system provides the ability to establish special billing rates and/or the
definition of special G/L Revenue accounts that may be assigned. These Special Rates
and Special Accounts 677 may be created for groups of employees belonging to specific
Employee Rate-Groups.
671
The Employee Rate-Group Codes defined here are listed in the Series 5 Employee RateGroup Code LOV Lookup 102 window.
The Employee Rate-Group Codes Maintenance function is accessed from the P/I Main
menu, by selecting Employee Rate-Group Codes... from the Codes Maintenance dropdown menu.
Employee Rate-Group Codes Maintenance Grid
Employee Rate-Group Codes are maintained using a Series 5 grid processing screen.
© 2007 - 2014 by Sentinel Hill Software, all rights reserved
644
Series 5 Professional Invoicing - User Help
"Fast Buttons"
New
Add a new Employee RateGroup Code
Modify
Modify the Employee RateGroup Code highlighted in the
grid
Delete
Delete the Employee RateGroup Code highlighted in the
grid
Print
Generate a report listing the
Employee Rate-Group Codes
already on file
Edit an existing Employee Rate-Group Code by double-clicking it's associated row. Standard
Series 5 grid controls apply.
The Print Options tab screen will be displayed, from which you can select to direct the output
to be displayed to the screen, archived, printed, saved as an MS Word document, saved as a
PDF, and/or emailed. (Refer to the topic titled Report Generation and Printing 159 for full
details).
The report listing the Employee Rate-Group Codes on file, if archived, will be catalogued with
a report name of PI_EMPGROUP.LST.
Employee Rate-Group Code - Properties Screen
The properties for each Employee Rate-Group Code are defined with the following screen:
© 2007 - 2014 by Sentinel Hill Software, all rights reserved
Professional Invoicing Menu Functions
Field Definitions
Employee Rate-Group Code
X(6)
This is the alphanumeric code assigned to the Employee Rate-Group. Enter this code
when a Employee Rate-Group code needs to be used within the Professional Invoicing
system.
Description
X(24)
Is a description of the Employee Rate-Group. This is printed on most reports, and is
displayed to most screens where the Employee Rate-Group Code is utilized.
9.9.16 Assign Valid Projects to Employees
The Series 5 Professional Invoicing system provides the ability to accumulate charges
against a given Project. These are typically recorded as WIP items using the Employee
Timesheet Entry 263 operation. If you have a lot of Projects and/or Tasks, and wish to either
streamline the time entry function, or restrict which Projects and Tasks an employee can
record time against, you may set up those Projects using this maintenance routine. Should
© 2007 - 2014 by Sentinel Hill Software, all rights reserved
645
646
Series 5 Professional Invoicing - User Help
you have employees that need the ability to enter time-sheet activity over the internet,
assigning Projects and Tasks to those employees makes it easier for them, as the assigned
Projects and Tasks will be presented to them in a drop-down list.
Some of the features associated to the assignment of Projects and Tasks to Employees in
the P/I system are as follows:
One or more Projects may be assigned to each Employee
Optionally, up to 50 Tasks may be assigned to each Project that is assigned to an
Employee.
The assignment of a Project to an Employee can be either indefinite, or up until a
specific date.
If any Projects are assigned to an Employee, then when time-sheets are entered,
only those assigned Projects may be selected. They are presented in a drop-down
list.
The Series 5 Professional Invoicing system offers a function that will generate a spreadsheet
for each employee pre-listing potential time sheet activity to be recorded. A number of
standard entries are created assigned to a specific administrative Project, but as well, entries
for the Projects and Tasks that are defined by this maintenance function are also created.
This time-sheet spreadsheet is then automatically emailed to each employee. The
spreadsheet may then be edited as required, and emailed back. An associated function, that
may be executed, will read the returned emails from employees containing the completed
time-sheet spreadsheet as an attachment. (See the topics titled Email Blank Employee
Timesheets 299 and Load Timesheets from Employee Emails 305 for more information).
The Employee Assigned Projects Maintenance function is accessed from the P/I Main menu,
by selecting Employee Assigned Projects... from the Codes Maintenance drop-down
menu.
Employee Assigned Projects Maintenance Grid
The Assignment of Projects to Employees is a function maintained using a Series 5 grid
processing screen.
© 2007 - 2014 by Sentinel Hill Software, all rights reserved
Professional Invoicing Menu Functions
647
"Fast Buttons"
New
Add a new Project to an
Employee
Modify Modify the properties of
the Employee assigned
Project that is highlighted
in the grid
Delete Delete the Employee
assigned Project that is
highlighted in the grid
Print
Generate a report listing
the Projects that have
been assigned to
Employees
Import Load Assigned Employee
Projects from a
spreadsheet
Export Export Assigned
Employee Projects to a
spreadsheet
After selecting the applicable Employee, or Project, edit an existing assignment by doubleclicking it's associated row. Standard Series 5 grid controls apply.
Some of the special features of this "Inquiry" grid are as follows:
A given Employee or Project may
be chosen either by entering their
Employee or Project Code,
choosing it using the Lookup
binoculars icon, or by having the
next or previous code displayed
that has an assignment defined.
(Click the binocular icon with the
up/down arrow to display
transactions that exist for the prior/
next occurrence of that code on
file).
The option to List By provides the
ability to browse through the
assignments either showing
© 2007 - 2014 by Sentinel Hill Software, all rights reserved
648
Series 5 Professional Invoicing - User Help
Projects associated to a selected
Employee, or showing those
Employees to which a selected
Project has been assigned to.
The Print Options tab screen will be displayed, from which you can select to direct the output
to be displayed to the screen, archived, printed, saved as an MS Word document, saved as a
PDF, and/or emailed. (Refer to the topic titled Report Generation and Printing 159 for full
details).
The report listing the Projects and Tasks that have been assigned to each Employee on file, if
archived, will be catalogued with a report name of VALID_EMPLPROJ.LST.
Employee Assigned Projects - Properties Screen
The properties for each Project that has been assigned to an Employee are defined with the
following screen:
© 2007 - 2014 by Sentinel Hill Software, all rights reserved
Professional Invoicing Menu Functions
649
Field Definitions
Employee Code
X(6)
Select the P/I Employee Code to which Projects are to be assigned.
Project Code
X(6)
Select the P/I Project Code to be assigned to the selected Employee. When entering
time-sheets for this employee, this Project will be presented in a drop-down list.
Enable Use of Project
radio-buttons & mm/dd/yy
If you wish to specify a Date Limit up to which this Project may be recorded on the
employee's time sheets, click the appropriate button, and enter a date. When entering
the time-sheet, the WIP Transaction Date is tested against the cut-off date entered here.
Task Used with this Project
radio-buttons
If you wish to assign specific Task Codes that are permitted to be entered on the
employee's time sheets when the associated Project is selected, set the Only Selected
Tasks radio-button. Then double-click in the drop-list table to choose up to 50 Task
Codes that apply.
Restricted Use ONLY for Web Entered
Time-sheets
check-box
If you wish to limit the use of this Project, and Tasks, by this Employee ONLY when TimeSheets are entered through the company's web-site, set this check-box. If not checked
then the use of this Project and Tasks is valid both for Website entry, and normal terminal
Time-Sheet entry.
Task to be Used with Project by the
Employee
table
To add or remove Tasks that are to be the only ones that can be recorded against the
selected Employee and Project, double-click any part of the table. A Select Task(s)
window 150 will be displayed from which specific Tasks may be chosen. Only up to 50
Tasks may be selected. When entering time-sheets for this employee, selected Tasks
will be presented in a drop-down list.
© 2007 - 2014 by Sentinel Hill Software, all rights reserved
650
Series 5 Professional Invoicing - User Help
9.9.17 Invoice Group Codes Maintenance
The Professional Invoicing Invoice Group Codes are used to categorize and group tasks that
will be recording activity to different Projects.
For a given Task Code, it might be associated to a particular Invoice Group, and an Invoice
Section. When generating invoices for a particular Invoice Layout, items may be grouped and
listed with sub-totals for an Invoice Section. Invoice Sections are just Invoice Groups that are
used as a means for providing two levels of grouping on Invoices.
The Series 5 P/I system provides the ability to establish special billing rates and/or the
definition of special G/L Revenue accounts that may be assigned. These Special Rates 671
and Special Accounts 677 may be created for groups of Task belonging to specific Invoice
Groups.
Invoice Groups may be used within the Professional Invoicing system assigned to the
following codes and/or are used as follows:
Invoice Section Codes and Invoice Group Codes are assigned to each P/I Task code
Invoice Group Codes may be assigned to P/I Employee codes
Special Rates may be created for Invoice Groups
When the G/L Revenue account is assigned to chargeable WIP items, it could be
derived either from the Invoice Section or the Invoice Group
When the G/L Cost account is assigned to WIP items, it could be derived either from
the Invoice Section or the Invoice Group
Invoices may be generated with sub-totals for charges for Tasks associated to Invoice
Sections and Invoice Groups
Project Budgets may be maintained for each Invoice Group
The Invoice Group Codes defined here are listed in the Series 5 Invoice Group Code LOV
Lookup 102 window.
The Invoice Group Codes Maintenance function is accessed from the P/I Main menu, by
selecting Invoice Group Codes... from the Codes Maintenance drop-down menu.
Invoice Group Codes Maintenance Grid
Invoice Group Codes are maintained using a Series 5 grid processing screen.
© 2007 - 2014 by Sentinel Hill Software, all rights reserved
Professional Invoicing Menu Functions
651
"Fast Buttons"
New
Add a new Invoice Group
Code
Modify
Modify the Invoice Group Code
highlighted in the grid
Delete
Delete the Invoice Group
Code highlighted in the grid
Print
Generate a report listing the
Invoice Group Codes already
on file
Import
Load Invoice Group Codes
from a spreadsheet
Export
Ouptut Invoice Group Codes
to a spreadsheet
Edit an existing Invoice Group Code by double-clicking it's associated row. Standard Series
5 grid controls apply.
The Print Options tab screen will be displayed, from which you can select to direct the output
to be displayed to the screen, archived, printed, saved as an MS Word document, saved as a
PDF, and/or emailed. (Refer to the topic titled Report Generation and Printing 159 for full
details).
The report listing the Invoice Group Codes on file, if archived, will be catalogued with a report
name of PI_INV_GROUP.LST.
Invoice Group Code - Properties Screen
The properties for each Invoice Group Code are defined with the following screen:
© 2007 - 2014 by Sentinel Hill Software, all rights reserved
652
Series 5 Professional Invoicing - User Help
Field Definitions
Invoice Group Code
X(10)
This is the alphanumeric code assigned to the Invoice Group. Enter this code when an
Invoice Group code needs to be used within the Professional Invoicing system. Note that
Invoice Groups are also used to define any Invoice Sections that are utilized. (They are
stored as Invoice Groups, but where reference, are treated as an Invoice Section).
Description
X(24)
Is a description of the Invoice Group. This is printed on most reports, and is displayed to
most screens where the Invoice Group Code is utilized. Invoices may be generated using
a variety of different formats. Depending on the sorting and/or grouping option for a
particular Invoice Layout, items are grouped by Invoice Section or Invoice Group Codes.
This description will appear as invoice section sub-headings where applicable.
Invoice Group Display Units
X(14)
Depending on the sorting and/or grouping option for a particular Invoice Layout, items are
© 2007 - 2014 by Sentinel Hill Software, all rights reserved
Professional Invoicing Menu Functions
653
grouped by Invoice Section or Invoice Group Codes. This description will appear as the
literal following any units totals that are reported on invoices where applicable.
Invoice Group Revenue Account
9(18) - 9(5)
The Revenue associated to Work-In-Progress activity may be recorded in the General
Ledger System to an account that is derived from a number of different sources. If the
system has determined that Revenue for a specific set of tasks, or an Invoice Group, are
to be charged to a specific G/L Cost Account, enter that cost account number in this
field.
Cost Distribution Account
9(18) - 9(5)
The Costs of Work-In-Progress activity may be recorded in the General Ledger System to
an account that is derived from a number of different sources. If the system has
determined that Costs for a specific Invoice Group are to be charged to a specific G/L
Cost Account, enter that cost account number in this field.
Invoice Group Codes Import/Export Data Formats
For Invoice Group Codes that are imported or exported, the following fields are input/
output from/to an Excel spreadsheet, a tab-delimited text file, or a CSV text file. The
default filenames are either PI_InvGroups_In.XLS or PI_InvGroups_Out.XLS.
Column # Excel Column
Field
Format
1
A
Task Code
X(10)
2
B
Description
X(24)
3
C
Display Units
X(14)
4
D
* Revenue Account - Main Segment 9(i)
1
5
E
* Revenue Account - Main Segment 9(i)
2
6
F
Revenue Account - Profit Center
9(5)
7
G
* Cost Account - Main Segment 1
9(i)
8
H
* Cost Account - Main Segment 2
9(j)
9
I
Cost Account - Profit Center
9(5)
* Each segment of the G/L Account's Main number is output into it's own
column.
© 2007 - 2014 by Sentinel Hill Software, all rights reserved
654
Series 5 Professional Invoicing - User Help
9.9.18 Invoice Layout Codes Maintenance
The Series 5 P/I system provides the capability to have Invoices generated using a variety of
different formats, and sub-totalling options. The assorted rules for defining how these
variations of invoices are built are defined in an Invoice Layout record. In order to apply any of
the special rules for invoicing, you must set up a Layout and assign it to those P/I Projects for
which it is to apply. If you do not assign an Invoice Layout to a Project then a default set of
rules will be applied when it's invoices are created and printed.
Using Invoice Layouts
For those customers who have Projects that generate EDI invoices, or that
have peculiar sorting, or that have multiple Invoices generated for each
Project, it is important that the correct settings are made, and that the
Invoice Layout is defined in the Project's properties.
For Projects that have invoices generated as EDI invoices, a Layout must still also be
defined.
A given Layout is also required to define the properties associated to On-Demand Invoices.
An Invoice Layout is assigned to each On-Demand Control Set. All requests for On-Demand
Invoices that are serviced by that Control Set will be automatically generated based on the
rules defined by the assigned Layout, (even if it is different from the Layout assigned to
the Project).
© 2007 - 2014 by Sentinel Hill Software, all rights reserved
Professional Invoicing Menu Functions
655
9.9.18.1 Invoice Layouts Grid Screen
Invoice Layouts are maintained using a Series 5 grid processing screen.
Invoice Layouts Codes Maintenance Grid
"Fast Buttons"
New
Add a new Invoice Layout
Modify
Modify the Invoice Layout
highlighted in the grid
Delete
Delete the Invoice Layout
highlighted i the grid
Print
Generate a report listing the
Invoice Layouts
Edit an existing Layout Code by double-clicking it's associated row. Standard Series 5
grid controls apply.
9.9.18.2 Invoice Layouts Properties Screen
The Invoice Layout is used to define how the Customer Invoices are generated for each
Project. Assigning the correct properties is critical to having the invoices prepared to suite the
requirements of the customer's payable departments.
The Invoice Layout dictates the following characteristics of invoices:
For a given Project, whether multiple Invoices are created. (ie., separate invoices for
work performed by each Employee, Department, Task Types, or Reference Billing
Codes)
When printed, how the Invoices are sorted
The title(s) that are printed
How detail charges are printed. (ie., in detail, or grouped, or sub-totalled, or
summarized)
What type of description is printed. (ie., Employee name, task description, the WIP
Reference, or combinations of)
Whether there is a limit to the number of charges that can be listed on a single invoice
How tax is computed and presented
© 2007 - 2014 by Sentinel Hill Software, all rights reserved
656
Series 5 Professional Invoicing - User Help
Whether or not a paper, or an electronic Invoice, (EDI), is generated
Whether each Invoice is generated as a separate document, or one document is
generated containing all invoices produced from the Invoicing Wizard or the Print/Post
Final Invoices function
Some points to note when setting up an Invoice Layout:
The most critical property associated to an Invoice Layout is to define how invoices are
generated. That is whether Multiple Invoices per Project are generated, whether EDI
invoices are generated, and whether or not charges are sub-totaled or consolidated.
Whether Invoices are generated separately or as a Set
If EDI Invoices are required for a Project, an Invoice Layout must be set up, along with
an EDI Specification.
The properties associated to each Invoice Layout are maintained by a screen that offers two
tabbed sub-screens.
Invoice Layout - Generation and Output Options Screen
The properties associated to each Invoice Layout with respect to the generation and output of
Invoices is offered in the following screen:
© 2007 - 2014 by Sentinel Hill Software, all rights reserved
Professional Invoicing Menu Functions
657
Invoice Layout Generation and Output Properties Screen - Field Definitions
Invoice Layout Code
999
This is the code that is used to identify the Invoice Layout. This is the code that is entered
and carried in the assorted Series 5 data records.
Description
X(30)
The description is displayed for verification, and in the LOV when invoked.
Build Multiple Invoices, .... For this Project ?
check-box
Set this check-box if defining a Layout to be used for invoices with the following features:
© 2007 - 2014 by Sentinel Hill Software, all rights reserved
658
Series 5 Professional Invoicing - User Help
Multiple Invoices are generated for a single Project
EDI Invoices are generated as well, or instead of paper invoices
The Layout is used for defining properties of On-Demand Invoices
WIP charges are grouped and/or sub-totalled by a Billing Code associated to the
Reference
(Setting this check box enables the drop-down list, from which the applicable Generation
Type must be selected).
For a Given Project, Separate Invoices for Each
drop-down list
This property is used to determined the type of
invoices that are to be generated. In particular, this
defines whether or not multiple invoices are
generated for a single Project, and what criteria is
used in grouping and printing the charges.
Even if a single invoice is generated for each
Project, you may need to select the appropriate
Generation Type code.
Invoices Sorted By
drop-down list
This property determines the order in which the
invoices are generated and printed. They may be
sorted based on a variety of different fields. (WIP
items are sorted based on this selection when they
are selected to be billed, therefore this option must
be established before the billing process)
Note on Sorting
Notice that the sort options are associated to the Invoice layout. You may assign different Layouts to
different Projects, and it is possible that for a given invoice run, different types of invoices will be
printed. This sort option is meant to be applied to all Projects that used the same Invoice Layout.
Keep in mind that for a given Project, depending on the Layout Type, multiple invoices could be
generated.
If you wish to make sure that only those invoices for Projects associated to particular Layouts are
generated together, you could enter an Invoice Layout code on the Project Selects filter screen of the
Generate Invoices function.
Enable generation of EDI or XML Invoices
check-box
If invoices produced as defined by this Layout are to be generated as data files, for EDI or
XML, set this check-box.
© 2007 - 2014 by Sentinel Hill Software, all rights reserved
Professional Invoicing Menu Functions
659
Warning
If an EDI Control Specification has been assigned to a Project, but this check-box is not set, an EDI/
XML file WILL NOT BE CREATED. This check-box must be set.
Invoices are Generated As ?
radio-buttons
The Invoices that are generated, when invoked using this Wizard, may be created as
individual documents, or as a single document holding all invoices. It depends whether
the invoices are to be emailed individually to each Customer, or just printed as a set, and
distributed using traditional "snail" mail.
As a Set Within a Single File
Each as a Separate Document
The same option is offered with each Invoicing Wizard Control Code. If defined there,
then the rule associated to the Invoice Wizard is employed.
Invoices are Output To, or Created As
radio-buttons
When the Invoices associated to this Invoice
Layout are produced, they can be output as
a PDF, an MS Word document that is
automatically printed, or not; or as an ASCII
text file. If the previous setting was for "A
set Within a Single File", then they may
also just be output directly to a selected
Series 5 printer queue. Set the radio-button
for the desired results.
MS Word Template File Override
X(30)
When invoices are to be output as MS Word or PDF documents as "A Separate
Document", you may define the name of the MS Word Template that is to be applied
when the invoice document is created. If left blank, then the template that is defined by
the MSWORD-PI-INV-SPECS variable, found in the runtime configuration file, is used.
Have Invoice(s) Archived ?
check-box
If the generated Invoices are to be also saved as a Series 5 "Archive", then set the checkbox. Note that if this option is selected, then a separate Archive file will be produced for
each invoice.
Email Invoices to Eligible Customers ?
© 2007 - 2014 by Sentinel Hill Software, all rights reserved
check-box
660
Series 5 Professional Invoicing - User Help
When generating Invoices as PDF or MS Word Documents, as an option, you may also
have each one emailed to the customer. Note that they will be emailed only if an email
address is provided for the Customer, and the Customer has it's applicable property set
to allow emails to be sent.
Output Invoice Index Info File ?
check-box
As an option, when generating Invoices as PDF or MS Word Documents, a text file will be
generated for each invoice. This will contain a list of the Billing Order Number and Order
Lines that individual charges were originally associated with.
Output Folder for Invoice
X(120)
When generating Invoices as PDF or MS Word Documents, this is the directory in which
those invoice documents will be created.
Output Filename(s) Prefix
X(10)
When generating Invoices as as PDF or MS Word Documents, they will be assigned
filenames in the following formats:
PPPPPPPPPP_99999999_CCCCCC.INV.EXT
Where the following codes are used:
PPPPPPPPP - is the Prefix that is defined by the field
P
99999999
- is the Invoice Number
CCCCCC
- is the Customer Code
.EXT
- is the extension as determined by the type of file.
(ie., .PDF, .DOC or .DOCX)
If the Prefix field is left blank, then the system assigns a prefix of the letter "I"
When an Index Info file is also created with each invoice, it will have the following name:.
PPPPPPPPPP_99999999_CCCCCC-Idx.TXT
Invoice Layout - Formatting of Detail/Summary Charges Options Screen
The properties associated to each Invoice Layout with respect to how detail or summary
charges are output within the body of the Invoices is offered in the following screen:
© 2007 - 2014 by Sentinel Hill Software, all rights reserved
Professional Invoicing Menu Functions
Invoice Layout Formatting of Detail/Summary Charges Properties Screen Field Definitions
WIP Detail Items Descriptive Text
drop-down list
For invoices that are printed with the WIP detail to
be listed, this option indicates what text is to be
printed. (Note that this option is not applicable to
EDI generated invoices).
Print WIP Task Description Override Option
check-box
This property is applicable when invoices are printed in detail, with the Task Description
being output for each charge. If this check-box is set and the WIP item's Task
© 2007 - 2014 by Sentinel Hill Software, all rights reserved
661
662
Series 5 Professional Invoicing - User Help
Description Override field had been populated with text, then it will be printed instead of
the Task Description.
For Detail Formats, Also Print the Following
check-boxes
For invoices that are printed with the WIP detail to
be listed, this option indicates what text, in addition
to that selected in the previous option, is to be
printed. The selected fields are printed on extra
lines for each detail WIP charge printed. (Note that
this option is not applicable to EDI generated
invoices).
Type "B" or "C" Flagged Group Consolidation
radio-buttons
These radio-buttons are offered only when the Layout is defined for Generation Types "B"
or "C".
WIP charges may be recorded into the P/I system with a Consolidation Flag. This is a 1
character field that can take a value of D, F, or a number from 1, .... 9. Depending on the
options specified, all WIP charges may be grouped and sub-totalled by their
Consolidation Flag. All WIP having the same Consolidation Flag are grouped together.
As an additional option, the WIP within each Group will be sorted by the WIP Reference
field. In some cases, the Reference field holds an individuals's name, or a Billing-Code.
All charges with the same Reference field would be sub-totalled and printed as one line
on the invoice.
No consolidation is performed. Each WIP
charge is printed in detail
Sum items within a Group printed All the charges with the same Consolidation Flag
are sub-totalled and printed as one line.
as a total
WIP for a Group are sub-totalled by All the charges with the same Consolidation Flag
are sub-totalled by their WIP Reference field. An
Reference
additional sub-total is printed for each
Consolidation Group.
Sub-Total by Reference Bill-Code All the charges with the same Bill-Code, that is
determined from the WIP's Reference field, are
sub-totalled and printed. When selected, you
must also specify which portion of the Reference
field is to be used as the Bill-Code. (The
Consolidation Flag is not used in this case).
None
Consolidation Flags in the Configuration File
Using type B or C Invoice Layouts with Consolidation Flags requires the definition of up to 9
© 2007 - 2014 by Sentinel Hill Software, all rights reserved
Professional Invoicing Menu Functions
663
variables in the runtimes Configuration file. Each variable is associated to the 9 numeric values that
the Consolidation Flag may take. The variable is defined as follows:
PI-INV-DESCn <flag> <description text>
where:
n is the value 1 - 9;
<flag> will be either an A or a B indicating the Generation Type rule to be used, (or ignored for
the B layouts);
<description text> will be printed as the description on the invoice for the consolidated total
of all items flagged with n.
Portion of WIP Reference used as the Bill Code
radio-buttons
These radio-buttons are offered only when the Layout is defined for Generation Types "B"
or "C", and when the option to sub-total WIP by the Reference Bill-Code has been
chosen. Select which portion of the WIP's Reference field is to be used as the Bill-Code.
Entire String
The first 10 characters
The trailing 4 characters
Calculate/Print Allocated Tax to WIP
drop-down list
If the invoices are to be generated and printed so that tax is computed for each section,
when using Generation Types A, B, C or J, this option indicates how the amounts are
presented.
Project Titles Printed in the Invoice Header
drop-down list
Select the the title to be printed at the top of the
invoice between the address and the detail
charges. (Note that this option is not applicable to
EDI generated invoices).
Bottom of Invoice Comment
X(35)
A brief message that will be printed at the bottom of the invoice following the WIP and
Disbursement charges.
© 2007 - 2014 by Sentinel Hill Software, all rights reserved
664
Series 5 Professional Invoicing - User Help
Limit the # of Line Items per Invoice
check-box - 9(4)
For some variations of P/I Invoices, there may be a limit to the number of line items that
can be processed. This is the case for a number of different EDI types of invoices,
(presumably being processed by ancient EDI systems developed by low-life wanna-be
programmers in the 1980's). If this is the case, then set this check-box, and enter the
maximum number of charges that can be recorded. If there are more WIP items to be
billed than specified here, the system will generate additional invoices as needed.
Limit the $ Value of an Invoice
check-box - $
999,999
For some variations of P/I Invoices, there may be a maximum $ dollar value limit that an
invoice may have, that can be processed. This is the case for a number of different EDI
types of invoices. If this is the case, then set this check-box, and enter the maximum $
value an invoice may have. If there are more WIP item charges to be billed than specified
here, the system will generate additional invoices as needed.
9.9.19 Job Class Codes Maintenance
The Professional Invoicing Job Class Codes are used to categorize and group employees, or
machines, that will be recording activity to different Projects.
The Series 5 P/I system provides the ability to establish special billing rates and/or the
definition of special G/L Revenue accounts that may be assigned. These Special Rates 671
and Special Accounts 677 may be created for groups of employees belonging to specific Job
Classes.
The Job Class Codes defined here are listed in the Series 5 Job Class Code LOV Lookup
window.
The Job Class Codes Maintenance function is accessed from the P/I Main menu, by
selecting Job Class Codes... from the Codes Maintenance drop-down menu.
102
Job Class Codes Maintenance Grid
Job Class Codes are maintained using a Series 5 grid processing screen.
© 2007 - 2014 by Sentinel Hill Software, all rights reserved
Professional Invoicing Menu Functions
665
"Fast Buttons"
New
Add a new Job Class Code
Modify
Modify the Job Class Code
highlighted in the grid
Delete
Delete the Job Class Code
highlighted in the grid
Print
Generate a report listing the
Job Class Codes already on
file
Edit an existing Job Class Code by double-clicking it's associated row. Standard Series 5
grid controls apply.
The Print Options tab screen will be displayed, from which you can select to direct the output
to be displayed to the screen, archived, printed, saved as an MS Word document, saved as a
PDF, and/or emailed. (Refer to the topic titled Report Generation and Printing 159 for full
details).
The report listing the Job Class Codes on file, if archived, will be catalogued with a report
name of JOB_CLASS.LST.
Job Class Code - Properties Screen
The properties for each Job Class Code are defined with the following screen:
© 2007 - 2014 by Sentinel Hill Software, all rights reserved
666
Series 5 Professional Invoicing - User Help
Field Definitions
Job Class Code
X(6)
This is the alphanumeric code assigned to the Job Class. Enter this code when a Job
Class code needs to be used within the Professional Invoicing system.
Description
X(24)
Is a description of the Job Class. This is printed on most reports, and is displayed to
most screens where the Job Class Code is utilized.
9.9.20 Location Codes Maintenance
The Professional Invoicing Location Codes are used to categorize and group employees by
location.
The Series 5 P/I system provides the ability to establish special billing rates and/or the
definition of special G/L Revenue accounts that may be assigned. These Special Rates
and Special Accounts 677 may be created for groups of employees belonging to specific
671
© 2007 - 2014 by Sentinel Hill Software, all rights reserved
Professional Invoicing Menu Functions
667
Locations.
The Location Codes defined here are listed in the Series 5 Location Code LOV Lookup 102
window.
The Location Codes Maintenance function is accessed from the P/I Main menu, by selecting
Location Codes... from the Codes Maintenance drop-down menu.
Location Codes Maintenance Grid
Location Codes are maintained using a Series 5 grid processing screen.
"Fast Buttons"
New
Add a new Location Code
Modify
Modify the Location Code
highlighted in the grid
Delete
Delete the Location Code
highlighted in the grid
Print
Generate a report listing the
Location Codes already on file
Edit an existing Location Code by double-clicking it's associated row. Standard Series 5 grid
controls apply.
The Print Options tab screen will be displayed, from which you can select to direct the output
to be displayed to the screen, archived, printed, saved as an MS Word document, saved as a
PDF, and/or emailed. (Refer to the topic titled Report Generation and Printing 159 for full
details).
The report listing the Location Codes on file, if archived, will be catalogued with a report name
of PI_LOCATIONS.LST.
Location Code - Properties Screen
The properties for each Location Code are defined with the following screen:
© 2007 - 2014 by Sentinel Hill Software, all rights reserved
668
Series 5 Professional Invoicing - User Help
Field Definitions
Location Code
X(6)
This is the alphanumeric code assigned to the Location. Enter this code when a Location
code needs to be used within the Professional Invoicing system.
Description
X(24)
Is a description of the Location. This is printed on most reports, and is displayed to most
screens where the Location Code is utilized.
Profit Center Override
9(5)
Is a description of the Location. This is printed on most reports, and is displayed to most
screens where the Location Code is utilized.
© 2007 - 2014 by Sentinel Hill Software, all rights reserved
Professional Invoicing Menu Functions
669
9.9.21 Rate Class Codes Maintenance
The Professional Invoicing Rate Class Codes are used to categorize and group employees,
or machines, that will be recording activity to different Projects.
The Series 5 P/I system provides the ability to establish special billing rates, costing rates
and/or the definition of special G/L Revenue accounts that may be assigned. These Special
Rates 671 and Special Accounts 677 may be created for specific Employees, Tasks, Employee
Groups, Invoice Groups, or combinations of these codes.
Using Special Rates, unique cost or billing rates may be created which differ from the
standards, as determined by either the Client, Project, Employee or Task records. You will
need to establish Special Rates if you wish to define separate billing rates for specific
employees. There are four main types of Special Billing Rates which you may define. Task
Group, Employee Group, Employee and Employee/Task; and two types of Special Cost
Rates: Employee & Task. Depending on the combination of Employee and Task entered on
a time-sheet, for a given Project, the Special Rates tables will be examined for an entry which
matches the combination. If it exists, that rate is used; if not, the billing rate determined from
either the Client, the Project or the Task Record or the cost rate from either the Task or
Employee Record will be used.
Additional Special Rate/Cost modifiers allows, the billing rate or cost derived to be adjusted by
a given percentage for a specific task.
For a given Project, Special Rates will be looked up using a Rate Class code. Every project
must have a Rate Class code defined if it is to make use of the Special Rates tables. A Rate
Class might be considered as a column of rates found in an X/Y matrix of special rates.
The Rate Class Codes defined here are listed in the Series 5 Rate Class Code LOV Lookup
102 window.
The Rate Class Codes Maintenance function is accessed from the P/I Main menu, by
selecting Rate Class Codes... from the Codes Maintenance drop-down menu.
Rate Class Codes Maintenance Grid
Rate Class Codes are maintained using a Series 5 grid processing screen.
© 2007 - 2014 by Sentinel Hill Software, all rights reserved
670
Series 5 Professional Invoicing - User Help
"Fast Buttons"
New
Add a new Rate Class Code
Modify
Modify the Rate Class Code
highlighted in the grid
Delete
Delete the Rate Class Code
highlighted in the grid
Print
Generate a report listing the
Rate Class Codes already on
file
Edit an existing Rate Class Code by double-clicking it's associated row. Standard Series 5
grid controls apply.
The Print Options tab screen will be displayed, from which you can select to direct the output
to be displayed to the screen, archived, printed, saved as an MS Word document, saved as a
PDF, and/or emailed. (Refer to the topic titled Report Generation and Printing 159 for full
details).
The report listing the Rate Class Codes on file, if archived, will be catalogued with a report
name of RATE_CLASS.LST.
Rate Class Code - Properties Screen
The properties for each Rate Class Code are defined with the following screen:
© 2007 - 2014 by Sentinel Hill Software, all rights reserved
Professional Invoicing Menu Functions
671
Field Definitions
Rate Class Code
X(6)
This is the alphanumeric code assigned to the Rate Class. Enter this code when a Rate
Class code needs to be used within the Professional Invoicing system.
Description
X(24)
Is a description of the Rate Class. This is printed on most reports, and is displayed to
most screens where the Rate Class Code is utilized.
9.9.22 Special Rates Maintenance
The Professional Invoicing Special Rates are used to define sets of chargeable and nonchargeable rates for special cases. Using Special Rates you may set up either cost or billing
rates which differ from the standard defaults provided from either the Client, Project,
Employee or Task property records.
Depending on the combination of Employee and Task for charges recorded for a given
© 2007 - 2014 by Sentinel Hill Software, all rights reserved
672
Series 5 Professional Invoicing - User Help
Project, the Special Rates tables will be examined for an entry which matches the
combination. If a Special Rate has been set up, then that rate is used. If not, then the billing
Chargeable Rate determined from either the Client, the Project or the Task properties record,
(or the cost rate from either the Task or Employee Record), will be assigned.
There are five main types of Special Billing Rates which can be defined:
Tasks % Markups on Default Chargeable Rate
Invoice Groups (Task Groups)
Employees
Employee Rate Groups
Combination of Employee and Task
Three types of Special Costing Rates can be defined:
Employees
Employee % Markups on Default Cost Rate
Tasks
For the Special Chargeable Rates defined, an Overhead percentage may also be specified.
Employee Chargeout Rates
The Employee Codes properties does not offer a Chargeable Rate field. If each employee is to be
charged out at a special individual rate, then a Special Rate must be created either directly for that
employee. If a group of employees are all charged out at the same rate, then an Employee Rate Group
should be defined, assigned to each employee, and a Special Rate for the group set up.
One of the properties that may be define for a given Project is it's Rate Class Code. If
Charge-out Rates, or Costing Rates for activity recorded for a given Project are to be
established based on the Special Rates defined by this function, then a Rate Class must be
assigned to that Project. All Special Rates are set up for a specific Rate Class. In this
fashion, then it is possible to set up entirely different sets of charge out, or cost rates, that
may be assigned to different Projects. Testing for the occurrence of Special Rates is always
carried out using a Rate Class code. A Rate Class might be considered logically to be similar
to a column of rates found in an spreadsheet matrix.
The Special Rates Codes Maintenance function is accessed from the P/I Main menu, by
selecting Special Rates Codes... from the Codes Maintenance drop-down menu.
Special Rates Codes Maintenance Grid
Special Rates Codes are maintained using a Series 5 grid processing screen.
© 2007 - 2014 by Sentinel Hill Software, all rights reserved
Professional Invoicing Menu Functions
673
"Fast Buttons"
New
Add a new Special Rates
Code
Modify
Modify the Special Rates
Code highlighted in the grid
Delete
Delete the Special Rates
Code highlighted in the grid
Print
Generate a report listing the
Special Rates Codes already
on file
Edit an existing Special Rates Code by double-clicking it's associated row. Standard Series
5 grid controls apply.
The Print Options tab screen will be displayed, from which you can select to direct the output
to be displayed to the screen, archived, printed, saved as an MS Word document, saved as a
PDF, and/or emailed. (Refer to the topic titled Report Generation and Printing 159 for full
details).
The report listing the Special Rates Codes on file, if archived, will be catalogued with a report
name of PI_RATES.LST.
Special Rates Code - Properties Screens
The properties for each Special Rate for Chargeable rates are basically defined with the
following screen. (Depending on the Rate Type selected, slightly different codes fields will be
presented):
© 2007 - 2014 by Sentinel Hill Software, all rights reserved
674
Series 5 Professional Invoicing - User Help
The properties for each Special Rate for Costing rates are basically defined with the following
screen. (Depending on the Rate Type selected, slightly different codes fields will be
presented):
© 2007 - 2014 by Sentinel Hill Software, all rights reserved
Professional Invoicing Menu Functions
675
Field Definitions
Unit Rate Type
drop-list
Select type of rate that is to be established.
Special Rates may be created for either
Tasks, Employees, Employee Groups,
Invoice Groups, or even a combination of
Employee and Task.
Depending on the Rate Type selected,
different sub-screen of fields will be
presented.
Rate Class
X(6)
Enter the Rate Class to which the special rate entry is to belong to. The Rate Class may
be considered as a group or a column of information in a rate table. When charges are
© 2007 - 2014 by Sentinel Hill Software, all rights reserved
676
Series 5 Professional Invoicing - User Help
entered for a given Project, the Rate Class for the Project is used to examine (or look-up
in the rate table), for special rates belonging to that Rate Class. It is possible to have only
a single Rate Class in the system, although all Projects would then have to share the
same set of Special Rates.
Employee Code
X(6)
Enter the Employee for which the special rate is being defined for.
For Employee Charge-out rates, an expiry date may also be entered. There may be
more than one rate set up for a given employee, as long as they have different In Effect
Until dates. When attempting to assign rates, the system reads through the possible
rates for the employee until one is found where the Charge Date is earlier or equal to the
Effective Date.
Employee Rate Group
X(6)
Enter the Employee Rate Group for which the special rate is being defined for. Each
Employee, as one of it's properties, may be assigned to a particular Employee Rate
Group. The rate defined would then apply to all employees belonging to the Rate Group.
Task Code
X(10)
Enter the Task for which the special rate is being defined for.
Invoice Group
X(10)
Enter the Invoice Group for which the special rate is being defined for.
System Derived Rate % Adjustment
9,999.99- %
These fields are presented for the Task % Markup
on Default Charge-out Rate Types.
Enter the Chargeable and the Non-Chargeable Unit
Rate % factor. The amounts are entered as
percentage values. (For example, enter 300.00 to
modify the system derived rate by 300% so a rate of
$15 would be adjusted to $45)
Cost Plus Adjustment
radio-buttons
These fields are presented for the Task % Markup
on Default Charge-out Rate Types.
If making use of Cost Plus factors, you may select
© 2007 - 2014 by Sentinel Hill Software, all rights reserved
Professional Invoicing Menu Functions
677
an Adjustment factor. When an adjustment is
selected, the amount of the WIP item contributing to
the Cost Plus amounts will be adjust by ½ or 2/3
depending on the selection. For example if a rate
adjustment was defined for an "Overtime Test" at
200.00% (double time), but only the regular time
could be used in the Cost Plus factors, then click
the Contribute 50% of total WIP radio button.
Unit Rates - Chargeable and NonChargeable
$ 99,999.99-
These fields are presented for those Rate Types defined for charge-out rates. Enter the
Chargeable and the Non-Chargeable Rates for the selected rate type.
Depending on whether the system deems the WIP activity to be chargeable or nonchargeable, the applicable rate will be assigned. (Refer to the topic on Assignment of
Rates 70 for further discussion as to how rates are assigned).
Overhead - Computed with a % Rate
99,999.99- % and check-box
These fields are presented for those Rate Types defined for charge-out rates. As
determined by a property associated to each Project, Overhead amounts may be
computed based on a percentage defined for each Task. If when this special rate is
deemed applicable, the Overhead % rate will be overridden; or, can be disabled entirely.
Unit Cost Rate
$ 9,999.99-
This field is presented for Rate Types defined for Employee Cost or Task Cost rates.
Enter the Costing Rate for the selected rate type.
System Derived Unit Cost % Adjustment
9,999.99- %
This field is presented for the Task % Markup on Default Cost Rate Types.
Enter the Unit Cost Rate % factor. The amount is entered as percentage value. (For
example, enter 50.00 to modify the system derived cost rate by 50% so a rate of $40
would be adjusted to $20).
9.9.23 Special Accounts Maintenance
The Professional Invoicing Special Accounts are used to define the Revenue account or the
Cost account that should be applied when the default account using the standard methods,
© 2007 - 2014 by Sentinel Hill Software, all rights reserved
678
Series 5 Professional Invoicing - User Help
cannot apply. Special Revenue Accounts may be created for combinations of Project and
Tasks, whereas Special Costing Accounts may be created for combinations of Employee Job
Codes and Tasks.
The Special Accounts Codes Maintenance function is accessed from the P/I Main menu, by
selecting Special Accounts Codes... from the Codes Maintenance drop-down menu.
Special Accounts Codes Maintenance Grid
Special Accounts Codes are maintained using a Series 5 grid processing screen.
"Fast Buttons"
New
Add a new Special
Accounts Code
Modify Modify the Special
Accounts Code highlighted
in the grid
Delete Delete the Special
Accounts Code highlighted
in the grid
Print
Generate a report listing the
Special Accounts Codes
already on file
Edit an existing Special Accounts Code by double-clicking it's associated row. Standard
Series 5 grid controls apply.
The Print Options tab screen will be displayed, from which you can select to direct the output
to be displayed to the screen, archived, printed, saved as an MS Word document, saved as a
PDF, and/or emailed. (Refer to the topic titled Report Generation and Printing 159 for full
details).
The report listing the Special Accounts Codes on file, if archived, will be catalogued with a
report name of SPEC_ACCT.LST.
Special Accounts Code - Properties Screen
The properties for each Special Accounts Code are defined with the following screen. (For
Cost Accounts,
© 2007 - 2014 by Sentinel Hill Software, all rights reserved
Professional Invoicing Menu Functions
679
Field Definitions
Type
drop-list
Select type of Account that is to be established. Special
Accounts may be created for either Revenues or Costs
accounts.
Depending on the Account Type selected, different subscreen of fields will be presented.
For Project
X(6)
This field is presented for the Revenue Accounts. Enter the Project Code for which the
special account is being defined for.
For Job Class
© 2007 - 2014 by Sentinel Hill Software, all rights reserved
X(6)
680
Series 5 Professional Invoicing - User Help
This field is presented for the Cost Accounts. Enter the Employee Job Class for which
the special account is being defined for.
For Task
X(10)
Enter the Task Code for which the special account is being defined for.
Revenue Account or Cost Account
9(18)-9(5)
Enter the G/L Revenue account that is to be assigned to WIP activity recorded for the
specified combination of Project and Task Codes; or enter the G/L Costing account that
is to be assigned to WIP activity recorded for employees belonging to the specified
combination of Job Class and Task Codes.
9.9.24 Tax Exempt Codes Maintenance
This maintenance function is used to create sets of rules as to whether or not chargeable
activity is taxable, or not, for Customers whose have been assigned specific A/R Tax Codes.
For each of the Tax Codes defined, up to 15 logical Tax Groups may be established. Each
Tax Group is then flagged to indicate whether tax should be computed or not. (The Tax
Groups are labeled alphabetically from A to Q).
One of the properties defined for each Task Code record is used to indicate whether charges
recorded for it is taxable or not, and/or whether it should belong to one of the Tax Groups.
With this feature, you effectively will be able to specify that certain Tasks are taxable in some
jurisdictions, but not in others, by assigning a Tax Group to each jurisdiction.
The Tax Exempt Codes Maintenance function is accessed from the P/I Main menu, by
selecting Tax Exempt Codes... from the Codes Maintenance drop-down menu.
Tax Exempt Codes Maintenance Grid
Tax Exempt Codes are maintained using a Series 5 grid processing screen.
© 2007 - 2014 by Sentinel Hill Software, all rights reserved
Professional Invoicing Menu Functions
681
"Fast Buttons"
New
Add a new Tax Exempt Code
Modify
Modify the Tax Exempt Code
highlighted in the grid
Delete
Delete the Tax Exempt Code
highlighted in the grid
Print
Generate a report listing the
Tax Exempt Codes already on
file
Edit an existing Tax Exempt Code by double-clicking it's associated row. Standard Series 5
grid controls apply.
The Print Options tab screen will be displayed, from which you can select to direct the output
to be displayed to the screen, archived, printed, saved as an MS Word document, saved as a
PDF, and/or emailed. (Refer to the topic titled Report Generation and Printing 159 for full
details).
The report listing the Tax Exempt Codes on file, if archived, will be catalogued with a report
name of PITAX_EXMPT.LST.
Tax Exempt Code - Properties Screen
The properties for each Tax Exemption Code are defined with the following screen:
© 2007 - 2014 by Sentinel Hill Software, all rights reserved
682
Series 5 Professional Invoicing - User Help
Field Definitions
Tax Code
X(6)
This is the A/R Tax Code for which the Tax Exemption Groups are to be set up for. This
code must already have been defined in the Accounts Receivable system as a valid Tax
Code.
Type
radio-buttons
Used for information purposes to record whether the selected Tax Code is for a State tax
or a Municipal tax.
Comment
X(24)
May be used to record a brief description to describe this particular Tax Code.
Tax Groups - Taxable Status
15 check-boxes
Labeled from A to Q, (with no N or O). Each check-box represents one of the 15 logic
Tax Groups that may be defined. Set the check-mark if the given Tax Group is taxable.
© 2007 - 2014 by Sentinel Hill Software, all rights reserved
Professional Invoicing Menu Functions
683
Taxable Status
Task Codes may be assigned to one of the logic Tax Groups that are established. When charges are
invoiced, the following steps are followed to determine if they are taxable or not:
1) If the Task is flagged as being Non-Taxable, no taxes are computed.
2) If the Task is flagged as Taxable for All Tax Groups, then taxes are computed.
3) If the Task has been assigned to a particular Tax Group then the following tests are done
The applicable Tax Code is obtained from the Customer's properties record
The Tax Exempt Code record is loaded
If the Tax Group associated to the Task is checked then taxes are computed.
9.9.25 Ariba Invoice Code Mapping Maintenance
When electronic invoices are generated and sent to Ariba for processing and distribution to
applicable customers, the individual charges must refer to an arranged upon set of reference
codes and distribution codes. This maintenance routine is used to defines three types of
codes that are established for a customers' contract with Ariba. A different set of Reference
Codes must be defined for each contract that is established with Ariba. In the P/I system,
each contract will be associated to the EDI Control Code that is set up for the different
customers. Currently the following types of invoices are generated for the customers
indicated:
Customer
FIle
Type
Mapping
Bank of
America
cXML
Supplier Part Id (substring of PI Task code)
Number Reference ID
JP Morgan
Chase
cXML
WIP Bill Code
Sun Trust
CSV
Supplier Part Id (substring of PI Task code)
Number Reference ID
Line
Legal Entity & Business Unit Codes
Line
1) For Bank of America, the Reference Codes are derived from the P/I system's Task
Codes. (Actually only a segment of the Task Code is actually used).
When these cXML invoice files are generated, a segment of the Task Code,
(characters 5 - 8), is used as the key to read the Mapped record, to determine the
Line Reference number, nnnn, that is inserted as the argument to the
<InvoiceDetailItemReference lineNumber=nnnn> ........... </
© 2007 - 2014 by Sentinel Hill Software, all rights reserved
684
Series 5 Professional Invoicing - User Help
InvoiceDetailItemReference> tag.
The segment of the Task Code used, xxxx, is inserted in the
<ItemID><SupplierPartID>xxxx</SupplierPartID></ItemID> tag.
2) For JP Morgan Chase, the Legal Entity and Business Unit codes associated to the Cost
Center, (as determined by the WIP Bill Code)
When these cXML invoice files are generated, the WIP's Bill Code, cccccc, (which is
the customer's cost center), is used as the key to read the Mapped record, to
determine the Legal Entity, llllll, and Business Unit, bbbbb, codes. These are
inserted into tags found within the <Distribution>.....</Distribution> tag set as
follows:
<Distribution>
<Accounting name="DistributionCharge">
<AccountingSegment
id="Company:CostCenter:AccountNumber">
<Name xml:lang="en-US">Reference ID</Name><Description
xml:lang="en-US">cccccc</Description>
</AccountingSegment>
<AccountingSegment id="100">
<Name xml:lang="en-US">Split Percentage</
Name><Description xml:lang="en-US">Percentage</Description>
</AccountingSegment>
<AccountingSegment id="bbbbbb">
<Name xml:lang="en-US">Business Unit</Name><Description
xml:lang="en-US">CostCenter.UniqueName</Description>
</AccountingSegment>
<AccountingSegment id="llllll">
<Name xml:lang="en-US">Legal Entity</Name><Description
xml:lang="en-US">Company.UniqueName</Description>
</AccountingSegment>
</Accounting>
<Charge>..............</Charge>
(is the Charge amount to be
distributed)
</Distribution>
<Extrinsic name="legalEntity">llllll</Extrinsic>
<Extrinsic name="businessUnit">bbbbbb</Extrinsic>
3) For Sun Trust, the Reference Codes are derived from the P/I system's Task Codes.
(Actually only a segment of the Task Code is actually used).
When these CSV invoice files are generated, a segment of the Task Code, (the
rightmost 3 digit numeric), is used as the key to read the Mapped record, to determine
the Line Reference number, nnnn,. The resulting code and description is recorded in
columns "AR" and "AS" of the resulting CSV file. These columns have headings of
InvoiceLineID and ItemDescription.
© 2007 - 2014 by Sentinel Hill Software, all rights reserved
Professional Invoicing Menu Functions
685
The segment of the Task Code used, xxx, is recorded in column "AT" with the of
heading SupplierPartID.
This maintenance routine provides functions to Import and Export the mapping codes from/to
spreadsheet to make it easier to update.
Task/Ariba Reference Codes Grid
The Mapped Reference Codes are maintained using a Series 5 grid processing screen.
"Fast Buttons"
New
Add a new Map Code
Modify Modify the Map Code
highlighted in the grid
or for the Cost Center mapping:
Delete
Print
Delete the Map Code
highlighted in the grid
Generate a report listing
the Map Code on file
Import Imports the Map Codes
from a spreadsheet
Export Exports the Map Code to a
spreadsheet
Edit an existing Department by double-clicking it's associated row. Standard Series 5
grid controls apply.
Task/Ariba Mapping Screens
The mapping for each Bank of America or Sun Trust PI Task to an Ariba cXMLLine Reference
is defined with the following screen:
© 2007 - 2014 by Sentinel Hill Software, all rights reserved
686
Series 5 Professional Invoicing - User Help
The mapping for each of JP Morgan's Cost Center to the Ariba cXML Legal Entity and
Business Unit codes is defined with the following screen:
© 2007 - 2014 by Sentinel Hill Software, all rights reserved
Professional Invoicing Menu Functions
687
Supplier Codes Mapping Screen Field Definitions
EDI Control Set
X(6)
The Line Reference Codes are assigned to each customer at the time the contract is
established with Ariba. They are tied to a particular EDI Control Code that you would have
already set up for Ariba cXML or CSV Invoices using the EDI Specifications Maintenance
function 612 .
Supplier (Task Code Segment)
X(12)
This field is the portion of the P/I Task Code that is used as the key to lookup the Line
Reference Code. Depending on the selected customer, this is either the Task code, or a
portion of it.
XML Line Reference Code
X(8)
This is code or number that is inserted as the argument in the
<InvoiceDetailItemReference lineNumber=nnnn> tag of the cXML invoice.
Part or Task Description
X(40)
The description of the part of the task be billed that may be recorded in the CSV or cXML
invoice.
Units of Measure
X(6)
Used to record the Units of Measure. Strictly for information purposes.
Cost Center Codes Mapping Screen Field Definitions
EDI Control Set
X(6)
The Line Reference Codes are assigned to each customer at the time the contract is
established with Ariba. They are tied to a particular EDI Control Code that you would have
already set up for Ariba cXML Invoices using the EDI Specifications Maintenance function
612 .
Cost Center (WIP Bill Code)
© 2007 - 2014 by Sentinel Hill Software, all rights reserved
X(12)
688
Series 5 Professional Invoicing - User Help
This field is the portion of the P/I Task Code that is used as the key to lookup the Line
Reference Code. This is either the Task code, or a portion of it.
JP Morgan Chase Legal Entity Code
X(8)
This is the Legal Entity code that is inserted as the argument in the
<AccountingSegment id="llllll">
<Name xml:lang="en-US">Legal Entity</Name>
<Description xml:lang="en-US">Company.UniqueName</Description>
tag of the cXML invoice.
JP Morgan Chase Business Unit Code
X(15)
This is the Business Unit code that is inserted as the argument in the
<AccountingSegment id="bbbbbbbbbb">
<Name xml:lang="en-US">Business Unit</Name>
<Description xml:lang="en-US">CostCenter.UniqueName</Description>
tag of the cXML invoice.
Description
X(40)
A description. Strictly for information purposes.
Ariba Line Mapping Codes – Import/Export Data Formats
For the mapping of Ariba Line #, (contract task codes), that are imported or exported, the
following fields are input/output from/to an Excel spreadsheet, a tab-delimited text file, or
a CSV text file. The default filenames are either PI_AribaTaskPart_Maps_In.XLS or
PI_AribaTaskPart_Maps_Out.XLS. The standard Series 5 Import/Export screens will
be presented when the specific function is launched. The layout of the columns on the
spreadsheet are defined with the following table:
Column # Excel Column
Field
Format
1
A
Supplier's Part # Code
X(8)
2
B
Ariba's Line Reference #
X(8)
3
C
Description
X(40)
© 2007 - 2014 by Sentinel Hill Software, all rights reserved
Professional Invoicing Menu Functions
4
D
Units
689
X(6)
When importing the Codes from a spreadsheet, you may also specify a pre-defined
processing directive in column 1.
%RADD% All codes for the rows following will be 1st deleted from the
– system, then updated with the new fields provided.
%DELE% All codes for the rows following will be deleted from the
– system and not replaced. Only the Supplier Part # Code
needs to be specified in column 1 of the input
spreadsheet.
JP Morgan cXML Line Mapping Codes – Import/Export Data Formats
For the mapping of the Bill Codes used by JP Morgan, that are imported or exported, the
following fields are input/output from/to an Excel spreadsheet, a tab-delimited text file, or
a CSV text file. The default filenames are either PI_XMLBillCode_Maps_In.XLS or
PI_XMLBillCode_Maps_Out.XLS. The standard Series 5 Import/Export screens will
be presented when the specific function is launched. The layout of the columns on the
spreadsheet are defined with the following table:
Column # Excel Column
Field
Format
1
A
Cost Center Bill Code
X(12)
2
B
Business Unit Code
X(15)
3
C
Legal Entity Code
X(8)
4
D
not used
5
E
not used
6
F
Description
X(40)
When importing the Codes from a spreadsheet, you may also specify a pre-defined
processing directive in column 1.
%RADD% All codes for the rows following will be 1st deleted from the
– system, then updated with the new fields provided.
%DELE% All codes for the rows following will be deleted from the
– system and not replaced. Only the Cost Center Bill Code
© 2007 - 2014 by Sentinel Hill Software, all rights reserved
690
Series 5 Professional Invoicing - User Help
needs to be specified in column 1 of the input
spreadsheet.
9.10
Purging
The topics in this chapter describe functions and procedures that are a available under the
Purging drop down menu on the Professional Invoicing menu. These menu items are
used to remove old history records to free up disk space and overhead in the related data
files.
These functions are available from the P/I Menu Bar as shown:
9.10.1 Purge Archived WIP History
Enter topic text here.
9.10.2 Purge Archived Disbursement History
Enter topic text here.
9.10.3 Purge Archived Invoice History
Once P/I Invoices have been generated, printed and posted to A/R, they will be recorded in
the P/I system as Historic Invoices. Their respective data records, along with the WIP and
Recap Detail records, are available for display, and to be reprinted if necessary. These will
remain in the system until they are archived. Once archived, they will remain in the system
until purged.
Accessing the function to purge the "Archived" Invoice History files, can be done either
directly from the Invoice History Inquiry function 235 , or from the P/I's Menu's Purging dropdown menu:
© 2007 - 2014 by Sentinel Hill Software, all rights reserved
Professional Invoicing Menu Functions
Purge Invoice History - Options Screen
The following screen is displayed offering a variety of filters for the purge function:
When having the archived history records purged, the operator is also presented with the
standard Project Select Filters 142 screen, the Customer Select Filters screen 151 . and
© 2007 - 2014 by Sentinel Hill Software, all rights reserved
691
692
Series 5 Professional Invoicing - User Help
Demographic Selects screen 156 . These allow you to specify selected or ranges of Projects,
Project Locations, Project Departments, Customers, Customer Types, Sales
Representatives, and/or only those customers and/or projects satisfying a variety of filter
criteria.
Purge Archived Invoice History Filter Options Screen - Field Definition
Historic Invoice Number(s)
radio-buttons and 9(6)
To select All Invoices regardless of their Invoice numbers; or for only those that fall within
a range of numbers. If a range is selected, enter the starting/ending Invoice numbers.
For the 12 Periods — in Intervals of
radio-buttons and (mmddyy)
Totals are accumulated for up to 12 periods, of either Months, Quarters or Years. Based
on the selection, the system will default the From/To dates displayed. (If a different date
range is selected, the 12 periods tallied for will commence from the Starting Date
ending up to the ending date, or up to the end of the 12th period, which ever is
earliest).
Include only Invoices — for Invoice Layout
Code
9(3)
To have only those Invoices that were generated based on a particular Invoice Layout
Code. (Leave the field blank if it is not to be considered as a selection filter).
9.11
Control Option Functions
The topics in this chapter describe functions and procedures that are a available under the
Control Options drop down menu on the Professional Invoicing menu. These menu
© 2007 - 2014 by Sentinel Hill Software, all rights reserved
Professional Invoicing Menu Functions
693
items are used to set up control options, and user access rights to the application.
These functions are available from the P/I Menu Bar as shown:
9.11.1 P/I Control Preferences
The P/I Control Preference function governs the overall structure of the P/I system for the
specific Company System that your are signed on with. Failure to set the correct options
could result in incorrect usage of the P/I, unwanted allocation of revenue, or invoices printed in
the wrong format, or the disabling a feature that you might like to make use of.
Accessing the P/I Control Properties for the first time
When setting up the system for the first time, a message will be displayed advising you
that the PI Control is not available. Click the Yes button. You will then be advised of an
Error 35. At this point you need to click the Yes button again to proceed.
The P/I system preferences window will be displayed. There are a number of different
categories of options, each grouped in a tabbed sub-screen. As you finish editing each
screen, click the Next > button at the bottom.
Setup Tip
© 2007 - 2014 by Sentinel Hill Software, all rights reserved
694
Series 5 Professional Invoicing - User Help
As you may not have actually entered any Master Code records
that may be referenced in these screens, just enter any value.
(Particularly in the Accounts fields). You can also come back
to edit the Control Preferences later.
Once your P/I Control Preferences is established, the system can then be used.
9.11.1.1 General Tab Screen
Defines the properties for basic Professional Invoicing processing.
© 2007 - 2014 by Sentinel Hill Software, all rights reserved
Professional Invoicing Menu Functions
695
Field Definitions
Next System Assigned - Time Sheet Number
9(6)
An employee's activity, or a machine's usage, may be recorded in a Time Sheet as
billable or non-billable hours. Time sheets are assigned a unique number. This field
holds the next number that will be assigned.
Next System Assigned - Project Code Number
9(6)
Project Codes may be numeric or alphanumeric. If using numeric codes, when a new
project is added to the system, the operator can strike the F1 function key to have the
Next Numeric Project Code automatically assigned. At that point this field will be
incremented.
Next System Assigned - Recap Detail Number
9(8)
Recap Detail are records that provide extended information about WIP charges. (They
may be entered manually in the Generalized WIP Entry function, of can be interfaced from
3rd party systems). Recap records are assigned a unique number. If entered by hand,
this field hold the next number to be assigned.
Generate Detail Work-In-Progress Distributions
check-box
When Chargeable Time-Sheet entries are entered and posted in the P/I the amount is
recorded to a G/L Work-In-Progress account. If a separate journal entry is to be made for
each time-sheet or invoice, then set this check-box, otherwise a total distribution is
recorded for every date. You should typically have this field checked.
Generate Detail Revenue Distributions
check-box
When Chargeable Time-Sheet entries are entered and posted in the P/I, or when Invoices
are generated and posted to A/R, the amount is recorded to a G/L Revenue account. A
separate journal entry will be made for each time-sheet and/or invoice if this check-box is
set; otherwise a total distribution is recorded for every date. You should typically have this
field checked.
Generate Revenue Distributions with Sub-Ledger
Project Codes
check-box
When activity is entered to employee's Time Sheets, a Sub-Ledger Project code my be
assigned. If this check-box is selected, then the Sub-ledger Project will be recorded with
any Revenue distributions that are generated. The sub-ledger Code is carried forward to
the General Ledger system with the journal entry that is recorded there.
© 2007 - 2014 by Sentinel Hill Software, all rights reserved
696
Series 5 Professional Invoicing - User Help
Generate Cost Distributions with Sub-Ledger Project check-box
Codes
When activity is entered to employee's Time Sheets, a Sub-Ledger Project code my be
assigned. If this check-box is selected, then the Sub-ledger Project will be recorded with
any Cost distributions that are generated. The sub-ledger Code is carried forward to the
General Ledger system with the journal entry that is recorded there.
Next System Assigned Invoice Number
9(8)
Invoice numbers are automatically assigned when Invoices are generated. This field
holds the next number to be assigned. You need to be careful about the assignment of
Invoice numbers. Invoices derived from the Customer Order Entry system, the P/I
system, Class Registration system, and perhaps others, all end up being recorded in the
Accounts Receivable system. You must ensure that the Invoice numbers from the
different systems do not conflict. You need to pre-assign ranges of numbers to
each system.
Default "Labor" & "Disbursement" Charges Section
Headings
X(40)
A number of different Invoice Layouts may be generated. On the standard default format,
charges are listed under two main categories - Labor and Disbursements. These fields
will be used as the titles for each of these sections.
Default Print Queue for P/I
X(20)
Select the Series 5 Printer Queue that would be used to typically print the reports
generated for this Professional Invoicing system. When any of the reporting functions are
executed, this printer will be displayed as the default, unless overridden by the user's
assigned Printer Queue. Print Queues are defined by a System Maintenance function.
(Refer to the Systems Management Help if required).
On-Demand Invoicing Sales Batch Prefix & Next
Number
X(2) - 9(4)
The PI system provides for the automatic generation of Invoices when requested by live
telephone or service desk agents. Once generated and/or delivered via email to the
agent, the Invoices are then automatically posted to an Accounts Receivable Sales Batch.
A new Sales Batch is created each day On-Demand invoices are generated. The Sales
Batch Code assigned can be constructed either using defined codes in each On-Demand
Control Set, or from the codes defined by these fields.
The Sales Batch code is constructed as PP9999, where PP is the 2 character Prefix
entered, and 9999 is a number that is assigned and incremented for each new batch
created.
© 2007 - 2014 by Sentinel Hill Software, all rights reserved
Professional Invoicing Menu Functions
9.11.1.2 Rates and Revenue Tab Screen
Defines the properties for those functions that determine the Unit Rate and the Revenue
Account to be assigned to WIP charges in the Professional Invoicing system.
Field Definitions
WIP Rate - Rate Select Basis
radio-buttons
When time sheet information is entered, the system automatically determines whether
the resulting WIP item will be chargeable or non-chargeable, and which Special Rate
Class is to be used. This information may be stored in either the Client or the Project
© 2007 - 2014 by Sentinel Hill Software, all rights reserved
697
698
Series 5 Professional Invoicing - User Help
master records. Setting this option indicates to the system from which source the
defaults are determined from. This field is critical in that it governs the process which is
used to calculate charge-out rates, and whether the time entered is to be invoiced or not.
From Project
From Client
Click the applicable button for the desired results
WIP Rate - Rates Selection Precedence
radio-buttons
When time sheet information is entered, the system will attempt to automatically
determine the default charge-out rate. Default rates may be determined from the Project
record or the Task record. The system searches each possible source, and uses the
last non-zero value found. Selecting Projects over Tasks, the system will first look to the
Task, and then to the Project, thus Project has a priority over the Task). Select Tasks
over Projects to have the system first look at the Project, and then the Task. Note that
after either of these rates are selected, it is still possible that the PI Special Rates table
would be examined, and the final rate derived from there.
Projects over Tasks
Tasks over Projects
Click the applicable button for the desired results
WIP Rate - Special Rates Class Selection
Precedence
radio-buttons
When time sheet information is entered, after a default rate is determined, the Special
Rates tables are examined. Special Rates are available based on Employee Codes and
Task Codes. You may specify the priority in which rates are evaluated. (Keep in mind
that the last rate tested is actually the highest priority). Select Employee Groups over
Tasks, the system will first test for a Task Group rate, then an Employee Group rate, then
a Task Group (or referred to as an Invoice Group). Select Task/Inv Group over
Employee and the order tested is Employee Group, Employee followed by Task Group.
Click the applicable button for
the desired results
Employee Groups over Tasks
Task/Inv Group over Employees
WIP Revenue Distributions Generated
radio-buttons
A/R Revenue distributions may be generated either when WIP activity is entered into the
PI system as either Time Sheets are General WIP entry, or after Invoices have been
generated and posted in the Accounts Receivable system.
When WIP charges are entered into PI
When Invoices are Posted in A/R
Click the applicable button for
the desired results
© 2007 - 2014 by Sentinel Hill Software, all rights reserved
Professional Invoicing Menu Functions
Project Revenue Accruals - Generate
699
check-box
Project Revenue Accruals may be generated on the system as a means to carry forward
outstanding unbilled charges forward through the G/L accounting periods. You would
execute this process on the last day of each month (or shortly there after). Each time it is
run, the current month and year is saved in this field. It may be edited to force
subsequent runs on different months, although this would be discouraged. Each time the
Accruals are generated it will use the next month following the date defined here.
Project Revenue Accruals - Update A/R Customer
Monthly Totals
check-box
In order to correctly maintain monthly client revenue figures, when accruals are
generated, the monthly sales figures associated with the Customer record in the A/R will
be updated. To disable or enable this feature set the check-box accordingly.
Accounts Derived From
radio-buttons
When time sheet information is entered, the system will attempt to automatically
determine the default revenue account to be used for the revenue earned. Default
accounts may be determined from the Project record, the Invoice Section record, the
Invoice Group, or for the Employee's Department. Click the appropriate radio button for
the preferred revenue account source. Note that Non-Recoverable Disbursement
accounts are defined by each Disbursement Code; and Disbursement Markup revenue
is defined by a single account defined in the Control options.
Project
Employee's Department
Invoice Section
Invoice Group
Click the applicable button for the
desired results
Accounts Profit Center Override From
radio-buttons
After the system determines the revenue account or the recoverable expense account
from the basic rules defined, the profit center may then be set according to the
Employee's Department, or Location record or the Project revenue account field may be
used. If no value exists (i.e. zero) or this field is blank, the original profit center will be
used.
Click the applicable button for the desired results
No Override
Project
Employee's Department
Employee's Location
Recoverable Expense Account Derived From
© 2007 - 2014 by Sentinel Hill Software, all rights reserved
radio-buttons
700
Series 5 Professional Invoicing - User Help
When recoverable disbursement charges are entered, the system will automatically
assign the Recoverable Expense account to be used for when the item is invoiced. This
account may be specified with either the Project record or the Disbursement Code
record.
Project
Disbursement Type
Click the applicable button for the desired results
9.11.1.3 Costing Tab Screen
Defines the properties associated to generating Cost Distributions for activity performed and
recorded in the P/I system.
© 2007 - 2014 by Sentinel Hill Software, all rights reserved
Professional Invoicing Menu Functions
701
Field Definitions
Record Cost Amounts for Work-In-Progress
check-box
The For those systems requiring WIP Costing to be implemented, set the check box.
When Costing is turned on, Cost amounts for all time-sheet entries are computed and
recorded; G/L Cost Distributions may be generated; and the total Cost associated to each
Invoice is passed on to the Accounts Receivable system with each Sales Transaction.
The G/L Cost Distributions are generated only when the [D] option is specified.
Generate G/L Cost Distributions for Work-InProgress
check-box
For those systems with Costing turned on, if G/L Cost Distributions are also to be
generated when WIP charges are posted to the system, set the check-box
Cost Distribution Accounts Derived from
radio-buttons
For those systems with Costing turned on, the system will attempt to automatically
assign the Cost account to each WIP item entered via time sheets. You may select to
have the Cost account derived from a number of different sources bases on how you
want costs recorded in the G/L system.
Project
Invoice Section
Invoice Group
Task
Employee's
Department
Employee
Click the applicable button for the desired results
Cost Accounts Profit Center Override From
radio-buttons
For those systems with Costing turned on, after the system determines the G/L Cost
account or the Recoverable Expense account from the basic rules defined, the profit
center may then be set according to either the employee’s Department, the employee’s
Location record or the Project Revenue’s account. If no value exists from the specified
source, (i.e. has a value of Zero or this field is blank), the original profit center will be used.
Click the applicable button for the desired results
Project
Employee's Department
Employee's Location
© 2007 - 2014 by Sentinel Hill Software, all rights reserved
702
Series 5 Professional Invoicing - User Help
Username of the Individual Allowed to View WIP Cost X(16)
Amounts
For those systems with Costing turned on, then the costs associated to Work-InProgress activity will be determined and recorded with each WIP item on file. In some
cases, sensitive labor costs may be displayed or listed in assorted reports. If a
Username is entered in this field, then Cost figures will be presented only to that user.
(Note that the USERNAME entered in this field will be the only person that will be allowed
to change this field in the future).
9.11.1.4 Default G/L Accounts Tab Screen
Defines the defaults for the significant G/L Accounts used in the P/I processing
© 2007 - 2014 by Sentinel Hill Software, all rights reserved
Professional Invoicing Menu Functions
703
Field Definitions
Work-In-Progress Control Account 9(18) - 9(5)
The Work-in-Progress Account is a G/L account defined within the A/R which is used to
accumulate the total of all chargeable time entered into the system. It is debited when
time is entered and credited when that time is invoiced, written off or marked up/down. If
the option to Generate Detailed WIP Distributions is set, a separate entry is made for
each time-sheet, otherwise a single entry is made for the batch of time-sheets entered.
Unearned Revenue Account .....
or
Invoiced Revenue Holding
Account
© 2007 - 2014 by Sentinel Hill Software, all rights reserved
9(18) - 9(5)
704
Series 5 Professional Invoicing - User Help
Depending on whether the option to record revenue distribution at the time it is entered
into the PI system, or when posted in A/R, this field will be labeled as Invoiced Revenue
Holding Account or Unearned Revenue Account.
For systems recording Revenue Distributions at the time WIP charges are entered into
the system, the Invoiced Revenue Holding account is debited when Invoices are
generated and credited when the invoices are posted in the Accounts Receivable system.
For systems recording revenue when Invoices are posted in the Accounts Receivable
system, the Unearned Revenue Account is a G/L account defined within the A/R which is
used to accumulate the total of all potential (or unearned) revenue entered as chargeable
time into the system. It is credited when time is entered and debited when that time is
invoiced, written off or marked up/down. The account is also used when the project
revenue accruals are generated.
Deferred Income Account
9(18) - 9(5)
The Deferred Income Account is a G/L account defined within the A/R which is used to
accumulate the total of all Project Deposits that have been recorded as computed when
Project Revenue Accruals are generated. The profit center for this account will be
determined from the Revenue account for the associated Project.
Holdback Receivables Accounts
9(18) - 9(5)
The Holdback Revenue Account is a G/L account defined within the A/R which is used to
accumulate the total of all Holdbacks generated for those Projects using the Holdback
option. Holdbacks are automatically generated when invoices are generated
Disbursements Markup Account
9(18) - 9(5)
The Disbursement Markup Account is a G/L account defined within the A/R which is used
to accumulate the total of all revenue derived as a result of marking up recoverable
expenses billed to a client. The profit center for this account will be determined from the
Recoverable Expense account for the associated disbursement.
Suspense Revenue Account
9(18) - 9(5)
The Suspense Revenue Account is a G/L account defined within the A/R which is used to
accumulate the total of all Manual Invoices entered into the system. It is credited when
the invoice is entered, and debited when items are marked as belonging to the invoice.
Suspense Credit Account
9(18) - 9(5)
The Suspense Credit Account is a G/L account defined within the A/R which is used to
accumulate the total of all credit notes entered into the system. It is credited when the
Credit Note is entered, and debited when invoiced items are marked down as a result of
© 2007 - 2014 by Sentinel Hill Software, all rights reserved
Professional Invoicing Menu Functions
705
the credit note.
Costs Accumulated Account
9(18) - 9(5)
The Cost Accumulated Account is a G/L account defined within the A/R which is used to
accumulate the total of all WIP costs calculated via time-sheet entry.
9.11.1.5 Cost Plus Control Tab Screen
Defines the Cost Plus percentages, formulas, and Task Codes used to record them as used
in the P/I system in the P/I system.
© 2007 - 2014 by Sentinel Hill Software, all rights reserved
706
Series 5 Professional Invoicing - User Help
Field Definitions
Enable Cost Plus Invoicing ?
check-box
The Professional Invoicing system has, as an option, the capability to automatically
compute and charge out Cost Plus amounts. These are computed when Invoices are
generated and recorded as charges against special Cost-Plus Tasks. Amounts are
computed based on pre-defined custom formulas. Should you wish to take advantage of
this feature, set the check-box.
Cost Plus Task Codes
X(10)
Each Cost Plus Factor is actually just a P/I Task Code. The task must already be
defined using the Task code Maintenance function. Each cost plus factor will be the
same for the entire system, although the percentages may vary from project to project.
Cost Plus Description
X(60)
The Professional Invoicing system supports the use of multiple A/R Revenue accounts. If
you intend on having multiple revenue accounts, or are using the Series 5 Customer
Order Processing system, then set this check-box as checked. If left unchecked, then
all revenue amounts for Sales Transactions will be recorded to the Default Sales
Revenue account specified.
Cost Plus Default Percentage
99.9 %
The percentage value entered will be used as the default for the given Cost Plus Factor.
When assigned to a given Project, this percentage value may be changed for that
particular Project.
Cost Plus Calculation Formula
radio-button
The manner of calculating the cost plus factors will vary from installation to installation.
Each user of the Professional Invoicing package will be assigned a calculation number
which will be customized to their exact specifications. Two formulas for the computation
of Cost Plus Amount are defined. Select the desired function. (Contact the Sentinel
Hill Software help desk if you need to have a customized formula developed).
Default "Cost Plus" Section Heading for Invoices
X(30)
On the invoice, all the information calculated for the cost plus factors will be summarized
using the description you enter in this field, such as "Cost Plus Amounts". This phrase
© 2007 - 2014 by Sentinel Hill Software, all rights reserved
Professional Invoicing Menu Functions
707
will appear on the heading before all the Cost Plus Factors are printed.
Generate Project Accruals for Un-Billed Cost Plus
Charges ?
check-box
If the Professional Invoicing system should generate Revenue Accruals, set the checkbox depending whether of not Un-BIlled Cost Plus charges are to be accrued or not.
9.11.2 Invoice Wizard Codes Maintenance
The Professional Invoicing Invoice Wizard is a program that automates the basic processes
associated to the invoicing cycle. It steps through each of the operational functions offered
by the P/I system to load interfaced external data, selects items to be billed, generates and
prints invoices, and posts them to the Accounts Receivable system.
The Invoice Wizard Codes are set up to define the options associated to these invoicing
related operations. Each Wizard Code is established to represent a unique set of options.
Typically each Wizard Code would perhaps represent charges accumulated for a different
branch office. Each office is then dealt with separately, having their accumulated activity
loaded, billed, invoices printed, and moved to A/R.
When the Invoicing Wizard is launched as an operation, it will attempt to process each
Invoicing Wizard code that has been defined. A given Wizard code, or branch office set of
files, is processed if the associated interface files are found in it's designated directory folder.
(The interface files must be first installed into the their respective folders and have a
predefined filename). For further discussion refer to the topic under the Operational
Functions chapter titled Interface/Invoicing Wizard 340 .
The Invoice Wizard Codes Maintenance function is accessed from the P/I Main menu, by
selecting Invoicing Wizard Code Control... from the Codes Maintenance drop-down
menu.
Invoice Wizard Codes Maintenance Grid
Invoice Wizard Codes are maintained using a Series 5 grid processing screen.
© 2007 - 2014 by Sentinel Hill Software, all rights reserved
708
Series 5 Professional Invoicing - User Help
"Fast Buttons"
New
Add a new Invoice
Wizard Code
Modify
Modify the Invoice
Wizard Code highlighted
in the grid
Delete
Delete the Invoice
Wizard Code highlighted
in the grid
Print
Generate a report listing
the Invoice Wizard
Codes already on file
Edit an existing Invoice Wizard Code by double-clicking it's associated row. Standard Series
5 grid controls apply.
The Print Options tab screen will be displayed, from which you can select to direct the output
to be displayed to the screen, archived, printed, saved as an MS Word document, saved as a
PDF, and/or emailed. (Refer to the topic titled Report Generation and Printing 159 for full
details).
The report listing the Invoice Wizard Codes on file, if archived, will be catalogued with a report
name of INVWIZ_LOG.LST.
Invoice Wizard Code - Properties Screen
The properties for each Invoice Wizard Code are defined with the following screen:
© 2007 - 2014 by Sentinel Hill Software, all rights reserved
Professional Invoicing Menu Functions
709
Field Definitions
Invoice Wizard Code
X(6)
This is the alphanumeric code assigned to the Invoice Wizard. The Invoicing Wizard
Operation automatically processes each Wizard Code in the alphabetic order based on
the code.
Description
X(40)
Is a description of the Invoice Wizard. This is displayed as the Wizard processes each
code and is printed on the execution log. It would typically be the name of the office or the
set of charges being interfaced and invoiced.
Print Queue for Execution Statistics
X(20)
When the Invoicing Wizard it executed, statistics are accumulated and printed as a
report. Select the Series 5 Printer Queue to which this report will be output to as a
© 2007 - 2014 by Sentinel Hill Software, all rights reserved
710
Series 5 Professional Invoicing - User Help
default.
Invoice Wizard Code - Interfacing Options Screen
The properties associated to the Data Interfacing process for each Invoice Wizard Code are
defined with the following screen
Field Definitions
Types of Charges To Load
radio-buttons
The first step processed by the Wizard is the loading of the charges that were generated
from an external source. There are two types of data that is loaded; standard WIP
charges information and Recap Detail. Recap detail provides extended information
pertaining to each WIP charge. Select the applicable option for the types of data to be
© 2007 - 2014 by Sentinel Hill Software, all rights reserved
Professional Invoicing Menu Functions
711
loaded by the Wizard.
Interface Input File – Folder
X(70)
Specify the name of the folder where the external interface data has been stored. This is
the folder where the Wizard will attempt to locate files having the expected filenames
associated to the Wizard Code being set up.
You may click on the Browse button to locate the desired directory. Only those folders
which are descendants of the root directory, of that which is defined by the From Folder
field, can be displayed. So if you wish to choose a folder on your "C" drive, enter C:\ in
the From Folder field before clicking the "Browse" button. Setting the From Folder field
blank, or to a path that does not have a drive letter designation, would result in only being
able to browse descendants of the user's default working directory.
Interface Input File – File Name Prefix
X(10)
Specify the base name of the external interface files to be loaded. The Invoicing Wizard
uses the Name Prefix to build the names of the files that are to be loaded.
The Invoicing Wizard loads basic WIP charge records for the Wizard Code, and Recap
supporting records. Each Wizard Code represents the charges, say for a particular
office. The File Name Prefix is used to identify the interface files for each office. The
Recap data is loaded from one file identified with a specific name. (If there are more than
one sets of files for multiple offices, or multiple Wizard Codes, to be loaded, the Recaps
are still loaded from only one file).
For each Wizard Code, when the Invoicing Wizard is executed, there are two types of
WIP charges files that are loaded. These are referred to as Remote charges and Local
charges. Hence for each Wizard Code there potentially are 4 interface files that could be
processed.
The following filenames are expected for the Recap detail record files:
UDS_DyRecapyymmddR_hhmmss.dat
UDS _DyRecapyymmddL_hhmmss.dat
The following filenames are expected for the WIP charges record files:
PPPPPP_DyInvoiceyymmddR_hhmmss.dat
PPPPPP_DyInvoiceyymmddL_hhmmss.dat
Where:
PPPPPP
yymmdd
hhmmss
R or L
- Is the File Name Prefix associated to the Wizard Code
- Is the date the interface files were created
- Is the time the interface files were created
- Indicates the files as being either the Remote or Local charges
When the Invoicing Wizard is executed, it first attempts to find the earliest pair of Remote
and Local Recap files in the selected directory. Once these are found it uses the date
and time stamp embedded within the filename, along with the File Name Prefix, to form
© 2007 - 2014 by Sentinel Hill Software, all rights reserved
712
Series 5 Professional Invoicing - User Help
the WIP charges filenames.
Local and Remote Interface Data Files
With any given interface set of files, all "Local" files have the same date/time
stamp. All "Remote" files have the same date/time stamp. These time
stamps may not necessarily be the same for the "Local" and "Remote" files.
Interface Exception Report – Destination
radio-buttons
When the Invoicing Wizard it executed, for the particular set of data, an exception report
is generated. Select the reporting output option for this report.
Interface Exception Report – Print Queue
X(20)
When the Invoicing Wizard it executed, for the particular set of data, an exception report
is generated. Select the Series 5 Printer Queue to which this report will be output to as a
default.
Invoice Wizard Code - Invoicing Options Screen
The properties associated to the Invoicing process for each Invoice Wizard Code are defined
with the following screen:
© 2007 - 2014 by Sentinel Hill Software, all rights reserved
Professional Invoicing Menu Functions
713
Field Definitions
Projects Invoiced with – Invoice Cycle Code X(1)
The second major function processed by the Wizard is the generation of invoices.
Invoices are generated for P/I Projects. Each Project has defined as one of it's
properties, an Invoice Cycle Code. For this Wizard Code, you may specify the Invoicing
Cycle Code to be used as a filter to select the Projects that are invoiced.
Projects Invoiced with – Invoice Layout Code 9(3)
Invoices are generated for P/I Projects. Each Project has defined as one of it's
properties, an Invoice Layout Code. For this Wizard Code, you may specify the Invoicing
Layout Code to be used as a filter to select the Projects that are invoiced.
Invoices are Generated As ?
radio-buttons
The Invoices that are generated, when invoked using this Wizard, may be created as
© 2007 - 2014 by Sentinel Hill Software, all rights reserved
714
Series 5 Professional Invoicing - User Help
individual documents, or as a single document holding all invoices. It depends whether
the invoices are t