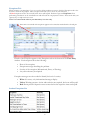
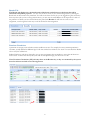
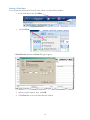
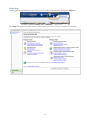
1
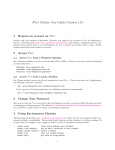
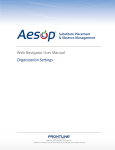
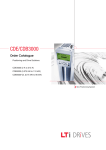
Payroll Office Straz Tower, 175 915 W. Wisconsin Ave. Phone: 414-288-5136 Fax: 414-288-6600 EmpCenter Student Time and Attendance User Manual Version 1.0 Introduction This manual illustrates the most commonly used employee functions in EmpCenter Time and Attendance. The intended audience is student employees who use EmpCenter Time and Attendance to record and view time worked, and generate time sheet reports. Office of Finance EmpCenter Table of Contents About EmpCenter .........................................................................................................................1 Student Multiple Assignments (when you have multiple jobs) ...........................................1 EmpCenter Functions Methods to Record Time .....................................................................................................1 The Time Clock ...................................................................................................................2 The WebClock .....................................................................................................................3 To Login...............................................................................................................................3 To Record Time ...................................................................................................................4 Variables, Reporting, and Viewing Common Situations (lunch breaks, multiple assignments) ..................................................5 How to Review Hours Worked ............................................................................................5 Time Sheet View Options ....................................................................................................7 Exceptions Tab.....................................................................................................................8 Student Exceptions List .......................................................................................................8 Results Tab...........................................................................................................................9 Premium Calculations ..........................................................................................................9 Printing a Time Sheet.........................................................................................................10 Generating Reports ............................................................................................................11 Online Help ........................................................................................................................12 About EmpCenter What is EmpCenter? EmpCenter is Marquette’s electronic time and attendance (payroll) recording system, which includes a web application and standard time clocks to record hours worked. Hourly student employees will utilize EmpCenter to record their time and attendance. What changes will I have in my day-to-day processes? EmpCenter should reduce the time it takes you and your supervisor to record, calculate, approve and submit your hours worked. EmpCenter offers ease of use and multiple ways to record time, through a web application or a time clock. What are the general time entry rules applied to EmpCenter Timekeeping? All student employees using EmpCenter are non-exempt (hourly employees) and clock their time in and out via EmpCenter each day they work. All student employees use bi-weekly time sheets. Shifts crossing midnight will be recorded as time worked on the day the shift begins. Students working multiple jobs with multiple supervisors fall within the functionality known as Multiple Assignments. Work time is reported using in/out entries in one minute increments. Time is rounded to the nearest quarter hour based on an 8 minute grace period. Student Multiple Assignments In EmpCenter, the job you perform for a specific manager in a specific department is referred to as an assignment. Within Marquette University, you may perform more than one job and work in more than one department or area. You may also have more than one manager or supervisor who is responsible for tracking and approving your time and attendance for a particular set of tasks and responsibilities. Perhaps your rate of pay is different for each job. In EmpCenter, multiple jobs, with multiple supervisors, and multiple pay rates are referred to as Multiple Assignments. Each assignment has its own time sheet, so if you have more than one assignment (job), you are also responsible for reviewing or recording time in more than one time sheet. When you log into EmpCenter, you must choose which time sheet you wish to open. Methods to Record Time Supervisors will assist new student employees as to how and where they should clock into EmpCenter to record their time. Employees can record hours worked in one or more of the following ways: • Swipe your MUID at a standard time clock to record time. • Login at the WebClock, a web-based interface using a personal computer. 1 The Time Clock Below is an example of the EmpCenter Standard Time Clock which will be located in certain departments on campus. For a list of current time clock locations visit: http://www.marquette.edu/its/projects/tsi/time-clock-locations.shtml 1. If the screen is blank, press any key to activate the clock. 2. On the keypad, press the appropriate Function key, F1 to Clock In or F5 to Clock Out. 3. Swipe your MU ID Card with picture facing in (magnetic stripe to the right). 4. If you have more than one job, use the arrow keys to move up and down the list of options then press F3 to Select the assignment (job) for the time stamp you wish to record. If you only have one job you will not need to select an assignment. 5. Confirm the job on the following screen is correct. Press F8 to Save and log off. 2 The WebClock Some student employees use a virtual time clock known as the WebClock. The WebClock is accessed through the online EmpCenter application and works like a data collection terminal where authorized employees can quickly record times in and out of work assignments. Access the application via this link (also found on various Marquette University web pages). https://empcenter.mu.edu/workforce/Logon.do To Login Enter your eMarq User ID and Password. Click Login The first time you log into EmpCenter, the following dialog box appears: Click OK. The following screen shot shows the Student Employee EmpCenter Dashboard. This should be the first screen to appear every time you log in after your initial log in. 3 To Record Time 1. To record time, click Go to Web Clock from the Time Entry menu: 2. Each assignment has its own time sheet. If you have more than one job, you are responsible for correctly clocking in and out on each job worked. When you use the Web Clock, you will see a list of active jobs to choose from. If you only have one assignment the application will skip this step and take you to the WebClock screen as seen in Step 4. 3. Select the Assignment (job) for which you need to record time: Important Note: the Assignment titles are structured as follows: Job Reference Number or Job ID as the department entered it into JobConnection Job Title as entered by the department into JobConnection MyJob Employee ID number with a hyphen-then number to differentiate each job from the others. 4. The WebClock screen appears like this: 4 The WebClock screen includes the following buttons: In: Records the start of work time. Out: Records the end of the work period. Logout: Logs you out of EmpCenter Timesheet: Takes you to the Timesheet View for that job. Switch Assignment: Takes you to the Assignment list, if you have more than one assignment. 5. Confirm that the Job Title displayed at the top of the screen is the correct job, then click In or Out for the time stamp you wish to record. If you realize that you’ve chosen the wrong assignment, click Switch Assignments to return to your Assignment list so you can select the correct Assignment. A successfully recorded time stamp will be confirmed as follows: Click Logout when you have finished clocking time in the application. Common Situations Lunch and Breaks To record a lunch or unpaid break, a student employee will use the Out and In function. The time Out records the time the student stops working, the time In records the time the student returns to work. Multiple Assignments If you are a student who works multiple jobs within the same department or building, it is possible that you would need to clock out of one job and into a different one right away. Using either clock, you will first choose the job you are leaving and click Out. Then, you will Switch Assignments, choose the job you are starting, and click In. Clock Pay Code vs. Reg Hours (Worked) If you choose to review your timesheet right after you have punched, you will see the punch recorded for that job as a Clock paycode until an Out punch is recorded. When the Out punch completes that “slice” of time, it triggers the system to apply standard rules, note any exceptions, and calculate your Reg (Worked) hours. The Reg (Worked) hours will be interfaced to MyJob for payment. How to Review Hours Worked You will want to review your timesheet each pay period to ensure that there are no exception errors and to assist your supervisor with correcting any incorrect punches or swipes. To review: 1. Login to the system 2. Open your timesheet by selecting View Time Sheet from the Time Entry area of the Dashboard and, 3. If applicable, select the appropriate assignment. 5 Time Entry Window The timesheet (My Time Entry window) for employees is view only. Student employees cannot make entries or edits to their timesheets. You will need to contact your supervisor for any timesheet changes needed. See the following example of a student employee timesheet. The top panel displays the Time Entry tab (your timesheet) while the bottom panel displays the Exceptions and Results tabs. The information on these tabs is described on pages 8-10. Select the Pay Period to View The pay period selector allows the user to move forward or backward one period at a time, using the arrow icons, or to select a specific period using the calendar icon. You may need to change time periods to review old timesheets, reconcile your pay slip, or to review the timesheet that has been approved by your supervisor at the time timesheets are due to Payroll for processing. 1. Click the respective arrow on the Period Selector button to retreat or advance one pay period. 2. Click the Period Selector button to access a pop-up calendar, and then select a pay period or click the Default Period button. 3. EmpCenter timesheet view defaults to show only one week of the pay period at a time. To view time for the entire period, select the Show All Weeks checkbox. 6 EmpCenter provides two views (or formats) for displaying time sheet information: List View and Table View. Each view displays time sheet information for an entire pay period. The default is the List View. To change this at any time, select the respective view through the View button: The settings you choose will remain in place for the next time you access EmpCenter. List View The List View displays the days in the selected Pay Period as a vertical list. Totals per time slice appear on the right side of the window. The sum total for the Pay Period is displayed in the bottom right corner. Table View The Table View displays the days in the selected Pay Period as a horizontal list on your time sheet: Table View totals per pay code appear on the right side of the window, and totals for each day are at the bottom of the window. The sum total for the Pay Period is displayed in the bottom right corner. 7 Time Entry Window Time Sheet View Options Exceptions Tab While reviewing your timesheet, if you see a red or yellow pushpin on an entry, click the Exceptions tab at the bottom or click on the pushpin. These exceptions will alert you to errors on your timesheet. All Red exceptions need to be resolved before hours will be paid. Red errors prevent EmpCenter from performing calculations on the recorded hours and will result in non-payment of hours. Please work with your supervisor(s) to help resolve the error. Note: You cannot make edits to your timesheet; it is view only. Time entries associated with exceptions appear on the timesheet marked with a colored pin: Details of the Exception appear on the Exceptions tab on the bottom of the Time Entry window. Each exception shows the following: • • • • Date of the exception. Exception message describing the problem. Severity of the exception (Informational, Error, or Warning). Any action that may be required. Exception messages are color-coded to identify the level of severity: • • • White: No errors; only informational messages display. Yellow: Warnings present. Action and resolution are required, but hours will be paid. Red: Errors present. Supervisor must correct before the respective time can be paid. Student Exceptions List 8 The Results tab displays the calculated results of the hours worked, these are the hours that will be interfaced to Payroll for payment. You can view the hours for all of your worked assignments by clicking the Results tab on the bottom of any timesheet. You will see the hours for the job you are logged into, plus total hours from any other jobs you have. Along with the hours, you can view the email address of the supervisor for each of the positions on which you have clocked hours this period. The Results tab will look the same on each assignment, even though the hours may not all be worked on that assignment. Premium Calculations A premium is extra pay received when certain conditions are met. For example, the most common premium is Overtime, usually defined as additional pay for all time worked over 40 hours in a week. You can check the Results tab to verify the calculations. Student Employees with hours charged to one or more assignment that accumulates to more than 40 hours in a week receive 1.5 times their hourly rate (time and one half premium pay) for the hours over 40. Note: Premium Calculations (OT) will only show on the Results tab, as they are calculated by the system based on all hours worked across all assignments. 9 Information Tabs Results Tab 1. In the Time Sheet view click More. 2. And click Print A Print Preview window and Print dialog box appear. 3. Select your print options, then click OK. 4. Click Close link to close the Print Preview window. 10 Information Tabs Printing a Time Sheet You can print the information from all of the tabs in your Time Entry window. Student employees can also access general reports to view time sheet information for a certain period or to see comments on their time sheets. 1. To generate a report from the dashboard, click Reports for Employees. 2. A list of report categories appears. 3. Select the name of the report you want to generate. 4. A second window appears, allowing you to specify report criteria. Complete the required fields. 6. Select your preferred output format: Excel to view/print the report as a Microsoft Excel spreadsheet. HTML (the default) to view the report in the browser window as a web page. PDF to view/print the report in Adobe Acrobat PDF format. The Adobe Acrobat Reader is required to view this format. The Reader is available at: http://get.adobe.com/reader/ . 7. Click Submit to generate the report. 11 Generating Reports Requesting Time-Off Generating Reports The Help link opens the online version of the EmpCenter End User Guide in a new browser window 12 Time Clock Function Student Employment Online Help Online Help Once logged into the dashboard, you have access to online documentation through the Help link.