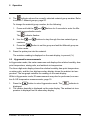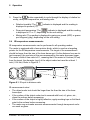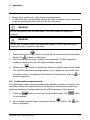
1
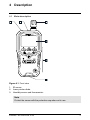
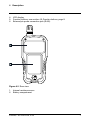
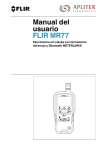
User’s manual
FLIR MR77
Pinless moisture psychrometer with infrared
thermometer and Bluetooth METERLiNK®
User’s manual
FLIR MR77
#T559822; r. AE/ 10036/10036; en-US
Table of contents
1
Disclaimers. . . . . . . . . . . . . . . . . . . . . . . . . . . . . . . . . . . . . . . . . . . . . . . . . . . . . . . . . . . . . . 1
1.1
Copyright. . . . . . . . . . . . . . . . . . . . . . . . . . . . . . . . . . . . . . . . . . . . . . . . . . . . . . . 1
1.2
Quality assurance . . . . . . . . . . . . . . . . . . . . . . . . . . . . . . . . . . . . . . . . . . . . . 1
1.3
Documentation updates . . . . . . . . . . . . . . . . . . . . . . . . . . . . . . . . . . . . . . . 1
1.4
Disposal of electronic waste. . . . . . . . . . . . . . . . . . . . . . . . . . . . . . . . . . . 1
2
Safety information . . . . . . . . . . . . . . . . . . . . . . . . . . . . . . . . . . . . . . . . . . . . . . . . . . . . . . 2
2.1
FCC Compliance . . . . . . . . . . . . . . . . . . . . . . . . . . . . . . . . . . . . . . . . . . . . . . 2
2.2
Industry Canada compliance. . . . . . . . . . . . . . . . . . . . . . . . . . . . . . . . . . 3
3
Introduction . . . . . . . . . . . . . . . . . . . . . . . . . . . . . . . . . . . . . . . . . . . . . . . . . . . . . . . . . . . . . 5
3.1
Key features. . . . . . . . . . . . . . . . . . . . . . . . . . . . . . . . . . . . . . . . . . . . . . . . . . . . 5
4
Description . . . . . . . . . . . . . . . . . . . . . . . . . . . . . . . . . . . . . . . . . . . . . . . . . . . . . . . . . . . . . . 6
4.1
Meter description . . . . . . . . . . . . . . . . . . . . . . . . . . . . . . . . . . . . . . . . . . . . . . 6
4.2
Function buttons . . . . . . . . . . . . . . . . . . . . . . . . . . . . . . . . . . . . . . . . . . . . . . . 8
4.3
Display description . . . . . . . . . . . . . . . . . . . . . . . . . . . . . . . . . . . . . . . . . . . . 9
4.4
Status icons and indicators. . . . . . . . . . . . . . . . . . . . . . . . . . . . . . . . . . . . 9
5
Operation . . . . . . . . . . . . . . . . . . . . . . . . . . . . . . . . . . . . . . . . . . . . . . . . . . . . . . . . . . . . . . .12
5.1
Powering the meter . . . . . . . . . . . . . . . . . . . . . . . . . . . . . . . . . . . . . . . . . . .12
5.2
Moisture measurements. . . . . . . . . . . . . . . . . . . . . . . . . . . . . . . . . . . . . .12
5.3
Hygrometric measurements. . . . . . . . . . . . . . . . . . . . . . . . . . . . . . . . . .14
5.4
IR temperature measurements. . . . . . . . . . . . . . . . . . . . . . . . . . . . . . .15
5.5
Condensation measurements . . . . . . . . . . . . . . . . . . . . . . . . . . . . . . . .16
5.6
Vapor pressure measurements . . . . . . . . . . . . . . . . . . . . . . . . . . . . . .17
5.7
Selecting measurement units . . . . . . . . . . . . . . . . . . . . . . . . . . . . . . . .18
5.8
Storing and recalling measurements. . . . . . . . . . . . . . . . . . . . . . . . .18
5.9
Alarm settings. . . . . . . . . . . . . . . . . . . . . . . . . . . . . . . . . . . . . . . . . . . . . . . . .19
5.10
Locked mode . . . . . . . . . . . . . . . . . . . . . . . . . . . . . . . . . . . . . . . . . . . . . . . . .20
5.11
Streaming measurement data using Bluetooth . . . . . . . . . . . . . .21
6
Maintenance. . . . . . . . . . . . . . . . . . . . . . . . . . . . . . . . . . . . . . . . . . . . . . . . . . . . . . . . . . . .22
6.1
Cleaning and storage. . . . . . . . . . . . . . . . . . . . . . . . . . . . . . . . . . . . . . . . .22
6.2
Battery replacement . . . . . . . . . . . . . . . . . . . . . . . . . . . . . . . . . . . . . . . . . .22
7
Material groups . . . . . . . . . . . . . . . . . . . . . . . . . . . . . . . . . . . . . . . . . . . . . . . . . . . . . . . .23
8
Technical specifications . . . . . . . . . . . . . . . . . . . . . . . . . . . . . . . . . . . . . . . . . . . . . .41
8.1
General specifications . . . . . . . . . . . . . . . . . . . . . . . . . . . . . . . . . . . . . . . .41
8.2
Humidity meter specifications . . . . . . . . . . . . . . . . . . . . . . . . . . . . . . . .42
#T559822; r. AE/ 10036/10036; en-US
v
Table of contents
8.3
8.4
8.5
8.6
8.7
Moisture specifications . . . . . . . . . . . . . . . . . . . . . . . . . . . . . . . . . . . . . . .42
Thermal measurement range specifications. . . . . . . . . . . . . . . . .43
Vapor pressure specifications . . . . . . . . . . . . . . . . . . . . . . . . . . . . . . . .43
Dew Point Temperature specifications . . . . . . . . . . . . . . . . . . . . . . .43
Mixing Ratio specifications . . . . . . . . . . . . . . . . . . . . . . . . . . . . . . . . . . .43
9
Technical support . . . . . . . . . . . . . . . . . . . . . . . . . . . . . . . . . . . . . . . . . . . . . . . . . . . . .44
10
Warranties . . . . . . . . . . . . . . . . . . . . . . . . . . . . . . . . . . . . . . . . . . . . . . . . . . . . . . . . . . . . . .45
10.1
FLIR Global Limited Lifetime Warranty . . . . . . . . . . . . . . . . . . . . . .45
10.2
FLIR Test and Measurement Limited 2 Year
Warranty. . . . . . . . . . . . . . . . . . . . . . . . . . . . . . . . . . . . . . . . . . . . . . . . . . . . . . 46
#T559822; r. AE/ 10036/10036; en-US
vi
1 Disclaimers
1.1 Copyright
1.3 Documentation updates
© 2013, FLIR Systems, Inc. All rights reserved worldwide.
No parts of the software including source code may be reproduced, transmitted, transcribed or translated into any
language or computer language in any form or by any
means, electronic, magnetic, optical, manual or otherwise,
without the prior written permission of FLIR Systems.
Our manuals are updated several times per year, and we
also issue product-critical notifications of changes on a
regular basis.
The documentation must not, in whole or part, be copied,
photocopied, reproduced, translated or transmitted to any
electronic medium or machine readable form without prior
consent, in writing, from FLIR Systems.
Names and marks appearing on the products herein are
either registered trademarks or trademarks of FLIR Systems and/or its subsidiaries. All other trademarks, trade
names or company names referenced herein are used for
identification only and are the property of their respective
owners.
To access the latest manuals and notifications, go to the
Download tab at:
http://support.flir.com
It only takes a few minutes to register online. In the download area you will also find the latest releases of manuals
for our other products, as well as manuals for our historical
and obsolete products.
1.4 Disposal of electronic waste
1.2 Quality assurance
The Quality Management System under which these
products are developed and manufactured has been certified in accordance with the ISO 9001 standard.
FLIR Systems is committed to a policy of continuous development; therefore we reserve the right to make
changes and improvements on any of the products without prior notice.
As with most electronic products, this equipment must be
disposed of in an environmentally friendly way, and in accordance with existing regulations for electronic waste.
Please contact your FLIR Systems representative for
more details.
#T559822; r. AE/ 10036/10036; en-US
1
2 Safety information
Note
Before operating the device, you must read, understand, and follow all instructions, dangers, warnings, cautions, and notes.
Note
FLIR Systems reserves the right to discontinue models, parts or accessories,
and other items, or to change specifications at any time without prior notice.
WARNING
Do not look directly into the laser beam. The laser beam can cause eye
irritation.
WARNING
Do not use the laser pointer near explosive gases or in other possible explosive areas. Injury to persons can occur.
This symbol, adjacent to another symbol or terminal, indicates that
the user must refer to the manual for further information.
This symbol, adjacent to a terminal, indicates that, under normal
use, hazardous voltages may be present.
Double insulation.
2.1 FCC Compliance
This device complies with part 15 of the FCC Rules. Operation is subject to the
following two conditions:
1.
2.
This device may not cause harmful interference.
This device must accept any interference received, including interference
that may cause undesired operation.
This equipment has been tested and found to comply with the limits for a Class B
digital device, pursuant to part 15 of the FCC Rules. These limits are designed to
#T559822; r. AE/ 10036/10036; en-US
2
2 Safety information
provide reasonable protection against harmful interference in a residential installation. This equipment generates, uses, and can radiate radio frequency energy
and, if not installed and used in accordance with the instructions, may cause
harmful interference to radio communications. However, there is no guarantee
that interference will not occur in a particular installation. If this equipment does
cause harmful interference to radio or television reception, which can be determined by turning the equipment off and on, the user is encouraged to try to correct the interference by one or more of the following measures:
•
•
•
•
Reorient or relocate the receiving antenna.
Increase the separation between the equipment and receiver.
Connect the equipment into an outlet on a circuit different from that to which
the receiver is connected.
Consult the dealer or an experienced radio/TV technician for help.
CAUTION
Exposure to Radio Frequency Radiation.
To comply with FCC/IC RF exposure compliance requirements, a separation
distance of at least 20 cm must be maintained between the antenna of this device and all persons. This device must not be co-located or operating in conjunction with any other antenna or transmitter.
WARNING
Changes or modifications not expressly approved by the party responsible for
compliance could void the user's authority to operate the equipment.
2.2 Industry Canada compliance
This device complies with Industry Canada licence-exempt RSS standard(s). Operation is subject to the following two conditions: (1) this device may not cause interference, and (2) this devicemust accept any interference, including
interference that may cause undesired operation of thedevice.
#T559822; r. AE/ 10036/10036; en-US
3
2 Safety information
CAUTION
Exposure to Radio Frequency Radiation.
To comply with RSS 102 RF exposure compliance requirements, for mobile
configurations, a separation distance of at least 20 cm must be maintained between the antenna of this device and all persons. This device must not be colocated or operating in conjunction with any other antenna or transmitter.
#T559822; r. AE/ 10036/10036; en-US
4
3 Introduction
Congratulations on your purchase of the FLIR MR77 with METERLiNK® Bluetooth capabilities for use with FLIR infrared (IR) cameras.
This pinless moisture meter incorporates a patented built-in IR thermometer and
20-point memory. You can monitor moisture in wood and other building materials
with no surface damage with the pinless moisture sensor (pin-type moisture
probe included), and measure humidity and air temperature with the built-in
probe, plus non-contact IR temperature using its patented IR design. Advanced
functions provide moisture content, dew point, and vapor pressure calculations.
This meter is shipped fully tested and calibrated and, with proper use, will provide
years of reliable service.
3.1 Key features
•
•
•
•
•
•
•
•
•
•
•
Quickly indicates the moisture content of materials with pinless technology
without damaging the surface.
Optional remote pin-type probe (MR77-P) allows for moisture readings at different penetration levels (0.9 m (3′) cable length).
Easy to read, large dual display with backlight feature.
Simultaneously displays the percentage moisture content of wood or material
being tested and the air temperature, IR temperature, or humidity.
Uses a patented IR design to measure non-contact surface temperature, with
an 8:1 distance-to-spot ratio and 0.95 fixed emissivity.
Built-in humidity/temperature probe measures relative humidity and air temperature plus the mixing ratio and the dew point.
Measures ambient and surface vapor pressure.
Automatically calculates the differential temperature.
Minimum/maximum and data hold modes.
20-point internal memory.
Auto power off and low battery indication.
#T559822; r. AE/ 10036/10036; en-US
5
4 Description
4.1 Meter description
Figure 4.1 Front view
1.
2.
3.
IR sensor.
Laser pointer diode.
Humidity sensor and thermometer.
Note
Protect the sensor with the protective cap when not in use.
#T559822; r. AE/ 10036/10036; en-US
6
4 Description
4.
5.
6.
LCD display.
Function buttons, see section 4.2 Function buttons, page 8.
External pin probe connection jack (RJ45).
Figure 4.2 Rear view
1.
2.
Internal moisture sensor.
Battery compartment.
#T559822; r. AE/ 10036/10036; en-US
7
4 Description
4.2 Function buttons
•
•
•
•
•
•
•
•
•
Press the button to enter Hygrometer mode, see section 5.3
Hygrometric measurements, page 14.
Press the button repeatedly to cycle through the display of relative humidity, dew point temperature, and mix ratio.
Press and hold the button for 2 seconds to enter Humidity
alarm set mode, see section 5.9 Alarm settings, page 19.
Press the button to enter Condensation mode, see section
5.5 Condensation measurements, page 16.
Press the button repeatedly to toggle between Condensation
mode and Vapor pressure mode, see section 5.6 Vapor pressure measurements, page 17.
When in Moisture mode, press and hold the button for 2 seconds to toggle between the relative and absolute readings,
see section 5.2 Moisture measurements, page 12.
Press the button to enter Moisture mode, see section 5.2
Moisture measurements, page 12.
Press the button repeatedly to toggle between the internal
sensor and external pin probe measurements.
Press and hold the button for 2 seconds to enter Moisture
alarm set mode, see section 5.9 Alarm settings, page 19.
Press the button to enable/disable the display backlight.
•
•
Press the button to toggle between Normal and Hold mode. In
Hold mode, the display freezes the last reading and continues
to display this value.
Press and hold the button for 5 seconds to toggle between
Normal and Locked mode, see section 5.10 Locked mode,
page 20.
Press and hold the button to enable IR temperature measurements, see section 5.4 IR temperature measurements, page 15.
#T559822; r. AE/ 10036/10036; en-US
8
4 Description
•
•
Press and hold the button for 2 seconds to change the unit
setting. For more information, see section 5.7 Selecting measurement units, page 18.
When in View data mode, press the button to step through the
datalogger memory locations.
When in View data mode, press the button to step through the
datalogger memory locations.
Press the button to capture and store the current readings. For
more information, see section 5.8 Storing and recalling measurements, page 18.
Press the button to switch the meter on/off.
4.3 Display description
1.
2.
3.
Main display.
Secondary display.
Bar graph (matches the reading on the main display).
4.4 Status icons and indicators
Indicates that METERLiNK® (Bluetooth) communication is active, see section 5.11 Streaming measurement data using Bluetooth, page 21.
Indicates that the IR sensor and the laser pointer diode are active.
#T559822; r. AE/ 10036/10036; en-US
9
4 Description
Indicates that the meter is displaying relative moisture measurements (solid indicator) or absolute moisture measurements
(flashing indicator).
Indicates that the meter is in Hold mode.
Indicates that the reading is lower than the Low alarm threshold.
Indicates that the reading is higher than the High alarm threshold.
Indicates that the meter is in Locked mode.
Indicates that the internal moisture sensor is active.
Indicates that the external pin probe is active.
Indicates the battery voltage status.
Indicates that the auto power off function is enabled.
Indicates the active datalogger memory location (1–20).
Indicates that the meter is in Hygrometer mode.
Indicates that the meter is displaying dew point temperature readings on the main display.
Indicates that the meter is in Condensation mode.
Indicates that the meter is in Moisture mode.
Indicates the number that represents the material group under
test, see section 7 Material groups, page 23.
Indicates that the meter is displaying vapor pressure in millibar
(mBar) or in kilopascal (kPa) units.
Indicates that the meter is displaying the mixing ratio in grains per
pound (GPP) or in grams per kilogram (g/kg) units.
#T559822; r. AE/ 10036/10036; en-US
10
4 Description
Indicates that the meter is displaying relative humidity in percent
(%) units.
Indicates that the meter is displaying temperature in degrees Celsius (℃) units.
Indicates that the meter is displaying temperature in degrees Fahrenheit (℉) units.
High/low calibration point.
#T559822; r. AE/ 10036/10036; en-US
11
5 Operation
5.1 Powering the meter
1.
Remove the protective cap from the humidity sensor/thermometer assembly.
2.
3.
Press the
button to switch on the meter.
If the battery indicator
shows that the battery voltage is low or if the meter does not power on, replace the battery. See section 6.2 Battery replacement, page 22.
4.
Press the
button to switch off the meter.
5.1.1 Auto power off
The meter enters sleep mode after 30 minutes of inactivity. The meter beeps
three times 20 seconds before powering off. Press any function button to prevent
the meter from powering off. The auto power off time-out is then reset.
5.1.1.1 Disable auto power off
1.
To disable the auto power off function, start with the meter switched off.
2.
Simultaneously press and hold the
and
buttons until the
dicator disappears, indicating that the function is disabled.
in-
5.2 Moisture measurements
With the meter in Moisture mode, moisture measurements can be performed using either the internal moisture sensor or by connecting the external pin probe.
The internal moisture sensor can detect moisture to a depth of 19 mm (0.75″).
The internal moisture reading can be relative or absolute.
The three-digit main display shows the moisture reading, and the four-digit secondary display shows the ambient air temperature. The bar graph matches the
reading on the main display.
While in Moisture mode, IR measurements may also be performed, see section
5.4 IR temperature measurements, page 15.
#T559822; r. AE/ 10036/10036; en-US
12
5 Operation
5.2.1 Internal moisture sensor
1.
2.
3.
Press the
button to enter the Moisture mode.
The
and
indicators are displayed. The
indicator is also displayed, indicating that the meter is displaying relative measurements. The
ambient temperature is displayed on the secondary display.
Place the internal moisture sensor (located on the rear side of the meter) on
the surface of the material to be tested.
The relative moisture reading is displayed on the main display. No units of
measurement are displayed.
Absolute or Zero Mode measurements. This mode allows measurements to
be displayed as a difference between the actual reading and a stored reference reading. Follow the steps below.
1.
2.
3.
4.
For best results, keep hands and other surfaces and objects away from
the internal moisture sensor area when turning on the unit.
Place the internal moisture sensor on the surface that will be the "reference" surface. Press and hold the
button for 2 seconds until the
indicator flashes. This will zero the meter at the reference value.
Place the internal moisture sensor on the surface of the material to be
tested. The measurement will be read as the offset value of your stored
reference.
Press and hold the
button for 2 seconds to return to normal internal moisture measurement mode.
5.2.2 External pin probe
1.
Connect the external pin probe to the EXT connection jack (located at the
bottom of the meter).
2.
Press the
displayed.
button to enter the Moisture mode. The
3.
Press the
button once more to activate external pin probe measure-
ments. The
indicator is
indicator is displayed.
#T559822; r. AE/ 10036/10036; en-US
13
5 Operation
4.
The
indicator shows the currently selected material group number. Refer
to section 7 Material groups, page 23.
To change the material group number, do the following:
1.
Press and hold the
and
terial group selection mode.
The
5.
buttons for 2 seconds to enter the Ma-
indicator flashes.
2.
Use the
numbers.
3.
Press the
lection mode.
and
buttons to step through the nine material group
button to set the group and exit the Material group se-
Press the probe pins into the material.
The moisture reading is displayed on the main display, in percent (%).
5.3 Hygrometric measurements
In Hygrometer mode, the meter measures and displays the relative humidity, dew
point temperature, mixing ratio, and ambient air temperature.
The three-digit main display shows the relative humidity, dew point temperature,
or mixing ratio, and the four-digit secondary display shows the ambient air temperature. The bar graph matches the reading on the main display.
While in Hygrometer mode, IR measurements may also be performed, see section 5.4 IR temperature measurements, page 15.
1.
2.
Press the
button to enter Hygrometer mode. The
indicator is
displayed.
The relative humidity is displayed on the main display. The ambient air temperature is displayed on the secondary display.
#T559822; r. AE/ 10036/10036; en-US
14
5 Operation
3.
Press the
button repeatedly to cycle through the display of relative humidity, dew point temperature, and mixing ratio.
•
Relative humidity: The
displayed in percent (%).
•
Dew point temperature: The
indicator is displayed and the reading
is displayed in ℃ or ℉, depending on the unit setting.
Mixing ratio: The reading is displayed in grains per pound (GPP) or grams
per kilogram (g/kg), depending on the unit setting.
•
indicator is displayed and the reading is
5.4 IR temperature measurements
IR temperature measurements can be performed in all operating modes.
The meter is equipped with a laser pointer diode, which is used as a targeting
pointer for the IR temperature measurements. The target of the measurement
should be larger than the size of the laser beam spot. As the distance from an object increases, the spot size of the area measured by the meter becomes larger.
The meter’s field of view ratio is 8:1, meaning that if the meter is 8 inches (20 cm)
from the target, the diameter (spot) of the object under test must be at least 1
inch ( 2.54 cm). Refer to Figure 5.1.
Figure 5.1 IR spot-to-distance ratio
IR measurement notes:
•
•
•
•
The object under test should be larger than the than the size of the laser
beam spot.
If the surface of the object under test is covered with frost, oil, grime, etc.,
clean the surface before measuring.
If the surface of the object is highly reflective, apply masking tape or flat black
paint to the surface before measuring.
The meter may not make accurate measurements through transparent surfaces such as glass.
#T559822; r. AE/ 10036/10036; en-US
15
5 Operation
•
•
Steam, dust, smoke, etc., may obscure measurements.
To find a hot spot, aim the meter outside the area of interest, then scan across
(in an up and down motion) until the hot spot is located.
WARNING
Do not look directly into the laser beam. The laser beam can cause eye
irritation.
WARNING
Do not use the laser pointer near explosive gases or in other possible explosive areas. Injury to persons can occur.
1.
Press and hold the
2.
diode. The
indicator is displayed.
Aim the laser pointer at the surface to be measured. The IR temperature
reading is displayed on the four-digit secondary display.
3.
Release the
button to enable the IR sensor and the laser pointer
button to disable the IR sensor and the laser pointer diode.
The last IR temperature reading remains on the display for 8 seconds; then
the meter returns to a display of the ambient air temperature, and the
dicator disappears.
in-
5.5 Condensation measurements
In Condensation mode, the meter determines whether a surface is at risk of condensation, based on measurements of the dew point temperature (relative humidity and ambient air temperature) and the IR temperature of the surface.
1.
Press the
button to enter the Condensation mode. The
tor is displayed.
2.
Aim the meter at the surface. Press and hold the
cator is displayed
#T559822; r. AE/ 10036/10036; en-US
button. The
indica-
indi-
16
5 Operation
3.
The dew point temperature is displayed on the main display. The IR temperature of the surface is displayed on the secondary display. The bar graph indicates the level of risk for condensation:
•
•
•
4.
If the IR temperature is more than 14℃ (25℉) above the dew point temperature, the bar graph is empty.
If the IR temperature is 3–14℃ (5–25℉) above the dew point temperature, the bar graph indicates a percentage of full scale.
If the IR temperature is less than 3℃ (5℉) above the dew point temperature, the bar graph is full.
Release the
button to disable the IR sensor and the laser pointer diode.
The last IR temperature reading remains on the display for 8 seconds; then
the meter returns to a display of the ambient air temperature and the
dicator disappears.
in-
5.6 Vapor pressure measurements
Vapor pressure measurement is a special variant of condensation measurement.
The meter calculates the vapor pressure based on measurements of the relative
humidity and the IR temperature of the surface.
1.
Press the
button to enter Condensation mode. The
indicator is
displayed. The unit of measurement on the main display is ℃ or ℉, depending on the unit setting.
2.
Press the
button once more to enter Vapor pressure mode. The unit
of measure on the main display changes to kPa or mBar, depending on unit
setting.
3.
4.
Aim the meter at the surface. Press and hold the
button.
The vapor pressure is displayed on the main display. The IR temperature of
the surface is displayed on the secondary display.
5.
Release the
button to disable the IR sensor and the laser pointer diode.
The last IR temperature reading remains on the display for 8 seconds; then
the meter returns to a display of the ambient air temperature and the
dicator disappears.
#T559822; r. AE/ 10036/10036; en-US
in-
17
5 Operation
5.7 Selecting measurement units
There are two sets of units; US and metric. The unit setting can be changed at
any time in any mode, by pressing and holding the
button for 2 seconds.
The unit setting applies to all modes. It is not possible to, for example, display
moisture in g/kg while showing temperature in ℉.
US unit setting:
•
•
•
Temperature is displayed in degrees Fahrenheit (℉).
Mixing ratio is displayed in grains per pound (GPP).
Vapor pressure is displayed in millibars (mBar).
Metric unit setting:
•
•
•
Temperature is displayed in degrees Celsius (℃).
Mixing ratio is displayed in grams per kilogram (g/kg).
Vapor pressure is displayed in kilopascals (kPa).
5.8 Storing and recalling measurements
5.8.1 Datalogger memory locations
The meter has 20 datalogger memory locations for the storage of measurement
data. Each memory location stores the current readings for all operating modes,
with the current unit settings. Thus, each location contains moisture, humidity,
ambient temperature, and IR temperature data.
5.8.2 Storing a measurement
1.
Press the
button to capture and store the currently displayed readings.
The data is saved to the memory location shown by the
indicator.
The memory location indicator then advances to the next location. When the
20 memory locations are full, the meter overwrites saved readings, starting
with memory location 1.
#T559822; r. AE/ 10036/10036; en-US
18
5 Operation
5.8.3 View data
1.
Press and hold the
button for 2 seconds to enter View data mode.
The
indicator flashes, and the data stored in that location is
displayed.
2.
Press the
3.
Press the
,
different modes.
4.
Press and hold the
exit View data mode.
or
button to step through the memory locations.
, or
button to display the stored data for the
button for 2 seconds until a single beep sounds to
5.8.4 Clearing the data from memory
Note
To avoid deleting valuable data when done viewing your data, advance the
memory to an empty location before exiting this mode.
1.
Press and hold the
2.
In View data mode, press and hold the
for 3 seconds to clear all data.
button for 2 seconds to enter View data mode.
and
buttons simultaneously
5.9 Alarm settings
High and low alarm thresholds can be set for moisture and humidity measurements. If either of the thresholds is exceeded during the measurement, the meter
beeps and the corresponding alarm indicator is displayed: the low alarm indicator
or the high alarm indicator
.
The default setting for the moisture and humidity alarms is off.
#T559822; r. AE/ 10036/10036; en-US
19
5 Operation
1.
To enter the alarm set mode, do one of the following:
•
To enter the Moisture alarm set mode, press and hold the
for 2 seconds.
button
•
To enter the Humidity alarm set mode, press and hold the
for 2 seconds.
button
2.
The current high threshold or OFF (if the alarm is disabled) is flashing on the
main display.
To switch from OFF to the numerical display, momentarily press both the
3.
Use the
4.
5.
To disable the high alarm, simultaneously press the
and
buttons.
When the desired high alarm threshold (or OFF) is displayed, press the
and
buttons simultaneously.
and
buttons to adjust the high alarm threshold.
button to save the value.
The current low threshold or OFF (if the alarm is disabled) is now flashing on
the main display.
6.
To switch from OFF to the numerical display, simultaneously press the
and
buttons.
7.
Use the
and
buttons to adjust the low alarm threshold. The low
alarm value cannot exceed the high alarm value.
8.
9.
To disable the low alarm, simultaneously press the
and
buttons.
When the desired low alarm threshold (or OFF) is displayed, press the
button to save the value and exit the alarm set mode.
5.10 Locked mode
In Locked mode, the meter ignores all button presses except
and
.
The auto power off function, see section 5.1.1 Auto power off, page 12, is disabled in Locked mode.
#T559822; r. AE/ 10036/10036; en-US
20
5 Operation
1.
To enter Locked mode, press and hold the
The
2.
button for 5 seconds.
indicator is displayed.
To exit Locked mode, press and hold the
again.
button for 5 seconds once
5.11 Streaming measurement data using Bluetooth
5.11.1 General
Some IR cameras from Flir Systems support Bluetooth communication and to
those cameras you can stream measurement data from the meter. The data is
then merged into the result table in the IR image.
Streaming measurement data is a convenient way to add important information
to an IR image. For example, when identifying a water leakage in a wall, you may
want to know the humidity in the wall.
The Bluetooth range is 10m (32ft) maximum.
5.11.2 Procedure
1.
2.
3.
4.
5.
Pair the IR camera with the instrument. Refer to the camera manual for information on how to pair Bluetooth devices.
Turn on the camera.
Turn on the meter.
Press and hold the
button on the meter to enable Bluetooth.
Take a measurement reading. Results from the meter will now automatically
be displayed in the result table in the top left corner of the IR camera screen.
#T559822; r. AE/ 10036/10036; en-US
21
6 Maintenance
6.1 Cleaning and storage
Clean the meter with a damp cloth and mild detergent; do not use abrasives or
solvents.
If the meter is not to be used for an extended period, remove the battery and
store it separately.
6.2 Battery replacement
1.
2.
3.
4.
Switch off the meter before attempting to replace the battery.
Turn the half turn screw so that the UNLOCK symbol is facing up and then lift
open the battery compartment.
Replace the standard 9 V battery.
Secure the battery compartment cover.
6.2.1 Disposal of electronic waste
As with most electronic products, this equipment must be disposed of in an environmentally friendly way, and in accordance with existing regulations for electronic waste.
Please contact your FLIR Systems representative for more details.
#T559822; r. AE/ 10036/10036; en-US
22
7 Material groups
The tables below list woods types along with the material group number that
should be selected for each type.
Table 7.1 Common names of timbers (BS888 & 589:1973) with selectable
FLIR MR77 material group numbers. Note: Material Group No. 9 should be used
for building materials (chip board, dry wall, and plywood)
Abura
4
Afara
1
Aformosa
6
Afzelia
4
Agba
8
Amboyna
6
Ash, American
2
Ash, European
1
Ash, Japanese
1
Ayan
3
Baguacu, Brazilian
5
Balsa
1
Banga Wanga
1
Basswood
6
Beech, European
3
Berlina
2
Binvang
4
Birch, European
8
Birch, Yellow
1
Bisselon
4
#T559822; r. AE/ 10036/10036; en-US
23
7 Material groups
Table 7.1 Common names of timbers (BS888 & 589:1973) with selectable
FLIR MR77 material group numbers. Note: Material Group No. 9 should be used
for building materials (chip board, dry wall, and plywood) (continued)
Bitterwood
5
Blackbutt
3
Bosquiea
1
Boxwood, Maracaibo
1
Camphorwood, E African
3
Canarium, African
2
Cedar, Japanese
2
Cedar, West Indian
8
Cedar, Western Red
3
Cherry, European
8
Chestnut
3
Coachwood
6
Cordia, American Light
5
Cypress, E African
1
Cypress, Japanese (18–28%mc)
3
Cypress, Japanese (8–18%mc)
8
Dahoma
1
Danta
3
Douglas Fir
2
Elm, English
4
Elm, Japanese Grey Bark
2
Elm, Rock
4
#T559822; r. AE/ 10036/10036; en-US
24
7 Material groups
Table 7.1 Common names of timbers (BS888 & 589:1973) with selectable
FLIR MR77 material group numbers. Note: Material Group No. 9 should be used
for building materials (chip board, dry wall, and plywood) (continued)
Elm, White
4
Empress Tree
8
Erimado
5
Fir, Douglas
2
Fir, Grand
1
Fir, Noble
8
Gegu, Nohor
7
Greenheart
3
Guarea, Black
8
Guarea, White
7
Gum, American Red
1
Gum, Saligna
2
Gum, Southern
2
Gum, Spotted
1
Gurjun
1
Hemlock, Western
3
Hiba
8
Hickory
5
Hyedunani
2
Iroko
5
Ironbank
2
Jarrah
3
Jelutong
3
#T559822; r. AE/ 10036/10036; en-US
25
7 Material groups
Table 7.1 Common names of timbers (BS888 & 589:1973) with selectable
FLIR MR77 material group numbers. Note: Material Group No. 9 should be used
for building materials (chip board, dry wall, and plywood) (continued)
Kapur
1
Karri
1
Kauri, New Zealand
4
Kauri, Queensland
8
Keruing
5
Kuroka
1
Larch, European
3
Larch, Japanese
3
Larch, Western
5
Lime
4
Loliondo
3
Mahogany, African
8
Mahogany, West Indian
2
Makore
2
Mansonia
2
Maple, Pacific
1
Maple, Queensland
2
Maple, Rock
1
Maple, Sugar
1
Matai
4
Meranti, Red (dark/light)
2
Meranti, White
2
Merbau
2
#T559822; r. AE/ 10036/10036; en-US
26
7 Material groups
Table 7.1 Common names of timbers (BS888 & 589:1973) with selectable
FLIR MR77 material group numbers. Note: Material Group No. 9 should be used
for building materials (chip board, dry wall, and plywood) (continued)
Missanda
3
Muhuhi
8
Muninga
6
Musine
8
Musizi
8
Myrtle, Tasmanian
1
Naingon
3
Oak, American Red
1
Oak, American White
1
Oak, European
1
Oak, Japanese
1
Oak, Tasmanian
3
Oak, Turkey
4
Obeche
6
Odoko
4
Okwen
2
Olive, E African
2
Olivillo
6
Opepe
7
Padang
1
Padauk, African
5
Panga Panga
1
Persimmon
6
#T559822; r. AE/ 10036/10036; en-US
27
7 Material groups
Table 7.1 Common names of timbers (BS888 & 589:1973) with selectable
FLIR MR77 material group numbers. Note: Material Group No. 9 should be used
for building materials (chip board, dry wall, and plywood) (continued)
Pillarwood
5
Pine, American Long Leaf
3
Pine, American Pitch
3
Pine, Bunya
2
Pine, Caribbean Pitch
3
Pine, Corsican
3
Pine, Hoop
3
Pine, Huon
2
Pine, Japanese Black
2
Pine, Kauri
4
Pine, Lodgepole
1
Pine, Maritime
2
Pine, New Zealand White
2
Pine, Nicaraguan Pitch
3
Pine, Parana
2
Pine, Ponderosa
3
Pine, Radiata
3
Pine, Red
2
Pine, Scots
1
Pine, Sugar
3
Pine, Yellow
1
Poplar, Black
1
#T559822; r. AE/ 10036/10036; en-US
28
7 Material groups
Table 7.1 Common names of timbers (BS888 & 589:1973) with selectable
FLIR MR77 material group numbers. Note: Material Group No. 9 should be used
for building materials (chip board, dry wall, and plywood) (continued)
Pterygota, African
1
Pyinkado
4
Queensland Kauri
8
Queensland Walnut
3
Ramin
6
Redwood, Baltic (European)
1
Redwood, Californian
2
Rosewood, Indian
1
Rubberwood
7
Santa Maria
7
Sapele
3
Sen
1
Seraya, Red
3
Silky Oak, African
3
Silky Oak, Australian
3
Spruce, Japanese (18–28%mc)
3
Spruce, Japanese (8–18%mc)
8
Spruce, Norway (European)
3
Spruce, Sitka
3
Sterculia, Brown
1
Stringybark, Messmate
3
Stringybark, Yellow
3
#T559822; r. AE/ 10036/10036; en-US
29
7 Material groups
Table 7.1 Common names of timbers (BS888 & 589:1973) with selectable
FLIR MR77 material group numbers. Note: Material Group No. 9 should be used
for building materials (chip board, dry wall, and plywood) (continued)
Sycamore
5
Tallowwood
1
Teak
5
Totara
4
Turpentine
3
Utile
8
Walnut, African
8
Walnut, American
1
Walnut, European
3
Walnut, New Guinea
2
Walnut, Queensland
3
Wandoo
8
Wawa
6
Whitewood
3
Yew
3
#T559822; r. AE/ 10036/10036; en-US
30
7 Material groups
Table 7.2 Botanical names of timbers with selectable FLIR MR77 material
group numbers.
Abies alba
1
Abies grandis
1
Abies procera
8
Acanthopanex ricinifolius
1
Acer macrophyllum
1
Acer pseudoplatanus
5
Acer saccharum
1
Aetoxicon punctatum
6
Aformosia elata
6
Afzelia spp
4
Agathis australis
4
Agathis palmerstoni
8
Agathis robusta
8
Amblygonocarpus andogensis
1
Amblygonocarpus obtusungulis
1
Araucaria angustifolia
2
Araucaria bidwilli
2
Araucaria cunninghamii
3
Berlinia grandiflora
2
Berlinia spp
2
Betula alba
8
Betula alleghaniensis
8
Betula pendula
8
#T559822; r. AE/ 10036/10036; en-US
31
7 Material groups
Table 7.2 Botanical names of timbers with selectable FLIR MR77 material
group numbers. (continued)
Betula spp
8
Bosquiera phoberos
1
Brachylaena hutchinsii
8
Brachystegia spp
2
Calophyllum brasiliense
7
Canarium schweinfurthii
2
Cardwellia sublimes
3
Carya glabra
5
Cassipourea elliotii
5
Cassipourea melanosana
5
Castanea sutiva
3
Cedrela odorata
8
Ceratopetalum apetala
6
Chamaecyparis spp (18–28%mc)
3
Chamaecyparis spp (8–18%mc)
8
Chlorophora excelsa
5
Cordia alliodora
5
Croton megalocarpus
8
Cryptomelia japonica
2
Cupressus spp
1
Dacryium franklinii
2
Dalbergia latifolia
1
Diospyros virginiana
6
#T559822; r. AE/ 10036/10036; en-US
32
7 Material groups
Table 7.2 Botanical names of timbers with selectable FLIR MR77 material
group numbers. (continued)
Dipterocarpus (Keruing)
5
Dipterocarpus zeylanicus
1
Distemonanthus benthamianus
3
Dracontomelium mangiferum
2
Dryobanalops spp
1
Dyera costulata
3
Endiandra palmerstoni
3
Entandrophragma angolense
7
Entandrophragma cylindricum
3
Entandrophragma utile
8
Erythrophleum spp
3
Eucalyptus acmenicides
3
Eucalyptus crebra
2
Eucalyptus diversicolor
1
Eucalyptus globulus
2
Eucalyptus maculate
1
Eucalyptus marginata
3
Eucalyptus microcorys
1
Eucalyptus obliqua
3
Eucalyptus pilularis
3
Eucalyptus saligna
2
Eucalyptus wandoo
8
#T559822; r. AE/ 10036/10036; en-US
33
7 Material groups
Table 7.2 Botanical names of timbers with selectable FLIR MR77 material
group numbers. (continued)
Fagus sylvatica
3
Flindersia brayleyana
2
Fraxinus Americana
2
Fraxinus excelsior
1
Fraxinus japonicus
1
Fraxinus mardshurica
1
Gonystylus macrophyllum
6
Gossweilodendron balsamiferum
8
Gossypiospermum proerox
1
Grevillea robusta
3
Guarea cedrata
7
Guarea thomsonii
8
Guibortia ehie
2
Hevea brasilensis
7
Intsia bijuga
2
Juglans nigra
1
Juglans regia
3
Khaya ivorensis
8
Khaya senegalensis
4
Larix decidua
3
Larix kaempferi
3
Larix leptolepis
3
Larix occidentalis
5
#T559822; r. AE/ 10036/10036; en-US
34
7 Material groups
Table 7.2 Botanical names of timbers with selectable FLIR MR77 material
group numbers. (continued)
Liquidamper styraciflua
1
Lovoa klaineana
8
Lovoa trichiloides
8
Maesopsis eminii
8
Mansonia altissima
2
Millettia stuhimannii
1
Mimusops heckelii
2
Mitragyna ciliata
4
Nauclea diderrichii
7
Nesogordonia papaverifera
3
Nothofagus cunninghamii
1
Ochroma lagopus
1
Ochroma pyramidalis
1
Ocotea rodiaei
3
Ocotea usambarensis
3
Octomeles sumatrana
4
Olea hochstetteri
2
Olea welwitschii
3
Palaquium spp
1
Paulownia tomentosa
8
Pericopsis elata
6
Picaenia excelsa
3
Picea abies
3
Picea jezoensis (18–28%mc)
3
#T559822; r. AE/ 10036/10036; en-US
35
7 Material groups
Table 7.2 Botanical names of timbers with selectable FLIR MR77 material
group numbers. (continued)
Picea jezoensis (8–18%mc)
8
Picea sitchensis
3
Pinus caribaea
3
Pinus contorta
1
Pinus lampertiana
3
Pinus nigra
3
Pinus palustris
3
Pinus pinaster
2
Pinus ponderosa
3
Pinus radiate
3
Pinus spp
2
Pinus strobus
1
Pinus sylvestris
1
Pinus thunbergii
2
Pipadeniastrum africanum
1
Piptadenia africana
1
Podocarpus dacrydiodes
2
Podocarpus spicatus
3
Podocarpus totara
4
Populus spp
1
Prunus avium
8
Pseudotsuga menzesii
2
Pterocarpus angolensis
6
#T559822; r. AE/ 10036/10036; en-US
36
7 Material groups
Table 7.2 Botanical names of timbers with selectable FLIR MR77 material
group numbers. (continued)
Pterocarpus indicus
6
Pterocarpus soyauxii
5
Pterygota bequaertii
1
Quercus cerris
4
Quercus delegatensis
3
Quercus gigantean
3
Quercus robur
1
Quercus spp
1
Ricinodendron heudelotti
5
Sarcocephalus diderrichii
7
Scottellia coriacea
4
Sequoia sempervirens
2
Shorea smithiana
3
Shorea spp
2
Sterculia rhinopetala
1
Swietenia candollei
1
Swietenia mahogani
2
Syncarpia glomulifera
3
Syncarpia laurifolia
3
Tarrietia utilis
3
Taxus baccata
3
Tectona grandis
5
Terminalia superba
1
#T559822; r. AE/ 10036/10036; en-US
37
7 Material groups
Table 7.2 Botanical names of timbers with selectable FLIR MR77 material
group numbers. (continued)
Thuja plicata
3
Thujopsis dolabrat
8
Tieghamella heckelii
2
Tilia americana
6
Tilia vulgaris
4
Triploehiton scleroxylon
6
Tsuga heterophylia
3
Ulmus americana
4
Ulmus procera
4
Ulmus thomasii
4
Xylia dolabriformis
4
Zelkova serrata
2
#T559822; r. AE/ 10036/10036; en-US
38
2
8.2
10
10.8
11.7
12.7
13.6
14.5
15.3
16.3
16.9
17.7
18.2
19
20
1
7
8
#T559822; r. AE/ 10036/10036; en-US
9
10
11
12
13
14
15
16
17
18
19
20
22.6
21
19.7
18.8
17.5
16.7
15.5
14.5
13.7
12.6
11.5
10.9
10.5
9
3
5
6
7
17.8
16.9
16.3
15.7
14.8
14.1
13.4
12.7
12.1
11.3
10.4
9.7
9.3
8
16.9
15.9
15
14.3
13
12.5
11.8
11.2
10.5
9.5
8.6
7.9
7.5
7.1
16.1
15.2
14.5
13.9
13.2
12.6
11.8
11.2
10.5
9.7
8.8
8.1
7.4
7
18.4
17.6
17
16.6
16
15.6
15
14.5
14
13.4
12.7
12.1
11.5
11
%WME (percent wood moisture equivalent)
4
Material Wood Group Nos.
21.3
20
19.1
18.5
17.7
17
16
15.1
14.3
13.4
12.2
11.6
11
10.5
8
17.2
16.7
16.1
15.3
14.9
14.4
13.5
12.5
11.5
10.5
9.4
8.5
-
-
9
Table 7.3 The table below shows the material group numbers and the moisture range (scale) for each group in
%WME.
7 Material groups
39
20.8
21.5
22.9
23.5
24.2
25.3
26.5
28
29.6
21
22
23
24
25
26
#T559822; r. AE/ 10036/10036; en-US
27
28
29
-
-
-
29
27.8
27.4
26.4
24.5
23.5
25.6
24.4
23.3
22.4
21.2
20.8
20.2
29.3
18.5
26.3
24.8
23.4
22.3
21
20.4
19.8
18.3
17.6
22.9
21.7
20.8
20.1
19.4
19
18.6
17.4
16.8
27.1
25.9
24.7
23.9
22.7
22
21.2
19.7
19.1
-
-
28.1
27.3
26.3
25.8
25.3
23.2
22.3
-
-
-
-
≈23
20.5
19.9
19.1
18.3
Table 7.3 The table below shows the material group numbers and the moisture range (scale) for each group in
%WME. (continued)
7 Material groups
40
8 Technical specifications
Accuracy specifications for all measurement ranges are applicable under the following ambient conditions: 18℃ to 28℃ (64.4℉ to 82.4℉); <80% RH.
8.1 General specifications
Display
•
•
•
•
Controls
•
•
Other indications
•
•
3-digit 15 mm (0.6″) main display
4-digit 6 mm (0.24″) secondary
display
10-segment bar graph
Memory counter
7 dedicated function buttons:
moisture, relative humidity, condensation, hold/lock, up (⇑), down
(⇓), store/recall
4 auxiliary buttons: IR, Bluetooth,
backlight/work light, power
24 icon-style locations + 2-digit
memory indicator
Piezo beeper (85 dBA)
Sample rate
2 per second
Backlight
White LED
Internal memory
(1) storage location
Power supply
1 × 9 V battery (MN1604 or
equivalent)
Battery life
100 hours, using alkaline batteries,
with no backlight/work light use
Auto power off (APO)
After 30 minutes (nominal) inactivity,
with audible pre-alert; reset when the
power button is pressed. Disable
function supported
APO quiescent current
50 µA maximum
#T559822; r. AE/ 10036/10036; en-US
41
8 Technical specifications
Operating temperature
0 to 50℃ (32 to 122℉)
Storage temperature
–10 to 60℃ (14 to 140℉)
Operating humidity
•
•
•
90%, 0 to 30℃ (32 to 86℉)
75%, 30 to 40℃ (86 to 104℉)
45%, 40 to 50℃ (104 to 122℉)
Storage humidity
90% maximum
Dimensions (excluding sensor)
139 mm × 72 mm × 42 mm (5.4″ ×
2.8″ × 1.7″)
Weight
0.29 kg (0.65 lb.), including batteries
Bluetooth range
10 m (32 ft) maximum
Agency approvals
FCC Class B
8.2 Humidity meter specifications
Function
Range
Accuracy (of reading)
Relative humidity
measurement
0–10%
±3%
10–90%
±2.5%
90–99%
±3%
20 to 30℃ (68 to 86℉)
8.3 Moisture specifications
Function
Range
Accuracy (of reading)
Pin moisture
0–99% WME
±5%
Pin-less moisture range
0–99.9
Relative measurement
#T559822; r. AE/ 10036/10036; en-US
42
8 Technical specifications
8.4 Thermal measurement range specifications
Function
IR range
Accuracy (of reading)
IR temperature (8:1
ratio)
–20 to 0℃ (–4 to 32℉)
±5℃ (±9℉)
1 to 200℃ (33 to
392℉)
Greater of ±3.5% or
±5℃ (±9℉)
IR Emissivity
0.95 (fixed)
Sensor temperature
-28 to 77℃ (-18 to
170℉)
±2 ℃ (3.6℉)
8.5 Vapor pressure specifications
Function
Range
Accuracy (of reading)
Vapor pressure
measurement
0.0–20.0 kPa
Greater of ±2.0% or 0.2
kPa
–1 to 60℃ (30 to 140℉)
8.6 Dew Point Temperature specifications
Function
Range
Accuracy (of reading)
Dew Point Temperature
range
-30 to 100 ℃ (-22 to
199℉)
Calculated from %RH
and Air temperature
measurements.
8.7 Mixing Ratio specifications
Function
Range
Accuracy (of reading)
Mixing Ratio range
0-999 GPP (0 to 160 g/
kg)
Calculated from %RH
and Air temperature
measurements.
#T559822; r. AE/ 10036/10036; en-US
43
9 Technical support
Website
http://www.flir.com/test
Technical support
T&[email protected]
Repairs
[email protected]
Phone number
+1 855-499-3662 (toll-free)
#T559822; r. AE/ 10036/10036; en-US
44
10 Warranties
10.1 FLIR Global Limited Lifetime
Warranty
A qualifying FLIR Test and Measurement product (the
“Product”) purchased either directly from FLIR Commercial Systems Inc and affiliates (FLIR) or from an authorized FLIR distributor or reseller that Purchaser registers
on-line with FLIR is eligible for coverage under FLIR’s Limited Lifetime Warranty, subject to the terms and conditions
in this document. This warranty only applies to purchases
of Qualifying Products (see below) purchased and manufactured after April 1, 2013.
PLEASE READ THIS DOCUMENT CAREFULLY; IT CONTAINS IMPORTANT INFORMATION ABOUT THE PRODUCTS THAT QUALIFY FOR COVERAGE UNDER THE
LIMITED LIFETIME WARRANTY, PURCHASER’S OBLIGATIONS, HOW TO ACTIVATE THE WARRANTY, WARRANTY COVERAGE, AND OTHER IMPORTANT TERMS,
CONDITIONS, EXCLUSIONS AND DISCLAIMERS.
1. PRODUCT REGISTRATION. To qualify for FLIR’s Limited Lifetime Warranty, Purchaser must fully register the
Product directly with FLIR on-line at http://www.flir.com
within Sixty (60) DAYS of the date the Product was purchased by the first retail customer (the “Purchase Date”).
Qualifying PRODUCTS THAT ARE NOT REGISTERED
ON-LINE WITHIN SIXTY (60) DAYS OF THE PURCHASE
DATE WILL HAVE A LIMITED ONE YEAR WARRANTY
FROM DATE OF PURCHASE.
2. QUALIFYING PRODUCTS. Upon registration, Test and
Measurement products that qualify for coverage under
FLIR’s Limited Lifetime Warranty are: MR7x, CM7x,
CM8x, DMxx, VP5x not including accessories which may
have their own warranty.
3. WARRANTY PERIODS. For purposes of the The Limited Lifetime Warranty, Lifetime is defined as seven years
(7) after the product is no longer manufactured, or ten
years (10) from date of purchase, whichever is greater.
This Warranty is only applicable to the original owner of
the Products.
Any Product that is repaired or replaced under warranty is
covered under this Limited Lifetime Warranty for one hundred eighty days (180) days from the date of return shipment by FLIR or for the remaining duration of the
applicable Warranty Period, whichever is longer.
4. LIMITED WARRANTY. In accordance with the terms
and conditions of this Limited Lifetime Warranty, and except as excluded or disclaimed in this document, FLIR
warrants, from the Purchase Date, that all fully registered
Products will conform to FLIR’s published Product specifications and be free from defects in materials and workmanship during the applicable Warranty Period.
PURCHASER’S SOLE AND EXCLUSIVE REMEDY
UNDER THIS WARRANTY, AT FLIR’S SOLE DISCRETION, IS THE REPAIR OR REPLACEMENT OF
#T559822; r. AE/ 10036/10036; en-US
DEFECTIVE PRODUCTS IN A MANNER, AND BY A
SERVICE CENTER, AUTHORIZED BY FLIR. IF THIS
REMEDY IS ADJUDICATED TO BE INSUFFICIENT, FLIR
SHALL REFUND PURCHASER’S PAID PURCHASE
PRICE AND HAVE NO OTHER OBLIGATION OR LIABILITY TO BUYER WHATSOEVER.
5. WARRANTY EXCLUSIONS AND DISCLAIMERS.
FLIR MAKES NO OTHER WARRANTY OF ANY KIND
WITH RESPECT TO THE PRODUCTS. ALL OTHER
WARRANTIES, EXPRESS OR IMPLIED, INCLUDING
BUT NOT LIMITED TO IMPLIED WARRANTIES OF MERCHANTABILITY, FITNESS FOR A PARTICULAR PURPOSE (EVEN IF PURCHASER HAS NOTIFIED FLIR OF
ITS INTENDED USE FOR THE PRODUCTS), AND NONINFRINGEMENT ARE EXPRESSLY EXCLUDED FROM
THIS AGREEMENT.
THIS WARRANTY EXPRESSLY EXCLUDES ROUTINE
PRODUCT MAINTENANCE, SOFTWARE UPDATES,
AND REPLACEMENT OF MANUALS, FUSES, OR DISPOSABLE BATTERIES. FLIR FURTHER EXPRESSLY
DISCLAIMS ANY WARRANTY COVERAGE WHERE
THE ALLEGED NONCONFORMITY IS DUE TO NORMAL WEAR AND TEAR, OTHER ALTERATION, MODIFICATION, REPAIR, ATTEMPTED REPAIR, IMPROPER
USE, IMPROPER MAINTENANCE, NEGLECT, ABUSE,
IMPROPER STORAGE, FAILURE TO FOLLOW ANY
PRODUCT INSTRUCTIONS, DAMAGE (WHETHER
CAUSED BY ACCIDENT OR OTHERWISE), OR ANY
OTHER IMPROPER CARE OR HANDING OF THE
PRODUCTS CAUSED BY ANYONE OTHER THAN FLIR
OR FLIR’S EXPRESSLY AUTHORIZED DESIGNEE.
THIS DOCUMENT CONTAINS THE ENTIRE WARRANTY AGREEMENT BETWEEN PURCHASER AND
FLIR AND SUPERSEDES ALL PRIOR WARRANTY NEGOTIATIONS, AGREEMENTS, PROMISES AND
UNDERSTANDINGS BETWEEN PURCHASER AND
FLIR. THIS WARRANTY MAY NOT BE ALTERED WITHOUT THE EXPRESS WRITTEN CONSENT OF FLIR.
6. WARRANTY RETURN, REPAIR AND REPLACEMENT. To be eligible for warranty repair or replacement,
Purchaser must notify FLIR within thirty (30) days of discovering of any apparent defect in materials or workmanship. Before Purchaser may return a Product for warranty
service or repair, Purchaser must first obtain a returned
material authorization (RMA) number from FLIR. To obtain
the RMA number Owner must provide an original proof of
purchase. For additional information, to notify FLIR of an
apparent defect in materials or workmanship, or to request
an RMA number, visit http://www.flir.com. Purchaser is
solely responsible for complying with all RMA instructions
provided by FLIR including but not limited to adequately
packaging the Product for shipment to FLIR and for all
packaging and shipping costs. FLIR will pay for returning
to Purchaser any Product that FLIR repairs or replaces
under warranty.
45
10 Warranties
FLIR reserves the right to determine, in its sole discretion,
whether a returned Product is covered under Warranty. If
FLIR determines that any returned Product is not covered
under Warranty or is otherwise excluded from Warranty
coverage, FLIR may charge Purchaser a reasonable handling fee and return the Product to Purchaser, at Purchaser’s expense, or offer Purchaser the option of handling the
Product as a non-warranty return.
7. NON-WARRANTY RETURN. Purchaser may request
that FLIR evaluate and service or repair a Product not covered under warranty, which FLIR may agree to do in its
sole discretion. Before Purchaser returns a Product for
non-warranty evaluation and repair, Purchaser must contact FLIR by visiting http://www.flir.com to request an evaluation and obtain an RMA. Purchaser is solely
responsible for complying with all RMA instructions provided by FLIR including but not limited to adequately
packaging the Product for shipment to FLIR and for all
packaging and shipping costs. Upon receipt of an authorized non-warranty return, FLIR will evaluate the Product
and contact Purchaser regarding the feasibility of and the
costs and fees associated with Purchaser’s request. Purchaser shall be responsible for the reasonable cost of
FLIR’s evaluation, for the cost of any repairs or services
authorized by Purchaser, and for the cost of repackaging
and returning the Product to Purchaser.
Any non-warranty repair of a Product is warranted for one
hundred eighty days (180) days from the date of return
shipment by FLIR to be free from defects in materials and
workmanship only, subject to all of the limitations, exclusions and disclaimers in this document.
10.2 FLIR Test and Measurement
Limited 2 Year Warranty
A qualifying FLIR Test and Measurement product (the
“Product”) purchased either directly from FLIR Commercial Systems Inc and affiliates (FLIR) or from an authorized FLIR distributor or reseller that Purchaser registers
on-line with FLIR is eligible for coverage under FLIR’s Limited Warranty, subject to the terms and conditions in this
document. This warranty only applies to purchases of
Qualifying Products (see below) purchased and manufactured after April 1, 2013.
PLEASE READ THIS DOCUMENT CAREFULLY; IT CONTAINS IMPORTANT INFORMATION ABOUT THE PRODUCTS THAT QUALIFY FOR COVERAGE UNDER THE
LIMITED WARRANTY, PURCHASER’S OBLIGATIONS,
HOW TO ACTIVATE THE WARRANTY, WARRANTY
COVERAGE, AND OTHER IMPORTANT TERMS, CONDITIONS, EXCLUSIONS AND DISCLAIMERS.
1. PRODUCT REGISTRATION. To qualify for FLIR’s Limited Warranty, Purchaser must fully register the Product directly with FLIR on-line at http://www.flir.com within Sixty
(60) DAYS of the date the Product was purchased by the
first retail customer (the “Purchase Date”). Qualifying
PRODUCTS THAT ARE NOT REGISTERED ON-LINE
#T559822; r. AE/ 10036/10036; en-US
WITHIN SIXTY (60) DAYS OF THE PURCHASE DATE
WILL HAVE A LIMITED ONE YEAR WARRANTY FROM
DATE OF PURCHASE.
2. QUALIFYING PRODUCTS. Upon registration, Test and
Measurement products that qualify for coverage under
FLIR’s Limited Warranty are: VS70 Videoscope, VSAxx
Articulation Camera, VSCxx Camera, VSSxx Probe Spool,
VST handset, MR02 Pin Extension Probe, and TAxx not
including accessories which may have their own warranty.
3. WARRANTY PERIODS. The applicable Limited Warranty Period measured from the Purchase data are:
Products
Limited Warranty
Period
VS70, VSAxx, VSCxx,
VSSxx, VST, MR02,
TAxx
TWO (2) Years
Any Product that is repaired or replaced under warranty is
covered under this Limited Warranty for one hundred
eighty days (180) days from the date of return shipment
by FLIR or for the remaining duration of the applicable
Warranty Period, whichever is longer.
4. LIMITED WARRANTY. In accordance with the terms
and conditions of this Limited Warranty, and except as excluded or disclaimed in this document, FLIR warrants,
from the Purchase Date, that all fully registered Products
will conform to FLIR’s published product specifications
and be free from defects in materials and workmanship
during the applicable Warranty Period. PURCHASER’S
SOLE AND EXCLUSIVE REMEDY UNDER THIS WARRANTY, AT FLIR’S SOLE DISCRETION, IS THE REPAIR
OR REPLACEMENT OF DEFECTIVE PRODUCTS IN A
MANNER, AND BY A SERVICE CENTER, AUTHORIZED
BY FLIR. IF THIS REMEDY IS ADJUDICATED TO BE INSUFFICIENT, FLIR SHALL REFUND PURCHASER’S
PAID PURCHASE PRICE AND HAVE NO OTHER OBLIGATION OR LIABILITY TO BUYER WHATSOEVER.
5. WARRANTY EXCLUSIONS AND DISCLAIMERS.
FLIR MAKES NO OTHER WARRANTY OF ANY KIND
WITH RESPECT TO THE PRODUCTS. ALL OTHER
WARRANTIES, EXPRESS OR IMPLIED, INCLUDING
BUT NOT LIMITED TO IMPLIED WARRANTIES OF MERCHANTABILITY, FITNESS FOR A PARTICULAR PURPOSE (EVEN IF PURCHASER HAS NOTIFIED FLIR OF
ITS INTENDED USE FOR THE PRODUCTS), AND NONINFRINGEMENT ARE EXPRESSLY EXCLUDED FROM
THIS AGREEMENT.
THIS WARRANTY EXPRESSLY EXCLUDES ROUTINE
PRODUCT MAINTENANCE, SOFTWARE UPDATES,
AND REPLACEMENT OF FUSES, OR DISPOSABLE
BATTERIES. FLIR FURTHER EXPRESSLY DISCLAIMS
ANY WARRANTY COVERAGE WHERE THE ALLEGED
NONCONFORMITY IS DUE TO NORMAL WEAR AND
TEAR, OTHER ALTERATION, MODIFICATION, REPAIR,
ATTEMPTED REPAIR, IMPROPER USE, IMPROPER
46
10 Warranties
MAINTENANCE, NEGLECT, ABUSE, IMPROPER STORAGE, FAILURE TO FOLLOW ANY PRODUCT INSTRUCTIONS, DAMAGE (WHETHER CAUSED BY ACCIDENT
OR OTHERWISE), OR ANY OTHER IMPROPER CARE
OR HANDING OF THE PRODUCTS CAUSED BY ANYONE OTHER THAN FLIR OR FLIR’S EXPRESSLY AUTHORIZED DESIGNEE.
THIS DOCUMENT CONTAINS THE ENTIRE WARRANTY AGREEMENT BETWEEN PURCHASER AND
FLIR AND SUPERSEDES ALL PRIOR WARRANTY NEGOTIATIONS, AGREEMENTS, PROMISES AND
UNDERSTANDINGS BETWEEN PURCHASER AND
FLIR. THIS WARRANTY MAY NOT BE ALTERED WITHOUT THE EXPRESS WRITTEN CONSENT OF FLIR.
6. WARRANTY RETURN, REPAIR AND REPLACEMENT. To be eligible for warranty repair or replacement,
Purchaser must notify FLIR within thirty (30) days of discovering of any apparent defect in materials or workmanship. Before Purchaser may return a Product for warranty
service or repair, Purchaser must first obtain a returned
material authorization (RMA) number from FLIR. To obtain
the RMA number Owner must provide an original proof of
purchase. For additional information, to notify FLIR of an
apparent defect in materials or workmanship, or to request
an RMA number, visit http://www.flir.com. Purchaser is
solely responsible for complying with all RMA instructions
provided by FLIR including but not limited to adequately
packaging the Product for shipment to FLIR and for all
packaging and shipping costs. FLIR will pay for returning
to Purchaser any Product that FLIR repairs or replaces
under warranty.
#T559822; r. AE/ 10036/10036; en-US
FLIR reserves the right to determine, in its sole discretion,
whether a returned Product is covered under Warranty. If
FLIR determines that any returned Product is not covered
under Warranty or is otherwise excluded from Warranty
coverage, FLIR may charge Purchaser a reasonable handling fee and return the Product to Purchaser, at Purchaser’s expense, or offer Purchaser the option of handling the
Product as a non-warranty return.
7. NON-WARRANTY RETURN. Purchaser may request
that FLIR evaluate and service or repair a Product not covered under warranty, which FLIR may agree to do in its
sole discretion. Before Purchaser returns a Product for
non-warranty evaluation and repair, Purchaser must contact FLIR by visiting http://www.flir.com to request an evaluation and obtain an RMA. Purchaser is solely
responsible for complying with all RMA instructions provided by FLIR including but not limited to adequately
packaging the Product for shipment to FLIR and for all
packaging and shipping costs. Upon receipt of an authorized non-warranty return, FLIR will evaluate the Product
and contact Purchaser regarding the feasibility of and the
costs and fees associated with Purchaser’s request. Purchaser shall be responsible for the reasonable cost of
FLIR’s evaluation, for the cost of any repairs or services
authorized by Purchaser, and for the cost of repackaging
and returning the Product to Purchaser.
Any non-warranty repair of a Product is warranted for one
hundred eighty days (180) days from the date of return
shipment by FLIR to be free from defects in materials and
workmanship only, subject to all of the limitations, exclusions and disclaimers in this document.
47
A note on the technical production of this publication
This publication was produced using XML — the eXtensible Markup Language.
For more information about XML, please visit http://www.w3.org/XML/
A note on the typeface used in this publication
This publication was typeset using Linotype Helvetica™ World. Helvetica™ was
designed by Max Miedinger (1910–1980)
LOEF (List Of Effective Files)
T501022.xml; en-US; AE; 10036; 2013-11-22
#T559822; r. AE/ 10036/10036; en-US
48
Corporate
last page Headquarters
FLIR Systems, Inc.
27700 SW Parkway Ave.
Wilsonville, OR 97070
USA
Telephone: +1-503-498-3547
Website
http://www.flir.com
Customer support
http://support.flir.com
Publ. No.:
Release:
Commit:
Head:
Language:
Modified:
Formatted:
T559822
AE
10036
10036
en-US
2013-11-22
2013-11-22