1
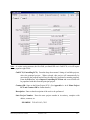
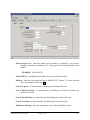
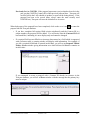
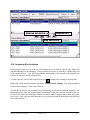
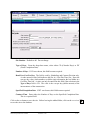
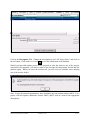
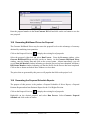
10. MANAGING PROPOSALS
After you have finished with the project(s), category(ies), funding and items, you are ready to
create the proposal. A Trns·port proposal is one or more projects grouped together for bidletting.
Generally, the Scheduling and Contract Division personnel create the proposal. The proposal for
some Maintenance-funded projects is created by personnel in other divisions.
A proposal is similar to a project in that it contains items or work, but it also contains bidding
information, such as DBE and WBE goals. Trns·port combines ‘like items’ into a single
biddable item so that bidders only view and bid on the item once. Trns·port automatically
generates proposal line numbers and proposal section numbers.
After creating a proposal, you tell Trns·port which projects you want to assign to it. The
proposal is then assigned to a bid letting and the proposal documents are produced.
10.1 Adding a Proposal
Click on the Proposal List icon
to display the existing list of proposals.
Right-click within the list of the proposals and select Tabbed Folder Add.
An Add Proposal tabbed folder window displays. Use the [TAB] key to move between fields
and enter the project information on the General tab.
Some fields have Reference Tables. As you [TAB] to such a field, a drop-down arrow will
appear. A selection MUST be made from the available choices in the table.
Some fields are required; the project will not be saved to the database unless the required fields
are filled-in. The required fields on Page 1 of the General tab of the Proposal are:
Contract ID
Item Code Table
Road System
Type of Contract
Counties
State Project No.
Location (line 1)
Primary Fund Type
Contract Type of Work
Controlling PCN
Description
Route Number
Surface Type
Primary Dis/Res
Federal Project Number
The Add Proposal tabbed folder window is displayed on the following page:
VDOT Trns·port PES User’s Manual
December 1, 2011
10-1
Note: As a time-saving measure, the first field you should fill out is Cntl PCN, as it will import
data to populate eight fields.
Cntl PCN (Controlling PCN): From the drop-down menu’s listing of available projects,
select the principal project. When selected, this project will automatically be
associated to the proposal and will not be able to be associated to another proposal.
From the Edit menu, select Import Controlling PCN Data and several fields will
be populated with data from the principal project.
Contract ID: Same as the Prime Project PCN. (See Appendix A - A.4 Prime Project
PCN and Contract ID for further details.)
Description: Enter a short description of the work to be performed.
State Project Number: Enter the state project number in its entirety, complete with
dashes, commas, etc.
EXAMPLE: 7029-021-103, C502
VDOT Trns·port PES User’s Manual
December 1, 2011
10-2
Location: Use the first line for FROM: (location) and the second line for TO: (location).
For Bridge projects, enter the location from the front sheet title block.
Route Number: Enter the four-digit route number.
Road System: Enter the functional class of the road. Select the appropriate code from
the down-down menu.
Surface Type: Select the appropriate code from the drop-down menu.
Primary Dis/Res: Select the appropriate code from the drop-down menu.
Control Group: The control group is the security designation which decides which user
has access to which proposals(s). This field will already be filled out with your
control group. The data in this field may be changed in order to transfer the
project to another control group.
Counties: Up to four counties may be entered. Select the appropriate county code(s)
from the drop-down menu.
Cont. Alt. ID 1: Not currently used.
Cont. Alt. ID 2: Not currently used.
Item Code Table: Enter 03 for Metric jobs, 04 for English jobs. (93 and 94 remain for
existing conversion projects.)
Primary Fund Type: Select the appropriate code from the drop-down menu.
Type of Contract: Select the appropriate code from the drop-down menu.
Contract Type of Work: Select the appropriate code from the drop-down menu.
DBE/MBE Goal (PCT): Percentage that has been determined by the Civil Rights
Division.
WBE Goal (PCT): Percentage that has been determined by the Civil Rights Division.
Proposal DBE Goals: From the drop-down menu, select a code indicating which of the
two goals described above apply to this proposal. If you enter NONE, no goals
will be printed on any report. If you enter DBE, only the DBE/MBE goal will be
printed, labeled as a DBE goal. If you enter BOTH, both the DBE/MBE goal
(labeled as an MBE goal) and the WBE goal will print.
Qualification Classes: Not used by designers.
Click on the radio button for page 2 of Proposal:
VDOT Trns·port PES User’s Manual
December 1, 2011
10-3
Federal Project No.: Enter the federal project number, if applicable, in its entirety,
complete with dashes, parentheses, etc. If the project is not federally-funded, enter
NONE.
EXAMPLE: NH-5401(876)
Order/Call No.: Scheduling and Contract Division will fill in this field.
Ad Date: Enter the Advertisement Date in MMDDYYYY format. You may select the
date by pressing the clock icon.
Cost of Proposal: As determined by Scheduling and Contract Division.
Cost of Half Size Plans: As determined by Scheduling and Contract Division (cost
without X-sections).
Cost of Full Size Plans: As determined by Scheduling and Contract Division.
Cost of X-Sections: As determined by Scheduling and Contract Division.
Mandatory Showing: Select the appropriate value from the dropdown menu.
VDOT Trns·port PES User’s Manual
December 1, 2011
10-4
NOTE: Select Yes ONLY if the showing is mandatory. If not then select N. You
can still enter the showing location for non mandatory showings.
Progress Schedule Category: This field is read only and populated from the project
controlling pcn.
Bridges: The number of bridges on the proposal.
NOTE; To add a new showing location code to the code follow these instructions:
(this can only be performed by certain individuals in the Scheduling and
Contracts Division).
1.
2.
3.
4.
5.
On any proposal right click and select tabbed folder change.
Click on the attachments tab.
Double click on the name Show Location.
On the bottom of the list click to insert new show location record.
Enter the location code: For example: If Bristol enter ‘01’ followed by the next
sequence for the district (0159).
6. Enter location description. For example: Lebanon Residency.
7. Enter the physical address: for example: 100 Easy Street.
8. Enter City, State and Zip code.
9. Enter location detail.
10. Comments: This field is used if you need to explain the location. For example:
no physical address or need to give directions.
Once you are done, click insert data. You must logoff PES and back on to see the newly
added location code.
Showing Location Code: Select the location code from the dropdown menu.
Showing Time: As determined by Scheduling and Contract Division.
Showing Location: Enter extra showing information in this field as needed.
Showing Date: As determined by Scheduling and Contract Division.
CTB Meeting Date: The actual date that the Transportation Board holds their meeting
for award recommendation.
VDOT Trns·port PES User’s Manual
December 1, 2011
10-5
Previously Let As CONTID: If the proposal represents a project that has been let in the
past, put the CONTID (Contract ID) of that previous proposal here. Trns·port will
use this field in the LAS schedule to produce a report on the letting history. If the
proposal has been re-let several times, always enter the most recently used
CONTID here; Trns·port will trace the chain back to its source.
When both pages of the proposal have been completed, click on the SAVE icon
proposal into the Trns·port database.
to enter the
o If you have completed all required field criteria satisfactorily and the Contract ID is a
unique number, the proposal will be added. You will notice that the Contract ID field
has turned blue, indicating it is now display-only and cannot be changed.
o If a required field was not filled-in or incorrect data entered at a field which is supported
with a reference table, a warning window will display with information. For example, if
you left a required field blank or entered invalid data, you will see an Proposal Tabbed
Folder - Errors window giving information as to what field was left blank or contains an
invalid value:
If you attempted to create a proposal with a Contract ID already in existence in the
Trns·port database, you will see an Error window with the message that the primary key
must be unique:
VDOT Trns·port PES User’s Manual
December 1, 2011
10-6
10.2 Changing a Proposal
Click on the Proposal List icon
to display the existing list of proposals.
Right-click within the list of the proposals and select Tabbed Folder Change.
The Proposal tabbed folder window displays. After making the changes, click on the SAVE icon.
Note that changes cannot be made to the Contract ID field as it is display-only.
10.3 Associating / Disassociating Projects to a Proposal
Click on the Proposal List icon
to display the existing list of proposals.
Right-click on the desired proposal and select Tabbed Folder Change. Click on the Projects
tab.
VDOT Trns·port PES User’s Manual
December 1, 2011
10-7
The top part of the Projects tab contains a list of all the existing projects associated to the
proposal. The bottom part of the tab is a master list of projects from which you can choose to
add to your proposal. (See screen print on following page.) The master list will contain only
those projects that meet these criteria:
-
All the projects have the same Item Code Table as the proposal.
All the projects are in your control group.
None of the projects have been assigned to another proposal.
All the projects match the Unit System of any other projects already assigned to the
proposal.
Note: If you chose a project as the Controlling PCN on the General tab, that project will already
be associated to the proposal.
You can view all the details of any project listed by right-clicking on the project record and
selecting Zoom. After reviewing the project details, click on the CLOSE button at the bottom of
the screen to return to the Projects tab.
10.3.1 Adding Projects to the Proposal
To add a project to the proposal, select the project in the master list (bottom portion of the
screen) and click the ADD SELECTED button.
After adding the projects, click on the SAVE icon.
10.3.2 Deleting Projects from the Proposal
To delete a project from the proposal, select the project in the list of projects (upper portion of
the screen) and click the REMOVE SELECTED button.
You can delete all projects associated to the proposal by clicking on the REMOVE ALL button.
Note that if you use this option, the project you selected in the Cntl PCN field on your General
tab will be blanked out.
After deleting the projects, click on the SAVE icon.
VDOT Trns·port PES User’s Manual
December 1, 2011
10-8
REMOVE SELECTED
REMOVE ALL
ADD SELECTED
10.4 Assigning Site Locations
Each proposal must have at least one site, numbered 00, in order to specify time limits and
liquidated damages in Site Manager. Trns·port allows two types of work days: calendar days and
fixed completion date. Cost Plus Time bidding information is also entered at the proposal site
level but is only used for the calendar days.
To enter your site, click on the Proposal List icon
to display the existing list of proposals.
Right-click on the desired proposal and select Tabbed Folder Change. The Proposal tabbed
folder window displays. Click on the Sites tab.
The top part of the Sites tab contains a list of all existing sites associated with the proposal. The
bottom part of the Sites tab contains detail information for the site currently selected in the list.
To add a site, right-click within the window and select Add. Trns·port adds a blank row to the
list of sites. You can enter data about the new site into the blank fields displayed in the detail
area of the Sites tab.
VDOT Trns·port PES User’s Manual
December 1, 2011
10-9
Site Number: Defaults to 00. Do not change.
Type of Days: From the drop-down menu, select either CD (Calendar Days) or DT
(Fixed Completion Date).
Number of Days: If CD was chosen, this field becomes required.
Road User Cost Per Day: The field is used by Scheduling and Contract Division only.
A value entered in this field indicates the Site is a Cost Plus Time Site. Enter the
cost per day value (whole number; no dollar sign) to determine the low bidder in a
Cost Plus Time bid. A value can only be entered in this field if the selection in the
Type of Days field is CD. The value is the cost per day (dollar amount) of the
inconvenience of the construction.
Specified Completion Date: If DT was chosen, this field becomes required.
Contract Time: Enter either the Number of Days or the Specified Completion Date.
This is a required field.
Click on the OK button to save the site. Before leaving the tabbed folder, click on the SAVE icon
to save the site to the database.
VDOT Trns·port PES User’s Manual
December 1, 2011
10-10
10.5 Specifying Section and Line Numbers
When you create a proposal that consists of more than one project and generate section and line
numbers, Trns·port combines the projects and project items in the following way:
o If you have set the Combine With Like Items flag to YES in the Worksheet tab, each item
will appear once because Trns·port combines them into single proposal line items, even if
they are in different categories or projects. Bidders can then bid on a single item. In
order for non-standard items to combine, the Description (Non-std) and Spec Book (Nonstd) information must be exactly the same.
o If you set the Combine With Like Items flag to N, that item will not be combined.
o Because bidders will not bid on non-bid items (you set the flag on the Worksheet tab),
non-bid items will be omitted from the proposal report.
o After Trns·port combines like items, it assigns unique proposal line numbers, then
updates every database item record to reflect the proposal line item number to which the
record now belongs.
To generate your section and line numbers, click on the Proposal List icon
existing list of proposals.
to display the
Right-click on the desired proposal and select Tabbed Folder Change. The Proposal tabbed
folder window displays. Click on the Sections tab.
At the bottom of the screen, click on the
perform this process.
GENERATE SECTIONS AND LINE NUMBERS
button to
After the process is finished, the bottom portion of the screen will be updated with a section
number and description (the program uses the category description of the first category assigned
to the section). The description may not be the correct verbiage desired by VDOT. If it reads
anything except All Project Items, it will need to be changed.
The top portion of the screen will be populated with the sections from the associated projects.
VDOT Trns·port PES User’s Manual
December 1, 2011
10-11
Click in the Description field. Change the description to read “All Project Items” and click on
the OK button. Click on the SAVE icon
to save this information to the database.
Should you later add another project to the proposal or alter the items in any of the projects
associated to the proposal, you need to return to the Sections tab and generate section and line
numbers again. When you select the Sections tab, you will receive a reminder screen alerting
you of the need to do this:
Note: Except for unusual circumstances, there should be only one section number (0001). For a
project with bid options, additional sections (0002) (0003) shall be created with appropriate
descriptions.
VDOT Trns·port PES User’s Manual
December 1, 2011
10-12
10.6 Entering or Modifying a Long Description of the Proposal
You can enter multiple lines of free-form text to describe the type of work, description, or other
relevant information about the proposal.
Click on the Proposal List icon
to display the existing list of proposals.
On the proposal for which you wish to add or modify a description, right-click and select Tabbed
Folder Change.
The Proposal tabbed folder window displays. Click on the Description tab.
You can enter a description of about 32,000 characters or 400 lines. Do not press [ENTER] at
the end of each line; your text will be automatically wrapped to a new line. If you wish to start a
new paragraph, then press [ENTER]. You can also use the Windows Copy (ctrl+c) and Paste
(ctrl+v) commands from the Edit menu to copy and paste text from other windows.
After entering or modifying the description, click on the save icon.
10.7 Copying the Proposal
The Copy Special command on the Edit menu allows you to copy a proposal. After you copy the
proposal, you can make any minor changes to the new proposal. This will be particularly useful
when a proposal will be re-advertised. Instead of having to re-create the proposal for the readvertisement, you can use the Copy Special command and when asked to name the new
proposal, give it the same Contract ID as before with a “B” added at the end.
What about the projects that have been associated to the proposal?
o You do not need to disassociate the projects from the proposal before copying. Trns·port
will leave the projects associated to the original proposal, but show no associated projects
on the copied one. However, the Controlling PCN field on the copied proposal will still
list the PCN you chose, but it will be invalid since it belongs to the original proposal and
cannot belong to more than one.
o If you do want the projects to be associated to the copied proposal, disassociate them
from the original proposal prior to copying. On the copied proposal, select one project as
the Controlling PCN and associate the rest of the desired projects on the Projects tab.
To copy a proposal, select the proposal you want from the Proposal list window.
Copy Special from the Edit menu. Trns·port displays the Copy Proposal window.
Select
VDOT Trns·port PES User’s Manual
10-13
December 1, 2011
Enter the proposal number in the New Contract ID field and click on the OK button to save the
new proposal.
10.8 Generating Bid-Based Prices for Proposal
The Generate Bid-Based Prices may be run at the proposal level to take advantage of economy
obtained by combining item quantities.
Click on the Proposal List icon
to display the existing list of proposals.
Select the proposal, right-click and select Run Process. From the Processes window, select
Generate Bid-Based Prices and click on the OK button. At the Generate Bid Based Prices
window, enter the Letting Date and click on the SUBMIT button. Almost immediately, you will
see a Client Job Monitor window informing you that the Process has been submitted, and then a
DPS Status Monitor window informing you that the Profile for the Process has been completed.
Click on the OK button on both of these windows to close them.
The prices that are generated by this process will populate the fields at the project level.
10.9 Generating the Proposal Schedule Reports
The purpose of this process is the produce a Proposal Schedule of Prices Report, a Proposal
Estimate Report and an Item Estimate Report for the Civil Rights Division.
Click on the Proposal List icon
to display the existing list of proposals.
Right-click on the desired proposal and select Run Process. Select Generate Proposal
Schedule and click on the OK button.
VDOT Trns·port PES User’s Manual
December 1, 2011
10-14
The Proposal Price Schedule Options window displays:
Click on the SUBMIT button. Almost immediately, you will see a Client Job Monitor window
informing you that the Process has been submitted, and then a DPS Status Monitor window
informing you that the Profile for the Process has been completed. Click on the OK button on
both of these windows to close them.
See 9.5 Viewing the Process Reports for instructions on viewing the report on-line.
When the report is ready to be printed, select Run Process again. Select Generate Proposal
Schedule and click on the OK button. When the Proposal Price Schedule Options window
displays, click on the PARAMETERS button.
At the Process Submission Parameters window, click on the box for Print Output Files, and
change the Orientation from Landscape to Portrait. (See following page.)
VDOT Trns·port PES User’s Manual
December 1, 2011
10-15
Check
to Print
Set to
Portrait
Click on the OK button. At the Proposal Price Schedule Option window, click on the
button to submit the report to the printer.
SUBMIT
Note: The Ad Sheet will print only for proposals which have been associated to a bid letting.
10.10 Deleting the Contract Proposal
Click on the Proposal List icon
to display the existing list of proposals.
Right-click on the proposal you wish to delete and select Delete. Trns·port displays the Delete
window:
The option for Power Delete
is not to be used as it will
delete the project items,
funding, categories and
proposal.
VDOT Trns·port PES User’s Manual
December 1, 2011
10-16
Select the radio button for Delete. The Delete option deletes the associations of the proposal
with the projects. It also deletes the proposal header records, section, site and description.
Click on the OK button to proceed. A Delete Warning (1 of 1) window displays:
Click on the YES button for the final confirmation.
A Confirm Delete window displays. Click on the YES button to confirm the deletion.
10.11 Proposal Addendums
VDOT will not use the Trns·port method of revising proposals at this time.
Revisions to bid items will be made by revising the estimate as explained in 8.3 Changing an
Item.
Be sure to assign item line numbers and renumber the items, if necessary.
After the estimate has been renumbered, generate line numbers for the proposal before you
generate the proposal schedule. See 10.5 Specifying Section and Line Numbers for
instructions.
For instructions on how to generate the Proposal Schedule Report, see 10.8 Generating the
Proposal Schedule Reports.
VDOT Trns·port PES User’s Manual
December 1, 2011
10-17