1
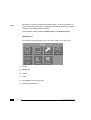
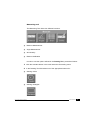
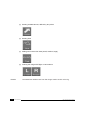
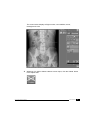
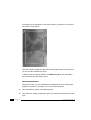
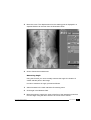
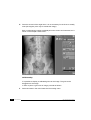
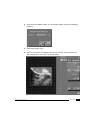
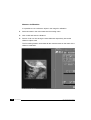
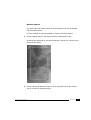
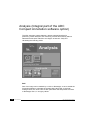
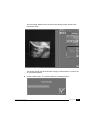
ADC COMPACT
ANNOTATION SOFTWARE
USER MANUAL
TABLE OF CONTENTS
ADC COMPACT ANNOTATION SOFTWARE
Drawing tool
2
Measuring tool
3
Measuring Distance
6
Measuring Angle
7
Grid overlay
8
Distance Calibration
10
Deleting objects
11
ANALYSIS
12
ROI
12
Density profile
14
PERFORMANCE REQUIREMENTS
ADC Compact Annotation Software
1
17
2205A GB 199801
i
ii
2205A GB 199801
ADC Compact Annotation Software
ADC Compact Annotation software
The ADC Compact system features a user-friendly button-operated interface
for annotating ADC Compact images on-screen.
Annotations can be saved with the image and toggled ON or OFF when
reviewing.
ADC Compact Annotation Software
2205A GB 199801
1
Annotations can also be made on Zoomed images. For more information on
how to Zoom images we refer to pages 65 and following of the ADC Compact
Interactive Processing Software manual.
Note
The Annotation mode includes a Drawing Tool and a Measuring Tool.
Drawing tool
The Drawing Tool enables the user to annotate images on-screen using:
2
■
Circles
■
Rectangles
■
Arrows
■
Lines
■
Text additions in three font sizes
■
Left and Right markers
2205A GB 199801
ADC Compact Annotation Software
Measuring tool
The Measuring Tool offers four different functions:
■
Distance Measurement
■
Angle Measurement
■
Grid Overlay
■
Distance Calibration
In order to use the options offered in the Drawing Tool, proceed as follows:
1
Click the Annotate button in the main Interactive Processing menu.
2
In the Drawing Tool field select one of the appropriate buttons for:
■
drawing circles
■
drawing rectangles
ADC Compact Annotation Software
2205A GB 199801
3
■
drawing scalable arrows, defined by two points
■
drawing lines
■
adding text in three font sizes (small, medium, large)
■
marking the image with Right or Left markers
Caution
4
2205A GB 199801
Annotated text additions are lost after image rotation and/or mirroring.
ADC Compact Annotation Software
The screen below displays a Right marker, a text addition, arrow,
rectangle and circle.
3
Whenever you wish to delete a drawn screen object, click the ‘Delete’ button
in the Object field.
ADC Compact Annotation Software
2205A GB 199801
5
The object is then displayed on the screen featuring a handle, as is shown in
the sample screen below.
Click the handle to delete the object and click anywhere else on the screen if
you do not want to delete the object.
In order to use the options offered in the Measuring Tool, click Annotate in
the main Interactive Processing menu.
Measuring Distance
Using this function you can measure the actual distance on the image plate
between two points in an image. To do so, proceed as follows:
6
1
Click the Distance button in the Measure field.
2
Click within the image to specify the point you want the measurement to start
from.
2205A GB 199801
ADC Compact Annotation Software
3
Move the cursor. The displacement from the starting point is displayed in a
separate field as can be seen from the illustration below:
4
Click to freeze the measurement.
Measuring Angle
Using this function you can accurately measure the angle of inclination of
certain relevant parts in the image.
In order to measure an angle, proceed as follows:
1
Select Annotate in the main Interactive Processing menu.
2
Click Angle in the Measure field.
3
Move the pointer to specify the onset of the first of the intersecting lines that
form the angle. Drag the line to where it is to end. Click to freeze.
ADC Compact Annotation Software
2205A GB 199801
7
4
Draw the second of the angle lines. It is not necessary for the lines to actually
meet (the angular point may lie outside the image).
Both complementary angles are displayed on the screen and measured, as is
shown in the sample screen below.
Grid Overlay
It is possible to display a calibrated grid over the image. The grid can be
dragged over the image.
In order to place a grid over an image, proceed as follows:
1
8
2205A GB 199801
Select Annotate in the main Interactive Processing menu.
ADC Compact Annotation Software
2
Click Grid in the Measure field. The Processing Station returns the following
submenu:
3
Enter the grid size (mm).
4
Click the ‘Put’ button and drag the grid over the image. Click to freeze. The
grid is displayed on the screen as shown below.
ADC Compact Annotation Software
2205A GB 199801
9
Distance Calibration
It is possible to use a reference object in the image for calibration.
1
Select Annotate in the main Interactive Processing menu.
2
Click ‘Calib’ and enter the distance.
3
Draw a circle or a line having the same diameter respectively size as the
reference object used.
The Processing Station recalculates all the measurements on the basis of the
reference calibration.
10
2205A GB 199801
ADC Compact Annotation Software
Deleting objects
Any objects that have been created in the Annotation menu can be deleted,
using the Delete button.
In order to delete an object annotated on-screen, proceed as follows:
1
Click the Delete button in the Object field of the Annotation screen.
All objects are displayed on the screen featuring a handle, as is shown in the
sample screen below.
2
Click the handle to delete the object or click anywhere else on the screen if
you do not want to delete the object.
ADC Compact Annotation Software
2205A GB 199801
11
Analysis (Integral part of the ADC
Compact Annotation software option)
The ADC Compact system features a button-operated interface for
performing certain analyses, like measuring contrast and intensity within a
selected window (also referred to as “Region of Interest”- ROI) and
calculating the intensity profile.
ROI
Part of an image can be marked by a Circle or Rectangle, so as to enable the
Processing Station to calculate the average SAL value (SAL is the Scan
Average Level, the 12-bit value of each pixel within the ROI) within the Circle
or Rectangle, like X, Y and grey values.
12
2205A GB 199801
ADC Compact Annotation Software
In order to do so, proceed as follows:
1
Click the Analysis button in the main Image Processing screen.
2
Click the Circle or Rectangle button in the ROI field.
3
Drag the circle or rectangle over the image.
4
Click to freeze.
The Processing Station calculates the average SAL value visualizing the
Region of Interest (ROI) as a dotted graph in the histogram, as shown in the
sample screen below.
ADC Compact Annotation Software
2205A GB 199801
13
Density Profile
The density profile is a graphical plot of the 8-bit grey values of the image
obtained after the window and level procedure.
In order to calculate the density profile of the on-screen image, proceed as
follows:
14
1
Click the Vertical respectively Horizon. button in the Density Profile field.
2
Drag the vertical respectively horizontal line across the image and click to
freeze.
2205A GB 199801
ADC Compact Annotation Software
The Processing Station returns a screen with density profile, similar to the
one shown below:
The density profile can be saved onto a floppy in ASCII-format. In order to do
so, proceed as follows:
1
Click the Save button. The system returns the following screen:
ADC Compact Annotation Software
2205A GB 199801
15
2
Insert a diskette into the floppy drive and enter the filename when the system
displays the following screen:
The data (line, column and pixel values) is saved and can be accessed using
any spreadsheet software (e.g. Excel).
16
2205A GB 199801
ADC Compact Annotation Software
Performance Requirements
Processing Server
■
ADC Compact Autoprocessing software
■
ADC Compact Interactive processing software
ADC Compact Annotation Software
2205A GB 199801
17
Printed in Belgium
Published by Agfa-Gevaert N.V., B-2640 Mortsel-Belgium
2205A GB 199801