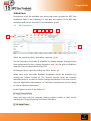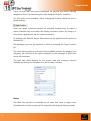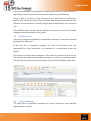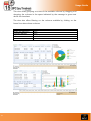
1
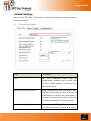
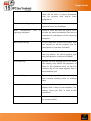
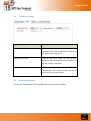
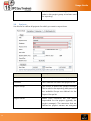
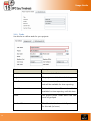
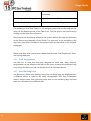
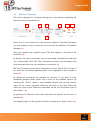
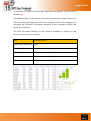
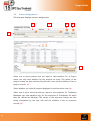
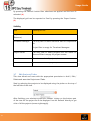
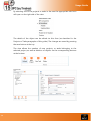
Usage Guide v 2.0 www.bpc-components.com Table of Contents 1.INTRODUCTION .................................................................................................................. 3 1.GLOBAL SETTINGS .............................................................................................................. 4 1.1 Timesheet Settings .................................................................................. 4 1.2 Toolbar Settings ...................................................................................... 6 1.3 Web Part Headers ................................................................................... 6 1.4 Localizations............................................................................................ 7 2.BASIC ENTITIES ................................................................................................................... 7 2.1 Customers ............................................................................................... 7 2.2 Departments ........................................................................................... 8 2.3 Project Phases ......................................................................................... 8 2.4 Cost Groups............................................................................................. 9 2.5 Cost Categories ....................................................................................... 9 2.6 Resources.............................................................................................. 10 2.7 Project Groups ...................................................................................... 11 2.8 Projects ................................................................................................. 12 2.9 Project Assignments .............................................................................. 14 2.10 Tasks ..................................................................................................... 15 2.11 Task Assignments .................................................................................. 16 2.12 Non-Working Days ................................................................................ 16 3.WEB PARTS ...................................................................................................................... 17 3.1 My Timesheet ....................................................................................... 17 3.2 My Resources ........................................................................................ 19 3.3 Project Summary ................................................................................... 19 3.4 Resource Summary................................................................................ 22 3.5 Project Cost Summary ........................................................................... 23 3.6 Project Assignments .............................................................................. 26 3.7 Edit Projects/Tasks ................................................................................ 27 Usage Guide User Manual 1.Introduction BPC Easy Timesheets for SharePoint is a solution for easily managing timesheet submission and monitoring on SharePoint. This document is intended as documentation for all roles involved in the time management process. Role definitions: Simple User (Resource): The user that is just required to submit timesheets. Timesheet Manager: A user responsible for the timesheets of several users (a team leader f.e.). Project Owner: Is the user overall responsible for the project and its timesheets (the Project Manager). Executive: Special user type that allows viewing of all BPC Easy Timesheets data but no alterations. Administrator: BPC Easy Timesheets administrator. 3 Usage Guide User Manual 1.Global Settings Before using BPC Easy Timesheets the following application global settings should be defined. 1.1 Timesheet Settings Field Description Title BPC Easy Timesheets always gets its configuration settings from a record with the title “Global Settings” so refrain from altering this value. Select Not Running Projects When checked, BPC Easy Timesheets users will have the option to save and submit timesheets for projects with end-dates in the past. Otherwise, users will be only able to report timesheet for running projects. Select Unassigned Projects When checked, BPC Easy Timesheets users will have the option to save and submit 4 Usage Guide User Manual timesheets for any project. Otherwise, users will be able to report timesheets only for projects that they’ve been assigned to. Allow Overtime Reporting Define whether or not users can report overtime hours on timesheets. Allow Unsubmitted reporting web parts Time in Define if users will have the option to to include the saved timesheets that are not submitted in calculations of the reporting webparts. Max Hours per Day It’s the daily limit of the hours that a user can submit for all the projects that he participates in (overtime included). Max Hours per Week It’s the weekly limit of the hours that a user can submit for all the projects that she participates in (overtime included). First Week Day Defines the first working day of the week. This setting only affects the sequence of days for the timesheet view, as the first working day of the week appears first in the timesheet grid. Hours Per Day This setting only affects the calculation that converts working hours to working days. Display Time In Days Defines if the users will have the option to display time in days in the webparts. The setting “Hours per Day” is used in this conversion. Currency Symbol It’s the currency symbol that will be used for currency fields. 5 Usage Guide User Manual 1.2 Toolbar Settings Field Description Toolbar Start Color Defines the starting color of the toolbar gradient. This setting affects the toolbar of all user facing web parts. Toolbar End Color Defines the end color of the toolbar gradient. This setting affects the toolbar of all user facing web parts. Icon Theme Select an icon theme for BPC Easy Timesheets. This setting affects the icons of all user facing web parts. 1.3 Web Part Headers On this tab the headers of all available web parts can be modified. 6 Usage Guide User Manual 1.4 Localizations This Tab contains most text strings of the user facing components of BPC Easy Timesheet to be used for localization (or renaming). 2.Basic Entities In order to start using the BPC-Easy Timesheets application data must be entered in its basic entities: Customers Projects (Task definition is optional) Departments Resources (Users) Project Assignments (Assign users to Projects) Non-Working Days 2.1 Customers Use this list to define customers that are related to projects for which you want to report time. 7 Usage Guide User Manual Field Description Customer Name The Customer’s Name. This is the only mandatory field in order to insert a new customer. Address Full address of the customer. Zip Code The address zip code. Phone Customer’s business phone. Email Customer’s Email Address. 2.2 Departments In this section the departments that resources belong to can be defined. Field Description Department Name The Department’s Name. 2.3 Project Phases Use this section to define the Project Phases (f.e: Analysis, Implementation, UAT etc.) that are going to be used. 8 Field Description Phase Name The Phase’s Name. Usage Guide User Manual 2.4 Cost Groups Use this option to define the Cost Groups that are going to be used in the reporting web parts. Each Cost Group can include several Cost Categories that are entered either in this form or directly into the Cost Categories list. Field Description Group Name The Cost Group’s Name. Categories Use this grid to create the Cost Categories for this Cost Group. Click on the New Record Button to add a category. 2.5 Cost Categories In this section Cost Categories are defined in conjunction with the Cost Group to which they belong. 9 Usage Guide User Manual Field Description Category Name The Cost Category’s Name. Cost Group The Cost Group to which this category belongs. Use the Cost Groups list to define Cost Groups. 2.6 Resources Use this list to define resources. Resources are the user that participate in projects for which time will be reported. Although a resource can be connected with a SharePoint user, a SharePoint user can only be connected with one resource. Field Description Resource Name The name of the resource as it will be displayed throughout BPC Easy Timesheets. User Account 10 The SharePoint user that is related with Usage Guide User Manual the resource. Timesheet manager The timesheet manager of the resource. Department The department that the resource belongs to. Work Hours (Daily) The default hours that a resource works daily. (For informational info only) Is Timesheet Administrator Defines the resource as a Timesheet Administrator. Is Executive Defines the resource as an Executive. Is Outsourcer Defines the resource as an Outsourcer. Standard Rate (per Hour) The hourly standard cost of the resource. The value of this field (if completed) overrides the default standard rate that is defined at the application’s global settings. Overtime Rate (per Hour) The hourly overtime cost of the resource. The value of this field (if completed) overrides the default overtime rate that is defined at the application’s global settings 2.7 Project Groups The Group to which this project belongs is defined in this section. The information is used in the reporting web parts. 11 Field Description Group Name The Project Group’s Name. Usage Guide User Manual Code This field can be used to assign an internal code to this project group to be later used for reporting. 2.8 Projects Use this list to define all projects for which you want to report time. Field Description Title Project Title (the name of the project). Customer The Customer for which this project is for. Project Group The Group to which this project belongs. This is used in the reporting web parts and the available Groups are defined via the Project Groups list. Project Owner Select from resources the one who’s responsible for the project (typically the project manager). The resources that are defined as project owners are assigned 12 Usage Guide User Manual special privileges in BPC Easy Timesheets. Active Defines if the project is Active or Inactive. No time can be reported for inactive projects. Is Administrative Time If true, it determines that it’s not an actual project but rather a virtual project (a container) create in order to let resources report time on tasks that are not relevant to an actual project (e.g. Illness, Vacation, etc.) Sort Order The sort order in which the project will be displayed in every list. Baseline Effort The effort that has been initially estimated (in hours). Baseline Cost The project cost that had been initially estimated. Start Date Project’s start date. From this date on the project will be available for time reporting. Finish Date Project’s finish date. The project will be available for time reporting until this date. The building of the Project Team (i.e. the assigning resources to the project) can be done via the Resources tab of the Project Form. Use the grid to add resources by clicking on the New Record button. Resources must be already added to the system before this step as described in the Resources paragraph of this Guide. 13 Usage Guide User Manual Field Description Group Name The Cost Group’s Name. Categories Use this grid to create the Cost Categories for this Cost Group. Click on the New Record Button to add a category. Please note that projects can be also created from the new “Edit Project and Tasks” user facing Web part. 2.9 Project Assignments Use this list to view the resources assigned to each project. New resource assignments can be added to the project via the form however the preferred way is by using the Resources tab of the project form as described above. 14 Usage Guide User Manual 2.10 Tasks Use this list to define tasks for your projects. Field Description Task Name The name of the Task Project The project to which this task belongs Start Date Task’s start date. From this date on the task will be available for time reporting. Finish Date Task’s finish date. The task will be available for time reporting until this date. Phase The project phase under which this task must be grouped. Baseline Effort The effort that has been initially estimated for this task (in hours). 15 Usage Guide User Manual Baseline Cost The task cost that had been initially estimated. Cost Group – Cost Category Used for cost classification of the task. Task Code – Cost Code Used for internal reporting reasons. The building of the Task Team (i.e. the assigning resources to the task) can be done via the Resources tab of the Task Form. Use the grid to add resources by clicking on the New Record button. Resources must be already added to the system before this step as described in the Resources paragraph of this Guide. For resources to be available in this step they must first be added to the project team as described in the Projects paragraph. Please note that tasks can be also created from the new “Edit Project and Tasks” user facing Web part. 2.11 Task Assignments Use this list to view the resources assigned to each task. New resource assignments can be added to the task via the form, however the preferred way is by using the Resources tab of the task form as described above. 2.12 Non-Working Days Use this list to define non-working days. Non-working days are displayed with a different colour in order to be easily recognizable. BPC Easy Timesheets doesn’t restrict users from reporting work time on non-working days and that time isn’t calculated at a different rate. 16 Usage Guide User Manual 3.Web Parts Descriptions of all the available user facing web parts, provided by BPC Easy timesheets. Each of the following is a web part view option of the BPC Easy timesheet web part as described in the installation guide. 3.1 My Timesheet 2 3 4 5 6 7 1 8 Select the period for which time will be reported. (1) (2). The list of projects (and tasks if available) by default displays all projects that have assignments for the currently logged on user. (8). the grid is editable so data entry can be performed directly on it. All changes can be saved by clicking the ‘Save’ Button (3). When data entry has been finalized timesheets should be submitted by clicking the ‘Submit’ button (4). The ‘Submit’ function locks the currently selected period in, so that no further changes are allowed. From this time on, only the Application Administrator or Timesheet administrator has the ability to unlock submitted timesheets. In the Options section of the ribbon (7): Users can keep only the currently running projects visible on their list by checking the ‘Projects Running This Period’ checkbox. 17 Usage Guide User Manual Users can also view and report timesheets on projects that aren’t officially assigned to them, by deselecting the ‘Only Assigned Projects’ checkbox. For this option to be available, ‘Select Unassigned Projects’ should be true in global settings. Users can report overtimes beyond the standard working time. In order to report overtime they must check the ‘Display Overtime’ option. By doing so, a new column appears per day for overtime insertion. By pressing the ‘Refresh’ button filter selections are applied and the period is reloaded (5). The displayed grid can be exported to Excel by pressing the ‘Export’ button (6). This view offers grouping on several of the available columns by dragging and dropping the columns in the space indicated by the message in green text above the timesheet. The view also offers filtering on the project, task and customer columns available by clicking on the funnel icon above these columns. Notes: This Web Part should be accessible by all users that have to report time. Timesheet information is reported for a specific period (period being a week). 18 Usage Guide User Manual Users are restricted on the maximum working hours they can report both per day and per week. Those restrictions can be defined at global settings. There is also an option to enter comments on a daily basis. By selecting a specific grid cell (project/Day), the Comments field appears below the list. The presence of comments for a specific day/project is indicated by the comments icon. The available options to the user are defined via selections made in the Global Setting as described earlier in this guide. 3.2 My Resources This view is designed especially for timesheet managers to view the reported timesheets of their team. In the top list, a timesheet manager can view all resources that he’s responsible for, with summaries on submitted or un-submitted hours per project. The bottom list shows the timesheets of the resource selected in the top list. The bottom list allows the timesheet manager to unlock a submitted period. This list has exactly the same functionality as that of My Timesheets Web Part. 3.3 Project Summary This Web Part is specifically designed for Project Owners to view statistics regarding their projects. 19 Usage Guide User Manual 3 4 6 7 8 1 2 5 Select one or more projects for which you want to view statistics. A Project owner can only view statistics for projects he owns. (1) Select whether you want to display all projects or only the active ones. (2) Filter the statistics by a specific period. The filter applies to the date of the timesheet. (3) By default, this view summarizes only the submitted timesheets. By selecting ‘Incl. unsubmitted Hours’ the application includes in summaries the timesheets that have been saved but not submitted yet. (4) The Timesheet application stores effort information in hours. Check ‘Time in Days’ if you want the summaries regarding effort to be displayed in days instead of hours. (5) By default all summaries are grouped by project. If you want to have additional grouping levels select one or more of the available options. By checking the ‘Charts’ option a new resizable window with all the relevant charts for the current grouping selections, will open on the right. Select the charts you want to see. Charts are exportable via the icon on bottom right of the window. (6) By pressing the ‘Refresh’ button filter selections are applied and the form is reloaded (7) By checking the ‘Charts’ option a new windows with all the relevant charts for the current grouping selections will open on the right. The displayed grid can be exported to Excel by pressing the ‘Export’ button (8) 20 Usage Guide User Manual This view offers grouping on some of the available columns by dragging and dropping the columns in the space indicated by the message in green text above the timesheet. The view also offers filtering on the columns available by clicking on the funnel icon above these columns. Role Simple User (Resource) Timesheet Manager Project Owner Executive Administrator 21 Visibility/Access None None Only projects that he’s the owner Full Access Full Access Usage Guide User Manual 3.4 Resource Summary This view is designed for Timesheet Managers to view statistics regarding the resources they’re responsible for. 1 2 3 5 6 7 4 Select one or more resources to view resource statistics. Timesheet Managers can view statistics only for resources for which they are defined as Timesheet Manager. (1) Filter your statistics by a specific period. The filter applies to the date of the timesheet. (2) By default, this view summarizes only the submitted timesheets. By selecting ‘Incl. unsubmitted Time’ BPC Easy Timesheets includes the timesheets that have been saved but not yet submitted, in summaries. (3) BPC Easy Timesheet stores effort information in hours. Check ‘Time in Days’ if you want the summaries regarding effort to be displayed in days instead of hours. (4) By default all summaries are grouped by resource. If you want to have additional grouping levels, select one or more of the available options. By checking the ‘Charts’ option a new resizable window with all the relevant charts for the current grouping selections, will open on the right. Select the charts you want to see. Charts are exportable via the icon on bottom right of the window. (5) By pressing the ‘Refresh’ button filter selections are applied and the form is reloaded (6) The displayed grid can be exported to Excel by pressing the ‘Export’ button (7) 22 Usage Guide User Manual This view offers grouping on some of the available columns by dragging and dropping the columns in the space indicated by the message in green text above the timesheet. The view also offers filtering on the columns available by clicking on the funnel icon above these columns. Role Visibility/Access Simple User (Resource) None Timesheet Manager Can view or select resources that he’s responsible for Project Owner None Executive Full View Access Administrator Full Access 3.5 Project Cost Summary This Web Part is especially designed for Project Owners to view financial statistics of their projects. 23 Usage Guide User Manual 3 4 5 7 8 9 1 2 6 Select one or more projects that you want to view statistics for. A Project owner can only view statistics for the projects she owns. (1) Select whether all projects are displayed or just the active ones. (2) Filter your statistics by a specific period. The filter applies to the date of the timesheet. (3) Select whether you want to display statistics for: Non Administrative projects only (Actual Projects) Administrative projects only (not actual projects but rather virtual projects that you create in order to let resources report time on tasks that are not relevant to an actual project, e.g. Illness, Vacation, etc.). All projects (both Administrative and Non-Administrative) (4) By default, this view summarizes only the submitted timesheets. By selecting ‘Incl. unsubmitted Hours’ BPC Easy Timesheets includes timesheets that have been saved but not submitted yet in summaries. (5) BPC Easy Timesheet stores effort information in hours. Check ‘Time in Days’ if you want the summaries regarding effort to be displayed in days instead of hours. (6) By default all summaries are grouped by project. If you want to have additional grouping levels select one or more of the available options. By checking the ‘Charts’ option a new resizable window with all the relevant charts for the current grouping selections, will open on the right. Select the charts you want to see. Charts are exportable via the icon on bottom right of the window. 24 (7) Usage Guide User Manual By pressing the ‘Refresh’ button filter selections are applied and the form is reloaded (8) The displayed grid can be exported to Excel by pressing the ‘Export’ button (9) This view offers grouping on some of the available columns by dragging and dropping the columns in the space indicated by the message in green text above the timesheet. The view also offers filtering on the columns available by clicking on the funnel icon above these columns. Role Visibility/Access Simple User (Resource) None 25 Timesheet Manager None Project Owner Can only view or select projects he owns Executive Can view or select all projects Administrator Can view or select all projects Usage Guide User Manual 3.6 Project Assignments This web part displays resource assignments. 1 3 4 5 2 6 Select one or more projects that you want to view statistics for. A Project owner can only view statistics for the projects he owns. The values of the project lookup are also restricted by the user’s role and the visibility it has on project records. (1) Select whether you want all projects displayed or just the active ones. (2) Select one or more resources that you want to view statistics for. Timesheet Managers can view statistics only for the resources of Timesheets for which they are defined as Manager. The values of the resources lookup are also being constrained by the user role and the visibility it has on resources records. (3) 26 Usage Guide User Manual By pressing the ‘Refresh’ button filter selections are applied and the form is reloaded. (4) The displayed grid can be exported to Excel by pressing the ‘Export’ button. (5) Visibility Role Visibility/Access Simple User None. (Resource) Timesheet Manager Can only view or select resources that he’s responsible for. Project filter is empty for Timesheet Managers. Project Owner Can only view or select projects he’s the owner of. Resource filter is empty for project owners. Executive Can view or select all projects / resources. Administrator Can view or select all projects / resources. 3.7 Edit Projects/Tasks This view allows end users with the appropriate permission to Add / Edit / Delete and associate Projects and Tasks. Start by selecting the projects to be displayed using the picker on the top of the left side of the view. After finishing your selections press the ‘Refresh” button on the bottom part of the view for the project list to be displayed. Just hit ‘Refresh’ directly to get a list of all the projects (access rights apply). 27 Usage Guide User Manual By selecting one of the projects or tasks in the tree the appropriate edit form will open on the right side of the view. The details of the object can be edited via this form (as described in the Projects or Tasks paragraphs of this guide). The changes are saved by pressing the save button at the top. The view allows the creation of new projects, or tasks belonging to the selected project, as well as deletion of objects via the corresponding buttons at the bottom. 28