1
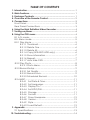
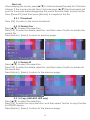
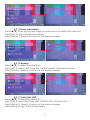
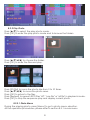
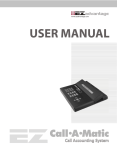
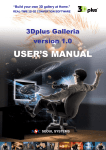
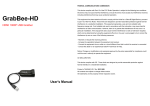
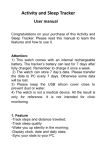
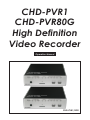
CHD-PVR1 CHD-PVR80G High Definition Video Recorder Operation Manual CHD-PVR1/80G TABLE OF CONTENTS 1. Introduction................................................................................. 1 2. Main Features............................................................................. 1 3. Package Contents..................................................................... 1 4. Overview of the Remote Control.............................................. 2 5. Connections................................................................................3 Front Panel................................................................................... 3 Rear Panel Connections............................................................ 3 6. Using the High Definition Video Recorder................................ 4 7. Turning on power........................................................................ 4 8. Using the OSD menu.................................................................. 4 8.1 A/V mode.............................................................................. 5 8.2. Menu mode..........................................................................5 8.2.1 Play Movie.......................................................................... 5 8.2.1.1 Thumbnail............................................................... 6 8.2.1.2 Delete One.............................................................6 8.2.1.3 Delete All................................................................ 6 8.2.1.4 Copy (With 80G HDD only)................................... 6 8.2.1.5 Show Information................................................... 7 8.2.1.6 Repeat.................................................................... 7 8.2.1.7 Auto Hide OSD....................................................... 7 8.2.2 Play Photo.......................................................................... 8 8.2.2.1 Photo Menu............................................................8 8.2.3 Record Setup..................................................................... 9 8.2.3.1 Set Quality.............................................................. 9 8.2.3.2 Record From...........................................................9 8.2.3.3 Scheduled Record.............................................. 10 8.2.4 MISC.................................................................................. 11 8.2.4.1 Set Date & Time................................................. 11 8.2.4.2 Set Language.....................................................11 8.2.4.3 Display On.......................................................... 11 8.2.4.4 Set NTSC/PAL...................................................... 11 8.2.4.5 Storage............................................................... 11 8.2.4.6 Format................................................................. 11 8.2.4.7 Show Freespace................................................ 12 8.2.4.8 Version................................................................ 12 8.2.4.9 Style..................................................................... 12 8.2.4.10 Load Default...................................................... 12 9. Appendix................................................................................... 13 9.1 Specifications...................................................................... 13 10. Troubleshooting........................................................................ 14 Preface This user manual teaches you about the High Definition Video Recorder and how to make full use of its features. Information contained in this manual has been carefully checked for accuracy; however, no guarantee is given to the correctness of the contents. The information in this document is subject to change without notice. Safety information Do not disassemble this unit. Touching the product's internal parts could result in injury. In the event of a malfunction or if the unit is accidentally broken open, take the product to an authorized service center for inspection. 1. Introduction High Definition Video Recorder is the most valuable add-on to any home theater settings. This is great replacement to traditional VCR or even DVD-RW recorders, with their compact size and superior support to variable mobile devices. This product can perfectly serve as the data center of all incoming multimedia. You won't miss any favorite clip as you can record it as H.264 MPEG 4 format into Secure Digital Card (SD Card) instant. The other High Definition Video Recorder can build in 2.5" 80G HDD, it can record it into SD/HDD with H.264 MPEG4 format, by simply clicking on the remote controller. 2. Main Features ● ● ● ● ● ● ● ● ● Video Recording: H.264 MP/HP (Main Profile/High Profile partial) and stereo sound, optimized resolution for TV up to 1920x1080i@60fields/s. Video Playback: H.264 MP/HP with stereo sound. HD DVD quality up to 1920x1080i@60fields/s. Audio Recording: AAC+ compression. Photo viewer: JPEG (Only accept JPEG files from digital camera). Audio pass through. Video pass through. Recording live HD/SD TV program as VCR and very easy to use. Support video format: 480i/60Hz, 480p/60Hz, 576i/50Hz, 576p/60Hz, 720p/50Hz, 720p/60Hz,1080i/50Hz,1080i/60Hz Remote control for easy indoor usage. 3. Package Contents 1. High Definition Video Recorder main body 2. Remote control with Batteries 3. Power Adaptor 4. User manual 5. Converter software CD 1 4. Overview of the Remote Control 1 . Power: Switch unit on or off Power Mute 2 . Mute: Mute or un-mute the audio 1 2 (only for play mode) Source HDD/SD Repeat Vol + 3 5 3 . Source: Choose Component/ Output Pause Zoom Vol 4 6 SV/AV/HDMI1/HDMI2 input 7 9 8 Record 10 source 11 13 14 12 4 . HDD/SD: Switch between 17 15 HDD/SD mode Menu Return 18 16 20 19 5 . Repeat: Select "off", "one file", "all file" repeat in playback mode OK 6 . VOL+: Press to increase volume 21 22 (only for play mode) Display Info 7 . Output: Choose HDMI/ 24 23 Component/AV/SV output 8 . Pause: Pause current process at the first press 9 . Zoom: Zoom 2x ~ 10x 10. Vol -: Press to decrease volume (Only for play mode) 11. Record: Record the AV signal to SD/ HDD device 12. : Stop playing the file or Stop record the file 13. l: Jump to the previous page/file 14. l: Jump to next page/file 15. l: Simultaneous press it to decrease the slow-backward speed: x1/2, x1/4, x1/8, x1/16, x1/32, x1/64 16. l: Simultaneous press it to decrease the slow-forward speed: x1/2, x1/4, x1/8, x1/16, x1/32, x1/64 17. : Simultaneous press it to increase the fast-backward speed: x2, x4, x8, x16, x32, x64 18. : Simultaneous press it to increase the fast-forward speed: x2, x4, x8, x16, x32, x64 19. Return: Return to the previous state 20. Menu: Display or switch off the OSD menu or switch between AV source and SD/HDD device source 21. ///: Move the cursor Up/Down/Left/Right or move the zoom area Up/Down/Left/Right 22. Ok: Confirm the selection 23. Info: Press to display the information 24. Display: Display or switch off the OSD menu or switch between AV source and SD/HDD device source 2 5. Connections Input I/O: Component with Audio R/L S-Video with Audio R/L Video with Audio R/L HDMI Output I/O: Component x 1 S-Video x1 Video x1 HDMI x1 R/L x1 x1 x1 x1 x2 Front Panel 1 2 G BYPASS R PREVIEW 3 OUTPUT HDMI COMP VIDEO/ SVIDEO 4 SD PLAY INPUT REC COMP SVIDEO VIDEO HDMI 1 HDMI 1 INPUT SD HDMI 2 HDMI 2 INPUT CHD-PVR1 5 6 7 1. Bypass/Preview indicators: When selected Bypass mode the signal will bypass without doing any process and the LED will illuminate in Green light. When selected Preview mode the signal will process before pass out and the LED will illuminate in Red light. 2. Output port indicators: When the output port been selected the LED will illuminate to indicate which outpot source is selected. 3. Play/REC indicators: When play the files from SD card, the LED illuminate in Red color, when play the files from HDD, the LED will illuminate in Blue color (CHD-PVR80G only). When record the files to SD/HDD card, the LED will illuminate in Red color. 4. Input source indicators: When the input source been selected the LED will illuminate to indicate which input source is selected. If video and S-video connected at the same time the Video input is the first priority from the system. 5. IR sensor 6. SD card slot 7. HDMI 1 & 2 input: Connect the HDMI input ports to the HDMI or DVI output of your source equipment such as DVD player or set-top-box. 3 Rear Panel Connections Connect to the S-video and audio output terminals from other video equipment Connect to the Y/Cb/Cr and audio output terminals from other video equipment The Household AC outlet (AC 100~ 240V, 50/60Hz) DC 5V AUDIO INPUT VIDEO INPUT S/R S/L COMP/R COMP/L R L V/R V/L V S COMPONENT INPUT Pr/Cr Pb/Cb Y OUTPUT HDMI cable HDMI VIDEO OUTPUT COMPONENT OUTPUT AV/S-video Connect to the video and audio output terminals from other video equipment The description of the component video input terminals depends on the television or monitor (e.g. Y/Pb/Pr). Connect to terminals of the same color. 6. Using the High Definition Video Recorder After connecting the unit to the TV and Power on, you are ready to start the product. This chapter describes how to turn on the device and how to control On-Screen Display (OSD) menu to configure the device settings. 7. Turning on power Turning on the TV and select the appropriate video input and output to suit the connections to this unit. 8. Using the OSD menu Press [Menu/Display] to display Home menu. Active device me menu iconMode title Input video source Output video source 4 Date Time 8.1 A/V mode In AV mode, press [Return/Menu/Display] to return to Home menu. Press [Record] to save the file to SD card/HDD device. Press [Stop] to stop playing the file or stop record the file 8.2 Menu mode Press [/] to select the playing file. Press [OK] to enter the Play Movie mode and to the thumbnail browser. 8.2.1 Play Movie Press [///] to select the playing file or previous/next file. Press [OK] to play the file. Press [] fast-forward the speed. Press [] fast-backward the speed. Press [l] slow-forward the speed. Press [l] slow-backward the speed. Press [Stop] to stop playing the file and then press [OK] to play the file from beginning. Press [Pause/OK] to pause current process, press once to continue playing. Press [Display] to display or switch off the information menu During the playing movie, press [Menu] to go to movie menu selection. 4 5 Short cut: When playing the movie, press [/] to fast backward/forward for 15minutes interval. If the movie is shorter then 15minutes press [/] the time search will point to 2 seconds before/beginning the movie files and starts to play the file. Press [Pause/OK] and then press [Record] to snapshoot the file. 8.2.1.1 Thumbnail Press [OK] to return to the movie thumbnail. 8.2.1.2 Delete One Press [/] to select the selection. Press [OK] to enter the delete selection, and then select Yes/No to delete the current file. Press [Return] / [Menu] to return to previous page. 8.2.1.3 Delete All Press [/] to select the selection. Press [OK] to enter the delete selection, and then select Yes/No to delete all the movie files. Press [Return] / [Menu] to return to the previous page. 8.2.1.4 Copy (With 80G HDD only) Press [/] to select the selection. Press [OK] to enter the copy selection, and then select Yes/No to copy the files to HDD/SD device. Press [Return] / [Menu] to return to the previous page. 6 8.2.1.5 Show Information Press [/] to go to the next page of movie menu or select the selection. Press [OK] to show the file information. Press [Return] / [Menu] to return to the previous page. 8.2.1.6 Repeat Press [/] to select the selection. Press [OK] to select "off", "one file", "all file" repeat in playback mode. Press [Return] / [Menu] to return to the previous page. 8.2.1.7 Auto Hide OSD Press [/] to select the selection. Press [OK] to select the Auto Hide OSD for off/1/2/3 seconds. Press [Return] / [Menu] to return to the previous page. Press [Return] to go to the Home menu. 7 8.2.2 Play Photo Press [/] to select the play photo mode. Press [OK] to enter the play photo mode and to browse the folders. Press [///] to choose the folder. Press [OK] to enter the files and play. Press [ZOOM] to zoom the photo size from 2 to 10 times. Press [///] to move the photo area. Press [OK] to return to the files. Press [Repeat] to repeat JEPG files "off", "one file" or "all file" in playback mode. Press [OK] to stop the sequence play and display current photo. 8.2.2.1 Photo Menu During the playing photo, press [Menu] to go to photo menu selection. All the operation procedures, please refer to section 8.2.1 movie menu. 8 8.2.3 Record Setup Press [/] to select the Record Setup. Press [OK] to enter the Record Setup. 8.2.3.1 Set Quality Press [OK] to enter the Set Quality. Press [/] to select the Record Quality. Press [Menu/Return] to return to the previous page. 8.2.3.2 Record From Press [OK] to enter the Record input source. Press [/] to select the input source (Component/Video/S-Video/HDMI1/HDMI2). Press [Menu/Return] to return to the previous page. Press [OK] to confirm the record input source and return to the Home menu. 9 [Note] When input source is HDMI 1 (with HDCP encryption), the record files will enforce to save in HDD not SD card. 8.2.3.3 Scheduled Record Press [OK] to enter the Scheduled Record setup. Press [/] to setup the schedule list and user can setup 8 different record schedules. Press [OK] to start set date/time/length Press [/] to adjust the digits. Press [OK] to return the Schedule List. Press [Menu/Return] to return to the previous page. Reference for Record Time to 80G HDD: Mode Extra Fine Normal Economic Super Eco 80 Resolution HD HD HD HD Mode Extra Fine Normal Economic Super Eco 80 Resolution SD SD SD SD GB Bit Rate (Mbps) Record Time (Min) Record Time (Hour) 1,092.3 18.2 10 1,456.4 24.3 7.5 2,184.5 36.4 5 3,120.8 52.0 3.5 GB Bit Rate (Mbps) 4 3 2 1.5 Record Time (Min) Record Time (Hour) 2,730.7 45.5 3,640.9 60.7 5,461.3 91.0 7,281.8 121.4 [Note]:1. When input source is HDMI 1 (with HDCP encryption), the record files will enforce to save in HDD not SD card. 2. After the record, inside SD/HDD will remain 80~100MB for program use. 10 8.2.4 MISC Press [OK] to enter the Miscellaneous Menu. Press [/] to select the setup list and there are 10 different lists. 8.2.4.1 Set Date & Time Press [OK] to Set Date & Time. Press [/] to adjust the digits. Press [OK] to go to the time setup. Press [OK] to return to the Home menu. 8.2.4.2 Set Language Press [OK] to set display language. Press [/] to select the display language (Chinese/English). Press [OK] to return to the Home menu. 8.2.4.3 Display On Press [OK] to set output display. Press [/] to select the output display (Component/Video/HDMI). Press [OK] to return to the Home menu. 8.2.4.4 Set NTSC/PAL Press [OK] to set NTSC/PAL. Press [/] to select the output display system (NTSC/PAL). Press [OK] to return to the Home menu. 8.2.4.5 Storage Only function for the product with 80G HDD. Press [OK] to set storage system. Press [/] to select the storage system (SD/HDD). Press [OK] to return to the Home menu. 8.2.4.6 Format Press [OK] to enter the format selection. Press [/] to select YES/NO to format the storage system. Press [OK] to return to the Home menu. 11 8.2.4.7 Show Freespace Press [OK] to enter free space mode and press [OK] again to show the storage memory space. Press [OK] to return to the Home menu. 8.2.4.8 Version Press [OK] to enter software version mode. Press [OK] to show the software version. Press [OK] to return to the Home menu. 8.2.4.9 Style Press [OK] to set background style. Press [/] to select the background style (Style 1 and Style 2). Press [OK] to return to the Home menu. 8.2.4.10 Load Default Press [OK] to set load default mode. Press [/] to choose YES/NO to select it's the system return to the factory mode. Press [OK] to return to the Home menu. 12 9. Appendix 9.1 Specifications Input ports: Component with Audio R/L x 1 S-Video with Audio R/L x1 Video with Audio R/L x1 HDMI x2 Output ports: Component x1 S-Video x1 Video x1 HDMI x1 R/L x1 Power Supply: High Definition Video Recorder: 5V/3.2A, High Definition Video Recorder with 80G HDD: 5V/5A DC (US/EU standards, CE/FCC/UL certified) Remote Control: Discrete IR remote Dimensions (mm): 176 (W) x 175 (D) x 45 (H) Weight(g): High Definition Video Recorder: 1306 g; High Definition Video Recorder with 80G HDD: 1402g Chassis Material: Metal with Plastic Silk Skin Color: White with Black Operating Temperature: Operating from 0oC ~ 40oC 13 2007.7.18 MPM-CHDPVR1 10. Troubleshooting Problem Power LED is not illuminated Power On the LED in blue color Remote control is not working No Picture Possible causes Power cord is not connected correctly. Solutions Make sure that the power cord is connected correctly. Power not available. There may be a power outage in your area. Make sure that other electronic devices are working correctly. System may be in standby Use the remote control to mode. turn on the unit. Batteries may be low. A/V connection may be loose. Incorrect TV source is selected. Incorrect connection to the unit. No Volume Can't please the Movies on the PC Volume too low or muted from the unit or TV. Replace the remote control batteries. Check that the A/V cables are connected securely. Make sure that the correct input source is selected. Refer to the TV user manual for more information. Make sure that the correct input sources are correctly to connect to the unit input connectors. Increase volume setting for the TV or the unit. LR cable may not connect Make sure that the correct correctly. TV input source. Refer to the TV user manual for more information. The product is the H.264 Make sure the package MPEG4 recording engine included the converter and need to use the CD. converter software to convert to PC format.