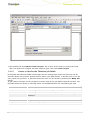
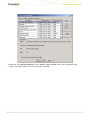
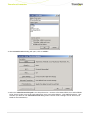
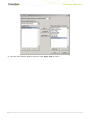
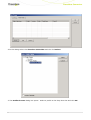
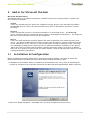
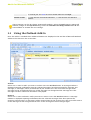
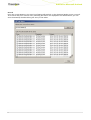
1
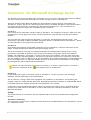
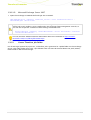
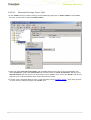
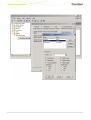
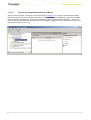
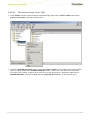
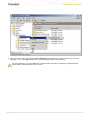
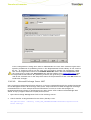
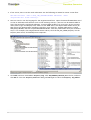
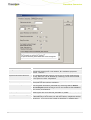
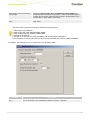
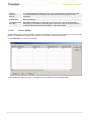
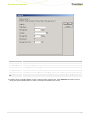
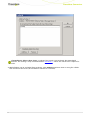
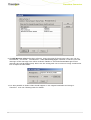
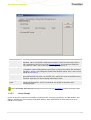
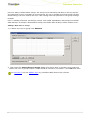
Connector for
Microsoft®
Exchange Server
www.therefore.net
© 2009 Therefore, all rights reserved.
ados.com
© 2009 Therefore, all rights reserved.
CREDITS
All rights reserved. No parts of this w ork may be reproduced in any form or by any means - graphic,
electronic, or mechanical, including photocopying, recording, taping, or information storage and retrieval
systems - w ithout the w ritten permission of the publisher.
Products that are referred to in this document may be either trademarks and/or registered trademarks of the
respective ow ners. The publisher and the author make no claim to these trademarks.
Canon is either a registered trademark or trademarks of Canon Inc.in the United States and/or other
countries.
UniFlow Output Manager is either a registered trademark or trademark of NTWare in the United States
and/or other countries.
Microsoft, Outlook, SQL Server, SharePoint, NT, Excel, Internet Explorer, Vista and Pow erPoint are either
registered trademarks or trademarks of Microsoft Corporation in the United States and/or other countries.
Window s Explorer, SharePoint, Office, Window s, Exchange and Microsoft MAPI Editor screen shots reprinted
w ith permission from Microsoft Corporation.
SAP and R/3 are the trademarks or registered trademark of SAP AG in Germany and in several other
countries.
Oracle is a registered trademark of Oracle Corporation and/or its affiliates. Other names may be trademarks
of their respective ow ners.
IBM, DB2 and Lotus Notes are trademarks of International Business Machines Corporation in the United
States, other countries, or both.
Kofax Capture, Ascent, VirtualReScan and Adrenaline are the trademarks or registered trademarks of Kofax,
Inc., in the United States and other countries.
eCopy, ShareScan and eCopy Desktop are the trademarks or registered trademarks of eCopy, Inc., in the
United States and other countries.
Adobe is either a registered trademark or trademark of Adobe Systems Incorporated in the United States
and/or other countries.
While care has been taken in the preparation of this document, the publisher and the author assume no
responsibility for errors or omissions, or for damages resulting from the use of information contained in this
document or from the use of programs and source code that may accompany it. In no event shall the
publisher and the author be liable for any loss of profit or any other commercial damage caused or alleged
to have been caused directly or indirectly by this document.
Printed: August 2009
Contact: [email protected]
Table of Contents
Connector for Microsoft Exchange Server
1. Therefore
.......................................................................................................................................8
Connect or
1. 1
Syst em Requirement
.....................................................................................................................................................
s
8
1. 2
Inst allat ion
1. 3
Configurat ion
..................................................................................................................................................... 9
..................................................................................................................................................... 12
2. Add-in.......................................................................................................................................55
for Microsoft Out look
2. 1
Inst allat ion & Configurat
.....................................................................................................................................................
ion
55
2. 2
Using t he Out look
.....................................................................................................................................................
Add-In
57
3. Add-in.......................................................................................................................................59
for Microsoft Out look Web Access
3. 1
Inst allat ion
..................................................................................................................................................... 59
3. 2
Configurat ion
..................................................................................................................................................... 60
4. Upgrading
.......................................................................................................................................68
from Previous Versions
© 2009 Therefore, all rights reserved.
Connector for Microsoft Exchange Server
The Therefore Connector for Microsoft® Exchange Server is a server and policy based tool to offload
and save e-mails in Microsoft Exchange to a secure storage location in Therefore™ .
There are primarily three Microsoft Outlook e-mail archiving scenarios that are covered by the
Therefore™ system. The first is a manual procedure and is a standard Therefore™ feature which does
not require the Thereofore™ Connector for Microsoft Exchange Server. The second two are
automatic functions an require the installation of the connector.
Scenario 1
Users need to save and index specific e-mails to Therefore. For example in a lawyer’s office an e-mail
pertaining to a certain legal case can be saved to Therefore™ and indexed using the client matter
number.
This scenario does NOT require the Therefore™ Connector for Microsoft Exchange Server. This
functionally is provided by Microsoft Office integration which is a default feature in Therefore™ . Please
see the Therefore™ User manual for more details.
Scenario 2
All incoming and outgoing e-mail traffic should be saved to Therefore™ and then stored on secure
media. E-mails should not be deleted from the Exchange Server.
This is best solved by using the journaling functionality of the Microsoft Exchange Server. Using
journaling it is possible to forward a copy of every incoming or outgoing e-mail to a pre-defined
mailbox. The Therefore™ Connector can then easily access this mailbox, save all e-mails from there
and then clear this journaling mailbox . This process guarantees that ALL user e-mails are saved, but
the user mailboxes are not affected at all. This method ensures optimal performance and minimum load
for the Exchange Server, as only one mailbox needs to be processed. For information on Exchange
journaling please refer to Microsoft documentation.
Where a certain step does not pertain to Scenario 2, or where it only pertains to scenario 2,
then this is indicated by the
icon together with an explanation.
Scenario 3
E-mails, defined by a policy, should be saved to Therefore™ to free up space in the Exchange
database: thereby improving system performance.
This is solved by saving e-mails from configured user mailboxes to Therefore™ and replacing the
original e-mails by a small stub/link document. Opening the link/stub in Outlook or OWA (if OWA Add-In
is installed) opens the original mail directly from Therefore™ for viewing.
Furthermore using the Microsoft Outlook add-in it is possible for Outlook users to perform full-text
searches of e-mails stored in Therefore, as well as full restore an e-mail from Therefore™ back into
Microsoft Exchange.
Setup
The setup consists of a connector and two optional add-ins that can be installed and configured if
needed.
Therefore™ Connect or
The connector contains three components that need to be installed directly on the Therefore™ Server
or a dedicated server.
4
© 2009 Therefore, all rights reserved.
Windows services for Microsoft Exchange Server
The Windows Services process the Exchange Store and are responsible for building a job queue
(Queuing service), processing all archive jobs in job queue (Storing service) and processing all
retrieve jobs (Restoring service).
The Web Service
The Web Service allows Outlook to access in e-mails saved in Therefore™ without connection to
the Exchange Server. It also processes Full-text search requests that are sent by the Outlook addIn.
Administ rat ion Tool
This is used for creating profiles, configuring basic settings, connect profiles to mailboxes, logging
etc.
Figure1. Arc hit ec t ure of t he Therefore™ Connec t or
55
Microsoft Out look Add-In
The Outlook add-in is an optional component, installed on client PCs, which provides a toolbar with
three features in Outlook.
Archive
A user can manually add an e-mail to the configured storage queue (in the Therefore Job Folder).
The St oring services checks for queued emails, saves them to Therefore™ and leaves a stub in
Exchange.
Ret rieve
A user can fully fully restore an e-mail from Therefore™ to Exchange Server. The Rest oring
service checks for queued e-mails and restores them to Exchange from Therefore™ . The length of
time the e-mail will remain restored can be configured.
Search
A user can perform full-text searching against all e-mails in Therefore™ for which they have read
access. This begins a Search process which searches the Therefore™ system via the Web Service
on the Therefore™ Server. The user is then provided with a hit-list of matching e-mails. Selecting
an e-mail begins a View process which gets the e-mail from Therefore™ and opens it for viewing.
(Note: the email is not fully restored and the contents will be lost when it is closed). In addition,
when the user retrieves a saved e-mail, this add-in displays a pop-up informing them that the e-mail
is being fetched from Therefore™ .
Figure 2. Add-in for Mic rosoft Out look.
6
© 2009 Therefore, all rights reserved.
Microsoft Out look Web Access Add-In
The OWA add-in is an optional component installed on the server where Exchange OWA is intstalled. It
is a plug-in into OWA that allows the user to access stored email directly from OWA. This plug-in is only
required for a Scenario 3 situation where e-mails are deleted from Exchange and only a stub-link to the
e-mail in Therefore™ is left. When a user opens an e-mail stub a request is sent to the OWA Add-in
which contacts the Exchange Server to get the document ID and then gets the e-mail from Therefore™
via the Web Service on the Therefore™ Server. The user can then view the contents of the email in
Microsoft OWA, but the e-mail is not restored to the exchange server and the contents will be lost
once the e-mail is closed.
Figure 3. The add-in for Mic rosoft Out look Web Ac c ess.
77
Therefore Connector
1. Therefore Connector
System Requirements
1.1
It em
Requirement s
Microsoft Exchange
Server
Microsoft Exchange 2003 or 2007 Server with the organizational forms
library. For OWA int egrat ion wit h Exchange 2007, Exchange 2007 SP1
or lat er is required.
Microsoft Internet
Information Server
A Microsoft Internet Information Server 6.x or 7.x.
Therefore Server
· Therefore™ 2009 Server installed on a different server to Microsoft
Exchange.
· Microsoft Outlook 2003 or 2007 must be installed.
· A valid license point for the Therefore™ connector must be installed.
· A category for e-mail storage for Microsoft Exchange.
· Microsoft Framework 2.0 SP1 or higher must be installed.
· Microsoft CDO (Collaboration Data Objects) must be installed on the
Server where the Therefore connector's Windows Services are installed.
Microsoft Outlook 2003: in the advanced installation options of the user
defined installation. Microsoft Outlook 2007: download from microsoft.
com
· Microsoft ASP.net 2.x extensions or higher must be installed.
1.1.1
Category
The category for archiving e-mails to Microsoft Exchange must have the following index data fields.
Field name
Field t y pe
Lengt h
Descript ion
Sender
String
150
E-mail address of the sender.
Recipients
String
1500
E-mail addresses of the recipients.
Subject
String
150
Subject of mail message.
DateRecieved
Date
Folderpath
String
200
Path to Exchange folder.
StoreName
String
150
Name of the Information Store on Exchange
Server.
StoreOwner
String
150
Name of the Store owner.
MD5Hash
String
35
MD5 Hash code.
Date received by Exchange Server.
Optional fields
StoreDate
Date
Default must be <Date> (today's date).
An XML File is saved in the Outlook Forms directory of the Therefore™ Connector installation
which can be imported directly into the Solution Designer.
8
© 2009 Therefore, all rights reserved.
Therefore Connector
1.1.2
Category Permissions
Therefore Mail User Account
Create a user (e.g. Therefore Mail) who has full access to the category.
General Users/Groups
Define the general users/groups who should only be able access their own e-mails. Give them Access
Cat egory and Execut e Query rights. Do NOT give View Document in Hit list and Open Document
rights.
1.2
Installation
We recommend that this installation is not attempted without assistance from a Therefore™
consultant. Please also read this document carefully, and review the requirements table.
1. Run the "Setup.exe" file in the "Connector for Microsoft Exchange" directory. Click Next to start.
99
Therefore Connector
2. Accept the default installation path, or define a new one. When done click Next .
3. Select either Complet e or Cust om installation.
10
© 2009 Therefore, all rights reserved.
Therefore Connector
4. If Custom is chosen the following options are available. In this section the components of the
Therefore™ connector can be selected for installation. Since the connector supports a distributed
architecture, not all components must be installed on a single system. Click Next when done.
5. The Ready t o Inst all t he Program dialog will open. Click Inst all.
11
11
Therefore Connector
1.3
Configuration
1.3.1
Microsoft Exchange Server
Configuration of the Microsoft Exchange Server is needed before the connector can be used. Due to
differences in the user interfaces the configuration for Microsoft Exchange 2003 and Microsoft
Exchange 2007 differs. Please refer to the section that matches your version. It is recommended that
the configuration be done with an administrator account (e.g. Mail Administ rat or).
1.3.1.1
Define Mailbox User
In order for e-mails to be saved to Therefore™ , permission to the relevant mailboxes must be granted.
The system account or the domain administrator account does not have, and cannot be granted, any
access permission to the mailbox stores by Windows security policy.
1.3.1.1.1
Microsoft Exchange Server 2003
1. Open the Servers section of the Exchange System Manager. Open the First St orage Group and
right-click on Mailbox St ore and choose Propert ies in the context menu. Select the Securit y
tab, add the user (Therefore Mail) and allow ALL permissions. Click OK when done.
12
© 2009 Therefore, all rights reserved.
Therefore Connector
1.3.1.1.2
Microsoft Exchange Server 2007
1. Open the Exchange Command Shell and type the command:
Add-ADPermission -Identity "<Mailbox_Store>" -user "<Therefore Mail>" –
ExtendedRights “Receive-As”
If the Therefore user is not mailbox enabled in Exchange 2007, the execution of this command
will fail. The user's mailbox can be configured in the Exchange 2007 management console, or
the with the respective command in the Exchange Command Shell:
Enable-Mailbox -Identity <UserIdParameter> -Alias <AliasName> -Database
<DatabaseIdParameter>
You can find more detailed technical information about this command at http://technet.
microsoft.com/en-us/library/bb124403.aspx
1.3.1.2
Create Therefore Job Folder
For all messages queued by a process, a Therefore job is generated in a public folder on the Exchange
Server. This public folder must have a pre-defined name and must be located below the path /Folder/
Public Folder in Microsoft Exchange.
13
13
Therefore Connector
1.3.1.2.1
Microsoft Exchange Server 2003
1. In the Folders section of the Exchange System Manager right-click on Public Folders. Select New
from the context menu and then Public Folder...
2. Name the folder Therefore Job Folder and click OK. Right-click on the newly created folder and
select Propert ies. Select the Permissions tab and then click on Client Permissions. Add the user (
Therefore Mail) who has access to all messages in the mailbox store. Select the Owner role for the
selected user in the drop-down menu of the permissions frame.
3. If certain users should be able to store e-mails manually (via the Outlook Add-in ), then these groups
or users must be added and given the Aut hor role.
14
© 2009 Therefore, all rights reserved.
Therefore Connector
15
15
Therefore Connector
1.3.1.2.2
Microsoft Exchange Server 2007
1. Open the Outlook Client right-click on Public Folders and select New Folder...
2. Name the folder Therefore Job Folder and click OK. Right-click on the newly created folder and
select Propert ies. Select the Permissions tab. Add the user (Therefore Mail) who has access to all
messages in the mailbox store. Select the Owner role for the selected user in the drop-down menu
of the permissions frame.
3. If certain users should be able to store e-mails manually (via the Outlook Add-in), then these groups
or users must be added and given the Aut hor role.
16
© 2009 Therefore, all rights reserved.
Therefore Connector
If you want to set the permission directly at the Exchange Server, you can use the Exchange
Command Shell to do so. For more information about how to use cmdlets, see online Help for
Exchange 2007. Additionally, visit the following Microsoft Web site: http://technet.microsoft.
com/en-us/library/bb124411.aspx
cmdlet
Descript ion
Set-PublicFolder
To set storage limits.
Add-PublicFolderClientPermission
To set client permissions.
AddTo set administrative permissions.
PublicFolderAdministrativePermissio
ns
17
17
Therefore Connector
1.3.1.3
Create the Organizational forms library
For the scenario where a stub-link is left in Exchange (scenario 3), a script is needed within Outlook
that correctly fetches the e-mail from Therefore™ . This is achieved by publishing a custom form (IPM.
Note.Archived), containing the script code needed, into the Organizational forms library. There can
only be one Organizational Forms Library for each language, and hence if one already exists then only
the permissions have to be set.
18
© 2009 Therefore, all rights reserved.
Therefore Connector
1.3.1.3.1
Microsoft Exchange Server 2003
1. In the Folders section of the Exchange System Manager right-click on Public Folders and select
View Sy st em Folders from the context menu.
2. The folder EFORMS REGISTRY will be visible under Public Folders. If an Organizational form already
exists, it will be visible in the EFORMS REGISTRY folder. If this is the case then a new one does
not need to be created. Simply skip to point 4 to set the permissions. Otherwise right-click on
EFORMS REGISTRY and choose New and then Organizat ional Form... in the context menu.
19
19
Therefore Connector
3. Give the form a name and in the E-forms language drop-down box, please choose the relevant
language. Press the Apply button to create the Organizational forms library.
If your language is not selectable this would indicate, that there is already an Organizational
forms library existing which must be used.
20
© 2009 Therefore, all rights reserved.
Therefore Connector
If the configuration is being done with an administrator account with sufficient rights then
specific permissions for publishing forms to the Organizational Forms Library do not need to
be set. If, however, this is not the case and you need to change the permissions, Rightclick on the Organizational form in the EFORMS REGISTRY folder and select Propert ies from
the context menu. Select the Permissions tab, and then add the user (Mail Administrator) who
will open Microsoft Outlook for publishing of forms and generating views. Select the Owner
role for the selected user in the drop down menu of the permissions frame. Click OK button to
confirm the changes.
1.3.1.3.2
Microsoft Exchange Server 2007
Since creating an Organizational Forms Library is no longer supported through the graphical Exchange
Server Management Tools for Exchange 2007, these steps must be executed through the Exchange
Command Shell. For more in-depth technical information on how to create and configure an
Organizational Forms Library on Exchange Server 2007, please refer to Microsoft Knowledge Base
Article at http://support.microsoft.com/kb/933358/en-us
1. Open the Exchange Management Shell on the Exchange Server.
2. Check whether an Organizational Forms Library already exists:
Get-publicfolder -identity "\NON_IPM_SUBTREE\EFORMS REGISTRY\Organizational
Forms Library".
21
21
Therefore Connector
3. If one exists, then it can be used. Otherwise use the following command to create a new form:
New-PublicFolder -Path "\NON_IPM_SUBTREE\EFORMS REGISTRY" -Name
"Organizational Forms Library".
4. Now we need to set the language for the Organizational form. Open the Microsft MAPI Editor Tool
on the PC with Microsoft Outlook (not on the Exchange Server). The tool can be downloaded at
http://go.microsoft.com/?linkid=5684182. Create a MAPI profile if it is necessary. On the Session
menu, click Logon and Display Store Table. On the MDB menu, click Open Public Folder Store, do
NOT select the administration privileges checkbox, then click OK . Expand Public Root, expand
NON_IPM_SUBTREE, and then expand EFORMS REGISTRY. Click the public folder that you created in
step 1. For example, click Organizational Forms Library. Click the PR_URL_NAME property. On the
Property Pane menu, click Modify Extra Properties.
5. Click Add, and then click Select Propert y Tag. Click PR_EFORMS_LOCALE_ID in the list, and then
click OK to close the Propert y Select or dialog and OK again to close the Propert y Tag Edit or.
22
© 2009 Therefore, all rights reserved.
Therefore Connector
6. A red icon is displayed next to the newly created PR_EFORMS_LOCALE_ID property. Double-click
this property.
7. The Propert y Edit or dialog will open. In the Unsigned Decimal box, type the desired locale ID,
and then click OK. (e.g. 1033 for English, 1040 for Italian, for other IDs see: http://msdn2.microsoft.
com/en-us/library/aa579489.aspx ). Click Ok when done and then exit the MAPI Editor.
23
23
Therefore Connector
If the configuration is being done with an administrator account with sufficient rights then
specific permissions for publishing forms to the Organizational Forms Library do not need to
be set. If, however, this is not the case and you need to change the permissions for the
account (Mail Administrator). This can be done using the following command:
Add-PublicFolderAdministrativePermission -Identity <PublicFolderName> User <Mail Administrator> -AccessRights AllExtendedRights -Inheritance
SelfAndChildren
Please refer to http://technet.microsoft.com/en-us/library/bb310789(EXCHG.80).aspx if
further details are needed.
1.3.1.4
Publish forms to Organizational Forms Library
The Therefore connector requires that two forms be published and a view for the Therefore job folder
using the Outlook Client is available. This configuration step can be carried out on any client.
1. In Microsoft Outlook click Tools then Forms and then Design a Form...
24
© 2009 Therefore, all rights reserved.
Therefore Connector
2. In the Design Form dialog Browse... to "C:\Program files\Therefore\Exchange\Outlook Forms". Two
IPM Forms are listed in this folder, "IPM.Note.Archived" and "IPM.Post.TheArchiveJob".The IPM.Not e.
Archived form contains the script needed for opening stub-emails and the IPM.Post .
TheArchiveJob form is used for queuing e-mails before saving to Therefore™ . Select IPM.Not e.
Archived and click Open.
For Scenario 2 only the TheArchiveJob form needs to be published since e-mail stubs are not
used.
25
25
Therefore Connector
3. Click the View Code icon.
26
© 2009 Therefore, all rights reserved.
Therefore Connector
4. The code will open in the Script Editor. Set the correct URL for Const c_WebServiceUrl then close
the window (all changes will be automatically saved).
27
27
Therefore Connector
5. Click Tools then Forms and then Publish Form.
28
© 2009 Therefore, all rights reserved.
Therefore Connector
6. Choose Organizat ional Forms Library from the Look in drop-down. Give the form the name
Archived and click Publish.
29
29
Therefore Connector
7. Next publish the form IPM.Post .TheArchiveJob. This is done in the same way except the script
does not need to be changed. This time, however, give it the name TheArchiveJob.
1.3.1.5
Create a View for the Therefore Job Folder
In the public Therefore Job Folder all messages that are waiting to be stored are listed and can be
viewed in detail. Every task is posted with its status (see table below). A double-click on the list
entry opens the job form. A job that caused an error can be retried by pressing the Retry Job
button.
To get a better overview on the job queue a custom view for the job folder should be created. See
the tables below for details on message status and available fields for the customizing the view.
St at us
Descript ion
WAITING
The message is queued and waiting for archiving.
SUCCESS
The message was archived successfully.
ERROR
The message could not be archived successfully. An error message will be
displayed.
Field
Descript ion
Job Type
Describes the type of job, Archive or Restore.
From Store
Name of the Mailbox owner or Public Folder.
30
© 2009 Therefore, all rights reserved.
Therefore Connector
From Folder
Path to the message item in the Mailbox or Public Folder.
Subject
Subject of the message.
Created on
Date of job creation.
Created by
Name of creating user.
Status
Status of the job.
Error Message
Error message and stack.
1. Select the public Therefore Job Folder. Go to the View menu and select Current View and then
Define Views.
2. The Cust om View Organizer dialog shows. Click New.
31
31
Therefore Connector
3. Name the view ThereforeJobView, select Table as Ty pe of View, check the appropriate radio
button (normally visible to everyone) and then click OK.
32
© 2009 Therefore, all rights reserved.
Therefore Connector
4. The Cust omize View dialog will open, click on Fields...
5. Select the ThereforeArchiveJob in the drop-down list. Remove all standard fields, then add all fields
to be shown in the view to the right side pane. (See screenshot below). Click OK when done. This
will take you back to the Cust omize View dialog where various other settings can be altered (see
Outlook documentation).
33
33
Therefore Connector
6. The new view will now appear in the list. Click Apply View to save it.
34
© 2009 Therefore, all rights reserved.
Therefore Connector
7. When you now open the Therefore Jobs Folder this view will be used.
1.3.2
Therefore Web Service
On the Microsoft IIS the TheExchWebSrv service component must be configured to run in the
appropriate application pool and to have proper access rights in the Web Inbox during document
retrieval.
1. In Comput er Management open the Web Sit es folder of the Int ernet Informat ion Services, and
the right-click on TheExchWebSrv. Select Propert ies in the context menu and then click on the
Virt ual Direct ory tab. In the Applicat ion pool combo box select Therefore Exchange
WebService. Then click OK.
35
35
Therefore Connector
Make sure that the application pool for the Therefore Exchange WebService is not executed
under the user: Net workSy st em. It must be executed with user LocalSy st em in order to
have access rights to the local web-inbox folder for retrieving Therefore™ documents.
2. Next, to ensure that every user performing a full-text search only gets access to his own archived
e-mails, it is necessesary to change the access rights for the TheExchFTSearch.aspx file is so that
the Therefore Web Service for Exchange is able to impersonate the Domain User Account to
perform a full-text search in Therefore™ . In the right-pane right-click on TheExchFTSearch.aspx
and select Propert ies from the context menu. Select the File Securit y tab and click Edit in the
Aut hent icat ion and Access frame. Make sure that Enable anony mous access is NOT checked,
and then click OK.
36
© 2009 Therefore, all rights reserved.
Therefore Connector
3. Finally to enable debugging of the TheExchWebSrv, you need to define the following registry keys
at HKEY_LOCAL_MACHINE\Software\Therefore\Exchange.
37
37
Therefore Connector
It em
Descript ion
LogFileName
Path for LOG file. The UserID whose credentials are used for the Application Pool,
needs to have full access to this path. Otherwise no Log File will be created.
LogLevel
OFF
Logging for archive and restore tasks is disabled.
ERROR
All archive and restore task errors are written to the log file.
INFO
Detailed archive and restore information for each folder action is
written to the log file.
DEBUG
Detailed archive and restore information for all actions is written to
the log file.
1.3.3
Therefore Connector
All server side settings for the Therefore connector are set in the Therefore Mail Administrator
application. After installation you can find this application in the Therefore program menu.
38
© 2009 Therefore, all rights reserved.
Therefore Connector
1.3.3.1
Configure the General Settings
The general settings consist of an Therefore tab where logon and repository settings can be done;
and then three process tabs. Each process has a Windows service, and can be run in a simulation
mode for testing the settings without any archiving activity.
1. Set the Exchange and Therefore settings as explained in the following table.
39
39
Therefore Connector
Set t ing
Descript ion
Logon Account
Select the user name (Therefore Mail) the logon account by clicking on the
browse button.
Logon Server
Enter the name of the Therefore Server.
Viewing in OWA
2003
If viewing of archived emails is to be done with Outlook Access 2003 AND
Microsoft Exchange 2003 is used, then check the Viewing in OWA 2003. If you are
using Microsoft Exchange 2007 DO NOT check this option.
Use Therefore
Category
From the drop-down box select the Therefore category to be used for archiving
e-mails.
Configuration ID
If multiple instances of Therefore Connector are installed on several servers, the
Configuration ID must be unique for every instance. Otherwise use a value of 1.
2. Configure the Queuing service as explained in the following table.
40
© 2009 Therefore, all rights reserved.
Therefore Connector
Set t ing
Descript ion
Polling Interval
(min):
Set the interval for the process to be run. A recommended operational setting
here is 30 minutes, for simulation purposes choose 1 minute.
Suspend
Execution
between
If it is required that the process not be run at certain times during the day, then
this can be defined by selecting a start and end time for the process to be
suspended.
Ignore Restriction By selecting Ignore Rest rict ion on Week End, the suspended period will only be
on Week End
valid on weekdays.
Simulation Mode
For testing the system set simulation mode to Yes. When the system becomes
operational change this to No.
3. Configure the Storing service as explained in the following table.
41
41
Therefore Connector
Set t ing
Descript ion
Polling Interval (min):
Set the interval for the process to be run. A recommended
operational setting here is 30 minutes, for simulation purposes
choose 1 minute.
Suspend Execution between
If it is required that the process not be run at certain times during
the day, then this can be defined by selecting a start and end time
for the process to be suspended.
Ignore Restriction on Week End By selecting Ignore Rest rict ion on Week End, the suspended
period will only be valid on weekdays.
Delete Successful Jobs
Therefore Jobs that have been successfully archived can be deleted
from the public Therefore Job Folder by checking Yes for Delet e
Successful Jobs (while testing it can be set to No so that individual
jobs can be investigated).
Retry Error Jobs
Check Yes for Ret ry Error Jobs. This will automatically re-try any
problem jobs the next time the job folder is polled.
Use Single Instance Storage
By checking Use Single Inst ance St orage, all archived e-mails will
be identified by a hash code (see info box below). Duplicates will be
filtered out, so as not to be stored in Therefore™ multiple times.
42
© 2009 Therefore, all rights reserved.
Therefore Connector
Shrink Index Data to Therefore By checking Shrink Index Dat a t o Therefore Field Lengt h, any
Field Length
information that exceeds the Therefore™ index data field length is
removed. The archived ".MSG" file still contains all information, only
the Therefore™ index data is truncated.
Text to display instead of e-mail it is possible to edit the standard text that will appear in the body of
body...
a stub email
The hash code is generated using the following mail properties:
1. Mail subject (PR_SUBJECT)
2. Mail sender (PR_SENT_REPRESENTING_NAME)
3. Mail sending time (PR_CLIENT_SUBMIT_TIME)
4. Mail body (PR_BODY)
5. Recipients in the mail (each PR_RECIPIENT_TYPE and PR_EMAIL_ADDRESS)
6. Attachments in the msg file (binary's, PR_ATTACH_FILENAME, PR_ATTACH_LONG_FILENAME)
4. Configure the Storing service as explained in the following table.
Set t ing
Polling Interval
(min):
Descript ion
Set the interval for the process to be run. A recommended operational setting
here is 30 minutes, for simulation purposes choose 1 minute.
43
43
Therefore Connector
Suspend
Execution
between
If it is required that the process not be run at certain times during the day, then
this can be defined by selecting a start and end time for the process to be
suspended.
Ignore Restriction By selecting Ignore Rest rict ion on Week End, the suspended period will only be
on Week End
valid on weekdays.
Re-stub Restored The number of days that a retrieved e-mail stays in the user's Outlook folder
Items after:
before being re-stubbed (=removed) again, can be set. If set to 0, the e-mail will
not be automatically stored to Therefore™ and stubed again.
1.3.3.2
Create Profiles
Profiles define which e-mails should be stored to Therefore™ . Filters can be defined to prevent certain
emails (e.g. SPAM) from being stored. Profiles can be added, edited and removed.
1. Click Add New to create a new profile.
2. The Profile Edit dialog will open. Configure this as explained in the following table.
44
© 2009 Therefore, all rights reserved.
Therefore Connector
Set t ing
Descript ion
Profile Name
Enter a name for the profile.
Message Age
The minimum age of e-mails to be stored.
Condition
Message age and message size can be linked with either an AND or OR condition.
Message Size
The minimum size of e-mails to be stored
Skip Unread
To stop unread messages from being stored, check Skip Unread.
Message Store
Size
The minimum size of the whole message store before queuing will begin.
3. E-mails can be excluded based on the content of the subject line. Click Add New and then enter a
string for typical SPAM emails or other e-mail that should not be saved.
45
45
Therefore Connector
If Immediat ely delet e t hese it ems is selected, the e-mail is not archived, but immediately
deleted. This setting is only recommended for Scenario 2 , where this will clear the copies of emails.
4. Whole folders can be excluded from archiving. Click Add New and then enter a string for a folder
that should not be saved. (All sub folders will also be excluded).
46
© 2009 Therefore, all rights reserved.
Therefore Connector
5. Message classes in Outlook are used to differentiate different types of messages and display them
differently in Outlook. Message classes usually have different properties. The default Message Class
is IPM.NOTE which contains all e-mail messages. Typical other message classes are IPM.SCHEDULE
(Calendar Appointments) or REPORT.IPM.NOTE.IPNRN (Return Receipts). The message class can be
found in the Exchange Property PR_MESSAGE_CLASS. It is possible to define which message classes
SHOULD be archived. Click Add New.
47
47
Therefore Connector
6. the Add Message Class dialog box will open. Enter the name of the message class. You can use
the wildcard .* to include all subclasses. Under Processing Ty pe: if Archive is selected, all e-mail
messages of this message class will be archived. If Delete is selected all E-Mail Messages of this
message class will be deleted only. Note: Use this setting with care as incorrect usage could lead to
loss of important information.
7. It is also possible to define what should happen to the original email after archiving to
Therefore. See the following table for details.
48
© 2009 Therefore, all rights reserved.
Therefore Connector
Aft er Archiving
Create Stub
Requirement s
A stub is left in the Exchange Information Store after the e-mail is archived to
Therefore. The e-mail appears in Microsoft Outlook client, but the body of the email is replaced by the text set in the Storing Service. To retrieve the body the
user clicks on a link. This is the correct setting for Scenario 3.
Leave Unchanged The e-mail is left unchanged in the Exchange Information Store after it is archived
to Therefore. The archiving process generates a copy of the mail in the Therefore
repository. There is no change for in Microsoft Outlook Client. This is the correct
setting for Scenario 3.
Delete
The e-mail is deleted after the archiving process. The e-mail does not appear in
Microsoft Outlook any more. To retrieve the e-mail it has to be restored from the
Therefore repository to the Exchange Information Store.
Is Exchange 2007 The Exchange 2007 Journaling differs from the Exchange 2003 Journaling. This
Journal
setting tells Therefore™ that it should treat this profile as Exchane 2007
Journaling Profile.
The Is Exchange 2007 Journal setting must only be used in Scenario 2, and for Exchange 2007.
1.3.3.3
Users/Groups
In this section the execution of profiles are linked to the existing user/groups or public folders. The
dialog is divided into Users/Groups and public folders. Each public folder to be archived has to be
linked to one profile.
49
49
Therefore Connector
Users are always shown before Groups. The Group can be moved up and down in the list, which is
very important if a user is member of several groups. If a user is member of several groups, the first
found setting is the one used for this user. User settings also take preference over group settings.
Example:
User1 is member of Group1 and Group2. Group1 uses Profile "Immediately" and Group2 uses Profile
"After 60 Days". If Group2 is listed before Group1, the Profile "After 60 Days" will be used for User1.
Adding a New User or Group
1. To add a new user or group click Add New.
2. This opens the Select Users or Groups dialog from which users or groups can be selected.
Select the user or groups whose e-mails should be stored to Therefore™. Click OK when done.
For Scenario 2, only the Mailbox User (e.g. Therefore Mail) needs to be selected.
50
© 2009 Therefore, all rights reserved.
Therefore Connector
3. The Profile Chooser dialog box will open. Select the matching profile in the drop down list and
click OK.
4. The new user or group will now appear in the list.
Adding a Public Folder
1. To add a new Public Folder, click the Public Folder tab and then Add New.
51
51
Therefore Connector
2. In the dialog select the Therefore Job Folder and the click Select.
3. The Profile Chooser dialog box opens. Select a profile in the drop down list and click OK.
52
© 2009 Therefore, all rights reserved.
Therefore Connector
1.3.3.4
Logging Settings
Here the log settings for the Task, Queuing, and Simulate logs can be set. A name and patch for
each log file can be set as well as the logging level (see the table below).
Log
Level
OFF
Task
Logging for archive and restore
tasks is disabled.
Queuing
Simulat e
Logging is disabled.
Not applicable.
ERROR All archive and restore task errors
are written to the log file.
All queuing errors are
written to the log file.
Not applicable.
INFO
Detailed queuing
A statistical summary of the
information for each
simulated actions are logged.
folder action is logged in
the log file.
Detailed archive and restore
information for each folder action
is written to the log file.
DEBUG Detailed archive and restore
Detailed queuing
information for all actions is written information for all
to the log file.
actions is logged in the
log file.
A detailed log for each mailbox
and folder is generated.
53
53
Therefore Connector
TRACE Most detailed archive and restore
information level for all action
details is written to the log file.
1.3.3.5
Most detailed queuing
A detailed log for each e-mail is
information level for all generated.
action details is logged.
Web Service
For the retrieval of e-mails already archived to Therefore, one user must be defined. This can be the
Mail Box user (Therefore Mail) defined earlier. This user handles the internal traffic by retrieving the email and passes the retrieved message file to the Outlook client. This user does not need to be linked
to Microsoft Exchange, but has to have at least retrieve rights for the e-mail category in Therefore.
Enter the Username and Password for the relevant user. After the user and the user's password is
typed in the dialog, the information can be saved to the local windows registry on the Internet
Information Server, or it can be exported to a *.reg file for manual import to the Windows registry. The
username and password information is validated during the save operations. An error message is
displayed if the credentials are not correct.
1.3.4
Configure Windows Services
After installation and configuration, make sure that the installed Windows Services are defined to
use the Windows Domain Account (Therefore Mail) that was given access to all mailboxes here.
54
© 2009 Therefore, all rights reserved.
Add-in for Microsoft Outlook
2. Add-in for Microsoft Outlook
Microsoft Out look Add-In
The Outlook add-in is an optional component, installed on client PCs, which provides a toolbar with
three features in Outlook.
Archive
A user can manually add an e-mail to the configured storage queue (in the Therefore Job Folder).
The St oring services checks for queued emails, saves them to Therefore™ and leaves a stub in
Exchange.
Ret rieve
A user can fully fully restore an e-mail from Therefore™ to Exchange Server. The Rest oring
service checks for queued e-mails and restores them to Exchange from Therefore™ . The length of
time the e-mail will remain restored can be configured.
Search
A user can perform full-text searching against all e-mails in Therefore™ for which they have read
access. This begins a Search process which searches the Therefore™ system via the Web Service
on the Therefore™ Server. The user is then provided with a hit-list of matching e-mails. Selecting
an e-mail begins a View process which gets the e-mail from Therefore™ and opens it for viewing.
(Note: the email is not fully restored and the contents will be lost when it is closed). In addition,
when the user retrieves a saved e-mail, this add-in displays a pop-up informing them that the e-mail
is being fetched from Therefore™ .
2.1
Installation & Configuration
Before installing the Outlook add-in please read this document carefully. The client PC where the
Outlook add-in will be installed must have either Microsoft Outlook 2003 or 2007.
1. Installation of the Outlook add-in is started from the distribution CD. This is done by launching the
"Setup.exe" program in the "Therefore Connector for Microsoft Exchange/Outlook Add-in" directory.
2. The license dialog will appear. Click Next once you have accepted the license terms.
55
55
Add-in for Microsoft Outlook
3. The Installation Options dialog opens. Click Next when finished.
4. The Ready to Install the Program dialog will open. Click Inst all.
These settings can also be defined using command line, as this setup is provided as
distributable MSI package. In this case the setup can be performed automatically.
Propert y
Descript ion
SERVICEADDRESS
URL to the Therefore Exchange Web Service (f.ex. http://<server>/
ThereforeExchWebSrv)
USEOUTLOOKADDI If set to "ADDIN" the Outlook Add-In is used for viewing of archived E-Mail,
N
if set to "NONE" the Outlook Form is used for retrieval.
INSTALLDIR
56
Sets the installation directory (e.g. c:\program files\Therefore)
© 2009 Therefore, all rights reserved.
Add-in for Microsoft Outlook
CONFIGID
The ConfigID that should be used when a user creates an ad-hoc archive
or retrieve job. See here for more details about the ConfigID.
HIDEARBUTTONS
0 = view Archive and Retrieve Buttons; 1 = hide Archive and Retrieve
Buttons
These settings can also be change in Microsoft Outlook. Select the Tools menu in Microsoft
Outlook, and go to the Opt ions dialog. Select the Therefore Exchange Connect or t ab. Restart Outlook to activate the new settings.
2.2
Using the Outlook Add-In
Once the add-in is installed three additional buttons are displayed in the tool bar of Microsoft Outlook
similar to that shown in the screenshot.
Archive
Select one or more e-mail's you want to archive. Press the Archive button. A message window is
displayed requiring confirmation that the selected messages have been queued for archiving. The
message, or messages, will be archived later by the archive task. The successful storage of the
message can be recognized if the icon of the message has changed and the message text 'This
message has been archived to Therefore' is displayed.
Rest ore
Select one or more archived e-mail's you want to restore. Press the Ret rieve button. A message
window is displayed requiring confirmation that the selected messages have been queued for
restoring. The message, or messages, will be restored later by the restore task. The successful restore
of the message can be recognized if the icon of the message has been changed again.
57
57
Add-in for Microsoft Outlook
Search
Press the Search Button in the icon bar of Microsoft Outlook. In the displayed Dialog, enter your FullText search and press Search. If any matching document are displayed in the Hitlist below, you can
view the E-Mail by double-clicking the entry in the Hitlist.
58
© 2009 Therefore, all rights reserved.
Add-in for Microsoft Outlook Web Access
3. Add-in for Microsoft Outlook Web Access
The OWA add-in is an optional component installed on the server where Exchange OWA is intstalled. It
is a plug-in into OWA that allows the user to access stored email directly from OWA. This plug-in is only
required for a Scenario 3 situation where e-mails are deleted from Exchange and only a stub-link to the
e-mail in Therefore™ is left. When a user opens an e-mail stub a request is sent to the OWA Add-in
which contacts the Exchange Server to get the document ID and then gets the e-mail from Therefore™
via the Web Service on the Therefore™ Server. The user can then view the contents of the email in
Microsoft OWA, but the e-mail is not restored to the exchange server and the contents will be lost
once the e-mail is closed.
This setup is NOT required for Scenario 2 since e-mails are not deleted from the Exchange Server
and are hence available as before.
3.1
Installation
Before installing the Outlook OWA add-in please read this document carefully. The add-in must be
installed on the same server as Outlook Web Access components. In 2003 typically the Exchange
Server itself, but in 2007 could also be an OWA Web Server.
For OWA int egrat ion wit h Exchange 2007, Exchange 2007 SP1 or lat er is required.
1. Installation of the Outlook add-in is started from the distribution CD. This is done by launching
the "Setup.exe" program in the "Therefore Connector for Microsoft Exchange/OWA Add-in"
directory.
1. The license dialog will appear. Click Next once you have accepted the license terms.
59
59
Add-in for Microsoft Outlook Web Access
2. Click Next when finished.
3. The Ready to Install the Program dialog will open. Click Install.
3.2
3.2.1
Configuration
Outlook Web Access 2003
1. Start the set-up file "OWASetupWiz.exe" which is stored in the "Therefore Connector for Microsoft
Exchange/OWA Add-in" directory.
2. Select Exchange Server 2003 (Inst all/Repair) and click Next .
60
© 2009 Therefore, all rights reserved.
Add-in for Microsoft Outlook Web Access
3. Enter the Therefore Web Service URL. For retrieving e-mails stubs from Therefore™ the OWA add-in
needs to access the Exchange server to retrieve the document no. The method of connecting to
Exchange must hence be specified (see the following table for details). When done click Next .
Connect ion
Use Integrated Security
Descript ion
The system attempts to determine the user credentials of the Exchange user
using Microsoft OWA. These credentials are then used by the OWA add-in to
retrieve the document no. from Exchange. Should this automatic recognition fail,
the user will need to enter their login credentials again.
For this connection to work, it is necessary to change the access rights for the
TheExchMsg2k3.aspx file, so that the connecting user account can be
impersonated. This is done using via the IIS Service Manager in Computer
Management.
61
61
Add-in for Microsoft Outlook Web Access
1. In the Web Sit es folder open the Default Web Sit e sub-folder and select
TheExchOWA.
2. In the right-pane right-click on TheExchMsg2k3.aspx and select Propert ies
from the context menu.
3. Click the File Securit y tab. Then click Edit in the Aut hent icat ion and Access
frame. Make sure that Enable anony mous access is NOT checked, and then
click OK.
Connect with fixed
credentials
This is the recommended setting and uses a fixed user with access to all mail
boxes (Therefore Mail) to access the document no. This is achieved by
impersonating all Exchange user accounts.
4. The final step is to define the Exchange server name and the URL to the Therefore OWA Add-in.
Furthermore the user to connect to the Exchange Server web store and save this configuration. It
is recommended to use the Therefore Mail user for this.
62
© 2009 Therefore, all rights reserved.
Add-in for Microsoft Outlook Web Access
3.2.2
Outlook Web Access 2007
1. Start the set-up file OWASetupWiz.exe which is stored the in folder "Therefore Connector for
Microsoft Exchange/OWA Add-in" directory.
2. Select Exchange Server 2007 and click Next .
3. Enter the Therefore Web Service URL. For retrieving e-mails stubs from Therefore™ the OWA add-in
needs to access the Exchange server to retrieve the document no. The method of connecting to
Exchange must hence be specified (see the following table for details). When done click Finish to
complete the installation.
63
63
Add-in for Microsoft Outlook Web Access
Connect ion
Use Integrated Security
Descript ion
The system attempts to determine the user credentials of the Exchange user
using Microsoft OWA. These credentials are then used by the OWA add-in to
retrieve the document no. from Exchange. Should this automatic recognition fail,
the user will need to enter their login credentials again.
For this connection to work, it is necessary to change the access rights for the
TheExchMsg2k3.aspx file, so that the connecting user account can be
impersonated. This is done using via the IIS Service Manager in Computer
Management.
1. In the Web Sit es folder open the Default Web Sit e sub-folder and select
TheExchOWA.
2. In the right-pane right-click on TheExchMsg2k3.aspx and select Propert ies
from the context menu.
3. Click the File Securit y tab. Then click Edit in the Aut hent icat ion and Access
frame. Make sure that Enable anony mous access is NOT checked, and then
click OK.
64
© 2009 Therefore, all rights reserved.
Add-in for Microsoft Outlook Web Access
Connect with fixed
credentials
This is the recommended setting and uses a fixed user with access to all mail
boxes (Therefore Mail) to access the document no. This is achieved by
impersonating all Exchange user accounts and requires that two commands are
executed on the Exchange server shell. See http://msdn.microsoft.com/en-us/
library/bb204095.aspx for more details.
Configure Exchange Impersonat ion on a server for a user
Get-ExchangeServer | where {$_.IsClientAccessServer -eq $TRUE}
| ForEach-Object {Add-ADPermission -Identity $_.
distinguishedname -User (Get-User -Identity <Therefore Mail> |
select-object).identity -extendedRight ms-Exch-EPIImpersonation},
Configure Exchange Impersonat ion for a user on a dat abase
Get-MailboxDatabase | ForEach-Object {Add-ADPermission Identity $_.DistinguishedName -User <Therefore Mail> ExtendedRights ms-Exch-EPI-May-Impersonate}
4. After installation you will find the file "registry.xml" in the folder "Inetpub/wwwRoot/TheExchOWA/
Setup". This file registers the add-in for OWA on the Exchange Server for the custom Therefore
Message Class IPM.NOTE.ARCHIVED. Open "registry.xml" in a text editor and edit the URL to
"TheExchMsg2k7.aspx" to match your system.
65
65
Add-in for Microsoft Outlook Web Access
5. Copy this file to "c:\program files\microsoft\exchange server\client
access\owa\forms\customization". This folder should already contain the files registry.xml.template
and UIExtensions.xml.template. Restart the IIS. Now every request to an archived e-mail with
Message Class IPM.NOTE.ARCHIVED should be redirected.
If the customization folder is missing, make sure Exchange 2007 (SP 1) is installed.
3.2.3
Therefore OWA Web Service
On the Microsoft IIS the TheExchOWA service component must be configured to run in the
appropriate application pool and to have proper access rights in the Web Inbox during document
retrieval.
1. In the WEB SITES folder of the IIS Service Manager open the DEFAULT WEB SITE sub-folder.
Select Web Service TheExchOWA and open the context menu with a right mouse click.
Select Properties in the context menu. Click on the Virtual Directory tab. In the Application
settings frame select the appropriate Application pool:
Exchange 2003: ExchangeApplicationPool
Exchange 2007: MSExchangeOWAAppPool (Any pool, including custom pools, can be
used).
Click OK when done.
66
© 2009 Therefore, all rights reserved.
Add-in for Microsoft Outlook Web Access
2. To enable debugging of the TheExchOWA, you need to define the following registry keys at
HKEY_LOCAL_MACHINE\Software\Therefore\Exchange\OWA. The settings are as for the
TheExchWebSrv.
67
67
Upgrading from Previous Versions
4. Upgrading from Previous Versions
Version later than 6.5.x are, by default, installed in a different folder: "c:\Program
Files\Therefore\Exchange Connector". In addition the Retrieval Web Service is installed in a different
Web Directory which is now "c:\Inetpub\wwwRoot\TheExchWebSrv".
1. Copy the Files "Config.xml" and "log4cplus.properties" from the old installation directory to the new
one.
2. Check the accounts used for the Windows Services and the Web Service.
3. Install the new version.
4. Open the Therefore Mail Administrator
5. Check if current configuration was upgraded correctly. Especially check the Message Class
definitions in the profiles.
6. If you want to enable OWA Viewing on Exchange 2003, make sure you check the checkbox Viewing
in OWA 2003 in General Settings.
7. Re-save the password for the Web Service to the registry.
8. Click Save & exit to save the configuration file.
9. Make sure that you have published the latest Outlook Forms (details see here).
10.If you want to enable OWA Viewing on Exchange 2003, you need to start the TheExchCrawler.exe
once from the command line. This sets the necessary properties in all previously archived and
stubbed e-mails, in order to enable viewing through Therefore Add-In for OWA.
Log on with the Domain Account the services are configures to run with (Therefore Mail). This
account has to have access to all Mailboxes.
Instead of logging on with this user account you can use the: "run as" shell command in the
command line window. Open the command line and go to the installation directory of the
Therefore Connector. Execute: TheExchCrawler.exe /console /OWA2003. This command can
be executed again at any time without problems.
Wait until the process is finished. Depending on the number of archived e-mails, this migration can
take up to several hours.
For Scenario 2 only points 1 to 5 are required.
68
© 2009 Therefore, all rights reserved.