1
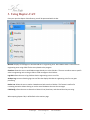
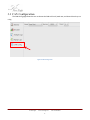
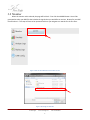
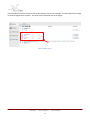
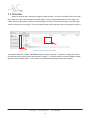
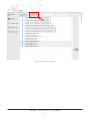
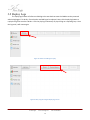
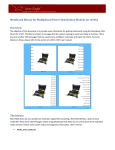
CON TR OL S Y ST E M S O LU TI ON S
Raptor-CAN
User Manual
Last Updated: 3/31/2015
© New Eagle
www.neweagle.net
PH: 734.929.4557
Contents
1.
Introduction ........................................................................................................................................................3
2.
Installation ..........................................................................................................................................................4
3.
2.1
Dongle license.............................................................................................................................................6
2.2
Node-locked license ...................................................................................................................................6
Using Raptor-CAN ...............................................................................................................................................7
3.1
CAN Configuration ......................................................................................................................................8
3.2
Monitor.......................................................................................................................................................9
3.3
Simulate ................................................................................................................................................... 11
3.4
Analyze Logs ............................................................................................................................................ 13
3.5
Replay Logs .............................................................................................................................................. 18
© New Eagle
www.neweagle.net
2
PH: 734.929.4557
1. Introduction
Trying to monitor raw CAN bus data or debug CAN bus problems without the proper software tools can be can
be time consuming, tedious, and labor intensive. Yet many of the software products currently available on the
market are either expensive, overly complex, or difficult to use.
New Eagle’s Raptor-CAN software breaks from the status quo by offering a simple, low cost, and easy to use
solution for practically any CAN bus monitoring & debugging needs.
Raptor-CAN can monitor, log, or send data to the CAN bus. Raptor-CAN decodes raw CAN bus data using DBC
files so end-users only see signals in engineering units within the Raptor-CAN software. Raptor-CAN is even
capable of transmitting pre-recorded CAN data back on to the bus. This powerful feature is especially useful for
recreating scenarios without having to use the actual hardware that originally sent the messages.
Raptor-CAN is part of the Raptor family of hardware and software products designed to guide businesses from
concept to production. Learn more at www.neweagle.net
© New Eagle
www.neweagle.net
3
PH: 734.929.4557
2. Installation
Raptor-CAL can be downloaded from http://software.neweagle.net (note that “www” is not used in the web
address). A user account will need to be created to login in to the site.
Once logged into the site, click on the “Downloads” button at the top of the page and then choose “Raptor-CAN”
from Project drop down menu in the right hand corner of the page.
Figure 1: Software.neweagle.net
© New Eagle
www.neweagle.net
4
PH: 734.929.4557
From here you will be able to see the latest version of Raptor-CAN available for download. Click on the link to
download the installation file.
Figure 2: Downloads for the Raptor-CAN
© New Eagle
www.neweagle.net
5
PH: 734.929.4557
Once the installation file has finished downloading, open the file and follow the on-screen guide to complete the
installation process. In addition to Raptor-CAN, the New Eagle License Viewer program will also be installed.
2.1 Dongle license
1. Plug the dongle into a USB port on your computer.
2. Wait until Windows completes installation of the USB dongle (Monitor the notifications in the bottom
right-hand corner of screen).
3. Open the New Eagle License Viewer.
4. Click on the “Update License Online” button in the bottom right hand corner of the screen (If a license
does not appear after several attempts, e-mail [email protected]).
5. Once the license appears in the license viewer, open Raptor-CAN. If Raptor-CAN was already open, close
and re-open it.
2.2 Node-locked license
1. Open the New Eagle License Viewer.
2. Click on the “New License” button in the bottom left hand corner of the screen.
3. Enter your name, e-mail, and company and then click “Submit”. New Eagle will notify you via e-mail
once your license has been issued. If you do not receive a notification e-mail within one business day of
your request, please e-mail [email protected].
4. After receiving notification that your license has been issued, re-open New Eagle License Viewer.
5. Click on the “Update License Online” button in the bottom right hand corner of the screen.
6. Once the license appears in the license viewer, open Raptor-CAN. If Raptor-CAN was already open, close
and re-open it.
© New Eagle
www.neweagle.net
6
PH: 734.929.4557
3. Using Raptor-CAN
Once you open the Raptor-CAN software, you will be presented with six tabs.
Monitor: displays all messages on selected CAN bus in engineering units. Raw CAN bus data is converted into
engineering units using a DBC file the user uploads to the program.
Simulate: allows the user to send CAN messages directly on to the CAN bus. The user can either enter a specific
value in engineering units or drag a slider to send messages to the CAN bus.
Log CAN: allows the user to log CAN bus data in engineering units to a csv file.
Analyze Log: converts CAN King logs into csv files that display CAN data in engineering units for easy post
processing.
Replay Log: allows the user to replay a logged event back onto the CAN bus. This feature is perfect for
recreating scenarios without having to use the actual hardware that sent the messages
CAN Config: allows the user to choose the CAN to PC tool, baud rate, and channel that they are using.
When opening Raptor-CAN, it will default to the monitor page.
© New Eagle
www.neweagle.net
7
PH: 734.929.4557
3.1 CAN Configuration
The CAN Config page allows the user to choose the CAN to PC tool, baud rate, and channel that they are
using.
Figure 3: CAN Config screen
© New Eagle
www.neweagle.net
8
PH: 734.929.4557
3.2 Monitor
When the monitor tab is selected, the page will be blank. First click the add DBC button. You will be
prompted to select your DBC file that includes the signals that you would like to monitor. Browse for your DBC
file and select it. This step will have to be repeated each time you navigate to a new tab for the first time.
Figure 4: How to add a DBC file for the monitor screen
Figure 5: Browsing for a DBC file
© New Eagle
www.neweagle.net
9
PH: 734.929.4557
Once the DBC file has been selected, click the plus buttons next to each message. This will expand the message
to show the signals that it contains. The values will be displayed next to the signals.
Figure 6: Monitor Screen
© New Eagle
www.neweagle.net
10
PH: 734.929.4557
3.3 Simulate
When the simulate tab is selected, the page will again be blank. First select your DBC file as you did with
the monitor tab. When the messages on the DBC appear, they can be expanded so that all of the signals are
visible. When the play button to the left of the messages is clicked, the software will begin to send messages
with the values shown to the right. The user can adjust these values using the sliders or by typing the values in.
Figure 7: Controls in the Simulate screen
A simulation display for a Raptor VeeCAN 800 display is shown in Figure 8. The display is reading values from
the CAN buys during the simulation demonstration in Figure 7. This demonstrates an external module reading
signals from the simulate feature. This is useful for troubleshooting during software on the display.
© New Eagle
www.neweagle.net
11
PH: 734.929.4557
Figure 8: VeeCAN 800 Demo Display reading CAN signals
© New Eagle
www.neweagle.net
12
PH: 734.929.4557
3.4 Analyze Logs
The analyze logs function allows the user to convert raw CAN logs into a .csv with engineering units. To
start, first add a DBC file. All of the signals on the DBC will appear in the box on the left side. Select the signals
that are to be converted and press the green arrow pointing to the right box. To remove signals, select a signal
in the right box and click on the red circle. Next, select a log file. Currently, the log function works with CAN
King log files recorded in Hexadecimal units. Once the signals are selected and the log has been selected, press
the convert to CSV button. A browser window will appear. Select the location and name for the file.
Figure 9: Adding signals to the .csv in the Analyze Logs screen
© New Eagle
www.neweagle.net
13
PH: 734.929.4557
Figure 10: Selecting a log to analyze
© New Eagle
www.neweagle.net
14
PH: 734.929.4557
Figure 11: Browsing for a log file
Figure 12: Convert the log to CSV
© New Eagle
www.neweagle.net
15
PH: 734.929.4557
Figure 13 shows an example of a raw CAN log from CAN King software. Figure 14 shows the log after it has been
converted into engineering units and a .csv file. Now the CAN data can be easily post processed using excel or
other spreadsheet software.
Figure 13: An example of a CAN King Hex Log raw
Figure 14: Post-processed log from Raptor-CAN in engineering units
© New Eagle
www.neweagle.net
16
PH: 734.929.4557
© New Eagle
www.neweagle.net
17
PH: 734.929.4557
3.5 Replay Logs
The replay logs feature will allow raw CAN logs to be sent back out onto the CAN bus as they occurred
when being logged. To do this, first select the raw CAN log to be replayed. Next, click the play log button to
replay the log once onto the CAN bus. Click the play log continuously to play the log on a repeating loop. Once
the log ends, it will restart again.
Figure 15: Select raw CAN log for replay
Figure 16: Play a log file using the Replay Logs screen
© New Eagle
www.neweagle.net
18
PH: 734.929.4557
Figure 17: CAN log being replayed
© New Eagle
www.neweagle.net
19
PH: 734.929.4557