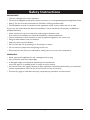
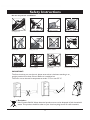
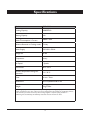
1
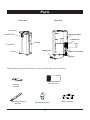
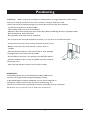
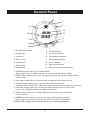
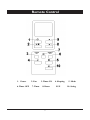
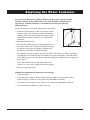
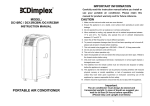
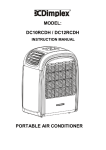
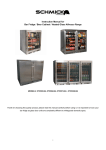
JHS8 TRADING COMPANY
Owner¶s Manual
Portable Air Conditioner
Model No: JHS-A004
It is important that you read these instructions before using your new purchase and
we strongly recommend that you keep them in a safe place for future reference.
Table of Contents
Safety Instructions …………………………………………………………… 1-2
Specifications ……………………………………………………………………3
Parts ……………………………………………………………………………4
Positioning ………………………………………………………………………5
Control Panel ……………………………………………………………………6
Remote Control …………………………………………………………………7
Operation ………………………………………………………………………8
Emptying the Water Container …………………………………………………9
Cleaning ……………………………………………………………………… 10
Troubleshooting ……………………………………………………………… 11
Safety Instructions
IMPORTANT!
Ć The unit is designed for indoor operation.
Ć The unit is not designed to cool server rooms, sun rooms, or a room generating constant high levels of heat.
Ć Rating: This unit must be connected to a 2 2 0 -2 4 0 V ~ /50Hz grounded outlet.
Ć The installation must be in accordance with regulations of the country where the unit is used.
If you are in any doubt about the electrical installation, have it checked and if necessary modified by a
qualified electrician.
Ć Never connect the unit to an electrical outlet using an extension cord.
If an outlet is not available, one should be installed by a licensed electrician.
Ć The air conditioner is safe. However, as with any electrical appliance, use it with care.
Ć Dong let little children touch the machine.
Ć Keep out of the reach of children.
Ć Do not clean the unit by spraying it or immersing it in water.
Ć Do not insert any object into the openings of the unit.
Ć Disconnect the unit from the outlet before cleaning the unit or any of its components.
WARNING!
Ć Never operate this appliance if it has a damaged cord or plug.
Ć Do not lead the cord over sharp edges.
Ć A damaged supply cord should be replaced by the manufacturer,
its service agent or a qualified person in order to avoid a hazard.
Ć Any service other than regular cleaning or filter replacement should be performed by an authorized
service representative. Failure to do so could result in a loss of warranty.
Ć See warranty page to read about warranty requirements, procedure, and instructions.
1
Safety Instructions
Do not use your air conditioner:
If the power cable wires
are frayed or cut
When small children may
be left unattended
On a slope or uneven
surface
Close to a heat source
This products is not made
for DIY repair
If there is a risk of liquid
falling on the unit
Inside unit exposed to the
weather outdoors
In a permanent very humid
environment
Do Not Connect the unit
to extension cord.
Where the power cable
may be damaged
Where it may be damaged
by chemicals
Where there is a risk of
interference by foreign objects
IMPORTANT:
The first time that you use the unit, please ensure that it has been standing in an
upright position for at least 2 hours before it is switched on.
The unit is not to be used in temperatures under 5ĈºC or over 35ĈºC.
Reminder:
Unit Contains R410A. Waste electrical products must not be disposed of with household
waste. This product should be taken to your local recycling center for safe treatment.
2
Specifications
Model
JHS-A004
Cooling Capacity
14000BTU/h
Heating Capacity
N/A
Cooling
Power Consumption / Current
1480W / 6.5A
Moisture Removal in Cooling mode 37L/day
Power Supply
2 2 0 -2 4 0 V ~ / 5 0 H z
Refrigerant
R410A
Compressor
Rotar y
Fan Speed
3 Speeds
Thermostat
18 ºC - 32 ºC
Ambient Temperature Range for
Operation
5 ºC - 35 ºC
Timer
24 hour Timer
Dimensions
(W*H*D)500x415x815 mm
Weight
35kg/77.2lbs
The cooling capacity of the unit may be affected by the height of your ceiling, quality of your insulation, or
number of windows in your room. There is no current testing statute for portable air conditioning products
in the Indonesia, yet we have made every effort to design engineer a superior quality portable air
conditioning unit that effectively and efficiently cools select areas of the home or office.
3
Parts
Back Side
Front Side
Air-outlet
Filter frame upper
Control Panel
Exhaust hose
Fan blade
Castor
Handle
Supply cord
Power Cord Location
Plug cap
Check packing accessories and read your user’s manual to learn how to use them.
Exhaust Hose
Remote
Control
Adjustable Window
Slide Bar
S lide bar connector
4
Water container
Positioning
WARNING !
Before using the air conditioner it should be left in an upright position for at least 2 hours.
This unit can easily be moved from one room to another. In doing so keep this in mind:
-ÿEnsure that the unit is positioned upright, on a level surface and 50 cm away from obstacles.
- To place the loose filters in the filters holder.
. Take the filters holder out of the air conditioner
. Release the filters fix er and place the active carbon filter (black) and 3M High Air Flow in the filters holder.
. Place the filters fix er back in the holder.
. Place the filters holder back in the air conditioner.
- Do not operate the unit inside the bathroom, shower, or in any other very humid environment.
- Connect the hose to the unit by turning it clockwise (at least 5 turns).
- Similarly, connect the hose to the slide bar connector as far as
possible.
- Place the telescopic slide bar in the open window or door and adjust
the length to fill as much open space as possible.
- Put the slide bar connector in the opening in the telescopic slide bar.
- Close the window or door as much as possible to prevent outside air
entering the room.
- Ensure that the slide bar connector has a free flow outside.
IMPORTANT
The flex ible ex haust hose can be ex tended from 660 to 2000 mm for
mounting. This length has been designed especially according
to the specifications of the air conditioner. Do not use an extension or
ex change for a different hose as that may lead to malfunctioning. The
ex haust air must flow freely, any blockage can lead to overheating of the air conditioner.
Handle with care to prevent any kink or bend in the exhaust hose.
5
Control Panel
1
9
2
3
8
10
11
13
4
5
7
6
14
12
1. On/Off (Power) button
8. Fan speed button
2. S wing button
9.
Fan speed indicator
3. Up button
10
Hours:Minutes Indicator
4. Down button
11. Temperature indicator
5. Mode button
12. Timer indicator
6. Timer button
13. S leep mode indicator
7. S leep button
14. Remote control operation button
1. POWER: Press this key to turn on/off machine.
After machine turns on, default operation is cooling mode with low fan speed.
2. MODE: After machine turns on, for cooling only model, press this key to select cooling
and fan mode.
3. FAN: After machine turns on, press this key to select fan speed (high and low).
4. DOWN: Under cooling mode , press this key to downward setting
temperature from 18 ºC~32 ºC ; under timer mode, press this key to downward on/off time.
5. UP: Under cooling mode, press this key to upward temperature from 18 ºC ~32 ºC;
under timer mode, press this key to upward on/off timer.
6 . TIMER: Under power-on or standby mode, press this key to setup on/off time
from 0~24 hours.
7 . S WING :1SFTTUIJTbutton, the louvres will swing continuously up and down.
1SFTT it again the movement will stop and the louvres remain in that position.
8. S LEEP: under cooling mode, press this key to turn on/off sleeping function.
6
Remote Control
TIMER
ON
1.
Power
6. Timer OFF
2. Fan
7. Timer
TIMER
OFF
3. Timer ON
8. Down
7
4. Sleeping
9.UP
5. Mode
10. Swing
Operation
Cooling Mode
ĉ
ĉ
ĉ
ĉ
After machine turns on, default value is cooling mode with 22ºC and low fan speed.
Press “MODE” to select cooling mode, cooling mode indictor turns on .
Press “UP” or “DOWN” to adjust temperature (from 18ºC to 32ºC).
Press “FAN” to select fan speed (low, high)
Fan Mode
ĉ Press “MODE” to select fan mode, fan mode indicator turns on .
ĉ Press “FAN” to select fan speed (low, high)
ĉ Temperature and sleeping function cannot be setup.
Timer Mode
ĉ Under standby mode, press “TIMER” to setup the power-on time,
press “UP” and “DOWN” to adjust the timer (from 1 to 24 hours). Timer indicator turns on.
ĉ
Under power-on mode, press “TIMER” to setup power-off timer.
Press “UP” and “DOWN” to adjust the timer (from 1 to 24 hours). Timer indicator turns on.
Sleep Mode
The sleep mode function adjusts the set temperature of the unit to the thermal needs of
the body falling asleep as follow:
.Default fan speed: LOW
Press this button to operate the sleep mode. Press it again in order to cancel the sleep mode.
The set temperature will increase 1°C after 1 hour and a further 1°C after 2 hours.
No FAN mode under S LEEP mode operation.
Compressor Protection
ĉ Three minutes later after power on / restart, compressor starts to run.
8
Emptying the Water Container
In case of the WATER FULL (W.F.) LED alert, the unit is required to be
drained. At the end of AC Season, this unit should be drained prior
to storage. In both situations, we recommend that you take the
following steps.
Switch off the unit and remove the plug from the outlet.
• Position a flat container or dish on the floor under
the drain hole. Use container only for temporary
draining of the unit, do not allow the water to drip
continuously into the container, as it might easily
overflow.
• Remove the drain knob.
• Remove the rubber plug, the water will flow in the
container. When this is nearly full, replace the plug
to stop the water flow and empty it. Repeat this
process until all water has been removed.
• For seasonal storage purposes, put the unit ON in fan mode on a warm, dry day for
a couple of hours to ensure that the inside can dry out completely. We also recommend allowing the unit to air dry for a period of 24 hours without the drain plug and
cap in place.
• Insert the rubber plug into the drain hole firmly,
the WATER FULL LED (W.F.) should not flash any longer.
• Screw on the drain knob.
Additional maintenance/tasks prior to storage.
• Clean the filters.
• Store the power cable as shown, protect the unit against dust (put back into its
original carton) and store in a dry place not accessible for children.
• To protect the unit against dust, store in a dry place not accessible by children
• Do not stock heavy objects on top of the unit
9
Cleaning
Always unplug the unit from the power supply (wall outlet) before
beginning the cleaning.
Housing
Use a soft, damp cloth to wipe the body clean. Never use strong
chemicals, oil-based products, detergents, chemically treated cloths or
other cleaning solutions. These could possibly damage the housing.
Filter
ĉ Clean the ILilters every two weeks, if ILilters are blocked by dust,
machine efficiency will be reduced.
ĉ Use a vacuum cleaner or tap the filter lightly to remove loose dust
and dirt from the filters and then rinse them thoroughly under running
water (not warmer than 31ºC).
ĉ Dry thoroughly with a soft cloth before inserting them back
into the unit.
10
Troubleshooting
Never try to repair or dismantle the air condition yourself.
Incompetent repairs result in loss of warranty and can endanger the user and the property.
Problem
Cause
Solution
Connect to a functioning outlet and switch on.
See below for Plug and Reset button application.
No power supply. Make sure the
The air
green light on the plug is lit.
conditioner does
Is the power light ashing?
not function.*
Is the water full LED lit?
The unit is in direct sunlight.
Empty the water container (See pg. 9).
Close curtains/shades
Close doors and windows. Unit is not made to
Windows or doors open, many
cool server rooms, sun rooms, or any rooms
people or a heat source in the room.
The air
generating a constant high levels of heat.
conditioner does
The filter is dirty.
Clean the filter (See pg. 10).
not seem to
Power off the unit and unplug from outlet.
perform.
Air inlet or air outlet blocked.
Remove blockage.
Room temperature lower than the
Change temperature selection.
selected value.
Set at the lowest possible setting: 16 C.
The unit is noisy. Unit stands uneven.
Place on an even, solid surface (less vibrations).
The compressor The overheat protection may be
Wait 30 minutes until the temperature has
does not work.
activated.
decreased, then turn on the unit again.
Distance too great.
Make sure the remote control is correctly aimed
Remote control signal not detected
The remote
at the control panel.
control does not by the control panel.
function.
The batteries are drained.
Check batteries on the remote control.
Note: When abnormal situations occur, turn off machine and pull out plug, then contact
with professional electrician for help
* Make sure unit is plugged directly into a dedicated electrical source/outlet.
Do not use any extension cords. See electrical specications listed on
page 3 and make sure the electrical source can accommodate the unit’s
energy consumption.
11