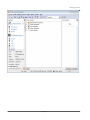
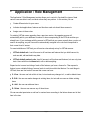
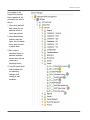
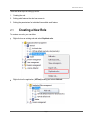
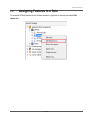
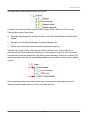
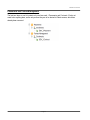
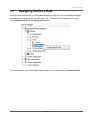
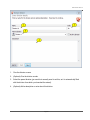
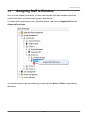
1
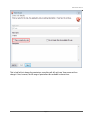
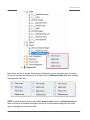
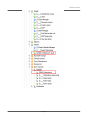
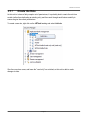
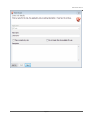
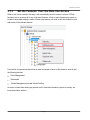
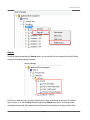
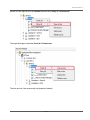
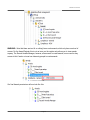
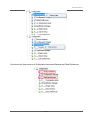
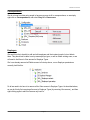
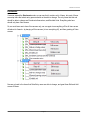
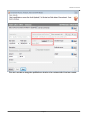
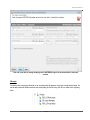
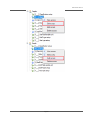
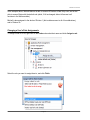
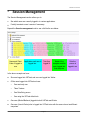
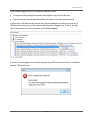
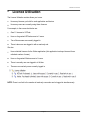
VETtrak Security
VETtrak User Manual
Contents
1 Introduction
3
2 Application / Role Management
5
2.1
Creating a New Role
7
2.2
Assigning Features to a Role
9
2.3
Setting Permissions for a Role
11
2.4
Example One - Setting Up a Trainer Role
13
2.4.1
Create the Role
13
2.4.2
Set the Features That This Role Can Access
14
2.4.3
Set the Permissions
16
2.5
Example Two - Setting Up a Data Entry Role
21
2.5.1
Create the Role
22
2.5.2
Set the Features That This Role Can Access
24
2.5.3
Set the Permissions
25
2.6
Assigning Staff to a Role
43
3 Division Management
44
3.1
Creating Divisions
44
3.2
Assigning Staff to Divisions
46
4 User Management
47
5 Session Management
52
6 Licence Utilisation
54
Page 2
VETtrak User Manual
1
Introduction
The VETtrak Security Manager allows you to control users' access to VETtrak in two ways:
You can finely control what sort of information users can see and what actions they can perform
by setting up roles and indicating what features and functions of VETtrak each role should have
access to.
You can control which clients and enrolments a user can see by dividing your database up into
divisions.
The Security Manager can be accessed via the Dashboard, the Manage menu, or the
the toolbar. There are five sections in this manager:
icon on
Application / Role Management - Allows you to set up a number of different roles for your
users, and determine what features and functions of VETtrak will be available to users with that
role.
Division Management - Allows you to set up a hierarchical system of divisions to control what
areas of your database various users can access.
User Management - Allows you to see and set roles and divisions on a per user basis.
Session Management - Allows you to see information about who is currently logged into
VETtrak, and to forcibly terminate a user's session if necessary.
Licence Utilisation - Shows a summary of the VETtrak features you have licences for, which
users have access to each feature, and how many of those licences are currently being used by
logged in users.
Page 3
VETtrak User Manual
Page 4
VETtrak User Manual
2
Application / Role Management
The Application / Role Management section allows you to control in fine detail the types of data
various users are able to see, and what actions they can perform. In this section you can:
Create different roles for your users.
Indicate what applications, features and functions each role should have access to.
Assign users to these roles.
For existing VETtrak users upgrading from a previous version, the upgrade process will
automatically add to your database a number of roles corresponding to the VETtrak modules you
already have. If you are happy with the access to VETtrak that your users currently have, you do not
need to do anything, as your users will be automatically assigned to the role that corresponds to
their current level of access.
For new installations of VETtrak, you will see two roles already set up for VETtrak access:
VETtrak default role - has full access to all functions and features that you hold licences for,
and can add, edit and delete any data.
VETtrak default read-only role - has full access to all functions and features, but can only view
data. Users with this role cannot add, edit or delete anything.
Expand a role to see a tree listing of each of the features you have a licence for. Then expand a
feature to see a detailed listing of access levels to each item within that feature. For most things in
VETtrak, there are four levels of access that a user can have:
V - View - the user can look at this at item, but not make any changes to it, or add or delete items.
E - Edit - the user can make changes to existing items, but not add new ones or delete existing
items
A - Add - the user can add new items.
D - Delete - the user can remove any of these items.
We can see what permission a role has for various items according to the letters shown next to that
item in the tree.
Page 5
VETtrak User Manual
For example, in the
Sample Role that has
been expanded in the
screenshot, the user is
able to:
1. View clients and edit
their details, but not
add new clients or
remove any clients.
2. View classifications,
positions and visa
types, but not change
them, add new ones
or delete them.
3. Edit a client's
education history, or
add new education
history items, but not
remove any
education history.
4. View full details about
staff members, but
not make any
changes at all
relating to staff
members.
Page 6
VETtrak User Manual
There are three steps in setting up a role:
1.
Creating the role.
2.
Setting what features the role has access to.
3.
Setting the permissions for individual items within each feature.
2.1
Creating a New Role
To create a new role, you can either:
Right-click on an existing role and select Duplicate role.
Right-click on the application (VETtrak) heading and select Add role.
Page 7
VETtrak User Manual
1.
Give the role a name
2.
Tick this box if you want this role to have read-only access to all aspects of VETtrak.
NOTE: If a role is set as read-only, it will not be possible to grant Edit, Add or Delete access to any
features at all. If you want to create a role that has only View access to most features, but a higher
access level for a small number of features, you could:
Create the role as non-read-only, and manually remove higher access levels from all features
that are meant to have only View access.
Create the role as read-only (so it starts out with only View access to everything), then edit the
role to untick the read-only box. You will then be able to add the higher access level to the few
items that require it.
Duplicate a read-only role, and then edit the role to untick the read-only box. You will then be
able to add the higher access level to the few items that require it.
Page 8
VETtrak User Manual
2.2
Assigning Features to a Role
To set which VETtrak features a role will have access to, right-click on the role and select Edit
feature list.
Page 9
VETtrak User Manual
Click on a feature to see a description of that feature in the right-hand panel. Tick the features you
want this role to be able to use, then click Finish.
Page 10
VETtrak User Manual
2.3
Setting Permissions for a Role
There are two ways to set the permissions for the various objects within VETtrak:
Right-click on a node to grant or deny permissions to all objects underneath that node, or
Right-click on the individual objects to set permissions for that object only.
If, for example, our role currently has View access to all aspects of Employers, but we want it to also
have Edit permission for everything related to Employers, we would right-click on the Employers
node and select Grant all > Edit access:
This would leave us with permissions that look like this:
If, however we only want this role to be able to edit information about Employer Contacts, but not
Employers themselves or Employer Types, we would right-click on the Employer contact node and
click Edit access to enable it.:
Page 11
VETtrak User Manual
This would leave us with permissions that look like this:
For some items, however, there is only one level of access, which is marked as "View" access.
There are three types of these items:
Things that only designed for viewing information, such as the Award Register and Sent Email
Register.
Managers, such as the Client Manager, Programme Manager, etc.
Utilities, such as the various claims wizards for government reporting.
These are 'all or nothing' items, where the only reason to access them is to either carry out a
particular action (such as government reporting), or to have access to a range of other items which
are controlled by their own permissions (such as the various Managers). As well as only having "[V]"
next to them, these items are also easily distinguishable by having a blue icon next to them, instead
of green:
Take care when granting permissions for these items, and remember that giving any access to
these items may be allowing the user to carry out certain activities.
Page 12
VETtrak User Manual
2.4
Example One - Setting Up a Trainer Role
In this example we will set up the permissions for the role that you want to give your training staff.
You want your trainers to be able to:
View everything in VETtrak apart from financial information, custom reports, and security
settings.
Record results and attendance, but not to be able to change anything else.
2.4.1
Create the Role
First we need to create the new role. As this role will have access to most VETtrak features, and that
access is mostly read-only, the easiest way to begin would be to duplicate the default VETtrak readonly role.
Give the new role a name:
Page 13
VETtrak User Manual
Like the VETtrak default read-only role, this new role now has access to all VETtrak features that
your company has licences for, and all of that access is read-only.
2.4.2
Set the Features That This Role Can Access
Next, we need to remove this role's access to the features that we don't want our trainers to use - in
this case, Finance, Security and Custom Reports. To do this we right-click on the role and select
Edit feature list.
Page 14
VETtrak User Manual
Untick the features you do not want this role to access, and click Finish.
Page 15
VETtrak User Manual
2.4.3
Set the Permissions
Now we need to give this role access to the appropriate items. Note that as this role was created by
duplicating a read-only role, it currently only has View access to everything, and there is no option to
add more than View access:
However, we want to give our trainers Add, Edit and Delete access to a limited group of functions,
which we cannot currently do. To do so, we need to make this role not read-only, so we edit the role,
and untick the read-only box:
Page 16
VETtrak User Manual
This in itself will not change the permissions, everything will still only have View access until we
change it. Now, however, the full range of permissions are available to choose from:
Page 17
VETtrak User Manual
Now that we are able to allocate the full range of permissions, we can proceed to give our trainers
full access to results and attendance. So we right click on Unit/Element result three times, adding a
new permission each time:
NOTE: We have given full access only to Unit / element result, and not to Result type setup, as
there is a fixed set of allowable result types, and we do not want trainers adding their own result
types or changing the ones that are there.
Page 18
VETtrak User Manual
We now want to allow them to record attendance as well. Attendance is related to classes, which
can be found under the Short Courses feature:
Again we right-click three times, to add each of the extra permissions, as shown above for results.
We can now see that our Trainer has View access to most things, and Add / Edit / Delete access to
results and attendance:
Page 19
VETtrak User Manual
Page 20
VETtrak User Manual
2.5
Example Two - Setting Up a Data Entry Role
Our data entry person is able to add and edit information about our trainees related to:
Clients
Employers
Contracts
Enrolments (but they cannot edit the AVETMISS values of an enrolment once it is created)
Groups
Events
Placements
Results
Note that they are not to be allowed Delete access to anything.
They should have view only access to:
Awards
Configuration Manager, and all items that are set up there
Qualifications and Units
Staff
They do not need access at all to:
Government reporting
Correspondence
System reports or custom reports
Finance
Security
Short Courses
Page 21
VETtrak User Manual
2.5.1
Create the Role
As this role is to have a fairly complex set of permissions, it is probably best to create the role from
scratch (rather than duplicating an existing role), and then work through each feature carefully to
ensure we give the correct permissions.
To create a new role, right click on the VETtrak heading and select Add role.
Give the new role a name, and leave the "read only" box unticked, as this role is able to make
changes to data.
Page 22
VETtrak User Manual
Page 23
VETtrak User Manual
2.5.2
Set the Features That This Role Can Access
When a new role is created in this way, it will automatically have full access to all core VETtrak
functions, but no access at all to any of the extra features. As we do want the data entry person to
be able to enter data relating to some of these extra features, we need to edit their feature list, and
add access to the relevant features.
From the list of permissions above that we want our people to have, in this wizard we need to add
the following features:
Event Management
Placements
Trainee Management (but not Trainee Profiles)
As we do not want them having any access at all to financial information, reports or security, we
leave those items unticked.
Page 24
VETtrak User Manual
2.5.3
Set the Permissions
Our role now has access to all things we want them to be able to see, but they have Edit, Add and
Delete access to everything, which in many cases is not what we want. So we now need to work our
way carefully down the tree, and set the appropriate permissions for each item.
The first thing to do, as we have determined that these users are not allowed to delete anything, is
to remove Delete access to all aspects of VETtrak. We can do this quickly and easily by rightclicking on the VETtrak node, and selecting Deny all > Delete access.
Page 25
VETtrak User Manual
Awards
If we now start by expanding the Awards node, we can see that this role currently has all but Delete
access to everything relating to awards:
As this is not what we want, we need to reduce this to View access only for all items. The easiest
way to do this, is to use the Deny all option against the Awards node itself. As removing View
access also removes all other permissions for that item, the quickest way to remove all but View
Page 26
VETtrak User Manual
access is to first right-click on the Awards node and select Deny all > View access.
Then right-click again, and select Grant all > View access.
The role now has View access only to all aspects of awards:
Page 27
VETtrak User Manual
WARNING: Note that there are two 'all or nothing' items under awards, which only have one level of
access. For the Award Register this is not an issue, as the register only allows you to view awards
anyway. The Record Awards Manager, however, allows users to create awards, so we need to deny
access to this if we do not want our data entry people to create awards.
Our final Awards permissions will now look like this:
Page 28
VETtrak User Manual
Compliance (Government Reporting)
The next items in our tree are all the Compliance features, which give access to the various
government reporting requirements. We do not want our data entry person to have any access to
government reporting, so we right-click on each of these nodes and select Deny all > View access.
Page 29
VETtrak User Manual
Configuration
Next, we expand the Configuration node, to see what is under there:
Our data entry person should not be able to change any configuration information, so we need to
remove all but View access from all these items. There are also two things here that we do not want
them to touch at all - we don't want them to be able to:
Run database backups
Make any changes to VETtrak's global preferences
As both of these are "all or nothing" features (in that having any access them allows things to be
changed), we need to deny all access to these two items.
As with Awards above, the easiest way is to right-click on the Configuration heading and select
Deny all > View access, then Grant all > View access. But as this still leaves these users with
access to backups and global preferences, we now need to remove View access from these two
individual items.
Page 30
VETtrak User Manual
Our role now has View access to all Configuration items except Backups and Global Preferences.
Page 31
VETtrak User Manual
Correspondence
We do not want our data entry people to have any access at all to correspondence, so we simply
right-click on Correspondence, and select Deny all > View access.
Employers
We want this role to be able to add and edit employers and their contact people, but not delete
them. They should not be able to set up new employer types, or edit or delete existing ones, so we
will need to limit them to View access for Employer Types.
We have already removed all Delete access in first step above, so our Employer permissions
currently look like this:
So all we need to do here is to remove all but View access to Employer Types. As described above,
we can do this by first removing all access to Employer Types (by removing View access) , and then
right-clicking again to add View access only back in.
Page 32
VETtrak User Manual
Now our role can view, edit and add employers and their contacts, but not delete them. It can also
view employer types, but not add, change, or delete them.
Page 33
VETtrak User Manual
Enrolments
If we now expand the Enrolments node, we can see that it contains a lot of items, but most of these
are setup items that a data entry person should not be able to change. The only items that this role
should be able to change are Enrolments themselves, and Enrolled Units. Everything else here
should only have View access.
So, as most items are to have View access only, we can again turn everything off for all items as we
did above for Awards - by denying all View access (to turn everything off), and then granting all View
access.
Now we go back to the items that Data Entry users are able to change, and grant them Edit and Add
access to these.
Page 34
VETtrak User Manual
Note that although our data entry people are able to add and edit enrolments, they do not have
permission to edit the AVETMISS values of an enrolment once it is created. This means that in
addition to the Edit AVETMISS values item not being available in the right-click menu against an
enrolment, certain fields in the Enrolment Wizard will be disabled when they are editing an existing
enrolment:
Page 35
VETtrak User Manual
This role is not able to change the qualification or location of an enrolment after it has been created.
Page 36
VETtrak User Manual
This role is not able to change anything on the AVETMISS page of an enrolment after it has been
created.
Groups
Our data entry people are allowed to do anything with all aspects of groups except delete them. As
we already removed Delete access from everything in the first step, we do not need to do anything
here.
Page 37
VETtrak User Manual
People
As with enrolments, we want this role to be able to add and edit the clients themselves, but only to
view the other items in the list. So again, we go to Deny all > View access, then Grant all > View
access, then grant Edit and Add permission for the Client item only.
Page 38
VETtrak User Manual
Page 39
VETtrak User Manual
Reports
We do not want our data entry people to have any access to reports at all, so we choose Deny all >
View access against the top-level Reports node.
Results
Under Results, we want our role to be able to use the Results Manager, view Result Types, and
have everything except Delete access for Unit / Element Results. So we:
Leave Record Results Manager as it is with View access (as this an 'all or nothing' item)
Remove all but View access for Result Type Setup (by unticking Edit access and Add access).
Page 40
VETtrak User Manual
Event Management
The Event Management feature contains three items - Attributes, Events and Contact Records. We
want our data entry people to be able to add attributes and events to both clients and employers,
and contact records to enrolments, but not to create new types of attribute, event or contact record.
So for Attribute setup, Event setup and Contact type setup we:
Deny View access to remove all permissions.
Add View access only back in.
Then for Client Attribute, Employer Attribute, Client Event, Employer Event and Contact Record, we
have nothing to do, as we have already removed Delete access from everything.
There is one other item under Event Management - a section called Reports, which contains the
VETtrak Calendar. The Calendar normally shows both occurrence classes and events, but as these
users do not have any access to the Short Courses feature at all, it will only show Events for them.
So we can leave this item with View access so they can see the events they create. Now our Events
permissions should now look like this:
Page 41
VETtrak User Manual
Placements and Trainee Management
The last two items on our list contain only one item each - Placements and Contracts. We do not
need to do anything here, as the only access they are to be denied is Delete access, which has
already been removed.
Page 42
VETtrak User Manual
2.6
Assigning Staff to a Role
Once you have created a role, you then need to assign your staff to the role, so that the right people
have permission to do the things you want them to do. To assign the staff, expand the role, rightclick on Assigned staff and click Assign staff to role.
You can then select any number of staff who you want to have that role, and click Next and Finish.
Page 43
VETtrak User Manual
3
Division Management
The Division Management section allows you to set up any number of divisions to mirror your
organisation's structure in VETtrak. Clients, enrolments and groups can then be associated with
particular divisions, and this association used to restrict which clients / enrolments / groups a user
can see when they access VETtrak. Alternatively, this association can simply be a way of splitting
your database into manageable units.
3.1
Creating Divisions
VETtrak initially comes with a single divison, the "Root" division, already set up. Any new divisions
will automatically be subdivisions of this all-encompassing division. You can have as many levels in
your division hierarchy as you want.
For our example, we have already set up three new divisions called Division 1, Division 2 and
Divsion 3. We want to further subdivide these divisions, so we right-click on Division 1 and select
Add new child division.
Page 44
VETtrak User Manual
1.
Give the division a name.
2.
(Optional) Give the division a code.
3.
Select the parent division (you would not normally need to set this, as it is automatically filled
with the division from which you launched the wizard).
4.
(Optional) Add a description or notes about this division.
Page 45
VETtrak User Manual
3.2
Assigning Staff to Divisions
Once you have created your divisions, you then need to decide which staff members should have
access to the clients, enrolments and/or groups in each division.
To allocate staff to a particular division, expand the division, right-click on Assigned staff and click
Assign staff to division.
You can then search for the staff member(s) you want and click Next and Finish to assign them to
that division.
Page 46
VETtrak User Manual
4
User Management
The User Management section allows you to see and set permissions from an individual user’s point
of view. For each user you can:
See what applications they have access to and what role they hold for that application.
Assign them to, or remove them from, any number of roles
See what divisions they have access to.
Grant or deny them access to any number of divisions.
To see what roles and divisions a user is assigned to, expand their node, and expand the Roles and
Divisions nodes under their name.
Page 47
VETtrak User Manual
In the example above, Mitchell Bathurst is able to access VETtrak as a Data Entry user, and is also
able to access Waiter with the default role (which, if left unchanged, allows full access to all
functions in the Waiter module).
Mitchell is also assigned to the whole of Division 1 (this includes access to all of its subdivisions),
and to Division 2A.
Changing a User's Role Assignments
To assign a user to a role, right-click on the Roles node under their name and click Assign to role.
Select the role you want to assign them to, and click Finish.
Page 48
VETtrak User Manual
To remove a role from a user, right-click on the role you want to remove, and click Remove role
from staff.
NOTE: It is possible for a user to be assigned to more than one role for the same application. You
might want to do this to conserve licences, if for example, a user is allowed to do a wide range of
things in VETtrak but only needs to do them when another staff member is absent. As VETtrak
licensing works on a concurrent user basis, you would not need to purchase an extra licence for the
higher features, as the extra person only needs to use them when the other user is not logged in. In
this case, when the user logs into VETtrak, they will receive a prompt asking what role they want to
use for this session, and they then choose the role corresponding to the tasks that they need to do
in that session.
Page 49
VETtrak User Manual
Changing a User's Division Assignments
To assign a user to a division, right-click on the Divisions node under their name, and click Assign
to division.
Select the division you want to assign them to, and click Finish.
Page 50
VETtrak User Manual
To remove a user's access to a division, right-click on the division and click Remove from division.
Page 51
VETtrak User Manual
Session Management
5
The Session Management section allows you to:
See which users are currently logged in to various applications.
Forcibly terminate a user’s session if necessary.
Expand the Session management node to see a list like the one below:
Name and Client
Code of logged in
user
Application each user is
logged into.
Time they
logged in
Name of the
computer and the
user logged into
that computer
Role the
person is
logged in as.
In the above example we have:
Six users logged into VETtrak, and one user logged into Waiter.
Of the users logged into VETtrak we have:
o
One read-only user
o
Three Trainers
o
One Data Entry person
o
One using the VETtrak default role
One user (Mitchell Bathurst) logged into both VETtrak and Waiter
One user (Lincoln Rooke) who is logged into VETtrak twice with the same role on two different
computers.
Page 52
VETtrak User Manual
A user could be logged in twice for a number of reasons, such as:
He may have simply changed computers and forgotten to log out of the first one.
The first computer may have crashed and he was unable to close his session properly.
In either case, a VETtrak user with access to the Security Manager can forcibly log a user out of
VETtrak without having to go to the computer that the person is logged in on. To do so, just right
click on the session you want to terminate, and click Force logout.
If the user you are logging out is still at the computer using VETtrak, they will receive a notification,
and their VETtrak will close:
Page 53
VETtrak User Manual
6
Licence Utilisation
The Licence Utilisation section allows you to see:
How many licences you hold for each application and feature.
How many users are currently using these licences.
For example, in the screen shot below we:
Own 11 licences to VETtrak.
Have so far granted VETtrak access to 5 users.
Two of those users are currently logged in.
There is also one user logged in with a read-only role.
We also:
Have unlimited licences for the Waiter application (this application is always licenced for an
unlimited number of users).
Have so far granted Waiter access to 5 users.
There is currently one user logged in to Waiter.
There are no read-only users currently logged in.
NOTE: There is no limit to the number of read-only users who can be logged in simultaneously.
Page 54