1
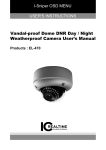
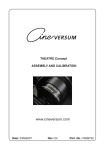
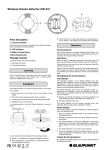
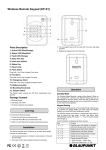
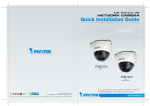
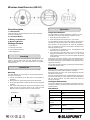
Wireless Heat Detector (HD-S1)
Parts Description
1. LED Indicator
Press the button to transmit a learn/test code, silence the alarm
or test the Heat Detector
2. Learn/Test Button
3. Battery Compartment
4. Mounting Bracket
Package Content
1 x Heat Detector
4 x wall plugs and screws
3 x 1.5V AA alkaline batteries
1 x Mounting Bracket
Learning
Put the Control Panel into learning mode, then press the Test
Button to transmit learn code, the Heat Detector will emit a
two-tone beep. Refer to your Control Panel manual to complete
learning process.
Operation
Temperature Detection
The Heat Detector monitors temperature condition and will
raise alarm when either of the following conditions are met:
1. When temperature exceeds 57.3°C.
2. When temperature rises more than 8.3 °C per minute.
The Heat Detector will then send alarm signal to Control Panel
and raise alarm with its built-in siren. The LED will flash rapidly.
After activation, the Heat Detector will check the temperature
every 10 seconds and continue to sound alarm until either of the
following conditions is met:
1. If temperature has exceeded 57.3°C, the temperature must
drop below 49°C for alarm to stop.
2. If the temperature did not exceed 57.3°C and the alarm is
triggered by temperature rising more than 8.3 °C per minute,
the temperature must drop 4°C below the highest temperature
for alarm to stop.
When either of the above condition is met, the Heat Detector will
stop alarming and send a restore signal to the Control Panel. If
the alarm is not stopped, the Heat Detector will resend the alarm
signal every 2 minutes.
You can stop the alarm manually by pressing the learn/test button
to enter Alarm Silence mode.
Installation
Alarm Silence
When the alarm is activated, pressing the Test button will put the
Heat Detector into Alarm Silence mode for 10 minutes.
Mounting
The Heat Detector has 2 knockouts on the mounting bracket for
mounting on the ceiling.
1. Use the two knockouts on the back cover to mark position on
the ceiling.
2. Drill holes into the ceilling using the knockouts as template.
3. Fix the mounting bracket onto the wall with the screw and plugs
provided.
4. Line up the Heat Detector with the hook on the bracket. Fit the
hooks into the two mounting holes on the, rotate the Heat
Detector counter-clockwise to lock it in onto the bracket.
Knockouts x 2
During this period, the built-in siren will be stopped and the LED
will flash once per second.
After the 10-minute period is over, the Heat Detector will sound a
2-tone beep and return to normal operation. If the temperature is
still over alarm threshold, the Heat Detector will sound the
warning alarm again.
Testing the Heat Detector
You can test whether the Heat Detector’s temperature sensor is
functioning normally by pressing the learn/test button once under
normal operation
LED Indicator
Off
Normal Operation
On (2 seconds)
The Heat Detector is sending an alarm
signal
Quick Flash
The Heat Detector is alarming
Flash
second
every
Flash every
seconds
30
During Alarm Silence mode, the LED will
flash once every second for 10 minutes.
Low Battery
Flash every 60
seconds with one
beep.
The Heat Detector is out of order or low
on battery
On (1.5 seconds)
When the learn/test button is pressed
under normal operation
Battery
The Heat Detector uses three 1.5V AA alkaline batteries as its
power source. It also features low battery detection function to
notify the Control Panel when battery voltage is low.
When Heat Detector is on low battery, follow the procedure below
to change the batteries.
1. Rotate the Heat Detector clockwise to remove it removed from
the mounting bracket.
2. Remove the battery compartment cover.
3. Remove the old batteries.
4. Press the learn/test Button several times to fully discharge.
5. Insert the new batteries and orient them according to the
correct polarity. The Heat Detector will sound a two-tone beep.
6. Replace the battery compartment cover.
7. Hook the Heat Detector back to the mounting bracket
Specification
Environmental Condition
-10°C to 40°C, relative humidity 85% non-condensing.
Radio
433 MHz
FCC Statement
This device complies with Part 15 of the FCC Rules. Operation is
subject to the following two conditions:
(1) This device may not cause harmful interference, and
(2) This device must accept any interference received, including
interference that may cause undesired operation.
FCC Caution:
To assure continued compliance, any changes or modifications
not expressly approved by the party responsible for compliance
may void the user's authority to operate this equipment. (Example
- use only shielded interface cables when connecting to computer
or peripheral devices).