1
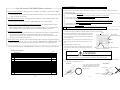
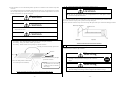
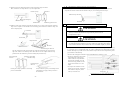
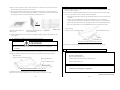
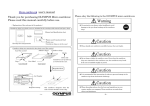
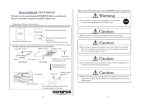
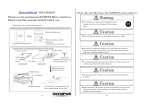
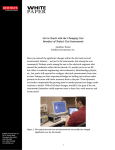
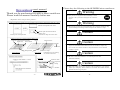
Please obey the following to the OLYMPUS micro cantilevers user’s manual 書 Thank you for purchasing OLYMPUS Micro cantilever. Please read this manual carefully before use. Warning Use protective eye glasses when handling to avoid damage to the eyes from breakage of the cantilever chips. <Explanation of the each part of the products> Cantilever chips in a plastic case are included in the envelope with manual and spec. sheet. Manual and Specification sheet Label Warning Use protective gloves to avoid getting hurt by a shard of cantilever chip, when breaking and cutting cantilever chips from cantilever strips. Inside Plastic pack (translucent blue) Plastic case (Cantilever chips are in the case) Envelope for transportation Caution Please handle our cantilevers carefully because they are fragile. Cantilever chips are contained in the plastic case. Case for transportation (plastic) Label side Arrow mark Cover Bottom Cover Upside Down side Case (closed) Case (open) Do not drop or shake the cantilever case. Even when the cantilever strips are contained in the cantilever case, the cantilever strips may move in the case and the cantilever may break if the case is handled roughly or jarred. Cantilever strips Hold position Caution Cantilevers are tip-side-up as viewed in the case. Caution Be sure to store the cantilevers at room temperature and Case label Case label OMCL-TR400PSA-□ moderate humidity. Products name Inspection stamp Caution When discarding, please obey the laws and regulations in your country Lot. Number and/or your company. These cantilevers are made from silicon nitride, gold/chromium and pyrex glass. - 1e - - 2e - 1 Special feature of OLYMPUS Micro cantilever Preparation 1) Please prepare the followings before using OLYMPUS cantilevers. 1. Contact mode Cantilever – This type of micro cantilever is suitable for contact mode AFM measurement. 2) To gain a better understanding of how cantilevers and chips are connected, cantilevers should be inspected under the microscope. 1) Work environment : Clean bench The small spring constant of the silicon nitride cantilevers enables you to set the tip loading force small (Use of an electrical charge neutralizer of ionizer is recommended.) to probe the sample surface gently. 2) For hazard avoidance : Protective eye glasses, Thin gloves 2. AC mode operation in water – This type of micro cantilever is also used for dynamic mode AFM measurement in water. 3) For cantilever treatment and disconnecting procedure : Microscope slide glass, Tweezers, Scalpel or razor blade, Scotch drafting tape For this purpose, 100 m long cantilever in OMCL-TR400PSA- series is recommended. (Use of anti-electrostatic discharge mat and a wrist band is recommended.) 4) For cantilever storage : Dry box, Case for storage 3. Variety of cantilevers with different mechanical properties – A suitable cantilever can be chosen from the different types of the cantilevers on a chip. Each triangular-cantilever type chip (TR type) has two different cantilevers on each end of the chip. Each rectangular-cantilever type chip (RC type) has four different cantilevers on the chip. 4. Sharpened pyramidal tip 5) For inspection : Stereo microscope 2 Open the case and take out the cantilever strip from the case 1) It is recommended that the cantilever case be opened in a clean environment like a clean bench in order to avoid the cantilever being contaminated. Handing under an ionizer is recommended. The tip shape about 0.3 micron down from the top is oxide-sharpened so that the tip angle parallel to the cantilever axis is smaller than 70 deg. and that the tip radius is smaller than 20 nm. The tip material (silicon nitride) is less prone to wear and tear than a single crystal silicon so that the tips ensure more stable measurements. Case 2) Avoid wearing clothes like woolen sweaters, fleece, etc that Arrow mark (indicate opening position) give off the static electricity when handling the cantilever cases and chips. Use of an anti-electrostatic mat and wrist band is preferable. 5. Reflex gold coating – Gold is coated on the back side of the cantilevers for optical detection. Dual side gold coating types are also available, OMCL-TR400PB-, OMCL-TR800PB- and OMCL-RC800PB-. These make functionalizing the cantilever easier (e.g., using thiol chemistry) Lip 3) In opening the case, put the plastic case label-side up on a desk, and turn the case so the arrow mark comes to your Tape side. 4) Peel off the tape to open the case. See the specification sheet of OLYMPUS Micro cantilevers at the last page of this manual. Don’t throw away the tape. That will be used again to fix the closed case after taking out the cantilever strip from the case. Table of contents page 1 Preparation 4e 2 Open the case and take out the cantilever strip from the case 4e 3 Preparation before disconnecting the cantilever chip 6e 4 Disconnecting the cantilever chip 6e 5 Attaching the cantilever chip to your instrument 8e 6 Returning the cantilever strips to the plastic case 8e 7 Storing the cantilever strips in the case for storage 9e 8 Storing the disconnected cantilever chips in the case for storage 10e 9 Information 10e 10 Specification 1s Caution Be sure to grasp the bottom cover in taking the cantilever case, or the case may be opened and the cantilever strips may slip off and break. 5) After peeling off the tape from the case, be sure to grasp the bottom cover like in the drawing left below. Don’t pick up the case by grabbing the cover Correct If you pick up the cover like in the drawing (right), the case may open and the cantilever strip may slip off and break Incorrect Cover (Case) Bottom cover (Case) Cantilever strip Case - 3e - Label Hold position (Bottom Cover) Cantilever case (Top view) - 4e - Slip off 6) In the procedure 1) to 3) in the drawing below, open the cover and take out the cantilever strip with tweezers. If you find the cantilever strip attached to the back side of the cover, stop opening the cover. Close the case again and pat the cover with your finger to move the cantilever strip from the cover to the bottom cover. Then try to open the case again. Caution 3 Preparation before disconnecting the cantilever chip Caution Do not use the plastic case for transportation as a work plate in the process for chip disconnection. 1) Use a microscope slide glass as a work plate in the process for disconnecting the cantilever chip. Please handle our cantilevers carefully because they are fragile. 2) Lay the cantilever strip tip-side-up on the microscope slide glass. 3) Then, settle the cantilever strip on the microscope slide glass with a piece of Scotch drafting tape (below). Caution Avoid any contact with the cantilevers when you pull up the cantilever strip from the case. Caution Cantilever chips should always be placed tip-side-up. 1) in the fig. : Press the hold position on the bottom cover to keep the stationary. 2) in the fig. : Using your thumb, carefully open the lid. 3) in the fig. : Pull the cantilever strip straight up with the tweezers. 4 Disconnecting the cantilever chip 2) Using your thumb, carefully open the lid. 1) Disconnect the cantilever chip as follows. Tweezers Lip 3) Pull the cantilever strip straight up with the tweezers. 1) Press the hold position on the bottom cover to keep the case stationary. Warning) Pay attention not to touch the cantilevers to the case and the other strips. Warning Use protective eyewear when handling to avoid damage to the eyes from breakage of the cantilever chips. Warning Use protective gloves to avoid getting hurt by a shard of cantilever chip, when breaking and cutting cantilever chips from cantilever strips. The way to open the case and to put out the cantilever strip from the case - 5e - - 6e - 2) Turn the microscope slide glass sideway for disconnecting a chip (see below). Then, cantilevers on a chip end face to you (see right below). 5 Attaching the cantilever chip to your instrument 1) After reading the instruction manual of your instrument again, grasp the side of the cantilever chip with the tweezers and attach the cantilever chip to your scanning probe microscope. Cantilever chip Cantilever Cantilever chip substrate Microscope slide glass Cantilever strip Cantilever strip. Place a scalpel (or razor blade) at the connecting part between the cantilever chips, and scribe a chip off gently. Tweezers Razor blade Razor blade Chip substrate Tweezers Connecting part (Groove) Put the scalpel to the edge of connecting part, push the scalpel and give pressure to the edge with it like in the drawing above. The side face of the scalpel should be kept parallel to the side wall of the groove for making this procedure easy. Scalpel or razor blade Cantilever chip Connecting part (Groove) Putting the scalpel parallel to connecting part is recommended. 6 Returning the cantilever strips into the plastic case Caution Lay the cantilever strip correctly in the grooves of the bottom cover when you return the cantilever strips into the plastic case for transportation again. Tape Connecting part (Groove) Tweezers Connecting part (Groove) 3) Hold the center of the cantilever chip with the tweezers to cut a chip at the end of the cantilever Tape It may be better to press your forefinger on the scalpel (above) to apply vertical pressure to the connection. Caution Do not drop or shake the cantilever case. Even when the cantilever strips are contained in the cantilever case, the cantilever strips may move in the case and the cantilever may break if the case is handled roughly or jarred. 1) Once you take out a cantilever strip from the case for transportation, storing the cantilever strip in a separate case is recommended. The way will be explained in the next head (8) in this manual. Although it is possible to store the cantilever strip in the case for transportation, please pay attention to the following. * Please avoid storing plural cantilever strips with different lot number in a case. Groove * Please pay attention to the position and the direction of the grooves where cantilever strips should be placed on. Be carefully to lay the cantilever strips parallel to/in the grooves of the bottom cover. (see right) * If you place the cantilever on the bottom case incorrectly, cantilevers and cantilever strips may break when you close the case. Hold position Laying cantilever in a groove of the bottom cover - 7e - - 8e - 2) After you set the cantilever strips correctly in the grooves, close the cover and put a piece of the Scotch drafting tape at the lip of the case to fix it. 8 Storing the disconnected cantilever chips in the case for storage 1) Store the cantilever chips in another case for storage. If you have a GEL-PAK container, those 3) Once open the cantilever case, level the case with the ground even the case closed (illust. left). Avoid tilting the case with large angle while handling, or cantilevers may break by scraping with the stopper pins on the cover if the cantilever strips slide in the case. chips are easily stored in it. 2) If you don’t have a GEL-PAK container, there is a way to arrange a substitute case for chips storage by yourself. Please refer to the way in the drawing below. * Like in the drawing below, settle the tape (3) adhesive-side-up on the case with the tape (1) and (2). * Using a tape in week adhesiveness as the tape (3) will give you a good result. For instance, Scotch drafting tape or the adhesive area from a Post-it note is recommended because the adhesiveness of the tape is appropriate. The use of both side adhesive tapes that is usual in the office, is not recommendable because most of them is too sticky. Incorrect The case is always kept even with ground. Avoid tilting the case with large angle while handling Stopper pins Case for storage (Plastic case for 3.5 inch floppy disk) Cantilever strip Tape (3) (adhesive side up) 4) Store the cantilevers in a desiccate box for avoiding dust, high temperature and humid even the case is closed. Tape (2) 7 Storing the cantilever strips in the case for storage Tape (1) Caution Cantilever chip The way to store the cantilever chips in the case 3) Be sure to give a memo of the product name and lot number on the case for storage. Be sure to store the cantilevers at room temperature and moderate humidity. 9 1) Prepare a case for storing the remaining cantilever strip. (Plastic case for 3.5 inch floppy disk etc.) 2) Keep the cantilever strip in the case for storage as it is taped to the microscope slide glass. Information Please contact following if you have any question on this user’s manual. OLYMPUS CORPORATION Case for storage (Plastic case for 3.5 inch floppy disk) Microtechnology R&D Division Microscope slide glass Rest of cantilever strip 2-3 Kuboyama-cho Hachioji-shi Tokyo 192-8512 Japan email : [email protected] Please access to the web page of OLYMPUS micro cantilevers. The way to store the rest cantilever strip in the case http://www.olympus.co.jp/probe 3) Attach the microscope slide glass on the case with a Scotch drafting tape. Ver. 5.0 4) Be sure to give a memo of the product name and lot number on the case for storage. Aug. 6, 2009 OLYMPUS CORPORATION - 9e - - 10e -