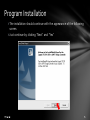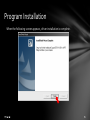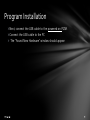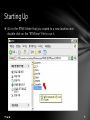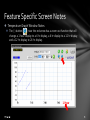
1
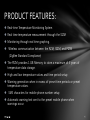
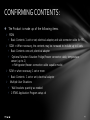
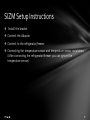
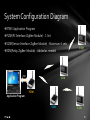
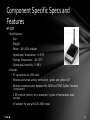
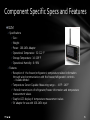
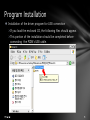
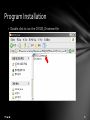
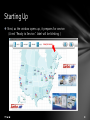
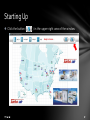
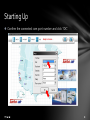
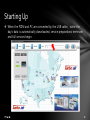
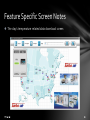
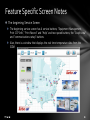
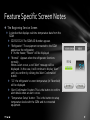
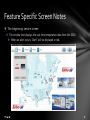
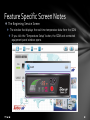
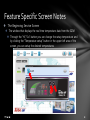
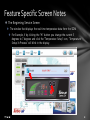
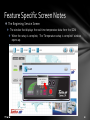
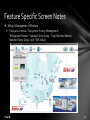
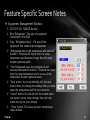
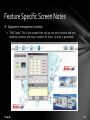
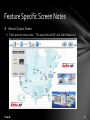
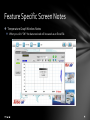
2011.05.03 Turbo Air Inc. Contents - Introduction - Preparations - Basic Structure - Structure Specific Specifications - RTMS Program -Introduction -Safety Precautions -Product Features Introduction This product and user guide are protected under copyright law. Without the prior written consent of Turbo Air Inc. it is not lawful to copy, reproduce, duplicate, translate or transform to machine language all or any part of the product or user guide. First, read the safety precautions and use the product accordingly. The actual pictures and screens may be different from those depicted in the user guide. The user guide may be different based upon the product’s software version and the circumstances of Turbo Air Inc. The user guide may also change without prior written notice to the users. For the user guide for the most recent software version please reference www.Turboairinc.net The program and functionalities provided by the product may be different based upon national or product specifications. The company assumes no responsibility for problems arising outside of the provided program. As a registered business software system, we aim for its commercial use and the product may be used in all regions. SAFETY PRECAUTIONS WARNING Do not touch the product or the electrical plug with wet hands. You may suffer an electrical shock. Do not place the product, it’s adaptor etc. near heat sources. (Space Heater, Gas Range, etc.) This may cause the product to change, explode or catch fire. CAUTION: Do not allow external shocks or drop the product. The screen or appearance can be damaged, and the internal parts can break. As the user, do not rebuild, take apart or repair the product. You may be suffer electrical shock. If rebuilt, taken apart, or repaired by the user, you may not get it repaired free of charge. PRODUCT FEATURES: Real-time Temperature Monitoring System Real time temperature measurement through the SIZM Monitoring through real time graphing. Wireless communication between the RZM, SIZM, and PIZM (ZigBee Standard Compliance) The PIZM provides 1 GB Memory to store a maximum of 3 years of temperature data storage. High and low temperature values and time period setup Warning generation when in excess of preset time periods or preset temperature values. SMS characters for mobile phone number setup Automatic warning text sent to the preset mobile phone when warnings occur. -Confirm Contents -PIZM Setup Instructions -SIZM Setup Instructions -RZM Setup Instructions CONFIRMING CONTENTS: The Product is made up of the following items. PIZM Basic Contents: 1 unit or set, electrical adaptor, and usb connector cable for PC. SIZM ⇒ When necessary, the contents may be increased to include up to 4 sets. Basic Contents: one unit, electrical adaptor Optional Selection Situation: Fridge/Freezer connector cable, temperature sensor (up to 2) ⇒ Refrigerator/freezer connection cable capable model: RZM ⇒ when necessary, 1 set or more Basic Contents: 1 set or unit, electrical adaptor Multiple User Situations Wall brackets: quantity as needed 1 RTMS Application Program setup cd PIZM Setup Instructions Install the bracket Connect the adaptor Connect the usb cable to the PC SIZM Setup Instructions Install the bracket Connect the Adaptor Connect to the refrigerator/freezer Connecting the temperature sensor and temperature sensor installation. (After connecting the refrigerator/freezer you can ignore the temperature sensor.) RZM Setup Instructions Install the bracket Connect the adapter -System configuration diagram -Components provided and features System Configuration Diagram RTMS Application Program PIZM(PC Interface ZigBee Module) : 1 Set SIZM(Sensor Interface ZigBee Module) : Maximum 4 sets SIZM RZM(Relay ZigBee Module) : Added as needed USB SIZM PIZM Application Program RZM SIZM Component Specific Specs and Features PIZM Specifications: Size : Weight : Power : 100-240V Adapter Operational Temperature : 0~50℃ Storage Temperature : -10~70℃ Operational Humidity : 0~90% Features PC connection via USB cable Wireless and wired activity notification: green and yellow LED Wireless communication between the SIZM and RZM (ZigBee Standard Compliance) 1 GB internal memory for a maximum 3 years of temperature data storage 5V adapter for use with 100-240V input Component Specific Specs and Features SIZM Specifications Size : Weight : Power : 100-240V Adapter Operational Temperature : 32~122 ℉ Storage Temperature : 14~158 ℉ Operational Humidity : 0~90% Features Reception of the freezer/refrigerator’s temperature related information through wired communication with the freezer/refrigerator’s controls. – Useable Model : Temperature Sensor Capable: Measuring range – - 40℉~140℉ Periodic transmission of refrigerator/freezer information and temperature measurement values. Graphic LCD display of temperature measurement values 5V adapter for use with 100-240V input Component Specific Specs and Features RZM Specifications Size : Weight : Power : 100-240V Adapter Operational Temperature : 32~122 ℉ Storage Temperature : 14~158 ℉ Operational Humidity : 0~90% Features Able to function as a data transmission intermediary when wireless communication problems occur due to large distances between the PIZM and SIZM or between SIZMs Boosted wireless data activity notifications: Green and Yellow LED 5V adapter for use with 100-240V input Component Specific Specs and Features Common Standards Wireless Standard: Frequency Range : 2.4~2.4835GHz RF Tx Power : Max. 17dBm RF Rx Sensitivity : -95dBm PHY & MAC Layer : Compliant to IEEE802.15.4 Network & Application Layer : Compliant to ZigBee Standard Antenna 3dBi gain Swivel Joint, SMA connector Omni-directional radiation pattern Size (Length & Diameter) : 102.8 x 11 (mm) Weight : 12.5g - Recommended Computer Specifications - Important Features - Program Installation -Starting Up -Feature Specific Screen Explanations Recommended Computer Specifications ( Minimum Recommended System Requirements) OS : Microsoft Windows 2000/XP or more CPU : Intel Pentium 4 – 2GHz processor or more RAM : 1GB or more HDD : 250GB or more LAN integrated USB : 2EA or more Monitor Display Resolution : 1280 x 768 or more Important Features Real-time Temperature Monitoring System Display of information received from the SIZM : Temperatures, etc. Temperature monitoring through real time graphing Use refrigerator/freezer specifications input and management High and low temperature values and durations setup Alarm generation when temperatures or durations exceed setup values Cell phone number setup for SMS text messaging Automatic alert text messages to the setup cell phone when alarms occur Viewable stored temperature history file Detailed view of alarm history(occurrence time, alarm contents etc.) Remote freezer/refrigerator temperature level setup ( some models only) Program Installation Installation of the driver program for USB connection If you load the enclosed CD, the following files should appear. This portion of the installation should be completed before connecting the PIZM’s USB cable. Program Installation Among these files, open the “CP2102_Driver” folder. Program Installation Double click to run the CP2101_Driver.exe file Program Installation The installation should continue with the appearance of the following screen. Just continue by clicking “Next” and “Yes” Program Installation When the following screen appears, driver installation is complete. Program Installation Next, connect the USB cable to the powered on PIZM. Connect the USB cable to the PC The “Found New Hardware” window should appear Program Installation RTMS Application Program Installation Copy the “RTMS” folder to the desired location. Starting Up Go to the RTMS folder that you copied to a new location and double click on the “RTMS.exe” file to run it. . Starting Up Next, as the window opens up, it prepares for service. (A red “Ready to Service..” label will be blinking. ) Starting Up Click the button ( ) in the upper right area of the window. Starting Up Confirm the connected com port number and click “OK”. Starting Up When the PIZM and PC are connected by the USB cable, , while the day’s data is automatically downloaded, service preparations terminate and full services begin. Feature Specific Screen Notes The day’s temperature related data download screen Feature Specific Screen Notes The download completion screen Click the “OK” button when the download completes. Feature Specific Screen Notes The beginning Service Screen The beginning service screen has 4 service buttons, “Equipment Management, Print CCP Info”, “Print Record” and “Help” and two speed buttons, the “Graph view” and “communications setup” buttons. Also, there is a window that displays the real time temperature data from the SIZM. Feature Specific Screen Notes The Beginning Service Screen A window that displays real time temperature data from the SIZM. SZ155137120: The SIZM’s ID Number appears. “Refrigerator”: The equipment connected to the SIZM appears as the refrigerator. If it’s the freezer, “Freezer” will be displayed. “Normal”: Appears when the refrigerator functions normally . When a alert occurs, a red “Alert” message will be displayed. In this case, it will continue to display “Alert” until you confirm by clicking the “Alert Confirmation” button. “21”: the refrigerator’s current temperature (in Fahrenheit) will be displayed. “Alert Confirmation” button: This is the button to confirm alert details when an alert occurs. “Temperature Setup” button : This is the button to setup temperature levels with the SIZM and its connected equipment. Feature Specific Screen Notes The beginning service screen The window that displays the real time temperature data from the SIZM When an alert occurs, “Alert” will be displayed in red. Feature Specific Screen Notes The beginning service screen The window that displays the real time temperature data from the SIZM If you click the “Alert Confirmation” button, the alert contents window opens up. This alert’s incident status list is registered. Feature Specific Screen Notes The Beginning Service Screen The window that displays the real time temperature data from the SIZM If you click the “Temperature Setup” button, the SIZM and connected equipment panel window opens. Feature Specific Screen Notes The Beginning Service Screen The window that displays the real time temperature data from the SIZM Through the panel window, you can confirm the status of the temperature of the SIZM’s connected equipment, the temperature setup, the fan, the door etc. Feature Specific Screen Notes The Beginning Service Screen The window that displays the real time temperature data from the SIZM Through the “Hi”/”Lo” button you can change the setup temperature and by clicking the “Temperature setup” button in the upper left area of the screen, you can setup the desired temperatures. Feature Specific Screen Notes The Beginning Service Screen The window that displays the real time temperature data from the SIZM For Example, if by clicking the “Hi” button you change the current 5 degrees to 7 degrees and click the “Temperature Setup” icon, “Temperature Setup In Process” will blink in the display. Feature Specific Screen Notes The Beginning Service Screen The window that displays the real time temperature data from the SIZM When the setup is complete, The “Temperature setup is complete” window opens up. Feature Specific Screen Notes Setup Management Window There are 4 menus: “Equipment History Management”, “Refrigerator/Freezer” Standard Temp Setup, “Fryer/Sanitizer/Washer Standard Temp Setup”, and “SMS Setup”. Feature Specific Screen Notes Equipment Management Window “Equipment History Management”: This is a window where you can input and manage the refrigerator/freezer’s Equipment ID, Model, etc. Feature Specific Screen Notes Equipment Management Window “Refrigerator/Freezer basic setup screen”: Sets up the standard temperatures and durations to enable alert generation. Feature Specific Screen Notes Equipment Management Window SZ155137120 : SIZM ID Number Blue “Refrigerator”: The type of equipment connected to the SIZM Gray “ Refrigerated Area” : The area of the equipment that needs temp management “Refrigerated Area’s high temperature and excessive duration”: Temperatures higher than the setup temperature and durations longer than the setup duration generate alerts. “The Refrigerated area’s low temperature and excessive temperature duration”: Temperatures lower than the setup temperature and in excess of the temperature duration generate alerts. “Save” button: You must definitely click the save button when you change the settings after you have setup the temperature and the time durations . “Cancel” button: You should click this button when you want to cancel setup changes that you have made and rely on prior settings. “Close” button: This closes the basic temperature setup window. Feature Specific Screen Notes The Equipment management window “Fryer/Sanitizer/Washer basic temperature setup”: This feature is not currently provided. Feature Specific Screen Notes Equipment management window “SMS Setup”: This is the window that sets up the alert contents and sms receiving numbers and reply numbers for when an alert is generated. Feature Specific Screen Notes Equipment Management Window “Receiving Number”: Here you enter the number to receive the text messages. Also, you can use the checkbox to determine whether or not to use SMS. “Reply Number” : Here you enter the number that you want to use to answer the sms message from the receiving number. This will be the SMS outgoing number. “Transmission Contents” or “Message Contents” : Here you enter the text message contents. “Save” button: You must definitely click the save button when you change the settings after you have setup the temperatures and the times . “Cancel” button: You should click this button when you want to cancel setup changes that you have made and rely on prior settings. “Close” button: This closes the basic temperature setup window. Feature Specific Screen Notes CCP information output screen You can open the education center’s CCP information file. Feature Specific Screen Notes Record Output Screen There are two menus here: “The open Record file” and “Alert Status List” Feature Specific Screen Notes Record Output Screen “Open Record File” A file of one unit of temperature data can be opened. “20110110.xls”: means a temperature data file for 10/01/11. Feature Specific Screen Notes Record Output File “Alert Status List” You can view a list of all the generated alerts up to the present. Feature Specific Screen Notes Help Screen RTMS Version, RTMS User Manual Feature Specific Screen Notes Temperature Data Graph View Click the Speed Button ( ) in the upper right of the screen. Feature Specific Screen Notes Temperature Data Graph View The temperature graph basic window appears. Feature Specific Screen Notes Temperature Graph Window Notes In the upper left corner the SIZM’s ID “SZ155137120” appears. Feature Specific Screen Notes Temperature Graph Window Notes In the upper left part of the window, the blue “Refrigerator” label shows that the equipment connected to the SIZM is a refrigerator. If the SIZM is connected to a freezer, then “Freezer” will be displayed here. Feature Specific Screen Notes Temperature Graph Window Notes “The gray “Refrigerated Area” button indicates that as the equipment connected to the SIZM is a refrigerator, this is the area to be refrigerated. In the case of a refrigerated freezer area, the left side will display “Freezer area”, and the right will display “Refrigerated area”. Feature Specific Screen Notes Temperature Graph Notes The Red arrow points to the current date and time “Year/Month/Day Hr:Mn:Sec“ will display. Feature Specific Screen Notes Temperature Graph Window Notes The red arrow in the upper portion of the screen indicates the reference date for the graph . When first opened the temperature graph window displays today’s date. Feature Specific Screen Notes Temperature Graph Window Notes After entering your desired reference date, click the run( bring up the temperature data for the date you entered. ) button to Feature Specific Screen Notes Temperature Graph Window Notes When the reference date temperature data is on the PC, there is no separate download from the PIZM. When it is not in the PC, a download from the PIZM is received. Feature Specific Screen Notes Temperature Graph Window Notes This is the download completion screen. When the download completes, click “OK” to save it as an Excel file. Feature Specific Screen Notes Temperature Graph Window Notes When you click “OK” the data received will be saved as an Excel file. Feature Specific Screen Notes Temperature Graph Window Notes If your reference date is today then “Would you like to download today’s saved data?” prompt will appear. When this prompt appears, if you select “Yes” then the day’s data will be downloaded again. . Feature Specific Screen Notes Temperature Graph Window Notes the Left Arrow button( ) by the Red arrow moves the display left to display earlier times. The “Real Time View’ button should be unchecked. So, a 6 to 12 hour graph would display 0 to 6 hr display on the next window. Feature Specific Screen Notes Temperature Graph Window Notes the right Arrow button( ) by the Red arrow moves the display right to display later times. The “Real Time View’ button should be unchecked. So, a 0 to 6 hour graph would display a 6 to 12 hr display on the next window. Feature Specific Screen Notes Temperature Graph Window Notes The (+) button( ) near the red arrow has a zoom in function that will change a 24 hour display to a 12 hr display, a 12 hr display to a 6 hr display, and a 6 hr display to 1 hr display. Feature Specific Screen Notes Temperature Graph Window Notes The (-) button( ) near the red arrow has a zoom out function that will change a 1 hour display to a 6 hr display, a 6 hr display to a 12 hr display, and a 12 hr display to 24 hr display.