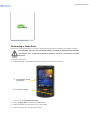
1
RP1200 User‟s Manual RP1200 User‟s Full Manual Rugged & Professional RP1200 Integrator Manual Apr 1, 2013 RP1200 User‟s Manual 2 © 2013 by Gen2wave, Inc. All rights reserved. No part of this publication may be reproduced or used in any form, or by any electrical or mechanical means, without permission in writing from Gen2wave. This includes electronic or mechanical means, such as photocopying, recording, or information storage and retrieval systems. The material in this manual is subject to change without notice. The software is provided strictly on an “as is” basis. All software, including firmware, furnished to the user is on a licensed basis. Gen2wave grants to the user a non-transferable and non-exclusive license to use each software or firmware program delivered hereunder (licensed program). Except as noted below, such license may not be assigned, sublicensed, or otherwise transferred by the user without prior written consent of Gen2wave. No right to copy a licensed program in whole or in part is granted, except as permitted under copyright law. The user shall not modify, merge, or incorporate any form or portion of a licensed program with other program material, create a derivative work from a licensed program, or use a licensed program in a network without written permission from Gen2wave. The user agrees to maintain Gen2wave‟s copyright notice on the licensed programs delivered hereunder, and to include the same on any authorized copies it makes, in whole or in part. The user agrees not to decompile, disassemble, decode, or reverse engineer any licensed program delivered to the user or any portion thereof. Gen2wave reserves the right to make changes to any software or product to improve reliability, function, or design. Gen2wave does not assume any product liability arising out of, or in connection with, the application or use of any product, circuit, or application described herein. No license is granted, either expressly or by implication, estoppels, or otherwise under any Gen2wave, Inc., intellectual property rights. An implied license only exists for equipment, circuits, and subsystems contained in Gen2wave products. Gen2wave, Inc. http://www.gen2wave.com RP1200 User‟s Manual 3 Revision History Changes to the original manual are listed below: Version Date Description Rev 1.0 13/02/20 Initial release Rev 1.1 13/04/01 Image Changing Rev 1.2 13/05/10 Button Image Changing RP1200 User‟s Manual 4 Table of Contents RP1200 User‟s Full Manual............................................................................................................................................................................... 1 Revision History ..................................................................................................................................................................................................... 3 About This Guide .................................................................................................................................................................................................. 7 Introduction.................................................................................................................................................................................................... 7 Software Versions........................................................................................................................................................................................ 8 RP1200 Version ................................................................................................................................................................................... 8 AKU Version .......................................................................................................................................................................................... 8 System Version .................................................................................................................................................................................... 8 Service Information .................................................................................................................................................................................... 9 Getting Started ....................................................................................................................................................................................................10 Introduction..................................................................................................................................................................................................10 RP1200 Specifications .............................................................................................................................................................................10 Unpacking the RP1200 ...........................................................................................................................................................................12 Getting Started ...........................................................................................................................................................................................13 Installing a microSD Card .....................................................................................................................................................................13 Installing the SIM Card ...........................................................................................................................................................................14 Installing the Battery................................................................................................................................................................................15 Charging the Main Battery ...................................................................................................................................................................16 Table 1-1 LED Charge Indicators .............................................................................................................................................16 Checking the Battery Status.................................................................................................................................................................17 Resetting the RP1200 ..............................................................................................................................................................................18 Performing a Soft Reset Boot .............................................................................................................................................................18 Performing a Hard Reset .......................................................................................................................................................................19 Performing a Clean Boot .......................................................................................................................................................................20 RP1200 Service Verification ...........................................................................................................................................................................21 Ensuring Network Coverage ................................................................................................................................................................21 Configuring a Data Connection...................................................................................................................................................................23 Connecting to an ISP ..............................................................................................................................................................................23 Connecting to a Network With a VPN Server ............................................................................................................................24 RP1200 Settings...................................................................................................................................................................................................25 Phone Tab .....................................................................................................................................................................................................25 Security Tab..................................................................................................................................................................................................26 Enabling a PIN ...................................................................................................................................................................................26 Changing a PIN .................................................................................................................................................................................27 Disabling a PIN .................................................................................................................................................................................27 Services ...........................................................................................................................................................................................................28 Call Barring (Call Blocking) ..........................................................................................................................................................29 Caller ID ................................................................................................................................................................................................29 Call Forwarding .................................................................................................................................................................................30 Call Waiting.........................................................................................................................................................................................30 Voice Mail and Text Messages..................................................................................................................................................31 Fixed Dialing .......................................................................................................................................................................................31 5 RP1200 User‟s Manual Network..........................................................................................................................................................................................................32 Changing Networks Manually ...................................................................................................................................................32 Viewing Available Networks .......................................................................................................................................................33 Setting Preferred Networks.........................................................................................................................................................34 Via Wireless LAN .......................................................................................................................................................................................35 Accessories .............................................................................................................................................................................................................36 Introduction..................................................................................................................................................................................................36 Single Slot USB Cradle............................................................................................................................................................................37 Setup ...............................................................................................................................................................................................................37 Charging the RP1200 Battery ..............................................................................................................................................................38 Charging the Spare Battery ..................................................................................................................................................................39 Battery Charging Indicators .................................................................................................................................................................40 Table 2-1 Spare Battery LED Charging Indicators ...........................................................................................................40 Charging and Communication............................................................................................................................................................41 LED Charging Indicators ........................................................................................................................................................................41 Charge LED .........................................................................................................................................................................................41 Charging Temperature ..................................................................................................................................................................41 Vehicle Cradle .............................................................................................................................................................................................42 Using the Computer ..........................................................................................................................................................................................43 Adjusting the Volume of the RP1200 .............................................................................................................................................43 Using the Touch Screen .........................................................................................................................................................................44 Configuring the Backlight Settings ...................................................................................................................................................44 Using the Stylus .........................................................................................................................................................................................45 Understanding the Screen Icons .......................................................................................................................................................45 Aligning the Touch Screen ...................................................................................................................................................................46 Rotating the Screen .................................................................................................................................................................................46 Reading Bar Codes ...................................................................................................................................................................................47 Using the Color Camera ........................................................................................................................................................................48 Using a microSD Card.............................................................................................................................................................................50 Enabling the Integrated GPS on the RP1200 ..............................................................................................................................50 Using the A-GPS on the RP1200 .......................................................................................................................................................50 Button Assign Function ..........................................................................................................................................................................53 RP1200 Numeric Keypad ................................................................................................................................................................................55 Numeric Keypad Input Modes............................................................................................................................................................56 Connecting and Configuring the RP1200...............................................................................................................................................57 Connecting the RP1200 to a PC ........................................................................................................................................................57 Connecting the RP1200 to Your Network ....................................................................................................................................58 Connecting the RP1200 Using WIFI Communications ............................................................................................................59 Connecting the RP1200 Using Bluetooth Communications ................................................................................................61 Configuring the Phone ...........................................................................................................................................................................62 Turning On the Phone Using the Wireless Manager ..............................................................................................................62 Using Internet Sharing ............................................................................................................................................................................63 Making a Phone Call ...............................................................................................................................................................................65 6 RP1200 User‟s Manual Installing Applications ......................................................................................................................................................................................66 Installing Applications on the RP1200 ............................................................................................................................................66 Installing Applications Using Microsoft ActiveSync .................................................................................................................67 Installing Applications Using a microSD Card ............................................................................................................................68 RP1200 User‟s Manual 7 About This Guide Introduction This Integrator Guide provides information about setting up and configuring the RP1200 and its accessories. NOTE. Screens and windows pictured in this guide are samples and can differ from actual screens. RP1200 User‟s Manual 8 Software Versions This guide covers various software configurations and references are made to operating system or software versions for: Adaptation Kit Update (AKU) version OEM version Phone version BT version Fusion version. RP1200 Version Build Version: 29058.5.3.12.8 Software Name & Version: Windows Embedded Handheld 6.5 Classic & CE OS 5.2.29058 AKU Version To determine the Adaptation Kit Update (AKU) version: Tap Start > Settings > System > About icon > Version tab. The second line lists the operating system version and the build number. The last part of the build number represents the AKU number. For example, Build 29058.5.3.12.8 indicates that the device is running AKU version 21903 5.0.92. System Version To determine the OEM software version: Tap Start > Settings > System tab > System Info icon RP1200 User‟s Manual 9 Service Information If you have a problem with your equipment, contact Gen2wave Enterprise Mobility support for your region. Contact Information is available at: http://www.gen2wave.com/ Manufacturing label Gen2wave responds to calls by e-mail, telephone or fax within the time limits set forth in support agreements. RP1200 User‟s Manual 10 Getting Started Introduction This chapter provides information about the RP1200, accessories, charging, and resetting the RP1200. RP1200 Specifications Performance Characteristics Battery(4000mA) Performance CPU Samsung S5PV210 1GHz Standby time 220 hours OS Windows®Embeded Handheld 6.5.3 Talk time 10 hours Memory 256MB SDRAM (512MB Optional) User profiles Outdoor WAN+GPS, 15min/hour voice communication, 10kB transmission every 1G ROM Communication USB HOST 2.0 FULL SPEED Interface USB Client 2.0 HIGH SPEED 10 min, and GPS on all time, 10.5 hours of operation. Ext. Serial RS232C Outdoor Voice, 15 min/hour voice communication, 10.5 hours of operation and 150 hours standby time. Physical Characteristics User Environment Dimensions 139mm H X 73mm W X 21mm D Sealing IP64 Weight 270 gram with 1860mAH battery Drop Spec. 1.5M drop to concrete. 315 gram with 4000mAH battery Display 2 drops per 6 sides Main -20°C ~ +60°C Touch Panel, 4 side keys, power key, Storag -25°C ~ +70°C Alphanumeric Keypad e 3.5inch. VGA Operating Temp. Input Battery Standard : 1860mA/h Li-ion AC Power Extended : 4000mA/h Li-ion Input : AC 100 ~ 240V, 50 ~ 60Hz Output : DC +5.0V, 3.5A Build-in backup battery : 200mA/h (polymer) Expansion Slot High capacity micro SD Card Relative Humidity 5% ~ 80% Audio Speaker / Receiver / MIC Used frequency UMTS/HSPA+ : Wireless HSPA+ (Five band) band Five band: (WWAN) Quad-band EDGE GPRS GSM 800/850/900/1900/2100MHz Bluetooth EDR V2.1 (Intenna, BT Headset support) Download:14.4Mbps, Upload:5.7Mbps GSM/GPRS/EDGE : Quad band, 850/900/1800/1900 MHz Wireless LAN 802.11 b/g/n 1D Laser Scanner (IS4813) GPS Embedded A-GPS Signal Output Digital, industry standard Notification Vibration and Charging LED Resolution: 5 mil (0.127 mm) Scanner 1D Laser Type Roll: 42° Pitch Angle: 68° 2D Imager Color Camera RP1200 User‟s Manual 11 Resolution: 5.0 megapixel Yaw 52° Illumination: User controllable flash Light Source Visible Laser Diode 650 nm Lens: Auto Focus Scan Rate 100 scan lines per second 2D Imager Engine (5100SR-110R) Sweep Angle 54° minimum Focal Distance 7 inches (17.8cm) from lens plate Ambient Light 4842 Lux (450 foot-candles) Sensor Resolution 752 x 480 pixels Levels Typical 5.2 mil 70 mm - 95 mm (2.8˝ - 3.78˝) Performance* 7.5 mil 57 mm - 171 mm (2.3˝ - 6.8˝) Narrow Width Depth of Field Image Sensor 752 X 480 CMOS sensor * 10.4 mil 50 mm - 210 mm (2.0˝ - 8.3˝) 13 mil 50 mm - 254 mm (2.0˝ - 10.0˝) 19.5 mil 75 mm - 300 (3.0˝ - 11.8˝) Performance may be impacted by bar code quality and environmental conditions Motion Tolerance 4 in. (10.2cm) per second Regulatory Rotational 360° Electrical Safety Sensitivity IEC 60950-1: 2005 (2nd Edition) and/or EN 60950-1:2006 Viewing Angle +40° Environmental RoHS-compliant Ambient Light Total darkness to 100,000 lux WLAN & Bluetooth ETSI EN300328:V1.7.1(2006-10) Immunity (full sunlight) Illumination LEDs 626nm +30nm EDGE/GSM 900/ 3GPP TS 34.123 GCF approved DCS 1800 module ETSI EN301 511:V.9.0.2(2003-03) ETSI TS 151 010-1 :V7.9.0(200804) Aiming LEDs: 526nm +30nm HSPA+ ETSI EN 301 9081&2:V.3.2.1(2007-5) 3GPP TS 25.102 V8.0.0 (2008-05) Laser: 650nm +10nm RF Exposure EN 60950-1: 2006+A11:2009 , EN50360: 2001, EN62209-1: 2006 and IEEE1528-2003 Peripherals and Accessories EMI/RFI ETSI EN 301 489-1 V1.8.1(04/2008) Communication USB Client 2.0 HIGH SPEED Battery Chargers: 1-slot battery charger Cradle V1.3.1(11/2005) Vehicle Chager Cradle ETSI EN 301 489- 4-slot battery Changer Cradle V1.3.1(04/2008) ETSI EN 301 489-7 ETSI EN 301 489-24 V1.4.1(09/2007) Electrical Safety: EMI/RFI: IEC 60950-1: 2005 (2nd Edition) and/or Laser Safety IEC 60825- EN 60950-1:2006 1:1993+A1:1997+A2:2001, EN 55022:2006 Class B EN 60825- EN 61000-3-2:2006 1:1994+A2:2001+A1:2002 EN 61000-3-3:1995 +A1:2001+A2:2005 “Safety of Laser products” Interactive Sensor Technology Motion-sensor: 3-axis accelerometer that enables motion-sensing applications for dynamic screen orientation, and Magnetic Field Sensor, power management and free-fall detect. RP1200 User‟s Manual 12 Unpacking the RP1200 Carefully remove all protective material from the RP1200 and save the shipping container for later storage and shipping. Verify that you received the following equipment: RP1200 Lithium-ion battery stylus Quick Start Guide RP1200 BATTERY STYLUS Quick Guide RP1200 User‟s Manual 13 Getting Started To start using the RP1200 for the first time: Install a microSD card (optional) Install the SIM card Install the main battery. Charge the RP1200. Power on the RP1200. Installing a microSD Card The microSD card slot provides secondary non-volatile storage. The slot is located under the battery pack. Refer to the documentation provided with the card for more information, and follow the manufacturer‟s recommendations for use. CAUTION Follow proper ESD precautions to avoid damaging the SD card. Proper ESD precautions include, but are not limited to, working on an ESD mat and ensuring that the operator is properly grounded To install the microSD card: RP1200 User‟s Manual 14 Installing the SIM Card ★ NOTE RP1200 configuration only GSM phone service requires a Subscriber Identification Module (SIM) card, or smart card. Obtain the card from the your service provider. The card can contain the following information: ★ Mobile phone service provider account details. Information regarding service access and preferences. Contact information, which can be moved to Contacts on the RP1200. Any additional services to which you have subscribed. NOTE For more information about SIM cards, refer to the service provider's documentation. To install the SIM card: RP1200 User‟s Manual 15 Installing the Battery ★ NOTE The RP1200 ships with either a 1860 mAh or 4000 mAh battery. The 1860 mAh battery is shown in this installation procedure. To install the battery. Insert the battery, top first, into the battery compartment in the back of the RP1200. Press the battery down into the battery compartment Lock the Battery Release Latch Battery Release Latch RP1200 User‟s Manual 16 Charging the Main Battery Before using the RP1200 for the first time, charge the main battery until the amber Charging/Battery Status LED remains lit (see Table 1-1 for charge status indications). To charge the RP1200, use a cable or a cradle with the appropriate power supply. For information about the accessories available for the RP1200, see Accessories Chapter. For cable and cradle setup and charging procedures see Accessories Chapter for more information. Charge Only Cable Single Slot USB Cradle To charge the main battery: Connect the charging accessory to the appropriate power source. Insert the RP1200 into a cradle or attach to a cable. The RP1200 begins charging. The Charging/Battery Status LED red while charging, then turns LED green when fully charged. See Table 1-1 for charging indications. The 1860 mAh battery fully charges in approximately four hours and the 4000 mAh battery fully charges in approximately six hours. Table 1-1 LED Charge Indicators Charging/Battery Indication Status LED Off RP1200 is not charging. RP1200 is not inserted correctly in the cradle or connected to a power source. Charger/cradle is not powered. Red LED RP1200 is charging. Green LED Charging complete Do not use any other charger except one (5.0V / 3.5A) provide. Make sure to handle it gentle; damage with excessive force may cause no warranty. Risk of explosion if battery is replaced by an incorrect type. Dispose of used batteries according to the instructions. When attached battery is completely discharged, plug charger to main body, then reset the device to check if screen is back on. Charging Spare Batteries RP1200 User‟s Manual 17 See Accessories for information on using accessories to change spare batteries. Charging Temperature Charge batteries in temperatures from 0°C to 40°C (32°F to 104°F). Note that charging is intelligently controlled by the RP1200. To accomplish this, for small periods of time, the RP1200 or accessory alternately enables and disables battery charging to keep the battery at acceptable temperatures. The RP1200 or accessory indicates when charging is disabled due to abnormal temperatures via its LED. See Table 1-1. Powering On the RP1200 After inserting the battery or when turning the RP1200 on for the first time, the splash screen displays for about a minute as the RP1200 boots, then the calibration window appears. Calibrating the Screen NOTE To calibrate the screen so the cursor on the touch screen aligns with the tip of the stylus: Remove the stylus from its holder on the side of the RP1200. Carefully press and briefly hold the tip of stylus on the center of each target that appears on the screen. Repeat as the target moves around the screen, and then tap the screen to continue. Checking the Battery Status The easiest way to check the status of your battery is to look at the battery icon on the status bar of your RP1200. Battery Icon Status Icon Status Battery is fully charged. Battery has a medium charge. You should be able to work for several more hours before changing batteries. Battery is low. You need to charge or replace the battery soon. Battery is critically low. You need to replace the battery now. Battery is charging. RP1200 User‟s Manual 18 Resetting the RP1200 You rarely need to reset the computer. If the computer or an application lock up, you may need to reset the RP1200. The RP1200 uses the configuration currently saved in flash memory during the boot process. There are three ways to reset the RP1200: Soft Reset Hard Reset Clean booting If the RP1200 is not functioning properly, perform a reset first. If the RP1200 still does not respond, perform a hard reset. Performing a Soft Reset Boot You may need to perform a Soft Reset boot to correct conditions where an application stops responding to the system. To perform a Soft Reset boot: Using the stylus, press the Soft Reset button. Soft Reset Button The RP1200 systematically shuts down. The computer goes through the initialization process and restarts. RP1200 User‟s Manual 19 Splash Screen (Reset) Performing a Hard Reset To perform a Hard reset boot: Hold down the red Power button, and press the Reset button. 2) Press the Reset button 1) Hold down the Power button RP1200 User‟s Manual 20 Splash Screen (Hard-reset) Performing a Clean Boot A clean boot resets the RP1200 to the factory default settings. All data in the Application folder is retained. The clean boot process erases the RP1200 memory, including all applications and data files in the object store. To preserve applications through a clean boot, store them in the Flash File Store. To perform a clean boot: 1. Keeping pressing on the volume down button, press the reset button one time. 2) Hold down the volume down button 1) Press the reset button 2. You can see the „System Setup Screen‟. 3. Select „2. Clean Boot‟ and then press enter button. 4. When prompted, tap the screen to set up the RP1200. 5. Follow the instructions to calibrate the screen RP1200 User‟s Manual 21 RP1200 Service Verification RP1200 phone and data services require a live SIM card, obtained from a service provider, installed in the RP1200 phone. The SIM card has embedded circuitry on one side of its surface which, when inserted into an RP1200 phone, provides phone service. The SIM card provides a phone number, determines the features or services available to the subscriber, and identifies the subscriber to the network. In addition to SIM card installation, the RP1200 may require various settings to operate as a phone with data connection features. Ensuring Network Coverage 1. Ensure an activated SIM card, from the phone service provider, is installed in the RP1200. NOTE 2. The SIM card must be enabled to connect to the network. Verify active phone and data services by tapping to display the Phone dialog. The Carrier name appears in the dialog box. Connectivity Dialog 3. Verify SIM card functionality: A. Tap Start > Settings > Personal > Phone icon > Network tab. RP1200 User‟s Manual 22 Phone Settings Window - Network Tab B. Ensure the service provider‟s network appears in the Current network: field. C. If the network does not appear, tap Find Network. If the network still does not appear, verify that the SIM card was installed correctly. If it was, and no network appears, contact the service provider. RP1200 User‟s Manual 23 Configuring a Data Connection Connecting to an ISP You can connect to your Internet Service Provider (ISP), and use the connection to send and receive e-mail messages and view web pages. Get an ISP dial-up access telephone number, a user name, and a password from your ISP. Tap the Help icon at any time to view additional information for the wizard or the settings. To connect to an Internet service provider 1 Tap Start > Settings > Connections > Connections. 2 Under My ISP, tap Add a new modem connection. 3 Enter a name for the connection, such as “ISP Connection.” 4 If using an external modem connected to your RP1200 with a cable, select Hayes Compatible on COM1 from the Select a modem drop-down list. 5 Tap Next. 6 Enter the access phone number and then tap Next. 7 Enter the User name, Password, and Domain (if provided by an ISP or your network administrator). 8 Tap Finish. 9 Tap the Advanced tab from the Connections screen and then tap Dialing Rules. 10 Select Use dialing rules, tap ok at the dialog box, and then tap Edit. 11 Specify your current phone type and then tap ok until you exit and return to the Settings page. Once the RP1200 is connected, you can: • send and receive message by using Messaging (Outlook E-mail). • visit web pages by using Internet Explorer Mobile. RP1200 User‟s Manual 24 Connecting to a Network With a VPN Server A VPN connection helps you to securely connect to servers, such as a corporate network, through the Internet. Before you can make a VPN connection, you will need the following items from your network administrator: • User name • Password • Domain name • TCP/IP settings • Host name or IP address of the VPN server To create a VPN server connection to work 1 Tap Start > Settings > Connections. 2 Under My Work Network, tap Add a new VPN server connection. 3 In the Name field, enter a name for the connection, such as your company name. 4 In the Host name / IP field, enter the VPN server name or IP address. 5 Select the VPN type of authentication to use with your RP1200. If you are not sure which option to choose, check with your network administrator. 6 Tap Next. 7 Select a way for the RP1200 to authenticate the connection. If you select A pre-shared key, enter the key provided by your network administrator. 8 Click Next. 9 Enter the User name, Password, and Domain (if provided by an ISP or your network administrator). 10 Tap Finish. RP1200 User‟s Manual 25 RP1200 Settings Use the Phone Settings window to customize settings, such as the ring type and ring tone for incoming calls, security options, and other options depending on the type of service. Phone Tab Use the Phone tab to customize ring type, ring tone, keypad tone, and security options. Tap Start > Settings > Personal tab > Phone icon > Phone tab or Start > Phone > Menu > Options > Phone tab. Phone Window - Phone Tab Sounds 1. Phone Number automatically displays on the Phone tab when a live SIM card is installed. 2. Select a ring type from the Ring type: drop-down list. The ring type changes the way the RP1200 rings when you receive an incoming call. Regardless of the ring type selected, a dialog box appears on the RP1200‟s display for incoming calls. 3. Select a ring tone for incoming calls from the Ring tone: drop-down list. To hear a sample of the selected ring tone, tap 4. . Tap to end the ring tone. Select a keypad tone from the Keypad: drop-down list. This selection determines the tone that sounds when entering a phone number on the keypad. Select Short tones or Long tones to specify the duration of the sound when you press a number on the keypad. Select Off to disable tones. NOTE Turning off sounds saves power and prolongs battery life. RP1200 User‟s Manual 26 Security Tab Enabling a PIN NOTE Place emergency calls at any time, without requiring a PIN or a SIM card. Security Tab To require a PIN when using the phone: 1. From the Security tab, select the Require PIN when phone is used check box under PIN Security. Enter PIN 2. Use the touch keypad to enter a four to eight digit PIN. RP1200 User‟s Manual 27 3. Tap Enter to enable the PIN and return to the Phone tab. Changing a PIN CAUTION: If you enter an incorrect PIN, the message “SIM PIN incorrect: Try again” appears. After three consecutive incorrect attempts, the SIM card is blocked. The phone does not allow you to attempt to enter your PIN again and you must obtain a PIN Unblock Key from your service provider. 1. From the Security tab (Phone Window - Phone Tab), tap Change PIN. 2. Use the touch keypad to enter the current PIN. 3. Tap Enter. 4. Use the touch keypad to enter a new four to eight digit PIN. 5. Tap Enter. 6. Reenter the new PIN for confirmation and tap Enter. 7. Tap ok to confirm the change. Disabling a PIN 1. From the Security tab, deselect the Require PIN when phone is used check box. 2. Use the touch keypad to enter the current PIN. 3. Tap Enter. 4. Tap ok to confirm the change. 5. Tap ok to exit settings. RP1200 User‟s Manual 28 Services Use the Services tab to configure settings for subscribed phone services. For example, block certain types of incoming and/or outgoing calls, disclose the caller‟s identity when making outgoing calls, forward incoming calls to a different phone number, receive notification of incoming calls when a phone session is in use, and set up voice mail and short message service. 1. Tap Start > Settings > Personal tab > Phone icon > Services tab. or Start > Phone > Menu > Options > Services tab. Phone Window - Services Tab 2. Select a service from the list and tap Get Settings... . 3. Change services settings as follows. RP1200 User‟s Manual 29 Call Barring (Call Blocking) Use call barring to block certain types of incoming and/or outgoing calls. Select the type of incoming and/or outgoing calls to block. Call Barring Caller ID Enable caller ID to reveal the identity of the person making an outgoing call. Select the Everyone radio button toalways display the caller ID. Select the No one radio button to prevent the caller‟s identity from appearing to others. Caller ID RP1200 User‟s Manual 30 Call Forwarding Call Forwarding may not be available on all networks. Check with your service provider for NOTE availability. Use call forwarding to forward incoming calls to a different phone number. To forward all calls to a different phone number: select the Forward all incoming phone calls check box. enter the phone number to receive forwarded calls in the To: text box. To forward incoming calls to a different phone number based on a specific situation, select one or more of the check boxes under Forward phone calls only if:. No answer: enter the phone number to receive forwarded calls only when the phone cannot be answered. Then select a time period from the Forward after: drop-down list. Options are 5, 10, 15, 20, 25, and 30 seconds. Unavailable: enter the phone number to receive forwarded calls only when the phone is turned off or the user is unreachable. Busy: enter the phone number to receive forwarded calls only when the line is busy. Call Waiting NOTE Call Waiting may not be available on all networks. Check with your service provider for availability. Call waiting notifies you of an incoming call when the phone is in a phone session. Select the Notify me radio button to enable call waiting. Select the Do not notify me radio button to disable call waiting. Call Waiting RP1200 User‟s Manual 31 Voice Mail and Text Messages To use voice mail and send short messages, enter the voice mail and/or text message phone number in the appropriate text boxes. Voice Mail and Text Messages Fixed Dialing Use Fixed Dialing to restrict the phone to dial only the phone number(s) or area code(s) specified in a Fixed Dialing list. 1. Select Fixed Dialing and tap Get Settings. 2. Select the Enable fixed dialing check box. 3. To add a number to the list, tap Menu > Add. 4. Enter the phone number or area code to restrict and tap Done. 5. Repeat steps 3 and 4 to add more numbers, and tap Done twice when complete. 6. Enter PIN2 and tap Done. RP1200 User‟s Manual 32 Network Use the Network tab to view available networks, determine the order in which the phone accesses another network if the current network is unavailable, and specify whether to change networks manually or automatically. The current network remains active until it‟s changed, the signal is lost, or the SIM card is changed. The network the RP1200 currently uses appears in the Current network: field at the top of the window. Changing Networks Manually 1. Tap Start > Settings > Personal tab > Phone icon > Network tab Or Start > Phone > Menu > Options > Network tab. Phone Window - Network Tab 2. From the Network selection drop-down list, select Manual. Choose Network RP1200 User‟s Manual 33 3. From the Choose Network window, select the network to use. 4. Tap OK. Viewing Available Networks To view all wireless networks available: 1. Tap Start > Settings > Personal tab > Phone icon > Network tab. or Start > Phone > Options > Network tab. Phone Window - Network Tab 2. Tap Find Network. Choose Network 3. From the Choose Network window, select the network to use. 4. Tap OK. RP1200 User‟s Manual 34 Setting Preferred Networks Set networks in a preferred order of access. Setting preferred networks allows the RP1200 to access a second preferred network if the first is unavailable. 1. Tap Start > Settings > Personal tab > Phone icon > Network tab or Start > Phone > Menu > Options > Network tab. Phone Window - Network Tab 2. Tap Set Networks to view all available networks. Preferred Networks 3. Select the preferred networks by tapping one or more check boxes. 4. Tap Move Up and Move Down, as necessary, to place the selected networks in the preferred order. 5. Tap ok to send the new settings to the network. 6. From the Network tab, select Automatic from the Network selection drop-down list. 7. Tap ok to exit settings. RP1200 User‟s Manual 35 Via Wireless LAN You can use the Wireless Network Via Wireless LAN. RP1200 supports IEEE 802.11b and 802.11g. To connect the Wireless LAN (AP must be on and functioning) RP1200 User‟s Manual 36 Accessories Introduction This chapter provides set up information for the following RP1200 accessories: Charge Only Cable - Provides power to the RP1200. USB Charging Cable - Provides power to the RP1200 and USB communication with a host computer. Single Slot Modem/USB Cradle - Charges the RP1200 main battery and a spare battery. Synchronizes the RP1200 with a host computer through an Modem or USB connection. RP1200 User‟s Manual 37 Single Slot USB Cradle This section describes how to set up and use a Single Slot USB cradle with the RP1200. For USB communication setup procedures see ActiveSync Chapter. The Single Slot USB cradle: • Synchronizes information between the RP1200 and a host computer. See ActiveSync Chapter for information on setting up a partnership between the RP1200 and a host computer. • Charges the RP1200‟s battery. • Charges a spare battery. Setup AC Power 5V, 3.5A USB Client USB Host Single Slot USB Cradle Power and USB Connections Select switch on right : USB Host RP1200 User‟s Manual 38 Charging the RP1200 Battery Connect the cradle to power. Insert the RP1200 into the RP1200 slot to begin charging. Charges the RP1200‟s battery RP1200 User‟s Manual 39 Charging the Spare Battery Spare Battery Charging RP1200 User‟s Manual 40 Battery Charging Indicators The Single Slot USB cradle charges the RP1200‟s main battery and a spare battery simultaneously. The RP1200‟s Charging/Battery Status LED indicates the status of the battery charging in the RP1200. See Table 1-1 for charging status indications. The spare battery charging LED on the cradle indicates the status of the spare battery charging in the cradle. See Table 2-1 for charging status indications. Charge Status LED Charging Temperature. Charge batteries in temperatures from 0°C to 40°C (32°F to 104°F). Charging is intelligently controlled by the RP1200. To accomplish this, for small periods of time, the RP1200 or accessory alternately enables and disables battery charging to keep the battery at acceptable temperatures. The RP1200 or accessory indicates when charging is disabled due to abnormal temperatures via its LED. See Table 1-1 and Table 2-1. Table 2-1 Spare Battery LED Charging Indicators Spare Battery LED (on cradle) Indication Red LED Spare battery is charging. Green LED Spare battery is fully charged. Off Not charging. RP1200 User‟s Manual 41 Charging and Communication Insert the RP1200 into a slot to begin charging. LED Charging Indicators Charge LED The RP1200‟s charge LED shows the status of the battery charging in the RP1200. See Table 1-1 for charging status indications. Charging Temperature Charge batteries in temperatures from 0°C to 40°C (32°F to 104°F). Charging is intelligently controlled by the RP1200. To accomplish this, for small periods of time, the RP1200 alternately enables and disables battery charging to keep the battery at acceptable temperatures. The RP1200 indicates when charging is disabled due to abnormal temperatures via its LED. See Table 1-1. RP1200 User‟s Manual 42 Vehicle Cradle This guide will help you on basic usage of the product. Please check if all the contents shown below are nearby for use. RAM Mount and Cigar Jack are needed for installing and charging. (INPUT: DC 12~24V Max 2A / OUTPUT: DC 5V Max 3A) 1. I/O Connector 5. USB Host 2. LED Connection Indicator 4. Release Button 6. RS232 Serial Port 7. DC Jack (Optional) 1. I/O Connector: Used for data communication with PDA and changing. 2. Power LED: Connection status of the Cigar Jack. Note that the LED on the PDA will show the charging status of PDA. 3. Release Button: Press and hold to slide out PDA from Vehicle Cradle. 4. USB Host: Used for USB device. 5. RS232 Serial Port (Optional): This RS232 port enables serial communication. Use COM6. 6. DC Jack: DC Jack connector. 7. Joint Slot: Vehicle Cradle is joined to RAM Mount. RP1200 User‟s Manual 43 Using the Computer Adjusting the Volume of the RP1200 You can adjust the computer volume for your needs and your environment. The volume includes sounds you hear when you tap the screen or scan bar codes with a scanner. You can set the volume to off, very low, low, medium, high, very high (default), and vibrate. You can use the Volume application (available from the navigation bar) or the Volume buttons (on the side of the RP1200) to change the volume of the computer. Location of Volume Buttons on the RP1200 To adjust the volume with the Volume application 1 Tap the Volume ( ) icon at the top of the screen. 2 Use your stylus to adjust the volume slider to the volume you want, select Vibrate, or select Off. To adjust the volume with the Volume buttons • Press the upper side button to increase the volume. • Press the lower side button to decrease the volume, set the volume to vibrate, or turn the volume off. RP1200 User‟s Manual 44 Using the Touch Screen The RP1200 has a 480 x 640 pixel color touch screen display. Main Screen is set below Info Bar Day/Time info Wireless info Message Info Task Info Today Info Lock Info Left / Right function info Windows Mobile 6.5 Start Screen To turn the screen LCD on and off • For the keypad, press power key Configuring the Backlight Settings By default, the RP1200 goes into Screen Off mode when there is no activity on the computer. Screen Off mode turns off the backlight and display. Press a key or tap the screen to resume activity. To configure the backlight 1 Tap Start > Settings > System > the Backlight icon > the Battery Power tab. 2 With Turn off backlight if device is not used for checked, select the timeout value (30 seconds, or 1 to 5 minutes). RP1200 User‟s Manual 45 Using the Stylus Your computer has a stylus for selecting items and entering information on the touch screen. Functions You Can Perform With the Stylus Action Description Tap Touch the screen once with the stylus to select options, open or close applications, or launch menus from the Command bar. Drag Hold the stylus on the screen and drag across the screen to select text and images. Tap and hold Tap and hold the stylus on an item to see a menu of actions available for that item. On the pop-up menu that appears, tap the action you want to perform. Understanding the Screen Icons Use the screen icons on the navigation bar and the command bar to see the network connection status and other system information. For information about the battery icons, see “Checking the Battery Status”. Some standard Microsoft icons are included in this table. Screen Icons Icon Description The volume is turned off. To turn the volume back on, tap this icon and choose your setting. The computer is connected to the network. The computer is not connected to the network. The 802.11 radio is connected to the wireless network. RP1200 User‟s Manual 46 Aligning the Touch Screen If the touch screen does not respond when you tap it with the stylus, you may need to calibrate the screen. Before you calibrate the touch screen, make sure the RP1200 screen is unlocked. To calibrate the touch screen 1 Tap Start > Settings > Systems > Screen. 2 Tap Align Screen and follow the instructions to align the screen. 3 Click ok. If the touch screen is so out of alignment that you cannot open the Start menu, you may need to align the screen menu using only the keypad. Rotating the Screen The internal accelerometer enables you to have the screen rotate by sensing the orientation of the RP1200. You can enable the screen to rotate all the time depending on orientation, you can enable it to rotate for specific applications, you can disable rotation for selected applications, or you can disable it. To configure the screen rotation 1. Tap Start > Settings > Systems > TAS Config. 2. Calibration 3. Select the option (“Enable all”) you want to use. RP1200 User‟s Manual 47 Reading Bar Codes The RP1200 ships with an internal imager to read and enter bar code data. To read a bar code 1. Press Power key to turn on the RP1200. 2. Point the scanner window at the bar code label, and hold the RP1200 steady a few inches from the label. 3. In File Explorer, Flash Disk > Scanner > ScanDemo > execute G2W_Scanner 4. Press the Scan button. The laser pointer and illumination beam and frame appear. 5. Use the laser pointer as a guide and aim toward the middle of the bar code. Make sure that the illumination frame covers the bar code you are trying to decode. When the RP1200 successfully reads a bar code label, you hear a high beep. 6. Release the Scan button. RP1200 User‟s Manual 48 Using the Color Camera The high-quality 5.0 megapixel color camera with flash is a standard feature of the RP1200. You can take photos in high, normal, or low quality, with image sizes up to 2048 x 1536 pixels. When you take a picture, the images are saved as .jpg files and stored in the /MyDocuments/My Pictures folder. Camera Location of the RP1200 Color Camera You can use the Pictures & Videos application on the RP1200 to take, view, and edit pictures or record and launch video clips stored on the RP1200 or a storage card. You can also send pictures and video clips to others or save an image as the background on the Today screen. After you have opened up the camera application, you can configure camera options by tapping Menu. You can zoom in or out on an image while using either camera mode or video mode. Function Still Video Comment Mode Normal, Burst, Timer N/A Setting for taking photo Brightness Resolution -3, -2, -1, 0, +1, +2, +3 QCIF, QVGA, VGA, SVGA, QCIF, QVGA Setting for Brightness Setting for size XGA, SXGA, UXGA, QXGA White Balance Automatic, Sunny, Cloudy, Fluorescent, Incandescent Setting for White Balance Flash Flash ON, Flash OFF Setting for Flash ON/OFF AF Trig AF Setting for Auto Focus RP1200 User‟s Manual 49 Camera is optional. On the device with no built-in camera, Camera function can not be used. To take a picture with the camera 1 Tap Start > Pictures & Videos. 2 Tap the Camera icon in the grid, or tap Camera on the taskbar. 3 Using the screen as a viewfinder, move the camera until you have the image you want to capture. 4 Tap Take Pic on the taskbar or press Enter to save the image. If you select to save your pictures to Main memory, they are saved to permanent storage on the RP1200. 5 Auto Focus: Press and hold “Enter” key for 2~3 sec. till you hear sound “Tik” and then release the key. To switch to Video mode • Tap Menu > Video Mode. The camera icon below the screen turns into a video camera and Record now appears in the taskbar. RP1200 User‟s Manual 50 To set options for saving pictures 1. From the Pictures & Videos application, tap Menu > Options. 2. Set these options: • (Optional) A filename prefix. The default prefix is .img. • Where you want to save picture files. • The still image compression level. 3. Click ok. You can also set options for flash, video, quality, and some advanced options from the Settings menu. Using a microSD Card To install a microSD card 1. Remove the battery. 2. Insert the microSD card in the bottom slot. 3. Install the battery. 4. Turn on the RP1200 You should be able to navigate to the Storage Card folder and see the contents of the microSD card. Enabling the Integrated GPS on the RP1200 The RP1200 comes equipped with an integrated Global Positioning System (GPS) receiver. Using the A-GPS on the RP1200 To use A-GPS, you need to set parameter in G2W.INI which is located in Flash Disk\G2W_Setup. Remark: G2W_INI is not directly settable on the RP1200. To set INI parameter, you need to synchronize the RP1200 with your PC. On the PC, you change INI parameter. G2W_INI is convenient setting tool to control various functions G2W_setup manual is available for download. To configure your GPSID settings Tap Start > Settings > System > External GPS RP1200 User‟s Manual 51 Tap External GPS. The GPS Settings screen appears. GPS program port: COM2 or COM9 On the Programs tab, select the COM port that you want your programs to use to get GPS data from your RP1200. 1. Tap the Hardware tab, and confirm these default settings. GPS hardware port: COM8 Baud rate: 9600 2. Tap the Access tab and select the Manage GPS automatically heck box. RP1200 User‟s Manual 52 3. Tap ok. RP1200 User‟s Manual 53 Button Assign Function Assign Button : L-Scan key, M-Scan key, R-Scan key, Soft 1 key, Soft 2 key, Call key, End key, Left/Right/Up/Down key RP1200 User‟s Manual 54 Button Assign Method 1. Start Menu -> Settings -> Personal -> Buttons 2. Select a button in “1. Select a button” field. 3. In “2 Assign a program” field, select the program and press the “ok”. ※ If you assign the Virtual keyboard, select the “<Input Panel>” in the “2 Assign a program” field. RP1200 User‟s Manual 55 RP1200 Numeric Keypad * Blue key: Use this key to access function keys Blue key shown on the keypad in blue. Press the Blue key once to active key this state temporarily. Press the Blue key twice to lock this state. Press the Blue key a third time to unlock. * Orange key: Use this key to access the secondary layer of characters. Press the Orange key once to active key this state temporarily. Press the Orange key twice to lock this state. Press the Orange key a third time to unlock. Orange Key RP1200 User‟s Manual 56 Numeric Keypad Input Modes Numeric Mode Key - Orange Key Orange Key + Shift keys Blue + Shift + 1st 2nd 3rd 4th 1st 2nd 3rd 4th Key Key Press Press Press Press Press Press Press Press , @ 1 1 F1 ! , @ 2 2 F2 @ a b c A B C 3 3 F3 # d e f D E F 4 4 F4 $ g h i G H I 5 5 F5 % j k l J K L 6 6 F6 ^ m n o M N O 7 7 F7 & p q r P Q R 8 8 F8 * t u v T U V 9 9 F9 ( w x y W X Y 0 0 F10 ) space space • • • • ← Action Action Action Call Action Soft-1 Action Action End Action Soft-2 Action Action * * esc – – # # OK + + Enter Action Action Action Action Up Up Left Up Up Down Down Right Down Down Start Menu s z S Z RP1200 User‟s Manual 57 Connecting and Configuring the RP1200 Use this chapter to understand how to configure the RP1200 to communicate in your network. Connecting the RP1200 to a PC You can use Microsoft ActiveSync to establish a connection between your RP1200 and PC. ActiveSync lets you transfer files, synchronize files, remotely debug, and perform other device management activities. ActiveSync is a free application available from the Microsoft web site at www.windowsmobile.com/getstarted. To establish an ActiveSync partnership between your RP1200 and PC, you need to physically connect your RP1200 to your PC using these accessories: • RP1200 AC adapter • USB to micro-USB cable To establish an ActiveSync partnership 1. Download ActiveSync from the Microsoft web site and install ActiveSync on your PC. When installation is complete, the Get Connected dialog box appears. 2. Follow the onscreen instructions to establish a partnership. When the partnership is established, the Microsoft ActiveSync screen appears on your PC. RP1200 User‟s Manual 58 Connecting the RP1200 to Your Network The RP1200 is a versatile mobile computer that you can easily add to your wireless or wired data collection network. You can connect your RP1200 using: • 802.11 radio communications. • Bluetooth communications. • USB communications. Note: The RP1200 radios are disabled when the battery is low. Attach a charger or replace the battery to reenable the radios. RP1200 User‟s Manual 59 Connecting the RP1200 Using WIFI Communications Make sure all components with antennas are at least 30 cm (1 ft.) apart when power is applied. Failure to comply could result in equipment damage. Your RP1200 has an 802.11 radio to transfer data using wireless communications. This section assumes that your wireless network is set up, including your access points. To configure 802.11 radio parameters 1. Tap Start > Settings > Connections > Wireless Manager > WI-FI status is changed to ON. 2. Menu > Wi-Fi Settings. The Configure Wireless Networks page appears. 3. If the Network you want to connect to is available in the wireless networks list, tap the network name and proceed to Step 4. If the Network you want to connect to is not in the wireless networks list: Tap Add New. In the Network Name field, type in the name of your network and then tap Next. The Configure Network Authentication page appears. 4. From the Authentication list, choose either Open, Shared, WPA, WPA-PSK, WPA2, or WPA-PSK. • If you choose Open or Shared, Data Encryption is automatically set to WEP and the key is automatically provided. • If you choose WPA, Data Encryption is automatically set to TKIP. • If you choose WPA2, Data Encryption should be set to AES. RP1200 User‟s Manual 60 • If you choose WPA-PSK, Data Encryption is automatically set to TKIP and you need to enter a Network key. • If you choose WPA2-PSK, Data Encryption should be set to AES and you need to enter a Network key. 5. Tap Next. 6. For EAP type, select either PEAP or Smart Card or Certificate from the list and tap Finish. You return to the Configure Wireless Networks page. 7. Tap Connect. The RP1200 prompts you to enter this network information: User name Password 8. Tap OK. Your device connects to the network. 9. Make sure that your RP1200 is talking to the network and that the network can see your RP1200. If you are connected to the wireless network you will see a connected icon in navigation bar and you will see the name of your network next to Wi-Fi in the Wireless Manager. Wireless LAN is optional. You can only use WLAN, When the WLAN module is built in to the device RP1200 User‟s Manual 61 Connecting the RP1200 Using Bluetooth Communications You RP1200 is Bluetooth™-enabled, which lets you connect to other Bluetooth devices, such as printers. You need to turn on the Bluetooth radio before you can discover and connect to other Bluetooth devices. By default, the radio is turned off. Bluetooth is optional. Device without built-in Bluetooth can not use Bluetooth service. Bluetooth support the transmission and reception of files between the serial connecting service and Windows Mobile device. To turn on the Bluetooth radio 1 Tap Start > Settings >Bluetooth > the Mode tab. 2 Tap the Turn on Bluetooth checkbox. Or Tap the Bluetooth. Select Tab the Bluetooth RP1200 User‟s Manual 62 3 (Optional) If you want your RP1200 to be visible to other Bluetooth devices, tap Make this device visible to other devices. 4 Tap ok. The Bluetooth radio maintains its current state through a reset or hard reset and maintains virtual COM ports. If you clean boot your RP1200, you need to recreate pairings to devices. Configuring the Phone The RP1200 supports two types of mobile wireless phone technology: HSDPA UMTS With the radio module installed in the RP1200, you can send and receive telephone calls as well as transmit data through wide-area (WAN) cellular networks. The RP1200 provides a phone speaker, microphone, and speakerphone. It also supports the use of a Bluetooth headset or hands-free kit. The factory default setting for the phone is disabled. After you have turned on the phone and activated with the wireless carrier of your choice, you can customize the features of the phone and network settings. Turning On the Phone Using the Wireless Manager You can use the Wireless Manager to enable and disable Bluetooth, Wi-Fi, and the phone on your RP1200. To turn on the phone using the wireless manager 1 Tap Start > Settings > Connections > Wireless Manager. 2. In the Wireless Manager, tap Phone. The phone turns on. 3. Tap Done to close the Wireless Manager. RP1200 User‟s Manual 63 Using Internet Sharing Internet Sharing allows you to setup a connection from your laptop to your mobile phones data connection. From here the instructions are simple; 1. Start the application on you mobile phone. It will probably remind you that you‟re starting the Bluetooth radio and ask you to confirm 2. Next go to your laptop Bluetooth devices and add the mobile device. In most cases you should create a pin when prompted, I usually use 1234. 3. Once you‟ve connected the Bluetooth device you need to go to the network and sharing center and click setup a new connection RP1200 User‟s Manual 64 4. Select setup a new connection, and all going well you should see „Connect to a Bluetooth PAN 5. Hit connect and you should now be connected to the internet via your mobile! RP1200 User‟s Manual 65 Making a Phone Call After you turn on your phone, you are ready to start making phone calls. The icon in the navigation bar will change to indicate that the radio is now active. To make a phone call 1. Tap Start > Phone. 2. Tap the keys to enter the telephone number you want to call. 3. Tap the Talk button. RP1200 User‟s Manual 66 Installing Applications Use this chapter to understand the guidelines for applications for use on the RP1200. Installing Applications on the RP1200 There are several ways you can install applications on your mobile computer: • You can package your application as a cabinet (.cab) file. • If you have a simple application, you may only need to deliver the .exe file. • You can copy a directory structure that contains the application, supporting files, DLLs, images, and data files. Gen2wave recommends using .cab files to install your applications. The mobile computer uses standard Windows Mobile .cab files and will install third-party .cab files. You can have your .cab files place your application in any of these memory locations on the mobile computer: • The Object Store. • The optional microSD card. Depending on available disk space, you may want to consider installing you application files on the microSD card. Using a microSD card creates the Storage Card folder on the RP1200. • The non-volatile Flash File Store. Applications and data in the Flash File Store will persist through a clean boot. Since the flash in the system has a limited number of write cycles, do not use the Flash File Store for excessive writing. There are several ways you can install files and applications on the RP1200: • ActiveSync • microSD card The following sections explain how to use each one of these processes to install your application on the computer. RP1200 User‟s Manual 67 Installing Applications Using Microsoft ActiveSync You can send applications from your PC to your RP1200 using Microsoft ActiveSync. To download ActiveSync or the Windows Mobility Center. To install an application using Microsoft ActiveSync 1 On your PC, copy the .cab file you want to download to your RP1200. 2 Create an ActiveSync connection between your PC and RP1200. For help, see “Connecting the RP1200 to a PC”. 3 Click Explore. The Mobile Device window opens. 4 Double-click My Windows Mobile-Based Device. 5 Navigate to the folder you want to copy the .cab file to, and paste the .cab file in the folder. 6 On your RP1200, tap Start > Programs > File Explorer and navigate to the location of the .cab file. 7 Tap the .cab file to install it. RP1200 User‟s Manual 68 Installing Applications Using a microSD Card You can also use a microSD card to install applications. To install applications using the microSD card 1 Suspend the RP1200 and remove the microSD card. 2 Insert the microSD card into a microSD adapter card and then place it in the storage card reader connected to your PC. 3 Copy your application file to the microSD card. 4 Remove the microSD card from the adapter card and insert it into the RP1200. 5 On your RP1200, navigate to the storage card folder and run your application.