1
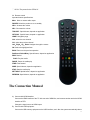
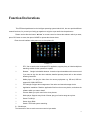
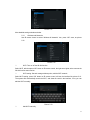
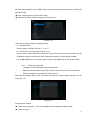
HD Intelligent Network Set
Top Box
User Manual
Content
IMPORTANT SAFETY INSTRUCTIONS ................................................................................3
OUTLINE ................................................................................................................................4
HARDWARE SPECIFICATIONS ............................................................................................5
THE CONNECTION MANUAL ...............................................................................................6
QUICK INSTALLATION..........................................................................................................7
FUNCTION DECLARATIONS ................................................................................................8
TECHNICAL INDEX .............................................................................................................18
TROUBLE SHOOTINGS ......................................................................................................19
I
2
Important Safety Instructions
1. Please read this user manual before you use the product.
2. Do not open the cover in order to protect the product from the shock.
3. Turn off the power when you do not use this product for a long time. To reduce the risk of fire or electric
shock,please do not use the damaged power line。
4. Do not touch the power when your hands are wet. Please cut off the power immediately when there is liquid
in this product in case of fire or electric shock, and call the after-sales service staff to repair.
5. Please install this product in ventilated environment and keep from any heat sources.
6. Please put the product flat wise avoid any unnecessary damage.
7. When you remove the product to another place and the temperature difference between the two places are
big, please do not start the product at once unless after 1-2 hours.
8. Install attention: ventilation, comfortable temperature, avoid strait light, dripping and splashing, avoid
strenuous vibration.
9. Please do not put the heavy weight on the product.
10. The apparatus shall not be exposed to dripping or splashing and that no objects filled with liquids, such as
vase, shall be placed on the apparatus or near the apparatus.
11. Keep the products operating handily when the main plug or connector as separable equipment.
Attention: The ESD grade of this apparatus’ USB interface is C class, it need to pull out the USB
memory equipment or restart the product when the USB equipment works abnormally.
3
Outline
1.1
Product Introductions
Thanks for choosing this HD intelligent network set top box. This product can operate existing
Android 2D/3D smoothly, support H.264 HD decoding,, HDMI high quality digital video output, bring the
same experience as in the cinema to you; meanwhile it provides simple user interface, make sure you
can search the internet and experience the large number of application software by not using the touch
pad.
This user manual will help you with the installation, operation and maintenance. Please read this
user manual carefully to ensure the proper use of this product.
Declaration: The company reserves the rights to change all the product descriptions in this user
manual, if the pictures and words in manual are different from the product, the product shall prevail.
1.2
Main Features
◇ MPEG-2/ H.264 HD and SD decode
◇ Support avi、rm、rmvb、mkv、flv、DivX etc.
◇ Support mp3、aac、ac3、dts etc.
◇ Support updating software online
◇ Use Android 4.0 system
◇ Support Android application
◇ GPU support Android 2D/3D game
◇ Support HTML5
◇ Support Flash Video
◇ Support Android, desktop ipad, iphone etc. browsing
◇ Support WIFI and Ethernet
◇ Support USB hard disk, 2.4G wireless mouse & keyboard, Air mouse etc.
4
Hardware Specifications
2.1 Front panel
① POWER & STANDBY: power & power light, running state the light is green and red in standby model.
② IR: IR(Infrared Radiation) connector
2.2 Side panel
① SD CARD: SD card interface
2.3 Rear panel
① A/V: Three for one AV output
② ETHERNET: Ethernet interface
③ USB: Connect with the USB memory equipment
④ HDMI: HDMI output
5
⑤ DC 5V: The power for the STB is 5V
2.4 Remote control
Important buttons specifications:
Mute:Mute or restore audio output
POWER: Switch the product to on or standby
VOL+: Increase the volume
VOL-: Decrease the volume
TVGUIDE:Special button, depend on application
OPTIONS:Special button, depend on application
HOME: Navigation page
CH+: select the next channel
CH-: select the previous channel
Left、Right、Up、Down: Navigate through the menus
OK: Select the highlighted item
BACK: Return to the previous operation
Red/Green/Yellow/Blue:Special button, depend on application
REW: Rewind
PLAY: Play the media
PAUSE: Pause the media play
FFWD: Fast forward
WIDE: Special button, depend on application
STOP: Stop the media play
SETTINGS: Special button, depend on application
REFRESH: Special button, depend on application
The Connection Manual
A) Connect with HDMI interface
Connect the HDMI interface of the TV with one end of HDMI line, and connect another end to the HDMI
interface of STB
Change the signal source to HDMI output
B) Connect with USB equipment
Connect the USB memory equipment to the USB interface, use it after the system automatically detect
6
the equipment
C) Connect the net
Plug the cable in the ETHERNET interface, through this STB to set relevant net index, after that you
can search the net (The setting method please refer to the system setting)
Quick Installation
The first: check the connection of system
Make sure TV, STB are be correctly connected
The Second: Change the TV to video status
Make sure the right interface connections, then turn on the TV, and change it to video status
The third: Plug in the power, and turn on the STB
Plug in the power, the power lamp lights on front panel
The fourth: Standby and recover
Press the standby button under start status, the STB is standby, the STANDBY indicator light (The
STB is in low power status at the moment). Press the button again, return to work states.
The fifth: Turn off
Turn off the power, the STB is nonfunctional.
Attention: All the function implementations can be realized by using the remote control or the mouse. If
there is some difficult when you use this product, please refer to the relevant chapters on this user
manual. Still have problems please contact with the operators.
7
Function Declarations
This STB developed based on the intelligent operating system Android 4.0, aim at to provide different
network functions, for you and your family get together to enjoy the super audio-visual experiences.
Please use the direction button “▲▼◀▶” on remote control to choose the submenu which you want,
press ”OK” button to enter, then press “HOME” to operate the relevant items.
Enter the main interface when power on, such as picture 5-1
Picture 5-1
◇
IPTV: Can customize the developed IPTV application; support plenty of video/word/picture
watching, suitable for the operators to expand.
◇
Browser: Google is the default browser. It needs to input the websites with remote control
if you want to sign into the other websites, detailed process please refer to the website
browsing instruction.
◇
Media player: Can play the video from the memory equipment e.g. SD card, USB etc.
support AVI, WMV, MPEG etc.
◇
File manager: Support the management of the native and external storage device.
◇
Application installation: Read the application files from the memory device, and select the
software which you want to install.
◇
Pictures: Make you quick scan for the clear pictures.
◇
Music player: Support many kinds of format, play your favorite songs at any time.
◇
Game: Fruit Ninja.
◇
Game: Angry Birds.
◇
Search: The whole system searching.
5.1 Words Input
The instruction of how to use the remote control to input words.
8
1
Long press the “OK” button, then pops an input method select box, as the picture 5-2.
Picture 5-2
2
Select the Input Method to enter the interface, as the picture 5-3.
Picture 5-3
3
Select one input method. The yellow button is used for the switch among the input area, candidate
area, and display area. When switched to the candidate, you can use 【◀▶▲▼】to page turning
or select character, as the picture 5-4.
Picture 5-4
4
You can use arrow key to select character in input area, as picture 5-5.
Picture 5-5
9
5.2 Application Instruction
This product provides all kinds of network functions; you can search the internet, watch the video,
maps, live chat etc. just like the PC.
5.2.1
Web Browsing.
Use【▲▼◀▶】button on remote control to select browser on main interface, then press “OK”
button to enter to Google, as bellowing picture 5-6:
Picture 5-6
If you want to search the other websites, please press “HOME” button & “OK” button on
remote control, enter the website input interface to re-input the website that you want, as
picture 5-7:
Picture 5-7
If there are other websites in your opened interface, please use 【▲▼◀▶】 button to select
the “Delete” button of the soft keyboard to delete them, then use the soft keyboard to input
the website you want, after that move the cursor to “START” button, press “OK” to open the
website, as picture 5-8:
10
Picture 5-8
5.2.2
IPTV
Use 【▲▼◀▶】button on remote control to select IPTV on main interface, press “OK” to enter,
as picture 5-9:
Picture 5-9
5.2.3
Game
Use 【▲▼◀▶】button on remote control to select Fruit Ninja on main interface, press “OK” to
enter, this game need mouse, as picture 5-10:
Picture 5-10
5.3 System Setting
On system interface, select “Setting” menu, press “OK” on remote control to enter the system setting
interface, as picture 5-11 below, here you can set the system more detailed.
11
Picture 5-11
More detailed setting methods as below.
5.3.1
Wireless and Networks
Use IR remote control to select “Wireless & Networks” icon, press “OK” enter, as picture
5-12.
Picture 5-12
◇
Wi-Fi: Turn on/ off the WLAN function
Select Wi-Fi, after that press “OK” button on IR remote control, the right arrow lights, at the moment the
WLAN function was turned on.
◇
Wi-Fi setting: Set and manage wireless point, add the Wi-Fi network.
Select Wi-Fi setting, press “OK” button on IR remote control, will see the interface like picture 5-13.
The system wills automatically search the Wi-Fi, and show the result in the interface, if not, you can
add the Wi-Fi manually.
Picture 5-13
◇
Add Wi-Fi manually
12
On Wi-Fi setting interface, press “HOME” button on IR remote control, pop up the menu, including the
options as follow:
● Scan: Use this option to scan the Wi-Fi again.
● Advanced: Enter the advanced setting, as the picture 5-14.
Picture 5-14
There are two options under the advanced setting:
a) Adjustment area
Set the quantity of channel, such as 11, 13 or 14.
b) Use static IP: Choose using the static IP or not
If you choose to use the static IP, the items below it (see picture 5-14) can be set with index, such as
IP address, gateway, network mask, DNS. Otherwise the settings of these items are useless.
Use 【▲▼◀▶】button on IR remote control to select, press【◀】button or “OK” button confirm.
5.3.2
Ethernet Configuration
This option is used for detailed setting of the ethernet.
◇
Ethernet: Select this option, press “OK” button on remote control to turn on/ off ethernet.
◇
Ethernet configuration: Set network IP index and so on.
Select “Ethernet setting” option, press “OK” button, and enter the ethernet setting interface, such as
the picture 5-15.
Picture 5-15
In the ethernet interface:
● The ethernet equipment: The current available ethernet equipment, default is eth0.
● Connection type:
13
a) DHCP mode: Automatic access IP address module;
b) Static IP: Static IP mode, It needs to set correct static indexes and save them if you choose this
kind of mode.
5.3.3
Audio
This option is used for setting the audio equipment of STB, as picture 5-16.
Picture 5-16
◇
HDMI audio:
The users could turn on/ off the HDMI output depends on the demand.
◇
Volume
Increase or decrease the volume.
5.3.4
Display setting
Set the related attribute, press “OK” button on remote control to enter.
Animation: Show all windows animation.
Repetition rate: In order to achieve the best play, the users need to set the repetition rate, as
picture 5-17.
Picture 5-17
Setting method: Click the repetition rate, will pop up a dialog box “This operation will restart
the system, still continue?” After confirmed, the system will restart and enter the “Repetition
rate” adjustment interface. The default is 100%, you can use mouse to click the progress bar
or press the Left/Right button on remote control, both of them can set the value of repetition
rate. The repetition rate is the most suitable for your TV when the picture occupied the whole
screen, which meant there are white frame around the picture, as picture 5-18: after
confirmed it will enter the system start interface.
14
Picture 5-18
5.3.5
Application Program
This option is used for managing and setting the installed applications. Select the
“Application Program” option, then press “OK” on remote control to enter, as the picture 5-19.
Picture 5-19
◇
Unknown Source
Select this option the users can download application program from any sources, or can just download
from Android Market.
◇
Quick Launch
Distribute the quick start button of the application.
◇
Application Management
Access the installed applications and check the messages.
◇
Running Services
Check the running services and access the services for management.
5.3.6
SD Card and Device Memory
The setting of SD card and device memory, the users can check the detailed information
about the external SD card, USB, internal SD card and the memory massage, also the
relevant operation such as uninstallation, installation and formatting, as picture 5-20. The
download application will be stored in internal SD card if there is no external SD card.
Attention: Before formatting, please uninstalled successfully.
15
Picture 5-20
5.3.7
Language and Keyboard
This option is used for setting the language and keyboard mode.
Press “OK” button on remote control, such as picture5-21 below:
Picture 5-21
Select the language which is you want, other options you could use the default values.
5.4 Application Installation
Install your favorite third-party applications, steps as below:
1 Download the application programs and store them in U disk or SD card.
2 Insert the USB memory or SD card with application programs.
3 Press 【▲▼◀▶】button on remote control to choose application programs, then press ”OK” button
to enter and will pop ups the dialog as picture 5-22:
Picture 5-22
16
4 Select the device memory which you inserted before, press “OK” to do the relevant operations.
√ SD card: SD card device
√ U disk: USB removable storage device
After correct select, the system will scan the application automatically and after that will list all
applications, as the picture 5-23:
Picture 5-23
5 On interface (picture 5-23), use 【▲▼】and “OK” button on IR remote control to select the application
which you want to install, as picture 5-24:
Picture 5-24
6 Select “Confirm” and “OK” button to install the applications, as picture 5-25. Select “Cancel” and
press “Ok” button to uninstall.
Picture 5-25
6
When the installation is completed, it will pop up “Open” and “Finish” options, you could do the relevant operation.
17
Technical Index
Basic specifications:
Features
Basic on system Android 4.0
Support local audio, video playing
Support html5
Support OpenGL2.0
Support Android 2D/3D game
Support mpeg、avi、mov、mp4、rm、rmvb、mp3
Support jpeg、bmp、png、gif
Support many kinds of languages: English, Simplified Chinese, Traditional Chinese,
Spanish etc.
Support USB 2.0 HOST interface
Support SD card interface
Support USB, SD card
Support IR remote control
Support USB wired mouse or wireless keyboard inputs
Support WIFI
Support HDMI output and A/V input
Support IPTV:EPG, VOD, Live, Time-shift, TV of yesterday, JS/JVM game etc.
Interface
USB HOST * 2
SD card * 1
RJ45 (Ethernet interface) * 1
HDMI * 1
A/V output * 1 (Three for one interface)
IR receive * 1
DC 5.0 input * 1
Built-in WIFI
18
Chip and Memory
Processor Power: 1GHz
Flash Capacity: 2GB
RAM Capacity: 1GB
Trouble shootings
Problem
Without any indication
after the boot
No sound, no picture
Only sound, no picture
Potential Reasons
The outlet is no power or the
power line is incorrect
connected
The STB is standby
No or incorrect connection with
video cable
Incorrect connection with audio
cable
Mute the STB
What To Do
Connect the power and make
sure the voltage is normal
Press the "POWER" button on
remote control
Connect video cable correctly
Connect audio cable correctly
Press the "Mute" on remote
control
Only picture, no sound
Incorrect setting for audio index
Select the correct sound track
The volume is too low
Increase the volume
Strange sound or the
picture is not match the
sound
The sound tracks are discord
Re-select the track on AV
setting menu
19
The image stop
The signal is too weak or
Strengthen the signal or
suddenly or mosaic
unstable
connect with the operator
Remote control unit is not in the
Adjust the way of holding
right opposite of the front panel
remote control unit
The battery is exhausted
Change new battery
Maybe remote control is
Go to the nearest repair station
damaged
to repair it
Remote control is not
workable
20