1
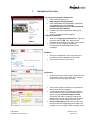
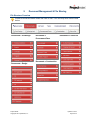
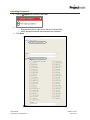
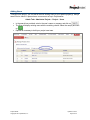
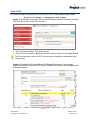
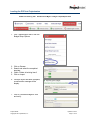
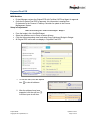
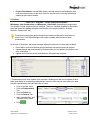
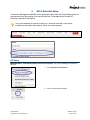
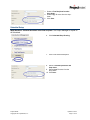
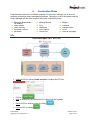
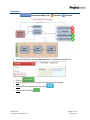
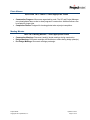
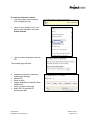
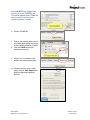
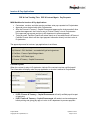
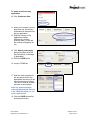
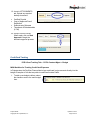
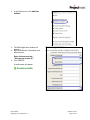
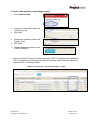
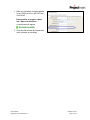
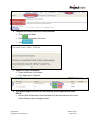
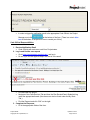
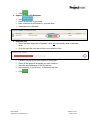
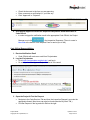
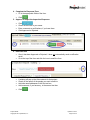
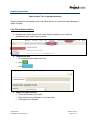
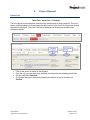
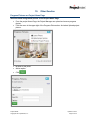
Projectmates User Guide for Montclair State University Facilities Construction Projects Systemates, Inc. Dallas, Texas 214.217.4100 www.montclair.edu/projectmates Projectmates® Copyright© 2013 Systemates, Inc. Updated 11/2014 Page 1 of 45 Table of Contents 1. Navigation Overview ........................................................................................................... 4 2. Document Management & File Sharing ............................................................................... 6 File Structure Overview .......................................................................................................... 6 Uploading Documents ............................................................................................................ 7 3. Project Initiation .................................................................................................................. 8 Project Information Fields ....................................................................................................... 8 Adding Users .......................................................................................................................... 9 Original PCE..........................................................................................................................10 Loading the PCE into Projectmates .......................................................................................11 Projected Final PCE ..............................................................................................................12 4. Pre-Design & Design .........................................................................................................14 Pre-Design and Design Documents .......................................................................................14 Photo Albums ........................................................................................................................14 Discussion Forums ................................................................................................................14 Schedules .............................................................................................................................15 5. RFI & Submittal Setup........................................................................................................16 RFI Setup ..............................................................................................................................16 Submittal Setup .....................................................................................................................17 6. Construction Phase............................................................................................................18 RFIs ......................................................................................................................................18 Submittals .............................................................................................................................19 Submittal Register (Optional) .................................................................................................20 GC Daily Field Reports ..........................................................................................................20 PM Field Reports ...................................................................................................................20 Photo Albums ........................................................................................................................21 Meeting Minutes ....................................................................................................................21 7. Construction Finances .......................................................................................................22 PCE .......................................................................................................................................22 Contracts ...............................................................................................................................22 Proposed Change Orders ......................................................................................................24 Change Orders ......................................................................................................................25 Invoices & Pay Applications...................................................................................................27 Credit Card Tracking .............................................................................................................29 Capital Budget Transfer .........................................................................................................31 8. Code Services ...................................................................................................................34 Projectmates® Copyright© 2013 Systemates, Inc. Updated 11/2014 Page 2 of 45 Code Services Documents ....................................................................................................34 Plan Review / Permit Submittal..............................................................................................34 Inspection Requests & Responses ........................................................................................38 Ongoing Inspections ..............................................................................................................41 9. Project Closeout.................................................................................................................43 Punch List .............................................................................................................................43 10. Other Goodies ................................................................................................................44 Progress Pictures on Project Home Page ..............................................................................44 Global Ball in Court................................................................................................................45 Projectmates® Copyright© 2013 Systemates, Inc. Updated 11/2014 Page 3 of 45 1. Navigation Overview Log into your Projectmates software site Open Internet browser, go to www.montclair.edu/projectmates Enter USERNAME and PASSWORD (Usernames and passwords are CaSe SeNsItIvE) For MSU employees, use your University Net-ID for username and password. Follow the onscreen instructions to allow pop-up windows. A list of your projects will be displayed. Forgot your password? Click on the Forgot your password? link. Type your username and click GO. Your username and password will be emailed to you within a few minutes. If you do not have a login ID, contact your Projectmates Site Administrator listed on the homepage. My Work Shows your Global Ball in Court. All pending and overdue items will be displayed on this screen. Items on this screen are color coded. My Projects Select a project and click the "Open" button OR Click on the project name; you are taken to the selected project where you may begin your work. Once inside a project, information is organized into three frames for easy navigation. The tabs at the top are for navigating through the various workflow utilities and documents within the system, such as Construction Mgmt & Tasks. Choose the tab, and the respective modules will appear below. Click on each utility button to access the sub menus, which display in the Left Frame. Project Leapfrogging: Once inside a project, click the project name or magnifying glass located in the top-right corner to navigate quickly to another project. Projectmates® Copyright© 2013 Systemates, Inc. Updated 11/2014 Page 4 of 45 Projectmates Navigation File Sharing Projectmates® Copyright© 2013 Systemates, Inc. Updated 11/2014 Page 5 of 45 2. Document Management & File Sharing File Structure Overview Access to document folders varies from user to user. Your view may differ from the view below. Documents > Pre-Design Documents > Procurement Docs Documents > Close Out Documents > Construction Documents > Design Projectmates® Copyright© 2013 Systemates, Inc. Updated 11/2014 Page 6 of 45 Uploading Documents Click on In the upload window: o Drag and drop files or right click in the box to choose files. o Notify appropriate parties that documents are uploaded. Click Send. Upload icon next to the file folder. Projectmates® Copyright© 2013 Systemates, Inc. Updated 11/2014 Page 7 of 45 3. Project Initiation Once a project has received Presidential approval or similar authorization for emergency and compliance projects, a Projectmates Site Administrator will create that project in the software with all relevant metadata (project name, number, type, approved PCE value, etc). For projects approved during the annual budget call process, this will occur once the Controller's Office and Budget Office establish the funding source(s) and set up an account in the University’s Financial Management System (FRS). Project Information Fields Inside each project, project information fields store project-related data such as project type, fiscal year, current phase, and project manager. Verify and update the information inside the project. From within the project, click on Project Info located in the top right corner to update the fields pertaining to this project. Verify and update the project info as needed on the General and Project Info tabs. Click Projectmates® Copyright© 2013 Systemates, Inc. Updated 11/2014 Page 8 of 45 Adding Users Throughout the project, you can add or remove existing users to your specific project(s). Always search first to check if a person has a user account set up in Projectmates. Admin Tab > Administer Project > Project – Users In the search box provided, enter in the user's name or company and click on The filter will display existing users with the matching criteria. Select the user(s) and click on Repeat as necessary to build your project user team. Projectmates® Copyright© 2013 Systemates, Inc. Updated 11/2014 Page 9 of 45 Original PCE The Project Manager is responsible for setting up the PCE in Projectmates budget module. Documents > Pre-Design > 5 – Working PCE > PCE Template Option 1: Download the document "Self Calc PCE Budget Worksheet" located in the folder. This Excel file contains all the PCE line items. Add Total Project Budget - PCE dollar amount. Once the PCE is complete, Save the Excel file locally for import into the budget module. The Excel document contains all PCE line items and is formatted to upload easily into Projectmates. Option 2: Download the file called “Blank PCE Budget Worksheet.xls” and manually populate the values to get a total PCE. Save the Excel file for import into the budget module as described above. Projectmates® Copyright© 2013 Systemates, Inc. Updated 11/2014 Page 10 of 45 Loading the PCE into Projectmates PCE & Cost Tracking Tab > PCE & Contract Mgmt > Budget > Import/Export Items 1. Click "Import/Export items" from the Budget Setup Options. 2. Click on Browse. 3. Search and select the completed template. 4. Check "Delete all existing items" 5. Click on Import. 6. Once the import has been complete, a confirmation message will be display. 7. Click on View/Edit Budget to view and verify. Projectmates® Copyright© 2013 Systemates, Inc. Updated 11/2014 Page 11 of 45 Projected Final PCE MSU Workflow Project Manager reviews the Original PCE with Facilities AVP/Fiscal Agent for approval. Once the Projected Final PCE is approved, this information is emailed from Projectmates to the Finance & Treasury Controller for update in the Finance Management System. Setup in Projectmates PCE & Cost Tracking Tab > PCE & Contract Mgmt > Budget > From the budget, click View/Edit Budget. Select the checkbox next to Group to select all items. Click the Actions dropdown menu and select Copy Preliminary Budget to Budget. All Original PCE values will now display in Projected Final PCE. 1. To edit line items, click the expand icon to view all subitems. 2. After the subitems have been expanded, click the edit icon It will then open in edit form. Projectmates® Copyright© 2013 Systemates, Inc. . Updated 11/2014 Page 12 of 45 3. The Edit Budget Item window will appear. Make any necessary changes/updates, then click Save. Enter values into "Projected Final PCE (E) " A confirmation will appear 4. Close the Edit window and repeat with other subitems as necessary. Projectmates® Copyright© 2013 Systemates, Inc. Updated 11/2014 Page 13 of 45 4. Pre-Design & Design Pre-Design and Design Documents Pre-design and design document folders been configured to give internal MSU staff and external consultants, architects, and engineers various degrees of access to documents. Documents > Pre-Design Documents > Design Photo Albums Quick Links Tab > Photos > Existing Conditions Existing Conditions: The Project Manager can upload photos taken onsite to show existing conditions prior to construction. There are default albums for Exterior and Interior photos; additional albums can be created as needed. Discussion Forums Discussion Forums are one of the simplest, most effective ways of enabling team members to communicate without the hassle of long-running email correspondence. Use Discussion Forums to conduct topic-based discussions. Tasks Tab > Discussion Forum > Select Appropriate Thread Design Coordination: Internal MSU people and external architects and engineers can use this forum for general discussions during design phase. Projectmates® Copyright© 2013 Systemates, Inc. Updated 11/2014 Page 14 of 45 Project Coordination: Internal MSU people, external architects and engineers, and contractors have access to this forum. Best for communication involving internal and external project team members. Schedules Tasks Tab > Schedule > Select Appropriate Schedule Milestones - New Construction and Milestones - Renovation (depending on project type): This is MSU’s overall project milestone schedule. There is a schedule prepared for the project team that should be updated throughout the lifecycle of the project (Initiation, Architect Selection, Construction, etc.) Predecessors and typical project durations have been configured for most tasks for ease of use. The Project Manager only needs to update tasks that do not have predecessors. At the start of the project, the project manager adjusts the schedule to reflect planned dates. Do not add or remove milestones since milestones are reported across all projects. Update planned start and planned finish dates when you are added to the project or as soon as possible. *** Update actual start and actual finish dates as milestones are complete. ***Predecessors have been created in the schedule. Updating one task should update all other tasks dates based on predecessor relationships. However, there may be times when you need to break a predecessor and manually enter in a date. Click on the task name. Click the Predecessors Tab Click the Delete link. Click the General Tab. Input “Planned Start” and “Planned Finish” dates. Click Projectmates® Copyright© 2013 Systemates, Inc. Updated 11/2014 Page 15 of 45 5. RFI & Submittal Setup Construction Management Modules are the applications built within the Projectmates system for communication and job tracking in the construction field. These applications include RFI, Submittal, and Daily Field Reports. The Project Manager is required to setup RFI, Submittal, and Daily Field Report workflow per the project requirements. Setup is a simple process. RFI Setup MSU Workflow - External Architect is the first recipient. The Project Manager is copied on all RFIs. 1. Click Request for Information. 2. Click on the thread description. Projectmates® Copyright© 2013 Systemates, Inc. Updated 11/2014 Page 16 of 45 3. Select a First Recipient from the drop-down. 4. Select Copy To users from the dropdown. 5. Click Save. Submittal Setup MSU Workflow –External Architect is the first recipient. The Project Manager is copied on all Submittals. 6. Click Submittal/Shop Drawing. 7. Click on the thread description. 8. Select a First Recipient from the drop-down. 9. Select Copy To users from the drop-down. 10. Click Save. Projectmates® Copyright© 2013 Systemates, Inc. Updated 11/2014 Page 17 of 45 6. Construction Phase Projectmates provides over 30 different modules out-of-the-box, making it one of the most complete construction project management products. Following is a list of the system tools the Project Manager will use most frequently during the construction phase. Document Management / File Sharing Photo Albums Team Directory Discussion Forums Schedules Meeting Minutes Budget RFIs Submittals Field Reports Punch Lists Contracts Change Orders PCOs Invoices/ Pay Apps RFIs Construction Mgmt Tab > RFI > RFI Initiate an RFI by clicking Create new item. Complete the RFI form. Click on View an existing RFI by clicking the RFI subject from the log page. Route an RFI to another person by clicking Close an RFI by clicking Projectmates® Copyright© 2013 Systemates, Inc. Updated 11/2014 Page 18 of 45 Submittals Construction Mgmt Tab > Submittal > Submittal Initiate a Submittal by clicking Create new item. Complete the Submittal form. Click on View an existing RFI by clicking the RFI subject from the log page. Route an RFI to another person by clicking Close an RFI by clicking Projectmates® Copyright© 2013 Systemates, Inc. Updated 11/2014 Page 19 of 45 Submittal Register (Optional) In some cases, the GC furnishes a submittal schedule at the start of the project. If so, this submittal register can be imported through a Projectmates Excel template. The submittal register is used to predefine all needed Submittals during a construction project. The Project Manager can upload this master list into the submittal module to track the status of submittal items automatically. You can prepare a list of submittals in an Excel spreadsheet and import the spreadsheet into Projectmates’ Submittal Register. To import submittal register items: 1. Click the Import/Export register items link. 2. The Submittals Register – Import/Export Items page displays. 3. Click the Download MS Excel template link. 4. Enter information in the template. Instructions are provided in the template. 5. Save the completed Excel template to your hard drive and return to Projectmates. 6. Click the Browse… button. 7. Locate the template you just created. 8. Click the Import button. GC Daily Field Reports Construction Mgmt Tab > Daily Field Report > GC Daily Field Reports: General Contractor completes DFR and submits to Project Manager. PM Field Reports Construction Mgmt Tab > PM Field Report > PM Field Reports: Project Manager completes the PM Field Report and submits to Facilities AVP/Fiscal Agent. Projectmates® Copyright© 2013 Systemates, Inc. Updated 11/2014 Page 20 of 45 Photo Albums Quick Links Tab > Photos > Select Appropriate Thread Construction Progress: Albums are organized by week. The GC and Project Manager can upload photos taken onsite to show progress of construction. Additional albums can be created for longer jobs. Completion Photos: Designed for housing photos taken at project completion. Meeting Minutes Tasks Tab > Meeting Minutes > Select Appropriate Thread Construction Meetings: Document (weekly) jobsite meetings during construction. Design Meetings: Document meetings with architects or others during design phase(s). Pre Design Meetings: Document meetings pre design. Projectmates® Copyright© 2013 Systemates, Inc. Updated 11/2014 Page 21 of 45 7. Construction Finances PCE The Project Manager is responsible for maintaining the PCE in the Projectmates budget module. Reference Loading the PCE into Projectmates in this document for more information. PCE & Cost Tracking Tab > PCE & Contract Mgmt > Budget Contracts PCE & Cost Tracking Tab > PCE & Contract Mgmt > Contract MSU Workflow Facilities Finance Admin inputs electronic version of contract into Projectmates once the Project Manager selects contractor and starts the approval process in Projectmates. Facilities Finance Admin enters Requisition for a Purchase Order in FRS as is done currently. Once PO processed in FRS, open the contract in Projectmates, attach any supporting documents, and enter the PO# into the accounting field. Type YES or NO to indicate if Certified Payroll Required. Certified payroll is required for any contract that requires construction services. The approval process for contracts is as follows: 1. Facilities – Finance Capital Budget Admin 2. Facilities - Project Manager Projectmates® Copyright© 2013 Systemates, Inc. Updated 11/2014 Page 22 of 45 To create an electronic contract: 1. From the budget, select checkbox next to budget line item. 2. Scroll to top of budget. Click on the Actions menu dropdown and select Create Contract. 3. Type a Contract Description and click GO. The contract page will open. 4. Complete the contract information, including the following: Awarded To Scope of Work Original Substantial Completion Date (Details tab) Verify Line Items (Items tab) Attach PDF of executed PO (Attachments tab) Projectmates® Copyright© 2013 Systemates, Inc. Updated 11/2014 Page 23 of 45 5. Input information into the ACCOUNTING fields (General tab). Once the Purchase Order is assigned in the FRS system, that number should be added to the Purchase Order field. 6. Click Start Approval on the Approve tab. Proposed Change Orders PCE & Cost Tracking Tab > Contracts & COs > PCOs MSU Workflow Contractor initiates PCO in Projectmates. Facilities Project Manager either approves or rejects PCO after s/he has had a chance to negotiate amount w/ contractor during weekly meeting. The approval process for PCOs is as follows: 1. Facilities - Project Manager Projectmates® Copyright© 2013 Systemates, Inc. Updated 11/2014 Page 24 of 45 Change Orders PCE & Cost Tracking Tab > PCE & Contract Mgmt > Contract MSU Workflow: Contractor or Facilities Project Manager enters the change order into Projectmates and then starts the electronic approval process. The approval process for change orders is as follows: 1) External – CM/Architect/Engineer 2) Facilities - Project Manager 3) Facilities - Finance Director 4) Facilities - AVP/Fiscal Agent 5) Finance & Treasury - Capital Procurement To create a change order: 1. Click Add new Change Order. 2. Select the contract from the dropdown list. All contract information will be pulled into the change order. 3. Select a Reason Code from the drop-down. 4. Reference PCOs in the Notes section. 5. Click the SAVE button. Projectmates® Copyright© 2013 Systemates, Inc. Updated 11/2014 Page 25 of 45 Note: DO NOT enter change order amount ($) on the GENERAL tab. This will be entered under ITEMS tab next to specific line items in the contract schedule of values. 6. Jump to ITEMS tab. 7. Enter in the change order amount next to the appropriate line item(s) in the contract schedule of values. 8. Click the SAVE button after entering all amounts. 9. Jump to ATTACHMENTS tab. Upload any backup documents. 10. Jump to APPROVE tab. When ready, click on Start Approval to begin the electronic approval process. Projectmates® Copyright© 2013 Systemates, Inc. Updated 11/2014 Page 26 of 45 Invoices & Pay Applications PCE & Cost Tracking Tab > PCE & Contract Mgmt > Pay Requests MSU Workflow for Invoices & Pay Applications Contractors, vendors, and other service providers enter pay requests into Projectmates. Approval occurs electronically within Projectmates After the Finance & Treasury - Capital Procurement approves the invoices and all other parties have approved, the invoice is sent to "Printer Friendly" view in Projectmates. Print approved pay request and give to AP department to process payment. Twice per week, Facilities Finance will review check run to see what check's AP has cut. Facilities Finance Admin will then input payment information directly into the invoice in Projectmates. The approval process for invoices / pay applications is as follows: 1) Facilities - Project Manager 1a) External – CM / Architect – as needed will get hard signatures 1) Facilities – Finance Capital Budget Admin 1) Facilities - AVP/Fiscal Agent 1) Finance & Treasury - Capital Procurement Certified Payrolls When the contract is setup in Projectmates, indicate if the contract requires certified payroll. That information will display when the pay application or invoice is entered in Projectmates. If YES, Finance & Treasury – Capital Procurement will verify certified payroll as part of approving. If NO, Finance & Treasury – Capital Procurement still needs to review and approve before printing and giving pay app or invoice to AP department to process payment. Projectmates® Copyright© 2013 Systemates, Inc. Updated 11/2014 Page 27 of 45 To create a invoice or pay application: 11. Click Create new item. 12. Select your contract from the drop-down list. All contract information will be pulled into the pay application. 13. Enter the Invoice or Pay Application number. Alternatively, click the question mark (?) icon and the number will populate for you. 14. Click Specify custom pay periods and then enter the Pay Period and % retainage (if applicable). 15. Click the SAVE button. 16. Jump to ITEMS tab. 17. Enter the work complete for this pay period next to the appropriate line item(s) in the contract schedule of values. This can be entered as dollar amounts or percentages. Note: Any approved change orders will automatically show up in the ITEMS tab where you can invoice against them. 18. Click the SAVE button after entering all amounts. Projectmates® Copyright© 2013 Systemates, Inc. Updated 11/2014 Page 28 of 45 19. Jump to ATTACHMENTS tab. Upload any required backup documents. Certified Payrolls Copy of Approved Pencil Requisition Subcontractor Releases Timesheets & Reimbursables (if CM) 20. Jump to APPROVE tab. When ready, click on Start Approval to begin the electronic approval process. Credit Card Tracking PCE & Cost Tracking Tab > PCE & Contract Mgmt > Budget MSU Workflow for Tracking Credit Card Expenses In Projectmates, the Facilities Finance Admin logs credit card invoice amounts directly into the budget. Examples of bills that are paid via credit card include FedEx. 1. To add a new budget subitem, select the checkbox next to the main budget item. Projectmates® Copyright© 2013 Systemates, Inc. Updated 11/2014 Page 29 of 45 2. In the Action menu, click Add New Subitem. 3. The Edit Budget Item window will appear. 4. Input WBS/Section, Description, and dollar amount. Enter dollar amount into "Subcontract Invoice (S) " 5. Click CREATE. A confirmation will appear Projectmates® Copyright© 2013 Systemates, Inc. Updated 11/2014 Page 30 of 45 Capital Budget Transfer PCE & Cost Tracking Tab > Capital Budget Transfer MSU Capital Budget Transfer Process PM Identify need for funds transfer CBT Submitted for Approval Facilities Finance Director PM Completes Capital Budget Transfer (CBT) Form Approved CBT submitted to Finance & Treasury Controller PM Updates PCE Finance & Treasury Controller Updates FRS YES Facilities AVP Fiscal Agent YES Finance & Treasury Controller Approves in Projectmates Facilities VP 1) Facilities – Finance Director 2) Facilities - AVP/Fiscal Agent 3) Facilities - VP 4) Finance & Treasury - Controller View all CBT requests in Projectmates by viewing the CBT log. Projectmates® Copyright© 2013 Systemates, Inc. Updated 11/2014 Page 31 of 45 To initiate a new request for capital budget transfer: 1. Click Create new item. 2. Complete the necessary fields in the Transfer From tab. 3. Click SAVE. 4. Complete the necessary fields in the Transfer To tab. 5. Click SAVE. 6. To begin the approval process, click START APPROVAL. Once the Finance & Treasury Controller approves the CBT in Projectmates and updates the FRS, the Facilities Project Manager will receive an automatic email notification and should update the PCE in the budget module. PCE & Cost Tracking Tab > PCE & Contract Mgmt > Budget Projectmates® Copyright© 2013 Systemates, Inc. Updated 11/2014 Page 32 of 45 1. Make any necessary changes/updates for any PCE line item in the CBT form. Click SAVE. Enter positive or negative values into "Approved Revisions " A confirmation will appear 2. Close the Edit window and repeat with other subitems as necessary. Projectmates® Copyright© 2013 Systemates, Inc. Updated 11/2014 Page 33 of 45 8. Code Services Code Services Documents Documents > Construction > Code Services Plan Review / Permit Submittal Code Services Tab > Plan Review / Permit Submittal MSU Workflow Facilities Project Manager completes the Plan Review and/or Permit Submittal form in the appropriate thread. Code Services completes the Project Review Response on the same form. 1) Office of Code Compliance - DCA Project Manager Responsibilities: 1. Create the Plan Review/Permit Submittal Form Select “Create new item” under the appropriate thread (Building, Electrical, Elevator, Fire, or Plumbing). Projectmates® Copyright© 2013 Systemates, Inc. Updated 11/2014 Page 34 of 45 2. Complete the Plan Review and/or Permit Submittal Fill out all relevant fields. Click Click at the bottom of the form. 3. Approve or Reject the Request Check the box next to your name. Click “Approved” or “Rejected”. 4. Start Default Approval Process for the Response & Send Notification to Code Official After the Plan Review and/or Permit Submittal form has been approved, the Project Review Response form will appear below it. Projectmates® Copyright© 2013 Systemates, Inc. Updated 11/2014 Page 35 of 45 In order to trigger the notification email to the appropriate Code Official, the Project Manager must click at the bottom of the form. (There is a note in blue text at the bottom of the previous form to remind you of this.) Code Official Responsibilities: 1. Receive Notification Email Code Officials will receive an email from Projectmates. 2. Log in and find the new request Go to https://projectmates.montclair.edu/ and log in. Do not try to use the Approve/Reject link that is in the email. Find and open the project. Navigate to the Code Services Tab and then the Plan Review/Permit Submittal Log under the appropriate thread. (New items can also be found under the My Work Tab.) Find the Request and click “Edit” on the right. 3. Complete the Response. Fill in the appropriate fields of the form. Projectmates® Copyright© 2013 Systemates, Inc. Updated 11/2014 Page 36 of 45 Click 4. Approve or Reject the Response: Click Check the box next to your name. Enter comments or certifications, if you have them. Click Approved or Rejected. 5. Email the form Once it has been Approved or Rejected, it does not automatically send a notification email. Go to the top of the form and click the icon to email the form. A window will pop up that lists contacts for that project. Check off the names of the people you want to send to. Add other email addresses in the first text box. Add comments, if you have any, in the second text box. Click Projectmates® Copyright© 2013 Systemates, Inc. Updated 11/2014 Page 37 of 45 Inspection Requests & Responses Code Services Tab > Inspections MSU Workflow Facilities Project Manager completes the Inspection Request form. o Upon completion, select the appropriate Inspector to notify. o Director of Code Services & Professional Service Specialist copied on all requests. Project Manager Responsibilities: 1. Create the Inspection Request Form Select “Create new item” under the appropriate thread (Building, Electrical, Elevator, Fire, or Plumbing) 2. Complete the Inspection Request Form Fill out all relevant fields. Click 3. Approve or Reject the Request Click Projectmates® Copyright© 2013 Systemates, Inc. Updated 11/2014 Page 38 of 45 Check the box next to the item you are approving. Enter comments or certifications, if you have any. Click “Approved” or “Rejected”. 4. Start Default Approval Process for Inspection Response & Send Notification to Code Official In order to trigger the notification email to the appropriate Code Official, the Project Manager must click in the Inspection Response. (There is a note in blue text at the bottom of the Request Form to remind you of this.) Code Official Responsibilities: 1. Receive Notification Email Code Officials will receive an email from Projectmates. 2. Log into Projectmates Go to https://projectmates.montclair.edu/ and log in. Do not try to use the Approve/Reject link that is in the email. 3. Open the Project & Find the Request Navigate to the Code Services Tab and then the Inspection Request Log under the appropriate thread. (New items can also be found under the My Work Tab.) Find the Request in the log and click Edit on the right. Projectmates® Copyright© 2013 Systemates, Inc. Updated 11/2014 Page 39 of 45 4. Complete the Response Form Fill in the appropriate fields of the form. Click 5. Approve or Reject the Inspection Response: Click Check the box next to your name. Enter comments or certifications, if you have them. Click Approved or Rejected. 6. Email the form Once it has been Approved or Rejected, it does not automatically send a notification email. Go to the top of the form and click the icon to email the form. A window will pop up that lists contacts for that project. Check off the names of the people you want to send to. Add other email addresses in the first text box. Add comments, if you have any, in the second text box. Click Projectmates® Copyright© 2013 Systemates, Inc. Updated 11/2014 Page 40 of 45 Ongoing Inspections Code Services Tab > Ongoing Inspections Ongoing Inspections are initiated by the Code Official and do not require the Project Manager to submit a request. Code Official Responsibilities: 1. Navigate to the Code Services Tab, select Ongoing Inspections and, under the appropriate thread, select Create new item. 2. Complete the form Fill in the appropriate fields of the form. Click Click 3. Approve or Reject the form: Check the box next to your name. Enter comments or certifications, if you have them. Click Approved or Rejected. Projectmates® Copyright© 2013 Systemates, Inc. Updated 11/2014 Page 41 of 45 4. Email the form Once it has been Approved or Rejected, it does not automatically send a notification email to the Project Manager. Go to the top of the form and click the icon to email the form. A window will pop up that lists contacts for that project. Check off the names of the people you want to send to. Add other email addresses in the first text box. Add comments, if you have any, in the second text box. Click Projectmates® Copyright© 2013 Systemates, Inc. Updated 11/2014 Page 42 of 45 9. Project Closeout Punch List Tasks Tab > Action List > Punchlist The list of project rooms should be extracted from Archibus prior to project closeout. This list of rooms will be uploaded into Projectmates punchlist module. A list of all CSI divisions are already populated in the project. From here, the Project Manager can develop the punchlist while walking the jobsite. Click on the punch list menu on the left pane. From the Log, you can easily view complete items and also those awaiting verification. GC will mark items Complete. The Project Manager or other authorized person will then check off as items are Verified. Projectmates® Copyright© 2013 Systemates, Inc. Updated 11/2014 Page 43 of 45 10. Other Goodies Progress Pictures on Project Home Page Show the latest and greatest picture on the Project Home Page. From the project Home Page, the Project Manager can upload and remove progress photos. Click the menu in the upper right of the Progress Pictures box. And select Upload project picture. Browse for the photo. Add a caption. Click Projectmates® Copyright© 2013 Systemates, Inc. Updated 11/2014 Page 44 of 45 Global Ball in Court For users working in multiple projects, Projectmates offers a “Global Ball in Court,” which is a dashboard view of action items and deadlines for all current projects. Inside Global Ball in Court, you can filter items by project or by type, and then respond to them with a minimal amount of clicks. These items are color coded to help you easily differentiate between items that are pending vs. overdue. For example, a Project Manager may have many invoices that require his or her approval; s/he would be able to view and approve numerous invoices across multiple projects with just a few clicks. If needed, s/he can drill down into an item to review it further. Projectmates® Copyright© 2013 Systemates, Inc. Updated 11/2014 Page 45 of 45