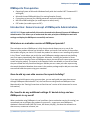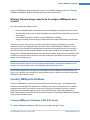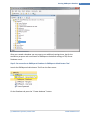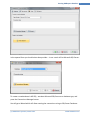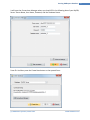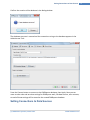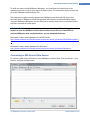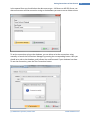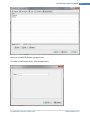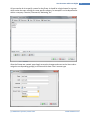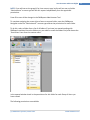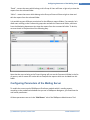
1
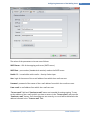
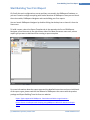
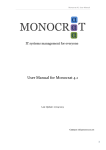
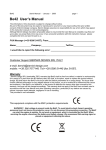
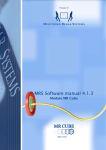
DMReports Prerequisites DMReports Administration Contents DMReports Prerequisites .............................................................................................................................. 2 Introduction: General concept of DMReports Administration. .................................................................... 2 What does an evaluation version of DMReport provide? ........................................................................ 2 How do add my own data sources for reports building?.......................................................................... 2 Do I need to do any additional settings if I decide to buy and use DMReports in my work? ................... 2 What are the main things I need to do to configure DMReports from scratch? ...................................... 3 Creating DMReports Database ..................................................................................................................... 3 Creating DMReports Database in MS SQL Server. .................................................................................... 3 Creating DMReports Database in MS Access .......................................................................................... 12 Creating DMReports Database in MySQL Server .................................................................................... 16 Setting Connections to Data Sources .......................................................................................................... 18 Connecting to MS Access Data Source. .................................................................................................. 19 Connecting to SQL Server Data Source. .................................................................................................. 22 Connecting to MySQL Server Data Source .............................................................................................. 24 Creating ODBC Data Sources .................................................................................................................. 27 User Accounts and Access Rights ................................................................................................................ 34 Creating User Accounts........................................................................................................................... 34 Creating Groups of Users and Assigning Access Rights .......................................................................... 37 Configuring Parameters of the Mailing Server ........................................................................................... 41 Start Building Your First Report .................................................................................................................. 43 (c) DMWorks Systems, 2002-2012 www.dmworks.net 1 DMReports Prerequisites DMReports Prerequisites Operating System of Microsoft Windows family with the installed .NET Framework 3.5 and higher; Microsoft Access 2000 and higher (for running Samples Center); Connection to internet (for enabling automatic reports distribution by email); MS Office 2000 and higher (to enable export to word, excel); PDF reader (to enable export to PDF). Introduction: General concept of DMReports Administration. IMPORTANT: Please read carefully this section devoted to the General Concept of DMReports Administration. This allows you to understand the main principles of DMReports work and settings and deploy the DMReports successfully and secure. What does an evaluation version of DMReport provide? The evaluation version of DMReports is fully-functional and allows you to try out all the features of the product without any limitations. When you install a trial version of the product, the installer will give you choice if to install the product as a demo or not. Installing the product in the “Demo” mode allows you to skip the main DMReports settings steps and start building your first reports immediately after installation. Moreover, installing the product in Demo mode, you install a Samples Center of DMReports where you see the main report types you can create using the product. The reports in the Samples Center are editable, so you can see how they are created the fully-functional designer. Besides you can create your own reports using the sample Northwind database that comes in the product package and/or add your own data sources and build the reports using your own data. How do add my own data sources for reports building? If you want to build reports using your own data, you can easily add your own data sources through DMReports Administrator Tool, the Data Sources tab (please see DMReports User Manual and/or the “Setting Connections to Data Sources” section of this document for more information). Do I need to do any additional settings if I decide to buy and use DMReports in my work? When you decide using DMReports in real conditions (not as evaluation version for testing), we recommend you to configure the products from scratch – create your own DMReports database in desired format (MS SQL Server, MS Access, MySQL), set there the connection to data sources, create user accounts, etc. (c) DMWorks Systems, 2002-2012 www.dmworks.net 2 Creating DMReports Database Please see DMReports User Manual that comes in the product package and/or the “Creating DMReports Database” section of this document for more information). What are the main things I need to do to configure DMReports from scratch? The main settings you need to do are: - Create a database where the information about DMReports application will be stored. Set the connection to one or several databases you would like to use as data sources for your reports. Create User Accounts for further access to DMReports modules. Setup the mailing server settings to enable automatic reports distribution functionality. After you set these main settings, you may install other instances of DMReports on other machines within your company and point them to the created DMReports database. In this case, all the main settings of the application (connections to the data sources, user accounts, etc) will be taken from the created database and you won’t need to set anything except the connection to DMReports database on these machines. Besides, all the reports created by users on different machines will be stored in one place, and users from different machines can get access to all created reports. NOTE: It is possible to grant/restrict access to reports to different users and groups of users. To learn how to do that, please read the ‘’User Accounts and Access Rights’’ Section in the DMReports User Guide or the corresponding section of this DMReports Administration tutorial. For the security purposes, it is highly recommended to install DMReports Administrator tool just on one machine, the machine of a system administrator or business user who will perform DMReports administration tasks. Creating DMReports Database Creation of DMReports is the first and one of the most important steps – this database will store the main settings of the application, including connections to the data sources, reports templates you create, user accounts, and other important information. Currently, you may select one of the database types you want to use: MS SQL Server, MS Access database or MySQL Server. Below you will find step-by-step instructions on creating of DMReports database using all these database types. Creating DMReports Database in MS SQL Server. To create a DMReports database in MS SQL you should go through 2 steps: (c) DMWorks Systems, 2002-2012 www.dmworks.net 3 Creating DMReports Database 1. Create a new database in Microsoft SQL Server using SQL Server Configuration Manager. 2. Set Connection to the created database in DMReports Administrator tool. Step 1. Create a new database in Microsoft SQL Server First of all you should create a Microsoft SQL database in your Microsoft SQL Server. To do that, launch MS SQL Management Studio and select Databases: Right click the Databases item and select New Database: (c) DMWorks Systems, 2002-2012 www.dmworks.net 4 Creating DMReports Database In the opened form, give the name to your database and press Ok: Check if the database is created and appears in the list of your databases: (c) DMWorks Systems, 2002-2012 www.dmworks.net 5 Creating DMReports Database After you created a database you may want to set additional settings there, but for the evaluation purposes and normal work of DMReports the default settings of SQL Server Database are ok. Step 2. Set connection to DMReports Database in DMReports Administrator Tool. Launch the DMReports Administrator Tool from the Start menu: On the Database tab press the ‘’Create database’’ button: (c) DMWorks Systems, 2002-2012 www.dmworks.net 6 Creating DMReports Database In the opened form you should select data provider – in our case it will be Microsoft SQL Server: To create a new database in MS SQL, we select Microsoft SQL Server as a database type, and press the Connections Manager button: You will get a Wizard which will allow creating the connections string to SQL Server Database: (c) DMWorks Systems, 2002-2012 www.dmworks.net 7 Creating DMReports Database Here you should define the settings for the creation of new tables and fields for your existing SQL Server database. Select the server in the Server name field and the created database in the Database Name field: (c) DMWorks Systems, 2002-2012 www.dmworks.net 8 Creating DMReports Database If you want to get access to all the advanced settings of SQL Server Database connection, press the Advanced Settings button: When the connection string to the SQL Server database is set, press the Test Connection button to test the connection: If the connection is set properly you get the following message: (c) DMWorks Systems, 2002-2012 www.dmworks.net 9 Creating DMReports Database The press OK in the Connection Manager window – you will get the Connection String filed filled: Press the Create New button and confirm the creation of the database structure by pressing OK: The Ok button in the window below becomes enabled – this means that the database structure has been created. Press Ok: (c) DMWorks Systems, 2002-2012 www.dmworks.net 10 Creating DMReports Database Now the process of database creation is finished and you can see the connection string in the main form of the Administrator Tool: Press the Connect button to test the connection: (c) DMWorks Systems, 2002-2012 www.dmworks.net 11 Creating DMReports Database If you see this message, the creation of the database and its structure went successfully and you can go to next step and set the connection to the data sources. Creating DMReports Database in MS Access Now let’s go through main steps required to create a database in Microsoft Access. To do this, launch DMReports Administrator Tool from the Start menu and press the Create Database button: Then select Microsoft Access Database File as a database type and set a path to a file where the database will be stored: (c) DMWorks Systems, 2002-2012 www.dmworks.net 12 Creating DMReports Database You will be prompted to save the database somewhere on your machine: Select a place where you want to save the database and click the Save button. After the path is set, you should click the ‘Create New’ button: (c) DMWorks Systems, 2002-2012 www.dmworks.net 13 Creating DMReports Database After that we get a message offering to create Database Structure. Press OK to create it: Click OK to create the database structure, then press OK to use the connection to the created database: (c) DMWorks Systems, 2002-2012 www.dmworks.net 14 Creating DMReports Database As a result, in the Connection String field we get the connection string to the database we have just created: To Test the connection, press the ‘’Connect’’ button under the Connection string field. If the connection string is set properly, you get the following message: If you see this message, the creation of the database and its structure went successfully and you can go to next step and set the connection to the data sources. (c) DMWorks Systems, 2002-2012 www.dmworks.net 15 Creating DMReports Database Creating DMReports Database in MySQL Server To create a DMReports database in MySQL, it is necessary to have some ready MySQL database without any data, since DMReports does not create the database itself, but only creates the structure required for DMReports work. To create database structure for DMReports database in MySQL, open the DMReports Administrator tool, Database tab and press the ‘’Create database’’ button: In the opened window select MySQL Server as a database and press the Connections Manager button: (c) DMWorks Systems, 2002-2012 www.dmworks.net 16 Creating DMReports Database It will open the Connections Manager where you should fill in the following data of your MySQL Server: Server Name, User Name, Password, and the Database Name: Press Ok. And then press the Create New button on the opened form: (c) DMWorks Systems, 2002-2012 www.dmworks.net 17 Setting Connections to Data Sources Confirm the creation of the database in the dialog window: The database structure is created and the connections string to the database appears in the Administrator Tool: Press the Connect button to connect to the DMReports database, then Apply. Now you can move to other tabs and set other settings for DMReports work, like data sources, user accounts, etc and all these settings will be stored to the created DMReports database. Setting Connections to Data Sources (c) DMWorks Systems, 2002-2012 www.dmworks.net 18 Setting Connections to Data Sources To build the reports using DMReports Navigator, you should set the connections to the databases you want to use in your reports as data sources. The connection to data sources are set in the DMReports Administrator Tool. The data sources types currently supported by DMReports are Microsoft SQL Server and Microsoft Access. DMReports allows using several data sources. And when building reports using the DMReports Navigator you can select one or another data source or use several data sources in one and the same report. IMPORTANT NOTE: Using both evaluation and licensed version of DMReports, you can connect to your own databases and use them as data sources. But if you would like to evaluate DMReports with sample databases, you can download them here: Northwind Traders sample database for MS SQL Server: http://www.dmworks.net/files/dmreports/resources/sample_databases/SQL2000SampleDb.m si Northwind Traders sample database for MS Access... http://www.dmworks.net/files/dmreports/resources/sample_databases/Nwind.exe Connecting to MS Access Data Source. To connect to MS Access data source, open DMReports Administrator Tool, second tab – Data Sources, and click the Add button: (c) DMWorks Systems, 2002-2012 www.dmworks.net 19 Setting Connections to Data Sources In the opened form you should select the data source type – MS Access or MS SQL Server, set data source name and the connection string to the database you want to use as a data source: To set the connection string to the database, you can either write the connections string manually or launch the Connections Manager by pressing the corresponding button. Here you should set a path to the database, and indicate User and Password if your database has them. To test the connection, press the Test Connection button: (c) DMWorks Systems, 2002-2012 www.dmworks.net 20 Setting Connections to Data Sources Press Ok. As a result, all settings are defined and we press OK to add a data source. A new data source is being added to the list of all availbale data sources in the DMReport Administrator Tool: Here, you can Edit the data source, Delete it, Test the connection to it and add additional data sources by pressing the corresponding buttons on the form. (c) DMWorks Systems, 2002-2012 www.dmworks.net 21 Setting Connections to Data Sources Connecting to SQL Server Data Source. To connect to SQL Server data source, open DMReports Administrator Tool, second tab – Data Sources, and click the Add button: In the opened form you should select the data source type – Microsoft SQL Server, set its name, so you can distinguish the data source in the list of all available data sources, and finally set the connection string to the database you want to use as a data source: (c) DMWorks Systems, 2002-2012 www.dmworks.net 22 Setting Connections to Data Sources To set the connection string to the database, you can either write the connections string manually or launch the Connections Manager by pressing the corresponding button. In the Connections Manager, you should select the data source type – Microsoft SQL Server, choose the Server, and select the database from a list of available: Then, press the Test Connection button to test the connection to the selected database and press OK. As a result, a new data source will be added to the list of all availbale data sources you can use to build the reports: (c) DMWorks Systems, 2002-2012 www.dmworks.net 23 Setting Connections to Data Sources Here, you can edit the data source, delete it, test the connection to it and add additional data sources by pressing the corresponding buttons on the form. When you create reports, these data sources will be involved in the reports, so if a data source is already used in a report, it will be impossible to delete it. When modifying the connection string of the data source that is already used, please keep in mind that if a new database differs from the previous database by its structure, the reports can become invalid. Once the connections to the data sources are set, move to the next tab – Users, where you can create user accounts for providing access to DMReports to different users. Connecting to MySQL Server Data Source To connect to MySQL SQL Server data source, open DMReports Administrator Tool, second tab – Data Sources, and click the Add button: (c) DMWorks Systems, 2002-2012 www.dmworks.net 24 Setting Connections to Data Sources In the opened form you should select the data source type – MySQL Server, set its name, so you can distinguish the data source in the list of all available data sources, and finally set the connection string to the database you want to use as a data source: (c) DMWorks Systems, 2002-2012 www.dmworks.net 25 Setting Connections to Data Sources To set the connection string to the database, you can either write the connections string manually or launch the Connections Manager by pressing the corresponding button. In the Connections Manager, you should select the data source type – MySQL Server, and fill in the required fields: Server name, User Name, Password and the Database name: Then, press the Test Connection button to test the connection to the selected database and press OK. As a result, a new data source will be added to the list of all available data sources you can use to build the reports: (c) DMWorks Systems, 2002-2012 www.dmworks.net 26 Setting Connections to Data Sources Here, you can edit the data source, delete it, test the connection to it and add additional data sources by pressing the corresponding buttons on the form. NOTE: When you create reports, these data sources will be involved in the reports, so if a data source is already used in a report, it will be impossible to delete it. When modifying the connection string of the data source that is already used, please keep in mind that if a new database differs from the previous database by its structure, the reports can become invalid. Creating ODBC Data Sources To set connection to data sources which are not directly supported by DMReports (currently, DMReports supports MS Access, MS SQL Server, and MySQL), you can use ODBC. Using ODBC you can connect to Excel files, Oracle, Firebird, PosgreSQL, Sybase, Interbase, and other databases, including proprietary ones. Before creating an ODBC data source, it is required to install the corresponding driver on your machine. The required ODBC drivers can be obtained from vendors of corresponding databases. Before creating ODBC data sources, a decision must be made whether they should be user or system data sources. User data sources cannot be reached unless the correct user id was used when logging on. To share the data sources with other users, system data sources must be created. (c) DMWorks Systems, 2002-2012 www.dmworks.net 27 Setting Connections to Data Sources It is important to note that if you wish to display your reports created with DMReports over web using DMReports Server, it is required to create system ODBC data sources. User data sources cannot be read by DMReports Server because they are written to the registry belonging to a machine user who created hat data source. The system data sources are written to the registry key available for all users. To add an ODBC data source, open the DMReports Administrator Tool, the Data Sources tab and click Add: In the opened window, set the Name of your data source – it can be any name by which you can distinguish the data source among others. Then, select the ODBC as the data provider and press the Connections Manager button: (c) DMWorks Systems, 2002-2012 www.dmworks.net 28 Setting Connections to Data Sources In the Connections Manager Window there are two options: - Use user or system data source name – here you may choose your previously created ODBC data sources; Use connection string – use this option for creation of a new ODBC data source. If you wish to choose the previously created data source, check the Use user or system data source name and select the data source from a list of created data source. Enter User Name and Password to your data source if required, then press Test Connection to test the connection to the data source and/or click Ok to connect to it. For creating a new ODBC data source, check the Use connection string option and click Build. (c) DMWorks Systems, 2002-2012 www.dmworks.net 29 Setting Connections to Data Sources In the opened form you can either select/create a file data source that describes driver with which it is required to connect (the first tab) or a computer data source (the second tab). (c) DMWorks Systems, 2002-2012 www.dmworks.net 30 Setting Connections to Data Sources To create a new ODBC data source, go to the second tab – Computer data source, and click Create: In the opened form choose what type of the data source you want to create: user or system data source. Note that user data source is available only for a user who creates this data source, and cannot be accessed by other users of the computer and cannot be used as a data source if you further want to use this data source in DMReports Server to display the reports over web. System data source can be accessed by any user and can be used by DMReports Server. (c) DMWorks Systems, 2002-2012 www.dmworks.net 31 Setting Connections to Data Sources Select the type of the data source and click Next. In the opened form choose the driver for the corresponding data source (Excel, Oracle, FireBird, etc). Note that here it displays only the drivers installed on your machine. If you cannot find the corresponding driver here, please download and install the driver from the vendor of your database. After you choose the required driver, press Next, then Finish. After that you will be prompted to set the settings specific for the chosen data source. For example, if we choose Excel Driver, we will need to set the following settings: Name, Description, and choose the Excel file by pressing the Select a spreadsheet button: (c) DMWorks Systems, 2002-2012 www.dmworks.net 32 Setting Connections to Data Sources Click Ok to confirm the creation of the data source in all forms. If the data source is created, it will appear in the list of data sources in DMReports Administrator tool: Press Ok if you finished adding new data sources or Apply, then Add if you wish to add more data sources. (c) DMWorks Systems, 2002-2012 www.dmworks.net 33 User Accounts and Access Rights User Accounts and Access Rights To work with DMReports it is required to create user accounts. If you do not create any account, you will not be able to enter the main module DMReports Navigator where you build the reports. So, when you first launch DMReports Administrator Tool, you need to create at least one user account with Administrator rights. There are 3 available user account types: ‘’Administrator’’ – this account type is required to be created when configuring DMReports. It provides access to the whole product functionality, including the creation of other account types (User, Disable) and granting/restricting access to report folders and setting other parameters of DMReports. And only the Administrator account type has access to the DMReports Administrator Tool. ‘’User’’ – this account type allows to access DMReports Navigator where users can create/view/edit reports depending on the access rights granted by the Administrator. NOTE: when creating “User” account type, it is necessary to set the access rights for each User you create, otherwise all users which have the “User” account type will not see any report folder in the DMReports Navigator. Please see the ‘’Assigning User Access Rights’’ section to learn how to grant the access rights for the ‘’User’’ account type. ‘’Disable’’ – this account type restricts access to the product functionality. It can be used if it is needed to temporarily restrict the access of a user to the application. Creating User Accounts Users of DMReports can enter DMReports only using the credentials (login and password). So, it is important to create user accounts when you start working with DMReports. It is possible to create different accounts granting different access rights to DMReports. The User Accounts for DMReports are created in the DMReports Administrator Tool, on the Users tab: (c) DMWorks Systems, 2002-2012 www.dmworks.net 34 User Accounts and Access Rights Here you can create a new user, delete an existing one, or edit the data of the account. When creating/editing an account, the following data shall be filled in: Name – name of the user which distinguish him/her among other users; Login – login name for entering into DMReports; Password – password of a user Account Type – type of a user account: Administrator, User, Disable; “User” – a simple user of an application. This type of user can create and edit reports, but cannot set the parameters of reports mailing: what reports are sent to what recipients on what date. “Administrator” – has access to the whole product functionality. “Disable” – there is no access to any functionality of the application. This category is needed to temporarily restrict the access to the application. ‘’Group of Users’’ – group which a user belongs to. NOTE: “Group of Users” field is required for assigning access rights of the ‘’User” account type users to report folders. To enable User account type users to see the reports it is necessary to (c) DMWorks Systems, 2002-2012 www.dmworks.net 35 User Accounts and Access Rights create Groups of Users and assign one or several groups to a User account. If you will not set the group(s) for User account type, he/she will not see any folder. “Administrator” account type will see ALL reports independently from the appointed permissions. To learn how to create Groups of Users, please see the ‘’Creating Groups of Users and Assigning Access Rights’’ Section. To create an account, press the Add button, define all necessary settings in the opened form and press OK: A new user will be created and will appear in the list of all user accounts grouped by account type: (c) DMWorks Systems, 2002-2012 www.dmworks.net 36 User Accounts and Access Rights Press the ‘’Apply’’ button to save the changes. Creating Groups of Users and Assigning Access Rights DMReports allows you to grant/restrict access to the reports which are built. This is very useful feature that allows storing all the reports devoted to different subjects in the same database, but to allow viewing/editing reports just to the users who has the corresponding permissions for a folder(s). To create a Group of Users click the Group of Users tab on the DMReports Administrator Tool: (c) DMWorks Systems, 2002-2012 www.dmworks.net 37 User Accounts and Access Rights Here you can Add/Edit/Delete a group of users. To create a new Group of Users, click the Add button: (c) DMWorks Systems, 2002-2012 www.dmworks.net 38 User Accounts and Access Rights All you need to do is to specify a name for the Group. It should be a logical name for a group which unites the users relating for some specific category, for example it can be departments within a company: Financial, Commercial, Marketing, etc. After the Groups are created, press Apply to save the changes and move to the Users tab to assign the corresponding group(s) to all users which have ‘User’ account type. (c) DMWorks Systems, 2002-2012 www.dmworks.net 39 User Accounts and Access Rights NOTE: If you will not set the group(s) for User account type, he/she will not see any folder. “Administrator” account type will see ALL reports independently from the appointed permissions. Press OK to save all the changes in the DMReports Administrator Tool. To complete assigning the access rights of users to reports folder, enter the DMReports Navigator under the ‘’Administrator’’ account type and set the permissions for each folder. To do this, select a folder from a list of all folders (if you have just started working with DMReports and don’t have the folders yet, you need to create the folders first) and choose the ‘Permissions’ item from the context menu: In the opened window check-in the permissions for this folder for each Group of Users you have created. The following permissions are available: (c) DMWorks Systems, 2002-2012 www.dmworks.net 40 Configuring Parameters of the Mailing Server ‘’Read’’ - means that users which belong to this Group of Users will have a right only to view the reports from the selected folder. “Write” – means that users which belong to the Group of Users will have a right to view and edit the reports from the selected folder. It is possible to grant different permissions for the different reports folders. For example, let’s allow users relating to the Commercial group view and edit the Commercial folder, and users from the Marketing department just view the reports from the commercial folder. To do this, we must check-in the permissions the following way: Note that the users relating to the Financial group will not see the Commercial folder in the list of reports, and of course will not be able to view/edit the reports which are included into this folder. Configuring Parameters of the Mailing Server To enable the correct work of DMReports Distributor module which is sending reports according to the predefined schedule that you set in DMReports Navigator, you should set the mail server parameters. All these parameters are set in the “Mail Server’’ tab of the DMReports Administrator Tool: (c) DMWorks Systems, 2002-2012 www.dmworks.net 41 Configuring Parameters of the Mailing Server The values of the parameters to be set are as follows: SMTP Server – URL of the outgoing mail server (SMTP server). SMTP Port – port number (hexadecimal notation) used on the SMTP server. Enable SSL – is used while mails transfer - Security Socket Layer. User- login of the owner of the e-mail address from which the e-mails are sent. Password - password of the owner of the e-mail address from which the e-mails are sent. From e-mail- e-mail address from which the e-mails are sent “To test e-mail” field and “Send test e-mail” button are intended for settings testing. To test, set the address of the e-mail to which you have an access in the “To test e-mail” and press the “Send test e-mail” button. If all the settings are set correctly, an e-mail will be delivered to the address indicated in the “To test e-mail” field. (c) DMWorks Systems, 2002-2012 www.dmworks.net 42 Start Building Your First Report Start Building Your First Report Ok, finally the main configurations are set and they are stored in the DMReports Database, so you won’t need to configure anything with further launches of DMReports. Now you can launch the main module, DMReports Navigator and start building your first reports. You can launch DMReports Navigator by double clicking the desktop icon or launch it from the Start menu. To build a report, select the Report Template tab in the opened main form of DMReports Navigator, press the arrow in the right bottom side of the New Document menu tem, select a report type you want to build and start creating a report template. For more information about the report types and the detailed instructions on how to build each of the report types, please read the User Manual of DMReports that comes with the product package and Report Building Tutorials from our website: Report Types supported in DMReports - Destination and Main Usage Scenarios … How to Create a List Report with Grouping using DMReports Wizard for Document Report Type… (c) DMWorks Systems, 2002-2012 www.dmworks.net 43 Start Building Your First Report How to Create an Interactive OLAP Cube (pivot table) with DMReports using Wizard… How to Create a Chart with DMReports using Wizard… How to Create a Simple Dashboard using Document Report Type… Creating Parameterized Reports in DMReports – General Concept… Creating a report with Date/Time Parameter (Orders Details Sample Report)... In case of any questions, please feel free to contact us at [email protected] Hope you enjoy using our product! (c) DMWorks Systems, 2002-2012 www.dmworks.net 44