1
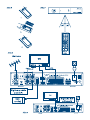
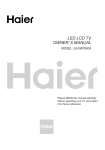
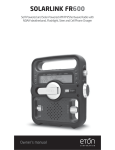
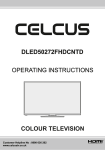
Picture similar Digital Terrestrial HD Receiver SRT 8525 User Manual Up to USB Recording 400 Channels High Definition 4 Man./ Auto TV Info Search Digital Audio Subtitles Favourite lists 30 Timers MP3/JPG MPEG 0.70 Watt Stand-by PART 2 • English 27 Nov 2012 14:46 1.0 INTRODUCTION 1.1 Safety Instructions 1.2 Storage 1.3 Equipment Set-up 1.4 Accessories 1.5 Usage of external USB devices 2.0 Your receiver 2.1 Front panel 2.2 Rear panel 2.3 Remote control 2.4 Installing the batteries 2.5 Using the remote control 3.0 Connections 3.1 Connecting to your aerial antenna 3.2 Connecting to TV with HDMI cable 3.3 Connecting to TV with SCART cable 3.4 Connecting to TV with cinch cable 3.5 Connecting to a digital audio amplifier 3.6 Connecting to a digital A/V receiver and TV using HDMI 3.7 Connecting an external USB storage device 4.0 Starting up for the first time 4.1 Antenna Adjustment 5.0 Quick guide to using your receiver 5.1 Changing channels 5.2 Adjusting volume and audio 5.3 Info Banner 5.4 Electronic TV Programme Guide (EPG) 5.5 Selecting subtitle language 5.6 Displaying Teletext 5.7 Using external USB storage devices 5.8 Instant Recording 5.9 Playback of recording 6.0 Main Menu 6.1 Programme Organizer 6.2 Channel search 6.3 System Setup 6.4 Tools 6.5 Records 6.6 Multimedia 6.7 Irdeto CA Status 7.0 Troubleshooting 8.0 Technical specification 9.0 Appendix 2 2 2 2 3 3 3 3 3 4 5 5 5 5 5 6 6 6 6 6 6 7 7 7 8 8 9 9 9 10 10 10 10 10 12 13 15 16 18 19 20 21 23 STRONG declares that this item complies with the basic requirements and other relevant regulations of directives CE 2004/108/EC and 73/23/EC, RoHS 2002/95/EC Subject to alterations. In consequence of continuous research and development technical specifications, design and appearance of products may change. Irdeto is a registered trademark of Irdeto Access BV. All other product names are trademarks or registered trademarks of their respective owners. © STRONG 2012. All rights reserved. 1 English Table of Contents PART 2 • English 1.0 INTRODUCTION 1.1 Safety Instructions DO NOT INSTALL YOUR RECEIVER In a closed or poorly ventilated cabinet; directly on top of or under any other equipment; on a surface which might obstruct the ventilation slots. DO NOT EXPOSE THE RECEIVER OR ITS ACCESSORIES To direct sunlight or any other equipment that generates heat; to rain or intense moisture; to intense vibration and to any shock which may cause permanent damage to your receiver or to any magnetic objects, such as loudspeakers, transformers, etc. Do not use a damaged power cord. It may cause a fire or an electric shock. Do not touch a power cord with wet hands. It may cause an electric shock. When the receiver is not used for a long period of time, you should unplug the power cord from the wall socket. Do not use alcohol or ammonia based liquids to clean the receiver. If you wish, you may clean your receiver with a soft lint-free cloth slightly made damp with a mild soap solution, only after disconnecting from the mains voltage supply. Make sure no foreign objects fall through the ventilation slots because this could cause fire or an electric shock. Do not place any objects on top of the receiver because this might prevent proper cooling of the components inside. Safety Precautions Never open the receiver cover. It is dangerous to touch the inside of the receiver due to high voltages. Opening the receiver will void the warranty of the product. Refer all maintenance or servicing to suitably qualified personnel. When you are connecting cables, be sure that the receiver is disconnected from the mains supply voltage. Wait a few seconds after switching off the receiver before you move the receiver or disconnect any equipment. It is a necessity that you only use an approved extension and compatible wiring that is suitable for the electrical power consumption of the installed equipment. Please ensure that the electrical power supply corresponds with the voltage on the electrical identification plate at the back of the receiver. If the receiver does not operate normally, even after strictly following the instructions in this user manual, it is recommended to consult your local dealer or contact the appropriate service. 1.2 Storage Your receiver and its accessories are stored and delivered in a packaging designed to protect against electric shocks and moisture. When unpacking it, make sure that all the parts are included and keep the packaging away from children. When transporting the receiver from one place to another or if you are returning it under warranty conditions, make sure to repack the receiver in its original packaging with its accessories. Failing to comply with such packaging procedures could damage the product and void your warranty. 1.3 Equipment Set-up We recommend you consult a professional installer to set up your equipment. Otherwise, please follow the instructions below: Refer to the user manual of your TV and your antenna. Make sure that all the connections, cables and outdoor components are in a good condition and all the connections are well shielded and from good quality. We recommend using high quality HDMI cables at least corresponding to HDMI 1.3 standard. 2 PART 2 • English This manual provides complete instructions for installing and using this receiver. The following symbols will serve as follow: Warning: Indicates warning information. Note: Indicates any other additional important or helpful information. MENU (Bold Characters) Move to (Italic Characters) Represents a button on the remote control or the receiver. English Represents a menu item within a window. 1.4 Accessories Receiver - 1 pc. User Manual - 1 pc. Remote control - 1 pc. Batteries (AAA) - 2 pcs. Warning: The batteries should not be recharged, disassembled, electrically shortcircuited, be mixed or used with other types of batteries. If rechargeable accumulators instead of batteries are going to be used, we recommend using (e.g. NiMH) types with low self-discharge to ensure long time operation of remote control. 1.5 Usage of external USB devices It is recommended to use USB 2.0 storage devices. If your device is not compatible to USB 2.0 specifications, the multimedia and video playback with your receiver would not work properly. If you are going to use external USB HDD (Hard Disk Drive) please consider that it might be the case that the power specifications exceed the supported output of your receiver (5 V/500 mA). If so, please connect your USB HDD to a corresponding external power adapter. STRONG cannot guarantee compatibility to all types of USB storage devices. It is advised not to store important information on USB storage devices used with the receiver. Always make backups of data on your USB storage device before using it with this receiver. STRONG will not take responsibility for any loss of information or circumstances caused by loss of information. Please ensure that the USB device is already formatted to FAT/FAT32 or NTFS. If it is not, please format the USB device via your PC or notebook. 2.0 Your receiver 2.1 Front panel 1. 2. 3. 4. Fig. 1 q button: Switches the receiver between standby (off ) and operating mode. Stand-by indicator: Green light in operating mode and red light in standby mode. Infrared sensor: Receives signals from the remote control. Slot for smart card: The slot is behind the front flap and only intended for service use, it won’t be used during operation. 2.2 Rear panel 1. ANT IN 2. ANT OUT Fig. 2 To connect to your aerial using a standard antenna cable. To connect to your TV or additional receiver via a standard antenna cable. 3 PART 2 • English 3. AUDIO (L/R) 4. VIDEO 5. S/PDIF 6. USB 7. HDMI 8. SCART 9. Power cord 2.3 Remote control 1. q 2. ! 3. 0-9 4. 5. 6. 7. 8. AV TV/R MENU EXIT pq 9. tu 10. OK 11. 12. 13. 14. 15. 16. EPG V+/V- FAV AUDIO ZOOM 17. P+/P- 18. RED/V.F 19. GREEN/TEXT 20. YELLOW/SUB 21. BLUE/RCL 22. 2 4 To connect to your TV or VCR, alternatively you can connect to an amplifier or HIFI system using an RCA cable. To connect to your TV or VCR using an RCA cable. To connect to a digital home theatre or audio amplifier with an audio cinch cable. To connect your USB storage device (stick, HDD, etc.) To connect to the HDMI input of your TV using a good quality HDMI cable. To connect to your TV set using a SCART cable. To connect your receiver to the local power supply system, supporting a voltage range of ~ 100 – 240 V 50/60 Hz. Fig. 3 To switch the receiver between standby and working mode To disable/enable the audio outputs of the receiver. In viewing mode: to switch to a channel by entering its number In menu mode: to enter numeric values No function Toggles between TV and RADIO mode To access the main menu and in menu to return to viewing mode Exits from the menu, sub-menu or cancels actions In viewing mode: to change to the next/previous channel In menu and channel list mode: to move the cursor up/down. In viewing mode: to decrease/increase the volume In menu mode: for navigation and to change settings in specific menus In viewing mode: to open the channel list or confirm displayed messages In menu mode: to open the menus and to confirm settings or changes To enter the Electronic Programme Guide. Shows the current channel information (2x extended info) To increase/decrease the volume level Opens the favourite group selection To open the list of audio languages and settings To zoom into a specific area of the video, further pressing increases zoom factor and zoom modes In viewing mode: to switch through the channels In menu/channel list: to scroll page up/down In viewing mode: to switch the resolution between 576i, 576p, 720p, 1080i and 1080p (50 Hz) In menu and Teletext mode: depends on the menu context In viewing mode: to open Teletext (if broadcasted) In menu and Teletext mode: depends on the menu context In viewing mode: to select a subtitle language (if subtitles are broadcasted) In menu and Teletext mode: depends on the menu context In viewing mode: to toggle between the two last watched channels In menu and Teletext mode: depends on the menu context In viewing mode: to pause TV picture In multimedia mode: to pause playback of a file PART 2 • English For multimedia playback: to start playback of the previous file For multimedia playback: to start playback of the next file No function For multimedia playback: to start playback For multimedia playback: starts fast rewind, supported modes are: 2x, 4x, 8x, 16x and 32x For multimedia playback: starts fast forward, supported modes are: 2x, 4x, 8x, 16x and 32x For multimedia playback: to stop playback of a file : " 4 1 5 28. 6 29. 3 2.4 Installing the batteries Fig. 4 Open the cover on the remote control and insert 2x AAA batteries into the compartment. Correct position of the polar diagram shows the batteries inside the compartment. 1. Open the cover 2. Insert the batteries 3. Close the lid Warning: The batteries should not be recharged, disassembled, electrically shortcircuited, be mixed or used with other types of batteries. If rechargeable accumulators will be used instead of batteries, we recommend using (e.g. NiMH) types with low self-discharge to ensure long time operation of the remote control. 2.5 Using the remote control Fig. 5 To use the remote control, point it towards the front of your receiver. The remote control supports a range of up to 7 meters distance to the receiver at an angle of up to approx. +-30 degrees. NOTE: Managing the receiver will be limited or not possible if there are obstacles between the remote control sensor (at the front panel of the receiver) and the remote control. Direct sunlight or very bright light can reduce or disturb the reception of the remote control signals. 3.0 Connections Warning: Please make sure that connection devices are disconnected from their main power supplies before connecting these to the receiver. 3.1 Connecting to your aerial antenna Fig. 6 To receive digital broadcast signals, your receiver has to be connected to a terrestrial indoor or outdoor antenna. Use the antenna cable to connect the aerial with the ANT IN connector on the back of your receiver. Please ensure that a properly shielded antenna cable and suitable connectors are used. The TO TV connector allows you to loop the antenna signal to a second receiver or TV set. 3.2 Connecting to TV with HDMI cable Fig. 6 We recommend connecting your TV set with the receiver using a good quality HDMI 1.3 or higher cable (not included). This connection supports the highest possible quality. 5 English 23. 24. 25. 26. 27. PART 2 • English 3.3 Connecting to TV with SCART cable Fig. 6 The receiver is also equipped with a SCART connector; alternatively, the TV set can be connected to the receiver using a good quality SCART cable. 3.4 Connecting to TV with cinch cable Fig. 6 Your receiver is also equipped with Audio L, R and VIDEO connectors. As an alternative you can use these connections if your TV set doesn’t have an HDMI connector. 3.5 Connecting to a digital audio amplifier Fig. 6 By connecting your receiver to a digital amplifier or home theatre system, you can enjoy the best possible sound quality and multi-channel audio (depending on broadcast). Connect your digital audio amplifier or home theatre system with a suitable cable to the S/PDIF connector on the back of the receiver. 3.6 Connecting to a digital A/V receiver and TV using HDMI Fig. 7 By connecting your receiver to an A/V receiver or enhanced digital home theatre system with HDMI, you will enjoy the best possible sound and picture quality as well as multi-channel audio (depending on broadcast). Connect the HDMI output of the receiver to the corresponding input of your A/V system and then connect the HDMI output of the A/V receiver or home theatre system to your TV set. Select the correct input on your A/V system to watch and listen to programmes. If your TV set already supports DD audio we recommend you to use the direct connection as described above in chapter 3.2. 3.7 Connecting an external USB storage device Note: Fig. 6 For details to consider when using a USB storage device please refer to chapter 1.5. 4.0 Starting up for the first time Ensure that your connections are setup properly. In case of difficulties or questions, please ask your local dealer or service for assistance. It is recommended to follow the Installation Guide step by step. It will guide you through the basic installation and channel searching process. It will enable you to enjoy digital HD broadcasts just within a few minutes. Start by selecting your language using tu. After selecting your language, press q to move the highlight to Region. Select your region with the tu buttons. Display Mode: Use tu to switch the HDMI resolution to your value of choice. If your TV set doesn’t support a specific resolution you will see black picture, but to recover you can use tu for switching to the next or previous resolution. Aspect Mode: Use this option to select the aspect ratio of your TV set and the preferred conversion method. The options are: Auto (automatic detection of aspect ratio), 4:3 Panscan (Displays 16:9 broadcasts full screen and cut upper and lower parts of 16:9 video on your 4:3 TV), 4:3 letterbox (black bars on top and under the picture on a 4:3 TV) and 16:9 Wide Screen or 16:9 PillarBox (Displays 4:3 broadcast with back pillars at left and right sides on your 16:9 TV) which you can use for 16:9 TV sets. 6 PART 2 • English Set to On if you use an active antenna. When set to On, 5 V will be present on the ANT IN connector of the receiver. Select Off for passive antennas or when connected to a house distribution system. When all settings have been made, move the highlight to Next and press OK to continue. The receiver will now advance to the Antenna Adjustment screen. Antenna Power: In this menu you can adjust the antenna in order to ensure best signal quality. Band: Allows you to select the frequency range according to your local broadcast conditions. The default adjusted UHF range is the mostly used one, so we recommend not to change this setting. If you know that the VHF range is used in your country you can select it with tu. Frequency channel: Select a channel/frequency that broadcasts digital TV channels in the region where you live. Now you can adjust your aerial antenna to a proper position in order to get the best signal quality and strength indication displayed. Afterwards press q to move the highlight to Search and press OK to start the channel scan process. The receiver will start searching for channels. Information about the scanned frequency, found TV and radio channels and channel scan progress is displayed on screen. When the channel scan has been completed, the receiver will tune on the first found TV channel. Note: If the receiver hasn’t found any channels by the end of the channel scan, it is possible that your antenna is not installed/ aligned correctly. To ensure good results and the proper antenna configuration, refer to qualified professionals. 5.0 Quick guide to using your receiver We at STRONG understand that you can’t wait to enjoy your new high definition digital terrestrial receiver. The following quick guide will help you getting familiar with the basic operation of this device. We do, however, advice you to read the full manual to get the best performance from your receiver. To switch your receiver ON or in standby, use the q button on the remote control or on the front panel of your receiver. If you will not use the receiver for a longer time, unplug it from the mains by unplugging the power plug from the outlet. Note: 5 min after switching the receiver to standby it will enter the deep sleep mode. Within this time the receiver is able to start up quickly. Starting up from deep sleep takes approx. 40 sec. 5.1 Changing channels There are different ways to change channels: Via direct access using the 0~9 buttons. Via the channel list through the OK button. Via the pq or P+ and P- buttons. 5.1.1 Direct access To access to a channel directly, simply enter its number with the 0~9 buttons on the remote control. Channel numbers can be up to four digits long. Entering a number with less than four digits is possible. Just wait a few seconds and your receiver will switch to the channel number, or just press OK after inserting. 7 English 4.1 Antenna Adjustment PART 2 • English 5.1.2 Channel list Press OK in viewing mode to display the channel list. Use pq in the list to highlight your channel of choice and press OK to switch to this channel. To scroll to the next or previous 9 channels you can also use the P+/P- buttons. With the tu buttons you can toggle between the TV and radio channel list. To change directly from TV to radio mode, press the TV/R button. By pressing the FAV button in viewing mode you can open the FAV group selection, if a favourite list has been created. If more than one FAV list have been created then you can use the tu buttons to toggle between the different FAV groups: Movies, News, Sports and Music. 5.1.3 Using pq or P+/Pp switches to the next channel. q switches to the previous channel. P+ switches to the next channel. P- switches to the previous channel. 5.2 Adjusting volume and audio To adjust the volume you can use the V+/V- or tu buttons. To mute the audio output, press !, to enable the audio output again, press ! again. Some channels support a choice of different audio formats and/or languages. To select another audio language, press AUDIO in viewing mode. A list with available audio languages will be displayed. Use pq to select language and confirm with OK. The audio channel as stereo, mono left and mono right can be selected with the tu buttons. 5.3 Info Banner Every time you switch to a channel, the info banner will be displayed. While watching TV you can press the i button to display it again to access information about the current channel and event. Press i twice for detailed programme and technical information. 5.3.1 Standard information banner The following information will be provided: Channel number and name Current date and time Start and end time of the current event Start and end time of the next event Icons, showing the presence of additional services provided and some properties of this channel: — The channel is broadcasted in standard definition resolution. — The channel is broadcasted in high definition resolution. — Green colour indicates the presence of Teletext. — Green colour indicates the presence of DVB subtitles. — Green colour indicates that this an encrypted channel. — Green colour indicates that the channel is locked via channel lock. — Indicates that the current aspect ratio is broadcasted in 4:3 format. — Indicates that the current aspect ratio is broadcasted in 16:9 format. — Green colour indicates the presence of Dolby Digital audio stream. — Green colour indicates the presence of subtitles for the hearing impaired. 8 PART 2 • English The information banner is automatically removed from the screen after a certain time, specified by the setting for Banner timeout within the Time Setting menu. For details refer to chapter 6.3.3. Note: Event information will be displayed when available. Availability depends on the broadcast. Note: English 5.3.2 Extended information banner To display extended information press i once again, or twice from viewing mode. The following information will be provided: On top of the frame you will see the name of the channel. Below you will find the frequency, bandwidth and signal indicators of the channel. In the 2nd half of the screen you will find the event description. Use tu to switch between the current Now and Next event. If the complete information exceeds the displayed area use pq in order to read further. To remove the info banner, press i or EXIT. Event information will be displayed when available. Availability depends on the broadcast. 5.4 Electronic TV Programme Guide (EPG) This function gives you the opportunity to view programme schedules of digital terrestrial channels for up to 7 days. To open the EPG, press EPG in viewing mode. Use pq to select a channel and tu to select an event. Press i to display detailed information of the selected event. You can use pq to scroll the text and EXIT to close this information. For fast navigating press BLUE to show events taking place the next day at the same time. From this moment on you can also use the YELLOW button to go back to the previous day. Alternatively you can also move from one day to the other one by using the tu buttons across the events. It is not possible to view information about past programmes. To choose an event for watching, press OK to open the timer settings. The detailed timer setup is described in chapter 6.4.1. After the timer has been set up, press EXIT to return to the EPG. To close the EPG, press EXIT again. Note: Event information will be displayed when available. Availability depends on the broadcast. 5.5 Selecting subtitle language Press SUB in viewing mode to display a list of available subtitle languages. Use pq to select a language and confirm with OK. Please consider that this function supports DVB and TXT subtitles and this selection is only displaying them temporarily. Subtitles may not be supported by every channel/broadcaster. Additionally please adjust your preferred subtitle language as described in chapter 6.3.1 Language Setting. 5.6 Displaying Teletext To open the Teletext, press the GREEN (TEXT) button in viewing mode. Use the 0-9 buttons to enter the page number. The coloured buttons allow you to jump directly to the pages as indicated in the bottom line. You can also use the pq buttons to select the next/previous page. With the tu buttons you can select subpages. Press EXIT to close the Teletext. 9 PART 2 • English 5.7 Using external USB storage devices We strongly recommend you to carefully read and follow the specified points mentioned in chapter 1.5 Usage of external USB devices! Further please consider these points when you use your receiver with an external USB storage device: Before you disconnect the USB device from the receiver, we recommend using the Remove the USB device function which is available in several menus of your receiver. If you have removed the USB device unintentionally, then please reconnect it to be detected again. Well functioning multimedia playback is highly depending on the data rate supported by the connected USB device. Especially for playback of video files and loading high resolution pictures, a reading speed of min. 10 - 15 MB/sec is required. As high data rates are not supported by all types of USB devices it is necessary to ensure that the used USB device can fulfil this requirement. Mostly such data can be found on the website or specification sheet of the USB device manufacturer. 5.8 Instant Recording Your new receiver allows you to make an instant recording of programmes you are watching. Simply press 4 to start the recording. To enter the duration for the recording, press 4 again. Use 0~9 to input the recording time. For a recording duration of 45 min, just enter 45 and press OK or for 1h 30 min, just enter 130 and press OK. During the recording a progress banner appears on the upper left corner of your TV screen. To open the recording info press . To stop the recording, press STOP. *Please connect a USB storage device formatted in FAT32 with sufficient free space before you start a recording. For recording HD broadcast, we strongly recommend to use a high speed device. Warning:Within Irdeto encrypted services some events may be protected or limited and following to that recording might not be possible. This might also be the case for recording through the analogue output on Scart to a VCR or DVD recorder. If maturity rating is activated for a specific recording you will have to enter the appropriate PIN Code MATURITY Rating PIN: 0000 to record this event. 5.9 Playback of recording If recordings were already made you have the possibility to access the HDD Manager directly from viewing mode by pressing the u button. With pq select the record of your choice and with OK start the playback in preview mode. To watch a record in full screen mode press OK again. Alternatively you can press u to start playback in preview mode. Further options are displayed in the Records menu. For a detailed description of the menu please refer to chapter 6.5 Records. 6.0 Main Menu The main menu gives you access to specific settings and multimedia functions. To access the main menu, press MENU in viewing mode. The main menu consists of the following sub menus: Program Organizer, Channel Search, System Setup, Tools and Multimedia. Press EXIT in the main menu to get back to the previous menu. 6.1 Programme Organizer Press MENU and use tu to select the Program Organizer and press OK. Following submenus are displayed: Channel Manager, Channel Sort and Delete all. Use pq to select a submenu and press OK or u to access. 6.1.1 Channel Manager The channel manager allows you to move, skip, lock, delete and add channels to the favourite list. To access this menu you will need to enter your PIN code (DEFAULT PIN: 0000). 10 Now your TV channel list will be shown. To switch between the TV and radio list use tu. To navigate within the list, use the pq buttons. Move To move a channel to a new position, use the pq buttons to select the channel, then press the RED button. Now next to the channel’s name the symbol is shown. This indicates that this channel can be moved to another position. To do so, use the pq buttons to move it and press OK to confirm. Proceed as described for any other channels you wish to move. You can also correct the channel selection for moving by pressing the RED button again. Skip To skip a channel during switching through the channel list, use the pq buttons to select the channel, then press the GREEN button. Now next to the channel’s name the symbol is shown. After that, channels marked with will be ignored when switching through the channels in viewing mode. Proceed as described for any other channels you wish to skip. You can also correct the channel selection by pressing the GREEN button again. Channels marked for skipping will stay accessible within the channel list. Lock To lock a channel of the channel list, use the pq buttons to select the channel, then press the YELLOW button. Now next to the channel’s name the symbol is shown. After that, channels marked with will request the PIN code (DEFAULT PIN: 0000) when switching to it. Proceed as described for any other channels you wish to lock. You can also correct the channel lock by pressing the YELLOW button again. Delete To delete a channel, use the pq buttons to select the channel then press the BLUE button. Now you will be asked if you want to delete this channel. Press OK to confirm or EXIT to cancel. The channel(s) you delete from the channel list will be permanently removed, also if this channel is part of the favourite list. Add channels to favourite lists To add a channel to a favourite group, use the pq buttons to select the channel then press the FAV button. Now the favourite group selection will be shown. Select the group to which the channel should be added with pq and press OK. The selected channel will be marked with the symbol v. Additionally you can also select another favourite group where to add this channel. To do so, press OK at the this group. When you have added the channel to the group(s), press EXIT to go back to the channel list. There you can proceed in the same way to add other channels to favourite groups. You can also remove a channel from a favourite group by pressing the FAV button again and selecting the group it is part of. Then press OK to remove the symbol and the channel will be removed from this (these) favourite group(s). 6.1.2 Channel Sort This menu allows you to sort the channels by following methods: By LCN: The channels will be sorted according to the LCN (Logical Channel Numbering) system, which may be broadcasted in your area. If the operator does not support LCN your channel numbers will start with channel number 800, otherwise the LCN channels will be sorted in regional order starting with 1. None LCN channels can be found again starting with number 800. Further, 11 English PART 2 • English PART 2 • English By Service Name: By Frequency: By Operator: the LCN method will allow you to save the strongest channels broadcasted in your area, only. The channels will be sorted in alphabetical order. The channels will be sorted in ascending order of the frequency in which they are broadcasted. The channels will be sorted by the operator ID. 6.1.3 Delete All Use this menu carefully! It will delete all of the stored channels and settings! To execute this function it will be requested to enter the PIN code (DEFAULT PIN: 0000). After you have performed this action you will be guided to the Installation Guide again! Warning: The Delete all function will permanently delete all of the stored channels and settings from your receiver! 6.2 Channel search In the menu Channel Search you can adjust your search settings and perform an automatic or manual channel search. Press MENU and use tu to select Channel Search, then press OK. Following submenus will be displayed: Search Setup, Auto Search and Manual Search. Use pq to select a submenu and press OK or u to access. 6.2.1 Search Setup In the menu Search setup you can set the antenna power and the country in which you live. Country: Use the tu buttons to change the country. Antenna Power: If you use an antenna that can be amplified (i.e. an active indoor/ outdoor antenna) and it requires a voltage of 5 V and doesn’t consume more than 60 mA, then you can set the antenna power to On. If you use an antenna without an amplifier or your antenna is already amplified by an external power supply or if you use an antenna from a house distribution system, please keep the antenna power Off. 6.2.2 Auto Search After selecting this menu item and pressing OK you will be asked to enter the PIN code (DEFAULT PIN: 0000) in order to update the current channel list. If you don’t want to perform a full channel scan you can press EXIT to cancel. After entering the PIN code (DEFAULT PIN: 0000) the receiver will perform an automatic channel search through all frequencies and after finishing this process it will update the channel list. During the search process the receiver will display the progress bar, the currently scanned frequency and the channel names. The receiver will add all new found channels to the channel list. 6.2.3 Manual search In this menu you can search for channels on a specific frequency or channel. This menu requires knowledge of some parameters in order to search on the correct channel/frequency in your area. Scan mode: Use tu to choose between By Channel and By Frequency. If you set the scan mode By Channel, then the following is available: Band: Use tu to choose UHF (Ultra High Frequency) or VHF (Very High Frequency). Frequency channel: Select a frequency channel on which you would like to search for the channels. If you set the scan mode By Frequency, then the following is available: Frequency: Use 0-9 to enter the frequency on which you would like to search for channels. 12 PART 2 • English For the VHF frequency band commonly used 7 MHz, for UHF frequency 8 MHz is used. Signal level and quality indicators will help you ensure that you have signal on the selected frequency channel or frequency entered, as well as to adjust the antenna, if necessary. After you have entered the settings correctly you will need to select Search (directly above the signal bars) and press OK. The receiver will start to search for channels and if available with your entered parameters, they will be added to the channel list. If you don’t get a satisfying result after the search process, please contact the local service or check reliable websites/magazines if the entered values are correct. 6.3 System Setup Press MENU and use tu to select System Setup, then press OK. Following submenus will be displayed: Language Setting, Output Setting, Time Setting, Auto Standby, Parental Guidance and Reset Factory default. Use pq to select the desired submenu and press OK or u to access. 6.3.1 Language Setting In this menu you can set your language of chioce for menu, audio and subtitles. OSD Language: Use tu to select menu language. Audio Language: Digital TV allows transmitting more than one audio track/ language. If a channel has multiple audio tracks/languages, the receiver will select the suitable audio track/language automatically according to your selection. Subtitle Language: This setting allows you to define the subtitle language. Use tu to select a subtitle language and the receiver will display the subtitles in this language automatically (if available). If you do not want to display subtitles, then adjust the setting to Off. Note: Subtitles will be displayed when available. Availability depends on the local broadcast. Please also consider that events may contain “built in” subtitles which can’t be disabled. 6.3.2 Output Setting In this menu you can set the output parameters of the receiver according to the connected TV set and for the connected audio amplifier if applicable. TV Mode: Use tu to select the mode. Commonly the PAL standard is used, but it might be that you need to use the setting NTSC. We recommend referring to the user manual of your TV set to check the correct setting. Video Output: Use tu to select between RGB and CVBS modes. Screen Mode: Use tu to adjust this setting in accordance with the aspect ratio of your TV set (4:3 or 16:9) and the preferred conversion. The options are: Auto (automatic detection of aspect ratio), 4:3 Panscan (displays 16:9 broadcasts full screen and cut upper and lower parts of 16:9 video on your 4:3 TV), 4:3 letterbox (displays 16:9 widescreen broadcasts with black bars on top and under the picture on a 4:3 TV). For a modern 16:9 TV set following options can be set: 16:9 Wide Screen, 16:9 PillarBox (4:3 broadcasts will be shown with black vertical bars on the left and right side of the image) and 16:9 Pan&Scan. We recommend trying these settings in order to find the option that suits you best. Do not forget 13 English Band: PART 2 • English about the possibility to control the TV format via the menu of your TV set. HDMI Output: Allows you to change the resolution of the HDMI output. If the connected TV does not support the set resolution you will see a black screen. In this case, wait for 10-15 seconds without pressing any buttons on the remote control of the receiver, and the previous value will be recovered automatically. Loop out in stand-by: This allows to by-pass the antenna signal to the ANT OUT connector, where you may have an additional TV set/receiver connected, in order to receive analogue/digital broadcasts there too. Digital audio: Use tu to adjust this setting in accordance to the used audio equipment. To loop the digital audio through HDMI or S/PDIF to a connected amplifier, home theatre or other equipment able to decode AAC and AC3, set RAW HDMI ON. If neither your TV set nor any other connected audio equipment support decoding AAC and AC3, adjust RAW HDMI OFF. 6.3.3 Time Setting This menu allows you to specify the method which the receiver will use to synchronise the date and time and you can set the duration for displaying the information banner. Time Offset: Use tu to choose Auto to synchronise time and time zone automatically, or Manual to specify the time zone manually. Region: Use tu to choose your specific country. Time Zone: This setting is only available when the Time Offset is set to Manual. You can use tu to adjust the time zone, if the automatic settings in your region are not supported by the broadcast. Summer Time: Use tu to select On or Off according to your local season. Banner Time OUT: Use tu to choose between the available settings: 3s, 4s, 5s, 6s, 7s, 8s, 9s and 10s. 6.3.4 Auto Standby Auto standby is a new feature that helps you reduce power consumption. When Activation is set to On, the receiver will switch to standby if it hasn’t received any commands for three hours. Set Auto Standby to Off to deactivate this function. When the setting is On you can adjust the Duration Before Standby: Available settings are: 1 Hour - 12 Hours with steps of one hour. 6.3.5 Parental Control After selecting this menu item and pressing OK you will be asked to enter the PIN code (DEFAULT PIN: 0000). This menu allows you to use the EPG based parental rating system if supported by the local broadcast. Age: Use tu to change the settings. Following rates are available: OFF (to disable the function), 04, 05, 06, 07, 08, 09, 10, 11, 12, 13, 14, 15, 16, 17 and 18. Whenever switching through channels which submit EPG based parental rate and the rate of the current broadcast is below the adjusted rate, you will have to enter your PIN code. Example: Your youngest child is 7 years old and you have set a rate of 07. Now when you switch to a channel which is not foreseen for an age below 10 years you will have to enter the PIN code (DEFAULT PIN: 0000). 6.3.6 Reset Factory Default This option allows you to reset the receiver to the factory settings, which clears all stored channels and settings. 14 PART 2 • English Warning: By resetting your receiver to the factory default, all your settings and stored channels will be permanently deleted. Please use this option with care! After selecting this menu and pressing OK you will be asked to enter the PIN code (DEFAULT PIN: 0000). After having entered the PIN code you will be guided to the Installation Guide again! If necessary, you can change the PIN code. To change the PIN code, please enter the Tools menu, see chapter 6.4.3 of this manual. Press MENU and use tu to select Tools, then press OK. Following submenus will be displayed: Timers, Information, Change Password, USB Upgrade, OAD Upgrade and Remove USB device. Use pq to select a submenu and press OK or u to access. 6.4.1 Timer The timer function allows you to turn the receiver on and off according to the defined settings. Timers can be set from the EPG in the most convenient way but you can also set timers manually via this menu. In the menu Schedule, a summary of the configured timers will be displayed: number, channel name, date, start and end time, repeat and timer status. Note: The list will be empty if there are no configured timers. You can add, change or delete a timer. Add: To add a timer, press the RED button. Use tu pq and 0-9 in the menu to configure the settings for the event. After the settings have been made, set the necessary parameters and press OK to apply the timer into the list. Channel Type: Use tu to choose between TV and radio programmes (the radio option is not available if there are no radio channels broadcasted/ in the channel list). Channel No.: Use tu to select the channel number to which you want to switch. Channel Name: Shows the name of the chosen channel. Start Date: Use 0-9 to enter the date on which the timer should switch the receiver on. Please consider the date format “dd/mm/yyyy.” Start Time: Use 0-9 to enter the start time. End Time: Use 0-9 to enter the end time. Repeat: Use tu to select in which cycle the timer should be repeated. Once - the timer will switch ON once, after this the timer will be removed from timer list. Daily - the timer will switch ON every day at the set time. Weekly - the timer will switch ON once a week at the set time. In viewing mode, the receiver will notify you 10 seconds before a timer starts. You can confirm the timer by pressing OK or cancel with EXIT. If there is no input given, the timer will be executed. After the timer event has been finished, the receiver switches to the last watched channel. If the receiver was in standby, it automatically turns to standby again after the timer passed. If you already have timers in the list you can use these functions as well: Edit: If you wish to change some settings for a present timer, use pq to select the timer and press GREEN to open it. Afterwards you can define the settings like described in above. Delete: For deleting a timer you don’t need, use the pq buttons to select the timer and press BLUE to delete it. A message will be 15 English 6.4 Tools PART 2 • English shown where you can press OK to confirm deletion or EXIT if you wish to keep the timer. After your settings have been made, you can leave the menu with EXIT. 6.4.2 Information In the Information menu you can get information about the hardware and software version installed in your receiver. Furthermore, you will find information about our website: www.strong.tv. Please open this menu when you call our hotline or contact the support. The person who answers your call/email might ask for the information given on this screen. 6.4.3 Change Password In order to access certain functions of the receiver you need to enter a PIN code. This is done to prevent changes of the receiver settings through persons who do not know the PIN code (e.g. children). To change the PIN code to a personal one it is required to enter your old (current) PIN (DEFAULT PIN: 0000) by using 0-9 to enter it, and then to enter the new PIN code and confirm it again in below. 6.4.4 Updating the software by USB This feature allows you to upgrade receiver software via the USB port. If new software is available for your receiver, it can be downloaded from our website www.strong.tv. Place the software file (unzipped) into the root directory of your USB storage device (HDD, memory stick etc.) and insert this device into the USB port of the receiver. Please consider that only USB devices formatted in FAT or FAT32 file system will be detected and can be used for the update process. Now select Upgrade by USB via the pq buttons and press OK to proceed. If the USB device is detected successfully, you will be asked to enter your PIN code (DEFAULT PIN: 0000). The receiver will start the update process now and the progress information will be shown. Please wait until the update is finished! After the update has been completed, the receiver will reboot automatically. Warning: After the update the receiver restarts automatically! During this process NEVER disconnect the receiver from the main, the USB device or switch the power OFF! This can damage your receiver and warranty will void! 6.4.5 Software update via terrestrial signals Your receiver can update software via digital terrestrial broadcast as well. You can find out via your local support or dealer whether there is a new software version broadcasted in your area. When you know that there is an update available, enter the menu OAD Upgrade in the Tools menu and press OK to continue. The further steps will be shown on screen. Please read the instructions carefully to update your receiver successfully! During the update, a progress banner will be displayed for your reference. Warning: During the update process NEVER disconnect the receiver from the main, switch the power OFF or disconnect the antenna cable! This can damage your receiver and warranty will void! After the update has been finished the receiver restarts automatically! 6.4.6 Remove the USB device This menu item only appears if a USB device is connected. Select the menu item and press OK to remove the USB device from your receiver safely. Now you can disconnect the USB device after the message USB device is removed disappears. 6.5 Records Press MENU and use tu to select Records, then press OK. Following submenus will be displayed: Records List, Record Setup, Format and Remove USB device. Use pq to select a submenu and press OK or u to access. 16 PART 2 • English 6.5.1 Records List After selecting this menu a list of the recordings will appear on screen. The recordings are stored in the folder “SRT_RECORDS” which is created on your USB device right after its connection to the receiver for the first time. In this menu you can select a recording to playback, rename record and delete. To navigate to the upper folder of the USB disk use the RED button. To select a recording use the pq buttons and OK to watch in preview mode or u to start palyback in full screen mode. Rename:Use the pq buttons to select a recording you wish to rename and press the GREEN button. On screen will appear an alphabet to choose from. Use the pq and tu buttons to select a letter and OK to choose it. Switching between upper- and lower-case letters can be done with the Caps Off/On button on screen. To delete wrong characters you can select the - button. When you are finished entering the name select the OK button on screen and press OK on remote control. To discard changes select Cancel and press OK or EXIT. Lock:Use the pq buttons to select a recording you wish to lock and press the YELLOW button. You will need to enter the PIN code. The lock symbol will appear near the file. To unlock the record select it again, press the YELLOW button and enter the PIN code. Delete:To delete a recording, use the pqbuttons to select the recording, then press the BLUE button. Now you will be asked if you want to delete this recording. Press OK to confirm or EXIT to cancel. The recording(s) you delete from the recordings list will be permanently removed from the USB disk. Warning:Within Irdeto encrypted services some events may be protected and fast forward/rewind will be limited or might not be possible. If maturity rating is activated for a specific recording, you need to enter your PIN Code MATURITY Rating PIN: 0000 before playback can be started. 6.5.2 Record Setup In this menu you can setup recording parameters. Disk:If your USB device consists of more than one partitions then you can select a partition you want to use for recording. Record Time Period:This value defines the default duration for the instant recording. You can also edit this value, when you press 4 two times in viewing mode. This menu also contains information about disk format, total space and free space. 6.5.3 Format In this menu you can format your USB device. Use the tu buttons to select a partition. Press OK to start the format process or use EXIT to cancel. Warning:Format operation will delete all data from your USB device. Please, make sure to backup important data from your USB device before formatting it. 17 English Before you use the recording functions of your receiver, please ensure that your USB device is connected properly and that it is formatted in the required file system. This will enable you to watch and manage recordings. PART 2 • English 6.5.4 Remove USB device This menu item only appears if a USB device is connected.Select the menu item and press OK to safely remove theUSB device from your receiver.Now you can disconnect the USB device after the message USB device is removed disappears. 6.6 Multimedia Press MENU and use tu to select Multimedia, then press OK. Following submenus will be displayed: Picture, Music, Movie, Photo Config and Movie Config. Use pq to select a submenu and press OK or u to access. Before you use the various multimedia functions of your receiver, please ensure that your USB device is connected properly and that it is formatted in the required file system. This will enable you to view pictures and play music and video files. 6.6.1 Picture Your receiver supports photo files in the following formats: JPEG, BMP and PNG. To navigate in the list of files and folders, use the pq buttons. To open a folder, press OK, when a picture is selected it is shown in full screen mode. To get back to the list of files, press EXIT. If you currently are in a subfolder, use the RED button to access the parent folder. The receiver shows the selected files on the right side next to the list. When you press the GREEN button, the receiver will show the files in a small preview. If you want to start the slide show, press u and if you want to quit it again, press 3. Settings for the slide show can be made in the menu Photo config, see chapter 6.5.4. 6.6.2 Music Your receiver supports playback of music files in the following formats: MP3 and WMA. To navigate in the list of files and folders, use the pq buttons. To start playback of a music file, press OK. During playback, it is possible to perform following actions: 2: To pause playback. 65 For fast forward or fast rewind during playback :/": To jump to playback of the previous or next file 3: To stop playback Additionally you can use tu and ! to adjust the volume. With the GREEN button you can change the repetition mode between; 1 Once - the selected file will be repeated randomly, Folder – the files contained in this folder will be repeated once and Folder Random – the files contained in this folder will be repeated randomly. With another press on the button you will return to standard mode (no repetition). 6.6.3 Movie Your receiver supports playback of movie files in the following formats: MPG, MPEG, TS, VOB, MP4, AVI, MKV. To navigate in the list of files and folders, use the pq buttons. To start playback of a movie press OK, to watch it in full screen mode press u. During playback, it is possible to perform the following actions: 2: To pause playback. 65 For fast forward or fast rewind during playback :/": To jump to playback of the previous or next file 3: To stop playback GREEN: To change the repetition mode between; 1 Once - the selected file will be repeated randomly, Folder – the files contained in this folder will be repeated once and Folder Random – the files contained in this folder will be repeated randomly. With another press on the button you will return to standard mode (no repetition). 18 PART 2 • English Allows you to switch between the supported audio languages. If a file contains more than one audio track, then each press of this button will switch to the next audio track. SUB: Displays a list of subtitles, if available in the same folder for this movie. Displays technical details of the currently played file. i: YELLOW: Allows you to play a separate segment of the movie. Press this button once at the time to start the repeat of a segment (the screen will replay A), press the button a second time at the end of the segment (you will see Repeat AB) and the receiver will play this sequence in a loop. To stop the loop playback, press the button again. BLUE: Opens the GOTO function where you can enter a time at which you want to start playback. Additionally you can use tu and ! to adjust the volume. 6.6.4 Photo Config This menu allows you to customise the settings for the slide show. Use tu to change the Slide time. You can change the Slide mode as well, it will change the effect between slides. 6.6.5 Movie Config This menu allows you to customise the settings for the subtitle display. Use tu to change and pq to select the preferred colour, background and font colour. 6.6.6 Remove USB device This menu item only appears when a USB device is connected. Select the menu item and press OK to remove the USB device from your receiver safely. Now you can disconnect the USB device after the message USB device is removed disappears. 6.7 Irdeto CA Status The menu Irdeto CA Status allows you to access information about the embedded CA system. Primarily it is intended for professionals and includes terms and abbreviations mostly in English. Under some circumstances, you may need to access information from this menu, in order to provide it to your service provider/support. This will only be necessary if you are facing problems while watching scrambled channels of your basic or additional subscription. 6.7.1 Service Status In this menu you can find information about the service descrambling status. 6.7.2 Loader Status In this menu you can find information about the used software version, Irdeto loader, the CSSN (chipset serial number) and serial number of your receiver. 6.7.3 Product Status The Product Status shows the current subscription status information of the product(s) you have subscribed to by your operator. You will see the activation date and duration of the subscribed product(s). 6.7.4 Client Status This menu displays all details of the built-in conditional access system and its capabilities. 6.7.5 Mail Box In this menu you can read mails sent by the operator. 19 English AUDIO: PART 2 • English 6.7.6 Announcement Box In this menu you can read announcements sent by the operator. 6.7.7 Region Status This menu displays the specific regional data according to the country this product is developed for. 7.0 Troubleshooting There may be many reasons that affect the correct operation of your receiver. If the receiver does not work as you expect, please follow the steps outlined below. If after performing these operations, the receiver does not work well, contact your dealer or service centre in your area. Do not open the receiver cover. This action will damage the warranty seals and warranty repairs will be denied. Problem The mode indicator does not light up No signal found No picture or sound on TV Possible reason The power plug is not connected The receiver is connected to the main power through an extender and the power is OFF. The antenna is disconnected. The antenna is damaged/ misaligned. The cable between the antenna and the receiver is damaged. Possible bad connections in the cable system. Out of digital signal area. The active antenna requires turning the antenna power/ external power ON. HDMI/SCART/AV is not selected on your TV or the amplifier or is set to a higher resolution than the TV supports TV is not switched on Connections are not done properly. Quality of connected cables insufficient. Video with “mosaic”, audio is noisy or A/V disappears from time to time 20 Low signal level due to bad weather conditions. The antenna is damaged or covered by ice (winter time). Damaged cable from antenna to receiver. The indoor antenna has been moved from a good position and does not provide the necessary signal level anymore. Remedy Check the connection of the receiver to the main power. Turn the power extender ON. Connect the antenna cable. Check the antenna and its position. Make sure that the cable is in good condition. Check proper connections. Check with your dealer. Make sure to enable antenna power from the receiver menu (see chapter 6.2.1) or use an external power supply. Switch to correct TV input Select lower resolution via receiver Switch on TV Please ensure that the connections are done correctly and are fitting well to the connected input/output Check that the quality of all cables is good. Reconnect all cables between the receiver and TV set. For good signal reception you may need to realign/replace antenna. Check the antenna and cables. Setup the antenna at a better position. Check the signal level and quality (see chapter 5.3.2) Problem Message “No rights” or “Pay TV channel” Possible reason The channel is scrambled. Not possible to control the receiver with the remote control Batteries are exhausted/wrongly inserted. Receiver powered or switched off. Remote not aimed correctly. IR sensor obstructed/disturbed. The IR sensor is covered up by some object (obstacle between RCU and receiver). The receiver is switched off. Forgot your PIN code The receiver switches off automatically. Auto standby function enabled. Remedy Either you have tuned to a channel which is not part of your subscription or you have not been patient enough to wait until the channel of your basic subscription has opened. If the problem persists, please contact the support of your service provider. Support contact information can be found in the enclosed brochure. Replace the batteries/check the correct polarity. Plug in/turn on the receiver. Point your remote towards the front panel. Check for obstructions, other possible influence. Remove obstacles between RCU and receiver. Turn the receiver ON. Consult your local dealer Disable/adjust auto standby. See chapter 6.3.4 for details. 8.0 Technical specification Tuner Input connector: Input frequency range: Input signal level: Antenna power: IEC60169-2, female, 75 Ohm nominal VHF: 177.5 ~ 226.5 MHz UHF: 474 ~ 858 MHz -82 ~ -25 dBm 5 V DC (+/- 0.5 V), max. 60 mA, short cut protected Demodulation DVB-T/T2 Demodulation: Demodulation modes: Bandwidth: FFT mode: Guard interval: Forward Error Corrections: Compliant to DVB-T (EN 300 744), DVB-T2 (EN 302 755) QPSK, 16/64/256 QAM 7 or 8 MHz 1K, 2K, 4K; 8K, 16K, 32K and extended normal DVB-T: 1/32, 1/16, 1/8, 1/4; DVB-T2: 1/128, 1/32, 1/16, 19/256, 1/8, 19/128, 1/4 DVB-T: 1/2, 2/3, 3/4, 5/6 7/8; DVB-T2: 1/2, 3/5, 2/3, 3/4, 4/5 5/6 Video decoder Profile: Input bit rate: Aspect ratio: Frame rate: Video resolution: MPEG-2 MP @ ML, MP @ HL, MPEG-4 H.264/AVC Up to 30 Mbit/s 4:3 and 16:9, Letterbox, Pan & Scan, Auto 25 Hz for PAL 576p, 720p, 1080i, 1080p 21 English PART 2 • English PART 2 • English Audio decoder Audio support: Audio mode: Frequency response: Sampling rate: Conditional Access System System: Card reader: System and memory Processor: Flash memory: System memory: Multimedia: Video playback: Audio playback: Picture view: MPEG-1 Layer 1 & 2, AAC Mono L/R, Stereo 20 Hz ~ 20 kHz, unevenness in the frequency range 60 Hz ~ 18 kHz +/- 0.5 dB 32, 44.1, 48 kHz Irdeto CCA 1 slot, conforming to ISO 7816 MSD5043 8 MByte 128 MByte Supports various formats (MPG, MPEG, TS, VOB, MP4, AVI, MKV)* Supported formats MP3, WMA Supported formats JPG, PNG, BMP *STRONG can’t guarantee the playback of all files in the mentioned formats. The possibility to playback depends on the used codecs, data rates and resolution. For a detailed list of supported codecs, please refer to the Appendix. Connectors Antenna Input Antenna output TV SCART 3 RCA (Composite Video, Audio Left and Right) S/PDIF (coaxial) USB 2.0, Type A connector HDMI Type A, version 1.3 with HDCP General data: Input power: Power consumption: Power consumption in standby: Operating temperature range: Storage temperature: Operating humidity range: Dimensions (W x D x H) in mm: Weight: 22 AC 100 – 240 V ~ 50/60 Hz 10 W max. (with USB device connected) 0.70 W (without USB device connected) 0 ~ +40 °C -10 ~ +50 °C 10 ~ 85% RH, non-condensing 210 x 145 x 49 0.59 kg PART 2 • English 9.0 Appendix Video specifications mpg, mpeg, dat Container MPG, MPEG Video Codec Audio Codec SPEC Bit Rate Profile Comment MPEG-1, 2 MP2, MP3, LPCM 1920x1080 @ 30p 20 Mbit/s Main Profile MP4: GMC is not supported 1920x1080 @ 30p 20 Mbit/s H.264: Main Profile and High Profile @Level 4.0 MPEG-2: Main Profile -//- 1920x1080 @ 30p 20 Mbit/s Main Profile -//- 1920x1080 @ 30p 20 Mbit/s H.264: Main Profile and High Profile @Level 4.0 MPEG-4: Simple Profile and Advanced Simple Profile @Level 5 -//- 1920x1080 @ 30p MPEG1/2/4: 20 Mbit/s H264: 25 Mbit/s H264: Main Profile and High Profile @ Level 4.1 MPEG4: Simple Profile and Advanced Simple Profile @Level 5 -//- 20 Mbit/s MPEG-2: Main Profile MPEG-4: Simple Profile and Advanced Simple Profile @Level 5 -//- ts, trp, tp, m2ts, m2t1 MPEG-2 TS H.264 TS MPEG-2,H.264, AVS MP2, MP3, AAC, HEAAC vob MPEG-2 PS MPEG-1, 2 MP2, MP3, LPCM mp4, mov mkv divx, avi Motion JPEG (avi, mp4, mkv) flv 3gp ts MP4, QTFF MPEG-4 Divx 4.12, Divx 5.x, AAC, Divx 6, Xvid 1.00, HEAAC, Xvid 1.01, Xvid 1.02, Xvid 1.03, MP3 Xvid 1.10-beta1/2 H.264 Matroska MP2, MP3, AAC, HEAAC, LPCM H.264, MPEG1,2,4, Divx, Xvid, MPEG-2, MPEG-4 MP2, DivX 4, DivX 5, MP3, DivX 6, Xvid 1.00, AVI(1.0, 2.0), LPCM, 1920x1080 Xvid 1.01, Xvid DMF0,1,2 ADPCM, @ 30p 1.02, Xvid 1.03, AAC, Xvid 1.10-beta1/2 HEAAC H.264 AVI, MP4, QTFF, Matroska JPEG LPCM, ADPCM 640x480 @ 30p 10 Mbit/s flv Sorenson H.263, H264 MP3, AAC 1920x1080 @ 30p 20 Mbit/s 3GP MPEG-4, Sorenson H.263 1920x1080 @ 30p 20 Mbit/s ts AVS 1920x1080 @ 30p 20 Mbit/s English File Extension -//Sorenson H.263 H264: Main Profile and High Profile @ Level 4.0 -//- -//AVS Jizhun profile @ Level 6.0 -//- 23 PART 2 • English Audio specifications Audio Codec MPEG-1 Layer2 MPEG-1 Layer3 OGG Vobis AAC, HEAAC WMA WMA Pro LPCM IMA-ADPCM/MSADPCM LBR File Extension BitRate/SamplingRate 32 Kbps ~ 448 Kbps(Bit rate) MP3 32 KHz ~ 48 kHz(Sampling rate) 32 Kbps ~ 320 Kbps(Bit rate) MP3 32 KHz ~ 48 KHz(Sampling rate) 32 Kbps ~ 192 Kbps(Bit rate) OGG 8 KHz ~ 48 KHz(Sampling rate) 24 Kbps ~ 384 Kbps(Bit rate) M4A/AAC 8 KHz ~ 48 KHz(Sampling rate) Bitrate: 128 bps ~ 320 Kbps WMA/ASF Sampling Rate: 8 KHz ~ 48 Khz Bitrate: 768 kbps WMA/ASF Sampling rate: ~ 96 KHz N/A Bitrate: 64 Kbps ~ 1.5 Mbps (work with video files only) Sampling Rate: 8 KHz ~ 48 Khz N/A Bitrate: 384 Kbps (work with video files only) Sampling Rate: 8 KHz ~ 48 Khz N/A Bitrate: 6 Kbps ~ 96K bps (work with video files only) Sampling Rate: 8 KHz ~ 48 Khz Photo specifications Photo Codec File Extension JPG JPG, JPEG, JPE BMP PNG BMP PNG 24 Max Resolution Base line: 15360x8640 Progressive: 1024x768 9600x6400 9600x6400