1
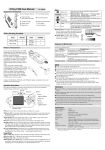
Fiber Identifier
RY-3306ID Overview
Fiber Identifier is a tool necessary for the maintenance of optical fibers, used
to identify the optical fibers not yet damaged. It can detect anywhere in
single-mode fiber and multiple-mode fiber. During the maintenance, installation,
wiring and restoration of optical fibers, we usually need identify and isolate a
specific fiber without interrupting our business. By transmitting the signals with
modulation sound (270Hz, 1 kHz, 2kHz) into one end of fiber 1310nm or 1550nm,
the identifier can identify the fiber from the route. Besides, Fiber Identifier can
indicate the business direction.
Specifications
Model
Fiber Identifier
Range of identifiable
wavelength (nm)
800~1700
Type of probe
InGaAs
Type of adapter (mm)
Φ0.25 (for bare fiber); Φ0.9, Φ2.0, Φ3.0 (for pigtail fiber)
Modulation frequency
(Hz)
CW, 270, 1K, 2K
Signal direction
Left/right LED indicator
1
indicator
Signal direction testing
range
(dBm,CW/0.9mm bare
fiber)
-46~10 (1310nm)
-50~10 (1550nm)
Signal power testing
range
(dBm ,CW/0.9mm bare
fiber )
-50~10
Signal frequency
indicator (Hz)
270, 1K, 2K
Frequency testing
range (dBm, average
value)
Φ0.9, Φ2.0, Φ3.0
-30~0 (270Hz,1KHz)
-25~0 (2KHz)
-25~0 (270Hz,1KHz)
Φ0.25
-20~0 (2KHz)
Insertion loss (dB,
typical value)
0.8 (1310nm)
Alkaline battery (V)
3 (2 pcs. 1.5V 7# dry cells)
Continuous working
hours of battery (h)
10
Working temperature
(℃)
0~+50
Storage temperature
(℃)
-10~+70
Dimensions (mm)
196*30*26
Weight (g)
190g
2.5 (1550nm)
Packing list
1. Fiber Identifier (1 pcs) 2. User’s Manual (1 copy) 3. Soft pack (1 pcs) 4. Battery
(2 pcs. 1.5V 7# dry cells) 5. Adapter (4 optional types) 6. Warranty Registration
Card (1 pcs)
Functions
Features
2
1. Able to identify the direction of the light and the frequency in a safe and
effective way without cutting off the optical fiber.
2. PTT (Push-To-Talk) operation makes the operation easier and simpler.
3. Optional adapters supporting both bare fiber and pigtail fiber.
4. Able to identify three common signal frequency, i.e.: 2KHz, 1KHz, 270Hz,
giving out beeping sound while identifying signal frequency.
5. Able to display the power value of the measured optical fiber.
6. It uses two pcs 7# dry cells, which has low power consumption and small size,
easy to carry.
7. LED indicator is concise and clear.
Descriptions of functions
1. Fixture
It is used to clamp and hold the fiber for identification.
2. Fixture push button
Push this button, you can clamp, hold, release the fixture.
3. Indicators
Including fiber direction indicators, fiber transmission optical frequency
indicator and battery indicator
Operating Instructions
Select adapter
3
Please select appropriate adapters as per the specifications of different bare
fibers and pigtails fiber and install them appropriately (4 optional types).
Holding / releasing fixture
1. To clamp the fiber, Push the push button till the fiber is held firmly, then press
and hold down upper front of the push button obliquely downward, to make the
button move in slight rotational motion, while keep the clamping locked firmly.
2. To release the fiber, slightly push forward the push button, then press and hold
down lower back of the push button, the fixture will reciprocate automatically
under the effect of the spring, release the fiber.
Power On / Off
1. Push up the button of the fixture, the instrument will be automatically powered
on.
2. Release the button of the fixture, the instrument will be automatically powered
off
Fiber Identification
1. Place the fiber to be tested in groove of the fixture, push the button to lock the
fixture.
2. If there are signals in the fiber, the left and right direction indicator displays the
signal direction, the signal strength indicator displays the strength of the signals.
3. If there are no signals in the fiber, LO will appear in the signal strength indicator,
and direction indicator may flick leftward or rightward at the same time. If there
are no fibers in the fixture, direction indicator may also flick leftward or rightward.
4. When the signal frequency is 2KHz, 1KHz, 270Hz, the corresponding indicator
will illuminate, accompanied by beep echoes. (When the signal is too weak, it will
not be able to be identified properly).
Steps of replacing fixtures
1. Push the fixture adapter gently leftward or rightward along the track to remove
the existing adapter..
2. Select an adapter matching the fiber to be tested.
3. Push in adapter gently along the track of the fixture until it engages well with
the positioning device .
Maintenance
1. Make sure the fixture adapter matches the fiber to be tested, and the fiber is
exactly stuck in the groove of the fixture.
4
2. Do not touch both sides of the fixture with your hands or anything else.
3. Keep clean the probe on both sides of the fixture, regularly clean the surface of
the probe with cleaning liquid.
4. If you are not going to use the instrument for a long time, please take out the
battery.
Quality Warranty
Warranty Period: 18 months since the date of delivery.
We undertake that the materials and workmanship of our products are free of
quality defect. We provide 18-month warranty period since the arrival of product
in user’s hand. If you find any quality defect during the said warranty period, we
will repair or replace the product as the case may be. However, anyhow our
liability on the product is limited to the purchase price that you have paid for the
product.
If any problem is found in the product in normal use, and if the problem still exists
even after you have followed the instructions of troubleshooting, please don’t
open the cabinet by yourself, but contact our market department and local
dealers.
For any fault caused by production defect, the manufacturer will repair or replace
the product free of the charge. The warranty only cover any fault occurring in
normal use, without any manmade destruction or improper use.
The problems/faults occurring in the following events are not covered by the
warranty on the Fiber Identifier.
1. User has repaired or modified the instrument by himself without
prior consent of the manufacturer.
2. The fault or problem is caused by improper use, gross negligence or
accident.
Each of our products is supplied with a Warranty Registration Card.
Please complete it properly and send back to our market department
together with the photocopy of the invoice so that we have the records
as the basis for making maintenance, technical upgrade, calibration for
5
your instrument in the future.
Notes to Warranty
Warranty Period: 18 months since the date of purchase.
Terms of Warranty
I.
Any product fault occurring in normal use, as long as it is still
within warranty period, can have us repair free of charge against
this Warranty Registration Card or invoice or receipt (or their
photocopies).
II.
However, in the following events, user need pay for the repair, for
example, a certain amount of material fee, repair fee or freight as the
case may be.
1. Although the fault occurs in normal use, it has been outside of warranty
term;
2. User failed to show Warranty Registration Card, or Warranty
Registration Card is missing, altered or information thereof is unclearly
completed;
3. The fault is caused by improper use, for example, the product is
damaged for improper use, or the product is used in abnormal
conditions like high temperature, high voltage or high humidity.
4. Any fault or damage not caused by quality defects.
5. Any fault or damage arising of failure to follow the instructions and
precautions as specified in this Manual.
III.
In the following events, the request for repair will be rejected.
1. User has repaired or modified the instrument by himself without our
consent.
2. The product is not manufactured or sold by us.
6