1
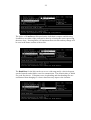
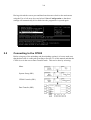
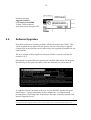
Film-Tech
The information contained in this Adobe Acrobat pdf
file is provided at your own risk and good judgment.
These manuals are designed to facilitate the
exchange of information related to cinema
projection and film handling, with no warranties nor
obligations from the authors, for qualified field
service engineers.
If you are not a qualified technician, please make no
adjustments to anything you may read about in these
Adobe manual downloads.
www.film-tech.com
î
Load500
Serial Communication
Software for the CP500
Cinema Processor
SECTION 1
INTRODUCTION
1.1
About Load500
Load500 is a specific DOS based program which has been developed to make the
task of transferring alignment and format information to and from a computer both
simpler and quicker. The program includes a special option which allows CP500
operating software to be updated easily from new files supplied on disc.
1.2
About this Manual
This manual is intended to be a guide for anyone installing and maintaining Dolby
CP500 cinema processors. The Load500 program requires a 486 PC (or better) to
run the program. This manual assumes minimal understanding of computers and
the DOS operating system.
1.3
Load500 Software and Required Equipment
The Load500 software requires the following minimum configuration:
•
•
•
•
•
•
1.4
33 MHz, 486-based PC with 4MB RAM, hard disk, 1.44 MB 3.5"
floppy disk drive, and high-speed FIFO serial I/O card, with DOS
operating system
VGA Multi-sync Monitor
Keyboard
Load500 Program and Installation Diskette
Load500 User's Manual
15-foot serial data cable, D-type 9-pin Male to D-type 9-pin Female
Software Installation
The Load500 software and support files are supplied on the 3.5 inch floppy labeled
Load500 Program Disk. The user is encouraged to make a backup copy of this
diskette and keep it in a safe location. They should be copied to a subdirectory on
the hard drive named C:\LOAD500.
If the user needs to re-install or upgrade the Load500 software, simply insert the
Load500 Program Disk and copy all of the files into the Load500 directory.
1-2
1.5
Cable requirements
The RS232 link between the CP500 and computer serial port requires a screened
D-type 9-pin Male to D-type 9-pin Female with pin to pin connections.
All cables connecting the CP500 and the PC should be attached with the power to
both the CP500 and the PC turned off.
The cable should be connected between the serial data port on the PC and the
Serial Data connector on the back of the CP500. Mounting screws should be used
to prevent disconnection from the PC or CP500.
SECTION 2
LOAD500 OPERATION
2.1
Running the program
From the directory where the Load500 program has been copied, type load500 and
press Enter. When the program is opened for the first time the screen will look as
shown below.
2.2
Navigating the Menus
The Load500 software Version 1.00 is completely keyboard driven. A pointing
device such as a mouse or trackball is not supported. The software is based on
pop-out and drop-down menus. Moving around in these menus is accomplished by
using the following keys:
Enter, Esc (Escape), and the arrow keys ↑, →, ←, and ↑.
Any bold letter in the item title (such as the U in 1. Upgrade Software) or the item
number can be used as a shortcut key to get to that item faster than using the arrow
keys. For example, rather than pressing the ↓ key to get from the
1. Upgrade Software item to the 5. Save Configuration item, the s key (always
lower case only) or the number 5 can be pressed.
Highlighted menu items may be selected by pressing the Enter key. Pressing the
Esc key leaves the current menu.
2-2
2.3
Screen Layout
The screen is made up of several sections, only one of which is used for navigating
through the software. The area in the top left of the screen called
Load500 Main Menu lists the available menu options. The six options can be
highlighted with the up ↑ and down ↓ arrow key and selected using the right arrow
key → or the enter key. Typing the appropriate lower case letter or the item
number also allows immediate selection of each option.
The area to the top right of the screen labelled Status shows the communication
status of the software and the names of the files in use. The default name for the
file containing CP500 operating software to be loaded is dcp16.sct. Brain.dmp is
the default name for the file used to store the CP500 parameters when downloaded
from the processor.
The middle section of the screen labelled Help provides a reminder of the function
of the selected menu item.
The large lower portion of the screen called Messages provides information on the
operation of the software. When the software first opens it will look for a
previously stored configuration file (see section 2.4 below) and since this will not
yet have been created will use the default settings shown in the Status block.
2.4
Initial settings - Saving Configuration
When Load500 is first run there will be no configuration file found and so the
software will use the default settings shown in the status box. It is a good idea to
begin by selecting 4. Communications Settings on the menu to set the
communication port and baud rate for future use. This can be done by moving the
highlight bar using the up ↑ or down ↓ arrow key and pressing Enter, or by
pressing the letter c (lower case only) or by pressing the number 4 on the keyboard.
This will bring out the additional Comms Settings Menu allowing selection of the
correct 1. Com Port and 2. Baud Rate.
2-3
The choice of Com Port will depend on the individual computer and directing
Load500 to use either of the ports can be done by selecting the correct port using
the arrow keys. Pressing Enter will implement that selection and any change will
be seen in the Status section of the screen.
The Baud Rate for the link can be set over a wide range and is a choice between
speed of transfer and reliable, error free transmission. The default value of 38400
is a good first choice. If frequent errors in uploading and downloading files are
encountered then changing to a slower baud rate may improve the situation.
2-4
Having selected the correct port and baud rate then move back to the main menu
using the Esc or left arrow keys and select 5. Save Configuration so that these
settings will automatically be recalled when the programme is opened again.
2.5
Connecting to the CP500
Before using any of the uploading and downloading options it is best to make sure
that the data cable is connected according to Section 1.5 of this manual and that the
CP500 is set in the correct Data Transfer mode. This can be done by selecting:
Menu
System Setup (SK1)
CP500 Controls (SK1)
Data Transfer (SK2)
2-5
and then selecting
Upgrade Software
(or Connect to Load500
in later CP500 software)
in the pop-up box and press OK.
2.6
Upgrade Software
Software Upgrades
From time to time new operating software will be released for the CP500. This
will be supplied in new units from the factory, but if it is necessary to upgrade
existing units in the field this can be done using a file supplied to installers for use
with Load500.
The new software will be supplied in a format called a sector file with the file
extension .SCT.
Selecting the Upgrade Software option in the Load500 Main Menu will bring up
the following screen where the name of the new software file can be entered.
To upgrade software, the name of the new .sct file should be typed in the space
shown above. Typing in this name (with or without the .sct extension) and
pressing Enter (or pressing Enter if the correct file name is already selected) will
start the Upgrade process.
Note: The name dcp16.sct which may appear in the Status window as the default Sector File and which will
also appear when the Upgrade Software option is first selected is not a valid file and should not be used.
2-6
If the CP500 is not set in the correct Data Transfer mode the Load500 software will
continue to try to connect to the cinema processor until the correct mode is selected
(see previous section). A Timeout count will be displayed in the message screen
below the line
Connecting to CP500 …
The Load500 screen will display the normal progress of the upgrade operation as
shown below, as well as listing any problems such as the failure to make a
connection.
In the following example the new software file is called newcode.sct.
After checking the validity of the new software file Load500 establishes a data link
with the CP500. The program then continues to automatically download all the
system settings, A-chain alignment, B-chain alignment, User Formats, etc. from
theCP500 so that these can be restored at the end of the upgrade process. At a baud
rate of 38400 this process will take about 10 seconds. The display on the CP500
will indicate the progress of the data transfer.
These parameters will be stored in a temporary file called brain.dmp.
If this file already exists from previously upgrading or downloading settings
from a different processor then the previous file will be overwritten without
warning.
2-7
After storing the current settings from the CP500 Load500 will begin sending the
new software file to the processor. Progress is indicated by the incrementing
numbers of sent and acknowledged sectors in the messages window. All Done
indicates the software upgrade process is complete.
At the end of the transfer process which at 38400 Baud should take about 40
seconds in total the Load500 screen will appear as shown below. The total number
of sectors acknowledged will be the sum of the software sectors and the braindump
sectors transferred to the CP500.
The CP500 screen will also be indicating the progress of the data transfer. This
data transfer process should not be interrupted. Once all the data have been
received and verified the CP500 will automatically reboot to begin operating using
the new software.
After a new software file has been used for the first time it may be useful to store
that name within the Load500 configuration file so that it will automatically be
selected for future upgrades. This can easily be done by selecting 5. Save
Configuration after the All Done message appears.
2-8
2.7
Downloading Parameters from the CP500
Load500 can be used to perform the same download function as has been described
elsewhere in our Field Bulletin 187.
See Sections 2.4 and 2.5 of this manual for instructions on selecting the correct
communication settings and establishing the data link with the CP500.
When selecting the menu option 2. Download Parameters from CP500 choice
needs to be made between downloading only the parameters — that is only the data
file — or the data file and a text version of all the CP500 settings.
Before downloading and saving the parameter file Load500 will ask for a name for
the stored file. Any file name within the normal DOS constraints may be used.
The file is stored in the same directory as the Load500 program unless a different
path is specified in the file name. The full path name cannot exceed nineteen
characters. The .dmp extension is not automatically added by the Load500
program and should therefore normally be included in the typed file name.
Note: The default file name brain.dmp should not be used. That name should be reserved for the temporary
use of the Upgrade Software option as it is liable to be overwritten without warning.
Progress of the downloading will be shown both on the CP500 screen and on the
Load500 screen.
2.7.1 Reading Text files
If the Upload Parameters and Text option is chosen, the text information
downloaded from the CP500 is stored in the first part of the .dmp files and can be
read or printed using a text editing program.
Note: The text generated with the data file is for information only and it is not possible to edit this text file to
change any of the stored parameters.
2-9
2.8
Uploading Saved Parameters to the CP500
Load500 can be used to perform the same upload function as has been described
elsewhere in our Field Bulletin 187.
See Sections 2.4 and 2.5 of this manual for instructions on selecting the correct
communication settings and establishing the data link with the CP500.
When selecting menu option 3. Upload Parameters to CP500 choice needs to be
made between uploading all or only a section of the previously stored data.
Load500 will then ask for the name of the stored file. The software has no facility
for browsing from a selection of files on disc and the exact file name including the
correct file extension must be known before running Load500. The program
assumes that the file is stored in the same directory as the Load500 program unless
a different path is specified in the file name. The full path name cannot exceed
nineteen characters.
Progress of the uploading will be shown both on the CP500 screen and on the
Load500 screen.