1
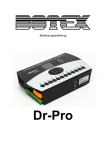
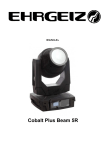
Manual
Recorder DMX
DR-Pro
Table of contents
1.
Safety instructions ........................................................................................................................... 3
1.1.
2.
3.
Overview .......................................................................................................................................... 5
2.1.
Front view ................................................................................................................................ 5
2.2.
Rear view ................................................................................................................................. 6
Control ............................................................................................................................................. 7
3.1.
Operation modes ..................................................................................................................... 7
3.2.
User settings ............................................................................................................................ 7
3.3.
Points of menu ......................................................................................................................... 7
3.3.1.
Record DMX .................................................................................................................... 7
3.3.2.
Add a chase ..................................................................................................................... 8
3.3.3.
Edit a chase ..................................................................................................................... 8
3.3.4.
Delete a scene, show or chase ....................................................................................... 9
3.4.
4.
FOR SAFE AND EFFICIENT OPERATION ............................................................................ 3
To trigger an event .................................................................................................................. 9
3.4.1.
Time Event ....................................................................................................................... 9
3.4.2.
SMPTE/MTC Trigger ..................................................................................................... 10
3.4.3.
DMX Trigger .................................................................................................................. 10
3.5.
Assign Memory ...................................................................................................................... 11
3.6.
Set date and time .................................................................................................................. 11
3.7.
Change the password ............................................................................................................ 11
3.8.
Data Backup .......................................................................................................................... 11
Technical data ................................................................................................................................ 13
2 / 16
1. Safety instructions
•
Read the safety instructions and also this manual carefully.
•
Keep the manual.
•
Observe all red flags.
•
Observe the manual.
•
To prevent fire or electric shocks, protect the device against rain and
humidity
•
Pull the plug before opening the housing.
•
To prevent an electric shock you should not remove the cover.
•
Do not operate the device in the near of water.
•
Use only a dry cloth for cleaning.
1.1. FOR SAFE AND EFFICIENT OPERATION
Be careful with heat and extreme temperature
Avoid exposing it to direct rays of the sun or near a heating appliance.
Not put it in a temperature bellow 41°F /5°C, or exceeding 95°F /35°C.
To avoid placing on un-stable location
Select a level and stable location to avoid vibration.
Do not use chemicals or volatile liquids for cleaning
Use a clean dry cloth to wipe off the dust, or a wet soft cloth for stubborn dirt. Pull the plug before
cleaning.
If out of work, contact sales agency immediately
Any troubles arose, remove the power plug soon, and contact with an engineer for repairing, do not
open the cabinet by yourself, it might result a danger of electric shock.
Take care with the power cable
Never pull the power cable to remove the plug from the receptacle, be sure to hold the plug. When not
using the device for an extended period of time, be sure to disconnect the plug from the receptacle.
Ventilation
It is not allowed cover fans and air in and outlets.
3 / 16
Safety
Do not remove the grounding. It is for your safety. If you remove the grounding it can cause electric
shocks.
Accessory
Please use only the accessory which is set by the manufacturer.
Important
Damages caused by the disregard of this user manual are not subject to warranty. The dealer will not
accept liability for any resulting defects or problems. Make sure the electrical connection is carried out
by qualified personnel. All electrical and mechanical connections have to be carried out according to
the European safety standards.
4 / 16
2. Overview
2.1. Front view
1. Display
2. SMPTE LED
This LED lights if the device received a readable SMPTE time in SMPTE/MIDI Trigger mode.
3. MIDI LED
This LED lights if the device received a readable MIDI time in SMPTE/MIDI Trigger mode.
4. DMX OUT LED
This LED lights if the device sends a DMX signal.
5. DMX IN LED
This LED lights if the device receives a DMX signal.
6. Left/Right/Up/Down/OK buttons
With these buttons you can choose a function or confirm your settings.
7. Memory 1-8 buttons
With these buttons you can choose and activate a memory space in manual mode.
8. Play/Pause/Stop buttons
With these buttons you can control the program in manual mode.
9. Black out
While this button is activated the device does not send a DMX signal.
5 / 16
2.2. Rear view
1. Power connection
2. ON/OFF button
3. USB Port
Here you can connect a PC for updates, etc.
4. SD Card Port
Here you can put in a SD card.
5. Memory 1-8 contact loop point
Here can you select by potential-free contacts the memories 1-8.
6. Play/Pause/Stop/Blackout contact loop point
Here you can select by potential-free contacts Play/Pause/Stop/Blackout.
7. DMX IN
8. DMX OUT
9. MIDI IN
10. SMPTE IN
6 / 16
3. Control
3.1. Operation modes
There are 5 different operation modes.
1. Manual Control
2. Real-Time Trigger
3. Time Code Trigger
4. External DMX Trigger
5. DMX Monitor
To get to the menu press and hold the OK button for at least 2s. With the UP and DOWN buttons you
can set the required operations modes.
3.2. User settings
To get to menu to the user settings use in operation mode menu the UP and DOWN buttons to choose
SET&MODIFY. Press OK, after this key in the password (1668 by pressing the memory buttons). Now
the menu for user settings appears.
3.3. Points of menu
3.3.1.
Record DMX
With this function you can record DMX data. Use this function to get to the following submenus.
Record a scene
A scene can record DMX data directly. If you want this choose this function. In this case a scene
depends on the actual settings; there are no changing DMX values.
Confirm with ENTER to get to the menu. With the UP/DOWN buttons you can choose a name and
with ENTER you can key in a new name. If you are ready, choose with the UP/DOWN buttons
CONFIRMATION&RECORD and press ENTER. The LED lights up three times. If you want to exit the
menu choose FINISH&RETURN and press ENTER.
Record a show
To get to this menu choose it with the UP/DOWN buttons and confirm with ENTER. You can set the
names as described above. There 4 different record modes.
1. Manual
In this mode press the START button to start the record of the DMX signal. Press STOP to stop
the record.
7 / 16
2. Auto
In this mode the recorder starts the record if every DMX channel is set to 0. While the recorder
receives data unequal 0 the device is in standby mode and waits for the start of the record. If all
DMX channel are, after the start of the record, again 0 the recorder stops the record.
3. Semi Auto
This mode is similar to the Auto mode. The only difference is that you can stop the record with the
STOP button.
4. Smart
With this mode you can create a perfect loop. The record starts with the PLAY button and stops
automatically if there are the same values as in the first frame.
If you are ready choose CONFIRM&RECORD to get to the record menu. Choose START
RECORD to start the record. The recorder will start the record and admit it like you have set the
record mode before. If you want to stop your record earlier, press STOP&RETURN.
3.3.2.
Add a chase
In this menu you can create chases by merging it out of the scenes. You have to record the scenes
before.
1. Choose ADD CHASE and confirm with ENTER.
2. With the function buttons you can change the name as described before.
3. After sign CUR-STEP you can see xxx/yyy whereby xxx is for the actual step and yyy is for the
total amount of stored step.
4. With SCENE you can store the required scene for this step. Here you can find all scenes
which you have stored.
5. You can set the HOLD and FADE time by pressing ENTER after the respective sign. Change
the value with the UP/DOWN buttons. To confirm your settings press ENTER again.
6. If you have made your settings press CONFIRM&SAVE.
7. Now you can read out CUR-STEP 002. If you want to add a second step follow the steps
above gain.
8. Repeat these steps until you have added all required steps.
Every time you can step back to assign it to other scenes. Exit the menu by pressing
FINISH&RETURN.
3.3.3.
Edit a chase
To edit a chase you have to choose EDIT CHASE in the menu and confirm with ENTER.
1. Choose the chase you want to edit and press with ENTER.
2. Now you can change or edit parameters like described above. A chase can only have 200
steps.
8 / 16
3. You can also insert or delete steps.
4. With CONFIRM&RETURN you can leave the menu.
3.3.4.
Delete a scene, show or chase
To delete go to the menu DELETE SCENE, SELETE SHOW or DELETE CHASE according what you
want to delete. You get a list of all stored variants. Choose which you want to delete and press
ENTER. The recorder asks a second time for confirming.
3.4. To trigger an event
Choose in the main menu the submenu TRIGGER EVENT and confirm with ENTER. There are 3
trigger methods. TIME EVENT, SMPTE/MTC EVENT and EXTERNAL DMX TRIGGER.
3.4.1.
Time Event
The TIME EVENT makes it possible to start a program automatically with the options date and weekly.
In this case the event is triggered by the internal clock.
In the menu you have the following options.
Add weekly
Use this function if you want to add a weekly recurring event. Confirm with ENTER.
In the new menu you can now indicate on which days and at which time the event should happen. For
choosing press ENTER.
In the next line you can choose which show, scene or chase should be started. In the following line
you can enter the state play, pause or stop. In the next line you can enter what the output should give
out blackout or normal.
You can create an event which runs every day from 8:00 to 22:00 o’clock. For this you will need two
events. The START EVENT and the STOP EVENT.
Add dately
This mode has a similar function as the mode above. The difference is that you can set a date of start
and with a STOP EVENT a date of stop.
Edit dately/Edit weekly
Here you can call up and edit the stored events. Choose, depending on what you want to change,
DATELY or WEEKLY: It is also possible to run many events at the same time, so complex timings are
possible.
9 / 16
Important
The DATELY EVENT has a higher priority as the WEEKLY EVENT. To start a WEEKLY EVENT
after a DATELY EVENT has run, you have to insert a NO MEMORY TRIGGER to reset the
device.
Delete an Event
Depending on what you want to delete, you have to confirm DELETE DATELY and DELETE WEEKLY
with ENTER. You get a list of the events, with ENTER you can confirm and delete the required event.
Exit the menu by pressing FINISH&RETURN.
3.4.2.
SMPTE/MTC Trigger
This event is triggered extern by MIDI TIMECODE or SMPTE. Confirm the menu with ENTER.
Choose ADD SMPTE/MTC and confirm with ENTER. You can set the FRAME RATE between 24, 25
and 30 and also the trigger time and the memory space.
Basically this mode works like the date modes before with a START, STOP or PAUSE event.
Exit the menu by pressing CONFIRM&SAVE.
With EDIT TRIGGER you can change the trigger as described before.
With DELETE you can delete the TRIGGER EVENT as described before.
3.4.3.
DMX Trigger
Here you can telecontrol the device by DMX. Set the DMX start address in the menu. You will need 3
channels for DMX control.
Channel
1
2
Value from
Value to
Function
0
3
Memory 1
4
7
Memory 2
8
12
Memory 3
13
16
Memory 4
17
20
Memory 5
21
24
Memory 6
25
27
Memory 7
28
31
Memory 8
32
255
The memory would not be changed.
0
79
Pause
10 / 16
80
159
Play
160
255
Stop
0
127
Normal output
128
255
Blackout
3
At the point NO DMX IN you could decide what should happen if there is no DMX signal.
At the point NO SMPTE/MTC you could decide what should happen if there is no MTC or SMPTE
signal.
3.5. Assign Memory
Here you can assign your programs to the buttons on the front.
1. With SELECT MEMORY you can choose which space you want to edit.
2. With TYPE you can choose if the memory should be a scene, a chaser or a show.
3. Now you can choose with ASSIGN the stored program.
4. You can enter a required fade time.
5. Exit the menu by pressing FINISH&RETURN.
3.6. Set date and time
Choose in the menu MODIFY CLOCK to set the date and the clock. This time will be used for
triggering the events.
3.7. Change the password
Here you can change the password for the SET&MODIFY mode.
3.8. Data Backup
Here you can load data from the recorder to a SD card or from the SD card to the recorder.
The functions are as described below.
Scene
SD Card
Chase
SD Card
Show
Memory
Event
SD Card
SD Card
SD Card
Copy of all data of the scenes from the recorder
to the SD Card.
Copy of all data of the chases from the recorder
to the SD Card.
Copy of all data of the shows from the recorder to
the SD Card.
Copy of all data of the assigned memories from
the recorder to the SD Card.
Copy of all data of the Event Trigger from the
11 / 16
recorder to the SD Card.
Picture
All
SD Card
SD Card
Copy of all data of the pictures from the recorder
to the SD Card.
Copy of all data of the scenes from the recorder
to the SD Card.
You can also load your data from the SD Card to the recorder.
If you connect your recorder via USB with your PC you will find a hard disk where you can store or
load your data directly.
12 / 16
4. Technical data
Power supply
Voltage
9-12 V; 500 mA min.
Battery
Yes
Connections
XLR in/out
3pol XLR
Input 1
Midi in
Controlling
DMX512
Yes
Hardware
Dimension (L/B/H)
220 x 127 x 50 mm
Weight
1 kg
13 / 16
14 / 16
15 / 16
Importer:
B & K Braun GmbH
Industriestraße 2
D-76307 Karlsbad
www.bkbraun.com
[email protected]
16 / 16