1
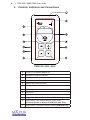
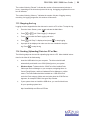
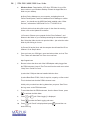
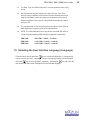
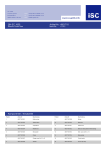
PRM-7000 / 8000 / 9000
Nuclear Radiation Monitor
Users Guide
2
|
PRM-7000 / 8000 / 9000 Users Guide
Mazur Instruments
200 South Wilcox Street #448
Castle Rock, CO 80104 USA
© 2008-2014 Mazur Instruments
All Rights Reserved
PRM-7000 / 8000 / 9000 Users Guide
Contents
1. Safety Information . . . . . . . . . . . . . . . . . 5
2. Controls, Indicators and Connections. . . . . . . . . . 6
3. Using The PRM Instrument For The First Time . . . . . . 7
3.1
3.2
3.3
3.4
Powering On the PRM Instrument .
Muting The Beeper . . . . . . .
Setting Desired Measurement Units
Setting Time and Date . . . . . .
.
.
.
.
.
.
.
.
.
.
.
.
.
.
.
.
.
.
.
.
.
.
.
.
.
.
.
.
.
.
.
.
.
.
.
.
.
.
.
.
.
.
.
.
7
7
8
8
4. Home Screen . . . . . . . . . . . . . . . . . . . 9
4.1
4.2
4.3
4.4
4.5
4.6
4.7
4.8
Current Measurement . . . . . . .
Average Measurement . . . . . .
Maximum Measurement . . . . . .
Minimum Measurement . . . . . .
Total Count Measured . . . . . . .
Time/Date of Maximum Measurement
Current Time and Date . . . . . .
Elapsed Time . . . . . . . . . .
.
.
.
.
.
.
.
.
.
.
.
.
.
.
.
.
.
.
.
.
.
.
.
.
.
.
.
.
.
.
.
.
.
.
.
.
.
.
.
.
.
.
.
.
.
.
.
.
.
.
.
.
.
.
.
.
.
.
.
.
.
.
.
.
.
.
.
.
.
.
.
.
.
.
.
.
.
.
.
.
9
10
11
11
11
11
11
12
5. Navigating the Menu System . . . . . . . . . . . . . 13
6. Performing a Timed Measurement (Timed Measure) . . . . 14
6.1
Perpetual Timed Measurements . . . . . . . . . . . . . 15
7. Changing the Units of Measurements (Set Units) . . . . . 15
8. Selecting User Preferences (Settings) . . . . . . . . . 15
8.1
8.2
8.3
8.4
8.5
8.6
8.7
8.8
8.9
Beeper On/Off . . . . . . . . . . . . . . . .
LED On/Off . . . . . . . . . . . . . . . . .
Alarm On/Off . . . . . . . . . . . . . . . .
Setting Alarm Threshold in mR/hr (mR/hr Alarm) . .
Setting Alarm Threshold in uSv/hr (uSv/hr Alarm) . .
Setting the Time and Date (Set Time/Date). . . . .
Internal Battery Power Management Setting (Bt-Pwr:)
External Power Management Setting (Ex-Pwr:) . . .
Low AvWin . . . . . . . . . . . . . . . . .
.
.
.
.
.
.
.
.
.
.
.
.
.
.
.
.
.
.
.
.
.
.
.
.
.
.
.
.
.
.
.
.
.
.
.
.
15
16
16
16
16
16
17
17
18
9. Utilities . . . . . . . . . . . . . . . . . . . . . 19
9.1
9.2
Resetting Counter Values (Reset Counters) . . . . . . . . 19
Performing a Hardware Reset (Hardware Reset) . . . . . . 19
| 3
4
|
PRM-7000 / 8000 / 9000 Users Guide
9.3
9.4
9.5
9.6
Powering Down the Unit (Power Down) . . . . . . . .
Restoring Factory Calibration (Load Defaults) . . . . .
Displaying Battery and External Voltages (Display Bat/DC)
Calibration Procedure (Calibrate) . . . . . . . . . .
.
.
.
.
.
.
.
.
19
19
19
20
10. Configuring the Audio/Data Connector
(Ext Audio/Data) . . . . . . . . . . . . . . . . . . 21
11. Data Logging . . . . . . . . . . . . . . . . . . . 22
11.1
11.2
11.3
11.4
Setting the Interval and Starting Data Logging
Checking Log Status While Logging . . . .
Stopping the Log . . . . . . . . . . . .
Sending (Uploading) Data to a PC or Mac . .
.
.
.
.
.
.
.
.
.
.
.
.
.
.
.
.
.
.
.
.
.
.
.
.
.
.
.
.
22
22
23
23
12. Selecting the User Interface Language (Language) . . . . 25
13. Replacing the Internal Battery
. . . . . . . . . . . . 26
14. Fundamental Measurement Procedures
. . . . . . . . 27
14.1 Determining Background Radiation. . . . . . . . . . . . 27
14.1.1 About Background Radiation . . . . . . . . . . . . . . . . 27
14.1.2 Measuring Background Radiation . . . . . . . . . . . . . . 28
14.2
14.3
14.4
14.5
14.6
14.7
Area Measurement and Monitoring .
Measuring Objects . . . . . . .
Scanning for Surface Contamination
Measuring Food . . . . . . . .
Measuring Liquids . . . . . . .
Measuring Air . . . . . . . . .
.
.
.
.
.
.
.
.
.
.
.
.
.
.
.
.
.
.
.
.
.
.
.
.
.
.
.
.
.
.
.
.
.
.
.
.
.
.
.
.
.
.
.
.
.
.
.
.
.
.
.
.
.
.
.
.
.
.
.
.
.
.
.
.
.
.
29
29
30
30
31
32
15. Interpreting Measurements. . . . . . . . . . . . . . 33
15.1 Units . . . . . . . . . . . . . . . . . . . . . . . 33
15.2 What is a Safe Level of Radiation? . . . . . . . . . . . . 34
16. Additional Resources . . . . . . . . . . . . . . . . 35
16.1 Web Resources . . . . . . . . . . . . . . . . . . . 35
16.2 Additional Reading . . . . . . . . . . . . . . . . . . 35
17. PRM-7000 Specifications¹ . . . . . . . . . . . . . . 36
18. PRM-8000 Specifications¹ . . . . . . . . . . . . . . 38
19. PRM-9000 Specifications¹ . . . . . . . . . . . . . . 40
20. Warranty . . . . . . . . . . . . . . . . . . . . . 42
PRM-7000 / 8000 / 9000 Users Guide
1. Safety Information
This symbol indicates important information that
requires additional attention by the user.
High Voltage is present in the PRM Instrument. This
symbol indicates that additional caution should be
exercised by the user.
Notify your local environmental and/or hazardous
material authorities if you have concerns that your
environment consists of nuclear radiation levels that
exceed the accepted limits established by the environmental or hazardous materials agencies in your
locale.
| 5
6
|
PRM-7000 / 8000 / 9000 Users Guide
2. Controls, Indicators and Connections
PRM-7000 / 8000 / 9000
A
2-Line by 14-Character Backlit LCD
B
Radioactive Event LED Indicator
C
Back Key
D
External Audio and Data Jack
E
External DC Power Input Jack
F
Up Key
G
Down Key
H
Sound Port
I
Select/Power On Key
J
Geiger-Müller Pancake Tube Window (PRM-9000 Only)
K
Geiger-Müller Tube Gamma Detection Center Point
(Crosshair Printed on Bottom of PRM-7000 / 8000 Only)
L
Geiger-Müller Tube Alpha Detection Window (PRM-8000 Only)
PRM-7000 / 8000 / 9000 Users Guide
3. Using The PRM Instrument For The First Time
This section provides some basic operations most new users will want to perform before
using the PRM Instrument.
3.1 Powering On the PRM Instrument
Press and hold down
until the start up message and serial number is displayed on
the LCD. After approximately three seconds the unit will default to the home screen and
begin displaying the current measurement. The unit will beep every time it detects an
ionized radiation particle.
This detection is normal everywhere as background radiation exists everywhere. Your
particular background radiation level is dependent on many factors including altitude. For
example, in Castle Rock, Colorado a normal background radiation measurement is 0.022
mR/hr while in Miami, Florida a normal background radiation measurement would be in
the 0.012 mR/hr range. For comparison, on an airplane, at cruising altitude of 40,000
feet, a typical reading would be in the vicinity of 0.400 mR/hr, or approximately 180
beeps per minute for the PRM-7000, 400 beeps per minute for the PRM-8000, or 1,400
beeps per minute for the PRM-9000. Additional information on background radiation and
its measurement using the PRM Instrument can be found in the Users Guide, section
14.1 “Determining Background Radiation.” For more information on radiation units see
the Users Guide, section 15.1 “Units.”
3.2 Muting The Beeper
The beeper is a vital indicator on the PRM Instrument. Changes in the rate of beeps will
be the first indication of a radioactive object or area. However, it is oftentimes desirable
to mute the beeper. To mute the beeper:
1.
If the Display is off (power saving mode), press any key to wake up the
PRM Instrument
2.
Press
to display the “Main Menu”
3.
Press
two times to display the “Settings” menu
4.
Press
to select the “Settings” menu
5.
The first setting displayed is the beeper and the factory default is
“Beeper: Medium”
6.
Press
7.
to move back to the “Main Menu” and press again to return
Press
to the Home Screen
to rotate through the beeper settings until you reach “OFF”
| 7
8
|
PRM-7000 / 8000 / 9000 Users Guide
3.3 Setting Desired Measurement Units
The PRM Instrument can display measurements in microrems per hour (μR/hr), millirems
per hour (mR/hr), microSieverts per hour (μSv/hr), Counts per Second (CPS) or Counts
per Minute (CPM).
1.
If the Display is off (power saving mode), press any key to wake up the
PRM Instrument
2.
From the Home Screen, press
3.
Press
once to move to “Set Units”
4.
Press
key to select the Set Units menu
5.
The current units will be displayed and pressing the
change the setting
6.
Press
to activate the Main Menu
key will
when complete to return to the Main Menu
3.4 Setting Time and Date
1.
If the Display is off (power saving mode), press any key to wake up the
PRM Instrument
2.
Press
to display the “Main Menu”
3.
Press
two times to display the “Settings” menu
4.
Press
to select the “Settings” menu
5.
Press
Date”
or
6.
Press
to select and the Time/Date setting screen will be displayed
7.
Press
the digit
to move the cursor to the desired digit and
8.
Once the desired time and date are entered, press
setting
to scroll through the settings. Stop at “Set Time/
to advance
to save the
NOTE: The Clock default Time is 00:00:00 and the default date is 01/01/11. The
clock will be reset to the default time when the user initiates a Hardware Reset or
when the battery has been replaced. The clock will continue to function when the
user powers down the device.
PRM-7000 / 8000 / 9000 Users Guide
4. Home Screen
The Home Screen provides the user with the ability to quickly access measurement
and
keys allow the user to scroll
information with a single key press. The
key turns the
through various displays as indicated in the table below. Pressing the
LCD backlight on and off.
Home Screen Operation
Toggle Backlight On and Off
or
Move up and down through the seven screens:
1. Current Measurement (Section 4.1)
2. Average Measurement (Section 4.2)
3. Maximum Measurement (Section 4.3)
4. Minimum Measurement (Section 4.4)
5. Total Count Measured (Section 4.5)
6. Time/Date of Maximum Measurement (Section 4.6)
7. Current Time and Date (Section 4.7)
8. Elapsed Time Since Power Up, or Reset (Section 4.8)
Select Main Menu
This Home Screen and the recording of the measurements indicated above has been
implemented in the PRM Instrument specifically to provide the user with a complete assessment of the radiation level of the environment where the monitor is located.
While powered on and even in sleep mode, the PRM Instrument is constantly recording this information and doing so while preserving battery power. The following sections
provide additional detail on the screens.
4.1 Current Measurement
This display indicates the current radiation measurement in the chosen measurement
units. The user can select microrems per hour (μR/hr), millirems per hour (mR/hr),
microSieverts per hour (μSv/hr), Counts per Second (CPS) or Counts per Minute (CPM).
The default unit of measurement is mR/hr.
While powered on, the PRM Instrument takes measurements every second. At low
levels of radiation (less than 6.00 mR/hr) these measurements are averaged across the
number of seconds as determined by the Low AvWin setting.
The default setting is 20 seconds. In this setting the display will update with the average
of the last 20 seconds of measurements. The setting can be changed to enable a quicker
(shorter averaging period) response time at low levels.
| 9
10 |
PRM-7000 / 8000 / 9000 Users Guide
Quicker response times are useful for locating objects and/or areas which are the source
of radiation levels that are above the normal background levels See Section “8.9 Low
AvWin” on page 18 for more information on the Low AvWin setting.
NOTE: Because of the random nature of background and low-level radiation, it is
normal for the Current measurement to vary while observing the display. Also note
that the maximum value viewed on the Current display is averaged over the Low
AvWin setting of 5, 10 or 20 seconds. At low levels of less than 6.00 mR/hr, The
Maximum screen (discussed below) is the Maximum value measured and averaged
across one minute. It is normal that maximum values observed in the Current Measurement display will likely differ from those recorded in the Maximum Measurement
display.
4.2 Average Measurement
This display indicates the Average dose rate level that has been measured since the device was turned on, or since the Average, Maximum, Minimum, Total and Elapsed Time
counters were reset.
This capability is very useful for determining the normal background radiation and
together with Maximum and Minimum Measurement displays (discussed below), for long
term monitoring of an area or an object.
The PRM Instrument is constantly counting all pulses from the Geiger tube and calculating the average by dividing the total count by the elapsed time and then compensating
through the calibration solver to accurately represent the average in the selected dose
rate units.
NOTE: The Average, Maximum, Minimum and Total counters, as well as the Time/
Date of Maximum and Elapsed Time registers, are reset by any of the following:
1. The unit is powered on
2. A Hardware Reset is performed
3. The user resets the counters from the Utility menu
4. After the user performs a Timed Measurement
PRM-7000 / 8000 / 9000 Users Guide
| 11
4.3 Maximum Measurement
This display indicates the Maximum dose rate level that has been measured since the
device was turned on, or since the Average, Maximum, Minimum, Total and Elapsed
Time counters have been reset. This capability provides valuable insight into one-time
events or conditions that occur while the user is away from the device.
When a new maximum is recorded, the PRM Instrument notes the time and date and
stores this information for later viewing by the user.
4.4 Minimum Measurement
This display indicates the Minimum dose rate level that has been measured since the device was turned on, or since the Average, Maximum, Minimum, Total and Elapsed Time
counters have been reset. This provides useful information as to the minimum value the
device has measured.
NOTE: At low levels of less than 6.00 mR/hr, The Maximum and Minimum are averaged over one minute. At higher levels, the Maximum and Minimum are determined
by measurements recorded every second.
4.5 Total Count Measured
This display indicates the total number of pulses from the Geiger tube recorded by the
PRM Instrument since the device was turned on, or since the Average, Maximum, Minimum, Total and Elapsed Time counters have been reset. The value is uncompensated
and indicates only the number of pulses detected by the device which corresponds to the
number of times the audible click sounds, or the LED blinks.
4.6 Time/Date of Maximum Measurement
When a new Maximum dose rate level is recorded, the PRM Instrument captures the
time and date that the Maximum occurred. This allows the instrument to capture and
report transient maximums in radiation level that may occur within an otherwise normal
background radiation environment. Time format on this screen is 24 hour hh:mm:ss and
the date format is: MM:DD:YY.
4.7 Current Time and Date
This screen displays the time and date of the real time clock/calendar within the PRM
Instrument. Time format is 24-hour hh:mm:ss and the date format is: MM/DD/YY.
12 |
PRM-7000 / 8000 / 9000 Users Guide
4.8 Elapsed Time
This screen displays the elapsed time in days, hours, minutes and seconds since the
last reset of the Elapsed Time registers. The Elapsed Time shows the time frame durin
which the Average, Minimum and Maximum values have been established.
PRM-7000 / 8000 / 9000 Users Guide
| 13
5. Navigating the Menu System
Pressing the
key from the Home Screen activates the Main Menu. From the Main
Menu, users can navigate through the menus as indicated in the table below. Each submenu will be discussed in the sections that follow.
Select Main Menu
or
Move up or down through the sub-menus:
1. Timed Measure
This function allows users to take measurements over a defined amount of time. This is useful for detecting small amounts
of contamination.
2. Set Units
Users can select either μR/hr, mR/hr, μSv/hr, CPS or CPM
measurement units.
3. Settings
This sub-menu allows the user to customize the behavior of
the PRM Instrument. Settings include those associated with
the beeper, LED, dose-rate alarm, time/date, power settings as
well as the control over the averaging performed at low dose
rates.
4. Utilities
This sub-menu includes functions to reset the measurement
counters (Average, Minimum, Maximum, Total and Elapsed
Time), perform a hardware reset, power down the device, load
the factory calibration values, display the voltage of the battery
and perform the calibration procedure.
5. Ext Audio/Data
This sub-menu is used to control the behavior of the audio/
data jack. The jack can output audio at three selectable
volume levels, provide a pulse output compatible with third
party software or output a serial data stream (optional cable
required) on the minute for data collection using a PC.
6. Data Logging
This sub-menu provides functions to control data logging to
the internal logging memory in the PRM Instrument.
7. Language
This allows the user to set the language to English or Japanese
Select the desired sub-menu. Repeat the process for navigating
through the sub-menus
Return to previous menu
14 |
PRM-7000 / 8000 / 9000 Users Guide
6. Performing a Timed Measurement (Timed Measure)
Timed measurements provide a measurement over a fixed period of time. Timed measurements extend the sensitivity of the detector by extending the measurement over
longer periods of time.
This capability is useful for detecting low-level radiation above the established background count. Consider the opening of a flower blossom. From hour to hour the differences are hardly noticeable, but when still images are recorded over a long period of
time and played back, the changes are clearly noticeable.
Similarly, timed measurements that detect one or two additional particles every minute
will result in a noticeable difference when a 90-minute timed measurement is taken. The
resultant average would indicate a value noticeably above the normal background count.
The PRM Instrument can take timed measurements in 1,5,10,20,30,60 or 90 minutes. To
take a timed measurement, set the desired length and start the measurement as follows:
to activate the Main Menu
1.
From the Home Screen, press
2.
Press
again to select the “Timed Measure” menu
3.
Press
once to display the “Length: ##” setting
4.
The current length will be displayed and pressing the
rotate through the settings. Select the desired length
5.
once to display the “Start” command and press
Press
the timed measurement
6.
As the measurement progresses, the time remaining in minutes will be
displayed along with the current average value
7.
If audio is enabled, a series of tones will sound indicating that the timed
measurement is complete
8.
During the measurement, pressing
9.
After completion, or to end the timed measurement early, press any
other key. The prompt “Cancel Timed Measure?” will be displayed
10.
(to answer YES) to end the timed measurement and return
Press
to the Home Screen
key will
to start
will toggle the LCD backlight
NOTE: Once the length is chosen in Step 4 above, it will be saved. To start future
timed measurements of the same length, simply press the
key three times.
PRM-7000 / 8000 / 9000 Users Guide
| 15
6.1 Perpetual Timed Measurements
By resetting the in-line statistical counters - see “9.1 Resetting Counter Values (Reset
Counters)” - the combination of the Elapsed Time Display and the Average Screens
forms the basis for a perpetual, any-length, timed measurement.
The true average of actual counts over the elapsed time enables timed measurements of
hours, days or even months. This is very useful for long term monitoring.
NOTE: After completion or cancellation of a Timed Measurement, the PRM Instrument will reset the Average, Minimum, Maximum and Total Count Registers, as well
as Elapsed Time Register.
7. Changing the Units of Measurements (Set Units)
The PRM Instrument can display measurements in microrems per hour (μR/hr), millirems
per hour (mR/hr) and microSieverts per hour (μSv/hr), Counts per Second (CPS) and
Counts per Minute (CPM).
to activate the Main Menu
1.
From the Home Screen, press
2.
Press
once to move to “Set Units”
3.
Press
key to select the Set Units menu
4.
The current units will be displayed and pressing the
change the setting
5.
Press
key will
when complete to return to the Main Menu
8. Selecting User Preferences (Settings)
Various settings can be selected to enable the user to customize the behavior of the
PRM Instrument as desired. Settings remain in place until the battery is exhausted. If, at
any time, the user desires to replace the current settings with the factory default settings,
perform a Hardware Reset of the device from the Utilities menu.
to enter the Main Menu and use the arrow
To enter the Settings Menu, press the
to enter the
keys to advance until “Settings” is displayed in the lower line. Press
Settings Menu. The specific settings will be discussed in the sections that follow.
8.1 Beeper On/Off
The current state of the Beeper will be displayed. Press
to change. The Beeper
tone sounds when a nuclear particle is detected and provides audible feedback as to the
current measurement level.
16 |
PRM-7000 / 8000 / 9000 Users Guide
8.2 LED On/Off
The current state of LED will be displayed. Press
to change. The LED blinks when
a nuclear particle is detected and provides visual feedback as to the current measurement level.
NOTE: When the unit enters the sleep state and the LCD display is off, the settings
of the Beeper and LED will remain in effect. While these indicators have been designed to enable prolonged battery life, both the Beeper and LED should be disabled
to provide the longest battery life.
8.3 Alarm On/Off
This setting is used to enable or disable the dose rate alarm. The current On/Off state of
to change. An Alarm condition will occur when the
Alarm will be displayed. Press
Alarm is On and when the Alarm dose-rate level is exceeded.
NOTE: Once an alarm condition is present, the alarm will continue to sound until the
measurement is no longer greater than the threshold level.
8.4 Setting Alarm Threshold in mR/hr (mR/hr Alarm)
This setting allows the user to select the desired alarm level threshold in mR/hr units.
Once selected the display will indicate the current setting. The table below outlines how
to use the keys to enter the desired value.
8.5 Setting Alarm Threshold in uSv/hr (uSv/hr Alarm)
This setting allows the user to select the desired alarm level threshold in uSv/hr units.
Once selected the display will indicate the current setting. The table below outlines how
to use the keys to enter the desired value.
8.6 Setting the Time and Date (Set Time/Date)
Use the keys as indicated below to set the time and date. The clock is represented in
24-hour format. See “3.4 Setting Time and Date” for step-by-step instructions.
PRM-7000 / 8000 / 9000 Users Guide
| 17
Setting the Alarm, Time and Date
Set mRh Alarm
Set uSv Alarm
Set Time/Date
Sets the dose rate measurement in mR/hr that will result in
audible alarm
Sets the dose rate measurement in uSv/hr that will result in
audible alarm
to select digit
to set digit value
save setting and exit
exit without change
Set time and date in 24-hour
format hh:mm:ss, MM/DD/YY
8.7 Internal Battery Power Management Setting (Bt-Pwr:)
This setting allows the user to specify what battery power management profile to use
when operating solely from the 9-Volt battery inside the PRM Instrument. The current
to change.
Power Setting will be displayed. Press
The power settings are outlined in the table below. The factory default for battery operation is Lowest. In this setting the LCD will be turned off after 60 seconds of inactivity.
While continuing to measure nuclear radiation, the unit will enter a sleep mode in order
to conserve battery power. Once any key is pressed the LCD will resume normal operation. In the Lowest setting the backlight will be turned off after 15 seconds.
8.8 External Power Management Setting (Ex-Pwr:)
This setting allows the user to specify what battery power management profile to use
when operating from an external power source connected to the power connector of the
to change.
PRM Instrument. The current Power Setting will be displayed. Press
The power settings are outlined in the table below. The factory default for external power
operation is High. In this setting the LCD and backlight will remain on. The unit detects
when external power at the proper voltage is present and will activate the external power
management setting. Similarly, the unit senses the removal of the external source and
will resume the battery power setting.
External power management is very useful for remote, long-term application of the PRM
Instrument where the device is powered by large external batteries or alternative sources
such as solar cells.
18 |
PRM-7000 / 8000 / 9000 Users Guide
Power Management Settings
Power Setting
Time of Inactivity Until:
(Set in Settings)
LCD Off
Backlight Off
Lowest
60 Seconds
15 Seconds
Medium
10 Minutes
45 Seconds
High
Always On
Always On
Low Battery
Condition
30 Seconds
2 Seconds
NOTE: If the LCD is turned off, the PRM Instrument will continue
to monitor and measure radiation including current, average,
maximum, minimum and total-count values Pressing any key
will “wake-up” the display and operations continue normally
until the inactivity threshold of the selected Power Setting is
exceeded.
8.9 Low AvWin
This setting allows the user to specify the time in seconds (or window) over which lowlevel measurements are averaged in the Current Measurement displayed of the Home
Screen. This capability allows the user to shorten the window so that measurement
response time can be increased. Increased response time is useful for efficiently locating
specific sources of radioactive activity.
Once at this setting, the current averaging window will be displayed in seconds. Press
to change. Choices are 5, 10 and 20 seconds. The factory default is 20 seconds.
PRM-7000 / 8000 / 9000 Users Guide
| 19
9. Utilities
The PRM Instrument provides a number of commands in the Utilities menu that will be
outlined in the sections below.
9.1 Resetting Counter Values (Reset Counters)
Pressing the
key while at this command will reset only the Average, Maximum,
Minimum and Total counters to zero and will resume measurement. This is very useful
in cases where the instrument is exposed to a new level of radiation and it is desired to
know the average, maximum and minimum values of that particular source or location.
9.2 Performing a Hardware Reset (Hardware Reset)
Pressing the
key while at this command will reset the counter in the same way as
removing all power sources from the device would. Time and Date will be reset. All
settings will return to the factory default. However, if a calibration record exists in the
device, that calibration will be used when the PRM Instrument is reset. To restore the
factory default calibration see the Load Defaults command below.
9.3 Powering Down the Unit (Power Down)
The PRM Instrument is designed to be “Always-On” and the internal battery life in sleep
mode can be up to 60,000 hours (under normal background conditions and using a lithium 9-Volt battery). However, for long term storage, the user may desire to power down
key while at this command will power down. While powered
the unit. Pressing the
down the unit will not take any measurements, however, the internal clock calendar will
continue to function.
9.4 Restoring Factory Calibration (Load Defaults)
Pressing the
key while at this command will restore the factory default calibration
and erase any calibration data present in the device. Use this command with care.
9.5 Displaying Battery and External Voltages (Display Bat/DC)
Pressing the
key while at this command will display a screen that shows the voltage
of the internal battery and any external power source connected to the power connector.
A decimal point to the left-most side of the display line indicates that the respective voltage is at an acceptable level.
20 |
PRM-7000 / 8000 / 9000 Users Guide
9.6 Calibration Procedure (Calibrate)
Pressing the
key while at this command will initiate the calibration procedure. The
Calibration Procedure Should Only Be Used By A Certified Calibration Lab. The calibration process is as follows:
1.
Setup Cs137 source for 20mR/hr
2.
Press the
3.
The unit counts down 10 seconds, beeping at each second, then takes
a 60-second measurement
4.
After 60 seconds, the unit beeps and displays the raw CPM
5.
Make a record of the CPM reading displayed for 20mR/hr
6.
Press any key to go to the 200mR/hr (125 mR/hr for PRM-9000)
measurement screen
7.
Repeat steps 2 through 5 for Cs137 at 200mR/hr (125 mR/hr for PRM9000)
8.
Make a record of the CPM reading displayed for 200mR/hr (125 mR/hr
for PRM-9000)
9.
Press any key to continue and the unit will complete calibration and
restart
10.
A decimal point to the right of the serial number will be displayed at
key to start
restart. This indicates the unit is operating from calibrated values and
not the factory settings.
NOTE: Calibration Should Only Be Performed By Certified Calibration Labs. Visit
www.MazurInstruments.com for a list of recommended calibration labs.
PRM-7000 / 8000 / 9000 Users Guide
| 21
10. Configuring the Audio/Data Connector
(Ext Audio/Data)
The standard 3.5mm audio jack on the left side of the PRM Instrument can serve multiple purposes, including being connected to external, amplified speakers and used with
portable media player headphones for discreet monitoring of radioactive activity. The
jack also enables connection to a PC or Mac with USB (with an optional cable) for data
logging.
key to activate the Main Menu. Use the arrow
From the Home Screen press the
keys to move to the entry: Ext Audio/Data. The current setting for the connector will be
key to move through all of the available settings for the port. A
displayed. Press the
description of the settings follows.
Audio/Data Connector Settings
Off
All functions of the connector are off
Data
Using the optional 3.5mm to USB cable, the PRM Instrument will
output a comma separated value (CSV) text string every minute.
The string includes the time, date, six digit CPM value as well as
the text “CPM” to indicate the units.
For Example: “10:30:00”,”04/08/2011”,“000025”,”CPM” <CR>
Baud rate is fixed at: 57.6K baud, 8 bits, no parity, 2 stop bits
Using a terminal emulator such as Terra Term (downloadable at
no cost) the output of the PRM Instrument can be captured into a
log file. The result is a CSV file that can be loaded into a variety
of standard software tools used for analysis including Excel, Access, MATLAB and others.
Note that 1000 CPM = 1 mR/hr = 10 uSv/hr
Audio:Low
Connector outputs audio beeps at a low volume level for headphone use or connection to external speakers
Audio: Medium
Connector outputs audio beeps at a medium volume level for
headphone use or connection to external speakers
Audio: High
Connector outputs audio beeps at high volume level for headphone use or connection to external speakers
Pulse Out
Connector outputs a pulse each time a radiation particle is detected. This output is compatible with monitoring software such
as GeigerGraph from Mineralab
Exercise caution. Excessive audio volume level through
headphones can seriously damage hearing.
22 |
PRM-7000 / 8000 / 9000 Users Guide
11. Data Logging
11.1 Setting the Interval and Starting Data Logging
The counts per minute (CPM) measurement can be logged every minute or every hour.
The default logging interval is set to one minute, and the interval can be changed as
follows:
to activate the Main Menu
1.
From the Home Screen, press
2.
Press
or
3.
Press
to select the Data Logging sub menu
4.
The logging interval will be displayed as “Every: Minute” or “Every:
to change the logging interval
Hour”. Press
5.
once to display the “Start” command and press
Press
data logging
6.
A prompt will be displayed to let the user know that any data currently
to continue and start login logging memory will be erased. Press
ging or any other key to cancel logging and return to the Home Screen.
until “Data Logging” is displayed
to start
NOTE: Turning the PRM Instrument off or performing a reset from the Utility menu
will stop logging. All logging data will be preserved, however, this data should be sent
to a PC or Mac for storage because restarting the log will erase the previously stored
data.
11.2 Checking Log Status While Logging
Once logging is started, the data logging sub-menu will have only two commands (“Stop”
and “Status”) available to the user. The status of the logging activity can be checked at
any time. To check the status:
to activate the Main Menu
1.
From the Home Screen, press
2.
Press
or
3.
Press
to select the Data Logging sub-menu
4.
until “Status” is displayed and press
Press
status screen
until “Data Logging” is displayed
to display the
PRM-7000 / 8000 / 9000 Users Guide
The number following “Record:” indicates the number of measurements (minutes or
hours, depending on the interval set) stored in the log. As logging progresses this number will increase.
The number following “Memory:” indicates the number of bytes of logging memory
remaining. As logging progresses, this number will decrease.
11.3 Stopping the Log
Logging must be stopped before the data can be sent to a PC or Mac. To stop the log:
to activate the Main Menu
1.
From the Home Screen, press
2.
Press
or
3.
Press
to select the Data Logging sub menu
4.
Press
until “Stop” is displayed and press
5.
A prompt will be displayed to make sure the user intended to stop the
to stop the log
log. Press
until “Data Logging” is displayed
to stop logging
11.4 Sending (Uploading) Data to a PC or Mac
The following steps can be used for uploading log data to a PC. More detailed instructions for the Mac will be forthcoming.
1.
Insert the USB cable into your computer. The driver should install
automatically and install a new COM (Serial) port on your system.
2.
Windows Users: To determine the COM Port of the installed Data
Cable open Device Manager on your computer, navigating there via
Control Panel/System, and then Hardware/Device Manager or similar
menus. The Data Cable should be installed as a “USB Serial Port”
under the Ports category. Make note and write down the COM Port assignment, for example COM4. Now goto Step 5 below.
3.
If your system does not install the USB driver, you can find the drivers
for your operating system here:
http://www.ftdichip.com/Drivers/VCP.htm
| 23
24 |
PRM-7000 / 8000 / 9000 Users Guide
4.
Windows Users: Download the VCP driver ZIP folder for your Windows version to your Windows Desktop. Extract the zipped files to a
folder on your desktop.
a) Open Device Manager on your computer, navigating there via
Control Panel/System, and then Hardware/Device Manager or similar
menus. You should see the USB Data Cable installed under “Other
Devices”, indicated as “USB Serial Port” or TTL-232R-5V-AJ.
b) Double click on that device file to open it, then from the ensuing
screen, click on the Update Driver button.
c) Choose to “Browse your computer for the Driver Software”, and
browse to the folder on your Desktop containing the extracted zipped
files. Select the folder, but do not open the folder - just select the entire
folder by left clicking on it once.
d) Choose OK and/or Next, and the computer should install the Driver
software. Go to Step 2 above.
5.
Once you have your COM port, use a terminal emulator, such as Tera
Term. Users can download Tera Term at no cost from:
http://logmett.com
6.
Be sure to have the other end of the USB adapter cable plugged into
the PRM Instrument. Launch Tera Term and from the main menu select
“Setup” then “Serial Port” and
a) select the COM port that was installed with the driver
b) select Baud Rate 57600, 8 bits, 2 stop bits, no parity, no flow control.
This is the baud rate that the PRM Instrument uses
At this point you should see the log data when you press “Send” from
the Log menu on the PRM Instrument
7.
To send data from the PRM Instrument, from the Home Screen, press
to activate the Main Menu
8.
Press
or
9.
Press
to select the Data Logging sub-menu
10.
until “Send” is displayed and press
Press
tents of the log
until “Data Logging” is displayed
to send the con-
PRM-7000 / 8000 / 9000 Users Guide
11.
The Date, Time and CPM will be sent in comma separated value (CSV)
format
12.
Use the terminal emulator software to capture the text. Terra Term
offers a variety of flexibility so that users can save the data received to
a log file. Alternately, users can simply cut the data from the terminal
window and paste it into a text file using Windows Notepad to create a
file on the PC.
13.
The resultant data file can then be opened using Excel, Open Office or
other application program to analyze and plot the data.
14.
NOTE: The CPM data stored in the log can be converted into mR/hr or
uSv/hr using the following PRM Instrument calibration relationship:
PRM-7000:
PRM-8000:
PRM-9000:
450 CPM = 1 mR/hr - 10 uSv/hr
1,000 CPM = 1 mR/hr - 10 uSv/hr
3,500 CPM = 1 mR/hr - 10 uSv/hr
12. Selecting the User Interface Language (Language)
From the Home Screen press the
key to activate the Main Menu. Use the arrow
keys to move to the entry: Language. The current language setting will be displayed.
key to select English or Japanese. Pressing the
key will return the
Press the
user to the Main Menu with text displayed in the selected language.
| 25
26 |
PRM-7000 / 8000 / 9000 Users Guide
13. Replacing the Internal Battery
To replace the battery perform the steps listed below:
1.
Disconnect any external connections to the power connector and
audio/data connector of the PRM Instrument
2.
Using a Phillips head screwdriver carefully remove the four screws
located around the keypad while being careful not to scratch the case
or keypad.
High Voltage is present inside the PRM Instrument.
Avoid any contact with areas underneath or past the
LCD towards the front of the device
3.
Remove the top part of the case and gently place it on its face being
careful not to over extend the ribbon cable connecting the keypad to
the main board of the PRM Instrument.
4.
Disconnect the 9-Volt battery clip by moving the 9-Volt battery down
in its bracket so that it covers the Mazur Instruments logo and then
removing the clip from the battery.
5.
From the terminal side of the battery, lift the battery out over the
bracket that is securing the battery in place.
6.
Wait 30 seconds for the system to completely de-energize.
7.
Properly discard the used battery.
8.
Orient the new battery so that it is positioned to mate with the battery
clip and install the clip on the new battery, then use the side of the new
battery to spread apart the bracket so that the battery is secured in
place.
9.
The PRM Instrument should display the startup message and serial
number.
10.
Be sure to fold the shield into place and gently secure the cover back
into position.
11.
Reinstall the four Phillips head screws to complete the procedure being
careful not to over tighten the screws.
PRM-7000 / 8000 / 9000 Users Guide
| 27
14. Fundamental Measurement Procedures
14.1 Determining Background Radiation
14.1.1
About Background Radiation
Background Radiation is radioactivity from the environment where the instrument is
present. There are three sources contributing to background radiation; terrestrial, manmade and cosmic. Although background radiation is present everywhere, the concentrations and distributions are not constant. Certain materials have higher concentrations of
background radiation, and varying environmental and physical conditions can result in
accumulations of background radiation.
Terrestrial Radioactivity
The naturally occurring forms of radioactive elements incorporated into the Earth during
its formation that is still present are referred to as “terrestrial radionuclides.” The most
significant terrestrial radionuclides include the uranium and thorium decay series, potassium-40 and rubidium-87. Virtually all materials found in nature contain some concentration of terrestrial radionuclides.
Man-Made Radioactive Materials
Nuclear weapons testing and nuclear power reactors have produced large quantities
of radionuclides through the fissioning of uranium and other heavy elements and the
activation of various elements. Examples of man-made radionuclides that could be in
the environment are Cesium 137 (137Cs), Strontium 90 (90Sr), and various isotopes of
Plutonium.
Prior to the 1963 Limited Test Ban Treaty, fallout from atmospheric nuclear tests distributed large quantities of man-made radionuclides around the globe. Following the 1963
treaty, most nuclear weapons tests were conducted underground, although China and
France continued atmospheric testing of nuclear weapons into the late 1970s. In 1996, a
Comprehensive Test Ban Treaty was negotiated with the help of the United Nations. As
of this writing the Comprehensive Test Ban Treaty has not been ratified by China or the
United States and was broken by Pakistan and India in 1998. However, worldwide fallout
concentrations have been declining since the mid 1960s.
In 1964 a Department of Defense weather satellite containing a radiation source failed
to achieve orbit. The Space Nuclear Auxiliary Power (SNAP) 9-A Radioisotopic Thermoelectric Generator (RTG) burned up on re-entry and dispersed the nuclear inventory
(primarily plutonium-238) into the atmosphere. Incidents involving Soviet satellites with
radioisotopes or nuclear reactors occurred in 1969, 1973, 1978, and 1983. In April of
1986, there was a non-nuclear steam explosion and fire at the number four reactor at the
nuclear power plant in Chernobyl in north-central Ukraine. Large quantities of radioactive
material were released into the environment as a result of the catastrophe. The radionu-
28 |
PRM-7000 / 8000 / 9000 Users Guide
clides from these incidents have been deposited in a non-uniformly around the world.
Isolated pockets with elevated concentrations of man-made radionuclides can still be
found. For example, ventilation systems that were installed prior to 1963 collected fallout
radionuclides. If these systems are still in use and the ducts have not been thoroughly
cleaned, there is a potential for elevated background radiation. Another potential source
of elevated background radiation from man-made radionuclides is wood ash. Trees filter
and store some airborne pollutants, including 137Cs from fallout. When the wood is
burned the 137Cs is concentrated in the wood ash. Materials or equipment associated
with the ash could have elevated levels of background radiation.
Cosmic Radiation
Cosmic radiation consists of highly energetic particles that are believed to originate from
phenomena such as solar flares and supernova explosions. The Earth’s atmosphere
serves as a shield for these particles, although on rare occasions a solar flare is strong
enough to produce a significant radiation dose in the lower reaches of the atmosphere.
Cosmic radiation is also responsible for the production of radioactive elements called
cosmogenic radionuclides. These radionuclides are produced from collisions between
the highly energetic cosmic radiation with stable elements in the atmosphere. Cosmogenic radionuclides include 3H, 7Be, 14C, and 22Na.
14.1.2
Measuring Background Radiation
Once the PRM Instrument is moved to a new area, a new background measurement
should be established as follows:
1.
Place the PRM Instrument away from items that could be radioactive,
such as metals, pottery, granite counter tops, etc. Ideally, locate the
instrument in the center of the area that you want to monitor and locate
it table height above the floor.
2.
Reset the Average Counter Values - see “9.1 Resetting Counter Values
(Reset Counters)” - or power-cycle the unit off and on to reset the
counters.
3.
Simply allow the unit to run overnight and the next morning, look at the
Average measurement and note the reading. This will be the normal
background count.
4.
While measuring, feel free to look at the Average value to see the
value it is moving towards, but do not move the unit from the current
location until the background measurement is complete.
5.
Alternately, a Timed Measurement can be used. See “6. Performing a
Timed Measurement (Timed Measure)”. A 10-minute timed measurement will be reasonably accurate, but an hour will be more accurate.
PRM-7000 / 8000 / 9000 Users Guide
| 29
14.2 Area Measurement and Monitoring
The PRM Instrument is designed to be always-on monitoring the area where it is located.
To assess an area, simply move through the screens (See “4. Home Screen”) of the unit
and view the Average, Minimum and Maximum values. Note the Maximum value measured as well as the time and date that the Maximum was recorded.
NOTE: Due to the random nature of radioactivity, it is normal to detect a maximum
that is 2X to 3X the normal background radiation. Sustained increases in radiation
will generally be reflected in an increased Average.
The dose rate alarm can also be set to provide an alarm when the threshold set by the
user is exceeded, See sections “8.3 Alarm On/Off” and “8.4 Setting Alarm Threshold in
mR/hr (mR/hr Alarm)” or “8.5 Setting Alarm Threshold in uSv/hr (uSv/hr Alarm)”.
If an increase in the radiation of the area is suspected, re-establish the background count
taking keen interest to the resulting Average and Maximum values as compared to the
previously established norms for the area.
If increased radiation (indicating prior contamination) is suspected in a particular region
within the area, take timed measurements of the same duration. Compare results with
the normal background and previous measurements to hone in on the source or location
of the highest measurement.
14.3 Measuring Objects
Refer to the following guidelines when measuring an object:
1.
With the sensor window or crosshair pointing towards and located
close to the object, slowly scan the object with the PRM Instrument
noting obvious increases in the beep or LED-blink rate.
2.
Think of the sensor window or crosshair as a camera lens that is
“looking” at the object. Locating the window farther from the object
increases the area that the PRM Instrument can “see,” but does so at a
greater distance from the potential source of radiation.
NOTE: The user should locate the sensor window or crosshair at a distance from
the object keeping in mind that the strength of a radiation emission decreases as the
square of the distance from the source. For example, if the distance from the source
is doubled, the emission will decrease by a factor of four. If the distance is tripled, the
emission will decrease by a factor of nine. This is known as the inverse square law.
30 |
PRM-7000 / 8000 / 9000 Users Guide
3.
If a suspected object, or part of an object is detected, locate the meter
in close proximity and take a timed-measurement to determine the specific measurement and the extent to which the measurement exceeds
the normal background count of the area.
4.
If while performing guideline 1 above, no obvious increases are noticed, this does not mean that the object is completely free of radiation.
Users should take timed measurement(s) of suspected objects and
compare the result with the normal background radiation.
14.4 Scanning for Surface Contamination
To check for radioactive contamination of a surface, please us the following guidelines:
1.
Using two coins of equal size, or other shims, orient the PRM Instrument vertical with the sensor window pointed towards the surface.
2.
Use a timed measurement or simply reset the counters of the PRM
Instrument and allow the device to measure overnight.
NOTE: Do not allow a surface that may be contaminated to come in direct contact
with the PRM Instrument. Use spacers or shims to isolate the PRM Instrument from
the surface and if any contamination is found, dispose of the spacers appropriately.
14.5 Measuring Food
Measuring food for radiation typically requires advanced equipment and procedures.
Because many foods are largely composed of water (itself a radiation shield), thorough
detection often requires a special oven for “ashing” the foods. Ashing removes the water
and concentrates any radioactivity present. Measuring radiation in food is also complicated by the fact that many foods, such as dried bananas and Brazil nuts, contain naturally
occurring radiation. Individuals have several options for determining whether the food
that they consume contains radiation:
• Make no assumption and take no action and be 100% blind to the presence of
radiation in food.
• Assume that the food has been scanned to the standards set forth by various government agencies and departments and is safe for consumption.
• Purchase and use the same advanced equipment and related procedures that such
agencies use to conduct their tests
• Use a personal radiation monitor such as a PRM Instrument that may not be as
sensitive, accurate and thorough as advanced methods but does provides users
with some level of assurance.
PRM-7000 / 8000 / 9000 Users Guide
The following is the procedure that Mazur Instruments follows when scanning food for
radiation. This procedure is not represented as the best, most thorough or least error
prone approach.
1.
Prepare a test area to place the food. Do not place the food on any
stone, granite, metal or other surface that could itself be partially radioactive. Plastic or glass will likely be the best choice.
2.
Establish an accurate background measurement baseline for the test
area by placing the PRM Instrument in the area and reconfirming the
background radiation measurement. (See “14.1.2 Measuring Background Radiation”)
3.
Remove the food from any packaging and place the food in the test
area.
4.
Always point the sensor window or crosshair towards the food and at
a distance that is as close as practical without touching the food. Use
appropriate shims as required, and avoid placing the instrument in a
plastic bag.
5.
Perform an initial scan of the entire food item by slowly moving the detector across the item in an even and steady manner while maintaining
the same sensor distance from the item. Note any obvious increases in
the beep or LED-blink rate of the PRM Instrument.
6.
If desired, use a timed-measurement of at least 10 minutes as a secondary way to detect radiation that may have been missed using the
initial scan. Note any amount of radiation measured above that of the
established background baseline of step 2 above.
14.6 Measuring Liquids
When measuring liquids with the PRM Instrument, use the following guidelines:
1.
Orient the PRM Instrument across a suitable drinking glass or beaker
with the sensor window over the liquid. The PRM Instrument should
rest in a stable manner across the edges of the glass.
2.
Establish an accurate background measurement baseline for the test
container by placing the PRM Instrument over the container and reconfirming the background radiation measurement. (See “14.1.2 Measuring Background Radiation”)0”)
3.
Fill the sample liquid as close to the top of the container as possible exercising care not to bring the liquid in contact with the PRM
Instrument. If only a small amount of the liquid is available, locate an
appropriately sized container as required.
| 31
32 |
PRM-7000 / 8000 / 9000 Users Guide
4.
Perform a timed measurement of at least 60 minutes and note any
amount of radiation measured above that of the established background baseline of step 2 above.
5.
A second alternative is to evaporate or boil the substance. The remaining concentrate can then be measured.
6.
When measuring water and similar liquids that are available in relative
abundance, such as pond or rain water, it is recommended to augment
this procedure by filtering a large amount of the liquid using a coffee
filter or other filter. After filtration, measure the filter using “14.3 Measuring Objects”
NOTE: For those interested in testing for radioactivity of well-water, a convenient
location for testing is any water filter that may be in line with the water supply. When
changing filters, simply measure the filter using the procedure (See “14.3 Measuring
Objects”)
14.7 Measuring Air
To measure contamination in air using the PRM Instrument, it is generally necessary to
measure the contents of a filter that has been in use for a reasonable amount of time to
filter the air of interest. Examples include whole-house heating and cooling filters, HEPA
Filters and automobile cabin filters. Particles concentrate in the filter elements and if any
radioactive substances will likely be in the concentrate as well. It is a good practice to
measure these filters periodically if there are any concerns about radiation.
To measure the filter, follow the procedure “14.3 Measuring Objects”with the addition of
the following guidelines:
1.
Be careful not to allow any of the dust from the filter to enter the
PRM Instrument. This could contaminate the instrument.
2.
Orient the filter with the surface area of the filter in the vertical position
and rest the PRM Instrument on a stack of books, or other appropriate
shim that provides a stable surface for moving the PRM Instrument as
close to the filter as possible, without touching the filter.
NOTE: Placing a piece of thin plastic in between the filter and the PRM Instrument
will block the detection of alpha particles, but this arrangement will continue to enable
the detection of other types of ionizing radiation.
PRM-7000 / 8000 / 9000 Users Guide
| 33
15. Interpreting Measurements
15.1 Units
There are four different but interrelated quantities related to the measurement of radiation. Each quantity has associated units of measurement that are represented in both
the English System of Measurements as well as the International System of Units, also
known as SI.
The four quantities are radioactivity, exposure, absorbed dose, and dose equivalent. In
the order presented, these quantities start by indicating characteristics of the radiation
source and end by indicating biological impact on human beings.
Radioactivity refers to the amount of ionizing radiation released by a material. Whether it
emits alpha or beta particles, gamma rays, x-rays, or neutrons, a quantity of radioactive
material is expressed in terms of its radioactivity (or simply its activity), which represents
how many atoms in the material decay in a given time period. The units of measure for
radioactivity are the curie (Ci) and in SI becquerel (Bq).
Exposure describes the amount of radiation traveling through the air. The units for exposure are the roentgen (R) and in SI coulomb/kilogram (C/kg).
Absorbed dose describes the amount of radiation absorbed by an object or person. That
is, the amount of energy that radioactive sources deposit in materials through which they
pass. The units for absorbed dose are the radiation absorbed dose (rad) and in SI the
gray (Gy).
Dose equivalent (or effective dose) combines the amount of radiation absorbed and
the medical effects of that type of radiation on a human being. For beta and gamma
radiation, the dose equivalent is the same as the absorbed dose. By contrast, the dose
equivalent is larger than the absorbed dose for alpha and neutron radiation, because
these types of radiation are more damaging to the human body.
NOTE: The detection and measurement of neutrons requires specialized instrumentation, Geiger counters do not detect neutrons.
The units for dose equivalent are the roentgen equivalent man (rem) and in SI Sievert
(Sv). These biological dose equivalents are commonly measured in one thousandths of a
rem and is known as a millirem (mrem) or 1 millionth of a Sievert known as microSievert
(uSv).
For further clarification, note that a measure given in Bq indicates the radioactivity of a
substance, while a measure in mrem or uSv indicates the amount of energy that a radioactive source deposits in living tissue.
34 |
PRM-7000 / 8000 / 9000 Users Guide
The PRM Instrument is calibrated in units of dose equivalent rate (also known as effective dose rate), referenced to Cesium 137, in milli-Roentgen per hour (mR/hr) or microSieverts per hour (uSv/hr). Micro-Roentgen per hour (uR/hr) is also provided. For activity
levels, counts per minute (CPM) and counts per second (CPS) are also made available
to the user. To convert the dose rate to the accumulated dose, multiply the number of
hours by the dose rate.
Example 1: On the PRM Instrument the Average Screen indicates 0.025 mR/hr. The
Elapsed time is 3 Days and 6 hours.
What is the accumulated effective dose?
1.
3 Days and 6 hours = (24 x 3) + 6 or 78 hours
2.
78 hours X .025 mR/hr = 1.95 milli-Roentgens
If a safety or other exposure limit is provided in a yearly accumulated dose of millirem, or
microSieverts then divide the yearly dose by the number of hours in a year.
Example 2: The paper entitled “Environmental Radiation” published by the Health
Physics Society (http://hps.org/documents/environmental_radiation_fact_sheet.pdf)
states: ”Each year, a resident of the United States receives an average total dose from
background radiation of about 3.1 mSv.”
Convert this value to an average dose rate of uSv/hr.
1.
3.1 mSv (milliSeivert) per year is the same as 3100 uSv (microSieverts) per year.
2.
The number of hours in a year is 365 days X 24 Hours/day or 8,760
hours.
3.
Therefore, the average hourly dose rate would be 3100 uSv / 8760 or
.353 uSv/hr
4.
Recall that 1 mR/hr = 10 uSv/hr. Therefore .353 uSv/hr = .035 mR/hr
15.2 What is a Safe Level of Radiation?
There continues to be much debate as to the safe level of radiation exposure. Opinions
range from the position that there is no safe level of radiation exposure to complete acceptance of the limits established by the global collections of governments and agencies.
The matter remains largely a personal choice and Mazur Instruments offers no specific
advice on what constitutes a safe level. The company will leave these discussions to the
global collection of experts in the domain.
A list of web links is included below as a resource for the reader.
PRM-7000 / 8000 / 9000 Users Guide
16. Additional Resources
16.1 Web Resources
American Nuclear Society Radiation Dose Chart
http://www.new.ans.org/pi/resources/dosechart/
Canadian Nuclear Safety Commission
http://www.nuclearsafety.gc.ca/
ENENews.com - Energy News
http://enenews.com/
Fairewinds Energy Education
http://fairewinds.com/
Health Physics Society
http://www.hps.org/
National Institutes of Health
http://www.nih.gov/
Nick’s World Collection of Radiation Links
http://www.calytrix.biz/radlinks/
United States Environmental Protection Agency - Radiation Protection Division
http://www.epa.gov/radiation/
United States Nuclear Regulatory Commission (NRC)
http://www.nrc.gov/
16.2 Additional Reading
Cember, H. Introduction to Health Physics. 4th ed., McGraw-Hill Medical, 2008.
“Conference of Radiation Control Program Directors, Inc.” 2011. Conference of
Radiation Control Program Directors. www.crcpd.org
“Health Physics Society.” 2011. Health Physics Society. www.hps.org
Martin, A. and Harbison, S.A., An Introduction to Radiation Protection. 3rd ed., London: Chapman and Hall, 1987.
“Radiation Protection.” 2011. U.S. Environmental Protection Agency. www.epa.gov/
radiation
Shapiro, J. Radiation Protection. 4th ed., Harvard University Press, 2002.
Turner, J.F. Atoms, Radiation, and Radiation Protection 3rd ed. Wiley, 2007.
| 35
36 |
PRM-7000 / 8000 / 9000 Users Guide
17. PRM-7000 Specifications¹
Battery Life²
Standard 9V Lithium
60,000 Hours / 6.85 Years
Standard 9V Alkaline
28,250 Hours / 3.22 Years
Measurement
Front End
Detector
LND 713 Geiger-Muller tube, Halogen-quenched Thin Wall
Beta-Gamma Detector (Made in The USA)
Radiation Detected
beta, gamma and x-radiation
Energy Sensitivity
beta / gamma / X-rays: min 35 keV
gamma sensitivity: 450 CPM/mR/hr
calibrated to Cesium-137 (Cs137)
Accuracy
±10% Typical, ±15% Maximum
Measurement Ranges
0.001 to 500 mR/hr
0.01 to 5,000 uSv/hr
1 to 500,000 uR/hr
1 to 225,000 CPM (450 CPM/mR/hr)
0 to 3,750 CPS (7.5 CPS/mR/hr)
Total Count: 0 to 4,294,967,295 (32 Bit Integer)
Measurement Statistics
Continuous availability of Average, Minimum and Maximum
dose rate measurements in
either uR/hr, mR/hr, uSv/hr, CPS or CPM
Time stamp on new maximum
Dose Rate Alarm
Alarm can be set in mR/hr or uSv/hr to any value within the
measurement range.
Internal Data Logging
Storage
100,000 Bytes non-volatile memory
Logging Intervals
Every Minute or Every Hour
Maximum Capacity
91,466 Minutes or Hours
(90% Normal Background, 10% Full-Scale)
Minimum Capacity
32,656 Minutes or Hours
(100% Full-Scale Measurement Levels)
Logging Output Format
Standard Comma Separated Value (CSV) with time stamp
and CPM Data (1000 CPM/mR/hr)
PRM-7000 / 8000 / 9000 Users Guide
| 37
User Interface
Languages Supported
English and Japanese
Display
Two-Line, 14-character transflective LCD with backlight for
low-light conditions
Keypad
Weather resistant commercial-grade membrane keypad
Visual Indicator
LED pulses on and off when a radiation detection event occurs. LED can be disabled.
Audio Indicator
Tone beeps when a radiation detection event occurs. Audio
can be muted.
Input/Output
Audio Output / Digital
Interface
Standard 3.5mm jack with three selectable volume levels
for output to audio systems, computer speakers or media
player headphones
Jack can also be provisioned by the user for pulse output
or as a USB Interface for logging data by PC or transferring
internal data logging memory (requires optional cable)
External Power
9 VDC at a minimum current rating of 100mA
Environmental /
Physical
Temperature Range
-20° to 60° C (-4° to 140° F)
Size
143 x 83 x 35 mm (5.63” x 3.25” x 1.37”)
Weight
261 grams (9.2 oz.) including battery
Compliance
CE, Lead-Free
Independently tested and found to be substantially compliant with FCC requirements for home use. Approval to
display FCC logo pending.
Notes:
1. All specifications are subject to change without notice.
2. Assuming that background radiation is less than 25 CPM, the device is using
the low-power setting and temperature of operation is 25° C (77° F).
38 |
PRM-7000 / 8000 / 9000 Users Guide
18. PRM-8000 Specifications¹
Battery Life²
Standard 9V Lithium
60,000 Hours / 6.85 Years
Standard 9V Alkaline
28,250 Hours / 3.22 Years
Measurement
Front End
Detector
LND 712 Geiger-Müller tube, Halogen-quenched with mica
end window
Radiation Detected
alpha, beta, gamma and x-rays
Energy Sensitivity
alpha: minimum 2.5 MeV; efficiency at 3.6 MeV > 80%
beta: minimum 50 keV with 35% efficiency at 150 keV 75%
gamma/X rays: min 10 keV (window), min 40 keV (case)
1000 CPM/mR/hr
Calibrated to Cesium-137 (Cs137)
Accuracy
±10% Typical, ±15% Maximum
Measurement Ranges
0.001 to 200 mR/hr
0.01 to 2000 uSv/hr
0 to 3,333 CPS (16.66 CPS/mR/hr)
0 to 200,000 CPM (1000 CPM/mR/hr)
Total Count: 0 to 4,294,967,295 (32 Bit Integer)
Measurement Statistics
Continuous availability of Average, Minimum and Maximum
dose rate measurements in
either uR/hr, mR/hr, uSv/hr, CPS or CPM
Time stamp on new maximum
Dose Rate Alarm
Alarm can be set in mR/hr or uSv/hr to any value within the
measurement range.
Internal Data Logging
Storage
100,000 Bytes non-volatile memory
Logging Intervals
Every Minute or Every Hour
Maximum Capacity
91,466 Minutes or Hours
(90% Normal Background, 10% Full-Scale)
Minimum Capacity
32,656 Minutes or Hours
(100% Full-Scale Measurement Levels)
Logging Output Format
Standard Comma Separated Value (CSV) with time stamp
and CPM Data (1000 CPM/mR/hr)
PRM-7000 / 8000 / 9000 Users Guide
| 39
User Interface
Languages Supported
English and Japanese
Display
Two-Line, 14-character transflective LCD with backlight for
low-light conditions
Keypad
Weather resistant commercial-grade membrane keypad
Visual Indicator
LED pulses on and off when a radiation detection event occurs. LED can be disabled.
Audio Indicator
Tone beeps when a radiation detection event occurs. Audio
can be muted.
Input/Output
Audio Output / Digital
Interface
Standard 3.5mm jack with three selectable volume levels
for output to audio systems, computer speakers or media
player headphones
Jack can also be provisioned by the user for pulse output
or as a USB Interface for logging data by PC or transferring
internal data logging memory (requires optional cable)
External Power
9 VDC at a minimum current rating of 100mA
Environmental /
Physical
Temperature Range
-20° to 60° C (-4° to 140° F)
Size
143 x 83 x 35 mm (5.63” x 3.25” x 1.37”)
Weight
201 grams (9.2 oz.) including battery
Compliance
CE, Lead-Free
Independently tested and found to be substantially compliant with FCC requirements for home use. Approval to
display FCC logo pending.
Notes:
1. All specifications are subject to change without notice.
2. Assuming that background radiation is less than 25 CPM, the device is using
the low-power setting and temperature of operation is 25° C (77° F).
40 |
PRM-7000 / 8000 / 9000 Users Guide
19. PRM-9000 Specifications¹
Battery Life²
Standard 9V Lithium
42,850 Hours / 4.89 Years
Standard 9V Alkaline
20,150 Hours / 2.30 Years
Measurement
Front End
Detector
LND 7317 Pancake Geiger-Muller tube, Halogen-quenched
with mica window and 45mm (1.75 inch) effective diameter
Radiation Detected
alpha, beta, gamma and x-rays
Energy Sensitivity
alpha: minimum 2.0 MeV
beta: minimum 0.16 MeV with 25% efficiency at 1 MeV
gamma/X rays: min 10 keV (window)
gamma sensitivity: 3,500 CPM/mR/hr
calibrated to Cesium-137 (Cs137)
Accuracy
±10% Typical, ±15% Maximum
Measurement Ranges
0.001 to 125 mR/hr
0.01 to 1,250 uSv/hr
1 to 125,000 uR/hr
1 to 437,500 CPM (3,500 CPM/mR/hr)
0 to 7,291 CPS (58.33 CPS/mR/hr)
Total Count: 0 to 4,294,967,295 (32 Bit Integer)
Measurement Statistics
Continuous availability of Average, Minimum and Maximum
dose rate measurements in
either uR/hr, mR/hr, uSv/hr, CPS or CPM
Time stamp on new maximum
Dose Rate Alarm
Alarm can be set in mR/hr or uSv/hr to any value within the
measurement range.
Internal Data Logging
Storage
100,000 Bytes non-volatile memory
Logging Intervals
Every Minute or Every Hour
Maximum Capacity
91,466 Minutes or Hours
(90% Normal Background, 10% Full-Scale)
Minimum Capacity
32,656 Minutes or Hours
(100% Full-Scale Measurement Levels)
Logging Output Format
Standard Comma Separated Value (CSV) with time stamp
and CPM Data (1000 CPM/mR/hr)
PRM-7000 / 8000 / 9000 Users Guide
| 41
User Interface
Languages Supported
English and Japanese
Display
Two-Line, 14-character transflective LCD with backlight for
low-light conditions
Keypad
Weather resistant commercial-grade membrane keypad
Visual Indicator
LED pulses on and off when a radiation detection event occurs. LED can be disabled.
Audio Indicator
Tone beeps when a radiation detection event occurs. Audio
can be muted.
Input/Output
Audio Output / Digital
Interface
Standard 3.5mm jack with three selectable volume levels
for output to audio systems, computer speakers or media
player headphones
Jack can also be provisioned by the user for pulse output
or as a USB Interface for logging data by PC or transferring
internal data logging memory (requires optional cable)
External Power
9 VDC at a minimum current rating of 100mA
Environmental /
Physical
Temperature Range
-20° to 60° C (-4° to 140° F)
Size
143 x 83 x 35 mm (5.63” x 3.25” x 1.37”)
Weight
368 grams (13 oz.) including battery
Compliance
CE, Lead-Free
Independently tested and found to be substantially compliant with FCC requirements for home use. Approval to
display FCC logo pending.
Notes:
1. All specifications are subject to change without notice.
2. Assuming that background radiation is less than 85 CPM, the device is using
the low-power setting and temperature of operation is 25° C (77° F).
42 |
PRM-7000 / 8000 / 9000 Users Guide
20. Warranty
LIMITED WARRANTY
WARRANTOR:
Mazur Instruments
200 South Wilcox Street #448
Castle Rock, Colorado, 80104, USA
ELEMENTS OF WARRANTY: Mazur Instruments warrants for 120 days the Geiger-Müller tube and for one year all materials and craftsmanship in the PRM-7000, PRM-8000
and/or PRM-9000 to be free from all defects with only the limitations set forth below.
WARRANTY DURATION: The warranty shall terminate and be of no further effect one
year (120 days on the Geiger-Mueller tube) after the original date of purchase of the
product or at the time the product is:
a) Damaged or not maintained as is reasonable or necessary, b) modified, c) repaired
by someone other than the warrantor for a defect or malfunction covered by this Warranty, d) contaminated with radioactive materials, or e) used in a manner or purpose for
which the instrument was not intended or contrary to Mazur Instruments instructions.
This warranty does not apply to any PRM-7000, PRM-8000 and/or PRM-9000 that has
been subjected to corrosive elements, misuse, abuse, or neglect.
STATEMENT OF REMEDY: In the event that the product does not conform to the warranty at any time while this warranty is effective, Mazur Instruments will repair the defect
and return the instrument to customer without charge for parts or labor. If customer is
located within the continental United States, Mazur Instruments will return the instrument with pre-paid shipping. Customers outside of the continental United States will be
responsible for the shipping charges and any other related fees associated with Mazur
Instruments returning the instrument to the customer after warranty service.
NOTE: While the product will be remedied under this warranty without charge, this
warranty does not cover or provide for the reimbursement or payment of incidental or
consequential damages arising from the use of or the inability to use the PRM-7000,
PRM-8000 and/or PRM-9000.
The liability of the company arising out of the supplying of this instrument, or its use,
whether on warranties or otherwise, shall not in any case exceed the cost of correcting
defects in the instrument, and after the said one year (120 days on the Geiger-Mueller
tube) period all such liability shall terminate. Any implied warranty is limited to the duration of the written warranty.
PRM-7000 / 8000 / 9000 Users Guide
PROCEDURE FOR OBTAINING PERFORMANCE OF WARRANTY: In the event that
the product does not conform to this warranty, please Email, call or write to the address
above. Mazur Instruments will not accept contaminated instruments for repair under
warranty or otherwise.
NOTE: Before using the PRM-7000, PRM-8000 and/or PRM-9000 for the detection,
measurement and monitoring of nuclear radiation, the user must determine the suitability of the product for their intended use. The user assumes all risk and liability
connected with such use.
The terms of this warranty are subject to change without notice.
| 43


![[WAP035] [Evaluating Twittervane] Project Final Report](http://vs1.manualzilla.com/store/data/005882807_1-a2020170b6b6795bf72e9c3d683c54a5-150x150.png)