1
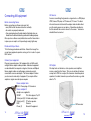
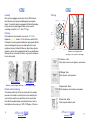
Nexus Multimedia The revolutionary new system that Multimedia distributes audio, video, telephony and data around your home. User manual Please read and save these instructions. © AVNex Ltd. Introduction Table of Contents 1. Introduction p.3 2. Safety instructions p.3 3. Quick start guide p.4 4. Nexus kit list p.6 5. Cabling your house p.8 6. Connecting equipment p.10 • AV sources p.13 • AV outputs p.13 • Telephones p.14 • Ethernet p.14 • Labelling p.16 • Patching p.16 7. Operation p.18 • p.20 Setup function 8. Maintenance p.22 9. Troubleshooting p.22 10. Technical specifications 2 AVNex Ltd www.avnex.co.uk p.24 Thank you for purchasing the Nexus system from AVNex Ltd. Nexus offers a unique capability to distribute and control entertainment, communications and media systems throughout your home, office or building. Through the use of a simple hand-held remote control, the user can hear and see any of the audio and video sources plugged into the system throughout the building. These devices can also be controlled with their original remote controls, from any where in the building via the Nexus’s integral infra-red passthrough system. The function of a socket in any place may be changed within seconds at the Nexus Hub, from telephone to audio-visual, or data. Safety • Make sure that both the hub and the patch panels are securely fitted to the wall . • Make sure the Nexus is in a dry place where it will not get damaged or cause obstruction. • Never dismantle the Nexus Hub. • Make sure that the Nexus is fully disconnected from patch panels and power supply before attempting to move the unit. • Your Nexus should be positioned out of the reach of small children, or in a locked cabinet - Nexus Cabinets and Mounting frames are availible from AVNex Ltd. • It is advisible to turn off the Nexus when not in use, i.e. when away on holiday. The telephones will continue to work even when the power is off. AVNex Ltd www.avnex.co.uk 3 Quick start guide Labelling Before connecting Nexus It is useful to label the Nexus label plates with colour coded magnetic labels as you connect your equipment. Before connecting your Nexus make sure that: every RJ45 socket has been tested for continuity. all sockets are properly numbered. Connect your AV equipment Plug every piece of AV equipment into an RJ45 socket using the Nexus adaptor cables and adaptor cable kit provided. The cables connect to composite video and line level audio on your appliance. Adaptors are provided for all types of audio and video equipment. IR transceiver Infra red control For AV sources eg DVD player, VCR, camera, CD player, PC video out, TV tuners, the IR emitter on the Nexus adaptor cable should be fixed over the remote sensor on your device. For AV outputs such as TVs. screens, active speakers and amplifiers, the IR receiver on the Nexus adaptor cable should placed so that it points into the room. Telephones and ethernet Using the ‘Telephone Line In’ cable, connect your Master tel line socket to a CAT5 socket and patch the socket into the Green ‘Line In’ at the hub. Use the ‘Telephone Line Out’ adaptor cables to connect telephones at any RJ45 socket. 4 AVNex Ltd www.avnex.co.uk Patch the Nexus The patch panel numbering corresponds to the numbers on RJ45 sockets around your house. Using the patch cables, connect your patch panel sockets to the correct Nexus ports. Video players, pay TV boxes, music players, cameras etc. are connected to the red Audiovisual Source ports. Numbering on the sources corresponds to numbering on your remote control. TVs, active speakers, amplifiers etc patch to the blue AVoutputs. Telephones patch to the green telephone ports Computer network cards patch to the yellow ethernet ports. Use your Nexus. Plug in the Nexus and switch TVs to AV and Amplifiers to Aux. By using the Nexus remote control at any TV/ Speakers you can now selectively watch and listen to all your music and video in any room. You can control any sources you are watching by using its own remote. Showing your sources on the On Screen Display Choose the source you wish to label. Press Alt + Menu Using the channel keys select a name for that source. Press SELECT to confirm. Volume control. You can set volume for every source to every output in order to harmonise volume levels. It is best to keep the source volume and Nexus volume low in order to improve quality. AVNex Ltd www.avnex.co.uk 5 Nexus kit list Nexus Multimedia hub 6 or 12 AV source sockets (red) 6, 12 or 18 output sockets (blue) telephone hub (green) (optional) ethernet hub (yellow) (optional) Nexus AV adaptor cables - one per source and output. Remote controls - one per output. AAA batteries - two per remote. 6 x Mounting bolts and washers. Red, Blue, Yellow and Green magnetic labels. Red patch cables 0.5m (one per source) Blue patch cables 0.5m (one per output) Adaptor cable kit with adaptors from phono to: 4 x SCART 2 x 3.5mm audio jack male 2 x 3.5mm jack female 2 x BNC video 2 x Phono female Nexus Multimedia hub with Nexus cabinet Telephone and ethernet option 1 x Telephone inlet adaptor cable (two lines) 2 x Telephone outlets - 2 lines 2 x Telephone outlets 4 x Yellow and Green patch cables 0.5m. Nexus AV Cable Nexus Remote Nexus cabinet option Cabinet in any finish Shielded patch panels x 48 Labelling plates 6 AVNex Ltd www.avnex.co.uk AVNex Ltd www.avnex.co.uk 7 Cabling your house Location of Nexus hub The Nexus requires a Category 5 cabling infrastucture (STP). Floodwiring with shielded category 5 data cable (STP) will provide you with a “Nexus ready” infrastructure that is futureproof and flexible to changing needs. The NEXUS can be mounted in a 19 inch rack or in a Nexus cabinet. It should be placed in an area that is easy to bring cable to, and should be accessible so that you can reconfigure your system when necessary. In the study or under the stairs would be an appropriate place. Keep away from moist or dusty environments. Where should I locate my RJ45 sockets? How many sockets do you need to be “Nexus ready”? There are some simple rules to ensure your house is “Nexus ready”. 1. One for each audio and video output such as the following: TV with in built speakers Active speakers Amplifier PC music server Video recorder. 2. One socket for each audio and video source device such as: DVD player, CD player, Hifi output, Camera, PC audio and video 3. One for 1 or 2 telephone lines. 4. One for each PC to be networked 1. As a general rule place 2 double sockets (4 total) in each room next to the power sockets. To ensure that sockets are available from as many areas of a room as possible, it is best to locate sockets at opposite ends of the room. 2. Put the hub in a place which is dry, easy to cable to and readily accessible for ‘patching’ . 3. Place extra RJ45 sockets where you will definitely want more equipment, eg in the living room or office. 4. If your services are not next to the hub, put an extra socket next to any incoming service so you can distribute it back to the hub. • ISDN • Master telephone • Terrestrial TV/FM/ digital radio/digital TV • Satellite or Cable TV What type of cable and sockets? Use shielded category 5, 5e or 6 cable with shielded RJ45 sockets. Please contact us if you require further information. 8 AVNex Ltd www.avnex.co.uk Some of your equipment, such as a Hifi or a PC, will need more than one socket. A hifi needs one socket for its output so that you can hear the CD player around the house, and one for its Aux input to receive audio from the other devices in the house. A PC may require up to 4 sockets, one in order to use aTV card to view the PC as a TV, one for using a PC as a music server or DVD player (with video card), one for telephone line to the modem and one for ethernet. AVNex Ltd www.avnex.co.uk 9 Connecting equipment PC Security camera Sound card for music server + Video card with composite output + IR keyboard to control PC from anywhere. TV card with composite input + PC Speakers Modem Ethernet Composite. Separate 12 V power AVNex miniature camera Powered through CAT5 by Nexus Hifi separates Active speakers Amplifier Aux input Line level output Music player. Screens (inc speakers) DVD player Wiring All wires are CAT5. These can be used for the following by patching at the hub AV Sources AV Outputs Telephone Ethernet Set-top box Control Telephone You can control what you watch and listen to in any room using the Nexus remote. Connecting AV equipment Before connecting Nexus Before connecting your Nexus make sure that: • every RJ45 socket has been tested for continuity. • all sockets are properly numbered. • if you are planning to use the data network at high data rates, you should have the network tested by a professional cabling company. Once you have a Nexus ready infrastructure and the Nexus hub is in place you are ready to set it up and begin using it right away. AV Sources A source is something that generates a signal such as a DVD player, VCR, Camera, CD player or PC video out, TV tuners. The black infra-red transceiver attached to the adaptor cable should be fixed over the remote sensor on your device. It should be orientated so that the side with the screws is closest to the sensor. Your device should still work as normal. Decide what to put where TVs in the lounge, bedroom and kitchen. Video in the lounge. You can put your equipment anywhere as long as it is in reach of a spare RJ45 socket. IR Transceiver Connect your equipment Plug every separate piece of AV equipment into an RJ45 socket using the Nexus adaptor cables provided. Audiovisual equipment can be divided into two separate categories, Sources and Outputs. Nexus adaptor cables are multi-purpose and may be used to connect both sources and outputs. The Nexus adaptor kit allows you to connect a wide ariety of equipment. If you require further adaptors or signal converters please enquire. AV Outputs AV output such as televisions, active speakers, and amplifiers recieve a signal from the Nexus . This can also include for instance an input on a VCR. For an output, the transceiver should be placed anywhere it is visible, from where you will use the remote e.g. onthe side of a TV. Nexus adaptor cable RJ45 - Phono plugs + IR transceiver. Nexus adaptor kit Adaptors are supplied for SCART TVs, Video players, Pay TV 3.5mm jack (M) Portable audio players 3.5mm jack (F) PC active speakers. BNC Cameras Phono (F) General AV equipment. 12 AVNex Ltd www.avnex.co.uk IR Transceiver AVNex Ltd www.avnex.co.uk 13 Telephones (b) Pinnning for wiring telephone lines to a patch panel Connecting the telephone hub (if telephone hub included) Line A The telephone hub allows you to use any RJ45 socket in the house as an extension for one or two lines. To enable this, you need to connect your telephone lines to the green telephone hub by one of the following methods: (a) Using the Tel line In cables shown below. (b) Wiring the telephone line to the patch panel and patching this to the hub. Tel line in adaptor cables. These Tel Line In cables connect one or two telephone lines to an RJ45 socket. The RJ45 plug may be plugged either directly into the green marked telephone ports on the Nexus or via the CAT5 network (socket to Patch Panel). Line B Tel pin 2 5 2 5 Patch panel pin 1 4 6 8 Telephone Out adaptor cables Use these telephone adaptor cables to connect a telephone at any RJ45 socket. Line out Single Tel Line Output Double Tel Line Output Once you have patched in your telephone hub to the appropriate socket (see next page) your telephone extension will work Line in Telephone input line A Telephone input - lines A+ B • Make sure you know which telephone number is line A and which is line B. • Do not plug two different telephone lines into the same line (lines A and B as designated on connecting cables). Ethernet The ethernet hub enables you to network computers to share files, printers, peripherals and play networked computer games. See the Netgear installation guide for more details on operating the hub. The Data port nearest to the middle of the nexus can also be used for uplinking when the black button is depressed. 14 AVNex Ltd www.avnex.co.uk AVNex Ltd www.avnex.co.uk 15 Labelling Patching Once you have plugged your devices into the CAT5 network , label the patch panel using the labelling plate and magnetic labels. It is useful to label your equipment with the white labelling plates and colour coded magnetic labels as you connect everything. (socket No. 9 - TV - blue “TV “ tag). AV Sources AV Outputs Patch Panel Patching Patch cables are colour coded for ease of use; GREEN for telephones, YELLOW for data, RED for AV sources and BLUE for AV outputs. If you have properly labelled your patch panels with the colour coded magnetic tags you can simply patch from red on patch panel to red on thehub (AV Sources), blue to blue, yellow to yellow etc. Use the colour coded patch leads for easy identification. Warning: Do not cross-patch the Nexus - eg connect a telephone line to a data socket Ethernet Patch Panel Power Telephone Telephone ports and patch panel patching is colour coded for easier usage. AV Sources - Red Patch video sources, music players, and cameras AV Outputs - Blue Patch Screens, active speakers. RJ45 insertion Orientate correctly and push until it clicks. RJ45 removal Pinch the plug to remove. Remote control numbering The numbers next to the AV sources (red) refer to the number pressed on the remote to view that source. You should put the sources in the order that you want them on the remote, label them with the magnetic labels and note which device refers to which button on the remote eg 1. VCR, 2. CD player, 3. Camera. 16 AVNex Ltd www.avnex.co.uk Telephone hub - Green Patch telephones, fax machines and modems Ethernet hub - Yellow Patch computer network cards. AVNex Ltd www.avnex.co.uk 17 The remote Operation The basic functions of the remote are listed below. By now your Nexus should be wired up and ready to go. 1. First connect the power lead to the socket on the front of the Nexus. 2. You may then plug in and turn on your Nexus. 3. The power light on your Ethernet hub should now light up. 4. The main power light will not light up until the Nexus is in use (an output is activated). 5. The Nexus should be turned off when it is being left unused for an extended period of time, i.e. when you are on holiday. 6. Whilst the Nexus remains on, your settings will be kept. To reset these, turn off your Nexus, wait 10 seconds then restart. Numbers 1-12 Mute Chan+ Chan- Using Your Nexus Your Nexus will now be ready to distribute your audiovisual signals, as you require, at the touch of a button. To use: Vol+ Vol- 1. Put batteries in remote. 2. Check that you have at least one source playing (camera plugged in / VCR playing). 3. Switch the TVs to AV and amplifiers / hifis to Aux 4. By pushing a channel button on the remote corresponding to an active source you should be able to view/hear it at the desired output. Off Menu Select Alt + Menu Numbers correspond to the sources you may wish to select. E.g. Button 1 selects source 1. Mutes the sound for the source currently selected. This channel will remain muted at the selected output. Moves the selected channel number up by one. Moves the selected channel number down by one. Increases the volume of the selected channel. Decreases the volume of the selected channel. Turns off the output. When all outputs are turned off the Nexus goes into sleep mode. Displays list of sources Select s flashing label in menu Setup menu You will now be able to watch and hear any of your AV sources at any TV and speakers. You can also control the source from wherever you are watching/listening to it; just point the source’s remote control at the output and use as normal. You can only control the source you are watching or listening to. 18 AVNex Ltd www.avnex.co.uk AVNex Ltd www.avnex.co.uk 19 Menu Setup The buttons SELECT, ALT and MENU are for control of the setup function. The set-up function allows you to set up your Nexus so that when a source is selected with the remote, a description of that source will appear in the bottom right hand corner of the screen. This allows the user to easily see what they have selected. The first screen of the setup function is shown below. The labels are arranged to match the layout of the remote. In this instance the sources are labelled as follows: 1=PC 2=DVD 3=Tuner 4=CD 5=Radio 6=Camera 7=Unlabelled 8=Unlabelled 9=Unlabelled 10=Unlabelled 11=Unlabelled 12=Unlabelled Use the channel number buttons to select the channel you wish to label. Pressing ALT+MENU simultaneously will open the next menu screen and allow you to label the source. Use the channel buttons again to select what you wish the source to be called and then press SELECT to confirm. On the third screen, if desired, a number may be added to the name. This may be useful if you have more than one of the same type of source, for example DVD1 and DVD2. This number is selected in the same way as the previous menu, with channel numbers corresponding to on-screen positions. Press button 1 followed by SELECT if you do not require a number. To enter this screen press the menu button on your remote. This screen shows the labels that are currently assigned to each source. The source you have currently selected will appear flashing. 20 AVNex Ltd www.avnex.co.uk AVNex Ltd www.avnex.co.uk 21 No sound Maintenance Make sure remote batteries are charged. Inserting remote batteries. 1. The battery covers may be removed by inserting either a small flat-head screwdriver or similar item into the wider of the two slots on the back of the remote, and gently levering up the panel. 2. Two 1.5v AAA batteries (as supplied), should be inserted into the compartment. The required polarity is indicated by a + and sign for each battery. 3. Replace the battery cover. 4. Do not insert batteries into remotes you do not intend to use (spares). Troubleshooting NEXUS does not work at all If neither the ethernet hub light nor the main power light is on: Is the Nexus connected to the power supply? Is it switched on? If the ethernet hub light is on: Do you have some active devices plugged in as sources? Are they analogue sources (not digital)? Is the TV set to AV? Is the Hifi set to Aux? If video, is it a composite signal? Do you have your devices patched into the right ports (sources into source ports etc.)? Do the batteries in your remote need replacing? 22 AVNex Ltd www.avnex.co.uk Is it muted? Is it connected correctly? Does your source have a sound? E.g. a camera probably will not. No Picture Is it connected correctly? Does your source have a picture? E.g. a radio will not. Bad picture / sound Is the problem with the source? Are your CAT5 wires too close to power lines (less than 6 inches for any reasonable distance)? Is your problem with the output? Will not change channel Is it the remote / batteries? Telephones do not work Are they connected correctly? E.g. to the correct lines Are your telephone lines connected? Set-up Menu does not work Does your remote control work? Have you followed the set-up procedure correctly? Try resetting your nexus (power off for 15 seconds, then on). Cannot control source Is the infrared transceiver correctly positioned? Try moving it around. Is it the right way up? Do you currently have that source selected at the output you are using? Does remote control of the source work directly / does control of other sources work effectively? If YES, there may be a problem with your source. AVNex Ltd www.avnex.co.uk 23 Technical specifications Switching Power The Nexus matrix switches stereo audio and composite video. Switching is controlled at the outputs using a remote control. It is a non-blocking switch so each output acts independently such that many users can view the same source or different sources. Camera power supply Switch size Audiovisual Inputs Audiovisual Outputs 6 6 12 12 12 6 12 6 12 18 240V Input Sockets Power Output Voltage Maximum Current Pins used 12 V dc 100mA (over-current protected) 12V : 3, GND (0 V) : 6 Remote Control Transmission Infra-red Channel selection, 1-12 sources Volume control, mute and power. Ethernet Hub Audio Signal Type Channels Input Impedance Output Impedance Total Harmonic Distortion Signal to Noise ratio Crosstalk Maximum Transmission Distance Using Shielded category 5e cable Line level unbalanced or balanced Left + Right (stereo) 560 ohm 3 ohm 0.02 % (unbalanced) > 90 dB (unbalanced) > 90 dB > 305 metres (unbalanced) Make Type Port Netgear 10 Base T (10Mbps) 8 (socket 1 can be used for uplink) Telephone Lines Network Ports Maximum Pins used for telephone line Two PSTN (POTS) 8 REN 4 (Ring Equivalent Number) Line A: 1 & 4, Line B: 6 & 8 Video Signal Type Input Impedance Output Impedance Maximum Transmission Distance Using Shielded Category 5e cable Composite 75 ohm 75 ohm > 305 metres Infrared Passthrough 36kHz - 40kHz Suitable frequencies Passthough is switched, meaning that infrared is routed to the source that is being viewed. 24 AVNex Ltd www.avnex.co.uk Cabling standard Cabling Standard Cabling Type Category 5, 5e, 6 Shielded Twisted Pair Mounting Dimensions In 19 Inch Rack Dimensions with Cabinet 310 x 483 x 120 mm (W x H x D) Requires 7U (or 4U shelf) 530 x 600 x 240 mm (W x H x D) AVNex Ltd www.avnex.co.uk 25 Electromagnetic compatibility The Nexus unit is designed to comply with the requirements of EN61000 on electromagnetic compatibility, as they apply to the product. The unit will not emit interference, nor will it be affected by normal levels of external interference. The EMC performance of the connecting cables is strongly dependent on the quality of the cables, the installation and the attached peripheral equipment. In certain cicumstances, it is possible for the cables to emit low levels of interference or to be susceptible to interference from nearby cables or equipment. If interference is suspected, check that the cable and connectors are of good quality and specified to Category 5e, and that they are installed in compliance with the relevant wiring codes. Sources of interference can be identified by switching the suspect equipment on and off while observing the effect. Once the cause is identified, it is usually possible to eliminate the interference by moving either the cables or the equipment to increase separation. 26 AVNex Ltd www.avnex.co.uk AVNex Ltd www.avnex.co.uk 27